This document provides instructions for disassembling and assembling components of a 943 track loader, including the fuel pump drive, governor, and torque control group. Key steps include removing the fuel injection pump housing, fuel block, and fuel pump drive; disassembling the governor housing, lever assembly, and weight assembly; replacing seals and installing springs, sleeves, and bearings; and reassembling the governor components and housing before reinstalling on the fuel injection pump housing.
This document provides instructions for disassembling and assembling parts of an excavator including the fuel pump drive, governor, and fuel injection pumps of the 3204 engine. It details removing and installing components like the fuel block, fuel pump drive, governor housing, fuel injection pump housing, and more. Precise steps are outlined for disassembling parts like the fuel pump drive and governor, and reassembling them with the correct components, positions, and specifications.
This document provides instructions for disassembling and assembling parts of a 3204 engine that powers an excavator. It describes removing and installing the fuel pump drive, disassembling and assembling the fuel pump drive, removing and assembling the governor, and removing the fuel injection pumps. The procedures are outlined in step-by-step format with notes to ensure correct installation of parts.
This document provides instructions for disassembling and assembling various components of a 215 Excavator powered by a 3402 engine, including the fuel pump drive, governor, and fuel injection pumps. It describes removing and installing parts like the fuel block, fuel pump drive, governor housing, torque control, weight assembly, and fuel injection pumps. Detailed steps are provided for disassembling and assembling the fuel pump drive, governor, and ensuring proper measurements and alignments during assembly.
This document provides disassembly and assembly instructions for a governor for a 3204 vehicular engine used in 943 and 953 track-type loaders. The disassembly instructions list 37 steps to fully disassemble the governor. The assembly instructions list 40 steps to reassemble the governor, noting to apply clean oil to all parts before assembly and ensure all oil passages are clear.
This document provides disassembly and assembly instructions for a governor for a 3204 vehicular engine used in 943 and 953 track-type loaders. It describes removing and installing over 30 individual parts in 37 steps to fully disassemble and reassemble the governor. The key components include the housing, shaft assembly, flyweights, torque control group, and servo. Proper installation is important to prevent issues with fuel delivery control.
This document provides disassembly and assembly instructions for a governor for a 3204 vehicular engine used in 943 and 953 track-type loaders. It describes removing and installing over 30 individual parts in 37 steps to fully disassemble and reassemble the governor. The key components include the housing, shaft assembly, lever assembly, torque control group, and flyweight assembly. Proper installation is important to prevent issues with fuel delivery control.
This document provides disassembly and assembly instructions for a governor for a 3204 vehicular engine used in 943 and 953 track-type loaders. The disassembly instructions list 37 steps to fully disassemble the governor. The assembly instructions list 40 steps to reassemble the governor, noting to apply clean oil to all parts before assembly and ensure all oil passages are clear.
This document provides disassembly and assembly instructions for a governor for a 3204 vehicular engine used in 943 and 953 track-type loaders. It describes removing and installing over 30 individual parts in 37 steps to fully disassemble and reassemble the governor. The key components include the housing, shaft assembly, flyweights, torque control group, and servo. Proper installation is important to prevent issues with fuel delivery control.
This document provides disassembly and assembly instructions for a governor for a 3204 vehicular engine used in 943 and 953 track-type loaders. It describes removing and installing over 30 individual parts in 37 steps, including removing the fuel injection pump housing, governor components like springs, pins, and levers, and reassembling them in the reverse order. The goal is to disassemble or service the governor and fuel injection pump housing while following precise instructions to ensure correct reassembly.
This document provides disassembly and assembly instructions for a governor for a 3204 vehicular engine used in 943 and 953 track-type loaders. The disassembly instructions list 37 steps to fully disassemble the governor. The assembly instructions list 40 steps to reassemble the governor, noting to apply clean oil to all parts before assembly and ensure all oil passages are clear.
This document provides disassembly and assembly instructions for the governor of a 3204 vehicular engine used in 943 and 953 track-type loaders. It describes removing over 30 individual parts in 17 steps for disassembly, and installing over 30 individual parts in 33 steps for assembly. Key parts that must be removed include the fuel injection pump housing, governor housing, torque control group, flyweight assembly and dashpot assembly.
This document provides disassembly and assembly instructions for the governor component of a 3204 vehicular engine used in 953 track loaders. It describes removing and installing over 30 individual parts in 37 steps of disassembly and 33 steps of assembly. Key parts that must be removed include the fuel injection pump housing, governor housing, torque control group, flyweight assembly and dashpot assembly. Proper installation of parts is important to prevent issues like the riser being held in maximum fuel delivery.
This document provides disassembly and assembly instructions for a governor for a 3204 vehicular engine used in 943 and 953 track-type loaders. It describes removing and installing over 40 individual parts in 37 steps for disassembly and 33 steps for assembly, including removing the fuel injection pump housing, governor components like springs, pins, and levers, and reinstalling them in reverse order. Precise assembly is required to ensure proper governor function for fuel delivery control.
This document provides disassembly and assembly instructions for a governor for a 3204 vehicular engine used in 943 and 953 track-type loaders. It describes removing and installing over 40 individual parts in 37 steps for disassembly and 33 steps for assembly, including removing the fuel injection pump housing, governor components like springs, pins, and levers, and reinstalling them in reverse order. Precise positioning and tool usage is required to properly remove and replace small internal parts like seals and bearings.
This document provides disassembly and assembly instructions for a governor for a 3204 vehicular engine used in 943 and 953 track-type loaders. It describes removing and installing over 30 individual parts in 3 sentences or less for each step. The overall process involves disassembling the governor housing, fuel injection pump housing, and various internal components and installing them in the reverse order.
This document provides disassembly and assembly instructions for a governor for a 3204 vehicular engine used in 943 and 953 track-type loaders. It describes removing and installing over 40 individual parts in 37 steps for disassembly and 33 steps for assembly, including removing the fuel injection pump housing, governor components like springs, pins, and levers, and reinstalling them in the reverse order. Precise instructions are given to disassemble and reassemble small intricate parts like ensuring proper end play of flyweights on dowels during assembly.
This document provides disassembly and assembly instructions for a governor for a 3204 vehicular engine used in 943 and 953 track-type loaders. It describes removing and installing over 40 individual parts in 37 steps for disassembly and 33 steps for assembly, including removing the fuel injection pump housing, governor components like springs, pins, and levers, and reinstalling them in reverse order. Precise assembly is required to ensure proper governor function and prevent issues like holding the riser in maximum fuel delivery.
This document provides disassembly and assembly instructions for a governor for a 3204 vehicular engine used in 943 and 953 track-type loaders. It describes removing and installing over 30 individual parts in 3 sentences or less for each step. The overall process involves disassembling the governor housing, fuel injection pump housing, and various internal components and installing them in the reverse order.
This document provides disassembly and assembly instructions for a governor for a 3204 vehicular engine used in 943 and 953 track-type loaders. It describes removing and installing over 40 individual parts in 37 steps for disassembly and 33 steps for assembly, including removing the fuel injection pump housing, governor components like springs, pins, and levers, and reinstalling them in the reverse order. Precise assembly is required to ensure proper governor function that regulates fuel delivery based on engine speed.
This document provides disassembly and assembly instructions for a governor for a 3204 vehicular engine used in 943 and 953 track-type loaders. It describes removing and installing over 30 individual parts in 3 sentences or less for each step. The overall process involves disassembling the governor housing, fuel injection pump housing, and various internal components and installing them in the reverse order.
This document provides disassembly and assembly instructions for a governor for a 3204 vehicular engine used in 943 and 953 track-type loaders. It describes removing and installing over 70 individual parts in 37 steps for disassembly and 33 steps for assembly, including removing the fuel injection pump housing, governor components like springs, pins, and levers, and reinstalling them in the reverse order. The goal is to repair or replace parts like the governor shaft, flyweights, or dashpot assembly. Precise reassembly is needed for proper engine function.
Massey Ferguson MF 384 S TRACTOR (- 300993) Parts Catalogue Manual Instant Do...gua6982552kun
This document contains parts listings and technical specifications for the engine of a Massey Ferguson 384 S tractor. It includes 6 pages detailing over 60 individual parts for the engine, including the cylinder block, crankshaft, pistons, cylinder head, rocker shaft, and air induction/exhaust systems. Each part is listed with its part number, quantity used, description, and any replacement or comment information.
Massey Ferguson MF 384 F TRACTOR, - 0894 Parts Catalogue Manual Instant Downl...gua6982552kun
The document is a parts catalog for a Massey Ferguson MF 384 F tractor engine. It lists over 60 individual parts for the engine, including the cylinder block, crankshaft, pistons, connecting rods, cylinder head, rocker shaft and other components. Each part is given a reference number, part number, quantity and description, along with any replacement or additional part information.
More Related Content
Similar to Caterpillar Cat 943 TRACK LOADER (Prefix 19Z) Service Repair Manual Instant Download (19Z00001-00252).pdf
This document provides disassembly and assembly instructions for a governor for a 3204 vehicular engine used in 943 and 953 track-type loaders. The disassembly instructions list 37 steps to fully disassemble the governor. The assembly instructions list 40 steps to reassemble the governor, noting to apply clean oil to all parts before assembly and ensure all oil passages are clear.
This document provides disassembly and assembly instructions for a governor for a 3204 vehicular engine used in 943 and 953 track-type loaders. It describes removing and installing over 30 individual parts in 37 steps to fully disassemble and reassemble the governor. The key components include the housing, shaft assembly, flyweights, torque control group, and servo. Proper installation is important to prevent issues with fuel delivery control.
This document provides disassembly and assembly instructions for a governor for a 3204 vehicular engine used in 943 and 953 track-type loaders. It describes removing and installing over 30 individual parts in 37 steps, including removing the fuel injection pump housing, governor components like springs, pins, and levers, and reassembling them in the reverse order. The goal is to disassemble or service the governor and fuel injection pump housing while following precise instructions to ensure correct reassembly.
This document provides disassembly and assembly instructions for a governor for a 3204 vehicular engine used in 943 and 953 track-type loaders. The disassembly instructions list 37 steps to fully disassemble the governor. The assembly instructions list 40 steps to reassemble the governor, noting to apply clean oil to all parts before assembly and ensure all oil passages are clear.
This document provides disassembly and assembly instructions for the governor of a 3204 vehicular engine used in 943 and 953 track-type loaders. It describes removing over 30 individual parts in 17 steps for disassembly, and installing over 30 individual parts in 33 steps for assembly. Key parts that must be removed include the fuel injection pump housing, governor housing, torque control group, flyweight assembly and dashpot assembly.
This document provides disassembly and assembly instructions for the governor component of a 3204 vehicular engine used in 953 track loaders. It describes removing and installing over 30 individual parts in 37 steps of disassembly and 33 steps of assembly. Key parts that must be removed include the fuel injection pump housing, governor housing, torque control group, flyweight assembly and dashpot assembly. Proper installation of parts is important to prevent issues like the riser being held in maximum fuel delivery.
This document provides disassembly and assembly instructions for a governor for a 3204 vehicular engine used in 943 and 953 track-type loaders. It describes removing and installing over 40 individual parts in 37 steps for disassembly and 33 steps for assembly, including removing the fuel injection pump housing, governor components like springs, pins, and levers, and reinstalling them in reverse order. Precise assembly is required to ensure proper governor function for fuel delivery control.
This document provides disassembly and assembly instructions for a governor for a 3204 vehicular engine used in 943 and 953 track-type loaders. It describes removing and installing over 40 individual parts in 37 steps for disassembly and 33 steps for assembly, including removing the fuel injection pump housing, governor components like springs, pins, and levers, and reinstalling them in reverse order. Precise positioning and tool usage is required to properly remove and replace small internal parts like seals and bearings.
This document provides disassembly and assembly instructions for a governor for a 3204 vehicular engine used in 943 and 953 track-type loaders. It describes removing and installing over 30 individual parts in 3 sentences or less for each step. The overall process involves disassembling the governor housing, fuel injection pump housing, and various internal components and installing them in the reverse order.
This document provides disassembly and assembly instructions for a governor for a 3204 vehicular engine used in 943 and 953 track-type loaders. It describes removing and installing over 40 individual parts in 37 steps for disassembly and 33 steps for assembly, including removing the fuel injection pump housing, governor components like springs, pins, and levers, and reinstalling them in the reverse order. Precise instructions are given to disassemble and reassemble small intricate parts like ensuring proper end play of flyweights on dowels during assembly.
This document provides disassembly and assembly instructions for a governor for a 3204 vehicular engine used in 943 and 953 track-type loaders. It describes removing and installing over 40 individual parts in 37 steps for disassembly and 33 steps for assembly, including removing the fuel injection pump housing, governor components like springs, pins, and levers, and reinstalling them in reverse order. Precise assembly is required to ensure proper governor function and prevent issues like holding the riser in maximum fuel delivery.
This document provides disassembly and assembly instructions for a governor for a 3204 vehicular engine used in 943 and 953 track-type loaders. It describes removing and installing over 30 individual parts in 3 sentences or less for each step. The overall process involves disassembling the governor housing, fuel injection pump housing, and various internal components and installing them in the reverse order.
This document provides disassembly and assembly instructions for a governor for a 3204 vehicular engine used in 943 and 953 track-type loaders. It describes removing and installing over 40 individual parts in 37 steps for disassembly and 33 steps for assembly, including removing the fuel injection pump housing, governor components like springs, pins, and levers, and reinstalling them in the reverse order. Precise assembly is required to ensure proper governor function that regulates fuel delivery based on engine speed.
This document provides disassembly and assembly instructions for a governor for a 3204 vehicular engine used in 943 and 953 track-type loaders. It describes removing and installing over 30 individual parts in 3 sentences or less for each step. The overall process involves disassembling the governor housing, fuel injection pump housing, and various internal components and installing them in the reverse order.
This document provides disassembly and assembly instructions for a governor for a 3204 vehicular engine used in 943 and 953 track-type loaders. It describes removing and installing over 70 individual parts in 37 steps for disassembly and 33 steps for assembly, including removing the fuel injection pump housing, governor components like springs, pins, and levers, and reinstalling them in the reverse order. The goal is to repair or replace parts like the governor shaft, flyweights, or dashpot assembly. Precise reassembly is needed for proper engine function.
Similar to Caterpillar Cat 943 TRACK LOADER (Prefix 19Z) Service Repair Manual Instant Download (19Z00001-00252).pdf (20)
Massey Ferguson MF 384 S TRACTOR (- 300993) Parts Catalogue Manual Instant Do...gua6982552kun
This document contains parts listings and technical specifications for the engine of a Massey Ferguson 384 S tractor. It includes 6 pages detailing over 60 individual parts for the engine, including the cylinder block, crankshaft, pistons, cylinder head, rocker shaft, and air induction/exhaust systems. Each part is listed with its part number, quantity used, description, and any replacement or comment information.
Massey Ferguson MF 384 F TRACTOR, - 0894 Parts Catalogue Manual Instant Downl...gua6982552kun
The document is a parts catalog for a Massey Ferguson MF 384 F tractor engine. It lists over 60 individual parts for the engine, including the cylinder block, crankshaft, pistons, connecting rods, cylinder head, rocker shaft and other components. Each part is given a reference number, part number, quantity and description, along with any replacement or additional part information.
Caterpillar Cat TH460B Telehandler (Prefix SLF) Service Repair Manual Instant...gua6982552kun
This document provides instructions for removing and installing various engine components on a Caterpillar 3054E engine, including the cylinder head, rocker shaft, lifters, and camshaft. The procedures describe cleaning parts, lubricating bolts, and torquing fasteners to the specified values. Special tools may be required and safety precautions are noted regarding containing fluids.
Caterpillar Cat TH350B Telehandler (Prefix SLD) Service Repair Manual Instant...gua6982552kun
This document provides instructions for disassembling and assembling parts of a TELEHANDLER Model TH350B powered by a 3054E engine. The summary includes:
1) Instructions are provided to remove and install the front gear group, housing, valve mechanism cover, rocker shaft assembly, and pushrods of the 3054E engine.
2) Detailed steps and illustrations guide the disassembly and reassembly of each component, including any required tools.
3) Proper cleaning and installation of seals and gaskets is emphasized to prevent contamination.
Caterpillar Cat TH340B Telehandler (Prefix SLC) Service Repair Manual Instant...gua6982552kun
This document provides instructions for removing and installing various components of a TH340B Telehandler including the flywheel housing, crankshaft pulley, crankshaft front seal, and front cover. The flywheel housing removal procedure involves using lifting equipment to support the housing while removing setscrews. The crankshaft pulley installation ensures proper lubrication and torque of setscrews. The crankshaft front seal removal uses a puller, while installation uses a special tool and nut to push the seal into place. Front cover removal and installation requires removing/installing setscrews and ensuring a clean gasket surface.
This document provides instructions for removing and installing various engine components on a Caterpillar 3054B engine, including:
- Removing and installing the rocker arm and shaft, which involves installing new pushrods and oil seals and adjusting valve lash.
- Removing the cylinder head, which requires removing fuel injectors, exhaust manifolds, temperature regulators, rocker arms, and pushrods before loosening bolts and lifting the head off.
- Installing the cylinder head, which involves cleaning surfaces, installing a new gasket, torquing bolts in a specific sequence, and adjusting valve lash.
- Removing and installing the valve lifters using a magnet tool to pick them up
This document provides instructions for removing and installing the camshaft gear on a Caterpillar 3054B engine. The removal process involves aligning timing marks, removing a bolt and washer, and using a puller tool. The installation involves positioning the camshaft gear properly, installing the washer and bolt, and ensuring timing marks are aligned. Tools and torque specifications are provided.
This document provides assembly instructions for various components of a TH103 Telehandler 3PN transmission, including the forward high clutch drum assembly, forward high and reverse idler shaft assembly, output shaft and third clutch assembly, reversing clutch assembly, and second clutch assembly. The instructions include cleaning and inspecting parts, installing bearings and seals, assembling clutch components like springs, discs, and plates, and securing parts with retaining rings. Tools needed include retaining ring pliers, a compressor, and driver. Temperature and positioning details are provided for proper assembly.
This document provides instructions for removing and installing various components of a Caterpillar 3054 engine, including the valve cover, rocker shaft, pushrods, and cylinder head. The removal and installation procedures describe loosening specific bolts and nuts in a particular sequence, removing gaskets and seals, and ensuring proper alignment of components during reassembly.
This document provides instructions for removing and installing the cylinder head on a Caterpillar 3054 engine. The key steps are:
1. Drain coolant and remove components attached to the cylinder head like the air inlet manifold, exhaust manifold, fuel injection nozzles, and rocker arm assembly.
2. Gradually loosen the 22 cylinder head bolts in reverse tightening order.
3. Attach a lifting device and carefully remove the cylinder head, weighing 41 kg/90 lb. Remove the cylinder head gasket and note dowel pin locations.
4. Check for cylinder head distortion by aligning a straight edge with an installed bolt.
This document provides instructions for removing and installing various engine components on a Caterpillar 3054 engine, including the cylinder head, rocker shaft and pushrods, lifter group, and camshaft. The procedures describe removing parts, cleaning them, installing new seals or lubricating components, and tightening fasteners to the specified torques. Safety notices are included to warn technicians about containing fluids and preventing contaminants.
This document provides instructions for removing and installing various engine components on a Caterpillar D6R track-type tractor, including:
- Removing the valve mechanism cover and gasket
- Removing the valve mechanism cover base and seal
- Removing the cylinder head by draining coolant, disconnecting harnesses and tubes, removing bolts, and lifting it off using a link bracket tool.
This document provides instructions for disassembling and assembling the torque divider of a D6G2 track-type tractor. It describes removing over 30 individual components of the torque divider including gears, seals, bearings, and housing pieces. Detailed illustrations and notes are provided to caution safe operation and containment of fluids. Proper cleaning and inspection of all parts is emphasized before reassembling the torque divider using the provided tools.
The document provides instructions for disassembling and assembling the piston pump steering system on a D5R2 track-type tractor. It details 39 steps to disassemble components such as the piston pump, valves, housing, pistons, and seals. It then lists 36 steps for reassembling these components in reverse order. Safety warnings are provided throughout to prevent injury from spring-loaded parts.
This document provides instructions for removing and installing various components of a 3126B engine for a Caterpillar D5N track-type tractor, including the camshaft, camshaft gear, camshaft bearings, engine oil pan, and piston cooling jets. The procedures describe draining fluids, using required tools, cleaning and applying sealant to mating surfaces, and torquing bolts to specified values. Safety notices are provided to contain fluids and prevent contamination.
This document provides assembly instructions for the piston pump on the left side of a D5K XL track-type tractor. It includes 40 steps to assemble various components like springs, seals, valves, plates, and housing pieces. Special tools are required and safety precautions mentioned, like following procedures carefully when assembling spring-loaded parts to avoid injury. Measurements must be taken to determine the correct shim thickness for the rotating group.
This document provides instructions for installing a cylinder head on a D4K2 XL track-type tractor. It describes cleaning and inspecting the cylinder head and cylinder block faces and installing dowels. It outlines torquing the bolts that secure the cylinder head in the correct sequence. Proper lubrication and alignment of the cylinder head gasket is emphasized to avoid leaks or damage.
This document provides instructions for removing and installing the valve mechanism cover on a Caterpillar D4K2 XL track-type tractor powered by a C4.4 engine. The procedure involves removing bolts and brackets to access the cover, then removing and installing a new gasket before reinstalling the cover and related components. Separate sections provide details on disassembling and assembling the rocker shaft and related parts.
Caterpillar Cat CB564D Vibratory Compactor (Prefix D4M) Service Repair Manual...gua6982552kun
This document provides instructions for removing and installing the flywheel housing on a Caterpillar 3054C engine. The flywheel housing must first be supported with lifting equipment as it weighs approximately 39 kg. Setscrews securing the housing must be removed, and the housing can then be lifted off while tapping it with a soft hammer if needed. Cleaning and inspection steps are described before reinstalling the housing using setscrews, ensuring proper torque is applied.
This document provides instructions for removing and installing the front gear group of a C15 Industrial Engine N5F. Key steps include removing the front housing, camshaft gear, and various gears and plates. Installation involves cleaning parts, applying thread lock to bolts, and adjusting backlash between gears. Tightening torques and sequences are specified.
Welcome to ASP Cranes, your trusted partner for crane solutions in Raipur, Chhattisgarh! With years of experience and a commitment to excellence, we offer a comprehensive range of crane services tailored to meet your lifting and material handling needs.
At ASP Cranes, we understand the importance of reliable and efficient crane operations in various industries, from construction and manufacturing to logistics and infrastructure development. That's why we strive to deliver top-notch solutions that enhance productivity, safety, and cost-effectiveness for our clients.
Our services include:
Crane Rental: Whether you need a crawler crane for heavy lifting or a hydraulic crane for versatile operations, we have a diverse fleet of well-maintained cranes available for rent. Our rental options are flexible and can be customized to suit your project requirements.
Crane Sales: Looking to invest in a crane for your business? We offer a wide selection of new and used cranes from leading manufacturers, ensuring you find the perfect equipment to match your needs and budget.
Crane Maintenance and Repair: To ensure optimal performance and safety, regular maintenance and timely repairs are essential for cranes. Our team of skilled technicians provides comprehensive maintenance and repair services to keep your equipment running smoothly and minimize downtime.
Crane Operator Training: Proper training is crucial for safe and efficient crane operation. We offer specialized training programs conducted by certified instructors to equip operators with the skills and knowledge they need to handle cranes effectively.
Custom Solutions: We understand that every project is unique, which is why we offer custom crane solutions tailored to your specific requirements. Whether you need modifications, attachments, or specialized equipment, we can design and implement solutions that meet your needs.
At ASP Cranes, customer satisfaction is our top priority. We are dedicated to delivering reliable, cost-effective, and innovative crane solutions that exceed expectations. Contact us today to learn more about our services and how we can support your project in Raipur, Chhattisgarh, and beyond. Let ASP Cranes be your trusted partner for all your crane needs!
Fleet management these days is next to impossible without connected vehicle solutions. Why? Well, fleet trackers and accompanying connected vehicle management solutions tend to offer quite a few hard-to-ignore benefits to fleet managers and businesses alike. Let’s check them out!
Implementing ELDs or Electronic Logging Devices is slowly but surely becoming the norm in fleet management. Why? Well, integrating ELDs and associated connected vehicle solutions like fleet tracking devices lets businesses and their in-house fleet managers reap several benefits. Check out the post below to learn more.
Ever been troubled by the blinking sign and didn’t know what to do?
Here’s a handy guide to dashboard symbols so that you’ll never be confused again!
Save them for later and save the trouble!
What Could Be Behind Your Mercedes Sprinter's Power Loss on Uphill RoadsSprinter Gurus
Unlock the secrets behind your Mercedes Sprinter's uphill power loss with our comprehensive presentation. From fuel filter blockages to turbocharger troubles, we uncover the culprits and empower you to reclaim your vehicle's peak performance. Conquer every ascent with confidence and ensure a thrilling journey every time.
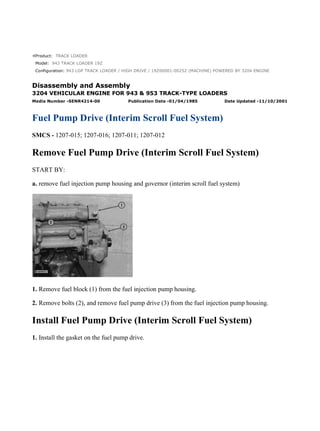
1. Product: TRACK LOADER
Model: 943 TRACK LOADER 19Z
Configuration: 943 LGP TRACK LOADER / HIGH DRIVE / 19Z00001-00252 (MACHINE) POWERED BY 3204 ENGINE
Disassembly and Assembly
3204 VEHICULAR ENGINE FOR 943 & 953 TRACK-TYPE LOADERS
Media Number -SENR4214-00 Publication Date -01/04/1985 Date Updated -11/10/2001
Fuel Pump Drive (Interim Scroll Fuel System)
SMCS - 1207-015; 1207-016; 1207-011; 1207-012
Remove Fuel Pump Drive (Interim Scroll Fuel System)
START BY:
a. remove fuel injection pump housing and governor (interim scroll fuel system)
1. Remove fuel block (1) from the fuel injection pump housing.
2. Remove bolts (2), and remove fuel pump drive (3) from the fuel injection pump housing.
Install Fuel Pump Drive (Interim Scroll Fuel System)
1. Install the gasket on the fuel pump drive.
1/5
943 LGP TRACK LOADER / HIGH DRIVE / 19Z00001-00252 (MACHINE) POWE...
2022/1/10
https://127.0.0.1/sisweb/sisweb/techdoc/techdoc_print_page.jsp?returnurl=/sis...
2. NOTE: Groove (slot) (2) in the camshaft of the fuel injection pump is not in the center of the
shaft so shaft (1) in the fuel pump drive must be turned to the same position when the pump drive
is installed.
2. Install the fuel pump drive on the fuel injection pump housing, and install the bolts that hold it
in place.
3. Be sure the O-ring seal is in position on fuel block (3), and put clean oil on the O-ring seal.
Install the fuel block in the end of the fuel injection pump housing as shown.
END BY:
a. install fuel injection pump housing and governor (interim scroll fuel system)
Disassemble Fuel Pump Drive (Interim Scroll Fuel System)
START BY:
a. remove fuel pump drive (interim scroll fuel system)
2/5
943 LGP TRACK LOADER / HIGH DRIVE / 19Z00001-00252 (MACHINE) POWE...
2022/1/10
https://127.0.0.1/sisweb/sisweb/techdoc/techdoc_print_page.jsp?returnurl=/sis...
3. 1. Remove fuel transfer pump (1).
2. Use tool (A) to remove snap ring (2). Remove O-ring seal (3).
3. Remove shaft assembly (4) from the housing.
4. Remove shaft (6) from cam (5) with tool (B) and a press.
3/5
943 LGP TRACK LOADER / HIGH DRIVE / 19Z00001-00252 (MACHINE) POWE...
2022/1/10
https://127.0.0.1/sisweb/sisweb/techdoc/techdoc_print_page.jsp?returnurl=/sis...
4. 5. Remove bearing (7) from cam (5).
Assemble Fuel Pump Drive (Interim Scroll Fuel System)
1. Install bearing (1) on cam (2).
2. Install shaft (3) in cam (2) with a press.
3. Put shaft assembly (4) in position in housing (5).
4/5
943 LGP TRACK LOADER / HIGH DRIVE / 19Z00001-00252 (MACHINE) POWE...
2022/1/10
https://127.0.0.1/sisweb/sisweb/techdoc/techdoc_print_page.jsp?returnurl=/sis...
5. 4. Install O-ring seal (7).
5. Use tool (A) to install snap ring (6).
6. Be sure the O-ring seal is in position on fuel transfer pump (8), and put clean oil on the O-ring
seal.
7. Put fuel transfer pump (8) in position on the fuel pump drive, and install the three nuts that hold
it in place.
END BY:
a. install fuel pump drive (interim scroll fuel system)
5/5
943 LGP TRACK LOADER / HIGH DRIVE / 19Z00001-00252 (MACHINE) POWE...
2022/1/10
https://127.0.0.1/sisweb/sisweb/techdoc/techdoc_print_page.jsp?returnurl=/sis...
6. Product: TRACK LOADER
Model: 943 TRACK LOADER 19Z
Configuration: 943 LGP TRACK LOADER / HIGH DRIVE / 19Z00001-00252 (MACHINE) POWERED BY 3204 ENGINE
Disassembly and Assembly
3204 VEHICULAR ENGINE FOR 943 & 953 TRACK-TYPE LOADERS
Media Number -SENR4214-00 Publication Date -01/04/1985 Date Updated -11/10/2001
Governor (Interim Scroll Fuel System)
SMCS - 1264-015; 1264-016
Disassemble Governor (Interim Scroll Fuel System)
START BY:
1/10
943 LGP TRACK LOADER / HIGH DRIVE / 19Z00001-00252 (MACHINE) POWE...
2022/1/10
https://127.0.0.1/sisweb/sisweb/techdoc/techdoc_print_page.jsp?returnurl=/sis...
7. a. remove fuel injection pump housing and governor (interim scroll fuel system)
NOTE: If it is desired to only remove the governor so the fuel injection pump housing can be
disassembled, do only Steps 1, 3, 5, 6, 12 and 13.
1. Remove cover (1).
2. Remove lever (2) and the key from the shaft.
3. Remove bolts (3) and cover (4) from the governor housing.
4. Remove O-ring seals (5) from the low and high idle adjustment screws.
5. Remove screw (6) from rack stop collar (7), and remove collar (7). Remove the spring from
behind the collar.
2/10
943 LGP TRACK LOADER / HIGH DRIVE / 19Z00001-00252 (MACHINE) POWE...
2022/1/10
https://127.0.0.1/sisweb/sisweb/techdoc/techdoc_print_page.jsp?returnurl=/sis...
8. 6. Remove bolts (8), and remove governor housing (9) from the fuel injection pump housing.
7. Remove high idle adjustment screw (11) and low idle adjustment screw (10) from the governor
housing. Remove the high idle adjustment screw first.
8. Remove bolts (12) and torque control (13) from the governor housing.
9. Remove bolt (14) and the lock. Remove shaft (15) and lever assembly (16) from the governor
housing.
Pin (19) holds spring (17) in compression. Use caution to prevent injury
when pin (19) is removed. Release the tension in spring (17) slowly.
3/10
943 LGP TRACK LOADER / HIGH DRIVE / 19Z00001-00252 (MACHINE) POWE...
2022/1/10
https://127.0.0.1/sisweb/sisweb/techdoc/techdoc_print_page.jsp?returnurl=/sis...
9. 10. Remove pin (19), spring (17) and plunger (18) from the lever assembly.
11. Remove seal (21) from the governor housing. Use tooling (A) to remove the plug and bearings
(20) from the governor housing.
NOTE: If a replacement of spring guide (22) is necessary, see Special Instruction, Form No.
SMHS7356 - Use Of 6V22 Tool Group For Replacement Of Governor Spring Guide.
12. Remove seat, washer, wave-washers and governor spring (23) from the weight assembly.
Remove spring washer (26) from the weight assembly.
13. Remove bolts (24) and the lock that hold weight assembly (25) to the fuel injection pump
housing. Pull the weight assembly out and to the side to disengage it from the rack.
14. Remove ring (27) and the dowel under the ring that holds seat (28) in place.
4/10
943 LGP TRACK LOADER / HIGH DRIVE / 19Z00001-00252 (MACHINE) POWE...
2022/1/10
https://127.0.0.1/sisweb/sisweb/techdoc/techdoc_print_page.jsp?returnurl=/sis...
10. 15. Remove seat (28), bolt (29) and spring (30) from the weight assembly. Remove washer (31)
from spring (30).
16. Remove guide (32), the two races and bearing from the sleeve.
17. Remove the second dowel (33) that holds sleeve (34) in place, and remove the sleeve.
18. Remove valve (37) from the weight assembly and cylinder (35).
19. Remove lock (36), and separate the weight assembly and cylinder (35).
20. Remove sleeve (38) and piston (39) from cylinder (35). Remove the O-ring seal from the sleeve.
Assemble Governor (Interim Scroll Fuel System)
5/10
943 LGP TRACK LOADER / HIGH DRIVE / 19Z00001-00252 (MACHINE) POWE...
2022/1/10
https://127.0.0.1/sisweb/sisweb/techdoc/techdoc_print_page.jsp?returnurl=/sis...
11. NOTE: Put clean oil on all parts before assembly and be sure all oil passages are clear.
1. Install the O-ring seal on sleeve (2). Install piston (1) in sleeve (2). Install sleeve (2) in cylinder
(3).
2. Install cylinder (3) in weight assembly (4), and install lock (5) to hold them together.
3. Install valve (7) through the cylinder, and install sleeve (6) on the valve with the second hole in
the sleeve in alignment with the hole in the valve. Install dowel (8) to hold the sleeve on the valve.
6/10
943 LGP TRACK LOADER / HIGH DRIVE / 19Z00001-00252 (MACHINE) POWE...
2022/1/10
https://127.0.0.1/sisweb/sisweb/techdoc/techdoc_print_page.jsp?returnurl=/sis...
12. 4. Install larger race (9), bearing (10), smaller race (11) and guide (12) on sleeve (8). Put the hole in
guide (12) in alignment with the first hole in sleeve (8).
5. Install washer (16) in spring (13). Install bolt (17) in seat (14). Put spring (13) and seat (14) in
position on guide (12) with the hole in seat (14) in alignment with the hole in guide (12). Install
dowel (18) through seat (14) and guide (12). Install ring (15) on the seat to hold the dowel in place.
6. Install the weight assembly on the fuel injection pump housing with piston (1) engaged over the
groove in rack (19). Install lock (20) and the bolts that hold the weight assembly to the fuel injection
pump housing.
7. Install spring washer (26) on the bolt as shown.
8. Install spring (25), one wave washer (24), flat washer (23), other wave washer (22) and seat (21)
on the bolt as shown.
7/10
943 LGP TRACK LOADER / HIGH DRIVE / 19Z00001-00252 (MACHINE) POWE...
2022/1/10
https://127.0.0.1/sisweb/sisweb/techdoc/techdoc_print_page.jsp?returnurl=/sis...
13. 9. Put plunger (28) and spring (27) in position in lever assembly (30), and install pin (29) to hold the
spring and plunger in place.
10. Dimensions (X) and (Y) are controlled by the depths of bearings (32) and (33) in the governor
housing. Install bearings (32) and (33) with tooling (A). Install lever assembly (30) and shaft (31) in
the governor housing. With lever assembly (30) pushed against bearing (33) on the detent side, the
clearance [dimension (Y)] between the guide for the governor spring and lever assembly (30) must
be approximately 2.49 mm (.098 in.). Push lever assembly (30) against bearing (32) on the other
side. The clearance [dimension (X)] between the guide for the governor spring and lever assembly
must be approximately 3.40 mm (.134 in.). If the measurements are not correct, remove the lever
assembly and the shaft, and move the bearings as necessary to get the correct measurement. After
the bearings are installed, there must be approximately .38 mm (.015 in.) end play in the lever
assembly. Remove the shaft and lever assembly.
11. Install the plug on the detent side of the governor housing with tooling (A) to a depth of 2.30 ±
0.5 mm (.091 ± 0.20 in.). Install the lip-type seal in the opposite side of the governor housing with
tooling (A). Install the lip-type seal with the lip toward the inside of the governor housing.
12. Put the lever assembly and shaft in position in the governor housing, and install the bolt and lock
in the lever assembly.
13. Assemble the torque control group as follows:
a. Install lock (35), retainer (36), insulator (37) and retainer (38) on bolts (34) as shown.
b. Install contact (39) on bolts (34) as shown.
8/10
943 LGP TRACK LOADER / HIGH DRIVE / 19Z00001-00252 (MACHINE) POWE...
2022/1/10
https://127.0.0.1/sisweb/sisweb/techdoc/techdoc_print_page.jsp?returnurl=/sis...
14. c. Install spring (40), spacer (41), shim (42), bar (43) and insulator (44) on bolts (34) as shown.
14. Install torque control group (45) on the governor housing as shown. Bend the lock to hold the
bolts tight.
15. Install low idle adjustment screw (46) first; then high idle adjustment screw (47) in the governor
housing.
16. Put the gasket and governor housing (48) in position on the fuel injection pump housing with
bolt (17) and the spring seat in alignment with the spring guide in the governor housing. Install the
bolts that hold the governor housing to the fuel injection pump housing.
9/10
943 LGP TRACK LOADER / HIGH DRIVE / 19Z00001-00252 (MACHINE) POWE...
2022/1/10
https://127.0.0.1/sisweb/sisweb/techdoc/techdoc_print_page.jsp?returnurl=/sis...
15. 17. Install O-ring seal (49) on the low and high idle adjustment screws.
18. Put spring (50) and rack stop collar (51) in position on the bolt in the weight assembly, and
install the allen screw that holds the rack stop collar in place.
19. Put the gasket and cover in position on the governor housing with dowel (52) in the cover in
alignment with notch (53) in the rack stop collar. Install the bolts that hold the cover in place.
20. Install the gasket and cover (54) over the low and high idle adjustment screws.
21. Install the key and lever on shaft (31).
22. After installation of the fuel injection pump housing and governor, adjust the rack and governor.
See Fuel Rack Setting And Governor Adjustments in Testing And Adjusting.
END BY:
a. install fuel injection pump housing and governor (interim scroll fuel system)
10/10
943 LGP TRACK LOADER / HIGH DRIVE / 19Z00001-00252 (MACHINE) PO...
2022/1/10
https://127.0.0.1/sisweb/sisweb/techdoc/techdoc_print_page.jsp?returnurl=/sis...
16. Product: TRACK LOADER
Model: 943 TRACK LOADER 19Z
Configuration: 943 LGP TRACK LOADER / HIGH DRIVE / 19Z00001-00252 (MACHINE) POWERED BY 3204 ENGINE
Disassembly and Assembly
3204 VEHICULAR ENGINE FOR 943 & 953 TRACK-TYPE LOADERS
Media Number -SENR4214-00 Publication Date -01/04/1985 Date Updated -11/10/2001
Governor (New Scroll Fuel System Effective In Production
With 10X5411-Up, 45V36536-Up)
SMCS - 1264-015; 1264-016
1/19
943 LGP TRACK LOADER / HIGH DRIVE / 19Z00001-00252 (MACHINE) POWE...
2022/1/10
https://127.0.0.1/sisweb/sisweb/techdoc/techdoc_print_page.jsp?returnurl=/sis...
17. Disassemble Governor (New Scroll Fuel System Effective In
Production With 10X5411-Up, 45V36536-Up)
START BY:
a. remove fuel injection pump housing and governor (new scroll fuel system effective in production
with 10X5411-UP, 45V36536-UP)
b. remove fuel transfer pump (new scroll fuel system effective in production with 10X5411-UP,
45V36536-UP)
NOTE: If it is desired to remove only the governor so the fuel injection pump housing can be
disassembled, do only Steps 1, 2, 15, 21, 25, 26, 27, 28, 31, 33, 34 and 37.
1. Remove bolts (1) and cover (2).
2/19
943 LGP TRACK LOADER / HIGH DRIVE / 19Z00001-00252 (MACHINE) POWE...
2022/1/10
https://127.0.0.1/sisweb/sisweb/techdoc/techdoc_print_page.jsp?returnurl=/sis...
18. 2. Remove six bolts (3), two top bolts (4), housing (5) and the gasket.
3. Remove governor spring (6), the two wave washers, one flatwasher and seat from the guide in the
housing.
4. Make a mark of the position of lever (7) on shaft (8). Loosen bolt (10). Use a chisel or
screwdriver to expand expansion of lever (7) so it can be removed from shaft (8).
5. Remove cover assembly (9).
6. Use tooling (A) to remove seal (10) from cover (9).
7. Remove low idle adjustment screw (12) and spring (11) from the housing.
3/19
943 LGP TRACK LOADER / HIGH DRIVE / 19Z00001-00252 (MACHINE) POWE...
2022/1/10
https://127.0.0.1/sisweb/sisweb/techdoc/techdoc_print_page.jsp?returnurl=/sis...
19. 8. Remove shaft assembly (14), lever (13) and lever (15) from the housing.
9. Remove two snap rings from pins (17), and remove pins (17). Remove plates (16) and stop (18)
from the shaft assembly.
10. Remove pin (20), pin (19) and spring (21) from the shaft assembly.
11. Remove shaft (22) and lever (23) from the housing.
4/19
943 LGP TRACK LOADER / HIGH DRIVE / 19Z00001-00252 (MACHINE) POWE...
2022/1/10
https://127.0.0.1/sisweb/sisweb/techdoc/techdoc_print_page.jsp?returnurl=/sis...
20. NOTICE
Remove check valve (24) only if a replacement is necessary because the
check valve will be damaged during removal.
12. Remove check valve (24) if a replacement is necessary.
13. Remove contact (25) and body (26) for the governor dashpot adjustment screw from the
housing. Remove bolts (27), cover (28) and the gasket from the housing.
14. Remove seal (29) and adjustment screw (30) for high idle.
15. Remove two bolts (31), housing (32) and the gasket from the fuel injection pump housing.
5/19
943 LGP TRACK LOADER / HIGH DRIVE / 19Z00001-00252 (MACHINE) POWE...
2022/1/10
https://127.0.0.1/sisweb/sisweb/techdoc/techdoc_print_page.jsp?returnurl=/sis...
21. 16. Remove bolts (33) and torque control group (34).
17. Disassemble the torque control group and inspect the spacer, spring and insulator for damage or
wear.
18. Remove bolts (36) and block (35) for the full load stop from the housing.
19. Remove the bolt that holds collar (37) to bolt (39). Remove collar (37) and spring (38) from bolt
(39). Remove bolt (39) from the block.
20. Remove the stop screw from collar (37) if a replacement is necessary.
21. Remove bolts (41) and governor servo (40) from the fuel injection pump.
6/19
943 LGP TRACK LOADER / HIGH DRIVE / 19Z00001-00252 (MACHINE) POWE...
2022/1/10
https://127.0.0.1/sisweb/sisweb/techdoc/techdoc_print_page.jsp?returnurl=/sis...
22. 22. Remove lockring (46), seat (45), spring (broken link spring) (44) and sleeve (43) from valve
(42). Remove the other lockring (46) from the groove in the center of valve (42).
NOTE: The groove in the bottom of valve (42) must be in alignment with the servo body to permit
removal from the fuel rack.
23. Remove valve (42), sleeve (47) and piston (49) from the governor servo. Remove the O-ring seal
from sleeve (47).
24. Remove pin (48) and lever (50) from the governor servo.
25. Use tool (C) to hold spring (52) in compression so ring (51) can be removed. Spring (52) is used
to put a preload on the thrust bearing for the camshaft in the fuel injection pump housing.
26. Remove ring (51); then remove tool (C).
27. Remove bearing (53), sleeves (54) and spring (52) from the governor shaft.
7/19
943 LGP TRACK LOADER / HIGH DRIVE / 19Z00001-00252 (MACHINE) POWE...
2022/1/10
https://127.0.0.1/sisweb/sisweb/techdoc/techdoc_print_page.jsp?returnurl=/sis...
23. 28. Remove ring (55) and dashpot assembly (56) from the governor shaft.
29. Use tool (B) to remove snap ring (62) from seat (59). Remove ring (61) and spool (60) from seat
(59).
30. Remove seat (59) from spring (58), and remove spring (58) from seat (57).
31. Remove spring (overfueling spring) (63) and riser (64) from the governor shaft.
32. Remove ring (65), races (66) and bearing (67) from the riser.
8/19
943 LGP TRACK LOADER / HIGH DRIVE / 19Z00001-00252 (MACHINE) POWE...
2022/1/10
https://127.0.0.1/sisweb/sisweb/techdoc/techdoc_print_page.jsp?returnurl=/sis...
24. Suggest:
For more complete manuals. Please go to
the home page.
https://www.ebooklibonline.com
If the above button click is invalid. Please
download this document first, and then
click the above link to download the
complete manual.
Thank you so much for reading
25. 33. Use a screwdriver to remove shield (68) as shown.
NOTE: Make a replacement of shield (68) any time it is removed.
34. Remove bolts (69) and carrier (70) for the governor flyweights.
35. Remove dowels (71) and flyweights (73) from the carrier.
36. Remove shaft (72) from the carrier. Remove the dowel from shaft (72).
37. Remove races (74) and bearing (75) from the camshaft in the fuel injection pump housing.
Assemble Governor (New Scroll Fuel System Effective In
Production With 10Y5411-UP, 45V36536-UP)
9/19
943 LGP TRACK LOADER / HIGH DRIVE / 19Z00001-00252 (MACHINE) POWE...
2022/1/10
https://127.0.0.1/sisweb/sisweb/techdoc/techdoc_print_page.jsp?returnurl=/sis...
26. NOTE: If the governor was removed only to permit repair of the fuel injection pump housing, do
only Steps 1, 4, 5, 7, 9, 10, 11, 16, 22, 37, 39 and 40.
NOTE: Put clean oil on all parts before assembly. Be sure all oil passages are clear.
1. Install one race (1), bearing (2) and the other race (1) on the camshaft in the fuel injection pump
housing.
2. Put flyweights (3) in position on carrier (4), and install the dowels to hold the flyweights in place.
The flyweights must move freely on the dowels and have 0.010 to 0.23 mm (0.0004 to 0.009 in.)
end play.
10/19
943 LGP TRACK LOADER / HIGH DRIVE / 19Z00001-00252 (MACHINE) PO...
2022/1/10
https://127.0.0.1/sisweb/sisweb/techdoc/techdoc_print_page.jsp?returnurl=/sis...