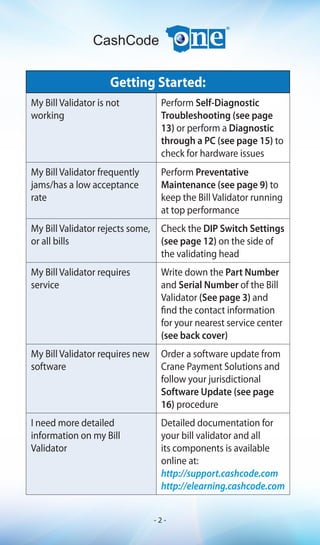
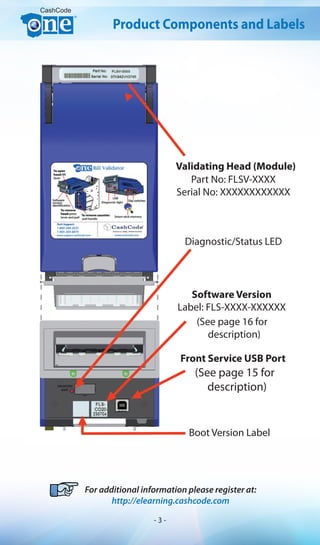
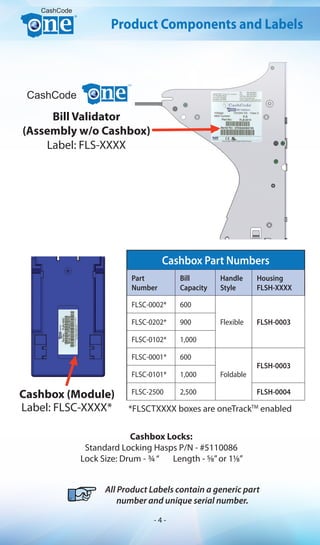
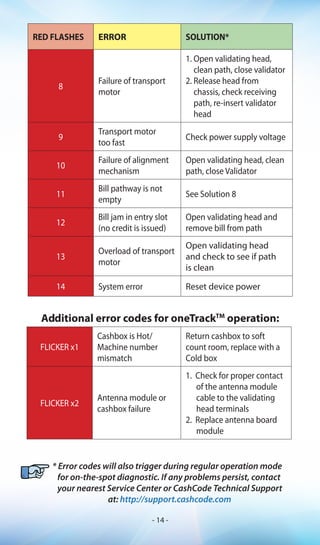
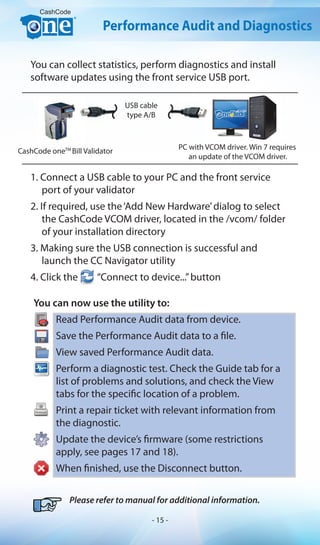
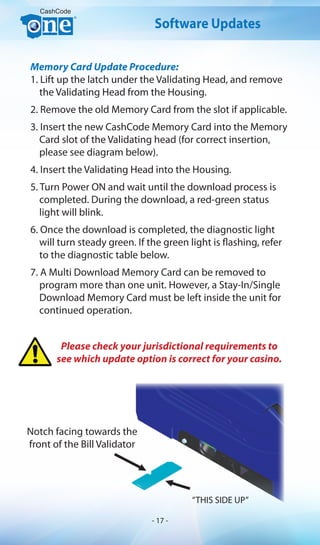
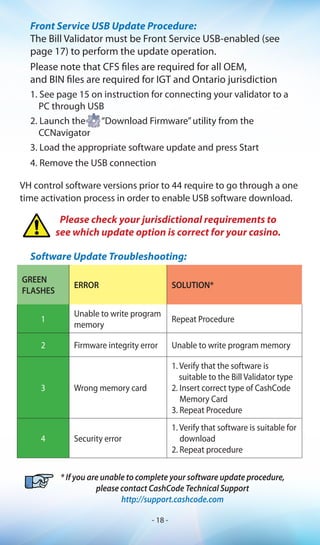
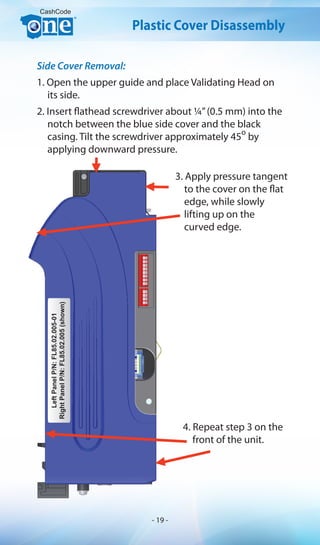
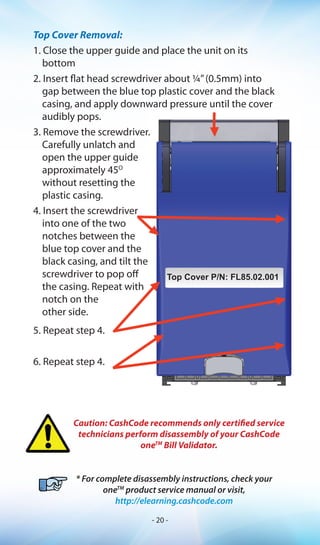
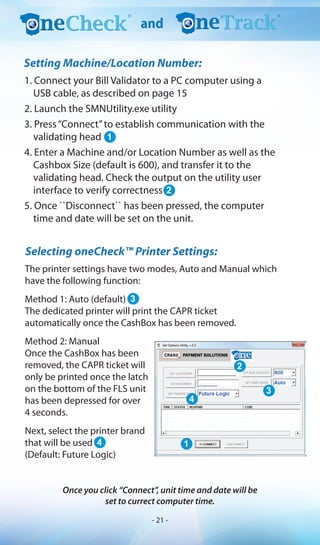
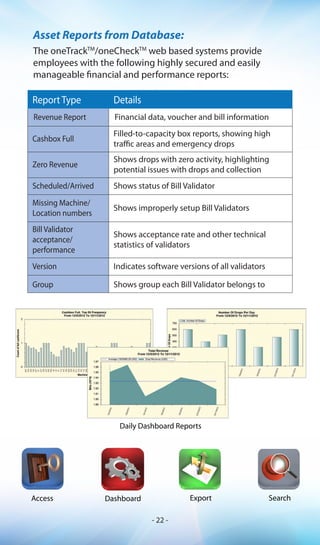
www.one.cashcode.com
support@cashcode.com
CashCode
Quick Reference Guide for
+1 905-303-8874
1-800-584-2633
Part No. OPT-FLS-FB, Rev 2.© 2013 Crane Payment Solutions
Getting Started:
My Bill Validator is not
working
Perform Self-Diagnostic
Troubleshooting (see page
13) or perform a Diagnostic
through a PC (see page 15) to
check for hardware issues
My Bill Validator frequently
jams/has a low acceptance
rate
Perform Preventative
Maintenance (see page 9) to
keep the Bill Validator running
at top performance
My Bill Validator rejects some,
or all bills
Check the DIP Switch Settings
(see page 12) on the side of
the validating head
My Bill Validator requires
service
Write down the Part Number
and Serial Number of the Bill
Validator (See page 3) and
find the contact information
for your nearest service center
(see back cover)
My Bill Validator requires new
software
Order a software update from
Crane Payment Solutions and
follow your jurisdictional
Software Update (see page
16) procedure
I need more detailed
information on my Bill
Validator
Detailed documentation for
your bill validator and all
its components is available
online at:
http://support.cashcode.com
http://elearning.cashcode.com
CashCode
- 2 -
For additional information please register at:
http://elearning.cashcode.com
Part No: FLSV-XXXX
Serial No: XXXXXXXXXXXX
CashCode
(See page 16 for
description)
(See page 15 for
description)
Product Components and Labels
Validating Head (Module)
Diagnostic/Status LED
Software Version
Label: FLS-XXXX-XXXXXX
Front Service USB Port
Boot Version Label
- 3 -
TM
Cashbox Part Numbers
Part
Number
Bill
Capacity
Handle
Style
Housing
FLSH-XXXX
FLSC-0002* 600
Flexible FLSH-0003FLSC-0202* 900
FLSC-0102* 1,000
FLSC-0001* 600
Foldable
FLSH-0003
FLSC-0101* 1,000
FLSC-2500 2,500 FLSH-0004
*FLSCTXXXX boxes are oneTrackTM
enabledLabel: FLSC-XXXX*
CashCode
CashCode
Product Components and Labels
Bill Validator
(Assembly w/o Cashbox)
Label: FLS-XXXX
Cashbox (Module)
Cashbox Locks:
Standard Locking Hasps P/N - #5110086
Lock Size: Drum - 3/4“ Length - 5/8”or 11/8”
All Product Labels contain a generic part
number and unique serial number.
- 4 -
Bezel Part Numbers
FLSB -5101: GPT Compatible Bezel with
Blue/Red runway lights
FLSB-530XY: Cole style bezel with runway lights
X: 1 - Full rectangle X: 3 - Flange cut top
X: 5 - Raised bottom
surface
X: 7 - Flange cut top
and raised surface
Y: _ - Green/Red Lights Y: R - Red/Green Lights
Y: B - Blue/Red Lights
FLSB-570X: Konami compatible Bezel with
open top and runway lights (Blue/Red)
X-Varian:
X: 1 – Standard
X: 2 – AGT/Stargames Customization
FLSB-5901: BAT (Aristocrat Compatible) Bezel
with oval shaped indicator light (Blue/Red)
- 5 -
Bezel Part Numbers
FLSB-5501: CashCode Coin Proof Plastic Bezel
with optic channel for status light (Green/Red)
Suitable for outdoor applications.
FLSB-7103: CashCode Coin proof Matal Bezel
with optic channel for status light (Green/Red)
This bezel requires additional grounding
hardware on the unit housing. Please see
the Bezel User Guide for mounting
instructions.
FLSB-7603: CashCode Coinproof Metal Bezel
with status light (Green/Red). This bezel is
mounted on an upside-stacker installation.
This bezel requires additional grounding
hardware on the unit housing.
FLSB-5902: Verve Bezel (Aristocrat compatible)
Bezel with oval shaped indicator light (Blue/
Red)
FLSB-5401: WMS BBXD Slant Top Bezel
For information on custom bezel configurations,
contact CashCode Technical Support
http://support.cashcode.com
- 6 -
TERMINAL FUNCTION
1 GROUND BUS
2 RECEIVE DATA (RxD-EXT)
3 TRANSMIT DATA (TxD-EXT)
4 POWER (VCC)
5 GROUND (GND)
6 RECEIVE DATA (RXD-EXT1)
7 INTERFACE GROUND (GND-EXT/EXT1)
8 TRANSMIT DATA (TXD-EXT1)
9 RS485-A BUS
10 RS485-B BUS
11 INPUT SIGNAL/ RECEIVE DATA (INP-RXD, MDB)
12 INPUT SIGNAL (INP-TTL1, MDB)
13 POWER (0V)
14 INPUT SIGNAL (INP-TTL2)
15 OUTPUT SIGNAL (OPEN-COLLECTOR )/ TRANSMIT DATA
16 OUTPUT SIGNAL (OPEN-COLLECTOR )
17 LED CATHODE/ OUTPUT SIGNAL (OPEN-COLLECTOR )
18 LED ANODE (A-LED-BDP)
19 POWER (12V/24V)
20 TRANSMIT DATA (TXD-BDP)
21 RECEIVE DATA (RXD-BDP)
22 MASTER RESET (RST-BDP)
23 INTERFACE GND (GND-BDP)
24 INTERFACE POWER (+12V BDP)
CashCode oneTM
Interface Connector Pin-out:
Terminal P/N (JAE): DR-SC24-1-7000 | Mating Socket P/N - #0100455
Above items can be ordered separately, or in one kit: OPT-MKFLS-24
It is highly recommended to ensure communication pin (1)
and unit ground pin (5) are not interconnected.
- 7 -
To order the Security Switch Kit
See part number: OPT-MKFLS-SWH
CashCode
For information on ordering a factory-installed
switch kit, contact CashCode Technical Support
http://support.cashcode.com
Installing Security Switch Kit
The optional cassette-present security switch allows the
host machine to detect whether a cashbox is present in the
validator housing. To install the kit:
1. Attach the provided
cable to the switch as
shown
2. Use a #2x1/2”wood
screw to secure the
switch to the FLS
Housing
3. Feed the cable up
through the housing
and connect to your
host machine
4. A security switch can
be installed on either
or both sides of the
housing
Connecting to host Machine:
Brown wire - NC switch
Red wire - NO switch
Orange wire - Common Ground
- 8 -
Special Cleaning Card (P/N: 8402022) and Cleaning Kits
are available (P/N: OPT-CLEAN-KIT-1 & OPT-CLEAN-KIT-2)
CashCode
Preventative Maintenance
To keep your oneTM
Bill Validator running at top
performance, the bill path should be cleaned as required*.
DONOTuseAcetone,Petroleum,orMineral
Oil based solvents as they will cause damage
to Bill Validator parts and void your warranty
Open the validating head using the grey latch, and follow
cleaning directions below. Refer to the colour legend for
rollers and sensors.
- 9 -
AFFECTED AREA CLEANING PROCEDURE
Dirt and dust particles in bill
path (entire surface)
1. Blow with compressed air to remove all
loose particles
2. Wipe with a micro-fiber anti-static
cloth to remove all other residues
Dirty Optical and Ultraviolet
Sensors
1. Blow with compressed air to remove all
loose particles
2. Check lens condition and clean using
a micro-fiber cloth and LCD cleaner
Dirty Rollers and O-Rings
Check for cracked o-rings and clean
using a micro-fiber cloth and LCD cleaner
*For more details on cleaning and maintenance,
check http://elearning.cashcode.com
- 10 -
PARAMETER SWITCH ON OFF
Orientation of the
ticket
SW2.1
Bar Code
Four-Way
Bar Code
Face-Up
Stacker orientation SW2.2 Down Up
Connectivity* SW2.3 oneCheckTM
oneTrackTM
Mode SW2.4 Service Mode Host Mode
* Default communication speed is 9600 Baud unless specified otherwise
The DIP switches are located on the side of the validating
head near the bottom:
CashCode
DIP Switch Settings
4
3 2 1
ON State
OFF State
The first four switches configure the operation of the validator.
Only the fourth switch should be used during service and
troubleshooting procedures to select between:
Host Mode: This is the mode for normal operation.
Service Mode: This is a stand alone mode for testing the oneTM
Bill Validator (see page 13 for procedure).
- 11 -
ON State
OFF State
PARAMETER SWITCH ON OFF
Denomination #1 SW1.1 Enabled Disabled
Denomination #2 SW1.2 Enabled Disabled
Denomination #3 SW1.3 Enabled Disabled
Denomination #4 SW1.4 Enabled Disabled
Denomination #5 SW1.5 Enabled Disabled
Denomination #6 SW1.6 Enabled Disabled
Denomination #7 SW1.7 Enabled Disabled
Acceptance Mode SW1.8 Accept All Reject Unfit Bills
A series of eight DIP switches configures accepted
denominations as well as acceptance mode.
8 7 6 5 4 3 2 1
For a complete documentation of switch descriptions, please
see the software release specifications for your particular
country/protocol at: http://support.cashcode.com
- 12 -
RED FLASHES ERROR SOLUTION*
1
Cashbox is removed
from Bill Validator
Check if cashbox is
installed correctly
2
Failure of CPU comm.
magnetic board
Reset device power
3
Cashbox is full/
ready for drop
Remove cashbox, and
insert empty replacement
4
Mechanical jam in
cashbox or stacker
failure
1. Remove cashbox from
Bill Validator Housing
and extract crumpled or
jammed bill
2. Turn power on and
check if stacker motor is
rotating
5
Failure of dielectric
sensor
Reset device power
6
Failure of optical sensor
Open validating head,
clean optical sensors
(see page 9)
7
Failure of magnetic
sensor
Open validating head,
clean inductive sensors
(see page 9)
CashCode
Self-DiagnosticTroubleshooting
CashCode’s oneTM
Bill Validator is equipped with an automatic
self-diagnostic test to aid in repair and maintenance.
Step 1: Put the validator into service mode (see page 11 and turn the 	
power on to start the test.
Step 2: After the test, check the status light:
GREEN: Test passed
RED: Count the number of flashes, turn power off, and see
below table for solution.
- 13 -
RED FLASHES ERROR SOLUTION*
8
Failure of transport
motor
1. Open validating head,
clean path, close validator
2. Release head from
chassis, check receiving
path, re-insert validator
head
9
Transport motor
too fast
Check power supply voltage
10
Failure of alignment
mechanism
Open validating head, clean
path, close Validator
11
Bill pathway is not
empty
See Solution 8
12
Bill jam in entry slot
(no credit is issued)
Open validating head and
remove bill from path
13
Overload of transport
motor
Open validating head
and check to see if path
is clean
14 System error Reset device power
FLICKER x1
Cashbox is Hot/
Machine number
mismatch
Return cashbox to soft
count room, replace with a
Cold box
FLICKER x2
Antenna module or
cashbox failure
1. Check for proper contact
of the antenna module
cable to the validating
head terminals
2. Replace antenna board
module
* Error codes will also trigger during regular operation mode
for on-the-spot diagnostic. If any problems persist, contact
your nearest Service Center or CashCode Technical Support
at: http://support.cashcode.com
Additional error codes for oneTrackTM
operation:
- 14 -
You can now use the utility to:
Read Performance Audit data from device.
Save the Performance Audit data to a file.
View saved Performance Audit data.
Perform a diagnostic test. Check the Guide tab for a
list of problems and solutions, and check the View
tabs for the specific location of a problem.
Print a repair ticket with relevant information from
the diagnostic.
Update the device’s firmware (some restrictions
apply, see pages 17 and 18).
When finished, use the Disconnect button.
Please refer to manual for additional information.
CashCode oneTM
Bill Validator
PC with VCOM driver. Win 7 requires
an update of the VCOM driver.
USB cable
type A/B
CashCode
Performance Audit and Diagnostics
You can collect statistics, perform diagnostics and install
software updates using the front service USB port.
1. Connect a USB cable to your PC and the front service
port of your validator
2. If required, use the‘Add New Hardware’dialog to select
the CashCode VCOM driver, located in the /vcom/ folder
of your installation directory
3. Making sure the USB connection is successful and
launch the CC Navigator utility
4. Click the “Connect to device...”button
- 15 -
(1) ONE Bill Validator Memory card
(2) Country code (ISO 3166-1)
(3) Protocol/OEM customization
(4) Control firmware
(5) Validation firmware
(6) C/Code Software Configuration
(7) Optional extensions indicating type of memory card.
Possible memory card extensions:
(___) Stay in/Single Download Card
(-OP) The card is locked as read-only, and any
validators programmed with the card
will only accept OTP cards for future updates
(-99) Allows up to 99 downloads
Software Version
Type 34: P1848-FSM34
- One Time Programmable (OTP)
- Stay-in/Single Download
- Kobetron Certifiable
Type 42: P1848-FSM42
- Multi Download
FLS-XXXX-XXXXXX-XX
(1)-(2)(3)-(4)(5)(6)-(7)
Card is One Time Programmable
CashCode
* For alternative update options please inquire with
CashCode Technical Support: http://support.cashcode.com
Software
Software Updates
The oneTM
Bill Validator is shipped with pre-installed
software, according to ordered specifications. It is
recommended to keep your unit’s firmware up-to-date*.
}
- 16 -
Notch facing towards the
front of the Bill Validator
“THIS SIDE UP”
Please check your jurisdictional requirements to
see which update option is correct for your casino.
CashCode
Software Updates
Memory Card Update Procedure:
1. Lift up the latch under the Validating Head, and remove
the Validating Head from the Housing.
2. Remove the old Memory Card from the slot if applicable.
3. Insert the new CashCode Memory Card into the Memory
Card slot of the Validating head (for correct insertion,
please see diagram below).
4. Insert the Validating Head into the Housing.
5. Turn Power ON and wait until the download process is
completed. During the download, a red-green status
light will blink.
6. Once the download is completed, the diagnostic light
will turn steady green. If the green light is flashing, refer
to the diagnostic table below.
7. A Multi Download Memory Card can be removed to
program more than one unit. However, a Stay-In/Single
Download Memory Card must be left inside the unit for
continued operation.
- 17 -
GREEN
FLASHES
ERROR SOLUTION*
1
Unable to write program
memory
Repeat Procedure
2 Firmware integrity error Unable to write program memory
3 Wrong memory card
1. Verify that the software is
suitable to the Bill Validator type
2. Insert correct type of CashCode
Memory Card
3. Repeat Procedure
4 Security error
1. Verify that software is suitable for
download
2. Repeat procedure
* If you are unable to complete your software update procedure,
please contact CashCode Technical Support
http://support.cashcode.com
Please check your jurisdictional requirements to
see which update option is correct for your casino.
Front Service USB Update Procedure:
The Bill Validator must be Front Service USB-enabled (see
page 17) to perform the update operation.
Please note that CFS files are required for all OEM,
and BIN files are required for IGT and Ontario jurisdiction
1. See page 15 on instruction for connecting your validator to a
PC through USB
2. Launch the “Download Firmware”utility from the
CCNavigator
3. Load the appropriate software update and press Start
4. Remove the USB connection
VH control software versions prior to 44 require to go through a one
time activation process in order to enable USB software download.
Software Update Troubleshooting:
- 18 -
Side Cover Removal:
1. Open the upper guide and place Validating Head on
its side.
2. Insert flathead screwdriver about ¼”(0.5 mm) into the
notch between the blue side cover and the black
casing. Tilt the screwdriver approximately 45
o
by
applying downward pressure.
CashCode
LeftPanelP/N:FL85.02.005-01
RightPanelP/N:FL85.02.005(shown)
Plastic Cover Disassembly
3. Apply pressure tangent
to the cover on the flat
edge, while slowly
lifting up on the
curved edge.
4. Repeat step 3 on the
front of the unit.
- 19 -
Caution: CashCode recommends only certified service
technicians perform disassembly of your CashCode
oneTM
Bill Validator.
* For complete disassembly instructions, check your
oneTM
product service manual or visit,
http://elearning.cashcode.com
Top Cover P/N: FL85.02.001
Top Cover Removal:
1. Close the upper guide and place the unit on its
bottom
2. Insert flat head screwdriver about 1/4”(0.5mm) into
gap between the blue top plastic cover and the black
casing, and apply downward pressure until the cover
audibly pops.
3. Remove the screwdriver.
Carefully unlatch and
open the upper guide
approximately 45O
without resetting the
plastic casing.
4. Insert the screwdriver
into one of the two
notches between the
blue top cover and the
black casing, and tilt the
screwdriver to pop off
the casing. Repeat with
notch on the
other side.
5. Repeat step 4.
6. Repeat step 4.
- 20 -
1. Connect your Bill Validator to a PC computer using a
USB cable, as described on page 15
2. Launch the SMNUtility.exe utility
3. Press“Connect”to establish communication with the
validating head
4. Enter a Machine and/or Location Number as well as the
Cashbox Size (default is 600), and transfer it to the
validating head. Check the output on the utility user
interface to verify correctness
5. Once ``Disconnect`` has been pressed, the computer
time and date will be set on the unit.
The printer settings have two modes, Auto and Manual which
have the following function:
Method 1: Auto (default)
The dedicated printer will print the CAPR ticket
automatically once the CashBox has been removed.
Method 2: Manual
Once the CashBox has been
removed, the CAPR ticket will
only be printed once the latch
on the bottom of the FLS unit
has been depressed for over
4 seconds.
Next, select the printer brand
that will be used
(Default: Future Logic)
Selecting oneCheck™ Printer Settings:
Once you click “Connect”, unit time and date will be
set to currect computer time.
1
2
3
4 1
4
3
2
and
Setting Machine/Location Number:
- 21 -
Report Type Details
Revenue Report Financial data, voucher and bill information
Cashbox Full
Filled-to-capacity box reports, showing high
traffic areas and emergency drops
Zero Revenue
Shows drops with zero activity, highlighting
potential issues with drops and collection
Scheduled/Arrived Shows status of Bill Validator
Missing Machine/
Location numbers
Shows improperly setup Bill Validators
Bill Validator
acceptance/
performance
Shows acceptance rate and other technical
statistics of validators
Version Indicates software versions of all validators
Group Shows group each Bill Validator belongs to
The oneTrackTM
/oneCheckTM
web based systems provide
employees with the following highly secured and easily
manageable financial and performance reports:
Daily Dashboard Reports
Access Dashboard Export Search
Asset Reports from Database:
- 22 -
Host Machine
Future Logic (Gen2 Universal)
Customer IGT WMS Others
Printer Harness
Cable Part Number
150-00106-100 150-00199-100 150-00123-100
CashCode One™
Harness Cable Part
Number
FL85.00.056
Printer Software Rev. J and above
BV Control
Software
58 + 65 + 65 +
Printer Harness Cable
CashCode one™
Bill Validator
Printer Harness
Cable
FL85.00.056
Future Logic
Printer
one™ Harness Cable
Additional printer template required, inquire for details.
Printer Setup and Reports
To Host
- 23 -
Printer Harness Cable (30cm)
Transact (Ithaca 950)
Customer All
Printer Harness
Cable Part Number
95-11683L
CashCode Harness
Part Number
Not Required
Printer SW SP 3 +
BV Control SW 58 + 66 + 66 +
To Host
Transact Printer
Host Machine
CashCode one™ Host
Cable (3m)
CashCode one™
Bill Validator
Printer Setup and Reports
- 24 -
REPORTTYPE DETAILS EXAMPLE
Last Five Bills
inserted Report
(Bill Dispute)
Press validator latch 2 times
within 6 seconds
Bill Validator
and Printer
Performance
Report
Press validator latch 4 times
within 6 seconds
Cashbox Audit
and
Performance
Report
(CAPR)
1. Hold validator latch for 2
seconds and release
2. Insert the report into validator
to stack in the cashbox
(4 red flashes)
3. Report must be scanned with
2D barcode scanner during soft
count process
* Patent Pending
Following Currency Counter or Sorter Systems are Compatible
with oneCheck™ or oneTrack™: Cummins, DeLaRue and G&D
Cash Management
1. PRINT CAPR
4. ANALYZE
2. DROP
3. SCAN and
REPORT ASSET
The oneCheck™ printer can generate three different reports (these are
either printer automatically or manually, based on setting from page 21):
- 25 -
EVENT RECOMMENDED DIRECTIONS
New Slot Machine
or New Validator
1. Ensure DIP switch is set to oneCheck™
(see page 10)
2. Install the validating head and
power up the Bill Validator
3. Initialize the unit as specified on p. 21
4. Install the cashbox inside the
validator
Jam in Bill
Validator
1. Remove validating head, and then the
cashbox, as necessary to clear the jam
2. Re-install the cashbox followed by
the validating head
3. To swap the Bill Validating heads
follow steps in next event
Exchanging
validating head
from one machine
to another
1. Print CAPR report and stack report
inside cashbox
2. Remove the Bill Validating head
3. Initialize the unit as specified on p. 21
Cashbox Full/
Emergency Drop
1. Print CAPR report and stack report
inside cashbox
2. Replace with a new Cold Box
Standard Drop
Operation
1. Print CAPR report and stack report
inside cashbox
2. Simply replace Hot Box with new Cold
Box only when unit is powered up
To find out about all neCheckTM
benefits, please visit the
oneCheck TM
section on the CashCode oneTM
page at:
http://elearning.cashcode.com/
CAPR Guidelines
- 26 -
EVENT DIRECTIONS
Drop during
power cycle down
or Machine out of
order
1. Validator should be powered up before
removing the cashbox
2. Print CAPR report and stack report
inside cashbox
Moving the Slot
Machine.
1. Remove cashbox while Bill Validator is
powered on and follow CAPR procedure
2. In the new location, power on the Bill
Validator and assign new location number
Scanning of
multiple CAPR
reports per
Cashbox into
Database
1. Scan each CAPR as collected from cashbox
on oneCheckTM
database using a 2D
barcode scanner (green signal will appear)
2. Proceed to counter/sorter machine with
all cashbox contents
3. Follow procedure recommended by
counter/sorter manufacturer
Bill
Validator
Firmware
Update
1. Follow CAPR procedure
2. Remove Hot Box and replace with a
Cold Box
3. Follow software update procedure
with cashbox inside the Bill Validator
4. Reassign machine location number
5. Use CCNavigator or CCNET Stat Utility to
verify that the Machine and Location
numbers as well as the cashbox size are
correct
For oneCheckTM
back office documentation see:
http://support.cashcode.com
- 27 -
Crane Part Number Gaming OEMs & Platforms
FL85.00.011 Spielo (oneCheck™)
FL85.00.012 Cole Harness (oneCheck™)
FL85.00.013-01 Aristocrat MK-VI (US oneCheck™)
FL85.00.013-02 Aristocrat MK-VI (US Universal)
FL85.00.014 oneCheck™ add on Harness
FL85.00.015 AGS Harness
FL85.00.016-02 Atronic Harness (oneCheck™)
FL85.00.017-01 Konami K2V Harness (oneCheck™)
FL85.00.018 Novomatic Coolfire2
FL85.00.019-01 Star Games Harness (oneCheck™)
FL85.00.020 Novomatic CoolFire1
FL85.00.021-01 / -02 Aristocrat Viridian (oneCheck™) / (Universal)
FL85.00.022 Aristocrat MKVI Excite
FL85.00.023-01 West Money (oneCheck™)
FL85.00.026-01 VGT & Aruze (US/Aus oneCheck™)
FL85.00.028-01 Aruze (Non - US Aus oneCheck™)
FL85.00.028-02 Aruze (Non - US Aus Universal)
FL85.00.031-01 Konami Podium (oneCheck™)
FL85.00.033-01 / -02 Konami Adv 5 (oneCheck™) / (Universal)
FL85.00.034 Gold Club
FL85.00.035 / -02 Bally (oneCheck™) / (Universal)
FL85.00.036-01 Ainsworth A560 (oneCheck™)
FL85.00.037-01 Ainsworth Ambassador (oneCheck™)
FL85.00.039 IGT (Old Revision - 2012)
FL85.00.039-02 IGT (New Revision - 2013)
FL85.00.049-01 Entropy (oneCheck™)
FL85.00.050-01 WMS Bluebird 2 / XD (oneCheck™)
FL85.00.055-01 GDS (oneCheck™)
FL85.00.056 Future Logic printer Add On (oneCheck™)
List of Available Harnesses
Mating kit can be ordered using P/N: OPT-MKFLS-24
- 28 -
Visit us at http://support.cashcode.com for:
- Product documentation
- Online technical support
- Service center information
Visit us at http://elearning.cashcode.com for:
- Online product training
- Available product configurations
- Product service and maintenance videos
E-Mail: support@cashcode.com
E-Mail: for RMA: orders@cashcode.com
or call our Technical Support line at:
+1 905-303-8874 or toll free in NA 1-800-584-2633
CashCode
600 900 1000 2500
2720 Steeles Ave. West, Concord, ON Canada L4K 4S3

CashCodeone_QuickReferenceGuide

  • 1.
    www.one.cashcode.com support@cashcode.com CashCode Quick Reference Guidefor +1 905-303-8874 1-800-584-2633 Part No. OPT-FLS-FB, Rev 2.© 2013 Crane Payment Solutions
  • 2.
    Getting Started: My BillValidator is not working Perform Self-Diagnostic Troubleshooting (see page 13) or perform a Diagnostic through a PC (see page 15) to check for hardware issues My Bill Validator frequently jams/has a low acceptance rate Perform Preventative Maintenance (see page 9) to keep the Bill Validator running at top performance My Bill Validator rejects some, or all bills Check the DIP Switch Settings (see page 12) on the side of the validating head My Bill Validator requires service Write down the Part Number and Serial Number of the Bill Validator (See page 3) and find the contact information for your nearest service center (see back cover) My Bill Validator requires new software Order a software update from Crane Payment Solutions and follow your jurisdictional Software Update (see page 16) procedure I need more detailed information on my Bill Validator Detailed documentation for your bill validator and all its components is available online at: http://support.cashcode.com http://elearning.cashcode.com CashCode - 2 -
  • 3.
    For additional informationplease register at: http://elearning.cashcode.com Part No: FLSV-XXXX Serial No: XXXXXXXXXXXX CashCode (See page 16 for description) (See page 15 for description) Product Components and Labels Validating Head (Module) Diagnostic/Status LED Software Version Label: FLS-XXXX-XXXXXX Front Service USB Port Boot Version Label - 3 -
  • 4.
    TM Cashbox Part Numbers Part Number Bill Capacity Handle Style Housing FLSH-XXXX FLSC-0002*600 Flexible FLSH-0003FLSC-0202* 900 FLSC-0102* 1,000 FLSC-0001* 600 Foldable FLSH-0003 FLSC-0101* 1,000 FLSC-2500 2,500 FLSH-0004 *FLSCTXXXX boxes are oneTrackTM enabledLabel: FLSC-XXXX* CashCode CashCode Product Components and Labels Bill Validator (Assembly w/o Cashbox) Label: FLS-XXXX Cashbox (Module) Cashbox Locks: Standard Locking Hasps P/N - #5110086 Lock Size: Drum - 3/4“ Length - 5/8”or 11/8” All Product Labels contain a generic part number and unique serial number. - 4 -
  • 5.
    Bezel Part Numbers FLSB-5101: GPT Compatible Bezel with Blue/Red runway lights FLSB-530XY: Cole style bezel with runway lights X: 1 - Full rectangle X: 3 - Flange cut top X: 5 - Raised bottom surface X: 7 - Flange cut top and raised surface Y: _ - Green/Red Lights Y: R - Red/Green Lights Y: B - Blue/Red Lights FLSB-570X: Konami compatible Bezel with open top and runway lights (Blue/Red) X-Varian: X: 1 – Standard X: 2 – AGT/Stargames Customization FLSB-5901: BAT (Aristocrat Compatible) Bezel with oval shaped indicator light (Blue/Red) - 5 -
  • 6.
    Bezel Part Numbers FLSB-5501:CashCode Coin Proof Plastic Bezel with optic channel for status light (Green/Red) Suitable for outdoor applications. FLSB-7103: CashCode Coin proof Matal Bezel with optic channel for status light (Green/Red) This bezel requires additional grounding hardware on the unit housing. Please see the Bezel User Guide for mounting instructions. FLSB-7603: CashCode Coinproof Metal Bezel with status light (Green/Red). This bezel is mounted on an upside-stacker installation. This bezel requires additional grounding hardware on the unit housing. FLSB-5902: Verve Bezel (Aristocrat compatible) Bezel with oval shaped indicator light (Blue/ Red) FLSB-5401: WMS BBXD Slant Top Bezel For information on custom bezel configurations, contact CashCode Technical Support http://support.cashcode.com - 6 -
  • 7.
    TERMINAL FUNCTION 1 GROUNDBUS 2 RECEIVE DATA (RxD-EXT) 3 TRANSMIT DATA (TxD-EXT) 4 POWER (VCC) 5 GROUND (GND) 6 RECEIVE DATA (RXD-EXT1) 7 INTERFACE GROUND (GND-EXT/EXT1) 8 TRANSMIT DATA (TXD-EXT1) 9 RS485-A BUS 10 RS485-B BUS 11 INPUT SIGNAL/ RECEIVE DATA (INP-RXD, MDB) 12 INPUT SIGNAL (INP-TTL1, MDB) 13 POWER (0V) 14 INPUT SIGNAL (INP-TTL2) 15 OUTPUT SIGNAL (OPEN-COLLECTOR )/ TRANSMIT DATA 16 OUTPUT SIGNAL (OPEN-COLLECTOR ) 17 LED CATHODE/ OUTPUT SIGNAL (OPEN-COLLECTOR ) 18 LED ANODE (A-LED-BDP) 19 POWER (12V/24V) 20 TRANSMIT DATA (TXD-BDP) 21 RECEIVE DATA (RXD-BDP) 22 MASTER RESET (RST-BDP) 23 INTERFACE GND (GND-BDP) 24 INTERFACE POWER (+12V BDP) CashCode oneTM Interface Connector Pin-out: Terminal P/N (JAE): DR-SC24-1-7000 | Mating Socket P/N - #0100455 Above items can be ordered separately, or in one kit: OPT-MKFLS-24 It is highly recommended to ensure communication pin (1) and unit ground pin (5) are not interconnected. - 7 -
  • 8.
    To order theSecurity Switch Kit See part number: OPT-MKFLS-SWH CashCode For information on ordering a factory-installed switch kit, contact CashCode Technical Support http://support.cashcode.com Installing Security Switch Kit The optional cassette-present security switch allows the host machine to detect whether a cashbox is present in the validator housing. To install the kit: 1. Attach the provided cable to the switch as shown 2. Use a #2x1/2”wood screw to secure the switch to the FLS Housing 3. Feed the cable up through the housing and connect to your host machine 4. A security switch can be installed on either or both sides of the housing Connecting to host Machine: Brown wire - NC switch Red wire - NO switch Orange wire - Common Ground - 8 -
  • 9.
    Special Cleaning Card(P/N: 8402022) and Cleaning Kits are available (P/N: OPT-CLEAN-KIT-1 & OPT-CLEAN-KIT-2) CashCode Preventative Maintenance To keep your oneTM Bill Validator running at top performance, the bill path should be cleaned as required*. DONOTuseAcetone,Petroleum,orMineral Oil based solvents as they will cause damage to Bill Validator parts and void your warranty Open the validating head using the grey latch, and follow cleaning directions below. Refer to the colour legend for rollers and sensors. - 9 -
  • 10.
    AFFECTED AREA CLEANINGPROCEDURE Dirt and dust particles in bill path (entire surface) 1. Blow with compressed air to remove all loose particles 2. Wipe with a micro-fiber anti-static cloth to remove all other residues Dirty Optical and Ultraviolet Sensors 1. Blow with compressed air to remove all loose particles 2. Check lens condition and clean using a micro-fiber cloth and LCD cleaner Dirty Rollers and O-Rings Check for cracked o-rings and clean using a micro-fiber cloth and LCD cleaner *For more details on cleaning and maintenance, check http://elearning.cashcode.com - 10 -
  • 11.
    PARAMETER SWITCH ONOFF Orientation of the ticket SW2.1 Bar Code Four-Way Bar Code Face-Up Stacker orientation SW2.2 Down Up Connectivity* SW2.3 oneCheckTM oneTrackTM Mode SW2.4 Service Mode Host Mode * Default communication speed is 9600 Baud unless specified otherwise The DIP switches are located on the side of the validating head near the bottom: CashCode DIP Switch Settings 4 3 2 1 ON State OFF State The first four switches configure the operation of the validator. Only the fourth switch should be used during service and troubleshooting procedures to select between: Host Mode: This is the mode for normal operation. Service Mode: This is a stand alone mode for testing the oneTM Bill Validator (see page 13 for procedure). - 11 -
  • 12.
    ON State OFF State PARAMETERSWITCH ON OFF Denomination #1 SW1.1 Enabled Disabled Denomination #2 SW1.2 Enabled Disabled Denomination #3 SW1.3 Enabled Disabled Denomination #4 SW1.4 Enabled Disabled Denomination #5 SW1.5 Enabled Disabled Denomination #6 SW1.6 Enabled Disabled Denomination #7 SW1.7 Enabled Disabled Acceptance Mode SW1.8 Accept All Reject Unfit Bills A series of eight DIP switches configures accepted denominations as well as acceptance mode. 8 7 6 5 4 3 2 1 For a complete documentation of switch descriptions, please see the software release specifications for your particular country/protocol at: http://support.cashcode.com - 12 -
  • 13.
    RED FLASHES ERRORSOLUTION* 1 Cashbox is removed from Bill Validator Check if cashbox is installed correctly 2 Failure of CPU comm. magnetic board Reset device power 3 Cashbox is full/ ready for drop Remove cashbox, and insert empty replacement 4 Mechanical jam in cashbox or stacker failure 1. Remove cashbox from Bill Validator Housing and extract crumpled or jammed bill 2. Turn power on and check if stacker motor is rotating 5 Failure of dielectric sensor Reset device power 6 Failure of optical sensor Open validating head, clean optical sensors (see page 9) 7 Failure of magnetic sensor Open validating head, clean inductive sensors (see page 9) CashCode Self-DiagnosticTroubleshooting CashCode’s oneTM Bill Validator is equipped with an automatic self-diagnostic test to aid in repair and maintenance. Step 1: Put the validator into service mode (see page 11 and turn the power on to start the test. Step 2: After the test, check the status light: GREEN: Test passed RED: Count the number of flashes, turn power off, and see below table for solution. - 13 -
  • 14.
    RED FLASHES ERRORSOLUTION* 8 Failure of transport motor 1. Open validating head, clean path, close validator 2. Release head from chassis, check receiving path, re-insert validator head 9 Transport motor too fast Check power supply voltage 10 Failure of alignment mechanism Open validating head, clean path, close Validator 11 Bill pathway is not empty See Solution 8 12 Bill jam in entry slot (no credit is issued) Open validating head and remove bill from path 13 Overload of transport motor Open validating head and check to see if path is clean 14 System error Reset device power FLICKER x1 Cashbox is Hot/ Machine number mismatch Return cashbox to soft count room, replace with a Cold box FLICKER x2 Antenna module or cashbox failure 1. Check for proper contact of the antenna module cable to the validating head terminals 2. Replace antenna board module * Error codes will also trigger during regular operation mode for on-the-spot diagnostic. If any problems persist, contact your nearest Service Center or CashCode Technical Support at: http://support.cashcode.com Additional error codes for oneTrackTM operation: - 14 -
  • 15.
    You can nowuse the utility to: Read Performance Audit data from device. Save the Performance Audit data to a file. View saved Performance Audit data. Perform a diagnostic test. Check the Guide tab for a list of problems and solutions, and check the View tabs for the specific location of a problem. Print a repair ticket with relevant information from the diagnostic. Update the device’s firmware (some restrictions apply, see pages 17 and 18). When finished, use the Disconnect button. Please refer to manual for additional information. CashCode oneTM Bill Validator PC with VCOM driver. Win 7 requires an update of the VCOM driver. USB cable type A/B CashCode Performance Audit and Diagnostics You can collect statistics, perform diagnostics and install software updates using the front service USB port. 1. Connect a USB cable to your PC and the front service port of your validator 2. If required, use the‘Add New Hardware’dialog to select the CashCode VCOM driver, located in the /vcom/ folder of your installation directory 3. Making sure the USB connection is successful and launch the CC Navigator utility 4. Click the “Connect to device...”button - 15 -
  • 16.
    (1) ONE BillValidator Memory card (2) Country code (ISO 3166-1) (3) Protocol/OEM customization (4) Control firmware (5) Validation firmware (6) C/Code Software Configuration (7) Optional extensions indicating type of memory card. Possible memory card extensions: (___) Stay in/Single Download Card (-OP) The card is locked as read-only, and any validators programmed with the card will only accept OTP cards for future updates (-99) Allows up to 99 downloads Software Version Type 34: P1848-FSM34 - One Time Programmable (OTP) - Stay-in/Single Download - Kobetron Certifiable Type 42: P1848-FSM42 - Multi Download FLS-XXXX-XXXXXX-XX (1)-(2)(3)-(4)(5)(6)-(7) Card is One Time Programmable CashCode * For alternative update options please inquire with CashCode Technical Support: http://support.cashcode.com Software Software Updates The oneTM Bill Validator is shipped with pre-installed software, according to ordered specifications. It is recommended to keep your unit’s firmware up-to-date*. } - 16 -
  • 17.
    Notch facing towardsthe front of the Bill Validator “THIS SIDE UP” Please check your jurisdictional requirements to see which update option is correct for your casino. CashCode Software Updates Memory Card Update Procedure: 1. Lift up the latch under the Validating Head, and remove the Validating Head from the Housing. 2. Remove the old Memory Card from the slot if applicable. 3. Insert the new CashCode Memory Card into the Memory Card slot of the Validating head (for correct insertion, please see diagram below). 4. Insert the Validating Head into the Housing. 5. Turn Power ON and wait until the download process is completed. During the download, a red-green status light will blink. 6. Once the download is completed, the diagnostic light will turn steady green. If the green light is flashing, refer to the diagnostic table below. 7. A Multi Download Memory Card can be removed to program more than one unit. However, a Stay-In/Single Download Memory Card must be left inside the unit for continued operation. - 17 -
  • 18.
    GREEN FLASHES ERROR SOLUTION* 1 Unable towrite program memory Repeat Procedure 2 Firmware integrity error Unable to write program memory 3 Wrong memory card 1. Verify that the software is suitable to the Bill Validator type 2. Insert correct type of CashCode Memory Card 3. Repeat Procedure 4 Security error 1. Verify that software is suitable for download 2. Repeat procedure * If you are unable to complete your software update procedure, please contact CashCode Technical Support http://support.cashcode.com Please check your jurisdictional requirements to see which update option is correct for your casino. Front Service USB Update Procedure: The Bill Validator must be Front Service USB-enabled (see page 17) to perform the update operation. Please note that CFS files are required for all OEM, and BIN files are required for IGT and Ontario jurisdiction 1. See page 15 on instruction for connecting your validator to a PC through USB 2. Launch the “Download Firmware”utility from the CCNavigator 3. Load the appropriate software update and press Start 4. Remove the USB connection VH control software versions prior to 44 require to go through a one time activation process in order to enable USB software download. Software Update Troubleshooting: - 18 -
  • 19.
    Side Cover Removal: 1.Open the upper guide and place Validating Head on its side. 2. Insert flathead screwdriver about ¼”(0.5 mm) into the notch between the blue side cover and the black casing. Tilt the screwdriver approximately 45 o by applying downward pressure. CashCode LeftPanelP/N:FL85.02.005-01 RightPanelP/N:FL85.02.005(shown) Plastic Cover Disassembly 3. Apply pressure tangent to the cover on the flat edge, while slowly lifting up on the curved edge. 4. Repeat step 3 on the front of the unit. - 19 -
  • 20.
    Caution: CashCode recommendsonly certified service technicians perform disassembly of your CashCode oneTM Bill Validator. * For complete disassembly instructions, check your oneTM product service manual or visit, http://elearning.cashcode.com Top Cover P/N: FL85.02.001 Top Cover Removal: 1. Close the upper guide and place the unit on its bottom 2. Insert flat head screwdriver about 1/4”(0.5mm) into gap between the blue top plastic cover and the black casing, and apply downward pressure until the cover audibly pops. 3. Remove the screwdriver. Carefully unlatch and open the upper guide approximately 45O without resetting the plastic casing. 4. Insert the screwdriver into one of the two notches between the blue top cover and the black casing, and tilt the screwdriver to pop off the casing. Repeat with notch on the other side. 5. Repeat step 4. 6. Repeat step 4. - 20 -
  • 21.
    1. Connect yourBill Validator to a PC computer using a USB cable, as described on page 15 2. Launch the SMNUtility.exe utility 3. Press“Connect”to establish communication with the validating head 4. Enter a Machine and/or Location Number as well as the Cashbox Size (default is 600), and transfer it to the validating head. Check the output on the utility user interface to verify correctness 5. Once ``Disconnect`` has been pressed, the computer time and date will be set on the unit. The printer settings have two modes, Auto and Manual which have the following function: Method 1: Auto (default) The dedicated printer will print the CAPR ticket automatically once the CashBox has been removed. Method 2: Manual Once the CashBox has been removed, the CAPR ticket will only be printed once the latch on the bottom of the FLS unit has been depressed for over 4 seconds. Next, select the printer brand that will be used (Default: Future Logic) Selecting oneCheck™ Printer Settings: Once you click “Connect”, unit time and date will be set to currect computer time. 1 2 3 4 1 4 3 2 and Setting Machine/Location Number: - 21 -
  • 22.
    Report Type Details RevenueReport Financial data, voucher and bill information Cashbox Full Filled-to-capacity box reports, showing high traffic areas and emergency drops Zero Revenue Shows drops with zero activity, highlighting potential issues with drops and collection Scheduled/Arrived Shows status of Bill Validator Missing Machine/ Location numbers Shows improperly setup Bill Validators Bill Validator acceptance/ performance Shows acceptance rate and other technical statistics of validators Version Indicates software versions of all validators Group Shows group each Bill Validator belongs to The oneTrackTM /oneCheckTM web based systems provide employees with the following highly secured and easily manageable financial and performance reports: Daily Dashboard Reports Access Dashboard Export Search Asset Reports from Database: - 22 -
  • 23.
    Host Machine Future Logic(Gen2 Universal) Customer IGT WMS Others Printer Harness Cable Part Number 150-00106-100 150-00199-100 150-00123-100 CashCode One™ Harness Cable Part Number FL85.00.056 Printer Software Rev. J and above BV Control Software 58 + 65 + 65 + Printer Harness Cable CashCode one™ Bill Validator Printer Harness Cable FL85.00.056 Future Logic Printer one™ Harness Cable Additional printer template required, inquire for details. Printer Setup and Reports To Host - 23 -
  • 24.
    Printer Harness Cable(30cm) Transact (Ithaca 950) Customer All Printer Harness Cable Part Number 95-11683L CashCode Harness Part Number Not Required Printer SW SP 3 + BV Control SW 58 + 66 + 66 + To Host Transact Printer Host Machine CashCode one™ Host Cable (3m) CashCode one™ Bill Validator Printer Setup and Reports - 24 -
  • 25.
    REPORTTYPE DETAILS EXAMPLE LastFive Bills inserted Report (Bill Dispute) Press validator latch 2 times within 6 seconds Bill Validator and Printer Performance Report Press validator latch 4 times within 6 seconds Cashbox Audit and Performance Report (CAPR) 1. Hold validator latch for 2 seconds and release 2. Insert the report into validator to stack in the cashbox (4 red flashes) 3. Report must be scanned with 2D barcode scanner during soft count process * Patent Pending Following Currency Counter or Sorter Systems are Compatible with oneCheck™ or oneTrack™: Cummins, DeLaRue and G&D Cash Management 1. PRINT CAPR 4. ANALYZE 2. DROP 3. SCAN and REPORT ASSET The oneCheck™ printer can generate three different reports (these are either printer automatically or manually, based on setting from page 21): - 25 -
  • 26.
    EVENT RECOMMENDED DIRECTIONS NewSlot Machine or New Validator 1. Ensure DIP switch is set to oneCheck™ (see page 10) 2. Install the validating head and power up the Bill Validator 3. Initialize the unit as specified on p. 21 4. Install the cashbox inside the validator Jam in Bill Validator 1. Remove validating head, and then the cashbox, as necessary to clear the jam 2. Re-install the cashbox followed by the validating head 3. To swap the Bill Validating heads follow steps in next event Exchanging validating head from one machine to another 1. Print CAPR report and stack report inside cashbox 2. Remove the Bill Validating head 3. Initialize the unit as specified on p. 21 Cashbox Full/ Emergency Drop 1. Print CAPR report and stack report inside cashbox 2. Replace with a new Cold Box Standard Drop Operation 1. Print CAPR report and stack report inside cashbox 2. Simply replace Hot Box with new Cold Box only when unit is powered up To find out about all neCheckTM benefits, please visit the oneCheck TM section on the CashCode oneTM page at: http://elearning.cashcode.com/ CAPR Guidelines - 26 -
  • 27.
    EVENT DIRECTIONS Drop during powercycle down or Machine out of order 1. Validator should be powered up before removing the cashbox 2. Print CAPR report and stack report inside cashbox Moving the Slot Machine. 1. Remove cashbox while Bill Validator is powered on and follow CAPR procedure 2. In the new location, power on the Bill Validator and assign new location number Scanning of multiple CAPR reports per Cashbox into Database 1. Scan each CAPR as collected from cashbox on oneCheckTM database using a 2D barcode scanner (green signal will appear) 2. Proceed to counter/sorter machine with all cashbox contents 3. Follow procedure recommended by counter/sorter manufacturer Bill Validator Firmware Update 1. Follow CAPR procedure 2. Remove Hot Box and replace with a Cold Box 3. Follow software update procedure with cashbox inside the Bill Validator 4. Reassign machine location number 5. Use CCNavigator or CCNET Stat Utility to verify that the Machine and Location numbers as well as the cashbox size are correct For oneCheckTM back office documentation see: http://support.cashcode.com - 27 -
  • 28.
    Crane Part NumberGaming OEMs & Platforms FL85.00.011 Spielo (oneCheck™) FL85.00.012 Cole Harness (oneCheck™) FL85.00.013-01 Aristocrat MK-VI (US oneCheck™) FL85.00.013-02 Aristocrat MK-VI (US Universal) FL85.00.014 oneCheck™ add on Harness FL85.00.015 AGS Harness FL85.00.016-02 Atronic Harness (oneCheck™) FL85.00.017-01 Konami K2V Harness (oneCheck™) FL85.00.018 Novomatic Coolfire2 FL85.00.019-01 Star Games Harness (oneCheck™) FL85.00.020 Novomatic CoolFire1 FL85.00.021-01 / -02 Aristocrat Viridian (oneCheck™) / (Universal) FL85.00.022 Aristocrat MKVI Excite FL85.00.023-01 West Money (oneCheck™) FL85.00.026-01 VGT & Aruze (US/Aus oneCheck™) FL85.00.028-01 Aruze (Non - US Aus oneCheck™) FL85.00.028-02 Aruze (Non - US Aus Universal) FL85.00.031-01 Konami Podium (oneCheck™) FL85.00.033-01 / -02 Konami Adv 5 (oneCheck™) / (Universal) FL85.00.034 Gold Club FL85.00.035 / -02 Bally (oneCheck™) / (Universal) FL85.00.036-01 Ainsworth A560 (oneCheck™) FL85.00.037-01 Ainsworth Ambassador (oneCheck™) FL85.00.039 IGT (Old Revision - 2012) FL85.00.039-02 IGT (New Revision - 2013) FL85.00.049-01 Entropy (oneCheck™) FL85.00.050-01 WMS Bluebird 2 / XD (oneCheck™) FL85.00.055-01 GDS (oneCheck™) FL85.00.056 Future Logic printer Add On (oneCheck™) List of Available Harnesses Mating kit can be ordered using P/N: OPT-MKFLS-24 - 28 -
  • 29.
    Visit us athttp://support.cashcode.com for: - Product documentation - Online technical support - Service center information Visit us at http://elearning.cashcode.com for: - Online product training - Available product configurations - Product service and maintenance videos
  • 30.
    E-Mail: support@cashcode.com E-Mail: forRMA: orders@cashcode.com or call our Technical Support line at: +1 905-303-8874 or toll free in NA 1-800-584-2633 CashCode 600 900 1000 2500 2720 Steeles Ave. West, Concord, ON Canada L4K 4S3