Downloaded 114 times


![How to create a camera2
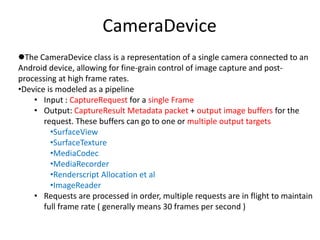
• Step1:To enumerate, query, and open available camera devices,
obtain a CameraManager instance.
CameraManager manager = (CameraManager)
activity.getSystemService(Context.CAMERA_SERVICE);
String cameraId = manager.getCameraIdList()[0];](https://image.slidesharecdn.com/camera2howtocreate-150329125634-conversion-gate01/85/How-to-create-a-camera2-2-320.jpg)
![Initialize CameraDevice
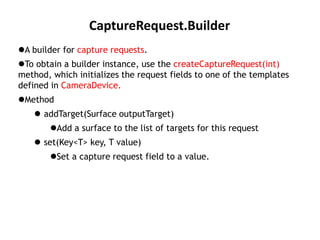
● Step2:Individual CameraDevices provide a set of static property
information that describes the hardware device and the available
settings and output parameters for the device.
// To get a list of available sizes of camera preview, we retrieve an instance of
// StreamConfigurationMap from CameraCharacteristics
CameraCharacteristics characteristics = manager.getCameraCharacteristics(cameraId);
StreamConfigurationMap map = characteristics
.get(CameraCharacteristics.SCALER_STREAM_CONFIGURATION_MAP);
(Camera.Size) mPreviewSize = map.getOutputSizes(SurfaceTexture.class)[0];
(SurfaceTexture) mTextureView.setAspectRatio(mPreviewSize.getWidth(),
// We are opening the camera with a listener. When it is ready, onOpened of
// (CameraDevice.StateListener)mStateListener is called.
manager.openCamera(cameraId, mStateListener, null);](https://image.slidesharecdn.com/camera2howtocreate-150329125634-conversion-gate01/85/How-to-create-a-camera2-3-320.jpg)

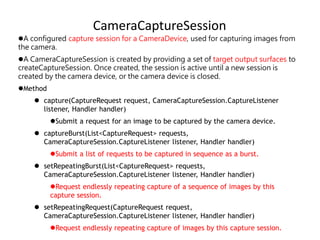
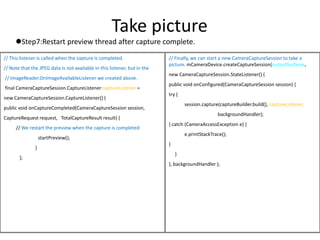
![Take picture
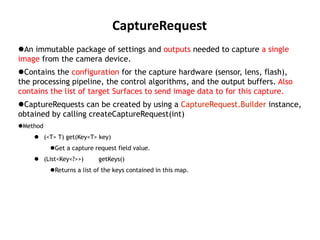
Step4: Capture of JPEG images or RAW buffers forDngCreator can be done
with ImageReader with the {android.graphics.ImageFormat#JPEG} and
{android.graphics.ImageFormat#RAW_SENSOR} formats.
CameraManager manager =
(CameraManager) activity.getSystemService(Context.CAMERA_SERVICE);
// Pick the best JPEG size that can be captured with this CameraDevice.
CameraCharacteristics characteristics =
manager.getCameraCharacteristics(mCameraDevice.getId());
Size[] jpegSizes = null;
if (characteristics != null) {
jpegSizes =
characteristics.get(CameraCharacteristics.SCALER_STREAM_CONFIGURATION_MAP) .getOutputSizes(ImageFor
mat.JPEG);
}
int width = 640; int height = 480;
if (jpegSizes != null && 0 < jpegSizes.length) {
width = jpegSizes[0].getWidth();
height = jpegSizes[0].getHeight();
}](https://image.slidesharecdn.com/camera2howtocreate-150329125634-conversion-gate01/85/How-to-create-a-camera2-11-320.jpg)

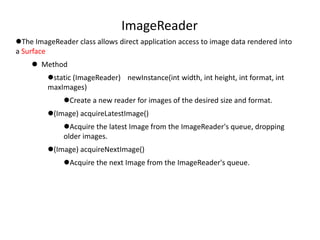
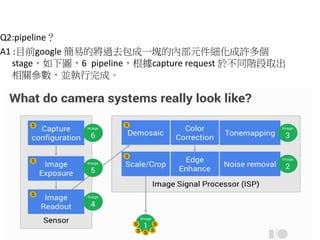
![ImageReader.OnImageAvailableListener
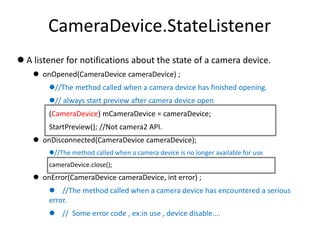
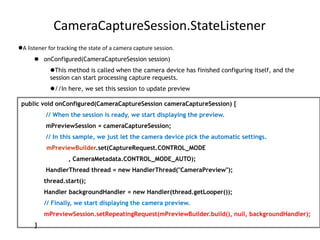
Callback interface for being notified that a new image is available.
onImageAvailable(ImageReader reader) {
image = reader.acquireLatestImage();
ByteBuffer buffer = image.getPlanes()[0].getBuffer();
byte[] bytes = new byte[buffer.capacity()];
buffer.get(bytes);
save(bytes);
…..//Use output stream to write out to file.
……
Image.close();](https://image.slidesharecdn.com/camera2howtocreate-150329125634-conversion-gate01/85/How-to-create-a-camera2-15-320.jpg)
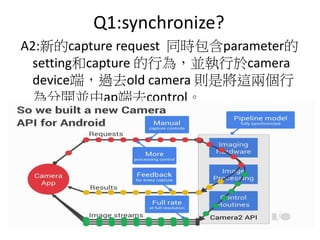
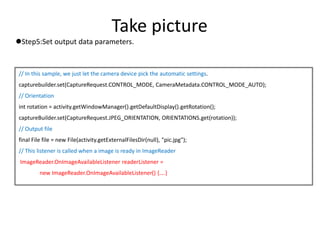
![Q3
Q:為何為何 captureSession 時,會放入
outputSurface(Surface[]) 多個surface 而並非
指定單一surface?
A:再創建CameraCaptureSession 通常會放入未
來可能會用到的target surfaces ,並不會只
放入單一的target surface ,而單一指定
surface 的需求寫入capture request裡。](https://image.slidesharecdn.com/camera2howtocreate-150329125634-conversion-gate01/85/How-to-create-a-camera2-21-320.jpg)

This document provides a detailed guide to creating and managing camera functionality using the Camera2 API in Android. It outlines steps to enumerate available cameras, configure capture sessions, and retrieve images, while describing key classes and methods such as CameraManager, CameraDevice, and ImageReader. Additionally, it addresses common questions related to the use of these components and how they work together in a camera application.