Download to read offline

![2. FEATURES 4. SPEAKER INSTALLATION
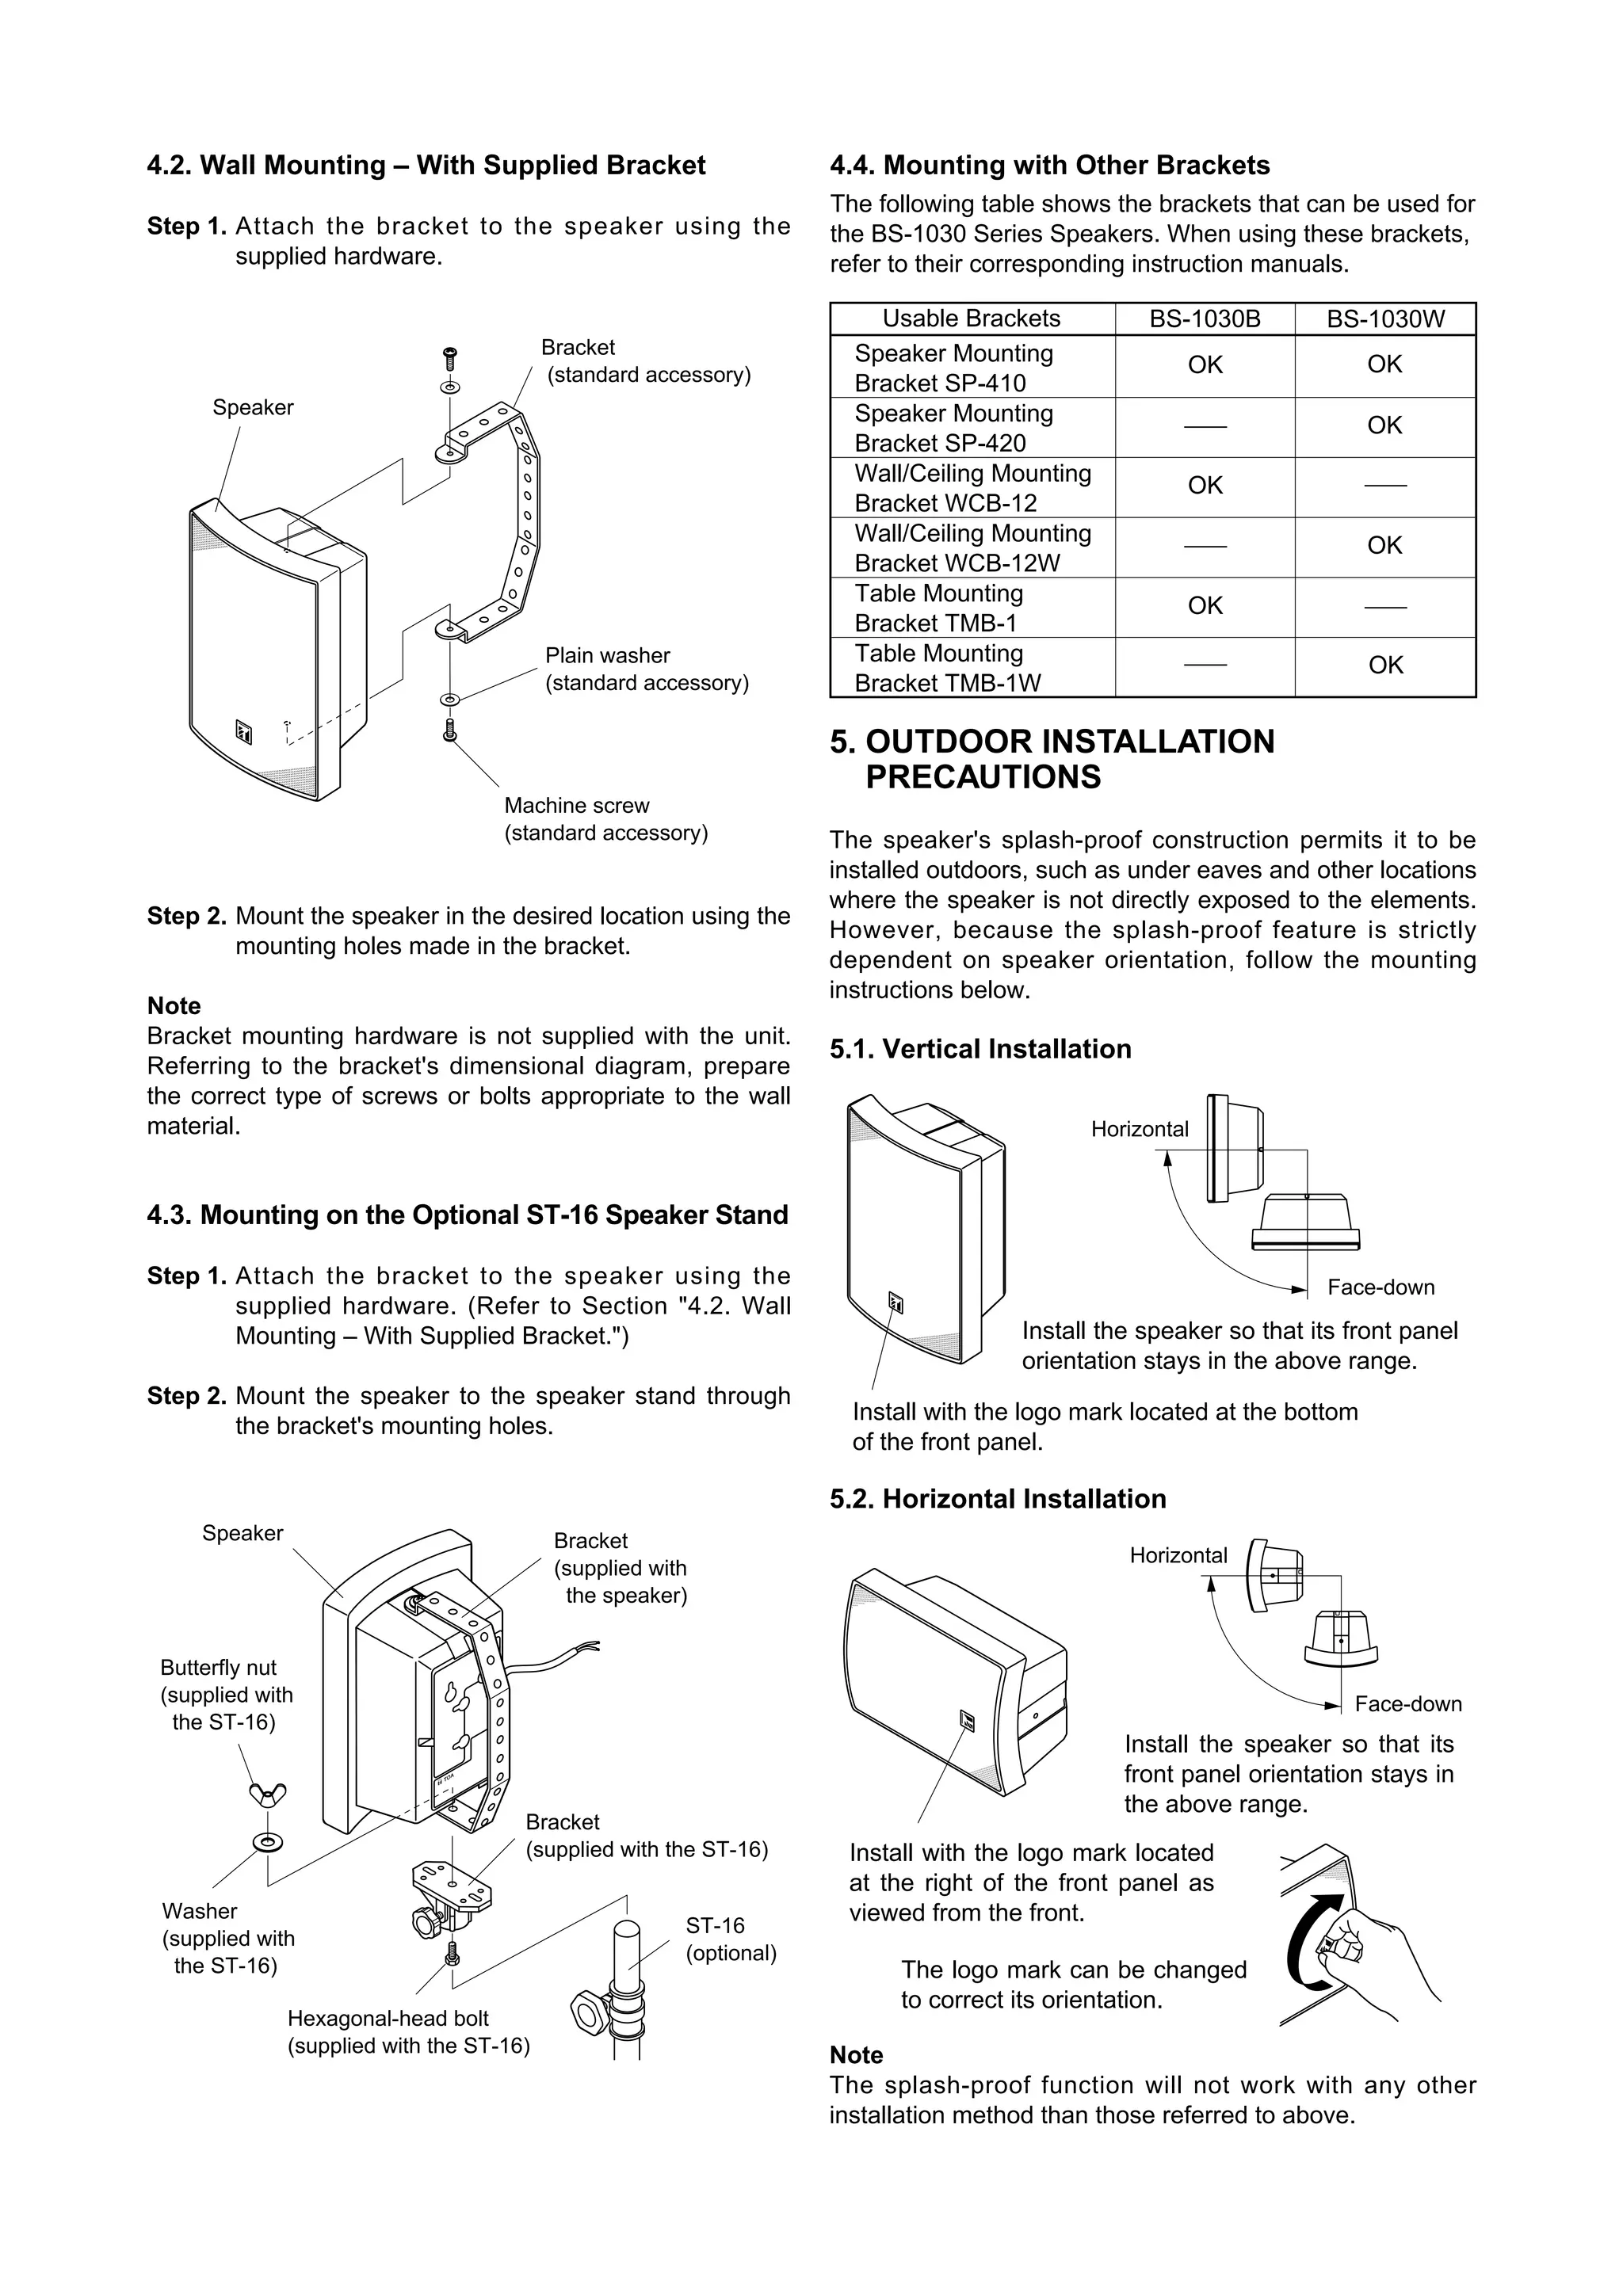
• The speaker's smoothly curved surface permits it to
blend in with virtually all modern buildings. 4.1. Wall Mounting – With Surface-Mount Screws
• A built-in matching transformer permits the speaker to be
used for both high-impedance and low-impedance (8 Ω) Note: The surface-mount screws are not supplied with
applications. The impedance can be easily changed from the unit. Referring to the mounting hole's dimensional
outside the speaker. diagram below, prepare the correct type of screws
• A splash-proof design enables the BS-1030 to even be appropriate to the wall material.
installed outdoors, in a location not directly exposed to
the elements, such as under eaves. 6 mm
• Mountable to wall surfaces directly or using with supplied
or optional mounting brackets. m
6m
16 mm
ø1
3. INPUT IMPEDANCE CHANGE
The speaker's input impedance is preset to 30 W (330 Ω)
of 100 V line by the factory. To change the impedance,
change the position of the rear panel-mounted rotary
Step 1. Install two surface-mount screws in the wall 50 mm
switches with a slotted screwdriver.
apart and leave them sticking out approximately 3
3.1. High Impedance (70 V or 100 V Line) Applications – 5 mm from the wall surface.
Set the [LINE VOL.] rotary switch to the 70 V or 100 V
position, and the [INPUT] rotary switch to the wattage to be Step 2. Connect the speaker cable.
used. (The figure below is an example of 100 V, 20 W.)
Step 3. Place the speaker's rear panel mounting holes
over the two installed screws to mount the speaker
to the wall surface.
30W
20W
15W INPUT
10W 2 Speaker cable
5W 8
OFF Mounting hole 1
LINE 70V 50 mm
VOL. OFF
100V
3
3.2. Low Impedance Applications 3 – 5 mm
Set both the [LINE VOL] and [INPUT] rotary switches to
Wall
the [8 Ω] position.
Note
Route the speaker cable as Screw
30W (Please prepare
shown in the figure so that it is separately.)
20W not pinched between the speaker
15W INPUT and the wall surface.
10W
5W 8
Tip
OFF When installing the speaker horizontally, use the relevant
LINE mounting holes shown below.
70V
VOL. OFF
100V
Notes
To avoid damage to the speaker, be sure to follow the
instructions below.
• Switch off the amplifier power when changing the input.
• Never set the [INPUT] switch to the [8 Ω] position when
the [LINE VOL.] switch is set to the 70V or 100 V (high
impedance) position.
Mounting hole](https://image.slidesharecdn.com/bs1030b1030w-121026000828-phpapp01/75/Bs-1030b-1030w-2-2048.jpg)
![6. DIMENSIONAL DIAGRAM 7. SPECIFICATIONS
• Speaker • Specifications common to both the BS-1030B
and BS-1030W
Unit: mm Enclosure Type 2-way bass-reflex system
Rated Input 30 W
Rated Impedance 8Ω
High impedance (100 V line):
330 Ω (30 W), 500 Ω (20 W), 670 Ω
(15 W), 1 kΩ (10 W), and 2 kΩ (5 W)
High impedance (70 V line):
170 Ω (30 W), 250 Ω (20 W), 330 Ω
(15 W), 500 Ω (10 W), and 1 kΩ (5 W)
Note: Impedance is changeable by
290
600
means of the rotary switch.
Sound Pressure 90 dB (1 W, 1 m)
Level
Frequency Response 80 – 20,000 Hz
Internal Speakers Low frequencies:
196 150
12 cm dynamic speaker
100
High frequencies:
2.5 cm dome tweeter
Operating – 10°C to +50°C
Temperature Range
Splash-Proof Capability IP-X3 (when the angle is specified in
50
60
vertical or horizontal installation)
Dimensions 196 (w) x 290 (h) x 150 (d) mm
Finish Refer to the table below.
Weight 2.8 kg (speaker only)
50
[Finish]
60
Case: ABS resin, black, paint
BS-1030B Grille: Pre-coated steel plate, black, paint
Bracket: Pre-coated steel plate, black, paint
• Bracket (standard accessory) Case: ABS resin, white, paint
BS-1030W Grille: Pre-coated steel plate, white, paint
Bracket: Pre-coated steel plate, white, paint
Note: The design and specifications are subject to change without
137.5
notice for improvement.
50
120
160
68
25
• Accessories
25
50 Bracket .................................................. 1
17- ø9
M5x10 machine screw ........................... 2
M5 plain washer .................................... 2
50
100
262
533-06-062-50](https://image.slidesharecdn.com/bs1030b1030w-121026000828-phpapp01/75/Bs-1030b-1030w-4-2048.jpg)

This instruction manual provides safety and installation instructions for the Universal Speaker BS-1030B/BS-1030W. The speaker is small but features high-quality, 2-way bass-reflex design, making it suitable for announcements and music reproduction. The manual instructs the user to follow safety precautions when installing the speaker, and describes how to change the speaker's input impedance for different voltage line applications or for low impedance use. It also provides details on wall mounting the speaker using either surface-mount screws, the supplied bracket, or optional mounting brackets.


