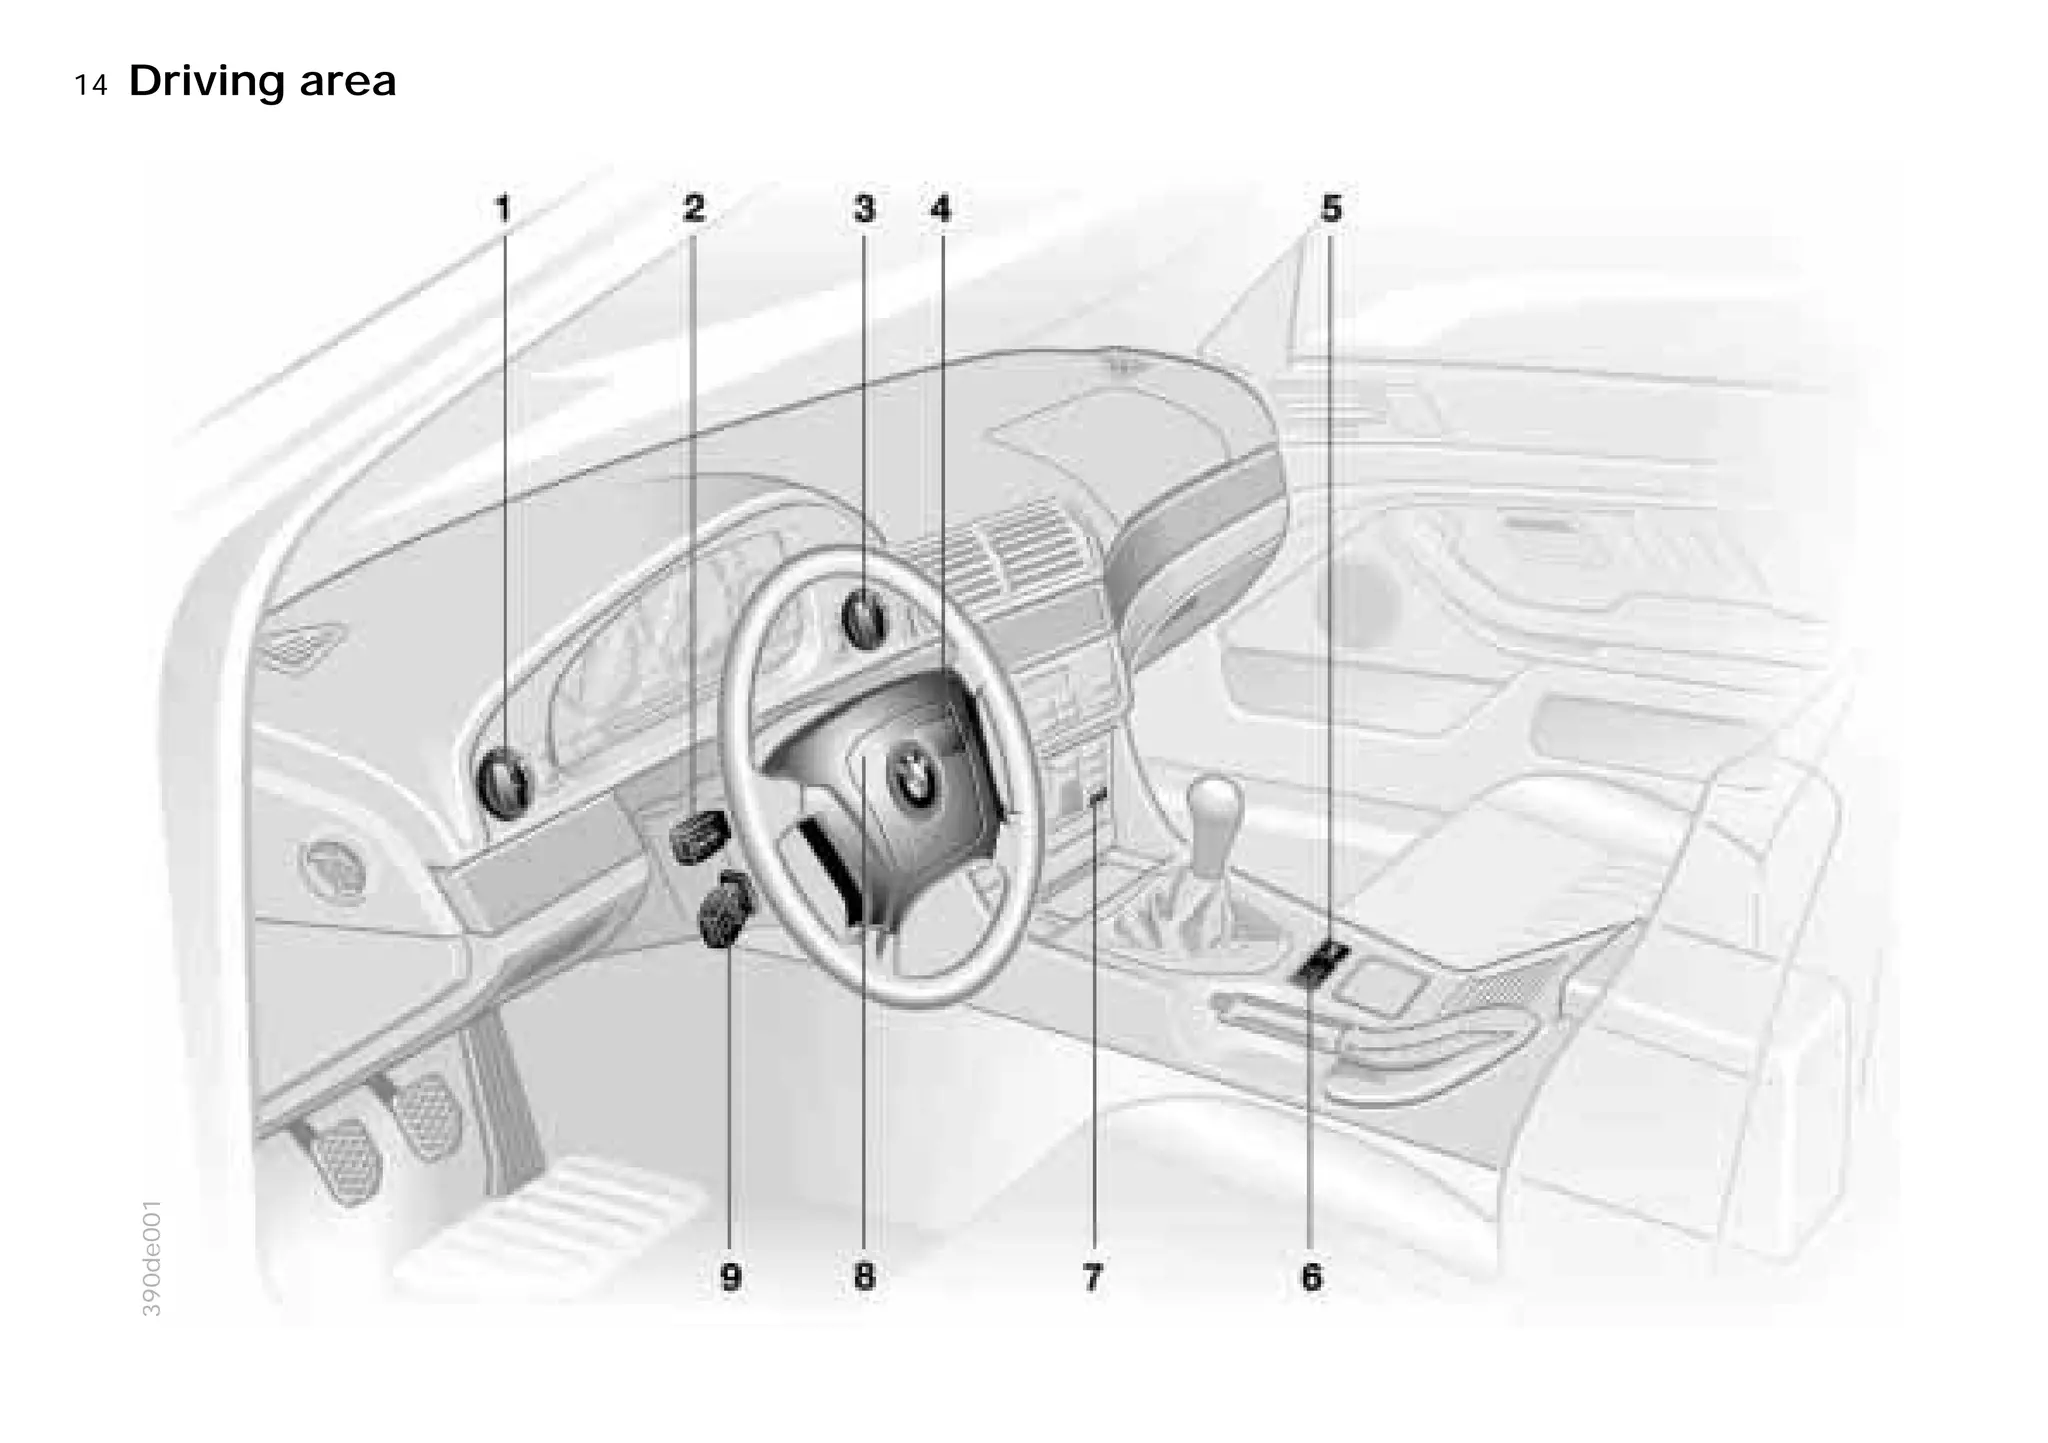
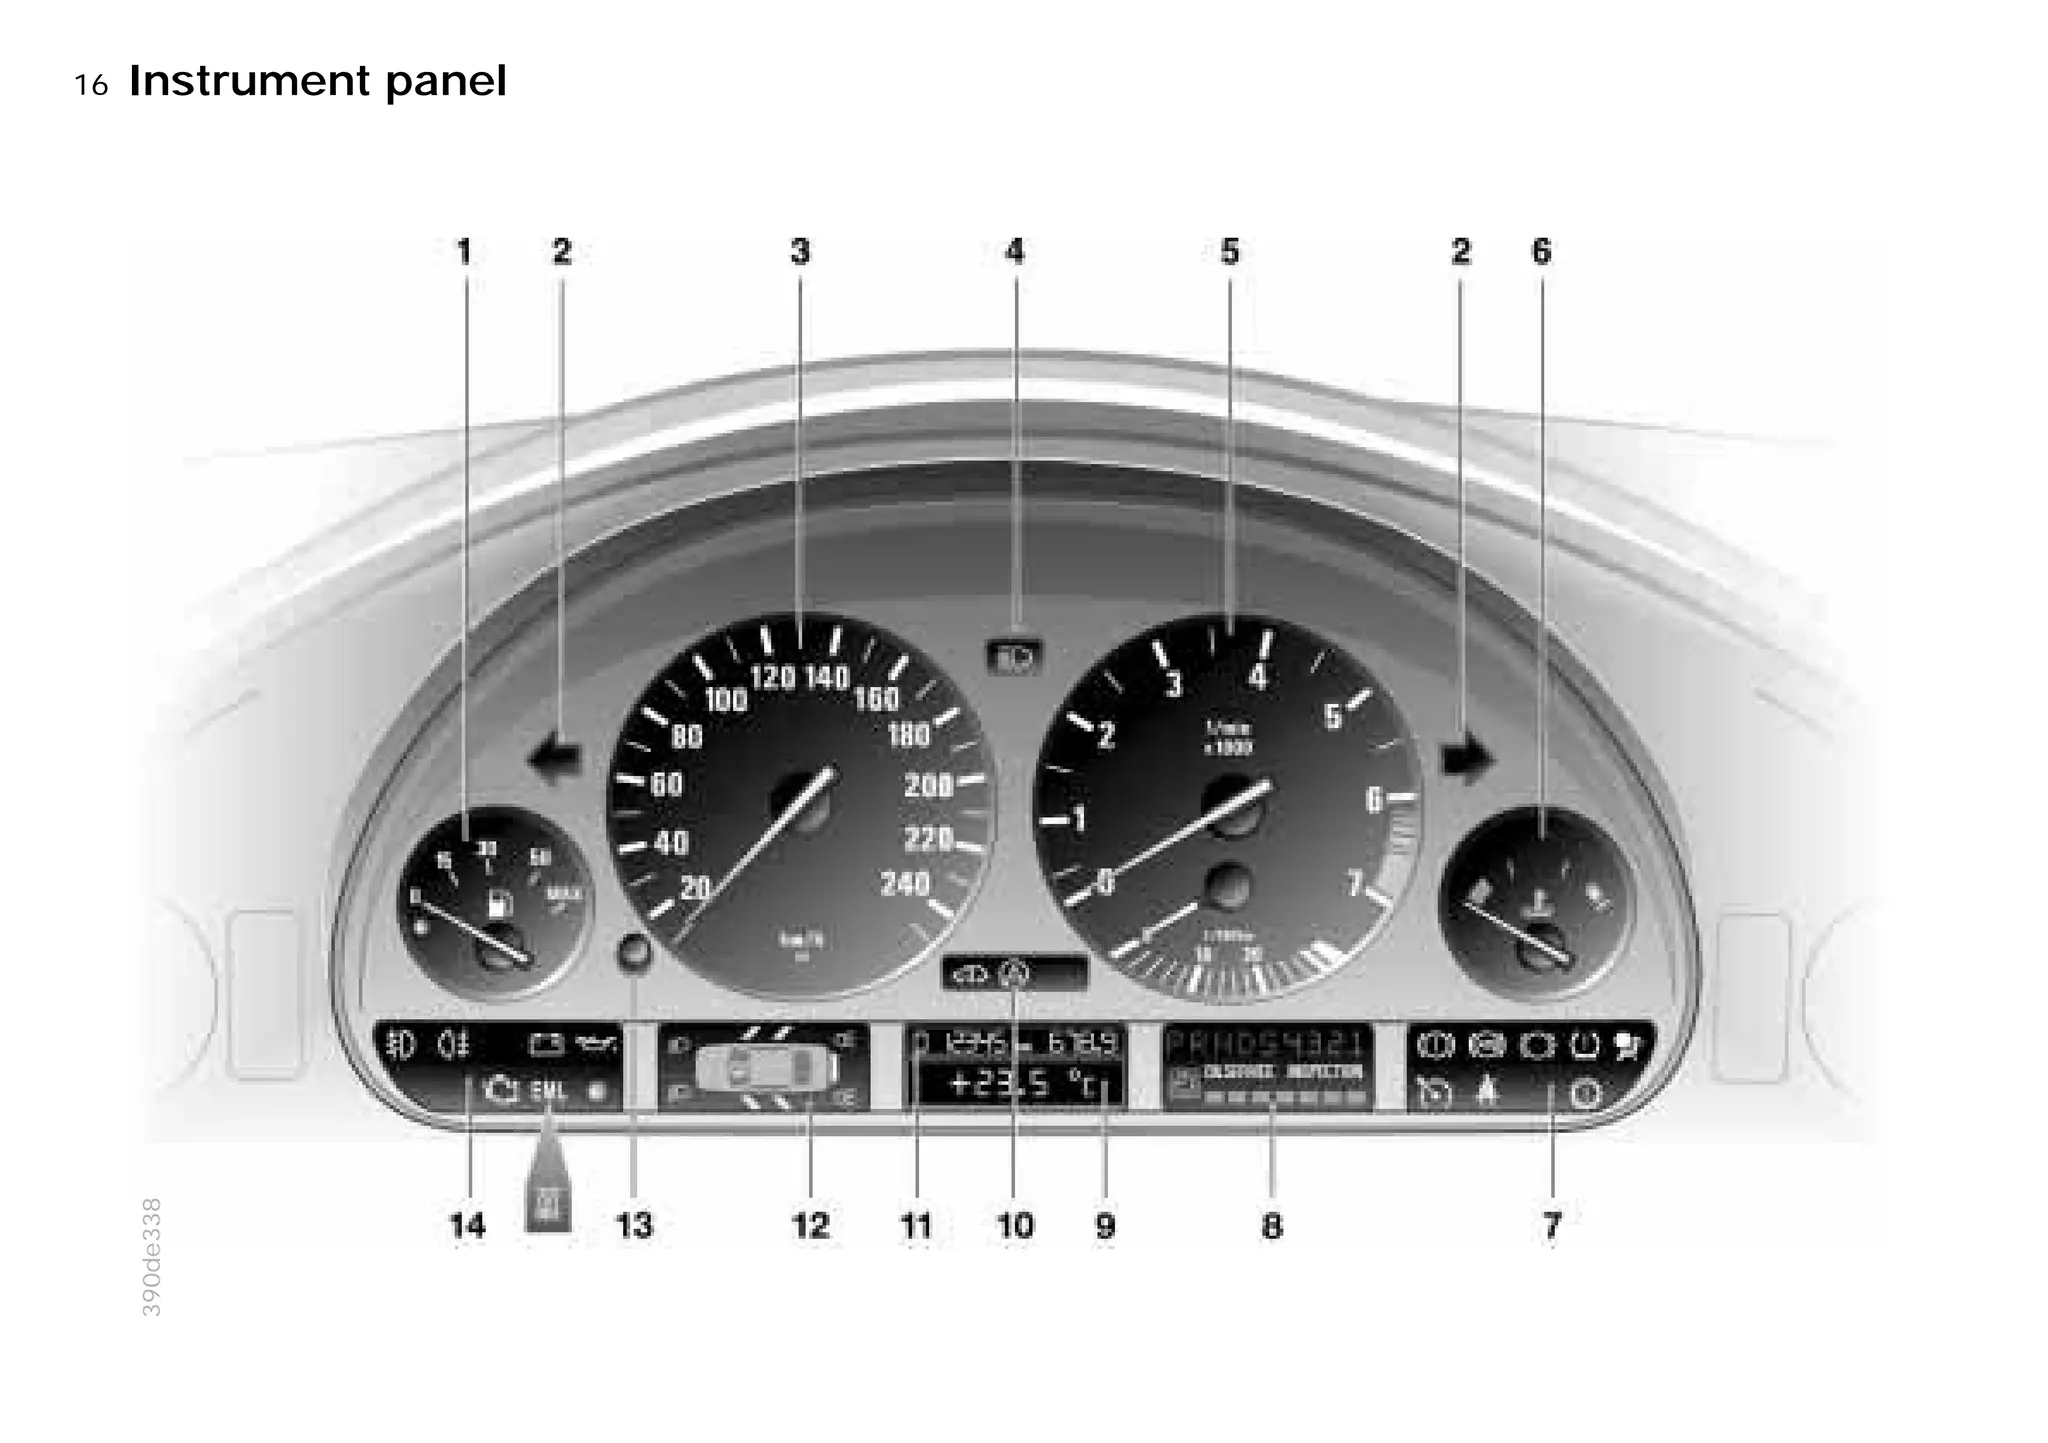
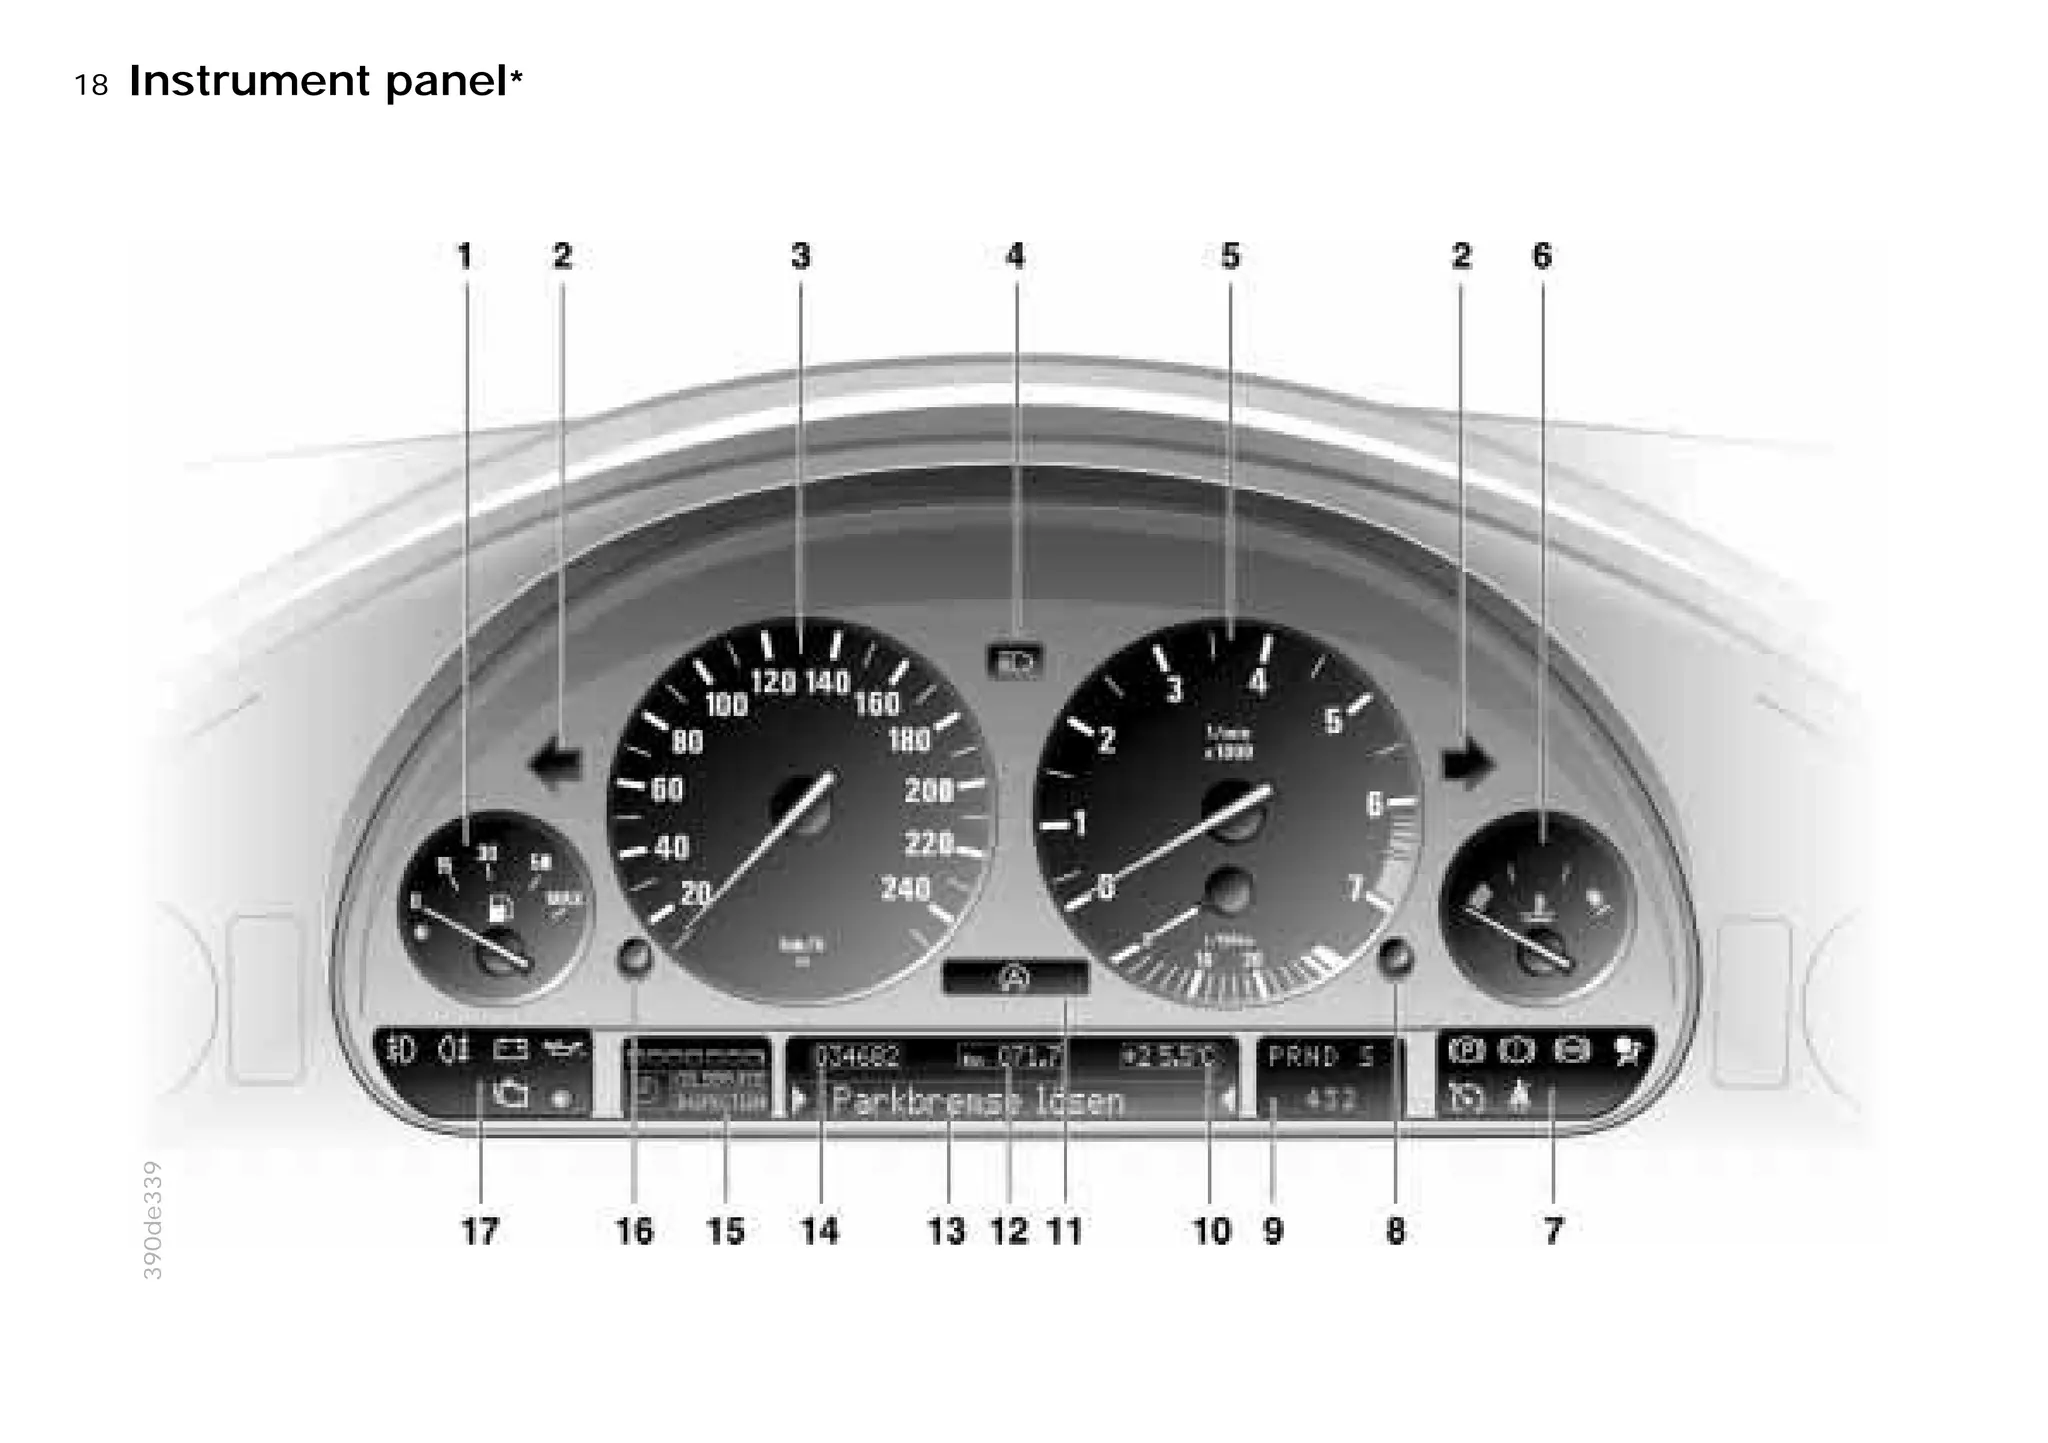
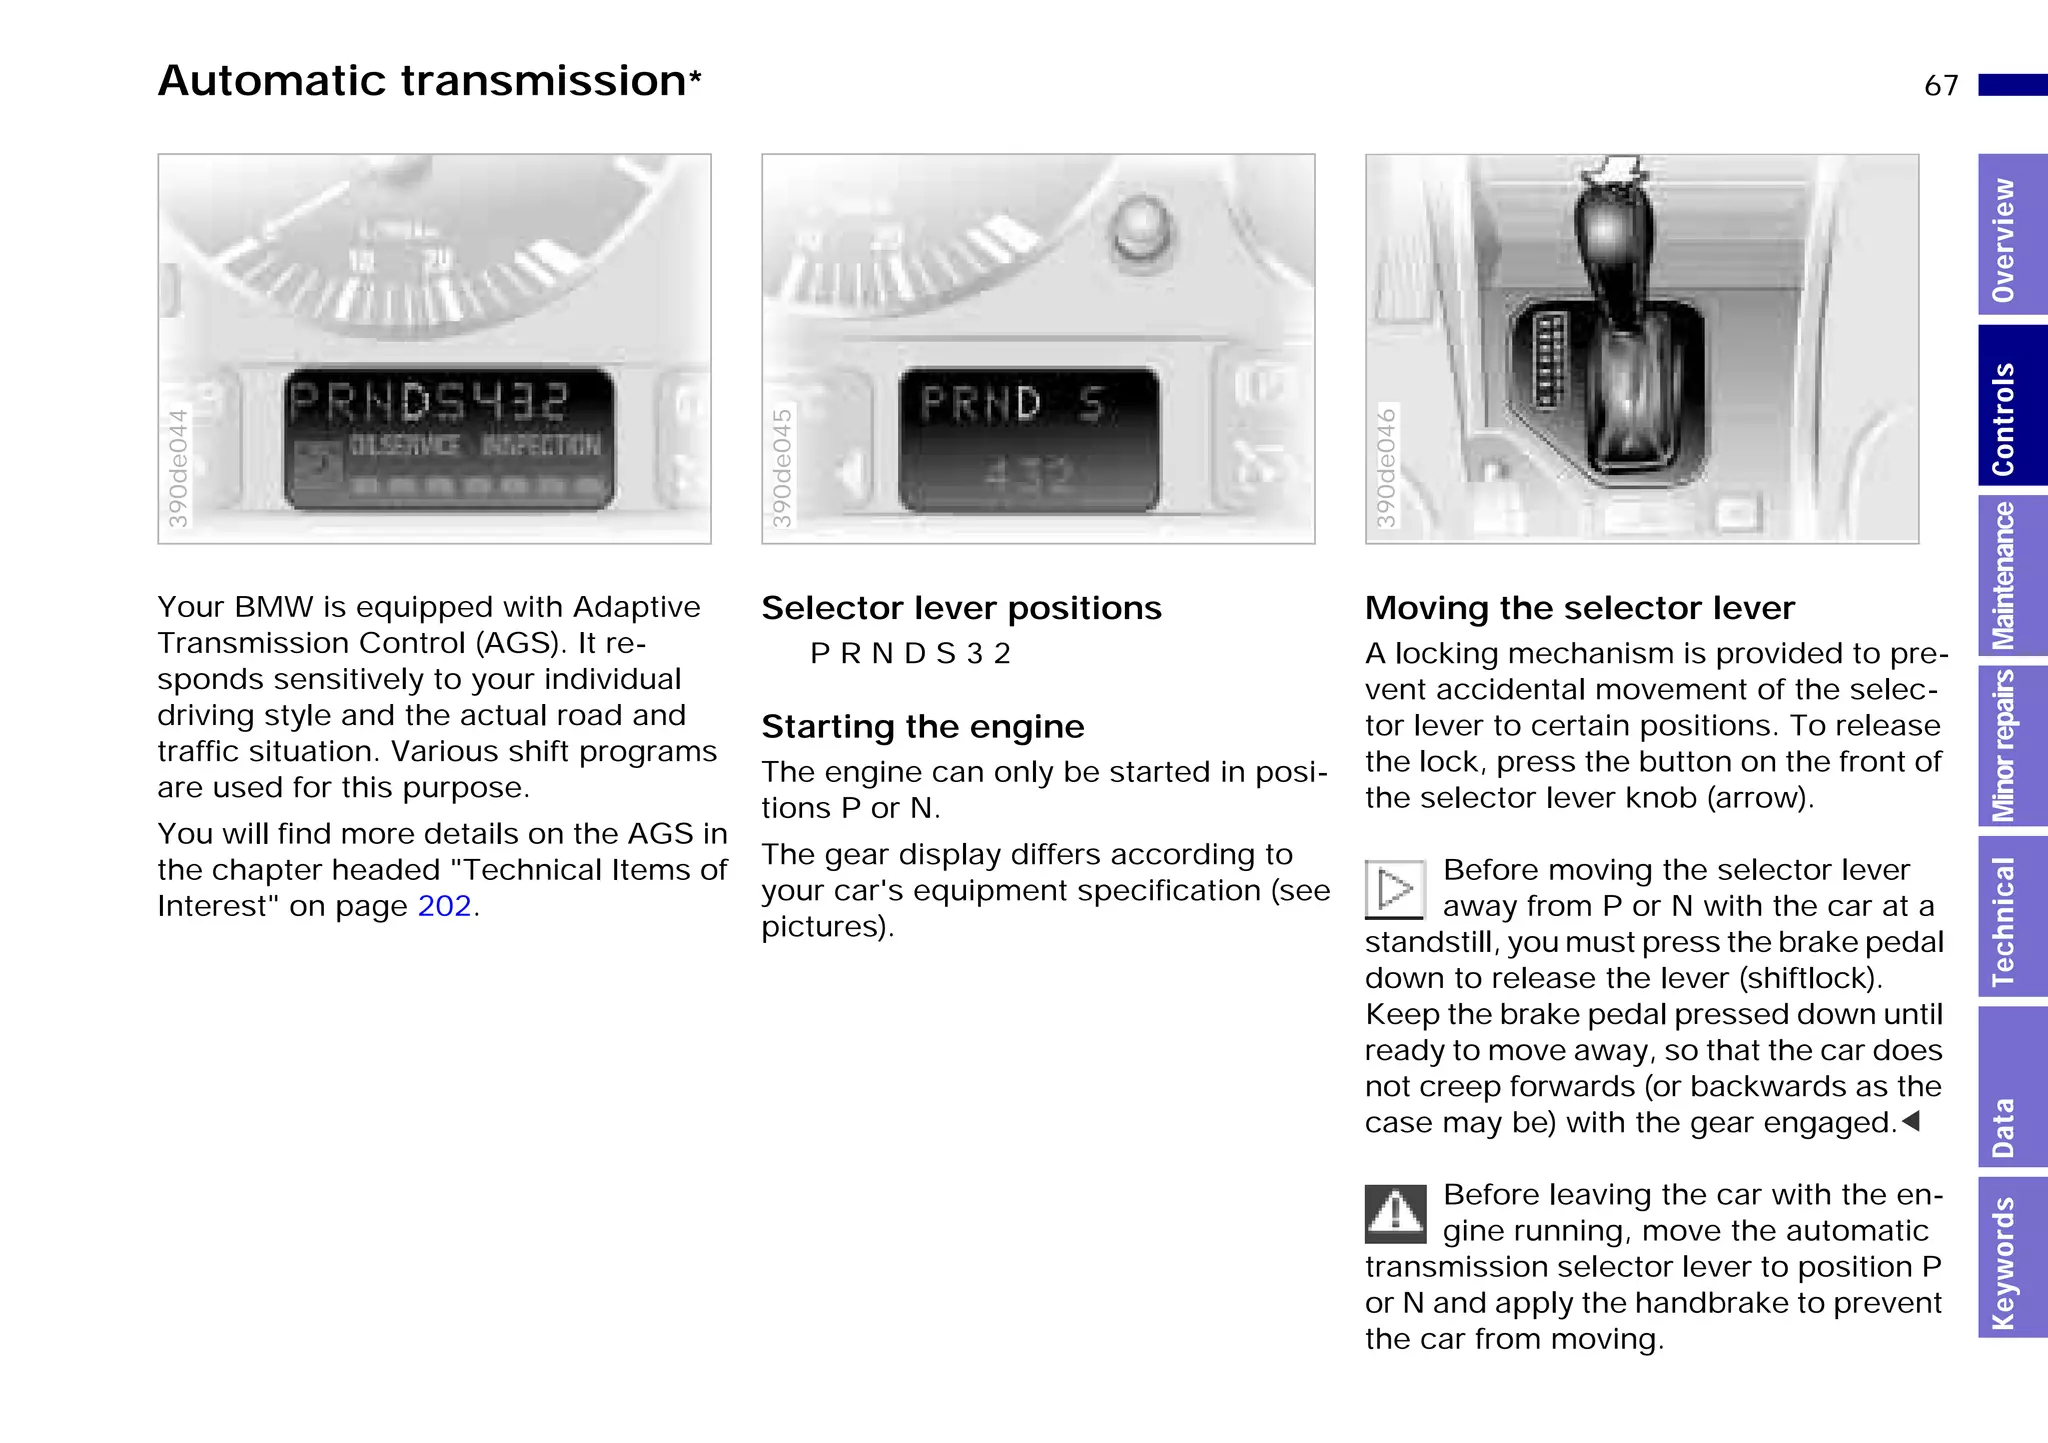
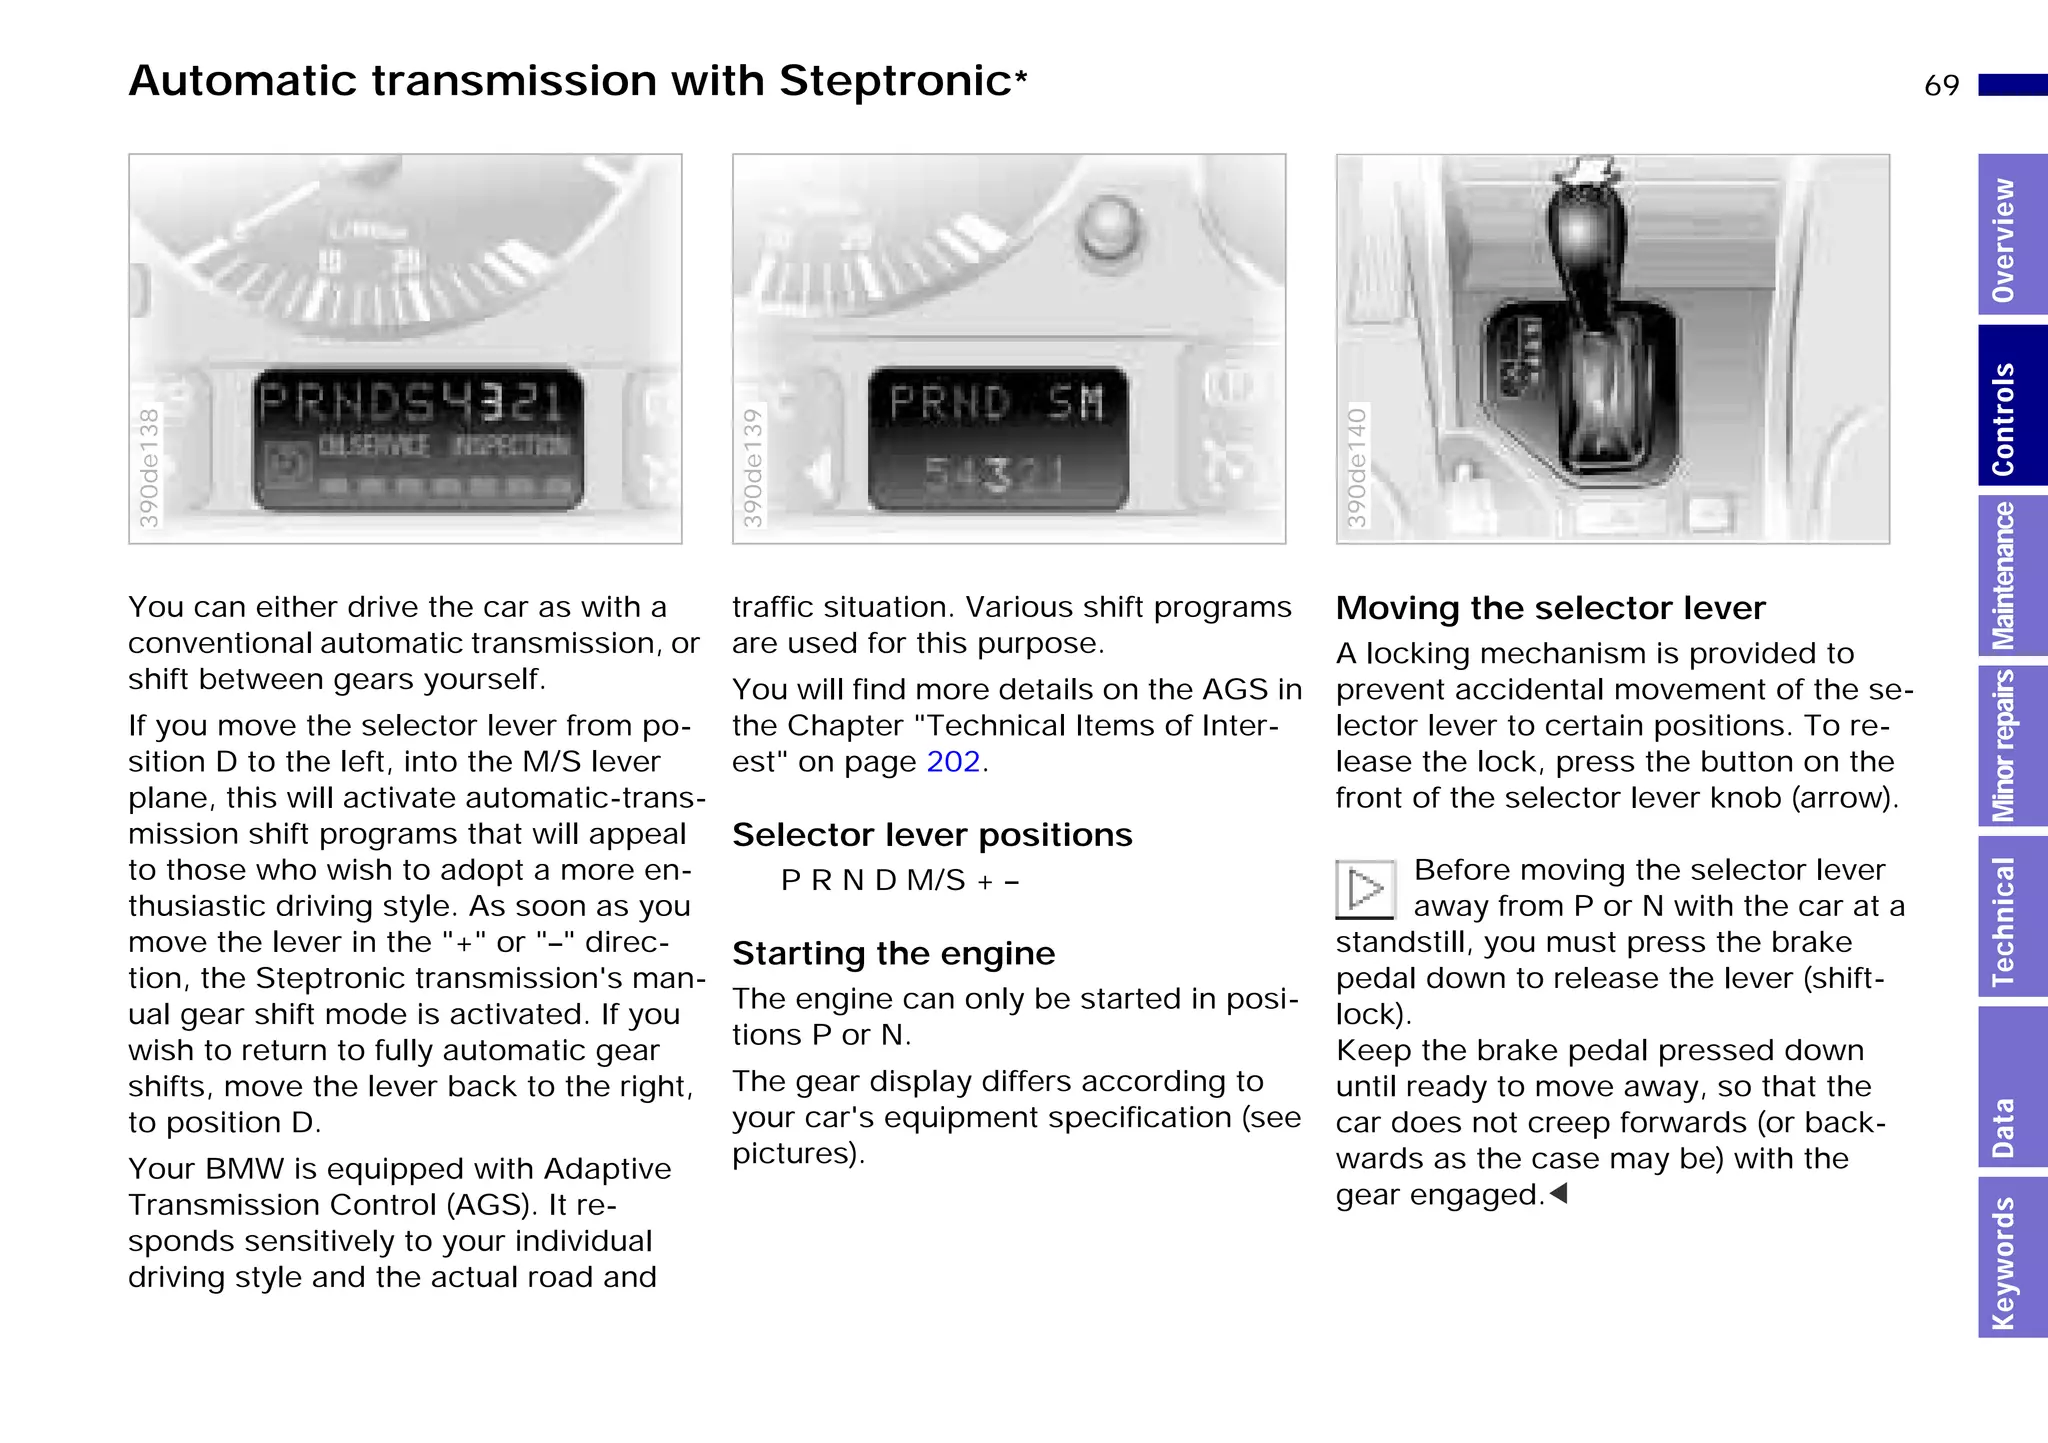
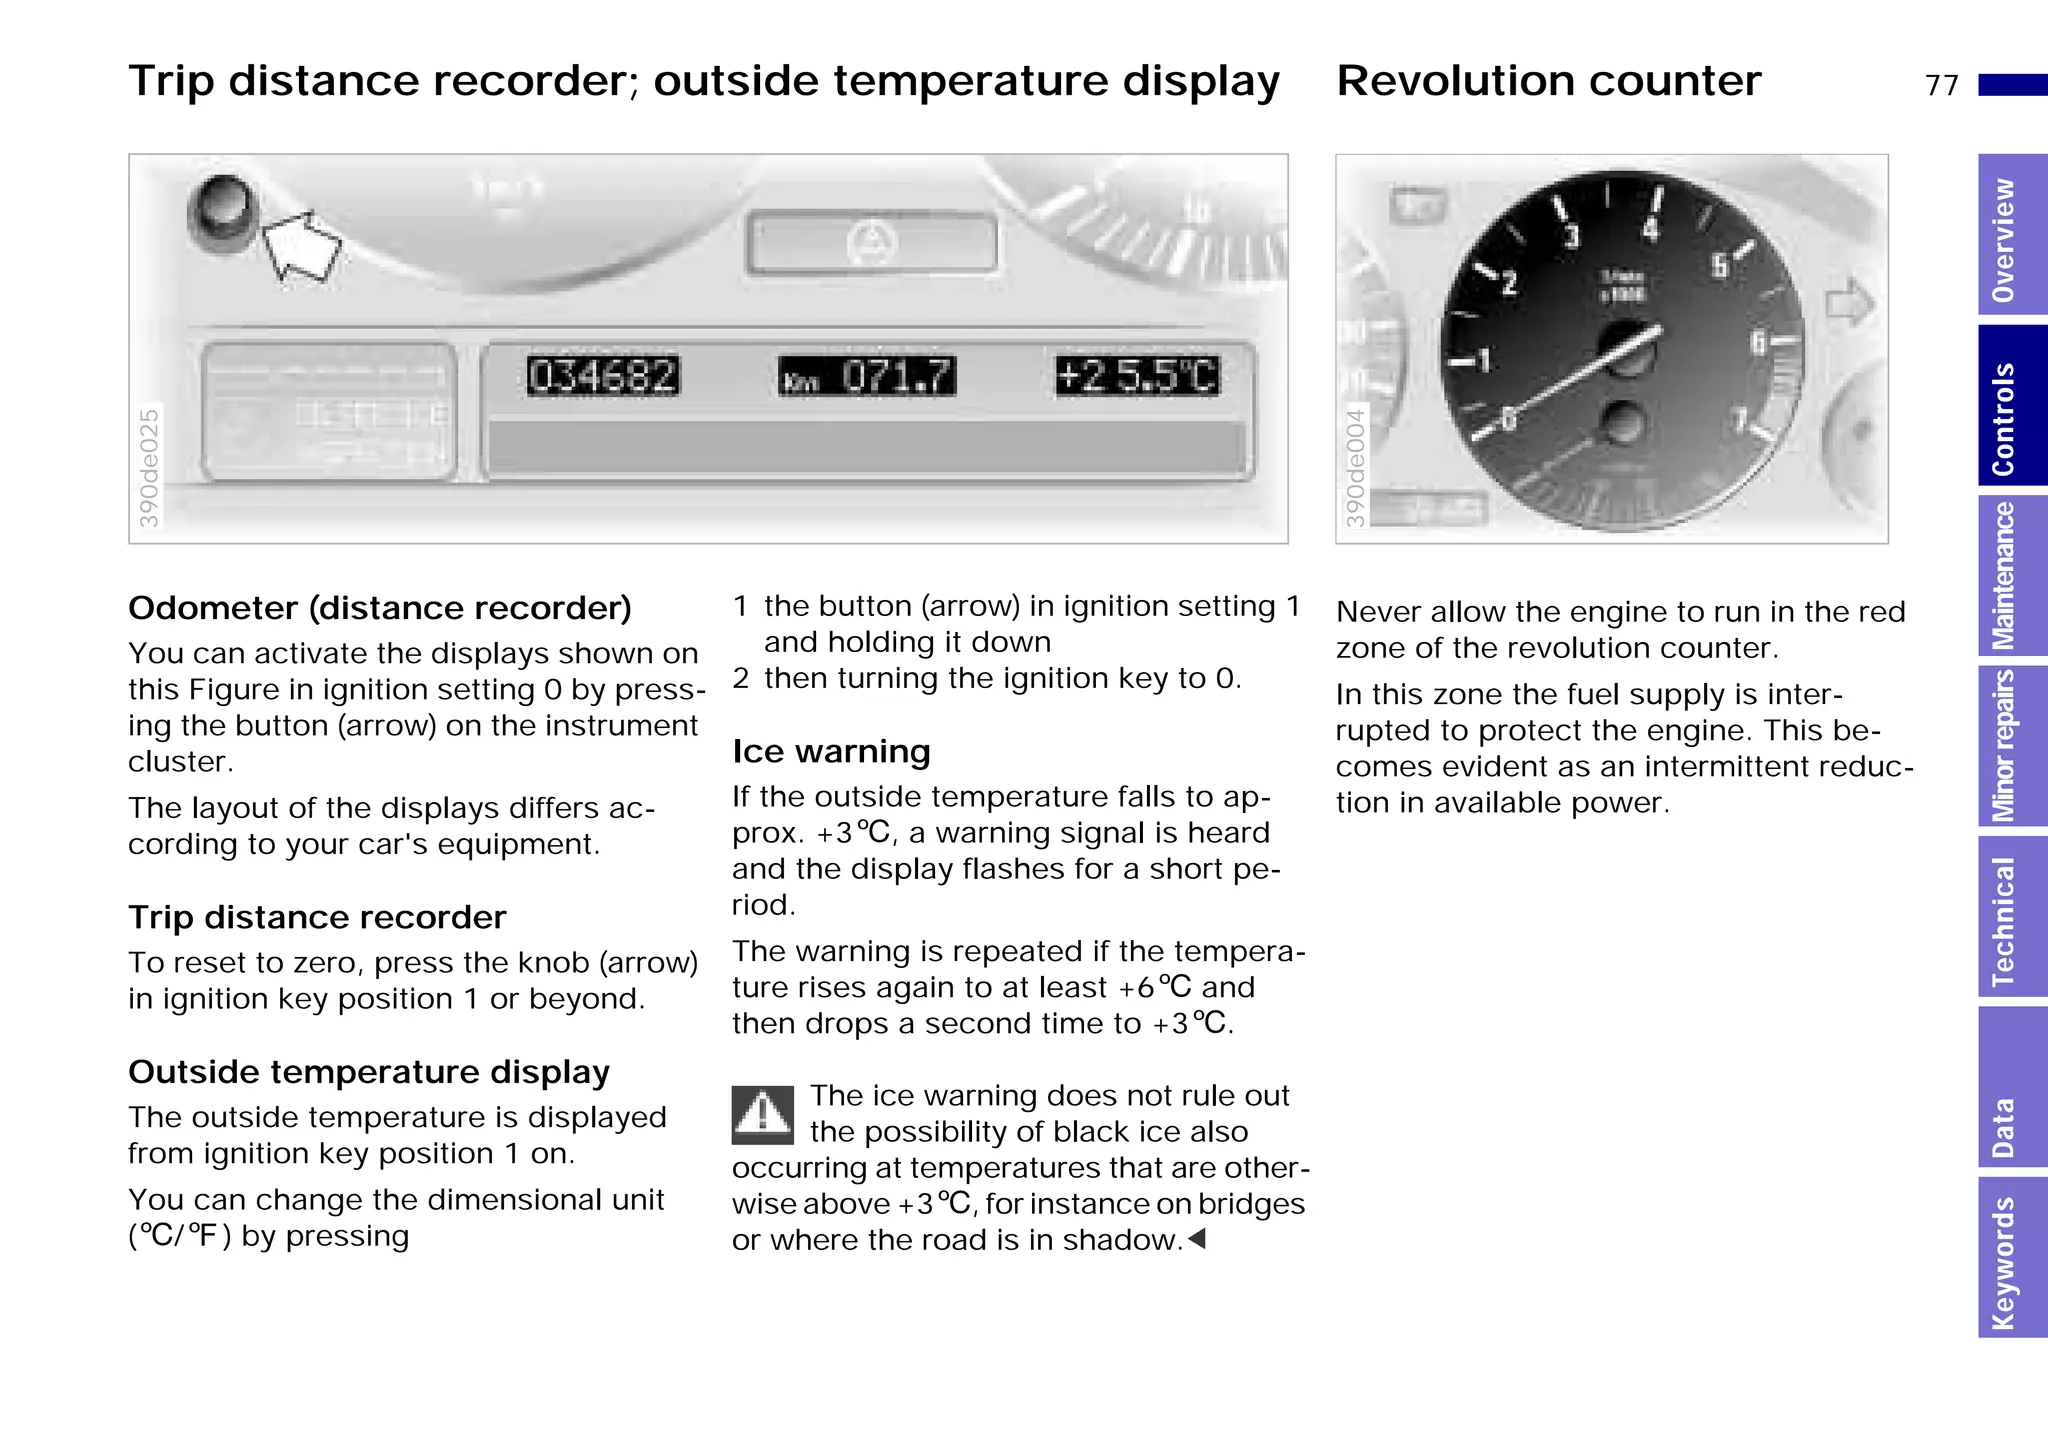
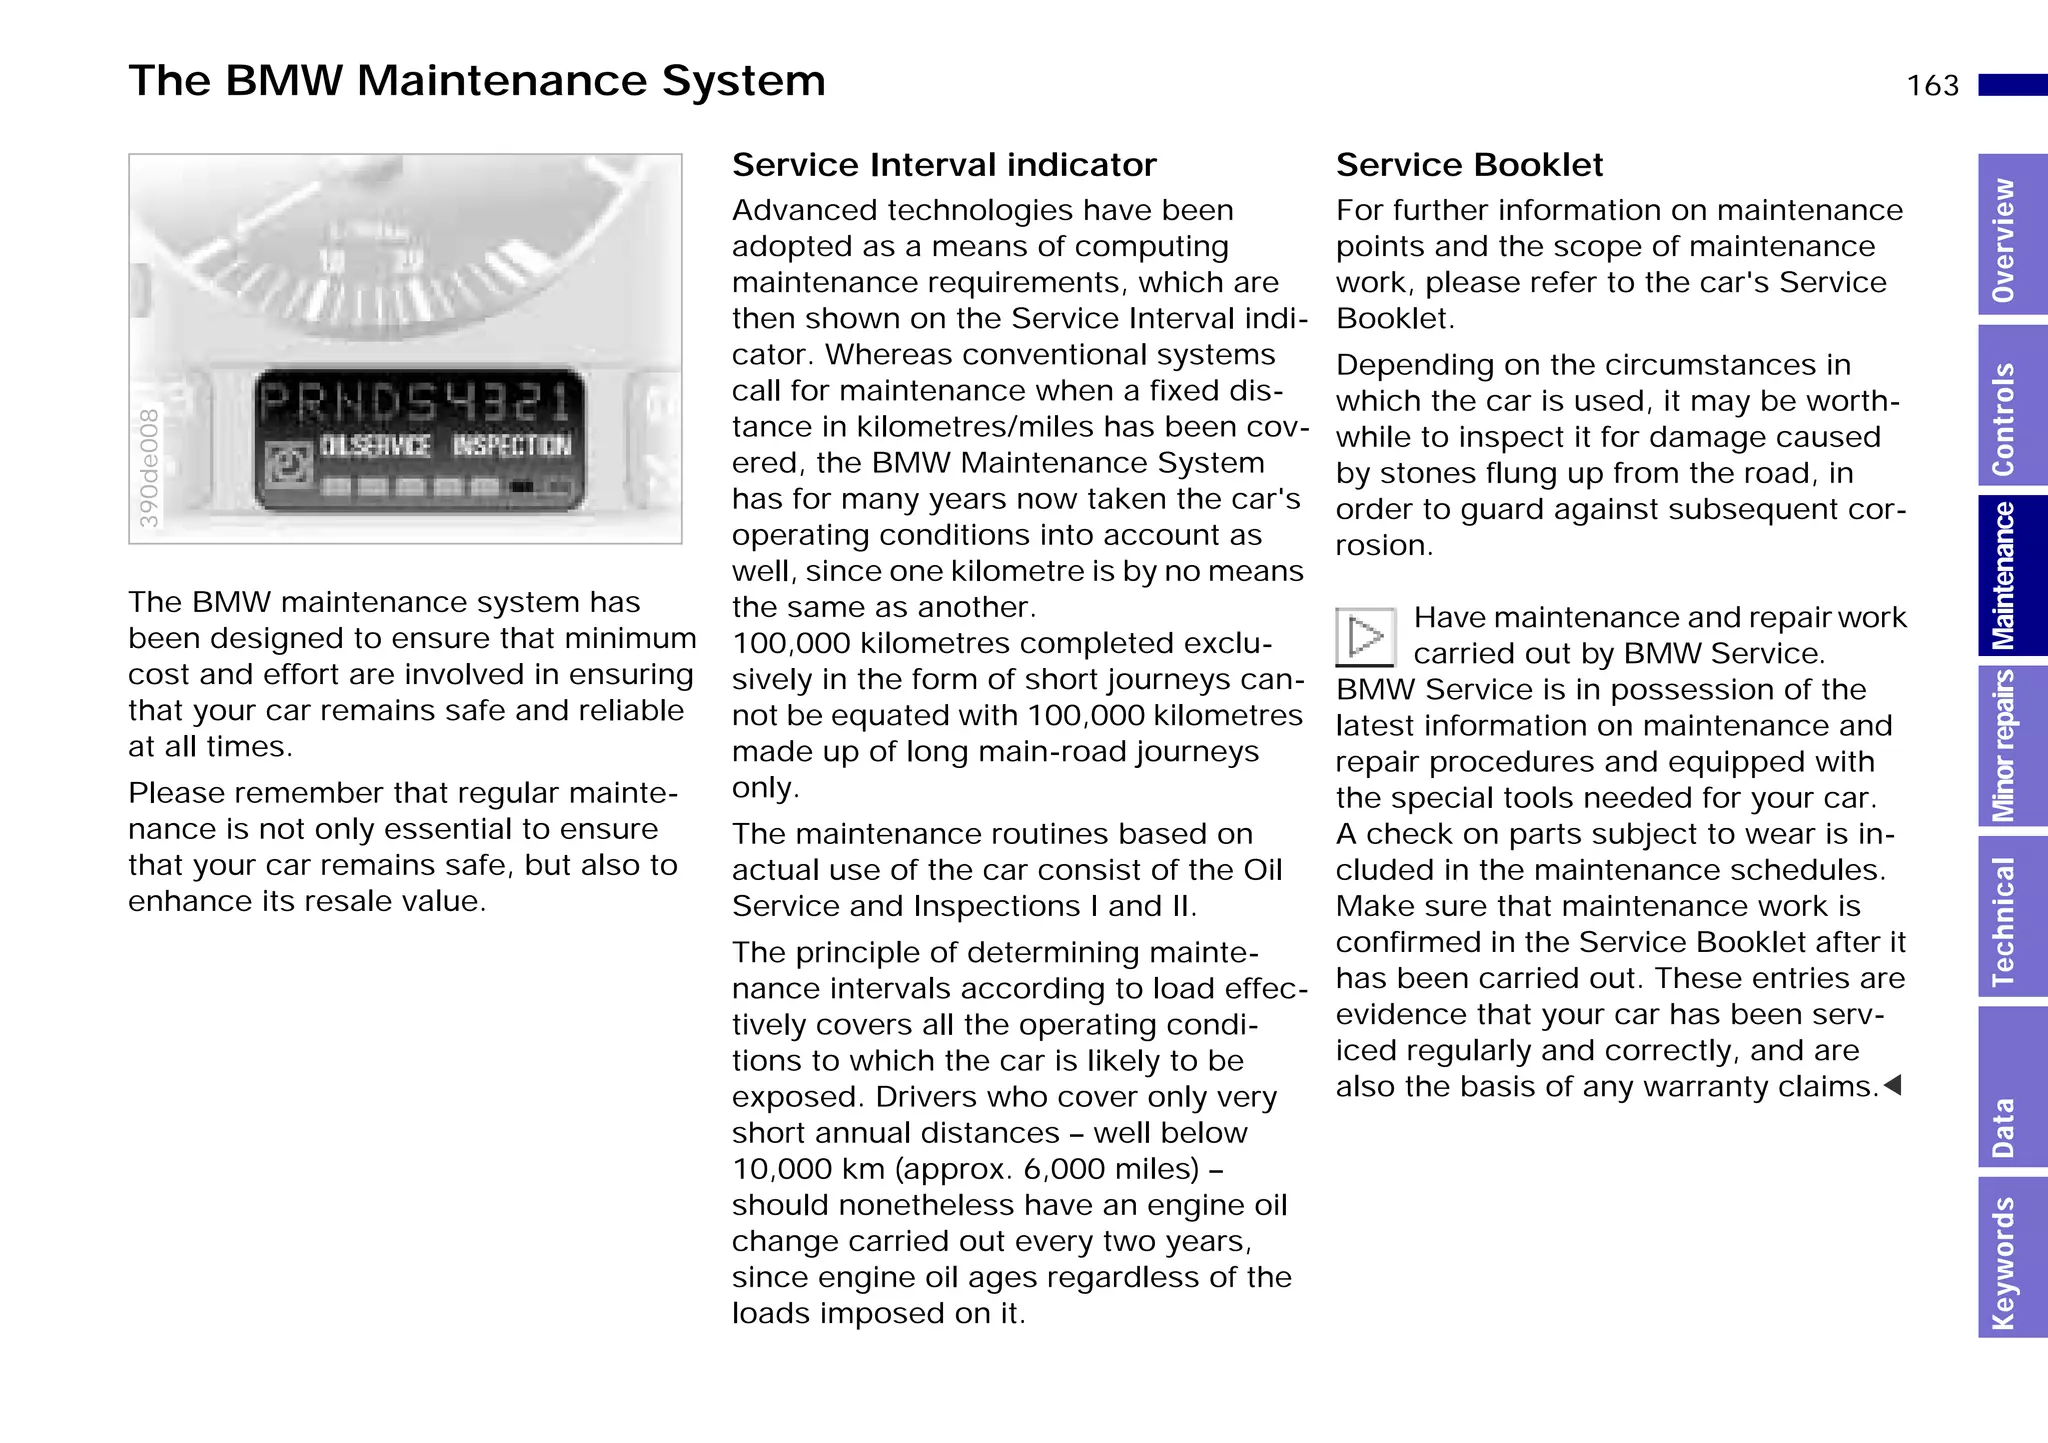
Owner's Handbook for the vehicle.
With quick reference guide.
Contents
A-Z
Online Edition for Part-No. 01 41 9 791 301 - © 01/99 BMW AG
Saloon
touring
520i
523i
528i
535i
540i
525td
525tds
530d
Online Edition for Part-No. 01 41 9 791 301 - © 01/99 BMW AG
Congratulations on your choice of a BMW.
The better you are acquainted with your car, the easier you will discover driving it to
be. We would therefore like to offer you the following advice.
This Owner's Handbook contains important information on operating and looking
after your BMW. Please read it carefully before setting out in your new car, so that
you are fully familiar with the technical advantages of your BMW. It also contains
useful information on care and maintenance, to uphold both the car's operating
safety and its full resale value.
We wish you an enjoyable driving experience.
BMW AG
Online Edition for Part-No. 01 41 9 791 301 - © 01/99 BMW AG
© 1998 BMW AG
Munich, Germany
Not to be reproduced wholly or in part without
written permission from BMW AG, Munich.
Order No. 01 41 9 791 301
English VIII/98
Printed in Germany
Printed on environmentally friendly paper
(bleached without chlorine, suitable for recycling).
4n
Notes on this Owner's Handbook
We have tried to make all the informa-
tion in this Owner's Handbook easy to
find. The quickest access to a particular
topic or item is by consulting the de-
tailed alphabetical index at the end.
Consult the first chapter for an initial
overview of your car. The detailed list of
contents immediately following the list
of main headings is intended to arouse
your curiosity about your new BMW and
encourage you to read this information
carefully.
When the time comes to sell your BMW,
please remember to hand over this
Owner's Handbook; it is regarded le-
gally as part of the vehicle.
If you have any queries, BMW Service
will be glad to advise you.
Symbols used
indicates instructions or precau-
tions which you should definitely
read for your safety and that of others,
and to prevent damage to the car.<
is used to identify details of spe-
cial features.<
refers to recycling methods or
procedures.<
< indicates the end of a particular in-
struction or description.
* identifies special equipment or items
to a particular national-market specifi-
cation, and also accessories.
indicates vehicle components
where it is advisable to consult
this Owner's Handbook.
draws your attention to functions
which BMW Service can adjust to
suit your own personal preferences
("Car Memory", "Key Memory"). See
page 57.<
Your own car
When you ordered your BMW, you
chose various items of equipment. This
handbook describes all models and
equipment specifications which BMW
offers within this particular model line.
This explains why the handbook may
also contain details of items which you
have not ordered. The differences can
easily be identified by the asterisk *
shown against optional extras.
If your BMW contains equipment that is
not described in this Owner's Hand-
book (e.g. a car radio or telephone),
supplementary operating instructions
will be supplied and you are requested
to study and comply with them.
Online Edition for Part-No. 01 41 9 791 301 - © 01/99 BMW AG
5n
Print status
Fuel consumption data are as deter-
mined at the time of closing for print. All
dimensional, weight and performance
figures in the Owner's Handbook refer
to the the German Standards Institute
(DIN e.V.) and comply with these toler-
ances. Deviations may occur with
respect to certain national-market ver-
sions of the cars. In cars with right-
hand drive, some controls will be lo-
cated differently from those illustrated
in this handbook.
The high safety and quality standards of
BMW vehicles are maintained by un-
ceasing development work on designs,
equipment and accessories. Because
of this, your car may differ from the in-
formation supplied in the Owner's
Handbook. Nor can errors and omis-
sions be entirely ruled out. You are
therefore asked to appreciate that no
legal claims can be entertained on the
basis of the data, illustrations or de-
scriptions in this handbook.
For your own safety
Use only parts and accessory
products which BMW has ap-
proved for your car.
Parts and products which BMW has ap-
proved for your car have been checked
for safety, function and suitability. BMW
accepts product liability for them.
BMW cannot accept liability for parts or
accessory products of any kind which it
has not approved.
BMW is unable to assess each individ-
ual product of outside origin as to its
suitability for use on BMW vehicles
without safety risk. Nor can suitability
be assured, for example, even if an offi-
cial inspection authority (such as the
German TÜV) has approved the product
or it has been granted a General Oper-
ating Permit. These tests cannot always
take into account the full range of oper-
ating conditions applicable to BMW ve-
hicles and may therefore be inade-
quate.
In short, the functional efficiency or
road safety of your BMW, and also its
value, may be affected if its specifica-
tion is altered by installing parts not ap-
proved for it. Original BMW parts and
accessories, other BMW-approved
products and competent advice on all
related matters are obtainable from
BMW Service.<
Online Edition for Part-No. 01 41 9 791 301 - © 01/99 BMW AG
6n
Online Edition for Part-No. 01 41 9 791 301 - © 01/99 BMW AG
Initial overview
Controls in detail
Operation, maintenance
and general care
Minor repairs
Technical data
Index
Technical items of interest
7n
MinorrepairsKeywordsOverviewControlsMaintenanceTechnicalData
Online Edition for Part-No. 01 41 9 791 301 - © 01/99 BMW AG
Contents
Initialoverview
Controlsindetail
Driving area 14
Instrument panel 16
Telltale and warning lamps 20
Multifunctional steering
wheel 23
Hazard warning flashers 24
Warning triangle 24
First aid box 24
Refuelling 25
Fuel grades 25
Tyre pressures 27
Opening and closing:
Keys 34
Electronic immobilizer 35
Central locking system 36
Doors – from outside 36
Radio remote control 37
Doors – from inside 39
Luggage comparement lid 40
Rear window 41
Luggage compartment 43
Alarm system 44
Electric windows 46
Sliding/tilt sunroof 47
Adjusting:
Seats 49
Steering wheel 52
Mirrors 53
Seat, mirror and steering wheel
position memory 55
Car Memory, Key Memory 57
Safety systems:
Seat belts 58
Airbags 59
Child restraint systems 61
Childproof door locks 62
Driving:
Ignition switch 63
Starting the engine 63
Stopping the engine 65
Handbrake 65
Manual gearbox 66
Automatic transmission 67
Automatic transmission with
Steptronic 69
Turn indicators/headlamp
flasher 72
Wipers/rain sensor 72
Heated rear window 75
Cruise control 75
Everything under control:
Trip distance recorder; outside
temperature display 77
Revolution counter 77
Energy Control 78
Fuel level indicator 78
Coolant thermometer 79
Service Interval indicator 79
Check Control 80
On-board computer 83
Technical features for journey
comfort and safety:
Park Distance Control (PDC) 85
Automatic Stability Control plus
Traction (ASC+T)/Dynamic
Stability Control (DSC) 86
Electronic Damping Control
(EDC) 87
Tyre Pressure Control (RDC) 88
Online Edition for Part-No. 01 41 9 791 301 - © 01/99 BMW AG
9n
Controlsindetail
Operation,maintenanceandgeneralcare
Lights:
Sidelights/low-beam
headlamps 90
Instrument lighting 90
Headlamp range control 91
High-beam headlamps/parking
lights 91
Fog lamps 92
Interior light/load-area light 92
Reading lights 93
Controlled-temperature air for a
pleasant interior climate:
Air conditioning 95
Automatic air conditioning 100
Seat heating 106
Heated steering wheel 106
Roller sun blind 106
Auxiliary heater 107
Auxiliary ventilation control 107
Auxiliary heater remote
control 108
Practical interior equipment:
Glove box 109
Storage compartments 109
Drink can holders 110
Ashtrays 111
Cigarette lighter 111
Loading and load-carrying:
Through-loading system 113
Ski bag 114
touring:
Luggage compartment 117
Roller-blind cover 117
Net in front of load area 117
Compartments in luggage
area 118
Removable floor in luggage
area 120
Load 121
Roof rack 122
Towing a trailer 123
Driving precautions:
Running in 128
Driving hints 128
Catalytic converter 129
Anti-lock brake system
(ABS) 130
Disc brakes 131
Brakes 132
Winter operation 133
Power steering 135
Self-levelling suspension 135
Digital Diesel Electronics
(DDE) 136
Car telephone 136
Radio reception 136
Wheels and tyres:
Tyre pressures 137
Condition of tyres 137
New tyres 138
Changing wheels 138
Wheel and tyre
combinations 139
Winter tyres 140
Snow chains 140
Approved wheel and tyre
sizes 141
Online Edition for Part-No. 01 41 9 791 301 - © 01/99 BMW AG
Contents
Operation,maintenanceandgeneralcare
Minorrepairs
Technicalitemsofinterest
In the engine compartment:
Engine hood 147
Engine compartment 148
Washer fluid 156
Washer jets 156
Engine oil 157
Coolant 160
Brake fluid 161
Power steering oil 162
Vehicle identification
number 162
Type plate 162
Maintenance and general care:
The BMW maintenance
system 163
Care of the car 164
Airbags 170
Laying up out of use 170
Legal requirements and
regulations:
Rule of the road 171
Registration abroad 171
Technical modifications 172
OBD socket 172
Recycling:
Recycling in the Service
area 173
Returning the car 173
Replacing parts:
Toolkit 176
Wiper blades 176
Lights and bulbs 177
Radio remote control 183
Auxiliary heater remote
control 185
Wheel-changing 186
Lockable wheel studs 189
Battery 190
Fuses 192
If an electrical fault occurs:
Fuel filler flap 194
Sliding/tilt sunroof 194
touring: tailgate 195
Mutual aid:
BMW Emergency Service 196
Starting with a flat battery 196
Tow-starting, towing away 197
Fire extinguisher 199
Adaptive transmission control
(AGS) 202
Airbags 203
Automatic Stability Control plus
Traction (ASC+T)/Dynamic Sta-
bility Control (DSC) 203
Car radio 204
Seat belt catch tensioner 204
Hi-fi system (DSP) 205
Interior mirror, automatic-
dip 205
Integral-link rear
suspension 206
Latent heat store 206
Self-levelling suspension 207
Rain sensor 207
Tyre pressure control (RDC) 208
Xenon headlamps 208
Water- and dirt-repellent
windscreen 209
Online Edition for Part-No. 01 41 9 791 301 - © 01/99 BMW AG
11n
Technicaldata
Index
Engine data 212
Fuel consumption, carbon diox-
ide/O emissions 213
Dimensions 215
Weights 217
Performance 221
Filling capacities 223
Electrical system 224
V-belts 224
From A to Z 228
Minor repairs from A to Z 234
Online Edition for Part-No. 01 41 9 791 301 - © 01/99 BMW AG
12n
Online Edition for Part-No. 01 41 9 791 301 - © 01/99 BMW AG
Initial overview
Controls in detail
Operation, maintenance
and general care
Minor repairs
Technical data
Index
Technical items of interest
13n
MinorrepairsKeywordsOverviewControlsMaintenanceTechnicalData
Driving area 14
Instrument panel 16
Telltale and warning lights 20
Multi-functional steering wheel
(MFL) 23
Hazard warning flashers 24
Warning triangle 24
First aid kit 24
Refuelling 25
Fuel grade 25
Tyre pressures 27
Online Edition for Part-No. 01 41 9 791 301 - © 01/99 BMW AG
14n
390de001
Driving area
Online Edition for Part-No. 01 41 9 791 301 - © 01/99 BMW AG
15n
MinorrepairsKeywordsOverviewControlsMaintenanceTechnicalData
1 Sidelights/low beam (dipped)
headlamps 90
2 d Flashing turn indicators 72
> Parking lights 91
> High-beam headlamps 91
> Headlight flasher 72
> Computer 83
3 Fog lights 92
4 Wipers/washer 72
5 Central locking system 36
6 Hazard warning flashers 24
7 Heated rear window 75
8 Horn, entire surface
9 Electric steering wheel
adjustment* 53
Driving area
Online Edition for Part-No. 01 41 9 791 301 - © 01/99 BMW AG
16nInstrument panel
390de338
Online Edition for Part-No. 01 41 9 791 301 - © 01/99 BMW AG
17n
MinorrepairsKeywordsOverviewControlsMaintenanceTechnicalData
Instrument panel
There are two versions, depending on
your car's equipment
1 Fuel display with telltale to indicate
when fuel is running out 78
2 Flashing turn indicator repeater 22
3 Speedometer
4 High beam telltale 22
5 Revolution counter and Energy
Control 77, 78
6 Engine coolant thermometer with
telltale "Coolant temperature too
high" 79
7 Telltale and warning lights (arranged
clockwise) for
> Handbrake/brake hydraulics, Dy-
namic Brake Control (DBC)* 22
> Anti-lock brake system (ABS) 21
> Brake pads 21
> Tyre pressure control (RDC)* 22
> Airbags 21
> Automatic transmission* 21
> Fasten seat belts 21
> Cruise control* 22
8 Selector lever position and pro-
gram displays for automatic
transmission* 67
Service Interval indicator 79
9 Computer display –
For operation from turn indicator
lever, see page 83:
> Outside temperature
> Average fuel consumption,
> Before refuelling
> Average speed
10 Telltale/warning lights for
> Automatic Stability Control plus
Traction (ASC+T)/Dynamic Stabil-
ity Control (DSC)* 21
> Self-levelling suspension* 22
11 Distance recorder (odometer) and
trip distance recorder 77
12 Display for Check Control 80
13 Trip distance control zeroing 77
14 Telltale and warning lights (arranged
clockwise) for
> Fog lights* 22
> Rear fog lights* 22
> Battery charge 20
> Engine oil level/pressure 20
> Electronic engine output control
(EML) 22
> Diesel engine preheat/Digital
Diesel Electronics (DDE)* 22
> Engine management 22
You can also have outside tem-
perature and the distance covered
displayed in another unit of measure-
ment.<
Online Edition for Part-No. 01 41 9 791 301 - © 01/99 BMW AG
18nInstrument panel*
390de339
Online Edition for Part-No. 01 41 9 791 301 - © 01/99 BMW AG
19n
MinorrepairsKeywordsOverviewControlsMaintenanceTechnicalData
Instrument panel*
There are two versions, depending on
your car's equipment
1 Fuel display with telltale to indicate
when fuel is running out 78
2 Flashing turn indicator repeater 22
3 Speedometer
4 High beam telltale 22
5 Revolution counter and Energy
Control 77
6 Coolant thermometer 79
7 Telltale and warning lights (arranged
clockwise) for
> Handbrake 21
> Brake hydraulics/Dynamic Brake
Control (DBC)* 22
> Anti-lock brake system (ABS) 21
> Airbags 21
> Fasten seat belts 21
> Cruise control* 22
8 Check Control button 79
9 Selector lever position and pro-
gram displays for automatic
transmission* 67, 69
10 Otside temperature display 77
11 Telltale for Automatic Stability Con-
trol plus Traction (ASC+T)/Dynamic
Stability Control (DSC)* 21
12 Trip distance recorder 77
13 Display for
> Check Control 80
> Computer: see radio operating
instructions
and on version with multi-func-
tional steering wheel (MFL), also
for
> Radio and telephone, see sepa-
rate operating instructions
14 Odometer (distance recorder) 77
15 Service Interval indicator 79
16 Trip distance control zeroing 77
17 Telltale and warning lights (arranged
clockwise) for
> Fog lights* 22
> Rear fog lights* 22
> Battery charge 20
> Engine oil pressure 20
> Engine management 22
You can also have the outside
temperature displayed in different
units of measurement or the Check
Control messages and computer infor-
mation displayed in a different lan-
guage.<
Online Edition for Part-No. 01 41 9 791 301 - © 01/99 BMW AG
20nTelltale and warning lights
Technical equipment that
monitors itself
Numerous systems on your BMW are
self-monitoring, both when starting and
during the journey. The function of tell-
tale and warning lights marked "q" is
checked when the ignition is switched
on. They come on once for varying peri-
ods.
If a defect occurs in one of the systems,
the corresponding light will remain on
when the engine is started or will come
on again during the journey. The correct
response on your part to this is de-
scribed below.
Red: stop as soon as possible
Battery charge q
The battery is not being
charged. The alternator V-belt is
defective or there is a fault in the alter-
nator charging circuit. Consult the near-
est BMW Service.
If the V-belt is defective, do not
continue the journey, as there is a
risk of the engine overheating and suf-
fering damage. A defective V-belt also
increases the effort needed to turn the
steering wheel.<
Engine oil pressure q
The message "STOP! ENGINE
OIL PRESS" may also appear in
the Check Control*: Stop immediately
and switch off the engine. Check
engine oil level and top up if necessary.
If the oil level is correct: Consult the
nearest BMW Service.
Do not continue the journey, as
the engine may otherwise be dam-
aged by inadequate lubrication.<
Tyre Pressure Control (RDC)* q
A gong signal is also heard: the
tyre is punctured or otherwise
damaged. Immediately reduce speed
and stop, avoiding violent braking and
sudden steering wheel movements.
Further details: page 88
Brake hydraulics q
If light remains on after releasing
handbrake: have the brake fluid
level checked. Before continuing on
your journey, read instructions on
pages 132 and 161.
Online Edition for Part-No. 01 41 9 791 301 - © 01/99 BMW AG
21n
MinorrepairsKeywordsOverviewControlsMaintenanceTechnicalData
Telltale and warning lights
Yellow: stop as soon as possible
Engine oil level*
If light comes on during journey:
stop immediately and switch off
the engine. The engine oil is at its abso-
lute minimum permitted level.
Do not continue the journey, as
the engine may otherwise be dam-
aged by inadequate lubrication.<
Red: important reminder
Handbrake* q
Lights up when handbrake is ap-
plied. Further details: page 65.
Handbrake* q
Lights up when handbrake is ap-
plied. Further details: page 65.
Also lights up when the message
"CHECK BRAKE LININGS" appears on
the Check Control.
Fasten seat beltsq
Depending on the version, a sig-
nal sounds at the same time* or
a message appears* in the Check Con-
trol display. Comes on for several sec-
onds or, depending on version, until the
seat belts are fastened. Further details:
page 58.
Airbags q
Please arrange for the problem
to be examined by BMW Serv-
ice. Further details: page 59, 203.
Yellow: have a check performed
soon
Anti-lock brake system (ABS) q
ABS is switched off because a
fault has developed. Normal
brake action is not affected (no restric-
tions). Please arrange for the problem
to be examined by BMW Service. Fur-
ther details: page 130.
Engine oil level*
If light comes on when engine is
switched off: check engine oil
level. Further details: page 157.
Automatic transmission* q
A fault has caused the auto-
matic transmission to switch to
the emergency-run program. Please
consult your nearest BMW Service.
Further details: page 68.
Brake pads* q
Check the condition of your
brake pads. Further details:
page 133.
Automatic Stability Control plus
Traction (ASC+T)/Dynamic
Stability Control (DSC)* q
ASC+T/DSC has been switched off by
pressing the control button, or due to a
fault. If there is a fault, please have it
checked by BMW Service. Further de-
tails: page 86.
Online Edition for Part-No. 01 41 9 791 301 - © 01/99 BMW AG
22nTelltale and warning lights
Dynamic Brake Control (DBC)* q
Malfunction in DBC system. Nor-
mal brake action is not affected
(no restrictions). Further details:
page 132.
Tyre Pressure Control (RDC)* q
To check tyre pressures, see
page 27, 88.
Self-levelling suspension* q
The self-levelling suspension is
out of action. Please consult
your nearest BMW Service. Further de-
tails: page 135.
Engine management system q
Engine control system malfunc-
tion. Please arrange for the
problem to be examined by BMW Serv-
ice.
Electronic engine output control
(EML)* q
EML malfunction. Higher pedal
pressure and longer pedal travel may
be needed when braking. Please ar-
range for the problem to be examined
by BMW Service.
Digital Diesel Electronics
(DDE)* q
If light comes on during journey:
please arrange for the problem to be
examined by BMW Service. Further de-
tails: page 136.
Yellow: for your information
Rear foglights*
Lights up when the rear fog
lights are switched on. Further
details: page 92.
Diesel engine preheat* q
Do not start the engine until the
light has gone out. Further de-
tails: page 63.
Green: for your information
Flashing turn indicators
Flashes rhythmically when a turn
is selected; also applies to
trailer if one is being towed. Rapid
flashing: system malfunction. Further
details: page 72.
Cruise control*
Comes on when the system is
switched on: Ready to operate
using the multi-function steering wheel.
Further details: page 75.
Fog lights*
Lights up when the foglights are
switched on. Further details:
page 92.
Blue: for your information
High-beam headlamps
Comes on when the high head-
lamp beams are in use or the
headlamp flasher is used. Further de-
tails: page 72, 91
Online Edition for Part-No. 01 41 9 791 301 - © 01/99 BMW AG
23n
MinorrepairsKeywordsOverviewControlsMaintenanceTechnicalData
Multifunctional steering wheel (MFL)*
Integrated into the multifunctional
steering wheel (MFL) are buttons to
permit the following functions to be per-
formed quickly and without the driver's
attention being distracted from the
traffic:
> Various radio functions
> Recirculated-air mode for air condi-
tioning or
> Heated steering wheel
> Cruise control
> Some telephone functions.
The systems in question must be
switched on before they can be
controlled from the multifunctional
steering wheel.<
The illustration shows a full set of con-
trols. For further details, please refer to
the description of the item concerned.
1 Telephone: accepting call, starting
dialling or terminating call. With
voice input*: switching on and off
2 Radio/telephone: change over
switch
3 Radio/telephone: search in reverse
or station keys (or browse in list of
names)
4 Radio/telephone: volume control
5 Radio/telephone: search forwards
or station keys (or browse in list of
names)
390de110
6 Horn, entire surface
7 Cruise control: recall
8 Cruise control: memorise and
accelerate (+), decelerate and
memorise (–)
9 Cruise control: activate/interrupt/
de-activate
10 Recirculated air and AUC or steer-
ing wheel heating: switching on and
off.
Online Edition for Part-No. 01 41 9 791 301 - © 01/99 BMW AG
24nHazard warning flashers Warning triangle* First aid box*
The pushbutton lights up in a regular
rhythm when the hazard warning flash-
ers are operating.
When the car's lights are in use, the
pushbutton is also lit so that it can be
located more easily after dark.
The turn signals have priority over
the hazard warning lights. For this
reason, from ignition key setting 1, you
are able to operate the turn signals,
even if the hazard warning lights are
switched on.<
390de039
The warning triangle is kept in the tool
holder in the luggage compartment lid
or tailgate, and easily reached when
needed.
To open the toolkit, unscrew the wing
bolt(s).
Please note that you may be re-
quired by law to carry a warning
triangle in the car.<
394de053
Under the front passenger's seat.
To remove: lift up the pushbutton catch
at the front (arrow) and pull the first aid
kit forwards out of its holder.
To replace in position: insert the first aid
kit in its holder and push to the rear until
the catch engages.
Certain of the items in the first aid
kit have a limited useful life. The
contents should therefore be checked
regularly and life-expired items re-
placed. Replacements can be obtained
from any pharmacy.
Comply with legal requirements con-
cerning the need to carry a first-aid box
in the car.<
390de086
Online Edition for Part-No. 01 41 9 791 301 - © 01/99 BMW AG
25n
MinorrepairsKeywordsOverviewControlsMaintenanceTechnicalData
Refuelling Fuel grade
Press front edge of fuel filler flap to
open.
To release the fuel filler flap if the cen-
tral locking system has failed, see
page 194.
When handling fuel, comply with
the safety regulations displayed
by garages and filling stations.<
394de011
Place the screw cap in the holder on
the flap.
When refuelling, insert the filler nozzle
fully into the filler neck. If the filler
nozzle is raised during refuelling,
> the supply of fuel will be cut off pre-
maturely
> and on filler nozzles with fuel vapour
recovery, the recirculating function
will be less effective.
394de120
Spark-ignition engine with
catalytic converter
The engine should be run exclusively on
unleaded fuel. Since the engines have a
knock control function, they can run on
different grades of fuel.
Your BMW's engine is rated to run on:
> Super Plus/premium plus fuel (octane
number 98, Research Method).
Fill up with petrol of this grade when-
ever possible, so that the nominal per-
formance and fuel consumption values
are achieved.
You can also run the engine on:
> Premium-grade unleaded fuel (oc-
tane number 95, Research Method).
This fuel is also known as:
DIN EN 228 or Euro-Super.
The minimum permissible grade is:
> Regular-grade unleaded fuel (octane
number 91, Research Method).
In view of the engine ratings, you are
recommended to use this fuel only in
exceptional circumstances.
Never use fuel containing lead if
the car is equipped with a catalytic
converter, otherwise the lambda probe
and the converter will be permanently
damaged.<
Online Edition for Part-No. 01 41 9 791 301 - © 01/99 BMW AG
26nFuel grade
Spark-ignition engines without
catalytic converter*
(the catalytic converter can be retro-
fitted)
The engine is designed to run on both
unleaded and leaded fuel. Since the
engines have a knock control function,
they can run on different grades of fuel.
Your BMW's engine is rated to run on:
> Super Plus/premium plus unleaded
fuel (octane number 98, Research
Method) or
> Super Plus/premium plus leaded fuel
(octane number 98, Research
Method). Super (premium) grade pet-
rol (gasoline) can be identified by its
conformity with German Industrial
Standard DIN 51 600.
Fill up with petrol of this grade when-
ever possible, so that the nominal per-
formance and fuel consumption values
are achieved.
You can also run the engine on:
> Premium-grade unleaded fuel (oc-
tane number 95, Research Method).
This fuel is also known as:
DIN EN 228 or Euro-Super.
The minimum permissible grade is:
> Regular-grade unleaded or leaded
fuel (octane number 91, Research
Method).
In view of the engine ratings, you are
recommended to use this fuel only in
exceptional circumstances.
Diesel engines
> Diesel oil to DIN EN 590 standard.
For winter-grade diesel oil, see
page 133.
Do not use rapeseed oil methyl
ester (RME) or Biodiesel, or you
risk damaging the engine.<
Online Edition for Part-No. 01 41 9 791 301 - © 01/99 BMW AG
27n
MinorrepairsKeywordsOverviewControlsMaintenanceTechnicalData
Tyre pressures
Tyre pressures are also shown on the
driver's door post (visible when the
door is open).
Checking tyre pressures
All pressure values in the table (see also
the following pages) are in bar (pounds
per square inch in brackets) and are
quoted for cold tyres (cold = no higher
than ambient temperature).
When towing a trailer, always use the
values for the higher load.
Cars with Tyre Pressure Control
(RDC)*:
After correcting tyre pressures, re-acti-
vate the system; see page 88.
390de351
Check tyre pressures regularly (at
least every two weeks and before
starting a long journey). Incorrect tyre
pressures can adversely affect the car's
roadholding and cause tyre damage,
which could result in an accident.
Remember to check the spare wheel
tyre pressure as well. It should be at the
highest pressure needed for any of your
car's tyres.<
Make sure that only approved
tyres are fitted
These tyre pressures apply to makes of
tyre approved by BMW and known to
BMW Service. If other makes of tyre are
fitted to the car, higher tyre pressures
may be needed. Approved tyre sizes
are shown on page 141 onwards.
Online Edition for Part-No. 01 41 9 791 301 - © 01/99 BMW AG
28nTyre pressures
BMW
saloon
Tyre size
525td
205/65 R 15 94 H
225/60 R 15 96 V
225/55 R 16 95 V
1.9
(27.0)
2.1
(29.8)
2.1
(29.8)
2.6
(37.0)
235/45 R 17 94 W/Y
255/40 R 17 94 W/Y
1.9
(27.0)
–
2.1
(29.8)
2.1
(29.8)
2.1
(29.8)
–
2.6
(37.0)
2.6
(37.0)
205/65 R 15 94 Q/T/H M+S
225/60 R 15 96 Q/T/H M+S
225/55 R 16 95 Q/T/H M+S
235/45 R 17 94 Q/T/H M+S
2.1
(29.8)
2.3
(32.7)
2.3
(32.7)
2.8
(39.8)
520i
523i
525tds
205/65 R 15 94 V
225/60 R 15 96 V
225/55 R 16 95 V
1.9
(27.0)
2.3
(32.7)
2.3
(32.7)
2.8
(39.8)
235/45 R 17 94 W/Y
255/40 R 17 94 W/Y
1.9
(27.0)
–
2.3
(32.7)
2.3
(32.7)
2.3
(32.7)
–
2.8
(39.8)
2.8
(39.8)
205/65 R 15 94 Q/T/H M+S
225/60 R 15 96 Q/T/H M+S
225/55 R 16 95 Q/T/H M+S
235/45 R 17 94 Q/T/H M+S
2.1
(29.8)
2.5
(35.6)
2.5
(35.6)
3.0
(42.7)
Online Edition for Part-No. 01 41 9 791 301 - © 01/99 BMW AG
29n
MinorrepairsKeywordsOverviewControlsMaintenanceTechnicalData
Tyre pressures
528i
530d
225/60 R 15 96 W
225/55 R 16 95 W
2.0
(28.5)
2.4
(34.1)
2.5
(35.6)
3.0
(42.7)
235/45 R 17 94 W/Y
255/40 R 17 94 W/Y
2.2
(31.3)
–
2.6
(37.0)
2.6
(37.0)
2.7
(38.4)
–
3.2
(45.5)
3.2
(45.5)
205/65 R 15 94 Q/T/H M+S
225/60 R 15 96 Q/T/H M+S
225/55 R 16 95 Q/T/H M+S
235/45 R 17 94 Q/T/H M+S
2.2
(31.3)
2.6
(37.0)
2.7
(38.4)
3.2
(45.5)
535i
540i
225/55 R 16 95 W 2.3
(32.7)
2.6
(37.0)
2.7
(38.4)
3.2
(45.5)
235/45 R 17 94 W/Y
255/40 R 17 94 W/Y
2.5
(35.6)
–
2.8
(39.8)
2.8
(39.8)
2.9
(41.2)
–
3.4
(48.4)
3.4
(48.4)
225/55 R 16 95 Q/T/H M+S
235/45 R 17 94 Q/T/H M+S
2.5
(35.6)
2.8
(39.8)
2.9
(41.2)
3.4
(48.4)
BMW
saloon
Tyre size
Online Edition for Part-No. 01 41 9 791 301 - © 01/99 BMW AG
30nTyre pressures
Tyre size 205/65 R 15 94 V is not
approved for the BMW 523i touring.<
BMW
touring
Tyre size
520i
523i
525tds
205/65 R 15 94 V
225/60 R 15 96 V
225/55 R 16 95 V
235/45 R 17 94 W/Y
2.0
(28.5)
2.4
(34.1)
2.6
(37.0)
3.1
(44.1)
205/65 R 15 94 Q/T/H M+S
225/60 R 15 96 Q/T/H M+S
225/55 R 16 95 Q/T/H M+S
235/45 R 17 94 Q/T/H M+S
2.2
(31.3)
2.6
(37.0)
2.8
(39.8)
3.3
(46.9)
528i
530d
225/60 R 15 96 W
225/55 R 16 95 W
2.1
(29.8)
2.5
(35.6)
2.6
(37.0)
3.1
(44.1)
235/45 R 17 94 W/Y
225/60 R 15 96 Q/T/H M+S
225/55 R 16 95 Q/T/H M+S
235/45 R 17 94 Q/T/H M+S
2.3
(32.7)
2.7
(38.4)
2.8
(39.8)
3.3
(46.9)
540i
225/55 R 16 95 W
235/45 R 17 94 Y
225/55 R 16 95 Q/T/H M+S
235/45 R 17 94 Q/T/H M+S
2.4
(34.1)
2.8
(39.8)
2.8
(39.8)
3.3
(46.9)
Online Edition for Part-No. 01 41 9 791 301 - © 01/99 BMW AG
31n
MinorrepairsKeywordsOverviewControlsMaintenanceTechnicalData
Online Edition for Part-No. 01 41 9 791 301 - © 01/99 BMW AG
32n
Opening and closing:
Keys 34
Electronic immobiliser 35
Central locking system 36
Doors – from outside 36
Radio remote control 37
Doors – from inside 39
Luggage compartment lid 40
Rear window 41
Load area 43
Alarm system 44
Electric windows 46
Sliding/tilting sunroof 47
Adjusting:
Seats 49
Steering wheel 52
Mirrors 53
Seat, mirror and steering wheel
position memory 55
Safety systems:
Seat belts 58
Airbags 59
Child restraint systems 61
Childproof door locks 62
Driving:
Ignition switch 63
Starting the engine 63
Stopping the engine 65
Handbrake 65
Manual gearbox 66
Automatic transmission 67
Automatic transmission with
Steptronic 69
Turn indicators/headlamp
flasher 72
Wipers/rain sensor 72
Heated rear window 75
Cruise control 75
Everything under control:
Trip distance recorder; outside
temperature display 77
Revolution counter 77
Energy Control 78
Fuel gauge 78
Coolant thermometer 79
Service Interval indicator 79
Check Control 80
On-board computer 83
Technical features for journey
comfort and safety:
Park Distance Control (PDC) 85
Automatic Stability Control plus
Traction (ASC+T)/Dynamic
Stability Control (DSC) 86
Electronic Damping Control
(EDC) 87
Tyre Pressure Control (RDC) 88
Online Edition for Part-No. 01 41 9 791 301 - © 01/99 BMW AG
Initial overview
Controls in detail
Operation, maintenance
and general care
Minor repairs
Technical data
Index
33n
MinorrepairsKeywordsOverviewControlsMaintenanceTechnicalData
Lights:
Sidelights/low-beam (dipped)
headlamps 90
Instrument lighting 90
Headlight beam angle control 91
High-beam headlamps/parking
lights 91
Fog lights 92
Interior light/load-area light 92
Reading lights 93
Controlled-temperature air for
pleasant interior conditions:
Air conditioning 95
Automatic air conditioning 100
Seat heating 106
Heated steering wheel 106
Roller sun blind 106
Auxiliary heater 107
Auxiliary ventilation control 107
Remote control for auxiliary
heater 108
Practical interior equipment:
Glove box 109
Storage compartments 109
Drink can holders 110
Ashtrays 111
Cigarette lighter 111
Loading and load carrying:
Through-loading system 113
Ski bag 114
touring:
Load area 117
Roller-blind cover 117
Net in front of load area 117
Compartments in luggage
area 118
Pull-out load floor 120
Load 121
Roof rack 122
Towing a trailer 123
Technical items of interest
Online Edition for Part-No. 01 41 9 791 301 - © 01/99 BMW AG
34nKeys
Key with radio remote control
1 Master key with radio remote control
transmitter
2 Spare key, to be kept in a safe place,
for instance in a purse or wallet. This
is a master key, but is not intended
for regular use
3 Key for doors and ignition.
This key does not open the luggage
compartment/tailgate or the glove
box – this can be useful for instance
at a hotel or restaurant with car park-
ing service.
390de326
Replacement keys
A replacement key can only be ob-
tained from BMW Service. Please note
that BMW Service is required to check
that you are entitled to order spare
keys, since the keys are part of the car's
security system (see Electronic immobi-
lizer, page 35).
Online Edition for Part-No. 01 41 9 791 301 - © 01/99 BMW AG
35n
MinorrepairsKeywordsOverviewControlsMaintenanceTechnicalData
Electronic immobiliser
The high-security key
The electronic immobiliser is an addi-
tional means of protecting your BMW
against theft, and operates without you
having to perform any selection or ad-
justing processes yourself. It ensures
that the engine will only start if an igni-
tion key which the immobiliser recog-
nises as belonging to the car is used.
You can also ask BMW Service to inval-
idate individual keys, for instance if they
are lost. If a key has been invalidated,
it can no longer be used to start the
engine.
390de015
What the electronics system can
do
A special electronic component is inte-
grated into the key. The vehicle's elec-
tronics exchange constantly updated
signals, which are individualized for
every vehicle, between the ignition
switch and the electronic components
in the key. The ignition, fuel supply and
starter motor are only released once the
key is identified as authorised.
The electronics integrated into the
key are exposed to mechanical
damage. This could prevent you from
starting the engine.<
Online Edition for Part-No. 01 41 9 791 301 - © 01/99 BMW AG
36nCentral locking system Doors – from outside
The principle
The central locking system cannot take
effect until both front doors are closed.
The following are unlocked and locked
together:
> Doors
> Trunk lid/tailgate and rear window*
> Tank flap.
The central locking system can be
operated
> from outside using the door or tail-
gate lock* and by the radio remote
control
> from inside using a button.
When operated from the outside, the
deadlocks are engaged at the same
time. It prevents the doors from being
unlocked either at the safety lock but-
tons or door handles. The alarm sys-
tem* is also activated or deactivated.
In the event of a collision, the central
locking system is released automati-
cally, but only at doors which were not
locked separately by means of the in-
side buttons; see page 39. The hazard
warning flashers and interior light are
also switched on.
Locking and unlocking
Do not lock the car when there is
anyone inside it, as it cannot then
be unlocked from the inside.<
On certain national-market ver-
sions, the alarm system can only
be operated from the radio remote con-
trol. On these cars, unlocking with a key
triggers off the alarm.
To switch off the alarm: press button 1
(unlock) or turn the ignition key to posi-
tion 1.<
For further details of the alarm system,
see page 44.
380de015
Comfort operation
You can also operate windows and the
sliding/tilting sunroof using the door
lock.
> To open: when the door is closed,
turn the key in the door lock to the re-
lease position and hold it there.
> To close: when the door is closed,
turn the key to the locking position
and hold it there.
Watch the closing movement to
ensure that no-one is trapped. The
movement is stopped when the key is
released.<
Manual operation
if an electrical fault has occurred
By turning the key to the limit positions
in the door lock, you can lock and un-
lock the driver's door.
Online Edition for Part-No. 01 41 9 791 301 - © 01/99 BMW AG
37n
MinorrepairsKeywordsOverviewControlsMaintenanceTechnicalData
Radio remote control
Unlocking
Press button 1.
At the same time the deadlocks are re-
leased, the alarm system* de-activated
and the interior light switched on.
On versions for certain markets,
pressing the button once only un-
locks the driver's door; it must be
pressed a second time to release the
remainder of the central locking sys-
tem.<
If you wish, you can have this spe-
cial arrangement programmed for
each specific remote control.<
394de013
Convenient opening
You can also open the windows and
sliding/tilting sunroof using the remote
control unit:
Hold button 1 down. When you release
the button, the opening process is in-
terrupted immediately.
Locking and thiefproofing
Press button 2.
The antitheft deadlock is simultane-
ously engaged and the alarm system
activated.
Do not lock the car when there is
someone inside it, as it cannot
then be unlocked from the inside.<
Convenient closure
You can also close the windows and
sliding/tilting sunroof using the remote
control unit:
Hold button 2 depressed. The closing
procedure is interrupted if the button is
released.
Watch the closing movement to
ensure that no-one is trapped. The
closing procedure is interrupted if the
button is released.<
On cars with an alarm system (see
page 44): if the convenient closure
movement is interrupted, the car must
be unlocked again with button 1 before
convenient closure is undertaken again.
Failing this, the tilt alarm sensor and in-
terior movement detector will be out of
action.<
Switching on the interior lighting
If the car is locked, press button 2.
Subject to the remote control's range,
this function can be used to locate your
car on a large car park, for example.
Switching off tilt alarm sensor
Briefly press button 2 again after lock-
ing the car.
This also switches off the alarm sys-
tem's interior movement detecting
function (see page 44).
LED (light-emitting diode) 3 comes
on briefly when any button is
pressed. Certain symbols on the radio
remote control may differ from those il-
lustrated here.<
Online Edition for Part-No. 01 41 9 791 301 - © 01/99 BMW AG
38nRadio remote control
Opening luggage compartment/
tailgate
Press button 4.
The boot lid/tailgate opens slightly,
regardless of whether it was previously
locked or unlocked.
394de013
Master keys
Keys with a radio remote control trans-
mitter are master keys.
Apart from "Switch on interior light" and
"Open boot lid/tailgate", all radio re-
mote control functions can also be op-
erated with the key in the driver's door
lock or the boot lid/tailgate lock.
The front passenger's door has no out-
side lock, in order to reduce the risk of
theft.
On certain national-market ver-
sions, the alarm system can only
be operated from the radio remote con-
trol. On these cars, unlocking with a key
triggers off the alarm.
To switch off the alarm: Press button 1
(unlock) or turn the ignition key to posi-
tion 1.<
Note that children could lock the
doors from the inside if they are
alone in the car. Always take the car
keys with you so that the car can be
opened from the outside.<
Interference
The radio remote control may be sus-
ceptible to local interference from other
systems or equipment operating on the
same frequency.
Online Edition for Part-No. 01 41 9 791 301 - © 01/99 BMW AG
39n
MinorrepairsKeywordsOverviewControlsMaintenanceTechnicalData
Doors – from inside
This button is used to operate the cen-
tral locking system when the front doors
are closed. This only unlocks or locks
the doors, luggage compartment lid/
window and fuel filler flap – it does not
activate the burglar alarm for them.
If you wish, the central locking
system can be set to engage as
soon as the car is driven away. You can
have this setting programmed as part of
the Key Memory facility.<
390de016
Unlocking and opening
> Either use the central locking button
to unlock all doors at once, then pull
the door handle above the armrest, or
> Pull the door handle out twice at any
door: the first pull will unlock the
door, the second pull will open it.
Locking
> Either lock all doors at the central
locking pushbutton, or
> Press the door safety buttons down.
To avoid being shut out of the car ac-
cidentally, the driver's door cannot be
locked with the safety button when it
is open.
Do not lock the doors with the
safety buttons during the journey,
or else the central locking system will
not be released in the event of an acci-
dent.
Note that children could lock the doors
from the inside if they are alone in the
car. Always take the key with you, so
that the car can be opened from the
outside.<
Online Edition for Part-No. 01 41 9 791 301 - © 01/99 BMW AG
40nLuggage compartment lid
Lock – saloon only
Only the central keys (see page 34) fit
the boot lid lock.
394de017
Locking separately
Turn the master key to the right past the
pressure point and take it out when hor-
izontal.
This locks the luggage compartment
and disconnects it from the central
locking system. If you then hand over
only door and ignition key 3 (see
page 34), the boot lid cannot be
opened. This extra security can be
useful, for instance, when arriving at a
hotel.
394de064
Opening from outside
Press the button (arrow): the boot lid
opens slightly.
The boot or luggage area is lit when you
open the boot lid/tailgate (also refer to
page 92).
Manual operation
if an electrical fault has occurred
Saloon:
Insert a master key into the luggage
compartment lid lock and turn fully to
the left – the lid will open slightly.
The luggage compartment is locked
again as soon as its lid is closed.
touring: See page 195.
394de009
Online Edition for Part-No. 01 41 9 791 301 - © 01/99 BMW AG
41n
MinorrepairsKeywordsOverviewControlsMaintenanceTechnicalData
Luggage compartment lid
Opening from inside car
With this button, you can open the lug-
gage compartment lid or tailgate while
the vehicle is stationary, provided it is
not deadlocked.
390de324
Rear window – touring
It is quick and easy to load and unload
small items if the rear window can be
opened separately.
Press the button (arrow): the rear win-
dow opens slightly. It can be swung up-
wards.
To close the window, press down on
the glass.
Protect the window if it is likely to
be struck by sharp-pointed or
sharp-edged objects on the load area
during the journey; this is to prevent
damage to the rear-window heating el-
ements.<
392de159
Closing – saloon
A recessed handle (arrow) next to the
lock mechanism makes it easier to pull
the lid down.
394de128
Online Edition for Part-No. 01 41 9 791 301 - © 01/99 BMW AG
42nLuggage compartment lid
Closing – touring
You can pull the tailgate down with both
hands if required (arrows) at the re-
cessed handles provided.
To close the tailgate, press it down only
lightly. The actual closing action is au-
tomatic.
To avoid injuries, as with any clos-
ing process, ensure that the clos-
ing area of the boot lid/tailgate is unob-
structed.<
When the tailgate on the touring is
open, the tip of the tailgate is
more than two metres off the ground.
Please note this if, for instance, you are
opening the tailgate in a garage.<
392de160
If possible, drive only with the tail-
gate and rear window fully closed,
to prevent exhaust gases from entering
the passenger compartment. If you are
obliged to drive the car with the lid, tail-
gate or rear window open:
> Close all other windows and the sun-
roof
> Increase the volume of air in the heat-
ing and ventilation system or the air
conditioner, refer to page 94 or 100.<
Online Edition for Part-No. 01 41 9 791 301 - © 01/99 BMW AG
43n
MinorrepairsKeywordsOverviewControlsMaintenanceTechnicalData
Load area
Tensioning straps
Use the tensioning straps on the floor of
the load area to prevent small objects
from slipping.
If you place objects on the lashing
straps, they form a non-slip base.
There are lashing points at the corners
of the load area to which a load area
net* or retaining straps can be attached
when loads have to be secured.
See also under "Loading", page 121.
394de302
Hanger*
There is a hook on the left in the load
area for hanging up carrier bags or sim-
ilar.
394de144
Online Edition for Part-No. 01 41 9 791 301 - © 01/99 BMW AG
44nAlarm system*
The alarm system reacts if:
> a door, the engine compartment, the
load area or load area or the rear win-
dow are opened
> there is any movement inside the car
(interior movement detector)
> there is a change in the car's attitude,
for instance if it is jacked up to re-
move a wheel or if it is towed away
> there is an interruption in the power
supply from the battery.
Depending on the national-market ver-
sion of the car, the alarm system indi-
cates unauthorised entry or tampering
in different ways:
> 30-second acoustic alarm
> Switching on the hazard warning
flashers for approx. 5 minutes*.
Activating and de-activating
Whenever the car is locked or un-
locked, whether at a lock or with the re-
mote control, the alarm system is acti-
vated or de-activated at the same time.
The interior movement detector is acti-
vated about 30 seconds after the last
locking action.
If the alarm system has been activated
correctly, the hazard warning flashers
come on once*.
Even when the system has been acti-
vated, you can open the lid/tailgate by
pressing button 4 on the radio remote
control. As soon as the lid/tailgate is
closed again, it is locked.
On certain national-market ver-
sions, the alarm system can only
be operated from the radio remote con-
trol. On these cars, unlocking with a key
triggers off the alarm.
To switch off the alarm: press button 1
(unlock) or turn the ignition key to posi-
tion 1.<
Alarm system telltale
> If the telltale lamp under the inside
mirror flashes steadily: the system is
activated.
> If the telltale flashes when the system
is being activated: not all doors, lids
or the rear window are properly
closed. Even if an item is not closed
fully, the remaining items are pro-
tected and the telltale lamp begins to
flash steadily after 10 seconds. How-
ever, the interior movement detector
is not activated.
> If the telltale goes out when the sys-
tem is de-activated, no attempt was
made to tamper with the car during
your absence.
390de020
Online Edition for Part-No. 01 41 9 791 301 - © 01/99 BMW AG
45n
MinorrepairsKeywordsOverviewControlsMaintenanceTechnicalData
Alarm system*
> If the telltale flashes for 10 seconds
when the system is de-activated, an
attempt was made to tamper with the
car.
After the alarm has stopped, the telltale
once again flashes intermittently.
Tilt sensor
The tilt alarm sensor and the interior
movement detector can be switched off
together. This prevents the alarm from
being triggered off when not wanted,
for instance in two-level garage parking
or when travelling on a car train or ferry:
Perform the locking movement (acti-
vate) twice, by pressing button 2 on the
radio remote control twice in succes-
sion, or repeating the locking move-
ment with the key.
The telltale comes on briefly, then
flashes continuously. The tilt alarm sen-
sor and interior movement detector are
then switched off until the system is de-
activated again.
Interior movement detector
The illustration shows the interior move-
ment detector's transmitter and re-
ceiver.
Before the interior movement detector
can operate correctly, the windows and
sunroof must be closed.
However, switch the interior movement
detector off (see under "Tilt alarm sen-
sor" in previous column) if
> children or animals remain in the car
> a window or the sunroof is to remain
open.
390de153
The tilt alarm sensor and interior
movement detector will be
switched off inadvertently if the con-
venient closure movement of the win-
dows and sunroof is interrupted and re-
started within the first 10 seconds. In
this case the complete system must be
de-activated and re-activated.<
Online Edition for Part-No. 01 41 9 791 301 - © 01/99 BMW AG
46nElectric windows
Opening and closing windows
From ignition key position 1:
> Press the rocker switch in until the
pressure point is felt:
the window continues to move for as
long as the rocker switch is pressed.
> Press the toggle switch over beyond
the pressure point:
the window then continues to move
automatically.
Press the switch briefly again to halt
the movement.
390de055
After the ignition is switched off:
> You can still operate the electric win-
dows for up to 15 minutes, unless a
front door was opened and closed
again. To open, press the rocker
switch beyond the normal detent
point.
When leaving the car, always take
out the ignition key and close the
doors, so that children cannot operate
the electric windows and possibly injure
themselves.<
For details of comfort operation using
the door lock and/or the radio remote
control unit, refer to page 36 or 37.
Protective function
There is a contact strip on the inside of
each window surround, at the top. If it is
compressed as the window closes, the
closing action is interrupted immedi-
ately and the window re-opens slightly.
Despite this protective function,
make sure that the window is not
obstructed as it closes; if this precau-
tion is not taken, the risk remains that
thin objects, for instance, may not actu-
ate the contact strip correctly.
The protective function is switched off
by pressing the switch beyond its nor-
mal pressure point and holding it
there.<
Online Edition for Part-No. 01 41 9 791 301 - © 01/99 BMW AG
47n
MinorrepairsKeywordsOverviewControlsMaintenanceTechnicalData
Electric windows Sliding/tilting sunroof*
Safety switch
This prevents the electric rear side win-
dows from being opened and closed at
the switches on the rear doors, for in-
stance by children.
Always press the childproof safety
switch when carrying children on
the rear seat. Careless closure of elec-
tric windows can cause injury.<
390de131
Always close the sliding/tilting
sunroof carefully, so that injuries
are avoided.
When leaving the car, always take out
the ignition key and close the doors, so
that children cannot operate the electric
windows and possibly injure them-
selves.<
Low air pressure or draughts inside the
car when the sunroof is slid back or
tilted up can be avoided by keeping the
ventilation outlets on the fascia open
and increasing the airflow if necessary.
See page 96, 103.
For details of comfort operation using
the door lock and/or the radio remote
control unit, refer to page 36 or 37.
Raising – opening – closing
From ignition key setting 1, press down
the switch and/or slide in the desired
direction up to the pressure point.
When being raised, the roof lining only
retracts a few centimetres.
You can operate the electric sunroof for
up to 15 minutes after switching off the
ignition, provided that a front door has
not been opened and closed again in
the meantime.
Automatic* opening and closing
Press the button and hold down beyond
the pressure point.
Furthermore, the following movements
are automated:
390de327
Online Edition for Part-No. 01 41 9 791 301 - © 01/99 BMW AG
48nSliding/tilting sunroof*
> When the roof is open, press the
switch in the "Raise" direction: the
roof moves to the limit position for
"Raising".
> When the roof is raised, press the
switch towards "Opening": the sun-
roof panel moves to the fully open
position.
Pressing the switch stops this move-
ment.
Protective function
If the sliding/tilting sunroof encounters
resistance when closing with the roof
roughly half closed, the closing opera-
tion is interrupted and the roof re-opens
slightly.
Despite this protective function,
make sure that the roof is not ob-
structed as it closes; if this precaution is
not taken, the risk remains that thin ob-
jects, for instance, may not actuate the
closing-force limiter correctly.
The protective function is switched off
by pressing the switch beyond its nor-
mal pressure point and holding it
there.<
Sunroof with glass panel*
Operation and function are as de-
scribed above for the conventional slid-
ing/tilting sunroof. To open the roof
from the raised position, hold the switch
in the opening direction until the roof
has reached the desired position.
When the roof panel is raised, the slid-
ing trim is pushed back slightly; when
the roof is slid open, it moves with the
roof panel. It remains in the open posi-
tion and can be moved to a new posi-
tion whenever required. Power supply failed or interrupted
After the power supply has been inter-
rupted (e.g. by disconnecting the bat-
tery), it is only possible to tilt up the
sunroof panel initially. To restore its full
range of functions:
1 Move the sliding/tilting roof to the
fully raised position
2 Hold the switch down for approx.
20 seconds.
If there is an electrical defect, the slid-
ing/tilting sunroof can be operated
manually, see page 194.
390de328
Online Edition for Part-No. 01 41 9 791 301 - © 01/99 BMW AG
49n
MinorrepairsKeywordsOverviewControlsMaintenanceTechnicalData
For your own personal safety, please
note the following precautions when
adjusting the seat position:
Do not reposition the driver's seat
while the car is in motion. Other-
wise an unexpected seat movement
could cause the driver to lose control of
the car and lead to an accident.
The seat belt should pass as closely as
possible over the wearer's body. In the
event of a head-on collision, the lap belt
could otherwise slide over the hips and
injure the lower part of the body. In ad-
dition, the restraining effect is reduced
if the seat belt is slack against the
wearer's body.
Do not recline the seat back too far
when the car is being driven (this ap-
plies in particular to the front passen-
ger), or there will be a risk of "submarin-
ing" under the seat belt, so that the belt
loses its full protective effect.
Do not slide the seats to the rear if the
car is inclined at an angle (for instance a
garage ramp or a slope). This could
lead to the automatic seat belt height
adjuster becoming disconnected.<
1 Forward/back
Pull the lever up and slide the seat to
the preferred position.
After releasing the lever, slide the
seat backwards or forwards very
slightly until engages correctly
2 Height
Pull up the lever and apply your
weight to the seat or allow it to rise380de021
3 Seat back
Pull the lever and either apply your
weight to the seat back, or lean for-
ward to relieve it of load
4 Seat angle (driver's seat only)
Pull the lever up and move the seat to
the desired angle.
380de022
Seats, adjusting Manual seat adjustment
Online Edition for Part-No. 01 41 9 791 301 - © 01/99 BMW AG
50nManual seat adjustment BMW Sport seat*
Correct seated position
To relieve the load on the discs of the
spine, sit well back in the seat with your
back resting firmly against the seat
back.
The ideal position is when the head is
a straight-line extension of the spinal
column.
On long journeys the seat back can be
reclined rearwards to a slightly greater
angle, in order to reduce muscle strain.
You should still be able to reach the
highest point on the steering wheel with
the arms slightly bent.
Lumbar support*
See BMW Comfort seat, next page.
Head restraints
To adjust height: pull out or push in.
Adjusting front head restraint angle:
swing forwards or back.
Head restraints reduce the risk of
neck injuries in the event of an ac-
cident.
The head restraint should therefore be
positioned with its centre at approxi-
mately the same height as the ears of
the seat's occupant.
The centre rear head restraint should
be left fully retracted; if it is pulled out
more than a very short distance, it will
not function correctly.<
390de065
Manual
On this seat, the thigh support area can
also be adjusted:
Pull the lever and move the thigh sec-
tion until it provides the necessary sup-
port.
The angle of the passenger's seat can
also be adjusted.
390de137
Online Edition for Part-No. 01 41 9 791 301 - © 01/99 BMW AG
51n
MinorrepairsKeywordsOverviewControlsMaintenanceTechnicalData
Electrically adjusted seat* BMW Comfort seat*
1 Angle
2 Forward/back
3 Height
4 Seat back
5 Head restraint height
Tilt the head restraint to alter its angle.
Comply with the adjusting instruc-
tions on page 49, or there may be
a risk to your personal safety.<
380de023
This seat has additional lumbar and
shoulder support settings.
1 Lumbar support
> Push the switch forward or back: the
curvature is increased or decreased.
> Press the switch at top or bottom:
curvature moves up or down.
The seat back contour can be altered to
provide more support to the curved
(lumbar) section of the spine.
The upper edge of the pelvis and the
spinal column are supported, to en-
courage an upright but relaxed seated
position.
380de024
2 Shoulder support
Press the switch: the angle of the upper
part of the seat back changes.
The adjustable upper section of the
seat back supports the shoulder area of
the seat occupant's body. It enables a
relaxed seat position to be found and
reduces the load on the shoulder mus-
cles.
To obtain the recommended optimum
settings:
Driver's and front passenger's side:
1 Tilt the upper part of the seat back
fully to the rear
2 Adjust to the most suitable position,
as described on page 50
3 Tilt the upper section of the seat back
forwards until adequate shoulder
support is obtained.
380de024
Online Edition for Part-No. 01 41 9 791 301 - © 01/99 BMW AG
52nBMW Comfort seat* BMW Sport seat* Adjusting steering wheel
Passenger's seat in rest position:
1 Tilt the upper part of the seat back
fully to the rear
2 Set the seat angle to a slightly more
upright position
3 Recline the seat back slightly more to
the rear
4 Tilt the upper section of the seat back
further forwards.
Correct the forward/back position
of the seat if necessary to ensure
that the seat belt still passes closely
over the wearer's body, otherwise the
belt's protective action may be af-
fected.<
380de064
Electric
This seat has electric thigh support
adjustment.
To operate it, press the switch.
390de371
Manual
1 Swing out the clamp lever
2 Move the steering wheel to the pre-
ferred reach and angle to suit your
seated position
3 Fold the lever back in to clamp the
steering column in the new position.
Do not adjust the steering wheel
position while the vehicle is in mo-
tion, otherwise an accident may result
from any unexpected movement.<
390de027
Online Edition for Part-No. 01 41 9 791 301 - © 01/99 BMW AG
53n
MinorrepairsKeywordsOverviewControlsMaintenanceTechnicalData
Adjusting steering wheel Mirrors
Electrical*
The steering wheel can be repositioned
in four directions, corresponding to the
lever movements.
Do not adjust the steering wheel
position while the vehicle is in mo-
tion, otherwise an accident may result
from any unexpected movement.<
To memorise steering wheel position,
see "seat, mirror and steering wheel
position memory", page 55.
390de028
Automatic steering wheel
adjustment
(only in conjunction with seat, mirror
and steering wheel memory*)
To make it easier to get in and out of
the driver's seat, the steering wheel au-
tomatically rises into its uppermost po-
sition before returning to the driving po-
sition (memory).
This automatic system responds to the
ignition key setting and the driver's
door. Outside mirrors
1 Switch for adjustment in all four
directions
2 Changeover switch for mirror on
other side of car
3 Button for folding the mirrors in and
out (only with automatic-dip outside
mirrors* – see page 55).
Press the button once to fold the mirrors
in, and again to fold them out. This can,
for example, be useful in car washes,
narrow streets or to reset a mirror to the
correct position if it was previously
folded forwards.
The mirrors can be folded in at a
road speed up to 10 km/h (approx.
6 mph).<
390de029
Online Edition for Part-No. 01 41 9 791 301 - © 01/99 BMW AG
54nMirrors
The mirrors can also be adjusted manu-
ally by pressing the edge of the glass.
To memorise mirror positions, see
"seat, mirror and steering wheel posi-
tion memory", page 55.
The outer, aspherically curved* section
of the mirror displays a larger field of
view, though slightly distorted, than the
inner, convex* section. In this way, the
view to the rear is extended and the
blind spot is reduced in size.
The mirror on the passenger's
side is more convex than the mir-
ror on the driver's side, and therefore
reflected objects are closer than they
appear. It may be difficult to estimate
the precise distance at which another
vehicle is following your car. The same
applies to the aspherical outer section
of the mirrors.<
Electric mirror heating
Both mirrors are heated automatically in
ignition key position 2.
Inside mirror
To reduce glare from following vehicles
after dark, tilt the mirror image by mov-
ing the small lever.
Illuminated make-up mirror*
Fold the sun visor down and slide the
mirror cover (if fitted) sideways.
The mirrors are illuminated from ignition
key position 1 on.
Sun visors
The sun visors can also be pivoted to
the side, against the door windows.
390de030
Interor mirror, automatic
anti-glare*
This mirror dims automatically and
steplessly in accordance with the inten-
sity of the light received (ambient light
and the effect of glare from headlamps).
The mirror switches automatically to the
clear, non-dimmed position when the
driver engages reverse gear or selects
R.
To ensure that the mirror always func-
tions correctly, keep the two photo-
cells clean and unobstructed. One
photo-cell (arrow) is in the mirror glass,
the other is slightly offset on the back of
the mirror.
For details of the electrochromic mirror
principle, refer to page 205.
390de031
Online Edition for Part-No. 01 41 9 791 301 - © 01/99 BMW AG
55n
MinorrepairsKeywordsOverviewControlsMaintenanceTechnicalData
Mirrors Seat, mirror and steering wheel position memory*
Automatic-dip outside mirrors*
These mirrors can be folded in or out at
button 3 (see page 53). They have the
same automatic-dip action as the inside
mirror.
You can memorise and call up three dif-
ferent driver's seat, outside mirror and
(with an electrically adjustable steering
wheel) steering wheel positions. The
picture shows the buttons on the
driver's door.
The setting of the lumbar support
is not recorded in the memory.<
Memorising
1 Ignition key in position 1 or 2
2 Select the desired seat, outside mir-
ror and steering wheel positions
3 Press the MEMORY button: the tell-
tale lamp in the switch comes on
4 Press memory button 1, 2 or 3: the
telltale lamp goes out.
390de032
Calling up
Driver's door open after being un-
locked, or ignition key in position 1:
> Press the appropriate memory button
1, 2 or 3 briefly.
The positioning movement is inter-
rupted immediately if you operate a
seat adjustment switch or one of the
memory buttons.
With the driver's door closed and the
ignition key either removed or in posi-
tion 0 or 2:
> Press memory button 1, 2 or 3 until
the adjusting procedure has been
completed.
If the MEMORY button was pressed
accidentally: press it again; the telltale
goes out.
Do not call up the memory while
the car is in motion, otherwise an
unexpected seat or steering wheel
movement may cause an accident.<
Online Edition for Part-No. 01 41 9 791 301 - © 01/99 BMW AG
56nSeat, mirror and steering wheel position memory*
You can have your car pro-
grammed so that when it is un-
locked with your own personal remote-
control key your preferred seat, mirror
and steering wheel positions are ob-
tained automatically.<
If you use this setting, make sure
before unlocking that the footwell
behind the driver's seat is unobstructed.
Otherwise damage could be caused if
the seat moves back automatically to
the previously selected position.< Passenger's side mirror tilt-down
(parking position)
1 Move the mirror changeover switch
(arrow) to the "Driver's mirror" posi-
tion
2 When reverse gear (or automatic
transmission selector lever position R)
is selected, The driver can then see
the ground close to the car (for in-
stance, the edge of the kerb).
This automatic function can be switched
off if not required: move the mirror
changeover switch to the passenger's
side mirror position.
390de147
Online Edition for Part-No. 01 41 9 791 301 - © 01/99 BMW AG
57n
MinorrepairsKeywordsOverviewControlsMaintenanceTechnicalData
Car Memory, Key Memory
How it works
You may often have wished that you
could modify the operation of certain
features of your car to suit your own in-
dividual preferences. When developing
the car, BMW therefore "designed in" a
number of freely programmable options
for the car, which BMW Service will
gladly adjust as you wish.
There are "Car Memory" and "Key
Memory" settings, the former relating to
the car itself, the latter to your personal
requirements. You can have up to four
sets of basic settings programmed for
two different persons. This presup-
poses that each person has his or her
own remote control key. By means of
data exchange with the key, the car
identifies the user when the car is un-
locked and performs the necessary ad-
justments.
390de329
Coloured adhesive labels are supplied
with the keys so that they can be identi-
fied by the users.
What can be selected
BMW Service will gladly inform you of
the facilities available with Car Memory
and Key Memory.
At the appropriate points in this
Owner's Handbook you will find
this symbol, as an indication that spe-
cial settings as described above are
available.<
An example of Key Memory is the auto-
matic repositioning of the electrically
adjusted driver's seat for the intending
user each time the car is unlocked.
Online Edition for Part-No. 01 41 9 791 301 - © 01/99 BMW AG
58n
Wear the seat belts whenever the car is
driven.
To fasten: the seat belt buckle must be
heard to engage.
To open: press the red release button
on the belt buckle and guide the belt
back if necessary to reinforce the action
of the automatic reel.
As the seat is moved forwards and
back, the upper belt loop is automati-
cally adjusted to the wearer's size.
The two seat belt buckles integrated
into the rear seat are intended for the
left and right seat occupants. The
buckle marked "CENTER" is only to be
used by a person occupying the center
rear seat.
390de033
Comply with the following instruc-
tions concerning the wearing of
seat belts in order to avoid any adverse
effects on personal safety or reduction
in the belt's protective function. These
instructions also apply to passengers in
the car. Never restrain more than one
person with each seat belt. Babies or
small children must not travel on the lap
of another occupant.
The belts should not be twisted and
must run firmly across the pelvis and
shoulder. They should not pass over
hard or fragile objects in your pockets.
It should not pass over any sharp, solid
or breakable objects in pockets etc.
The seat belt must not run across the
wearer's neck, nor should it be trapped
or abraded by coming into contact with
sharp edges or objects.
The seat belt should always be worn as
close to the seat occupant's body as
possible. If possible, avoid bulky cloth-
ing and remember to tauten the belt fre-
quently where it runs over the shoulder.
In the event of a head-on collision, the
lap belt could otherwise slide over the
hips and injure the lower part of the
body. In addition, the restraining effect
is reduced if the seat belt is slack
against the wearer's body. Pregnant
women should also wear the seat belt,
making sure that the lap strap is well
down on the hips and does not press
on the abdominal region of the body.<
For care of seat belts, see page 167.
Saloon with through-load system*:
please note the instructions for the
centre rear seat belt on page 113.
touring: If the centre belt cannot be
pulled out, the larger section of the rear
seat back is not properly locked into po-
sition; see page 117.<
If exposed to severe loads in an
accident, or if the belt system in-
cluding the buckle tensioner and any
child restraint systems* installed in the
car have been damaged, BMW Service
should renew them and check the belt
anchorages.<
Seat belts
Online Edition for Part-No. 01 41 9 791 301 - © 01/99 BMW AG
59n
MinorrepairsKeywordsOverviewControlsMaintenanceTechnicalData
Airbags
1 Front airbags for the driver and front
passenger
2 Head airbags (front)
3 Side airbags (front and at rear*)
Protective effect
The front airbags protect the occupants
of the front seats in the event of a head-
on collision, where the restraining effect
of the seat belts alone would no longer
be adequate. The head and side air-
bags provide protection in the event
of a side-on collision. The side airbag
which inflates has the effect of support-
ing the upper body from the side.
380de647
The picture shows the main directions
of impact to which the airbags respond.
390de142
Telltale light
The telltale lamp confirms that
the airbag system is ready to
operate (from ignition key posi-
tion 1 onwards).
System operational:
> The telltale lamp comes on briefly
and then goes out.
System defective:
> The telltale lamp does not come on,
or
> the telltale comes on briefly, goes out
briefly and then comes on again.
If there is a system fault, there is a risk
that it will not be triggered off even if a
sufficiently severe accident occurs
within the airbag range.
Please have it checked by BMW Serv-
ice without delay.
Online Edition for Part-No. 01 41 9 791 301 - © 01/99 BMW AG
60nAirbags
Note the following instructions
concerning airbags, in order to
ensure that personal safety is not re-
stricted or the airbags's protective func-
tion adversely affected. These instruc-
tions also apply to passengers in the
car.
Always fasten your seat belt on every
journey, despite the presence of an air-
bag: the airbags are an additional safety
feature, not a substitute. The airbags
are not triggered off in minor accidents,
nor if the car rolls over or is struck from
the rear. In such circumstances the seat
belt provides optimum protection.
Choose a seated position that is com-
fortable but also at the maximum possi-
ble distance from the steering wheel or
fascia and door.
Always grip the steering wheel on the
rim otherwise you may suffer hand and
arm injuries when the airbag is trig-
gered. No objects should be held or
allowed to rest between the airbag and
seat occupant.
The cover of the front passenger's air-
bag should not be used as a storage
tray.
Do not use adhesive on, cover over or
otherwise modify the upholstered cov-
ers on the steering wheel, the dash-
board, the side panels on front and rear
doors and the roof struts, nor the sides
of the roof liners.
Never install child restraint systems on
the front passenger's seat. Children
under 12 and those who are smaller
than 1.50 m (4 ft 11 in) should travel on
the rear seats and may be required to
do so by law.
When side airbags are fitted for back
seat passengers, ensure that child
seats are correctly mounted as far as
possible from the doors. Do not allow
children to lean out of the seat towards
the door, as this could result in consid-
erable injury in the event of the airbags
being triggered.<
Even if all these instructions are com-
plied with, injury to the face, arms or
hands as a result of the airbag inflating
cannot be entirely ruled out, depending
on the circumstances in which an acci-
dent occurs. If the car's occupants are
unduly sensitive to the ignition and in-
flation noise generated by the airbag
systems, their hearing may be tempo-
rarily affected.
For further information on the airbag
system, see pages 170 and 203.
Online Edition for Part-No. 01 41 9 791 301 - © 01/99 BMW AG
61n
MinorrepairsKeywordsOverviewControlsMaintenanceTechnicalData
Child restraint systems*
For children up to 12 years of age and
less than 150 cm (approx. 4 ft 11 in) tall,
suitable approved restraint systems
may have to be installed; comply with
local regulations.
Small children up to about 18 months
old can be secured with a rear-facing
restraint system on the back seats,
using standard seat belts.
BMW Service can supply suitable child
restraint systems for every age group.
Please comply with the notes in the in-
stallation instructions when using these
products.
Do not install child restraint sys-
tems on the front seat, as injury
could be caused if the passenger's air-
bag is triggered off.
In no circumstances are child restraint
systems to be modified, as their protec-
tive effect may otherwise be impaired.<
Integral child's seat*
These child's seats, in the two outer rear
seat positions, satisfy the legal require-
ments of ECE Directive R-44 and are
suitable for children between about 3g
and 12 years of age (weighing 15 to
36 kg/33 to 80 lbs).
Forchildrenagedfromapprox.18months
to 3g a years (weighing between 9 and
18 kg (20 and 40 lbs), use these seats in
conjunction with the "Comfort" seat
back and impact-absorbing table; these
are available from BMW Service.
Unfolding the child's seat:
Reach under the front of the seat and
pull it upwards diagonally to the rear
(arrow). Then press the child's seat to
the rear until it engages in position.
394de149
Folding away the child's seat:
Release by pulling the loop forwards
and down (arrow). Then press down
from the top until the child's seat en-
gages.
Use the integral child's seats only
in conjunction with the head re-
straints.
When repositioning the car's front
seats, make sure that the child's feet
are not trapped.
Never leave children in the car on their
own – even when occupying a child's
seat.<
394de150
Online Edition for Part-No. 01 41 9 791 301 - © 01/99 BMW AG
62nChild restraint systems* Childproof door locks
Note the safety instructions re-
garding seat belts on page 58, to
ensure that the full protective action of
the belts is maintained.
If damaged or subjected to severe
loads in an accident, have the integral
child's seat (and other accessories if
necessary) renewed by BMW Service.<
394de152
Insert key into slot on rear door and turn
outwards:
This door can now only be opened from
the outside.
390de019
Online Edition for Part-No. 01 41 9 791 301 - © 01/99 BMW AG
63n
MinorrepairsKeywordsOverviewControlsMaintenanceTechnicalData
0 Steering locked
The key can only be inserted and re-
moved in this position.
After removing the key, turn the steer-
ing wheel slightly if necessary until the
steering lock engages.
Automatic transmission cars: Do
not move the selector lever away
from position P until the engine is run-
ning (ignition key position 2).
Before the ignition key can be returned
to position 0 or pulled out, the auto-
matic transmission selector lever must
be moved to position P (interlock).<
390de010
1 Steering released
A slight movement of the steering wheel
often makes it easier to turn the key in
the ignition from 0 to 1.
Individual power consumers can then
operate.
2 Ignition switched on/
BMW 525td/tds, 530d:
preheating
All electrical consumers are ready to
operate.
3 Starting the engine
Before starting
> Apply the handbrake
> Move the gear lever to neutral (or
automatic transmission selector to
P or N)
> At low temperatures, depress the
clutch pedal.
Never run the engine in an en-
closed space. The exhaust gas
contains carbon monoxide, which is
colourless and odourless, but highly
toxic. Inhaling exhaust gas constitutes a
severe health risk and can lead to loss
of consciousness with fatal conse-
quences.
Do not leave the car unattended with
the engine running, as it then consti-
tutes a considerable potential hazard.<
Ignition switch Starting the engine
Online Edition for Part-No. 01 41 9 791 301 - © 01/99 BMW AG
64nStarting the engine
Cars with spark-ignition engine
> Start the engine without depressing
the accelerator pedal.
Allow the starter motor to run for a
reasonable time, but not for more
than about 20 seconds. As soon as the
engine fires, release the ignition key.
Do not allow the engine to warm up at a
standstill, but drive off as soon as pos-
sible, using moderate engine speeds.
BMW 535iA, 540iA:
Your BMW is equipped with a conven-
ient-start system. It is sufficient to turn
the ignition key briefly to position 3 (to
operate the starter motor), then to re-
lease it.
The starter then runs automatically for a
predetermined period, and cuts out as
soon as the engine has started.
If the battery voltage is low, automatic
starting cannot be activated, or the
function is interrupted. The engine can
be jump started (refer to page 196).<
If the engine does not start first time, for
instance if it is very cold or very hot:
> Depress the accelerator pedal half-
way while starting the engine.
Cold starts at very low ambient temper-
atures (below approx. –156) at high
altitude (more than 1000 m above sea
level):
> On the first occasion, take longer
over the starting operation (approx.
10 seconds)
> Depress the accelerator pedal half-
way while starting the engine.
Cars with diesel engine
When the engine is cold:
> Hold the ignition key in position 2 un-
til the preheat telltale or display goes
out
> Start the engine.
At extremely low temperatures, the
starter motor may have to be run for
up to 40 seconds.
When the engine is warm:
> The preheat telltale or display does
not come on. Start the engine imme-
diately.
Movement of the accelerator pedal has
no influence on the starting process.
Do not allow the engine to warm up at a
standstill, but drive off as soon as pos-
sible, using moderate engine speeds.
Bleeding the the fuel system:
Even if the fuel tank has been run dry,
the fuel system does not normally need
to be bled.
If you nevertheless encounter difficul-
ties in starting the engine:
> Run the starter motor for approx.
20 seconds.
Online Edition for Part-No. 01 41 9 791 301 - © 01/99 BMW AG
65n
MinorrepairsKeywordsOverviewControlsMaintenanceTechnicalData
Stopping the engine Handbrake
Turn the ignition key back to 1 or 0.
BMW 530d:
When the engine is cold, a fuel-burning
auxiliary heater is used to warm the
car's interior more rapidly. Its exhaust
fumes are discharged under the door
sill on the driver's side.
If the engine is stopped before it has
reached its regular operating tempera-
ture, the auxiliary heater continues to
run for a short time, and therefore pro-
duces exhaust fumes.
Never take out the ignition key
when the car is still moving, in
order to prevent the steering lock from
engaging.
When leaving the car, always remove
the ignition key and lock the steering.
Manual-gearbox cars:
When parking on a slope, apply the
handbrake, because merely engaging
first or reverse gear may not prevent the
car reliably from rolling away.
Automatic transmission cars:
Select position P.<
Applying
The lever engages automatically and
the telltale in the instrument cluster
lights up in ignition setting 2, refer to
page 20.
Releasing
Raise slightly, press the knob and move
the lever down.
The handbrake is primarily intended for
preventing a stationary vehicle from
rolling away, and acts on the rear
wheels.
In exceptional cases, if the hand-
brake has to be used to slow or
stop the car, do not pull the lever up too
hard. Keep the knob on the lever held in
all the time.
390de042
Too violent an application of the hand-
brake could over-brake the rear wheels
and cause the rear of the car to skid.
The brake lights do not come on when
the handbrake is applied.
Manual-gearbox cars:
When parking on a slope, apply the
handbrake, because merely engaging
first or reverse gear may not prevent the
car reliably from rolling away.
Automatic transmission cars:
Select position P.<
To avoid corrosion, apply the hand-
brake lightly from time to time when
coasting to a standstill, for instance at
a traffic signal, provided that it is safe
to do so.
Online Edition for Part-No. 01 41 9 791 301 - © 01/99 BMW AG
66nManual gearbox
The gear lever comes to rest when not
in use in the 3rd/4th gear gate plane
(dot in picture).
When the lever is moved from a forward
or reverse gear into neutral, it is auto-
matically spring-loaded to return to this
plane of the gate.
360de044
BMW 540i
The gear lever comes to rest when not
in use in the 3rd/4th gear gate plane
(dot in picture).
When the lever is moved from a forward
or reverse gear into neutral, it is auto-
matically spring-loaded to return to this
plane of the gate.
When selecting a gear in the 5th/
6th gear plane, always press the
lever to the right, to avoid accidentally
selecting a gear in the 3rd/4th plane of
the gate.<
380de044
Reverse
Engage this gear only when the car is
standing still. Press the gear lever to the
left until slight resistance is overcome.
The reversing lamps then come on au-
tomatically in ignition key position 2.
Never try to prevent the car from
rolling back on an uphill gradient
by slipping the clutch; always apply the
handbrake. A clutch that is allowed to
slip will wear rapidly.<
Online Edition for Part-No. 01 41 9 791 301 - © 01/99 BMW AG
67n
MinorrepairsKeywordsOverviewControlsMaintenanceTechnicalData
Automatic transmission*
Your BMW is equipped with Adaptive
Transmission Control (AGS). It re-
sponds sensitively to your individual
driving style and the actual road and
traffic situation. Various shift programs
are used for this purpose.
You will find more details on the AGS in
the chapter headed "Technical Items of
Interest" on page 202.
390de044
Selector lever positions
P R N D S 3 2
Starting the engine
The engine can only be started in posi-
tions P or N.
The gear display differs according to
your car's equipment specification (see
pictures).
390de045
Moving the selector lever
A locking mechanism is provided to pre-
vent accidental movement of the selec-
tor lever to certain positions. To release
the lock, press the button on the front of
the selector lever knob (arrow).
Before moving the selector lever
away from P or N with the car at a
standstill, you must press the brake pedal
down to release the lever (shiftlock).
Keep the brake pedal pressed down until
ready to move away, so that the car does
not creep forwards (or backwards as the
case may be) with the gear engaged.<
Before leaving the car with the en-
gine running, move the automatic
transmission selector lever to position P
or N and apply the handbrake to prevent
the car from moving.
390de046
Online Edition for Part-No. 01 41 9 791 301 - © 01/99 BMW AG
68nAutomatic transmission*
Do not leave the car unattended with
the engine running, as this constitutes a
potentially severe accident risk.<
P Park
Engage this gear only when the car is
standing still. The driven wheels are
locked.
R Reverse
Engage this gear only when the car is
standing still.
N Neutral
Select only if the journey is interrupted
for a fairly long time.
D Drive (automatic shift position)
Use this position for all normal driving.
The system shifts up through all forward
gears and the AGS functions in an unre-
stricted manner.
S Sport program
This position is recommended if it is in-
tended to make full use of the car's per-
formance.
3 and 2 Shift-limiting positions
Select these positions if you wish to
restrict gear selection, for instance on
steep uphill or downhill gradients in
mountainous regions. The transmission
continues to shift automatically, but
only up to the selected gear.
Position 2 is also particularly suitable
for use when towing a trailer.
Kick-Down
In the "kick-down" position, maximum
acceleration and top speed are availa-
ble in position D.
Press the accelerator pedal down be-
yond the regular full-throttle position;
increased resistance will be felt.
Shift electronics
If the warning lamp comes on or
the message "TRANS. FAIL-
SAFE PROG" appears in the
Check Control, an automatic transmis-
sion malfunction has occurred.
All lever positions can still be selected,
but in the forward positions only certain
gears are actually available when the
car is driven.
Avoid excessive loads, and take the car
to the nearest BMW Service.
Do not work in the engine com-
partment with the selector lever in
a driving position, in case the car be-
gins to move unexpectedly.<
For towing away, tow-starting and jump
starting see page 197 onwards.
Online Edition for Part-No. 01 41 9 791 301 - © 01/99 BMW AG
69n
MinorrepairsKeywordsOverviewControlsMaintenanceTechnicalData
Automatic transmission with Steptronic*
You can either drive the car as with a
conventional automatic transmission, or
shift between gears yourself.
If you move the selector lever from po-
sition D to the left, into the M/S lever
plane, this will activate automatic-trans-
mission shift programs that will appeal
to those who wish to adopt a more en-
thusiastic driving style. As soon as you
move the lever in the "+" or "–" direc-
tion, the Steptronic transmission's man-
ual gear shift mode is activated. If you
wish to return to fully automatic gear
shifts, move the lever back to the right,
to position D.
Your BMW is equipped with Adaptive
Transmission Control (AGS). It re-
sponds sensitively to your individual
driving style and the actual road and
390de138
traffic situation. Various shift programs
are used for this purpose.
You will find more details on the AGS in
the Chapter "Technical Items of Inter-
est" on page 202.
Selector lever positions
P R N D M/S + –
Starting the engine
The engine can only be started in posi-
tions P or N.
The gear display differs according to
your car's equipment specification (see
pictures).
390de139
Moving the selector lever
A locking mechanism is provided to
prevent accidental movement of the se-
lector lever to certain positions. To re-
lease the lock, press the button on the
front of the selector lever knob (arrow).
Before moving the selector lever
away from P or N with the car at a
standstill, you must press the brake
pedal down to release the lever (shift-
lock).
Keep the brake pedal pressed down
until ready to move away, so that the
car does not creep forwards (or back-
wards as the case may be) with the
gear engaged.<
390de140
Online Edition for Part-No. 01 41 9 791 301 - © 01/99 BMW AG
70n Automatic transmission with Steptronic*
Before leaving the car with the en-
gine running, move the automatic
transmission selector lever to position P
or N and apply the handbrake to pre-
vent the car from moving.
Do not leave the car unattended with
the engine running, as this constitutes a
potentially severe accident risk.<
P Park
Engage this gear only when the car is
standing still. The driven wheels are
locked.
R Reverse
Engage this gear only when the car is
standing still.
N Neutral
Select only if the journey is interrupted
for a fairly long time.
D Drive (automatic shift position)
Use this position for all normal driving.
All forward gears are selected as nec-
essary and the AGS is fully operational.
Kick-Down
In the "kick-down" position, maximum
acceleration and top speed are availa-
ble in position D.
Press the accelerator pedal down be-
yond the regular full-throttle position;
increased resistance will be felt.
M/S Manual mode and Sport
program
When changing from D to M/S, the
Sport program is activated and D S dis-
played on the instrument panel. This po-
sition is recommended if it is intended to
make full use of the car's available per-
formance.
When the lever is next moved, the auto-
matic transmission will switch from the
Sport program to the manual-shift
mode. If you move the lever forwards in
the "+" direction, the transmission shifts
up; if you move it to the rear, in the "–"
direction, a downshift takes place. The
gear display reads 1 to 5 or M1 to M5
according to version.
390de323
Online Edition for Part-No. 01 41 9 791 301 - © 01/99 BMW AG
71n
MinorrepairsKeywordsOverviewControlsMaintenanceTechnicalData
Automatic transmission with Steptronic*
The AGS performs up- and down-shifts
only at a suitable engine or road speed;
for example, it will not shift down if the
resulting engine speed would be too
high. The instrument panel shows the
selected gear briefly, followed by the
gear actually in use.
For rapid acceleration in the man-
ual-shift mode – for example when
overtaking – shift down manually or use
the kick-down to shift to a lower gear.<
The selector lever can only be moved
from M/S to the positions P, R and N if
it has first been moved back to D.
In the following situations, Steptronic
"thinks for you" in the manual-shift
mode:
> To prevent the engine from over-
speeding, an up-shift to the next-
higher gear takes place automatically
shortly before the governed speed
limit is reached in an intermediate
gear
> At low speeds, a lower gear is se-
lected automatically without any
action on the driver's part
> The kick-down, when used, selects
the lowest gear which can still be
used without risk of the engine over-
speeding.
Shift electronics
If the warning lamp comes on or
the message "TRANS. FAIL-
SAFE PROG" appears in the
Check Control, an automatic transmis-
sion malfunction has occurred.
All lever positions can still be selected,
but in the forward positions only certain
gears are actually available when the
car is driven.
Avoid excessive loads, and take the car
to the nearest BMW Service.
Do not work in the engine com-
partment with the selector lever in
a driving position, in case the car be-
gins to move unexpectedly.<
For towing away, tow-starting and
jumpstarting, see page 197 onwards.
Online Edition for Part-No. 01 41 9 791 301 - © 01/99 BMW AG
72nTurn indicator/headlamp flasher Wipers
1 High beam headlamps (blue telltale
lamp)
2 Headlamp flasher
3 Flashing turn indicators (green re-
peater lamps with rhythmic ticking of
flasher relay).
If the telltale flashes and the relay ticks
more rapidly than usual, a flashing turn
indicator has failed; if towing a trailer,
the failed lamp could be on the trailer.
390de335
To indicate a turn briefly
Move the lever lightly, only as far as
the first detent. It will cancel when re-
leased.
0 Parked position of wipers
1 Intermittent wipe setting or rain
sensor*
2 Normal wiper speed
3 Fast wiper speed
4 Flick wipe
5 Automatic windscreen wash
6 Automatic intensive cleaning*
7 Knurled wheel for controlling the in-
termittent wipe intervals andthe sen-
sitivity of the rain sensor
394de041
Online Edition for Part-No. 01 41 9 791 301 - © 01/99 BMW AG
73n
MinorrepairsKeywordsOverviewControlsMaintenanceTechnicalData
Wipers
1 Intermittent wipe interval or
rain sensor*
Intermittent wipe interval:
Using knurled wheel 7 you can select
four intermittent wipe intervals.
The wipe speed is also varied automati-
cally, according to road speed.
Rain sensor:
When the rain sensor is activated, the
wind screen wipers are controlled auto-
matically in response to wetting of the
windscreen (they of course also re-
spond to snow). This means you do not
need to involve yourself in switching the
windscreen wipers on and off, nor do
you need to concern yourself with any
of the settings between intermittent
wipe and continuous wipe. Instead, you
can focus your entire attention on pre-
vailing road and traffic conditions. This
advantage is particularly important in
adverse weather conditions.
Activating the rain sensor:
From ignition setting 1, shift into lever
setting 1. In any event, the wipers will
now cross the windscreen once.
You can leave the lever in setting 1 all
the time, then all you need to do is to
activate the rain sensor from ignition
setting 1. To do this,
> turn knurled wheel 7 briefly or
> use the automatic windscreen clean-
ing function (5) or the automatic in-
tensive cleaning function (6).
To vary the sensitivity of the rain sensor:
turn knurled wheel 7.
Switch off the rain sensor in an au-
tomatic car wash, or else the car’s
wipers may operate and be damaged.<
2 Normal wiper speed
The wipers change over automatically
to the intermittent wipe mode when the
car comes to a standstill (not on cars
with rain sensor).
3 Fast wiper speed
The wipers switch to normal speed
when the car comes to a standstill (not
on cars with rain sensor).
5 Automatic windscreen wash
Fluid from the washer tank is sprayed
on to the windscreen and the wipers
are operated for a short time.
If the lever is pulled only briefly, washer
fluid will be sprayed on to the wind-
screen, but the wipers will not be
switched on.
6 Intensive cleaning, automatic*
Same as 5, but intensive cleaning fluid
is first sprayed on to the windscreen.
Changing the wiper blades: see
page 176.
Online Edition for Part-No. 01 41 9 791 301 - © 01/99 BMW AG
74nWipers
Headlamp cleaning*
If the headlamps are switched on, they
are automatically cleaned as well on
each fifth occasion that the windscreen
wiper or intensive cleaning system is
operated.
The driver should only operate the
washers and cleaning equipment
if certain that the fluid will not freeze to
the windscreen and interfere with the
view ahead. Antifreeze should therefore
be added to the fluid; see page 156.
Do not run the washer systems if the
fluid reservoirs are empty, or the
washer pump will be damaged.<
Windscreen washer jets
The windscreen washer jets are auto-
matically heated when the ignition key
is in position 2.
Rear window wiper – touring
0 Parked position of rear window wiper
1 Rear window wiper operates intermit-
tently. When reverse gear is engaged,
the wiper operates continuously.
2 Automatic rear window washer
You can program the desired wipe
interval:
> Move the lever briefly from position 0
to position 1 and back
> The time which elapses before switch-
ing on again (from 0 to 1) is the pro-
grammed wipe interval (max. 30 sec-
onds).
392de158
Programming is cancelled:
> move the lever to position 0 for
approx. 10 seconds, or
> when the engine is switched off.
When the rear window is opened, its
wiper is switched off. After closing the
window it then has to be restarted if re-
quired.
To renew the wiper blade, see
page 176.
Online Edition for Part-No. 01 41 9 791 301 - © 01/99 BMW AG
75n
MinorrepairsKeywordsOverviewControlsMaintenanceTechnicalData
Heated rear window Cruise control*
Switching on
Press the button: while the telltale is lit,
the heated rear window is operating at
high power (fast thawing).
When the telltale lamp goes out, the
rear window heating continues to oper-
ate at reduced output, then switches it-
self off automatically.
Switching off
If the telltale lamp is on, press the but-
ton.
390de362
Above about 30 km/h (approx. 19 mph),
you can memorise and call up the car's
road speed.
Activating the system
From ignition key setting 2:
Press button 1: the telltale in the instru-
ment cluster lights up. You can then use
the cruise control.
Maintaining and memorising
speed, accelerating
Press button 2 briefly:
The car's actual speed is maintained
and memorised. Each time the switch is
pressed briefly again, road speed is in-
creased by approx. 1 km/h.
390de332
Hold button 2 in:
The car accelerates without the accel-
erator pedal being touched. As soon as
you release the switch, the speed the
car has reached will be maintained and
memorised.
If engine braking alone is insuffi-
cient on a downhill gradient, the
controlled speed may be exceeded. It
may also prove impossible to maintain
with the available engine power on up-
hill gradients.<
Decelerating
Press button 3 briefly:
Every time you press the button, road
speed drops by approx. 1 km/h if you
are already running with cruise control.
Hold button 3 in:
The car slows down by automatically
cutting the throttle if you are already
running on cruise control. As soon as
you release the switch, the speed the
car has reached will be maintained and
memorised.
Online Edition for Part-No. 01 41 9 791 301 - © 01/99 BMW AG
76n Cruise control
Cancelling the cruise control
When activated, press button 1: the tell-
tale remains lit. You can use the cruise
control again when required.
In addition, you interrupt the cruise con-
trol function automatically:
> When braking
> When operating the clutch or when
moving the automatic transmission
selector lever from D to N
> If the selected speed is exceeded or
not reached for a lengthy period, for
instance by depressing the accelera-
tor pedal.
Calling up memorised speed
Press button 4:
The speed last memorised is recalled
and maintained once it has been
reached again. If you turn the ignition
key to setting 0, the stored road speed
is cleared from memory and the system
is de-activated.
De-activating the system
If you have interrupted the cruise con-
trol function, press button 1 once again.
The telltale lamp goes out and the
stored road speed is cancelled.
Do not use the cruise control on
twisting roads, in heavy traffic
which prevents a constant speed from
being maintained or if the road surface
is slippery (snow, rain, ice) or loose
(stones, sand).<
Online Edition for Part-No. 01 41 9 791 301 - © 01/99 BMW AG
77n
MinorrepairsKeywordsOverviewControlsMaintenanceTechnicalData
Odometer (distance recorder)
You can activate the displays shown on
this Figure in ignition setting 0 by press-
ing the button (arrow) on the instrument
cluster.
The layout of the displays differs ac-
cording to your car's equipment.
Trip distance recorder
To reset to zero, press the knob (arrow)
in ignition key position 1 or beyond.
Outside temperature display
The outside temperature is displayed
from ignition key position 1 on.
You can change the dimensional unit
(6/7) by pressing
390de025
1 the button (arrow) in ignition setting 1
and holding it down
2 then turning the ignition key to 0.
Ice warning
If the outside temperature falls to ap-
prox. +36, a warning signal is heard
and the display flashes for a short pe-
riod.
The warning is repeated if the tempera-
ture rises again to at least +66 and
then drops a second time to +36.
The ice warning does not rule out
the possibility of black ice also
occurring at temperatures that are other-
wise above +36, for instance on bridges
or where the road is in shadow.<
Never allow the engine to run in the red
zone of the revolution counter.
In this zone the fuel supply is inter-
rupted to protect the engine. This be-
comes evident as an intermittent reduc-
tion in available power.
390de004
Trip distance recorder; outside temperature display Revolution counter
Online Edition for Part-No. 01 41 9 791 301 - © 01/99 BMW AG
78nEnergy Control Fuel gauge
Indicates current fuel consumption in
l/100 km. This enables you to check
how economical and environmentally
friendly your current driving style is.
When the car is halted, the needle
moves back to zero.
390de005
The warning light comes on briefly as
an operating check when the ignition is
switched on.
When the warning light comes on, there
are about
> 8l – BMW 520i, 523i, 528i,
525td/tds, 530d
> 10l – BMW 535i, 540i
of fuel left in the tank.
Fuel tank capacity: see page 223.
Certain vehicle positions, e.g. driving
uphill for prolonged periods, may cause
slight fluctuations in the fuel gauge
reading.
390de006
Add fuel in good time, or else
there is a risk of running the tank
dry and causing damage to the engine
or the catalytic converter.<
Online Edition for Part-No. 01 41 9 791 301 - © 01/99 BMW AG
79n
MinorrepairsKeywordsOverviewControlsMaintenanceTechnicalData
Coolant thermometer Service Interval indicator
Blue
The engine is still cold. Drive at moder-
ate engine and road speeds.
Red
If the warning light comes on or the
COOLANT TEMPERATURE Check
Control display appears*: the engine is
too hot. Switch it off at once and allow
to cool down.
Between the coloured zones
Normal operating temperature. At high
outside temperatures or when loads on
the car are severe, the needle may
move up as far as the beginning of the
red zone.
Checking coolant level: see page 160.
390de007
The display layout varies according to
your car's equipment specification.
Green light-emitting diodes
The fewer are on, the sooner the next
service will be due.
Yellow LED
This lights up in conjunction with
OILSERVICE or INSPECTION.
A service routine is due. Make arrange-
ments with BMW Service.
Red LED
The service routine is overdue.
390de008
Clock symbol
Shows that brake fluid renewal is due.
Periods during which the battery
was disconnected are ignored by
the display.
In such cases you must ensure that the
brake fluid is renewed every two years
regardless of the display. Also see
page 161.<
Online Edition for Part-No. 01 41 9 791 301 - © 01/99 BMW AG
80n
Graphic display
The following instructions and status
messages are depicted as symbols and
sound a gong from ignition setting 2.
They remain on display until the faults
have been remedied:
1 Check low- and high-beam head-
lamps and parking lights
2 Top up washer fluid – goes out after
approx. 1 minute
3 Door open
4 Luggage compartment lid/tailgate
open
5 Check rear light or brake light. A de-
fective third (centre) brake light is in-
dicated by the upper symbol.
At the end of a journey, when the
driver's door is opened, the LIGHTS ON
signal may be heard without any visual
display.
390de121
Alphanumeric display*
Clear-text instructions and reminders
are shown in ignition key position 2 and
beyond. A gong signal is always heard
at the same time.
1 Symbol that a warning is present
2 Display
3 CHECK button
The system malfunction displays are di-
vided into two priority categories:
390en111
Priority 1
These displays appear immediately,
accompanied by a gong signal and by
flashing fault display symbols 1. If sev-
eral faults occur at the same time, they
are displayed in succession. The dis-
plays remain in force until the faults
have been rectified, and cannot be
erased with CHECK button 3:
> RELEASE PARKINGBRAKE
> COOLANT TEMPERATURE
The temperature is too high. Stop the
car immediately and switch off the
engine; see page 160
> STOP! ENGINE OILPRESS
Engine oil pressure has dropped too
low. Stop the car immediately and
switch off the engine; see page 157
Check Control
Online Edition for Part-No. 01 41 9 791 301 - © 01/99 BMW AG
81n
MinorrepairsKeywordsOverviewControlsMaintenanceTechnicalData
Check Control
> CHECK BRAKE FLUID
The level is close to the minimum
mark. Add fluid at the earliest oppor-
tunity; see page 161. Have the cause
of brake fluid loss traced and rectified
by BMW Service
> TYRE DEFECT*
Immediately reduce speed ready to
stop, avoiding any pronounced brak-
ing and steering manoeuvres while
doing so.
See pages 89
> SELFLEVEL SUSP. INACT*
Have the car checked by the nearest
BMW Service; see page 135
> FUEL INJECT.SYS.*
Have a check performed by BMW
Service; see also page 136
> LIMIT*
Display shows whenever you are ex-
ceeding the legal speed limit in a
given country.
Priority 2
These faults or reminders are shown for
20 seconds in ignition key position 2
and beyond. After the text displays
have gone out, symbols remain visible
to indicate that there are fault mes-
sages in the Check Control. The mes-
sages can be called up again by press-
ing CHECK button 3.
> BOOTLID OPEN
Display only appears when car is
driven away from a standstill for the
first time
> DOOR OPEN
Display appears when the car has
reached a given (low) speed
> FASTEN SEAT BELTS*
The warning lamp with belt symbol
also comes on
> PRE-HEATING*
Do not start the engine until the dis-
play has gone out
> WASHER FLUID LOW
Restore the correct level at the earli-
est opportunity; see page 156
> CHECK ENGINE OIL LEV
Add engine oil as soon as possible;
see page 157
> SET TYRE PRESSURE*
The RDC has accepted the prevailing
tyre pressure as the nominal value it
has to monitor.
See pages 88
> CHECK TYRE PRESSURE*
Check the tyre pressure at the next
available opportunity (refueling stop)
and correct to the specified levels.
See pages 88
> TYRE CONTROL INACTIVE*
Brief fault in RDC or system fault,
refer to page 89
> CHECK BRAKE LIGHTS
A bulb has failed or there is a fault in
the electrical circuit; see page 179
and 192 or consult BMW Service
> CHECK LOWBEAM LIGHTS
CHECK PARK LIGHTS
CHECK TAIL LIGHTS
CHECK FRONT FOGLAMPS*
CHECK REAR FOGLIGHTS
CHECK NUMPLATE LIGHT
CHECK TRAILER LIGHTS*
CHECK HIGHBEAM LIGHT
CHECK REVERSE LIGHTS
In each case a bulb may have failed
or the electrical circuit may have a
fault. See page 177 onwards and 192
or consult BMW Service
Online Edition for Part-No. 01 41 9 791 301 - © 01/99 BMW AG
82nCheck Control
> TRANS FAILSAFE PROG*
Please visit your nearest BMW Serv-
ice centre, refer to page 67 or 69
> CHECK BRAKE LININGS
Have the brake pads checked by
BMW Service; see page 132
> RADIO KEY, BATTERY
Renew the battery; see page 183
> CHECK COOLANT LEVEL
Coolant level is too low and should
be topped up at the earliest opportu-
nity; see page 160
> ENGINE FAILSAFE PROG*
The Electronic Engine Output Control
(EML) has a fault. Higher pedal pres-
sure and longer pedal travel may be
needed when braking. Please have a
check performed by BMW Service
The following message cannot be
called up again:
> EXT. TEMP–5.06
This is an example of the display. The
actual outside temperature is shown
if it is +36 or below; see also
page 77.
Messages displayed at the end
of a journey
All malfunctions which have been indi-
cated during a journey are displayed
again in succession when the ignition
key is turned back to position 0.
The following information is also pro-
vided if appropriate:
> LIGHTS ON
Warning at end of journey, when
driver's door is opened
> CHECK ENGINE OIL LEV
Add engine oil at the earliest opportu-
nity (when refuelling); see page 157.
After the ignition key has been removed
and the display has gone out, you can
call up CHECK CONTROL displays for
up to approx. three minutes by pressing
the CHECK button 3. If there are sev-
eral displays, the CHECK button must
be pressed more than once.
Check Control test
Press the CHECK button 3 in ignition
key setting 2: the display should show
CHECK CONTROL OK.
There are no malfunctions in the sys-
tems monitored.
Computer
A description of the computer is to be
found in "Radio and information sys-
tems" and "Monitor".
You can also have Check Control
messages and computer informa-
tion displayed in another language.<
Online Edition for Part-No. 01 41 9 791 301 - © 01/99 BMW AG
83n
MinorrepairsKeywordsOverviewControlsMaintenanceTechnicalData
On-board computer
Calling up functions
Using the button in the turn indicator
lever, from ignition key setting 1, you
can call up on-board computer informa-
tion in the instrument cluster display
unit. Every time you press the button
towards the steering column, another
function is displayed on screen (i.e.
scrolling function).
The sequence of displays is:
ambient temperature, average fuel con-
sumption, range, average road speed.
From ignition setting 1, the most recent
setting appears on the display.
The layout of the displays differs
according to your car's equipment.
390de336
Outside temperature and average
fuel consumption
You can change the unit of measure-
ment for the ambient temperature dis-
play (6/7), by
1 pressing and holding down the reset
button for the trip distance display
(odometer)
2 then turning the ignition key to 0.
See also page 77.
390de126
Operating range and average
speed
The range is calculated on the basis of
distance actually covered.
The average speed display ignores any
stationary periods where the engine
was switched off.
390de125
Online Edition for Part-No. 01 41 9 791 301 - © 01/99 BMW AG
84nOn-board computer
Clearing the display
While average speed is being dis-
played, if you press the turn indicator
lever briefly, the on-board computer
display can be switched off.
Recalculating
If you hold the button down longer, the
average values displayed for fuel con-
sumption and road speed are recalcu-
lated, starting from this point in time.
The engine must be running.
Computer with alpha-numerical
display*
If your car has Check Control with an
alpha-numerical display, the computer
is described in the operating instruc-
tions "Radio and information systems".
Online Edition for Part-No. 01 41 9 791 301 - © 01/99 BMW AG
85n
MinorrepairsKeywordsOverviewControlsMaintenanceTechnicalData
PDC assists you when reversing the car
into a parking space. An audible warn-
ing signal tells you how far you are from
obstructions behind the car. To do this,
four ultrasonic sensors in the back
bumper measure the distance to the
nearest object. The measuring range for
the two corner sensors ends approx.
60 cm (approx. 2 ft) behind the bumper.
The two centre sensors have a range of
approx. 1.50 m (approx. 5 ft).
In ignition key position 2, the system is
activated automatically after approx. 1
second when reverse gear is selected
or the automatic transmission selector
lever moved to R. It is switched off
when the lever is moved out of reverse
gear or away from position R. If you are
towing a trailer, of course, the system
cannot make the appropriate measure-
ments and is therefore out of action.
Audible warning signals
The distance from an obstruction is in-
dicated by an intermittent audible sig-
nal. The closer the car approaches the
obstruction, the more rapid the se-
quence of signals. When the distance is
less than 30 cm (approx. 12 in), the sig-
nal becomes continuous.
The signal is interrupted after approx.
3 seconds if the distance from the ob-
stacle remains constant during this
time, for instance when reversing paral-
lel to a wall.
If a continuous signal at a pitch higher
than usual is heard when the system is
first activated, it is malfunctioning. Have
the cause traced and rectified by BMW
Service.
The PDC cannot act as a substi-
tute for your personal assessment
of obstructions. The sensors have cer-
tain "dead areas" in which objects can-
not always be detected. In addition, the
detection of obstacles can reach the
physical limits of ultrasonic measure-
ment, e.g. trailer towbars and couplings
or thin and painted objects.
Loud sound sources such as loud ra-
dios can overpower the signal tone of
the PDC.<
Keep the sensors clean and free
from ice, so that they always oper-
ate reliably.
Do not spray the sensors for any length
of time with a high-pressure cleaning
jet. Keep such jets at least 10 cm (ap-
prox. 4 in) away from the sensors.<
Park Distance Control (PDC)*
Online Edition for Part-No. 01 41 9 791 301 - © 01/99 BMW AG
86nASC+T/DSC*
Automatic Stability Control
plus Traction (ASC+T)/Dynamic
Stability Control (DSC)*
These systems ensure additional dy-
namic stability, particularly when accel-
erating and cornering.
The DSC adds to the advantages of
ASC+T. In addition to achieving opti-
mum dynamic stability when accelerat-
ing and starting from a standstill, a gain
in stability is obtained when cornering.
Note however that the car always re-
mains subject to the limits imposed by
the basic laws of dynamics.
The system is in operation whenever
the engine has been started.
390de359
Telltale lamp
The telltale lamp in the instru-
ment cluster goes out shortly
after the engine has been
started. See page 21.
If the telltale lamp flashes:
The system is active, that is to say it is
compensating for fluctuations in trac-
tion caused by the road surface.
If the telltale lamp does not go out after
the engine has been started or comes
on during the journey:
The system is defective, but the car it-
self is fully operational with the excep-
tion of the ASC+T/DSC stability control
function. Please visit BMW Service for
repair work.
Switching off
Press the button; the telltale lamp will
come on.
Depending on the car's equipment, the
button is marked either ASC or DSC.
When ASC+T/DSC is switched off, you
are driving conventionally. It is advisa-
ble to switch off the system to improve
traction:
> if the car has to be rocked out of a
hollow or a soft surface, or started in
deep snow or on a loose surface
> if snow chains are fitted.
See also page 133.
Switching on again
Press the button a second time; the tell-
tale lamp will go out.
Not even ASC+T/DSC can over-
come the laws of physics. If the
limit speed is exceeded, the driver is re-
sponsible for the consequences: a lack
of traction and poor lateral roadholding.
The extra safety potential offered by
this system must never be understood
as an invitation to take additional risks.<
You will find further details on ASC+T/
DSC in the Chapter "Technical items of
interest", page 203.
Online Edition for Part-No. 01 41 9 791 301 - © 01/99 BMW AG
87n
MinorrepairsKeywordsOverviewControlsMaintenanceTechnicalData
Electronic Damping Control (EDC)*
This system automatically ensures
that movement of the road wheels is
damped according to the car's needs,
and therefore enhances both ride com-
fort and safety.
390de358
Automatic control
Automatic control is activated each
time the engine is started. It takes effect
over the entire road-speed range and
regardless of the load on the car. If the
influencing factors change (road sur-
face and other operating factors such
as steering, braking etc.), the damping
force exerted by the shock absorbers is
automatically varied within a fraction of
a second.
Sport program
With the ignition key in position 2, press
the EDC button (arrow); the telltale lamp
next to the S will come on.
The Sport program should be selected
if you require a firmer response from the
suspension in all operating situations.
To change over to automatic control:
Press the button again; the telltale lamp
will go out.
Online Edition for Part-No. 01 41 9 791 301 - © 01/99 BMW AG
88n Tyre pressure control (RDC)*
The principle
The RDC monitors tyre pressures at all
four road wheels, both at a standstill
and when the car is being driven. The
system reports any sudden loss of
pressure in one or more tyres.
To enable the RDC to "get to know" the
correct tyre pressure, check tyre pres-
sures in all tyres against the tyre pres-
sure table on page 27 and correct if
necessary. Then activate the system.
This telltale in the instrument
cluster or the Check Control in-
forms you whenever tyre pres-
sure is not normal.
Activating the system
1 Turn the ignition key to position 2 (but
do not start the engine)
2 Keep the button pressed in (arrow)
until the yellow telltale lamp on the in-
strument panel comes on for a few
seconds or the Check Control dis-
plays "SET TYRE PRESSURE"
3 After the car has been driven for sev-
eral minutes, the RDC adopts the ac-
tual tyre pressures as the nominal
values which it is to monitor.
Do not repeat this process until you
have ensured that tyre pressures are
correct. Otherwise RDC operates auto-
matically in ignition setting 2 and there-
fore takes effect during every journey.
390de320
If there is a loss of tyre pressure
If the tyre pressure has dropped too far
after a short time (quite normal on any
tyre), the yellow telltale lamps up or the
message "check tyre pressure" appears
in the Check Control.
This is to remind you that the tyre pres-
sure should be corrected to the speci-
fied values again as soon as possible.
If you are asked to check tyre
pressures shortly after correcting
them, the corrected pressure values
were not plausible. Please check the
tyre pressures again and correct them
to the values specified in the tyre pres-
sure table. After this, re-activate the
system.<
Online Edition for Part-No. 01 41 9 791 301 - © 01/99 BMW AG
89n
MinorrepairsKeywordsOverviewControlsMaintenanceTechnicalData
Tyre pressure control (RDC)*
With a burst tyre
If you suffer a tyre defect involving loss
of pressure, the red telltale lamps up, or
the message "TYRE DEFECT" appears
in the Check Control. In addition, a
gong sounds.
When this occurs, slow down to a stop
immediately, avoiding harsh braking
and steering manoeuvres. Replace the
defective wheel with tyre.
The spare wheel supplied as
standard with your car is equipped
with the necessary RDC electronics and
is therefore also monitored automati-
cally after fitting, when the system has
been activated.<
The RDC system cannot provide
advance notification of any serious
sudden tyre damage caused by external
influences.<
Have your tyres changed by BMW
Service.
BMW Service is informed about how to
handle RDC and is equipped with the
necessary special tools.<
Faults
The RDC can be subjected to brief in-
terference locally by outside equipment
or devices which use the same radio
frequency.
While there is a fault in the system, the
yellow telltale lamps up or the message
"Tyre pressure control inactive" ap-
pears in the Check Control.
The same display appears
> in the event of a system fault
> if a wheel not equipped with RDC is
fitted to the car
> if one or more wheels equipped with
RDC electronics are carried on the
car in addition to the spare wheel.
Consult BMW Service if necessary.
Online Edition for Part-No. 01 41 9 791 301 - © 01/99 BMW AG
90n
Side lights
Low beam headlamps
If you switch off the ignition
while the low-beam headlamps
are switched on, only the park-
ing lights remain lit.
You can also have the "Delayed
switch-off" ("Follow-me-home")
headlamp setting selected: if the head-
lamp flasher lever is operated, the low-
beam headlamps then remain on for a
short time after the ignition has been
switched off.<
390de034
LIGHTS ON warning
When the ignition key is turned back to
0 and the driver's door is opened, a
buzzer sounds for several seconds as a
reminder if the lights are still on.
On cars with alphanumerical Check
Control*:
the reminder appears on the Check
Control; see page 81.
Daytime (dim-dip) circuit*
If desired, the light switch can remain in
the second position: when the ignition
is turned off, the car's lights go out.
You can have the daytime dipped
headlamp setting selected on your
car.<
Turn the knurled wheel to vary the
intensity of the lighting.
390de036
Sidelights/low-beam (dipped) headlamps Instrument lighting
Online Edition for Part-No. 01 41 9 791 301 - © 01/99 BMW AG
91n
MinorrepairsKeywordsOverviewControlsMaintenanceTechnicalData
Headlight beam throw adjustment* High-beam/parking lights
To avoid dazzling the drivers of oncom-
ing vehicles, the beam throw of the low
beam headlamps must be adjusted to
suit the load carried in the car:
Values in ( ) apply when towing a trailer.
0 (1) = 1 to 2 persons without luggage
1 (1) = 5 persons without luggage
1 (2) = 5 persons with luggage
2 (2) = 1 person, load area or
luggage compartment full
390de035
Cars with self-levelling suspension*:
All load conditions: position 0.
Exception:
1 person, luggage compartment or load
area full or when towing a trailer: posi-
tion 1.
Comply with permitted rear axle load,
see page 217.
Please use the correct settings to
avoid dazzling oncoming drivers.<
Xenon headlamps*
Cars with xenon headlamps are
equipped with automatic beam angle
adjustment.
1 High-beam headlamps
2 Headlight flasher (blue telltale lamp)
3 Parking lights
Right or left parking lights
In ignition key position 0, move the turn
indicator lever beyond its normal left or
right turn position until it reaches a final
detent and is retained there.
390de335
Online Edition for Part-No. 01 41 9 791 301 - © 01/99 BMW AG
92nFog lights Interior lighting
Fog lights*
The green telltale lamp on the
instrument panel comes on
when the fog lights are in use.
Rear fog lights*
The yellow telltale lamp in the
instrument cluster comes on
when the rear foglights are lit.
390de037
Foglights and rear foglights
Please comply with local leg-
islation concerning the use of
front and rear fog lights.
The interior lights are controlled auto-
matically.
Switching interior light on and off
manually
Press the button (arrow) briefly.
To switch off the light permanently, hold
the button depressed for about 3 sec-
onds.
To cancel this mode, press the button.
The load-area light in the touring oper-
ates similarly.
390de040
Online Edition for Part-No. 01 41 9 791 301 - © 01/99 BMW AG
93n
MinorrepairsKeywordsOverviewControlsMaintenanceTechnicalData
Interior lighting Reading lights
Footwell lights
The footwell lights operate in the same
way as the interior light.
There are reading lights at the front next
to the interior light, and in the rear pas-
senger area. They can be switched on
and off using the buttons beside them.
To protect the battery, all lights in-
side the car are switched off about
15 minutes after the ignition key has
been turned to 0.<394de301
Online Edition for Part-No. 01 41 9 791 301 - © 01/99 BMW AG
94n
390de340
Air conditioning
Online Edition for Part-No. 01 41 9 791 301 - © 01/99 BMW AG
95n
MinorrepairsKeywordsOverviewControlsMaintenanceTechnicalData
Air conditioning
1 Air supply to windscreen and side
windows
2 Air to the upper body area
The knurled wheels down the sides
open and close the air vents (any in-
termediate setting possible) and the
levers alter the direction of air flow.
The centre knurled wheel varies the
temperature of the airflow; see
page 97
3 Airflow to footwells
4 Airflow to rear-seat footwells
5 Airflow to upper-body area, rear-
seat passengers 97
6 Temperature 96
7 Air flow directed on to the
> Windows
> Upper body area
> Footwell
Any intermediate position is pos-
sible; see page 96
8 Air supply 96
Air temperature control takes effect
when the fan is switched on
9 Heated rear window 96
10 Cooling 96
11 Recirculated air mode 96
Online Edition for Part-No. 01 41 9 791 301 - © 01/99 BMW AG
96nAir conditioning
Tips for pleasant driving
For the air temperature 6 the setting
226 will normally result in pleasant
driving conditions. For air distribution
setting 7, move selector to "6 o'clock".
For setting 8, move to centre position.
Turn outlets 2 so that the airflow passes
the occupants without striking their
bodies directly. Turn the knurled wheel
between air vents 2 into a central posi-
tion to allow slightly cooler air to en-
hance fatigue-free driving.
The description below tells you how to
obtain various settings which may be
individually preferred.
Temperature
The scale values are guide fig-
ures for the interior tempera-
ture. 226 has been found to
be a pleasant setting. When
the car is in motion, the selected tem-
perature is reached as soon as possible
and held constant.
Air distribution
You can direct air on to the
windows, on to the upper
body and into the foot-
well. Any intermediate setting
is possible. In position a small
amount of air continues to reach the
windows in order to prevent them from
fogging over. The 6 o'clock setting is
recommended in normal conditions
(see illustration and overview of system
on page 94).
Air supply
The airflow volume can be
continuously varied. The
greater the incoming flow of
air, the more effective heating
and ventilation will be. In position 0 the
blower and air conditioning are
switched off and the fresh air supply
from outside the car is entirely shut off.
Heated rear window
When the heated rear window
is switched on, the telltale
lamp comes on. The heated
rear window switches itself off automat-
ically.
Cooling
Air is cooled when the air con-
ditioner is switched on, then is
heated back to suit the tem-
perature setting. Depending on weather
conditions, the windscreen may fog
over momentarily when the engine is
started.
Switch off the air conditioning at out-
side temperatures below approx. 56.
This helps to prevent the windows from
misting up.
If the windows fog over immediately
after switching off the air conditioning,
switch it on again.
Moisture condensate forms in the
air conditioning and is discharged
underneath the car. Traces of water on
the ground are therefore normal.<
Recirculated air mode
If there are strong smells out-
side, you can shut off the sup-
ply of outside air for temporary
periods. The air inside the car is then
recirculated.
If your car has a multifunctional steering
wheel with recirculated air button, this
can also be used to shut off the incom-
ing airflow (see page 23).
If the windows fog over in the
recirculated air mode, switch it off
and, if necessary, increase the airflow.<
Online Edition for Part-No. 01 41 9 791 301 - © 01/99 BMW AG
97n
MinorrepairsKeywordsOverviewControlsMaintenanceTechnicalData
Air conditioning
Draught-free ventilation
The outlets for the occupants' upper
body area can be adjusted to suit your
personal preferences:
Turn knurled wheels 1 to open or close
the outlets steplessly. Alter the direc-
tion of the airflow by moving levers 2.
Turn outlets so that the airflow passes
the occupants without striking their
bodies directly.
Knurled wheel 3 blends a varying
amount of cool air with the air for the
upper body area outlets:
> Turn towards the blue mark – cooler
> Turn towards the red mark – warmer.
390de051
Rear-seat area ventilation
Knurled wheel 1 opens the outlets step-
lessly. The airflow direction is varied at
levers 2.
The air emerging here is slightly cooler
that the air for the footwells.
390de355
Micro-filter
The micro-filter traps dust and pollen in
the incoming airflow. It is renewed
when your BMW Service carries out
routine maintenance work. If airflow is
noticeably less than usual, this may in-
dicate that the filter should be renewed
earlier.
Online Edition for Part-No. 01 41 9 791 301 - © 01/99 BMW AG
98nAir conditioning
Cooling
1 Select an interior temperature which
you find pleasant at the rotary tem-
perature control, e.g. 226
2 Switch on the air conditioning
3 Turn the rotary air distribution control
to position
4 Set the rotary blower control (air sup-
ply) to a central position
5 Open the air outlets for the upper
body zone
6 Turn knurled wheel 3 to a tempera-
ture setting which you find pleasant;
see "Draught-free ventilation",
page 97.
390de341
Rapid ventilation
1 Select an interior temperature which
you find pleasant at the rotary tem-
perature control, e.g. 226
2 Switch on the air conditioning and
select the recirculated-air mode
3 Turn the rotary air distribution control
to position
4 Turn the rotary blower control (air
supply) fully to the right
5 Open the air outlets for the upper
body zone
6 Set knurled wheel 3 to cold (blue);
see page 97.
390de342
Rapid heating
1 Select an interior temperature which
you find pleasant at the rotary tem-
perature control, e.g. 226
2 Turn the rotary air distribution control
to position
3 Turn the rotary blower control (air
supply) fully to the right
4 Close the rear seat-area outlets.
390de343
Online Edition for Part-No. 01 41 9 791 301 - © 01/99 BMW AG
99n
MinorrepairsKeywordsOverviewControlsMaintenanceTechnicalData
Air conditioning
Defrosting and demisting
windows
1 Select an interior temperature which
you find pleasant at the rotary tem-
perature control, e.g. 226
2 Turn the rotary air distribution control
to position
3 Turn the rotary blower control (air
supply) fully to the right
4 Close the rear seat-area outlets
5 To defrost the rear window, switch on
rear window heating.
The latent heat store* enables heat to
be obtained from ignition key position 1
on, even if the engine is not running.
390de344
Heating
If the windows are free from ice and
condensation, the following settings are
recommended:
1 Select an interior temperature which
you find pleasant at the rotary tem-
perature control, e.g. 226
2 Turn the rotary air distribution control
to position
3 Set the rotary blower control (air sup-
ply) to a central position
4 Close the rear seat-area outlets.
390de127390de345
Online Edition for Part-No. 01 41 9 791 301 - © 01/99 BMW AG
100n
390de365
Automatic air conditioning*
Online Edition for Part-No. 01 41 9 791 301 - © 01/99 BMW AG
101n
MinorrepairsKeywordsOverviewControlsMaintenanceTechnicalData
Automatic air conditioning*
1 Air supply to windscreen and side
windows
2 Air to the upper body area
The knurled wheels down the sides
open and close the air vents (any in-
termediate setting possible) and the
levers alter the direction of air flow.
The centre knurled wheel varies the
temperature of the emerging air;
see page 104
3 Air to footwells
4 Air to rear-seat footwells
5 Air to upper body area, rear-seat
passengers 105
6 Automatic air distribution 102
7 Individual air distribution 102
8 Temperature – left side 102
9 Temperature display, air
supply 102
10 Temperature – right side 102
11 Defrosting and demisting
windows 103
12 Air conditioning 103
13 Automatic Recirculated Air Control
(AUC) 103
14 Heated rear window 75, 104
15 Air supply 103
16 Residual heat utilisation 104
17 Air inlet grille for interior tempera-
ture sensor – keep unobstructed
Online Edition for Part-No. 01 41 9 791 301 - © 01/99 BMW AG
102nAutomatic air conditioning*
A pleasant interior temperature
Press AUTO key 4 to switch on the au-
tomatic mode. Choose an interior tem-
perature which you find pleasant, e.g.
226. Above ambient temperatures of
56 you can also use the air conditioner
10. This dries the air and prevents the
windows from misting up, for instance if
someone sits in the car with wet cloth-
ing. Turn outlets 2 so that the airflow
passes the occupants without striking
their bodies directly. The knurled wheel
between outlets 2 for the upper body
area should be turned to a central set-
ting, since slightly cooler air at this level
helps to avoid driving fatigue.
The description below tells you how to
obtain various settings which may be
individually preferred.
You can have your car pro-
grammed so that your preferred
automatic air conditioning settings are
obtained whenever you unlock the car
with your personal remote-control key.<
Automatic air distribution
The AUTO program handles the
setting of air distribution for you
and also adapts your temperature pref-
erences to suit ambient conditions
(summer, winter). It ensures a pleasant
interior climate at every time of year.
Select a pleasant interior temperature
for yourself, e.g. 226. Selected tem-
peratures and the reminder AUTO for
the airflow appear on display 7; see
overview on page 100. Open the outlets
for the occupants' upper body zone.
Switch the air conditioning on in the
warm season of the year. Maximum
cooling effect is obtained when knurled
wheel 3 (see page 104) is in the cold
setting.
Individual air distribution
You can also switch off the
AUTO program and choose your
own combination of air distribu-
tion settings. Air flows on to the
windows, to the upper body zone
and to the footwell .
Temperature
You can also select your own in-
dividual temperature setting on
driver and passenger sides of
the car. The displayed values are a
guide to the actual interior temperature.
226 is recommended as a pleasant
setting, whether or not the air condi-
tioning is in operation. During the jour-
ney, the chosen temperature is reached
as quickly as possible – in summer and
in winter – and maintained at a constant
value.
Turn knurled wheel 3 (see "Draught-free
ventilation", page 104) to a central set-
ting, since slightly cooler air at this level
helps to prevent driving fatigue.
This feature can be used primarily for
blending air to make slight adjustments
and enhance personal comfort.
You can obtain full output from the
heater (non-regulated) at the 326
setting. At 166 the full cool air output
is obtained when the air conditioning is
switched on.<
Online Edition for Part-No. 01 41 9 791 301 - © 01/99 BMW AG
103n
MinorrepairsKeywordsOverviewControlsMaintenanceTechnicalData
Automatic air conditioning*
Air supply
In the AUTO program, air sup-
ply is controlled automatically;
AUTO appears in display 7 – see the
summary on page 100. Using "+" and
"–" you can vary the air supply. Your en-
try is indicated by a bar display, the au-
tomatic air supply is switched off and
the automatic airflow distribution sys-
tem remains unchanged. However, you
can switch the automatic air supply sys-
tem back on by pressing the AUTO but-
ton.
In the lowest fan setting, if you press
"–", all displays disappear: blower,
heating and air conditioning are
switched off and the air supply shut off.
The automatic air conditioning can be
switched on again by pressing any but-
ton (except REST button 14).
Defrosting and demisting
windows
This program removes ice and
condensation quickly from the
windscreen and from the side windows.
Air conditioning
Air is cooled and dried when the
air conditioner is switched on,
then is heated back up to suit the tem-
perature setting.
Depending on weather conditions, the
windscreen may fog over momentarily
when the engine is started.
At outside temperatures below approx.
56, switch off the air conditioning. This
helps to prevent the windows from
misting up.
If the windows fog over immediately the
air conditioning is switched off, switch it
on again.
Moisture condensate forms in the
air conditioning and is discharged
underneath the car. Traces of water on
the ground are therefore normal.<
Automatic Recirculated Air
Control (AUC)
If the air outside the car has an
unpleasant odour or contains
pollutants, you can shut off the suply to
the interior of the car temporarily. The
air inside the car is then recirculated.
Obtain the desired operating mode by
pressing the button as often as neces-
sary.
> Telltale lights off: fresh air enters car
from the outside.
> Left telltale lamp on – AUC operation:
the system identifies pollutants in the
outside air and shuts off the supply if
necessary. The air inside the car is
then recirculated.
After this, the automatic system
switches between outside air supply
and recirculated air according to the
available air quality.
> Right telltale lamp on: the outside air
supply is permanently shut off. The
air inside the car is recirculated.
If your car has a multifunctional steering
wheel with recirculating air switch (see
page 23), you can use it to change be-
tween "Off" and the recirculating air
mode (or between AUC and the recircu-
lating air mode).
Online Edition for Part-No. 01 41 9 791 301 - © 01/99 BMW AG
104nAutomatic air conditioning*
If the windows fog over in the re-
circulated air mode, switch it off
and, if necessary, increase the airflow.<
Heated rear window
When the heated rear window is
switched on, the telltale lamp
comes on. The heated rear window
switches itself off automatically.
Residual heat utilisation
Heat from the engine is stored
and used to heat the car's interior
when the ignition is switched off, for in-
stance when waiting at a level crossing.
In ignition setting 1, you can adjust the
settings of the automatic air condition-
ing system. In ignition key position 0,
the heated air is directed automatically
to the windscreen, side windows and
footwells.
This function can be activated if
outside temperature is below ap-
prox. +156, the engine is at its regular
operating temperature and the battery
is sufficiently charged.<
Latent heat store*
Automatically activated in ignition key
position 1 when residual heat is used.
Draught-free ventilation
The outlets for the occupants' upper
body area can be adjusted to suit your
personal preferences:
Turn knurled wheels 1 to open or close
the outlets steplessly. Alter the direc-
tion of the airflow by moving levers 2.
Turn outlets so that the airflow passes
the occupants without striking their
bodies directly.
Knurled wheel 3 blends a varying
amount of cool air with the air for the
upper body area outlets:
> Turn towards the blue mark – cooler
> Turn towards the red mark – warmer
390de051
Online Edition for Part-No. 01 41 9 791 301 - © 01/99 BMW AG
105n
MinorrepairsKeywordsOverviewControlsMaintenanceTechnicalData
Automatic air conditioning*
Rear-seat area ventilation
Knurled wheel 1 opens the outlets step-
lessly. Use knurled wheel 3 to vary the
temperature of the airflow, subject to
the position of the knurled wheel at the
front of the car.
You can vary the airflow direction at
levers 2.
390de354
Micro-filter and activated
charcoal filter
The micro-filter traps dust and pollen
in the incoming airflow. The activated
charcoal filter in addition removes gas-
eous pollutants from the air entering the
car. This combined filter is changed by
BMW Service during routine mainte-
nance work. If the airflow is noticeably
less than usual, this may indicate that
the filter should be renewed earlier.
Online Edition for Part-No. 01 41 9 791 301 - © 01/99 BMW AG
106nHeated seats* Steering wheel heating* Roller sunblind*
The seat cushion and seat back can be
heated when the ignition key is in posi-
tion 2.
By pressing the button repeatedly, you
can obtain different heat outputs.
The maximum heat output is obtained
when three telltale lamps are on, the
minimum heat output when only one is
on. Temperature control is by thermo-
stat.
Direct switching off is also possible
when a higher heat output has been
selected:
keep the button pressed in for a longer
period.
390de356
The steering wheel heating is opera-
tional in ignition key position 2; to
switch on and off, press the key (arrow).
When the steering wheel is being heat-
ed, the telltale lamp in the button is on.
If your car has a multifunctional steering
wheel without steering wheel heating,
this position is occupied by the recircu-
lated air button (see page 23).
390de014
From ignition setting 1, press the button
to operate.
Roller sun blinds for rear side
windows*
Pull the blind out at its loop and secure
it to the retainer.
390de357
Online Edition for Part-No. 01 41 9 791 301 - © 01/99 BMW AG
107n
MinorrepairsKeywordsOverviewControlsMaintenanceTechnicalData
Auxiliary heater* Auxiliary ventilation*
If your car has an auxiliary fuel-burning
heater, it is also equipped with inde-
pendent ventilation control. Cars are
also supplied with independent ventila-
tion control only.
Both systems are operated by the
Multi-Information-Display (MID) or the
on-board monitor; refer to the Operat-
ing Manual.
Two different switch-on times can be
preselected, so that you can be sure
that the car's interior is warm when it is
next entered. Snow and ice are also
easier to remove from the windows.
The auxiliary heater runs for 30 minutes.
It can also be switched on and off di-
rectly. Since its current consumption is
high, it should not be run twice in suc-
cession unless there has in the mean-
time been an opportunity to recharge
the car's battery by driving the car.
The auxiliary fuel-burning heater can be
operated at outside temperatures be-
low 166 if the switch-on time is prese-
lected, or switched on directly at any
outside temperature. This only applies
when the car is driven, however, until
the engine has reached its regular oper-
ating temperature.
The heated air is directed automatically
to the windscreen, side windows and
footwell; maximum heating output is al-
ways used.
In ignition key position 1 you can adjust
the interior temperature, air supply and
air distribution.
The auxiliary heater continues to run
for a short period after it has been
switched off (telltale lamp out).
Even during the warm season of
the year the auxiliary heater
should be switched on directly about
once a month, then switched off again
after about 5 minutes.<
Do not operate the auxiliary heater
in confined spaces (closed
rooms). Always switch off the auxiliary
heater before refuelling the car.<
Ventilates the interior of the car and
lowers its temperature by means of the
(automatic) air conditioning blower.
The auxiliary ventilation is operated by
the Multi-Information-Display (MID) or
the on-board monitor; refer to your
Operating Manual.
Two different switch-on times can be
preselected; the ventilation system then
runs for 30 minutes. It can also be
switched on and off directly. Since its
current consumption is high, it should
not be run twice in succession unless
there has in the meantime been an op-
portunity to recharge the car's battery
by driving the car.
Independent ventilation control can be
operated at any outside temperature
above 166 if the switch-on time is
preselected, or switched on directly at
any outside temperature, but not when
the car is being driven.
Air emerges from the variable-flow,
controlled-direction outlets for the up-
per body zone on the fascia. These out-
lets must therefore remain open if the
independent ventilation system is to be
used.
In ignition key position 1, the airflow
volume and air distribution are adjusted
in the same way as for auxiliary heating.
Online Edition for Part-No. 01 41 9 791 301 - © 01/99 BMW AG
108nRemote control for auxiliary heater*
1 Switching on
2 Radio aerial
3 Telltale light
4 Switching off
You can switch the auxiliary heater on
and off with the remote control handset
provided that the outside temperature
is below 166. The average range for
signal reception is approx. 350 metres.
Switching on
1 Extend aerial 2 fully
2 Press button 1. Telltale light 3 comes
on three times, then emits short
rhythmic flashes for the remainder of
the operating period (max. 30 min-
utes)
3 Push the aerial back in, but only after
the first three regular flashes have
been seen.
390de155
Switching off
1 Extend aerial 2 fully
2 Press button 4. The telltale lamp
flashes three times and then goes out
3 Finally, push the aerial back in.
Renewing the battery and operating a
new transmitter: see page 185.
The best signal transmission is
obtained if the remote control is
held either vertical or horizontal. When
switching on and off, do not touch the
aerial or point it at the car.
The remote control only operates the
auxiliary heater if this is not already run-
ning after a preselected time input or
direct switch-on.<
Interference
Operation of the remote control may be
interfered with by outside equipment
operating on the same frequency.
Online Edition for Part-No. 01 41 9 791 301 - © 01/99 BMW AG
109n
MinorrepairsKeywordsOverviewControlsMaintenanceTechnicalData
To open
Pull the handle. The lamp comes on
automatically.
To close
Swing the lid up.
Locking
Lock with a master key. The glove box
can only be unlocked with a master key.
If you only hand over the door key
and ignition key, for example to
hotel staff (see page 34), this will pre-
vent unauthorised access to the glove
box.<
390de060
After using the glove box, close its
lid without delay, so that it cannot
cause injury in the event of an acci-
dent.<
Rechargeable hand lamp*
This is inside the glove box, on the left.
The lamp is protected against over-
charging and can therefore remain in
the socket when it is not in use.
Always switch the lamp off before
inserting it into the socket, or else
it could be overcharged and damaged.<
The lid of the compartment on the front,
inclined section of the centre console
can be slid open and closed (arrow).
If a cassette holder* is installed, each
cassette compartment is opened by
pressing the small button next to it.
Compartment on centre console be-
tween front seats: To open, reach into
the recess and pull up. If a car phone is
installed, it will occupy this compart-
ment.
390de043
Glove box Storage compartments
Online Edition for Part-No. 01 41 9 791 301 - © 01/99 BMW AG
110nStorage compartments Car phone* Drink can holders*
There is an open storage compartment
to the left of the steering column.
There is further storage space in all
doors and on the front seat backs*.
Hands-free telephone system*
On cars prepared for telephone installa-
tion* there is a trim panel for the hands-
free microphone in the roof lining, near
the interior lamp.
For further information on the car
phone, see the separate operating
instructions.390de353
There are two holders for drink cans or
cups at the front of the centre console
(see illustration) and another two at the
end of the centre console, below the
grille.
Press briefly to release and open them;
swing back inwards when not required.
390de363
Online Edition for Part-No. 01 41 9 791 301 - © 01/99 BMW AG
111n
MinorrepairsKeywordsOverviewControlsMaintenanceTechnicalData
Ashtray, front* Cigarette lighter*
To open
Press briefly in the direction of the
arrow.
To extinguish a cigarette, knock off the
ash and insert a short distance only into
the funnel-shaped hole.
390de061
To empty
Press the edge of the lid (arrow): the
ashtray will pop up and can be re-
moved.
On cars with non-smoker fittings, the
insert is removed in the same way.
390de062
Press the recess (arrow) briefly, then
press the cigarette lighter in.
The cigarette lighter can be removed
when it pops back out.
Hold the hot cigarette lighter only
by its knob, or else you may suffer
burns.
The cigarette lighter remains opera-
tional when the ignition key has been
removed. For this reason, do not leave
children in the car unattended.<
390de364
Online Edition for Part-No. 01 41 9 791 301 - © 01/99 BMW AG
112nCigarette lighter* Ashtray, rear*
Cigarette lighter socket
This can be used for a hand lamp,
vacuum cleaner or similar device, pro-
vided that it runs on 12 V DC and its
power consumption does not exceed
200 Watts. Make sure that the socket is
not damaged by attempting to insert
plugs of the wrong pattern.
On cars with non-smoker fittings, the
socket is at the same point.
To open
Press the recess briefly.
To empty
Press the edge of the lid (arrow). the
ashtray will pop up and can be re-
moved.
390de063
Online Edition for Part-No. 01 41 9 791 301 - © 01/99 BMW AG
113n
MinorrepairsKeywordsOverviewControlsMaintenanceTechnicalData
The rear seat back is divided into two
sections, one of them one-third and the
other two-thirds of the total width.
Either side can be folded forwards indi-
vidually if long or bulky objects have to
be carried in the car.
Folding:
Insert the fingers into the recess and
pull forwards (arrow 1).
When the seat backs are returned to
the raised position again, make sure
that their catches engage correctly. The
red panel (arrow 2) must move down.
394de117
The centre seat belt has a small addi-
tional belt lock.
> If you connect up the two belt sec-
tions, you can use the centre seat
belt just like any normal three-point
seat belt.
> Disconnecting the seat belt (arrow)
makes it more convenient to fold
down the larger seat back.394de303
Each seat back can be locked with one
of the car's master keys.
This prevents access to the luggage
compartment from the inside of the car
if you are obliged to hand over door and
ignition key 3 (see page 34). This is an
advantage, e.g. in hotels.
394de118
Through-loading system*
Online Edition for Part-No. 01 41 9 791 301 - © 01/99 BMW AG
114nSki bag*
This enables a maximum of four pairs of
skis to be carried safely and kept clean.
Using the full length of the ski bag and
the additional space in the luggage
compartment, skis up to a length of
2.10 m can be carried. If skis of this
length are carried, however, the ski
sack will only be able to hold two pairs
before it becomes too narrow.
Removing the centre armrest
(Not on cars with through-loading sys-
tem or on touring; see page 116).
1 Unfold the centre armrest completely
2 Detach the cover over the opening at
the top (it has a burr fastener) and
place it on the armrest
3 Hold the front of the armrest with one
hand, place the other hand under the
armrest and move it sharply upwards
(arrow).
394de067
Installing the centre armrest
Insert the centre armrest from the top
and press it down until it is heard to en-
gage in its holders.
Make sure that the pins at the
sides do not damage the seat up-
holstery.<
Online Edition for Part-No. 01 41 9 791 301 - © 01/99 BMW AG
115n
MinorrepairsKeywordsOverviewControlsMaintenanceTechnicalData
Ski bag*
Loading
1 Press the button (arrow 1): this will
unlock the loading flap in the luggage
compartment
2 Press the locking levers together
(arrows 2) and swing the cover for-
wards
3 Lay out the ski bag between the front
seats. The zip fastener simplifies ac-
cess to the contents of the bag, and
makes drying it out easier
394de068
4 Inside the luggage compartment, se-
cure the loading flap to the underside
of the rear window shelf with the
magnetic retainers.
Make sure that the skis are clean before
they are inserted into the bag, and that
any sharp edges on them or their bind-
ings do not damage or pierce the ski
bag.380de069
Secure the skis or any other
stored objects with the retaining
strap on the ski bag. Tighten the turn-
buckle to ensure that the retaining strap
is taut.<
To stow away the ski bag, follow the
opposite procedure.
380de070
Online Edition for Part-No. 01 41 9 791 301 - © 01/99 BMW AG
116nSki bag*
With through-loading system
1 Swing out the centre armrest, detach
the cover over the opening at the top
(it is secured by a burr fastener) and
place it on the armrest
2 Press catch 1 down and swing the
cover forwards
3 Press catch button 2: this unlocks the
flap in the luggage compartment.
394de119
In the touring
1 Swing out the centre armrest, detach
the cover over the opening at the top
(it is secured by a burr fastener) and
place it on the armrest
2 Press catch 1 down and swing the
cover forwards
3 Press button 2: this releases the flap
in the load area.
In conjunction with the removable
luggage floor* (refer to page 120):
removal of floor, unlock the flap and
slide the floor back in – the floor sec-
tion then covers the flap.
392de176
If the flap in the load area is con-
cealed by the pull-out floor panel,
do not fold the larger section of the rear
seat back, otherwise the flap will be
damaged.<
Online Edition for Part-No. 01 41 9 791 301 - © 01/99 BMW AG
117n
MinorrepairsKeywordsOverviewControlsMaintenanceTechnicalData
Load area – touring
Folding rear seat back
Insert fingers into the recess and pull
forwards (arrow).
The rear seat back is divided into two
sections, one of them one-third and the
other two-thirds of the total width. You
can fold down both sides to enlarge the
luggage area.
When the seat backs are returned
to the raised position again, make
sure that their catches engage cor-
rectly. The red warning zone in the
recess then disappears.
The centre seat belt can only be pulled
out when the larger section of the rear
seat back is locked into position.<
392de161
Roller-blind cover
Pull out the roller cover and secure it in
the retainers at the back
The cover can support the weight of
light articles, e.g. clothing.
Do not place any heavy or hard
objects on the roller cover or
these could endanger the occupants if
ever you have to brake sharply.
Do not allow the roller cover to run back
too fast, as this could damage it.<
For storage of the roller cover when the
seat is folded, see next page.
392de162
Protective net*
Pull the protective net out by its loop,
then hold the rod at both sides and in-
sert it into the retainers. This is best
done from the back seat.
Do not allow the protective net to
retract too fast, or it could cause
injury and itself become damaged.<
When the rear seat backs are folded,
the net tube can be secured in front of
the rear seats, from which point the net
can still be pulled out and secured at
the front retainers (see next page).
392de163
Online Edition for Part-No. 01 41 9 791 301 - © 01/99 BMW AG
118nLoad area – touring
Removing roller cover and
protective net
1 Press the buttons at the ends
(arrow 1)
2 Pull the tube out to the rear (arrow 2).
Installing
Simply insert the tube into the two side
catches and push it forward until it en-
gages.
392de164
Storage
Holders for the tube are provided in
front of the rear seat.
Insert the tube from the right, as shown
in the picture. The loop on the protec-
tive net must be at the top and the end
of the roller cover must be placed
around the tube at the bottom rear.
You can pull out the protective net and
insert it in the brackets above it in the
roof area.
392de165
Side flaps
To open, press the button.
392de166
Online Edition for Part-No. 01 41 9 791 301 - © 01/99 BMW AG
119n
MinorrepairsKeywordsOverviewControlsMaintenanceTechnicalData
Load area – touring
Compartment in floor
To open: press the recessed section of
the handle and swing up the flap (large
arrow).
The flap is lockable with a master key.
The partitions in the compartment can
be repositioned. If they are removed
and their holders turned to the left and
taken out, a compartment with a flat
floor is obtained.
392de167
Raising the floor panel flap
Swing up the holder (black) on the un-
derside of the flap and attach it to the
upper frame of the tailgate cutout.
Before folding the floor panel flap down
again, return the holder to its original
position.
392de168
Raising the spare wheel cover
Swing the cover up and attach it to the
red holder on the floor panel flap
(arrow).
Before folding the cover back down, re-
turn the holder to its original position.
392de169
Online Edition for Part-No. 01 41 9 791 301 - © 01/99 BMW AG
120nLoad area – touring
Pull-out load-area floor*
To release, pull the recessed handle up.
Pull out the floor.
Do not drive the car with the load-
area floor extended.
Do not release the load-area floor when
the car is standing on a slope, or it may
run out by itself and cause injury.
If an unsecured load is being carried, it
could slide if the load-area floor extends
accidentally, and fall to the ground when
the floor panel reaches its limit stop.<
392de174
When extended, the panel can with-
stand the following loads:
> Up to 300 kg (660 lb) distributed over
its entire surface
> Up to 75 kg (165 lb) at the rear edge.
Do not place heavier loads on the
panel, or damage may occur.
Do not reach under the load-area floor
when sliding it back in, or injury could
be caused.<
Raising the load-area floor
For access to the area under the floor,
the spare wheel etc.:
> Swing up the load-area floor panel
and retain it with the rod (arrow)
> Open the quick-release fasteners on
the spare wheel cover.
392de175
Online Edition for Part-No. 01 41 9 791 301 - © 01/99 BMW AG
121n
MinorrepairsKeywordsOverviewControlsMaintenanceTechnicalData
Load
Loading
If you carry heavy or bulky loads in your
BMW:
> Place heavy loads as far forward as
possible – right behind the back rests
or the load area partition– and keep
load low (this Figure illustrates the
touring)
> Wrap protective material round sharp
corners and edges
> Do not stack loads higher than the
seat backs
> Pull out the protective net* (refer to
page 117f) and ensure that objects
are not able to pass through the sep-
arating net
> When carrying very heavy loads with
no passengers on the back seat, in-
sert each of the outer seat belts into
their opposite locks.
392de177
Securing the load
> Small and light items can be retained
with the tensioning straps, a load-
area net* or other suitable straps (see
page 43)
> BMW Service can supply suitable
means of lashing and securing larger
or heavier loads*. Lashing points are
provided in the corners of the lug-
gage compartment or load area (pic-
ture shows touring)
> Please note the information supplied
with load securing equipment.
392de178
Always stow the load correctly
and secure it so that it cannot en-
danger the car's occupants if the driver
has to brake heavily or swerve.
Do not exceed the gross weight or axle
load limits (see page 217), as this could
endanger the car's operating safety and
infringe the law.
Do not carry heavy or hard objects
loose in the occupant area, in case they
are thrown around and endanger the
occupants when the car is braked heav-
ily or during a sudden avoidance man-
uoeuvre.<
Online Edition for Part-No. 01 41 9 791 301 - © 01/99 BMW AG
122nRoof rack*
Mounting points
Access to the mounting points:
To open the covers (arrow), use the tool
accompanying the roof rack system.
A special roof rack system is available
as an accessory for your BMW. If it is
used, please comply with the installa-
tion instructions supplied.
A loaded roof rack alters the car's road
behaviour and steering response quite
considerably, by moving its centre of
gravity.
When loading the roof rack, ensure that
the specified roof load limit, the car's
gross weight limit and the axle loads
are not exceeded. The relevant figures
are shown in the technical data section,
page 217.
394de369
The roof load must be uniformly distrib-
uted and should not be too large in
area. Heavy items of luggage should
always be placed at the bottom. Make
sure that sufficient clearance is availa-
ble for raising the sliding/tilting sunroof
and that no objects extend into the
hinge-up area of the tailgate.
Secure loads to the roof rack so that
they cannot shift or fall off during the
journey, and thus endanger following
traffic.
Drive smoothly and avoid violent accel-
eration, braking or cornering.
The roof load increases the car's sur-
face area exposed to the wind, so that
fuel consumption will be higher and the
loads on the roof structure of the car
more severe.
Online Edition for Part-No. 01 41 9 791 301 - © 01/99 BMW AG
123n
MinorrepairsKeywordsOverviewControlsMaintenanceTechnicalData
Towing a trailer
Towing a trailer
When a trailer is towed, the demands
on both car and driver are more severe.
A trailer reduces manoeuvrability, the
ability to climb hills, acceleration and
braking capacity and makes the car
handle and corner differently.
The permissible trailer load and nose
weight (towbar downthrust) are stated
in "Technical Data", page 217. The
trailer load limit is also entered in the
car's registration papers. Consult BMW
Service regarding increased trailer
weights.
Trailer tow hitch*
The suspension settings of your BMW
afford optimum safety, ride comfort and
sports performance.
If a trailer tow hitch is fitted by the
manufacturer, the vehicle will also be
equipped with uprated suspension* at
the rear as standard. This compensates
for the weight of the tow hitch and also
ensures optimum road behaviour when
the trailer is not being towed.
If a trailer tow hitch* is retrofitted, it
must be of a type approved by BMW
and be expertly installed by BMW Serv-
ice. You are recommended to have up-
rated suspension fitted as well.
On models with self-levelling suspen-
sion, the trailer-towing suspension
need not be retrofitted.
BMW does not approve of any other
suspension systems offered by the au-
tomotive trade for trailer towing pur-
poses.
Look after a detachable ball end in ac-
cordance with its manufacturer's oper-
ating instructions, to ensure that it can
be fitted and removed without difficulty.
If a trailer tow hitch is installed, the
self-regenerating action of the rear
bumper system may not be able to take
effect.<
The use of a stabilizing device can be
recommended, particularly if the trailer
is a heavy one. Information can be ob-
tained from BMW Service.
Online Edition for Part-No. 01 41 9 791 301 - © 01/99 BMW AG
124nTowing a trailer
Cover flap*
Removing
Take hold of the trailer tow hitch cover
panel in the cutout provided, pull down-
wards and to the rear and remove the
panel from the cutout.
For attaching and removing the ball
head, please see the separate instruc-
tions.
Fitting
first install the cover flap at the top with
the groove in the aperture, then press in
the lower area (arrow).
390de325
Nose weight
This is the load exerted downwards by
the trailer on the ball head of the tow
hitch (it can be determined with the aid
of bathroom scales or similar).
In Germany: a minimum nose weight of
25 kg (55 lb) is laid down by law.
Try to achieve a nose weight close to
the permitted limit (see page 217) with-
out exceeding it.
The trailer's nose weight affects the
towing vehicle, and must not lead to the
car's gross weight limit or rear axle load
limit being exceeded if a trailer is being
towed. The car's payload limit is re-
duced by the weight of the trailer tow
hitch and, if a trailer is being towed, by
its nose weight. The gross weight limit
for the combined car and trailer must
not be exceeded.
Load
When loading the trailer, make sure that
the weight is kept as low as possible
and stowed if possible close to the axle.
A low centre of trailer gravity makes the
outfit much more stable and safe to
drive.
Do not exceed either the trailer's gross
weight or the specified trailer load limit
for the car. The smaller value is the limit
which should be adhered to.
Before purchasing a trailer it is advisa-
ble to obtain a declaration from the
trailer concerning the effective trailer
weight and trailer payload limit.
Gradients
In the interests of safety and to avoid
holding up other traffic, do not attempt
to climb gradients steeper than 12X. If
an application is made to tow a heavier
trailer, the limit is 8X.
As altitude above sea level increases,
engine power output tends to drop. You
should therefore take particular care
when driving through mountainous
country, since the maximum gradient
on which the outfit can be started may
be lower than usual.
BMW 530d: Avoid driving up
lengthy hills in 1st gear alone,
since this could overheat the fuel and
cause bubbles to form, so that the en-
gine is starved of fuel and stalls. Auto-
matic-transmission cars: Select posi-
tion D.<
Online Edition for Part-No. 01 41 9 791 301 - © 01/99 BMW AG
125n
MinorrepairsKeywordsOverviewControlsMaintenanceTechnicalData
Towing a trailer
Downhill gradients
Special care must be taken when de-
scending gradients: before doing so, al-
ways change down to the next-lower
gear – and if necessary as far as 1st
gear or automatic transmission selec-
tor lever position 2 – and drive down the
hill slowly.
Speed limit
The maximum speed limit when towing
a trailer is 80 km/h in Germany, and
similar speed limits apply in other coun-
tries also. The trailer load limits have
been chosen to ensure that driving sta-
bility is satisfactory at this speed. If
higher speed limits apply in other coun-
tries, you are none the less recom-
mended not to drive faster for safety
reasons.
If the trailer begins to swing from side
to side, the outfit can only be stabilized
by braking immediately.
Tyre pressures
Check the car's and the trailer's tyre
pressures most carefully. For the trailer,
comply with the manufacturer's recom-
mendations.
Outside mirrors
If the standard outside mirror is not suit-
able for towing a trailer, legislation pre-
scribes two outside mirrors which bring
both rear corners of the trailer into your
field of view. Suitable mirrors, some
with adjustable arms, can be obtained
from BMW Service.
Electrical system
Higher electrical consumption
can be expected if a trailer (cara-
van) is towed. Try to avoid operating
electrical equipment for too long peri-
ods at a time, in order to limit the drain
on the car's battery.<
Before starting a journey, check
that the trailer's rear lamps are op-
erating correctly.<
Online Edition for Part-No. 01 41 9 791 301 - © 01/99 BMW AG
126n
Online Edition for Part-No. 01 41 9 791 301 - © 01/99 BMW AG
Initial overview
Controls in detail
Operation, maintenance
and general care
Minor repairs
Technical data
Index
Technical items of interest
127n
MinorrepairsKeywordsOverviewControlsMaintenanceTechnicalData
Driving precautions:
Running in 128
Driving hints 128
Catalytic converter 129
Anti-lock brake system
(ABS) 130
Disc brakes 131
Brakes 132
Winter operation 133
Power steering 135
Self-levelling suspension 135
Digital Diesel Electronics
(DDE) 136
Car telephone 136
Car radio 136
Wheels and tyres:
Tyre pressures 137
Condition of tyres 137
New tyres 138
Wheel-changing 138
Wheel and tyre
combinations 139
Winter tyres 140
Snow chains 140
Approved wheel and tyre
sizes 141
In the engine compartment:
Engine hood 147
Engine compartment 148
Washer fluid 156
Washer jets 156
Engine oil 157
Coolant 160
Brake fluid 161
Power steering oil 162
Vehicle identification
number 162
Type plate 162
Maintenance and general care:
The BMW Maintenance
System 163
Care of the car 164
Airbags 170
Laying up out of use 170
Legal requirements and
regulations
Rule of the road 171
Registration abroad 171
Technical modifications 172
OBD socket 172
Recycling:
Recycling in the Service
area 173
Returning the car 173
Online Edition for Part-No. 01 41 9 791 301 - © 01/99 BMW AG
128n
Please comply with the following in-
structions, which are intended to en-
sure that your car achieves its optimum
operating life and economy.
Engine and final drive
Up to 2000 km (approx. 1300 miles):
drive at varying road and engine
speeds, but do not exceed the follow-
ing maximum values:
> Cars with spark-ignition (petrol, gas-
oline) engine
6-cylinder: 4500 rpm or
160 km/h (99 mph)
8-cylinder: 4500 rpm or
170 km/h (106 mph)
> Cars with diesel engines
3500 rpm or
150 km/h (92 mph)
Avoid full throttle and do not use the
automatic transmission kick-down.
From a distance reading of 2000 km
(approx. 1250 miles) onwards, engine
and road speeds can be gradually in-
creased.
Comply with these running-in instruc-
tions again if an exchange engine or
final drive is fitted later in the car's life.
Tyres
New tyres do not achieve their full road
grip immediately, for production rea-
sons. You should therefore drive in a
restrained manner for the first 300 km
(approx. 200 miles).
Brakes
Brake pads and discs do not achieve a
favourable wear and contact pattern
until the car has covered about 500 km
(approx. 300 miles).
Brakes:
Do not rest your foot on the brake
pedal while the car is in motion. Even
slight continuous pressure on the brake
pedal could cause overheating, brake
pad wear or even brake system failure.
Aquaplaning:
When driving on wet or slushy surfaces,
reduce speed to prevent a wedge of
water from forming between the tyre
and the road. This situation, known as
aquaplaning, means that the tyre can
actually lose contact completely with
the road surface, so that the car can
neither be steered nor can the brakes
be properly applied.
Water on roads:
When there is water on the roads, only
drive through to a max. depth of 30 cm
(12 in), and no faster than a walking
pace, otherwise damage to the engine,
electrical system and transmission may
be caused.
Rear-window shelf:
Do not place heavy or hard objects on
the shelf, or these could injure the car's
occupants when the brakes are ap-
plied.
Running in Driving hints
Online Edition for Part-No. 01 41 9 791 301 - © 01/99 BMW AG
129n
MinorrepairsKeywordsOverviewControlsMaintenanceTechnicalData
Driving hints Catalytic converter
Coat hooks:
Items of clothing hung from the hooks
must not obstruct the driver's view. Do
not hang heavy objects from the hooks,
they could cause injury to the car's oc-
cupants during sudden or heavy brak-
ing or avoidance manoeuvres.<
The catalytic converter reduces the pol-
lutant content of the exhaust gas.
Cars with a spark-ignition engine must
be run on unleaded petrol.
Even very small amounts of lead in the
fuel are sufficient to damage the oxygen
sensor and the catalytic converter per-
manently.
To ensure that the engine always oper-
ates correctly and reliably, and to avoid
damaging it, the following instructions
should complied with:
> Always comply with the specified
maintenance work
> Do not run the fuel tank empty
> Tow-start the car only when the en-
gine is cold, to prevent unburned fuel
from igniting in the catalytic converter
and causing damage. It is better to
jump-start the car
> Avoid any other situations in which
fuel remains unburned or is only par-
tially burned, for example: running the
starter motor too frequently or for ex-
cessively long periods in rapid suc-
cession if the engine does not start
(though the engine can of course be
stopped and restarted at any time if it
is running correctly). Running the
engine with a spark plug lead de-
tached.
Always comply with the above
precautions, to prevent unburned
fuel from reaching the catalytic con-
verter. Otherwise there is a risk of the
catalytic converter overheating and be-
ing damaged.
High temperatures occur on all vehicles
equipped with a catalytic converter.
Never remove the heat shields protect-
ing the exhaust system, nor apply un-
derseal to them. Make sure that when
driving or parking the car or when the
engine is idling, no material which could
catch fire easily (e.g. hay, leaves, grass
etc.) can come into contact with the hot
exhaust system. It could ignite and
cause a fire, with the risk of severe inju-
ries or damage.<
Online Edition for Part-No. 01 41 9 791 301 - © 01/99 BMW AG
130nAnti-lock brake system (ABS)
The principle
ABS prevents the wheels from locking
when the brakes are applied, and thus
increases active safety. Locked wheels
are dangerous, because the front
wheels cannot then be steered and the
rear wheels may slide sideways and
cause the car to spin or slide off the
road.
With ABS in action, the car achieves the
shortest possible braking distances for
the prevailing conditions (straight-line
braking or cornering, on asphalt, ice,
wet roads etc.).
ABS is capable of satisfying two funda-
mental requirements whenever the
brakes are applied:
> Safe drive stability
> Secure steering and manoeuvrability
on differing road surfaces (asphalt,
cement, mud, rain, snow, ice).
Braking with ABS
The system functions above approx.
8 km/h (5 mph). Below about 3 km/h, it
stops operating. The wheels can there-
fore theoretically tend to lock during the
final stages of braking action. However,
in practice, this is not considered to be
critical.
You use ABS most effectively by apply-
ing maximum brake pressure in situa-
tions which call for this ("full braking").
Since you retain steering control of the
car, you are still able, despite hard
braking, to avoid any obstacles with rel-
atively calm movement of the steering
wheel.
The ABS regulation cycle takes place
within fractions of a second. The brake
pedal pulsates to warn the driver that
the ABS is active and therefore that the
car is reaching the adhesion limit. In ad-
dition, a rattling noise reminds you – as
a consequence of the ABS action – that
the friction coefficient or grip between
tyre and road surface (slippery surface)
is diminishing, and that you should re-
duce your road speed accordingly.
On roads with loose surfaces on a firm
base, e.g. on gravel or snow, and when
driving with snow chains, you may find
the braking distance is greater than
when the wheels are locked. However,
the advantages of greater stability and
the ability to steer while braking are still
available to the driver.
Information for your safety
Even ABS is unable to overcome the
laws of physics. It cannot absolve the
driver from the consequences of brak-
ing too late, maintaining insufficient
space from vehicles ahead, exceeding
the limits of adhesion when cornering at
speed or encountering a poor stretch of
road where aquaplaning occurs. Avoid-
ing such situations remains the driver's
responsibility. Although ABS enhances
active driving safety, this should not be
regarded as an invitation to take corre-
spondingly greater risks.
Make no modifications to the ABS
system.
All work on the ABS should be en-
trusted only to skilled, authorized per-
sonnel.<
Online Edition for Part-No. 01 41 9 791 301 - © 01/99 BMW AG
131n
MinorrepairsKeywordsOverviewControlsMaintenanceTechnicalData
ABS Disc brakes
In the event of a fault
the ABS warning lamp lights up,
refer to page 20. The brake sys-
tem then operates as it would in
cars not fitted with ABS. Arrange to
have this examined by BMW Service as
soon as possible. Additional faults to
the brake system could otherwise occur
without being readily apparent.
Disc brakes offer maximum braking effi-
ciency, responsive control of braking
force and the ability to resist severe
loads.
If the car is used only for short dis-
tances, is out of use for lengthy periods
or not subject to more than light loads,
corrosion of the brake discs and con-
tamination of the brake pads may oc-
cur, because the minimum contact
pressure between pads and discs,
which is needed to generate a self-
cleaning effect, has not been reached.
When the brakes are applied, corroded
discs tend to judder, and even lengthy
brake applications usually fail to elimi-
nate this effect entirely.
To ensure that the car's safety is
not affected, use only brake pads
and linings approved by BMW.<
Driving hints
In damp weather or heavy rain it is ad-
visable to apply the brakes with light
pedal pressure every few kilometres.
When doing so, make sure that no other
road-user is endangered. This will gen-
erate sufficient heat to dry out the discs
and pads.
It is a well-known fact that the most ef-
fective braking is obtained not with
locked wheels but when they are still
just rotating. ABS maintains this state of
affairs automatically. Should the ABS
malfunction, the driver should adopt the
cadence braking principle if possible
(see page 134).
To avoid any risk of brake fade when
descending long or steep hills, select
the gear which calls for a minimum
amount of braking (or shift the auto-
matic transmission down to an equiva-
lent speed stage).
The engine's braking effect can be fur-
ther increased by selecting a lower gear
or, with automatic transmission, 1st gear
or lever position 2.
Online Edition for Part-No. 01 41 9 791 301 - © 01/99 BMW AG
132nDisc brakes Brakes
If engine braking alone is insufficient,
do not apply the brakes for too long
with only slight or moderate force. In-
stead, it is better to brake the car quite
hard (providing that the road behind you
is clear) so that your speed is reduced
noticeably, and to repeat this process
at brief intervals as necessary. The
cooling-down phases between these
brake applications should avoid over-
heating and maintain full braking effi-
ciency.
Never drive with the clutch pedal-
held on, with the shift or selector
lever in neutral, or while the engine is
switched off, otherwise engine braking
action will not be present with the
transmission in neutral and there will be
no power assistance to the brakes
while the engine is switched off.
Make sure that the full travel of the
brake, clutch and accelerator pedals is
not obstructed by floor mats, carpets or
other objects.<
Dynamic Brake Control DBC*
If the brake pedal is pressed down rap-
idly, this system automatically boosts
the braking force to a maximum and
thus helps to pull the car up in the
shortest possible distance when a full
brake application is made. It also makes
full use of the advantages offered by
ABS.
Maintain pressure on the brake pedal
during the entire brake application. If
the brake pedal is released, DBC will be
switched off.
If a malfunction occurs, the yel-
low warning lamp comes on.
Normal brake action remains
available without restriction.
Have the system checked at the next
opportunity by BMW Service.
Please note the "Information for
your safety" concerning ABS on
page 130. It also applies to DBC where
appropriate.<
Brake fluid level
The brake hydraulics warning
lamp lights up or the message
"Check brake fluid" appears in
the Check Control display:
The brake fluid level in the reservoir is
too low (see page 161).
If the brake fluid level is too low and if
brake pedal travel is much longer than
usual, one of the two hydraulic brake
circuits may have failed.
Braking performance is still adequate
with the remaining brake circuit in use.
Visit your nearest BMW Service.
When driving the car in this condi-
tion, note that higher brake pedal pres-
sure and considerably longer brake
pedal travel may be necessary. Modify
your driving style accordingly.<
The warning lamp also comes on when
the CHECK BRAKE LININGS warning
appears on the Check Control display.
Online Edition for Part-No. 01 41 9 791 301 - © 01/99 BMW AG
133n
MinorrepairsKeywordsOverviewControlsMaintenanceTechnicalData
Brakes Winter operation
Brake pads
The warning lamp for the brake
linings lights up, or the message
"Check brake linings" appears in
the Check Control display:
The brake linings have reached the safe
limit for lining wear. To replace them,
visit your nearest BMW Service at the
next available opportunity.
To ensure that the car's safety is
not affected, use only brake pads
and linings approved by BMW.<
The winter, with its frequently changing
weather conditions, not only calls for
your style of driving to be modified as
appropriate but also for certain mea-
sures to be taken to ensure that your
car can be driven safely and reliably
Coolant
Ensure that the 50:50 mix ratio (water/
long-term anti-freeze and corrosion in-
hibitor) is present. This is equivalent to
frost resistance down to approx. –376.
Renew the coolant every 4 years.
Locks
BMW door lock de-icer can be used to
free them if frozen. This de-icer also
contains lubricant.
After its use, treatment with BMW lock
barrel grease is recommended.
Rubber parts
To prevent rubber parts on doors, bon-
net and boot from freezing solid, coat
them with a rubber care agent or with
BMW silicone spray.
BMW Service can supply suitable
car-care products.<
Diesel fuel
To ensure that the diesel engine oper-
ates reliably during the cold season of
the year, it must be run on winter-grade
diesel oil, which garages usually sell
during the period in question. Fuel filter
heating is installed as standard equip-
ment to prevent the fuel from solidifying
during operation.
The use of flow improvers is not permit-
ted, as these can lead to problems in
the fuel system.
Snow chains
BMW snow chains* may be fitted to
both summer and winter tyres, but only
to both rear wheels. Always observe the
manufacturer's safety recommenda-
tions. When snow chains are in use, do
not exceed 50 km/h (approx. 30 mph).
To improve traction, it is advisable to
switch off the ASC+T/DSC* when snow
chains are fitted, refer to page 86.
Online Edition for Part-No. 01 41 9 791 301 - © 01/99 BMW AG
134nWinter operation
Moving away from a standstill
To set off in deep snow, or to "rock the
car free", it is advisable to switch off the
ASC+T/DSC*, refer to page 86.
Driving on slippery roads
Operate the accelerator pedal gently,
avoid high engine speeds and shift up
to the next higher gear early. On uphill
or downhill gradients, change down to
the next lower gear in good time.
Maintain a safe distance from the vehi-
cle in front.
Brakes
Winter road conditions greatly reduce
the amount of tyre grip that is available,
so that the driver must expect braking
distances to be considerably longer
than usual in every situation.
ABS prevents the wheels from locking,
so that the car remains stable and can
always be steered.
Should the ABS fail and the road
wheels lock, reduce pressure on the
brake pedal until the wheels just start to
turn, but still remain braked.
Then increase pedal pressure again, re-
duce when the wheels start to lock then
increase again etc.
This intermittent braking action (the ca-
dence braking principle) reduces brak-
ing distances and you retain steering
control of your car at the same time.
You can still try to drive round danger
areas once you have reduced the brake
pedal pressure.
If the road surface is slippery, do
not shift to a lower gear in order to
slow the car, or else the rear wheels
may slip and you could lose control of
the car as a result.<
When applying the brakes hard on
slippery roads or if the amount of
surface grip varies widely, always de-
clutch as well.<
Correcting a skid
Depress the clutch pedal, release the
accelerator pedal or set the automatic
transmission selector lever to N. Try to
steer into the skid and bring the car
under control in this way.
Online Edition for Part-No. 01 41 9 791 301 - © 01/99 BMW AG
135n
MinorrepairsKeywordsOverviewControlsMaintenanceTechnicalData
Winter operation Power steering Self-levelling suspension*
Parking
Select 1st gear or reverse, or move the
automatic transmission selector lever to
P. If the gradient makes it necessary,
apply the handbrake as well on cars
with a manual-shift gearbox. To prevent
the handbrake linings from sticking to
the drums in freezing weather or as a
result of corrosion, dry out the hand-
brake briefly first, by applying it as the
car is coming to a halt. Make sure that
following traffic is not endangered.
The brake lights do not come on
when the handbrake is applied.<
If the steering is stiff to turn:
Check oil level; see page 162.
Steering becomes heavy when you turn
the steering wheel rapidly:
Without fail, visit BMW Service to have
your steering system checked.
Special instruction for
Servotronic*
If steering becomes lighter as speed in-
creases:
An electronic fault has occurred. Have it
rectified by BMW Service.
If the power assistance should fail,
greater effort will be required at
the steering wheel.<
If the self-levelling suspension
telltale lamp comes on or the
Check Control displays SELF-
LEVEL SUSP.INACT., a malfunction has
occurred in the self-levelling suspen-
sion.
Stop the car and examine it. If the body
is distinctly lower at the back than at
the front, and possibly standing at an
angle (for instance, lower at the left than
at the right), take it to the nearest BMW
Service. Drive cautiously while the car
is in this condition. The car's ground
clearance is reduced and its ride com-
fort below the usual standard.
Even if the car appears to be at its nor-
mal ride height and attitude, always
take it to a BMW Service if a malfunc-
tion is displayed.
Online Edition for Part-No. 01 41 9 791 301 - © 01/99 BMW AG
136nDDE Car phone* Car radio
Digital Diesel Electronics (DDE)
If the DDE warning lamp comes
on during a journey or the Check
Control displays FUEL INJECT.
SYS, a malfunction of the electronic fuel
injection system has occurred.
Except in an extreme situation where
the engine refuses to run, the car can
still be driven, since the engine man-
agement system has an emergency-run
program. Note, however, that full per-
formance may not be available when
this program is in use. For this reason,
the fuel injection system should be
checked as soon as possible by BMW
Service.
Only mobile communication systems
(car phone, radio telephone etc.) with a
rating of max. 10 Watts are permitted.
They can still cause malfunctions when
the car is being operated if they are not
intended for use with your car. Since
BMW cannot examine and test each
product, it is unable to accept any re-
sponsibility for the installation of items it
has not approved. Before purchasing
any such system you are recommended
to obtain advice from BMW Service.
In order to safeguard your BMW's oper-
ating reliability, do not operate any in-
car telephones or other mobile radio
equipment with an aerial inside the car
or not fitted to the car's exterior.
Detach the telephone aerial before
driving the car on to a car train or
into a car wash.<
The reception and reproduction quality
of a mobile radio system depends on
the range of the desired station, your lo-
cation for reception and the alignment
of the aerial.
Adverse factors such as high voltage
wires, buildings or natural obstacles
can cause noise interference even if
your car is equipped with optimum sup-
pression.
Climatic influences such as the intensity
of solar radiation, fog, rain or snowfall
can also interfere with radio reception.
Car phones not recommended by BMW
or mobile phones may also interfere
with the car's radio when they are used.
In such cases, a low-frequency hum is
often heard.
Operation and tuning of your car radio
are described in the separate instruc-
tions accompanying this handbook.
Online Edition for Part-No. 01 41 9 791 301 - © 01/99 BMW AG
137n
MinorrepairsKeywordsOverviewControlsMaintenanceTechnicalData
Information for your safety
The radial-ply tyres approved for your
car are matched to its characteristics
and ensure not only optimum road
safety but also the desired level of ride
comfort
The condition of the tyres and mainte-
nance of the specified tyre pressures
not only influence tyre life but also road
safety to a very considerable extent.
Incorrect pressures are often a cause of
tyre problems. They also have a consid-
erable effect on the roadholding of your
BMW.
Check the tyre pressure – also of
the spare wheel – at regular inter-
vals, at least twice a month and before
setting out on any long journeys. Incor-
rect tyre pressures can adversely affect
the car's roadholding and cause tyre
damage, which could result in an acci-
dent.<
Tyre tread – tyre damage
Inspect the tyres frequently for damage,
the presence of foreign bodies, unusual
wear and sufficient tread depth.
Tread depth should if possible not be
allowed to drop below 3 mm (approx.
0.12 in). Wear indicators (arrow) in the
tread recesses indicate when a tread
depth of 1.6 mm has been reached; this
is the European legal limit for passenger
car tyres in Europe. Below a tread
depth of 3 mm there is a risk of aqua-
planing at fairly high road speeds even
if the water is not very deep.
390de331
Do not continue driving with a flat
tyre. If air pressure is lost from a
tyre, this seriously affects the car's han-
dling and braking, and could cause the
driver to lose control.
Avoid overloading the car, as this could
cause the tyres' load capacity limit to be
exceeded. Otherwise you could over-
heat the tyres and cause internal dam-
age to them in the short to medium
term. In some cases, this can result in
sudden loss of tyre pressure.
Unusual vibration while the car is being
driven could indicate a tyre fault or
some other defect on your car. The
same applies to any other abnormal
road behaviour, such as pulling severely
to the right or left. In such cases, reduce
speed immediately. Proceed carefully to
the nearest BMW Service or tyre dealer,
or have the car towed there so that it
can be checked or its tyres inspected.
All forms of tyre damage (which could in
the worst case lead to sudden and total
loss of pressure) represent a risk of seri-
ous or even fatal injury to the car's oc-
cupants and to all other road users.<
Tyre pressures Condition of tyres
Online Edition for Part-No. 01 41 9 791 301 - © 01/99 BMW AG
138n New tyres Wheel-changing
To maintain the car's good road behav-
iour, always fit tyres of the same make
and tread pattern to all wheels.
Do not use retreaded tyres, as
these could have adverse effects
on the car's safety. Their carcases may
differ in internal construction or have
aged sufficiently to cast doubt on their
durability.<
Age of tyres
A tyre's date of manufacture is shown
as part of the inscription on the tyre
wall:
DOT ... 328 means for instance that the
tyre was manufactured in Week 32 of
the year 1998.
BMW recommends tyre replacement
after not more than 6 years, even if
tyres up to 10 years old may still be
suitable.
Spare tyres more than 6 years old
should be reserved for genuine emer-
gencies, e.g. if a regular tyre has be-
come punctured. New tyres should be
fitted in their place as soon as possible,
and they should no longer be brought
into regular service when new tyres are
fitted.
Between the axles
Tread wear patterns differ at the front
and rear wheels according to individual
operating conditions. In the interests of
safety and the car's road behaviour, in-
terchanging them is not recommended.
If a cost advantage is anticipated as a
result of interchanging the wheels from
front to rear, always remember that the
actual removal and fitting of the wheels
may incur additional cost which may
not be justified by the expected in-
crease in tyre life. If wheels are inter-
changed, this should always be under-
taken at relatively frequent intervals
(max. 5000 km/3000 miles). BMW Serv-
ice will gladly advise you.
If you do decide to interchange the
wheels, please take the following pre-
cautions:
do so only between front and rear on
each side of the car, otherwise braking
response and road grip may be ad-
versely affected.
Always check tyre pressures after fit-
ting, and adjust as necessary.
Never interchange wheels be-
tween the front and rear axles if
tyres of different sizes are fitted (see
page 141 onwards).<
Online Edition for Part-No. 01 41 9 791 301 - © 01/99 BMW AG
139n
MinorrepairsKeywordsOverviewControlsMaintenanceTechnicalData
Wheel and tyre combinations
Choosing the correct tyres
Use only tyres approved by BMW; see
page 141 onwards.
In view of the car's top speed, certain
makes and sizes of tyre are compul-
sory. Details can be obtained from
BMW Service.
Comply with any relevant national or
local regulations.
The correct wheel and tyre combi-
nation has an influence on various
systems, the function of which could
otherwise be adversely affected, for in-
stance ABS, AGS, ASC+T/DSC.
For this reason, use only tyres of the
same make and tread pattern on all
wheels, and after a puncture, for in-
stance, fit the approved wheel and
tyre combination again as soon as pos-
sible.<
Markings on tyres and wheels
The correct choice is made easier if the
meaning of the tyre markings is under-
stood.
Markings on radial-ply tyres:
The speed code letter indicates the
maximum permissible speed at which
the tyre is to be operated.
On summer tyres:
S = up to 180 km/h (112 mph)
T = up to 190 km/h (118 mph)
H = up to 210 km/h (131 mph)
V = up to 240 km/h (149 mph)
W = up to 270 km/h (168 mph)
Y = over 270 km/h (168 mph)
ZR = over 240 km/h (149 mph)
e.g.
Nominal width
in millimetres
Aspect ratio in X
Code letter for radial ply
Rim diameter in inches
Load capacity figure
(not on ZR tyres)
Speed code letter
(ahead of the R on ZR tyres)
225/60 R 15 96 W
On winter tyres:
Q M+S = up to 160 km/h (100 mph)
T M+S = up to 190 km/h (118 mph)
H M+S = up to 210 km/h (131 mph)
Markings on light alloy wheels:
Prevent dirt from entering the tyre
valves by attaching screw-on dust
caps. Dirt in the tyre valve can often
lead to a gradual loss of air pressure.
Rim width
in inches
Shoulder pattern
code letter
Symbol for well-base rim
Rim diameter in inches
Hump on 2 rim flanges
7 x 15 H 2J
Online Edition for Part-No. 01 41 9 791 301 - © 01/99 BMW AG
140nWinter tyres
The correct tyres
BMW recommends you to fit winter
tyres (M+S radial-ply) if the car is used
for driving in wintery conditions. Al-
though tyres sold for all-year use with
an M+S marking have better winter
characteristics than summer tyres
marked with speed letters H, V, W or
ZR, they do not normally match the per-
formance of winter tyres.
In the interests of reliable directional
stability and steerability, fit winter tyres
of the same make and tread pattern to
all four road wheels.
Fit only winter tyres approved by BMW.
BMW Service will gladly advise you on
the correct winter tyres for the condi-
tions in which your car has to operate.
Note the speed limit applicable to
these tyres
In Germany: a warning notice stating
the maximum permitted speed with
winter tyres fitted must be displayed in
the driver's field of view if the car is ca-
pable speed higher than that permitted
for the tyres (please check for similar lo-
cal legislation). Tyre dealers and BMW
Service can supply these labels.
Never exceed the maximum speed
laid down for the winter tyres fitted
to your car.
Lack of expert knowledge or incorrect
handling of tyres can cause damage
and lead to accidents.
All work on tyres should therefore be
carried out only by experts. BMW Serv-
ice will gladly place its specialised
knowledge and facilities at your dis-
posal.<
Tyre condition and tyre pressures
Below a tread depth of 4 mm (0.16 in),
winter tyres become noticeably less
suitable for winter driving conditions
and should therefore be replaced for
safety reasons.
Keep to the specified tyre pressures
and have the wheels and tyres rebal-
anced each time the wheels are
changed or new tyres fitted.
Tyre storage
Store wheels and tyres in a cool, dry
and preferably dark place when not in
use. Protect tyres against contamina-
tion from oil, grease and fuel.
Snow chains*
Fine-link BMW snow chains may be fit-
ted to either summer or winter tyres,
but only to both rear wheels. When fit-
ting, comply with the manufacturer's in-
structions.
Online Edition for Part-No. 01 41 9 791 301 - © 01/99 BMW AG
141n
MinorrepairsKeywordsOverviewControlsMaintenanceTechnicalData
Approved wheel and tyre sizes – saloon
Tyre sizes Pressed-steel
wheel
Alloy wheel
BMW 520i, 523i, 525td/tds
Summer
205/65 R 15 94 V – 6.5Jx15
7Jx15
225/60 R 15 96 V – 7Jx15
225/55 R 16 95 V – 7Jx16
235/45 R 17 94 W – 8Jx17
Front: 235/45 R 17 94 W – 8Jx17
Rear: 255/40 R 17 94W – 9Jx17
Winter (M+S)
205/65 R 15 94 Q/T/H 6.5Jx15
7Jx15
6.5Jx15
7Jx15
225/60 R 15 96 Q/T/H 7Jx15 7Jx15
225/55 R 16 95 Q/T/H – 7Jx16
235/45 R 17 94 Q/T/H – 8Jx17
BMW 525td
For summer tyres, tyres of speed cate-
gory "H" are sufficient.
Online Edition for Part-No. 01 41 9 791 301 - © 01/99 BMW AG
142n Approved wheel and tyre sizes – saloon
Tyre sizes Pressed-steel
wheel
Alloy wheel
BMW 528i, 530d
Summer
225/60 R 15 96 W – 7Jx15
225/55 R 16 95 W – 7Jx16
235/45 R 17 94 W – 8Jx17
Front: 235/45 R 17 94 W – 8Jx17
Rear: 255/40 R 17 94W – 9Jx17
Winter (M+S)
205/65 R 15 94 Q/T/H 6.5Jx15
7Jx15
6.5Jx15
7Jx15
225/60 R 15 96 Q/T/H 7Jx15 7Jx15
225/55 R 16 95 Q/T/H – 7Jx16
235/45 R 17 94 Q/T/H – 8Jx17
BMW 530d
Wheel size 6.5Jx15 is not approved.
Online Edition for Part-No. 01 41 9 791 301 - © 01/99 BMW AG
143n
MinorrepairsKeywordsOverviewControlsMaintenanceTechnicalData
Approved wheel and tyre sizes – saloon
Tyre sizes Pressed-steel
wheel
Alloy wheel
BMW 535i, 540i
Summer
225/55 R 16 95 W – 7Jx16
235/45 R 17 94 W – 8Jx17
Front: 235/45 R 17 94 W – 8Jx17
Rear: 255/40 R 17 94W – 9Jx17
Winter (M+S)
225/55 R 16 95 Q/T/H – 7Jx16
235/45 R 17 94 Q/T/H – 8Jx17
Comply with the tyre and wheel data stated in the car's docu-
ments. If tyre and wheel sizes not stated in the car's official reg-
istration documents are fitted, a special entry must be made.
Snow chains*
Snow chains cannot be fitted to 17-inch
wheels.
Online Edition for Part-No. 01 41 9 791 301 - © 01/99 BMW AG
144n Approved wheel and tyre sizes – touring
Tyre sizes Pressed-steel
wheel
Alloy wheel
BMW 520i, 523i, 525tds
Summer
205/65 R 15 94 V – 7Jx15
225/60 R 15 96 V – 7Jx15
225/55 R 16 95 V – 7Jx16
235/45 R 17 94 W – 8Jx17
Winter (M+S)
205/65 R 15 94 Q/T/H 7Jx15 7Jx15
225/60 R 15 96 Q/T/H 7Jx15 7Jx15
225/55 R 16 95 Q/T/H – 7Jx16
235/45 R 17 94 Q/T/H – 8Jx17
BMW 528i, 530d
Summer
225/60 R 15 96 W – 7Jx15
225/55 R 16 95 W – 7Jx16
235/45 R 17 94 W – 8Jx17
Winter (M+S)
225/60 R 15 96 Q/T/H 7Jx15 7Jx15
225/55 R 16 95 Q/T/H – 7Jx16
235/45 R 17 94 Q/T/H – 8Jx17
BMW 523i touring
Tyre size 205/65 R 15 94 V is not
approved.
Online Edition for Part-No. 01 41 9 791 301 - © 01/99 BMW AG
145n
MinorrepairsKeywordsOverviewControlsMaintenanceTechnicalData
Approved wheel and tyre sizes – touring
Tyre sizes Pressed-steel
wheel
Alloy wheel
BMW 540i
Summer
225/55 R 16 95 W – 7Jx16
235/45 R 17 94 Y – 8Jx17
Winter (M+S)
225/55 R 16 95 Q/T/H – 7Jx16
235/45 R 17 94 Q/T/H – 8Jx17
Comply with the tyre and wheel data stated in the car's docu-
ments. If tyre and wheel sizes not stated in the car's official regis-
tration documents are fitted, a special entry must be made.
Snow chains*
Snow chains cannot be fitted to 17-inch
wheels.
Online Edition for Part-No. 01 41 9 791 301 - © 01/99 BMW AG
146n
Online Edition for Part-No. 01 41 9 791 301 - © 01/99 BMW AG
147n
MinorrepairsKeywordsOverviewControlsMaintenanceTechnicalData
Unlocking
Pull the lever at the left under the fascia.
Do not work on the car unless you
possess the appropriate special-
ised knowledge. Before working in the
engine compartment, switch off the en-
gine and allow it time to cool. Discon-
nect the battery before working on the
electrical system. For any work on the
car at all, comply with the relevant
notes and instructions. If unfamiliar with
the regulations which have to be com-
plied with, have the work performed by
BMW Service; incorrect handling of
parts and materials could represent a
safety risk for the car's occupants or
other road users.<
390de071
To open
pull the release lever and open the lid.
390de072
To close
Press the engine compartment lid
lightly at the points illustrated (arrows)
to close it, or allow it to drop from a
height of approx. 10 cm (4 in) until it is
heard to engage.
To avoid injuries, as when closing
all doors or lids on the car, make
sure that the engine compartment lid is
unobstructed.
If you notice during the journey that the
engine compartement has not been
properly closed, stop the car at the ear-
liest possible moment and close it cor-
rectly.<
390de073
Engine hood
Online Edition for Part-No. 01 41 9 791 301 - © 01/99 BMW AG
148nEngine compartment – BMW 520i, 523i, 528i
390de372
Online Edition for Part-No. 01 41 9 791 301 - © 01/99 BMW AG
149n
MinorrepairsKeywordsOverviewControlsMaintenanceTechnicalData
Engine compartment – BMW 520i, 523i, 528i
1 Engine oil dipstick 157
2 Reservoir for brake fluid (under the
microfilter housing) 161
3 Jump-start connection point 196
4 Power steering oil reservoir 162
5 Coolant level-equalizing tank 160
6 Engine oil filler cap 157
7 Reservoir for intensive cleaning
system 156
8 Reservoir for windscreen washer
and headlamp cleaning system 156
Online Edition for Part-No. 01 41 9 791 301 - © 01/99 BMW AG
150nEngine compartment – BMW 535i, 540i
390de130
Online Edition for Part-No. 01 41 9 791 301 - © 01/99 BMW AG
151n
MinorrepairsKeywordsOverviewControlsMaintenanceTechnicalData
Engine compartment – BMW 535i, 540i
1 Reservoir for brake fluid (under the
microfilter housing) 161
2 Power steering oil reservoir 162
3 Jump-start connection point 196
4 Engine oil dipstick 157
5 Engine oil filler cap 157
6 Coolant level-equalizing tank 160
7 Reservoir for intensive cleaning
system 156
8 Reservoir for windscreen washer
and headlamp cleaning system 156
Online Edition for Part-No. 01 41 9 791 301 - © 01/99 BMW AG
152nEngine compartment – BMW 525td/tds
390de116
Online Edition for Part-No. 01 41 9 791 301 - © 01/99 BMW AG
153n
MinorrepairsKeywordsOverviewControlsMaintenanceTechnicalData
Engine compartment – BMW 525td/tds
1 Engine oil dipstick 157
2 Reservoir for brake fluid (under the
microfilter housing) 161
3 Jump-start connection point 196
4 Power steering oil reservoir 162
5 Coolant level-equalizing tank 160
6 Engine oil filler cap 157
7 Reservoir for intensive cleaning
system 156
8 Reservoir for windscreen washer
and headlamp cleaning system 156
Online Edition for Part-No. 01 41 9 791 301 - © 01/99 BMW AG
154nEngine compartment – BMW 530d
390de352
Online Edition for Part-No. 01 41 9 791 301 - © 01/99 BMW AG
155n
MinorrepairsKeywordsOverviewControlsMaintenanceTechnicalData
Engine compartment – BMW 530d
1 Engine oil dipstick 157
2 Reservoir for brake fluid (under the
microfilter housing) 161
3 Jump-start connection point 196
4 Power steering oil reservoir 162
5 Coolant level-equalizing tank 160
6 Engine oil filler cap 157
7 Reservoir for intensive cleaning
system 156
8 Reservoir for windscreen washer
and headlamp cleaning system 156
Online Edition for Part-No. 01 41 9 791 301 - © 01/99 BMW AG
156nWasher fluid Washer jets
Headlight cleaning system* and
windscreen washer
Capacity in litres (Imp. pints)
Windscreen washer:
approx. 3.5 (6.2) – saloon
approx. 6.0 (10.6) – touring
Incl. headlamp cleaning system:
approx. 6.0 (10.6).
Fill with water and – when required –
with anti-freeze according to manufac-
turer's instructions.
It is best to mix the water and
additive before filling the washer
fluid tank.<
390de082
Intensive cleaning system*
Content app. 1.0 litre (1.8 pints).
Fill with intensive cleaning agent. This is
frost-resistant down to approx. –276
and can be obtained from BMW Serv-
ice.
Antifreeze for the cleaning or in-
tensive cleaning systems is easily
flammable. Keep it away from possible
ignition sources and store it only in the
carefully sealed original packs, out of
reach of children. Comply with the in-
structions on the pack.<
390de083
Windscreen washer
Windscreen:
The jets of liquid should strike the wind-
screen in such a way that reliable
cleaning is assured even at high
speeds. Correct the direction of the jet
if necessary by inserting a needle and
moving the jet as required, or have this
work performed by BMW Service.
Rear window:
Have these jets adjusted by BMW Serv-
ice if necessary.
Headlight cleaning system
Have these jets adjusted by BMW Serv-
ice if necessary.
Online Edition for Part-No. 01 41 9 791 301 - © 01/99 BMW AG
157n
MinorrepairsKeywordsOverviewControlsMaintenanceTechnicalData
Engine oil
Checking engine oil level
1 Position the car on a flat, level sur-
face
2 Switch off the engine, which should
be at its regular operating tempera-
ture
3 After about 5 minutes, take out the
dipstick and wipe it clean with a non-
fluffy cloth, paper tissue or similar
4 Push the dipstick fully back into the
tube, then pull it out again
5 The oil level must be between the two
marks on the dipstick.
Like fuel consumption, engine oil con-
sumption depends on driving style and
operating conditions.
390de076
The quantity of oil between the two
dipstick marks is approx. 1 litre
(1.75 pints). Do not add oil above the
upper dipstick mark. Adding too much
oil will harm the engine.
460de189
Adding engine oil
Do not add more oil until the level has
dropped almost as far as the lower dip-
stick mark. However, the oil level should
not be allowed to fall below the lower
dipstick mark.
BMW engines are designed not to
need separate additives in the en-
gine oil, and indeed adding these sub-
stances could even be harmful in cer-
tain circumstances. This applies to
manual-shift gearbox or automatic
transmission, final drive and power
steering.<
390de077
Online Edition for Part-No. 01 41 9 791 301 - © 01/99 BMW AG
158nEngine oil
Specified engine oils
The quality of the engine oil is a deci-
sive factor for the correct operation and
long life of your car's engine. BMW has
conducted extensive tests before ap-
proving certain grades of engine oil.
Spark-ignition engines:
Use only an approved grade of "long-
life" oil.
If you are unable to purchase an ap-
proved grade of "Longlife" oil, you can
top up the oil level in between oil
changes, if only a small amount of oil is
needed, with a BMW-approved grade
of "Special oil". Only if no such oil is
available should you top up the engine
oil level with an oil to ACEA: A3 specifi-
cation.
BMW Service can provide details
of the "long-life" and "special" oils
approved by BMW for your car's en-
gine.<
Diesel engines:
The engine oil must always comply with
the ACEA A3 and ACEA B3 specifica-
tions.
Viscosities
The viscosity of an oil determines its
ability to flow and is quoted as an SAE
classification.
Choice of the correct SAE oil classifica-
tion depends on the climatic conditions
in which your BMW is operated.
BMW recommends the use of oils in
SAE categories SAE 0W-X or SAE 5W-
X. X indicates any suitable higher value,
e.g. 30, 40 or 50.
These oils can be used at any outside
temperatures.
If an SAE 10W-X oil is used, tempera-
tures under the lower limit are permitted
for short periods. However, the engine
may not start as easily from cold.
460de162
Online Edition for Part-No. 01 41 9 791 301 - © 01/99 BMW AG
159n
MinorrepairsKeywordsOverviewControlsMaintenanceTechnicalData
Engine oil
Comply with local and national
hazardous-material disposal regu-
lations when discarding used oil.<
Recommendation: have oil changes
carried out only by BMW Service.
In laboratory tests, prolonged
contact with used oils has caused
cancer.
For this reason, always wash the af-
fected skin areas thoroughly with soap
and water after work.
Keep all oils, greases etc. in a place
which is inaccessible for children and
always read and comply with any warn-
ing instructions on the containers.<
Online Edition for Part-No. 01 41 9 791 301 - © 01/99 BMW AG
160nCoolant
Do not top up the cooling system
while the engine is hot otherwise
you may scald yourself on the resultant
coolant steam.
To avoid the risk of subsequent dam-
age, use only long-life antifreeze and
corrosion inhibitor free from nitrites and
amino compounds, and approved by
the manufacturer. BMW Service is fa-
miliar with these products.
Antifreezes and corrosion inhibitors are
hazardous to health. Keep them in
sealed original packs, out of reach of
children.
Long-life antifreeze and corrosion inhib-
itor contain ethylene glycol, which is
flammable. For this reason, try to avoid
spilling long-life antifreeze and corro-
sion inhibitor on hot parts of the engine,
since it could cause burns if it were to
ignite.<
When disposing of used long-life
antifreeze and corrosion inhibitor,
comply with the relevant environmental
protection laws.<
Checking coolant level
Diesel engine:
Correct coolant level with engine cold
(approx. 206):
Add to just below the KALT/COLD mark
on the translucent reservoir.
390de373
Spark-ignition engine:
Correct coolant level with engine cold
(approx. 206):
Unscrew the cap on the header tank.
The coolant level is correct when the
upper end of the red float rod is level
with the edge of the filler pipe (see
arrow in picture or drawing next to filler
cap).
380de081
Online Edition for Part-No. 01 41 9 791 301 - © 01/99 BMW AG
161n
MinorrepairsKeywordsOverviewControlsMaintenanceTechnicalData
Coolant Brake fluid
Adding coolant
Open the cap on the equalizing tank
only when the engine has cooled down.
The needle of the coolant thermometer
on the instrument panel must be in the
blue zone, otherwise there is a risk of
being scalded.
1 Turn the cap slightly counter-clock-
wise until it starts to open, then allow
the pressure to escape before open-
ing it fully
2 Top up slowly until the correct level is
reached – do not overfill.
The coolant consists of water to which
a long-life antifreeze and corrosion in-
hibitor has been added. The 50:50 mix-
ing ratio must be maintained all the year
round to ensure protection against cor-
rosion. No other additives are needed.
Renew the coolant every 4 years.
If the warning lamp lights up for
brake hydraulics, or the mes-
sage "Check brake fluid" ap-
pears in the Check Control: The brake
fluid level is too low in the reservoir.
The brake fluid reservoir is located un-
der the micro-filter housing on the
driver's side. To top up the brake fluid,
or to rectify the cause of any loss of
brake fluid, please consult BMW Serv-
ice whose staff is familiar with the fac-
tory-approved grades of brake fluid
(DOT 4).
Loss of fluid will increase brake pedal
travel. Comply with the instructions on
page 132.
Brake fluid is hygroscopic, that is
to say it absorbs moisture gradu-
ally from the air.
To ensure that the car's brake system
remains in good working order, have
the brake fluid renewed every two years
by BMW Service; see also page 79, 191
and the Service Booklet.
Brake fluid is hazardous to health, and
also attacks the car's paintwork. Keep it
in sealed original packs, out of reach of
children.
Do not spill brake fluid; add it only up to
the MAX mark on the reservoir. If it
comes into contact with hot parts of the
engine, brake fluid may ignite and
cause burns.<
When disposing of old brake fluid,
comply with the relevant environ-
mental protection laws.<
Online Edition for Part-No. 01 41 9 791 301 - © 01/99 BMW AG
162nPower steering oil Vehicle identification Type plate
Illustration shows oil reservoir for BMW
520i, 523i and 528i as an example.
Oil reservoirs on other models:
see the engine compartment illustra-
tions starting on page 150.
With the engine stationary, unscrew the
container lid and insert the dipstick
once again with its cover, but without
screwing it on.
The oil level must be between the
marks on the dipstick.
After checking, screw on the container
lid.
Consult your local BMW Service agent
if there is a shortage of oil because only
ATF (automatic transmission fluid) can
be used, and specialist knowledge is
required when topping up.
390de078
In the engine compartment, on the left
spring strut mounting (arrow).
390de074
In the engine compartment down the
left side wall, and also where necessary
on the left upper side of the dash-
board*.
The data on the type plate must agree
with those in the car's documents.
The car's data are needed as a refer-
ence for all queries, checks and spare
part orders.
390de322
Online Edition for Part-No. 01 41 9 791 301 - © 01/99 BMW AG
163n
MinorrepairsKeywordsOverviewControlsMaintenanceTechnicalData
The BMW maintenance system has
been designed to ensure that minimum
cost and effort are involved in ensuring
that your car remains safe and reliable
at all times.
Please remember that regular mainte-
nance is not only essential to ensure
that your car remains safe, but also to
enhance its resale value.
390de008
Service Interval indicator
Advanced technologies have been
adopted as a means of computing
maintenance requirements, which are
then shown on the Service Interval indi-
cator. Whereas conventional systems
call for maintenance when a fixed dis-
tance in kilometres/miles has been cov-
ered, the BMW Maintenance System
has for many years now taken the car's
operating conditions into account as
well, since one kilometre is by no means
the same as another.
100,000 kilometres completed exclu-
sively in the form of short journeys can-
not be equated with 100,000 kilometres
made up of long main-road journeys
only.
The maintenance routines based on
actual use of the car consist of the Oil
Service and Inspections I and II.
The principle of determining mainte-
nance intervals according to load effec-
tively covers all the operating condi-
tions to which the car is likely to be
exposed. Drivers who cover only very
short annual distances – well below
10,000 km (approx. 6,000 miles) –
should nonetheless have an engine oil
change carried out every two years,
since engine oil ages regardless of the
loads imposed on it.
Service Booklet
For further information on maintenance
points and the scope of maintenance
work, please refer to the car's Service
Booklet.
Depending on the circumstances in
which the car is used, it may be worth-
while to inspect it for damage caused
by stones flung up from the road, in
order to guard against subsequent cor-
rosion.
Have maintenance and repair work
carried out by BMW Service.
BMW Service is in possession of the
latest information on maintenance and
repair procedures and equipped with
the special tools needed for your car.
A check on parts subject to wear is in-
cluded in the maintenance schedules.
Make sure that maintenance work is
confirmed in the Service Booklet after it
has been carried out. These entries are
evidence that your car has been serv-
iced regularly and correctly, and are
also the basis of any warranty claims.<
The BMW Maintenance System
Online Edition for Part-No. 01 41 9 791 301 - © 01/99 BMW AG
164n Care of the car
Car wash
You can put your new BMW through an
automatic car wash right from the start.
Ideally, you should try to find one that
operates without brushes.
Before washing the car, soak dead in-
sects and obstinate dirt marks and
wash them off.
To prevent patches from forming, do
not wash the car when the engine hood
is still hot, directly after it has been ex-
posed to strong sunlight or if it is
parked in the sun.
If an automatic car wash is used, make
sure
> that it can safely accommodate your
size of car
> that it cannot damage add-on body
elements (e.g. spoilers or a car phone
aerial). If necessary, consult the oper-
ator of the car wash first
> that your car's wheels and tyres can-
not be damaged by the mechanism
used to move the car through the au-
tomatic wash
> the brush pressure is as low as possi-
ble, and the car wash operates with
ample rinsing water.
Cars with a rain sensor:
clean the windscreen regularly. Wax or
silicone coatings from car washes, and
also insects adhering to the glass could
prevent the rain sensor from operating
correctly.
Switch off the rain sensor in an
automatic car wash, otherwise the
car’s wipers may operate and be dam-
aged.<
Clean the areas not reached in the
automatic wash by hand, for example
door sills, folds in door and lid panels
etc.
During the winter months in particular,
wash the car more frequently. Severe
dirt deposits and road salt are difficult
to remove and tend to damage the
paintwork if not attended to promptly.
If a steam jet or high-pressure
washer is used, make sure that it
is held sufficiently far away from the
car's panel surfaces. High pressure jets
striking it from only a short distance
away could cause damage, or surface
deterioration leading to damage at a
later date. In addition, water could pen-
etrate various components on the car
and cause long-term damage or fail-
ure.<
When cleaning the headlamps,
please note:
> do not rub them when dry or use
caustic or abrasive cleaning agents
> soak dirt or other deposits (e.g. dead
insects) with BMW Shampoo and
wash down with plenty of water
> use a de-icer spray to remove ice de-
posits – not a scraper or other hard
tool.<
After washing the car, drive it
briefly and apply the brakes to dry
them out; this is necessary to prevent
reduced braking effect when the brakes
are wet, and also to avoid corrosion of
the brake discs.<
Online Edition for Part-No. 01 41 9 791 301 - © 01/99 BMW AG
165n
MinorrepairsKeywordsOverviewControlsMaintenanceTechnicalData
Care of the car
Paintwork
The car's paintwork is built up in several
layers, for protection against corrosion.
In addition to cataphoretic dip coating
with primer, the body cavities are spe-
cially protected with materials that have
been subjected to stringent and suc-
cessful testing for a number of years.
The underside of the body has a resil-
ient PVC coating applied to it, followed
by complete wax-based undersealing
for additional protection.
Always remember that regular care of
your car will go a long way towards
maintaining not only its safe condition
but also its resale value.
Increasing awareness of the damage
which unfavourable environmental con-
ditions can cause to paintwork has led
to paint suppliers and automobile man-
ufacturers steadily increasing the dura-
bility of the paint finishes. Nonetheless,
regional environmental factors could
have adverse effects on the car's paint-
work. Please wash and clean the car as
frequently as needed.
In the case of mechanical loads caused
by sand, road salt, stone chippings or
similar, the paint surface may be broken
and corrosion may then be able to de-
velop under the paint, and spread out
from the damaged areas.
Mud and dirt from the roads, tar stains,
dead insects, bird droppings (strongly
alkaline) and even resin and pollen from
trees all contain substances that can
damage the paintwork if not removed
promptly (by causing patches, blisters,
caustic burns or flaking off of the top
coat).
In industrial areas, airborne fly ash,
lime, oily soot, acid rain or sulphur diox-
ide as well as other impurities in the air
are bound to attack the paintwork if not
cleaned with sufficient regularity,
though in most cases only the horizon-
tal panel surfaces are affected.
In coastal regions the high salt content
and humidity of the air encourages
more rapid corrosion.
In tropical zones, strong ultra-violet ra-
diation and high atmospheric humidity
are often accompanied by temperatures
above 406 in the shade. Light-col-
oured cars can reach a temperature as
high as 806 and dark-coloured cars up
to 1206.
Care of paintwork
The long-term effects of substances
which could damage the paint can be
counteracted by washing the car regu-
larly, particularly if it is used in an area
suffering from severe atmospheric pol-
lution or natural forms of contamination
(tree sap, pollen etc.).
However, always remove particularly
aggressive substances as soon as pos-
sible, to avoid the risk of paint damage
or discoloration. These may include
spilled fuel, oil, grease, brake fluid or
bird droppings.
Contamination of the paint surface is
particularly easy to identify after the car
has been washed. Remove such resi-
dues without delay, using cleaning-
grade petroleum spirit or alcohol on
a clean cloth or wadding. Remove tar
splashes with a suitable tar stain re-
mover. Finally, apply a paint preserving
product to the treated areas.
Cleaning and care products can
be obtained from BMW Service.<
Online Edition for Part-No. 01 41 9 791 301 - © 01/99 BMW AG
166n Care of the car
Protecting the paintwork
Polish the paintwork only with products
containing Carnauba or synthetic
waxes.
A sure sign that the paintwork needs
protective treatment is when water no
longer forms large droplets and rolls off
the surface.
Remove care product residues and sili-
cone from the windscreen with glass
cleaner.
Touching in paint damage
Minor paint damage can be touched in
with a BMW paint spray aerosol or
BMW paint pencil.
The colour of your car's paintwork is
stated on the type plate (see page 162)
and on the first page of the Service
Booklet.
Scratches and damage caused by flying
stones must be repaired immediately,
to prevent rust from forming.
If any areas of the body have already
started to rust as a result of paint dam-
age, remove the rust and clean them.
Apply primer coating with a BMW
primer stick, allow to dry thoroughly,
then apply the top coat. After a few
days, polish the touched-in areas and
apply a paint protection product.
You can have more widespread paint
damage expertly repaired by BMW
Service in accordance with the manu-
facturer's directives, using original
BMW paint materials.
Care of windows
Water- and dirt-repellent windscreen (in
preparation)
The coating is not affected by wax from
automatic car washes or windscreen
washer additives.
Depending on the how often the wipers
are used, and also on environmental in-
fluences, the windscreen coating will
incur an unavoidable degree of wear.
The properties of the coating then dete-
riorate to an increasing extent. After ap-
prox. 20,000 to 25,000 km, the glass
begins to resemble a non-coated wind-
screen. BMW Service can then renew
the windscreen coating.
Keep the inside surfaces of windows,
and the mirrors, clean and free from
smears with a glass cleaner. Never use
cleaning agents or polishing pastes
containing quarz powder on the mirrors.
For care of the protective glass*,
please note:
The inside surfaces of the car's side
windows have a plastic film applied to
them. For this reason, avoid attaching
any adhesive labels unless it is not in-
tended to remove them again.
Clean only with water, to which a com-
mercially available dishwasher deter-
gent can be added if desired. Do not
use abrasive cleaning products.
Online Edition for Part-No. 01 41 9 791 301 - © 01/99 BMW AG
167n
MinorrepairsKeywordsOverviewControlsMaintenanceTechnicalData
Care of the car
Fogged-over or iced-up windows can
be treated inside the car with a demist-
ing cloth or de-icing spray – do not use
an ice scraper.<
Clean the wiper blades with soapy wa-
ter. Renew the windscreen wipers twice
a year, before and after the cold sea-
son. This is particularly important on
cars with a rain sensor.
Use only BMW-approved wiper
blades.<
Care of special components
Alloy wheels should be treated with a
suitable cleaner, particularly in the win-
ter months, but do not use aggressive,
acid, strongly alkaline or abrasive
cleaning agents or steam jets at more
than 606 (comply with the manufac-
turer's instructions for use).
If your car has chrome-plated parts*
such as window surrounds, door han-
dles etc., they should be cleaned most
carefully with plenty of water to which a
shampoo can be added; this is particu-
larly important if the car is exposed to
road salt in winter. Use chrome polish
to buff up these parts.
Clean plastic parts, imitation leather
surfaces, the roof lining, the light
glasses, the glass over the instruments
and parts that are sprayed matt black
with water and possibly a plastic care
product. Do not soak the seats or roof
lining right through. Never use solvents
such as nitro thinners, cold cleanser,
fuel or similar.
Apart from water, treat rubber parts
only with rubber care products or sili-
cone spray.
Seat belts should only be cleaned with
mild soap suds (without removing them
from the car). Do not dry-clean or use
chemical products, or the fabric may be
weakened.
Never allow inertia reel seat belts to re-
tract unless they are dry. Dirt on the
seat belts can interfere with the action
of the reel and represent a safety haz-
ard.
Floor carpets and mats* can be treated
with a car interior cleaner if very dirty.
The floor mats can be taken out of the
car to enable the interior to be cleaned
more thoroughly.
Real wood trims and wooden parts
should only be cleaned using a damp
cloth. Then rub dry with a second soft
cloth.
Cleaning and care products can
be obtained from BMW Service.<
Online Edition for Part-No. 01 41 9 791 301 - © 01/99 BMW AG
168nCare of the car
Care of upholstery materials
The pressure areas which occur when
cloth seats are in daily use can be re-
stored by brushing against the pile di-
rection with a slightly moistened brush.
The tendency of the pile to lie in a par-
ticular direction on velour upholstery is
not a quality defect and, just as on
home textiles or clothing, cannot be
avoided.
Remove fluff from cloth upholstery and
rubbed-in threads or scraps of cloth or
suede with a suitable fluff roller or burr
brush. A cleaning glove is available for
particularly obstinate fluff. Stains and
fairly large areas of dirt should be
cleaned off without delay, using luke-
warm water and an interior cleaner,
stain remover or cleaning-grade ben-
zene. Brush the fabric afterwards to
restore its appearance.
If the car is likely to be exposed to
strong sunlight for a lengthy period,
either cover the seats or mask off the
windows in order to prevent a bleaching
effect.
The build-up of a static electrical
charge on the seats, particularly if at-
mospheric humidity is low, can give the
occupants an unpleasant electric shock
if they touch metal parts of the car after
leaving it. Although this is not danger-
ous in any way, it can be avoided by
holding on to a bare or polished metal
part of the car while getting out.
Care of leather
The leather* used by BMW is a natural
product of the highest quality, proc-
essed by the very latest methods, and
will remain in good condition for many
years if correctly treated.
Since this is an authentic natural prod-
uct, its special characteristics and how
it is used and looked after must be
given due consideration.
Regular cleaning and care are needed,
since dust and dirt, for instance from
the roads, collect in pores and creases,
cause severe abrasion and can lead to
the leather surface becoming prema-
turely brittle. You are therefore recom-
mended to remove dust from the
leather at regular intervals with a cloth
or vacuum cleaner.
For cleaning, please use BMW leather
cleaning foam.
Owing to the fact that dirt and grease
can, over time, permeate the protective
coating on the leather, cleaned leather
surfaces must be treated with a BMW
leather care product. This also helps to
prevent a static electrical charge from
building up.
Online Edition for Part-No. 01 41 9 791 301 - © 01/99 BMW AG
169n
MinorrepairsKeywordsOverviewControlsMaintenanceTechnicalData
Care of the car
To protect it against moisture and
damp, the leather can be treated with
BMW impregnating agent.
This treatment is recommended every
six months, assuming normal use of the
car.
If any liquids are spilled, wipe them off
immediately. Dab grease or oil stains
carefully with stain remover.
If exposed to strong sunlight when the
car is parked for a lengthy period,
leather seats should be covered or the
windows blanked off to prevent fading.
Cleaning and care products can
be obtained from BMW Service.<
Cleaning agents can contain haz-
ardous substances or constitute a
health risk. Always comply with the
warning and hazard avoidance instruc-
tions on the pack.
When cleaning the interior of the car,
leave the doors or windows open.
Never use any solvents or other sub-
stances not specifically intended for
cleaning the car.<
Online Edition for Part-No. 01 41 9 791 301 - © 01/99 BMW AG
170nAirbags Laying up out of use
1 Front airbags for the driver and pas-
senger
2 Head airbags (at front)
3 Side airbags (front and rear seats*)
Important safety instructions
Do not remove the airbag gas
generators. Have testing and as-
sembly work performed only by spe-
cially trained personnel. If the airbag
occupant restraint system develops a
fault, is shut down out of use or has
been triggered off in an accident, have
it repaired or dismantled only by BMW
Service.
Never make any modifications to the in-
dividual components of the system or
its wiring. This includes the upholstered
covers on the steering wheel, dash-
380de647
board, side panels on front and rear
doors and roof struts as well as down
the sides of the roof liners. Do not apply
adhesive or any surface material to
these covers or modify or process them
in any other way. Do not remove the
steering wheel.
In order to comply with valid safety
regulations, have airbag generators
scrapped only by BMW Service.
Any careless or unskilled interference
with the system could lead to its failure
or to accidental triggering off with the
risk of injury.<
Please ask BMW Service what precau-
tions are necessary if the car is to be
laid up out of use for more than three
months.
Online Edition for Part-No. 01 41 9 791 301 - © 01/99 BMW AG
171n
MinorrepairsKeywordsOverviewControlsMaintenanceTechnicalData
When entering another country involves
a switch to driving on the other side of
the road:
Cars with xenon headlamps, right-
hand-drive cars:
1 Remove the plugs above the head-
lamps
2 For driving on the left: slide lever to-
wards centre of car
For driving on the right: slide lever to-
wards outside of car
Left-hand-drive cars without xenon
headlamps:
Please contact BMW Service or, to
avoid dazzle from the headlamps, have
BMW Service carry out the necessary
modification.
390de143
Cars are always supplied to conform
with the registration laws of the country
in which they are intended for use.
If the owner moves to another country,
it is important to check beforehand that
import regulations and vehicle licensing
laws do not make it too difficult to im-
port the car.
You can obtain this information in Ger-
many by calling Tel. 089/382-0 and
stating the model, the vehicle identifica-
tion number and the date first regis-
tered.
In other countries, please contact BMW
Service or the importer.
Rule of the road Registration abroad
Online Edition for Part-No. 01 41 9 791 301 - © 01/99 BMW AG
172nTechnical modifications OBD socket
Any BMW Service will gladly advise you
concerning the value of proposed tech-
nical modifications to your car, the legal
requirements and the manufacturer's
recommendations. Enquiries should be
accompanied by the vehicle identifica-
tion number and, if relevant, the engine
number.
Light-emitting diodes (LED)
Controls, displays and other equipment
items inside your car have light-emitting
diodes (LEDs) behind a cover as their
light source. These LEDs resemble con-
ventional lasers and are classified by
law as "Class 1 light-emitting diodes".
Do not remove the cover or ex-
pose the eyes directly to the unfil-
tered light source for several hours at a
time, as this could cause irritation to the
iris.< Access to socket for On-Board Diagno-
sis (OBD):
Lift the cover on the top of the compart-
ment next to the steering column
(arrow).
Components which have a decisive
effect on exhaust emissions can be
tested at this interface with a suitable
device.
390de346
Online Edition for Part-No. 01 41 9 791 301 - © 01/99 BMW AG
173n
MinorrepairsKeywordsOverviewControlsMaintenanceTechnicalData
In many countries, BMW Service col-
lects residual materials during mainte-
nance and repair work according to
specific categories, for example:
> old oil
> oil filters
> antifreeze
> brake fluid
> batteries
> tyres
> air cleaner elements
> airbags
> windscreens and rear windows
BMW organises, pays for and super-
vises the removal and disposal of these
substances and has drawn up handling
principles far in excess of anything cur-
rently called for by law.
When your car reaches the end of its
useful life, the fact that it is largely suit-
able for recycling will avoid unneces-
sary expense for you and undue burden
on the environment. Easily removable
components and assemblies containing
re-usable materials wherever possible
increase the value of a scrapped vehi-
cle.
BMW cooperates with selected, li-
censed disposal and recycling compa-
nies in its various countries; these ac-
cept your vehicle at the end of its useful
life and recycle or dispose of it and its
component parts according to the prin-
ciples laid down by BMW.
Your BMW Service station will
gladly advise you on returning the
car for disposal as and when it has to
be withdrawn from use.<
Recycling in the Service areaReturning the car
Online Edition for Part-No. 01 41 9 791 301 - © 01/99 BMW AG
174n
Online Edition for Part-No. 01 41 9 791 301 - © 01/99 BMW AG
Initial overview
Controls in detail
Operation, maintenance
and general care
Minor repairs
Technical data
Index
Technical items of interest
175n
MinorrepairsKeywordsOverviewControlsMaintenanceTechnicalData
Replacing parts:
Toolkit 176
Wiper blades 176
Lights and bulbs 177
Radio remote control 183
Auxiliar heater remote
control 185
Wheel-changing 186
Lockable wheel studs 189
Battery 190
Fuses 192
If an electrical fault occurs:
Fuel filler flap 194
Sliding/tilting sunroof 194
touring: Tailgate 195
Mutual aid:
BMW Emergency Service 196
Starting with a flat battery 196
Tow-starting, towing away 197
Fire extinguisher 199
Online Edition for Part-No. 01 41 9 791 301 - © 01/99 BMW AG
176n
The toolkit is located in the luggage
compartment lid/tailgate.
To open, undo the wing bolt(s).
394de080
Front
1 Raise the wiper arm slightly and hold
it firmly
2 Move the sliding safety catch (arrow)
and take off the wiper blade towards
the windscreen
3 Attach the new wiper blade and slide
the safety catch back.390de097
Rear*
1 Hold the wiper blade against the
glass and pull the wiper arm off/un-
clip it (arrow) at the outer pivot
2 Offer up the new wiper blade and
press it against the wiper arm (clip
into position).
Use only BMW-approved wiper
blades.<
392de173
Toolkit Wiper blades
Online Edition for Part-No. 01 41 9 791 301 - © 01/99 BMW AG
177n
MinorrepairsKeywordsOverviewControlsMaintenanceTechnicalData
Lights and bulbs
Bulbs and lights are crucial safety fea-
tures of your car. Appropriate care and
attention should therefore be taken
when handling these components. If
you are unfamiliar with such tasks, it is
better to entrust them to BMW Service.
Do not touch the glass of a new
bulb with the fingers, because
even slight amounts of dirt or grease
will then be burned into the bulb and re-
duce its working life. Use a clean tissue,
cloth or similar, or hold the bulb by its
base.<
A box containing spare bulbs is availa-
ble from BMW Service.
Before any work is done on the
electrical system, switch off the
affected consumer equipment or dis-
connect the negative terminal from the
battery, to prevent any risk of short-cir-
cuits occurring.
Observe any instructions supplied by
the bulb manufacturer, to avoid causing
injury or damage when changing
bulbs.<
1 Low-beam headlamps
H7 bulb, 55 Watt
Right-hand-drive cars: HB4 bulb
The H7 bulb is pressurised, so
wear goggles and gloves. There is
otherwise a risk of physical injury if the
bulb should be damaged.<
1 Turn the bulb holder to the left (arrow)
and take it off
2 Pull out the bulb and change it.
2 High-beam headlamps
HB3 bulb, 60 Watt
1 Turn the bulb holder to the left and
take it off
2 Detach the cable connector
390de098
3 Attach new bulb holder with bulb to
plug connector – making sure that it
engages correctly
4 Install in the opposite order of work.
Please note when cleaning the
headlamps:
> Do not rub them when dry or use
caustic or abrasive cleaning agents
> Soak dirt or other deposits (e.g. dead
insects) with BMW Shampoo and
wash down with plenty of water
> Use a de-icer spray to remove ice de-
posits – not a scraper or other hard
tool.<
Online Edition for Part-No. 01 41 9 791 301 - © 01/99 BMW AG
178nLights and bulbs
Xenon headlamps*
The operating life of these light units is
extremely long and the likelihood of fail-
ure very low, provided that they are not
switched on and off a very great
number of times. If a Xenon headlamp
should nonetheless fail, switch on the
fog lights and continue the journey with
great care, provided that local legisla-
tion does not prohibit this.
In view of the high voltages that
are present, work on the entire
lighting system should only be carried
out by skilled personnel, to avoid the
risk of possibly fatal injury.<
Side and parking lights
5 Watt bulb
1 Turn the bulb holder to the left (arrow)
and take it off
2 Pull out the bulb and change it.
390de099
Front flashing turn indicator
21 Watt bulb
1 Press bulb holder together at the lugs
(arrows) and remove to the rear
2 Press the bulb in slightly, turn to the
left and remove
3 After changing the bulb, insert the
bulb holder (note correct position of
lugs) and engage.
390de100
Online Edition for Part-No. 01 41 9 791 301 - © 01/99 BMW AG
179n
MinorrepairsKeywordsOverviewControlsMaintenanceTechnicalData
Lights and bulbs
Side turn indicator repeater*
5 Watt bulb
1 Press the light forwards with the fin-
gertip at its rear edge (arrow) and
take it out
2 Press the bulb in slightly, turn to the
left and remove.
390de106
Fog lights
H7 bulb, 55 Watt
The bulb is pressurised, so protect
the eyes and wear gloves. There is
otherwise a risk of physical injury if the
bulb should be damaged.<
1 Pull the cover next to the fog light for-
wards and remove it
2 Take out the two screws (arrows) and
swing the fog light out
3 Release the spring on the back of the
fog light and turn the cap to the left
4 Disconnect the wire spring clip and
renew the bulb after pulling off the
contact cap.
390de101
Rear lights – saloon
Rear lights: 5 Watt bulbs
Other lights: 21 Watt
1 Flashing turn indicators yellow
2 Rear lights, rear fog lights red
3 Rear fog lights red
4 Reversing lights white
5 Brake lights red
If both bulbs fail in the rear lights,
the brake lights take on the func-
tion of the rear lights.<
394de102
Online Edition for Part-No. 01 41 9 791 301 - © 01/99 BMW AG
180nLights and bulbs
1 Fold down the side trim in the lug-
gage compartment, using the handle
at the top
2 Turn the quick-release bulb holder to
the left (arrow) and take it off
3 Press the bulb in slightly, turn to the
left and remove.
394de103
Rear lights – touring
Rear lights: 5 Watt bulbs
Other lights: 21 Watt
1 Flashing turn indicators yellow
2 Rear lights red
3 Rear fog lights red
4 Reversing lights white
5 Brake light, reflector red
If both bulbs fail in the rear lights,
the brake lights take on the func-
tion of the rear lights.<
392de104
Lights in rear panel:
1 Open the flap in the side panel trim
2 Turn the quick-release fastener and
take off the trim in front of the bulb
holder
3 Turn the quick-release fastener
(arrow) and take off the bulb holder
4 Press the bulb in slightly, turn to the
left and remove.
If a sub-woofer loudspeaker* is in-
stalled behind the right-hand flap, re-
lease the toggle screw and swing the
sub-woofer to one side.
392de170
Online Edition for Part-No. 01 41 9 791 301 - © 01/99 BMW AG
181n
MinorrepairsKeywordsOverviewControlsMaintenanceTechnicalData
Lights and bulbs
Lights in tailgate:
1 Open the trim in the tailgate
2 Turn the quick-release fastener
(arrow) and take off the bulb holder
3 Press the bulb in slightly, turn to the
left and remove.
392de171
Central brake light*
21 Watt bulb
1 Open the luggage compartment lid
2 Use a screwdriver to unclip the cover
on the underside of the rear window
shelf (arrow)
3 Turn the bulb holder to the left and
take it off
4 Press the bulb in slightly, turn to the
left and remove.
touring: LED strip light in tailgate.
394de123
Licence plate lights
5 Watt bulb
1 Insert screwdriver into slot and press
to the right (arrow); this will release
the light
2 Take out the light and change the
bulb.
394de105
Online Edition for Part-No. 01 41 9 791 301 - © 01/99 BMW AG
182nLights and bulbs
Interior lights
Front
Interior light (10 Watt bulb) with reading
lights (10 Watt bulbs)
1 Interior light: Press the light out to the
side with a screwdriver and take off
the cover. Pull the bulb out of its con-
tact tabs
2 Reading light: press the bulb in
slightly, turn to the left and remove.
Indirect lighting
1 Watt bulb
1 Unclip the bulb holder
2 Take out the bulb.
Rear – saloon
Interior light (10 Watt bulb) with reading
lights (5 Watt bulbs)
1 Insert a screwdriver at the top and
press the light out of the cutouts
2 Interior light: press the lug back at the
reflector and change the bulb
3 Reading light: press the bulb in
slightly, turn to the left and remove.
Rear – touring
Interior light: 5 Watt bulbs
1 Press the light out from the top with a
screwdriver
2 Take off the glass
3 Change the bulb.
Interior light (10 Watt bulb) with reading
lights (6 Watt bulbs)
1 Press the light out at the side next to
the switch with a screwdriver
2 Take off the glass
3 Change the bulb.
Footwell lights
5 Watt bulb
1 Lever the cover out at one side with a
screwdriver
2 Change the bulb.
Glove box light
5 Watt bulb
1 Press light out of recess with a
screwdriver
2 Take off the reflector
3 Change the bulb.
Luggage compartment lights
Light on underside of rear window
shelf: Halogen bulb, 10 Watt.
Light in the luggage compartment lid:
10 Watt bulb.
1 Press light out of recess with a
screwdriver
2 Take off the reflector
3 Change the bulb.
Load-area lights
Light on roof lining:
10 Watt bulbs.
1 Press the glass out at the side with a
screwdriver
2 Change the bulb.
Light at end of tailgate: 10 Watt bulb
1 Press the light out at the upper edge
with a screwdriver
2 Take off the reflector
3 Change the bulb.
Online Edition for Part-No. 01 41 9 791 301 - © 01/99 BMW AG
183n
MinorrepairsKeywordsOverviewControlsMaintenanceTechnicalData
Radio remote control
Changing the battery
Renew the battery when the Check
Control displays "REMOTE KEY
BATTERY". The LED no longer lights up
when a button is pressed, and the re-
mote control will not perform the lock-
ing action.
Use only one battery of the type stated
in the battery compartment (CR 2016),
and make quite sure that it is installed in
the correct position.
1 Using a screwdriver, lift the cover out
at the recess (arrow)
365de017
2 Remove the two screws (arrows) and
take off the cover.
The battery type and correct installed
position are marked on the base of the
battery compartment.
Dispose of old batteries only to an
authorised collecting point or re-
turn them to BMW Service.<365de018
Online Edition for Part-No. 01 41 9 791 301 - © 01/99 BMW AG
184nRadio remote control
New transmitter
If you begin to operate a new remote
control (a replacement or an additional
transmitter), it must first be initialised:
1 Enter the car and close the doors
2 Insert the ignition key into the steer-
ing lock, turn briefly to position 1
(max. 5 seconds) then back to 0; re-
move the key
3 Press button 1 (see picture) and hold
it in. Press button 2 three times in
rapid succession (within 10 seconds)
without releasing button 1
4 Release button 1. LED 3 will flash
slowly for a maximum of 10 seconds
5 The central locking system indicates
that initialisation has been performed
successfully by closing and releasing
the locks in rapid succession.
380de014
If the LED does not flash and the central
locking system does not operate, the
initialising procedure must be repeated.
If you use further remote control trans-
mitters for this car, all of them (up to
four) must be re-initialized within
30 seconds each. Repeat steps 3 and 4
above for each of the transmitters. The
central locking will confirm each initial-
ising operation as described in step 5.
In the event of faults, contact BMW
Service, which can also supply replace-
ment transmitters.
Prevent unauthorised use of the
transmitter, for example by hand-
ing over only door and ignition key 3 or
the spare key (see page 34) to hotel
staff.<
Online Edition for Part-No. 01 41 9 791 301 - © 01/99 BMW AG
185n
MinorrepairsKeywordsOverviewControlsMaintenanceTechnicalData
Remote control for auxiliary heater*
Changing the batteries
Renew the batteries if the telltale lamp
no longer flashes when the auxiliary
heater is switched on.
1 Pull open cover 1 for battery com-
partment
2 Insert two batteries of the same type
as before (LR 1). Battery type and
installed position are marked on the
base of the battery compartment
3 Press the cover back into position.
Dispose of old batteries only to an
authorised collecting point or re-
turn them to BMW Service.<
390de156
New transmitter
If you begin to use a new transmitter (a
replacement or additional transmitter), it
must first be initialised. Either one or
two transmitters can be used.
Observe the times stated below
accurately, otherwise initialising
will fail and have to be repeated.<
1 Remove the fuse for the auxiliary
heater (in luggage compartment or
load area on right, see page 193) and
insert it again after 10 seconds
2 Within 3 seconds of having inserted
the fuse again, press button 3
3 Next, press button 4 within 5 seconds
4 After a further 3 seconds, the system
is operational.
Online Edition for Part-No. 01 41 9 791 301 - © 01/99 BMW AG
186nWheel-changing
Safety precautions in the event of
a puncture or tyre failure:
Halt the car as far away from the main
traffic flow as possible, on a firm sur-
face; switch on the hazard warning
flashers.
Engage the steering lock in the straight-
ahead position, apply the handbrake
and select first or reverse gear or selec-
tor lever position P.
All occupants must leave the car and be
led to a point where they are not ex-
posed to risk, for example behind a
crash barrier at the side of the road.
If necessary, set up the warning triangle
or a flashing warning light at a sufficient
distance to the rear. Comply with rele-
vant local laws.
Only change wheels on flat, firm and
non-slip surface. On a soft or low-grip
surface (snow, ice, tiles or similar) there
is a risk of the car or the jack sliding
sideways.
Position the car's jack on a firm surface.
Never place wood blocks or similar un-
der the jack, or the maximum lifting ca-
pacity may be exceeded. When the car
has been jacked up, do not lie under it
or start the engine, as this could lead to
a potentially fatal accident.<
What you need
To avoid rattling noises later, please
make a note of the positions of the tools
when they are removed, and re-attach
them in the same positions later.
> Jack
Saloon: fold back the floor mat in the
luggage compartment and loosen the
wing nut (arrow).
touring: raise the floor panel and the
spare wheel cover (see page 119).
After using the jack, retract it fully,
swing the crank handle back in and
clip it securely
> Wheel chock
Next to the jack. Unscrew the wing
nut to remove it
394de090
Online Edition for Part-No. 01 41 9 791 301 - © 01/99 BMW AG
187n
MinorrepairsKeywordsOverviewControlsMaintenanceTechnicalData
Wheel-changing
> Spare wheel and adapter* for re-
moval of hub cap* (see next column)
Both are kept next to the jack. Take
off the adapter or the plastic cap. Un-
screw the wing nut (arrow) by hand
and take out the wheel
> Wheel stud wrench and screwdriver
In the car's toolkit under the luggage
compartment lid (see page 176).
touring: the wheel stud wrench is
next to the spare wheel.
394de091
Procedure
1 Note the safety precautions on the
previous page
2 Prevent the car from rolling away:
place the wheel chock behind the
front wheel on the side opposite to
where the wheel is to be removed
(or in front of the front wheel on a
downhill gradient). If the car cannot
be moved to a point on a less se-
vere gradient, you must protect it
reliably against rolling away
3 If full-width wheel covers are in-
stalled*: insert the fingers into the
vent holes and pull the cover off
4 Version with adapter*: Place the
adapter on the wheel stud cover, at-
tach the wheel stud wrench and
press to the left (see illustration)
380de092
5 If hub covers are fitted*: lever the
cover off by inserting a screwdriver
into the slot. For thiefproof wheel
studs, see page 189
6 Slacken off the wheel studs by a
1/2 turn
7 Attach the jack to the nearest
mounting point to the wheel which it
is intended to remove; the full sur-
face area of the base of the jack
should make contact with the
ground, and the jack head should
enter the rectangular recess of the
mounting point (see picture detail)
as the jack is raised
8 Continue to turn the crank handle
until the wheel you wish to change
is lifted clear of the ground
9 Take out the wheel studs and re-
move the wheel
390de350
Online Edition for Part-No. 01 41 9 791 301 - © 01/99 BMW AG
188nWheel-changing
10 Remove heavy dirt deposits from
the wheel and hub contact faces
and clean the wheel studs
11 Offer up the new wheel and secure
it with at least two studs inserted on
opposite sides of the hub
12 Insert and screw up the remaining
wheel studs, then tighten them all
firmly, working across the hub
rather than round it
13 Lower the car and remove the jack
14 Tighten the studs alternately on op-
posite sides of the hub
15 With full-width wheel covers: place
the cover in position so that the
valve cutout is aligned with the tyre
valve, then press the cover on to the
wheel with both hands
390de360
For this lightweight wheel, use
only the special full-width cover
supplied with the car, otherwise the
cover may not be held firmly.<
16 With hub cap: offer up the cap and
press into position
17 On wheels with a wheel stud cover
(hub cap): align the arrow on the
cover with the line on the wheel,
then press the cover on
18 Correct the tyre pressure at the ear-
liest opportunity.
Use the jack only for wheel chang-
ing. Do not attempt to raise an-
other type of vehicle or any other load
with this jack; this could result in injury
or damage.
For safety reasons, have the wheel stud
tightening torque checked without de-
lay, using a suitable calibrated torque
wrench (correct tightening torque =
100 Nm).<
When replacing a wheel in the spare
wheel well, make sure that the central
threaded rod in the well is not bent or
damaged.
If the car is fitted with alloy wheels not
of the Original BMW type, note that dif-
ferent wheel studs may be needed.
Have a flat tyre repaired as soon as
possible, and the wheel and tyre rebal-
anced before fitting.
For the lightweight wheel, use
only BMW approved balance
weights for alloy wheels. Do not at-
tempt to use hammer-on steel balance
weights on these wheels.<
Online Edition for Part-No. 01 41 9 791 301 - © 01/99 BMW AG
189n
MinorrepairsKeywordsOverviewControlsMaintenanceTechnicalData
Wheel-changing Thiefproof wheel studs*
Tyre size 255/40 R 17 94W* on
the rear wheels:
In the event of a puncture or similar, it
may be necessary to fit the spare wheel
and tyre (of different size) at the rear.
The car's spare wheel and tyre are of
full capacity in all load and speed
ranges. In such cases, fit a wheel and
tyre of the correct size as soon as pos-
sible.<
1 Cap (not needed for wheels with
wheel stud cover or hub cap)
2 Wheel stud for adapter
3 Adapter (in toolkit, next to spare
wheel in the touring)
To remove:
1 Turn cap 1 slightly to the left with the
wheel stud wrench, and take it off
2 Take adapter 3 out of the toolkit and
insert it into the wheel stud
3 Unscrew wheel stud 2.
After inserting and tightening the wheel
stud again, remove the adapter and
press on the stud cap.
The cap is located correctly if the
M of the BMW badge is over a
raised section on the wheel stud when
pressed on.<
360de094
The code number is embossed on the
front of the adapter. Please make a
careful note of this number and keep it
in a safe place, in case the adapter is
lost.
Online Edition for Part-No. 01 41 9 791 301 - © 01/99 BMW AG
190nBattery
Location
The battery is behind the right-hand
side trim in the luggage compartment/
load area.
Swing the trim panel down by pulling
the handle at the top; on the touring,
press the button.
If, on the touring, a sub-woofer loud-
speaker* is installed, release the toggle
screw and swing the sub-woofer to one
side.
394de305
Symbols
Your car's battery is marked with the
following symbols. For your own safety,
check the meaning of these symbols
before handling or working on the bat-
tery.
Before handling or working on
the battery, please note the fol-
lowing precautions.
Always wear eye protection.
Do not allow any particles con-
taining acid or lead to enter the
eyes, or to make contact with skin or
clothing.
Battery acid is highly caustic. Al-
ways wear protective gloves
and goggles. Do not tilt battery:
acid could then escape from breather
vents.
Keep the acid and the battery
out of the reach of children.
Naked flames and sparks must
be avoided; smoking is prohib-
ited. Avoid sparks when working
on wiring and electrical equipment. The
ignition key must be in position 0 when
disconnecting or reconnecting the bat-
tery. Never short-circuit the battery ter-
minals, or a powerful spark could result
and cause injury.
A highly explosive detonating
gas is generated when the bat-
tery is charged.
If acid comes into contact with
the eyes, rinse immediately with
clean water for several minutes.
Then immediately seek medical assist-
ance. Neutralize acid spillage on the
skin or clothes immediately with soap
and rinse off with plenty of water. If acid
has been swallowed, consult a physi-
cian immediately.
To protect the housing from
ultra-violet rays, do not expose
battery to direct sunlight. As
batteries which have run flat could
freeze, store in a place where there is
no risk of frost damage.
Maintenance
The battery is entirely maintenance-free
in accordance with German Industrial
Standard DIN 43 539/2, that is to say
one acid filling is sufficient for the whole
operating life of the battery.
Online Edition for Part-No. 01 41 9 791 301 - © 01/99 BMW AG
191n
MinorrepairsKeywordsOverviewControlsMaintenanceTechnicalData
Battery
State of charge
The "Magic Eye" (hydrometer, in prepa-
ration) can be used to read off the state
of battery charge:
> green: adequate charge
> black: state of charge is too low. The
battery needs to be recharged.
Please contact BMW Service and ar-
range for this to be done
> yellow: the battery must be replaced.
The battery will not achieve its full
operating life unless it is kept ade-
quately charged. Have the state of
charge checked more frequently if the
car is mainly used for short journeys.<
394de368
Removing and installing
Do not disconnect battery leads
while the engine is running, other-
wise excess current will destroy the ve-
hicle electronics unit.
Do not make any modifications to the
leads at the positive terminal, since this
could render the protective function of
the safety battery terminal ineffective.
Repairs and disposal should only be
undertaken by properly trained person-
nel.<
When removing the battery, first dis-
connect the lead at the negative termi-
nal, then the lead at the positive termi-
nal. Dismantle the battery retaining
bracket (1) and unfasten the screw con-
nection on the battery (2).
394de306
When installing the battery, connect the
lead to its positive terminal first, then
the lead to its negative terminal.
During installation, check that the
battery is correctly mounted and
fit the protective hoop, otherwise the
battery will not be secure enough in the
event of an accident.<
Recharging the battery
Recharge the battery only with the en-
gine stopped, or remove it from the car.
Before undertaking any work on
the car's electrical system, dis-
connect the lead from the negative ter-
minal of the battery in order to avoid the
risk of short-circuits and fire or injury.<
If the car is laid up out of use for more
than 4 weeks, disconnect the negative
lead from the battery in order to sepa-
rate it from the car's electrical system.
If the car is not to be used for more than
six weeks, remove the battery, recharge
it and store it in a cool place where is
no risk of frost damage. After 6 months
at the latest, and always before the bat-
tery is installed again, it must be re-
charged to prevent it from becoming
Online Edition for Part-No. 01 41 9 791 301 - © 01/99 BMW AG
192nBattery Fuses
useless. Every time a battery is allowed
to run flat, particularly if left in this state
for some time, its operating life is re-
duced.
Dispose of old batteries only to an
authorised collecting point or re-
turn them to BMW Service. Batteries
filled with acid should be transported
and stored upright. Protect batteries
against falling over when in transit.<
Periods of time in which the car's
battery is disconnected are not
counted by the Service Interval indica-
tor when the brake fluid renewal warn-
ing is given.
In such cases you must ensure that the
brake fluid is renewed every two years
regardless of the display.<
If an electrical consumer fails, switch it
off and check its fuse.
In glove box
1 Open the glove box and turn the two
white quick-release fasteners to the
left. The fuse strip also contains
spare fuses and plastic tweezers for
changing the fuses
2 Pull the fuse for the failed electrical
consumer out of its holder with the
tweezers
3 A blown fuse – identifiable by the
melted wire must be replaced by an-
other of the same colour and ampere
rating.
A list of fuses with ampere ratings and
consumers is located under the fuse
strip.
390de085
Close the fuse strip by pressing on the
lid at the top and turning the two quick-
release fasteners to the right.
There are additional fuses in the lug-
gage compartment/load area (see next
page).
On cars equipped for towing a trailer*
there are additional fuses for the trailer
lights in the trailer module, which is be-
hind the right trim panel in the luggage
compartment.
The fuse for the permanent positive line
is above the battery in a separate fuse
box. If a fault develops, have this fuse
changed by BMW Service.
Do not repair burnt out fuses or
replace them with fuses with dif-
ferent colours or ampere ratings other-
wise overloaded electrical wires can
cause a fire in the vehicle.<
If the fuse burns out several times, have
the cause of the fault rectified by BMW
Service.
Online Edition for Part-No. 01 41 9 791 301 - © 01/99 BMW AG
193n
MinorrepairsKeywordsOverviewControlsMaintenanceTechnicalData
Fuses
In luggage compartment
Fold the right side trim down with the
handle provided.
The list of fuses with ratings in amperes
and equipment connections is on the
back of the side trim.
394de124
In the load area
Press the button on the right-hand flap
to open it, and pull the trim to one side.
There is a list of fuses with current rat-
ings and attached consumers on the
back of the flap.
If a sub-woofer loudspeaker* is in-
stalled behind the right-hand flap, re-
lease the toggle screw and swing the
sub-woofer to one side.
392de172
Online Edition for Part-No. 01 41 9 791 301 - © 01/99 BMW AG
194n
Manual release – saloon
1 Swing the right side trim in the lug-
gage compartment down by means
of the handle at the top
2 Pull the button with the fuel pump
symbol (arrow).
394de095
Manual release – touring
1 Open the right-hand flap in the load
area by pressing the button, and
swing it down
2 Pull the button with the fuel pump
symbol (arrow).
If a sub-woofer loudspeaker* is in-
stalled behind the right-hand flap, re-
lease the toggle screw and swing the
sub-woofer to one side.
392de157
Operate manually
1 Take out the interior lamp (see
page 182), reach into the aperture
and press out the cover
2 Remove the plug (arrow) and turn the
sunroof panel in the desired direction
with the Allen key from the car's
toolkit (see page 176).
380de096
Fuel filler flap Sliding/tilting sunroof*
Online Edition for Part-No. 01 41 9 791 301 - © 01/99 BMW AG
195n
MinorrepairsKeywordsOverviewControlsMaintenanceTechnicalData
Tailgate
Manual release – touring
If an electrical defect occurs, you can
operate the tailgate manually.
1 Working from the load area, open and
take out the two side flaps (arrow)
392de166
2 In the tailgate, open the two quick-re-
lease fasteners for the toolkit cover
and raise the cover
3 Take out the plastic plug (arrow) and
pull towards the interior of the car to
release the tailgate
4 Open the tailgate, press the plug
back in and close the cover at the
quick-release fasteners
5 Insert and close the two side flaps.
392de301
Online Edition for Part-No. 01 41 9 791 301 - © 01/99 BMW AG
196n
The BMW Emergency Service is there
to assist you, even in the evenings, at
weekends and on public holidays.
If you have a breakdown, just call the
BMW Emergency Service control centre
for the country in which you are situ-
ated. Telephone numbers are shown at
the end of the list of BMW European
Service points.
If you cannot obtain the assistance you
require (e.g. because of difficulties in
obtaining a telephone connection or
communicating in the local language),
please call the BMW Emergency Serv-
ice in Munich, Germany:
National dialling code for Germany
(usually 0049) 89 - 260 99 09.
There is a list of national dialling codes
at the end of the list of BMW European
Service points.
Do not use the spray products sold as
starting aids.
If the car's own battery is flat, the en-
gine can be started by using two jumper
cables from another vehicle's battery.
Use only cables with fully insulated bat-
tery post clips, e.g. to German DIN
72551 standard or equivalent.
Do not touch any electrically live
parts when the engine is running
or a fatal accident may occur.<
Do not depart from the procedure de-
scribed below, or else personal injury
could result or one or both vehicles be
damaged.
1 Check that the other vehicle's battery
has a voltage of 12 V and approxi-
mately the same capacity in Amp/h
(this should be printed on the battery)
2 Do not disconnect the flat battery
from the car's electrical system
3 The two vehicles' bodies must not
touch – risk of short-circuit
4 Use one jumper lead to connect the
positive terminal of the other battery
to the jump-starting connection in
your car's engine compartment. The
cap over this connection is marked
Batt. + (see illustration). Pull the cap
up to remove it. This Figure illus-
trates, by way of example, the jump
start point on the BMW 520i, 523i
and 528i. For other models, see de-
scription of engine compartment,
starting on page 150
5 Connect the negative terminals of the
two batteries as follows: Make the
first connection to the negative termi-
nal of the donor battery or to earth
(ground) on the engine or body of the
donor vehicle, and then to earth
(ground) on the vehicle which you
wish to start. On your BMW a special
390de145
BMW Emergency Service Starting with a flat battery
Online Edition for Part-No. 01 41 9 791 301 - © 01/99 BMW AG
197n
MinorrepairsKeywordsOverviewControlsMaintenanceTechnicalData
Starting with a flat battery Tow-starting,towing away
nut is provided for this purpose on
the suspension strut housing; see
arrow in illustration
Connect the jumper leads in the
correct order when you are assist-
ing the driver of another vehicle as well,
so that no sparks occur at the battery
and possibly cause injury.<
6 If the donor vehicle's battery is not
strongly charged, run its engine
7 Start the engine of the affected vehi-
cle in the usual way, and allow it to
run as well as the other vehicle's en-
gine. If an initial attempt to start the
engine fails, wait several minutes until
the flat battery has been recharged to
a slightly greater degree
390de146
8 Before disconnecting the jumper
leads from your BMW, switch on the
lights, heated rear window and maxi-
mum heater blower speed and then
keep the engine running for at least
10 seconds, in order to avoid voltage
peaks reaching the electrical con-
sumers from the voltage regulator
9 Disconnect the jumper leads in the
opposite order from that in which
they were originally attached.
Have the battery recharged (depending
on the cause of the fault). Towing eye
The screw-in towing eye is kept in the
car's toolkit (on the touring, next to the
spare wheel) and should always be car-
ried on the car. It can be screwed in at
the front or the rear of the car, and is
only to be used for towing on a firm
road surface.
Access to threaded hole
Front:
Press the arrow symbol on the cover
and swing it out to remove.
390de087
Online Edition for Part-No. 01 41 9 791 301 - © 01/99 BMW AG
198nTow-starting, towing away
Rear:
Press the arrow symbol on the cover
and swing it out to remove.
Screw the towing eye in fully to
avoid the risk of its thread being
damaged.
Never tow the car or lash it down at any
of the suspension elements, as this
could cause damage and lead to acci-
dents occurring later.<
For towing, either use a towbar or a ny-
lon rope or tape to help avoid sudden
tensile loads.
394de088
Using a towbar
The towing eyes of both vehicles should
be on the same side.
If it is impossible to avoid attaching the
towbar at an angle, note the following:
> Towbar clearance may be restricted
when cornering
> The angled towbar generates lateral
forces which could be critical if the
road surface is slippery
> To compensate for the angled tow-
bar, the towed and towing vehicles
may have to be offset in relation to
one another
> there is a risk of skidding to one side
when the towing vehicle's brakes are
applied.
Do not tow a vehicle heavier than
your own, as there is otherwise a
risk of losing control.<
Tow-starting
Cars with catalytic converter should
only be tow-started if the engine is
cold. It is always preferable to use
jumper leads.
1 Switch on the hazard warning
flashers
(comply with local regulations)
2 Turn the ignition key to position 2
3 Select 3rd gear
4 Keep the clutch pedal down. When
the car is moving, gradually release
the clutch pedal. After the engine has
fired and is running, depress the
clutch pedal again
5 Switch off the hazard warning flash-
ers.
Have the cause of starting problems
traced and rectified by BMW Service.
Automatic-transmission cars:
These cars cannot be tow-started.
Starting with jumper leads: see
page 196.
Online Edition for Part-No. 01 41 9 791 301 - © 01/99 BMW AG
199n
MinorrepairsKeywordsOverviewControlsMaintenanceTechnicalData
Tow-starting, towing away Fire extinguisher*
Towing away
1 Ignition key in setting 1 to enable
brake lights, headlamp flashers, horn
and windscreen wipers to be acti-
vated
2 Switch on the hazard warning flash-
ers. (comply with local regulations).
If the car's electrical system has failed,
the car must be rendered identifiable to
following vehicles, for instance by plac-
ing a notice or the warning triangle in
the rear window.
Make sure that the ignition key is
turned to position 1 even if the
electrical system has failed; this is to
ensure that the steering lock cannot en-
gage and prevent the car from being
steered.
When the engine is not running, there is
no power assistance and the brake
servo is out of action. The steering and
brakes will require extra effort to oper-
ate.<
Automatic-transmission cars:
1 Set the selector lever to N
2 Maximum towing speed:
70 km/h (approx. 43 mph)
3 Maximum towing distance: 150 km
(approx. 93 miles).
Holder* on driver's seat, or on front
passenger's seat unless this space is
occupied by a first aid box.
To ensure that the fire extinguisher re-
mains operational, have it checked
every two years by its manufacturer's
authorised after-sales service organisa-
tion.
If these service points are not listed on
the extinguisher or in any documenta-
tion available to you, please consult a
local trade directory or the "yellow
pages" of the telephone service to ob-
tain the address.
Online Edition for Part-No. 01 41 9 791 301 - © 01/99 BMW AG
200n
Online Edition for Part-No. 01 41 9 791 301 - © 01/99 BMW AG
Initial overview
Controls in detail
Operation, maintenance
and general care
Minor repairs
Technical data
Index
Technical items of interest
201n
MinorrepairsKeywordsOverviewControlsMaintenanceTechnicalData
Adaptive transmission control
(AGS) 202
Airbags 203
Automatic Stability Control plus
Traction (ASC+T)/Dynamic
Stability Control (DSC) 203
Car radio 204
Seat belt catch tensioner 204
Hi-fi system (DSP) 205
Interior mirror, automatic-
dip 205
Integral-link rear
suspension 206
Latent heat store 206
Self-levelling suspension 207
Rain sensor 207
Tyre Pressure Control
(RDC) 208
Xenon headlamps 208
Water- and dirt-repellent
windscreen 209
Online Edition for Part-No. 01 41 9 791 301 - © 01/99 BMW AG
202n
Adaptive transmission control (AGS)
evaluates a number of factors before
determining the best possible auto-
matic transmission shift points. It takes
your individual driving style and the ac-
tual road and traffic situation into ac-
count.
AGS identifies driving style from the
opening angle and speed of movement
of the accelerator pedal, the rate of re-
tardation when braking and lateral ac-
celeration when cornering. It then se-
lects a suitable shift characteristic –
which can range all the way from re-
laxed travel with the emphasis on re-
finement to harder, highly enthusiastic
driving.
390de334
In order to take driving conditions into
account, AGS registers corners and
both uphill and downhill gradients. It
suppresses up-shifts, for instance,
when cornering fast. On uphill gradients
it delays the up-shift until a higher en-
gine speed has been reached, in order
to make better use of the engine's
power reserves. When driving downhill,
on the other hand, AGS shifts down
more rapidly as the car becomes faster
and the driver applies the brakes.
AGS*
Online Edition for Part-No. 01 41 9 791 301 - © 01/99 BMW AG
203n
MinorrepairsKeywordsOverviewControlsMaintenanceTechnicalData
Retardation sensors continuously moni-
tor the acceleration forces acting on the
car. If a frontal impact causes a rate of
retardation at which the seat belts alone
could not provide sufficient occupant
protection, the gas generators for the
driver's and front passenger's airbags
are ignited in parallel. However, the front
passenger's airbag is only triggered off
if a further sensor has identified that the
seat is occupied.
In the event of a side impact, the front
and rear* airbags are triggered off as
necessary.
390de319
The airbags located under the marked
covers are inflated within a few millisec-
onds by the gas which is generated,
causing them to emerge. When they do
so, they split open at the programmed
rupture lines down the upholstered cov-
ers and force these covers outwards.
In view of the very brief system re-
sponse time, the noise of propellant
ignition and inflation is lost in the gen-
eral accident situation. The gas re-
quired for filling the airbags is not dan-
gerous and escapes after a very short
period of time (emerging as smoke).
The entire process is over in a fraction
of a second.
Extremely responsive sensors monitor
the speeds of rotation of the road
wheels and in the case of DSC also the
steering lock angle, lateral acceleration,
braking pressure and the car's move-
ment round its vertical axis.
If differences in the wheel rotating
speeds are detected by the system,
there is a risk of wheelspin occurring,
and the power input is therefore re-
duced; in addition, the rear wheel
brakes are applied if necessary.
If an unstable driving condition is de-
tected by DSC, the front brakes may
also be applied in order to stabilise the
car.
The driver may find it difficult initially to
grow accustomed to the action of the
system. However, it ensures the best
possible forward traction and dynamic
stability at all times.
When the brakes are applied by the
system, some noise will be heard.
Airbags ASC+T/DSC*
Online Edition for Part-No. 01 41 9 791 301 - © 01/99 BMW AG
204nCar radio Seat belt catch tensioner
The medium wave (MW), long wave
(LW) and short wave (SW) bands can be
picked up a long way from the transmit-
ter, because the signals are broadcast
both as ground waves and through the
air – reflected by the ionosphere.
VHF (FM) reception provides far higher
listening quality than any of the AM
wavebands. The range of each trans-
mitter, however, is low, since the sig-
nals are transmitted by line of sight.
360de084
The limitations from which all non-sta-
tionary radio receivers suffer are com-
pensated for by a variety of ingenious
systems:
The Radio Data System (RDS) ensures
that when a radio station is being
broadcast on several frequencies, the
set automatically switches to whichever
frequency offers the best reception.
For aerial diversity, several VHF aerials
must be available. An integrated micro-
processor automatically selects the aer-
ial which provides the best reception of
the incoming VHF signal. The change to
the best aerial field occurs within a few
milliseconds, and is not apparent to the
listener.
The seat belt catch tensioner ensures
that in the event of a collision the seat
belt is tautened across the wearer's
body and holds it firmly in the seat.
Within a fraction of a second, the belt
catch is retracted by gas pressure, so
that the lap and shoulder straps of the
seat belt are both tautened at the same
time. This provides further protection
against slipping under the lap belt.
390de330
Online Edition for Part-No. 01 41 9 791 301 - © 01/99 BMW AG
205n
MinorrepairsKeywordsOverviewControlsMaintenanceTechnicalData
HiFi system (DSP)* Inside mirror, automatic anti-glare*
The Professional DSP hi-fi system with
top-quality hi-fi amplifier, Digital Sound
Processor (DSP) and integrated loud-
speakers yields a fascinatingly natural,
precise sound quality. The loudspeaker
system employs sub-woofers, woofers,
mid-range units and dome-pattern
tweeters to create a most impressive
spatial effect. The loudspeakers are lo-
cated in such a way that all the car's
occupants have the impression that the
sound image comes from the front, as
in a concert hall. During the journey, the
sound image is automatically modified
to take road speed and noise levels into
account.
390de109
The automatic-dip interior mirror coun-
teracts the glare caused by following
vehicles according to its intensity, and
restores the original reflecting capacity
of the mirror as soon as the offending
light source is no longer present. A light
sensor facing forwards in the mirror
casing measures light intensity in front
of the car. There is a second light sen-
sor in the mirror glass. An electronic
regulating system compares the light
intensities at the front and rear. The dif-
ference between them generates an
electrical voltage which is applied to a
gel coating on the mirror glass.
390de113
This gel undergoes a chemical reaction
when the voltage reaches it, and dark-
ens the mirror steplessly (electrochro-
mic principle).
The mirror no longer has to be reset
manually to avoid being dazzled by fol-
lowing vehicles, so that the driver can
concentrate fully on the general traffic
situation.
Online Edition for Part-No. 01 41 9 791 301 - © 01/99 BMW AG
206nIntegral-linkrearsuspension Latent heat store*
The control arms of the patented inte-
gral link rear suspension system, which
are made of aluminium, are not pivoted
directly to the body. They are resiliently
mounted on a sub-frame, which in turn
is resiliently attached to the bodyshell.
Even the slightest road surface irregu-
larities are absorbed by this double re-
silient mounting principle.
The wheel locating arms of the integral
link rear suspension have pivots with a
precisely computed degree of elasticity,
so that a predetermined self-steering
effect is achieved. This enhances driv-
ing safety in all situations.
The picture shows the saloon's rear
axle. The touring's compact, weight-
saving rear axle the shock absorbers
mounted at an angle from the vertical.
390de114
The latent heat store is capable of re-
taining waste heat from the engine for
several days, even at very low outside
temperatures. When the engine is re-
started, this heat is available for imme-
diate use, for instance to defrost the
windscreen and side windows. The
times required for heating the car inte-
rior and the time taken by the engine to
reach operating temperature are re-
duced substantially (arrow).
The latent heat accumulator consists of
an extremely well-insulated reservoir
connected to the engine's cooling sys-
tem.
390de115
The principle uses the latent heat re-
leased from an environmentally accept-
able salt mixture when it changes from
a liquid to a solid state. Like the heat
which is released when ice melts, the
heat from the warm engine is stored by
converting the salt mixture into a fluid.
If "empty", the latent heat accumulator
will be ready for further use after the car
has been driven for about 15 minutes.
In this way, the latent heat accumulator
is able to increase driving safety by im-
proving conditions within the car and
engine response, but without imposing
any burden on the environment.
No action on the driver's part is needed,
as the device is electronically control-
led.
Online Edition for Part-No. 01 41 9 791 301 - © 01/99 BMW AG
207n
MinorrepairsKeywordsOverviewControlsMaintenanceTechnicalData
Self-levelling suspension* Rain sensor*
Self-levelling rear suspension keeps the
car's ground clearance constant de-
spite load changes.
The car is equipped with air spring
struts at the rear instead of the conven-
tional steel springs and shock absorb-
ers. An electronic control unit deter-
mines body ride height at any given
moment with the help of two sensors,
and injects air from a compressor into
the air springs if necessary.
By increasing air spring pressure in re-
sponse to load, the self-levelling sus-
pension not only ensures a constant
ride height but also a consistently high
standard of ride comfort regardless of
the load being carried.
390de136
The rain sensor operates the wind-
screen wipers when rain is detected on
the glass.
An infra-red beam is directed against
the glass through an optical device, and
reflected fully if the windscreen is dry.
The amount of reflected light is meas-
ured by the device.
If there are droplets of water on the
windscreen, the amount of light re-
flected directly back is reduced, since
the infra-red beam can escape at the
glass surface. In other words, the pro-
portion of reflected light determines the
amount of rain striking the windscreen.
390de133
If the intermittent-wipe mode has been
selected, the wipers respond immedi-
ately, for instance, if the vehicle in front
splashes water on to the windscreen. In
this way, the rain sensor makes a con-
tribution to greater safety as well as
more convenient driving.
Online Edition for Part-No. 01 41 9 791 301 - © 01/99 BMW AG
208nTyre pressure control (RDC)* Xenon headlamps*
This system performs regular tyre pres-
sure checks for you and monitors the
pressure of all four tyres, even while
you are driving.
There is an electronic unit in every
wheel, designed to withstand high
stresses and strains and to cope with a
long service life. It contains a pressure
sensor, a transmitter and a battery.
Pressure is measured at frequent, regu-
lar intervals and the reading transmitted
by radio. If there is any irregularity, the
transmission rate is increased.
394de304
There are aerials in the body beside
each wheel which receive signals from
all four wheels. A central electronic
control unit evaluates these multiple
signals and reports any changes as
they appear.
RDC makes a significant contribution to
road safety.
Xenon light greatly increases the illumi-
nation of the areas in front of the car
and at the side of the road; it is consid-
erably brighter and more uniform than
conventional halogen headlamps.
In the xenon headlamp an electric arc
takes the place of the filament, and
generates an intensive light source. A
mixture of an inert gas and a metallic
vapour in a quartz glass sleeve is ig-
nited by a high electrical voltage. The
resulting arc is maintained by a lower
voltage. When the xenon headlamps
are switched on, a brief period is
needed for the full beam strength to
build up. Maximum brightness is
achieved after about 15 seconds.
390de134
Online Edition for Part-No. 01 41 9 791 301 - © 01/99 BMW AG
209n
MinorrepairsKeywordsOverviewControlsMaintenanceTechnicalData
Xenon headlamps* Water- and dirt-repellent windscreen
Xenon light helps the driver to locate
the car's position effectively, particu-
larly in poor weather and difficult driving
conditions for instance at night, in
heavy rain or if road works are encoun-
tered and the markings on the road sur-
face are missing.
Cars with xenon headlamps are also
equipped with automatic headlamp
beam angle control. The road surface is
thus illuminated effectively despite
changes in the load on the car, and on-
coming traffic is not dazzled. See also
page 91.
Xenon light also makes an important
contribution towards road safety by en-
abling the driver to see other road
users, particularly pedestrians, cyclists
and motorcyclists, at the side of the
road.
This windscreen (in preparation) has a
specially smoothed surface to which
water droplets do not adhere; as they
roll off they take dirt particles with them.
Even when new, glass in conventional
windows has a rough surface when
viewed under a microscope (1). The
water- and dirt-repellent windscreen is
given an absolutely transparent liquid
coating.
Depending on how clean the windscreen
is, droplets of water blow off at a speed
of approx. 60 km/h (approx. 37 mph).
The coating, which is absolutely trans-
parent,has no adverse effect on the view
through the windscreen.
390de337
Other advantages:
> A clear view and therefore greater
safety when weather conditions are
poor
> Less glare when driving after dark in
rainy weather.
Online Edition for Part-No. 01 41 9 791 301 - © 01/99 BMW AG
210n
Online Edition for Part-No. 01 41 9 791 301 - © 01/99 BMW AG
Initial overview
Controls in detail
Minor repairs
Technical data
Index
211n
MinorrepairsKeywordsOverviewControlsMaintenanceTechnicalData
Engine data 212
Fuel consumption, carbon diox-
ide/O emission level 213
Dimensions 215
Weights 217
Performance 221
Filling capacities 223
Electrical system 224
V-belts 224
Operation, maintenance
and general care
Technical items of interest
Online Edition for Part-No. 01 41 9 791 301 - © 01/99 BMW AG
212n
BMW 520i/touring BMW 523i/touring BMW 528i/touring BMW 535i
Displacement
Number of cylinders
cc 1991
6
2494
6
2793
6
3498
8
Max. power output
– at engine speed
kW/bhp
rpm
110/150
5900
125/170
5500
142/193
5500
180/245
5800
Max. torque
– at engine speed
Nm
rpm
190
3500
245
3500
280
3500
345
3800
Compression ratio e 11 10,5 10,2 10
Stroke
Bore
mm
mm
66
80
75
84
84
84
78,9
84
Mixture preparation Digital Motor Electronics
BMW 540i/touring BMW 525td BMW 525tds/touring BMW 530d/touring
Displacement
Number of cylinders
cc 4398
8
2497
6
2497
6
2926
6
Max. power output
– at engine speed
kW/bhp
rpm
210/286
5400
85/115
4800
105/143
4600
135/184
4000
Max. torque
– at engine speed
Nm
rpm
440
3600
230
1900
280
2200
390
1750 to 3200
Compression ratio e 10 22 22 18
Stroke
Bore
mm
mm
82.7
92
82.8
80
82.8
80
88
84
Mixture preparation Digital Motor
Electronics
Digital Diesel Electronics (DDE)
Engine data
Online Edition for Part-No. 01 41 9 791 301 - © 01/99 BMW AG
213n
MinorrepairsKeywordsOverviewControlsMaintenanceTechnicalData
BMW 520i BMW 520i BMW 523i BMW 523i
Town
Country
Total
O emissions
litres/100 km
(Imp. mpg)
litres/100 km
(Imp. mpg)
litres/100 km
(Imp. mpg)
grammes/km
5-sp. gearbox
12.6/13.7
(22.4/20.6)
9.0/9.6
(31.4/29.4)
8.1/8.3
(34.9/34.0)
215/220
Automatic
14.5/15.3
(19.5/18.5)
9.9/10.5 (
28.5/26.9)
9.1/9.4
(31.0/30.1)
242/250
5-sp. gearbox
13.1/13.4
(21.6/21.1)
9.4/9.8
(30.1/28.8)
8.1/8.3
(34.9/34.0)
215/220
Automatic
15.0/15.6
(18.8/18.1)
10.3/10.7
(27.4/26.4)
9.1/9.4
(31.0/30.1)
242/250
BMW 528i BMW 528i BMW 535i BMW 535i
Town
Country
Total
O emissions
litres/100 km
(Imp. mpg)
litres/100 km
(Imp. mpg)
litres/100 km
(Imp. mpg)
grammes/km
5-sp. gearbox
13.6/13.8
(20.8/20.5)
9.5/9.8
(29.7/28.8)
8.1/8.3
(34.9/34.0)
215/220
Automatic
15.6/15.5
(18.1/18.2)
10.5/10.7
(26.9/26.4)
9.1/9.4
(31.0/30.1)
242/250
5-sp. gearbox
16.9
(16.7)
11.6
(24.4)
11.9
(23.7)
283
Automatic
16.7
(16.9)
11.7
(24.1)
10.1
(28.0)
241
BMW 540i BMW 540i BMW 525td
Town
Country
Total
O emissions
litres/100 km
(Imp. mpg)
litres/100 km
(Imp. mpg)
litres/100 km
(Imp. mpg)
grammes/km
6-sp. gearbox
17.7/18.0
(16.0/15.7)
12.1/12.4
(23.3/22.8)
12.3/12.7
(23.0/22.2)
293/302
Automatic
17.2/17.6
(16.4/16.1)
12.1/12.6
(23.3/22.4)
9.1/9.4
(31.0/30.1)
242/250
5-sp. gearbox
11.3
(25.0)
6.0
(47.1)
7.9
(35.8)
210
First value: saloon; second value: touring
Fuel consumption, carbon dioxide (CO ) emissions2
Online Edition for Part-No. 01 41 9 791 301 - © 01/99 BMW AG
214nFuel consumption, carbon dioxide (CO ) emissions2
BMW 525tds BMW 525tds BMW 530d BMW 530d
Town
Country
Total
O emissions
litres/100 km
(Imp. mpg)
litres/100 km
(Imp. mpg)
litres/100 km
(Imp. mpg)
grammes/km
5-sp. gearbox
11.5/11.7
(24.6/24.1)
6.2/6.3
(45.6/44.8)
8.1/8.3
(34.9/34.0)
215/220
Automatic
13.0/13.4
(21.7/21.1)
7.0/7.2
(40.4/39.2)
9.1/9.4
(31.0/30.1)
242/250
5-sp. gearbox
9.8/10.0
(28.8/28.2)
7.2/7.4
(39.2/38.2)
8.1/8.3
(34.9/34.0)
215/220
Automatic
11.7/11.9
(24.1/23.7)
8.3/8.5
(34.0/33.2)
9.1/9.4
(31.0/30.1)
242/250
First value: saloon; second value: touring
Fuel consumption is determined according to a standard test method (93/116/EU). It is not the same as the average fuel
consumption in practice, which depends on a great many different factors such as driving style, load, road condition, traffic
density and flow, weather, tyre pressures etc. Engine power output and road performance data are measured in the condi-
tions laid down by 80/1269 EU and DIN 70020 (with the car to standard specification). This standard specifies the permit-
ted tolerances. Additional equipment on the car may have quite a significant influence on both performance and fuel con-
sumption, since it usually affects the car's weight and c value (drag coefficient), for instance roof rack, wider tyres,
additional mirrors etc.
Online Edition for Part-No. 01 41 9 791 301 - © 01/99 BMW AG
215n
MinorrepairsKeywordsOverviewControlsMaintenanceTechnicalData
Dimensions
394de367
All dimensions in millimetres (mm). Value after /: with automatic-dip outside mirrors
Minimum turning circle (dia.)11.3 m (37.1 ft); BMW 535i, 540i: 11.4 m (37.4 ft)
Online Edition for Part-No. 01 41 9 791 301 - © 01/99 BMW AG
216nDimensions
392de366
All dimensions in millimetres (mm). Value after /: with automatic-dip outside mirrors
Minimum turning circle (dia.): 11.3 m (37.1 ft); BMW 540i: 11.4 m (37.4 ft)
Online Edition for Part-No. 01 41 9 791 301 - © 01/99 BMW AG
217n
MinorrepairsKeywordsOverviewControlsMaintenanceTechnicalData
Weights – saloon
BMW 520i BMW 523i BMW 528i BMW 535i
Weight of car, unladen (with one occupant, ready for road, tank full, excluding optional extras)
with manual gearbox
with automatic transmission
kg (lb)
kg (lb)
1545 (3406)
1575 (3472)
1550 (3417)
1580 (3483)
1575 (3472)
1605 (3538)
1685 (3715)
1730 (3814)
Permitted gross weight
with manual gearbox
with automatic transmission
while towing a trailer
with manual gearbox
with automatic transmission
kg (lb)
kg (lb)
kg (lb)
kg (lb)
1980 (4365)
2010 (4431)
2020 (4453)
2050 (4519)
1985 (4376)
2015 (4442)
2030 (4475)
2060 (4541)
2040 (4497)
2070 (2070)
2050 (4519)
2080 (4586)
2150 (4740)
2195 (4839)
2240 (4938)
2285 (5038)
Front axle load limit kg (lb) 975 (2149) 975 (2149) 1000 (2205) 1090 (2403)
Rear axle load limit for trailer towing kg (lb)
kg (lb)
1125 (2480)
1230 (2712)
1125 (2480)
1230 (2712)
1170 (2580)
1250 (2756)
1200 (2646)
1305 (2877)
Towing loads according to EU operating permit (acc. to factory specification and legally permitted in Germany).
BMW Service will have details of possible increases. Note and comply with different values in certain countries.
unbraked
braked, max. gradient 12X (manual gearbox/auto-
matic transmission)
braked, max. gradient 8X (supplementary permit)
kg (lb)
kg (lb)
kg (lb)
750 (1653)
1500/1700
(3307/3748)
1900 (4189)
750 (1653)
1800/1900
(3968/4189)
1900 (4189)
750 (1653)
2000/2000
(4409/4409)
2000 (4409)
750 (1653)
2000/2000
(4409/4409)
2000 (4409)
Trailer nose weight kg (lb) 90 (198)
Roof load kg (lb) 100 (220)
Luggage compartment capacity acc. to VDA test l (cu.ft) 460 (16.2)
If you make full use of the quoted trailer load limit on gradients up to 12X and also wish to load the car itself up to its per-
missible gross weight limit, you are recommended not to drive up gradients steeper than 10X.
Do not exceed either the axle load limits or the car's gross weight limit.
Online Edition for Part-No. 01 41 9 791 301 - © 01/99 BMW AG
218nWeights – saloon
BMW 540i BMW 525td BMW 525tds BMW 530d
Weight of car, unladen (with one occupant, ready for road, tank full, excluding optional extras)
with manual gearbox
with automatic transmission
kg (lb)
kg (lb)
1705 (3759)
1735 (3825)
1580 (3483)
–
1585 (3494)
1615 (3560)
1650 (3638)
1660 (3660)
Permitted gross weight
with manual gearbox
with automatic transmission
while towing a trailer
with manual gearbox
with automatic transmission
kg (lb)
kg (lb)
kg (lb)
kg (lb)
2170 (4784)
2200 (4850)
2260 (4982)
2290 (5049)
2015 (4442)
–
2080 (4586)
–
2020 (4453)
2050 (4519)
2090 (4608)
2120 (4674)
2115 (4663)
2125 (4685)
2205 (4861)
2215 (4883)
Front axle load limit kg (lb) 1090 (2403) 1020 (2249) 1020 (2249) 1060 (2337)
Rear axle load limit for trailer towing kg (lb)
kg (lb)
1200 (2646)
1305 (2877)
1135 (2502)
1240 (2734)
1135 (2502)
1240 (2734)
1170 (2579)
1275 (2811)
Towing loads according to EU operating permit (acc. to factory specification and legally permitted in Germany).
BMW Service will have details of possible increases. Note and comply with different values in certain countries.
unbraked
braked, gradients up to 12X
braked, gradients up to 8X
(supplementary permit)
kg (lb)
kg (lb)
kg (lb)
750 (1653)
2000 (4409)
2000 (4409)
750 (1653)
1900 (4189)
1900 (4189)
750 (1653)
1900 (4189)
1900 (4189)
750 (1653)
2000 (4409)
2000 (4409)
Trailer nose weight kg (lb) 90 (198)
Roof load kg (lb) 100 (220)
Luggage compartment capacity acc. to VDA test litres
(cu.ft)
460 (16.2)
If you make full use of the quoted trailer load limit on gradients up to 12X and also wish to load the car itself up to its per-
missible gross weight limit, you are recommended not to drive up gradients steeper than 10X.
Do not exceed either the axle load limits or the car's gross weight limit.
Online Edition for Part-No. 01 41 9 791 301 - © 01/99 BMW AG
219n
MinorrepairsKeywordsOverviewControlsMaintenanceTechnicalData
Weights – touring
BMW 520i BMW 523i BMW 528i
Weight of car, unladen (with one occupant, ready for road, tank full, excluding optional extras)
with manual gearbox
with automatic transmission
kg (lb)
kg (lb)
1645 (3627)
1675 (3693)
1655 (3649)
1685 (3715)
1690 (3726)
1720 (3792)
Permitted gross weight
with manual gearbox
with automatic transmission
while towing a trailer
with manual gearbox
with automatic transmission
kg (lb)
kg (lb)
kg (lb)
kg (lb)
2195 (4839)
2225 (4905)
2125 (4685) or
2195 (4839)
2225 (4905)
2205 (4861)
2235 (4927)
2205 (4861)
2235 (4927)
2200 (4850)
2230 (4916)
2200 (4850)
2230 (4916)
Front axle load limit kg (lb) 1000 (2205) 1000 (2205) 1010 (2227)
Rear axle load limit for trailer towing kg (lb)
kg (lb)
1275 (2811)
1360 (2998)
1275 (2811)
1360 (2998)
1290 (2844)
1380 (3042)
Towing loads according to EU operating permit (acc. to factory specification and legally permitted in Germany).
BMW Service will have details of possible increases. Note and comply with different values in certain countries.
unbraked
braked, gradients up to 12X (manual gearbox/auto-
matic transmission)
braked, max. gradient 8X (with supplementary permit)
kg (lb)
kg (lb)
kg (lb)
750 (1653)
1600/1700
(3527/3748)
1900 (4189)
750 (1653)
1800/1900
(3968/4189)
1900 (4189)
750 (1653)
2000/2000
(4409/4409)
2000 (4409
Trailer nose weight kg (lb) 90 (198)
Roof load kg (lb) 100 (220)
Luggage compartment capacity acc. to VDA test l (cu.ft) 410–1525 (14.5–53.8)
If you make full use of the quoted trailer load limit on gradients up to 12X and also wish to load the car itself up to its per-
missible gross weight limit, you are recommended not to drive up gradients steeper than 10X.
Do not exceed either the axle load limits or the car's gross weight limit.
BMW 520i with manual gearbox: 1600 kg (3527 lb) trailer load only up to a gross vehicle weight of 2125 kg (4685 lb). If the
full gross vehicle weight of 2195 kg (4839 lb) is utilised, the max. towing load is only 1530 kg (3373 lb).
Online Edition for Part-No. 01 41 9 791 301 - © 01/99 BMW AG
220nWeights – touring
BMW 540i BMW 525tds BMW 530d
Weight of car, unladen (with one occupant, ready for road, tank full, excluding optional extras)
with manual gearbox
with automatic transmission
kg (lb)
kg (lb)
1815 (4001)
1845 (4067)
1695 (3737)
1725 (1725)
1760 (3880)
1770 (3902)
Permitted gross weight
with manual gearbox
with automatic transmission
while towing a trailer
with manual gearbox
with automatic transmission
kg (lb)
kg (lb)
kg (lb)
kg (lb)
2280 (5026)
2310 (5093)
2370 (5225)
2400 (5291)
2205 (4861)
2235 (4927)
2205 (4861)
2235 (4927)
2310 (5093)
2320 (5115)
2310 (5093)
2320 (5115)
Front axle load limit kg (lb) 1095 (2414) 1040 (2293) 1065 (2348)
Rear axle load limit for trailer towing kg (lb)
kg (lb)
1275 (2811)
1410 (3108)
1280 (2822)
1370 (3020)
1300 (2866)
1390 (3064)
Towing loads according to EU operating permit (acc. to factory specification and legally permitted in Germany).
BMW Service will have details of possible increases. Note and comply with different values in certain countries.
unbraked
braked, gradients up to 12X
braked, gradients up to 8X (supplementary permit)
kg (lb)
kg (lb)
kg (lb)
750 (1653)
2000 (4409)
2000 (4409)
750 (1653)
1900 (4189)
1900 (4189)
750 (1653)
2000 (4409)
2000 (4409)
Trailer nose weight kg (lb) 90 (198)
Roof load kg (lb) 100 (220)
Luggage compartment capacity acc. to VDA test l (cu.ft) 410–1525 (14.5–53.8)
If you make full use of the quoted trailer load limit on gradients up to 12X and also wish to load the car itself up to its per-
missible gross weight limit, you are recommended not to drive up gradients steeper than 10X.
Do not exceed either the axle load limits or the car's gross weight limit.
Online Edition for Part-No. 01 41 9 791 301 - © 01/99 BMW AG
221n
MinorrepairsKeywordsOverviewControlsMaintenanceTechnicalData
Performance – saloon
BMW 520i BMW 523i BMW 528i BMW 535i
Top speed
with automatic transmission
km/h (mph)
km/h (mph)
220 (136)
210 (130)
228 (141)
226 (140)
240 (149)
235 (146)
250 (155)
247 (153)
Acceleration from
0 to 50 km/h (0 to 31 mph) s 3.3 2.8 2.6 2.5
0 to 80 km/h (0 to 50 mph) s 6.8 5.8 5.3 5.0
0 to 100 km/h (0 to 62 mph) s 10.2 (11.5) 8.5 (9.7) 7.5 (8.8) 6.9 (7.6)
0 to 120 km/h (0 to 75 mph) s 13.9 11.6 10.6 9.7
80 to 120 km/h
(50 to 75 mph) in 4th gear
s 10.7 9.2 8.2 7.4
Standing-start kilometre s 31.1 (32.7) 29.2 (30.5) 28.2 (29.4) 27.1 (28.1)
BMW 540i BMW 525td BMW 525tds BMW 530d
Top speed
with automatic transmission
km/h (mph)
km/h (mph)
250 (155)
(governed)
250 (155)
(governed)
198 (123)
–
211 (131)
205 (127)
225 (139)
225 (139)
Acceleration from
0 to 50 km/h (0 to 31 mph) s 2.5 3.8 3.4 2.9
0 to 80 km/h (0 to 50 mph) s 4.6 8.0 7.0 5.6
0 to 100 km/h (0 to 62 mph) s 6.2 (6.5) 11.9 10.4 (11.0) 8.1 (8.4)
0 to 120 km/h (0 to 75 mph) s 8.5 17.1 14.4 11.1
80 to 120 km/h
(50 to 75 mph) in 4th gear
s 6.2 11.7 9.4 7.2
Standing-start kilometre s 25.9 (26.5) 33.3 31.6 (32.3) 28.8 (29.6)
Values in ( ): – with automatic transmission
Online Edition for Part-No. 01 41 9 791 301 - © 01/99 BMW AG
222nPerformance – touring
BMW 520i BMW 523i BMW 528i
Top speed
with automatic transmission
km/h (mph)
km/h (mph)
212 (131)
209 (129)
224 (139)
222 (137)
233 (144)
229 (142)
Acceleration from
0 to 50 km/h (0 to 31 mph) s 3.3 2.9 2.6
0 to 80 km/h (0 to 50 mph) s 7.0 6.0 5.5
0 to 100 km/h (0 to 62 mph) s 10.6 (11.9) 8.9 (10.2) 7.9 (9.3)
0 to 120 km/h (0 to 75 mph) s 14.5 12.2 11.1
80 to 120 km/h
(50 to 75 mph) in 4th gear
s 10.7 9.0 8.4
Standing-start kilometre s 31.6 (33.4) 29.7 (31.1) 28.8 (30.1)
BMW 540i BMW 525tds BMW 530d
Top speed
with automatic transmission
km/h (mph)
km/h (mph)
250 (155) (governed)
210 (130)
203 (126)
222 (137)
222 (137)
Acceleration from
0 to 50 km/h (0 to 31 mph) s 2.4 3.4 2.9
0 to 80 km/h (0 to 50 mph) s 4.6 7.2 5.7
0 to 100 km/h (0 to 62 mph) s 6.3 (6.7) 10.7 (11.4) 8.3 (8.9)
0 to 120 km/h (0 to 75 mph) s 8.8 14.9 11.6
80 to 120 km/h
(50 to 75 mph) in 4th gear
s 6.6 9.9 7.6
Standing-start kilometre s 26.2 (26.9) 32.0 (32.7) 29.3 (30.2)
Values in ( ): – with automatic transmission
Online Edition for Part-No. 01 41 9 791 301 - © 01/99 BMW AG
223n
MinorrepairsKeywordsOverviewControlsMaintenanceTechnicalData
Filling capacities
Litres (Imp. units) Note
Fuel tank
– including reserve of
approx. 70 (15.4 gal.)
approx. 8 (1.8 gal.) – with 6-cylinder engine
approx. 10 (2.1 gal.) – with 8-cylinder engine
Fuel grade: page 25
Windscreen washer
incl. headlamp cleaning system
Intensive cleaning system
approx. 3.5 (6.2 pints) – Saloon
approx. 6.0 (10.6 pints) – touring
approx. 6.0 (10.6 pints)
approx. 1.0 (1.8 pints)
For further details, page 156
Cooling system, incl. heater circuit 8.5 (99.9 pints) – BMW 520i, 523i, 528i
12.5 (22.0 pints) – BMW 535i, 540i
10.0 (99.9 pints) – BMW 525td/tds
9.2 (16.2 pints) – BMW 530d
For further details, page 160
Engine oil with filter renewal 6.5 (11.4 pints) – BMW 520i, 523i, 528i
7.5 (13.2 pints) – BMW 535i, 540i
6.75 (99.9 pints) – BMW 525td/tds
7.0 (12.3 pints) – BMW 530d
Long-life oil for spark-ignition
and diesel engines.
Oil grades: page 158
Manual gearbox, automatic transmission
and final drive
– Permanently filled, no oil
changes
Online Edition for Part-No. 01 41 9 791 301 - © 01/99 BMW AG
224nElectrical system V-belts
Battery
BMW 520i, 523i, 528i:
12 V, 70 Amp/h
BMW 535i, 540i:
12 V, 90 Amp/h
BMW 525td/tds, 530d:
12 V, 95 Amp/h
Spark plugs
NGK BKR 6 EQUP
Bosch FGR 7 DQP
BMW 520i, 523i, 528i
Coolant pump – alternator – power
steering
Ribbed, 6 K x 1538
Air conditioning compressor
Ribbed, 5 K x 906
BMW 535i, 540i
Coolant pump – alternator – power
steering
Ribbed, 7 K–LB x 1635
Air conditioning compressor
Ribbed, 5 K x 1007
BMW 525td/tds
Coolant pump – alternator – power
steering
Ribbed, 5 K x 1815
Air conditioning compressor
Ribbed, 4 PK x 781
BMW 530d
Coolant pump – alternator – power
steering
Ribbed, 5 PK x 2063
Air conditioning compressor
Ribbed, 5 PK x 810
You can obtain Original BMW
Parts and Accessories together
with competent advice from BMW Serv-
ice.<
Online Edition for Part-No. 01 41 9 791 301 - © 01/99 BMW AG
225n
MinorrepairsKeywordsOverviewControlsMaintenanceTechnicalData
Online Edition for Part-No. 01 41 9 791 301 - © 01/99 BMW AG
226n
Online Edition for Part-No. 01 41 9 791 301 - © 01/99 BMW AG
Initial overview
Controls in detail
Operation, maintenance
and general care
Minor repairs
Technical data
Index
Technical items of interest
227n
MinorrepairsKeywordsOverviewControlsMaintenanceTechnicalData
From A to Z 228
Minor repairs from A to Z 234
Online Edition for Part-No. 01 41 9 791 301 - © 01/99 BMW AG
From A to Z
A
ABS (anti-lock brake
system) 21, 130
Acceleration 221
Accessories 5
Activated charcoal filter 105
Adaptive Transmission Con-
trol 67, 202
Aerial 136
Aerial diversity 204
Air conditioning,
automatic 102
Air distribution 96, 102
Air outlets 94
Air supply 96, 103
Air vents 100
Airbags 21, 59, 170, 203
Alarm system 44
Alloy wheels 141
Antifreeze 133, 160
Anti-glare interior mirror 205
Anti-lock brake system
(ABS) 21, 130
Anti-theft system 44
Aquaplaning 128, 137
Artificial leather, care 167
ASC+T (Automatic Stability
Control plus Traction)
21, 86, 203
Ashtrays 111
AUC (Automatic Recircu-
lated Air Control) 103
Automatic air
conditioning 100
Automatic Recirculated Air
Control (AUC) 103
Automatic Stability Control
plus Traction (ASC+T)
21, 86, 203
Automatic transmission
21, 67
Automatic transmission with
Steptronic 69
Auxiliary heater 107
Changing remote control
battery 185
New transmitter 185
Auxiliary heater control, see
radio operating instruc-
tions
Auxiliary heater, remote con-
trol 108
Average fuel consump-
tion 83
Average speed 83
Axle loads 217
B
Battery 190, 224
Charging 191
Removing and
installing 191
State of charge 191
Battery capacity 224
Battery changing
Radio remote control 183
Remote control for auxil-
iary heater 185
Beam throw adjustment 91
Belt catch tensioner 204
Biodiesel 26
Blower 96, 103
BMW Comfort seat 51
Brake fluid 161
Brake hydraulics, brake
pads 20
Brake lights
Changing bulb 179
Brakes 131
Malfunctions 132
Breakdown Service 196
Bulb-changing 177
C
Can holder 110
Car care, exterior 165
Car care, interior 167
Car keys 34
Car Memory 57
Car phone 110, 136
Car phone malfunctions 136
Car phone, see separate
operating instructions
Car radio reception 136, 204
Car radio, see separate
operating instructions
Car washes 164
Caravan towing 123
Care of car 133
Care of car, exterior 165
Cassette operation,
see radio operating
instructions
Catalytic converter 129
CD operation, see radio
operating instructions
Central locking 36
Button, safety buttons on
doors 39
Centre brake light 181
Chassis number 162
Check Control 80
Check Control button 80
Child restraint systems 61
Child seat 61
Childproof door locks 62
Cigarette lighter 111
Clock, see radio operating
instructions
O emissions 213
Code, see radio operating
instructions
Comfort seat 51
Compartments in load
area 118
Computer 83
Consumption 78
Controls 14
Coolant 133, 160
A – Z
Online Edition for Part-No. 01 41 9 791 301 - © 01/99 BMW AG
From A to Z 229n
MinorrepairsKeywordsOverviewControlsMaintenanceTechnicalData
Coolant thermometer 79
Cruise control 75
Cup holder 110
D
Date, see radio operating
instructions
Daytime dipped head-
lamps 90
DBC (Dynamic Brake Con-
trol) 22, 132
Deadlock 44
Defogging windows 99
Defrost setting 102
Defrosting windows 99
Demisting windows 99
Diesel fuel 26, 133
Diesel-engine injection sys-
tem 136
Digital clock, see radio oper-
ating instructions
Digital Diesel Electronics
(DDE) 136
Dimensions 215
Dipped headlamps 90
Dipstick 157
Disc brakes 131
Displacement 212
Display lighting 90
Displays 16
Door keys 34
Doors
Locking and unlocking 36
Manual operation 36
Remote control 37
Driving area 14
Driving hints
Aquaplaning 128
DSC (Dynamic Stability Con-
trol) 21, 86, 203
DSP amplifier, refer to Radio
Owner's Manual
DSP Digital Sound Proces-
sor 205
Dynamic Brake Control
(DBC) 22, 132
Dynamic Stability Control
(DSC) 21, 86, 203
E
Eco-diesel 26
EDC (Electronic Damping
Control) 87
Electric mirror heating 54
Electric windows 46
Electrical consumer
failure 192
Electrical defect
Fuel filler flap 194
Sunroof 194
Tailgate (touring) 195
Electronic Damping Control
(EDC) 87
Electronic immobilizer 35
Emergency operation,
doors 36
load area 40
luggage compartment 40
tailgate 40
Emergency Service 196
Energy Control 78
Engine compartment 148
Engine compartment lid
release 147
Engine data 212
Engine oil 157
Engine oil consumption 157
Engine oil grades 158
Engine oil level 20, 21
Engine oil level check 157
Engine oil pressure 20
Engine size 212
Equipment fitted, see Serv-
ice Booklet
F
Failure displays 80
Fault displays 80
Filling capacities 223
Fire extinguisher 199
First aid kit 24
Flashing turn indicator
repeaters 22
Flat battery 196
Flooding 128
Fog lights 92
Changing bulb 179
Folding rear seat back 113
Foot brake 131
Footwell lights 93
Changing bulb 182
Foreign use 171
Front seat adjustment 49
Frost protection,
radiator 160
Fuel additives 133
Fuel consumption 78
Fuel consumption
figures 213
Fuel consumption,
average 83
Fuel filler flap 25
Release if an electrical
defect occurs 194
Fuel gauge 78
Fuel grade 25
Fuel reserve telltale 78
Fuel tank 223
Fuses 192
G
Gearbox, manual-shift 66
Glove box 109
Glove box light, changing
bulb 182
Grills 100
Gross weight 217
Online Edition for Part-No. 01 41 9 791 301 - © 01/99 BMW AG
From A to Z
H
Hand lamp 109
Handbrake 21, 65
Hands-free system 110
Hazard warning flashers 24
Head airbags 59
Head restraints 50
Headlamp cleaning
system 74
Headlamp flasher 72
Headlight adjustment driving
on right/left 171
Headlight beam throw
adjustment 91
Headlight cleaning
system 156
Headlight covers, care of
164, 177
Heat accumulator 206
Heated rear window 75, 96
Heated seats 106
Heated steering wheel 106
Heating and ventilation
94, 100
Heating with engine
stopped 104
Heating, rapid 98
Heavy loads 121
Height 215
HiFi system 205
High-beam headlamps
22, 91
Changing bulb 177
Horn 15
Hydraulic Brake Assistant,
see DBC 22, 132
I
Ice warning 77
Ice, removing from
windows 102
Ignition switch 63
Immobilizer 35
Independent ventilation 107
Inside mirror 54
Inspection 79
Instrument cluster 16
instrument cluster switch 72
Instrument lighting 90
Instrument panel 14
Integral rear suspension 206
Integrated children's
seats 61
Intensive cleaning
system 156
Intensive cleaning, auto-
matic 73
Interior light 37, 92
Remote control 37
Interior lights
Changing bulb 182
Interior mirror, automatic-
dip 205
Interior movement protec-
tion 44
Interlock 63
Intermittent-wipe setting 72
J
Jack 186
Jump starting 196
K
Key Memory 57
Keys 34
Keys with radio remote con-
trol 34
Keys, replacing 34
Knock control 25
L
Lashing down loads 43, 121
Lashing points 43
Latent heat accumulator 206
Laying up out of use 170
Leather, care of 168
Length 215
Licence plate lights, chang-
ing bulb 181
Light switch 90
Lights-on warning 90
Load area 40, 117
Load area capacity 217
Load area cover, touring 117
Load area lights 40
Changing bulb 182
Load area net 43
Load floor, removable 120
Load, securing 121
Lockable wheel studs 189
Locks 133
Long-life oils 158
Low-beam headlamps 90
Changing bulb 177
Luggage compartment 40
Capacity 217
Remote control 38
Securing separately 40
Luggage compartment lid 40
Opening from inside car 41
Luggage compartment
lights 92
Changing bulb 182
Lumbar support 51
M
M+S tyres 140
Magic eye, see battery state
of charge 191
Maintenance 79, 163
Make-up mirrors 54
Malfunction displays 80
Manual gearbox 66
Manual operation of
tailgate 40
Memory 55
MFL (multifunctional steering
wheel) 23
Micro-filter 97, 105
Microphone 110
Online Edition for Part-No. 01 41 9 791 301 - © 01/99 BMW AG
From A to Z 231n
MinorrepairsKeywordsOverviewControlsMaintenanceTechnicalData
MID (Multi-Information Dis-
play), see radio operating
instructions
Mirror memory 55
Mirror, anti-glare 54
Mirror, inside, automatic-
dip 54
Mirrors 53
Mirrors, outside, automatic-
dip 55
Mobile phone, see separate
operating instructions
Mobile telephones 136
Modifications, technical
5, 172
Multifunctional steering
wheel (MFL) 23
Multi-Information Display
(MID), see radio operating
instructions
N
Navigation system, see
separate operating
instructions
Net, protective (touring) 117
Non-smoker equipment 112
Nose weight 124
Nozzles 100
O
OBD socket 172
Octane numbers 25
Odometer 77
Oil additives 157
Oil change intervals
Oil for power steering 162
Oil grades 158
Oil level
Checking 157
Oil level warning light 21
Oil pressure warning light 20
Oil Service 79
Old batteries 192
On-board computer, see
also radio operating
instructions
Operating range 83
Outside mirrors 53
Outside temperature
display 77
Outside temperature,
computer display 83
P
Paint, protecting 166
Paintwork 165
Paintwork repairs 166
Paintwork, removing dirt 165
Park Distance Control
(PDC) 85
Parking aid 85
Parking brake 65
Parking in winter 134
Parking lights 91
Changing bulb 178
PDC (Park Distance
Control) 85
Performance 212, 221
Petrol 25
Pollen 105
Pollen filter 97
Power socket 112
Power steering 135
Power steering oil 162
Pre-heating 22, 63
Pressed-steel wheels 141
Protective glass, care of 166
Protective net 117
Pull-out load-area floor 120
Punctures 137, 186
R
Radiator 133
Radio Data System
(RDS) 204
Radio reception 136, 204
Radio remote control 37
Radio telephones 136
Radio, see separate operat-
ing instructions
Rain sensor 73, 207
Range 83
Rapeseed oil methyl ester 26
RDC (Tyre Pressure
Control) 88, 208
RDS (Radio Data
System) 204
Reading lights 93
Rear fog lights 92
Changing bulb 179
Rear light 179
Rear lights
Changing bulb 179
Rear lights, changing bulb
(touring) 180
Rear seat back, folding 113
Rear window
Opening 41
Rear window heating 75
Rear window washer, auto-
matic 74
Rear window wiper 74
Renewing wiper blade 176
Rear window, heated
96, 104
Recirculated air mode
96, 103
Reclining seat mecha-
nism 49
Recycling 173
Refuelling 25
Registration abroad 171
Remote control 37
Changing battery 183
New transmitter 184
Online Edition for Part-No. 01 41 9 791 301 - © 01/99 BMW AG
From A to Z
Remote control, auxiliary
heater 108
Removable load floor 120
Replacement keys 34
Residual heat 104
Restraint system 61
Retaining straps 43
Retreaded tyres 138
Return of vehicles 173
Reverse 66
Reversing lamps 66
Reversing lights
Changing bulb 179
Revolution counter 77
Roller sunblinds 106
Roller-blind cover, touring
Load area cover,
touring 117
Roof load 217
Roof rack 122
Rubber parts 133
Rule of the road
Adjusting headlamps 171
Running-in 128
S
Seat back adjustment 49
Seat belt catch tensioner 59
Seat belts 58, 59
Seat heating 106
Seat height adjustment
49, 51
Seat memory 55
Seat, electrically adjusted 51
Seat, manually adjusted 49
Seats, adjusting 49
Selecting desired memory
settings 57
Selector lever, automatic
transmission 67
Self-levelling suspension 22,
135, 207
Service Booklet 163
Service Interval indicator
79, 163
Servicemobile, see Emer-
gency Service 196
Servotronic 135
Shiftlock 67, 69
Shoulder support 51
Side airbags 59
Side lights 90
Changing bulb 178
Ski bag 114
Ski bag, touring 116
Skidding 134
Sliding/tilt sunroof 47
Closing if an electrical
defect occurs 194
Sliding/tilting sunroof 47
Snow chains 133, 140
Socket 112
Socket for On-Board Diag-
nosis 172
Spare keys 34
Spare wheel 186
Spark plugs 224
Special oils 158
Speech input (see also
separate operating
instructions) 23
Speedometer 16
Split rear seat back 113
Sport seat 50, 52
Starting difficulties 129, 196
Starting problems 64, 198
Starting the engine 63
Starting with a flat
battery 196
Steering 135
Steering lock 63
Steering wheel heating 106
Steering wheel height
adjustment 52
Steering wheel memory 55
Steering wheel, adjusting 52
Steptronic 69
Stopping the engine 65
Stopwatch, see radio operat-
ing instructions
Storage compartments 109
Storage space 109
Stratified temperature con-
trol 97
Rear-seat area ventila-
tion 104
Summer tyres 139
Summer-grade diesel
fuel 133
Sun roller blind 106
Sun visors 54
Sunroof 47
Convenient closure and
opening 36
Manual operation 194
Symbols 4, 190
T
Tailgate
Manual operation 40, 195
Opening from inside car 41
Securing separately 40
Technical modifications
5, 172
Telephone 110
Telephone, preparation for
installing 110
Telephone, see separate
operating instructions
Telltale lights 20
Temperature display, engine
coolant 79
Temperature, adjusting
96, 102
Thiefproof wheel studs 189
Thigh support, adjusting
50, 52
Third brake light 181
Through-loading system 113
Online Edition for Part-No. 01 41 9 791 301 - © 01/99 BMW AG
From A to Z 233n
MinorrepairsKeywordsOverviewControlsMaintenanceTechnicalData
Tilt alarm sensor 37, 45
Timer, see radio operating
instructions
Tools 176
Top speed 221
Topping up engine oil 157
Torch 109
Torque 212
touring
Changing load area light
bulb 182
Compartments in load
area 118
Folding rear seat back 117
Lashing loads 121
Load area 117
Opening rear window 41
Rear window wiper 74
Releasing tailgate if an
electrical defect
occurs 195
Renewing rear window
wiper blade 176
Securing load 121
Ski bag 116
Towbar downthrust 124, 217
Towing away 197, 198
Towing eyes 197
Tow-starting 197, 198
Track 215
Traction control, see ASC+T
and/or DSC 86
Trailer loads 217
Trailer nose weight 217
Trailer tow hitch, cover
flap 124
Trailer towing 123
Transmitter initialising
(remote control) 184
Tread depth, tyres 137
Trip distance recorder 77
Turn indicators 72
Changing bulb 178
Turning circle 215
Type plate 162
Tyre changing 138, 186
Tyre damage 137
Tyre inscriptions 139
Tyre markings 139
Tyre Pressure Control
(RDC) 88, 208
Tyre pressure monitoring
88, 208
Tyre pressures 27, 137
Tyre sizes 141
Tyre tread 137
U
Unladen weight 217
Upholstery, care of 168
V
Vacuum cleaner, connect
ing 112
V-belts 224
Vehicle identification 162
Vehicle recycling 173
Ventilation 97, 100
Ventilation grilles 94
Ventilation outlets 94
Ventilation, auxiliary 107
Ventilation, draught-free
97, 104
Ventilation, rear-seat area 97
Vents, ventilation 100
Voice input 23
W
Warm feet – cool head
97, 104
Warning displays 80
Warning lights 20
Warning triangle 24
Washer jets, adjusting 156
Washing the car 164
Water- and dirt-repellent
windscreen 166, 209
Water on road 128
Weights 217
Wheel changing 186
Wheel covers 187
Wheel stud wrench 186
Wheel studs 187
Wheel studs, lockable 189
Wheelbase 215
Wheels 139
Wheels and tyres 139, 141
Wheels, interchanging 138
Width 215
Window lifts 46
Windows
Convenient closure and
opening 36
Remote control 37
Safety switches 46
Windows, defrosting 99, 102
Windscreen washer reser-
voir, refilling 156
Windscreen washer, auto-
matic 73
Windscreen wipers 72
Windscreen, water- and dirt-
repellent 166, 209
Winter driving 133
Winter operation 133
Winter tyres 139, 140
Winter-grade diesel fuel 133
Wiper blades, renewing 176
Wipers 72
Wool velour, care of 168
Work on engine 147
X
Xenon headlamps 91, 178,
208
Online Edition for Part-No. 01 41 9 791 301 - © 01/99 BMW AG
A
Anti-freeze, adding 161
B
Battery changing
Radio remote control 183
Remote control for
auxiliary heater 185
Battery, recharging 191
Battery, state of charge 191
Bonnet, opening 147
Brake fluid, adding 161
Brake lights, changing
bulb 179
Brakes, malfunctioning 132
Breakdown Service 196
Bulb changing 177
C
Changing tyres 186
Check-Control 80
Checking oil level 157
Coolant, adding 161
D
Defect tyre 186
Defrosting 103
Defrosting windows 99, 103
De-icing windows 99, 103
Demisting windows 99, 103
Diesel, Fuel injection mal-
function 136
Door, manual operation 36
E
Electrical consumer
failure 192
Electrical fault
Fuel filler flap 194
Sliding/tilting sunroof 194
Emergency operation
Doors 36
Fuel filler flap 194
Luggage compartment
lid 40, 195
Sliding/tilting sunroof 194
Emergency Service 196
Engine compartment, open-
ing 147
Engine oil grades 158
Engine oil level check 157
Engine oil, topping up 157
F
Failure indications 80
Fault indications 80
Filling windscreen washer
fluid 156
Fire extinguisher 199
First aid box 24
Flashing turn indicator,
changing bulb 178
Flat battery 196
Fog lights, changing
bulb 179
Footwell lights, changing
bulb 182
Fuel filler flap, unlocking in
the event of an electrical
fault 194
G
Glove box light, changing
bulb 182
H
Hazard warning flashers 24
Headlamp adjustment, rule
of the road 171
Headlight covers, care
of 177
High-beam headlights, bulb
changing 177
I
Interior lights, changing
bulb 182
L
Licence plate lights, chang-
ing bulb 181
Low-beam headlights, bulb
changing 177
Luggage compartment lid
Emergency operation 40
Luggage compartment/load
area lights, changing
bulb 182
M
Maintenance 79, 163
Manual operation
Doors 36
Fuel filler flap 194
Luggage compartment lid
40, 195
Sliding/tilting sunroof 194
N
New transmitter
Radio remote control 184
Remote control for auxilia-
ry heating 185
O
Oil grades 158
P
Parking light, changing
bulb 178
Power steering oil,
adding 162
Protective glass, care of 166
R
Radio interior movement
detector, switching off 45
Rear fog light, changing
bulb 179
Rear lights, changing
bulb 179
Minor repairs from A to Z
Online Edition for Part-No. 01 41 9 791 301 - © 01/99 BMW AG
235n
MinorrepairsKeywordsOverviewControlsMaintenanceTechnicalData
Rear lights, changing bulb
(touring) 180
Rear window wiper, renew-
ing blade 176
Rear window wiper, renew-
ing blade (touring) 176
Recharging battery 191
Remote control
Battery changing 183
New transmitter 184
Remote control for auxiliary
heater
Battery changing 185
New transmitter 185
Renewing fuses 192
Reserve wheel 186
Reversing light, changing
bulb 179
Rule of the road
Headlamp adjustment 171
S
Self-levelling suspension
inactive 135
Servicemobile, see Emer-
gency Service 196
Side light, changing bulb 178
Sliding/tilting sunroof
Closing in the event of an
electrical malfunction 194
Power supply failed 48
Sliding/tilting sunroof, clos-
ing (electrical defect) 194
Snow chains 140
Spare wheel 186
Starting difficulties 64, 129,
198
Starting problems 196
Starting with a flat
battery 196
Steering stiff to turn 135
T
Telltale lights 20
Tilt alarm, switching off 45
Toolkit 176
touring
Fuel filler flap, unlocking in
the event of an electrical
fault 194
Luggage compartment lid,
unlocking in the event of
an electrical fault 195
Towing 198
Towing away 197
Towing eyes 197
Tow-starting 197
Tyre damage 137
Tyre pressures, checking 27
W
Warning lights 20
Warning signals 80
Warning triangle 24
Washer fluid, topping up 156
Washer jets, adjusting 156
Washer reservoir, filling 156
Wheel stud wrench 186
Wheel-changing 186
Windows 103
Windows, defrosting 99
Windscreen washer reser-
voir 156
Windscreen wiper blades,
renewing 176
Wiper blades, renewing 176
Working on engine 147
Minor repairs from A to Z
Online Edition for Part-No. 01 41 9 791 301 - © 01/99 BMW AG
So that you always have access to the
data you need when refuelling, you are
recommended to add the relevant infor-
mation to the table shown here.
Fuel
For description, see page 25
Engine oil
For description, see page 158
The quantity of oil between the two dip-
stick marks is approx. 1 litre (1.75 pints).
Designation
RON: for nominal power out-
put
RON: also permitted
RON: minimum, use only if
unavoidable
Grade
Tyre pressures
For description, see page 27
Summer Winter
front rear front rear
4 persons
5 persons or 4 plus luggage
Refuelling stop
Online Edition for Part-No. 01 41 9 791 301 - © 01/99 BMW AG
The Ultimate Driving Machine
01419791301En
Online Edition for Part-No. 01 41 9 791 301 - © 01/99 BMW AG

Bmw e39 - 5series owners handbook

  • 1.
    Owner's Handbook forthe vehicle. With quick reference guide. Contents A-Z Online Edition for Part-No. 01 41 9 791 301 - © 01/99 BMW AG
  • 2.
    Online Edition forPart-No. 01 41 9 791 301 - © 01/99 BMW AG
  • 3.
  • 4.
    Congratulations on yourchoice of a BMW. The better you are acquainted with your car, the easier you will discover driving it to be. We would therefore like to offer you the following advice. This Owner's Handbook contains important information on operating and looking after your BMW. Please read it carefully before setting out in your new car, so that you are fully familiar with the technical advantages of your BMW. It also contains useful information on care and maintenance, to uphold both the car's operating safety and its full resale value. We wish you an enjoyable driving experience. BMW AG Online Edition for Part-No. 01 41 9 791 301 - © 01/99 BMW AG
  • 5.
    © 1998 BMWAG Munich, Germany Not to be reproduced wholly or in part without written permission from BMW AG, Munich. Order No. 01 41 9 791 301 English VIII/98 Printed in Germany Printed on environmentally friendly paper (bleached without chlorine, suitable for recycling). 4n Notes on this Owner's Handbook We have tried to make all the informa- tion in this Owner's Handbook easy to find. The quickest access to a particular topic or item is by consulting the de- tailed alphabetical index at the end. Consult the first chapter for an initial overview of your car. The detailed list of contents immediately following the list of main headings is intended to arouse your curiosity about your new BMW and encourage you to read this information carefully. When the time comes to sell your BMW, please remember to hand over this Owner's Handbook; it is regarded le- gally as part of the vehicle. If you have any queries, BMW Service will be glad to advise you. Symbols used indicates instructions or precau- tions which you should definitely read for your safety and that of others, and to prevent damage to the car.< is used to identify details of spe- cial features.< refers to recycling methods or procedures.< < indicates the end of a particular in- struction or description. * identifies special equipment or items to a particular national-market specifi- cation, and also accessories. indicates vehicle components where it is advisable to consult this Owner's Handbook. draws your attention to functions which BMW Service can adjust to suit your own personal preferences ("Car Memory", "Key Memory"). See page 57.< Your own car When you ordered your BMW, you chose various items of equipment. This handbook describes all models and equipment specifications which BMW offers within this particular model line. This explains why the handbook may also contain details of items which you have not ordered. The differences can easily be identified by the asterisk * shown against optional extras. If your BMW contains equipment that is not described in this Owner's Hand- book (e.g. a car radio or telephone), supplementary operating instructions will be supplied and you are requested to study and comply with them. Online Edition for Part-No. 01 41 9 791 301 - © 01/99 BMW AG
  • 6.
    5n Print status Fuel consumptiondata are as deter- mined at the time of closing for print. All dimensional, weight and performance figures in the Owner's Handbook refer to the the German Standards Institute (DIN e.V.) and comply with these toler- ances. Deviations may occur with respect to certain national-market ver- sions of the cars. In cars with right- hand drive, some controls will be lo- cated differently from those illustrated in this handbook. The high safety and quality standards of BMW vehicles are maintained by un- ceasing development work on designs, equipment and accessories. Because of this, your car may differ from the in- formation supplied in the Owner's Handbook. Nor can errors and omis- sions be entirely ruled out. You are therefore asked to appreciate that no legal claims can be entertained on the basis of the data, illustrations or de- scriptions in this handbook. For your own safety Use only parts and accessory products which BMW has ap- proved for your car. Parts and products which BMW has ap- proved for your car have been checked for safety, function and suitability. BMW accepts product liability for them. BMW cannot accept liability for parts or accessory products of any kind which it has not approved. BMW is unable to assess each individ- ual product of outside origin as to its suitability for use on BMW vehicles without safety risk. Nor can suitability be assured, for example, even if an offi- cial inspection authority (such as the German TÜV) has approved the product or it has been granted a General Oper- ating Permit. These tests cannot always take into account the full range of oper- ating conditions applicable to BMW ve- hicles and may therefore be inade- quate. In short, the functional efficiency or road safety of your BMW, and also its value, may be affected if its specifica- tion is altered by installing parts not ap- proved for it. Original BMW parts and accessories, other BMW-approved products and competent advice on all related matters are obtainable from BMW Service.< Online Edition for Part-No. 01 41 9 791 301 - © 01/99 BMW AG
  • 7.
    6n Online Edition forPart-No. 01 41 9 791 301 - © 01/99 BMW AG
  • 8.
    Initial overview Controls indetail Operation, maintenance and general care Minor repairs Technical data Index Technical items of interest 7n MinorrepairsKeywordsOverviewControlsMaintenanceTechnicalData Online Edition for Part-No. 01 41 9 791 301 - © 01/99 BMW AG
  • 9.
    Contents Initialoverview Controlsindetail Driving area 14 Instrumentpanel 16 Telltale and warning lamps 20 Multifunctional steering wheel 23 Hazard warning flashers 24 Warning triangle 24 First aid box 24 Refuelling 25 Fuel grades 25 Tyre pressures 27 Opening and closing: Keys 34 Electronic immobilizer 35 Central locking system 36 Doors – from outside 36 Radio remote control 37 Doors – from inside 39 Luggage comparement lid 40 Rear window 41 Luggage compartment 43 Alarm system 44 Electric windows 46 Sliding/tilt sunroof 47 Adjusting: Seats 49 Steering wheel 52 Mirrors 53 Seat, mirror and steering wheel position memory 55 Car Memory, Key Memory 57 Safety systems: Seat belts 58 Airbags 59 Child restraint systems 61 Childproof door locks 62 Driving: Ignition switch 63 Starting the engine 63 Stopping the engine 65 Handbrake 65 Manual gearbox 66 Automatic transmission 67 Automatic transmission with Steptronic 69 Turn indicators/headlamp flasher 72 Wipers/rain sensor 72 Heated rear window 75 Cruise control 75 Everything under control: Trip distance recorder; outside temperature display 77 Revolution counter 77 Energy Control 78 Fuel level indicator 78 Coolant thermometer 79 Service Interval indicator 79 Check Control 80 On-board computer 83 Technical features for journey comfort and safety: Park Distance Control (PDC) 85 Automatic Stability Control plus Traction (ASC+T)/Dynamic Stability Control (DSC) 86 Electronic Damping Control (EDC) 87 Tyre Pressure Control (RDC) 88 Online Edition for Part-No. 01 41 9 791 301 - © 01/99 BMW AG
  • 10.
    9n Controlsindetail Operation,maintenanceandgeneralcare Lights: Sidelights/low-beam headlamps 90 Instrument lighting90 Headlamp range control 91 High-beam headlamps/parking lights 91 Fog lamps 92 Interior light/load-area light 92 Reading lights 93 Controlled-temperature air for a pleasant interior climate: Air conditioning 95 Automatic air conditioning 100 Seat heating 106 Heated steering wheel 106 Roller sun blind 106 Auxiliary heater 107 Auxiliary ventilation control 107 Auxiliary heater remote control 108 Practical interior equipment: Glove box 109 Storage compartments 109 Drink can holders 110 Ashtrays 111 Cigarette lighter 111 Loading and load-carrying: Through-loading system 113 Ski bag 114 touring: Luggage compartment 117 Roller-blind cover 117 Net in front of load area 117 Compartments in luggage area 118 Removable floor in luggage area 120 Load 121 Roof rack 122 Towing a trailer 123 Driving precautions: Running in 128 Driving hints 128 Catalytic converter 129 Anti-lock brake system (ABS) 130 Disc brakes 131 Brakes 132 Winter operation 133 Power steering 135 Self-levelling suspension 135 Digital Diesel Electronics (DDE) 136 Car telephone 136 Radio reception 136 Wheels and tyres: Tyre pressures 137 Condition of tyres 137 New tyres 138 Changing wheels 138 Wheel and tyre combinations 139 Winter tyres 140 Snow chains 140 Approved wheel and tyre sizes 141 Online Edition for Part-No. 01 41 9 791 301 - © 01/99 BMW AG
  • 11.
    Contents Operation,maintenanceandgeneralcare Minorrepairs Technicalitemsofinterest In the enginecompartment: Engine hood 147 Engine compartment 148 Washer fluid 156 Washer jets 156 Engine oil 157 Coolant 160 Brake fluid 161 Power steering oil 162 Vehicle identification number 162 Type plate 162 Maintenance and general care: The BMW maintenance system 163 Care of the car 164 Airbags 170 Laying up out of use 170 Legal requirements and regulations: Rule of the road 171 Registration abroad 171 Technical modifications 172 OBD socket 172 Recycling: Recycling in the Service area 173 Returning the car 173 Replacing parts: Toolkit 176 Wiper blades 176 Lights and bulbs 177 Radio remote control 183 Auxiliary heater remote control 185 Wheel-changing 186 Lockable wheel studs 189 Battery 190 Fuses 192 If an electrical fault occurs: Fuel filler flap 194 Sliding/tilt sunroof 194 touring: tailgate 195 Mutual aid: BMW Emergency Service 196 Starting with a flat battery 196 Tow-starting, towing away 197 Fire extinguisher 199 Adaptive transmission control (AGS) 202 Airbags 203 Automatic Stability Control plus Traction (ASC+T)/Dynamic Sta- bility Control (DSC) 203 Car radio 204 Seat belt catch tensioner 204 Hi-fi system (DSP) 205 Interior mirror, automatic- dip 205 Integral-link rear suspension 206 Latent heat store 206 Self-levelling suspension 207 Rain sensor 207 Tyre pressure control (RDC) 208 Xenon headlamps 208 Water- and dirt-repellent windscreen 209 Online Edition for Part-No. 01 41 9 791 301 - © 01/99 BMW AG
  • 12.
    11n Technicaldata Index Engine data 212 Fuelconsumption, carbon diox- ide/O emissions 213 Dimensions 215 Weights 217 Performance 221 Filling capacities 223 Electrical system 224 V-belts 224 From A to Z 228 Minor repairs from A to Z 234 Online Edition for Part-No. 01 41 9 791 301 - © 01/99 BMW AG
  • 13.
    12n Online Edition forPart-No. 01 41 9 791 301 - © 01/99 BMW AG
  • 14.
    Initial overview Controls indetail Operation, maintenance and general care Minor repairs Technical data Index Technical items of interest 13n MinorrepairsKeywordsOverviewControlsMaintenanceTechnicalData Driving area 14 Instrument panel 16 Telltale and warning lights 20 Multi-functional steering wheel (MFL) 23 Hazard warning flashers 24 Warning triangle 24 First aid kit 24 Refuelling 25 Fuel grade 25 Tyre pressures 27 Online Edition for Part-No. 01 41 9 791 301 - © 01/99 BMW AG
  • 15.
    14n 390de001 Driving area Online Editionfor Part-No. 01 41 9 791 301 - © 01/99 BMW AG
  • 16.
    15n MinorrepairsKeywordsOverviewControlsMaintenanceTechnicalData 1 Sidelights/low beam(dipped) headlamps 90 2 d Flashing turn indicators 72 > Parking lights 91 > High-beam headlamps 91 > Headlight flasher 72 > Computer 83 3 Fog lights 92 4 Wipers/washer 72 5 Central locking system 36 6 Hazard warning flashers 24 7 Heated rear window 75 8 Horn, entire surface 9 Electric steering wheel adjustment* 53 Driving area Online Edition for Part-No. 01 41 9 791 301 - © 01/99 BMW AG
  • 17.
    16nInstrument panel 390de338 Online Editionfor Part-No. 01 41 9 791 301 - © 01/99 BMW AG
  • 18.
    17n MinorrepairsKeywordsOverviewControlsMaintenanceTechnicalData Instrument panel There aretwo versions, depending on your car's equipment 1 Fuel display with telltale to indicate when fuel is running out 78 2 Flashing turn indicator repeater 22 3 Speedometer 4 High beam telltale 22 5 Revolution counter and Energy Control 77, 78 6 Engine coolant thermometer with telltale "Coolant temperature too high" 79 7 Telltale and warning lights (arranged clockwise) for > Handbrake/brake hydraulics, Dy- namic Brake Control (DBC)* 22 > Anti-lock brake system (ABS) 21 > Brake pads 21 > Tyre pressure control (RDC)* 22 > Airbags 21 > Automatic transmission* 21 > Fasten seat belts 21 > Cruise control* 22 8 Selector lever position and pro- gram displays for automatic transmission* 67 Service Interval indicator 79 9 Computer display – For operation from turn indicator lever, see page 83: > Outside temperature > Average fuel consumption, > Before refuelling > Average speed 10 Telltale/warning lights for > Automatic Stability Control plus Traction (ASC+T)/Dynamic Stabil- ity Control (DSC)* 21 > Self-levelling suspension* 22 11 Distance recorder (odometer) and trip distance recorder 77 12 Display for Check Control 80 13 Trip distance control zeroing 77 14 Telltale and warning lights (arranged clockwise) for > Fog lights* 22 > Rear fog lights* 22 > Battery charge 20 > Engine oil level/pressure 20 > Electronic engine output control (EML) 22 > Diesel engine preheat/Digital Diesel Electronics (DDE)* 22 > Engine management 22 You can also have outside tem- perature and the distance covered displayed in another unit of measure- ment.< Online Edition for Part-No. 01 41 9 791 301 - © 01/99 BMW AG
  • 19.
    18nInstrument panel* 390de339 Online Editionfor Part-No. 01 41 9 791 301 - © 01/99 BMW AG
  • 20.
    19n MinorrepairsKeywordsOverviewControlsMaintenanceTechnicalData Instrument panel* There aretwo versions, depending on your car's equipment 1 Fuel display with telltale to indicate when fuel is running out 78 2 Flashing turn indicator repeater 22 3 Speedometer 4 High beam telltale 22 5 Revolution counter and Energy Control 77 6 Coolant thermometer 79 7 Telltale and warning lights (arranged clockwise) for > Handbrake 21 > Brake hydraulics/Dynamic Brake Control (DBC)* 22 > Anti-lock brake system (ABS) 21 > Airbags 21 > Fasten seat belts 21 > Cruise control* 22 8 Check Control button 79 9 Selector lever position and pro- gram displays for automatic transmission* 67, 69 10 Otside temperature display 77 11 Telltale for Automatic Stability Con- trol plus Traction (ASC+T)/Dynamic Stability Control (DSC)* 21 12 Trip distance recorder 77 13 Display for > Check Control 80 > Computer: see radio operating instructions and on version with multi-func- tional steering wheel (MFL), also for > Radio and telephone, see sepa- rate operating instructions 14 Odometer (distance recorder) 77 15 Service Interval indicator 79 16 Trip distance control zeroing 77 17 Telltale and warning lights (arranged clockwise) for > Fog lights* 22 > Rear fog lights* 22 > Battery charge 20 > Engine oil pressure 20 > Engine management 22 You can also have the outside temperature displayed in different units of measurement or the Check Control messages and computer infor- mation displayed in a different lan- guage.< Online Edition for Part-No. 01 41 9 791 301 - © 01/99 BMW AG
  • 21.
    20nTelltale and warninglights Technical equipment that monitors itself Numerous systems on your BMW are self-monitoring, both when starting and during the journey. The function of tell- tale and warning lights marked "q" is checked when the ignition is switched on. They come on once for varying peri- ods. If a defect occurs in one of the systems, the corresponding light will remain on when the engine is started or will come on again during the journey. The correct response on your part to this is de- scribed below. Red: stop as soon as possible Battery charge q The battery is not being charged. The alternator V-belt is defective or there is a fault in the alter- nator charging circuit. Consult the near- est BMW Service. If the V-belt is defective, do not continue the journey, as there is a risk of the engine overheating and suf- fering damage. A defective V-belt also increases the effort needed to turn the steering wheel.< Engine oil pressure q The message "STOP! ENGINE OIL PRESS" may also appear in the Check Control*: Stop immediately and switch off the engine. Check engine oil level and top up if necessary. If the oil level is correct: Consult the nearest BMW Service. Do not continue the journey, as the engine may otherwise be dam- aged by inadequate lubrication.< Tyre Pressure Control (RDC)* q A gong signal is also heard: the tyre is punctured or otherwise damaged. Immediately reduce speed and stop, avoiding violent braking and sudden steering wheel movements. Further details: page 88 Brake hydraulics q If light remains on after releasing handbrake: have the brake fluid level checked. Before continuing on your journey, read instructions on pages 132 and 161. Online Edition for Part-No. 01 41 9 791 301 - © 01/99 BMW AG
  • 22.
    21n MinorrepairsKeywordsOverviewControlsMaintenanceTechnicalData Telltale and warninglights Yellow: stop as soon as possible Engine oil level* If light comes on during journey: stop immediately and switch off the engine. The engine oil is at its abso- lute minimum permitted level. Do not continue the journey, as the engine may otherwise be dam- aged by inadequate lubrication.< Red: important reminder Handbrake* q Lights up when handbrake is ap- plied. Further details: page 65. Handbrake* q Lights up when handbrake is ap- plied. Further details: page 65. Also lights up when the message "CHECK BRAKE LININGS" appears on the Check Control. Fasten seat beltsq Depending on the version, a sig- nal sounds at the same time* or a message appears* in the Check Con- trol display. Comes on for several sec- onds or, depending on version, until the seat belts are fastened. Further details: page 58. Airbags q Please arrange for the problem to be examined by BMW Serv- ice. Further details: page 59, 203. Yellow: have a check performed soon Anti-lock brake system (ABS) q ABS is switched off because a fault has developed. Normal brake action is not affected (no restric- tions). Please arrange for the problem to be examined by BMW Service. Fur- ther details: page 130. Engine oil level* If light comes on when engine is switched off: check engine oil level. Further details: page 157. Automatic transmission* q A fault has caused the auto- matic transmission to switch to the emergency-run program. Please consult your nearest BMW Service. Further details: page 68. Brake pads* q Check the condition of your brake pads. Further details: page 133. Automatic Stability Control plus Traction (ASC+T)/Dynamic Stability Control (DSC)* q ASC+T/DSC has been switched off by pressing the control button, or due to a fault. If there is a fault, please have it checked by BMW Service. Further de- tails: page 86. Online Edition for Part-No. 01 41 9 791 301 - © 01/99 BMW AG
  • 23.
    22nTelltale and warninglights Dynamic Brake Control (DBC)* q Malfunction in DBC system. Nor- mal brake action is not affected (no restrictions). Further details: page 132. Tyre Pressure Control (RDC)* q To check tyre pressures, see page 27, 88. Self-levelling suspension* q The self-levelling suspension is out of action. Please consult your nearest BMW Service. Further de- tails: page 135. Engine management system q Engine control system malfunc- tion. Please arrange for the problem to be examined by BMW Serv- ice. Electronic engine output control (EML)* q EML malfunction. Higher pedal pressure and longer pedal travel may be needed when braking. Please ar- range for the problem to be examined by BMW Service. Digital Diesel Electronics (DDE)* q If light comes on during journey: please arrange for the problem to be examined by BMW Service. Further de- tails: page 136. Yellow: for your information Rear foglights* Lights up when the rear fog lights are switched on. Further details: page 92. Diesel engine preheat* q Do not start the engine until the light has gone out. Further de- tails: page 63. Green: for your information Flashing turn indicators Flashes rhythmically when a turn is selected; also applies to trailer if one is being towed. Rapid flashing: system malfunction. Further details: page 72. Cruise control* Comes on when the system is switched on: Ready to operate using the multi-function steering wheel. Further details: page 75. Fog lights* Lights up when the foglights are switched on. Further details: page 92. Blue: for your information High-beam headlamps Comes on when the high head- lamp beams are in use or the headlamp flasher is used. Further de- tails: page 72, 91 Online Edition for Part-No. 01 41 9 791 301 - © 01/99 BMW AG
  • 24.
    23n MinorrepairsKeywordsOverviewControlsMaintenanceTechnicalData Multifunctional steering wheel(MFL)* Integrated into the multifunctional steering wheel (MFL) are buttons to permit the following functions to be per- formed quickly and without the driver's attention being distracted from the traffic: > Various radio functions > Recirculated-air mode for air condi- tioning or > Heated steering wheel > Cruise control > Some telephone functions. The systems in question must be switched on before they can be controlled from the multifunctional steering wheel.< The illustration shows a full set of con- trols. For further details, please refer to the description of the item concerned. 1 Telephone: accepting call, starting dialling or terminating call. With voice input*: switching on and off 2 Radio/telephone: change over switch 3 Radio/telephone: search in reverse or station keys (or browse in list of names) 4 Radio/telephone: volume control 5 Radio/telephone: search forwards or station keys (or browse in list of names) 390de110 6 Horn, entire surface 7 Cruise control: recall 8 Cruise control: memorise and accelerate (+), decelerate and memorise (–) 9 Cruise control: activate/interrupt/ de-activate 10 Recirculated air and AUC or steer- ing wheel heating: switching on and off. Online Edition for Part-No. 01 41 9 791 301 - © 01/99 BMW AG
  • 25.
    24nHazard warning flashersWarning triangle* First aid box* The pushbutton lights up in a regular rhythm when the hazard warning flash- ers are operating. When the car's lights are in use, the pushbutton is also lit so that it can be located more easily after dark. The turn signals have priority over the hazard warning lights. For this reason, from ignition key setting 1, you are able to operate the turn signals, even if the hazard warning lights are switched on.< 390de039 The warning triangle is kept in the tool holder in the luggage compartment lid or tailgate, and easily reached when needed. To open the toolkit, unscrew the wing bolt(s). Please note that you may be re- quired by law to carry a warning triangle in the car.< 394de053 Under the front passenger's seat. To remove: lift up the pushbutton catch at the front (arrow) and pull the first aid kit forwards out of its holder. To replace in position: insert the first aid kit in its holder and push to the rear until the catch engages. Certain of the items in the first aid kit have a limited useful life. The contents should therefore be checked regularly and life-expired items re- placed. Replacements can be obtained from any pharmacy. Comply with legal requirements con- cerning the need to carry a first-aid box in the car.< 390de086 Online Edition for Part-No. 01 41 9 791 301 - © 01/99 BMW AG
  • 26.
    25n MinorrepairsKeywordsOverviewControlsMaintenanceTechnicalData Refuelling Fuel grade Pressfront edge of fuel filler flap to open. To release the fuel filler flap if the cen- tral locking system has failed, see page 194. When handling fuel, comply with the safety regulations displayed by garages and filling stations.< 394de011 Place the screw cap in the holder on the flap. When refuelling, insert the filler nozzle fully into the filler neck. If the filler nozzle is raised during refuelling, > the supply of fuel will be cut off pre- maturely > and on filler nozzles with fuel vapour recovery, the recirculating function will be less effective. 394de120 Spark-ignition engine with catalytic converter The engine should be run exclusively on unleaded fuel. Since the engines have a knock control function, they can run on different grades of fuel. Your BMW's engine is rated to run on: > Super Plus/premium plus fuel (octane number 98, Research Method). Fill up with petrol of this grade when- ever possible, so that the nominal per- formance and fuel consumption values are achieved. You can also run the engine on: > Premium-grade unleaded fuel (oc- tane number 95, Research Method). This fuel is also known as: DIN EN 228 or Euro-Super. The minimum permissible grade is: > Regular-grade unleaded fuel (octane number 91, Research Method). In view of the engine ratings, you are recommended to use this fuel only in exceptional circumstances. Never use fuel containing lead if the car is equipped with a catalytic converter, otherwise the lambda probe and the converter will be permanently damaged.< Online Edition for Part-No. 01 41 9 791 301 - © 01/99 BMW AG
  • 27.
    26nFuel grade Spark-ignition engineswithout catalytic converter* (the catalytic converter can be retro- fitted) The engine is designed to run on both unleaded and leaded fuel. Since the engines have a knock control function, they can run on different grades of fuel. Your BMW's engine is rated to run on: > Super Plus/premium plus unleaded fuel (octane number 98, Research Method) or > Super Plus/premium plus leaded fuel (octane number 98, Research Method). Super (premium) grade pet- rol (gasoline) can be identified by its conformity with German Industrial Standard DIN 51 600. Fill up with petrol of this grade when- ever possible, so that the nominal per- formance and fuel consumption values are achieved. You can also run the engine on: > Premium-grade unleaded fuel (oc- tane number 95, Research Method). This fuel is also known as: DIN EN 228 or Euro-Super. The minimum permissible grade is: > Regular-grade unleaded or leaded fuel (octane number 91, Research Method). In view of the engine ratings, you are recommended to use this fuel only in exceptional circumstances. Diesel engines > Diesel oil to DIN EN 590 standard. For winter-grade diesel oil, see page 133. Do not use rapeseed oil methyl ester (RME) or Biodiesel, or you risk damaging the engine.< Online Edition for Part-No. 01 41 9 791 301 - © 01/99 BMW AG
  • 28.
    27n MinorrepairsKeywordsOverviewControlsMaintenanceTechnicalData Tyre pressures Tyre pressuresare also shown on the driver's door post (visible when the door is open). Checking tyre pressures All pressure values in the table (see also the following pages) are in bar (pounds per square inch in brackets) and are quoted for cold tyres (cold = no higher than ambient temperature). When towing a trailer, always use the values for the higher load. Cars with Tyre Pressure Control (RDC)*: After correcting tyre pressures, re-acti- vate the system; see page 88. 390de351 Check tyre pressures regularly (at least every two weeks and before starting a long journey). Incorrect tyre pressures can adversely affect the car's roadholding and cause tyre damage, which could result in an accident. Remember to check the spare wheel tyre pressure as well. It should be at the highest pressure needed for any of your car's tyres.< Make sure that only approved tyres are fitted These tyre pressures apply to makes of tyre approved by BMW and known to BMW Service. If other makes of tyre are fitted to the car, higher tyre pressures may be needed. Approved tyre sizes are shown on page 141 onwards. Online Edition for Part-No. 01 41 9 791 301 - © 01/99 BMW AG
  • 29.
    28nTyre pressures BMW saloon Tyre size 525td 205/65R 15 94 H 225/60 R 15 96 V 225/55 R 16 95 V 1.9 (27.0) 2.1 (29.8) 2.1 (29.8) 2.6 (37.0) 235/45 R 17 94 W/Y 255/40 R 17 94 W/Y 1.9 (27.0) – 2.1 (29.8) 2.1 (29.8) 2.1 (29.8) – 2.6 (37.0) 2.6 (37.0) 205/65 R 15 94 Q/T/H M+S 225/60 R 15 96 Q/T/H M+S 225/55 R 16 95 Q/T/H M+S 235/45 R 17 94 Q/T/H M+S 2.1 (29.8) 2.3 (32.7) 2.3 (32.7) 2.8 (39.8) 520i 523i 525tds 205/65 R 15 94 V 225/60 R 15 96 V 225/55 R 16 95 V 1.9 (27.0) 2.3 (32.7) 2.3 (32.7) 2.8 (39.8) 235/45 R 17 94 W/Y 255/40 R 17 94 W/Y 1.9 (27.0) – 2.3 (32.7) 2.3 (32.7) 2.3 (32.7) – 2.8 (39.8) 2.8 (39.8) 205/65 R 15 94 Q/T/H M+S 225/60 R 15 96 Q/T/H M+S 225/55 R 16 95 Q/T/H M+S 235/45 R 17 94 Q/T/H M+S 2.1 (29.8) 2.5 (35.6) 2.5 (35.6) 3.0 (42.7) Online Edition for Part-No. 01 41 9 791 301 - © 01/99 BMW AG
  • 30.
    29n MinorrepairsKeywordsOverviewControlsMaintenanceTechnicalData Tyre pressures 528i 530d 225/60 R15 96 W 225/55 R 16 95 W 2.0 (28.5) 2.4 (34.1) 2.5 (35.6) 3.0 (42.7) 235/45 R 17 94 W/Y 255/40 R 17 94 W/Y 2.2 (31.3) – 2.6 (37.0) 2.6 (37.0) 2.7 (38.4) – 3.2 (45.5) 3.2 (45.5) 205/65 R 15 94 Q/T/H M+S 225/60 R 15 96 Q/T/H M+S 225/55 R 16 95 Q/T/H M+S 235/45 R 17 94 Q/T/H M+S 2.2 (31.3) 2.6 (37.0) 2.7 (38.4) 3.2 (45.5) 535i 540i 225/55 R 16 95 W 2.3 (32.7) 2.6 (37.0) 2.7 (38.4) 3.2 (45.5) 235/45 R 17 94 W/Y 255/40 R 17 94 W/Y 2.5 (35.6) – 2.8 (39.8) 2.8 (39.8) 2.9 (41.2) – 3.4 (48.4) 3.4 (48.4) 225/55 R 16 95 Q/T/H M+S 235/45 R 17 94 Q/T/H M+S 2.5 (35.6) 2.8 (39.8) 2.9 (41.2) 3.4 (48.4) BMW saloon Tyre size Online Edition for Part-No. 01 41 9 791 301 - © 01/99 BMW AG
  • 31.
    30nTyre pressures Tyre size205/65 R 15 94 V is not approved for the BMW 523i touring.< BMW touring Tyre size 520i 523i 525tds 205/65 R 15 94 V 225/60 R 15 96 V 225/55 R 16 95 V 235/45 R 17 94 W/Y 2.0 (28.5) 2.4 (34.1) 2.6 (37.0) 3.1 (44.1) 205/65 R 15 94 Q/T/H M+S 225/60 R 15 96 Q/T/H M+S 225/55 R 16 95 Q/T/H M+S 235/45 R 17 94 Q/T/H M+S 2.2 (31.3) 2.6 (37.0) 2.8 (39.8) 3.3 (46.9) 528i 530d 225/60 R 15 96 W 225/55 R 16 95 W 2.1 (29.8) 2.5 (35.6) 2.6 (37.0) 3.1 (44.1) 235/45 R 17 94 W/Y 225/60 R 15 96 Q/T/H M+S 225/55 R 16 95 Q/T/H M+S 235/45 R 17 94 Q/T/H M+S 2.3 (32.7) 2.7 (38.4) 2.8 (39.8) 3.3 (46.9) 540i 225/55 R 16 95 W 235/45 R 17 94 Y 225/55 R 16 95 Q/T/H M+S 235/45 R 17 94 Q/T/H M+S 2.4 (34.1) 2.8 (39.8) 2.8 (39.8) 3.3 (46.9) Online Edition for Part-No. 01 41 9 791 301 - © 01/99 BMW AG
  • 32.
  • 33.
    32n Opening and closing: Keys34 Electronic immobiliser 35 Central locking system 36 Doors – from outside 36 Radio remote control 37 Doors – from inside 39 Luggage compartment lid 40 Rear window 41 Load area 43 Alarm system 44 Electric windows 46 Sliding/tilting sunroof 47 Adjusting: Seats 49 Steering wheel 52 Mirrors 53 Seat, mirror and steering wheel position memory 55 Safety systems: Seat belts 58 Airbags 59 Child restraint systems 61 Childproof door locks 62 Driving: Ignition switch 63 Starting the engine 63 Stopping the engine 65 Handbrake 65 Manual gearbox 66 Automatic transmission 67 Automatic transmission with Steptronic 69 Turn indicators/headlamp flasher 72 Wipers/rain sensor 72 Heated rear window 75 Cruise control 75 Everything under control: Trip distance recorder; outside temperature display 77 Revolution counter 77 Energy Control 78 Fuel gauge 78 Coolant thermometer 79 Service Interval indicator 79 Check Control 80 On-board computer 83 Technical features for journey comfort and safety: Park Distance Control (PDC) 85 Automatic Stability Control plus Traction (ASC+T)/Dynamic Stability Control (DSC) 86 Electronic Damping Control (EDC) 87 Tyre Pressure Control (RDC) 88 Online Edition for Part-No. 01 41 9 791 301 - © 01/99 BMW AG
  • 34.
    Initial overview Controls indetail Operation, maintenance and general care Minor repairs Technical data Index 33n MinorrepairsKeywordsOverviewControlsMaintenanceTechnicalData Lights: Sidelights/low-beam (dipped) headlamps 90 Instrument lighting 90 Headlight beam angle control 91 High-beam headlamps/parking lights 91 Fog lights 92 Interior light/load-area light 92 Reading lights 93 Controlled-temperature air for pleasant interior conditions: Air conditioning 95 Automatic air conditioning 100 Seat heating 106 Heated steering wheel 106 Roller sun blind 106 Auxiliary heater 107 Auxiliary ventilation control 107 Remote control for auxiliary heater 108 Practical interior equipment: Glove box 109 Storage compartments 109 Drink can holders 110 Ashtrays 111 Cigarette lighter 111 Loading and load carrying: Through-loading system 113 Ski bag 114 touring: Load area 117 Roller-blind cover 117 Net in front of load area 117 Compartments in luggage area 118 Pull-out load floor 120 Load 121 Roof rack 122 Towing a trailer 123 Technical items of interest Online Edition for Part-No. 01 41 9 791 301 - © 01/99 BMW AG
  • 35.
    34nKeys Key with radioremote control 1 Master key with radio remote control transmitter 2 Spare key, to be kept in a safe place, for instance in a purse or wallet. This is a master key, but is not intended for regular use 3 Key for doors and ignition. This key does not open the luggage compartment/tailgate or the glove box – this can be useful for instance at a hotel or restaurant with car park- ing service. 390de326 Replacement keys A replacement key can only be ob- tained from BMW Service. Please note that BMW Service is required to check that you are entitled to order spare keys, since the keys are part of the car's security system (see Electronic immobi- lizer, page 35). Online Edition for Part-No. 01 41 9 791 301 - © 01/99 BMW AG
  • 36.
    35n MinorrepairsKeywordsOverviewControlsMaintenanceTechnicalData Electronic immobiliser The high-securitykey The electronic immobiliser is an addi- tional means of protecting your BMW against theft, and operates without you having to perform any selection or ad- justing processes yourself. It ensures that the engine will only start if an igni- tion key which the immobiliser recog- nises as belonging to the car is used. You can also ask BMW Service to inval- idate individual keys, for instance if they are lost. If a key has been invalidated, it can no longer be used to start the engine. 390de015 What the electronics system can do A special electronic component is inte- grated into the key. The vehicle's elec- tronics exchange constantly updated signals, which are individualized for every vehicle, between the ignition switch and the electronic components in the key. The ignition, fuel supply and starter motor are only released once the key is identified as authorised. The electronics integrated into the key are exposed to mechanical damage. This could prevent you from starting the engine.< Online Edition for Part-No. 01 41 9 791 301 - © 01/99 BMW AG
  • 37.
    36nCentral locking systemDoors – from outside The principle The central locking system cannot take effect until both front doors are closed. The following are unlocked and locked together: > Doors > Trunk lid/tailgate and rear window* > Tank flap. The central locking system can be operated > from outside using the door or tail- gate lock* and by the radio remote control > from inside using a button. When operated from the outside, the deadlocks are engaged at the same time. It prevents the doors from being unlocked either at the safety lock but- tons or door handles. The alarm sys- tem* is also activated or deactivated. In the event of a collision, the central locking system is released automati- cally, but only at doors which were not locked separately by means of the in- side buttons; see page 39. The hazard warning flashers and interior light are also switched on. Locking and unlocking Do not lock the car when there is anyone inside it, as it cannot then be unlocked from the inside.< On certain national-market ver- sions, the alarm system can only be operated from the radio remote con- trol. On these cars, unlocking with a key triggers off the alarm. To switch off the alarm: press button 1 (unlock) or turn the ignition key to posi- tion 1.< For further details of the alarm system, see page 44. 380de015 Comfort operation You can also operate windows and the sliding/tilting sunroof using the door lock. > To open: when the door is closed, turn the key in the door lock to the re- lease position and hold it there. > To close: when the door is closed, turn the key to the locking position and hold it there. Watch the closing movement to ensure that no-one is trapped. The movement is stopped when the key is released.< Manual operation if an electrical fault has occurred By turning the key to the limit positions in the door lock, you can lock and un- lock the driver's door. Online Edition for Part-No. 01 41 9 791 301 - © 01/99 BMW AG
  • 38.
    37n MinorrepairsKeywordsOverviewControlsMaintenanceTechnicalData Radio remote control Unlocking Pressbutton 1. At the same time the deadlocks are re- leased, the alarm system* de-activated and the interior light switched on. On versions for certain markets, pressing the button once only un- locks the driver's door; it must be pressed a second time to release the remainder of the central locking sys- tem.< If you wish, you can have this spe- cial arrangement programmed for each specific remote control.< 394de013 Convenient opening You can also open the windows and sliding/tilting sunroof using the remote control unit: Hold button 1 down. When you release the button, the opening process is in- terrupted immediately. Locking and thiefproofing Press button 2. The antitheft deadlock is simultane- ously engaged and the alarm system activated. Do not lock the car when there is someone inside it, as it cannot then be unlocked from the inside.< Convenient closure You can also close the windows and sliding/tilting sunroof using the remote control unit: Hold button 2 depressed. The closing procedure is interrupted if the button is released. Watch the closing movement to ensure that no-one is trapped. The closing procedure is interrupted if the button is released.< On cars with an alarm system (see page 44): if the convenient closure movement is interrupted, the car must be unlocked again with button 1 before convenient closure is undertaken again. Failing this, the tilt alarm sensor and in- terior movement detector will be out of action.< Switching on the interior lighting If the car is locked, press button 2. Subject to the remote control's range, this function can be used to locate your car on a large car park, for example. Switching off tilt alarm sensor Briefly press button 2 again after lock- ing the car. This also switches off the alarm sys- tem's interior movement detecting function (see page 44). LED (light-emitting diode) 3 comes on briefly when any button is pressed. Certain symbols on the radio remote control may differ from those il- lustrated here.< Online Edition for Part-No. 01 41 9 791 301 - © 01/99 BMW AG
  • 39.
    38nRadio remote control Openingluggage compartment/ tailgate Press button 4. The boot lid/tailgate opens slightly, regardless of whether it was previously locked or unlocked. 394de013 Master keys Keys with a radio remote control trans- mitter are master keys. Apart from "Switch on interior light" and "Open boot lid/tailgate", all radio re- mote control functions can also be op- erated with the key in the driver's door lock or the boot lid/tailgate lock. The front passenger's door has no out- side lock, in order to reduce the risk of theft. On certain national-market ver- sions, the alarm system can only be operated from the radio remote con- trol. On these cars, unlocking with a key triggers off the alarm. To switch off the alarm: Press button 1 (unlock) or turn the ignition key to posi- tion 1.< Note that children could lock the doors from the inside if they are alone in the car. Always take the car keys with you so that the car can be opened from the outside.< Interference The radio remote control may be sus- ceptible to local interference from other systems or equipment operating on the same frequency. Online Edition for Part-No. 01 41 9 791 301 - © 01/99 BMW AG
  • 40.
    39n MinorrepairsKeywordsOverviewControlsMaintenanceTechnicalData Doors – frominside This button is used to operate the cen- tral locking system when the front doors are closed. This only unlocks or locks the doors, luggage compartment lid/ window and fuel filler flap – it does not activate the burglar alarm for them. If you wish, the central locking system can be set to engage as soon as the car is driven away. You can have this setting programmed as part of the Key Memory facility.< 390de016 Unlocking and opening > Either use the central locking button to unlock all doors at once, then pull the door handle above the armrest, or > Pull the door handle out twice at any door: the first pull will unlock the door, the second pull will open it. Locking > Either lock all doors at the central locking pushbutton, or > Press the door safety buttons down. To avoid being shut out of the car ac- cidentally, the driver's door cannot be locked with the safety button when it is open. Do not lock the doors with the safety buttons during the journey, or else the central locking system will not be released in the event of an acci- dent. Note that children could lock the doors from the inside if they are alone in the car. Always take the key with you, so that the car can be opened from the outside.< Online Edition for Part-No. 01 41 9 791 301 - © 01/99 BMW AG
  • 41.
    40nLuggage compartment lid Lock– saloon only Only the central keys (see page 34) fit the boot lid lock. 394de017 Locking separately Turn the master key to the right past the pressure point and take it out when hor- izontal. This locks the luggage compartment and disconnects it from the central locking system. If you then hand over only door and ignition key 3 (see page 34), the boot lid cannot be opened. This extra security can be useful, for instance, when arriving at a hotel. 394de064 Opening from outside Press the button (arrow): the boot lid opens slightly. The boot or luggage area is lit when you open the boot lid/tailgate (also refer to page 92). Manual operation if an electrical fault has occurred Saloon: Insert a master key into the luggage compartment lid lock and turn fully to the left – the lid will open slightly. The luggage compartment is locked again as soon as its lid is closed. touring: See page 195. 394de009 Online Edition for Part-No. 01 41 9 791 301 - © 01/99 BMW AG
  • 42.
    41n MinorrepairsKeywordsOverviewControlsMaintenanceTechnicalData Luggage compartment lid Openingfrom inside car With this button, you can open the lug- gage compartment lid or tailgate while the vehicle is stationary, provided it is not deadlocked. 390de324 Rear window – touring It is quick and easy to load and unload small items if the rear window can be opened separately. Press the button (arrow): the rear win- dow opens slightly. It can be swung up- wards. To close the window, press down on the glass. Protect the window if it is likely to be struck by sharp-pointed or sharp-edged objects on the load area during the journey; this is to prevent damage to the rear-window heating el- ements.< 392de159 Closing – saloon A recessed handle (arrow) next to the lock mechanism makes it easier to pull the lid down. 394de128 Online Edition for Part-No. 01 41 9 791 301 - © 01/99 BMW AG
  • 43.
    42nLuggage compartment lid Closing– touring You can pull the tailgate down with both hands if required (arrows) at the re- cessed handles provided. To close the tailgate, press it down only lightly. The actual closing action is au- tomatic. To avoid injuries, as with any clos- ing process, ensure that the clos- ing area of the boot lid/tailgate is unob- structed.< When the tailgate on the touring is open, the tip of the tailgate is more than two metres off the ground. Please note this if, for instance, you are opening the tailgate in a garage.< 392de160 If possible, drive only with the tail- gate and rear window fully closed, to prevent exhaust gases from entering the passenger compartment. If you are obliged to drive the car with the lid, tail- gate or rear window open: > Close all other windows and the sun- roof > Increase the volume of air in the heat- ing and ventilation system or the air conditioner, refer to page 94 or 100.< Online Edition for Part-No. 01 41 9 791 301 - © 01/99 BMW AG
  • 44.
    43n MinorrepairsKeywordsOverviewControlsMaintenanceTechnicalData Load area Tensioning straps Usethe tensioning straps on the floor of the load area to prevent small objects from slipping. If you place objects on the lashing straps, they form a non-slip base. There are lashing points at the corners of the load area to which a load area net* or retaining straps can be attached when loads have to be secured. See also under "Loading", page 121. 394de302 Hanger* There is a hook on the left in the load area for hanging up carrier bags or sim- ilar. 394de144 Online Edition for Part-No. 01 41 9 791 301 - © 01/99 BMW AG
  • 45.
    44nAlarm system* The alarmsystem reacts if: > a door, the engine compartment, the load area or load area or the rear win- dow are opened > there is any movement inside the car (interior movement detector) > there is a change in the car's attitude, for instance if it is jacked up to re- move a wheel or if it is towed away > there is an interruption in the power supply from the battery. Depending on the national-market ver- sion of the car, the alarm system indi- cates unauthorised entry or tampering in different ways: > 30-second acoustic alarm > Switching on the hazard warning flashers for approx. 5 minutes*. Activating and de-activating Whenever the car is locked or un- locked, whether at a lock or with the re- mote control, the alarm system is acti- vated or de-activated at the same time. The interior movement detector is acti- vated about 30 seconds after the last locking action. If the alarm system has been activated correctly, the hazard warning flashers come on once*. Even when the system has been acti- vated, you can open the lid/tailgate by pressing button 4 on the radio remote control. As soon as the lid/tailgate is closed again, it is locked. On certain national-market ver- sions, the alarm system can only be operated from the radio remote con- trol. On these cars, unlocking with a key triggers off the alarm. To switch off the alarm: press button 1 (unlock) or turn the ignition key to posi- tion 1.< Alarm system telltale > If the telltale lamp under the inside mirror flashes steadily: the system is activated. > If the telltale flashes when the system is being activated: not all doors, lids or the rear window are properly closed. Even if an item is not closed fully, the remaining items are pro- tected and the telltale lamp begins to flash steadily after 10 seconds. How- ever, the interior movement detector is not activated. > If the telltale goes out when the sys- tem is de-activated, no attempt was made to tamper with the car during your absence. 390de020 Online Edition for Part-No. 01 41 9 791 301 - © 01/99 BMW AG
  • 46.
    45n MinorrepairsKeywordsOverviewControlsMaintenanceTechnicalData Alarm system* > Ifthe telltale flashes for 10 seconds when the system is de-activated, an attempt was made to tamper with the car. After the alarm has stopped, the telltale once again flashes intermittently. Tilt sensor The tilt alarm sensor and the interior movement detector can be switched off together. This prevents the alarm from being triggered off when not wanted, for instance in two-level garage parking or when travelling on a car train or ferry: Perform the locking movement (acti- vate) twice, by pressing button 2 on the radio remote control twice in succes- sion, or repeating the locking move- ment with the key. The telltale comes on briefly, then flashes continuously. The tilt alarm sen- sor and interior movement detector are then switched off until the system is de- activated again. Interior movement detector The illustration shows the interior move- ment detector's transmitter and re- ceiver. Before the interior movement detector can operate correctly, the windows and sunroof must be closed. However, switch the interior movement detector off (see under "Tilt alarm sen- sor" in previous column) if > children or animals remain in the car > a window or the sunroof is to remain open. 390de153 The tilt alarm sensor and interior movement detector will be switched off inadvertently if the con- venient closure movement of the win- dows and sunroof is interrupted and re- started within the first 10 seconds. In this case the complete system must be de-activated and re-activated.< Online Edition for Part-No. 01 41 9 791 301 - © 01/99 BMW AG
  • 47.
    46nElectric windows Opening andclosing windows From ignition key position 1: > Press the rocker switch in until the pressure point is felt: the window continues to move for as long as the rocker switch is pressed. > Press the toggle switch over beyond the pressure point: the window then continues to move automatically. Press the switch briefly again to halt the movement. 390de055 After the ignition is switched off: > You can still operate the electric win- dows for up to 15 minutes, unless a front door was opened and closed again. To open, press the rocker switch beyond the normal detent point. When leaving the car, always take out the ignition key and close the doors, so that children cannot operate the electric windows and possibly injure themselves.< For details of comfort operation using the door lock and/or the radio remote control unit, refer to page 36 or 37. Protective function There is a contact strip on the inside of each window surround, at the top. If it is compressed as the window closes, the closing action is interrupted immedi- ately and the window re-opens slightly. Despite this protective function, make sure that the window is not obstructed as it closes; if this precau- tion is not taken, the risk remains that thin objects, for instance, may not actu- ate the contact strip correctly. The protective function is switched off by pressing the switch beyond its nor- mal pressure point and holding it there.< Online Edition for Part-No. 01 41 9 791 301 - © 01/99 BMW AG
  • 48.
    47n MinorrepairsKeywordsOverviewControlsMaintenanceTechnicalData Electric windows Sliding/tiltingsunroof* Safety switch This prevents the electric rear side win- dows from being opened and closed at the switches on the rear doors, for in- stance by children. Always press the childproof safety switch when carrying children on the rear seat. Careless closure of elec- tric windows can cause injury.< 390de131 Always close the sliding/tilting sunroof carefully, so that injuries are avoided. When leaving the car, always take out the ignition key and close the doors, so that children cannot operate the electric windows and possibly injure them- selves.< Low air pressure or draughts inside the car when the sunroof is slid back or tilted up can be avoided by keeping the ventilation outlets on the fascia open and increasing the airflow if necessary. See page 96, 103. For details of comfort operation using the door lock and/or the radio remote control unit, refer to page 36 or 37. Raising – opening – closing From ignition key setting 1, press down the switch and/or slide in the desired direction up to the pressure point. When being raised, the roof lining only retracts a few centimetres. You can operate the electric sunroof for up to 15 minutes after switching off the ignition, provided that a front door has not been opened and closed again in the meantime. Automatic* opening and closing Press the button and hold down beyond the pressure point. Furthermore, the following movements are automated: 390de327 Online Edition for Part-No. 01 41 9 791 301 - © 01/99 BMW AG
  • 49.
    48nSliding/tilting sunroof* > Whenthe roof is open, press the switch in the "Raise" direction: the roof moves to the limit position for "Raising". > When the roof is raised, press the switch towards "Opening": the sun- roof panel moves to the fully open position. Pressing the switch stops this move- ment. Protective function If the sliding/tilting sunroof encounters resistance when closing with the roof roughly half closed, the closing opera- tion is interrupted and the roof re-opens slightly. Despite this protective function, make sure that the roof is not ob- structed as it closes; if this precaution is not taken, the risk remains that thin ob- jects, for instance, may not actuate the closing-force limiter correctly. The protective function is switched off by pressing the switch beyond its nor- mal pressure point and holding it there.< Sunroof with glass panel* Operation and function are as de- scribed above for the conventional slid- ing/tilting sunroof. To open the roof from the raised position, hold the switch in the opening direction until the roof has reached the desired position. When the roof panel is raised, the slid- ing trim is pushed back slightly; when the roof is slid open, it moves with the roof panel. It remains in the open posi- tion and can be moved to a new posi- tion whenever required. Power supply failed or interrupted After the power supply has been inter- rupted (e.g. by disconnecting the bat- tery), it is only possible to tilt up the sunroof panel initially. To restore its full range of functions: 1 Move the sliding/tilting roof to the fully raised position 2 Hold the switch down for approx. 20 seconds. If there is an electrical defect, the slid- ing/tilting sunroof can be operated manually, see page 194. 390de328 Online Edition for Part-No. 01 41 9 791 301 - © 01/99 BMW AG
  • 50.
    49n MinorrepairsKeywordsOverviewControlsMaintenanceTechnicalData For your ownpersonal safety, please note the following precautions when adjusting the seat position: Do not reposition the driver's seat while the car is in motion. Other- wise an unexpected seat movement could cause the driver to lose control of the car and lead to an accident. The seat belt should pass as closely as possible over the wearer's body. In the event of a head-on collision, the lap belt could otherwise slide over the hips and injure the lower part of the body. In ad- dition, the restraining effect is reduced if the seat belt is slack against the wearer's body. Do not recline the seat back too far when the car is being driven (this ap- plies in particular to the front passen- ger), or there will be a risk of "submarin- ing" under the seat belt, so that the belt loses its full protective effect. Do not slide the seats to the rear if the car is inclined at an angle (for instance a garage ramp or a slope). This could lead to the automatic seat belt height adjuster becoming disconnected.< 1 Forward/back Pull the lever up and slide the seat to the preferred position. After releasing the lever, slide the seat backwards or forwards very slightly until engages correctly 2 Height Pull up the lever and apply your weight to the seat or allow it to rise380de021 3 Seat back Pull the lever and either apply your weight to the seat back, or lean for- ward to relieve it of load 4 Seat angle (driver's seat only) Pull the lever up and move the seat to the desired angle. 380de022 Seats, adjusting Manual seat adjustment Online Edition for Part-No. 01 41 9 791 301 - © 01/99 BMW AG
  • 51.
    50nManual seat adjustmentBMW Sport seat* Correct seated position To relieve the load on the discs of the spine, sit well back in the seat with your back resting firmly against the seat back. The ideal position is when the head is a straight-line extension of the spinal column. On long journeys the seat back can be reclined rearwards to a slightly greater angle, in order to reduce muscle strain. You should still be able to reach the highest point on the steering wheel with the arms slightly bent. Lumbar support* See BMW Comfort seat, next page. Head restraints To adjust height: pull out or push in. Adjusting front head restraint angle: swing forwards or back. Head restraints reduce the risk of neck injuries in the event of an ac- cident. The head restraint should therefore be positioned with its centre at approxi- mately the same height as the ears of the seat's occupant. The centre rear head restraint should be left fully retracted; if it is pulled out more than a very short distance, it will not function correctly.< 390de065 Manual On this seat, the thigh support area can also be adjusted: Pull the lever and move the thigh sec- tion until it provides the necessary sup- port. The angle of the passenger's seat can also be adjusted. 390de137 Online Edition for Part-No. 01 41 9 791 301 - © 01/99 BMW AG
  • 52.
    51n MinorrepairsKeywordsOverviewControlsMaintenanceTechnicalData Electrically adjusted seat*BMW Comfort seat* 1 Angle 2 Forward/back 3 Height 4 Seat back 5 Head restraint height Tilt the head restraint to alter its angle. Comply with the adjusting instruc- tions on page 49, or there may be a risk to your personal safety.< 380de023 This seat has additional lumbar and shoulder support settings. 1 Lumbar support > Push the switch forward or back: the curvature is increased or decreased. > Press the switch at top or bottom: curvature moves up or down. The seat back contour can be altered to provide more support to the curved (lumbar) section of the spine. The upper edge of the pelvis and the spinal column are supported, to en- courage an upright but relaxed seated position. 380de024 2 Shoulder support Press the switch: the angle of the upper part of the seat back changes. The adjustable upper section of the seat back supports the shoulder area of the seat occupant's body. It enables a relaxed seat position to be found and reduces the load on the shoulder mus- cles. To obtain the recommended optimum settings: Driver's and front passenger's side: 1 Tilt the upper part of the seat back fully to the rear 2 Adjust to the most suitable position, as described on page 50 3 Tilt the upper section of the seat back forwards until adequate shoulder support is obtained. 380de024 Online Edition for Part-No. 01 41 9 791 301 - © 01/99 BMW AG
  • 53.
    52nBMW Comfort seat*BMW Sport seat* Adjusting steering wheel Passenger's seat in rest position: 1 Tilt the upper part of the seat back fully to the rear 2 Set the seat angle to a slightly more upright position 3 Recline the seat back slightly more to the rear 4 Tilt the upper section of the seat back further forwards. Correct the forward/back position of the seat if necessary to ensure that the seat belt still passes closely over the wearer's body, otherwise the belt's protective action may be af- fected.< 380de064 Electric This seat has electric thigh support adjustment. To operate it, press the switch. 390de371 Manual 1 Swing out the clamp lever 2 Move the steering wheel to the pre- ferred reach and angle to suit your seated position 3 Fold the lever back in to clamp the steering column in the new position. Do not adjust the steering wheel position while the vehicle is in mo- tion, otherwise an accident may result from any unexpected movement.< 390de027 Online Edition for Part-No. 01 41 9 791 301 - © 01/99 BMW AG
  • 54.
    53n MinorrepairsKeywordsOverviewControlsMaintenanceTechnicalData Adjusting steering wheelMirrors Electrical* The steering wheel can be repositioned in four directions, corresponding to the lever movements. Do not adjust the steering wheel position while the vehicle is in mo- tion, otherwise an accident may result from any unexpected movement.< To memorise steering wheel position, see "seat, mirror and steering wheel position memory", page 55. 390de028 Automatic steering wheel adjustment (only in conjunction with seat, mirror and steering wheel memory*) To make it easier to get in and out of the driver's seat, the steering wheel au- tomatically rises into its uppermost po- sition before returning to the driving po- sition (memory). This automatic system responds to the ignition key setting and the driver's door. Outside mirrors 1 Switch for adjustment in all four directions 2 Changeover switch for mirror on other side of car 3 Button for folding the mirrors in and out (only with automatic-dip outside mirrors* – see page 55). Press the button once to fold the mirrors in, and again to fold them out. This can, for example, be useful in car washes, narrow streets or to reset a mirror to the correct position if it was previously folded forwards. The mirrors can be folded in at a road speed up to 10 km/h (approx. 6 mph).< 390de029 Online Edition for Part-No. 01 41 9 791 301 - © 01/99 BMW AG
  • 55.
    54nMirrors The mirrors canalso be adjusted manu- ally by pressing the edge of the glass. To memorise mirror positions, see "seat, mirror and steering wheel posi- tion memory", page 55. The outer, aspherically curved* section of the mirror displays a larger field of view, though slightly distorted, than the inner, convex* section. In this way, the view to the rear is extended and the blind spot is reduced in size. The mirror on the passenger's side is more convex than the mir- ror on the driver's side, and therefore reflected objects are closer than they appear. It may be difficult to estimate the precise distance at which another vehicle is following your car. The same applies to the aspherical outer section of the mirrors.< Electric mirror heating Both mirrors are heated automatically in ignition key position 2. Inside mirror To reduce glare from following vehicles after dark, tilt the mirror image by mov- ing the small lever. Illuminated make-up mirror* Fold the sun visor down and slide the mirror cover (if fitted) sideways. The mirrors are illuminated from ignition key position 1 on. Sun visors The sun visors can also be pivoted to the side, against the door windows. 390de030 Interor mirror, automatic anti-glare* This mirror dims automatically and steplessly in accordance with the inten- sity of the light received (ambient light and the effect of glare from headlamps). The mirror switches automatically to the clear, non-dimmed position when the driver engages reverse gear or selects R. To ensure that the mirror always func- tions correctly, keep the two photo- cells clean and unobstructed. One photo-cell (arrow) is in the mirror glass, the other is slightly offset on the back of the mirror. For details of the electrochromic mirror principle, refer to page 205. 390de031 Online Edition for Part-No. 01 41 9 791 301 - © 01/99 BMW AG
  • 56.
    55n MinorrepairsKeywordsOverviewControlsMaintenanceTechnicalData Mirrors Seat, mirrorand steering wheel position memory* Automatic-dip outside mirrors* These mirrors can be folded in or out at button 3 (see page 53). They have the same automatic-dip action as the inside mirror. You can memorise and call up three dif- ferent driver's seat, outside mirror and (with an electrically adjustable steering wheel) steering wheel positions. The picture shows the buttons on the driver's door. The setting of the lumbar support is not recorded in the memory.< Memorising 1 Ignition key in position 1 or 2 2 Select the desired seat, outside mir- ror and steering wheel positions 3 Press the MEMORY button: the tell- tale lamp in the switch comes on 4 Press memory button 1, 2 or 3: the telltale lamp goes out. 390de032 Calling up Driver's door open after being un- locked, or ignition key in position 1: > Press the appropriate memory button 1, 2 or 3 briefly. The positioning movement is inter- rupted immediately if you operate a seat adjustment switch or one of the memory buttons. With the driver's door closed and the ignition key either removed or in posi- tion 0 or 2: > Press memory button 1, 2 or 3 until the adjusting procedure has been completed. If the MEMORY button was pressed accidentally: press it again; the telltale goes out. Do not call up the memory while the car is in motion, otherwise an unexpected seat or steering wheel movement may cause an accident.< Online Edition for Part-No. 01 41 9 791 301 - © 01/99 BMW AG
  • 57.
    56nSeat, mirror andsteering wheel position memory* You can have your car pro- grammed so that when it is un- locked with your own personal remote- control key your preferred seat, mirror and steering wheel positions are ob- tained automatically.< If you use this setting, make sure before unlocking that the footwell behind the driver's seat is unobstructed. Otherwise damage could be caused if the seat moves back automatically to the previously selected position.< Passenger's side mirror tilt-down (parking position) 1 Move the mirror changeover switch (arrow) to the "Driver's mirror" posi- tion 2 When reverse gear (or automatic transmission selector lever position R) is selected, The driver can then see the ground close to the car (for in- stance, the edge of the kerb). This automatic function can be switched off if not required: move the mirror changeover switch to the passenger's side mirror position. 390de147 Online Edition for Part-No. 01 41 9 791 301 - © 01/99 BMW AG
  • 58.
    57n MinorrepairsKeywordsOverviewControlsMaintenanceTechnicalData Car Memory, KeyMemory How it works You may often have wished that you could modify the operation of certain features of your car to suit your own in- dividual preferences. When developing the car, BMW therefore "designed in" a number of freely programmable options for the car, which BMW Service will gladly adjust as you wish. There are "Car Memory" and "Key Memory" settings, the former relating to the car itself, the latter to your personal requirements. You can have up to four sets of basic settings programmed for two different persons. This presup- poses that each person has his or her own remote control key. By means of data exchange with the key, the car identifies the user when the car is un- locked and performs the necessary ad- justments. 390de329 Coloured adhesive labels are supplied with the keys so that they can be identi- fied by the users. What can be selected BMW Service will gladly inform you of the facilities available with Car Memory and Key Memory. At the appropriate points in this Owner's Handbook you will find this symbol, as an indication that spe- cial settings as described above are available.< An example of Key Memory is the auto- matic repositioning of the electrically adjusted driver's seat for the intending user each time the car is unlocked. Online Edition for Part-No. 01 41 9 791 301 - © 01/99 BMW AG
  • 59.
    58n Wear the seatbelts whenever the car is driven. To fasten: the seat belt buckle must be heard to engage. To open: press the red release button on the belt buckle and guide the belt back if necessary to reinforce the action of the automatic reel. As the seat is moved forwards and back, the upper belt loop is automati- cally adjusted to the wearer's size. The two seat belt buckles integrated into the rear seat are intended for the left and right seat occupants. The buckle marked "CENTER" is only to be used by a person occupying the center rear seat. 390de033 Comply with the following instruc- tions concerning the wearing of seat belts in order to avoid any adverse effects on personal safety or reduction in the belt's protective function. These instructions also apply to passengers in the car. Never restrain more than one person with each seat belt. Babies or small children must not travel on the lap of another occupant. The belts should not be twisted and must run firmly across the pelvis and shoulder. They should not pass over hard or fragile objects in your pockets. It should not pass over any sharp, solid or breakable objects in pockets etc. The seat belt must not run across the wearer's neck, nor should it be trapped or abraded by coming into contact with sharp edges or objects. The seat belt should always be worn as close to the seat occupant's body as possible. If possible, avoid bulky cloth- ing and remember to tauten the belt fre- quently where it runs over the shoulder. In the event of a head-on collision, the lap belt could otherwise slide over the hips and injure the lower part of the body. In addition, the restraining effect is reduced if the seat belt is slack against the wearer's body. Pregnant women should also wear the seat belt, making sure that the lap strap is well down on the hips and does not press on the abdominal region of the body.< For care of seat belts, see page 167. Saloon with through-load system*: please note the instructions for the centre rear seat belt on page 113. touring: If the centre belt cannot be pulled out, the larger section of the rear seat back is not properly locked into po- sition; see page 117.< If exposed to severe loads in an accident, or if the belt system in- cluding the buckle tensioner and any child restraint systems* installed in the car have been damaged, BMW Service should renew them and check the belt anchorages.< Seat belts Online Edition for Part-No. 01 41 9 791 301 - © 01/99 BMW AG
  • 60.
    59n MinorrepairsKeywordsOverviewControlsMaintenanceTechnicalData Airbags 1 Front airbagsfor the driver and front passenger 2 Head airbags (front) 3 Side airbags (front and at rear*) Protective effect The front airbags protect the occupants of the front seats in the event of a head- on collision, where the restraining effect of the seat belts alone would no longer be adequate. The head and side air- bags provide protection in the event of a side-on collision. The side airbag which inflates has the effect of support- ing the upper body from the side. 380de647 The picture shows the main directions of impact to which the airbags respond. 390de142 Telltale light The telltale lamp confirms that the airbag system is ready to operate (from ignition key posi- tion 1 onwards). System operational: > The telltale lamp comes on briefly and then goes out. System defective: > The telltale lamp does not come on, or > the telltale comes on briefly, goes out briefly and then comes on again. If there is a system fault, there is a risk that it will not be triggered off even if a sufficiently severe accident occurs within the airbag range. Please have it checked by BMW Serv- ice without delay. Online Edition for Part-No. 01 41 9 791 301 - © 01/99 BMW AG
  • 61.
    60nAirbags Note the followinginstructions concerning airbags, in order to ensure that personal safety is not re- stricted or the airbags's protective func- tion adversely affected. These instruc- tions also apply to passengers in the car. Always fasten your seat belt on every journey, despite the presence of an air- bag: the airbags are an additional safety feature, not a substitute. The airbags are not triggered off in minor accidents, nor if the car rolls over or is struck from the rear. In such circumstances the seat belt provides optimum protection. Choose a seated position that is com- fortable but also at the maximum possi- ble distance from the steering wheel or fascia and door. Always grip the steering wheel on the rim otherwise you may suffer hand and arm injuries when the airbag is trig- gered. No objects should be held or allowed to rest between the airbag and seat occupant. The cover of the front passenger's air- bag should not be used as a storage tray. Do not use adhesive on, cover over or otherwise modify the upholstered cov- ers on the steering wheel, the dash- board, the side panels on front and rear doors and the roof struts, nor the sides of the roof liners. Never install child restraint systems on the front passenger's seat. Children under 12 and those who are smaller than 1.50 m (4 ft 11 in) should travel on the rear seats and may be required to do so by law. When side airbags are fitted for back seat passengers, ensure that child seats are correctly mounted as far as possible from the doors. Do not allow children to lean out of the seat towards the door, as this could result in consid- erable injury in the event of the airbags being triggered.< Even if all these instructions are com- plied with, injury to the face, arms or hands as a result of the airbag inflating cannot be entirely ruled out, depending on the circumstances in which an acci- dent occurs. If the car's occupants are unduly sensitive to the ignition and in- flation noise generated by the airbag systems, their hearing may be tempo- rarily affected. For further information on the airbag system, see pages 170 and 203. Online Edition for Part-No. 01 41 9 791 301 - © 01/99 BMW AG
  • 62.
    61n MinorrepairsKeywordsOverviewControlsMaintenanceTechnicalData Child restraint systems* Forchildren up to 12 years of age and less than 150 cm (approx. 4 ft 11 in) tall, suitable approved restraint systems may have to be installed; comply with local regulations. Small children up to about 18 months old can be secured with a rear-facing restraint system on the back seats, using standard seat belts. BMW Service can supply suitable child restraint systems for every age group. Please comply with the notes in the in- stallation instructions when using these products. Do not install child restraint sys- tems on the front seat, as injury could be caused if the passenger's air- bag is triggered off. In no circumstances are child restraint systems to be modified, as their protec- tive effect may otherwise be impaired.< Integral child's seat* These child's seats, in the two outer rear seat positions, satisfy the legal require- ments of ECE Directive R-44 and are suitable for children between about 3g and 12 years of age (weighing 15 to 36 kg/33 to 80 lbs). Forchildrenagedfromapprox.18months to 3g a years (weighing between 9 and 18 kg (20 and 40 lbs), use these seats in conjunction with the "Comfort" seat back and impact-absorbing table; these are available from BMW Service. Unfolding the child's seat: Reach under the front of the seat and pull it upwards diagonally to the rear (arrow). Then press the child's seat to the rear until it engages in position. 394de149 Folding away the child's seat: Release by pulling the loop forwards and down (arrow). Then press down from the top until the child's seat en- gages. Use the integral child's seats only in conjunction with the head re- straints. When repositioning the car's front seats, make sure that the child's feet are not trapped. Never leave children in the car on their own – even when occupying a child's seat.< 394de150 Online Edition for Part-No. 01 41 9 791 301 - © 01/99 BMW AG
  • 63.
    62nChild restraint systems*Childproof door locks Note the safety instructions re- garding seat belts on page 58, to ensure that the full protective action of the belts is maintained. If damaged or subjected to severe loads in an accident, have the integral child's seat (and other accessories if necessary) renewed by BMW Service.< 394de152 Insert key into slot on rear door and turn outwards: This door can now only be opened from the outside. 390de019 Online Edition for Part-No. 01 41 9 791 301 - © 01/99 BMW AG
  • 64.
    63n MinorrepairsKeywordsOverviewControlsMaintenanceTechnicalData 0 Steering locked Thekey can only be inserted and re- moved in this position. After removing the key, turn the steer- ing wheel slightly if necessary until the steering lock engages. Automatic transmission cars: Do not move the selector lever away from position P until the engine is run- ning (ignition key position 2). Before the ignition key can be returned to position 0 or pulled out, the auto- matic transmission selector lever must be moved to position P (interlock).< 390de010 1 Steering released A slight movement of the steering wheel often makes it easier to turn the key in the ignition from 0 to 1. Individual power consumers can then operate. 2 Ignition switched on/ BMW 525td/tds, 530d: preheating All electrical consumers are ready to operate. 3 Starting the engine Before starting > Apply the handbrake > Move the gear lever to neutral (or automatic transmission selector to P or N) > At low temperatures, depress the clutch pedal. Never run the engine in an en- closed space. The exhaust gas contains carbon monoxide, which is colourless and odourless, but highly toxic. Inhaling exhaust gas constitutes a severe health risk and can lead to loss of consciousness with fatal conse- quences. Do not leave the car unattended with the engine running, as it then consti- tutes a considerable potential hazard.< Ignition switch Starting the engine Online Edition for Part-No. 01 41 9 791 301 - © 01/99 BMW AG
  • 65.
    64nStarting the engine Carswith spark-ignition engine > Start the engine without depressing the accelerator pedal. Allow the starter motor to run for a reasonable time, but not for more than about 20 seconds. As soon as the engine fires, release the ignition key. Do not allow the engine to warm up at a standstill, but drive off as soon as pos- sible, using moderate engine speeds. BMW 535iA, 540iA: Your BMW is equipped with a conven- ient-start system. It is sufficient to turn the ignition key briefly to position 3 (to operate the starter motor), then to re- lease it. The starter then runs automatically for a predetermined period, and cuts out as soon as the engine has started. If the battery voltage is low, automatic starting cannot be activated, or the function is interrupted. The engine can be jump started (refer to page 196).< If the engine does not start first time, for instance if it is very cold or very hot: > Depress the accelerator pedal half- way while starting the engine. Cold starts at very low ambient temper- atures (below approx. –156) at high altitude (more than 1000 m above sea level): > On the first occasion, take longer over the starting operation (approx. 10 seconds) > Depress the accelerator pedal half- way while starting the engine. Cars with diesel engine When the engine is cold: > Hold the ignition key in position 2 un- til the preheat telltale or display goes out > Start the engine. At extremely low temperatures, the starter motor may have to be run for up to 40 seconds. When the engine is warm: > The preheat telltale or display does not come on. Start the engine imme- diately. Movement of the accelerator pedal has no influence on the starting process. Do not allow the engine to warm up at a standstill, but drive off as soon as pos- sible, using moderate engine speeds. Bleeding the the fuel system: Even if the fuel tank has been run dry, the fuel system does not normally need to be bled. If you nevertheless encounter difficul- ties in starting the engine: > Run the starter motor for approx. 20 seconds. Online Edition for Part-No. 01 41 9 791 301 - © 01/99 BMW AG
  • 66.
    65n MinorrepairsKeywordsOverviewControlsMaintenanceTechnicalData Stopping the engineHandbrake Turn the ignition key back to 1 or 0. BMW 530d: When the engine is cold, a fuel-burning auxiliary heater is used to warm the car's interior more rapidly. Its exhaust fumes are discharged under the door sill on the driver's side. If the engine is stopped before it has reached its regular operating tempera- ture, the auxiliary heater continues to run for a short time, and therefore pro- duces exhaust fumes. Never take out the ignition key when the car is still moving, in order to prevent the steering lock from engaging. When leaving the car, always remove the ignition key and lock the steering. Manual-gearbox cars: When parking on a slope, apply the handbrake, because merely engaging first or reverse gear may not prevent the car reliably from rolling away. Automatic transmission cars: Select position P.< Applying The lever engages automatically and the telltale in the instrument cluster lights up in ignition setting 2, refer to page 20. Releasing Raise slightly, press the knob and move the lever down. The handbrake is primarily intended for preventing a stationary vehicle from rolling away, and acts on the rear wheels. In exceptional cases, if the hand- brake has to be used to slow or stop the car, do not pull the lever up too hard. Keep the knob on the lever held in all the time. 390de042 Too violent an application of the hand- brake could over-brake the rear wheels and cause the rear of the car to skid. The brake lights do not come on when the handbrake is applied. Manual-gearbox cars: When parking on a slope, apply the handbrake, because merely engaging first or reverse gear may not prevent the car reliably from rolling away. Automatic transmission cars: Select position P.< To avoid corrosion, apply the hand- brake lightly from time to time when coasting to a standstill, for instance at a traffic signal, provided that it is safe to do so. Online Edition for Part-No. 01 41 9 791 301 - © 01/99 BMW AG
  • 67.
    66nManual gearbox The gearlever comes to rest when not in use in the 3rd/4th gear gate plane (dot in picture). When the lever is moved from a forward or reverse gear into neutral, it is auto- matically spring-loaded to return to this plane of the gate. 360de044 BMW 540i The gear lever comes to rest when not in use in the 3rd/4th gear gate plane (dot in picture). When the lever is moved from a forward or reverse gear into neutral, it is auto- matically spring-loaded to return to this plane of the gate. When selecting a gear in the 5th/ 6th gear plane, always press the lever to the right, to avoid accidentally selecting a gear in the 3rd/4th plane of the gate.< 380de044 Reverse Engage this gear only when the car is standing still. Press the gear lever to the left until slight resistance is overcome. The reversing lamps then come on au- tomatically in ignition key position 2. Never try to prevent the car from rolling back on an uphill gradient by slipping the clutch; always apply the handbrake. A clutch that is allowed to slip will wear rapidly.< Online Edition for Part-No. 01 41 9 791 301 - © 01/99 BMW AG
  • 68.
    67n MinorrepairsKeywordsOverviewControlsMaintenanceTechnicalData Automatic transmission* Your BMWis equipped with Adaptive Transmission Control (AGS). It re- sponds sensitively to your individual driving style and the actual road and traffic situation. Various shift programs are used for this purpose. You will find more details on the AGS in the chapter headed "Technical Items of Interest" on page 202. 390de044 Selector lever positions P R N D S 3 2 Starting the engine The engine can only be started in posi- tions P or N. The gear display differs according to your car's equipment specification (see pictures). 390de045 Moving the selector lever A locking mechanism is provided to pre- vent accidental movement of the selec- tor lever to certain positions. To release the lock, press the button on the front of the selector lever knob (arrow). Before moving the selector lever away from P or N with the car at a standstill, you must press the brake pedal down to release the lever (shiftlock). Keep the brake pedal pressed down until ready to move away, so that the car does not creep forwards (or backwards as the case may be) with the gear engaged.< Before leaving the car with the en- gine running, move the automatic transmission selector lever to position P or N and apply the handbrake to prevent the car from moving. 390de046 Online Edition for Part-No. 01 41 9 791 301 - © 01/99 BMW AG
  • 69.
    68nAutomatic transmission* Do notleave the car unattended with the engine running, as this constitutes a potentially severe accident risk.< P Park Engage this gear only when the car is standing still. The driven wheels are locked. R Reverse Engage this gear only when the car is standing still. N Neutral Select only if the journey is interrupted for a fairly long time. D Drive (automatic shift position) Use this position for all normal driving. The system shifts up through all forward gears and the AGS functions in an unre- stricted manner. S Sport program This position is recommended if it is in- tended to make full use of the car's per- formance. 3 and 2 Shift-limiting positions Select these positions if you wish to restrict gear selection, for instance on steep uphill or downhill gradients in mountainous regions. The transmission continues to shift automatically, but only up to the selected gear. Position 2 is also particularly suitable for use when towing a trailer. Kick-Down In the "kick-down" position, maximum acceleration and top speed are availa- ble in position D. Press the accelerator pedal down be- yond the regular full-throttle position; increased resistance will be felt. Shift electronics If the warning lamp comes on or the message "TRANS. FAIL- SAFE PROG" appears in the Check Control, an automatic transmis- sion malfunction has occurred. All lever positions can still be selected, but in the forward positions only certain gears are actually available when the car is driven. Avoid excessive loads, and take the car to the nearest BMW Service. Do not work in the engine com- partment with the selector lever in a driving position, in case the car be- gins to move unexpectedly.< For towing away, tow-starting and jump starting see page 197 onwards. Online Edition for Part-No. 01 41 9 791 301 - © 01/99 BMW AG
  • 70.
    69n MinorrepairsKeywordsOverviewControlsMaintenanceTechnicalData Automatic transmission withSteptronic* You can either drive the car as with a conventional automatic transmission, or shift between gears yourself. If you move the selector lever from po- sition D to the left, into the M/S lever plane, this will activate automatic-trans- mission shift programs that will appeal to those who wish to adopt a more en- thusiastic driving style. As soon as you move the lever in the "+" or "–" direc- tion, the Steptronic transmission's man- ual gear shift mode is activated. If you wish to return to fully automatic gear shifts, move the lever back to the right, to position D. Your BMW is equipped with Adaptive Transmission Control (AGS). It re- sponds sensitively to your individual driving style and the actual road and 390de138 traffic situation. Various shift programs are used for this purpose. You will find more details on the AGS in the Chapter "Technical Items of Inter- est" on page 202. Selector lever positions P R N D M/S + – Starting the engine The engine can only be started in posi- tions P or N. The gear display differs according to your car's equipment specification (see pictures). 390de139 Moving the selector lever A locking mechanism is provided to prevent accidental movement of the se- lector lever to certain positions. To re- lease the lock, press the button on the front of the selector lever knob (arrow). Before moving the selector lever away from P or N with the car at a standstill, you must press the brake pedal down to release the lever (shift- lock). Keep the brake pedal pressed down until ready to move away, so that the car does not creep forwards (or back- wards as the case may be) with the gear engaged.< 390de140 Online Edition for Part-No. 01 41 9 791 301 - © 01/99 BMW AG
  • 71.
    70n Automatic transmissionwith Steptronic* Before leaving the car with the en- gine running, move the automatic transmission selector lever to position P or N and apply the handbrake to pre- vent the car from moving. Do not leave the car unattended with the engine running, as this constitutes a potentially severe accident risk.< P Park Engage this gear only when the car is standing still. The driven wheels are locked. R Reverse Engage this gear only when the car is standing still. N Neutral Select only if the journey is interrupted for a fairly long time. D Drive (automatic shift position) Use this position for all normal driving. All forward gears are selected as nec- essary and the AGS is fully operational. Kick-Down In the "kick-down" position, maximum acceleration and top speed are availa- ble in position D. Press the accelerator pedal down be- yond the regular full-throttle position; increased resistance will be felt. M/S Manual mode and Sport program When changing from D to M/S, the Sport program is activated and D S dis- played on the instrument panel. This po- sition is recommended if it is intended to make full use of the car's available per- formance. When the lever is next moved, the auto- matic transmission will switch from the Sport program to the manual-shift mode. If you move the lever forwards in the "+" direction, the transmission shifts up; if you move it to the rear, in the "–" direction, a downshift takes place. The gear display reads 1 to 5 or M1 to M5 according to version. 390de323 Online Edition for Part-No. 01 41 9 791 301 - © 01/99 BMW AG
  • 72.
    71n MinorrepairsKeywordsOverviewControlsMaintenanceTechnicalData Automatic transmission withSteptronic* The AGS performs up- and down-shifts only at a suitable engine or road speed; for example, it will not shift down if the resulting engine speed would be too high. The instrument panel shows the selected gear briefly, followed by the gear actually in use. For rapid acceleration in the man- ual-shift mode – for example when overtaking – shift down manually or use the kick-down to shift to a lower gear.< The selector lever can only be moved from M/S to the positions P, R and N if it has first been moved back to D. In the following situations, Steptronic "thinks for you" in the manual-shift mode: > To prevent the engine from over- speeding, an up-shift to the next- higher gear takes place automatically shortly before the governed speed limit is reached in an intermediate gear > At low speeds, a lower gear is se- lected automatically without any action on the driver's part > The kick-down, when used, selects the lowest gear which can still be used without risk of the engine over- speeding. Shift electronics If the warning lamp comes on or the message "TRANS. FAIL- SAFE PROG" appears in the Check Control, an automatic transmis- sion malfunction has occurred. All lever positions can still be selected, but in the forward positions only certain gears are actually available when the car is driven. Avoid excessive loads, and take the car to the nearest BMW Service. Do not work in the engine com- partment with the selector lever in a driving position, in case the car be- gins to move unexpectedly.< For towing away, tow-starting and jumpstarting, see page 197 onwards. Online Edition for Part-No. 01 41 9 791 301 - © 01/99 BMW AG
  • 73.
    72nTurn indicator/headlamp flasherWipers 1 High beam headlamps (blue telltale lamp) 2 Headlamp flasher 3 Flashing turn indicators (green re- peater lamps with rhythmic ticking of flasher relay). If the telltale flashes and the relay ticks more rapidly than usual, a flashing turn indicator has failed; if towing a trailer, the failed lamp could be on the trailer. 390de335 To indicate a turn briefly Move the lever lightly, only as far as the first detent. It will cancel when re- leased. 0 Parked position of wipers 1 Intermittent wipe setting or rain sensor* 2 Normal wiper speed 3 Fast wiper speed 4 Flick wipe 5 Automatic windscreen wash 6 Automatic intensive cleaning* 7 Knurled wheel for controlling the in- termittent wipe intervals andthe sen- sitivity of the rain sensor 394de041 Online Edition for Part-No. 01 41 9 791 301 - © 01/99 BMW AG
  • 74.
    73n MinorrepairsKeywordsOverviewControlsMaintenanceTechnicalData Wipers 1 Intermittent wipeinterval or rain sensor* Intermittent wipe interval: Using knurled wheel 7 you can select four intermittent wipe intervals. The wipe speed is also varied automati- cally, according to road speed. Rain sensor: When the rain sensor is activated, the wind screen wipers are controlled auto- matically in response to wetting of the windscreen (they of course also re- spond to snow). This means you do not need to involve yourself in switching the windscreen wipers on and off, nor do you need to concern yourself with any of the settings between intermittent wipe and continuous wipe. Instead, you can focus your entire attention on pre- vailing road and traffic conditions. This advantage is particularly important in adverse weather conditions. Activating the rain sensor: From ignition setting 1, shift into lever setting 1. In any event, the wipers will now cross the windscreen once. You can leave the lever in setting 1 all the time, then all you need to do is to activate the rain sensor from ignition setting 1. To do this, > turn knurled wheel 7 briefly or > use the automatic windscreen clean- ing function (5) or the automatic in- tensive cleaning function (6). To vary the sensitivity of the rain sensor: turn knurled wheel 7. Switch off the rain sensor in an au- tomatic car wash, or else the car’s wipers may operate and be damaged.< 2 Normal wiper speed The wipers change over automatically to the intermittent wipe mode when the car comes to a standstill (not on cars with rain sensor). 3 Fast wiper speed The wipers switch to normal speed when the car comes to a standstill (not on cars with rain sensor). 5 Automatic windscreen wash Fluid from the washer tank is sprayed on to the windscreen and the wipers are operated for a short time. If the lever is pulled only briefly, washer fluid will be sprayed on to the wind- screen, but the wipers will not be switched on. 6 Intensive cleaning, automatic* Same as 5, but intensive cleaning fluid is first sprayed on to the windscreen. Changing the wiper blades: see page 176. Online Edition for Part-No. 01 41 9 791 301 - © 01/99 BMW AG
  • 75.
    74nWipers Headlamp cleaning* If theheadlamps are switched on, they are automatically cleaned as well on each fifth occasion that the windscreen wiper or intensive cleaning system is operated. The driver should only operate the washers and cleaning equipment if certain that the fluid will not freeze to the windscreen and interfere with the view ahead. Antifreeze should therefore be added to the fluid; see page 156. Do not run the washer systems if the fluid reservoirs are empty, or the washer pump will be damaged.< Windscreen washer jets The windscreen washer jets are auto- matically heated when the ignition key is in position 2. Rear window wiper – touring 0 Parked position of rear window wiper 1 Rear window wiper operates intermit- tently. When reverse gear is engaged, the wiper operates continuously. 2 Automatic rear window washer You can program the desired wipe interval: > Move the lever briefly from position 0 to position 1 and back > The time which elapses before switch- ing on again (from 0 to 1) is the pro- grammed wipe interval (max. 30 sec- onds). 392de158 Programming is cancelled: > move the lever to position 0 for approx. 10 seconds, or > when the engine is switched off. When the rear window is opened, its wiper is switched off. After closing the window it then has to be restarted if re- quired. To renew the wiper blade, see page 176. Online Edition for Part-No. 01 41 9 791 301 - © 01/99 BMW AG
  • 76.
    75n MinorrepairsKeywordsOverviewControlsMaintenanceTechnicalData Heated rear windowCruise control* Switching on Press the button: while the telltale is lit, the heated rear window is operating at high power (fast thawing). When the telltale lamp goes out, the rear window heating continues to oper- ate at reduced output, then switches it- self off automatically. Switching off If the telltale lamp is on, press the but- ton. 390de362 Above about 30 km/h (approx. 19 mph), you can memorise and call up the car's road speed. Activating the system From ignition key setting 2: Press button 1: the telltale in the instru- ment cluster lights up. You can then use the cruise control. Maintaining and memorising speed, accelerating Press button 2 briefly: The car's actual speed is maintained and memorised. Each time the switch is pressed briefly again, road speed is in- creased by approx. 1 km/h. 390de332 Hold button 2 in: The car accelerates without the accel- erator pedal being touched. As soon as you release the switch, the speed the car has reached will be maintained and memorised. If engine braking alone is insuffi- cient on a downhill gradient, the controlled speed may be exceeded. It may also prove impossible to maintain with the available engine power on up- hill gradients.< Decelerating Press button 3 briefly: Every time you press the button, road speed drops by approx. 1 km/h if you are already running with cruise control. Hold button 3 in: The car slows down by automatically cutting the throttle if you are already running on cruise control. As soon as you release the switch, the speed the car has reached will be maintained and memorised. Online Edition for Part-No. 01 41 9 791 301 - © 01/99 BMW AG
  • 77.
    76n Cruise control Cancellingthe cruise control When activated, press button 1: the tell- tale remains lit. You can use the cruise control again when required. In addition, you interrupt the cruise con- trol function automatically: > When braking > When operating the clutch or when moving the automatic transmission selector lever from D to N > If the selected speed is exceeded or not reached for a lengthy period, for instance by depressing the accelera- tor pedal. Calling up memorised speed Press button 4: The speed last memorised is recalled and maintained once it has been reached again. If you turn the ignition key to setting 0, the stored road speed is cleared from memory and the system is de-activated. De-activating the system If you have interrupted the cruise con- trol function, press button 1 once again. The telltale lamp goes out and the stored road speed is cancelled. Do not use the cruise control on twisting roads, in heavy traffic which prevents a constant speed from being maintained or if the road surface is slippery (snow, rain, ice) or loose (stones, sand).< Online Edition for Part-No. 01 41 9 791 301 - © 01/99 BMW AG
  • 78.
    77n MinorrepairsKeywordsOverviewControlsMaintenanceTechnicalData Odometer (distance recorder) Youcan activate the displays shown on this Figure in ignition setting 0 by press- ing the button (arrow) on the instrument cluster. The layout of the displays differs ac- cording to your car's equipment. Trip distance recorder To reset to zero, press the knob (arrow) in ignition key position 1 or beyond. Outside temperature display The outside temperature is displayed from ignition key position 1 on. You can change the dimensional unit (6/7) by pressing 390de025 1 the button (arrow) in ignition setting 1 and holding it down 2 then turning the ignition key to 0. Ice warning If the outside temperature falls to ap- prox. +36, a warning signal is heard and the display flashes for a short pe- riod. The warning is repeated if the tempera- ture rises again to at least +66 and then drops a second time to +36. The ice warning does not rule out the possibility of black ice also occurring at temperatures that are other- wise above +36, for instance on bridges or where the road is in shadow.< Never allow the engine to run in the red zone of the revolution counter. In this zone the fuel supply is inter- rupted to protect the engine. This be- comes evident as an intermittent reduc- tion in available power. 390de004 Trip distance recorder; outside temperature display Revolution counter Online Edition for Part-No. 01 41 9 791 301 - © 01/99 BMW AG
  • 79.
    78nEnergy Control Fuelgauge Indicates current fuel consumption in l/100 km. This enables you to check how economical and environmentally friendly your current driving style is. When the car is halted, the needle moves back to zero. 390de005 The warning light comes on briefly as an operating check when the ignition is switched on. When the warning light comes on, there are about > 8l – BMW 520i, 523i, 528i, 525td/tds, 530d > 10l – BMW 535i, 540i of fuel left in the tank. Fuel tank capacity: see page 223. Certain vehicle positions, e.g. driving uphill for prolonged periods, may cause slight fluctuations in the fuel gauge reading. 390de006 Add fuel in good time, or else there is a risk of running the tank dry and causing damage to the engine or the catalytic converter.< Online Edition for Part-No. 01 41 9 791 301 - © 01/99 BMW AG
  • 80.
    79n MinorrepairsKeywordsOverviewControlsMaintenanceTechnicalData Coolant thermometer ServiceInterval indicator Blue The engine is still cold. Drive at moder- ate engine and road speeds. Red If the warning light comes on or the COOLANT TEMPERATURE Check Control display appears*: the engine is too hot. Switch it off at once and allow to cool down. Between the coloured zones Normal operating temperature. At high outside temperatures or when loads on the car are severe, the needle may move up as far as the beginning of the red zone. Checking coolant level: see page 160. 390de007 The display layout varies according to your car's equipment specification. Green light-emitting diodes The fewer are on, the sooner the next service will be due. Yellow LED This lights up in conjunction with OILSERVICE or INSPECTION. A service routine is due. Make arrange- ments with BMW Service. Red LED The service routine is overdue. 390de008 Clock symbol Shows that brake fluid renewal is due. Periods during which the battery was disconnected are ignored by the display. In such cases you must ensure that the brake fluid is renewed every two years regardless of the display. Also see page 161.< Online Edition for Part-No. 01 41 9 791 301 - © 01/99 BMW AG
  • 81.
    80n Graphic display The followinginstructions and status messages are depicted as symbols and sound a gong from ignition setting 2. They remain on display until the faults have been remedied: 1 Check low- and high-beam head- lamps and parking lights 2 Top up washer fluid – goes out after approx. 1 minute 3 Door open 4 Luggage compartment lid/tailgate open 5 Check rear light or brake light. A de- fective third (centre) brake light is in- dicated by the upper symbol. At the end of a journey, when the driver's door is opened, the LIGHTS ON signal may be heard without any visual display. 390de121 Alphanumeric display* Clear-text instructions and reminders are shown in ignition key position 2 and beyond. A gong signal is always heard at the same time. 1 Symbol that a warning is present 2 Display 3 CHECK button The system malfunction displays are di- vided into two priority categories: 390en111 Priority 1 These displays appear immediately, accompanied by a gong signal and by flashing fault display symbols 1. If sev- eral faults occur at the same time, they are displayed in succession. The dis- plays remain in force until the faults have been rectified, and cannot be erased with CHECK button 3: > RELEASE PARKINGBRAKE > COOLANT TEMPERATURE The temperature is too high. Stop the car immediately and switch off the engine; see page 160 > STOP! ENGINE OILPRESS Engine oil pressure has dropped too low. Stop the car immediately and switch off the engine; see page 157 Check Control Online Edition for Part-No. 01 41 9 791 301 - © 01/99 BMW AG
  • 82.
    81n MinorrepairsKeywordsOverviewControlsMaintenanceTechnicalData Check Control > CHECKBRAKE FLUID The level is close to the minimum mark. Add fluid at the earliest oppor- tunity; see page 161. Have the cause of brake fluid loss traced and rectified by BMW Service > TYRE DEFECT* Immediately reduce speed ready to stop, avoiding any pronounced brak- ing and steering manoeuvres while doing so. See pages 89 > SELFLEVEL SUSP. INACT* Have the car checked by the nearest BMW Service; see page 135 > FUEL INJECT.SYS.* Have a check performed by BMW Service; see also page 136 > LIMIT* Display shows whenever you are ex- ceeding the legal speed limit in a given country. Priority 2 These faults or reminders are shown for 20 seconds in ignition key position 2 and beyond. After the text displays have gone out, symbols remain visible to indicate that there are fault mes- sages in the Check Control. The mes- sages can be called up again by press- ing CHECK button 3. > BOOTLID OPEN Display only appears when car is driven away from a standstill for the first time > DOOR OPEN Display appears when the car has reached a given (low) speed > FASTEN SEAT BELTS* The warning lamp with belt symbol also comes on > PRE-HEATING* Do not start the engine until the dis- play has gone out > WASHER FLUID LOW Restore the correct level at the earli- est opportunity; see page 156 > CHECK ENGINE OIL LEV Add engine oil as soon as possible; see page 157 > SET TYRE PRESSURE* The RDC has accepted the prevailing tyre pressure as the nominal value it has to monitor. See pages 88 > CHECK TYRE PRESSURE* Check the tyre pressure at the next available opportunity (refueling stop) and correct to the specified levels. See pages 88 > TYRE CONTROL INACTIVE* Brief fault in RDC or system fault, refer to page 89 > CHECK BRAKE LIGHTS A bulb has failed or there is a fault in the electrical circuit; see page 179 and 192 or consult BMW Service > CHECK LOWBEAM LIGHTS CHECK PARK LIGHTS CHECK TAIL LIGHTS CHECK FRONT FOGLAMPS* CHECK REAR FOGLIGHTS CHECK NUMPLATE LIGHT CHECK TRAILER LIGHTS* CHECK HIGHBEAM LIGHT CHECK REVERSE LIGHTS In each case a bulb may have failed or the electrical circuit may have a fault. See page 177 onwards and 192 or consult BMW Service Online Edition for Part-No. 01 41 9 791 301 - © 01/99 BMW AG
  • 83.
    82nCheck Control > TRANSFAILSAFE PROG* Please visit your nearest BMW Serv- ice centre, refer to page 67 or 69 > CHECK BRAKE LININGS Have the brake pads checked by BMW Service; see page 132 > RADIO KEY, BATTERY Renew the battery; see page 183 > CHECK COOLANT LEVEL Coolant level is too low and should be topped up at the earliest opportu- nity; see page 160 > ENGINE FAILSAFE PROG* The Electronic Engine Output Control (EML) has a fault. Higher pedal pres- sure and longer pedal travel may be needed when braking. Please have a check performed by BMW Service The following message cannot be called up again: > EXT. TEMP–5.06 This is an example of the display. The actual outside temperature is shown if it is +36 or below; see also page 77. Messages displayed at the end of a journey All malfunctions which have been indi- cated during a journey are displayed again in succession when the ignition key is turned back to position 0. The following information is also pro- vided if appropriate: > LIGHTS ON Warning at end of journey, when driver's door is opened > CHECK ENGINE OIL LEV Add engine oil at the earliest opportu- nity (when refuelling); see page 157. After the ignition key has been removed and the display has gone out, you can call up CHECK CONTROL displays for up to approx. three minutes by pressing the CHECK button 3. If there are sev- eral displays, the CHECK button must be pressed more than once. Check Control test Press the CHECK button 3 in ignition key setting 2: the display should show CHECK CONTROL OK. There are no malfunctions in the sys- tems monitored. Computer A description of the computer is to be found in "Radio and information sys- tems" and "Monitor". You can also have Check Control messages and computer informa- tion displayed in another language.< Online Edition for Part-No. 01 41 9 791 301 - © 01/99 BMW AG
  • 84.
    83n MinorrepairsKeywordsOverviewControlsMaintenanceTechnicalData On-board computer Calling upfunctions Using the button in the turn indicator lever, from ignition key setting 1, you can call up on-board computer informa- tion in the instrument cluster display unit. Every time you press the button towards the steering column, another function is displayed on screen (i.e. scrolling function). The sequence of displays is: ambient temperature, average fuel con- sumption, range, average road speed. From ignition setting 1, the most recent setting appears on the display. The layout of the displays differs according to your car's equipment. 390de336 Outside temperature and average fuel consumption You can change the unit of measure- ment for the ambient temperature dis- play (6/7), by 1 pressing and holding down the reset button for the trip distance display (odometer) 2 then turning the ignition key to 0. See also page 77. 390de126 Operating range and average speed The range is calculated on the basis of distance actually covered. The average speed display ignores any stationary periods where the engine was switched off. 390de125 Online Edition for Part-No. 01 41 9 791 301 - © 01/99 BMW AG
  • 85.
    84nOn-board computer Clearing thedisplay While average speed is being dis- played, if you press the turn indicator lever briefly, the on-board computer display can be switched off. Recalculating If you hold the button down longer, the average values displayed for fuel con- sumption and road speed are recalcu- lated, starting from this point in time. The engine must be running. Computer with alpha-numerical display* If your car has Check Control with an alpha-numerical display, the computer is described in the operating instruc- tions "Radio and information systems". Online Edition for Part-No. 01 41 9 791 301 - © 01/99 BMW AG
  • 86.
    85n MinorrepairsKeywordsOverviewControlsMaintenanceTechnicalData PDC assists youwhen reversing the car into a parking space. An audible warn- ing signal tells you how far you are from obstructions behind the car. To do this, four ultrasonic sensors in the back bumper measure the distance to the nearest object. The measuring range for the two corner sensors ends approx. 60 cm (approx. 2 ft) behind the bumper. The two centre sensors have a range of approx. 1.50 m (approx. 5 ft). In ignition key position 2, the system is activated automatically after approx. 1 second when reverse gear is selected or the automatic transmission selector lever moved to R. It is switched off when the lever is moved out of reverse gear or away from position R. If you are towing a trailer, of course, the system cannot make the appropriate measure- ments and is therefore out of action. Audible warning signals The distance from an obstruction is in- dicated by an intermittent audible sig- nal. The closer the car approaches the obstruction, the more rapid the se- quence of signals. When the distance is less than 30 cm (approx. 12 in), the sig- nal becomes continuous. The signal is interrupted after approx. 3 seconds if the distance from the ob- stacle remains constant during this time, for instance when reversing paral- lel to a wall. If a continuous signal at a pitch higher than usual is heard when the system is first activated, it is malfunctioning. Have the cause traced and rectified by BMW Service. The PDC cannot act as a substi- tute for your personal assessment of obstructions. The sensors have cer- tain "dead areas" in which objects can- not always be detected. In addition, the detection of obstacles can reach the physical limits of ultrasonic measure- ment, e.g. trailer towbars and couplings or thin and painted objects. Loud sound sources such as loud ra- dios can overpower the signal tone of the PDC.< Keep the sensors clean and free from ice, so that they always oper- ate reliably. Do not spray the sensors for any length of time with a high-pressure cleaning jet. Keep such jets at least 10 cm (ap- prox. 4 in) away from the sensors.< Park Distance Control (PDC)* Online Edition for Part-No. 01 41 9 791 301 - © 01/99 BMW AG
  • 87.
    86nASC+T/DSC* Automatic Stability Control plusTraction (ASC+T)/Dynamic Stability Control (DSC)* These systems ensure additional dy- namic stability, particularly when accel- erating and cornering. The DSC adds to the advantages of ASC+T. In addition to achieving opti- mum dynamic stability when accelerat- ing and starting from a standstill, a gain in stability is obtained when cornering. Note however that the car always re- mains subject to the limits imposed by the basic laws of dynamics. The system is in operation whenever the engine has been started. 390de359 Telltale lamp The telltale lamp in the instru- ment cluster goes out shortly after the engine has been started. See page 21. If the telltale lamp flashes: The system is active, that is to say it is compensating for fluctuations in trac- tion caused by the road surface. If the telltale lamp does not go out after the engine has been started or comes on during the journey: The system is defective, but the car it- self is fully operational with the excep- tion of the ASC+T/DSC stability control function. Please visit BMW Service for repair work. Switching off Press the button; the telltale lamp will come on. Depending on the car's equipment, the button is marked either ASC or DSC. When ASC+T/DSC is switched off, you are driving conventionally. It is advisa- ble to switch off the system to improve traction: > if the car has to be rocked out of a hollow or a soft surface, or started in deep snow or on a loose surface > if snow chains are fitted. See also page 133. Switching on again Press the button a second time; the tell- tale lamp will go out. Not even ASC+T/DSC can over- come the laws of physics. If the limit speed is exceeded, the driver is re- sponsible for the consequences: a lack of traction and poor lateral roadholding. The extra safety potential offered by this system must never be understood as an invitation to take additional risks.< You will find further details on ASC+T/ DSC in the Chapter "Technical items of interest", page 203. Online Edition for Part-No. 01 41 9 791 301 - © 01/99 BMW AG
  • 88.
    87n MinorrepairsKeywordsOverviewControlsMaintenanceTechnicalData Electronic Damping Control(EDC)* This system automatically ensures that movement of the road wheels is damped according to the car's needs, and therefore enhances both ride com- fort and safety. 390de358 Automatic control Automatic control is activated each time the engine is started. It takes effect over the entire road-speed range and regardless of the load on the car. If the influencing factors change (road sur- face and other operating factors such as steering, braking etc.), the damping force exerted by the shock absorbers is automatically varied within a fraction of a second. Sport program With the ignition key in position 2, press the EDC button (arrow); the telltale lamp next to the S will come on. The Sport program should be selected if you require a firmer response from the suspension in all operating situations. To change over to automatic control: Press the button again; the telltale lamp will go out. Online Edition for Part-No. 01 41 9 791 301 - © 01/99 BMW AG
  • 89.
    88n Tyre pressurecontrol (RDC)* The principle The RDC monitors tyre pressures at all four road wheels, both at a standstill and when the car is being driven. The system reports any sudden loss of pressure in one or more tyres. To enable the RDC to "get to know" the correct tyre pressure, check tyre pres- sures in all tyres against the tyre pres- sure table on page 27 and correct if necessary. Then activate the system. This telltale in the instrument cluster or the Check Control in- forms you whenever tyre pres- sure is not normal. Activating the system 1 Turn the ignition key to position 2 (but do not start the engine) 2 Keep the button pressed in (arrow) until the yellow telltale lamp on the in- strument panel comes on for a few seconds or the Check Control dis- plays "SET TYRE PRESSURE" 3 After the car has been driven for sev- eral minutes, the RDC adopts the ac- tual tyre pressures as the nominal values which it is to monitor. Do not repeat this process until you have ensured that tyre pressures are correct. Otherwise RDC operates auto- matically in ignition setting 2 and there- fore takes effect during every journey. 390de320 If there is a loss of tyre pressure If the tyre pressure has dropped too far after a short time (quite normal on any tyre), the yellow telltale lamps up or the message "check tyre pressure" appears in the Check Control. This is to remind you that the tyre pres- sure should be corrected to the speci- fied values again as soon as possible. If you are asked to check tyre pressures shortly after correcting them, the corrected pressure values were not plausible. Please check the tyre pressures again and correct them to the values specified in the tyre pres- sure table. After this, re-activate the system.< Online Edition for Part-No. 01 41 9 791 301 - © 01/99 BMW AG
  • 90.
    89n MinorrepairsKeywordsOverviewControlsMaintenanceTechnicalData Tyre pressure control(RDC)* With a burst tyre If you suffer a tyre defect involving loss of pressure, the red telltale lamps up, or the message "TYRE DEFECT" appears in the Check Control. In addition, a gong sounds. When this occurs, slow down to a stop immediately, avoiding harsh braking and steering manoeuvres. Replace the defective wheel with tyre. The spare wheel supplied as standard with your car is equipped with the necessary RDC electronics and is therefore also monitored automati- cally after fitting, when the system has been activated.< The RDC system cannot provide advance notification of any serious sudden tyre damage caused by external influences.< Have your tyres changed by BMW Service. BMW Service is informed about how to handle RDC and is equipped with the necessary special tools.< Faults The RDC can be subjected to brief in- terference locally by outside equipment or devices which use the same radio frequency. While there is a fault in the system, the yellow telltale lamps up or the message "Tyre pressure control inactive" ap- pears in the Check Control. The same display appears > in the event of a system fault > if a wheel not equipped with RDC is fitted to the car > if one or more wheels equipped with RDC electronics are carried on the car in addition to the spare wheel. Consult BMW Service if necessary. Online Edition for Part-No. 01 41 9 791 301 - © 01/99 BMW AG
  • 91.
    90n Side lights Low beamheadlamps If you switch off the ignition while the low-beam headlamps are switched on, only the park- ing lights remain lit. You can also have the "Delayed switch-off" ("Follow-me-home") headlamp setting selected: if the head- lamp flasher lever is operated, the low- beam headlamps then remain on for a short time after the ignition has been switched off.< 390de034 LIGHTS ON warning When the ignition key is turned back to 0 and the driver's door is opened, a buzzer sounds for several seconds as a reminder if the lights are still on. On cars with alphanumerical Check Control*: the reminder appears on the Check Control; see page 81. Daytime (dim-dip) circuit* If desired, the light switch can remain in the second position: when the ignition is turned off, the car's lights go out. You can have the daytime dipped headlamp setting selected on your car.< Turn the knurled wheel to vary the intensity of the lighting. 390de036 Sidelights/low-beam (dipped) headlamps Instrument lighting Online Edition for Part-No. 01 41 9 791 301 - © 01/99 BMW AG
  • 92.
    91n MinorrepairsKeywordsOverviewControlsMaintenanceTechnicalData Headlight beam throwadjustment* High-beam/parking lights To avoid dazzling the drivers of oncom- ing vehicles, the beam throw of the low beam headlamps must be adjusted to suit the load carried in the car: Values in ( ) apply when towing a trailer. 0 (1) = 1 to 2 persons without luggage 1 (1) = 5 persons without luggage 1 (2) = 5 persons with luggage 2 (2) = 1 person, load area or luggage compartment full 390de035 Cars with self-levelling suspension*: All load conditions: position 0. Exception: 1 person, luggage compartment or load area full or when towing a trailer: posi- tion 1. Comply with permitted rear axle load, see page 217. Please use the correct settings to avoid dazzling oncoming drivers.< Xenon headlamps* Cars with xenon headlamps are equipped with automatic beam angle adjustment. 1 High-beam headlamps 2 Headlight flasher (blue telltale lamp) 3 Parking lights Right or left parking lights In ignition key position 0, move the turn indicator lever beyond its normal left or right turn position until it reaches a final detent and is retained there. 390de335 Online Edition for Part-No. 01 41 9 791 301 - © 01/99 BMW AG
  • 93.
    92nFog lights Interiorlighting Fog lights* The green telltale lamp on the instrument panel comes on when the fog lights are in use. Rear fog lights* The yellow telltale lamp in the instrument cluster comes on when the rear foglights are lit. 390de037 Foglights and rear foglights Please comply with local leg- islation concerning the use of front and rear fog lights. The interior lights are controlled auto- matically. Switching interior light on and off manually Press the button (arrow) briefly. To switch off the light permanently, hold the button depressed for about 3 sec- onds. To cancel this mode, press the button. The load-area light in the touring oper- ates similarly. 390de040 Online Edition for Part-No. 01 41 9 791 301 - © 01/99 BMW AG
  • 94.
    93n MinorrepairsKeywordsOverviewControlsMaintenanceTechnicalData Interior lighting Readinglights Footwell lights The footwell lights operate in the same way as the interior light. There are reading lights at the front next to the interior light, and in the rear pas- senger area. They can be switched on and off using the buttons beside them. To protect the battery, all lights in- side the car are switched off about 15 minutes after the ignition key has been turned to 0.<394de301 Online Edition for Part-No. 01 41 9 791 301 - © 01/99 BMW AG
  • 95.
    94n 390de340 Air conditioning Online Editionfor Part-No. 01 41 9 791 301 - © 01/99 BMW AG
  • 96.
    95n MinorrepairsKeywordsOverviewControlsMaintenanceTechnicalData Air conditioning 1 Airsupply to windscreen and side windows 2 Air to the upper body area The knurled wheels down the sides open and close the air vents (any in- termediate setting possible) and the levers alter the direction of air flow. The centre knurled wheel varies the temperature of the airflow; see page 97 3 Airflow to footwells 4 Airflow to rear-seat footwells 5 Airflow to upper-body area, rear- seat passengers 97 6 Temperature 96 7 Air flow directed on to the > Windows > Upper body area > Footwell Any intermediate position is pos- sible; see page 96 8 Air supply 96 Air temperature control takes effect when the fan is switched on 9 Heated rear window 96 10 Cooling 96 11 Recirculated air mode 96 Online Edition for Part-No. 01 41 9 791 301 - © 01/99 BMW AG
  • 97.
    96nAir conditioning Tips forpleasant driving For the air temperature 6 the setting 226 will normally result in pleasant driving conditions. For air distribution setting 7, move selector to "6 o'clock". For setting 8, move to centre position. Turn outlets 2 so that the airflow passes the occupants without striking their bodies directly. Turn the knurled wheel between air vents 2 into a central posi- tion to allow slightly cooler air to en- hance fatigue-free driving. The description below tells you how to obtain various settings which may be individually preferred. Temperature The scale values are guide fig- ures for the interior tempera- ture. 226 has been found to be a pleasant setting. When the car is in motion, the selected tem- perature is reached as soon as possible and held constant. Air distribution You can direct air on to the windows, on to the upper body and into the foot- well. Any intermediate setting is possible. In position a small amount of air continues to reach the windows in order to prevent them from fogging over. The 6 o'clock setting is recommended in normal conditions (see illustration and overview of system on page 94). Air supply The airflow volume can be continuously varied. The greater the incoming flow of air, the more effective heating and ventilation will be. In position 0 the blower and air conditioning are switched off and the fresh air supply from outside the car is entirely shut off. Heated rear window When the heated rear window is switched on, the telltale lamp comes on. The heated rear window switches itself off automat- ically. Cooling Air is cooled when the air con- ditioner is switched on, then is heated back to suit the tem- perature setting. Depending on weather conditions, the windscreen may fog over momentarily when the engine is started. Switch off the air conditioning at out- side temperatures below approx. 56. This helps to prevent the windows from misting up. If the windows fog over immediately after switching off the air conditioning, switch it on again. Moisture condensate forms in the air conditioning and is discharged underneath the car. Traces of water on the ground are therefore normal.< Recirculated air mode If there are strong smells out- side, you can shut off the sup- ply of outside air for temporary periods. The air inside the car is then recirculated. If your car has a multifunctional steering wheel with recirculated air button, this can also be used to shut off the incom- ing airflow (see page 23). If the windows fog over in the recirculated air mode, switch it off and, if necessary, increase the airflow.< Online Edition for Part-No. 01 41 9 791 301 - © 01/99 BMW AG
  • 98.
    97n MinorrepairsKeywordsOverviewControlsMaintenanceTechnicalData Air conditioning Draught-free ventilation Theoutlets for the occupants' upper body area can be adjusted to suit your personal preferences: Turn knurled wheels 1 to open or close the outlets steplessly. Alter the direc- tion of the airflow by moving levers 2. Turn outlets so that the airflow passes the occupants without striking their bodies directly. Knurled wheel 3 blends a varying amount of cool air with the air for the upper body area outlets: > Turn towards the blue mark – cooler > Turn towards the red mark – warmer. 390de051 Rear-seat area ventilation Knurled wheel 1 opens the outlets step- lessly. The airflow direction is varied at levers 2. The air emerging here is slightly cooler that the air for the footwells. 390de355 Micro-filter The micro-filter traps dust and pollen in the incoming airflow. It is renewed when your BMW Service carries out routine maintenance work. If airflow is noticeably less than usual, this may in- dicate that the filter should be renewed earlier. Online Edition for Part-No. 01 41 9 791 301 - © 01/99 BMW AG
  • 99.
    98nAir conditioning Cooling 1 Selectan interior temperature which you find pleasant at the rotary tem- perature control, e.g. 226 2 Switch on the air conditioning 3 Turn the rotary air distribution control to position 4 Set the rotary blower control (air sup- ply) to a central position 5 Open the air outlets for the upper body zone 6 Turn knurled wheel 3 to a tempera- ture setting which you find pleasant; see "Draught-free ventilation", page 97. 390de341 Rapid ventilation 1 Select an interior temperature which you find pleasant at the rotary tem- perature control, e.g. 226 2 Switch on the air conditioning and select the recirculated-air mode 3 Turn the rotary air distribution control to position 4 Turn the rotary blower control (air supply) fully to the right 5 Open the air outlets for the upper body zone 6 Set knurled wheel 3 to cold (blue); see page 97. 390de342 Rapid heating 1 Select an interior temperature which you find pleasant at the rotary tem- perature control, e.g. 226 2 Turn the rotary air distribution control to position 3 Turn the rotary blower control (air supply) fully to the right 4 Close the rear seat-area outlets. 390de343 Online Edition for Part-No. 01 41 9 791 301 - © 01/99 BMW AG
  • 100.
    99n MinorrepairsKeywordsOverviewControlsMaintenanceTechnicalData Air conditioning Defrosting anddemisting windows 1 Select an interior temperature which you find pleasant at the rotary tem- perature control, e.g. 226 2 Turn the rotary air distribution control to position 3 Turn the rotary blower control (air supply) fully to the right 4 Close the rear seat-area outlets 5 To defrost the rear window, switch on rear window heating. The latent heat store* enables heat to be obtained from ignition key position 1 on, even if the engine is not running. 390de344 Heating If the windows are free from ice and condensation, the following settings are recommended: 1 Select an interior temperature which you find pleasant at the rotary tem- perature control, e.g. 226 2 Turn the rotary air distribution control to position 3 Set the rotary blower control (air sup- ply) to a central position 4 Close the rear seat-area outlets. 390de127390de345 Online Edition for Part-No. 01 41 9 791 301 - © 01/99 BMW AG
  • 101.
    100n 390de365 Automatic air conditioning* OnlineEdition for Part-No. 01 41 9 791 301 - © 01/99 BMW AG
  • 102.
    101n MinorrepairsKeywordsOverviewControlsMaintenanceTechnicalData Automatic air conditioning* 1Air supply to windscreen and side windows 2 Air to the upper body area The knurled wheels down the sides open and close the air vents (any in- termediate setting possible) and the levers alter the direction of air flow. The centre knurled wheel varies the temperature of the emerging air; see page 104 3 Air to footwells 4 Air to rear-seat footwells 5 Air to upper body area, rear-seat passengers 105 6 Automatic air distribution 102 7 Individual air distribution 102 8 Temperature – left side 102 9 Temperature display, air supply 102 10 Temperature – right side 102 11 Defrosting and demisting windows 103 12 Air conditioning 103 13 Automatic Recirculated Air Control (AUC) 103 14 Heated rear window 75, 104 15 Air supply 103 16 Residual heat utilisation 104 17 Air inlet grille for interior tempera- ture sensor – keep unobstructed Online Edition for Part-No. 01 41 9 791 301 - © 01/99 BMW AG
  • 103.
    102nAutomatic air conditioning* Apleasant interior temperature Press AUTO key 4 to switch on the au- tomatic mode. Choose an interior tem- perature which you find pleasant, e.g. 226. Above ambient temperatures of 56 you can also use the air conditioner 10. This dries the air and prevents the windows from misting up, for instance if someone sits in the car with wet cloth- ing. Turn outlets 2 so that the airflow passes the occupants without striking their bodies directly. The knurled wheel between outlets 2 for the upper body area should be turned to a central set- ting, since slightly cooler air at this level helps to avoid driving fatigue. The description below tells you how to obtain various settings which may be individually preferred. You can have your car pro- grammed so that your preferred automatic air conditioning settings are obtained whenever you unlock the car with your personal remote-control key.< Automatic air distribution The AUTO program handles the setting of air distribution for you and also adapts your temperature pref- erences to suit ambient conditions (summer, winter). It ensures a pleasant interior climate at every time of year. Select a pleasant interior temperature for yourself, e.g. 226. Selected tem- peratures and the reminder AUTO for the airflow appear on display 7; see overview on page 100. Open the outlets for the occupants' upper body zone. Switch the air conditioning on in the warm season of the year. Maximum cooling effect is obtained when knurled wheel 3 (see page 104) is in the cold setting. Individual air distribution You can also switch off the AUTO program and choose your own combination of air distribu- tion settings. Air flows on to the windows, to the upper body zone and to the footwell . Temperature You can also select your own in- dividual temperature setting on driver and passenger sides of the car. The displayed values are a guide to the actual interior temperature. 226 is recommended as a pleasant setting, whether or not the air condi- tioning is in operation. During the jour- ney, the chosen temperature is reached as quickly as possible – in summer and in winter – and maintained at a constant value. Turn knurled wheel 3 (see "Draught-free ventilation", page 104) to a central set- ting, since slightly cooler air at this level helps to prevent driving fatigue. This feature can be used primarily for blending air to make slight adjustments and enhance personal comfort. You can obtain full output from the heater (non-regulated) at the 326 setting. At 166 the full cool air output is obtained when the air conditioning is switched on.< Online Edition for Part-No. 01 41 9 791 301 - © 01/99 BMW AG
  • 104.
    103n MinorrepairsKeywordsOverviewControlsMaintenanceTechnicalData Automatic air conditioning* Airsupply In the AUTO program, air sup- ply is controlled automatically; AUTO appears in display 7 – see the summary on page 100. Using "+" and "–" you can vary the air supply. Your en- try is indicated by a bar display, the au- tomatic air supply is switched off and the automatic airflow distribution sys- tem remains unchanged. However, you can switch the automatic air supply sys- tem back on by pressing the AUTO but- ton. In the lowest fan setting, if you press "–", all displays disappear: blower, heating and air conditioning are switched off and the air supply shut off. The automatic air conditioning can be switched on again by pressing any but- ton (except REST button 14). Defrosting and demisting windows This program removes ice and condensation quickly from the windscreen and from the side windows. Air conditioning Air is cooled and dried when the air conditioner is switched on, then is heated back up to suit the tem- perature setting. Depending on weather conditions, the windscreen may fog over momentarily when the engine is started. At outside temperatures below approx. 56, switch off the air conditioning. This helps to prevent the windows from misting up. If the windows fog over immediately the air conditioning is switched off, switch it on again. Moisture condensate forms in the air conditioning and is discharged underneath the car. Traces of water on the ground are therefore normal.< Automatic Recirculated Air Control (AUC) If the air outside the car has an unpleasant odour or contains pollutants, you can shut off the suply to the interior of the car temporarily. The air inside the car is then recirculated. Obtain the desired operating mode by pressing the button as often as neces- sary. > Telltale lights off: fresh air enters car from the outside. > Left telltale lamp on – AUC operation: the system identifies pollutants in the outside air and shuts off the supply if necessary. The air inside the car is then recirculated. After this, the automatic system switches between outside air supply and recirculated air according to the available air quality. > Right telltale lamp on: the outside air supply is permanently shut off. The air inside the car is recirculated. If your car has a multifunctional steering wheel with recirculating air switch (see page 23), you can use it to change be- tween "Off" and the recirculating air mode (or between AUC and the recircu- lating air mode). Online Edition for Part-No. 01 41 9 791 301 - © 01/99 BMW AG
  • 105.
    104nAutomatic air conditioning* Ifthe windows fog over in the re- circulated air mode, switch it off and, if necessary, increase the airflow.< Heated rear window When the heated rear window is switched on, the telltale lamp comes on. The heated rear window switches itself off automatically. Residual heat utilisation Heat from the engine is stored and used to heat the car's interior when the ignition is switched off, for in- stance when waiting at a level crossing. In ignition setting 1, you can adjust the settings of the automatic air condition- ing system. In ignition key position 0, the heated air is directed automatically to the windscreen, side windows and footwells. This function can be activated if outside temperature is below ap- prox. +156, the engine is at its regular operating temperature and the battery is sufficiently charged.< Latent heat store* Automatically activated in ignition key position 1 when residual heat is used. Draught-free ventilation The outlets for the occupants' upper body area can be adjusted to suit your personal preferences: Turn knurled wheels 1 to open or close the outlets steplessly. Alter the direc- tion of the airflow by moving levers 2. Turn outlets so that the airflow passes the occupants without striking their bodies directly. Knurled wheel 3 blends a varying amount of cool air with the air for the upper body area outlets: > Turn towards the blue mark – cooler > Turn towards the red mark – warmer 390de051 Online Edition for Part-No. 01 41 9 791 301 - © 01/99 BMW AG
  • 106.
    105n MinorrepairsKeywordsOverviewControlsMaintenanceTechnicalData Automatic air conditioning* Rear-seatarea ventilation Knurled wheel 1 opens the outlets step- lessly. Use knurled wheel 3 to vary the temperature of the airflow, subject to the position of the knurled wheel at the front of the car. You can vary the airflow direction at levers 2. 390de354 Micro-filter and activated charcoal filter The micro-filter traps dust and pollen in the incoming airflow. The activated charcoal filter in addition removes gas- eous pollutants from the air entering the car. This combined filter is changed by BMW Service during routine mainte- nance work. If the airflow is noticeably less than usual, this may indicate that the filter should be renewed earlier. Online Edition for Part-No. 01 41 9 791 301 - © 01/99 BMW AG
  • 107.
    106nHeated seats* Steeringwheel heating* Roller sunblind* The seat cushion and seat back can be heated when the ignition key is in posi- tion 2. By pressing the button repeatedly, you can obtain different heat outputs. The maximum heat output is obtained when three telltale lamps are on, the minimum heat output when only one is on. Temperature control is by thermo- stat. Direct switching off is also possible when a higher heat output has been selected: keep the button pressed in for a longer period. 390de356 The steering wheel heating is opera- tional in ignition key position 2; to switch on and off, press the key (arrow). When the steering wheel is being heat- ed, the telltale lamp in the button is on. If your car has a multifunctional steering wheel without steering wheel heating, this position is occupied by the recircu- lated air button (see page 23). 390de014 From ignition setting 1, press the button to operate. Roller sun blinds for rear side windows* Pull the blind out at its loop and secure it to the retainer. 390de357 Online Edition for Part-No. 01 41 9 791 301 - © 01/99 BMW AG
  • 108.
    107n MinorrepairsKeywordsOverviewControlsMaintenanceTechnicalData Auxiliary heater* Auxiliaryventilation* If your car has an auxiliary fuel-burning heater, it is also equipped with inde- pendent ventilation control. Cars are also supplied with independent ventila- tion control only. Both systems are operated by the Multi-Information-Display (MID) or the on-board monitor; refer to the Operat- ing Manual. Two different switch-on times can be preselected, so that you can be sure that the car's interior is warm when it is next entered. Snow and ice are also easier to remove from the windows. The auxiliary heater runs for 30 minutes. It can also be switched on and off di- rectly. Since its current consumption is high, it should not be run twice in suc- cession unless there has in the mean- time been an opportunity to recharge the car's battery by driving the car. The auxiliary fuel-burning heater can be operated at outside temperatures be- low 166 if the switch-on time is prese- lected, or switched on directly at any outside temperature. This only applies when the car is driven, however, until the engine has reached its regular oper- ating temperature. The heated air is directed automatically to the windscreen, side windows and footwell; maximum heating output is al- ways used. In ignition key position 1 you can adjust the interior temperature, air supply and air distribution. The auxiliary heater continues to run for a short period after it has been switched off (telltale lamp out). Even during the warm season of the year the auxiliary heater should be switched on directly about once a month, then switched off again after about 5 minutes.< Do not operate the auxiliary heater in confined spaces (closed rooms). Always switch off the auxiliary heater before refuelling the car.< Ventilates the interior of the car and lowers its temperature by means of the (automatic) air conditioning blower. The auxiliary ventilation is operated by the Multi-Information-Display (MID) or the on-board monitor; refer to your Operating Manual. Two different switch-on times can be preselected; the ventilation system then runs for 30 minutes. It can also be switched on and off directly. Since its current consumption is high, it should not be run twice in succession unless there has in the meantime been an op- portunity to recharge the car's battery by driving the car. Independent ventilation control can be operated at any outside temperature above 166 if the switch-on time is preselected, or switched on directly at any outside temperature, but not when the car is being driven. Air emerges from the variable-flow, controlled-direction outlets for the up- per body zone on the fascia. These out- lets must therefore remain open if the independent ventilation system is to be used. In ignition key position 1, the airflow volume and air distribution are adjusted in the same way as for auxiliary heating. Online Edition for Part-No. 01 41 9 791 301 - © 01/99 BMW AG
  • 109.
    108nRemote control forauxiliary heater* 1 Switching on 2 Radio aerial 3 Telltale light 4 Switching off You can switch the auxiliary heater on and off with the remote control handset provided that the outside temperature is below 166. The average range for signal reception is approx. 350 metres. Switching on 1 Extend aerial 2 fully 2 Press button 1. Telltale light 3 comes on three times, then emits short rhythmic flashes for the remainder of the operating period (max. 30 min- utes) 3 Push the aerial back in, but only after the first three regular flashes have been seen. 390de155 Switching off 1 Extend aerial 2 fully 2 Press button 4. The telltale lamp flashes three times and then goes out 3 Finally, push the aerial back in. Renewing the battery and operating a new transmitter: see page 185. The best signal transmission is obtained if the remote control is held either vertical or horizontal. When switching on and off, do not touch the aerial or point it at the car. The remote control only operates the auxiliary heater if this is not already run- ning after a preselected time input or direct switch-on.< Interference Operation of the remote control may be interfered with by outside equipment operating on the same frequency. Online Edition for Part-No. 01 41 9 791 301 - © 01/99 BMW AG
  • 110.
    109n MinorrepairsKeywordsOverviewControlsMaintenanceTechnicalData To open Pull thehandle. The lamp comes on automatically. To close Swing the lid up. Locking Lock with a master key. The glove box can only be unlocked with a master key. If you only hand over the door key and ignition key, for example to hotel staff (see page 34), this will pre- vent unauthorised access to the glove box.< 390de060 After using the glove box, close its lid without delay, so that it cannot cause injury in the event of an acci- dent.< Rechargeable hand lamp* This is inside the glove box, on the left. The lamp is protected against over- charging and can therefore remain in the socket when it is not in use. Always switch the lamp off before inserting it into the socket, or else it could be overcharged and damaged.< The lid of the compartment on the front, inclined section of the centre console can be slid open and closed (arrow). If a cassette holder* is installed, each cassette compartment is opened by pressing the small button next to it. Compartment on centre console be- tween front seats: To open, reach into the recess and pull up. If a car phone is installed, it will occupy this compart- ment. 390de043 Glove box Storage compartments Online Edition for Part-No. 01 41 9 791 301 - © 01/99 BMW AG
  • 111.
    110nStorage compartments Carphone* Drink can holders* There is an open storage compartment to the left of the steering column. There is further storage space in all doors and on the front seat backs*. Hands-free telephone system* On cars prepared for telephone installa- tion* there is a trim panel for the hands- free microphone in the roof lining, near the interior lamp. For further information on the car phone, see the separate operating instructions.390de353 There are two holders for drink cans or cups at the front of the centre console (see illustration) and another two at the end of the centre console, below the grille. Press briefly to release and open them; swing back inwards when not required. 390de363 Online Edition for Part-No. 01 41 9 791 301 - © 01/99 BMW AG
  • 112.
    111n MinorrepairsKeywordsOverviewControlsMaintenanceTechnicalData Ashtray, front* Cigarettelighter* To open Press briefly in the direction of the arrow. To extinguish a cigarette, knock off the ash and insert a short distance only into the funnel-shaped hole. 390de061 To empty Press the edge of the lid (arrow): the ashtray will pop up and can be re- moved. On cars with non-smoker fittings, the insert is removed in the same way. 390de062 Press the recess (arrow) briefly, then press the cigarette lighter in. The cigarette lighter can be removed when it pops back out. Hold the hot cigarette lighter only by its knob, or else you may suffer burns. The cigarette lighter remains opera- tional when the ignition key has been removed. For this reason, do not leave children in the car unattended.< 390de364 Online Edition for Part-No. 01 41 9 791 301 - © 01/99 BMW AG
  • 113.
    112nCigarette lighter* Ashtray,rear* Cigarette lighter socket This can be used for a hand lamp, vacuum cleaner or similar device, pro- vided that it runs on 12 V DC and its power consumption does not exceed 200 Watts. Make sure that the socket is not damaged by attempting to insert plugs of the wrong pattern. On cars with non-smoker fittings, the socket is at the same point. To open Press the recess briefly. To empty Press the edge of the lid (arrow). the ashtray will pop up and can be re- moved. 390de063 Online Edition for Part-No. 01 41 9 791 301 - © 01/99 BMW AG
  • 114.
    113n MinorrepairsKeywordsOverviewControlsMaintenanceTechnicalData The rear seatback is divided into two sections, one of them one-third and the other two-thirds of the total width. Either side can be folded forwards indi- vidually if long or bulky objects have to be carried in the car. Folding: Insert the fingers into the recess and pull forwards (arrow 1). When the seat backs are returned to the raised position again, make sure that their catches engage correctly. The red panel (arrow 2) must move down. 394de117 The centre seat belt has a small addi- tional belt lock. > If you connect up the two belt sec- tions, you can use the centre seat belt just like any normal three-point seat belt. > Disconnecting the seat belt (arrow) makes it more convenient to fold down the larger seat back.394de303 Each seat back can be locked with one of the car's master keys. This prevents access to the luggage compartment from the inside of the car if you are obliged to hand over door and ignition key 3 (see page 34). This is an advantage, e.g. in hotels. 394de118 Through-loading system* Online Edition for Part-No. 01 41 9 791 301 - © 01/99 BMW AG
  • 115.
    114nSki bag* This enablesa maximum of four pairs of skis to be carried safely and kept clean. Using the full length of the ski bag and the additional space in the luggage compartment, skis up to a length of 2.10 m can be carried. If skis of this length are carried, however, the ski sack will only be able to hold two pairs before it becomes too narrow. Removing the centre armrest (Not on cars with through-loading sys- tem or on touring; see page 116). 1 Unfold the centre armrest completely 2 Detach the cover over the opening at the top (it has a burr fastener) and place it on the armrest 3 Hold the front of the armrest with one hand, place the other hand under the armrest and move it sharply upwards (arrow). 394de067 Installing the centre armrest Insert the centre armrest from the top and press it down until it is heard to en- gage in its holders. Make sure that the pins at the sides do not damage the seat up- holstery.< Online Edition for Part-No. 01 41 9 791 301 - © 01/99 BMW AG
  • 116.
    115n MinorrepairsKeywordsOverviewControlsMaintenanceTechnicalData Ski bag* Loading 1 Pressthe button (arrow 1): this will unlock the loading flap in the luggage compartment 2 Press the locking levers together (arrows 2) and swing the cover for- wards 3 Lay out the ski bag between the front seats. The zip fastener simplifies ac- cess to the contents of the bag, and makes drying it out easier 394de068 4 Inside the luggage compartment, se- cure the loading flap to the underside of the rear window shelf with the magnetic retainers. Make sure that the skis are clean before they are inserted into the bag, and that any sharp edges on them or their bind- ings do not damage or pierce the ski bag.380de069 Secure the skis or any other stored objects with the retaining strap on the ski bag. Tighten the turn- buckle to ensure that the retaining strap is taut.< To stow away the ski bag, follow the opposite procedure. 380de070 Online Edition for Part-No. 01 41 9 791 301 - © 01/99 BMW AG
  • 117.
    116nSki bag* With through-loadingsystem 1 Swing out the centre armrest, detach the cover over the opening at the top (it is secured by a burr fastener) and place it on the armrest 2 Press catch 1 down and swing the cover forwards 3 Press catch button 2: this unlocks the flap in the luggage compartment. 394de119 In the touring 1 Swing out the centre armrest, detach the cover over the opening at the top (it is secured by a burr fastener) and place it on the armrest 2 Press catch 1 down and swing the cover forwards 3 Press button 2: this releases the flap in the load area. In conjunction with the removable luggage floor* (refer to page 120): removal of floor, unlock the flap and slide the floor back in – the floor sec- tion then covers the flap. 392de176 If the flap in the load area is con- cealed by the pull-out floor panel, do not fold the larger section of the rear seat back, otherwise the flap will be damaged.< Online Edition for Part-No. 01 41 9 791 301 - © 01/99 BMW AG
  • 118.
    117n MinorrepairsKeywordsOverviewControlsMaintenanceTechnicalData Load area –touring Folding rear seat back Insert fingers into the recess and pull forwards (arrow). The rear seat back is divided into two sections, one of them one-third and the other two-thirds of the total width. You can fold down both sides to enlarge the luggage area. When the seat backs are returned to the raised position again, make sure that their catches engage cor- rectly. The red warning zone in the recess then disappears. The centre seat belt can only be pulled out when the larger section of the rear seat back is locked into position.< 392de161 Roller-blind cover Pull out the roller cover and secure it in the retainers at the back The cover can support the weight of light articles, e.g. clothing. Do not place any heavy or hard objects on the roller cover or these could endanger the occupants if ever you have to brake sharply. Do not allow the roller cover to run back too fast, as this could damage it.< For storage of the roller cover when the seat is folded, see next page. 392de162 Protective net* Pull the protective net out by its loop, then hold the rod at both sides and in- sert it into the retainers. This is best done from the back seat. Do not allow the protective net to retract too fast, or it could cause injury and itself become damaged.< When the rear seat backs are folded, the net tube can be secured in front of the rear seats, from which point the net can still be pulled out and secured at the front retainers (see next page). 392de163 Online Edition for Part-No. 01 41 9 791 301 - © 01/99 BMW AG
  • 119.
    118nLoad area –touring Removing roller cover and protective net 1 Press the buttons at the ends (arrow 1) 2 Pull the tube out to the rear (arrow 2). Installing Simply insert the tube into the two side catches and push it forward until it en- gages. 392de164 Storage Holders for the tube are provided in front of the rear seat. Insert the tube from the right, as shown in the picture. The loop on the protec- tive net must be at the top and the end of the roller cover must be placed around the tube at the bottom rear. You can pull out the protective net and insert it in the brackets above it in the roof area. 392de165 Side flaps To open, press the button. 392de166 Online Edition for Part-No. 01 41 9 791 301 - © 01/99 BMW AG
  • 120.
    119n MinorrepairsKeywordsOverviewControlsMaintenanceTechnicalData Load area –touring Compartment in floor To open: press the recessed section of the handle and swing up the flap (large arrow). The flap is lockable with a master key. The partitions in the compartment can be repositioned. If they are removed and their holders turned to the left and taken out, a compartment with a flat floor is obtained. 392de167 Raising the floor panel flap Swing up the holder (black) on the un- derside of the flap and attach it to the upper frame of the tailgate cutout. Before folding the floor panel flap down again, return the holder to its original position. 392de168 Raising the spare wheel cover Swing the cover up and attach it to the red holder on the floor panel flap (arrow). Before folding the cover back down, re- turn the holder to its original position. 392de169 Online Edition for Part-No. 01 41 9 791 301 - © 01/99 BMW AG
  • 121.
    120nLoad area –touring Pull-out load-area floor* To release, pull the recessed handle up. Pull out the floor. Do not drive the car with the load- area floor extended. Do not release the load-area floor when the car is standing on a slope, or it may run out by itself and cause injury. If an unsecured load is being carried, it could slide if the load-area floor extends accidentally, and fall to the ground when the floor panel reaches its limit stop.< 392de174 When extended, the panel can with- stand the following loads: > Up to 300 kg (660 lb) distributed over its entire surface > Up to 75 kg (165 lb) at the rear edge. Do not place heavier loads on the panel, or damage may occur. Do not reach under the load-area floor when sliding it back in, or injury could be caused.< Raising the load-area floor For access to the area under the floor, the spare wheel etc.: > Swing up the load-area floor panel and retain it with the rod (arrow) > Open the quick-release fasteners on the spare wheel cover. 392de175 Online Edition for Part-No. 01 41 9 791 301 - © 01/99 BMW AG
  • 122.
    121n MinorrepairsKeywordsOverviewControlsMaintenanceTechnicalData Load Loading If you carryheavy or bulky loads in your BMW: > Place heavy loads as far forward as possible – right behind the back rests or the load area partition– and keep load low (this Figure illustrates the touring) > Wrap protective material round sharp corners and edges > Do not stack loads higher than the seat backs > Pull out the protective net* (refer to page 117f) and ensure that objects are not able to pass through the sep- arating net > When carrying very heavy loads with no passengers on the back seat, in- sert each of the outer seat belts into their opposite locks. 392de177 Securing the load > Small and light items can be retained with the tensioning straps, a load- area net* or other suitable straps (see page 43) > BMW Service can supply suitable means of lashing and securing larger or heavier loads*. Lashing points are provided in the corners of the lug- gage compartment or load area (pic- ture shows touring) > Please note the information supplied with load securing equipment. 392de178 Always stow the load correctly and secure it so that it cannot en- danger the car's occupants if the driver has to brake heavily or swerve. Do not exceed the gross weight or axle load limits (see page 217), as this could endanger the car's operating safety and infringe the law. Do not carry heavy or hard objects loose in the occupant area, in case they are thrown around and endanger the occupants when the car is braked heav- ily or during a sudden avoidance man- uoeuvre.< Online Edition for Part-No. 01 41 9 791 301 - © 01/99 BMW AG
  • 123.
    122nRoof rack* Mounting points Accessto the mounting points: To open the covers (arrow), use the tool accompanying the roof rack system. A special roof rack system is available as an accessory for your BMW. If it is used, please comply with the installa- tion instructions supplied. A loaded roof rack alters the car's road behaviour and steering response quite considerably, by moving its centre of gravity. When loading the roof rack, ensure that the specified roof load limit, the car's gross weight limit and the axle loads are not exceeded. The relevant figures are shown in the technical data section, page 217. 394de369 The roof load must be uniformly distrib- uted and should not be too large in area. Heavy items of luggage should always be placed at the bottom. Make sure that sufficient clearance is availa- ble for raising the sliding/tilting sunroof and that no objects extend into the hinge-up area of the tailgate. Secure loads to the roof rack so that they cannot shift or fall off during the journey, and thus endanger following traffic. Drive smoothly and avoid violent accel- eration, braking or cornering. The roof load increases the car's sur- face area exposed to the wind, so that fuel consumption will be higher and the loads on the roof structure of the car more severe. Online Edition for Part-No. 01 41 9 791 301 - © 01/99 BMW AG
  • 124.
    123n MinorrepairsKeywordsOverviewControlsMaintenanceTechnicalData Towing a trailer Towinga trailer When a trailer is towed, the demands on both car and driver are more severe. A trailer reduces manoeuvrability, the ability to climb hills, acceleration and braking capacity and makes the car handle and corner differently. The permissible trailer load and nose weight (towbar downthrust) are stated in "Technical Data", page 217. The trailer load limit is also entered in the car's registration papers. Consult BMW Service regarding increased trailer weights. Trailer tow hitch* The suspension settings of your BMW afford optimum safety, ride comfort and sports performance. If a trailer tow hitch is fitted by the manufacturer, the vehicle will also be equipped with uprated suspension* at the rear as standard. This compensates for the weight of the tow hitch and also ensures optimum road behaviour when the trailer is not being towed. If a trailer tow hitch* is retrofitted, it must be of a type approved by BMW and be expertly installed by BMW Serv- ice. You are recommended to have up- rated suspension fitted as well. On models with self-levelling suspen- sion, the trailer-towing suspension need not be retrofitted. BMW does not approve of any other suspension systems offered by the au- tomotive trade for trailer towing pur- poses. Look after a detachable ball end in ac- cordance with its manufacturer's oper- ating instructions, to ensure that it can be fitted and removed without difficulty. If a trailer tow hitch is installed, the self-regenerating action of the rear bumper system may not be able to take effect.< The use of a stabilizing device can be recommended, particularly if the trailer is a heavy one. Information can be ob- tained from BMW Service. Online Edition for Part-No. 01 41 9 791 301 - © 01/99 BMW AG
  • 125.
    124nTowing a trailer Coverflap* Removing Take hold of the trailer tow hitch cover panel in the cutout provided, pull down- wards and to the rear and remove the panel from the cutout. For attaching and removing the ball head, please see the separate instruc- tions. Fitting first install the cover flap at the top with the groove in the aperture, then press in the lower area (arrow). 390de325 Nose weight This is the load exerted downwards by the trailer on the ball head of the tow hitch (it can be determined with the aid of bathroom scales or similar). In Germany: a minimum nose weight of 25 kg (55 lb) is laid down by law. Try to achieve a nose weight close to the permitted limit (see page 217) with- out exceeding it. The trailer's nose weight affects the towing vehicle, and must not lead to the car's gross weight limit or rear axle load limit being exceeded if a trailer is being towed. The car's payload limit is re- duced by the weight of the trailer tow hitch and, if a trailer is being towed, by its nose weight. The gross weight limit for the combined car and trailer must not be exceeded. Load When loading the trailer, make sure that the weight is kept as low as possible and stowed if possible close to the axle. A low centre of trailer gravity makes the outfit much more stable and safe to drive. Do not exceed either the trailer's gross weight or the specified trailer load limit for the car. The smaller value is the limit which should be adhered to. Before purchasing a trailer it is advisa- ble to obtain a declaration from the trailer concerning the effective trailer weight and trailer payload limit. Gradients In the interests of safety and to avoid holding up other traffic, do not attempt to climb gradients steeper than 12X. If an application is made to tow a heavier trailer, the limit is 8X. As altitude above sea level increases, engine power output tends to drop. You should therefore take particular care when driving through mountainous country, since the maximum gradient on which the outfit can be started may be lower than usual. BMW 530d: Avoid driving up lengthy hills in 1st gear alone, since this could overheat the fuel and cause bubbles to form, so that the en- gine is starved of fuel and stalls. Auto- matic-transmission cars: Select posi- tion D.< Online Edition for Part-No. 01 41 9 791 301 - © 01/99 BMW AG
  • 126.
    125n MinorrepairsKeywordsOverviewControlsMaintenanceTechnicalData Towing a trailer Downhillgradients Special care must be taken when de- scending gradients: before doing so, al- ways change down to the next-lower gear – and if necessary as far as 1st gear or automatic transmission selec- tor lever position 2 – and drive down the hill slowly. Speed limit The maximum speed limit when towing a trailer is 80 km/h in Germany, and similar speed limits apply in other coun- tries also. The trailer load limits have been chosen to ensure that driving sta- bility is satisfactory at this speed. If higher speed limits apply in other coun- tries, you are none the less recom- mended not to drive faster for safety reasons. If the trailer begins to swing from side to side, the outfit can only be stabilized by braking immediately. Tyre pressures Check the car's and the trailer's tyre pressures most carefully. For the trailer, comply with the manufacturer's recom- mendations. Outside mirrors If the standard outside mirror is not suit- able for towing a trailer, legislation pre- scribes two outside mirrors which bring both rear corners of the trailer into your field of view. Suitable mirrors, some with adjustable arms, can be obtained from BMW Service. Electrical system Higher electrical consumption can be expected if a trailer (cara- van) is towed. Try to avoid operating electrical equipment for too long peri- ods at a time, in order to limit the drain on the car's battery.< Before starting a journey, check that the trailer's rear lamps are op- erating correctly.< Online Edition for Part-No. 01 41 9 791 301 - © 01/99 BMW AG
  • 127.
    126n Online Edition forPart-No. 01 41 9 791 301 - © 01/99 BMW AG
  • 128.
    Initial overview Controls indetail Operation, maintenance and general care Minor repairs Technical data Index Technical items of interest 127n MinorrepairsKeywordsOverviewControlsMaintenanceTechnicalData Driving precautions: Running in 128 Driving hints 128 Catalytic converter 129 Anti-lock brake system (ABS) 130 Disc brakes 131 Brakes 132 Winter operation 133 Power steering 135 Self-levelling suspension 135 Digital Diesel Electronics (DDE) 136 Car telephone 136 Car radio 136 Wheels and tyres: Tyre pressures 137 Condition of tyres 137 New tyres 138 Wheel-changing 138 Wheel and tyre combinations 139 Winter tyres 140 Snow chains 140 Approved wheel and tyre sizes 141 In the engine compartment: Engine hood 147 Engine compartment 148 Washer fluid 156 Washer jets 156 Engine oil 157 Coolant 160 Brake fluid 161 Power steering oil 162 Vehicle identification number 162 Type plate 162 Maintenance and general care: The BMW Maintenance System 163 Care of the car 164 Airbags 170 Laying up out of use 170 Legal requirements and regulations Rule of the road 171 Registration abroad 171 Technical modifications 172 OBD socket 172 Recycling: Recycling in the Service area 173 Returning the car 173 Online Edition for Part-No. 01 41 9 791 301 - © 01/99 BMW AG
  • 129.
    128n Please comply withthe following in- structions, which are intended to en- sure that your car achieves its optimum operating life and economy. Engine and final drive Up to 2000 km (approx. 1300 miles): drive at varying road and engine speeds, but do not exceed the follow- ing maximum values: > Cars with spark-ignition (petrol, gas- oline) engine 6-cylinder: 4500 rpm or 160 km/h (99 mph) 8-cylinder: 4500 rpm or 170 km/h (106 mph) > Cars with diesel engines 3500 rpm or 150 km/h (92 mph) Avoid full throttle and do not use the automatic transmission kick-down. From a distance reading of 2000 km (approx. 1250 miles) onwards, engine and road speeds can be gradually in- creased. Comply with these running-in instruc- tions again if an exchange engine or final drive is fitted later in the car's life. Tyres New tyres do not achieve their full road grip immediately, for production rea- sons. You should therefore drive in a restrained manner for the first 300 km (approx. 200 miles). Brakes Brake pads and discs do not achieve a favourable wear and contact pattern until the car has covered about 500 km (approx. 300 miles). Brakes: Do not rest your foot on the brake pedal while the car is in motion. Even slight continuous pressure on the brake pedal could cause overheating, brake pad wear or even brake system failure. Aquaplaning: When driving on wet or slushy surfaces, reduce speed to prevent a wedge of water from forming between the tyre and the road. This situation, known as aquaplaning, means that the tyre can actually lose contact completely with the road surface, so that the car can neither be steered nor can the brakes be properly applied. Water on roads: When there is water on the roads, only drive through to a max. depth of 30 cm (12 in), and no faster than a walking pace, otherwise damage to the engine, electrical system and transmission may be caused. Rear-window shelf: Do not place heavy or hard objects on the shelf, or these could injure the car's occupants when the brakes are ap- plied. Running in Driving hints Online Edition for Part-No. 01 41 9 791 301 - © 01/99 BMW AG
  • 130.
    129n MinorrepairsKeywordsOverviewControlsMaintenanceTechnicalData Driving hints Catalyticconverter Coat hooks: Items of clothing hung from the hooks must not obstruct the driver's view. Do not hang heavy objects from the hooks, they could cause injury to the car's oc- cupants during sudden or heavy brak- ing or avoidance manoeuvres.< The catalytic converter reduces the pol- lutant content of the exhaust gas. Cars with a spark-ignition engine must be run on unleaded petrol. Even very small amounts of lead in the fuel are sufficient to damage the oxygen sensor and the catalytic converter per- manently. To ensure that the engine always oper- ates correctly and reliably, and to avoid damaging it, the following instructions should complied with: > Always comply with the specified maintenance work > Do not run the fuel tank empty > Tow-start the car only when the en- gine is cold, to prevent unburned fuel from igniting in the catalytic converter and causing damage. It is better to jump-start the car > Avoid any other situations in which fuel remains unburned or is only par- tially burned, for example: running the starter motor too frequently or for ex- cessively long periods in rapid suc- cession if the engine does not start (though the engine can of course be stopped and restarted at any time if it is running correctly). Running the engine with a spark plug lead de- tached. Always comply with the above precautions, to prevent unburned fuel from reaching the catalytic con- verter. Otherwise there is a risk of the catalytic converter overheating and be- ing damaged. High temperatures occur on all vehicles equipped with a catalytic converter. Never remove the heat shields protect- ing the exhaust system, nor apply un- derseal to them. Make sure that when driving or parking the car or when the engine is idling, no material which could catch fire easily (e.g. hay, leaves, grass etc.) can come into contact with the hot exhaust system. It could ignite and cause a fire, with the risk of severe inju- ries or damage.< Online Edition for Part-No. 01 41 9 791 301 - © 01/99 BMW AG
  • 131.
    130nAnti-lock brake system(ABS) The principle ABS prevents the wheels from locking when the brakes are applied, and thus increases active safety. Locked wheels are dangerous, because the front wheels cannot then be steered and the rear wheels may slide sideways and cause the car to spin or slide off the road. With ABS in action, the car achieves the shortest possible braking distances for the prevailing conditions (straight-line braking or cornering, on asphalt, ice, wet roads etc.). ABS is capable of satisfying two funda- mental requirements whenever the brakes are applied: > Safe drive stability > Secure steering and manoeuvrability on differing road surfaces (asphalt, cement, mud, rain, snow, ice). Braking with ABS The system functions above approx. 8 km/h (5 mph). Below about 3 km/h, it stops operating. The wheels can there- fore theoretically tend to lock during the final stages of braking action. However, in practice, this is not considered to be critical. You use ABS most effectively by apply- ing maximum brake pressure in situa- tions which call for this ("full braking"). Since you retain steering control of the car, you are still able, despite hard braking, to avoid any obstacles with rel- atively calm movement of the steering wheel. The ABS regulation cycle takes place within fractions of a second. The brake pedal pulsates to warn the driver that the ABS is active and therefore that the car is reaching the adhesion limit. In ad- dition, a rattling noise reminds you – as a consequence of the ABS action – that the friction coefficient or grip between tyre and road surface (slippery surface) is diminishing, and that you should re- duce your road speed accordingly. On roads with loose surfaces on a firm base, e.g. on gravel or snow, and when driving with snow chains, you may find the braking distance is greater than when the wheels are locked. However, the advantages of greater stability and the ability to steer while braking are still available to the driver. Information for your safety Even ABS is unable to overcome the laws of physics. It cannot absolve the driver from the consequences of brak- ing too late, maintaining insufficient space from vehicles ahead, exceeding the limits of adhesion when cornering at speed or encountering a poor stretch of road where aquaplaning occurs. Avoid- ing such situations remains the driver's responsibility. Although ABS enhances active driving safety, this should not be regarded as an invitation to take corre- spondingly greater risks. Make no modifications to the ABS system. All work on the ABS should be en- trusted only to skilled, authorized per- sonnel.< Online Edition for Part-No. 01 41 9 791 301 - © 01/99 BMW AG
  • 132.
    131n MinorrepairsKeywordsOverviewControlsMaintenanceTechnicalData ABS Disc brakes Inthe event of a fault the ABS warning lamp lights up, refer to page 20. The brake sys- tem then operates as it would in cars not fitted with ABS. Arrange to have this examined by BMW Service as soon as possible. Additional faults to the brake system could otherwise occur without being readily apparent. Disc brakes offer maximum braking effi- ciency, responsive control of braking force and the ability to resist severe loads. If the car is used only for short dis- tances, is out of use for lengthy periods or not subject to more than light loads, corrosion of the brake discs and con- tamination of the brake pads may oc- cur, because the minimum contact pressure between pads and discs, which is needed to generate a self- cleaning effect, has not been reached. When the brakes are applied, corroded discs tend to judder, and even lengthy brake applications usually fail to elimi- nate this effect entirely. To ensure that the car's safety is not affected, use only brake pads and linings approved by BMW.< Driving hints In damp weather or heavy rain it is ad- visable to apply the brakes with light pedal pressure every few kilometres. When doing so, make sure that no other road-user is endangered. This will gen- erate sufficient heat to dry out the discs and pads. It is a well-known fact that the most ef- fective braking is obtained not with locked wheels but when they are still just rotating. ABS maintains this state of affairs automatically. Should the ABS malfunction, the driver should adopt the cadence braking principle if possible (see page 134). To avoid any risk of brake fade when descending long or steep hills, select the gear which calls for a minimum amount of braking (or shift the auto- matic transmission down to an equiva- lent speed stage). The engine's braking effect can be fur- ther increased by selecting a lower gear or, with automatic transmission, 1st gear or lever position 2. Online Edition for Part-No. 01 41 9 791 301 - © 01/99 BMW AG
  • 133.
    132nDisc brakes Brakes Ifengine braking alone is insufficient, do not apply the brakes for too long with only slight or moderate force. In- stead, it is better to brake the car quite hard (providing that the road behind you is clear) so that your speed is reduced noticeably, and to repeat this process at brief intervals as necessary. The cooling-down phases between these brake applications should avoid over- heating and maintain full braking effi- ciency. Never drive with the clutch pedal- held on, with the shift or selector lever in neutral, or while the engine is switched off, otherwise engine braking action will not be present with the transmission in neutral and there will be no power assistance to the brakes while the engine is switched off. Make sure that the full travel of the brake, clutch and accelerator pedals is not obstructed by floor mats, carpets or other objects.< Dynamic Brake Control DBC* If the brake pedal is pressed down rap- idly, this system automatically boosts the braking force to a maximum and thus helps to pull the car up in the shortest possible distance when a full brake application is made. It also makes full use of the advantages offered by ABS. Maintain pressure on the brake pedal during the entire brake application. If the brake pedal is released, DBC will be switched off. If a malfunction occurs, the yel- low warning lamp comes on. Normal brake action remains available without restriction. Have the system checked at the next opportunity by BMW Service. Please note the "Information for your safety" concerning ABS on page 130. It also applies to DBC where appropriate.< Brake fluid level The brake hydraulics warning lamp lights up or the message "Check brake fluid" appears in the Check Control display: The brake fluid level in the reservoir is too low (see page 161). If the brake fluid level is too low and if brake pedal travel is much longer than usual, one of the two hydraulic brake circuits may have failed. Braking performance is still adequate with the remaining brake circuit in use. Visit your nearest BMW Service. When driving the car in this condi- tion, note that higher brake pedal pres- sure and considerably longer brake pedal travel may be necessary. Modify your driving style accordingly.< The warning lamp also comes on when the CHECK BRAKE LININGS warning appears on the Check Control display. Online Edition for Part-No. 01 41 9 791 301 - © 01/99 BMW AG
  • 134.
    133n MinorrepairsKeywordsOverviewControlsMaintenanceTechnicalData Brakes Winter operation Brakepads The warning lamp for the brake linings lights up, or the message "Check brake linings" appears in the Check Control display: The brake linings have reached the safe limit for lining wear. To replace them, visit your nearest BMW Service at the next available opportunity. To ensure that the car's safety is not affected, use only brake pads and linings approved by BMW.< The winter, with its frequently changing weather conditions, not only calls for your style of driving to be modified as appropriate but also for certain mea- sures to be taken to ensure that your car can be driven safely and reliably Coolant Ensure that the 50:50 mix ratio (water/ long-term anti-freeze and corrosion in- hibitor) is present. This is equivalent to frost resistance down to approx. –376. Renew the coolant every 4 years. Locks BMW door lock de-icer can be used to free them if frozen. This de-icer also contains lubricant. After its use, treatment with BMW lock barrel grease is recommended. Rubber parts To prevent rubber parts on doors, bon- net and boot from freezing solid, coat them with a rubber care agent or with BMW silicone spray. BMW Service can supply suitable car-care products.< Diesel fuel To ensure that the diesel engine oper- ates reliably during the cold season of the year, it must be run on winter-grade diesel oil, which garages usually sell during the period in question. Fuel filter heating is installed as standard equip- ment to prevent the fuel from solidifying during operation. The use of flow improvers is not permit- ted, as these can lead to problems in the fuel system. Snow chains BMW snow chains* may be fitted to both summer and winter tyres, but only to both rear wheels. Always observe the manufacturer's safety recommenda- tions. When snow chains are in use, do not exceed 50 km/h (approx. 30 mph). To improve traction, it is advisable to switch off the ASC+T/DSC* when snow chains are fitted, refer to page 86. Online Edition for Part-No. 01 41 9 791 301 - © 01/99 BMW AG
  • 135.
    134nWinter operation Moving awayfrom a standstill To set off in deep snow, or to "rock the car free", it is advisable to switch off the ASC+T/DSC*, refer to page 86. Driving on slippery roads Operate the accelerator pedal gently, avoid high engine speeds and shift up to the next higher gear early. On uphill or downhill gradients, change down to the next lower gear in good time. Maintain a safe distance from the vehi- cle in front. Brakes Winter road conditions greatly reduce the amount of tyre grip that is available, so that the driver must expect braking distances to be considerably longer than usual in every situation. ABS prevents the wheels from locking, so that the car remains stable and can always be steered. Should the ABS fail and the road wheels lock, reduce pressure on the brake pedal until the wheels just start to turn, but still remain braked. Then increase pedal pressure again, re- duce when the wheels start to lock then increase again etc. This intermittent braking action (the ca- dence braking principle) reduces brak- ing distances and you retain steering control of your car at the same time. You can still try to drive round danger areas once you have reduced the brake pedal pressure. If the road surface is slippery, do not shift to a lower gear in order to slow the car, or else the rear wheels may slip and you could lose control of the car as a result.< When applying the brakes hard on slippery roads or if the amount of surface grip varies widely, always de- clutch as well.< Correcting a skid Depress the clutch pedal, release the accelerator pedal or set the automatic transmission selector lever to N. Try to steer into the skid and bring the car under control in this way. Online Edition for Part-No. 01 41 9 791 301 - © 01/99 BMW AG
  • 136.
    135n MinorrepairsKeywordsOverviewControlsMaintenanceTechnicalData Winter operation Powersteering Self-levelling suspension* Parking Select 1st gear or reverse, or move the automatic transmission selector lever to P. If the gradient makes it necessary, apply the handbrake as well on cars with a manual-shift gearbox. To prevent the handbrake linings from sticking to the drums in freezing weather or as a result of corrosion, dry out the hand- brake briefly first, by applying it as the car is coming to a halt. Make sure that following traffic is not endangered. The brake lights do not come on when the handbrake is applied.< If the steering is stiff to turn: Check oil level; see page 162. Steering becomes heavy when you turn the steering wheel rapidly: Without fail, visit BMW Service to have your steering system checked. Special instruction for Servotronic* If steering becomes lighter as speed in- creases: An electronic fault has occurred. Have it rectified by BMW Service. If the power assistance should fail, greater effort will be required at the steering wheel.< If the self-levelling suspension telltale lamp comes on or the Check Control displays SELF- LEVEL SUSP.INACT., a malfunction has occurred in the self-levelling suspen- sion. Stop the car and examine it. If the body is distinctly lower at the back than at the front, and possibly standing at an angle (for instance, lower at the left than at the right), take it to the nearest BMW Service. Drive cautiously while the car is in this condition. The car's ground clearance is reduced and its ride com- fort below the usual standard. Even if the car appears to be at its nor- mal ride height and attitude, always take it to a BMW Service if a malfunc- tion is displayed. Online Edition for Part-No. 01 41 9 791 301 - © 01/99 BMW AG
  • 137.
    136nDDE Car phone*Car radio Digital Diesel Electronics (DDE) If the DDE warning lamp comes on during a journey or the Check Control displays FUEL INJECT. SYS, a malfunction of the electronic fuel injection system has occurred. Except in an extreme situation where the engine refuses to run, the car can still be driven, since the engine man- agement system has an emergency-run program. Note, however, that full per- formance may not be available when this program is in use. For this reason, the fuel injection system should be checked as soon as possible by BMW Service. Only mobile communication systems (car phone, radio telephone etc.) with a rating of max. 10 Watts are permitted. They can still cause malfunctions when the car is being operated if they are not intended for use with your car. Since BMW cannot examine and test each product, it is unable to accept any re- sponsibility for the installation of items it has not approved. Before purchasing any such system you are recommended to obtain advice from BMW Service. In order to safeguard your BMW's oper- ating reliability, do not operate any in- car telephones or other mobile radio equipment with an aerial inside the car or not fitted to the car's exterior. Detach the telephone aerial before driving the car on to a car train or into a car wash.< The reception and reproduction quality of a mobile radio system depends on the range of the desired station, your lo- cation for reception and the alignment of the aerial. Adverse factors such as high voltage wires, buildings or natural obstacles can cause noise interference even if your car is equipped with optimum sup- pression. Climatic influences such as the intensity of solar radiation, fog, rain or snowfall can also interfere with radio reception. Car phones not recommended by BMW or mobile phones may also interfere with the car's radio when they are used. In such cases, a low-frequency hum is often heard. Operation and tuning of your car radio are described in the separate instruc- tions accompanying this handbook. Online Edition for Part-No. 01 41 9 791 301 - © 01/99 BMW AG
  • 138.
    137n MinorrepairsKeywordsOverviewControlsMaintenanceTechnicalData Information for yoursafety The radial-ply tyres approved for your car are matched to its characteristics and ensure not only optimum road safety but also the desired level of ride comfort The condition of the tyres and mainte- nance of the specified tyre pressures not only influence tyre life but also road safety to a very considerable extent. Incorrect pressures are often a cause of tyre problems. They also have a consid- erable effect on the roadholding of your BMW. Check the tyre pressure – also of the spare wheel – at regular inter- vals, at least twice a month and before setting out on any long journeys. Incor- rect tyre pressures can adversely affect the car's roadholding and cause tyre damage, which could result in an acci- dent.< Tyre tread – tyre damage Inspect the tyres frequently for damage, the presence of foreign bodies, unusual wear and sufficient tread depth. Tread depth should if possible not be allowed to drop below 3 mm (approx. 0.12 in). Wear indicators (arrow) in the tread recesses indicate when a tread depth of 1.6 mm has been reached; this is the European legal limit for passenger car tyres in Europe. Below a tread depth of 3 mm there is a risk of aqua- planing at fairly high road speeds even if the water is not very deep. 390de331 Do not continue driving with a flat tyre. If air pressure is lost from a tyre, this seriously affects the car's han- dling and braking, and could cause the driver to lose control. Avoid overloading the car, as this could cause the tyres' load capacity limit to be exceeded. Otherwise you could over- heat the tyres and cause internal dam- age to them in the short to medium term. In some cases, this can result in sudden loss of tyre pressure. Unusual vibration while the car is being driven could indicate a tyre fault or some other defect on your car. The same applies to any other abnormal road behaviour, such as pulling severely to the right or left. In such cases, reduce speed immediately. Proceed carefully to the nearest BMW Service or tyre dealer, or have the car towed there so that it can be checked or its tyres inspected. All forms of tyre damage (which could in the worst case lead to sudden and total loss of pressure) represent a risk of seri- ous or even fatal injury to the car's oc- cupants and to all other road users.< Tyre pressures Condition of tyres Online Edition for Part-No. 01 41 9 791 301 - © 01/99 BMW AG
  • 139.
    138n New tyresWheel-changing To maintain the car's good road behav- iour, always fit tyres of the same make and tread pattern to all wheels. Do not use retreaded tyres, as these could have adverse effects on the car's safety. Their carcases may differ in internal construction or have aged sufficiently to cast doubt on their durability.< Age of tyres A tyre's date of manufacture is shown as part of the inscription on the tyre wall: DOT ... 328 means for instance that the tyre was manufactured in Week 32 of the year 1998. BMW recommends tyre replacement after not more than 6 years, even if tyres up to 10 years old may still be suitable. Spare tyres more than 6 years old should be reserved for genuine emer- gencies, e.g. if a regular tyre has be- come punctured. New tyres should be fitted in their place as soon as possible, and they should no longer be brought into regular service when new tyres are fitted. Between the axles Tread wear patterns differ at the front and rear wheels according to individual operating conditions. In the interests of safety and the car's road behaviour, in- terchanging them is not recommended. If a cost advantage is anticipated as a result of interchanging the wheels from front to rear, always remember that the actual removal and fitting of the wheels may incur additional cost which may not be justified by the expected in- crease in tyre life. If wheels are inter- changed, this should always be under- taken at relatively frequent intervals (max. 5000 km/3000 miles). BMW Serv- ice will gladly advise you. If you do decide to interchange the wheels, please take the following pre- cautions: do so only between front and rear on each side of the car, otherwise braking response and road grip may be ad- versely affected. Always check tyre pressures after fit- ting, and adjust as necessary. Never interchange wheels be- tween the front and rear axles if tyres of different sizes are fitted (see page 141 onwards).< Online Edition for Part-No. 01 41 9 791 301 - © 01/99 BMW AG
  • 140.
    139n MinorrepairsKeywordsOverviewControlsMaintenanceTechnicalData Wheel and tyrecombinations Choosing the correct tyres Use only tyres approved by BMW; see page 141 onwards. In view of the car's top speed, certain makes and sizes of tyre are compul- sory. Details can be obtained from BMW Service. Comply with any relevant national or local regulations. The correct wheel and tyre combi- nation has an influence on various systems, the function of which could otherwise be adversely affected, for in- stance ABS, AGS, ASC+T/DSC. For this reason, use only tyres of the same make and tread pattern on all wheels, and after a puncture, for in- stance, fit the approved wheel and tyre combination again as soon as pos- sible.< Markings on tyres and wheels The correct choice is made easier if the meaning of the tyre markings is under- stood. Markings on radial-ply tyres: The speed code letter indicates the maximum permissible speed at which the tyre is to be operated. On summer tyres: S = up to 180 km/h (112 mph) T = up to 190 km/h (118 mph) H = up to 210 km/h (131 mph) V = up to 240 km/h (149 mph) W = up to 270 km/h (168 mph) Y = over 270 km/h (168 mph) ZR = over 240 km/h (149 mph) e.g. Nominal width in millimetres Aspect ratio in X Code letter for radial ply Rim diameter in inches Load capacity figure (not on ZR tyres) Speed code letter (ahead of the R on ZR tyres) 225/60 R 15 96 W On winter tyres: Q M+S = up to 160 km/h (100 mph) T M+S = up to 190 km/h (118 mph) H M+S = up to 210 km/h (131 mph) Markings on light alloy wheels: Prevent dirt from entering the tyre valves by attaching screw-on dust caps. Dirt in the tyre valve can often lead to a gradual loss of air pressure. Rim width in inches Shoulder pattern code letter Symbol for well-base rim Rim diameter in inches Hump on 2 rim flanges 7 x 15 H 2J Online Edition for Part-No. 01 41 9 791 301 - © 01/99 BMW AG
  • 141.
    140nWinter tyres The correcttyres BMW recommends you to fit winter tyres (M+S radial-ply) if the car is used for driving in wintery conditions. Al- though tyres sold for all-year use with an M+S marking have better winter characteristics than summer tyres marked with speed letters H, V, W or ZR, they do not normally match the per- formance of winter tyres. In the interests of reliable directional stability and steerability, fit winter tyres of the same make and tread pattern to all four road wheels. Fit only winter tyres approved by BMW. BMW Service will gladly advise you on the correct winter tyres for the condi- tions in which your car has to operate. Note the speed limit applicable to these tyres In Germany: a warning notice stating the maximum permitted speed with winter tyres fitted must be displayed in the driver's field of view if the car is ca- pable speed higher than that permitted for the tyres (please check for similar lo- cal legislation). Tyre dealers and BMW Service can supply these labels. Never exceed the maximum speed laid down for the winter tyres fitted to your car. Lack of expert knowledge or incorrect handling of tyres can cause damage and lead to accidents. All work on tyres should therefore be carried out only by experts. BMW Serv- ice will gladly place its specialised knowledge and facilities at your dis- posal.< Tyre condition and tyre pressures Below a tread depth of 4 mm (0.16 in), winter tyres become noticeably less suitable for winter driving conditions and should therefore be replaced for safety reasons. Keep to the specified tyre pressures and have the wheels and tyres rebal- anced each time the wheels are changed or new tyres fitted. Tyre storage Store wheels and tyres in a cool, dry and preferably dark place when not in use. Protect tyres against contamina- tion from oil, grease and fuel. Snow chains* Fine-link BMW snow chains may be fit- ted to either summer or winter tyres, but only to both rear wheels. When fit- ting, comply with the manufacturer's in- structions. Online Edition for Part-No. 01 41 9 791 301 - © 01/99 BMW AG
  • 142.
    141n MinorrepairsKeywordsOverviewControlsMaintenanceTechnicalData Approved wheel andtyre sizes – saloon Tyre sizes Pressed-steel wheel Alloy wheel BMW 520i, 523i, 525td/tds Summer 205/65 R 15 94 V – 6.5Jx15 7Jx15 225/60 R 15 96 V – 7Jx15 225/55 R 16 95 V – 7Jx16 235/45 R 17 94 W – 8Jx17 Front: 235/45 R 17 94 W – 8Jx17 Rear: 255/40 R 17 94W – 9Jx17 Winter (M+S) 205/65 R 15 94 Q/T/H 6.5Jx15 7Jx15 6.5Jx15 7Jx15 225/60 R 15 96 Q/T/H 7Jx15 7Jx15 225/55 R 16 95 Q/T/H – 7Jx16 235/45 R 17 94 Q/T/H – 8Jx17 BMW 525td For summer tyres, tyres of speed cate- gory "H" are sufficient. Online Edition for Part-No. 01 41 9 791 301 - © 01/99 BMW AG
  • 143.
    142n Approved wheeland tyre sizes – saloon Tyre sizes Pressed-steel wheel Alloy wheel BMW 528i, 530d Summer 225/60 R 15 96 W – 7Jx15 225/55 R 16 95 W – 7Jx16 235/45 R 17 94 W – 8Jx17 Front: 235/45 R 17 94 W – 8Jx17 Rear: 255/40 R 17 94W – 9Jx17 Winter (M+S) 205/65 R 15 94 Q/T/H 6.5Jx15 7Jx15 6.5Jx15 7Jx15 225/60 R 15 96 Q/T/H 7Jx15 7Jx15 225/55 R 16 95 Q/T/H – 7Jx16 235/45 R 17 94 Q/T/H – 8Jx17 BMW 530d Wheel size 6.5Jx15 is not approved. Online Edition for Part-No. 01 41 9 791 301 - © 01/99 BMW AG
  • 144.
    143n MinorrepairsKeywordsOverviewControlsMaintenanceTechnicalData Approved wheel andtyre sizes – saloon Tyre sizes Pressed-steel wheel Alloy wheel BMW 535i, 540i Summer 225/55 R 16 95 W – 7Jx16 235/45 R 17 94 W – 8Jx17 Front: 235/45 R 17 94 W – 8Jx17 Rear: 255/40 R 17 94W – 9Jx17 Winter (M+S) 225/55 R 16 95 Q/T/H – 7Jx16 235/45 R 17 94 Q/T/H – 8Jx17 Comply with the tyre and wheel data stated in the car's docu- ments. If tyre and wheel sizes not stated in the car's official reg- istration documents are fitted, a special entry must be made. Snow chains* Snow chains cannot be fitted to 17-inch wheels. Online Edition for Part-No. 01 41 9 791 301 - © 01/99 BMW AG
  • 145.
    144n Approved wheeland tyre sizes – touring Tyre sizes Pressed-steel wheel Alloy wheel BMW 520i, 523i, 525tds Summer 205/65 R 15 94 V – 7Jx15 225/60 R 15 96 V – 7Jx15 225/55 R 16 95 V – 7Jx16 235/45 R 17 94 W – 8Jx17 Winter (M+S) 205/65 R 15 94 Q/T/H 7Jx15 7Jx15 225/60 R 15 96 Q/T/H 7Jx15 7Jx15 225/55 R 16 95 Q/T/H – 7Jx16 235/45 R 17 94 Q/T/H – 8Jx17 BMW 528i, 530d Summer 225/60 R 15 96 W – 7Jx15 225/55 R 16 95 W – 7Jx16 235/45 R 17 94 W – 8Jx17 Winter (M+S) 225/60 R 15 96 Q/T/H 7Jx15 7Jx15 225/55 R 16 95 Q/T/H – 7Jx16 235/45 R 17 94 Q/T/H – 8Jx17 BMW 523i touring Tyre size 205/65 R 15 94 V is not approved. Online Edition for Part-No. 01 41 9 791 301 - © 01/99 BMW AG
  • 146.
    145n MinorrepairsKeywordsOverviewControlsMaintenanceTechnicalData Approved wheel andtyre sizes – touring Tyre sizes Pressed-steel wheel Alloy wheel BMW 540i Summer 225/55 R 16 95 W – 7Jx16 235/45 R 17 94 Y – 8Jx17 Winter (M+S) 225/55 R 16 95 Q/T/H – 7Jx16 235/45 R 17 94 Q/T/H – 8Jx17 Comply with the tyre and wheel data stated in the car's docu- ments. If tyre and wheel sizes not stated in the car's official regis- tration documents are fitted, a special entry must be made. Snow chains* Snow chains cannot be fitted to 17-inch wheels. Online Edition for Part-No. 01 41 9 791 301 - © 01/99 BMW AG
  • 147.
    146n Online Edition forPart-No. 01 41 9 791 301 - © 01/99 BMW AG
  • 148.
    147n MinorrepairsKeywordsOverviewControlsMaintenanceTechnicalData Unlocking Pull the leverat the left under the fascia. Do not work on the car unless you possess the appropriate special- ised knowledge. Before working in the engine compartment, switch off the en- gine and allow it time to cool. Discon- nect the battery before working on the electrical system. For any work on the car at all, comply with the relevant notes and instructions. If unfamiliar with the regulations which have to be com- plied with, have the work performed by BMW Service; incorrect handling of parts and materials could represent a safety risk for the car's occupants or other road users.< 390de071 To open pull the release lever and open the lid. 390de072 To close Press the engine compartment lid lightly at the points illustrated (arrows) to close it, or allow it to drop from a height of approx. 10 cm (4 in) until it is heard to engage. To avoid injuries, as when closing all doors or lids on the car, make sure that the engine compartment lid is unobstructed. If you notice during the journey that the engine compartement has not been properly closed, stop the car at the ear- liest possible moment and close it cor- rectly.< 390de073 Engine hood Online Edition for Part-No. 01 41 9 791 301 - © 01/99 BMW AG
  • 149.
    148nEngine compartment –BMW 520i, 523i, 528i 390de372 Online Edition for Part-No. 01 41 9 791 301 - © 01/99 BMW AG
  • 150.
    149n MinorrepairsKeywordsOverviewControlsMaintenanceTechnicalData Engine compartment –BMW 520i, 523i, 528i 1 Engine oil dipstick 157 2 Reservoir for brake fluid (under the microfilter housing) 161 3 Jump-start connection point 196 4 Power steering oil reservoir 162 5 Coolant level-equalizing tank 160 6 Engine oil filler cap 157 7 Reservoir for intensive cleaning system 156 8 Reservoir for windscreen washer and headlamp cleaning system 156 Online Edition for Part-No. 01 41 9 791 301 - © 01/99 BMW AG
  • 151.
    150nEngine compartment –BMW 535i, 540i 390de130 Online Edition for Part-No. 01 41 9 791 301 - © 01/99 BMW AG
  • 152.
    151n MinorrepairsKeywordsOverviewControlsMaintenanceTechnicalData Engine compartment –BMW 535i, 540i 1 Reservoir for brake fluid (under the microfilter housing) 161 2 Power steering oil reservoir 162 3 Jump-start connection point 196 4 Engine oil dipstick 157 5 Engine oil filler cap 157 6 Coolant level-equalizing tank 160 7 Reservoir for intensive cleaning system 156 8 Reservoir for windscreen washer and headlamp cleaning system 156 Online Edition for Part-No. 01 41 9 791 301 - © 01/99 BMW AG
  • 153.
    152nEngine compartment –BMW 525td/tds 390de116 Online Edition for Part-No. 01 41 9 791 301 - © 01/99 BMW AG
  • 154.
    153n MinorrepairsKeywordsOverviewControlsMaintenanceTechnicalData Engine compartment –BMW 525td/tds 1 Engine oil dipstick 157 2 Reservoir for brake fluid (under the microfilter housing) 161 3 Jump-start connection point 196 4 Power steering oil reservoir 162 5 Coolant level-equalizing tank 160 6 Engine oil filler cap 157 7 Reservoir for intensive cleaning system 156 8 Reservoir for windscreen washer and headlamp cleaning system 156 Online Edition for Part-No. 01 41 9 791 301 - © 01/99 BMW AG
  • 155.
    154nEngine compartment –BMW 530d 390de352 Online Edition for Part-No. 01 41 9 791 301 - © 01/99 BMW AG
  • 156.
    155n MinorrepairsKeywordsOverviewControlsMaintenanceTechnicalData Engine compartment –BMW 530d 1 Engine oil dipstick 157 2 Reservoir for brake fluid (under the microfilter housing) 161 3 Jump-start connection point 196 4 Power steering oil reservoir 162 5 Coolant level-equalizing tank 160 6 Engine oil filler cap 157 7 Reservoir for intensive cleaning system 156 8 Reservoir for windscreen washer and headlamp cleaning system 156 Online Edition for Part-No. 01 41 9 791 301 - © 01/99 BMW AG
  • 157.
    156nWasher fluid Washerjets Headlight cleaning system* and windscreen washer Capacity in litres (Imp. pints) Windscreen washer: approx. 3.5 (6.2) – saloon approx. 6.0 (10.6) – touring Incl. headlamp cleaning system: approx. 6.0 (10.6). Fill with water and – when required – with anti-freeze according to manufac- turer's instructions. It is best to mix the water and additive before filling the washer fluid tank.< 390de082 Intensive cleaning system* Content app. 1.0 litre (1.8 pints). Fill with intensive cleaning agent. This is frost-resistant down to approx. –276 and can be obtained from BMW Serv- ice. Antifreeze for the cleaning or in- tensive cleaning systems is easily flammable. Keep it away from possible ignition sources and store it only in the carefully sealed original packs, out of reach of children. Comply with the in- structions on the pack.< 390de083 Windscreen washer Windscreen: The jets of liquid should strike the wind- screen in such a way that reliable cleaning is assured even at high speeds. Correct the direction of the jet if necessary by inserting a needle and moving the jet as required, or have this work performed by BMW Service. Rear window: Have these jets adjusted by BMW Serv- ice if necessary. Headlight cleaning system Have these jets adjusted by BMW Serv- ice if necessary. Online Edition for Part-No. 01 41 9 791 301 - © 01/99 BMW AG
  • 158.
    157n MinorrepairsKeywordsOverviewControlsMaintenanceTechnicalData Engine oil Checking engineoil level 1 Position the car on a flat, level sur- face 2 Switch off the engine, which should be at its regular operating tempera- ture 3 After about 5 minutes, take out the dipstick and wipe it clean with a non- fluffy cloth, paper tissue or similar 4 Push the dipstick fully back into the tube, then pull it out again 5 The oil level must be between the two marks on the dipstick. Like fuel consumption, engine oil con- sumption depends on driving style and operating conditions. 390de076 The quantity of oil between the two dipstick marks is approx. 1 litre (1.75 pints). Do not add oil above the upper dipstick mark. Adding too much oil will harm the engine. 460de189 Adding engine oil Do not add more oil until the level has dropped almost as far as the lower dip- stick mark. However, the oil level should not be allowed to fall below the lower dipstick mark. BMW engines are designed not to need separate additives in the en- gine oil, and indeed adding these sub- stances could even be harmful in cer- tain circumstances. This applies to manual-shift gearbox or automatic transmission, final drive and power steering.< 390de077 Online Edition for Part-No. 01 41 9 791 301 - © 01/99 BMW AG
  • 159.
    158nEngine oil Specified engineoils The quality of the engine oil is a deci- sive factor for the correct operation and long life of your car's engine. BMW has conducted extensive tests before ap- proving certain grades of engine oil. Spark-ignition engines: Use only an approved grade of "long- life" oil. If you are unable to purchase an ap- proved grade of "Longlife" oil, you can top up the oil level in between oil changes, if only a small amount of oil is needed, with a BMW-approved grade of "Special oil". Only if no such oil is available should you top up the engine oil level with an oil to ACEA: A3 specifi- cation. BMW Service can provide details of the "long-life" and "special" oils approved by BMW for your car's en- gine.< Diesel engines: The engine oil must always comply with the ACEA A3 and ACEA B3 specifica- tions. Viscosities The viscosity of an oil determines its ability to flow and is quoted as an SAE classification. Choice of the correct SAE oil classifica- tion depends on the climatic conditions in which your BMW is operated. BMW recommends the use of oils in SAE categories SAE 0W-X or SAE 5W- X. X indicates any suitable higher value, e.g. 30, 40 or 50. These oils can be used at any outside temperatures. If an SAE 10W-X oil is used, tempera- tures under the lower limit are permitted for short periods. However, the engine may not start as easily from cold. 460de162 Online Edition for Part-No. 01 41 9 791 301 - © 01/99 BMW AG
  • 160.
    159n MinorrepairsKeywordsOverviewControlsMaintenanceTechnicalData Engine oil Comply withlocal and national hazardous-material disposal regu- lations when discarding used oil.< Recommendation: have oil changes carried out only by BMW Service. In laboratory tests, prolonged contact with used oils has caused cancer. For this reason, always wash the af- fected skin areas thoroughly with soap and water after work. Keep all oils, greases etc. in a place which is inaccessible for children and always read and comply with any warn- ing instructions on the containers.< Online Edition for Part-No. 01 41 9 791 301 - © 01/99 BMW AG
  • 161.
    160nCoolant Do not topup the cooling system while the engine is hot otherwise you may scald yourself on the resultant coolant steam. To avoid the risk of subsequent dam- age, use only long-life antifreeze and corrosion inhibitor free from nitrites and amino compounds, and approved by the manufacturer. BMW Service is fa- miliar with these products. Antifreezes and corrosion inhibitors are hazardous to health. Keep them in sealed original packs, out of reach of children. Long-life antifreeze and corrosion inhib- itor contain ethylene glycol, which is flammable. For this reason, try to avoid spilling long-life antifreeze and corro- sion inhibitor on hot parts of the engine, since it could cause burns if it were to ignite.< When disposing of used long-life antifreeze and corrosion inhibitor, comply with the relevant environmental protection laws.< Checking coolant level Diesel engine: Correct coolant level with engine cold (approx. 206): Add to just below the KALT/COLD mark on the translucent reservoir. 390de373 Spark-ignition engine: Correct coolant level with engine cold (approx. 206): Unscrew the cap on the header tank. The coolant level is correct when the upper end of the red float rod is level with the edge of the filler pipe (see arrow in picture or drawing next to filler cap). 380de081 Online Edition for Part-No. 01 41 9 791 301 - © 01/99 BMW AG
  • 162.
    161n MinorrepairsKeywordsOverviewControlsMaintenanceTechnicalData Coolant Brake fluid Addingcoolant Open the cap on the equalizing tank only when the engine has cooled down. The needle of the coolant thermometer on the instrument panel must be in the blue zone, otherwise there is a risk of being scalded. 1 Turn the cap slightly counter-clock- wise until it starts to open, then allow the pressure to escape before open- ing it fully 2 Top up slowly until the correct level is reached – do not overfill. The coolant consists of water to which a long-life antifreeze and corrosion in- hibitor has been added. The 50:50 mix- ing ratio must be maintained all the year round to ensure protection against cor- rosion. No other additives are needed. Renew the coolant every 4 years. If the warning lamp lights up for brake hydraulics, or the mes- sage "Check brake fluid" ap- pears in the Check Control: The brake fluid level is too low in the reservoir. The brake fluid reservoir is located un- der the micro-filter housing on the driver's side. To top up the brake fluid, or to rectify the cause of any loss of brake fluid, please consult BMW Serv- ice whose staff is familiar with the fac- tory-approved grades of brake fluid (DOT 4). Loss of fluid will increase brake pedal travel. Comply with the instructions on page 132. Brake fluid is hygroscopic, that is to say it absorbs moisture gradu- ally from the air. To ensure that the car's brake system remains in good working order, have the brake fluid renewed every two years by BMW Service; see also page 79, 191 and the Service Booklet. Brake fluid is hazardous to health, and also attacks the car's paintwork. Keep it in sealed original packs, out of reach of children. Do not spill brake fluid; add it only up to the MAX mark on the reservoir. If it comes into contact with hot parts of the engine, brake fluid may ignite and cause burns.< When disposing of old brake fluid, comply with the relevant environ- mental protection laws.< Online Edition for Part-No. 01 41 9 791 301 - © 01/99 BMW AG
  • 163.
    162nPower steering oilVehicle identification Type plate Illustration shows oil reservoir for BMW 520i, 523i and 528i as an example. Oil reservoirs on other models: see the engine compartment illustra- tions starting on page 150. With the engine stationary, unscrew the container lid and insert the dipstick once again with its cover, but without screwing it on. The oil level must be between the marks on the dipstick. After checking, screw on the container lid. Consult your local BMW Service agent if there is a shortage of oil because only ATF (automatic transmission fluid) can be used, and specialist knowledge is required when topping up. 390de078 In the engine compartment, on the left spring strut mounting (arrow). 390de074 In the engine compartment down the left side wall, and also where necessary on the left upper side of the dash- board*. The data on the type plate must agree with those in the car's documents. The car's data are needed as a refer- ence for all queries, checks and spare part orders. 390de322 Online Edition for Part-No. 01 41 9 791 301 - © 01/99 BMW AG
  • 164.
    163n MinorrepairsKeywordsOverviewControlsMaintenanceTechnicalData The BMW maintenancesystem has been designed to ensure that minimum cost and effort are involved in ensuring that your car remains safe and reliable at all times. Please remember that regular mainte- nance is not only essential to ensure that your car remains safe, but also to enhance its resale value. 390de008 Service Interval indicator Advanced technologies have been adopted as a means of computing maintenance requirements, which are then shown on the Service Interval indi- cator. Whereas conventional systems call for maintenance when a fixed dis- tance in kilometres/miles has been cov- ered, the BMW Maintenance System has for many years now taken the car's operating conditions into account as well, since one kilometre is by no means the same as another. 100,000 kilometres completed exclu- sively in the form of short journeys can- not be equated with 100,000 kilometres made up of long main-road journeys only. The maintenance routines based on actual use of the car consist of the Oil Service and Inspections I and II. The principle of determining mainte- nance intervals according to load effec- tively covers all the operating condi- tions to which the car is likely to be exposed. Drivers who cover only very short annual distances – well below 10,000 km (approx. 6,000 miles) – should nonetheless have an engine oil change carried out every two years, since engine oil ages regardless of the loads imposed on it. Service Booklet For further information on maintenance points and the scope of maintenance work, please refer to the car's Service Booklet. Depending on the circumstances in which the car is used, it may be worth- while to inspect it for damage caused by stones flung up from the road, in order to guard against subsequent cor- rosion. Have maintenance and repair work carried out by BMW Service. BMW Service is in possession of the latest information on maintenance and repair procedures and equipped with the special tools needed for your car. A check on parts subject to wear is in- cluded in the maintenance schedules. Make sure that maintenance work is confirmed in the Service Booklet after it has been carried out. These entries are evidence that your car has been serv- iced regularly and correctly, and are also the basis of any warranty claims.< The BMW Maintenance System Online Edition for Part-No. 01 41 9 791 301 - © 01/99 BMW AG
  • 165.
    164n Care ofthe car Car wash You can put your new BMW through an automatic car wash right from the start. Ideally, you should try to find one that operates without brushes. Before washing the car, soak dead in- sects and obstinate dirt marks and wash them off. To prevent patches from forming, do not wash the car when the engine hood is still hot, directly after it has been ex- posed to strong sunlight or if it is parked in the sun. If an automatic car wash is used, make sure > that it can safely accommodate your size of car > that it cannot damage add-on body elements (e.g. spoilers or a car phone aerial). If necessary, consult the oper- ator of the car wash first > that your car's wheels and tyres can- not be damaged by the mechanism used to move the car through the au- tomatic wash > the brush pressure is as low as possi- ble, and the car wash operates with ample rinsing water. Cars with a rain sensor: clean the windscreen regularly. Wax or silicone coatings from car washes, and also insects adhering to the glass could prevent the rain sensor from operating correctly. Switch off the rain sensor in an automatic car wash, otherwise the car’s wipers may operate and be dam- aged.< Clean the areas not reached in the automatic wash by hand, for example door sills, folds in door and lid panels etc. During the winter months in particular, wash the car more frequently. Severe dirt deposits and road salt are difficult to remove and tend to damage the paintwork if not attended to promptly. If a steam jet or high-pressure washer is used, make sure that it is held sufficiently far away from the car's panel surfaces. High pressure jets striking it from only a short distance away could cause damage, or surface deterioration leading to damage at a later date. In addition, water could pen- etrate various components on the car and cause long-term damage or fail- ure.< When cleaning the headlamps, please note: > do not rub them when dry or use caustic or abrasive cleaning agents > soak dirt or other deposits (e.g. dead insects) with BMW Shampoo and wash down with plenty of water > use a de-icer spray to remove ice de- posits – not a scraper or other hard tool.< After washing the car, drive it briefly and apply the brakes to dry them out; this is necessary to prevent reduced braking effect when the brakes are wet, and also to avoid corrosion of the brake discs.< Online Edition for Part-No. 01 41 9 791 301 - © 01/99 BMW AG
  • 166.
    165n MinorrepairsKeywordsOverviewControlsMaintenanceTechnicalData Care of thecar Paintwork The car's paintwork is built up in several layers, for protection against corrosion. In addition to cataphoretic dip coating with primer, the body cavities are spe- cially protected with materials that have been subjected to stringent and suc- cessful testing for a number of years. The underside of the body has a resil- ient PVC coating applied to it, followed by complete wax-based undersealing for additional protection. Always remember that regular care of your car will go a long way towards maintaining not only its safe condition but also its resale value. Increasing awareness of the damage which unfavourable environmental con- ditions can cause to paintwork has led to paint suppliers and automobile man- ufacturers steadily increasing the dura- bility of the paint finishes. Nonetheless, regional environmental factors could have adverse effects on the car's paint- work. Please wash and clean the car as frequently as needed. In the case of mechanical loads caused by sand, road salt, stone chippings or similar, the paint surface may be broken and corrosion may then be able to de- velop under the paint, and spread out from the damaged areas. Mud and dirt from the roads, tar stains, dead insects, bird droppings (strongly alkaline) and even resin and pollen from trees all contain substances that can damage the paintwork if not removed promptly (by causing patches, blisters, caustic burns or flaking off of the top coat). In industrial areas, airborne fly ash, lime, oily soot, acid rain or sulphur diox- ide as well as other impurities in the air are bound to attack the paintwork if not cleaned with sufficient regularity, though in most cases only the horizon- tal panel surfaces are affected. In coastal regions the high salt content and humidity of the air encourages more rapid corrosion. In tropical zones, strong ultra-violet ra- diation and high atmospheric humidity are often accompanied by temperatures above 406 in the shade. Light-col- oured cars can reach a temperature as high as 806 and dark-coloured cars up to 1206. Care of paintwork The long-term effects of substances which could damage the paint can be counteracted by washing the car regu- larly, particularly if it is used in an area suffering from severe atmospheric pol- lution or natural forms of contamination (tree sap, pollen etc.). However, always remove particularly aggressive substances as soon as pos- sible, to avoid the risk of paint damage or discoloration. These may include spilled fuel, oil, grease, brake fluid or bird droppings. Contamination of the paint surface is particularly easy to identify after the car has been washed. Remove such resi- dues without delay, using cleaning- grade petroleum spirit or alcohol on a clean cloth or wadding. Remove tar splashes with a suitable tar stain re- mover. Finally, apply a paint preserving product to the treated areas. Cleaning and care products can be obtained from BMW Service.< Online Edition for Part-No. 01 41 9 791 301 - © 01/99 BMW AG
  • 167.
    166n Care ofthe car Protecting the paintwork Polish the paintwork only with products containing Carnauba or synthetic waxes. A sure sign that the paintwork needs protective treatment is when water no longer forms large droplets and rolls off the surface. Remove care product residues and sili- cone from the windscreen with glass cleaner. Touching in paint damage Minor paint damage can be touched in with a BMW paint spray aerosol or BMW paint pencil. The colour of your car's paintwork is stated on the type plate (see page 162) and on the first page of the Service Booklet. Scratches and damage caused by flying stones must be repaired immediately, to prevent rust from forming. If any areas of the body have already started to rust as a result of paint dam- age, remove the rust and clean them. Apply primer coating with a BMW primer stick, allow to dry thoroughly, then apply the top coat. After a few days, polish the touched-in areas and apply a paint protection product. You can have more widespread paint damage expertly repaired by BMW Service in accordance with the manu- facturer's directives, using original BMW paint materials. Care of windows Water- and dirt-repellent windscreen (in preparation) The coating is not affected by wax from automatic car washes or windscreen washer additives. Depending on the how often the wipers are used, and also on environmental in- fluences, the windscreen coating will incur an unavoidable degree of wear. The properties of the coating then dete- riorate to an increasing extent. After ap- prox. 20,000 to 25,000 km, the glass begins to resemble a non-coated wind- screen. BMW Service can then renew the windscreen coating. Keep the inside surfaces of windows, and the mirrors, clean and free from smears with a glass cleaner. Never use cleaning agents or polishing pastes containing quarz powder on the mirrors. For care of the protective glass*, please note: The inside surfaces of the car's side windows have a plastic film applied to them. For this reason, avoid attaching any adhesive labels unless it is not in- tended to remove them again. Clean only with water, to which a com- mercially available dishwasher deter- gent can be added if desired. Do not use abrasive cleaning products. Online Edition for Part-No. 01 41 9 791 301 - © 01/99 BMW AG
  • 168.
    167n MinorrepairsKeywordsOverviewControlsMaintenanceTechnicalData Care of thecar Fogged-over or iced-up windows can be treated inside the car with a demist- ing cloth or de-icing spray – do not use an ice scraper.< Clean the wiper blades with soapy wa- ter. Renew the windscreen wipers twice a year, before and after the cold sea- son. This is particularly important on cars with a rain sensor. Use only BMW-approved wiper blades.< Care of special components Alloy wheels should be treated with a suitable cleaner, particularly in the win- ter months, but do not use aggressive, acid, strongly alkaline or abrasive cleaning agents or steam jets at more than 606 (comply with the manufac- turer's instructions for use). If your car has chrome-plated parts* such as window surrounds, door han- dles etc., they should be cleaned most carefully with plenty of water to which a shampoo can be added; this is particu- larly important if the car is exposed to road salt in winter. Use chrome polish to buff up these parts. Clean plastic parts, imitation leather surfaces, the roof lining, the light glasses, the glass over the instruments and parts that are sprayed matt black with water and possibly a plastic care product. Do not soak the seats or roof lining right through. Never use solvents such as nitro thinners, cold cleanser, fuel or similar. Apart from water, treat rubber parts only with rubber care products or sili- cone spray. Seat belts should only be cleaned with mild soap suds (without removing them from the car). Do not dry-clean or use chemical products, or the fabric may be weakened. Never allow inertia reel seat belts to re- tract unless they are dry. Dirt on the seat belts can interfere with the action of the reel and represent a safety haz- ard. Floor carpets and mats* can be treated with a car interior cleaner if very dirty. The floor mats can be taken out of the car to enable the interior to be cleaned more thoroughly. Real wood trims and wooden parts should only be cleaned using a damp cloth. Then rub dry with a second soft cloth. Cleaning and care products can be obtained from BMW Service.< Online Edition for Part-No. 01 41 9 791 301 - © 01/99 BMW AG
  • 169.
    168nCare of thecar Care of upholstery materials The pressure areas which occur when cloth seats are in daily use can be re- stored by brushing against the pile di- rection with a slightly moistened brush. The tendency of the pile to lie in a par- ticular direction on velour upholstery is not a quality defect and, just as on home textiles or clothing, cannot be avoided. Remove fluff from cloth upholstery and rubbed-in threads or scraps of cloth or suede with a suitable fluff roller or burr brush. A cleaning glove is available for particularly obstinate fluff. Stains and fairly large areas of dirt should be cleaned off without delay, using luke- warm water and an interior cleaner, stain remover or cleaning-grade ben- zene. Brush the fabric afterwards to restore its appearance. If the car is likely to be exposed to strong sunlight for a lengthy period, either cover the seats or mask off the windows in order to prevent a bleaching effect. The build-up of a static electrical charge on the seats, particularly if at- mospheric humidity is low, can give the occupants an unpleasant electric shock if they touch metal parts of the car after leaving it. Although this is not danger- ous in any way, it can be avoided by holding on to a bare or polished metal part of the car while getting out. Care of leather The leather* used by BMW is a natural product of the highest quality, proc- essed by the very latest methods, and will remain in good condition for many years if correctly treated. Since this is an authentic natural prod- uct, its special characteristics and how it is used and looked after must be given due consideration. Regular cleaning and care are needed, since dust and dirt, for instance from the roads, collect in pores and creases, cause severe abrasion and can lead to the leather surface becoming prema- turely brittle. You are therefore recom- mended to remove dust from the leather at regular intervals with a cloth or vacuum cleaner. For cleaning, please use BMW leather cleaning foam. Owing to the fact that dirt and grease can, over time, permeate the protective coating on the leather, cleaned leather surfaces must be treated with a BMW leather care product. This also helps to prevent a static electrical charge from building up. Online Edition for Part-No. 01 41 9 791 301 - © 01/99 BMW AG
  • 170.
    169n MinorrepairsKeywordsOverviewControlsMaintenanceTechnicalData Care of thecar To protect it against moisture and damp, the leather can be treated with BMW impregnating agent. This treatment is recommended every six months, assuming normal use of the car. If any liquids are spilled, wipe them off immediately. Dab grease or oil stains carefully with stain remover. If exposed to strong sunlight when the car is parked for a lengthy period, leather seats should be covered or the windows blanked off to prevent fading. Cleaning and care products can be obtained from BMW Service.< Cleaning agents can contain haz- ardous substances or constitute a health risk. Always comply with the warning and hazard avoidance instruc- tions on the pack. When cleaning the interior of the car, leave the doors or windows open. Never use any solvents or other sub- stances not specifically intended for cleaning the car.< Online Edition for Part-No. 01 41 9 791 301 - © 01/99 BMW AG
  • 171.
    170nAirbags Laying upout of use 1 Front airbags for the driver and pas- senger 2 Head airbags (at front) 3 Side airbags (front and rear seats*) Important safety instructions Do not remove the airbag gas generators. Have testing and as- sembly work performed only by spe- cially trained personnel. If the airbag occupant restraint system develops a fault, is shut down out of use or has been triggered off in an accident, have it repaired or dismantled only by BMW Service. Never make any modifications to the in- dividual components of the system or its wiring. This includes the upholstered covers on the steering wheel, dash- 380de647 board, side panels on front and rear doors and roof struts as well as down the sides of the roof liners. Do not apply adhesive or any surface material to these covers or modify or process them in any other way. Do not remove the steering wheel. In order to comply with valid safety regulations, have airbag generators scrapped only by BMW Service. Any careless or unskilled interference with the system could lead to its failure or to accidental triggering off with the risk of injury.< Please ask BMW Service what precau- tions are necessary if the car is to be laid up out of use for more than three months. Online Edition for Part-No. 01 41 9 791 301 - © 01/99 BMW AG
  • 172.
    171n MinorrepairsKeywordsOverviewControlsMaintenanceTechnicalData When entering anothercountry involves a switch to driving on the other side of the road: Cars with xenon headlamps, right- hand-drive cars: 1 Remove the plugs above the head- lamps 2 For driving on the left: slide lever to- wards centre of car For driving on the right: slide lever to- wards outside of car Left-hand-drive cars without xenon headlamps: Please contact BMW Service or, to avoid dazzle from the headlamps, have BMW Service carry out the necessary modification. 390de143 Cars are always supplied to conform with the registration laws of the country in which they are intended for use. If the owner moves to another country, it is important to check beforehand that import regulations and vehicle licensing laws do not make it too difficult to im- port the car. You can obtain this information in Ger- many by calling Tel. 089/382-0 and stating the model, the vehicle identifica- tion number and the date first regis- tered. In other countries, please contact BMW Service or the importer. Rule of the road Registration abroad Online Edition for Part-No. 01 41 9 791 301 - © 01/99 BMW AG
  • 173.
    172nTechnical modifications OBDsocket Any BMW Service will gladly advise you concerning the value of proposed tech- nical modifications to your car, the legal requirements and the manufacturer's recommendations. Enquiries should be accompanied by the vehicle identifica- tion number and, if relevant, the engine number. Light-emitting diodes (LED) Controls, displays and other equipment items inside your car have light-emitting diodes (LEDs) behind a cover as their light source. These LEDs resemble con- ventional lasers and are classified by law as "Class 1 light-emitting diodes". Do not remove the cover or ex- pose the eyes directly to the unfil- tered light source for several hours at a time, as this could cause irritation to the iris.< Access to socket for On-Board Diagno- sis (OBD): Lift the cover on the top of the compart- ment next to the steering column (arrow). Components which have a decisive effect on exhaust emissions can be tested at this interface with a suitable device. 390de346 Online Edition for Part-No. 01 41 9 791 301 - © 01/99 BMW AG
  • 174.
    173n MinorrepairsKeywordsOverviewControlsMaintenanceTechnicalData In many countries,BMW Service col- lects residual materials during mainte- nance and repair work according to specific categories, for example: > old oil > oil filters > antifreeze > brake fluid > batteries > tyres > air cleaner elements > airbags > windscreens and rear windows BMW organises, pays for and super- vises the removal and disposal of these substances and has drawn up handling principles far in excess of anything cur- rently called for by law. When your car reaches the end of its useful life, the fact that it is largely suit- able for recycling will avoid unneces- sary expense for you and undue burden on the environment. Easily removable components and assemblies containing re-usable materials wherever possible increase the value of a scrapped vehi- cle. BMW cooperates with selected, li- censed disposal and recycling compa- nies in its various countries; these ac- cept your vehicle at the end of its useful life and recycle or dispose of it and its component parts according to the prin- ciples laid down by BMW. Your BMW Service station will gladly advise you on returning the car for disposal as and when it has to be withdrawn from use.< Recycling in the Service areaReturning the car Online Edition for Part-No. 01 41 9 791 301 - © 01/99 BMW AG
  • 175.
    174n Online Edition forPart-No. 01 41 9 791 301 - © 01/99 BMW AG
  • 176.
    Initial overview Controls indetail Operation, maintenance and general care Minor repairs Technical data Index Technical items of interest 175n MinorrepairsKeywordsOverviewControlsMaintenanceTechnicalData Replacing parts: Toolkit 176 Wiper blades 176 Lights and bulbs 177 Radio remote control 183 Auxiliar heater remote control 185 Wheel-changing 186 Lockable wheel studs 189 Battery 190 Fuses 192 If an electrical fault occurs: Fuel filler flap 194 Sliding/tilting sunroof 194 touring: Tailgate 195 Mutual aid: BMW Emergency Service 196 Starting with a flat battery 196 Tow-starting, towing away 197 Fire extinguisher 199 Online Edition for Part-No. 01 41 9 791 301 - © 01/99 BMW AG
  • 177.
    176n The toolkit islocated in the luggage compartment lid/tailgate. To open, undo the wing bolt(s). 394de080 Front 1 Raise the wiper arm slightly and hold it firmly 2 Move the sliding safety catch (arrow) and take off the wiper blade towards the windscreen 3 Attach the new wiper blade and slide the safety catch back.390de097 Rear* 1 Hold the wiper blade against the glass and pull the wiper arm off/un- clip it (arrow) at the outer pivot 2 Offer up the new wiper blade and press it against the wiper arm (clip into position). Use only BMW-approved wiper blades.< 392de173 Toolkit Wiper blades Online Edition for Part-No. 01 41 9 791 301 - © 01/99 BMW AG
  • 178.
    177n MinorrepairsKeywordsOverviewControlsMaintenanceTechnicalData Lights and bulbs Bulbsand lights are crucial safety fea- tures of your car. Appropriate care and attention should therefore be taken when handling these components. If you are unfamiliar with such tasks, it is better to entrust them to BMW Service. Do not touch the glass of a new bulb with the fingers, because even slight amounts of dirt or grease will then be burned into the bulb and re- duce its working life. Use a clean tissue, cloth or similar, or hold the bulb by its base.< A box containing spare bulbs is availa- ble from BMW Service. Before any work is done on the electrical system, switch off the affected consumer equipment or dis- connect the negative terminal from the battery, to prevent any risk of short-cir- cuits occurring. Observe any instructions supplied by the bulb manufacturer, to avoid causing injury or damage when changing bulbs.< 1 Low-beam headlamps H7 bulb, 55 Watt Right-hand-drive cars: HB4 bulb The H7 bulb is pressurised, so wear goggles and gloves. There is otherwise a risk of physical injury if the bulb should be damaged.< 1 Turn the bulb holder to the left (arrow) and take it off 2 Pull out the bulb and change it. 2 High-beam headlamps HB3 bulb, 60 Watt 1 Turn the bulb holder to the left and take it off 2 Detach the cable connector 390de098 3 Attach new bulb holder with bulb to plug connector – making sure that it engages correctly 4 Install in the opposite order of work. Please note when cleaning the headlamps: > Do not rub them when dry or use caustic or abrasive cleaning agents > Soak dirt or other deposits (e.g. dead insects) with BMW Shampoo and wash down with plenty of water > Use a de-icer spray to remove ice de- posits – not a scraper or other hard tool.< Online Edition for Part-No. 01 41 9 791 301 - © 01/99 BMW AG
  • 179.
    178nLights and bulbs Xenonheadlamps* The operating life of these light units is extremely long and the likelihood of fail- ure very low, provided that they are not switched on and off a very great number of times. If a Xenon headlamp should nonetheless fail, switch on the fog lights and continue the journey with great care, provided that local legisla- tion does not prohibit this. In view of the high voltages that are present, work on the entire lighting system should only be carried out by skilled personnel, to avoid the risk of possibly fatal injury.< Side and parking lights 5 Watt bulb 1 Turn the bulb holder to the left (arrow) and take it off 2 Pull out the bulb and change it. 390de099 Front flashing turn indicator 21 Watt bulb 1 Press bulb holder together at the lugs (arrows) and remove to the rear 2 Press the bulb in slightly, turn to the left and remove 3 After changing the bulb, insert the bulb holder (note correct position of lugs) and engage. 390de100 Online Edition for Part-No. 01 41 9 791 301 - © 01/99 BMW AG
  • 180.
    179n MinorrepairsKeywordsOverviewControlsMaintenanceTechnicalData Lights and bulbs Sideturn indicator repeater* 5 Watt bulb 1 Press the light forwards with the fin- gertip at its rear edge (arrow) and take it out 2 Press the bulb in slightly, turn to the left and remove. 390de106 Fog lights H7 bulb, 55 Watt The bulb is pressurised, so protect the eyes and wear gloves. There is otherwise a risk of physical injury if the bulb should be damaged.< 1 Pull the cover next to the fog light for- wards and remove it 2 Take out the two screws (arrows) and swing the fog light out 3 Release the spring on the back of the fog light and turn the cap to the left 4 Disconnect the wire spring clip and renew the bulb after pulling off the contact cap. 390de101 Rear lights – saloon Rear lights: 5 Watt bulbs Other lights: 21 Watt 1 Flashing turn indicators yellow 2 Rear lights, rear fog lights red 3 Rear fog lights red 4 Reversing lights white 5 Brake lights red If both bulbs fail in the rear lights, the brake lights take on the func- tion of the rear lights.< 394de102 Online Edition for Part-No. 01 41 9 791 301 - © 01/99 BMW AG
  • 181.
    180nLights and bulbs 1Fold down the side trim in the lug- gage compartment, using the handle at the top 2 Turn the quick-release bulb holder to the left (arrow) and take it off 3 Press the bulb in slightly, turn to the left and remove. 394de103 Rear lights – touring Rear lights: 5 Watt bulbs Other lights: 21 Watt 1 Flashing turn indicators yellow 2 Rear lights red 3 Rear fog lights red 4 Reversing lights white 5 Brake light, reflector red If both bulbs fail in the rear lights, the brake lights take on the func- tion of the rear lights.< 392de104 Lights in rear panel: 1 Open the flap in the side panel trim 2 Turn the quick-release fastener and take off the trim in front of the bulb holder 3 Turn the quick-release fastener (arrow) and take off the bulb holder 4 Press the bulb in slightly, turn to the left and remove. If a sub-woofer loudspeaker* is in- stalled behind the right-hand flap, re- lease the toggle screw and swing the sub-woofer to one side. 392de170 Online Edition for Part-No. 01 41 9 791 301 - © 01/99 BMW AG
  • 182.
    181n MinorrepairsKeywordsOverviewControlsMaintenanceTechnicalData Lights and bulbs Lightsin tailgate: 1 Open the trim in the tailgate 2 Turn the quick-release fastener (arrow) and take off the bulb holder 3 Press the bulb in slightly, turn to the left and remove. 392de171 Central brake light* 21 Watt bulb 1 Open the luggage compartment lid 2 Use a screwdriver to unclip the cover on the underside of the rear window shelf (arrow) 3 Turn the bulb holder to the left and take it off 4 Press the bulb in slightly, turn to the left and remove. touring: LED strip light in tailgate. 394de123 Licence plate lights 5 Watt bulb 1 Insert screwdriver into slot and press to the right (arrow); this will release the light 2 Take out the light and change the bulb. 394de105 Online Edition for Part-No. 01 41 9 791 301 - © 01/99 BMW AG
  • 183.
    182nLights and bulbs Interiorlights Front Interior light (10 Watt bulb) with reading lights (10 Watt bulbs) 1 Interior light: Press the light out to the side with a screwdriver and take off the cover. Pull the bulb out of its con- tact tabs 2 Reading light: press the bulb in slightly, turn to the left and remove. Indirect lighting 1 Watt bulb 1 Unclip the bulb holder 2 Take out the bulb. Rear – saloon Interior light (10 Watt bulb) with reading lights (5 Watt bulbs) 1 Insert a screwdriver at the top and press the light out of the cutouts 2 Interior light: press the lug back at the reflector and change the bulb 3 Reading light: press the bulb in slightly, turn to the left and remove. Rear – touring Interior light: 5 Watt bulbs 1 Press the light out from the top with a screwdriver 2 Take off the glass 3 Change the bulb. Interior light (10 Watt bulb) with reading lights (6 Watt bulbs) 1 Press the light out at the side next to the switch with a screwdriver 2 Take off the glass 3 Change the bulb. Footwell lights 5 Watt bulb 1 Lever the cover out at one side with a screwdriver 2 Change the bulb. Glove box light 5 Watt bulb 1 Press light out of recess with a screwdriver 2 Take off the reflector 3 Change the bulb. Luggage compartment lights Light on underside of rear window shelf: Halogen bulb, 10 Watt. Light in the luggage compartment lid: 10 Watt bulb. 1 Press light out of recess with a screwdriver 2 Take off the reflector 3 Change the bulb. Load-area lights Light on roof lining: 10 Watt bulbs. 1 Press the glass out at the side with a screwdriver 2 Change the bulb. Light at end of tailgate: 10 Watt bulb 1 Press the light out at the upper edge with a screwdriver 2 Take off the reflector 3 Change the bulb. Online Edition for Part-No. 01 41 9 791 301 - © 01/99 BMW AG
  • 184.
    183n MinorrepairsKeywordsOverviewControlsMaintenanceTechnicalData Radio remote control Changingthe battery Renew the battery when the Check Control displays "REMOTE KEY BATTERY". The LED no longer lights up when a button is pressed, and the re- mote control will not perform the lock- ing action. Use only one battery of the type stated in the battery compartment (CR 2016), and make quite sure that it is installed in the correct position. 1 Using a screwdriver, lift the cover out at the recess (arrow) 365de017 2 Remove the two screws (arrows) and take off the cover. The battery type and correct installed position are marked on the base of the battery compartment. Dispose of old batteries only to an authorised collecting point or re- turn them to BMW Service.<365de018 Online Edition for Part-No. 01 41 9 791 301 - © 01/99 BMW AG
  • 185.
    184nRadio remote control Newtransmitter If you begin to operate a new remote control (a replacement or an additional transmitter), it must first be initialised: 1 Enter the car and close the doors 2 Insert the ignition key into the steer- ing lock, turn briefly to position 1 (max. 5 seconds) then back to 0; re- move the key 3 Press button 1 (see picture) and hold it in. Press button 2 three times in rapid succession (within 10 seconds) without releasing button 1 4 Release button 1. LED 3 will flash slowly for a maximum of 10 seconds 5 The central locking system indicates that initialisation has been performed successfully by closing and releasing the locks in rapid succession. 380de014 If the LED does not flash and the central locking system does not operate, the initialising procedure must be repeated. If you use further remote control trans- mitters for this car, all of them (up to four) must be re-initialized within 30 seconds each. Repeat steps 3 and 4 above for each of the transmitters. The central locking will confirm each initial- ising operation as described in step 5. In the event of faults, contact BMW Service, which can also supply replace- ment transmitters. Prevent unauthorised use of the transmitter, for example by hand- ing over only door and ignition key 3 or the spare key (see page 34) to hotel staff.< Online Edition for Part-No. 01 41 9 791 301 - © 01/99 BMW AG
  • 186.
    185n MinorrepairsKeywordsOverviewControlsMaintenanceTechnicalData Remote control forauxiliary heater* Changing the batteries Renew the batteries if the telltale lamp no longer flashes when the auxiliary heater is switched on. 1 Pull open cover 1 for battery com- partment 2 Insert two batteries of the same type as before (LR 1). Battery type and installed position are marked on the base of the battery compartment 3 Press the cover back into position. Dispose of old batteries only to an authorised collecting point or re- turn them to BMW Service.< 390de156 New transmitter If you begin to use a new transmitter (a replacement or additional transmitter), it must first be initialised. Either one or two transmitters can be used. Observe the times stated below accurately, otherwise initialising will fail and have to be repeated.< 1 Remove the fuse for the auxiliary heater (in luggage compartment or load area on right, see page 193) and insert it again after 10 seconds 2 Within 3 seconds of having inserted the fuse again, press button 3 3 Next, press button 4 within 5 seconds 4 After a further 3 seconds, the system is operational. Online Edition for Part-No. 01 41 9 791 301 - © 01/99 BMW AG
  • 187.
    186nWheel-changing Safety precautions inthe event of a puncture or tyre failure: Halt the car as far away from the main traffic flow as possible, on a firm sur- face; switch on the hazard warning flashers. Engage the steering lock in the straight- ahead position, apply the handbrake and select first or reverse gear or selec- tor lever position P. All occupants must leave the car and be led to a point where they are not ex- posed to risk, for example behind a crash barrier at the side of the road. If necessary, set up the warning triangle or a flashing warning light at a sufficient distance to the rear. Comply with rele- vant local laws. Only change wheels on flat, firm and non-slip surface. On a soft or low-grip surface (snow, ice, tiles or similar) there is a risk of the car or the jack sliding sideways. Position the car's jack on a firm surface. Never place wood blocks or similar un- der the jack, or the maximum lifting ca- pacity may be exceeded. When the car has been jacked up, do not lie under it or start the engine, as this could lead to a potentially fatal accident.< What you need To avoid rattling noises later, please make a note of the positions of the tools when they are removed, and re-attach them in the same positions later. > Jack Saloon: fold back the floor mat in the luggage compartment and loosen the wing nut (arrow). touring: raise the floor panel and the spare wheel cover (see page 119). After using the jack, retract it fully, swing the crank handle back in and clip it securely > Wheel chock Next to the jack. Unscrew the wing nut to remove it 394de090 Online Edition for Part-No. 01 41 9 791 301 - © 01/99 BMW AG
  • 188.
    187n MinorrepairsKeywordsOverviewControlsMaintenanceTechnicalData Wheel-changing > Spare wheeland adapter* for re- moval of hub cap* (see next column) Both are kept next to the jack. Take off the adapter or the plastic cap. Un- screw the wing nut (arrow) by hand and take out the wheel > Wheel stud wrench and screwdriver In the car's toolkit under the luggage compartment lid (see page 176). touring: the wheel stud wrench is next to the spare wheel. 394de091 Procedure 1 Note the safety precautions on the previous page 2 Prevent the car from rolling away: place the wheel chock behind the front wheel on the side opposite to where the wheel is to be removed (or in front of the front wheel on a downhill gradient). If the car cannot be moved to a point on a less se- vere gradient, you must protect it reliably against rolling away 3 If full-width wheel covers are in- stalled*: insert the fingers into the vent holes and pull the cover off 4 Version with adapter*: Place the adapter on the wheel stud cover, at- tach the wheel stud wrench and press to the left (see illustration) 380de092 5 If hub covers are fitted*: lever the cover off by inserting a screwdriver into the slot. For thiefproof wheel studs, see page 189 6 Slacken off the wheel studs by a 1/2 turn 7 Attach the jack to the nearest mounting point to the wheel which it is intended to remove; the full sur- face area of the base of the jack should make contact with the ground, and the jack head should enter the rectangular recess of the mounting point (see picture detail) as the jack is raised 8 Continue to turn the crank handle until the wheel you wish to change is lifted clear of the ground 9 Take out the wheel studs and re- move the wheel 390de350 Online Edition for Part-No. 01 41 9 791 301 - © 01/99 BMW AG
  • 189.
    188nWheel-changing 10 Remove heavydirt deposits from the wheel and hub contact faces and clean the wheel studs 11 Offer up the new wheel and secure it with at least two studs inserted on opposite sides of the hub 12 Insert and screw up the remaining wheel studs, then tighten them all firmly, working across the hub rather than round it 13 Lower the car and remove the jack 14 Tighten the studs alternately on op- posite sides of the hub 15 With full-width wheel covers: place the cover in position so that the valve cutout is aligned with the tyre valve, then press the cover on to the wheel with both hands 390de360 For this lightweight wheel, use only the special full-width cover supplied with the car, otherwise the cover may not be held firmly.< 16 With hub cap: offer up the cap and press into position 17 On wheels with a wheel stud cover (hub cap): align the arrow on the cover with the line on the wheel, then press the cover on 18 Correct the tyre pressure at the ear- liest opportunity. Use the jack only for wheel chang- ing. Do not attempt to raise an- other type of vehicle or any other load with this jack; this could result in injury or damage. For safety reasons, have the wheel stud tightening torque checked without de- lay, using a suitable calibrated torque wrench (correct tightening torque = 100 Nm).< When replacing a wheel in the spare wheel well, make sure that the central threaded rod in the well is not bent or damaged. If the car is fitted with alloy wheels not of the Original BMW type, note that dif- ferent wheel studs may be needed. Have a flat tyre repaired as soon as possible, and the wheel and tyre rebal- anced before fitting. For the lightweight wheel, use only BMW approved balance weights for alloy wheels. Do not at- tempt to use hammer-on steel balance weights on these wheels.< Online Edition for Part-No. 01 41 9 791 301 - © 01/99 BMW AG
  • 190.
    189n MinorrepairsKeywordsOverviewControlsMaintenanceTechnicalData Wheel-changing Thiefproof wheelstuds* Tyre size 255/40 R 17 94W* on the rear wheels: In the event of a puncture or similar, it may be necessary to fit the spare wheel and tyre (of different size) at the rear. The car's spare wheel and tyre are of full capacity in all load and speed ranges. In such cases, fit a wheel and tyre of the correct size as soon as pos- sible.< 1 Cap (not needed for wheels with wheel stud cover or hub cap) 2 Wheel stud for adapter 3 Adapter (in toolkit, next to spare wheel in the touring) To remove: 1 Turn cap 1 slightly to the left with the wheel stud wrench, and take it off 2 Take adapter 3 out of the toolkit and insert it into the wheel stud 3 Unscrew wheel stud 2. After inserting and tightening the wheel stud again, remove the adapter and press on the stud cap. The cap is located correctly if the M of the BMW badge is over a raised section on the wheel stud when pressed on.< 360de094 The code number is embossed on the front of the adapter. Please make a careful note of this number and keep it in a safe place, in case the adapter is lost. Online Edition for Part-No. 01 41 9 791 301 - © 01/99 BMW AG
  • 191.
    190nBattery Location The battery isbehind the right-hand side trim in the luggage compartment/ load area. Swing the trim panel down by pulling the handle at the top; on the touring, press the button. If, on the touring, a sub-woofer loud- speaker* is installed, release the toggle screw and swing the sub-woofer to one side. 394de305 Symbols Your car's battery is marked with the following symbols. For your own safety, check the meaning of these symbols before handling or working on the bat- tery. Before handling or working on the battery, please note the fol- lowing precautions. Always wear eye protection. Do not allow any particles con- taining acid or lead to enter the eyes, or to make contact with skin or clothing. Battery acid is highly caustic. Al- ways wear protective gloves and goggles. Do not tilt battery: acid could then escape from breather vents. Keep the acid and the battery out of the reach of children. Naked flames and sparks must be avoided; smoking is prohib- ited. Avoid sparks when working on wiring and electrical equipment. The ignition key must be in position 0 when disconnecting or reconnecting the bat- tery. Never short-circuit the battery ter- minals, or a powerful spark could result and cause injury. A highly explosive detonating gas is generated when the bat- tery is charged. If acid comes into contact with the eyes, rinse immediately with clean water for several minutes. Then immediately seek medical assist- ance. Neutralize acid spillage on the skin or clothes immediately with soap and rinse off with plenty of water. If acid has been swallowed, consult a physi- cian immediately. To protect the housing from ultra-violet rays, do not expose battery to direct sunlight. As batteries which have run flat could freeze, store in a place where there is no risk of frost damage. Maintenance The battery is entirely maintenance-free in accordance with German Industrial Standard DIN 43 539/2, that is to say one acid filling is sufficient for the whole operating life of the battery. Online Edition for Part-No. 01 41 9 791 301 - © 01/99 BMW AG
  • 192.
    191n MinorrepairsKeywordsOverviewControlsMaintenanceTechnicalData Battery State of charge The"Magic Eye" (hydrometer, in prepa- ration) can be used to read off the state of battery charge: > green: adequate charge > black: state of charge is too low. The battery needs to be recharged. Please contact BMW Service and ar- range for this to be done > yellow: the battery must be replaced. The battery will not achieve its full operating life unless it is kept ade- quately charged. Have the state of charge checked more frequently if the car is mainly used for short journeys.< 394de368 Removing and installing Do not disconnect battery leads while the engine is running, other- wise excess current will destroy the ve- hicle electronics unit. Do not make any modifications to the leads at the positive terminal, since this could render the protective function of the safety battery terminal ineffective. Repairs and disposal should only be undertaken by properly trained person- nel.< When removing the battery, first dis- connect the lead at the negative termi- nal, then the lead at the positive termi- nal. Dismantle the battery retaining bracket (1) and unfasten the screw con- nection on the battery (2). 394de306 When installing the battery, connect the lead to its positive terminal first, then the lead to its negative terminal. During installation, check that the battery is correctly mounted and fit the protective hoop, otherwise the battery will not be secure enough in the event of an accident.< Recharging the battery Recharge the battery only with the en- gine stopped, or remove it from the car. Before undertaking any work on the car's electrical system, dis- connect the lead from the negative ter- minal of the battery in order to avoid the risk of short-circuits and fire or injury.< If the car is laid up out of use for more than 4 weeks, disconnect the negative lead from the battery in order to sepa- rate it from the car's electrical system. If the car is not to be used for more than six weeks, remove the battery, recharge it and store it in a cool place where is no risk of frost damage. After 6 months at the latest, and always before the bat- tery is installed again, it must be re- charged to prevent it from becoming Online Edition for Part-No. 01 41 9 791 301 - © 01/99 BMW AG
  • 193.
    192nBattery Fuses useless. Everytime a battery is allowed to run flat, particularly if left in this state for some time, its operating life is re- duced. Dispose of old batteries only to an authorised collecting point or re- turn them to BMW Service. Batteries filled with acid should be transported and stored upright. Protect batteries against falling over when in transit.< Periods of time in which the car's battery is disconnected are not counted by the Service Interval indica- tor when the brake fluid renewal warn- ing is given. In such cases you must ensure that the brake fluid is renewed every two years regardless of the display.< If an electrical consumer fails, switch it off and check its fuse. In glove box 1 Open the glove box and turn the two white quick-release fasteners to the left. The fuse strip also contains spare fuses and plastic tweezers for changing the fuses 2 Pull the fuse for the failed electrical consumer out of its holder with the tweezers 3 A blown fuse – identifiable by the melted wire must be replaced by an- other of the same colour and ampere rating. A list of fuses with ampere ratings and consumers is located under the fuse strip. 390de085 Close the fuse strip by pressing on the lid at the top and turning the two quick- release fasteners to the right. There are additional fuses in the lug- gage compartment/load area (see next page). On cars equipped for towing a trailer* there are additional fuses for the trailer lights in the trailer module, which is be- hind the right trim panel in the luggage compartment. The fuse for the permanent positive line is above the battery in a separate fuse box. If a fault develops, have this fuse changed by BMW Service. Do not repair burnt out fuses or replace them with fuses with dif- ferent colours or ampere ratings other- wise overloaded electrical wires can cause a fire in the vehicle.< If the fuse burns out several times, have the cause of the fault rectified by BMW Service. Online Edition for Part-No. 01 41 9 791 301 - © 01/99 BMW AG
  • 194.
    193n MinorrepairsKeywordsOverviewControlsMaintenanceTechnicalData Fuses In luggage compartment Foldthe right side trim down with the handle provided. The list of fuses with ratings in amperes and equipment connections is on the back of the side trim. 394de124 In the load area Press the button on the right-hand flap to open it, and pull the trim to one side. There is a list of fuses with current rat- ings and attached consumers on the back of the flap. If a sub-woofer loudspeaker* is in- stalled behind the right-hand flap, re- lease the toggle screw and swing the sub-woofer to one side. 392de172 Online Edition for Part-No. 01 41 9 791 301 - © 01/99 BMW AG
  • 195.
    194n Manual release –saloon 1 Swing the right side trim in the lug- gage compartment down by means of the handle at the top 2 Pull the button with the fuel pump symbol (arrow). 394de095 Manual release – touring 1 Open the right-hand flap in the load area by pressing the button, and swing it down 2 Pull the button with the fuel pump symbol (arrow). If a sub-woofer loudspeaker* is in- stalled behind the right-hand flap, re- lease the toggle screw and swing the sub-woofer to one side. 392de157 Operate manually 1 Take out the interior lamp (see page 182), reach into the aperture and press out the cover 2 Remove the plug (arrow) and turn the sunroof panel in the desired direction with the Allen key from the car's toolkit (see page 176). 380de096 Fuel filler flap Sliding/tilting sunroof* Online Edition for Part-No. 01 41 9 791 301 - © 01/99 BMW AG
  • 196.
    195n MinorrepairsKeywordsOverviewControlsMaintenanceTechnicalData Tailgate Manual release –touring If an electrical defect occurs, you can operate the tailgate manually. 1 Working from the load area, open and take out the two side flaps (arrow) 392de166 2 In the tailgate, open the two quick-re- lease fasteners for the toolkit cover and raise the cover 3 Take out the plastic plug (arrow) and pull towards the interior of the car to release the tailgate 4 Open the tailgate, press the plug back in and close the cover at the quick-release fasteners 5 Insert and close the two side flaps. 392de301 Online Edition for Part-No. 01 41 9 791 301 - © 01/99 BMW AG
  • 197.
    196n The BMW EmergencyService is there to assist you, even in the evenings, at weekends and on public holidays. If you have a breakdown, just call the BMW Emergency Service control centre for the country in which you are situ- ated. Telephone numbers are shown at the end of the list of BMW European Service points. If you cannot obtain the assistance you require (e.g. because of difficulties in obtaining a telephone connection or communicating in the local language), please call the BMW Emergency Serv- ice in Munich, Germany: National dialling code for Germany (usually 0049) 89 - 260 99 09. There is a list of national dialling codes at the end of the list of BMW European Service points. Do not use the spray products sold as starting aids. If the car's own battery is flat, the en- gine can be started by using two jumper cables from another vehicle's battery. Use only cables with fully insulated bat- tery post clips, e.g. to German DIN 72551 standard or equivalent. Do not touch any electrically live parts when the engine is running or a fatal accident may occur.< Do not depart from the procedure de- scribed below, or else personal injury could result or one or both vehicles be damaged. 1 Check that the other vehicle's battery has a voltage of 12 V and approxi- mately the same capacity in Amp/h (this should be printed on the battery) 2 Do not disconnect the flat battery from the car's electrical system 3 The two vehicles' bodies must not touch – risk of short-circuit 4 Use one jumper lead to connect the positive terminal of the other battery to the jump-starting connection in your car's engine compartment. The cap over this connection is marked Batt. + (see illustration). Pull the cap up to remove it. This Figure illus- trates, by way of example, the jump start point on the BMW 520i, 523i and 528i. For other models, see de- scription of engine compartment, starting on page 150 5 Connect the negative terminals of the two batteries as follows: Make the first connection to the negative termi- nal of the donor battery or to earth (ground) on the engine or body of the donor vehicle, and then to earth (ground) on the vehicle which you wish to start. On your BMW a special 390de145 BMW Emergency Service Starting with a flat battery Online Edition for Part-No. 01 41 9 791 301 - © 01/99 BMW AG
  • 198.
    197n MinorrepairsKeywordsOverviewControlsMaintenanceTechnicalData Starting with aflat battery Tow-starting,towing away nut is provided for this purpose on the suspension strut housing; see arrow in illustration Connect the jumper leads in the correct order when you are assist- ing the driver of another vehicle as well, so that no sparks occur at the battery and possibly cause injury.< 6 If the donor vehicle's battery is not strongly charged, run its engine 7 Start the engine of the affected vehi- cle in the usual way, and allow it to run as well as the other vehicle's en- gine. If an initial attempt to start the engine fails, wait several minutes until the flat battery has been recharged to a slightly greater degree 390de146 8 Before disconnecting the jumper leads from your BMW, switch on the lights, heated rear window and maxi- mum heater blower speed and then keep the engine running for at least 10 seconds, in order to avoid voltage peaks reaching the electrical con- sumers from the voltage regulator 9 Disconnect the jumper leads in the opposite order from that in which they were originally attached. Have the battery recharged (depending on the cause of the fault). Towing eye The screw-in towing eye is kept in the car's toolkit (on the touring, next to the spare wheel) and should always be car- ried on the car. It can be screwed in at the front or the rear of the car, and is only to be used for towing on a firm road surface. Access to threaded hole Front: Press the arrow symbol on the cover and swing it out to remove. 390de087 Online Edition for Part-No. 01 41 9 791 301 - © 01/99 BMW AG
  • 199.
    198nTow-starting, towing away Rear: Pressthe arrow symbol on the cover and swing it out to remove. Screw the towing eye in fully to avoid the risk of its thread being damaged. Never tow the car or lash it down at any of the suspension elements, as this could cause damage and lead to acci- dents occurring later.< For towing, either use a towbar or a ny- lon rope or tape to help avoid sudden tensile loads. 394de088 Using a towbar The towing eyes of both vehicles should be on the same side. If it is impossible to avoid attaching the towbar at an angle, note the following: > Towbar clearance may be restricted when cornering > The angled towbar generates lateral forces which could be critical if the road surface is slippery > To compensate for the angled tow- bar, the towed and towing vehicles may have to be offset in relation to one another > there is a risk of skidding to one side when the towing vehicle's brakes are applied. Do not tow a vehicle heavier than your own, as there is otherwise a risk of losing control.< Tow-starting Cars with catalytic converter should only be tow-started if the engine is cold. It is always preferable to use jumper leads. 1 Switch on the hazard warning flashers (comply with local regulations) 2 Turn the ignition key to position 2 3 Select 3rd gear 4 Keep the clutch pedal down. When the car is moving, gradually release the clutch pedal. After the engine has fired and is running, depress the clutch pedal again 5 Switch off the hazard warning flash- ers. Have the cause of starting problems traced and rectified by BMW Service. Automatic-transmission cars: These cars cannot be tow-started. Starting with jumper leads: see page 196. Online Edition for Part-No. 01 41 9 791 301 - © 01/99 BMW AG
  • 200.
    199n MinorrepairsKeywordsOverviewControlsMaintenanceTechnicalData Tow-starting, towing awayFire extinguisher* Towing away 1 Ignition key in setting 1 to enable brake lights, headlamp flashers, horn and windscreen wipers to be acti- vated 2 Switch on the hazard warning flash- ers. (comply with local regulations). If the car's electrical system has failed, the car must be rendered identifiable to following vehicles, for instance by plac- ing a notice or the warning triangle in the rear window. Make sure that the ignition key is turned to position 1 even if the electrical system has failed; this is to ensure that the steering lock cannot en- gage and prevent the car from being steered. When the engine is not running, there is no power assistance and the brake servo is out of action. The steering and brakes will require extra effort to oper- ate.< Automatic-transmission cars: 1 Set the selector lever to N 2 Maximum towing speed: 70 km/h (approx. 43 mph) 3 Maximum towing distance: 150 km (approx. 93 miles). Holder* on driver's seat, or on front passenger's seat unless this space is occupied by a first aid box. To ensure that the fire extinguisher re- mains operational, have it checked every two years by its manufacturer's authorised after-sales service organisa- tion. If these service points are not listed on the extinguisher or in any documenta- tion available to you, please consult a local trade directory or the "yellow pages" of the telephone service to ob- tain the address. Online Edition for Part-No. 01 41 9 791 301 - © 01/99 BMW AG
  • 201.
    200n Online Edition forPart-No. 01 41 9 791 301 - © 01/99 BMW AG
  • 202.
    Initial overview Controls indetail Operation, maintenance and general care Minor repairs Technical data Index Technical items of interest 201n MinorrepairsKeywordsOverviewControlsMaintenanceTechnicalData Adaptive transmission control (AGS) 202 Airbags 203 Automatic Stability Control plus Traction (ASC+T)/Dynamic Stability Control (DSC) 203 Car radio 204 Seat belt catch tensioner 204 Hi-fi system (DSP) 205 Interior mirror, automatic- dip 205 Integral-link rear suspension 206 Latent heat store 206 Self-levelling suspension 207 Rain sensor 207 Tyre Pressure Control (RDC) 208 Xenon headlamps 208 Water- and dirt-repellent windscreen 209 Online Edition for Part-No. 01 41 9 791 301 - © 01/99 BMW AG
  • 203.
    202n Adaptive transmission control(AGS) evaluates a number of factors before determining the best possible auto- matic transmission shift points. It takes your individual driving style and the ac- tual road and traffic situation into ac- count. AGS identifies driving style from the opening angle and speed of movement of the accelerator pedal, the rate of re- tardation when braking and lateral ac- celeration when cornering. It then se- lects a suitable shift characteristic – which can range all the way from re- laxed travel with the emphasis on re- finement to harder, highly enthusiastic driving. 390de334 In order to take driving conditions into account, AGS registers corners and both uphill and downhill gradients. It suppresses up-shifts, for instance, when cornering fast. On uphill gradients it delays the up-shift until a higher en- gine speed has been reached, in order to make better use of the engine's power reserves. When driving downhill, on the other hand, AGS shifts down more rapidly as the car becomes faster and the driver applies the brakes. AGS* Online Edition for Part-No. 01 41 9 791 301 - © 01/99 BMW AG
  • 204.
    203n MinorrepairsKeywordsOverviewControlsMaintenanceTechnicalData Retardation sensors continuouslymoni- tor the acceleration forces acting on the car. If a frontal impact causes a rate of retardation at which the seat belts alone could not provide sufficient occupant protection, the gas generators for the driver's and front passenger's airbags are ignited in parallel. However, the front passenger's airbag is only triggered off if a further sensor has identified that the seat is occupied. In the event of a side impact, the front and rear* airbags are triggered off as necessary. 390de319 The airbags located under the marked covers are inflated within a few millisec- onds by the gas which is generated, causing them to emerge. When they do so, they split open at the programmed rupture lines down the upholstered cov- ers and force these covers outwards. In view of the very brief system re- sponse time, the noise of propellant ignition and inflation is lost in the gen- eral accident situation. The gas re- quired for filling the airbags is not dan- gerous and escapes after a very short period of time (emerging as smoke). The entire process is over in a fraction of a second. Extremely responsive sensors monitor the speeds of rotation of the road wheels and in the case of DSC also the steering lock angle, lateral acceleration, braking pressure and the car's move- ment round its vertical axis. If differences in the wheel rotating speeds are detected by the system, there is a risk of wheelspin occurring, and the power input is therefore re- duced; in addition, the rear wheel brakes are applied if necessary. If an unstable driving condition is de- tected by DSC, the front brakes may also be applied in order to stabilise the car. The driver may find it difficult initially to grow accustomed to the action of the system. However, it ensures the best possible forward traction and dynamic stability at all times. When the brakes are applied by the system, some noise will be heard. Airbags ASC+T/DSC* Online Edition for Part-No. 01 41 9 791 301 - © 01/99 BMW AG
  • 205.
    204nCar radio Seatbelt catch tensioner The medium wave (MW), long wave (LW) and short wave (SW) bands can be picked up a long way from the transmit- ter, because the signals are broadcast both as ground waves and through the air – reflected by the ionosphere. VHF (FM) reception provides far higher listening quality than any of the AM wavebands. The range of each trans- mitter, however, is low, since the sig- nals are transmitted by line of sight. 360de084 The limitations from which all non-sta- tionary radio receivers suffer are com- pensated for by a variety of ingenious systems: The Radio Data System (RDS) ensures that when a radio station is being broadcast on several frequencies, the set automatically switches to whichever frequency offers the best reception. For aerial diversity, several VHF aerials must be available. An integrated micro- processor automatically selects the aer- ial which provides the best reception of the incoming VHF signal. The change to the best aerial field occurs within a few milliseconds, and is not apparent to the listener. The seat belt catch tensioner ensures that in the event of a collision the seat belt is tautened across the wearer's body and holds it firmly in the seat. Within a fraction of a second, the belt catch is retracted by gas pressure, so that the lap and shoulder straps of the seat belt are both tautened at the same time. This provides further protection against slipping under the lap belt. 390de330 Online Edition for Part-No. 01 41 9 791 301 - © 01/99 BMW AG
  • 206.
    205n MinorrepairsKeywordsOverviewControlsMaintenanceTechnicalData HiFi system (DSP)*Inside mirror, automatic anti-glare* The Professional DSP hi-fi system with top-quality hi-fi amplifier, Digital Sound Processor (DSP) and integrated loud- speakers yields a fascinatingly natural, precise sound quality. The loudspeaker system employs sub-woofers, woofers, mid-range units and dome-pattern tweeters to create a most impressive spatial effect. The loudspeakers are lo- cated in such a way that all the car's occupants have the impression that the sound image comes from the front, as in a concert hall. During the journey, the sound image is automatically modified to take road speed and noise levels into account. 390de109 The automatic-dip interior mirror coun- teracts the glare caused by following vehicles according to its intensity, and restores the original reflecting capacity of the mirror as soon as the offending light source is no longer present. A light sensor facing forwards in the mirror casing measures light intensity in front of the car. There is a second light sen- sor in the mirror glass. An electronic regulating system compares the light intensities at the front and rear. The dif- ference between them generates an electrical voltage which is applied to a gel coating on the mirror glass. 390de113 This gel undergoes a chemical reaction when the voltage reaches it, and dark- ens the mirror steplessly (electrochro- mic principle). The mirror no longer has to be reset manually to avoid being dazzled by fol- lowing vehicles, so that the driver can concentrate fully on the general traffic situation. Online Edition for Part-No. 01 41 9 791 301 - © 01/99 BMW AG
  • 207.
    206nIntegral-linkrearsuspension Latent heatstore* The control arms of the patented inte- gral link rear suspension system, which are made of aluminium, are not pivoted directly to the body. They are resiliently mounted on a sub-frame, which in turn is resiliently attached to the bodyshell. Even the slightest road surface irregu- larities are absorbed by this double re- silient mounting principle. The wheel locating arms of the integral link rear suspension have pivots with a precisely computed degree of elasticity, so that a predetermined self-steering effect is achieved. This enhances driv- ing safety in all situations. The picture shows the saloon's rear axle. The touring's compact, weight- saving rear axle the shock absorbers mounted at an angle from the vertical. 390de114 The latent heat store is capable of re- taining waste heat from the engine for several days, even at very low outside temperatures. When the engine is re- started, this heat is available for imme- diate use, for instance to defrost the windscreen and side windows. The times required for heating the car inte- rior and the time taken by the engine to reach operating temperature are re- duced substantially (arrow). The latent heat accumulator consists of an extremely well-insulated reservoir connected to the engine's cooling sys- tem. 390de115 The principle uses the latent heat re- leased from an environmentally accept- able salt mixture when it changes from a liquid to a solid state. Like the heat which is released when ice melts, the heat from the warm engine is stored by converting the salt mixture into a fluid. If "empty", the latent heat accumulator will be ready for further use after the car has been driven for about 15 minutes. In this way, the latent heat accumulator is able to increase driving safety by im- proving conditions within the car and engine response, but without imposing any burden on the environment. No action on the driver's part is needed, as the device is electronically control- led. Online Edition for Part-No. 01 41 9 791 301 - © 01/99 BMW AG
  • 208.
    207n MinorrepairsKeywordsOverviewControlsMaintenanceTechnicalData Self-levelling suspension* Rainsensor* Self-levelling rear suspension keeps the car's ground clearance constant de- spite load changes. The car is equipped with air spring struts at the rear instead of the conven- tional steel springs and shock absorb- ers. An electronic control unit deter- mines body ride height at any given moment with the help of two sensors, and injects air from a compressor into the air springs if necessary. By increasing air spring pressure in re- sponse to load, the self-levelling sus- pension not only ensures a constant ride height but also a consistently high standard of ride comfort regardless of the load being carried. 390de136 The rain sensor operates the wind- screen wipers when rain is detected on the glass. An infra-red beam is directed against the glass through an optical device, and reflected fully if the windscreen is dry. The amount of reflected light is meas- ured by the device. If there are droplets of water on the windscreen, the amount of light re- flected directly back is reduced, since the infra-red beam can escape at the glass surface. In other words, the pro- portion of reflected light determines the amount of rain striking the windscreen. 390de133 If the intermittent-wipe mode has been selected, the wipers respond immedi- ately, for instance, if the vehicle in front splashes water on to the windscreen. In this way, the rain sensor makes a con- tribution to greater safety as well as more convenient driving. Online Edition for Part-No. 01 41 9 791 301 - © 01/99 BMW AG
  • 209.
    208nTyre pressure control(RDC)* Xenon headlamps* This system performs regular tyre pres- sure checks for you and monitors the pressure of all four tyres, even while you are driving. There is an electronic unit in every wheel, designed to withstand high stresses and strains and to cope with a long service life. It contains a pressure sensor, a transmitter and a battery. Pressure is measured at frequent, regu- lar intervals and the reading transmitted by radio. If there is any irregularity, the transmission rate is increased. 394de304 There are aerials in the body beside each wheel which receive signals from all four wheels. A central electronic control unit evaluates these multiple signals and reports any changes as they appear. RDC makes a significant contribution to road safety. Xenon light greatly increases the illumi- nation of the areas in front of the car and at the side of the road; it is consid- erably brighter and more uniform than conventional halogen headlamps. In the xenon headlamp an electric arc takes the place of the filament, and generates an intensive light source. A mixture of an inert gas and a metallic vapour in a quartz glass sleeve is ig- nited by a high electrical voltage. The resulting arc is maintained by a lower voltage. When the xenon headlamps are switched on, a brief period is needed for the full beam strength to build up. Maximum brightness is achieved after about 15 seconds. 390de134 Online Edition for Part-No. 01 41 9 791 301 - © 01/99 BMW AG
  • 210.
    209n MinorrepairsKeywordsOverviewControlsMaintenanceTechnicalData Xenon headlamps* Water-and dirt-repellent windscreen Xenon light helps the driver to locate the car's position effectively, particu- larly in poor weather and difficult driving conditions for instance at night, in heavy rain or if road works are encoun- tered and the markings on the road sur- face are missing. Cars with xenon headlamps are also equipped with automatic headlamp beam angle control. The road surface is thus illuminated effectively despite changes in the load on the car, and on- coming traffic is not dazzled. See also page 91. Xenon light also makes an important contribution towards road safety by en- abling the driver to see other road users, particularly pedestrians, cyclists and motorcyclists, at the side of the road. This windscreen (in preparation) has a specially smoothed surface to which water droplets do not adhere; as they roll off they take dirt particles with them. Even when new, glass in conventional windows has a rough surface when viewed under a microscope (1). The water- and dirt-repellent windscreen is given an absolutely transparent liquid coating. Depending on how clean the windscreen is, droplets of water blow off at a speed of approx. 60 km/h (approx. 37 mph). The coating, which is absolutely trans- parent,has no adverse effect on the view through the windscreen. 390de337 Other advantages: > A clear view and therefore greater safety when weather conditions are poor > Less glare when driving after dark in rainy weather. Online Edition for Part-No. 01 41 9 791 301 - © 01/99 BMW AG
  • 211.
    210n Online Edition forPart-No. 01 41 9 791 301 - © 01/99 BMW AG
  • 212.
    Initial overview Controls indetail Minor repairs Technical data Index 211n MinorrepairsKeywordsOverviewControlsMaintenanceTechnicalData Engine data 212 Fuel consumption, carbon diox- ide/O emission level 213 Dimensions 215 Weights 217 Performance 221 Filling capacities 223 Electrical system 224 V-belts 224 Operation, maintenance and general care Technical items of interest Online Edition for Part-No. 01 41 9 791 301 - © 01/99 BMW AG
  • 213.
    212n BMW 520i/touring BMW523i/touring BMW 528i/touring BMW 535i Displacement Number of cylinders cc 1991 6 2494 6 2793 6 3498 8 Max. power output – at engine speed kW/bhp rpm 110/150 5900 125/170 5500 142/193 5500 180/245 5800 Max. torque – at engine speed Nm rpm 190 3500 245 3500 280 3500 345 3800 Compression ratio e 11 10,5 10,2 10 Stroke Bore mm mm 66 80 75 84 84 84 78,9 84 Mixture preparation Digital Motor Electronics BMW 540i/touring BMW 525td BMW 525tds/touring BMW 530d/touring Displacement Number of cylinders cc 4398 8 2497 6 2497 6 2926 6 Max. power output – at engine speed kW/bhp rpm 210/286 5400 85/115 4800 105/143 4600 135/184 4000 Max. torque – at engine speed Nm rpm 440 3600 230 1900 280 2200 390 1750 to 3200 Compression ratio e 10 22 22 18 Stroke Bore mm mm 82.7 92 82.8 80 82.8 80 88 84 Mixture preparation Digital Motor Electronics Digital Diesel Electronics (DDE) Engine data Online Edition for Part-No. 01 41 9 791 301 - © 01/99 BMW AG
  • 214.
    213n MinorrepairsKeywordsOverviewControlsMaintenanceTechnicalData BMW 520i BMW520i BMW 523i BMW 523i Town Country Total O emissions litres/100 km (Imp. mpg) litres/100 km (Imp. mpg) litres/100 km (Imp. mpg) grammes/km 5-sp. gearbox 12.6/13.7 (22.4/20.6) 9.0/9.6 (31.4/29.4) 8.1/8.3 (34.9/34.0) 215/220 Automatic 14.5/15.3 (19.5/18.5) 9.9/10.5 ( 28.5/26.9) 9.1/9.4 (31.0/30.1) 242/250 5-sp. gearbox 13.1/13.4 (21.6/21.1) 9.4/9.8 (30.1/28.8) 8.1/8.3 (34.9/34.0) 215/220 Automatic 15.0/15.6 (18.8/18.1) 10.3/10.7 (27.4/26.4) 9.1/9.4 (31.0/30.1) 242/250 BMW 528i BMW 528i BMW 535i BMW 535i Town Country Total O emissions litres/100 km (Imp. mpg) litres/100 km (Imp. mpg) litres/100 km (Imp. mpg) grammes/km 5-sp. gearbox 13.6/13.8 (20.8/20.5) 9.5/9.8 (29.7/28.8) 8.1/8.3 (34.9/34.0) 215/220 Automatic 15.6/15.5 (18.1/18.2) 10.5/10.7 (26.9/26.4) 9.1/9.4 (31.0/30.1) 242/250 5-sp. gearbox 16.9 (16.7) 11.6 (24.4) 11.9 (23.7) 283 Automatic 16.7 (16.9) 11.7 (24.1) 10.1 (28.0) 241 BMW 540i BMW 540i BMW 525td Town Country Total O emissions litres/100 km (Imp. mpg) litres/100 km (Imp. mpg) litres/100 km (Imp. mpg) grammes/km 6-sp. gearbox 17.7/18.0 (16.0/15.7) 12.1/12.4 (23.3/22.8) 12.3/12.7 (23.0/22.2) 293/302 Automatic 17.2/17.6 (16.4/16.1) 12.1/12.6 (23.3/22.4) 9.1/9.4 (31.0/30.1) 242/250 5-sp. gearbox 11.3 (25.0) 6.0 (47.1) 7.9 (35.8) 210 First value: saloon; second value: touring Fuel consumption, carbon dioxide (CO ) emissions2 Online Edition for Part-No. 01 41 9 791 301 - © 01/99 BMW AG
  • 215.
    214nFuel consumption, carbondioxide (CO ) emissions2 BMW 525tds BMW 525tds BMW 530d BMW 530d Town Country Total O emissions litres/100 km (Imp. mpg) litres/100 km (Imp. mpg) litres/100 km (Imp. mpg) grammes/km 5-sp. gearbox 11.5/11.7 (24.6/24.1) 6.2/6.3 (45.6/44.8) 8.1/8.3 (34.9/34.0) 215/220 Automatic 13.0/13.4 (21.7/21.1) 7.0/7.2 (40.4/39.2) 9.1/9.4 (31.0/30.1) 242/250 5-sp. gearbox 9.8/10.0 (28.8/28.2) 7.2/7.4 (39.2/38.2) 8.1/8.3 (34.9/34.0) 215/220 Automatic 11.7/11.9 (24.1/23.7) 8.3/8.5 (34.0/33.2) 9.1/9.4 (31.0/30.1) 242/250 First value: saloon; second value: touring Fuel consumption is determined according to a standard test method (93/116/EU). It is not the same as the average fuel consumption in practice, which depends on a great many different factors such as driving style, load, road condition, traffic density and flow, weather, tyre pressures etc. Engine power output and road performance data are measured in the condi- tions laid down by 80/1269 EU and DIN 70020 (with the car to standard specification). This standard specifies the permit- ted tolerances. Additional equipment on the car may have quite a significant influence on both performance and fuel con- sumption, since it usually affects the car's weight and c value (drag coefficient), for instance roof rack, wider tyres, additional mirrors etc. Online Edition for Part-No. 01 41 9 791 301 - © 01/99 BMW AG
  • 216.
    215n MinorrepairsKeywordsOverviewControlsMaintenanceTechnicalData Dimensions 394de367 All dimensions inmillimetres (mm). Value after /: with automatic-dip outside mirrors Minimum turning circle (dia.)11.3 m (37.1 ft); BMW 535i, 540i: 11.4 m (37.4 ft) Online Edition for Part-No. 01 41 9 791 301 - © 01/99 BMW AG
  • 217.
    216nDimensions 392de366 All dimensions inmillimetres (mm). Value after /: with automatic-dip outside mirrors Minimum turning circle (dia.): 11.3 m (37.1 ft); BMW 540i: 11.4 m (37.4 ft) Online Edition for Part-No. 01 41 9 791 301 - © 01/99 BMW AG
  • 218.
    217n MinorrepairsKeywordsOverviewControlsMaintenanceTechnicalData Weights – saloon BMW520i BMW 523i BMW 528i BMW 535i Weight of car, unladen (with one occupant, ready for road, tank full, excluding optional extras) with manual gearbox with automatic transmission kg (lb) kg (lb) 1545 (3406) 1575 (3472) 1550 (3417) 1580 (3483) 1575 (3472) 1605 (3538) 1685 (3715) 1730 (3814) Permitted gross weight with manual gearbox with automatic transmission while towing a trailer with manual gearbox with automatic transmission kg (lb) kg (lb) kg (lb) kg (lb) 1980 (4365) 2010 (4431) 2020 (4453) 2050 (4519) 1985 (4376) 2015 (4442) 2030 (4475) 2060 (4541) 2040 (4497) 2070 (2070) 2050 (4519) 2080 (4586) 2150 (4740) 2195 (4839) 2240 (4938) 2285 (5038) Front axle load limit kg (lb) 975 (2149) 975 (2149) 1000 (2205) 1090 (2403) Rear axle load limit for trailer towing kg (lb) kg (lb) 1125 (2480) 1230 (2712) 1125 (2480) 1230 (2712) 1170 (2580) 1250 (2756) 1200 (2646) 1305 (2877) Towing loads according to EU operating permit (acc. to factory specification and legally permitted in Germany). BMW Service will have details of possible increases. Note and comply with different values in certain countries. unbraked braked, max. gradient 12X (manual gearbox/auto- matic transmission) braked, max. gradient 8X (supplementary permit) kg (lb) kg (lb) kg (lb) 750 (1653) 1500/1700 (3307/3748) 1900 (4189) 750 (1653) 1800/1900 (3968/4189) 1900 (4189) 750 (1653) 2000/2000 (4409/4409) 2000 (4409) 750 (1653) 2000/2000 (4409/4409) 2000 (4409) Trailer nose weight kg (lb) 90 (198) Roof load kg (lb) 100 (220) Luggage compartment capacity acc. to VDA test l (cu.ft) 460 (16.2) If you make full use of the quoted trailer load limit on gradients up to 12X and also wish to load the car itself up to its per- missible gross weight limit, you are recommended not to drive up gradients steeper than 10X. Do not exceed either the axle load limits or the car's gross weight limit. Online Edition for Part-No. 01 41 9 791 301 - © 01/99 BMW AG
  • 219.
    218nWeights – saloon BMW540i BMW 525td BMW 525tds BMW 530d Weight of car, unladen (with one occupant, ready for road, tank full, excluding optional extras) with manual gearbox with automatic transmission kg (lb) kg (lb) 1705 (3759) 1735 (3825) 1580 (3483) – 1585 (3494) 1615 (3560) 1650 (3638) 1660 (3660) Permitted gross weight with manual gearbox with automatic transmission while towing a trailer with manual gearbox with automatic transmission kg (lb) kg (lb) kg (lb) kg (lb) 2170 (4784) 2200 (4850) 2260 (4982) 2290 (5049) 2015 (4442) – 2080 (4586) – 2020 (4453) 2050 (4519) 2090 (4608) 2120 (4674) 2115 (4663) 2125 (4685) 2205 (4861) 2215 (4883) Front axle load limit kg (lb) 1090 (2403) 1020 (2249) 1020 (2249) 1060 (2337) Rear axle load limit for trailer towing kg (lb) kg (lb) 1200 (2646) 1305 (2877) 1135 (2502) 1240 (2734) 1135 (2502) 1240 (2734) 1170 (2579) 1275 (2811) Towing loads according to EU operating permit (acc. to factory specification and legally permitted in Germany). BMW Service will have details of possible increases. Note and comply with different values in certain countries. unbraked braked, gradients up to 12X braked, gradients up to 8X (supplementary permit) kg (lb) kg (lb) kg (lb) 750 (1653) 2000 (4409) 2000 (4409) 750 (1653) 1900 (4189) 1900 (4189) 750 (1653) 1900 (4189) 1900 (4189) 750 (1653) 2000 (4409) 2000 (4409) Trailer nose weight kg (lb) 90 (198) Roof load kg (lb) 100 (220) Luggage compartment capacity acc. to VDA test litres (cu.ft) 460 (16.2) If you make full use of the quoted trailer load limit on gradients up to 12X and also wish to load the car itself up to its per- missible gross weight limit, you are recommended not to drive up gradients steeper than 10X. Do not exceed either the axle load limits or the car's gross weight limit. Online Edition for Part-No. 01 41 9 791 301 - © 01/99 BMW AG
  • 220.
    219n MinorrepairsKeywordsOverviewControlsMaintenanceTechnicalData Weights – touring BMW520i BMW 523i BMW 528i Weight of car, unladen (with one occupant, ready for road, tank full, excluding optional extras) with manual gearbox with automatic transmission kg (lb) kg (lb) 1645 (3627) 1675 (3693) 1655 (3649) 1685 (3715) 1690 (3726) 1720 (3792) Permitted gross weight with manual gearbox with automatic transmission while towing a trailer with manual gearbox with automatic transmission kg (lb) kg (lb) kg (lb) kg (lb) 2195 (4839) 2225 (4905) 2125 (4685) or 2195 (4839) 2225 (4905) 2205 (4861) 2235 (4927) 2205 (4861) 2235 (4927) 2200 (4850) 2230 (4916) 2200 (4850) 2230 (4916) Front axle load limit kg (lb) 1000 (2205) 1000 (2205) 1010 (2227) Rear axle load limit for trailer towing kg (lb) kg (lb) 1275 (2811) 1360 (2998) 1275 (2811) 1360 (2998) 1290 (2844) 1380 (3042) Towing loads according to EU operating permit (acc. to factory specification and legally permitted in Germany). BMW Service will have details of possible increases. Note and comply with different values in certain countries. unbraked braked, gradients up to 12X (manual gearbox/auto- matic transmission) braked, max. gradient 8X (with supplementary permit) kg (lb) kg (lb) kg (lb) 750 (1653) 1600/1700 (3527/3748) 1900 (4189) 750 (1653) 1800/1900 (3968/4189) 1900 (4189) 750 (1653) 2000/2000 (4409/4409) 2000 (4409 Trailer nose weight kg (lb) 90 (198) Roof load kg (lb) 100 (220) Luggage compartment capacity acc. to VDA test l (cu.ft) 410–1525 (14.5–53.8) If you make full use of the quoted trailer load limit on gradients up to 12X and also wish to load the car itself up to its per- missible gross weight limit, you are recommended not to drive up gradients steeper than 10X. Do not exceed either the axle load limits or the car's gross weight limit. BMW 520i with manual gearbox: 1600 kg (3527 lb) trailer load only up to a gross vehicle weight of 2125 kg (4685 lb). If the full gross vehicle weight of 2195 kg (4839 lb) is utilised, the max. towing load is only 1530 kg (3373 lb). Online Edition for Part-No. 01 41 9 791 301 - © 01/99 BMW AG
  • 221.
    220nWeights – touring BMW540i BMW 525tds BMW 530d Weight of car, unladen (with one occupant, ready for road, tank full, excluding optional extras) with manual gearbox with automatic transmission kg (lb) kg (lb) 1815 (4001) 1845 (4067) 1695 (3737) 1725 (1725) 1760 (3880) 1770 (3902) Permitted gross weight with manual gearbox with automatic transmission while towing a trailer with manual gearbox with automatic transmission kg (lb) kg (lb) kg (lb) kg (lb) 2280 (5026) 2310 (5093) 2370 (5225) 2400 (5291) 2205 (4861) 2235 (4927) 2205 (4861) 2235 (4927) 2310 (5093) 2320 (5115) 2310 (5093) 2320 (5115) Front axle load limit kg (lb) 1095 (2414) 1040 (2293) 1065 (2348) Rear axle load limit for trailer towing kg (lb) kg (lb) 1275 (2811) 1410 (3108) 1280 (2822) 1370 (3020) 1300 (2866) 1390 (3064) Towing loads according to EU operating permit (acc. to factory specification and legally permitted in Germany). BMW Service will have details of possible increases. Note and comply with different values in certain countries. unbraked braked, gradients up to 12X braked, gradients up to 8X (supplementary permit) kg (lb) kg (lb) kg (lb) 750 (1653) 2000 (4409) 2000 (4409) 750 (1653) 1900 (4189) 1900 (4189) 750 (1653) 2000 (4409) 2000 (4409) Trailer nose weight kg (lb) 90 (198) Roof load kg (lb) 100 (220) Luggage compartment capacity acc. to VDA test l (cu.ft) 410–1525 (14.5–53.8) If you make full use of the quoted trailer load limit on gradients up to 12X and also wish to load the car itself up to its per- missible gross weight limit, you are recommended not to drive up gradients steeper than 10X. Do not exceed either the axle load limits or the car's gross weight limit. Online Edition for Part-No. 01 41 9 791 301 - © 01/99 BMW AG
  • 222.
    221n MinorrepairsKeywordsOverviewControlsMaintenanceTechnicalData Performance – saloon BMW520i BMW 523i BMW 528i BMW 535i Top speed with automatic transmission km/h (mph) km/h (mph) 220 (136) 210 (130) 228 (141) 226 (140) 240 (149) 235 (146) 250 (155) 247 (153) Acceleration from 0 to 50 km/h (0 to 31 mph) s 3.3 2.8 2.6 2.5 0 to 80 km/h (0 to 50 mph) s 6.8 5.8 5.3 5.0 0 to 100 km/h (0 to 62 mph) s 10.2 (11.5) 8.5 (9.7) 7.5 (8.8) 6.9 (7.6) 0 to 120 km/h (0 to 75 mph) s 13.9 11.6 10.6 9.7 80 to 120 km/h (50 to 75 mph) in 4th gear s 10.7 9.2 8.2 7.4 Standing-start kilometre s 31.1 (32.7) 29.2 (30.5) 28.2 (29.4) 27.1 (28.1) BMW 540i BMW 525td BMW 525tds BMW 530d Top speed with automatic transmission km/h (mph) km/h (mph) 250 (155) (governed) 250 (155) (governed) 198 (123) – 211 (131) 205 (127) 225 (139) 225 (139) Acceleration from 0 to 50 km/h (0 to 31 mph) s 2.5 3.8 3.4 2.9 0 to 80 km/h (0 to 50 mph) s 4.6 8.0 7.0 5.6 0 to 100 km/h (0 to 62 mph) s 6.2 (6.5) 11.9 10.4 (11.0) 8.1 (8.4) 0 to 120 km/h (0 to 75 mph) s 8.5 17.1 14.4 11.1 80 to 120 km/h (50 to 75 mph) in 4th gear s 6.2 11.7 9.4 7.2 Standing-start kilometre s 25.9 (26.5) 33.3 31.6 (32.3) 28.8 (29.6) Values in ( ): – with automatic transmission Online Edition for Part-No. 01 41 9 791 301 - © 01/99 BMW AG
  • 223.
    222nPerformance – touring BMW520i BMW 523i BMW 528i Top speed with automatic transmission km/h (mph) km/h (mph) 212 (131) 209 (129) 224 (139) 222 (137) 233 (144) 229 (142) Acceleration from 0 to 50 km/h (0 to 31 mph) s 3.3 2.9 2.6 0 to 80 km/h (0 to 50 mph) s 7.0 6.0 5.5 0 to 100 km/h (0 to 62 mph) s 10.6 (11.9) 8.9 (10.2) 7.9 (9.3) 0 to 120 km/h (0 to 75 mph) s 14.5 12.2 11.1 80 to 120 km/h (50 to 75 mph) in 4th gear s 10.7 9.0 8.4 Standing-start kilometre s 31.6 (33.4) 29.7 (31.1) 28.8 (30.1) BMW 540i BMW 525tds BMW 530d Top speed with automatic transmission km/h (mph) km/h (mph) 250 (155) (governed) 250 (155) (governed) 210 (130) 203 (126) 222 (137) 222 (137) Acceleration from 0 to 50 km/h (0 to 31 mph) s 2.4 3.4 2.9 0 to 80 km/h (0 to 50 mph) s 4.6 7.2 5.7 0 to 100 km/h (0 to 62 mph) s 6.3 (6.7) 10.7 (11.4) 8.3 (8.9) 0 to 120 km/h (0 to 75 mph) s 8.8 14.9 11.6 80 to 120 km/h (50 to 75 mph) in 4th gear s 6.6 9.9 7.6 Standing-start kilometre s 26.2 (26.9) 32.0 (32.7) 29.3 (30.2) Values in ( ): – with automatic transmission Online Edition for Part-No. 01 41 9 791 301 - © 01/99 BMW AG
  • 224.
    223n MinorrepairsKeywordsOverviewControlsMaintenanceTechnicalData Filling capacities Litres (Imp.units) Note Fuel tank – including reserve of approx. 70 (15.4 gal.) approx. 8 (1.8 gal.) – with 6-cylinder engine approx. 10 (2.1 gal.) – with 8-cylinder engine Fuel grade: page 25 Windscreen washer incl. headlamp cleaning system Intensive cleaning system approx. 3.5 (6.2 pints) – Saloon approx. 6.0 (10.6 pints) – touring approx. 6.0 (10.6 pints) approx. 1.0 (1.8 pints) For further details, page 156 Cooling system, incl. heater circuit 8.5 (99.9 pints) – BMW 520i, 523i, 528i 12.5 (22.0 pints) – BMW 535i, 540i 10.0 (99.9 pints) – BMW 525td/tds 9.2 (16.2 pints) – BMW 530d For further details, page 160 Engine oil with filter renewal 6.5 (11.4 pints) – BMW 520i, 523i, 528i 7.5 (13.2 pints) – BMW 535i, 540i 6.75 (99.9 pints) – BMW 525td/tds 7.0 (12.3 pints) – BMW 530d Long-life oil for spark-ignition and diesel engines. Oil grades: page 158 Manual gearbox, automatic transmission and final drive – Permanently filled, no oil changes Online Edition for Part-No. 01 41 9 791 301 - © 01/99 BMW AG
  • 225.
    224nElectrical system V-belts Battery BMW520i, 523i, 528i: 12 V, 70 Amp/h BMW 535i, 540i: 12 V, 90 Amp/h BMW 525td/tds, 530d: 12 V, 95 Amp/h Spark plugs NGK BKR 6 EQUP Bosch FGR 7 DQP BMW 520i, 523i, 528i Coolant pump – alternator – power steering Ribbed, 6 K x 1538 Air conditioning compressor Ribbed, 5 K x 906 BMW 535i, 540i Coolant pump – alternator – power steering Ribbed, 7 K–LB x 1635 Air conditioning compressor Ribbed, 5 K x 1007 BMW 525td/tds Coolant pump – alternator – power steering Ribbed, 5 K x 1815 Air conditioning compressor Ribbed, 4 PK x 781 BMW 530d Coolant pump – alternator – power steering Ribbed, 5 PK x 2063 Air conditioning compressor Ribbed, 5 PK x 810 You can obtain Original BMW Parts and Accessories together with competent advice from BMW Serv- ice.< Online Edition for Part-No. 01 41 9 791 301 - © 01/99 BMW AG
  • 226.
  • 227.
    226n Online Edition forPart-No. 01 41 9 791 301 - © 01/99 BMW AG
  • 228.
    Initial overview Controls indetail Operation, maintenance and general care Minor repairs Technical data Index Technical items of interest 227n MinorrepairsKeywordsOverviewControlsMaintenanceTechnicalData From A to Z 228 Minor repairs from A to Z 234 Online Edition for Part-No. 01 41 9 791 301 - © 01/99 BMW AG
  • 229.
    From A toZ A ABS (anti-lock brake system) 21, 130 Acceleration 221 Accessories 5 Activated charcoal filter 105 Adaptive Transmission Con- trol 67, 202 Aerial 136 Aerial diversity 204 Air conditioning, automatic 102 Air distribution 96, 102 Air outlets 94 Air supply 96, 103 Air vents 100 Airbags 21, 59, 170, 203 Alarm system 44 Alloy wheels 141 Antifreeze 133, 160 Anti-glare interior mirror 205 Anti-lock brake system (ABS) 21, 130 Anti-theft system 44 Aquaplaning 128, 137 Artificial leather, care 167 ASC+T (Automatic Stability Control plus Traction) 21, 86, 203 Ashtrays 111 AUC (Automatic Recircu- lated Air Control) 103 Automatic air conditioning 100 Automatic Recirculated Air Control (AUC) 103 Automatic Stability Control plus Traction (ASC+T) 21, 86, 203 Automatic transmission 21, 67 Automatic transmission with Steptronic 69 Auxiliary heater 107 Changing remote control battery 185 New transmitter 185 Auxiliary heater control, see radio operating instruc- tions Auxiliary heater, remote con- trol 108 Average fuel consump- tion 83 Average speed 83 Axle loads 217 B Battery 190, 224 Charging 191 Removing and installing 191 State of charge 191 Battery capacity 224 Battery changing Radio remote control 183 Remote control for auxil- iary heater 185 Beam throw adjustment 91 Belt catch tensioner 204 Biodiesel 26 Blower 96, 103 BMW Comfort seat 51 Brake fluid 161 Brake hydraulics, brake pads 20 Brake lights Changing bulb 179 Brakes 131 Malfunctions 132 Breakdown Service 196 Bulb-changing 177 C Can holder 110 Car care, exterior 165 Car care, interior 167 Car keys 34 Car Memory 57 Car phone 110, 136 Car phone malfunctions 136 Car phone, see separate operating instructions Car radio reception 136, 204 Car radio, see separate operating instructions Car washes 164 Caravan towing 123 Care of car 133 Care of car, exterior 165 Cassette operation, see radio operating instructions Catalytic converter 129 CD operation, see radio operating instructions Central locking 36 Button, safety buttons on doors 39 Centre brake light 181 Chassis number 162 Check Control 80 Check Control button 80 Child restraint systems 61 Child seat 61 Childproof door locks 62 Cigarette lighter 111 Clock, see radio operating instructions O emissions 213 Code, see radio operating instructions Comfort seat 51 Compartments in load area 118 Computer 83 Consumption 78 Controls 14 Coolant 133, 160 A – Z Online Edition for Part-No. 01 41 9 791 301 - © 01/99 BMW AG
  • 230.
    From A toZ 229n MinorrepairsKeywordsOverviewControlsMaintenanceTechnicalData Coolant thermometer 79 Cruise control 75 Cup holder 110 D Date, see radio operating instructions Daytime dipped head- lamps 90 DBC (Dynamic Brake Con- trol) 22, 132 Deadlock 44 Defogging windows 99 Defrost setting 102 Defrosting windows 99 Demisting windows 99 Diesel fuel 26, 133 Diesel-engine injection sys- tem 136 Digital clock, see radio oper- ating instructions Digital Diesel Electronics (DDE) 136 Dimensions 215 Dipped headlamps 90 Dipstick 157 Disc brakes 131 Displacement 212 Display lighting 90 Displays 16 Door keys 34 Doors Locking and unlocking 36 Manual operation 36 Remote control 37 Driving area 14 Driving hints Aquaplaning 128 DSC (Dynamic Stability Con- trol) 21, 86, 203 DSP amplifier, refer to Radio Owner's Manual DSP Digital Sound Proces- sor 205 Dynamic Brake Control (DBC) 22, 132 Dynamic Stability Control (DSC) 21, 86, 203 E Eco-diesel 26 EDC (Electronic Damping Control) 87 Electric mirror heating 54 Electric windows 46 Electrical consumer failure 192 Electrical defect Fuel filler flap 194 Sunroof 194 Tailgate (touring) 195 Electronic Damping Control (EDC) 87 Electronic immobilizer 35 Emergency operation, doors 36 load area 40 luggage compartment 40 tailgate 40 Emergency Service 196 Energy Control 78 Engine compartment 148 Engine compartment lid release 147 Engine data 212 Engine oil 157 Engine oil consumption 157 Engine oil grades 158 Engine oil level 20, 21 Engine oil level check 157 Engine oil pressure 20 Engine size 212 Equipment fitted, see Serv- ice Booklet F Failure displays 80 Fault displays 80 Filling capacities 223 Fire extinguisher 199 First aid kit 24 Flashing turn indicator repeaters 22 Flat battery 196 Flooding 128 Fog lights 92 Changing bulb 179 Folding rear seat back 113 Foot brake 131 Footwell lights 93 Changing bulb 182 Foreign use 171 Front seat adjustment 49 Frost protection, radiator 160 Fuel additives 133 Fuel consumption 78 Fuel consumption figures 213 Fuel consumption, average 83 Fuel filler flap 25 Release if an electrical defect occurs 194 Fuel gauge 78 Fuel grade 25 Fuel reserve telltale 78 Fuel tank 223 Fuses 192 G Gearbox, manual-shift 66 Glove box 109 Glove box light, changing bulb 182 Grills 100 Gross weight 217 Online Edition for Part-No. 01 41 9 791 301 - © 01/99 BMW AG
  • 231.
    From A toZ H Hand lamp 109 Handbrake 21, 65 Hands-free system 110 Hazard warning flashers 24 Head airbags 59 Head restraints 50 Headlamp cleaning system 74 Headlamp flasher 72 Headlight adjustment driving on right/left 171 Headlight beam throw adjustment 91 Headlight cleaning system 156 Headlight covers, care of 164, 177 Heat accumulator 206 Heated rear window 75, 96 Heated seats 106 Heated steering wheel 106 Heating and ventilation 94, 100 Heating with engine stopped 104 Heating, rapid 98 Heavy loads 121 Height 215 HiFi system 205 High-beam headlamps 22, 91 Changing bulb 177 Horn 15 Hydraulic Brake Assistant, see DBC 22, 132 I Ice warning 77 Ice, removing from windows 102 Ignition switch 63 Immobilizer 35 Independent ventilation 107 Inside mirror 54 Inspection 79 Instrument cluster 16 instrument cluster switch 72 Instrument lighting 90 Instrument panel 14 Integral rear suspension 206 Integrated children's seats 61 Intensive cleaning system 156 Intensive cleaning, auto- matic 73 Interior light 37, 92 Remote control 37 Interior lights Changing bulb 182 Interior mirror, automatic- dip 205 Interior movement protec- tion 44 Interlock 63 Intermittent-wipe setting 72 J Jack 186 Jump starting 196 K Key Memory 57 Keys 34 Keys with radio remote con- trol 34 Keys, replacing 34 Knock control 25 L Lashing down loads 43, 121 Lashing points 43 Latent heat accumulator 206 Laying up out of use 170 Leather, care of 168 Length 215 Licence plate lights, chang- ing bulb 181 Light switch 90 Lights-on warning 90 Load area 40, 117 Load area capacity 217 Load area cover, touring 117 Load area lights 40 Changing bulb 182 Load area net 43 Load floor, removable 120 Load, securing 121 Lockable wheel studs 189 Locks 133 Long-life oils 158 Low-beam headlamps 90 Changing bulb 177 Luggage compartment 40 Capacity 217 Remote control 38 Securing separately 40 Luggage compartment lid 40 Opening from inside car 41 Luggage compartment lights 92 Changing bulb 182 Lumbar support 51 M M+S tyres 140 Magic eye, see battery state of charge 191 Maintenance 79, 163 Make-up mirrors 54 Malfunction displays 80 Manual gearbox 66 Manual operation of tailgate 40 Memory 55 MFL (multifunctional steering wheel) 23 Micro-filter 97, 105 Microphone 110 Online Edition for Part-No. 01 41 9 791 301 - © 01/99 BMW AG
  • 232.
    From A toZ 231n MinorrepairsKeywordsOverviewControlsMaintenanceTechnicalData MID (Multi-Information Dis- play), see radio operating instructions Mirror memory 55 Mirror, anti-glare 54 Mirror, inside, automatic- dip 54 Mirrors 53 Mirrors, outside, automatic- dip 55 Mobile phone, see separate operating instructions Mobile telephones 136 Modifications, technical 5, 172 Multifunctional steering wheel (MFL) 23 Multi-Information Display (MID), see radio operating instructions N Navigation system, see separate operating instructions Net, protective (touring) 117 Non-smoker equipment 112 Nose weight 124 Nozzles 100 O OBD socket 172 Octane numbers 25 Odometer 77 Oil additives 157 Oil change intervals Oil for power steering 162 Oil grades 158 Oil level Checking 157 Oil level warning light 21 Oil pressure warning light 20 Oil Service 79 Old batteries 192 On-board computer, see also radio operating instructions Operating range 83 Outside mirrors 53 Outside temperature display 77 Outside temperature, computer display 83 P Paint, protecting 166 Paintwork 165 Paintwork repairs 166 Paintwork, removing dirt 165 Park Distance Control (PDC) 85 Parking aid 85 Parking brake 65 Parking in winter 134 Parking lights 91 Changing bulb 178 PDC (Park Distance Control) 85 Performance 212, 221 Petrol 25 Pollen 105 Pollen filter 97 Power socket 112 Power steering 135 Power steering oil 162 Pre-heating 22, 63 Pressed-steel wheels 141 Protective glass, care of 166 Protective net 117 Pull-out load-area floor 120 Punctures 137, 186 R Radiator 133 Radio Data System (RDS) 204 Radio reception 136, 204 Radio remote control 37 Radio telephones 136 Radio, see separate operat- ing instructions Rain sensor 73, 207 Range 83 Rapeseed oil methyl ester 26 RDC (Tyre Pressure Control) 88, 208 RDS (Radio Data System) 204 Reading lights 93 Rear fog lights 92 Changing bulb 179 Rear light 179 Rear lights Changing bulb 179 Rear lights, changing bulb (touring) 180 Rear seat back, folding 113 Rear window Opening 41 Rear window heating 75 Rear window washer, auto- matic 74 Rear window wiper 74 Renewing wiper blade 176 Rear window, heated 96, 104 Recirculated air mode 96, 103 Reclining seat mecha- nism 49 Recycling 173 Refuelling 25 Registration abroad 171 Remote control 37 Changing battery 183 New transmitter 184 Online Edition for Part-No. 01 41 9 791 301 - © 01/99 BMW AG
  • 233.
    From A toZ Remote control, auxiliary heater 108 Removable load floor 120 Replacement keys 34 Residual heat 104 Restraint system 61 Retaining straps 43 Retreaded tyres 138 Return of vehicles 173 Reverse 66 Reversing lamps 66 Reversing lights Changing bulb 179 Revolution counter 77 Roller sunblinds 106 Roller-blind cover, touring Load area cover, touring 117 Roof load 217 Roof rack 122 Rubber parts 133 Rule of the road Adjusting headlamps 171 Running-in 128 S Seat back adjustment 49 Seat belt catch tensioner 59 Seat belts 58, 59 Seat heating 106 Seat height adjustment 49, 51 Seat memory 55 Seat, electrically adjusted 51 Seat, manually adjusted 49 Seats, adjusting 49 Selecting desired memory settings 57 Selector lever, automatic transmission 67 Self-levelling suspension 22, 135, 207 Service Booklet 163 Service Interval indicator 79, 163 Servicemobile, see Emer- gency Service 196 Servotronic 135 Shiftlock 67, 69 Shoulder support 51 Side airbags 59 Side lights 90 Changing bulb 178 Ski bag 114 Ski bag, touring 116 Skidding 134 Sliding/tilt sunroof 47 Closing if an electrical defect occurs 194 Sliding/tilting sunroof 47 Snow chains 133, 140 Socket 112 Socket for On-Board Diag- nosis 172 Spare keys 34 Spare wheel 186 Spark plugs 224 Special oils 158 Speech input (see also separate operating instructions) 23 Speedometer 16 Split rear seat back 113 Sport seat 50, 52 Starting difficulties 129, 196 Starting problems 64, 198 Starting the engine 63 Starting with a flat battery 196 Steering 135 Steering lock 63 Steering wheel heating 106 Steering wheel height adjustment 52 Steering wheel memory 55 Steering wheel, adjusting 52 Steptronic 69 Stopping the engine 65 Stopwatch, see radio operat- ing instructions Storage compartments 109 Storage space 109 Stratified temperature con- trol 97 Rear-seat area ventila- tion 104 Summer tyres 139 Summer-grade diesel fuel 133 Sun roller blind 106 Sun visors 54 Sunroof 47 Convenient closure and opening 36 Manual operation 194 Symbols 4, 190 T Tailgate Manual operation 40, 195 Opening from inside car 41 Securing separately 40 Technical modifications 5, 172 Telephone 110 Telephone, preparation for installing 110 Telephone, see separate operating instructions Telltale lights 20 Temperature display, engine coolant 79 Temperature, adjusting 96, 102 Thiefproof wheel studs 189 Thigh support, adjusting 50, 52 Third brake light 181 Through-loading system 113 Online Edition for Part-No. 01 41 9 791 301 - © 01/99 BMW AG
  • 234.
    From A toZ 233n MinorrepairsKeywordsOverviewControlsMaintenanceTechnicalData Tilt alarm sensor 37, 45 Timer, see radio operating instructions Tools 176 Top speed 221 Topping up engine oil 157 Torch 109 Torque 212 touring Changing load area light bulb 182 Compartments in load area 118 Folding rear seat back 117 Lashing loads 121 Load area 117 Opening rear window 41 Rear window wiper 74 Releasing tailgate if an electrical defect occurs 195 Renewing rear window wiper blade 176 Securing load 121 Ski bag 116 Towbar downthrust 124, 217 Towing away 197, 198 Towing eyes 197 Tow-starting 197, 198 Track 215 Traction control, see ASC+T and/or DSC 86 Trailer loads 217 Trailer nose weight 217 Trailer tow hitch, cover flap 124 Trailer towing 123 Transmitter initialising (remote control) 184 Tread depth, tyres 137 Trip distance recorder 77 Turn indicators 72 Changing bulb 178 Turning circle 215 Type plate 162 Tyre changing 138, 186 Tyre damage 137 Tyre inscriptions 139 Tyre markings 139 Tyre Pressure Control (RDC) 88, 208 Tyre pressure monitoring 88, 208 Tyre pressures 27, 137 Tyre sizes 141 Tyre tread 137 U Unladen weight 217 Upholstery, care of 168 V Vacuum cleaner, connect ing 112 V-belts 224 Vehicle identification 162 Vehicle recycling 173 Ventilation 97, 100 Ventilation grilles 94 Ventilation outlets 94 Ventilation, auxiliary 107 Ventilation, draught-free 97, 104 Ventilation, rear-seat area 97 Vents, ventilation 100 Voice input 23 W Warm feet – cool head 97, 104 Warning displays 80 Warning lights 20 Warning triangle 24 Washer jets, adjusting 156 Washing the car 164 Water- and dirt-repellent windscreen 166, 209 Water on road 128 Weights 217 Wheel changing 186 Wheel covers 187 Wheel stud wrench 186 Wheel studs 187 Wheel studs, lockable 189 Wheelbase 215 Wheels 139 Wheels and tyres 139, 141 Wheels, interchanging 138 Width 215 Window lifts 46 Windows Convenient closure and opening 36 Remote control 37 Safety switches 46 Windows, defrosting 99, 102 Windscreen washer reser- voir, refilling 156 Windscreen washer, auto- matic 73 Windscreen wipers 72 Windscreen, water- and dirt- repellent 166, 209 Winter driving 133 Winter operation 133 Winter tyres 139, 140 Winter-grade diesel fuel 133 Wiper blades, renewing 176 Wipers 72 Wool velour, care of 168 Work on engine 147 X Xenon headlamps 91, 178, 208 Online Edition for Part-No. 01 41 9 791 301 - © 01/99 BMW AG
  • 235.
    A Anti-freeze, adding 161 B Batterychanging Radio remote control 183 Remote control for auxiliary heater 185 Battery, recharging 191 Battery, state of charge 191 Bonnet, opening 147 Brake fluid, adding 161 Brake lights, changing bulb 179 Brakes, malfunctioning 132 Breakdown Service 196 Bulb changing 177 C Changing tyres 186 Check-Control 80 Checking oil level 157 Coolant, adding 161 D Defect tyre 186 Defrosting 103 Defrosting windows 99, 103 De-icing windows 99, 103 Demisting windows 99, 103 Diesel, Fuel injection mal- function 136 Door, manual operation 36 E Electrical consumer failure 192 Electrical fault Fuel filler flap 194 Sliding/tilting sunroof 194 Emergency operation Doors 36 Fuel filler flap 194 Luggage compartment lid 40, 195 Sliding/tilting sunroof 194 Emergency Service 196 Engine compartment, open- ing 147 Engine oil grades 158 Engine oil level check 157 Engine oil, topping up 157 F Failure indications 80 Fault indications 80 Filling windscreen washer fluid 156 Fire extinguisher 199 First aid box 24 Flashing turn indicator, changing bulb 178 Flat battery 196 Fog lights, changing bulb 179 Footwell lights, changing bulb 182 Fuel filler flap, unlocking in the event of an electrical fault 194 G Glove box light, changing bulb 182 H Hazard warning flashers 24 Headlamp adjustment, rule of the road 171 Headlight covers, care of 177 High-beam headlights, bulb changing 177 I Interior lights, changing bulb 182 L Licence plate lights, chang- ing bulb 181 Low-beam headlights, bulb changing 177 Luggage compartment lid Emergency operation 40 Luggage compartment/load area lights, changing bulb 182 M Maintenance 79, 163 Manual operation Doors 36 Fuel filler flap 194 Luggage compartment lid 40, 195 Sliding/tilting sunroof 194 N New transmitter Radio remote control 184 Remote control for auxilia- ry heating 185 O Oil grades 158 P Parking light, changing bulb 178 Power steering oil, adding 162 Protective glass, care of 166 R Radio interior movement detector, switching off 45 Rear fog light, changing bulb 179 Rear lights, changing bulb 179 Minor repairs from A to Z Online Edition for Part-No. 01 41 9 791 301 - © 01/99 BMW AG
  • 236.
    235n MinorrepairsKeywordsOverviewControlsMaintenanceTechnicalData Rear lights, changingbulb (touring) 180 Rear window wiper, renew- ing blade 176 Rear window wiper, renew- ing blade (touring) 176 Recharging battery 191 Remote control Battery changing 183 New transmitter 184 Remote control for auxiliary heater Battery changing 185 New transmitter 185 Renewing fuses 192 Reserve wheel 186 Reversing light, changing bulb 179 Rule of the road Headlamp adjustment 171 S Self-levelling suspension inactive 135 Servicemobile, see Emer- gency Service 196 Side light, changing bulb 178 Sliding/tilting sunroof Closing in the event of an electrical malfunction 194 Power supply failed 48 Sliding/tilting sunroof, clos- ing (electrical defect) 194 Snow chains 140 Spare wheel 186 Starting difficulties 64, 129, 198 Starting problems 196 Starting with a flat battery 196 Steering stiff to turn 135 T Telltale lights 20 Tilt alarm, switching off 45 Toolkit 176 touring Fuel filler flap, unlocking in the event of an electrical fault 194 Luggage compartment lid, unlocking in the event of an electrical fault 195 Towing 198 Towing away 197 Towing eyes 197 Tow-starting 197 Tyre damage 137 Tyre pressures, checking 27 W Warning lights 20 Warning signals 80 Warning triangle 24 Washer fluid, topping up 156 Washer jets, adjusting 156 Washer reservoir, filling 156 Wheel stud wrench 186 Wheel-changing 186 Windows 103 Windows, defrosting 99 Windscreen washer reser- voir 156 Windscreen wiper blades, renewing 176 Wiper blades, renewing 176 Working on engine 147 Minor repairs from A to Z Online Edition for Part-No. 01 41 9 791 301 - © 01/99 BMW AG
  • 237.
    So that youalways have access to the data you need when refuelling, you are recommended to add the relevant infor- mation to the table shown here. Fuel For description, see page 25 Engine oil For description, see page 158 The quantity of oil between the two dip- stick marks is approx. 1 litre (1.75 pints). Designation RON: for nominal power out- put RON: also permitted RON: minimum, use only if unavoidable Grade Tyre pressures For description, see page 27 Summer Winter front rear front rear 4 persons 5 persons or 4 plus luggage Refuelling stop Online Edition for Part-No. 01 41 9 791 301 - © 01/99 BMW AG
  • 238.
    The Ultimate DrivingMachine 01419791301En Online Edition for Part-No. 01 41 9 791 301 - © 01/99 BMW AG