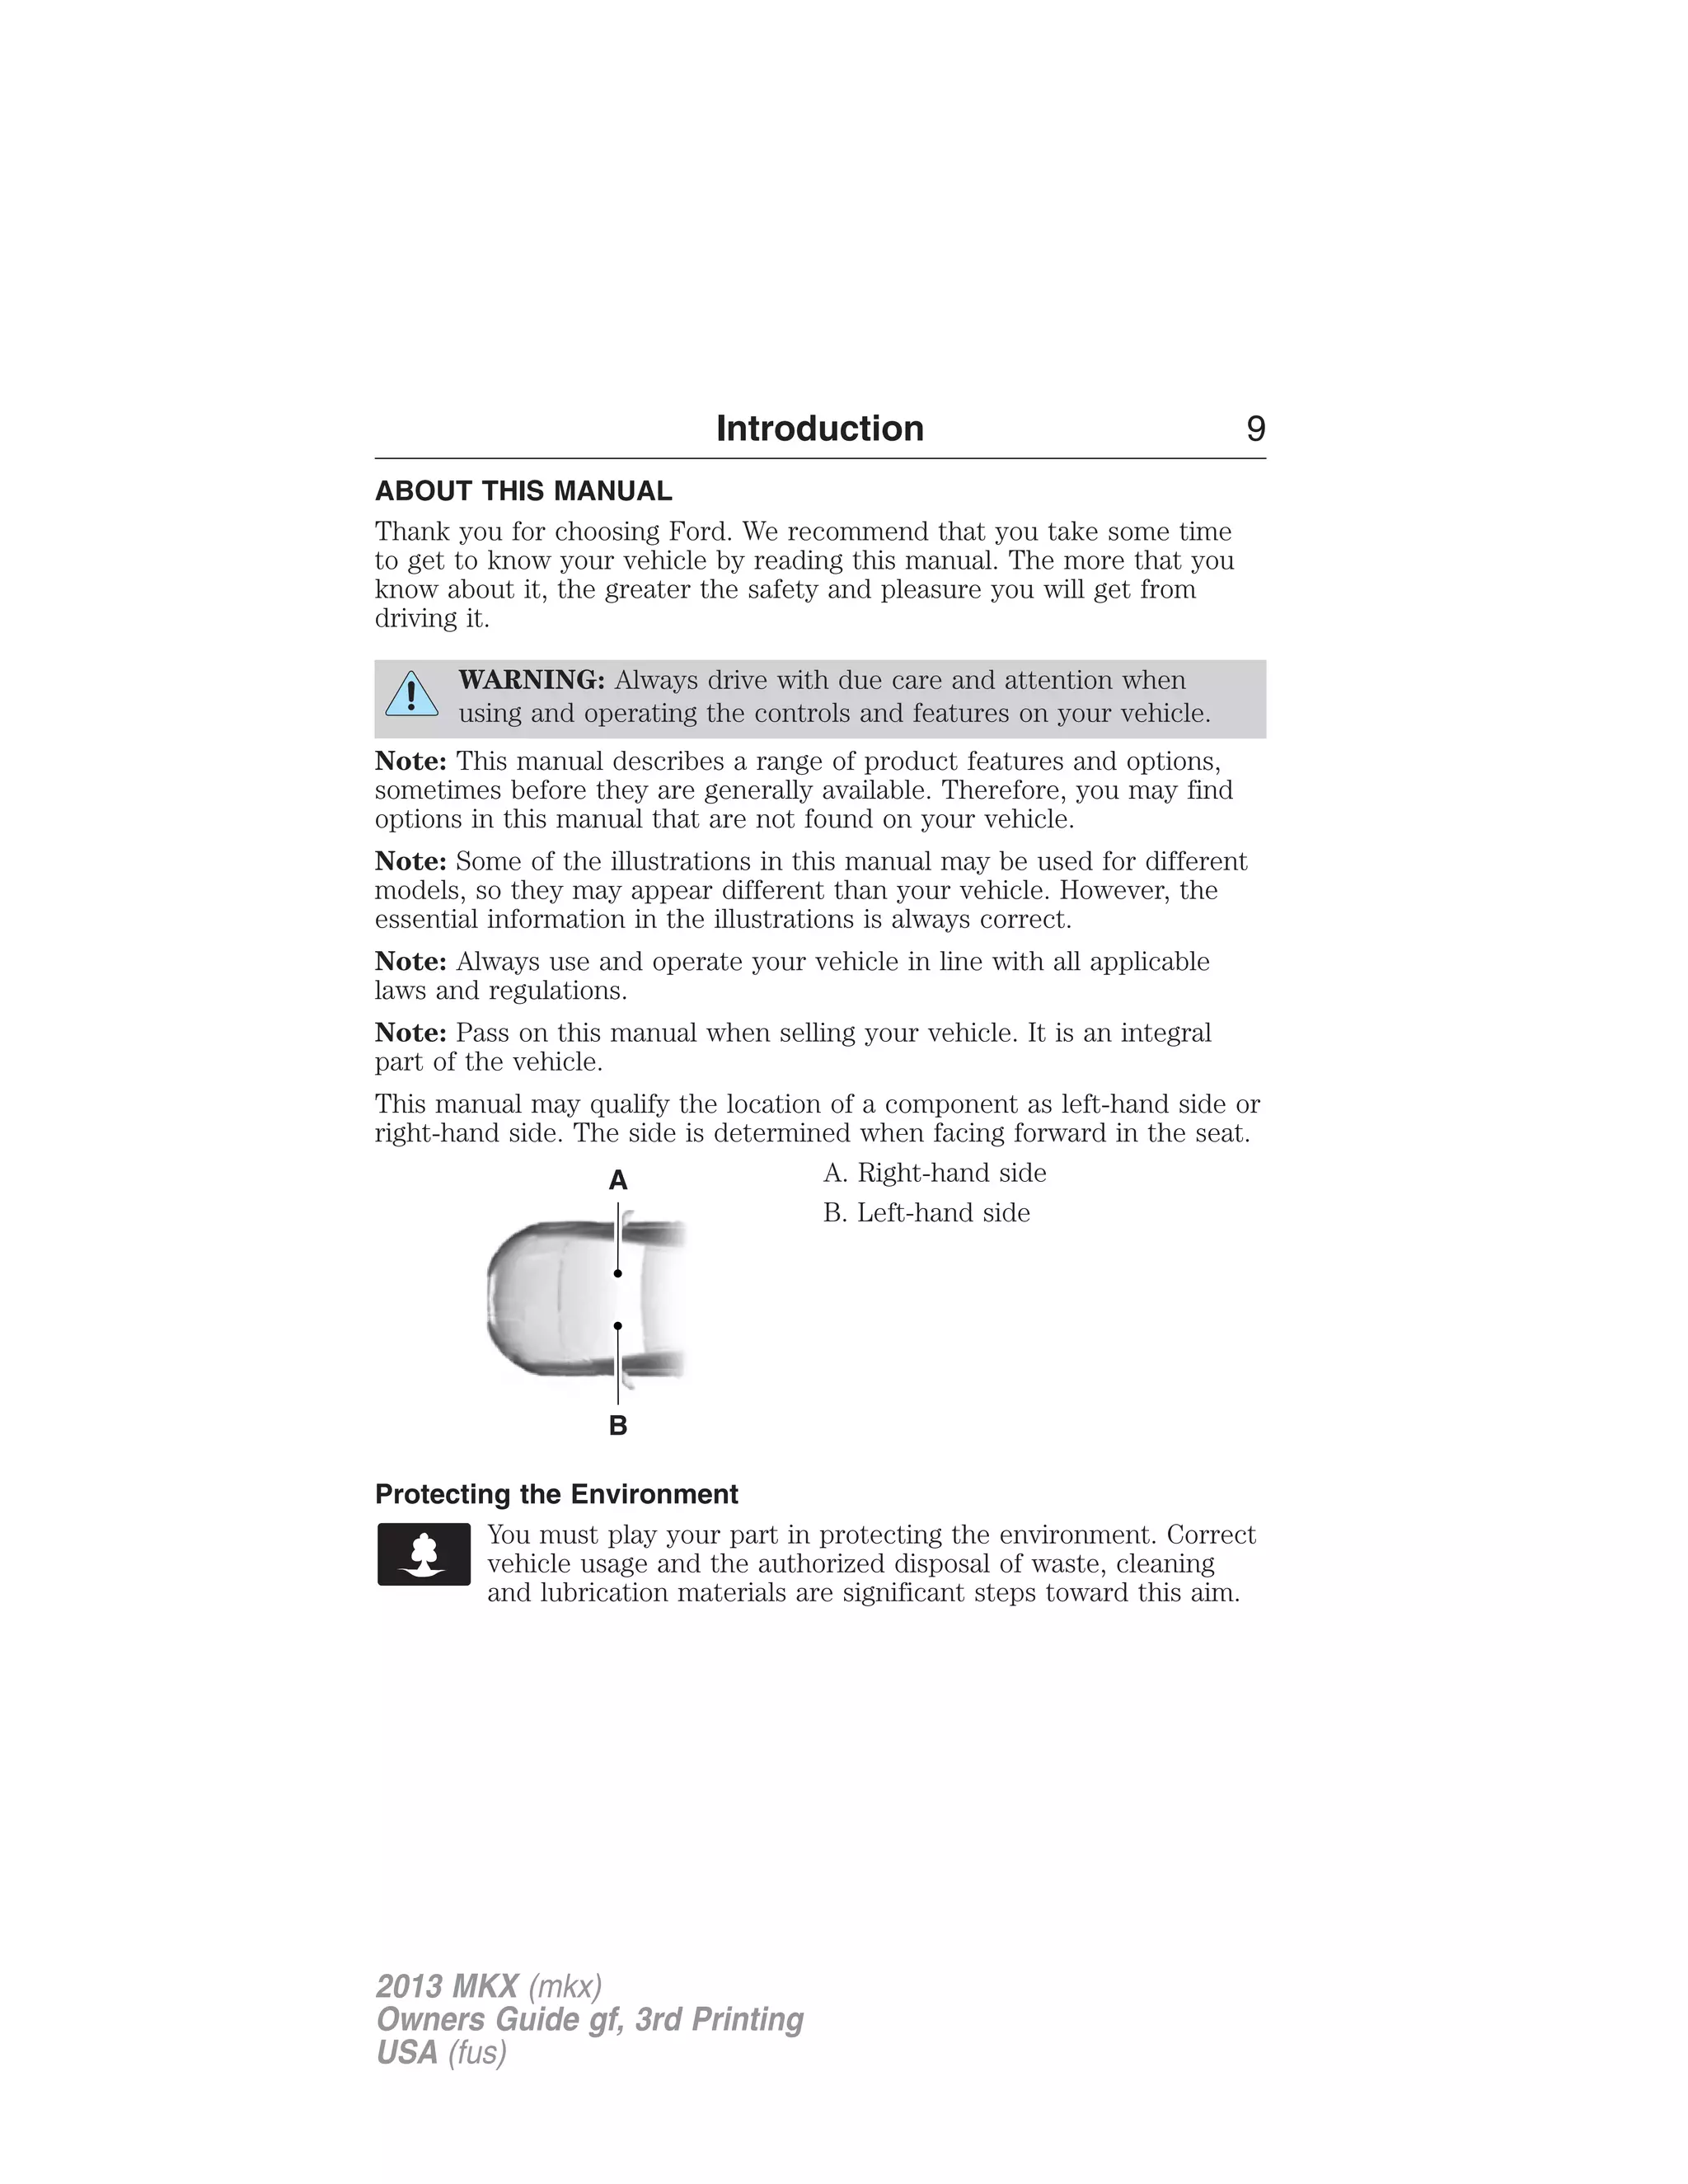
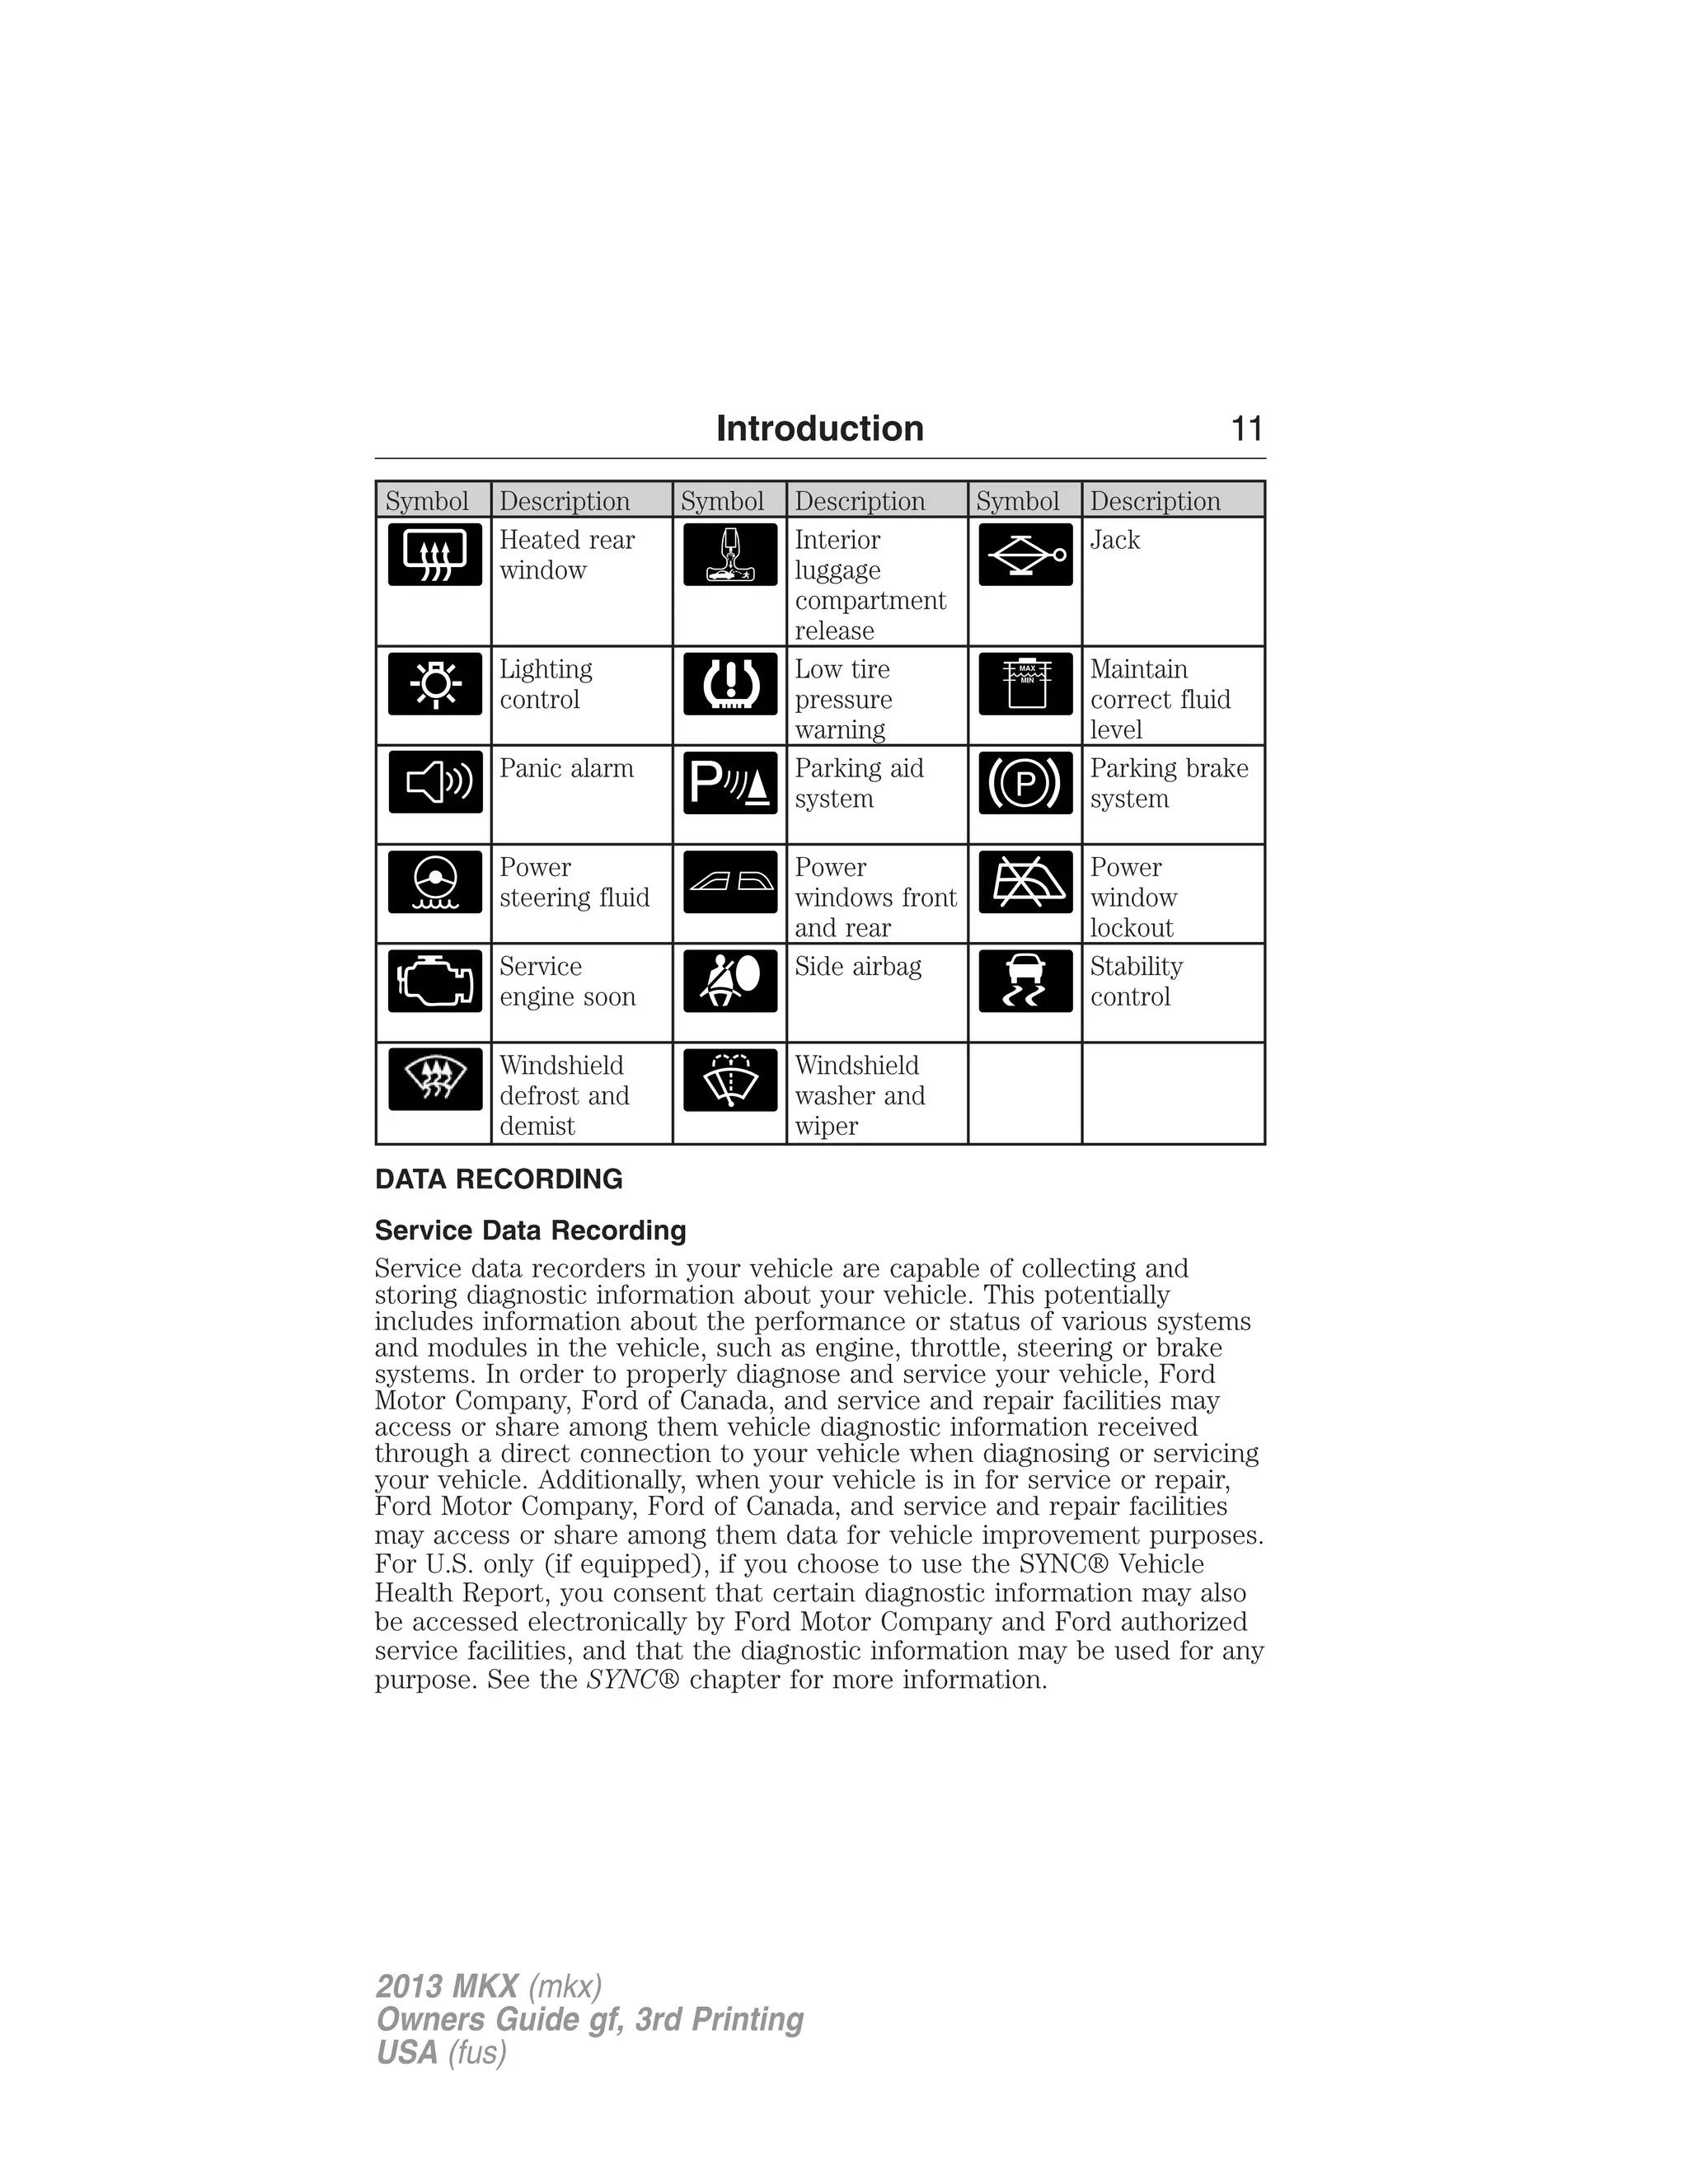
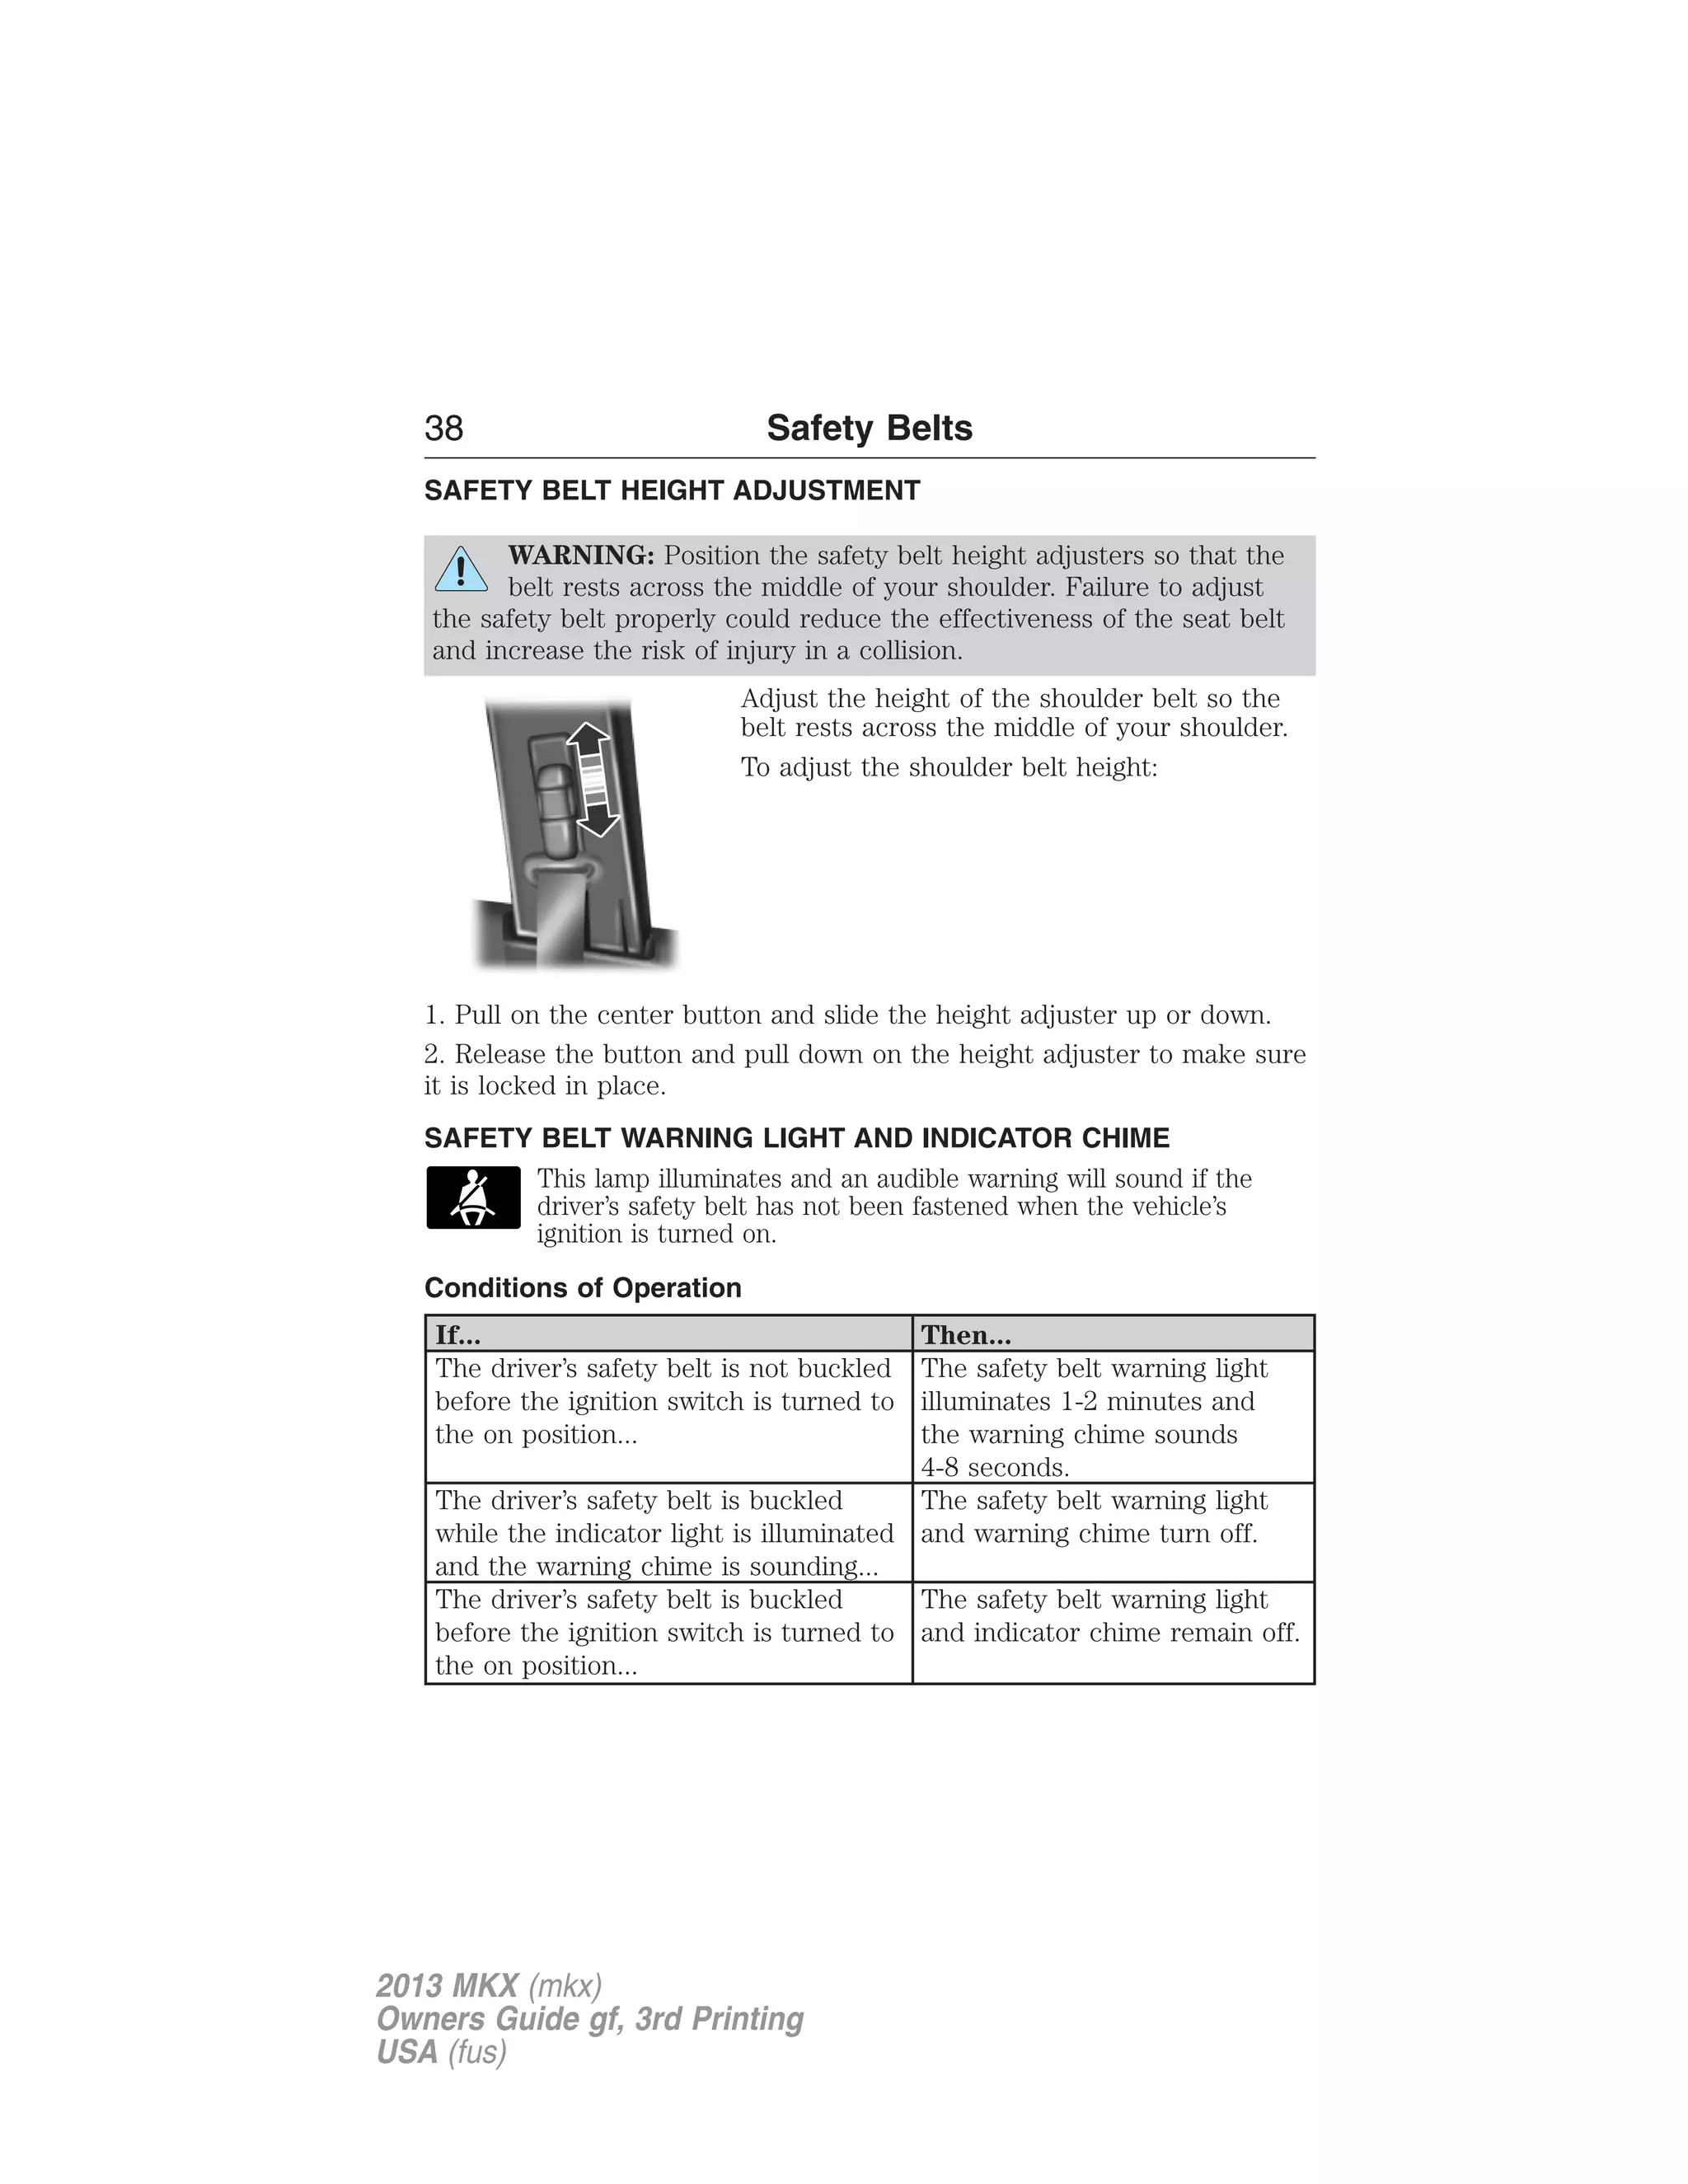
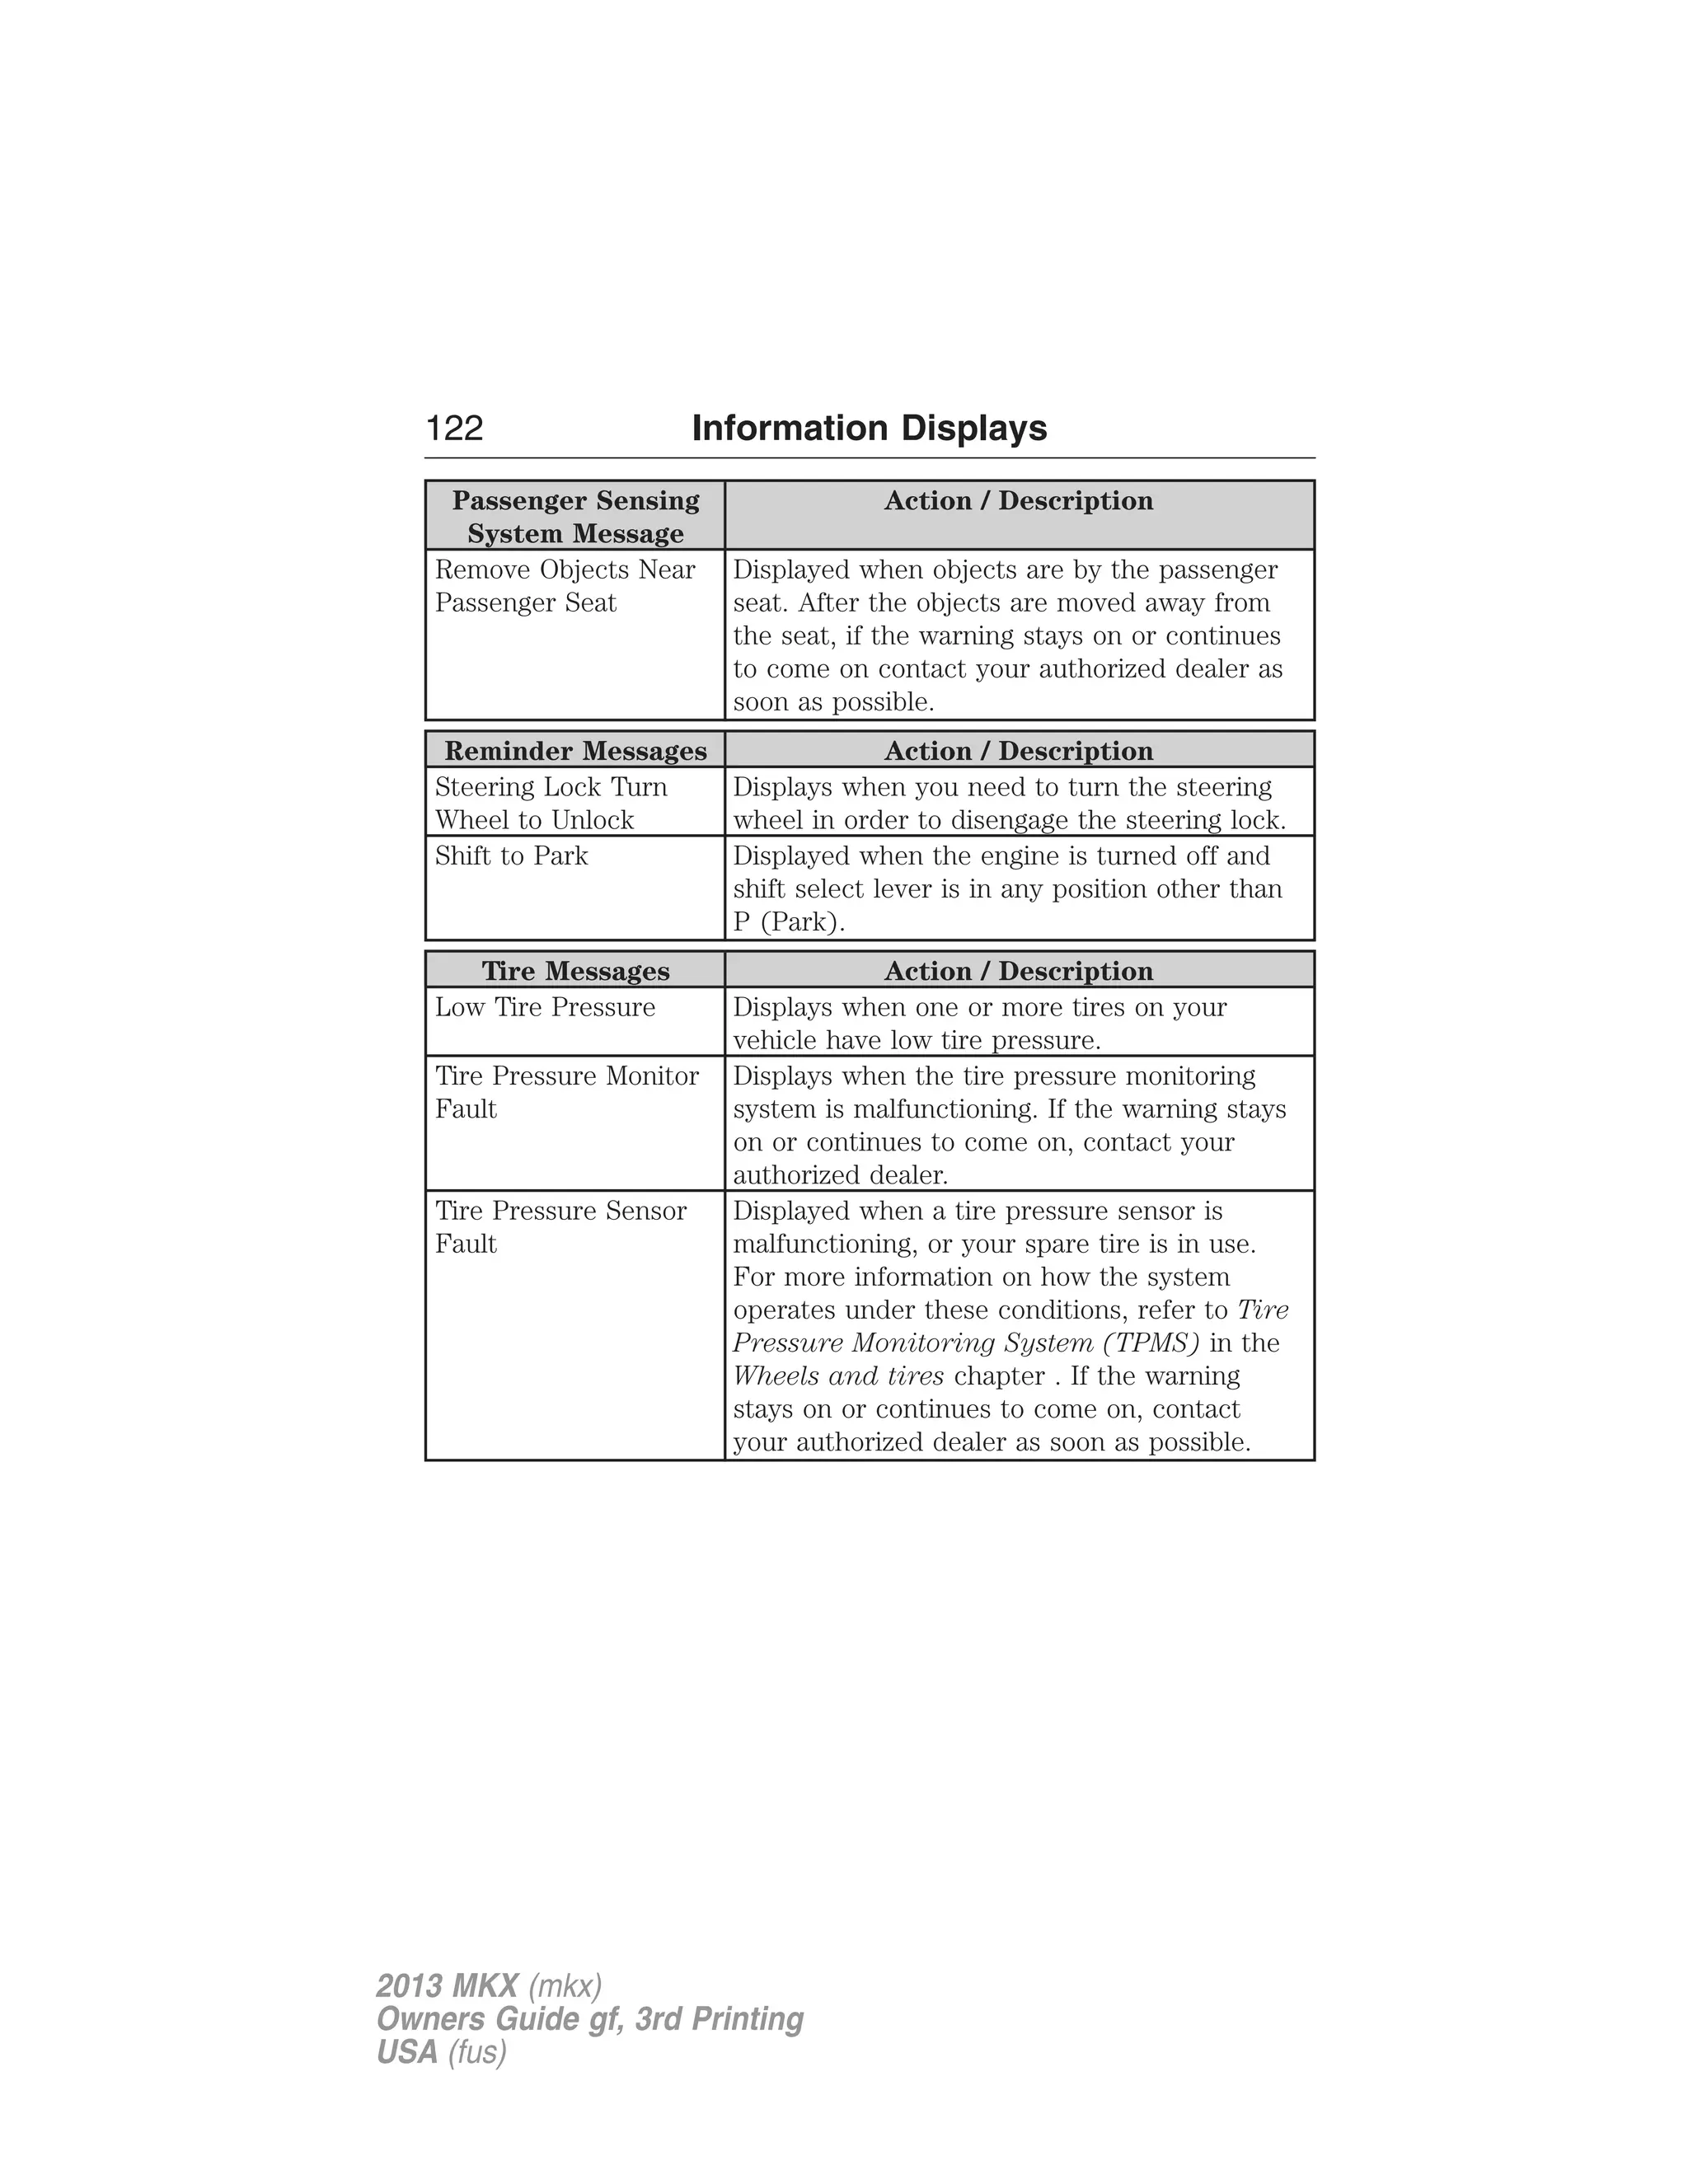
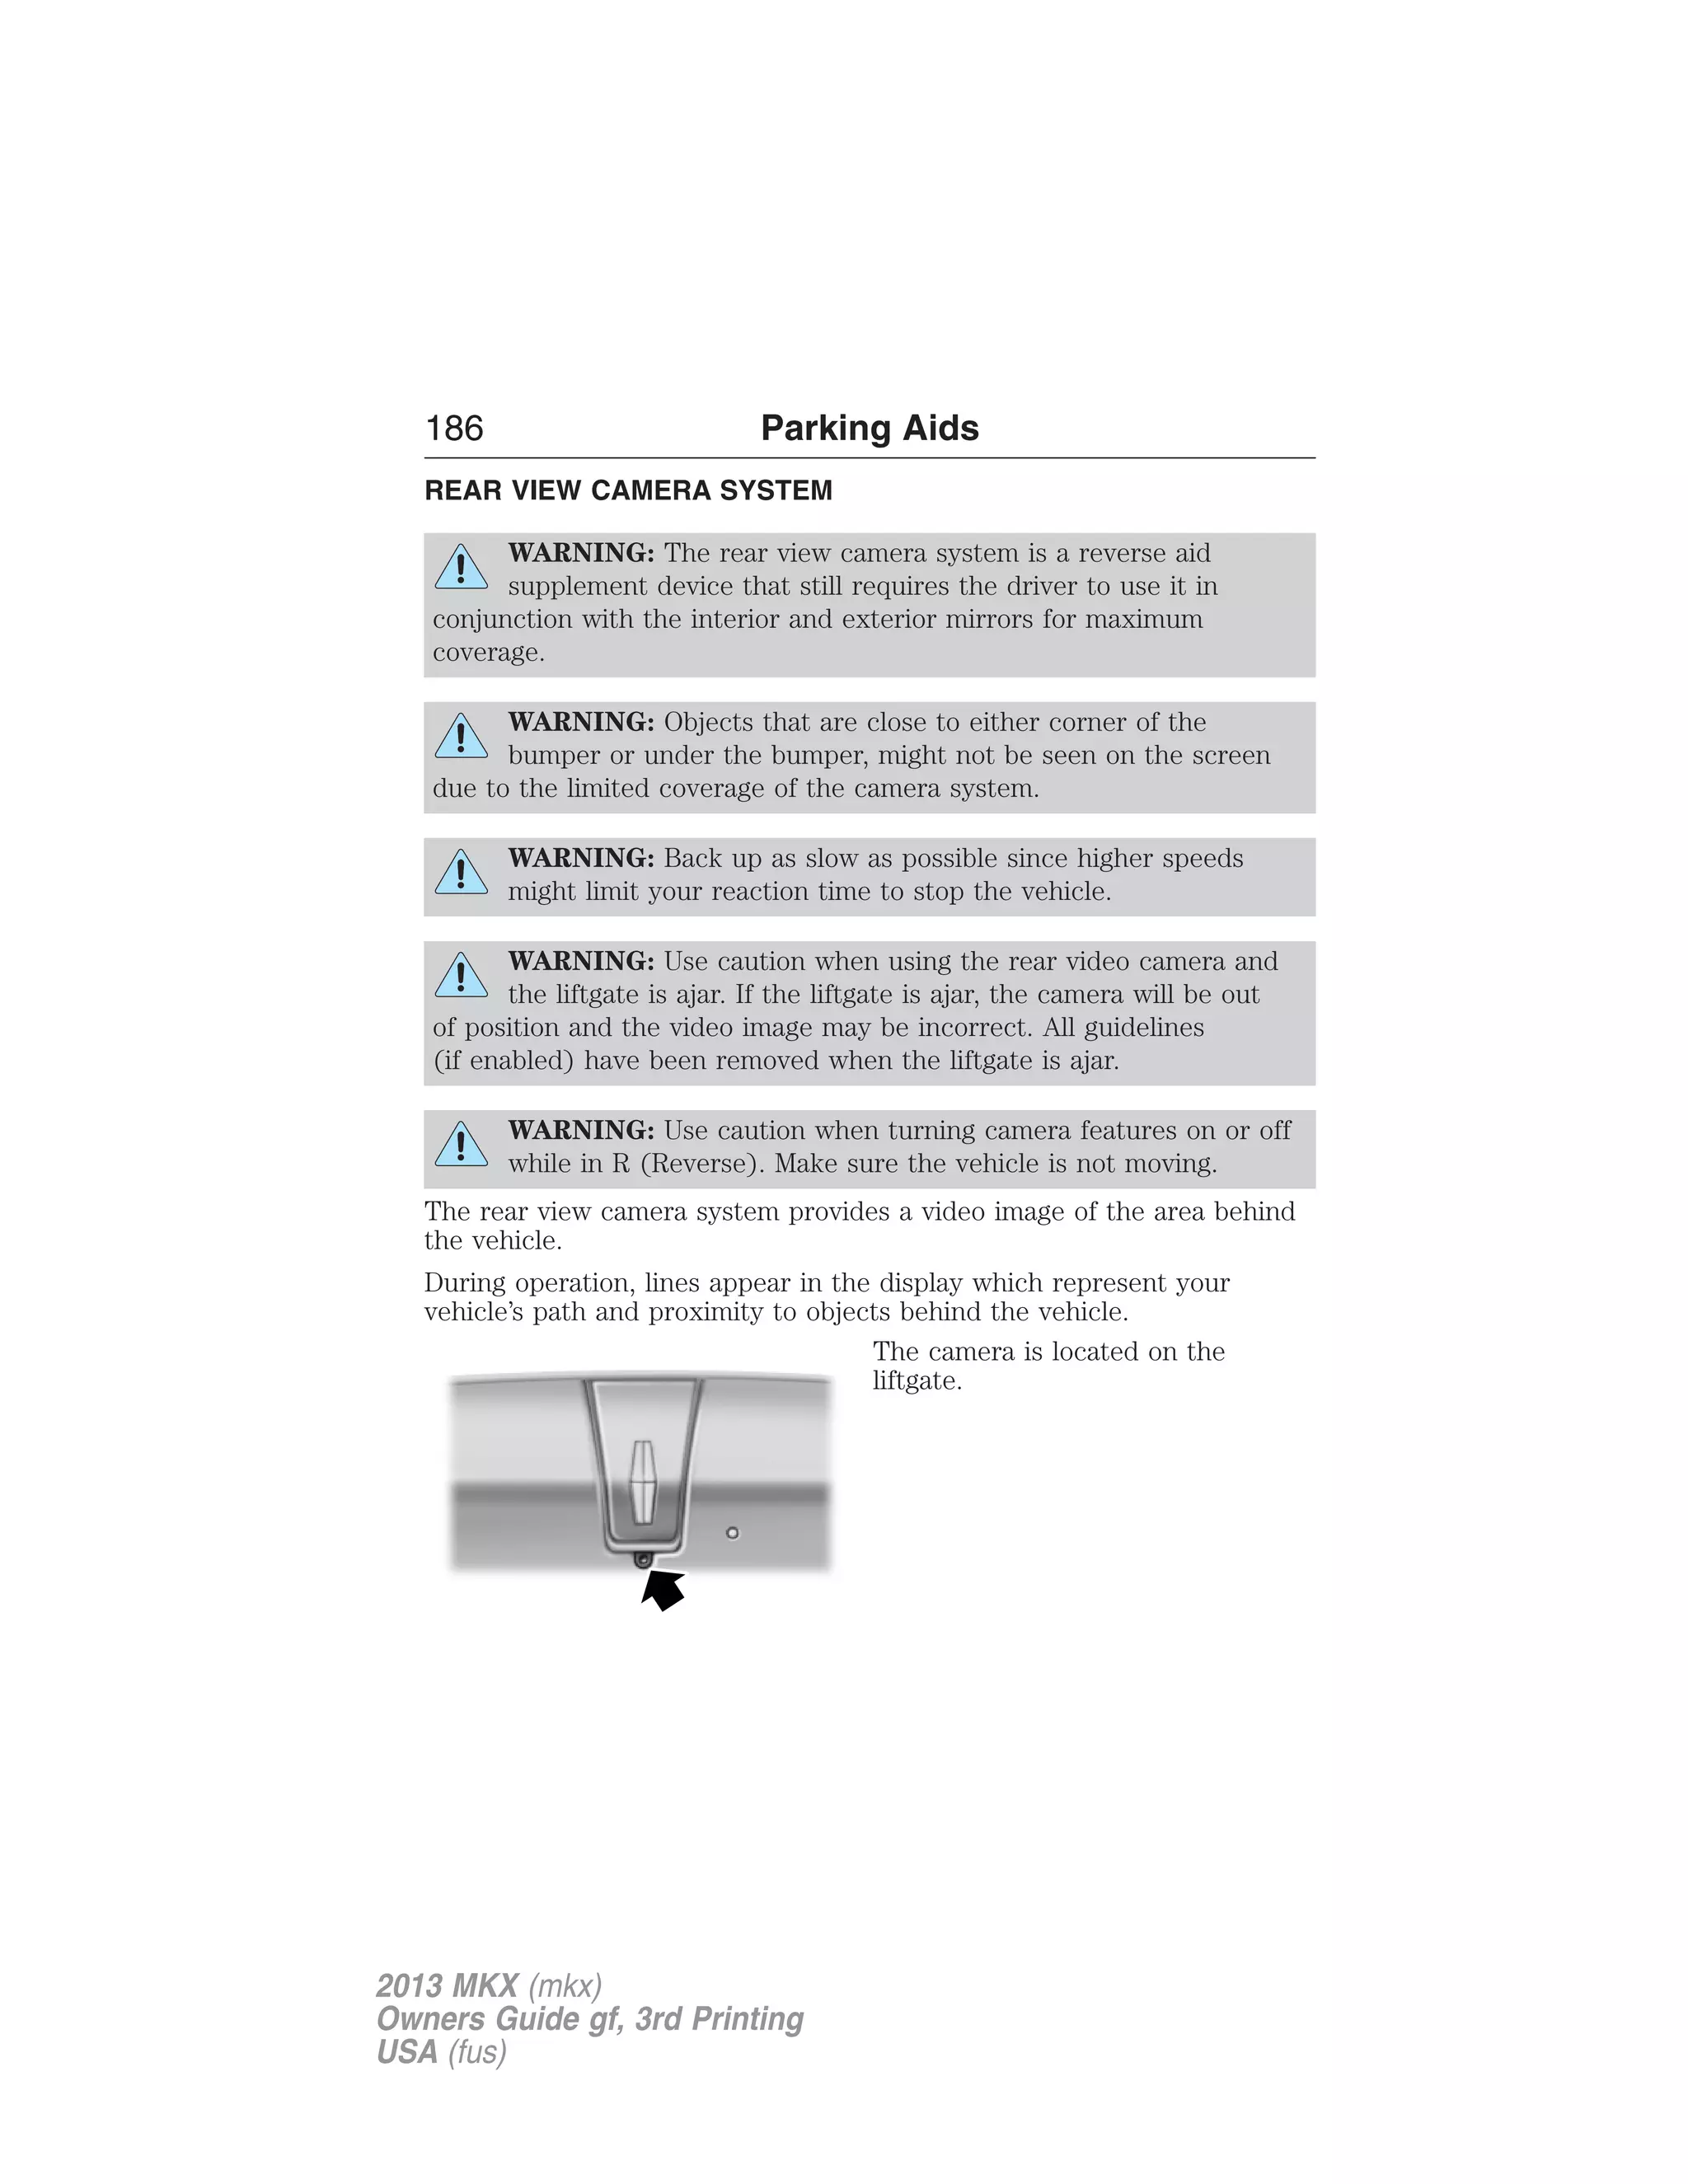
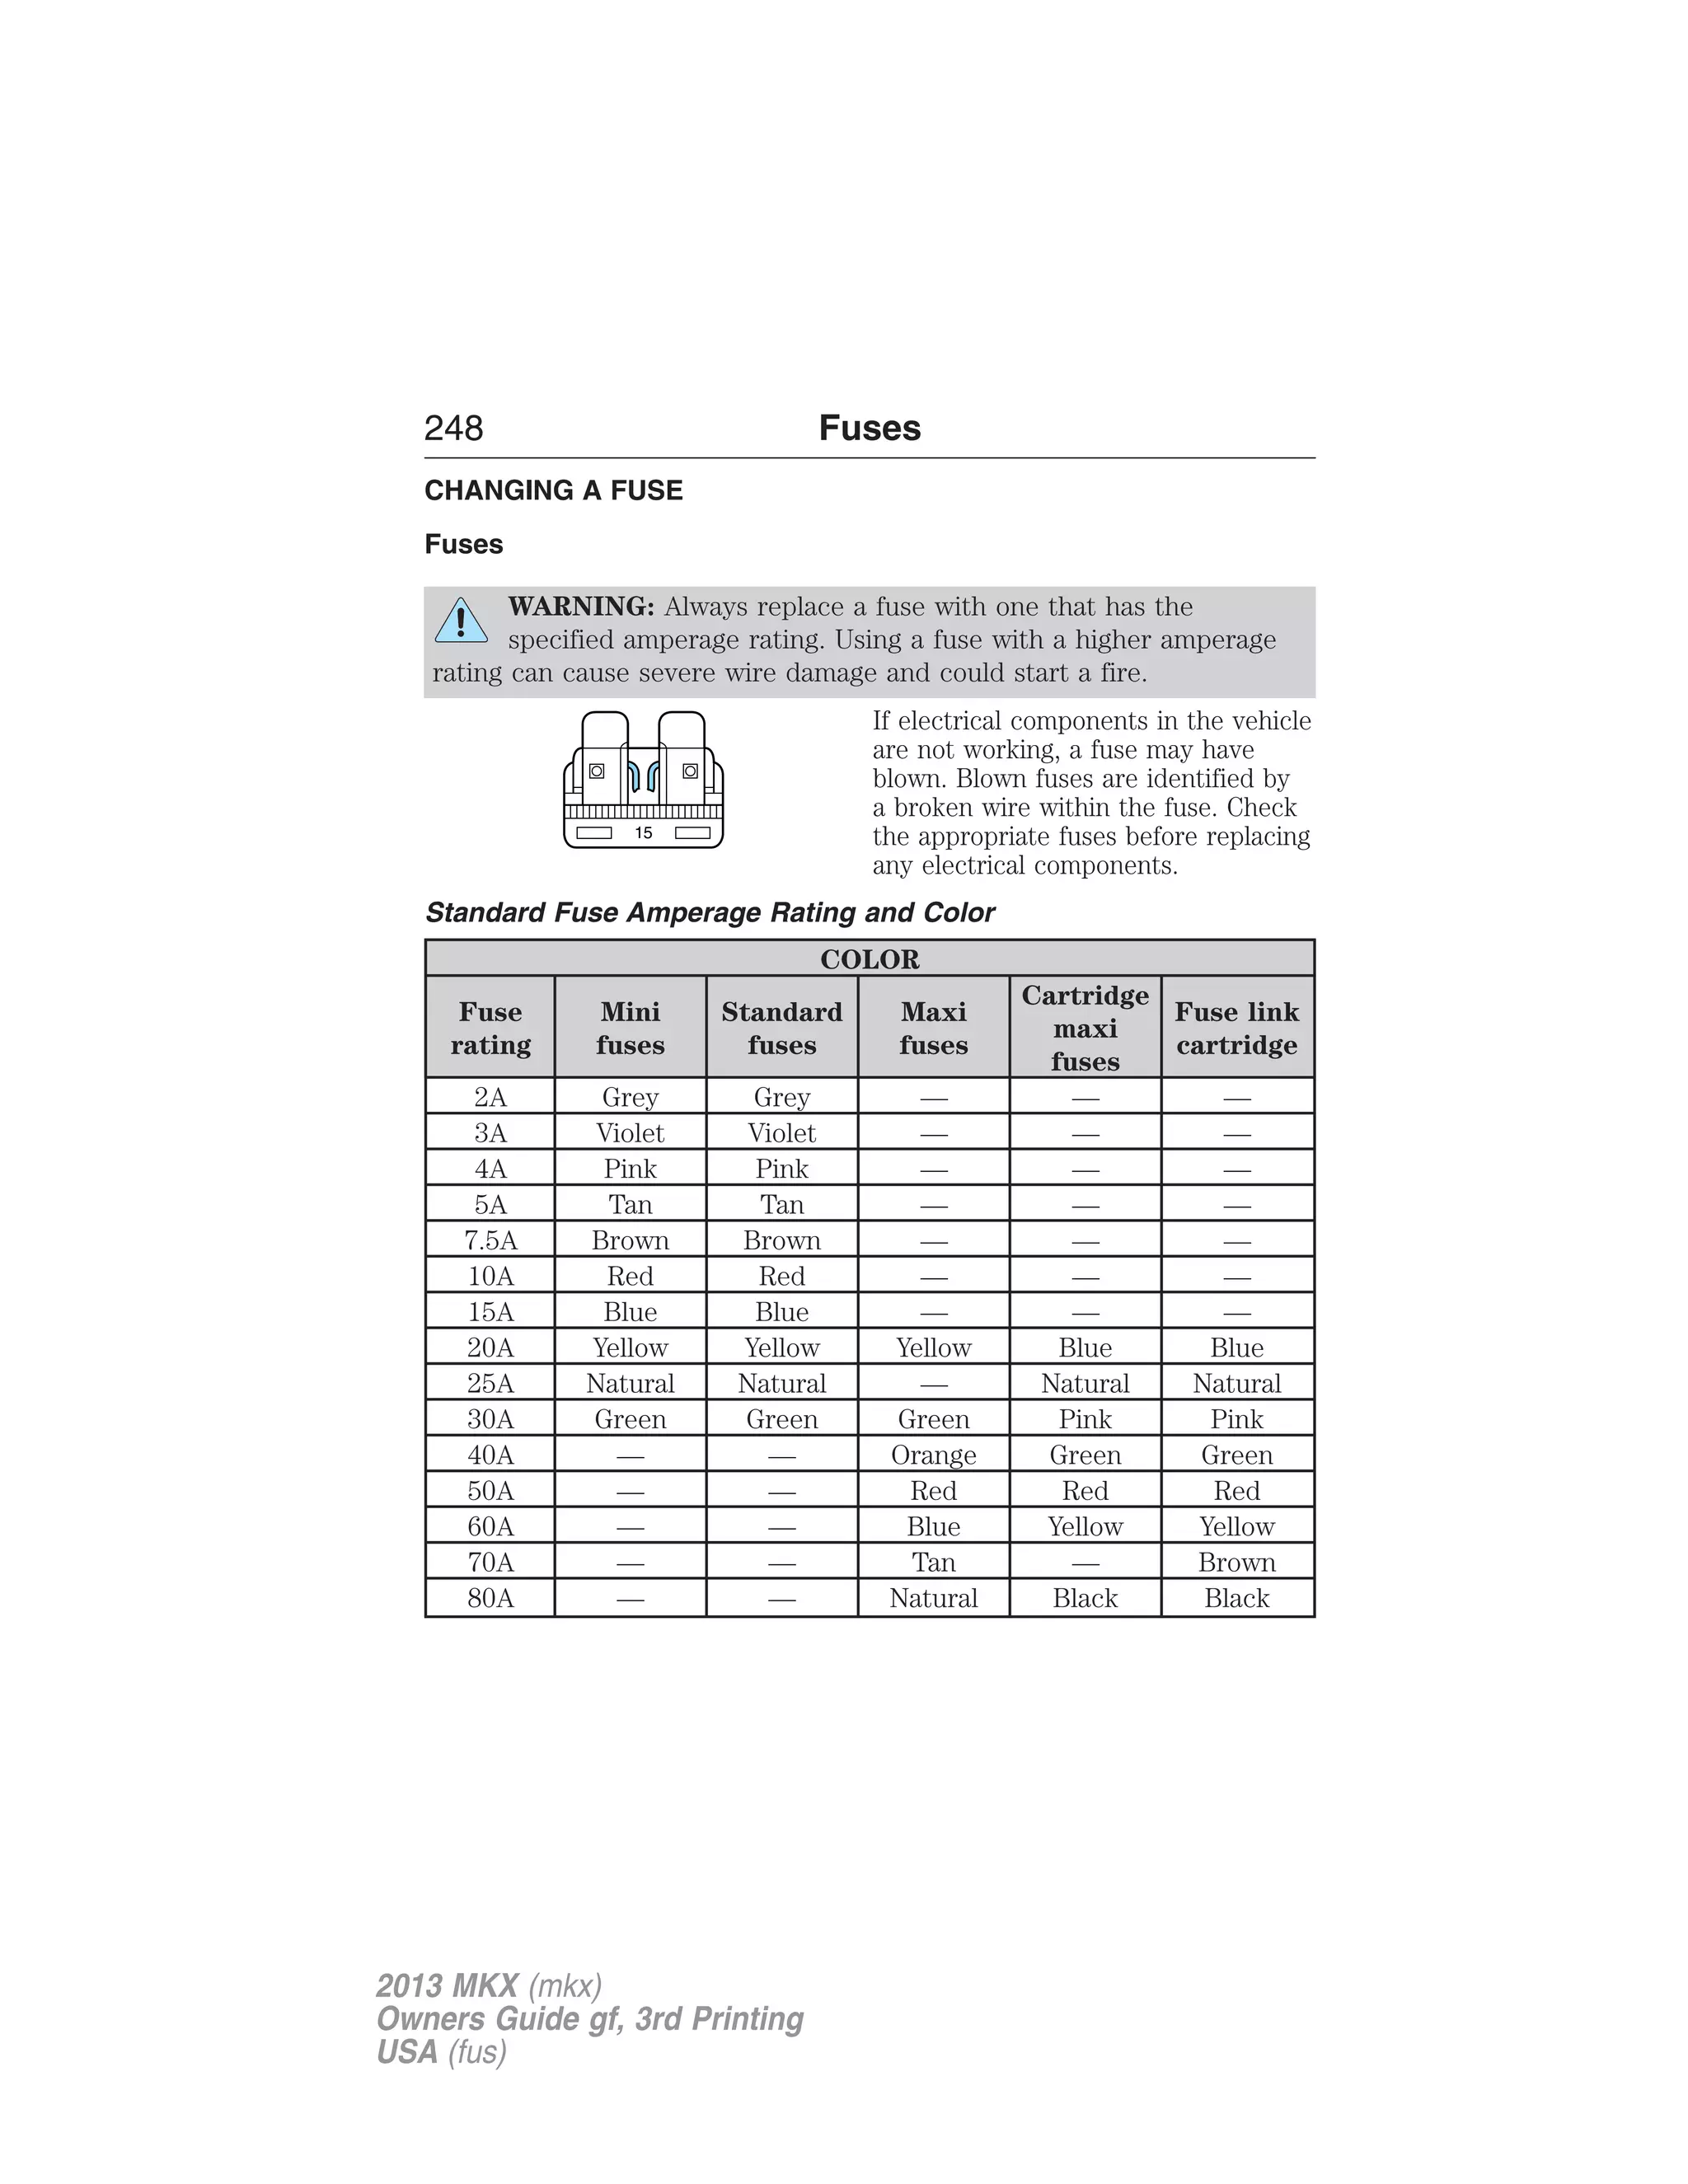
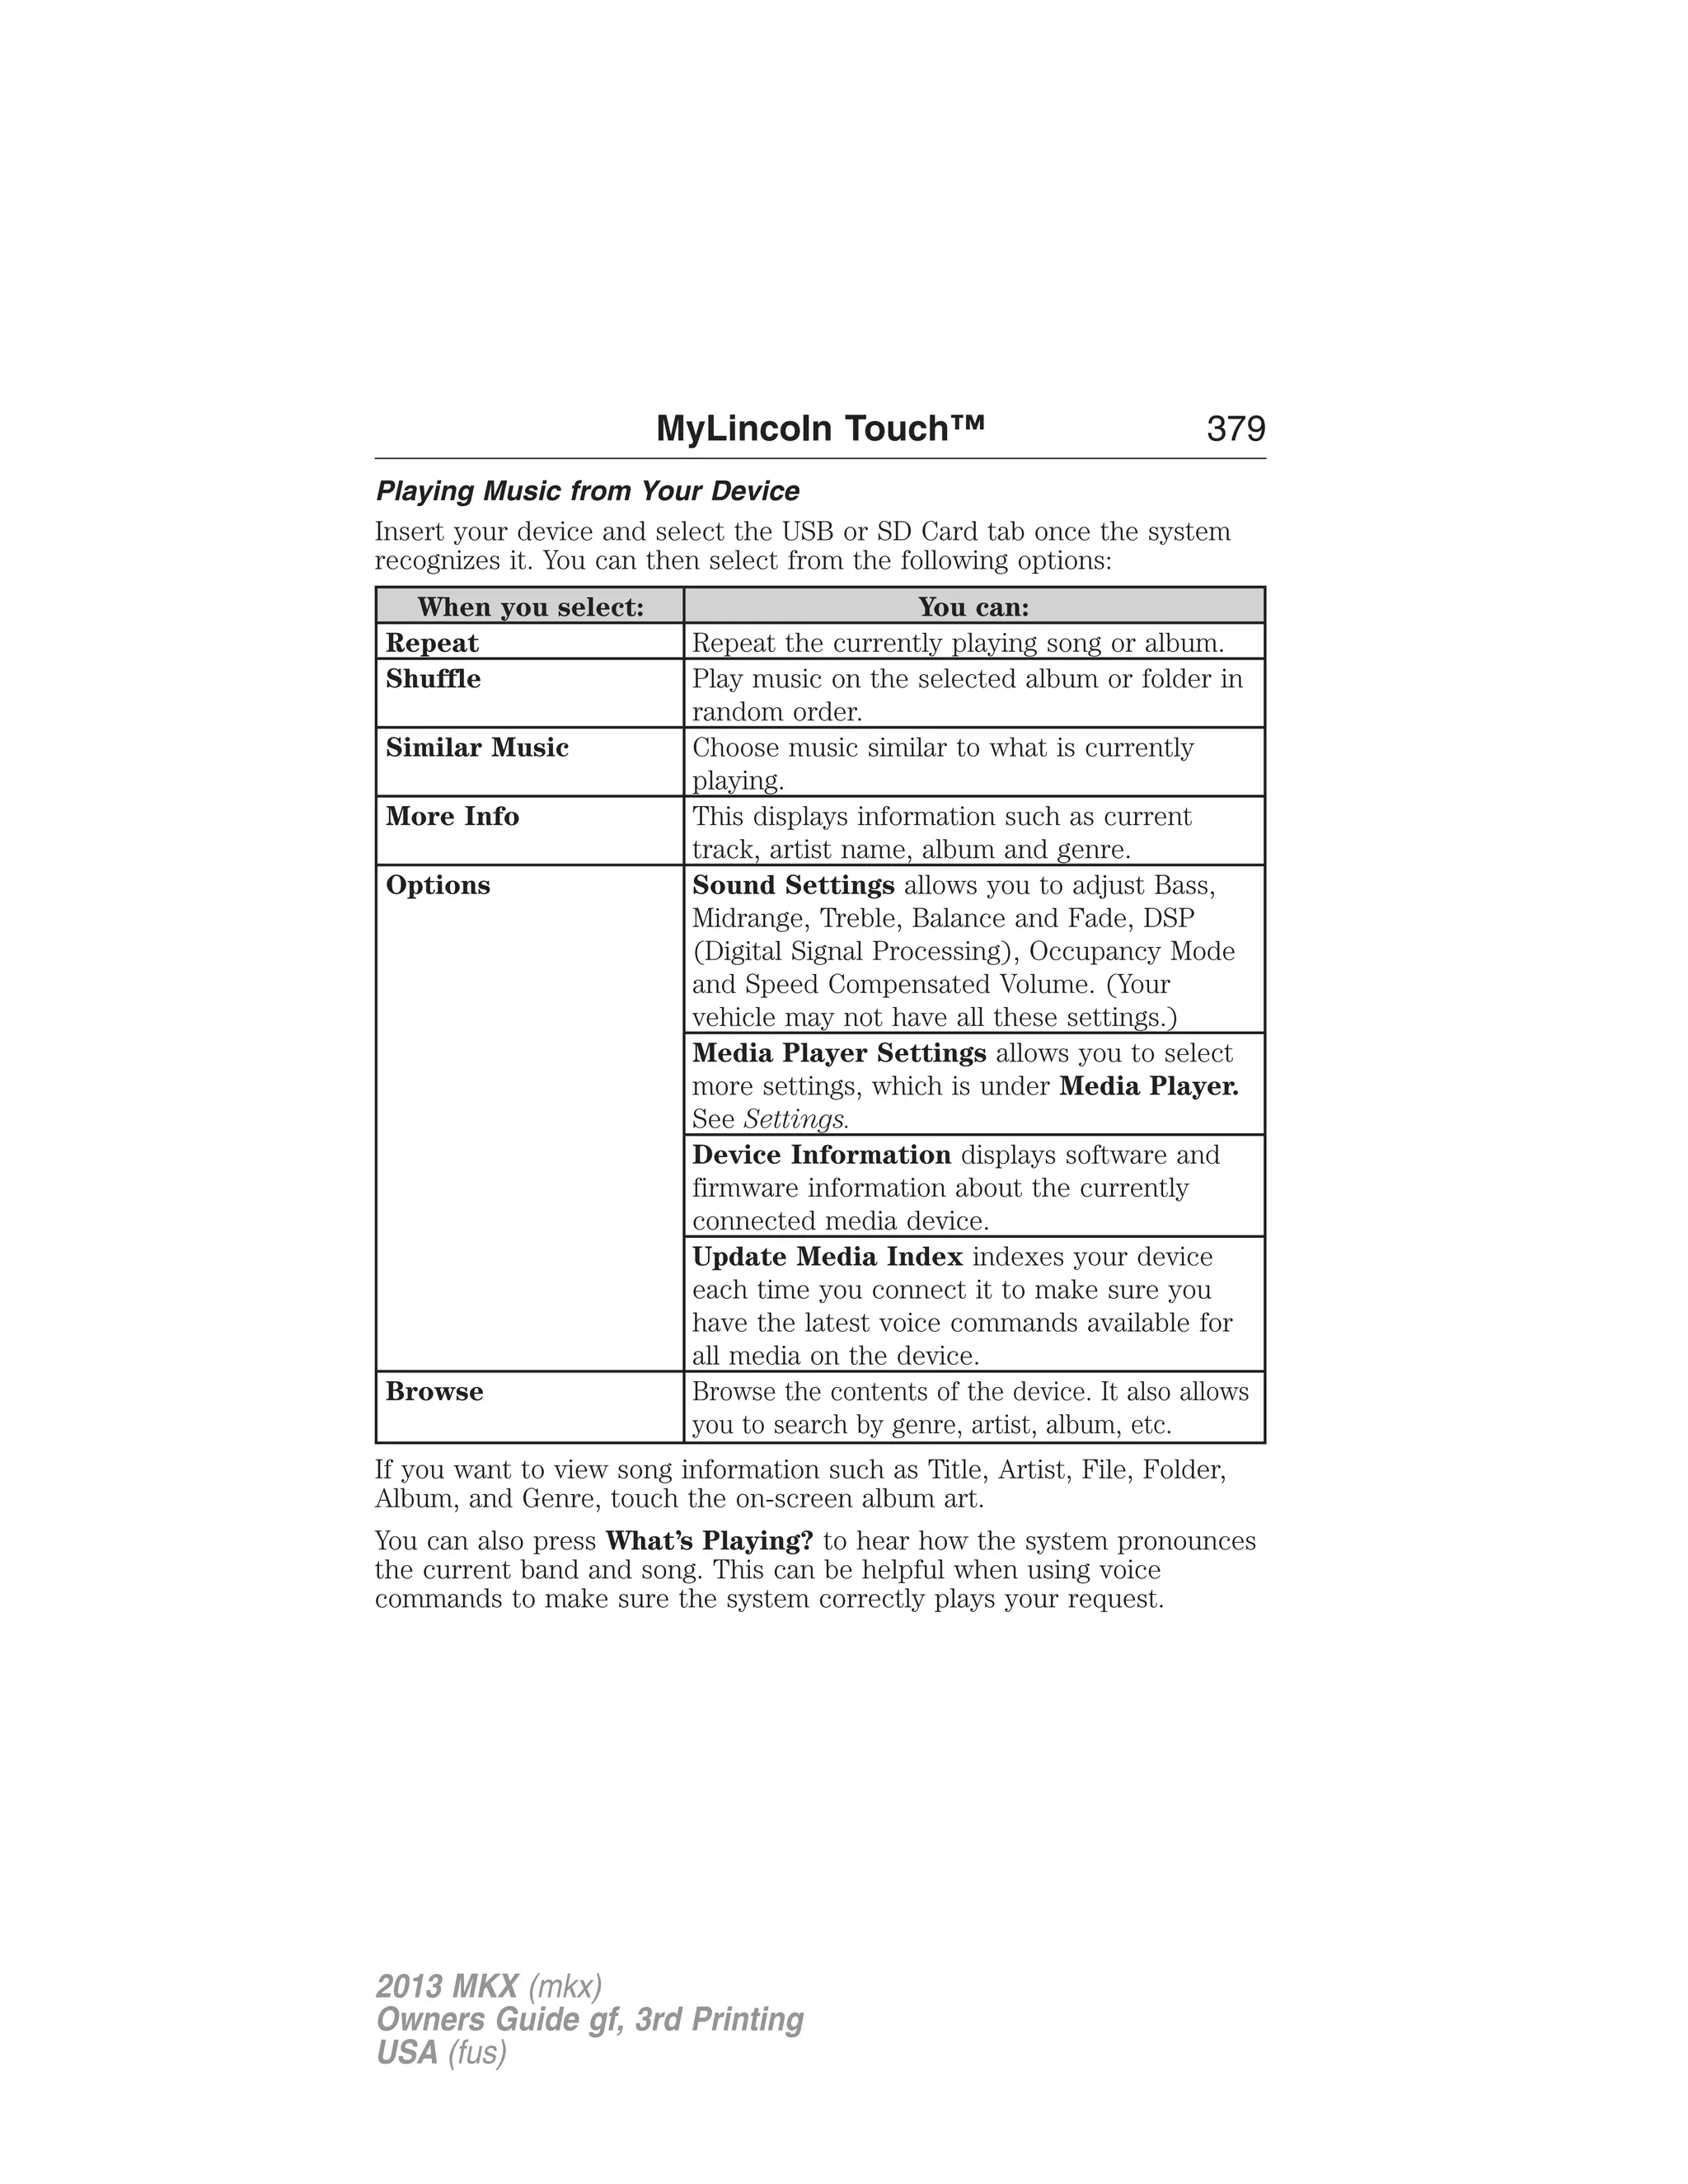
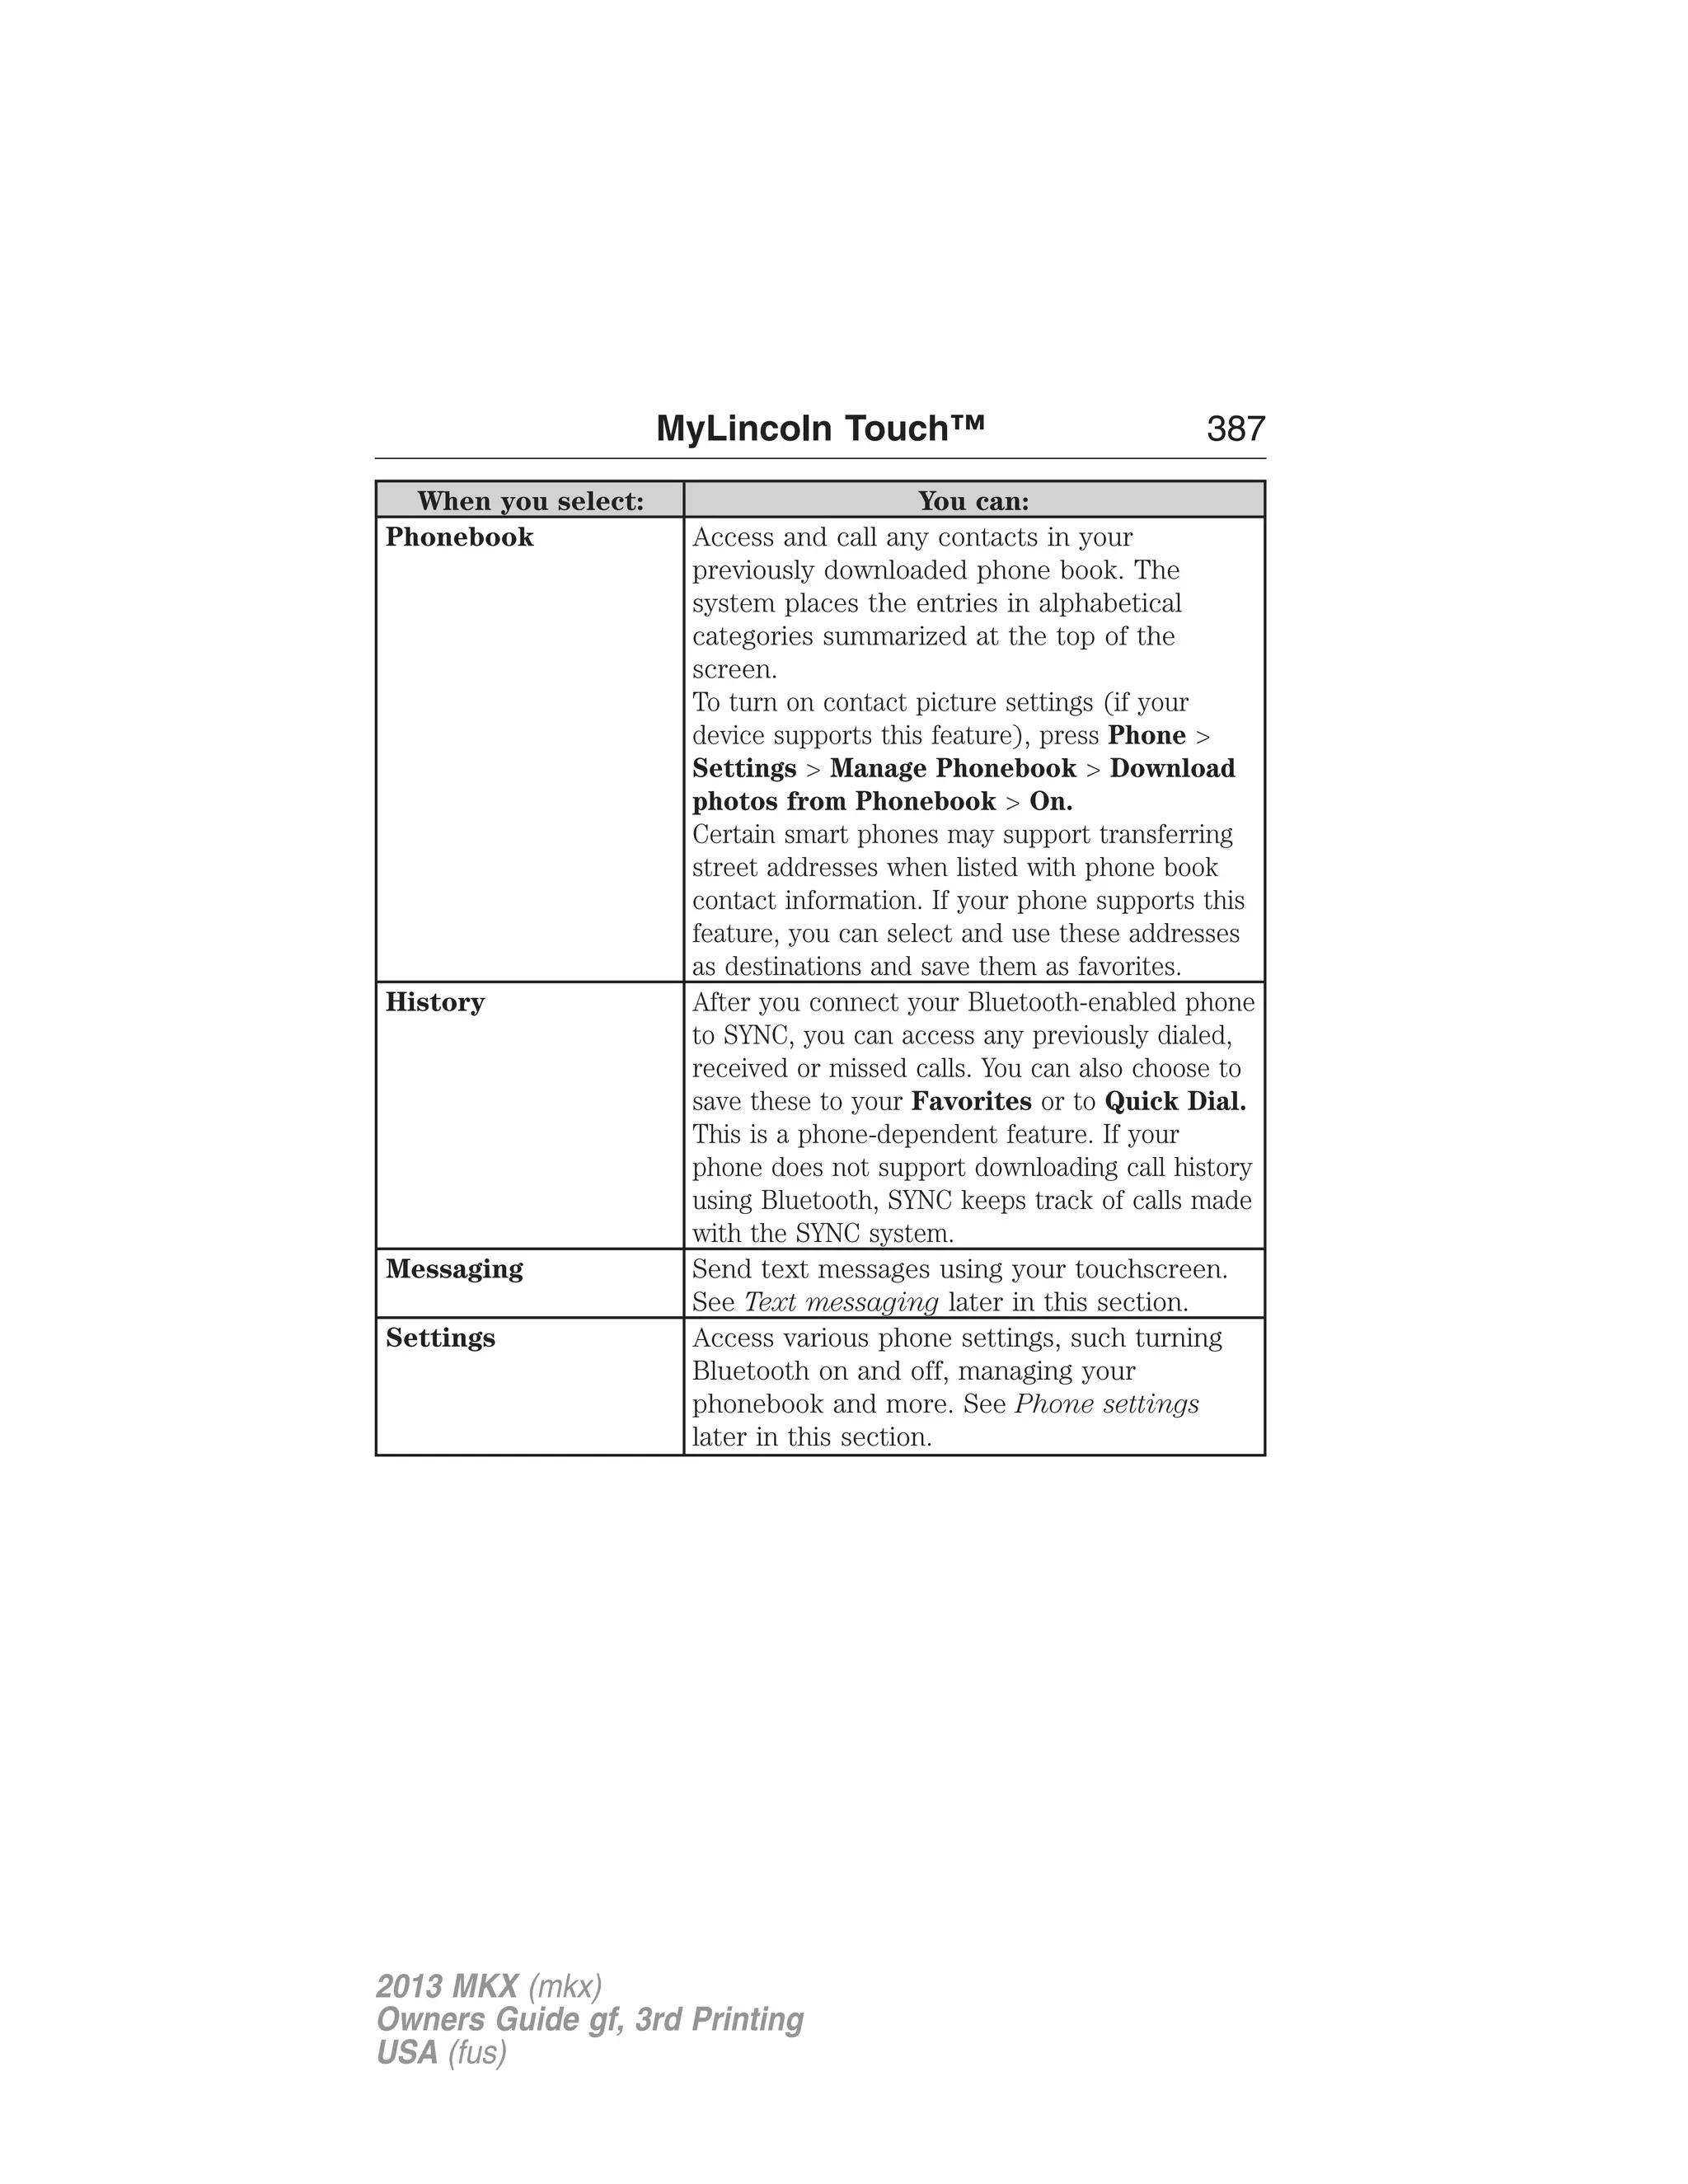
This document appears to be an owner's manual for the 2013 Lincoln MKX that covers various vehicle features and operating instructions over multiple sections. It includes information on child safety seats, safety belts, airbags, vehicle keys and locks, climate controls, and more. The manual provides guidance to vehicle owners on the proper use and maintenance of vehicle controls, components, and systems.


![110 Information Displays
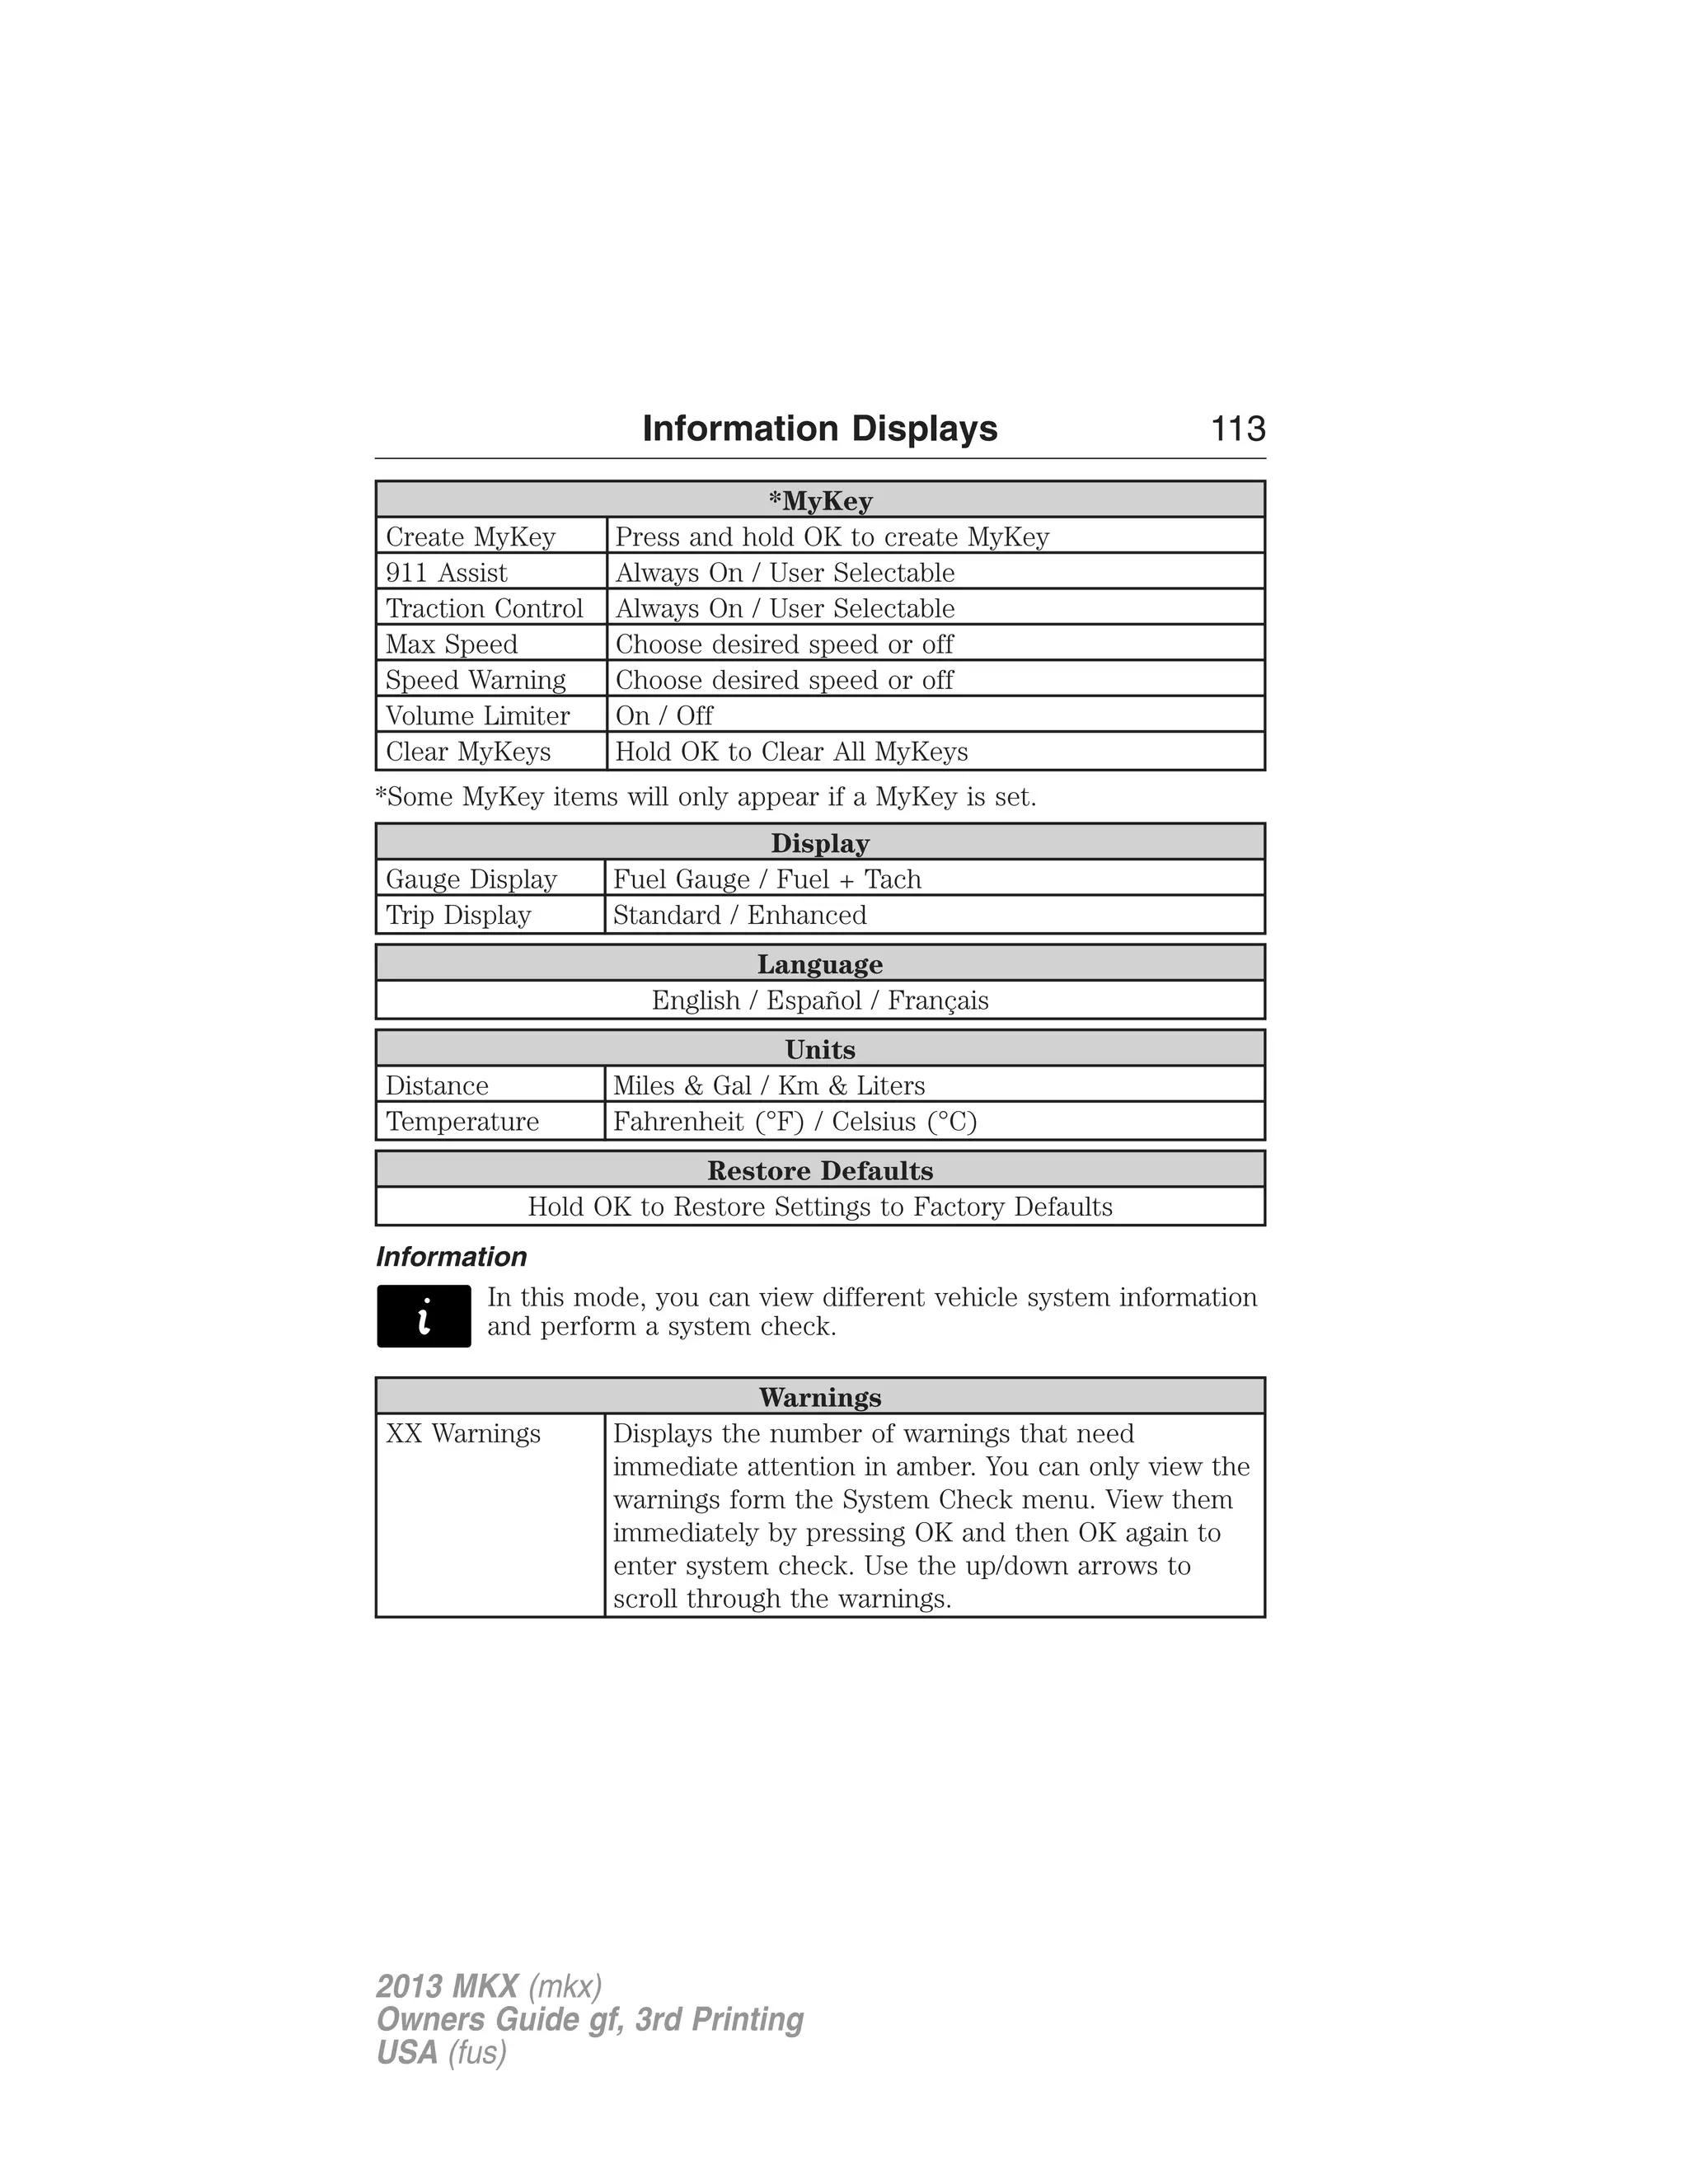
• Fuel gauge: Indicates approximately how much fuel is left in the fuel
tank. The fuel gauge may vary slightly when the vehicle is in motion
or on a grade. When the fuel level becomes low (50 miles [80 km] to
empty), the level indicator will change to amber. When the fuel level
becomes critically low (0 miles [0 km] to empty), the level indicator
will change to red.
Note: When a MyKey® is in use, low fuel warnings will display earlier.
The fuel icon and arrow indicates which side of the vehicle the fuel
filler door is located.
• Bar/Round tachometer: Indicates the engine speed in revolutions per
minute. Driving with your tachometer pointer continuously at the top
of the scale may damage the engine. During SelectShift Automatic™
transmission (SST) use, the currently selected gear will appear in the
display.
• Engine coolant temperature gauge: Indicates engine coolant
temperature. At normal operating temperature, the level indicator will
be in the normal range. If the engine coolant temperature exceeds the
normal range, stop the vehicle as soon as safely possible, switch off
the engine and let the engine cool.
• Intelligent AWD (if equipped): displays power distribution between the
front and rear wheels. More power to either front or rear wheels will
be displayed by more area filled in.
Trip 1 & 2
Choose between the standard or enhanced trip display. See the
Settings chart following to reach the trip display settings.
Trip 1 & 2 Standard display
Enhanced
display
Trip distance X X
Elapsed trip time X X
Average fuel economy X
Estimated amount of fuel consumed X
Total odometer (lower left corner)
Press OK to pause the Trip 1 or 2 screen. Press again to un-pause.
Press and hold OK to reset the currently displayed trip information.
• Trip distance — shows the accumulated trip distance.
• Elapsed trip time— timer stops when the vehicle is turned off and
restarts when the vehicle is restarted.
2013 MKX (mkx)
Owners Guide gf, 3rd Printing
USA (fus)](https://image.slidesharecdn.com/13mkx-140905063956-phpapp02/75/13mkx-111-2048.jpg)


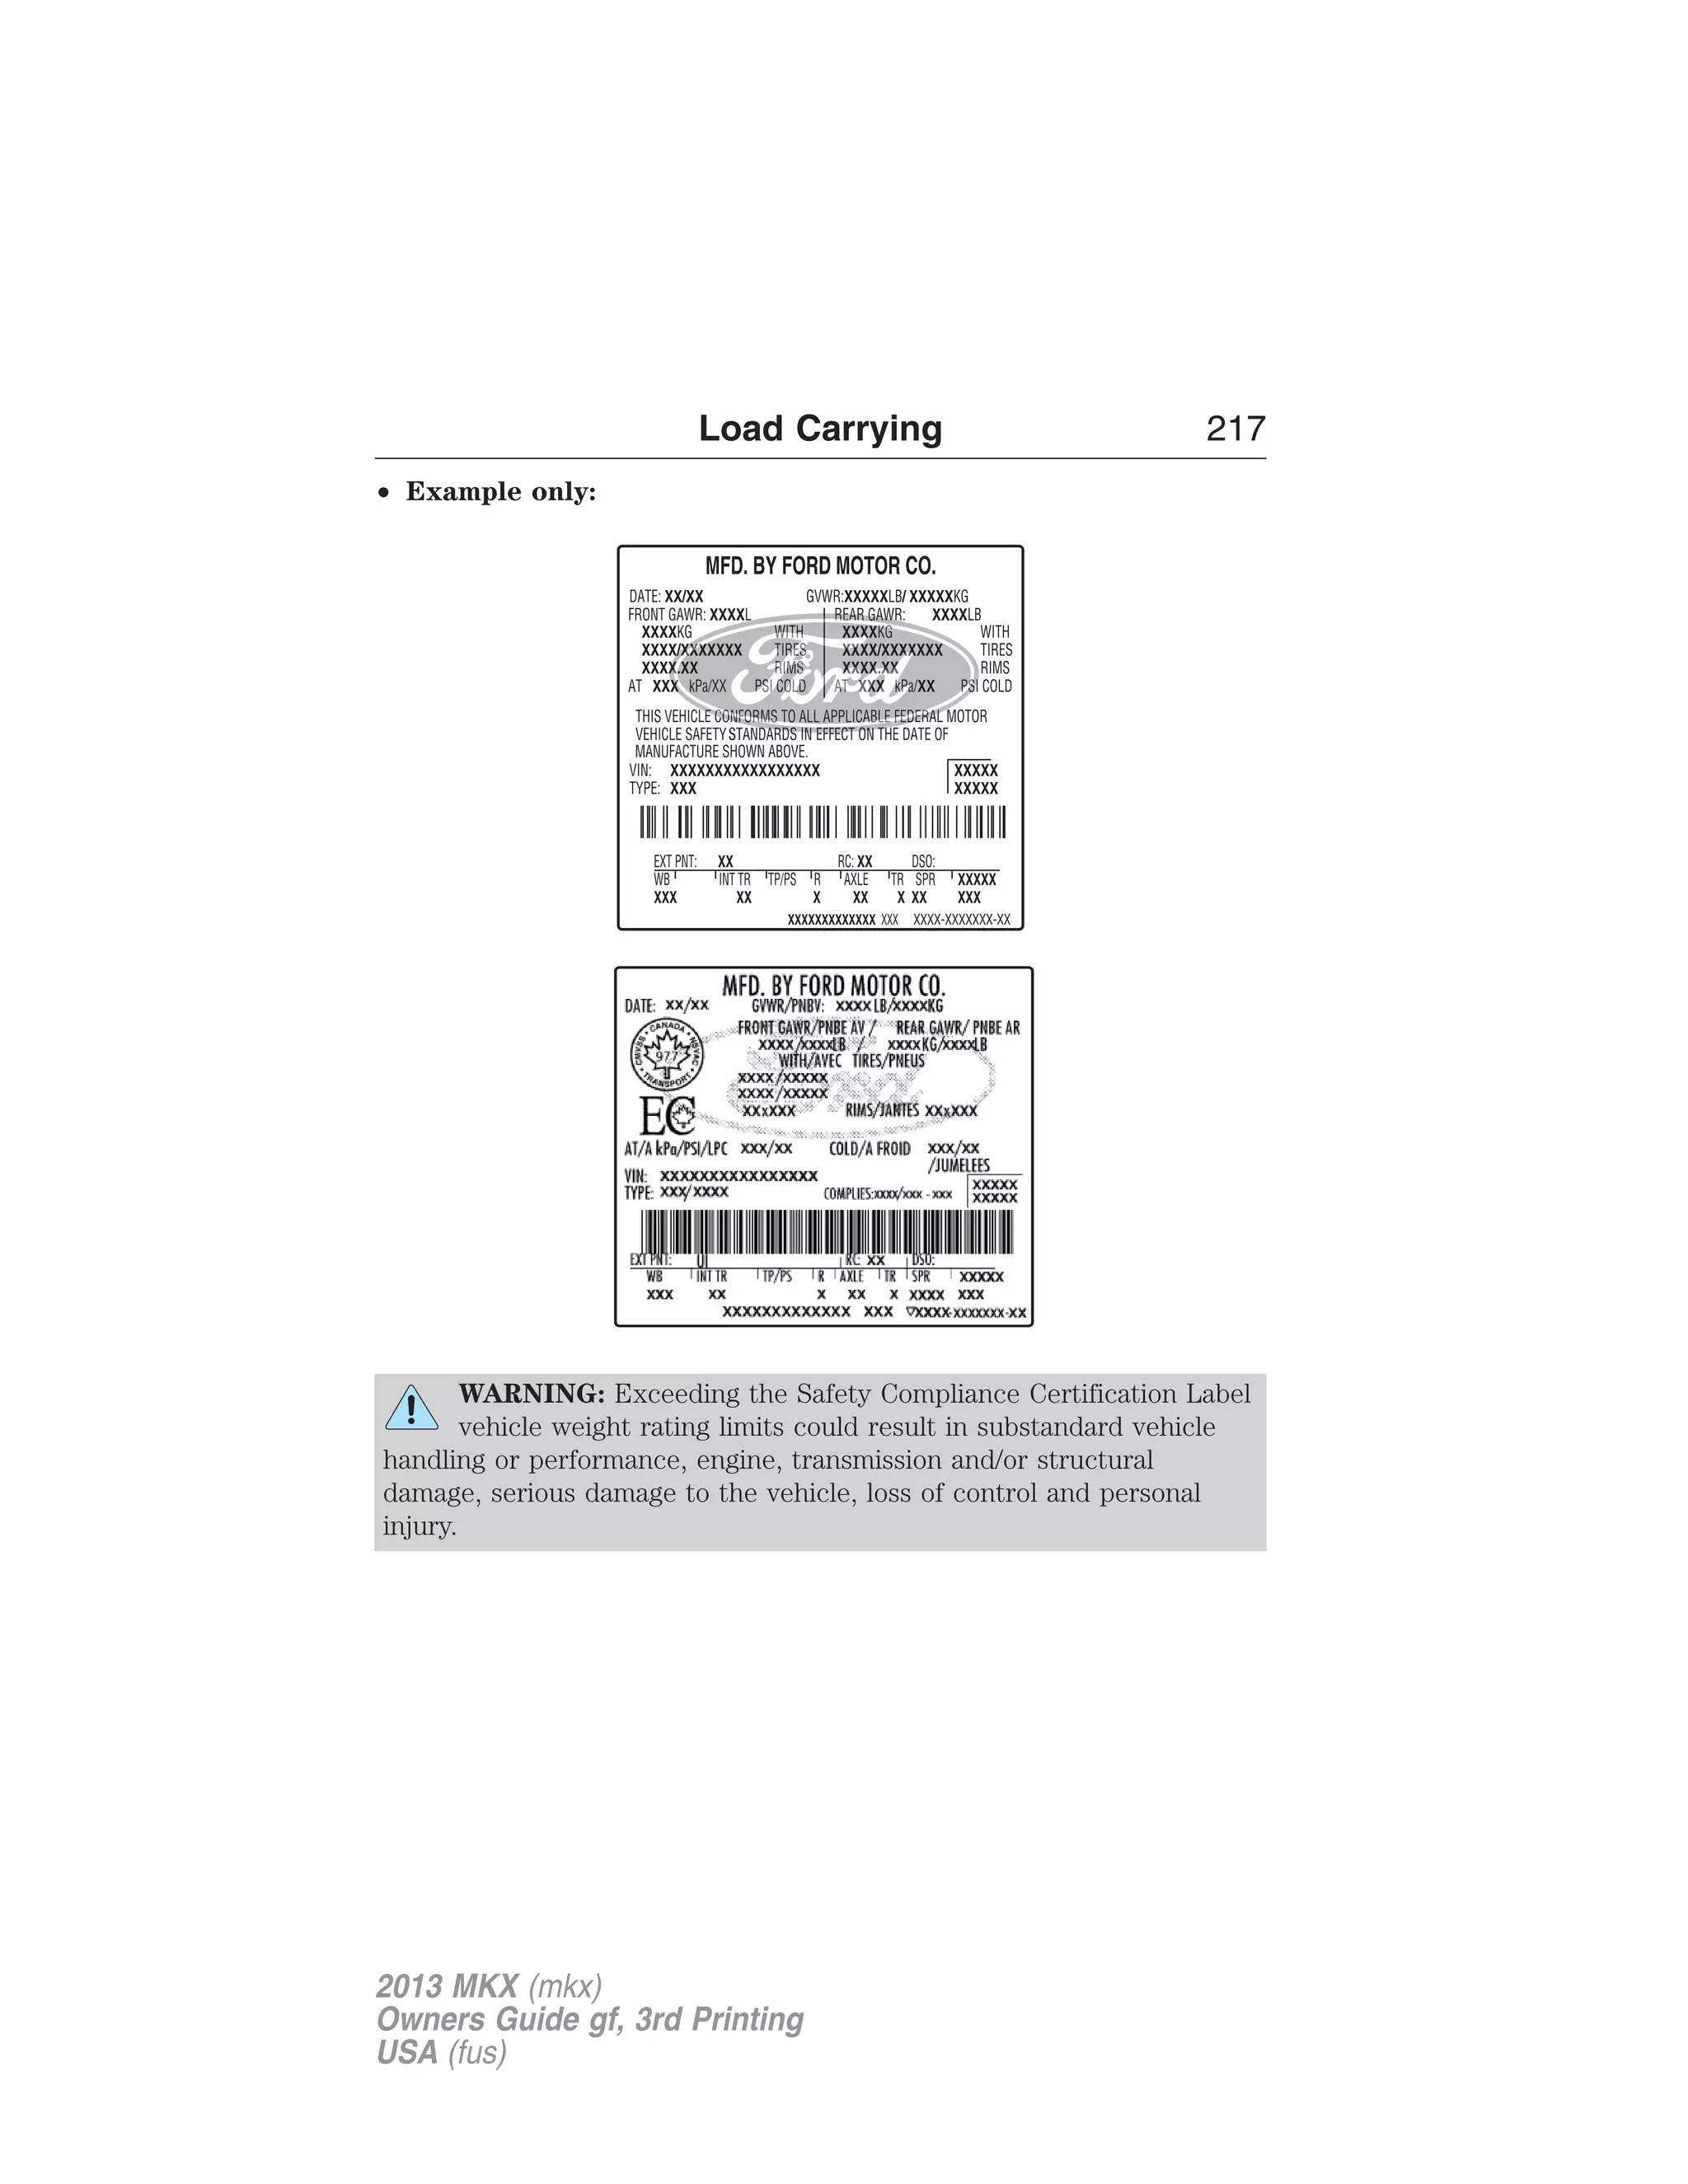
![218 Load Carrying
GCW (Gross Combined Weight) – is the weight of the loaded vehicle
(GVW) plus the weight of the fully loaded trailer.
GCWR (Gross Combined Weight Rating) – is the maximum allowable
weight of the vehicle and the loaded trailer – including all cargo and
passengers – that the vehicle can handle without risking damage.
(Important: The towing vehicle’s braking system is rated for operation at
GVWR, not at GCWR. Separate functional brakes should be used for safe
control of towed vehicles and for trailers where the GCW of the towing
vehicle plus the trailer exceed the GVWR of the towing vehicle. The GCW
must never exceed the GCWR.
Maximum Loaded Trailer Weight – is the highest possible weight of a
fully loaded trailer the vehicle can tow. It assumes a vehicle with only
mandatory options, no cargo (internal or external), a tongue load of
10–15% (conventional trailer), and driver only (150 lb. [68 kg]). Consult
your authorized dealer (or the RV and Trailer Towing Guide
provided by your authorized dealer) for more detailed information.
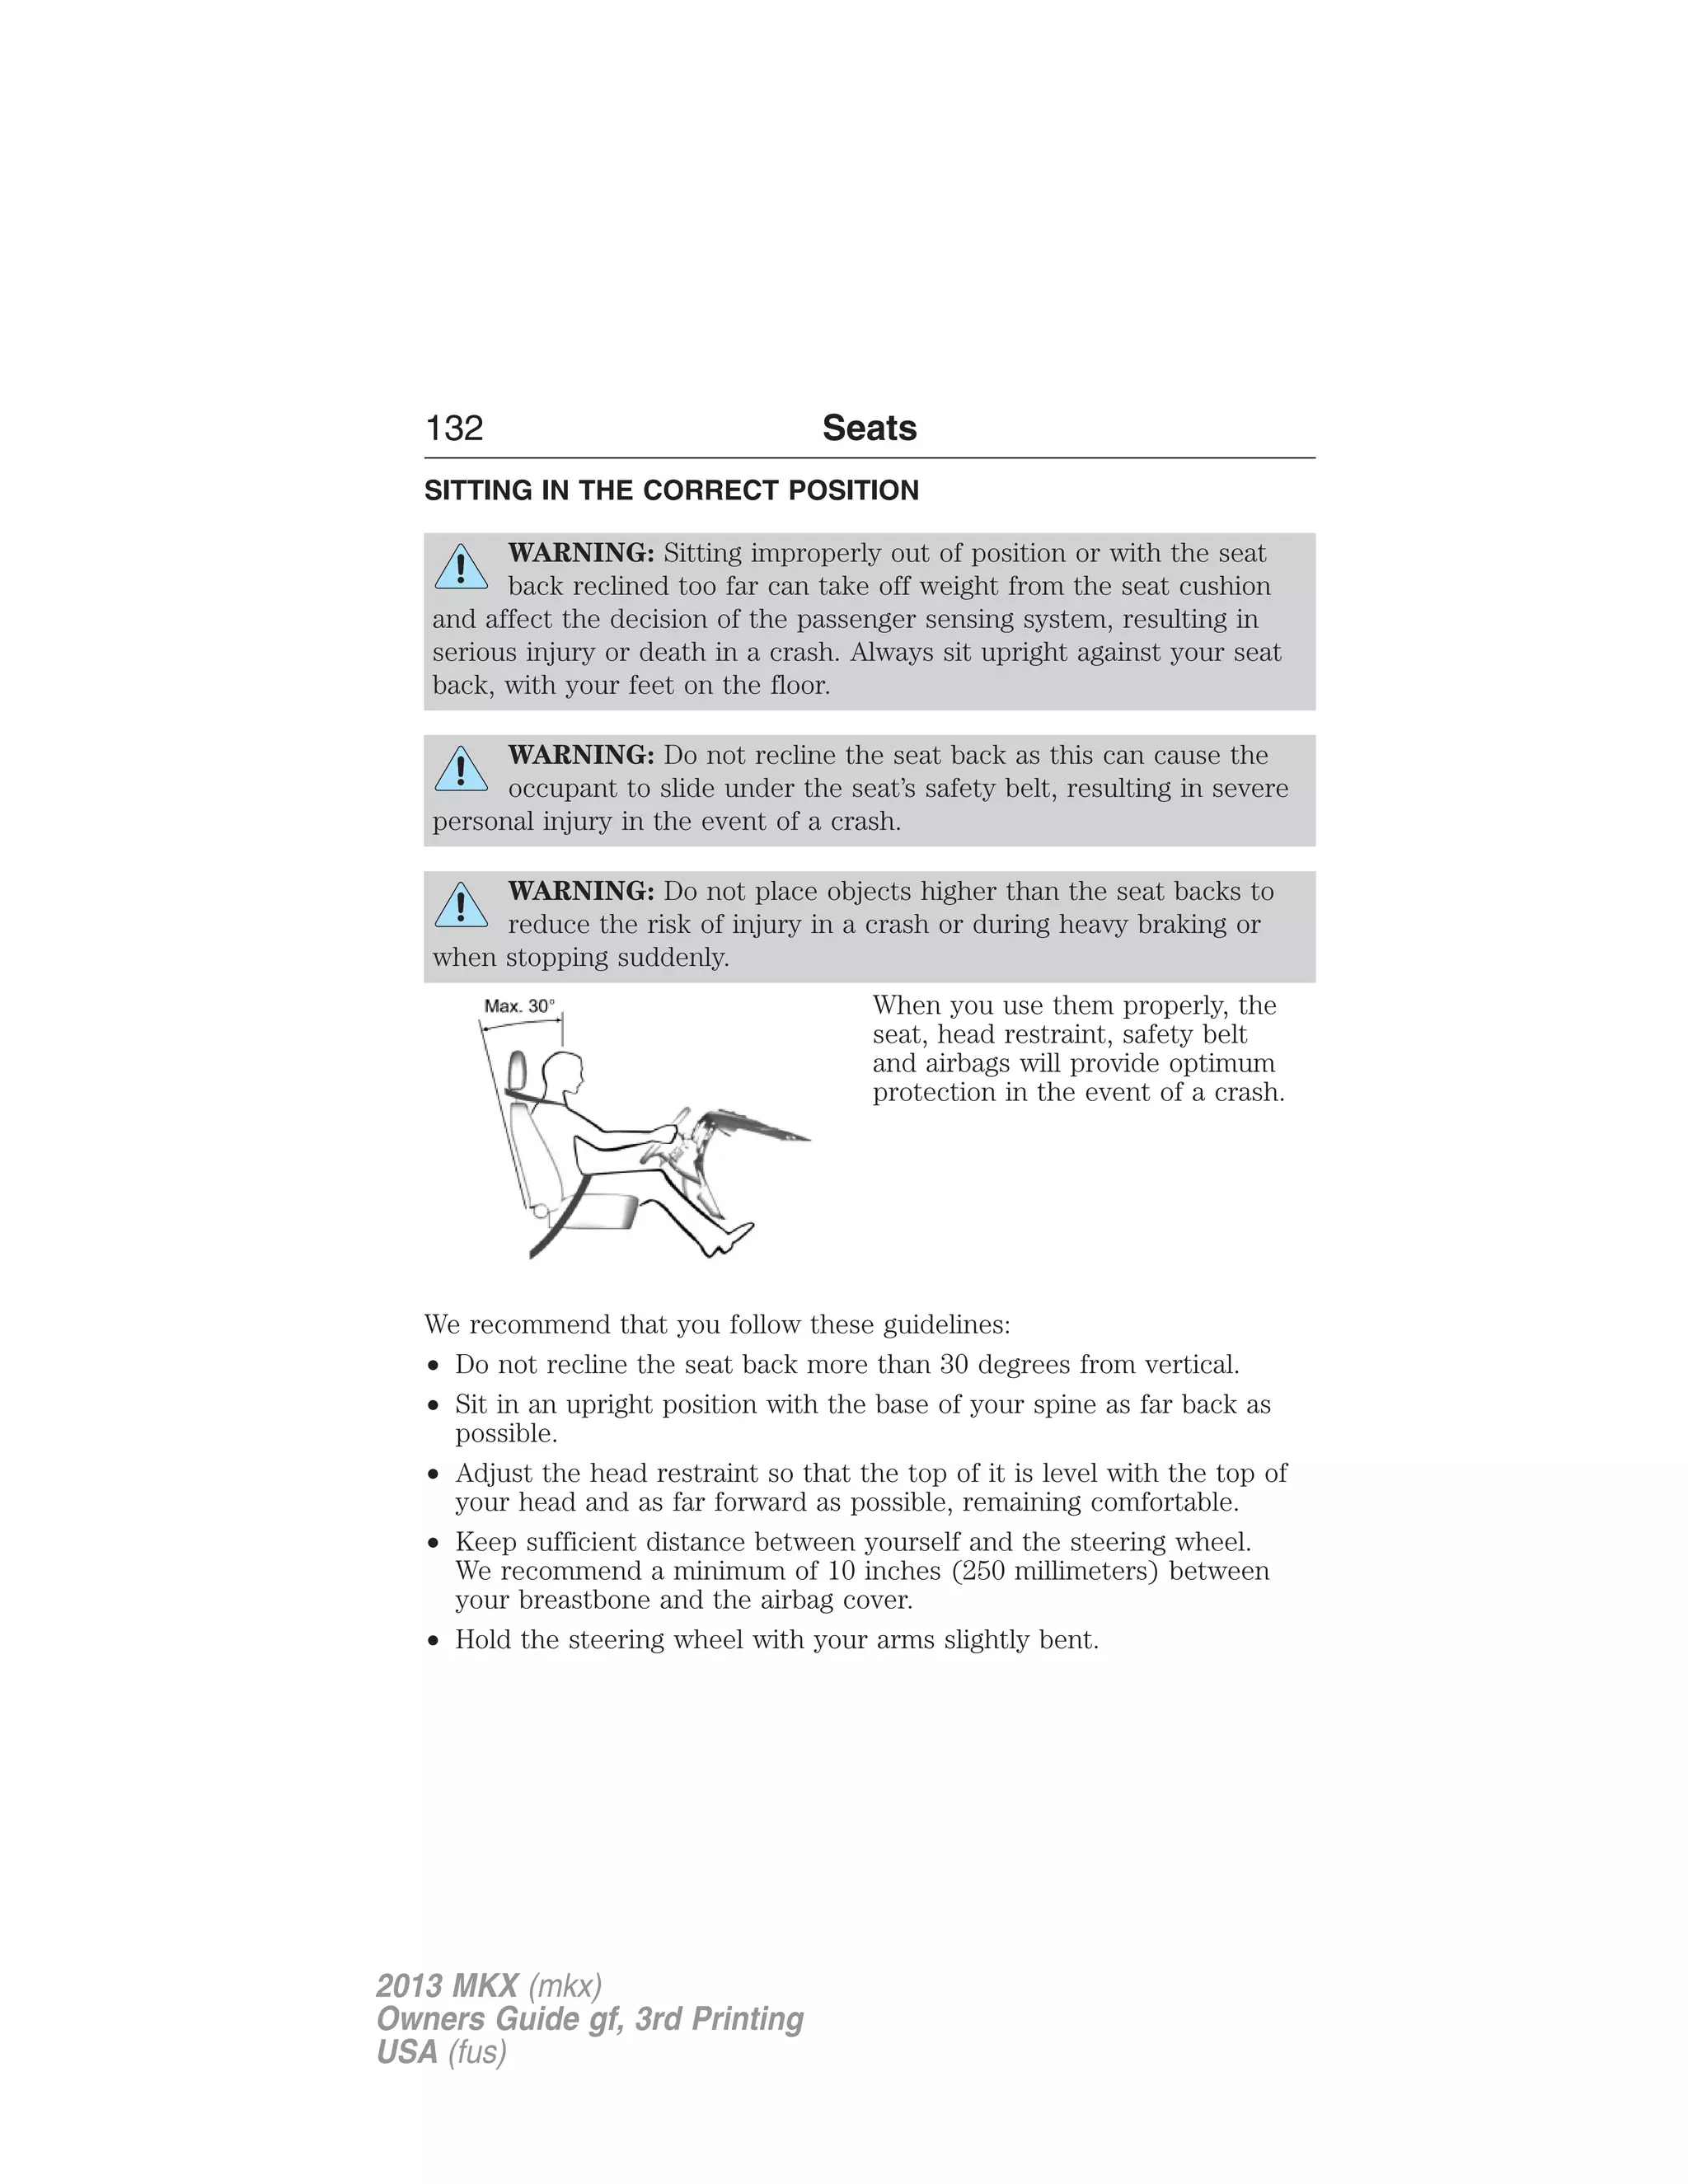
WARNING: Do not exceed the GVWR or the GAWR specified on
the Safety Compliance Certification Label.
WARNING: Do not use replacement tires with lower load
carrying capacities than the original tires because they may
lower the vehicle’s GVWR and GAWR limitations. Replacement tires
with a higher limit than the original tires do not increase the GVWR
and GAWR limitations.
WARNING: Exceeding any vehicle weight rating limitation could
result in serious damage to the vehicle and/or personal injury.
2013 MKX (mkx)
Owners Guide gf, 3rd Printing
USA (fus)](https://image.slidesharecdn.com/13mkx-140905063956-phpapp02/75/13mkx-219-2048.jpg)


![230 Driving Hints
BREAKING-IN
You need to break in new tires for approximately 300 mi (480 km).
During this time, your vehicle may exhibit some unique driving
characteristics. Avoid driving too fast during the first 1000 mi (1600 km).
Vary your speed frequently and change up through the gears early. Do
not labor the engine. Do not tow during the first 1000 miles (1600 km).
ECONOMICAL DRIVING
Fuel economy is affected by several things, such as how you drive, the
conditions you drive under and how you maintain your vehicle.
There are some things to keep in mind that may improve your fuel
economy:
• Accelerate and slow down in a smooth, moderate fashion.
• Drive at steady speeds without stopping.
• Anticipate stops; slowing down may eliminate the need to stop.
• Combine errands and minimize stop-and-go driving.
• Close the windows for high-speed driving.
• Drive at reasonable speeds (traveling at 55 mph [88 km/h] uses 15%
less fuel than traveling at 65 mph [105 km/h]).
• Keep the tires properly inflated and use only the recommended size.
• Use the recommended engine oil.
• Perform all regularly scheduled maintenance.
There are also some things you may not want to do because they may
reduce your fuel economy:
• Sudden or hard accelerations.
• Rev the engine before turning it off.
• Idle for periods longer than one minute.
• Warm up your vehicle on cold mornings.
• Use the air conditioner or front defroster.
• Use the speed control in hilly terrain.
• Rest your foot on the brake pedal while driving.
2013 MKX (mkx)
Owners Guide gf, 3rd Printing
USA (fus)](https://image.slidesharecdn.com/13mkx-140905063956-phpapp02/75/13mkx-231-2048.jpg)
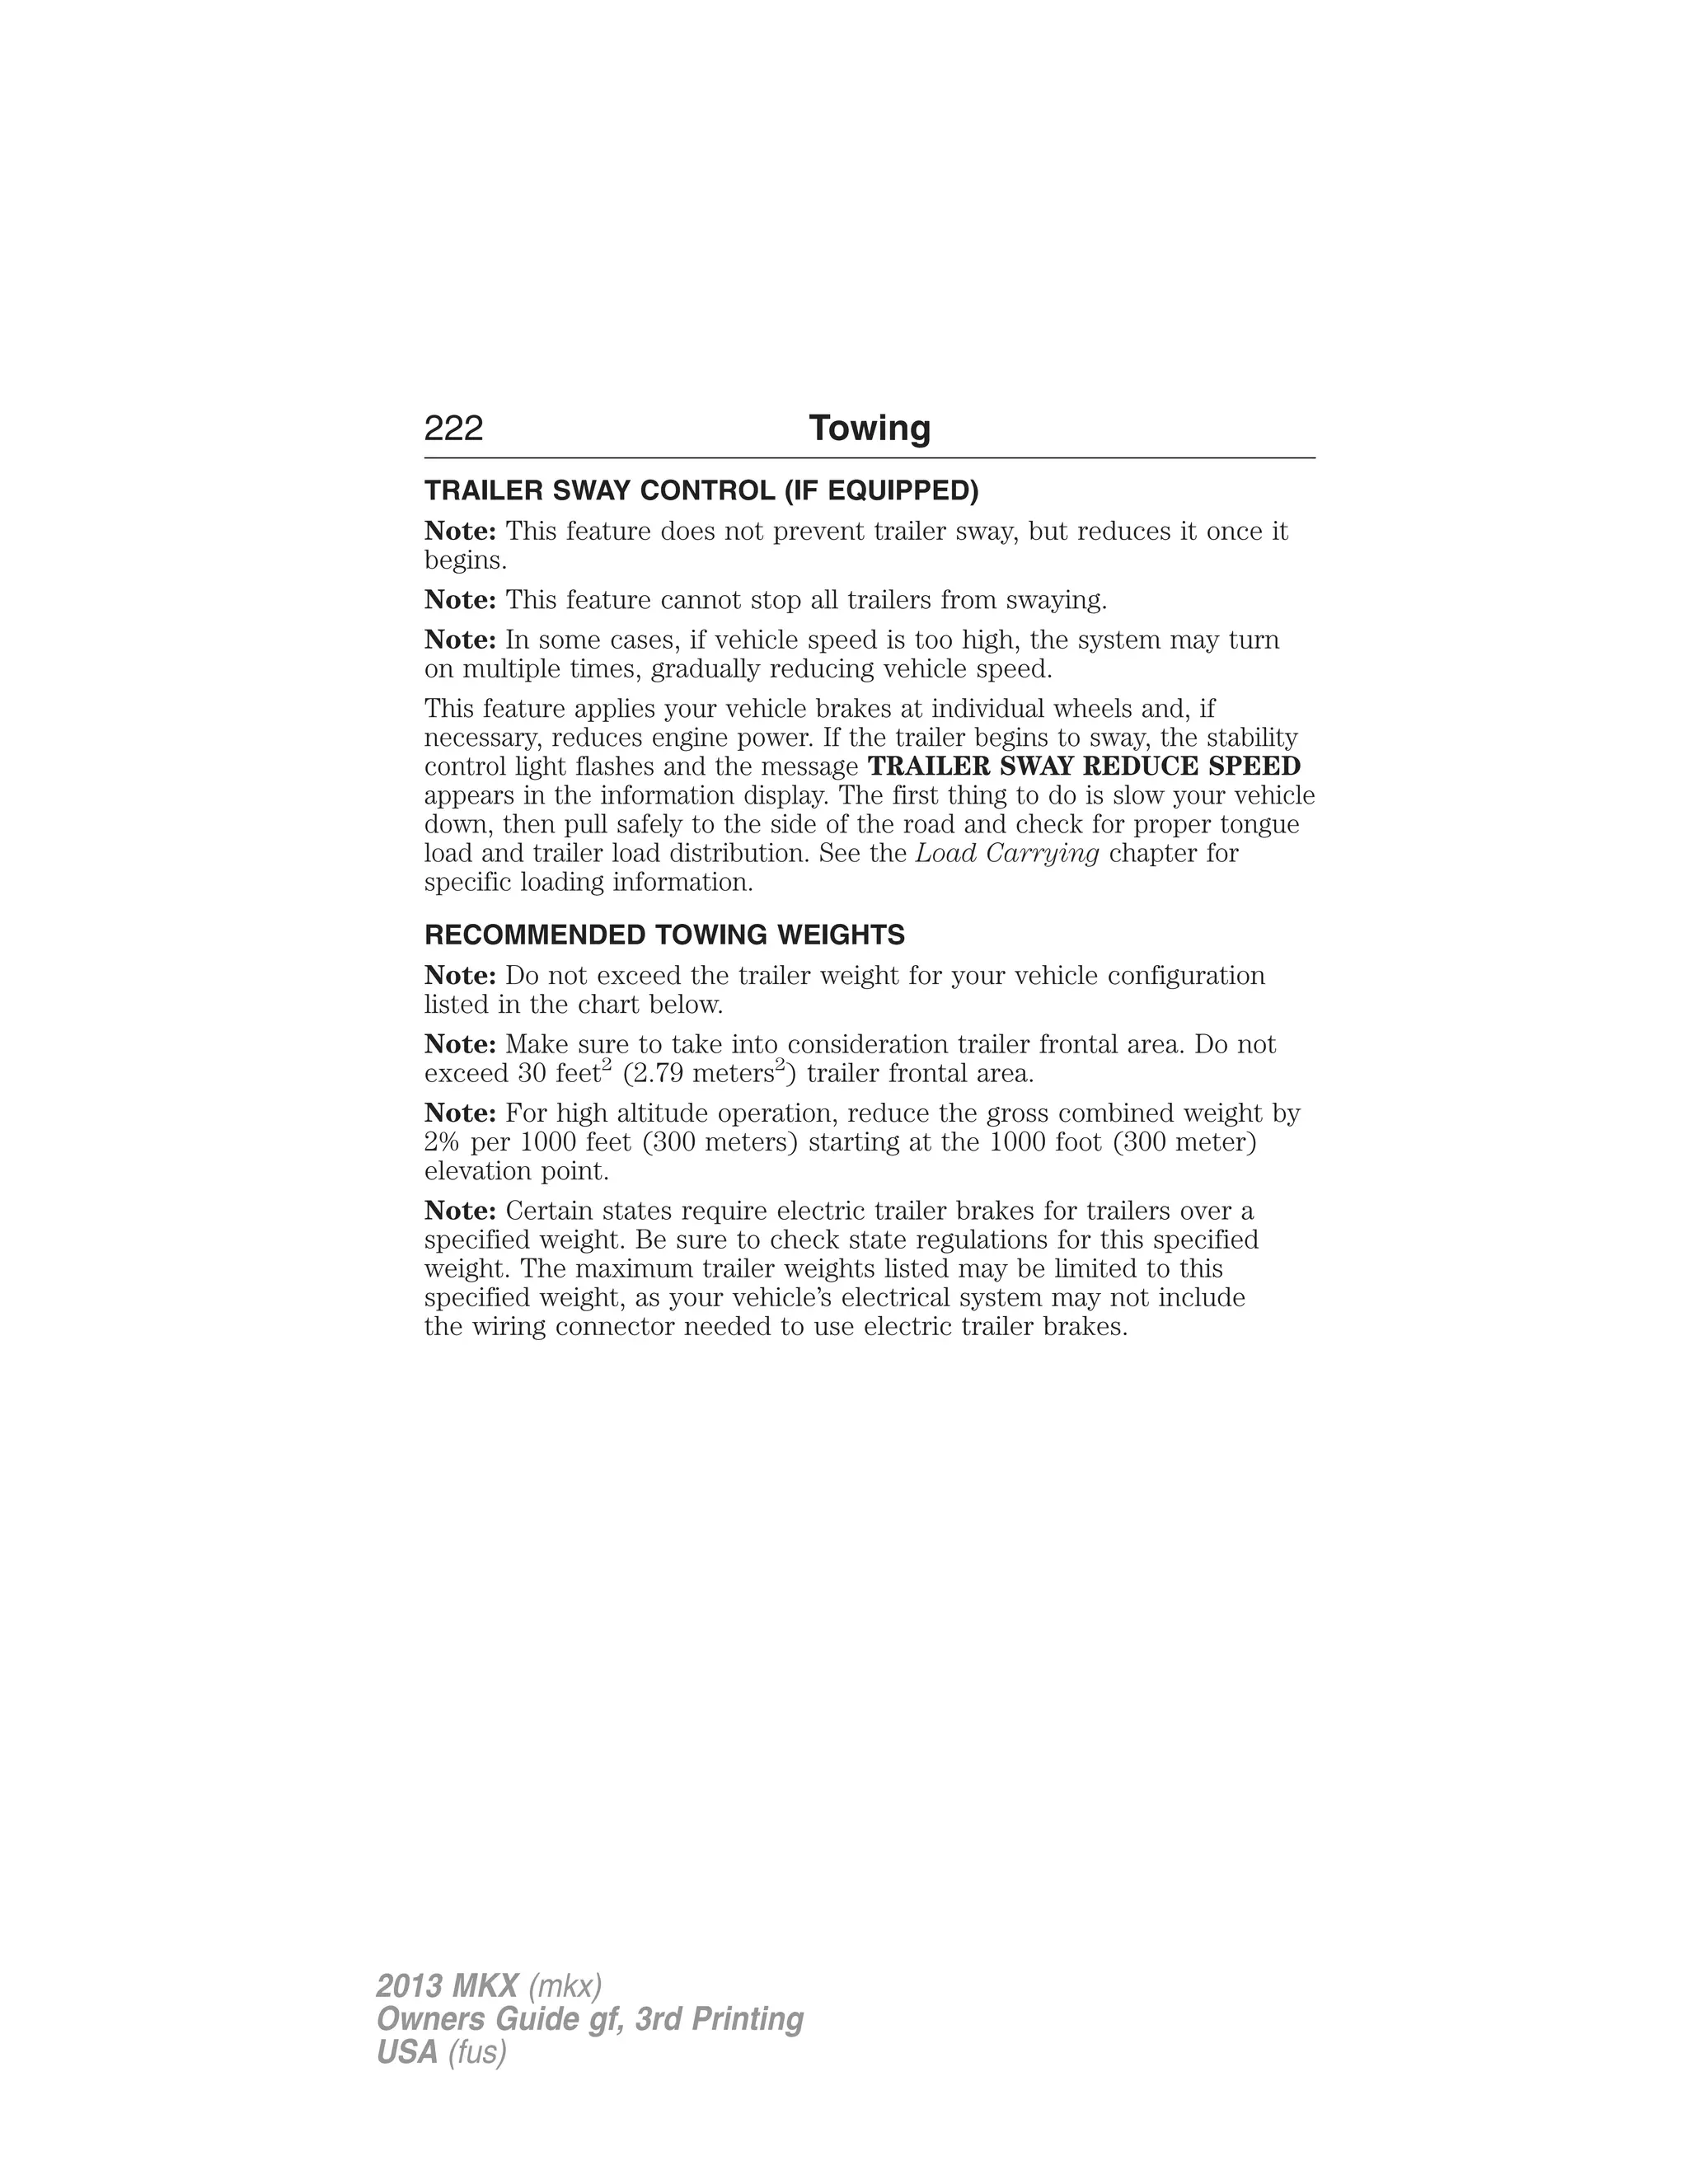
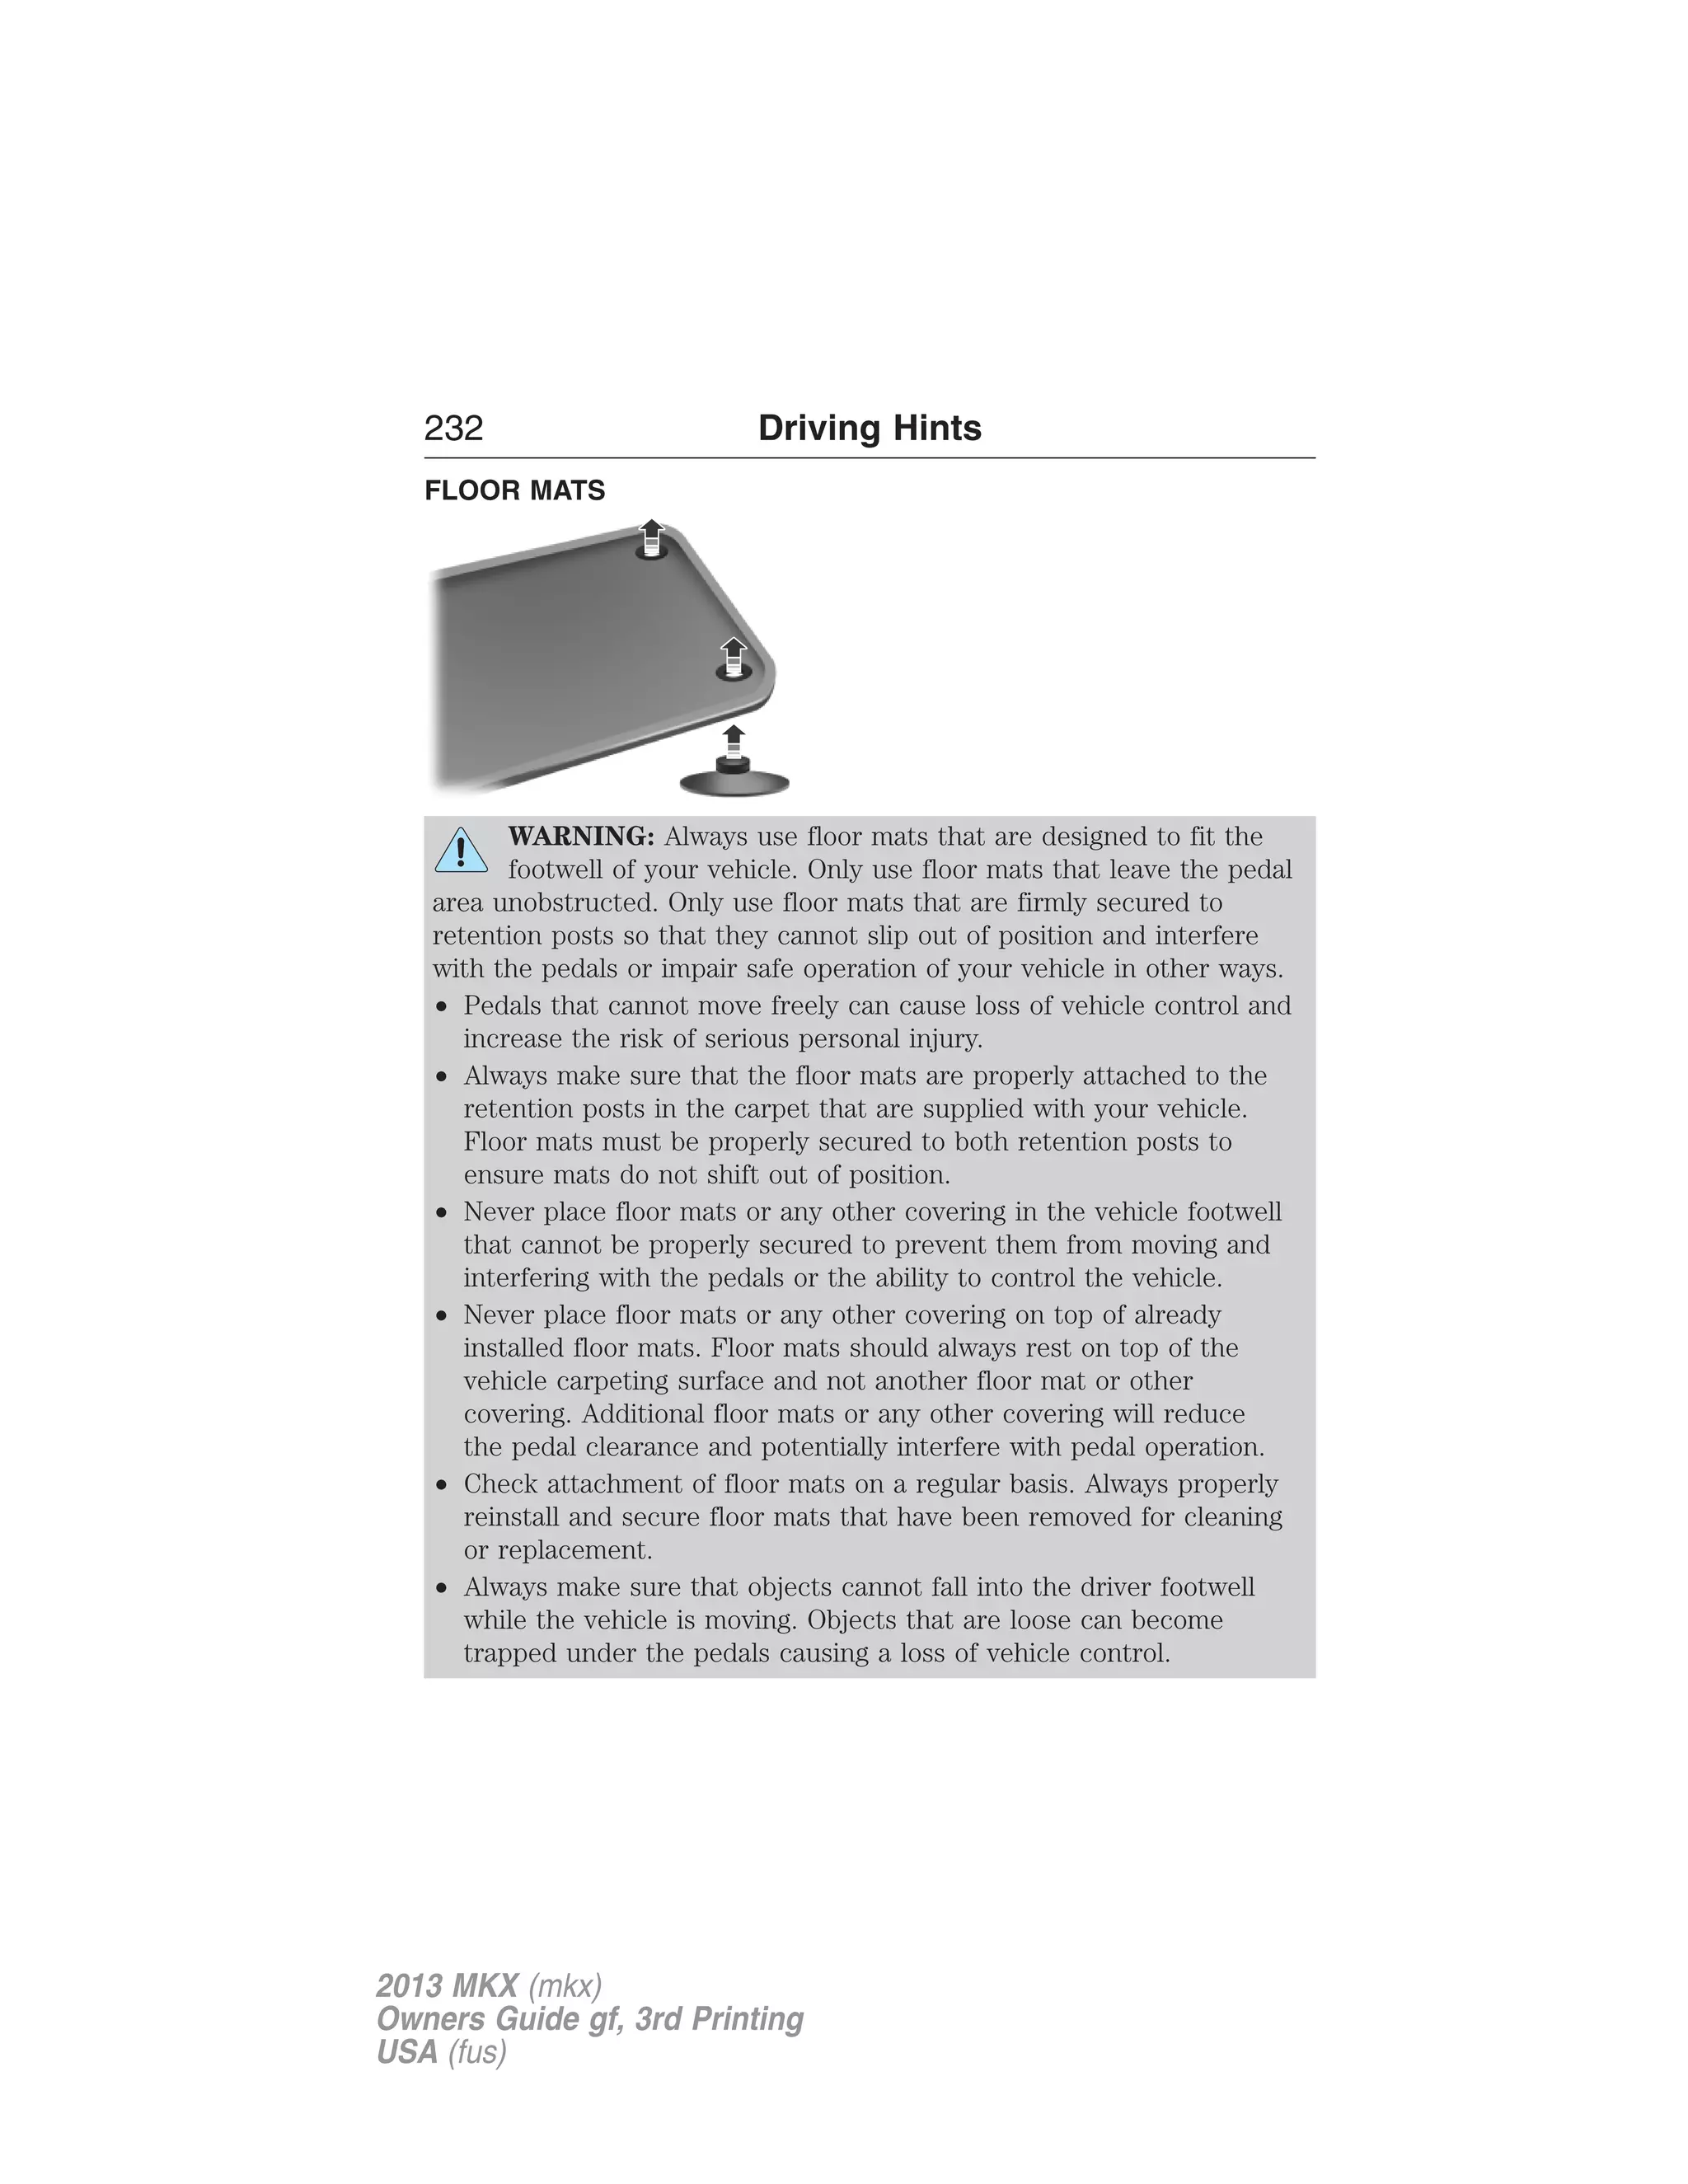
![Driving Hints 231
• Drive a heavily loaded vehicle or tow a trailer.
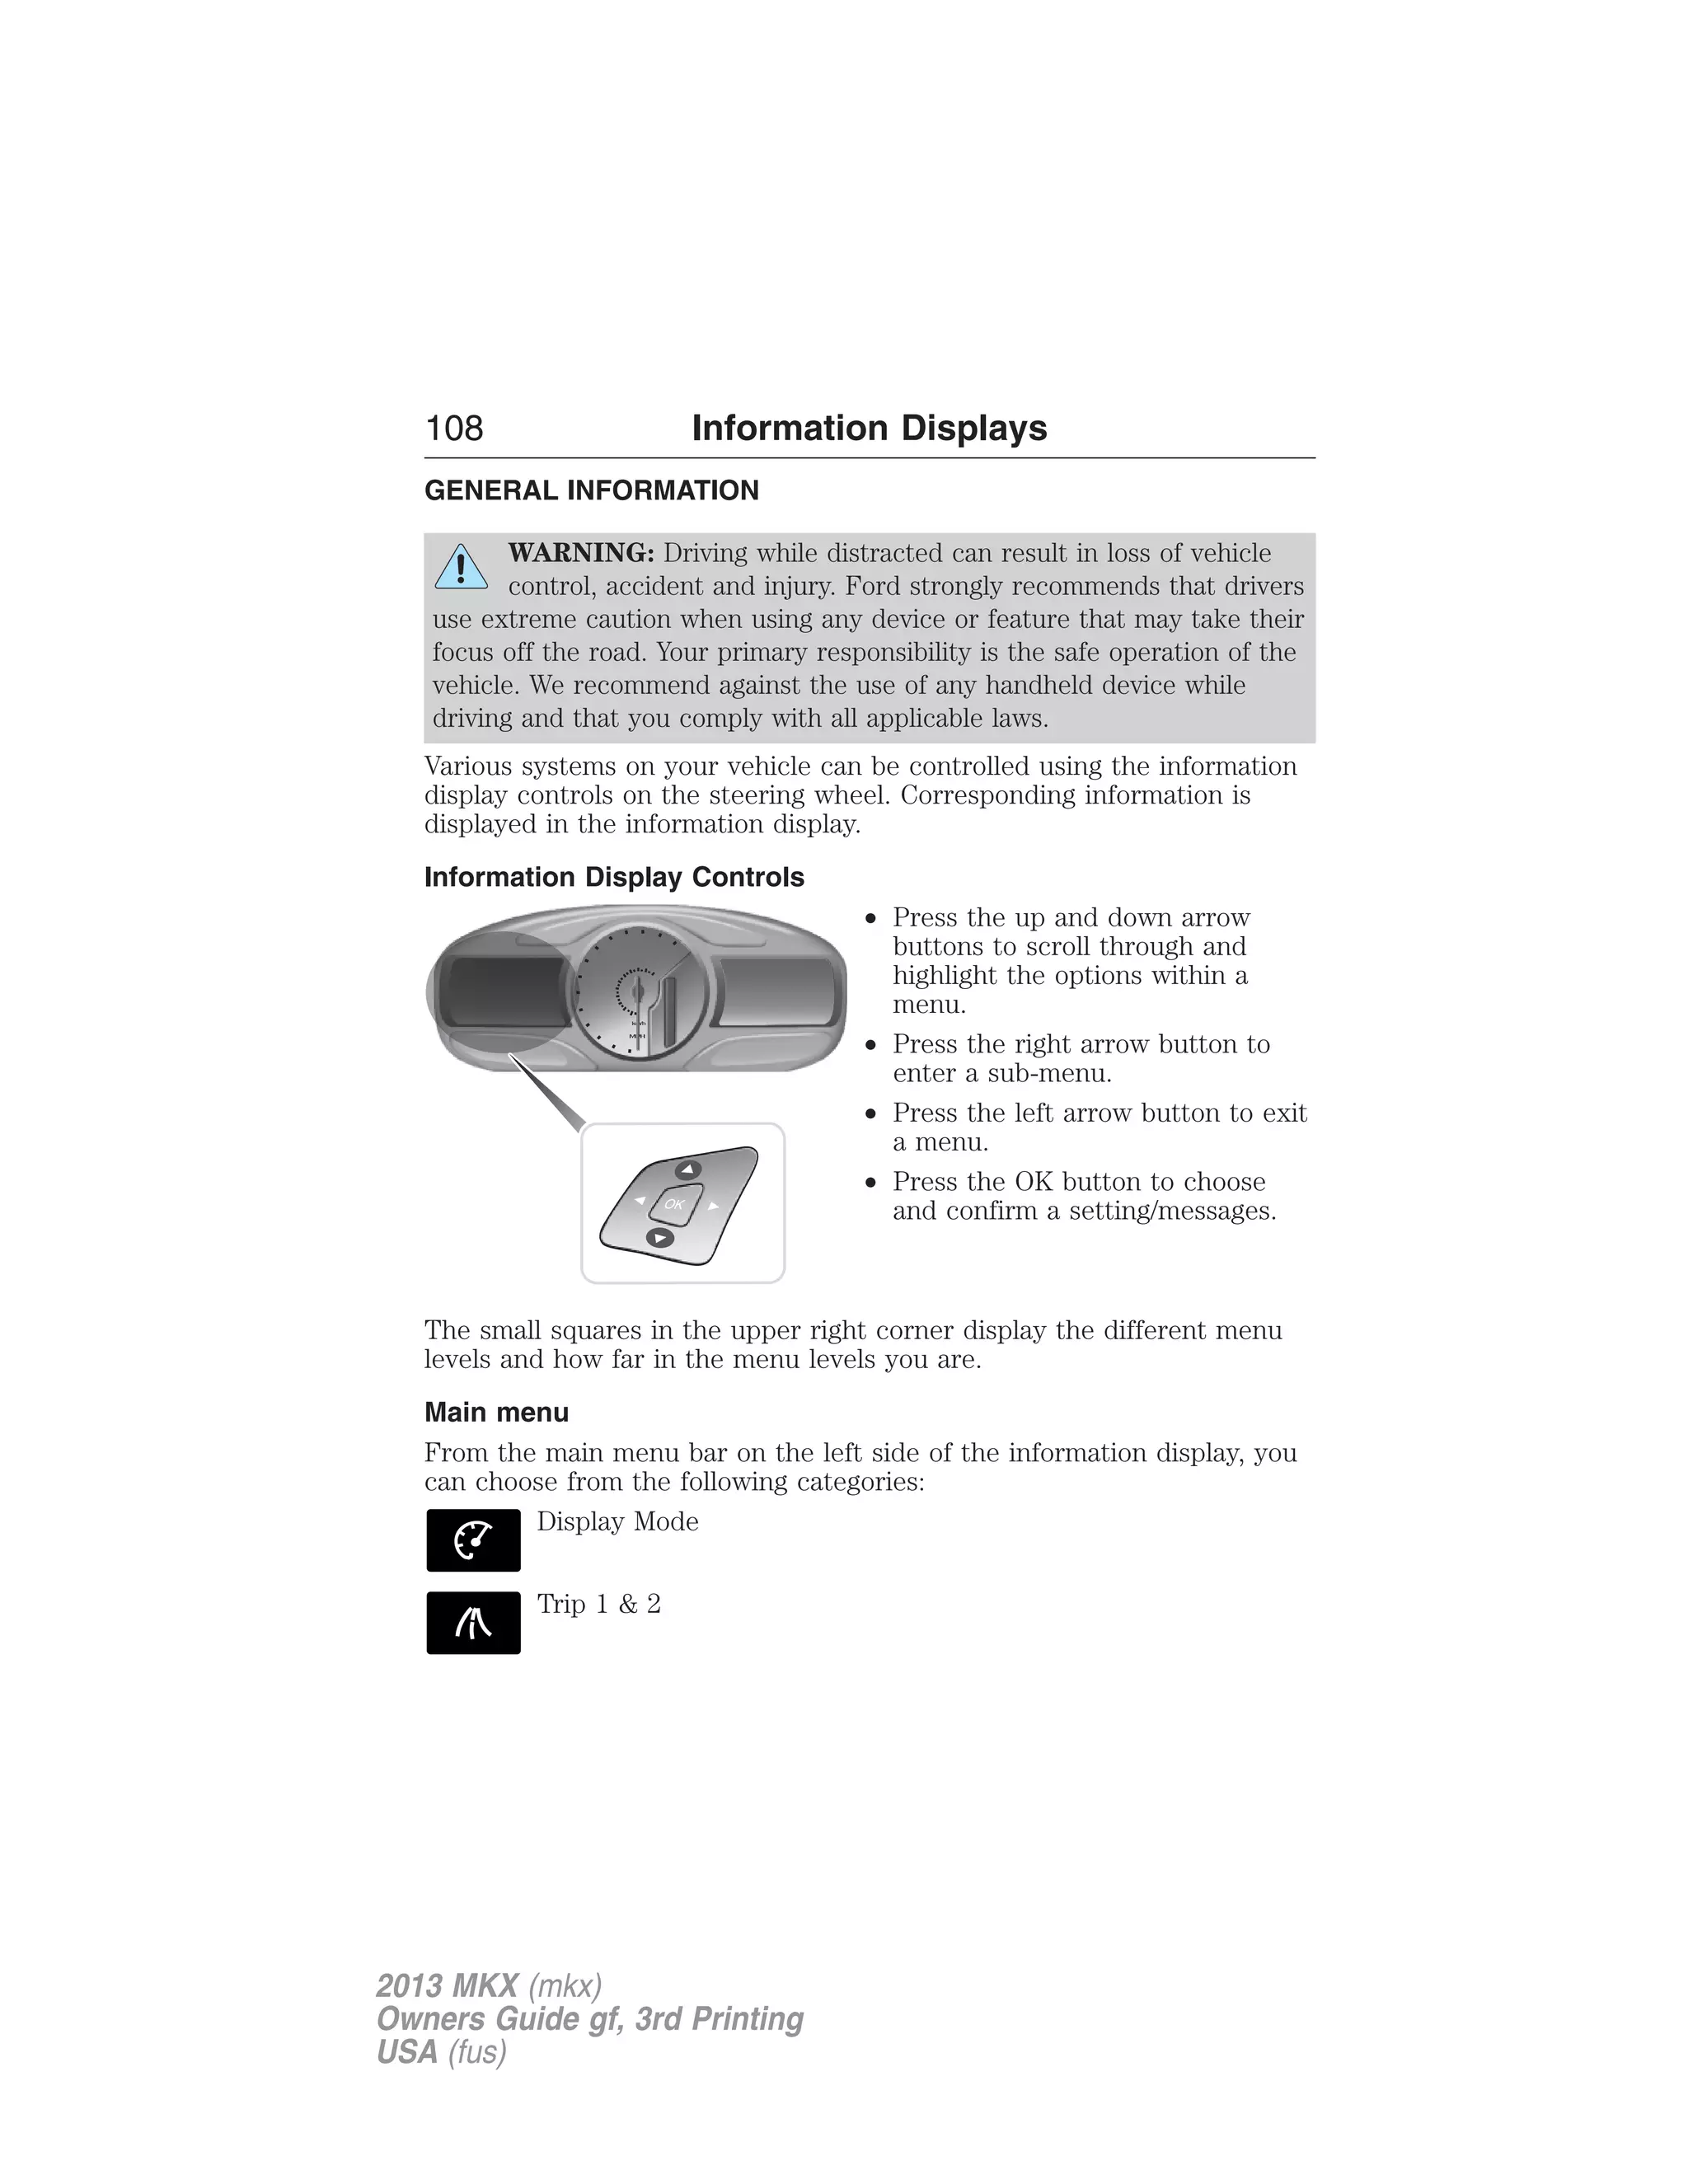
• Carry unnecessary weight (approximately 1 mpg [0.4 km/L] is lost for
every 400 pounds [180 kilograms] of weight carried).
• Add particular accessories to your vehicle (e.g.; bug deflectors,
rollbars or light bars, running boards, ski racks).
• Drive with the wheels out of alignment.
DRIVING THROUGH WATER
WARNING: Drive through water in an emergency only, and not
as part of normal driving.
WARNING: Engine damage can occur if water enters the air
filter.
Note: Driving through deep water may allow water into the transmission
or air intake and can cause internal vehicle damage or cause it to stall.
Note: Once through the water, always dry the brakes by moving your
vehicle slowly while applying light pressure on the brake pedal.
If driving through deep or standing water is unavoidable, proceed very
slowly. Never drive through water that is higher than the bottom of the
wheel rims (for cars) or the bottom of the hubs (for trucks).
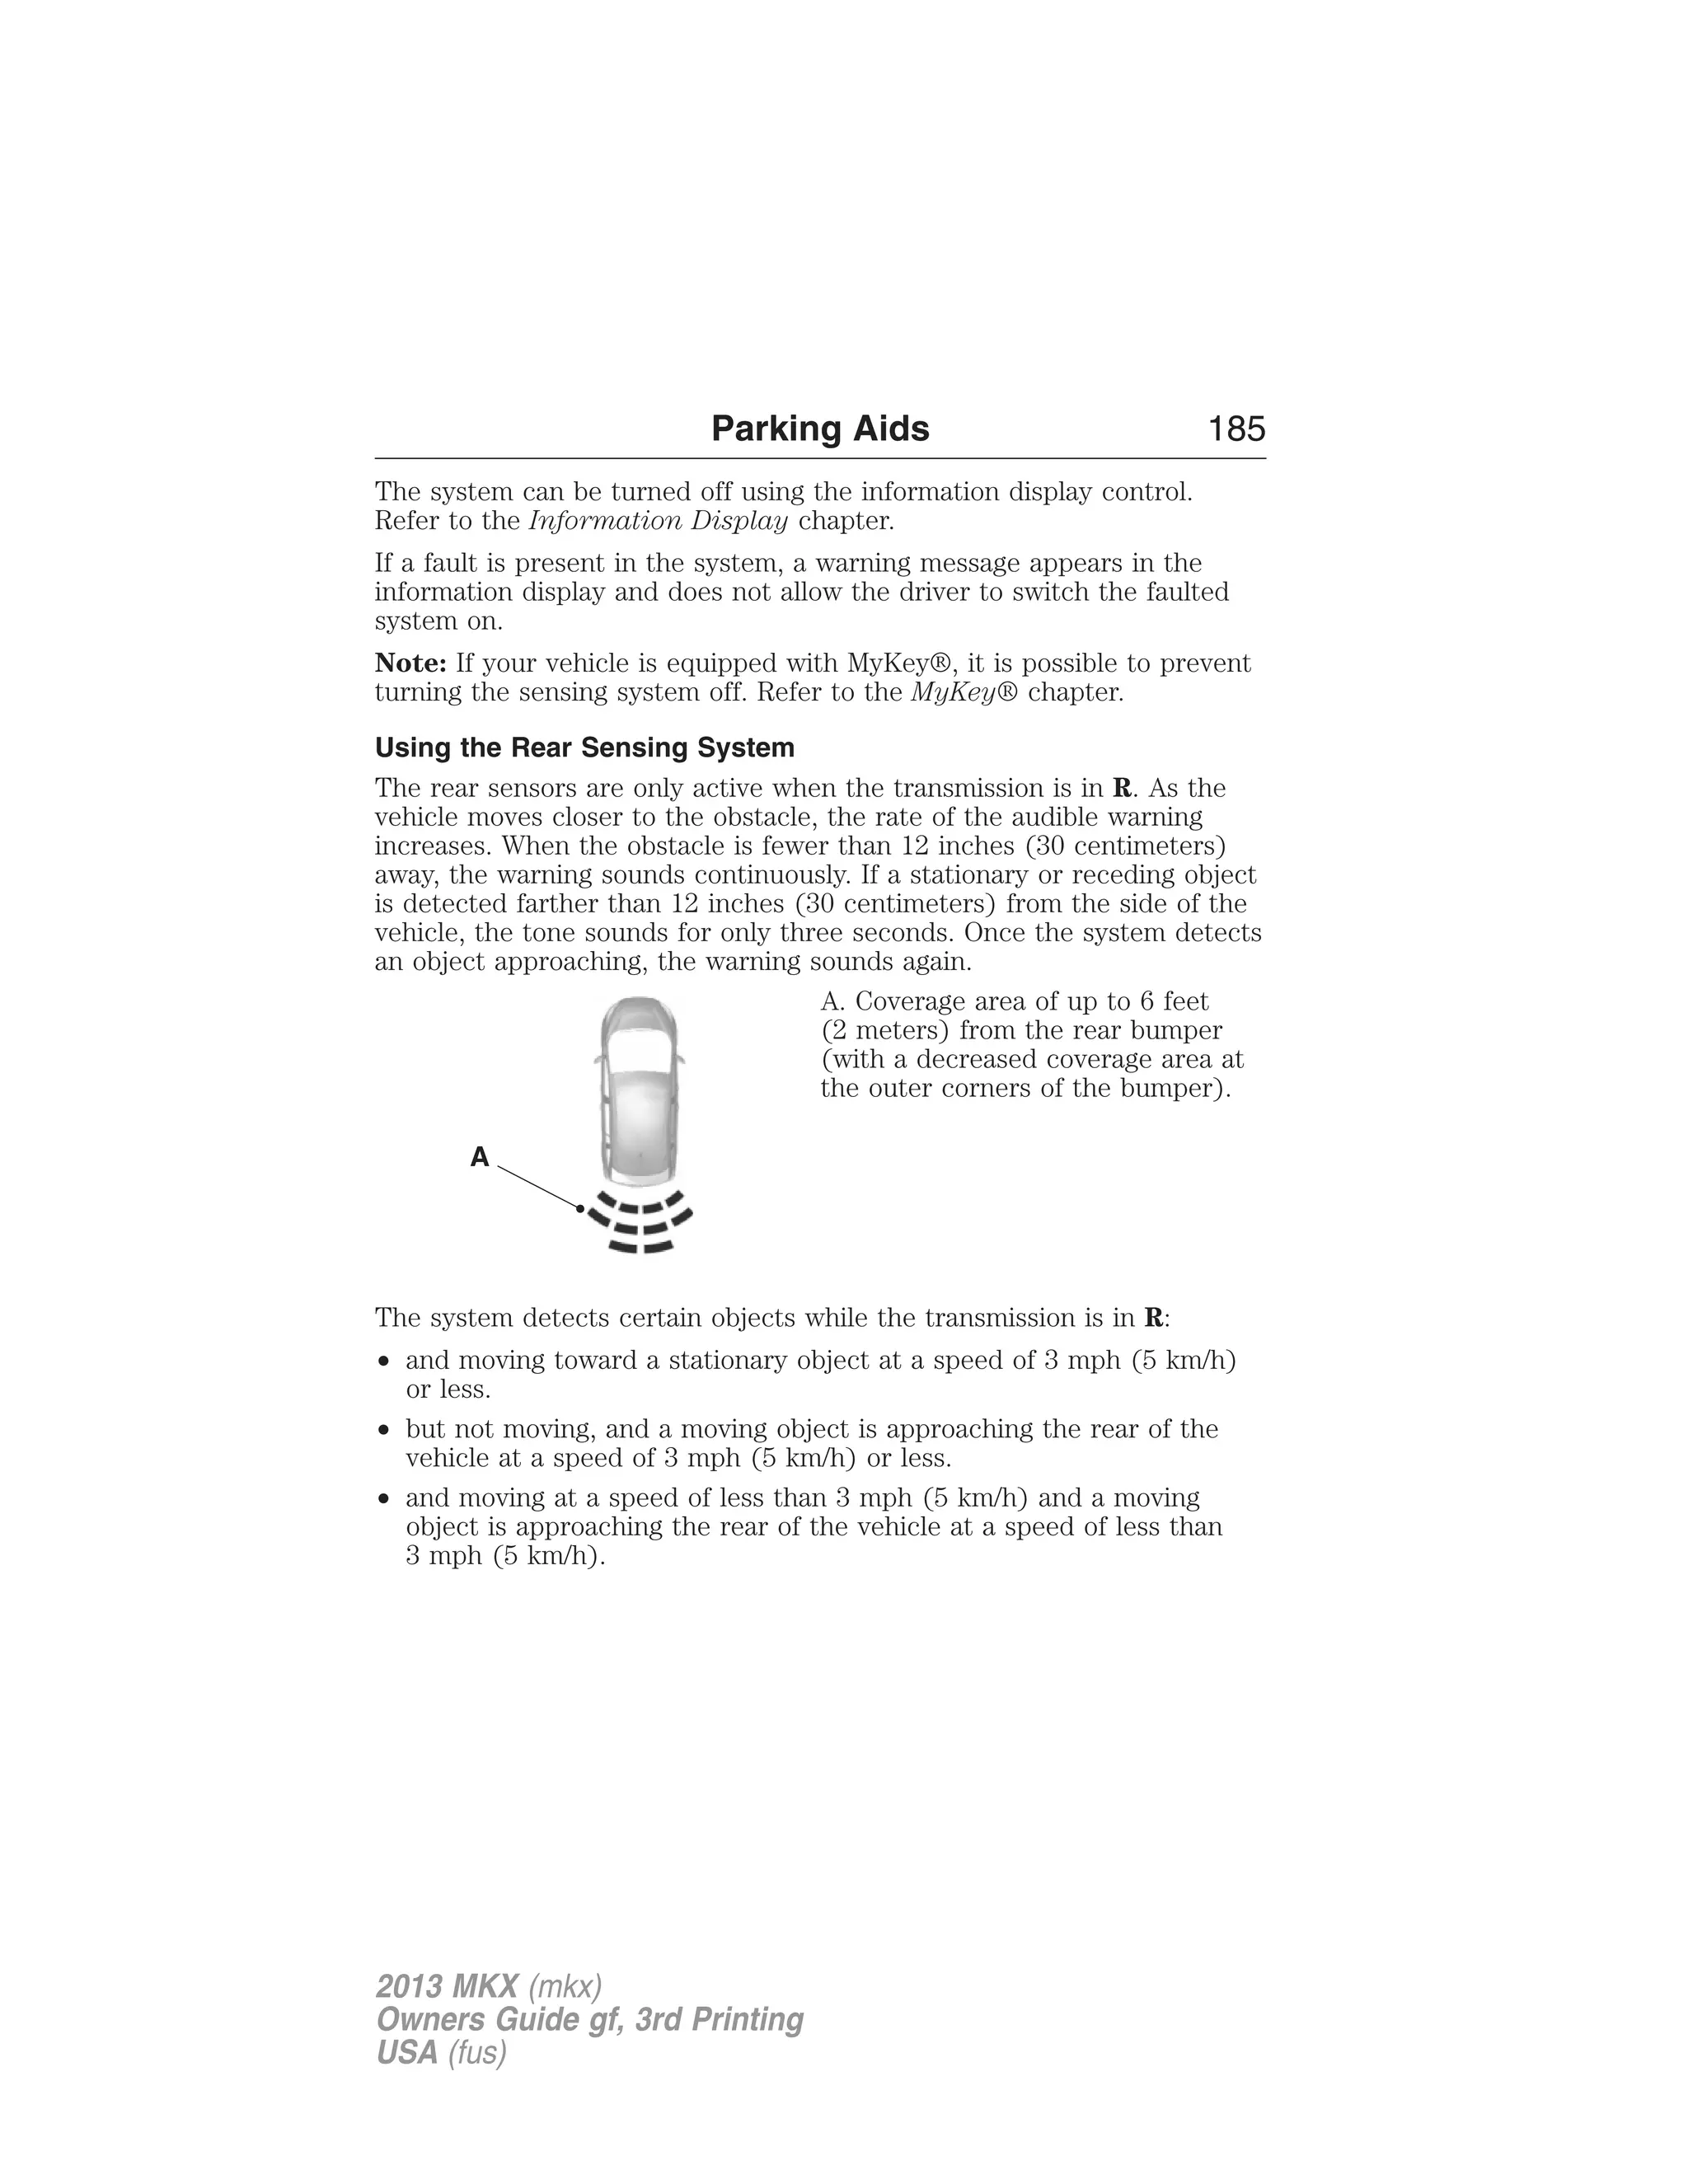
When driving through water,
traction or brake capability may
be limited. Also, water may enter
your engine’s air intake and severely
damage your engine or your vehicle
may stall.
Wet brakes do not stop the vehicle
as quickly as dry brakes.
2013 MKX (mkx)
Owners Guide gf, 3rd Printing
USA (fus)](https://image.slidesharecdn.com/13mkx-140905063956-phpapp02/75/13mkx-232-2048.jpg)


![Maintenance 265
You have limited engine power when in the fail-safe mode, so drive the
vehicle with caution. The vehicle will not be able to maintain high-speed
operation and the engine will run rough. Remember that the engine is
capable of completely shutting down automatically to prevent engine
damage, therefore:
1. Pull off the road as soon as safely possible and turn off the engine.
2. Arrange for the vehicle to be taken to an authorized dealer.
3. If this is not possible, wait a short period for the engine to cool.
4. Check the coolant level and replenish if low.
5. Restart the engine and take your vehicle to an authorized dealer.
Note: Driving the vehicle without repairing the engine problem increases
the chance of engine damage. Take your vehicle to an authorized dealer
as soon as possible.
TRANSMISSION FLUID CHECK
Note: Automatic transmission fluid expands when warmed. To obtain an
accurate fluid check, drive the vehicle until it is warmed up (approximately
20 miles [30 km]). If your vehicle has been operated for an extended
period at high speeds, in city traffic during hot weather or pulling a trailer,
the vehicle should be turned off until normal operating temperatures are
reached to allow the fluid to cool before checking. Depending on vehicle
use, cooling times could take up to 30 minutes or longer.
Refer to your scheduled maintenance information for scheduled
intervals for fluid checks and changes. Your transmission does not
consume fluid. However, the fluid level should be checked if the
transmission is not working properly, i.e., if the transmission slips
or shifts slowly or if you notice some sign of fluid leakage.
WARNING: The dipstick cap and surrounding components may
be hot; gloves are recommended.
1. Drive the vehicle 20 miles (30 km) or until it reaches normal operating
temperature.
2. Park the vehicle on a level surface and engage the parking brake.
3. With the parking brake engaged and your foot on the brake pedal,
start the engine and move the gearshift lever through all of the gear
ranges. Allow a minimum of 10 seconds for each gear to engage.
2013 MKX (mkx)
Owners Guide gf, 3rd Printing
USA (fus)](https://image.slidesharecdn.com/13mkx-140905063956-phpapp02/75/13mkx-266-2048.jpg)


![GENERAL INFORMATION
Your Ford or Lincoln authorized dealer has many quality products
available to clean your vehicle and protect its finishes.
CLEANING PRODUCTS
For best results, use the following products or products of equivalent
quality:
Motorcraft® Bug and Tar Remover (ZC-42)
Motorcraft® Custom Bright Metal Cleaner (ZC-15)
Motorcraft® Detail Wash (ZC-3-A)
Motorcraft® Dusting Cloth (ZC-24)
Motorcraft® Engine Shampoo and Degreaser (U.S. only) (ZC-20)
Motorcraft® Engine Shampoo (Canada only) (CXC-66-A)
Motorcraft® Multi-Purpose Cleaner (Canada only) (CXC-101)
Motorcraft® Premium Glass Cleaner (Canada only) (CXC-100)
Motorcraft® Premium Quality Windshield Washer Fluid (Canada only)
[CXC-37-(A, B, D or F)]
Motorcraft® Premium Windshield Washer Concentrate (U.S. only)
(ZC-32-A)
Motorcraft® Professional Strength Carpet & Upholstery Cleaner (ZC-54)
Motorcraft® Spot and Stain Remover (U.S. only) (ZC-14)
Motorcraft® Ultra-Clear Spray Glass Cleaner (ZC-23)
Motorcraft® Vinyl Cleaner (Canada only) (CXC-93)
Motorcraft® Wheel and Tire Cleaner (ZC-37-A)
CLEANING THE EXTERIOR
Wash your vehicle regularly with cool or lukewarm water and a neutral
pH shampoo, such as Motorcraft® Detail Wash.
• Never use strong household detergents or soap, such as dish washing
or laundry liquid. These products can discolor and spot painted
surfaces.
• Never wash a vehicle that is hot to the touch or during exposure to
strong, direct sunlight.
• Dry the vehicle with a chamois or soft terry cloth towel in order to
eliminate water spotting.
Vehicle Care 281
2013 MKX (mkx)
Owners Guide gf, 3rd Printing
USA (fus)](https://image.slidesharecdn.com/13mkx-140905063956-phpapp02/75/13mkx-282-2048.jpg)


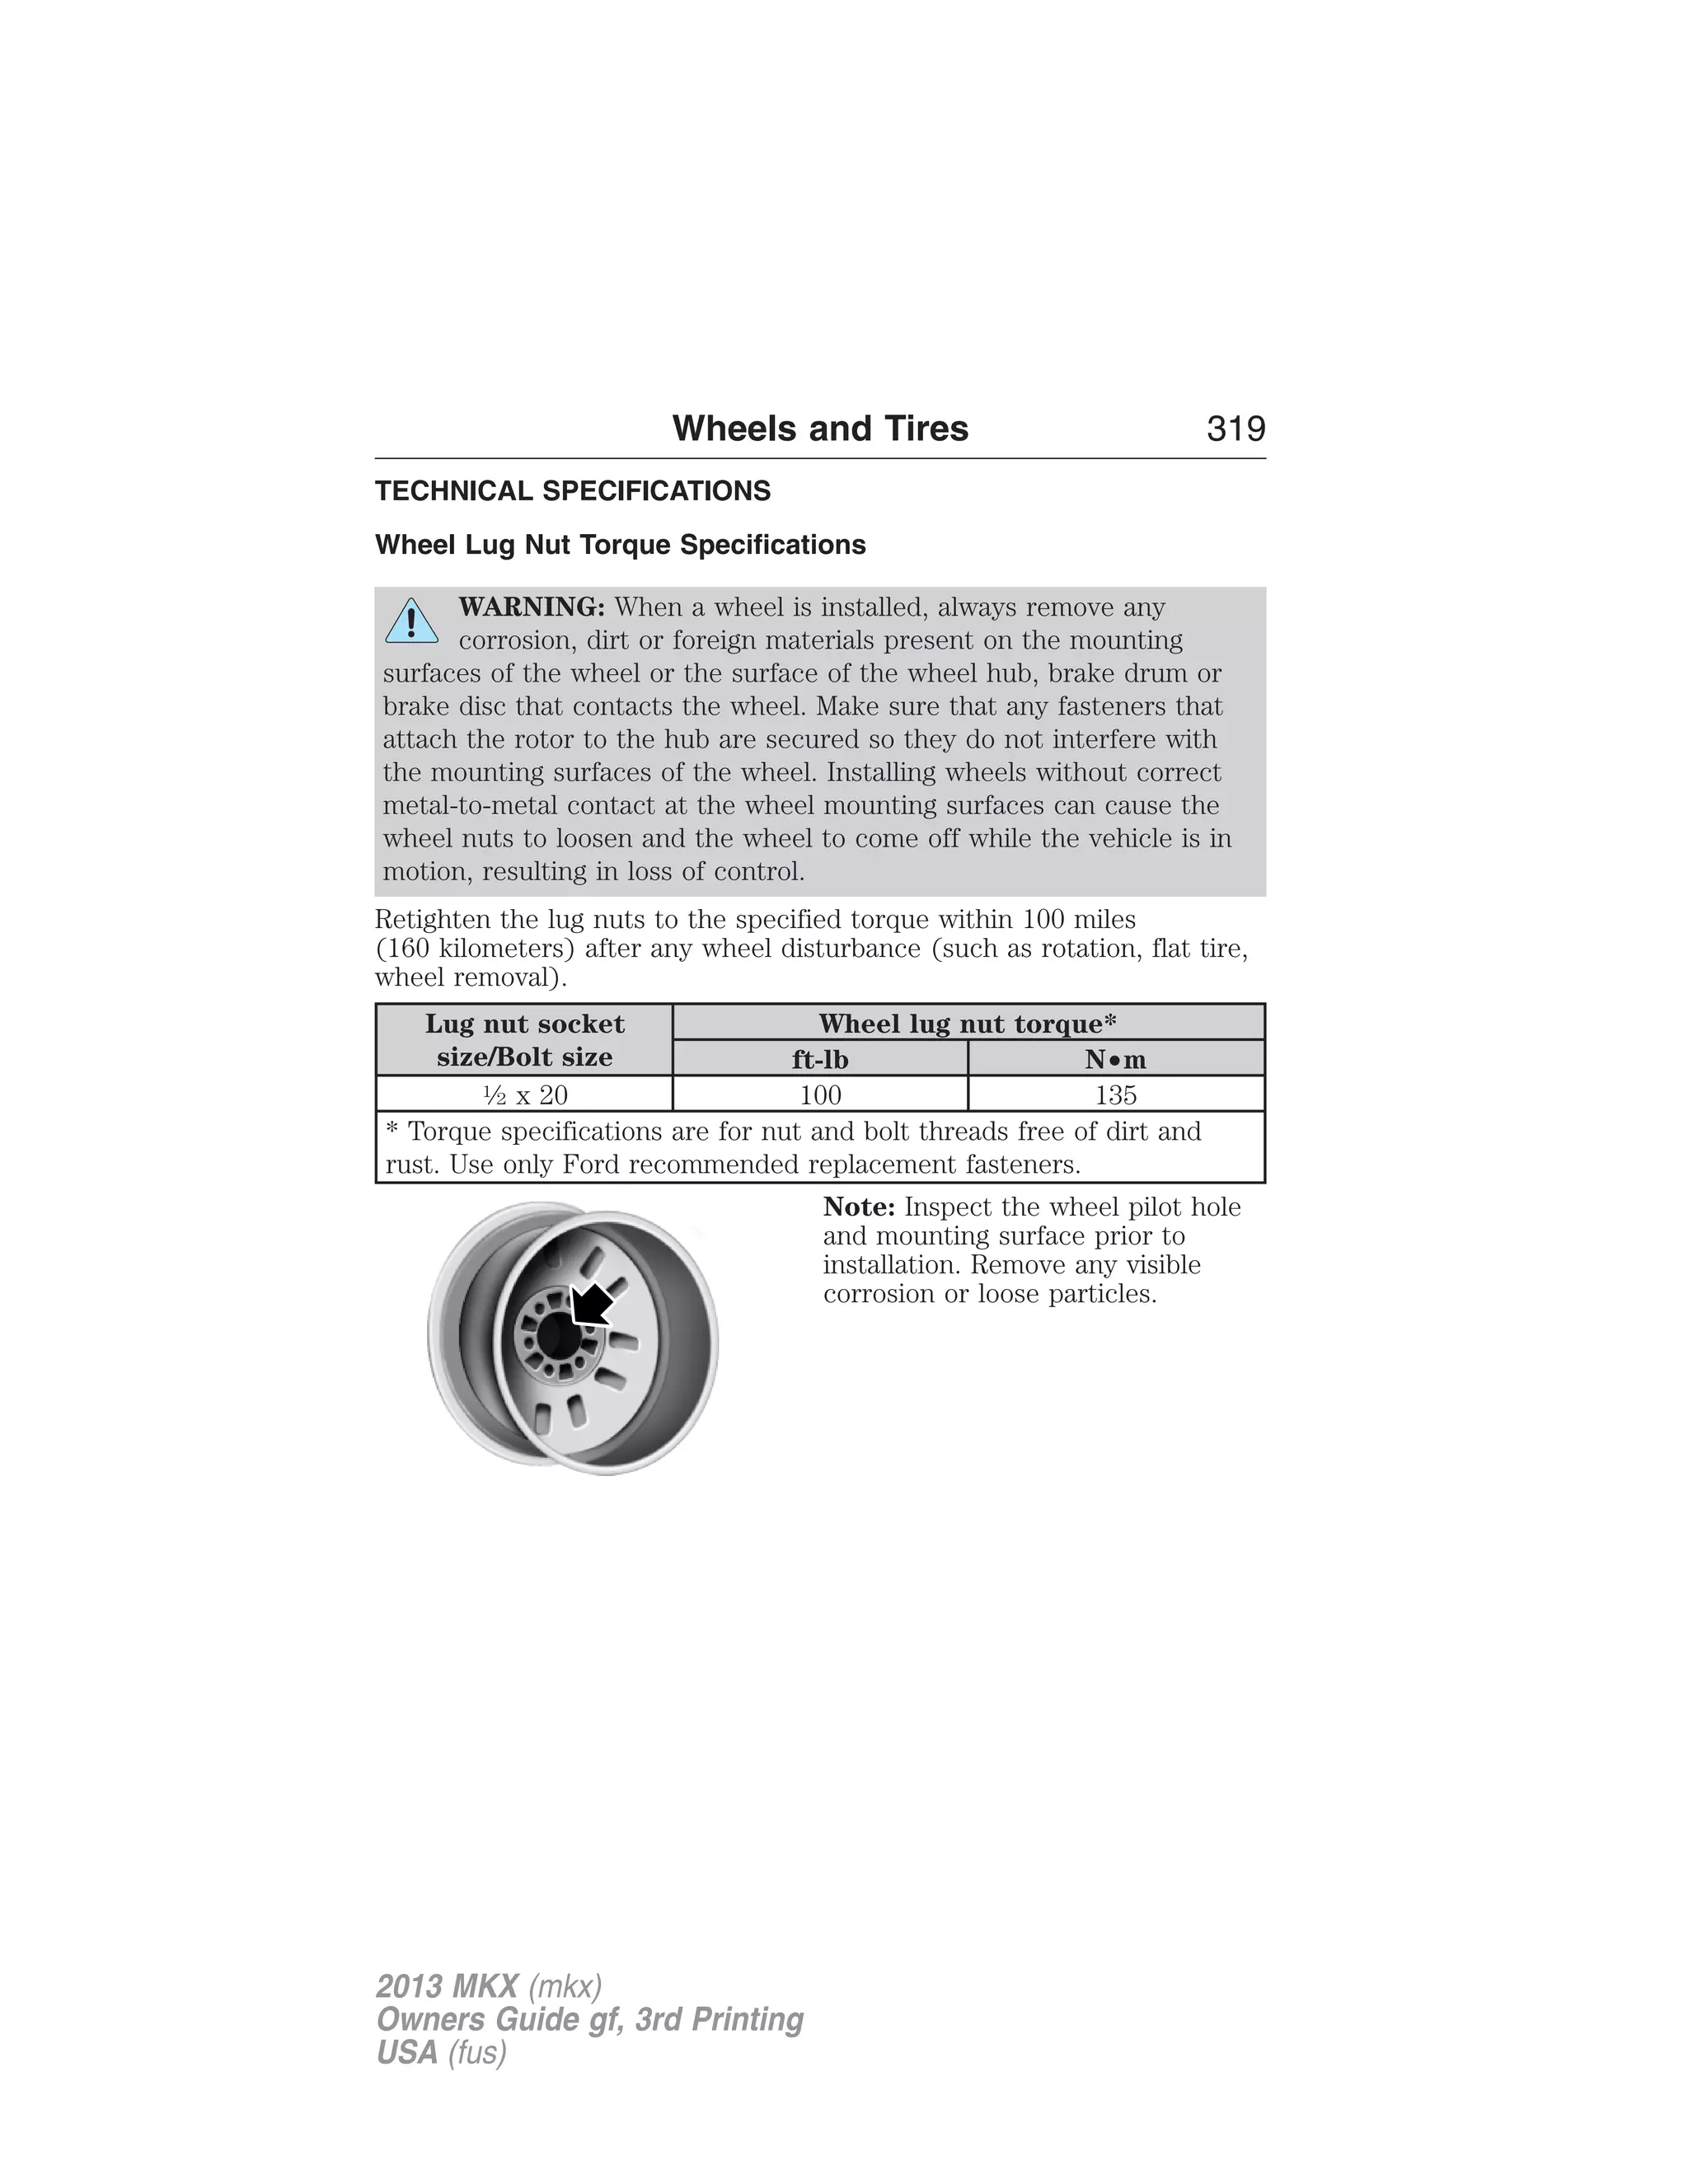
![294 Wheels and Tires
Temperature A B C
WARNING: The temperature grade for this tire is established for
a tire that is properly inflated and not overloaded. Excessive
speed, underinflation, or excessive loading, either separately or in
combination, can cause heat buildup and possible tire failure.
The temperature grades are A (the highest), B and C, representing the tire’s
resistance to the generation of heat and its ability to dissipate heat when
tested under controlled conditions on a specified indoor laboratory test
wheel. Sustained high temperature can cause the material of the tire to
degenerate and reduce tire life, and excessive temperature can lead to
sudden tire failure. The grade C corresponds to a level of performance which
all passenger car tires must meet under the Federal Motor Vehicle Safety
Standard No. 139. Grades B and A represent higher levels of performance
on the laboratory test wheel than the minimum required by law.
Glossary of Tire Terminology
• Tire label: A label showing the OE (Original Equipment) tire sizes,
recommended inflation pressure and the maximum weight the vehicle
can carry.
• Tire Identification Number (TIN): A number on the sidewall of
each tire providing information about the tire brand and manufacturing
plant, tire size and date of manufacture. Also referred to as DOT code.
• Inflation pressure: A measure of the amount of air in a tire.
• Standard load: A class of P-metric or Metric tires designed to carry a
maximum load at 35 psi [37 psi (2.5 bar) for Metric tires]. Increasing
the inflation pressure beyond this pressure will not increase the tire’s
load-carrying capability.
• Extra load: A class of P-metric or Metric tires designed to carry a
heavier maximum load at 41 psi [43 psi (2.9 bar) for Metric tires].
Increasing the inflation pressure beyond this pressure will not increase
the tire’s load-carrying capability.
• kPa: Kilopascal, a metric unit of air pressure.
• PSI: Pounds per square inch, a standard unit of air pressure.
• Cold tire pressure: The tire pressure when the vehicle has been
stationary and out of direct sunlight for an hour or more and prior to
the vehicle being driven for 1 mile (1.6 kilometers).
2013 MKX (mkx)
Owners Guide gf, 3rd Printing
USA (fus)](https://image.slidesharecdn.com/13mkx-140905063956-phpapp02/75/13mkx-295-2048.jpg)


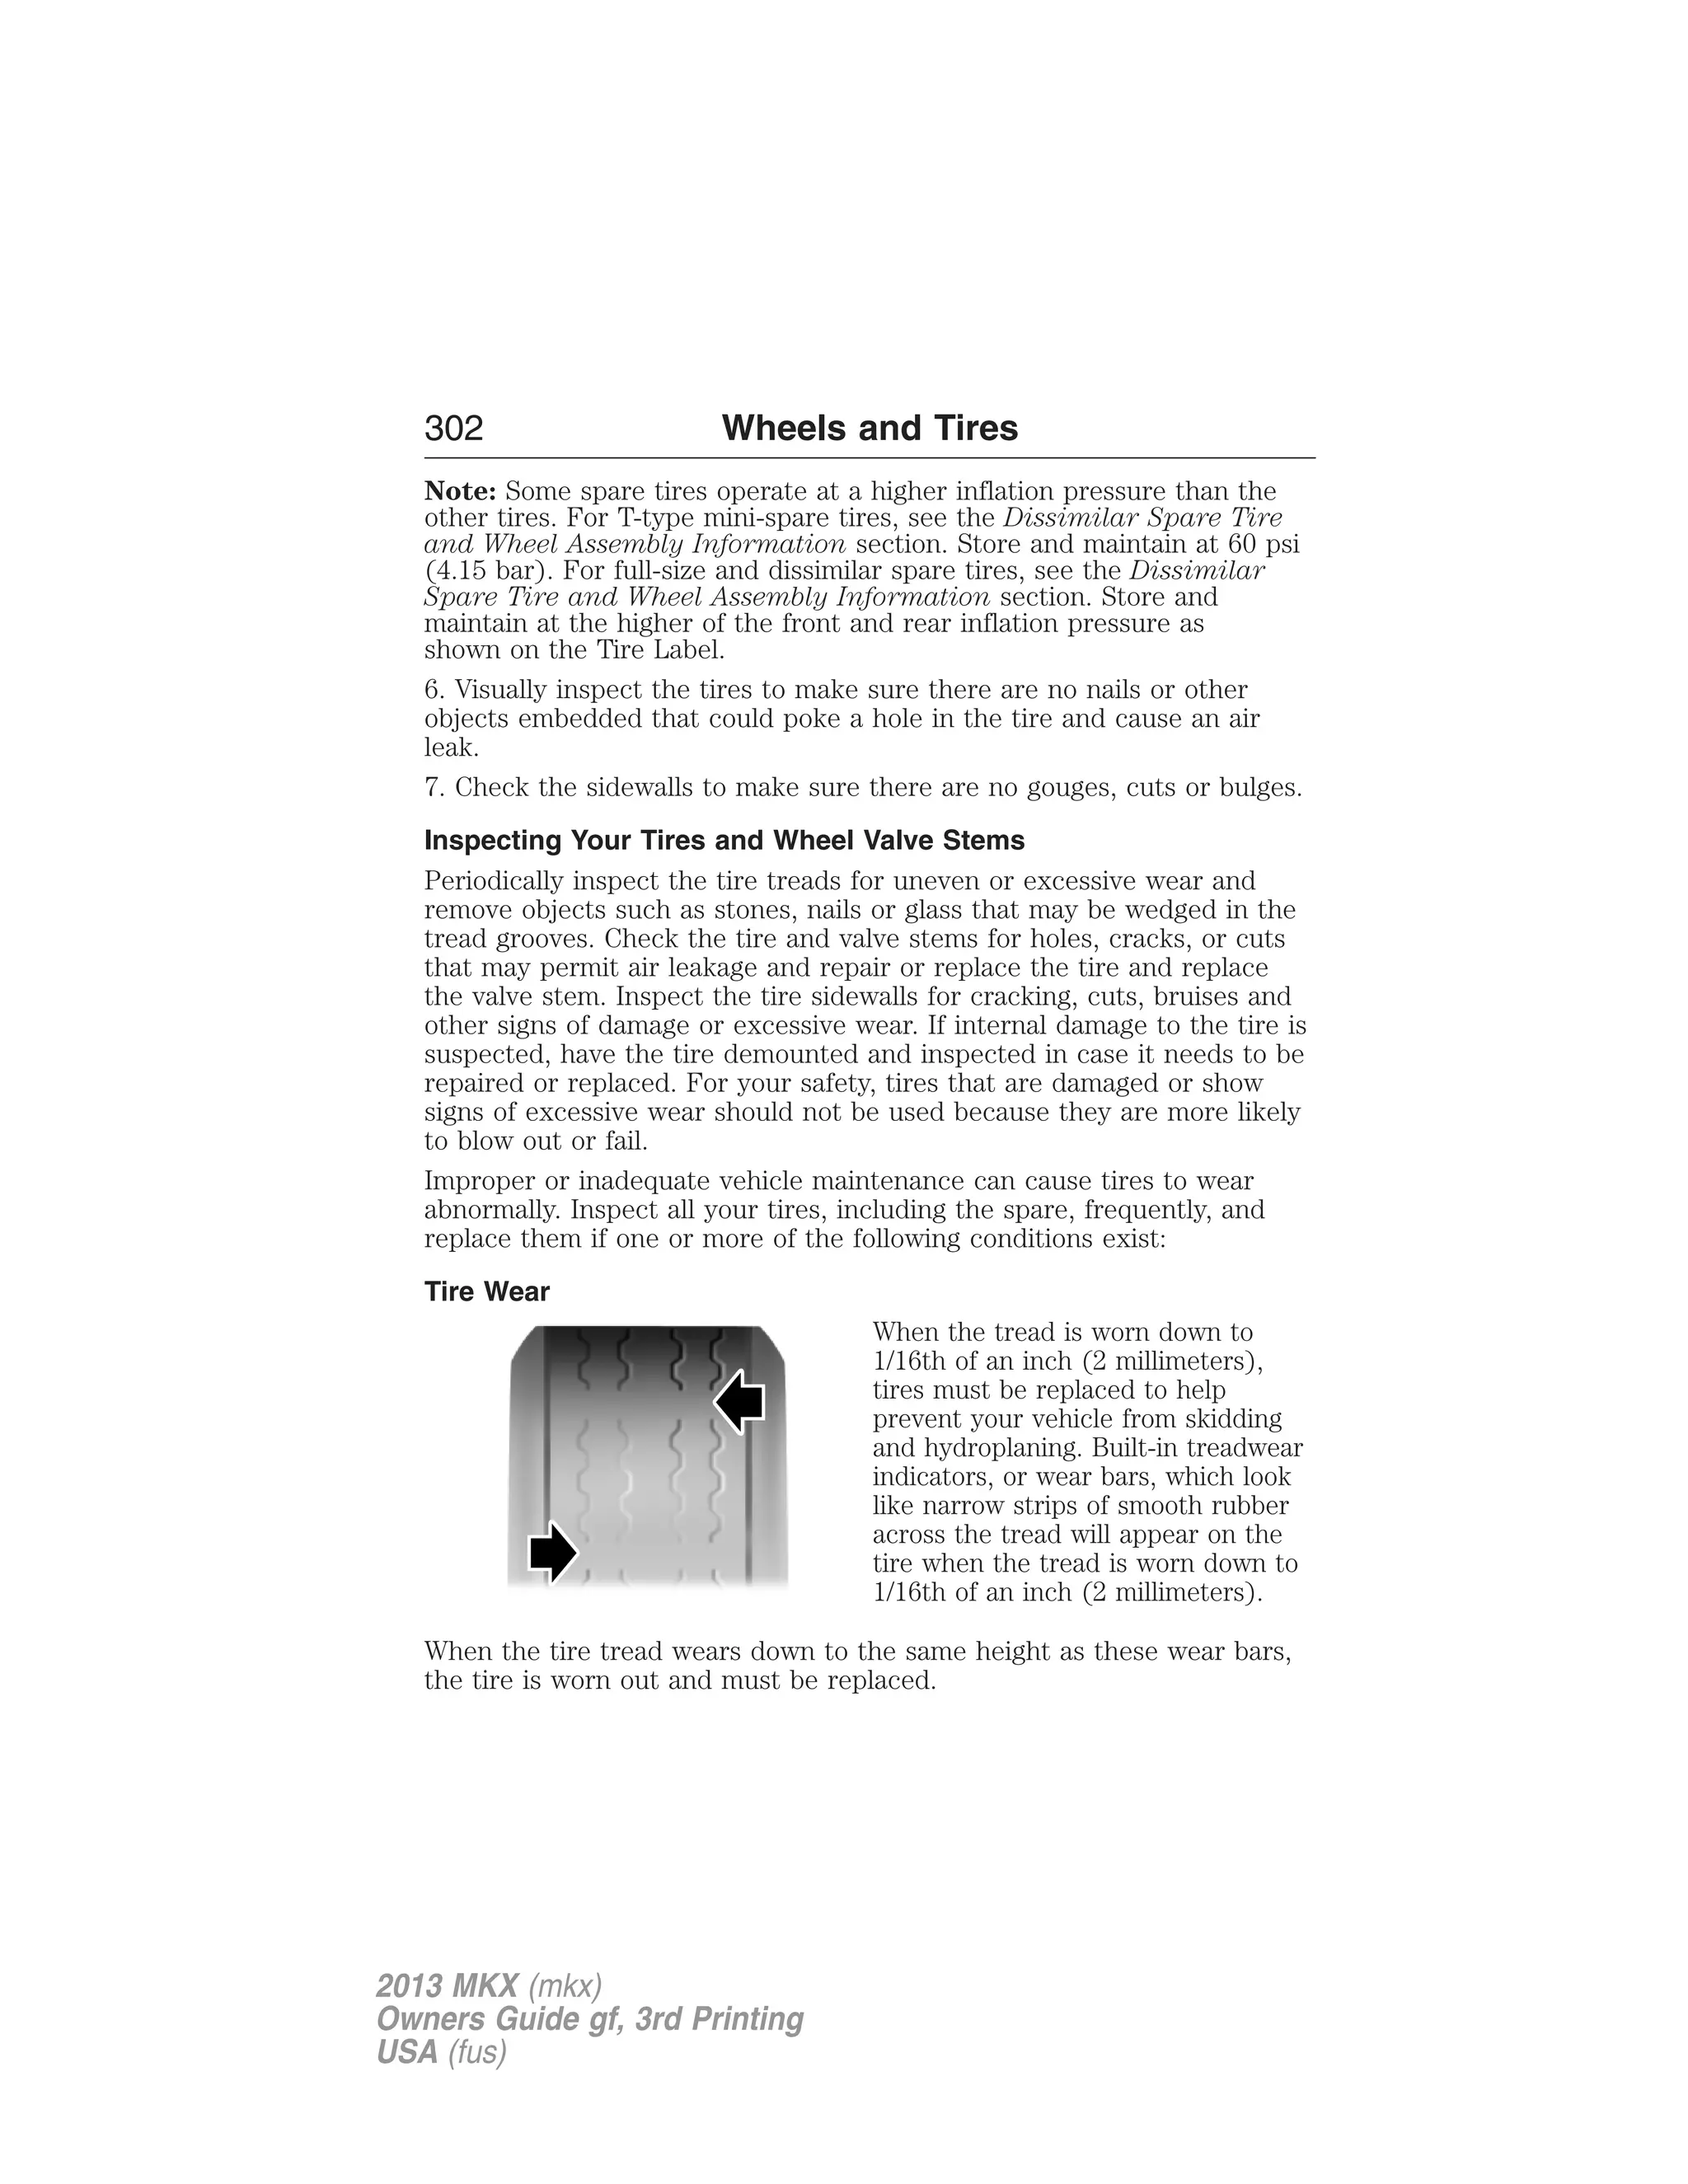
![Wheels and Tires 301
Maximum Inflation Pressure is the tire manufacturer’s maximum
permissible pressure or the pressure at which the maximum load can be
carried by the tire. This pressure is normally higher than the manufacturer’s
recommended cold inflation pressure, which can be found on the Safety
Compliance Certification Label (affixed to either the door hinge pillar,
door-latch post, or the door edge that meets the door-latch post, next to
the driver’s seating position), or Tire Label which is located on the B-Pillar
or the edge of the driver’s door. The cold inflation pressure should never
be set lower than the recommended pressure on the Safety Compliance
Certification Label or Tire Label.
When weather temperature changes occur, tire inflation pressures also
change. A 10°F (6°C) temperature drop can cause a corresponding
drop of 1 psi (7 kPa) in inflation pressure. Check your tire pressures
frequently and adjust them to the proper pressure which can be found
on the Safety Compliance Certification Label or Tire Label.
To check the pressure in your tire(s):
1. Make sure the tires are cool, meaning they are not hot from driving
even a mile.
Note: If you are checking tire pressure when the tire is hot (for
example, driven more than 1 mile [1.6 kilometers]), never bleed or
reduce air pressure. The tires are hot from driving and it is normal for
pressures to increase above recommended cold pressures. A hot tire at
or below recommended cold inflation pressure could be significantly
under-inflated.
Note: If you have to drive a distance to get air for your tire(s), check
and record the tire pressure first and add the appropriate air pressure
when you get to the pump. It is normal for tires to heat up and the air
pressure inside to go up as you drive.
2. Remove the cap from the valve on one tire, then firmly press the tire
gauge onto the valve and measure the pressure.
3. Add enough air to reach the recommended air pressure.
Note: If you overfill the tire, release air by pressing on the metal stem in
the center of the valve. Then recheck the pressure with your tire gauge.
4. Replace the valve cap.
5. Repeat this procedure for each tire, including the spare.
2013 MKX (mkx)
Owners Guide gf, 3rd Printing
USA (fus)](https://image.slidesharecdn.com/13mkx-140905063956-phpapp02/75/13mkx-302-2048.jpg)


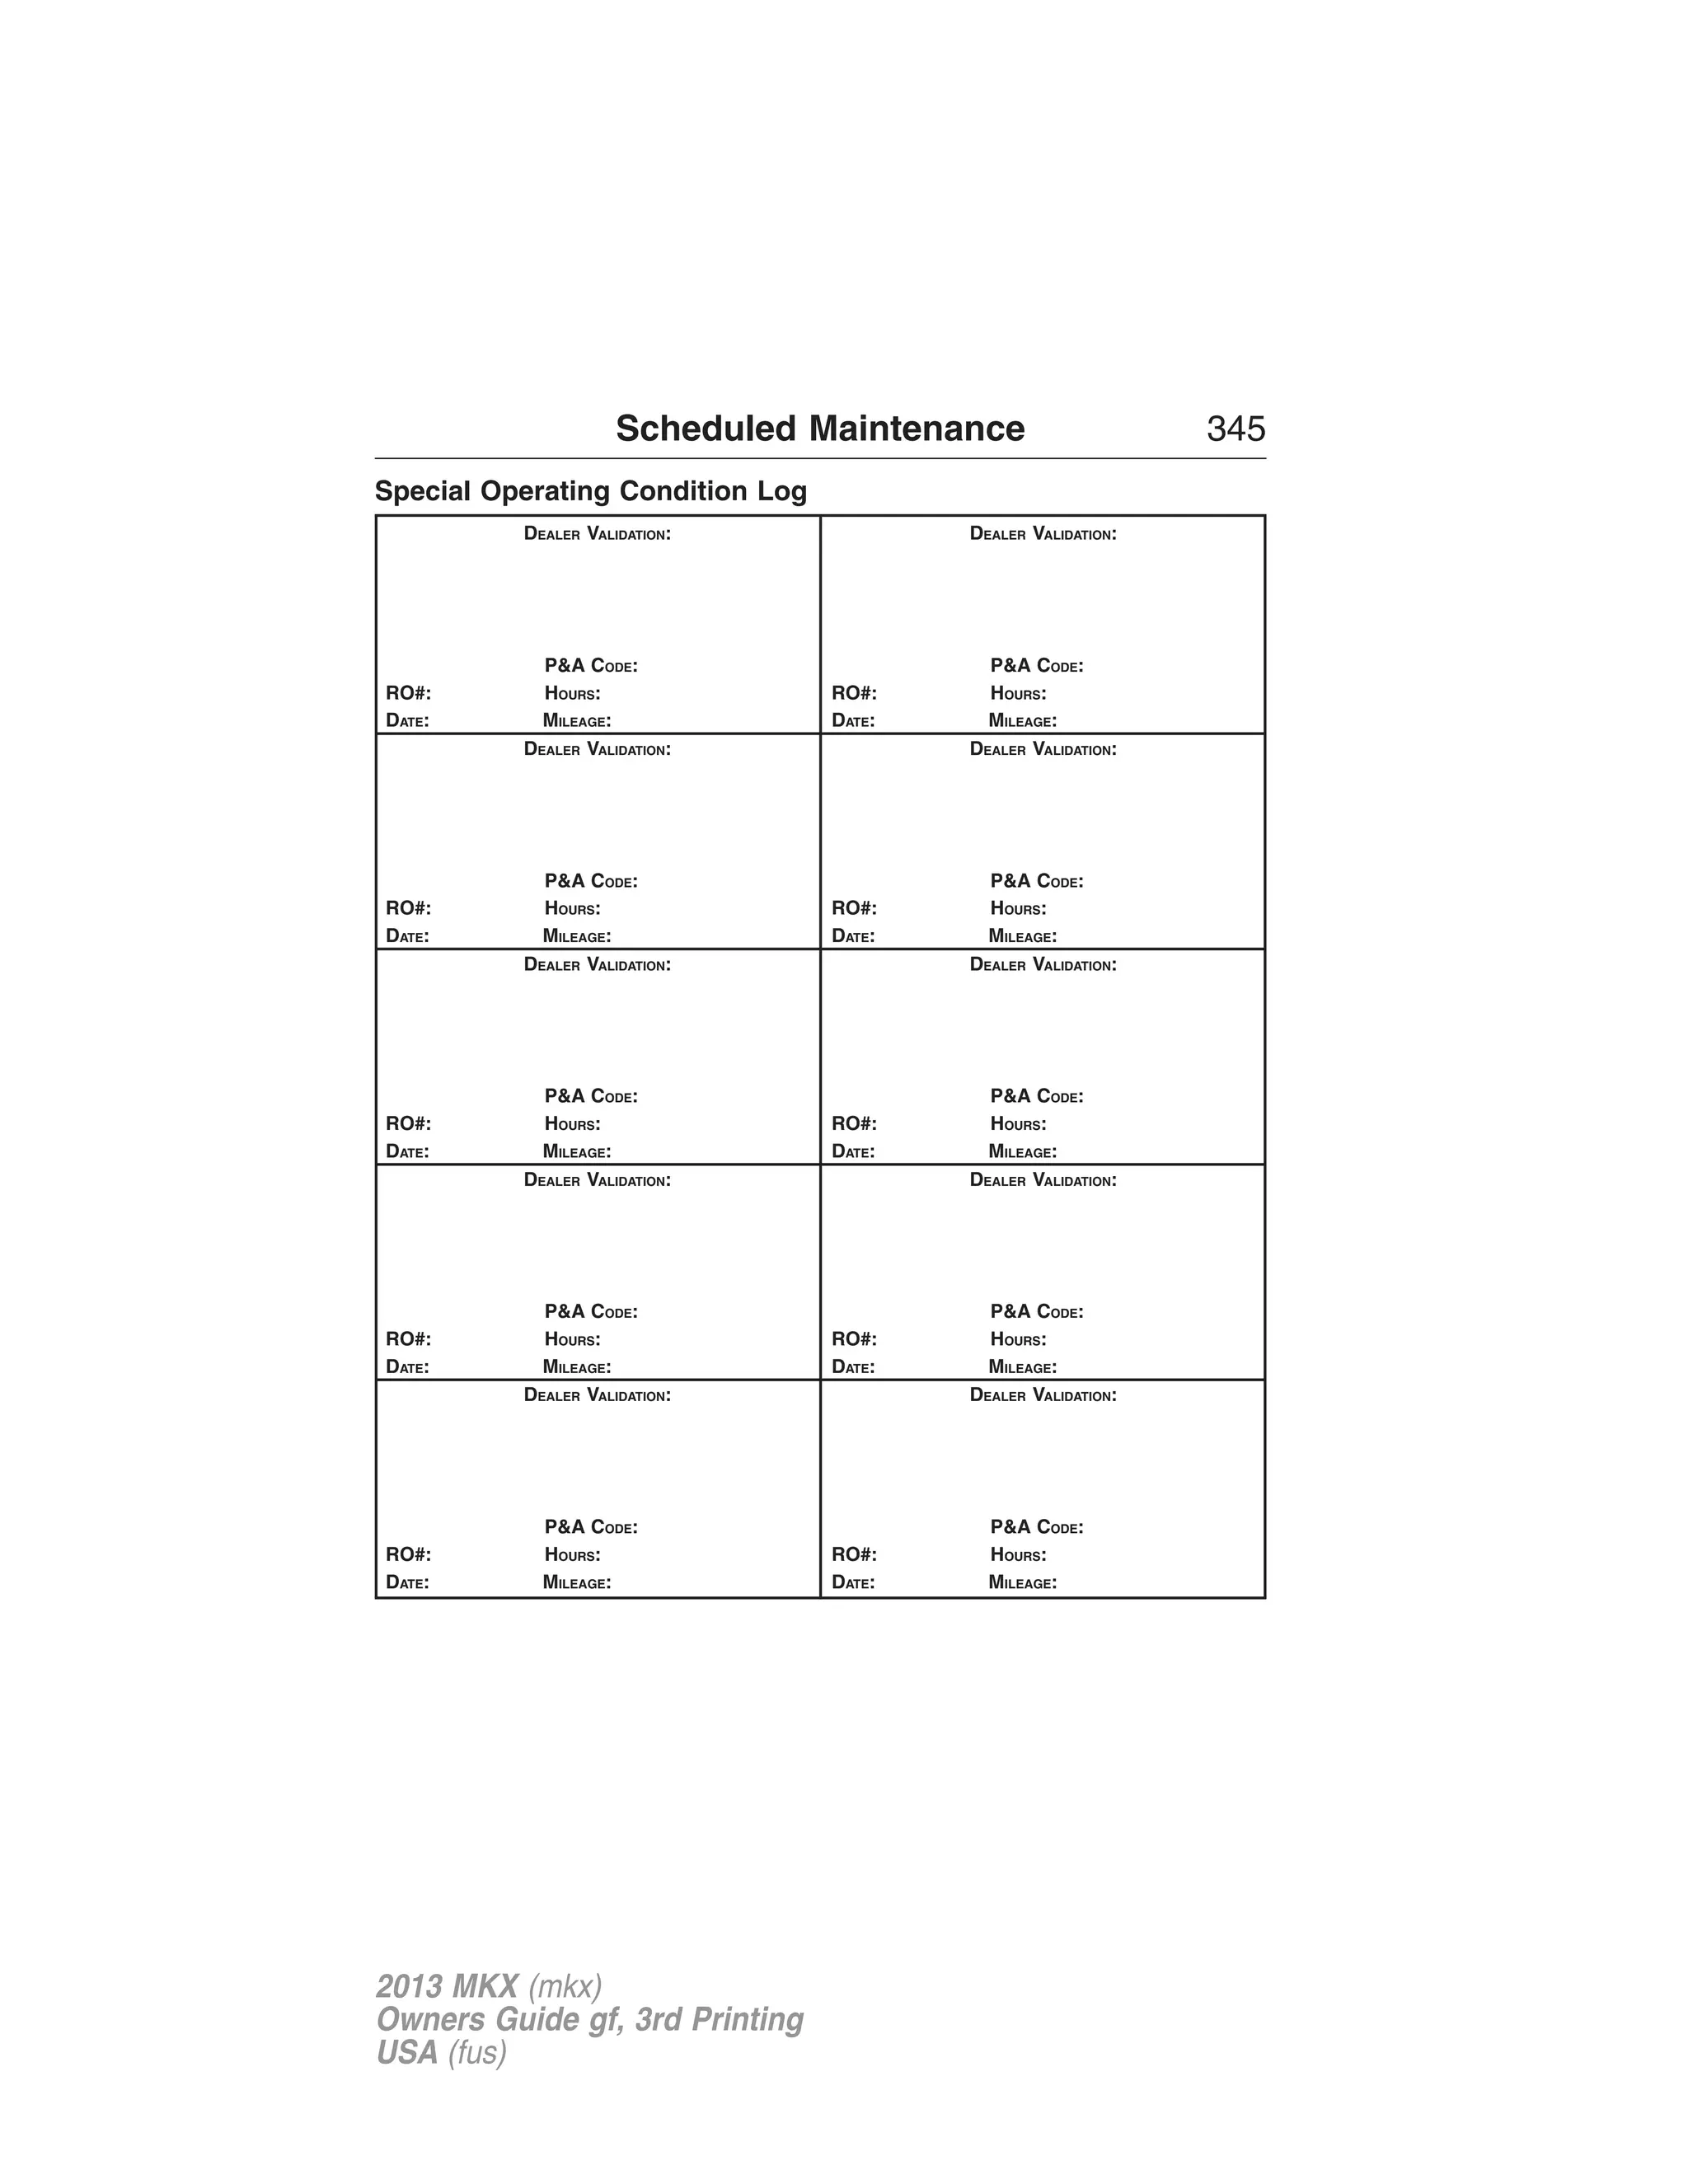
![Scheduled Maintenance 343
SPECIAL OPERATING CONDITIONS
If you operate your vehicle primarily in any of the following conditions,
you need to perform additional maintenance as indicated. If you
occasionally operate your vehicle under any of these conditions, it is
not necessary to perform the additional maintenance. For specific
recommendations, see your dealership service advisor or technician.
Perform the services shown in the following tables when specified or
within 3000 miles (4800 kilometers) of the OIL CHANGE REQUIRED
message appearing in the information display.
Example #1: The OIL CHANGE REQUIRED message comes
on at 28751 miles (46270 kilometers); perform the 30000 mile
(48000 kilometer) automatic transmission fluid replacement.
Example #2: The OIL CHANGE REQUIRED message has not come on,
but the odometer reads 30000 miles (48000 kilometers); perform the
engine air filter replacement. (i.e., Intelligent Oil-Life Monitor® was reset
at 25000 miles [40000 kilometers].)
Towing a Trailer or Using a Camper or Car-top Carrier
As required Change engine oil and filter as indicated by
the information display and perform services
listed in the Normal Scheduled Maintenance
chart.
Inspect frequently,
service as required
Inspect and lubricate U-joints.
See axle maintenance items under
Exceptions.
Every 30000 miles
(48000 km)
Change automatic transmission fluid.
2013 MKX (mkx)
Owners Guide gf, 3rd Printing
USA (fus)](https://image.slidesharecdn.com/13mkx-140905063956-phpapp02/75/13mkx-344-2048.jpg)


![400 MyLincoln Touch™
Note: If any user turns 911 Assist on or off, that setting applies for all
paired phones. If 911 Assist is turned off, either a voice message plays or
a display message (or icon) comes on (or both) when your vehicle is
started after a previously paired phone connects.
Note: Every phone operates differently. While SYNC 911 Assist works
with most cellular phones, some may have trouble using this feature.
If a crash deploys an airbag (excludes knee airbags and rear inflatable
safety belts [if equipped]) or activates the fuel pump shut-off, your
SYNC-equipped vehicle may be able to contact emergency services
by dialing 911 through a paired and connected Bluetooth-enabled
phone. You can learn more about the 911 Assist feature, visit
www.SYNCMyRide.com, www.SYNCMyRide.ca or www.syncmaroute.ca.
• For information on airbag deployment, see the Supplementary
Restraints System chapter.
• For information on the fuel pump shut-off, see the Roadside
Emergencies chapter.
Setting 911 Assist On
Press the Information button > Apps > 911 Assist, then select On.
You can also access 911 Assist by:
• Pressing the Settings icon > Settings > Phone > 911 Assist, or
• Pressing the Settings icon > Help > 911 Assist.
To Make Sure that 911 Assist Works Properly
• SYNC must be powered and working properly at the time of the
incident and throughout feature activation and use.
• The 911 Assist feature must be set on before the incident.
• You must pair and connect a Bluetooth-enabled and compatible phone
to SYNC.
• A connected Bluetooth-enabled phone must have the ability to make
and maintain an outgoing call at the time of the incident.
• A connected Bluetooth-enabled phone must have adequate network
coverage, battery power and signal strength.
• The vehicle must have battery power and be located in the U.S.,
Canada or in a territory in which 911 is the emergency number.
2013 MKX (mkx)
Owners Guide gf, 3rd Printing
USA (fus)](https://image.slidesharecdn.com/13mkx-140905063956-phpapp02/75/13mkx-401-2048.jpg)