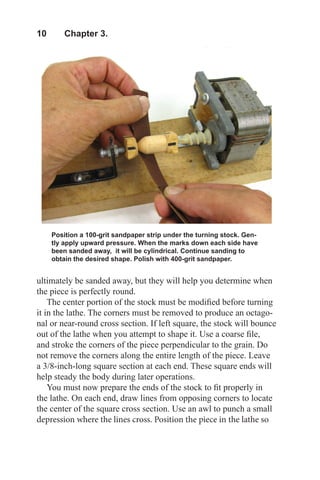
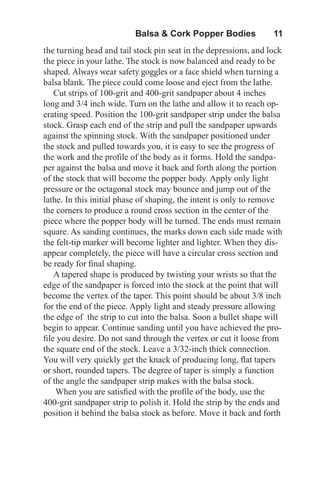
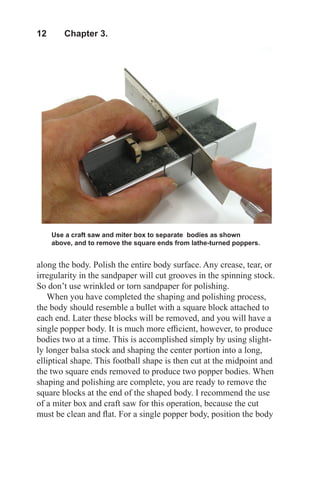
SlideShare a Scribd company logo
Balsa & Cork Popper Bodies   1
BALSA & CORK
POPPER BODIES
The methods and tools for shaping popper bodies from balsa
and cork are quite different from those for soft foam. Cork and
balsa are shaped by hand sanding and machine lathing. Soft foam,
however, is so resilient that hand sanding is ineffective, and high-
speed grinders are required. Conversely, molded bodies of high-
density foam require only superficial sanding to remove mold
seams and other minor imperfections. This chapter, however, is
devoted to balsa and cork. The directions that follow refer specifi-
cally to balsa, but are just as applicable to cork. Because balsa
stock is so easy to obtain and in several respects superior to cork
for making poppers, it is the material I prefer. The hook-attachment
method described in this chapter is also appropriate for molded,
high-density foam bodies.
Hook Styles
I will refer to two hook-attachment styles throughout this book,
the long-shank and short-shank styles. The long-shank variant uses
a hook with a shank that is longer than the popper body. When the
body is attached to the hook, the hook shank will extend beyond
2  Chapter 3.
On the left is a conventional long-shank style popper and on the
right a short-shank style. The short-shank style is well suited for
long popper bodies and lathe-shaped bodies which invariably
have a curved or tapered profile. The primary goal is to have an
unobstructed hook gap for better hooking efficiency.
the rear of the body. Tail materials are tied directly to the hook
shank. Long-shank popper bodies must have a bottom surface
profile that is flat in order to accept the long, straight shaft of the
hook. All commercially-tied poppers I have seen are the long-
shank variety. Round-bend, wide-gap rubber worm hooks, like the
Gamakatsu®
48111, and sproat hooks, such as the Mustad®
3366,
are perfect for the long-shank style specifically because they have
long hook shanks.
In the short-shank variation, the shank of the hook is shorter
than the popper body. The bend of the hook projects from the belly
of the popper. The bottom surface profile of a short-shank popper
can be curved without significantly interfering with the gap of the
hook. Tail materials are tied not to the hook shank but to a short
post that is then inserted into the rear of the popper body. Since
the hook bend is positioned beneath the popper body, rubber legs
and marabou tails are less likely to foul on it. This style is ideal for
patterns with very long bodies, but it works well for any body type.
The short-shank style permits complete fabrication of the popper
body, including painting and attaching rubber legs, eyes, and weed
Balsa & Cork Popper Bodies   3
guard, before the tail is added. Several bodies can be dressed in one
setting and the tails tied and attached later. The Mustad®
92671 and
Eagle Claw®
084 are excellent hooks for this style.
Whether you are constructing a long-shank or short-shank pop-
per, very early in the process you must select a hook that is com-
patible with the popper. The hook size and style must compliment
the dimensions of the popper. They must be properly matched to
provide hooking efficiency, buoyancy, and proper floating attitude.
Popper Proportions
Before I talk of shaping bodies, it will be helpful to examine the
relative dimensions of the various parts of a popper. Once you have
shaped the body, you have determined the size of the completed
popper. It is difficult to be specific about proportions, however,
because of the significant differences that exist between successful
patterns and styles. I can only make generalizations and suggest
rules-of-thumb. However, until you develope an intuition for suit-
able proportions and balance, I recommend that you follow these
general guidelines.
♦♦ The body should comprise 30% of the popper length, with the
skirt and tail making up the remaining 70%. (Some styles, such
as pencil poppers, have long, slender bodies that comprise 50%
or more of the popper length.)
♦♦ The tail should be about twice the length of the body.
♦♦ The hook gap should be equal or slightly larger than the width
of the body.
♦♦ The hook shank in long-shank styles should extend about 3/16
inch beyond the rear of the body to allow attachment of the tail.
4  Chapter 3.
Hand Shaping
Poppers typically have a round cross section. When you pur-
chase balsa stock, it will be either square or rectangular in cross
section. To construct a popper with a round cross section, you must
first prepare a cylindrical blank. Start by removing the corners of
square stock. Use square stock of at least the same thickness as the
diameter of the finished body. Cut a 6- to 8-inch length for shaping.
The body will be shaped on one end and the extra length will be
used as a handle. Place a strip of 60-grit sandpaper flat along the
edge of a table. Remove the corners back about 1 1/2 inches from
the end of the piece by rubbing the corners perpendicular to the
grain against the sandpaper. You can also accomplish this with a
coarse file. A single stroke perpendicular to the grain will remove a
lot of wood, so don’t apply too much pressure. Remove the cor-
ners until the piece has an octagonal cross section. Then press the
piece against the sandpaper while spinning it between your thumb
and forefinger. This will quickly remove the remaining small
edges and produce a circular cross section. Slip a washer over the
end to check the roundness. When the end of the shaft is roughly
To make a cylindrical popper, you must start with square stock.
Sand or file down the corners to produce an octagonal cross sec-
tion as shown in the left photograph. Then spin the piece while
pressing it firmly against coarse sandpaper until a round cross
section is produced as depicted in the right photograph.
Balsa & Cork Popper Bodies   5
Sketch a rough body shape on the balsa stock. Then remove ma-
terial lying outside the sketch by sawing or rasping to produce a
rough profile of the popper body. Shape the top of the popper by
stroking it against a 60-grit sanding block. Then taper the sides in
the same manner. Keep the rear end blunt and the sides square to
the back and belly.
cylindrical, complete the shaping process by sanding parallel to
the grain with 100-grit sandpaper to remove any remaining edges
and smooth the surface. You now have stock suitable for shaping a
body with a round cross section.
Begin a popper by choosing the shape, size, and cross section of
the body. Use square or rectangular commercial stock or cylindri-
cal stock you have prepared previously. I find it helpful to sketch
an actual-size profile of the popper on paper. Use the sketch to
select a hook that matches the body. The hook gap should at least
equal the thickness of the body. Select balsa stock with the appro-
priate cross section and cut a 6- to 8-inch piece. Place the hook
along the bottom edge of the balsa shaft with the bend pointed
out. If you are making a long-shank pattern, leave 3/16 inch of the
shank extending past the end of the balsa to allow for attachment
of the tail material. Place a mark immediately behind the eye of the
hook to locate the front of the body. Draw a line through this mark
to define the face of the popper. Then sketch a rough profile of the
body on the side of the balsa stock. Make sure the body size and
6  Chapter 3.
Final shaping is done with 100-grit sandpaper. Then polish the
body with 400-grit sandpaper. A final check should be made to en-
sure the hook is still appropriately sized for the completed body.
shape are balanced with the hook you have chosen and that neither
overpowers the other.
When the profile sketch is complete, remove all the excess
material from around the profile. I prefer to simply rub the balsa
shaft parallel to the grain against 60-grit sandpaper. Lay the factory
face of the balsa flat against the sandpaper before you start a series
of strokes. This will guide the strokes and help keep the back and
sides of the body square to each other. Start by sanding the spine
down to the sketch on the raw blank. This will define the profile of
the body. Next taper and round the sides, but don’t shape them to a
fine point at the rear. Leave the tail end blunt and thick, because it
must be slotted to receive the hook. Material will be removed very
quickly by the coarse sandpaper, so you must constantly check
shape, size, and symmetry. It is also important to keep the sides,
back, and belly square to each other. A lopsided body will not float
Balsa & Cork Popper Bodies   7
Separate the popper body from the handle. Use a miter box to
ensure the cut is square. If the face of the popper is canted to one
side, true it by dragging the leading edge across fine sandpaper.
Stand the popper on its face. It should stand vertical
with the proper attitude. The key is to make 3 or 4 strokes and then
inspect your work.
Now that the body has been rough shaped, switch to 100-grit
sandpaper. Hold a small piece between your thumb and forefinger,
and stroke the body quickly like you were strumming a guitar.
Smooth down the sharp edges along the sides, back, and belly.
Shape up any unsymmetrical areas. Continue smoothing, shaping,
and inspecting for proper size and symmetry until you are satisfied
with the body. Use a small piece of 400-grit sandpaper to polish the
balsa and remove any marks or blemishes. The surface of the balsa
will dent and scar easily, so you must treat it with care until you
have painted it with a primer.
At this point the body is completely shaped, but it is still at-
tached to the balsa shaft. Place the hook next to the body, and
check the location of the front face of the popper. Occasionally so
much material has been removed that you must use another size or
style hook or relocate the front edge of the popper. Remember to
leave 3/16 inch of hook shank extending behind the body if you are
tying a long-shank pattern. If the original location of the front edge
of the body is still acceptable, saw along the mark to separate the
8  Chapter 3.
popper body
from the shaft. This is a critical step. The face must be cut perpen-
dicular to the longitudinal axis of the body. A miter box and craft
saw are especially useful for producing a flat and properly aligned
face. Saw slowly to avoid splintering the wood. The separated shaft
can be used to make other bodies.
You must now test the popper face for proper alignment with
the body. It is acceptable, even desirable, if the face tilts slightly
towards the rear, but it must not cant towards either side, otherwise
the popper will not track straight when it is twitched. It may curl to
one side as it comes to rest or even spin when it is pulled through
the water. To check the alignment, stand the popper body on a flat
surface. Position it with its face down, its tail sticking up, and its
belly facing you. If the body leans to one side or the other, the
spine and face are not perpendicular, and you must sand down the
leading edge of the face. Place the body on 100-grit sandpaper in
this same position. Rub the face against the sandpaper while apply-
ing the most pressure on the leading edge. Make several circular
strokes and recheck the alignment. Continue this process until the
body stands perfectly straight. The goal is to correct the alignment
while removing the least possible amount of material. The face
must be a single, flat surface. It should not be faceted. Once the
popper face is correctly oriented, polish it with 400-grit sandpaper.
Lathe Shaping
The only way to produce bodies that have rectangular or square
cross sections is by hand shaping. Round bodies can also be pro-
duced by hand shaping, but turning them on a lathe is much eas-
ier, produces a perfectly symmetrical body, and allows far more
variability in body profile. Lathe-turned bodies are generally used
for short-shank poppers because the profile is invariably curved or
tapered. It is assumed in the instructions that follow that you have
purchased or constructed a lathe or adapted a power tool to func-
tion as one. Any time you use a power tool, wear eye protection.
Balsa & Cork Popper Bodies   9
Prepare the stock for turning by making a wide mark down the
center of each side. Then make diagonal marks from corner to
corner at each end to locate the center. Use a coarse file to re-
move the corners in the middle portion of the piece producing an
octagonal cross section.
When hand shaping bodies, the profile is sketched on balsa
stock and proportioned to fit a previously selected hook. You can
be reasonably confident that the finished body and hook will be
compatible. However, the lathing process will quickly remove any
guide marks on the balsa, so it is pointless to sketch a profile. This
makes it difficult to produce a body to fit a specific hook. The situ-
ation is further complicated when bodies are turned two at a time.
Therefore, it becomes a matter of shaping a body and then choos-
ing a hook to match it.
First, select square balsa stock slightly larger than the intended
diameter of the body. Cut a piece 3/4-inch longer than the antici-
pated length of the popper body. Using a felt-tip marker, make a
mark down the center of each side of the stock. These marks will
10  Chapter 3.
Position a 100-grit sandpaper strip under the turning stock. Gen-
tly apply upward pressure. When the marks down each side have
been sanded away, it will be cylindrical. Continue sanding to
obtain the desired shape. Polish with 400-grit sandpaper.
ultimately be sanded away, but they will help you determine when
the piece is perfectly round.
The center portion of the stock must be modified before turning
it in the lathe. The corners must be removed to produce an octago-
nal or near-round cross section. If left square, the stock will bounce
out of the lathe when you attempt to shape it. Use a coarse file,
and stroke the corners of the piece perpendicular to the grain. Do
not remove the corners along the entire length of the piece. Leave
a 3/8-inch-long square section at each end. These square ends will
help steady the body during later operations.
You must now prepare the ends of the stock to fit properly in
the lathe. On each end, draw lines from opposing corners to locate
the center of the square cross section. Use an awl to punch a small
depression where the lines cross. Position the piece in the lathe so
Balsa & Cork Popper Bodies   11
the turning head and tail stock pin seat in the depressions, and lock
the piece in your lathe. The stock is now balanced and ready to be
shaped. Always wear safety goggles or a face shield when turning a
balsa blank. The piece could come loose and eject from the lathe.
Cut strips of 100-grit and 400-grit sandpaper about 4 inches
long and 3/4 inch wide. Turn on the lathe and allow it to reach op-
erating speed. Position the 100-grit sandpaper strip under the balsa
stock. Grasp each end of the strip and pull the sandpaper upwards
against the spinning stock. With the sandpaper positioned under
the stock and pulled towards you, it is easy to see the progress of
the work and the profile of the body as it forms. Hold the sandpa-
per against the balsa and move it back and forth along the portion
of the stock that will become the popper body. Apply only light
pressure or the octagonal stock may bounce and jump out of the
lathe. In this initial phase of shaping, the intent is only to remove
the corners to produce a round cross section in the center of the
piece where the popper body will be turned. The ends must remain
square. As sanding continues, the marks down each side made with
the felt-tip marker will become lighter and lighter. When they dis-
appear completely, the piece will have a circular cross section and
be ready for final shaping.
A tapered shape is produced by twisting your wrists so that the
edge of the sandpaper is forced into the stock at the point that will
become the vertex of the taper. This point should be about 3/8 inch
for the end of the piece. Apply light and steady pressure allowing
the edge of the strip to cut into the balsa. Soon a bullet shape will
begin to appear. Continue sanding until you have achieved the pro-
file you desire. Do not sand through the vertex or cut it loose from
the square end of the stock. Leave a 3/32-inch thick connection.
You will very quickly get the knack of producing long, flat tapers
or short, rounded tapers. The degree of taper is simply a function
of the angle the sandpaper strip makes with the balsa stock.
When you are satisfied with the profile of the body, use the
400-grit sandpaper strip to polish it. Hold the strip by the ends and
position it behind the balsa stock as before. Move it back and forth
12  Chapter 3.
Use a craft saw and miter box to separate bodies as shown
above, and to remove the square ends from lathe-turned poppers.
along the body. Polish the entire body surface. Any crease, tear, or
irregularity in the sandpaper will cut grooves in the spinning stock.
So don’t use wrinkled or torn sandpaper for polishing.
When you have completed the shaping and polishing process,
the body should resemble a bullet with a square block attached to
each end. Later these blocks will be removed, and you will have a
single popper body. It is much more efficient, however, to produce
bodies two at a time. This is accomplished simply by using slight-
ly longer balsa stock and shaping the center portion into a long,
elliptical shape. This football shape is then cut at the midpoint and
the two square ends removed to produce two popper bodies. When
shaping and polishing are complete, you are ready to remove the
square blocks at the end of the shaped body. I recommend the use
of a miter box and craft saw for this operation, because the cut
must be clean and flat. For a single popper body, position the body
Balsa & Cork Popper Bodies   13
in the miter box so you can remove the block at the large end of the
body. The block attached at the small end will be removed last. The
flat surfaces of the blocks will stabilize the piece in the miter box.
Align the body so that its long axis is not quite perpendicular to
the saw blade. This will produce a very slight bevel to the popper
face. I prefer the face of a 1/2-inch diameter popper to be slanted
back about 1/10 to 1/8 inch from vertical. The popper will dip into
the surface slightly when twitched making plenty of commotion
and shedding any debris or weeds. Poppers with faces tilted for-
ward collect trash and are more difficult to retrieve through emer-
gent or floating vegetation. They tend to snag in brush.
For doubled bodies, the first step is to separate the two bod-
ies. Position the balsa in the miter box so the saw blade will pass
through the desired point of separation. Angle the balsa so the
blade will cut slightly beveled faces on the two bodies as you did
with the single body. Make a smooth, clean cut. If the faces are
not smooth and flat you may have to touch them up with 400-grit
sand paper. The blocks attached to the tail end of the bodies may
simply be cut off with a safety razor blade. If turned properly, the
attachment should only be about 3/32-inch thick and the ends can
be removed quite easily.
Shaping Popper Faces
Some patterns call for the popper face to be cupped to produce
noise and disturbance when the popper is twitched through the wa-
ter. Rotary cutter bits, sometimes referred to as deburring tools, are
excellent for cutting these depressions. If the rotary cutter shanks
are small, wrap them with tape so the bits can be handled easily.
Cut the depression by spinning the rotary cutter between your
thumb and forefinger while pressing it against the face of the pop-
per. Do not use power tools in this process. Accuracy and control
are required, not speed. It will be easier to keep the cutter in the
proper location if you mark the center point of the cup. Use a 3/16-
or 1/4-inch round-tipped cutter to begin the depression, since it
is easier to keep a small cutter positioned properly. Once the pilot
14  Chapter 3.
To make a cupped face, use a 3/16-inch round-tipped rotary
cutter to start the cup and finish with a 5/16- or 3/8-inch spherical
rotary cutter. Smooth the cup with a 3/8-inch spherical grinding
stone if desired.
depression is well defined, switch to a 5/16- or 3/8-inch spheri-
cal cutter to complete the process. Leave at least a 1/16-inch rim
around the top and sides of the cup and a slightly wider rim along
the bottom where the hook will be attached. A wide rim will con-
tribute strength and abrasion resistance to the popper face. Should
a portion of the rim become too thin, place the popper face down
on 400-grit sandpaper and sand lightly with a circular motion.
A few strokes will usually remove enough of the rim so the cavity
can be reshaped. The rotary cutter will leave a rather rough surface
in the depression. Though this is in no way detrimental to per-
formance, you may smooth the surface with a 5/16- or 3/8-inch
spherical grinding stone.
One of the most versatile and successful face styles I use
evolved from the bullet-shaped heads like the old Sneaky Pete and
Balsa & Cork Popper Bodies   15
the slant-faced divers. It is simply a concave, arcing depression
extending from the top of the popper to a point 3/16 inch from the
bottom. When stripped, this popper will dive several inches below
the water surface. When twitched gently, it will dip quietly, pro-
ducing a slight disturbance. When twitched more vigorously, it will
blurp like a cup-faced popper. Yet when you miss a strike or pickup
for a backcast, the popper will not make a frightening blurp that
will scare fish. Once you learn how to animate it properly, it’s like
having three poppers in one.
The curved face should be cut while the popper is still attached
to its handle. Lay the handle on its side and mark the front edge
of the popper. Using a wood dowel or some other round object as
a guide, mark the arc of the curved face on the side of the popper.
The center of the circular guide should lie on the front edge of the
This photo shows several balsa poppers with curved faces still
attached to their working handles, . A round wood file and dowel
wrapped wih sandpaper were used to cut the faces. Remove the
handles at a point where the bottom lip is 3/16-inch thick.
16  Chapter 3.
popper. The bottom of the arc should be no closer to the bottom of
the popper than 3/16 inch. This will allow room to attach the hook.
Use a 3/8- or 1/2-inch, coarse, round, wood file to cut the face.
Place the balsa piece on a work table and lay the file across the
top of the popper. Center the file directly over the front edge of
the popper face. Keep the file horizontal and perpendicular to the
longitudinal axis of the popper as you file down through the piece.
If handle material interferes with the process, remove it with a craft
saw. When you have completed the cut, use a wood dowel wrapped
with 100-grit sandpaper to true up the arc and clean up any ragged
edges. You may want to sand down the sharp corners at the front of
the popper slightly to produce a blunt taper. This will improve the
way it retrieves through hard structure.
Cutting the Hook Slot
Once the popper body has been completely shaped, you must
cut a slot down its belly to receive the hook. This seems like a
simple task, but it is easy to misalign the slot. Since it is essential
that the slot be precisely located, I recommend a two step process.
First, saw the slot, paying particular attention to its location and
alignment, then widen and deepen the slot as necessary to fit the
prepared hook. The second step is actually performed just prior to
mounting the hook.
Do not attempt to saw the slot without first marking its position.
If the shape of the body permits, stand it on its face and rotate it
until the belly is towards you. Carefully place a mark at the face
and tail end of the body to define the location of the slot. Examine
the marks to verify that the slot will run down the exact centerline.
Use a hacksaw blade or other fine-tooth saw to cut a 1/8-inch-
deep slot. The depth is not nearly as critical as the alignment,
because the slot will be expanded later with a knife file to fit a
specific hook. Do not use a large, cumbersome, or coarse-tooth saw
for this process, because you must cut a precise slot in a very small
object. Avoid tilting the blade to one side or the other as you saw.
If the pattern is a long-shank variety, saw the slot from the popper
Balsa & Cork Popper Bodies   17
face all the way to the tail. If it is a short-shank variety, you need
only make the slot long enough to hold the shank of the hook. Re-
member, in the short-shank variety, the hook shank is shorter than
the popper body, and the bend of the hook projects from its belly.
Priming
Except for some minor filing of the hook slot, all shaping of the
popper body is now complete. Balsa is very easily scarred, how-
ever, so it should be lightly sanded with 400-grit sandpaper and
protected with a coat of primer as soon as possible. The primer will
harden the surface and also make it easier to clean off smudges. I
have had good success with both water-based and petroleum-based
primers. However, cleanup is far simpler with water-based primers,
since you don’t have to use paint thinner.
Cork requires an additional step before priming. The pits must
be filled and sanded smooth. The product I prefer is the lightweight
spackling used to patch holes in sheetrock or plaster walls. It dries
quickly and is very easy to sand smooth. Yet when it absorbs the
primer it becomes just as durable as the cork. You will find it more
convenient and just as satisfactory as typical wood fillers.
Even if you use a small artist brush, it is difficult to apply the
primer without having a convenient way to hold the body. Simply
wedge a round or square toothpick in the hook slot and you will
have a convenient handle that will also assist in the drying process.
Give the body a single coat of primer, being careful not to get any
in the hook slot. To dry the popper, stick the toothpick in the open
end of a corrugation along the edge of a cardboard box. A soft
drink flat works great for this. When the primer has thoroughly
dried, use 400-grit sandpaper to lightly brush the entire body and
smooth the raised grain. The popper body will be given a second
coat of primer after the hook has been mounted to cover the hook
slot and any areas where the primer abrades. Do not use a heat
source to dry the primer on cork bodies. Air inside the cork will
expand and bubble the coating.
18  Chapter 3.
Attaching the Hook
The processes completed so far have all been of a woodcrafting
nature. However, attaching the hook to the popper body makes
use of conventional fly tying tools, namely a tying vise and thread
bobbin. The method I use, though only one of many I have seen
demonstrated, is relatively simple and extremely durable. Once
when a hook did twist loose, I was pleasantly surprised to find that
the performance of the popper was unaffected. I simply checked
occasionally to ensure the hook was properly positioned, and con-
tinued catching bass.
The method I recommend is to fasten a piece of flat toothpick to
the top of the hook shank before gluing the hook into the slot. The
toothpick acts as a key to prevent the hook from twisting. Secure
The hookless popper bodies impaled on toothpicks in the fore-
ground are drying after a primer coat. Those in the rear, hanging
from the wire, have been given a finish coat.
Balsa & Cork Popper Bodies   19
the hook in your tying vise, and fill your bobbin with unwaxed,
size 3/0 thread. Score the hook shank thoroughly on all sides
by dragging the corner of a file across it. This will substantially
increase the grip of the thread and glue. Make several forward
wraps near the front of the hook shank, and secure the thread by
wrapping backwards over them. Continue wrapping towards the
bend of the hook until you have wrapped approximately 1/8 inch
beyond the center of the hook shank. Now place a flat toothpick
on top of the hook shank. The wide end of the toothpick should be
towards the eye of the hook, and the center of the toothpick should
be positioned over the center of the hook shank. The toothpick
should rest on a narrow edge with its wide faces to the sides. Wrap
forward to a point slightly ahead of the center of the hook shank,
tightly securing the toothpick to the hook. Set the popper body
down on top of the toothpick with its face immediately behind the
hook eye. Do not force the toothpick into the slot. If it is too tight,
use a small knife file to expand the slot until it fits freely. Take care
not to loosen or twist the toothpick. Mark the toothpick where it
must be trimmed so it will not be exposed when the body is per-
manently attached. For long-shank patterns, an additional 1/8 inch
Above left, a flat toothpick was measured and trimmed to fit a long-
shank popper body, then lashed to the scored hook shank. Above
right, the toothpick key is covered with glue-impregnated thread
wraps and is ready for attachment of the popper body.
20  Chapter 3.
must be clipped off the rear end of the toothpick to make room for
the finishing thread wraps when the tail material is attached. The
finishing wraps will then be covered by the body. Using fingernail
clippers, cut off the ends of the toothpick at a 45-degree angle. Set
the body back over the hook shank and ensure that the toothpick is
not visible. Also check that the popper body is setting vertically on
the hook. Look directly at the face of the popper; the orientation of
the hook eye will give you a clue. If it is crooked, twist the body
and toothpick until the body is oriented vertically over the hook.
Apply a coat of glue to the thread wraps, hook shank, and tooth-
pick. A good glue for this process is a cyanoacrylate “superglue”
by Pacer called Slo-Zap®
CA. It is a no-run gel with a 2-minute
setting time. I have also had excellent success with exterior wood
glue. Keep the thread wraps coated with glue, and wrap forward
and then backwards until the toothpick is uniformly covered with
two saturated layers of thread. Tie off the thread with a series of
half hitches and trim it close to the hook. Wipe off all the glue and
place the popper body back on the hook for a final check. Do not
force it or the balsa may split. Use a knife file to widen and deepen
the slot until the body slips snugly over the toothpick. The hook
shank should not be recessed more than 1/32 inch into the belly of
the popper. It may take several attempts before you get a proper
fit. An unobstructed hook gap is the key to efficient hooking, so do
not reduce it by burying the hook shank deep in the body. With the
popper body seated atop the hook, inspect it face-on to verify that
the hook bend is perpendicular to the body and not canted to one
side. If the alignment is not correct, you must widen the slot a bit so
the body can be cocked on the shank and brought into alignment
when you permanently glue it in place. If there is any doubt about
the compatibility of the hook and body, you should test them at
this time. Simply fit the body on the hook and place them in a bowl
of water. If the hook is too heavy, the popper will float in a near
vertical position or it may sit low in the water. Either way, it will be
difficult to see it when fishing. There is nothing you can do to cor-
rect these flaws except switch to a different hook size or style.
Balsa & Cork Popper Bodies   21
If you are tying a long-shank style pattern, you are finished until
the tail material has been attached to the hook. Then you can glue
the body in place and finish the popper. Some tiers mount the pop-
per body on the hook before tying the tail, but you will get a neater
job if you put the body on last.
Several steps remain to complete the attachment of the hook to
the body. These steps are the same for both short-shank and long-
shank styles, except for the latter, they are performed after the tails
have been added. Coat the hook shank with glue and work it into
the thread wraps. Also apply glue liberally to the hook slot and
spread it with a bodkin or toothpick so that the sides and bottom
are coated. Set the balsa body onto the shaft and press it into place.
Check the alignment of the hook bend and straighten it as required.
Use a bodkin to remove any glue that squeezes out. Always check
the face of the popper for excess glue or for a void. If you are us-
ing wood glue, set the body aside where it will not be disturbed for
about 30 minutes so the glue can set.
Once the glue has thoroughly cured, the exposed slot on the bel-
ly of the popper body must be hidden. The easiest way to do this is
to fill it with a nonshrink, lightweight spackling. Both Elmer’s®
and
Red Devil®
have very similar products on the market which dry
in about 30 minutes. Do not use sheet rock seam paste, because it
dries very slowly, nor wood filler, which dries much harder than is
required and is more difficult to sand. Use a small blade to pack the
groove with spackling and smooth it. Leave the spackling a tiny
bit high so it can be sanded flush. Fill the slot on the face of the
popper as well, and on short-shank patterns, fill around the hook
bend where it projects from the belly. Let the spackling dry for 30
minutes or longer before sanding. Use 400-grit sandpaper to sand
the spackling flush. There should be no trace of the slot when you
have finished. All that remains is to apply another coat of primer.
Apply primer to the entire body, not just the spackled slot. It pro-
duces a brighter undercoat for the finish paint coat. Smooth down
the raised grain with a light sanding before applying the primer.
22  Chapter 3.
The bodies of short-shank patterns may now be completely
dressed. Since the hackle skirt and tail materials are tied on a post
that is inserted into the rear of the body, they can be added after
the body is completed. It is considerably easier to apply paint and
dress the popper with rubber legs, eyes, and a weed guard before
the tail is attached. You don’t have to worry about keeping the
hackle fibers out of fresh paint or damaging the tail.

More Related Content

Similar to Tying Bass Poppers Balsa And Cork Popper Bbodies

Water bottle rocket slide show
Water bottle rocket slide showWater bottle rocket slide show
Water bottle rocket slide show
Nurul Badriah
 
Tying Bass Poppers Dressing
Tying Bass Poppers DressingTying Bass Poppers Dressing
Tying Bass Poppers Dressing
Fred Crisp
 
Moccasin making tutorial
Moccasin making tutorialMoccasin making tutorial
Moccasin making tutorial
Antoinette Finnrsdottir
 
소형베틀도면
소형베틀도면소형베틀도면
소형베틀도면
Seongwon Kim
 
Mousetrap Car Construction
Mousetrap Car ConstructionMousetrap Car Construction
Mousetrap Car Construction
Bill Kuhl
 
syringe actuated mechanical arm
syringe actuated mechanical armsyringe actuated mechanical arm
syringe actuated mechanical armSuchit Moon
 
Woodworking projects
Woodworking projectsWoodworking projects
Woodworking projects
jazza patrick
 
Making felt slippers from an old sweater
Making felt slippers from an old sweaterMaking felt slippers from an old sweater
Making felt slippers from an old sweaterWoolcraft
 
How to Build an Adirondack Chair
How to Build an Adirondack ChairHow to Build an Adirondack Chair
How to Build an Adirondack Chair
Vera Stewart
 
Beginner Woodworking Projects
Beginner Woodworking ProjectsBeginner Woodworking Projects
Beginner Woodworking Projects
Jin Jay
 
To Create A Manuscript
To Create A ManuscriptTo Create A Manuscript
To Create A Manuscript
rdeveau
 
Make your own equipment (Archery)
Make your own equipment (Archery)Make your own equipment (Archery)
Make your own equipment (Archery)kelikados
 
How To Sew: Hoodie with Owl
How To Sew: Hoodie with Owl How To Sew: Hoodie with Owl
How To Sew: Hoodie with Owl
CandCSewing
 
Putting us on the Radar
Putting us on the RadarPutting us on the Radar
Putting us on the Radar
Jason Shoup
 
LO3 Embroidery Stitches.pptx
LO3 Embroidery Stitches.pptxLO3 Embroidery Stitches.pptx
LO3 Embroidery Stitches.pptx
JavanFerry1
 
Rattan tutorial by kevin graybeal
Rattan tutorial by kevin graybealRattan tutorial by kevin graybeal
Rattan tutorial by kevin graybeal
Anibal Ruben Reyes
 
Scrub Cap For Long Hair Printable Pattern and DIY Tutorial
Scrub Cap For Long Hair Printable Pattern and DIY TutorialScrub Cap For Long Hair Printable Pattern and DIY Tutorial
Scrub Cap For Long Hair Printable Pattern and DIY Tutorial
Larissa Fontenot
 
How To Sew: Heart Appliqué Quilt
How To Sew: Heart Appliqué QuiltHow To Sew: Heart Appliqué Quilt
How To Sew: Heart Appliqué Quilt
CandCSewing
 
400 proyectos de_mini_reloj[1]
400 proyectos de_mini_reloj[1]400 proyectos de_mini_reloj[1]
400 proyectos de_mini_reloj[1]
ruper montes
 

Similar to Tying Bass Poppers Balsa And Cork Popper Bbodies (20)

Water bottle rocket slide show
Water bottle rocket slide showWater bottle rocket slide show
Water bottle rocket slide show
 
Tying Bass Poppers Dressing
Tying Bass Poppers DressingTying Bass Poppers Dressing
Tying Bass Poppers Dressing
 
Moccasin making tutorial
Moccasin making tutorialMoccasin making tutorial
Moccasin making tutorial
 
소형베틀도면
소형베틀도면소형베틀도면
소형베틀도면
 
Mousetrap Car Construction
Mousetrap Car ConstructionMousetrap Car Construction
Mousetrap Car Construction
 
syringe actuated mechanical arm
syringe actuated mechanical armsyringe actuated mechanical arm
syringe actuated mechanical arm
 
Woodworking projects
Woodworking projectsWoodworking projects
Woodworking projects
 
TRU-FIT
TRU-FITTRU-FIT
TRU-FIT
 
Making felt slippers from an old sweater
Making felt slippers from an old sweaterMaking felt slippers from an old sweater
Making felt slippers from an old sweater
 
How to Build an Adirondack Chair
How to Build an Adirondack ChairHow to Build an Adirondack Chair
How to Build an Adirondack Chair
 
Beginner Woodworking Projects
Beginner Woodworking ProjectsBeginner Woodworking Projects
Beginner Woodworking Projects
 
To Create A Manuscript
To Create A ManuscriptTo Create A Manuscript
To Create A Manuscript
 
Make your own equipment (Archery)
Make your own equipment (Archery)Make your own equipment (Archery)
Make your own equipment (Archery)
 
How To Sew: Hoodie with Owl
How To Sew: Hoodie with Owl How To Sew: Hoodie with Owl
How To Sew: Hoodie with Owl
 
Putting us on the Radar
Putting us on the RadarPutting us on the Radar
Putting us on the Radar
 
LO3 Embroidery Stitches.pptx
LO3 Embroidery Stitches.pptxLO3 Embroidery Stitches.pptx
LO3 Embroidery Stitches.pptx
 
Rattan tutorial by kevin graybeal
Rattan tutorial by kevin graybealRattan tutorial by kevin graybeal
Rattan tutorial by kevin graybeal
 
Scrub Cap For Long Hair Printable Pattern and DIY Tutorial
Scrub Cap For Long Hair Printable Pattern and DIY TutorialScrub Cap For Long Hair Printable Pattern and DIY Tutorial
Scrub Cap For Long Hair Printable Pattern and DIY Tutorial
 
How To Sew: Heart Appliqué Quilt
How To Sew: Heart Appliqué QuiltHow To Sew: Heart Appliqué Quilt
How To Sew: Heart Appliqué Quilt
 
400 proyectos de_mini_reloj[1]
400 proyectos de_mini_reloj[1]400 proyectos de_mini_reloj[1]
400 proyectos de_mini_reloj[1]
 

Recently uploaded

Unit 2- Research Aptitude (UGC NET Paper I).pdf
Unit 2- Research Aptitude (UGC NET Paper I).pdfUnit 2- Research Aptitude (UGC NET Paper I).pdf
Unit 2- Research Aptitude (UGC NET Paper I).pdf
Thiyagu K
 
Palestine last event orientationfvgnh .pptx
Palestine last event orientationfvgnh .pptxPalestine last event orientationfvgnh .pptx
Palestine last event orientationfvgnh .pptx
RaedMohamed3
 
A Strategic Approach: GenAI in Education
A Strategic Approach: GenAI in EducationA Strategic Approach: GenAI in Education
A Strategic Approach: GenAI in Education
Peter Windle
 
Honest Reviews of Tim Han LMA Course Program.pptx
Honest Reviews of Tim Han LMA Course Program.pptxHonest Reviews of Tim Han LMA Course Program.pptx
Honest Reviews of Tim Han LMA Course Program.pptx
timhan337
 
Chapter 3 - Islamic Banking Products and Services.pptx
Chapter 3 - Islamic Banking Products and Services.pptxChapter 3 - Islamic Banking Products and Services.pptx
Chapter 3 - Islamic Banking Products and Services.pptx
Mohd Adib Abd Muin, Senior Lecturer at Universiti Utara Malaysia
 
How to Make a Field invisible in Odoo 17
How to Make a Field invisible in Odoo 17How to Make a Field invisible in Odoo 17
How to Make a Field invisible in Odoo 17
Celine George
 
Biological Screening of Herbal Drugs in detailed.
Biological Screening of Herbal Drugs in detailed.Biological Screening of Herbal Drugs in detailed.
Biological Screening of Herbal Drugs in detailed.
Ashokrao Mane college of Pharmacy Peth-Vadgaon
 
Additional Benefits for Employee Website.pdf
Additional Benefits for Employee Website.pdfAdditional Benefits for Employee Website.pdf
Additional Benefits for Employee Website.pdf
joachimlavalley1
 
Home assignment II on Spectroscopy 2024 Answers.pdf
Home assignment II on Spectroscopy 2024 Answers.pdfHome assignment II on Spectroscopy 2024 Answers.pdf
Home assignment II on Spectroscopy 2024 Answers.pdf
Tamralipta Mahavidyalaya
 
The approach at University of Liverpool.pptx
The approach at University of Liverpool.pptxThe approach at University of Liverpool.pptx
The approach at University of Liverpool.pptx
Jisc
 
Overview on Edible Vaccine: Pros & Cons with Mechanism
Overview on Edible Vaccine: Pros & Cons with MechanismOverview on Edible Vaccine: Pros & Cons with Mechanism
Overview on Edible Vaccine: Pros & Cons with Mechanism
DeeptiGupta154
 
Francesca Gottschalk - How can education support child empowerment.pptx
Francesca Gottschalk - How can education support child empowerment.pptxFrancesca Gottschalk - How can education support child empowerment.pptx
Francesca Gottschalk - How can education support child empowerment.pptx
EduSkills OECD
 
Polish students' mobility in the Czech Republic
Polish students' mobility in the Czech RepublicPolish students' mobility in the Czech Republic
Polish students' mobility in the Czech Republic
Anna Sz.
 
Sha'Carri Richardson Presentation 202345
Sha'Carri Richardson Presentation 202345Sha'Carri Richardson Presentation 202345
Sha'Carri Richardson Presentation 202345
beazzy04
 
Guidance_and_Counselling.pdf B.Ed. 4th Semester
Guidance_and_Counselling.pdf B.Ed. 4th SemesterGuidance_and_Counselling.pdf B.Ed. 4th Semester
Guidance_and_Counselling.pdf B.Ed. 4th Semester
Atul Kumar Singh
 
Embracing GenAI - A Strategic Imperative
Embracing GenAI - A Strategic ImperativeEmbracing GenAI - A Strategic Imperative
Embracing GenAI - A Strategic Imperative
Peter Windle
 
CLASS 11 CBSE B.St Project AIDS TO TRADE - INSURANCE
CLASS 11 CBSE B.St Project AIDS TO TRADE - INSURANCECLASS 11 CBSE B.St Project AIDS TO TRADE - INSURANCE
CLASS 11 CBSE B.St Project AIDS TO TRADE - INSURANCE
BhavyaRajput3
 
Unit 8 - Information and Communication Technology (Paper I).pdf
Unit 8 - Information and Communication Technology (Paper I).pdfUnit 8 - Information and Communication Technology (Paper I).pdf
Unit 8 - Information and Communication Technology (Paper I).pdf
Thiyagu K
 
Model Attribute Check Company Auto Property
Model Attribute  Check Company Auto PropertyModel Attribute  Check Company Auto Property
Model Attribute Check Company Auto Property
Celine George
 
Lapbook sobre os Regimes Totalitários.pdf
Lapbook sobre os Regimes Totalitários.pdfLapbook sobre os Regimes Totalitários.pdf
Lapbook sobre os Regimes Totalitários.pdf
Jean Carlos Nunes Paixão
 

Recently uploaded (20)

Unit 2- Research Aptitude (UGC NET Paper I).pdf
Unit 2- Research Aptitude (UGC NET Paper I).pdfUnit 2- Research Aptitude (UGC NET Paper I).pdf
Unit 2- Research Aptitude (UGC NET Paper I).pdf
 
Palestine last event orientationfvgnh .pptx
Palestine last event orientationfvgnh .pptxPalestine last event orientationfvgnh .pptx
Palestine last event orientationfvgnh .pptx
 
A Strategic Approach: GenAI in Education
A Strategic Approach: GenAI in EducationA Strategic Approach: GenAI in Education
A Strategic Approach: GenAI in Education
 
Honest Reviews of Tim Han LMA Course Program.pptx
Honest Reviews of Tim Han LMA Course Program.pptxHonest Reviews of Tim Han LMA Course Program.pptx
Honest Reviews of Tim Han LMA Course Program.pptx
 
Chapter 3 - Islamic Banking Products and Services.pptx
Chapter 3 - Islamic Banking Products and Services.pptxChapter 3 - Islamic Banking Products and Services.pptx
Chapter 3 - Islamic Banking Products and Services.pptx
 
How to Make a Field invisible in Odoo 17
How to Make a Field invisible in Odoo 17How to Make a Field invisible in Odoo 17
How to Make a Field invisible in Odoo 17
 
Biological Screening of Herbal Drugs in detailed.
Biological Screening of Herbal Drugs in detailed.Biological Screening of Herbal Drugs in detailed.
Biological Screening of Herbal Drugs in detailed.
 
Additional Benefits for Employee Website.pdf
Additional Benefits for Employee Website.pdfAdditional Benefits for Employee Website.pdf
Additional Benefits for Employee Website.pdf
 
Home assignment II on Spectroscopy 2024 Answers.pdf
Home assignment II on Spectroscopy 2024 Answers.pdfHome assignment II on Spectroscopy 2024 Answers.pdf
Home assignment II on Spectroscopy 2024 Answers.pdf
 
The approach at University of Liverpool.pptx
The approach at University of Liverpool.pptxThe approach at University of Liverpool.pptx
The approach at University of Liverpool.pptx
 
Overview on Edible Vaccine: Pros & Cons with Mechanism
Overview on Edible Vaccine: Pros & Cons with MechanismOverview on Edible Vaccine: Pros & Cons with Mechanism
Overview on Edible Vaccine: Pros & Cons with Mechanism
 
Francesca Gottschalk - How can education support child empowerment.pptx
Francesca Gottschalk - How can education support child empowerment.pptxFrancesca Gottschalk - How can education support child empowerment.pptx
Francesca Gottschalk - How can education support child empowerment.pptx
 
Polish students' mobility in the Czech Republic
Polish students' mobility in the Czech RepublicPolish students' mobility in the Czech Republic
Polish students' mobility in the Czech Republic
 
Sha'Carri Richardson Presentation 202345
Sha'Carri Richardson Presentation 202345Sha'Carri Richardson Presentation 202345
Sha'Carri Richardson Presentation 202345
 
Guidance_and_Counselling.pdf B.Ed. 4th Semester
Guidance_and_Counselling.pdf B.Ed. 4th SemesterGuidance_and_Counselling.pdf B.Ed. 4th Semester
Guidance_and_Counselling.pdf B.Ed. 4th Semester
 
Embracing GenAI - A Strategic Imperative
Embracing GenAI - A Strategic ImperativeEmbracing GenAI - A Strategic Imperative
Embracing GenAI - A Strategic Imperative
 
CLASS 11 CBSE B.St Project AIDS TO TRADE - INSURANCE
CLASS 11 CBSE B.St Project AIDS TO TRADE - INSURANCECLASS 11 CBSE B.St Project AIDS TO TRADE - INSURANCE
CLASS 11 CBSE B.St Project AIDS TO TRADE - INSURANCE
 
Unit 8 - Information and Communication Technology (Paper I).pdf
Unit 8 - Information and Communication Technology (Paper I).pdfUnit 8 - Information and Communication Technology (Paper I).pdf
Unit 8 - Information and Communication Technology (Paper I).pdf
 
Model Attribute Check Company Auto Property
Model Attribute  Check Company Auto PropertyModel Attribute  Check Company Auto Property
Model Attribute Check Company Auto Property
 
Lapbook sobre os Regimes Totalitários.pdf
Lapbook sobre os Regimes Totalitários.pdfLapbook sobre os Regimes Totalitários.pdf
Lapbook sobre os Regimes Totalitários.pdf
 

Tying Bass Poppers Balsa And Cork Popper Bbodies

  • 1. Balsa & Cork Popper Bodies   1 BALSA & CORK POPPER BODIES The methods and tools for shaping popper bodies from balsa and cork are quite different from those for soft foam. Cork and balsa are shaped by hand sanding and machine lathing. Soft foam, however, is so resilient that hand sanding is ineffective, and high- speed grinders are required. Conversely, molded bodies of high- density foam require only superficial sanding to remove mold seams and other minor imperfections. This chapter, however, is devoted to balsa and cork. The directions that follow refer specifi- cally to balsa, but are just as applicable to cork. Because balsa stock is so easy to obtain and in several respects superior to cork for making poppers, it is the material I prefer. The hook-attachment method described in this chapter is also appropriate for molded, high-density foam bodies. Hook Styles I will refer to two hook-attachment styles throughout this book, the long-shank and short-shank styles. The long-shank variant uses a hook with a shank that is longer than the popper body. When the body is attached to the hook, the hook shank will extend beyond
  • 2. 2  Chapter 3. On the left is a conventional long-shank style popper and on the right a short-shank style. The short-shank style is well suited for long popper bodies and lathe-shaped bodies which invariably have a curved or tapered profile. The primary goal is to have an unobstructed hook gap for better hooking efficiency. the rear of the body. Tail materials are tied directly to the hook shank. Long-shank popper bodies must have a bottom surface profile that is flat in order to accept the long, straight shaft of the hook. All commercially-tied poppers I have seen are the long- shank variety. Round-bend, wide-gap rubber worm hooks, like the Gamakatsu® 48111, and sproat hooks, such as the Mustad® 3366, are perfect for the long-shank style specifically because they have long hook shanks. In the short-shank variation, the shank of the hook is shorter than the popper body. The bend of the hook projects from the belly of the popper. The bottom surface profile of a short-shank popper can be curved without significantly interfering with the gap of the hook. Tail materials are tied not to the hook shank but to a short post that is then inserted into the rear of the popper body. Since the hook bend is positioned beneath the popper body, rubber legs and marabou tails are less likely to foul on it. This style is ideal for patterns with very long bodies, but it works well for any body type. The short-shank style permits complete fabrication of the popper body, including painting and attaching rubber legs, eyes, and weed
  • 3. Balsa & Cork Popper Bodies   3 guard, before the tail is added. Several bodies can be dressed in one setting and the tails tied and attached later. The Mustad® 92671 and Eagle Claw® 084 are excellent hooks for this style. Whether you are constructing a long-shank or short-shank pop- per, very early in the process you must select a hook that is com- patible with the popper. The hook size and style must compliment the dimensions of the popper. They must be properly matched to provide hooking efficiency, buoyancy, and proper floating attitude. Popper Proportions Before I talk of shaping bodies, it will be helpful to examine the relative dimensions of the various parts of a popper. Once you have shaped the body, you have determined the size of the completed popper. It is difficult to be specific about proportions, however, because of the significant differences that exist between successful patterns and styles. I can only make generalizations and suggest rules-of-thumb. However, until you develope an intuition for suit- able proportions and balance, I recommend that you follow these general guidelines. ♦♦ The body should comprise 30% of the popper length, with the skirt and tail making up the remaining 70%. (Some styles, such as pencil poppers, have long, slender bodies that comprise 50% or more of the popper length.) ♦♦ The tail should be about twice the length of the body. ♦♦ The hook gap should be equal or slightly larger than the width of the body. ♦♦ The hook shank in long-shank styles should extend about 3/16 inch beyond the rear of the body to allow attachment of the tail.
  • 4. 4  Chapter 3. Hand Shaping Poppers typically have a round cross section. When you pur- chase balsa stock, it will be either square or rectangular in cross section. To construct a popper with a round cross section, you must first prepare a cylindrical blank. Start by removing the corners of square stock. Use square stock of at least the same thickness as the diameter of the finished body. Cut a 6- to 8-inch length for shaping. The body will be shaped on one end and the extra length will be used as a handle. Place a strip of 60-grit sandpaper flat along the edge of a table. Remove the corners back about 1 1/2 inches from the end of the piece by rubbing the corners perpendicular to the grain against the sandpaper. You can also accomplish this with a coarse file. A single stroke perpendicular to the grain will remove a lot of wood, so don’t apply too much pressure. Remove the cor- ners until the piece has an octagonal cross section. Then press the piece against the sandpaper while spinning it between your thumb and forefinger. This will quickly remove the remaining small edges and produce a circular cross section. Slip a washer over the end to check the roundness. When the end of the shaft is roughly To make a cylindrical popper, you must start with square stock. Sand or file down the corners to produce an octagonal cross sec- tion as shown in the left photograph. Then spin the piece while pressing it firmly against coarse sandpaper until a round cross section is produced as depicted in the right photograph.
  • 5. Balsa & Cork Popper Bodies   5 Sketch a rough body shape on the balsa stock. Then remove ma- terial lying outside the sketch by sawing or rasping to produce a rough profile of the popper body. Shape the top of the popper by stroking it against a 60-grit sanding block. Then taper the sides in the same manner. Keep the rear end blunt and the sides square to the back and belly. cylindrical, complete the shaping process by sanding parallel to the grain with 100-grit sandpaper to remove any remaining edges and smooth the surface. You now have stock suitable for shaping a body with a round cross section. Begin a popper by choosing the shape, size, and cross section of the body. Use square or rectangular commercial stock or cylindri- cal stock you have prepared previously. I find it helpful to sketch an actual-size profile of the popper on paper. Use the sketch to select a hook that matches the body. The hook gap should at least equal the thickness of the body. Select balsa stock with the appro- priate cross section and cut a 6- to 8-inch piece. Place the hook along the bottom edge of the balsa shaft with the bend pointed out. If you are making a long-shank pattern, leave 3/16 inch of the shank extending past the end of the balsa to allow for attachment of the tail material. Place a mark immediately behind the eye of the hook to locate the front of the body. Draw a line through this mark to define the face of the popper. Then sketch a rough profile of the body on the side of the balsa stock. Make sure the body size and
  • 6. 6  Chapter 3. Final shaping is done with 100-grit sandpaper. Then polish the body with 400-grit sandpaper. A final check should be made to en- sure the hook is still appropriately sized for the completed body. shape are balanced with the hook you have chosen and that neither overpowers the other. When the profile sketch is complete, remove all the excess material from around the profile. I prefer to simply rub the balsa shaft parallel to the grain against 60-grit sandpaper. Lay the factory face of the balsa flat against the sandpaper before you start a series of strokes. This will guide the strokes and help keep the back and sides of the body square to each other. Start by sanding the spine down to the sketch on the raw blank. This will define the profile of the body. Next taper and round the sides, but don’t shape them to a fine point at the rear. Leave the tail end blunt and thick, because it must be slotted to receive the hook. Material will be removed very quickly by the coarse sandpaper, so you must constantly check shape, size, and symmetry. It is also important to keep the sides, back, and belly square to each other. A lopsided body will not float
  • 7. Balsa & Cork Popper Bodies   7 Separate the popper body from the handle. Use a miter box to ensure the cut is square. If the face of the popper is canted to one side, true it by dragging the leading edge across fine sandpaper. Stand the popper on its face. It should stand vertical with the proper attitude. The key is to make 3 or 4 strokes and then inspect your work. Now that the body has been rough shaped, switch to 100-grit sandpaper. Hold a small piece between your thumb and forefinger, and stroke the body quickly like you were strumming a guitar. Smooth down the sharp edges along the sides, back, and belly. Shape up any unsymmetrical areas. Continue smoothing, shaping, and inspecting for proper size and symmetry until you are satisfied with the body. Use a small piece of 400-grit sandpaper to polish the balsa and remove any marks or blemishes. The surface of the balsa will dent and scar easily, so you must treat it with care until you have painted it with a primer. At this point the body is completely shaped, but it is still at- tached to the balsa shaft. Place the hook next to the body, and check the location of the front face of the popper. Occasionally so much material has been removed that you must use another size or style hook or relocate the front edge of the popper. Remember to leave 3/16 inch of hook shank extending behind the body if you are tying a long-shank pattern. If the original location of the front edge of the body is still acceptable, saw along the mark to separate the
  • 8. 8  Chapter 3. popper body from the shaft. This is a critical step. The face must be cut perpen- dicular to the longitudinal axis of the body. A miter box and craft saw are especially useful for producing a flat and properly aligned face. Saw slowly to avoid splintering the wood. The separated shaft can be used to make other bodies. You must now test the popper face for proper alignment with the body. It is acceptable, even desirable, if the face tilts slightly towards the rear, but it must not cant towards either side, otherwise the popper will not track straight when it is twitched. It may curl to one side as it comes to rest or even spin when it is pulled through the water. To check the alignment, stand the popper body on a flat surface. Position it with its face down, its tail sticking up, and its belly facing you. If the body leans to one side or the other, the spine and face are not perpendicular, and you must sand down the leading edge of the face. Place the body on 100-grit sandpaper in this same position. Rub the face against the sandpaper while apply- ing the most pressure on the leading edge. Make several circular strokes and recheck the alignment. Continue this process until the body stands perfectly straight. The goal is to correct the alignment while removing the least possible amount of material. The face must be a single, flat surface. It should not be faceted. Once the popper face is correctly oriented, polish it with 400-grit sandpaper. Lathe Shaping The only way to produce bodies that have rectangular or square cross sections is by hand shaping. Round bodies can also be pro- duced by hand shaping, but turning them on a lathe is much eas- ier, produces a perfectly symmetrical body, and allows far more variability in body profile. Lathe-turned bodies are generally used for short-shank poppers because the profile is invariably curved or tapered. It is assumed in the instructions that follow that you have purchased or constructed a lathe or adapted a power tool to func- tion as one. Any time you use a power tool, wear eye protection.
  • 9. Balsa & Cork Popper Bodies   9 Prepare the stock for turning by making a wide mark down the center of each side. Then make diagonal marks from corner to corner at each end to locate the center. Use a coarse file to re- move the corners in the middle portion of the piece producing an octagonal cross section. When hand shaping bodies, the profile is sketched on balsa stock and proportioned to fit a previously selected hook. You can be reasonably confident that the finished body and hook will be compatible. However, the lathing process will quickly remove any guide marks on the balsa, so it is pointless to sketch a profile. This makes it difficult to produce a body to fit a specific hook. The situ- ation is further complicated when bodies are turned two at a time. Therefore, it becomes a matter of shaping a body and then choos- ing a hook to match it. First, select square balsa stock slightly larger than the intended diameter of the body. Cut a piece 3/4-inch longer than the antici- pated length of the popper body. Using a felt-tip marker, make a mark down the center of each side of the stock. These marks will
  • 10. 10  Chapter 3. Position a 100-grit sandpaper strip under the turning stock. Gen- tly apply upward pressure. When the marks down each side have been sanded away, it will be cylindrical. Continue sanding to obtain the desired shape. Polish with 400-grit sandpaper. ultimately be sanded away, but they will help you determine when the piece is perfectly round. The center portion of the stock must be modified before turning it in the lathe. The corners must be removed to produce an octago- nal or near-round cross section. If left square, the stock will bounce out of the lathe when you attempt to shape it. Use a coarse file, and stroke the corners of the piece perpendicular to the grain. Do not remove the corners along the entire length of the piece. Leave a 3/8-inch-long square section at each end. These square ends will help steady the body during later operations. You must now prepare the ends of the stock to fit properly in the lathe. On each end, draw lines from opposing corners to locate the center of the square cross section. Use an awl to punch a small depression where the lines cross. Position the piece in the lathe so
  • 11. Balsa & Cork Popper Bodies   11 the turning head and tail stock pin seat in the depressions, and lock the piece in your lathe. The stock is now balanced and ready to be shaped. Always wear safety goggles or a face shield when turning a balsa blank. The piece could come loose and eject from the lathe. Cut strips of 100-grit and 400-grit sandpaper about 4 inches long and 3/4 inch wide. Turn on the lathe and allow it to reach op- erating speed. Position the 100-grit sandpaper strip under the balsa stock. Grasp each end of the strip and pull the sandpaper upwards against the spinning stock. With the sandpaper positioned under the stock and pulled towards you, it is easy to see the progress of the work and the profile of the body as it forms. Hold the sandpa- per against the balsa and move it back and forth along the portion of the stock that will become the popper body. Apply only light pressure or the octagonal stock may bounce and jump out of the lathe. In this initial phase of shaping, the intent is only to remove the corners to produce a round cross section in the center of the piece where the popper body will be turned. The ends must remain square. As sanding continues, the marks down each side made with the felt-tip marker will become lighter and lighter. When they dis- appear completely, the piece will have a circular cross section and be ready for final shaping. A tapered shape is produced by twisting your wrists so that the edge of the sandpaper is forced into the stock at the point that will become the vertex of the taper. This point should be about 3/8 inch for the end of the piece. Apply light and steady pressure allowing the edge of the strip to cut into the balsa. Soon a bullet shape will begin to appear. Continue sanding until you have achieved the pro- file you desire. Do not sand through the vertex or cut it loose from the square end of the stock. Leave a 3/32-inch thick connection. You will very quickly get the knack of producing long, flat tapers or short, rounded tapers. The degree of taper is simply a function of the angle the sandpaper strip makes with the balsa stock. When you are satisfied with the profile of the body, use the 400-grit sandpaper strip to polish it. Hold the strip by the ends and position it behind the balsa stock as before. Move it back and forth
  • 12. 12  Chapter 3. Use a craft saw and miter box to separate bodies as shown above, and to remove the square ends from lathe-turned poppers. along the body. Polish the entire body surface. Any crease, tear, or irregularity in the sandpaper will cut grooves in the spinning stock. So don’t use wrinkled or torn sandpaper for polishing. When you have completed the shaping and polishing process, the body should resemble a bullet with a square block attached to each end. Later these blocks will be removed, and you will have a single popper body. It is much more efficient, however, to produce bodies two at a time. This is accomplished simply by using slight- ly longer balsa stock and shaping the center portion into a long, elliptical shape. This football shape is then cut at the midpoint and the two square ends removed to produce two popper bodies. When shaping and polishing are complete, you are ready to remove the square blocks at the end of the shaped body. I recommend the use of a miter box and craft saw for this operation, because the cut must be clean and flat. For a single popper body, position the body
  • 13. Balsa & Cork Popper Bodies   13 in the miter box so you can remove the block at the large end of the body. The block attached at the small end will be removed last. The flat surfaces of the blocks will stabilize the piece in the miter box. Align the body so that its long axis is not quite perpendicular to the saw blade. This will produce a very slight bevel to the popper face. I prefer the face of a 1/2-inch diameter popper to be slanted back about 1/10 to 1/8 inch from vertical. The popper will dip into the surface slightly when twitched making plenty of commotion and shedding any debris or weeds. Poppers with faces tilted for- ward collect trash and are more difficult to retrieve through emer- gent or floating vegetation. They tend to snag in brush. For doubled bodies, the first step is to separate the two bod- ies. Position the balsa in the miter box so the saw blade will pass through the desired point of separation. Angle the balsa so the blade will cut slightly beveled faces on the two bodies as you did with the single body. Make a smooth, clean cut. If the faces are not smooth and flat you may have to touch them up with 400-grit sand paper. The blocks attached to the tail end of the bodies may simply be cut off with a safety razor blade. If turned properly, the attachment should only be about 3/32-inch thick and the ends can be removed quite easily. Shaping Popper Faces Some patterns call for the popper face to be cupped to produce noise and disturbance when the popper is twitched through the wa- ter. Rotary cutter bits, sometimes referred to as deburring tools, are excellent for cutting these depressions. If the rotary cutter shanks are small, wrap them with tape so the bits can be handled easily. Cut the depression by spinning the rotary cutter between your thumb and forefinger while pressing it against the face of the pop- per. Do not use power tools in this process. Accuracy and control are required, not speed. It will be easier to keep the cutter in the proper location if you mark the center point of the cup. Use a 3/16- or 1/4-inch round-tipped cutter to begin the depression, since it is easier to keep a small cutter positioned properly. Once the pilot
  • 14. 14  Chapter 3. To make a cupped face, use a 3/16-inch round-tipped rotary cutter to start the cup and finish with a 5/16- or 3/8-inch spherical rotary cutter. Smooth the cup with a 3/8-inch spherical grinding stone if desired. depression is well defined, switch to a 5/16- or 3/8-inch spheri- cal cutter to complete the process. Leave at least a 1/16-inch rim around the top and sides of the cup and a slightly wider rim along the bottom where the hook will be attached. A wide rim will con- tribute strength and abrasion resistance to the popper face. Should a portion of the rim become too thin, place the popper face down on 400-grit sandpaper and sand lightly with a circular motion. A few strokes will usually remove enough of the rim so the cavity can be reshaped. The rotary cutter will leave a rather rough surface in the depression. Though this is in no way detrimental to per- formance, you may smooth the surface with a 5/16- or 3/8-inch spherical grinding stone. One of the most versatile and successful face styles I use evolved from the bullet-shaped heads like the old Sneaky Pete and
  • 15. Balsa & Cork Popper Bodies   15 the slant-faced divers. It is simply a concave, arcing depression extending from the top of the popper to a point 3/16 inch from the bottom. When stripped, this popper will dive several inches below the water surface. When twitched gently, it will dip quietly, pro- ducing a slight disturbance. When twitched more vigorously, it will blurp like a cup-faced popper. Yet when you miss a strike or pickup for a backcast, the popper will not make a frightening blurp that will scare fish. Once you learn how to animate it properly, it’s like having three poppers in one. The curved face should be cut while the popper is still attached to its handle. Lay the handle on its side and mark the front edge of the popper. Using a wood dowel or some other round object as a guide, mark the arc of the curved face on the side of the popper. The center of the circular guide should lie on the front edge of the This photo shows several balsa poppers with curved faces still attached to their working handles, . A round wood file and dowel wrapped wih sandpaper were used to cut the faces. Remove the handles at a point where the bottom lip is 3/16-inch thick.
  • 16. 16  Chapter 3. popper. The bottom of the arc should be no closer to the bottom of the popper than 3/16 inch. This will allow room to attach the hook. Use a 3/8- or 1/2-inch, coarse, round, wood file to cut the face. Place the balsa piece on a work table and lay the file across the top of the popper. Center the file directly over the front edge of the popper face. Keep the file horizontal and perpendicular to the longitudinal axis of the popper as you file down through the piece. If handle material interferes with the process, remove it with a craft saw. When you have completed the cut, use a wood dowel wrapped with 100-grit sandpaper to true up the arc and clean up any ragged edges. You may want to sand down the sharp corners at the front of the popper slightly to produce a blunt taper. This will improve the way it retrieves through hard structure. Cutting the Hook Slot Once the popper body has been completely shaped, you must cut a slot down its belly to receive the hook. This seems like a simple task, but it is easy to misalign the slot. Since it is essential that the slot be precisely located, I recommend a two step process. First, saw the slot, paying particular attention to its location and alignment, then widen and deepen the slot as necessary to fit the prepared hook. The second step is actually performed just prior to mounting the hook. Do not attempt to saw the slot without first marking its position. If the shape of the body permits, stand it on its face and rotate it until the belly is towards you. Carefully place a mark at the face and tail end of the body to define the location of the slot. Examine the marks to verify that the slot will run down the exact centerline. Use a hacksaw blade or other fine-tooth saw to cut a 1/8-inch- deep slot. The depth is not nearly as critical as the alignment, because the slot will be expanded later with a knife file to fit a specific hook. Do not use a large, cumbersome, or coarse-tooth saw for this process, because you must cut a precise slot in a very small object. Avoid tilting the blade to one side or the other as you saw. If the pattern is a long-shank variety, saw the slot from the popper
  • 17. Balsa & Cork Popper Bodies   17 face all the way to the tail. If it is a short-shank variety, you need only make the slot long enough to hold the shank of the hook. Re- member, in the short-shank variety, the hook shank is shorter than the popper body, and the bend of the hook projects from its belly. Priming Except for some minor filing of the hook slot, all shaping of the popper body is now complete. Balsa is very easily scarred, how- ever, so it should be lightly sanded with 400-grit sandpaper and protected with a coat of primer as soon as possible. The primer will harden the surface and also make it easier to clean off smudges. I have had good success with both water-based and petroleum-based primers. However, cleanup is far simpler with water-based primers, since you don’t have to use paint thinner. Cork requires an additional step before priming. The pits must be filled and sanded smooth. The product I prefer is the lightweight spackling used to patch holes in sheetrock or plaster walls. It dries quickly and is very easy to sand smooth. Yet when it absorbs the primer it becomes just as durable as the cork. You will find it more convenient and just as satisfactory as typical wood fillers. Even if you use a small artist brush, it is difficult to apply the primer without having a convenient way to hold the body. Simply wedge a round or square toothpick in the hook slot and you will have a convenient handle that will also assist in the drying process. Give the body a single coat of primer, being careful not to get any in the hook slot. To dry the popper, stick the toothpick in the open end of a corrugation along the edge of a cardboard box. A soft drink flat works great for this. When the primer has thoroughly dried, use 400-grit sandpaper to lightly brush the entire body and smooth the raised grain. The popper body will be given a second coat of primer after the hook has been mounted to cover the hook slot and any areas where the primer abrades. Do not use a heat source to dry the primer on cork bodies. Air inside the cork will expand and bubble the coating.
  • 18. 18  Chapter 3. Attaching the Hook The processes completed so far have all been of a woodcrafting nature. However, attaching the hook to the popper body makes use of conventional fly tying tools, namely a tying vise and thread bobbin. The method I use, though only one of many I have seen demonstrated, is relatively simple and extremely durable. Once when a hook did twist loose, I was pleasantly surprised to find that the performance of the popper was unaffected. I simply checked occasionally to ensure the hook was properly positioned, and con- tinued catching bass. The method I recommend is to fasten a piece of flat toothpick to the top of the hook shank before gluing the hook into the slot. The toothpick acts as a key to prevent the hook from twisting. Secure The hookless popper bodies impaled on toothpicks in the fore- ground are drying after a primer coat. Those in the rear, hanging from the wire, have been given a finish coat.
  • 19. Balsa & Cork Popper Bodies   19 the hook in your tying vise, and fill your bobbin with unwaxed, size 3/0 thread. Score the hook shank thoroughly on all sides by dragging the corner of a file across it. This will substantially increase the grip of the thread and glue. Make several forward wraps near the front of the hook shank, and secure the thread by wrapping backwards over them. Continue wrapping towards the bend of the hook until you have wrapped approximately 1/8 inch beyond the center of the hook shank. Now place a flat toothpick on top of the hook shank. The wide end of the toothpick should be towards the eye of the hook, and the center of the toothpick should be positioned over the center of the hook shank. The toothpick should rest on a narrow edge with its wide faces to the sides. Wrap forward to a point slightly ahead of the center of the hook shank, tightly securing the toothpick to the hook. Set the popper body down on top of the toothpick with its face immediately behind the hook eye. Do not force the toothpick into the slot. If it is too tight, use a small knife file to expand the slot until it fits freely. Take care not to loosen or twist the toothpick. Mark the toothpick where it must be trimmed so it will not be exposed when the body is per- manently attached. For long-shank patterns, an additional 1/8 inch Above left, a flat toothpick was measured and trimmed to fit a long- shank popper body, then lashed to the scored hook shank. Above right, the toothpick key is covered with glue-impregnated thread wraps and is ready for attachment of the popper body.
  • 20. 20  Chapter 3. must be clipped off the rear end of the toothpick to make room for the finishing thread wraps when the tail material is attached. The finishing wraps will then be covered by the body. Using fingernail clippers, cut off the ends of the toothpick at a 45-degree angle. Set the body back over the hook shank and ensure that the toothpick is not visible. Also check that the popper body is setting vertically on the hook. Look directly at the face of the popper; the orientation of the hook eye will give you a clue. If it is crooked, twist the body and toothpick until the body is oriented vertically over the hook. Apply a coat of glue to the thread wraps, hook shank, and tooth- pick. A good glue for this process is a cyanoacrylate “superglue” by Pacer called Slo-Zap® CA. It is a no-run gel with a 2-minute setting time. I have also had excellent success with exterior wood glue. Keep the thread wraps coated with glue, and wrap forward and then backwards until the toothpick is uniformly covered with two saturated layers of thread. Tie off the thread with a series of half hitches and trim it close to the hook. Wipe off all the glue and place the popper body back on the hook for a final check. Do not force it or the balsa may split. Use a knife file to widen and deepen the slot until the body slips snugly over the toothpick. The hook shank should not be recessed more than 1/32 inch into the belly of the popper. It may take several attempts before you get a proper fit. An unobstructed hook gap is the key to efficient hooking, so do not reduce it by burying the hook shank deep in the body. With the popper body seated atop the hook, inspect it face-on to verify that the hook bend is perpendicular to the body and not canted to one side. If the alignment is not correct, you must widen the slot a bit so the body can be cocked on the shank and brought into alignment when you permanently glue it in place. If there is any doubt about the compatibility of the hook and body, you should test them at this time. Simply fit the body on the hook and place them in a bowl of water. If the hook is too heavy, the popper will float in a near vertical position or it may sit low in the water. Either way, it will be difficult to see it when fishing. There is nothing you can do to cor- rect these flaws except switch to a different hook size or style.
  • 21. Balsa & Cork Popper Bodies   21 If you are tying a long-shank style pattern, you are finished until the tail material has been attached to the hook. Then you can glue the body in place and finish the popper. Some tiers mount the pop- per body on the hook before tying the tail, but you will get a neater job if you put the body on last. Several steps remain to complete the attachment of the hook to the body. These steps are the same for both short-shank and long- shank styles, except for the latter, they are performed after the tails have been added. Coat the hook shank with glue and work it into the thread wraps. Also apply glue liberally to the hook slot and spread it with a bodkin or toothpick so that the sides and bottom are coated. Set the balsa body onto the shaft and press it into place. Check the alignment of the hook bend and straighten it as required. Use a bodkin to remove any glue that squeezes out. Always check the face of the popper for excess glue or for a void. If you are us- ing wood glue, set the body aside where it will not be disturbed for about 30 minutes so the glue can set. Once the glue has thoroughly cured, the exposed slot on the bel- ly of the popper body must be hidden. The easiest way to do this is to fill it with a nonshrink, lightweight spackling. Both Elmer’s® and Red Devil® have very similar products on the market which dry in about 30 minutes. Do not use sheet rock seam paste, because it dries very slowly, nor wood filler, which dries much harder than is required and is more difficult to sand. Use a small blade to pack the groove with spackling and smooth it. Leave the spackling a tiny bit high so it can be sanded flush. Fill the slot on the face of the popper as well, and on short-shank patterns, fill around the hook bend where it projects from the belly. Let the spackling dry for 30 minutes or longer before sanding. Use 400-grit sandpaper to sand the spackling flush. There should be no trace of the slot when you have finished. All that remains is to apply another coat of primer. Apply primer to the entire body, not just the spackled slot. It pro- duces a brighter undercoat for the finish paint coat. Smooth down the raised grain with a light sanding before applying the primer.
  • 22. 22  Chapter 3. The bodies of short-shank patterns may now be completely dressed. Since the hackle skirt and tail materials are tied on a post that is inserted into the rear of the body, they can be added after the body is completed. It is considerably easier to apply paint and dress the popper with rubber legs, eyes, and a weed guard before the tail is attached. You don’t have to worry about keeping the hackle fibers out of fresh paint or damaging the tail.