Download to read offline
![Introduction
Stretch Database is a new feature available SQL Server 2016 onwards. This feature lets you migrate
your cold data to Microsoft Azure.
In the past when database used to grow beyond, the only option was to buy additional drives and let
the database grow more. This was a very expensive and cost inefficient solution.
To resolve problem like this Microsoft came up with a new feature to migrate data only to azure.
However, you can run your queries against your instance even if data has been migrated to azure.
You can move data back and forth between Azure and local database.
Stretch Database does not affect the application logics and queries.
What the article/code snippet does, why it's useful, the problem it solves etc.
Background
You will need active Microsoft Azure Subscription and SQL server 2016 to be able to use the stretch
feature.
Using the code
We will first create a database and a table to the database. Then we will add a table and populate it
with a lot of data. Then we will migrate the data only to Azure and run a few queries.
//
// -- First Create the Database
USE [master]
GO
CREATE DATABASE [StretchDatabase]
Go
//
Then after create a table in the database that we just created.
//--This code adds a table with 3 columns, SN (autoincremented), Name and Last Name
USE [StretchDatabase]
GO
CREATE TABLE [dbo].[StretchTable](
[sn] [int] IDENTITY(1,1) NOT NULL,
[Name] [varchar](50) NULL,
[Last Name] [varchar](50) NULL
) ON [PRIMARY]](https://image.slidesharecdn.com/sqlstretchblog-160725091356/85/Backup-your-tables-to-SQL-Azure-using-SQL-Stretch-1-320.jpg)
![GO
Then after add rows to tables. Since we are attempting migration of cold data to the Azure , we will
use for loops to insert 1000 rows of data. You can use as much as you like.
USE [StretchDatabase]
GO
DECLARE @cnt INT = 0;
WHILE @cnt < 1000
BEGIN
Insert into stretchTable (Name, [Last Name]) values ('Mahesh', 'Dahal')
SET @cnt = @cnt + 1;
END;
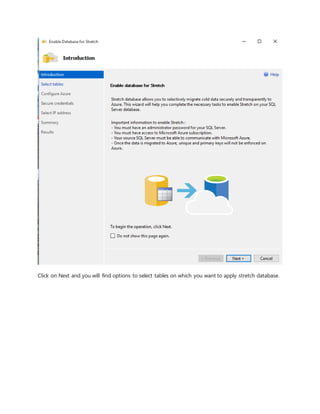
Now we have to go to the database and use UI to enable and migrate data.
Right Click on Database -> Tasks ->Stretch and Enable.
This will pop out a new window to configure the stretch feature.](https://image.slidesharecdn.com/sqlstretchblog-160725091356/85/Backup-your-tables-to-SQL-Azure-using-SQL-Stretch-2-320.jpg)


Stretch Database is a new feature in SQL Server 2016 that allows users to migrate cold data to Microsoft Azure, addressing storage cost inefficiencies. Users can continue to query their databases even after migration, and data can easily be moved back and forth. The feature requires an active Azure subscription and does not support certain operations such as primary key constraints on migrated data, as well as updates and deletes in the migrated table.