
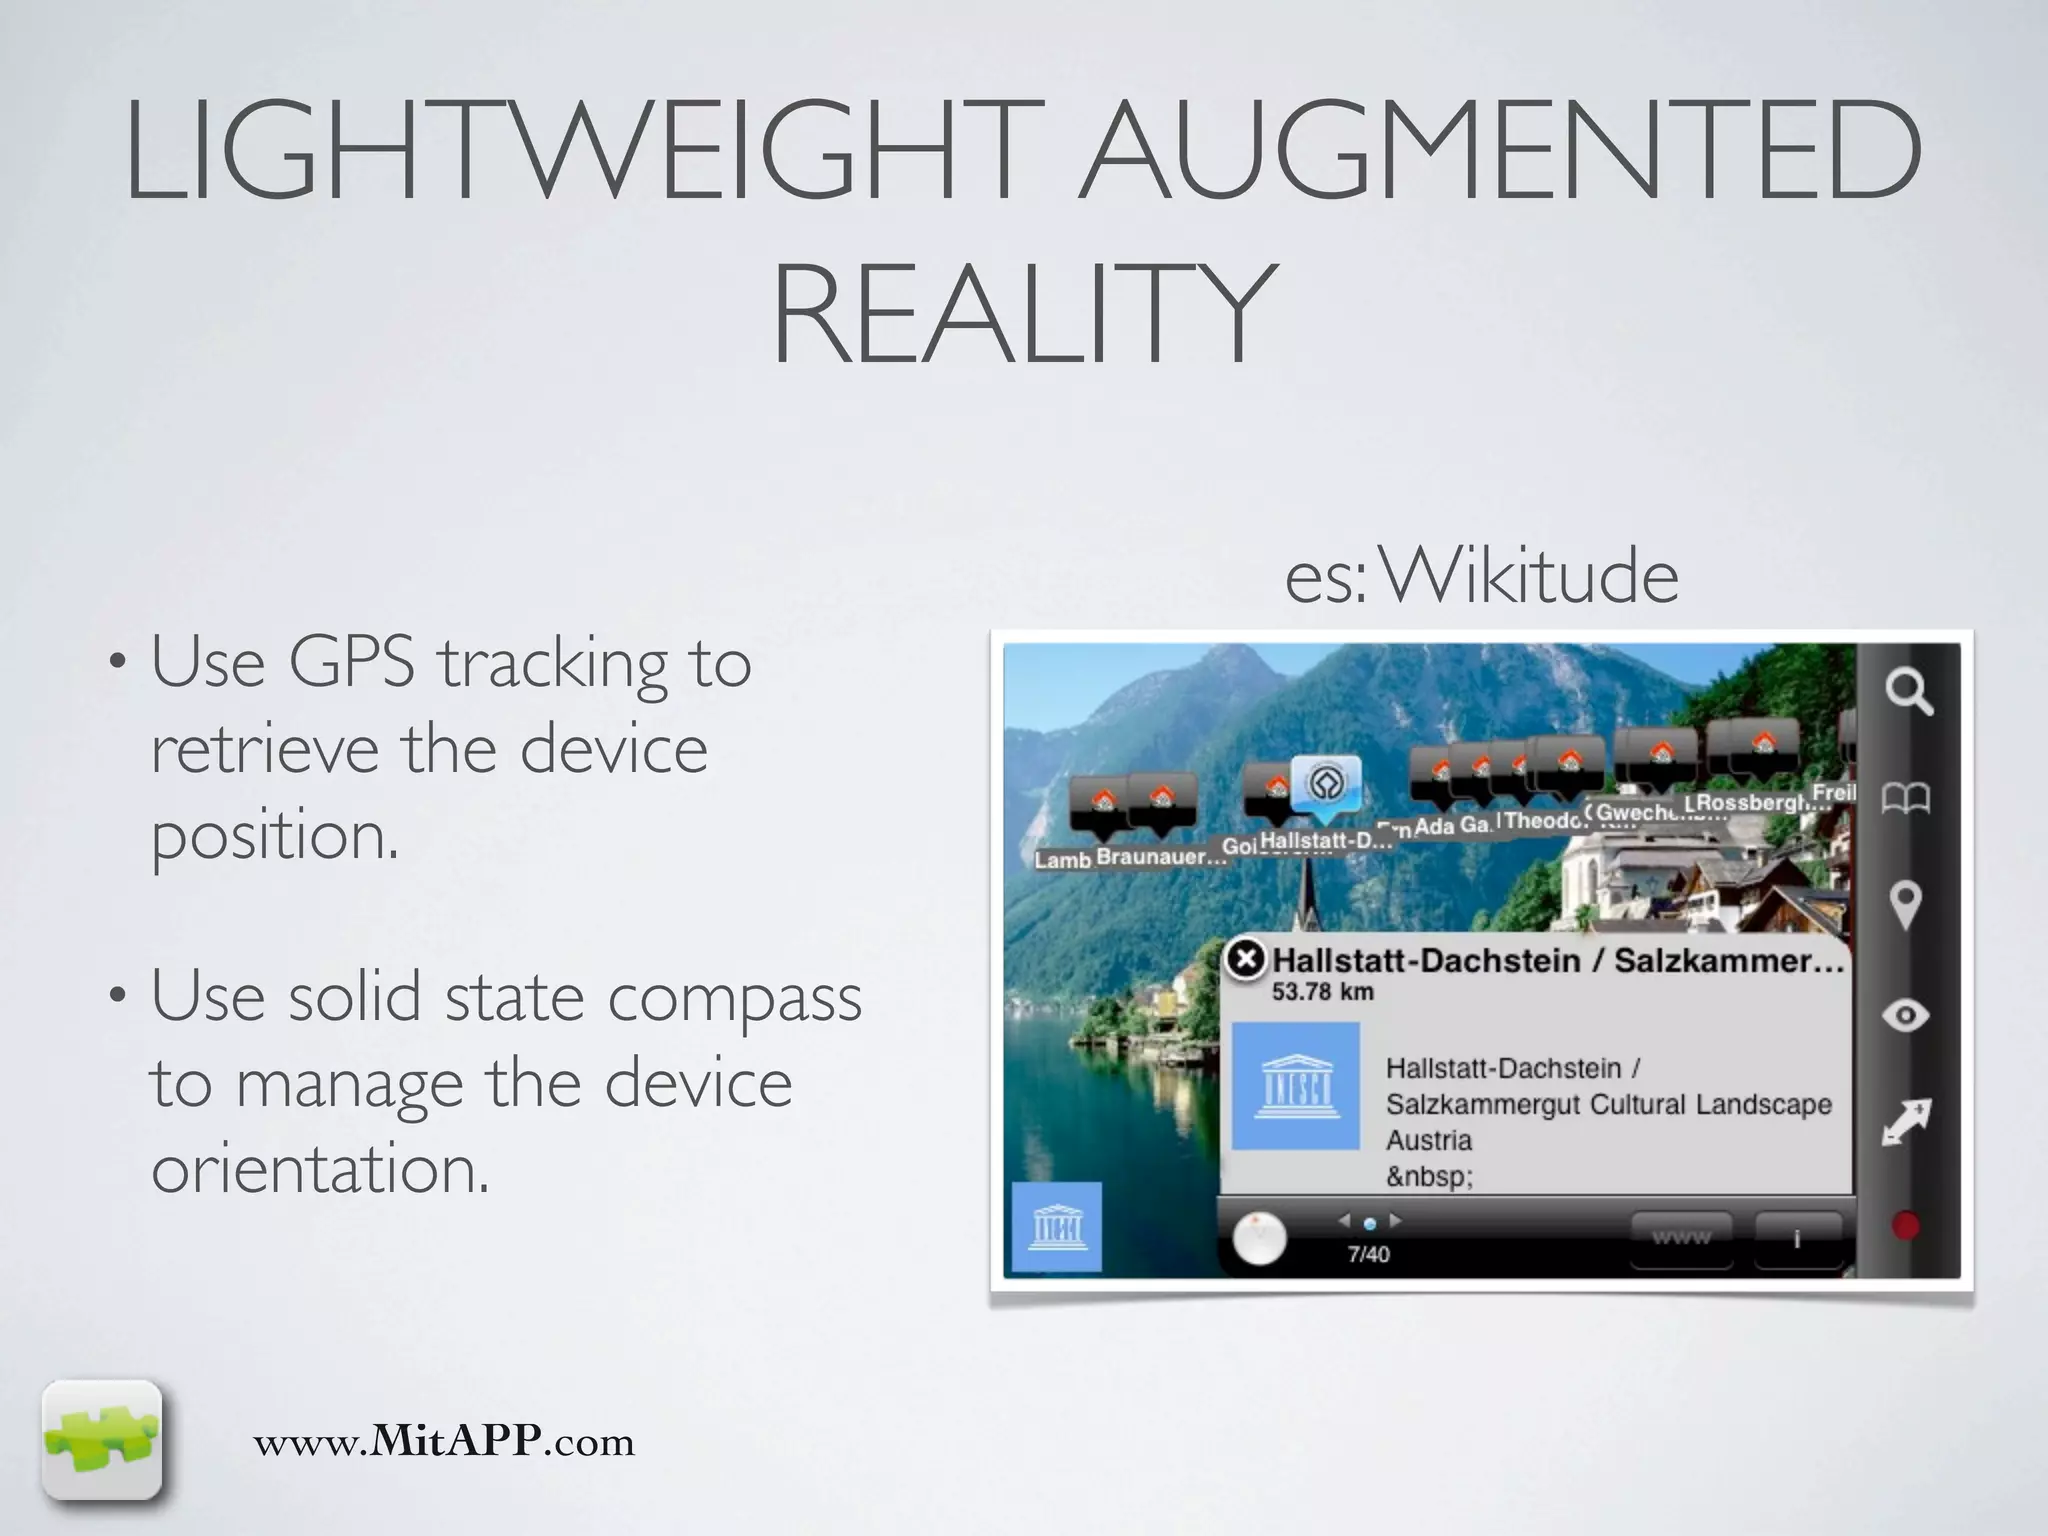
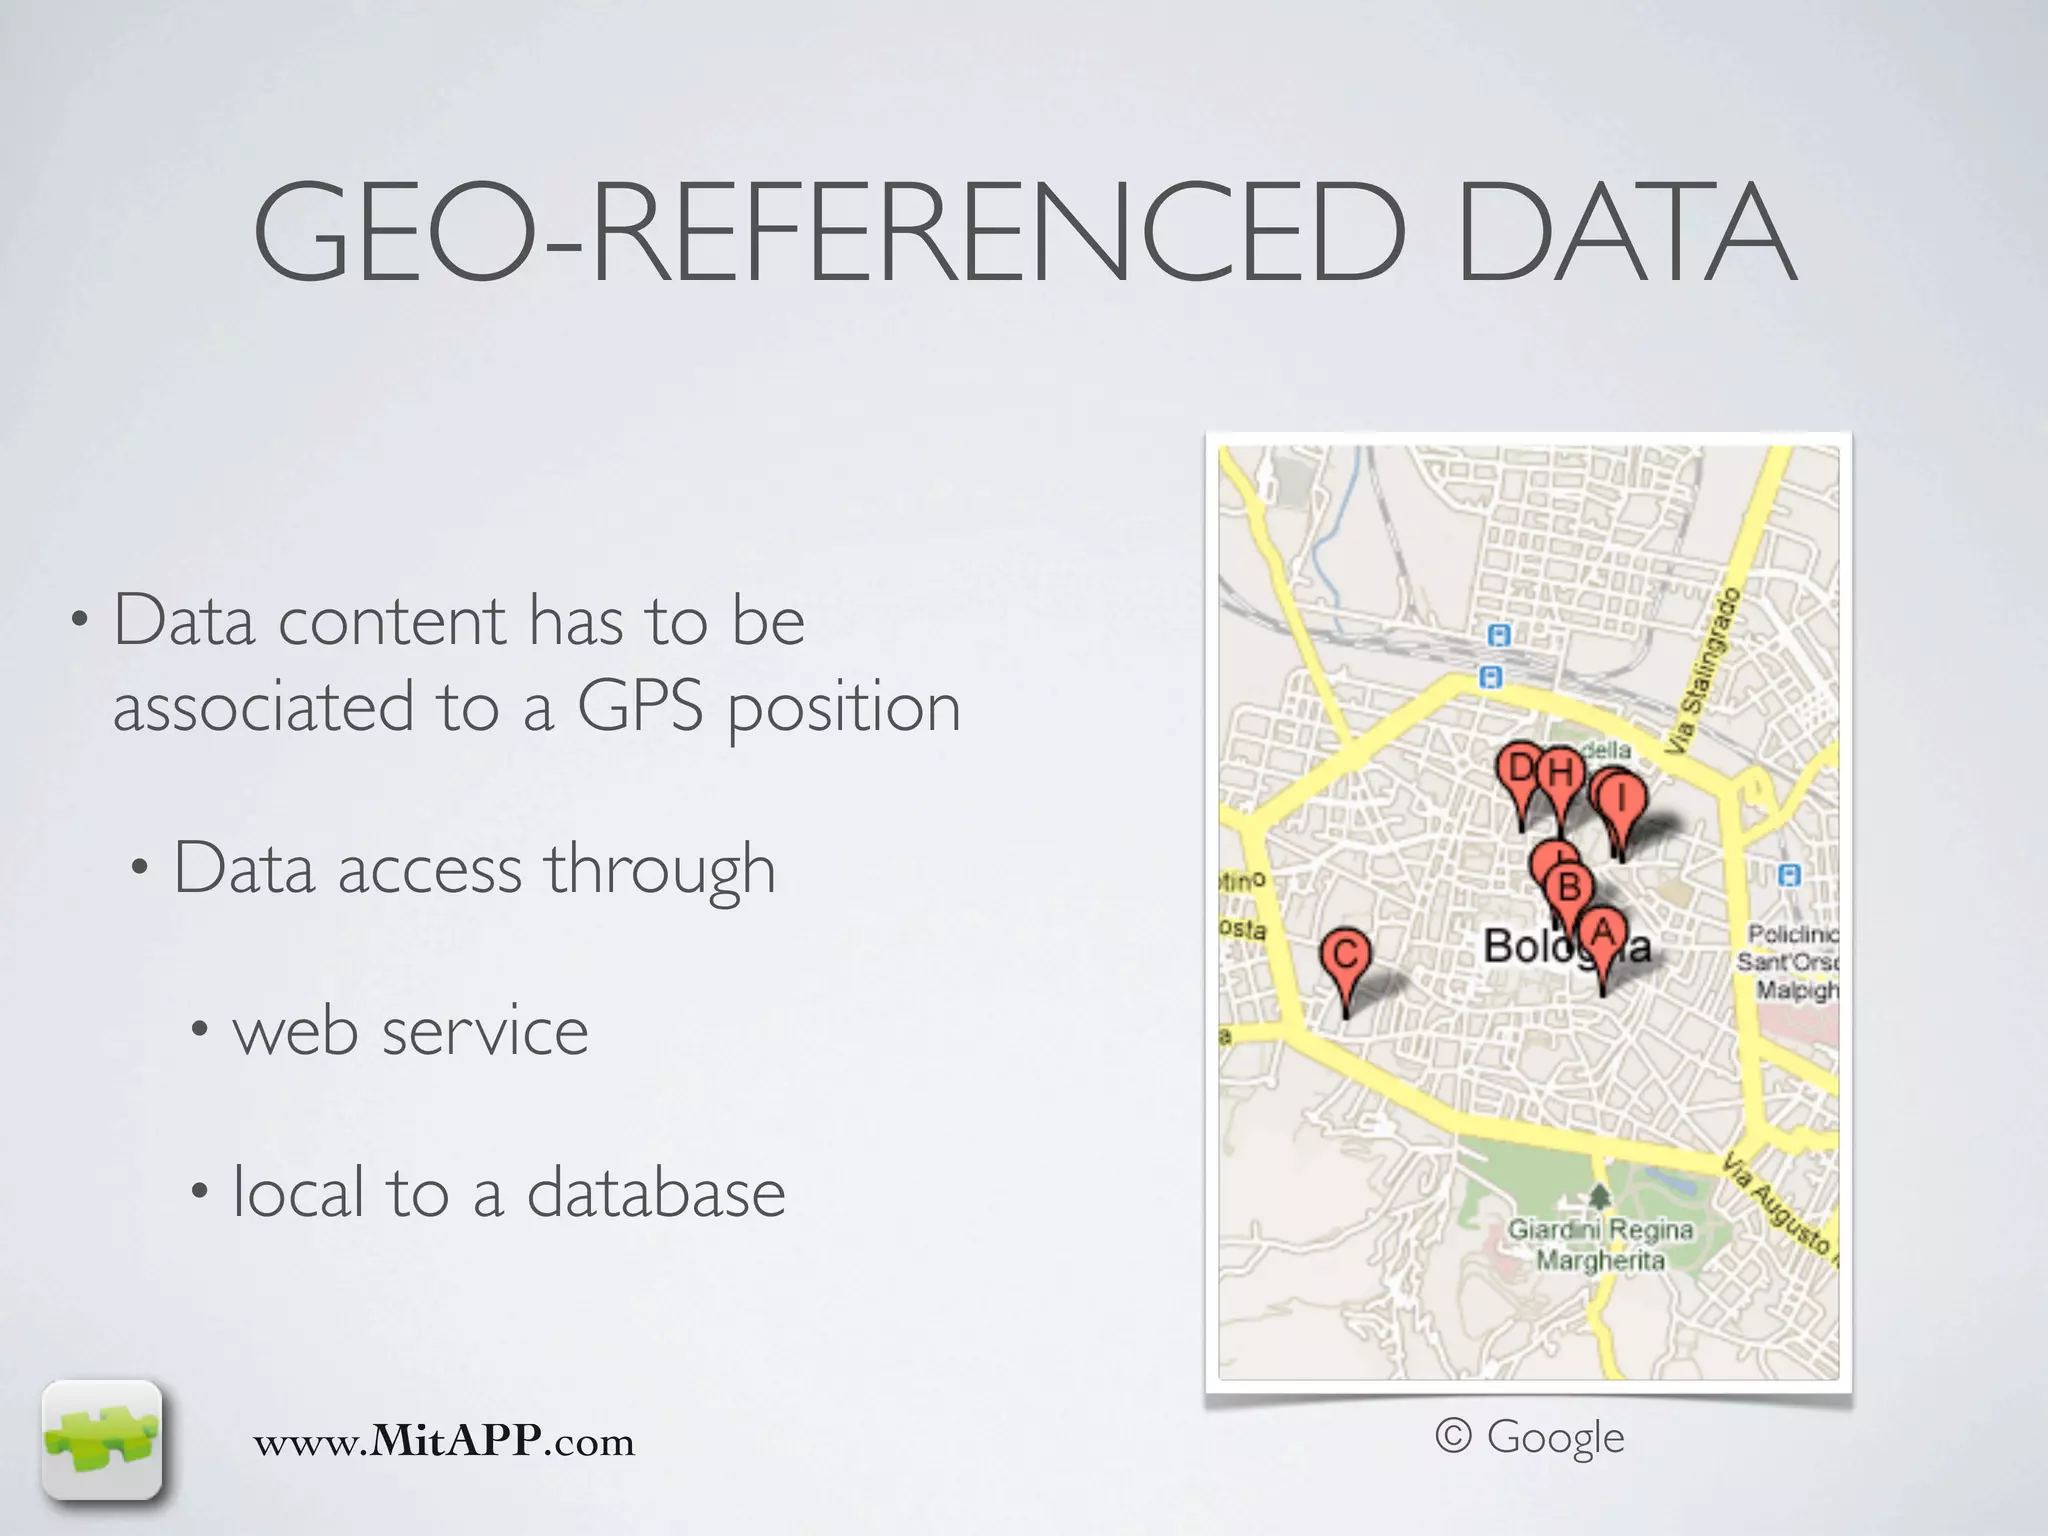
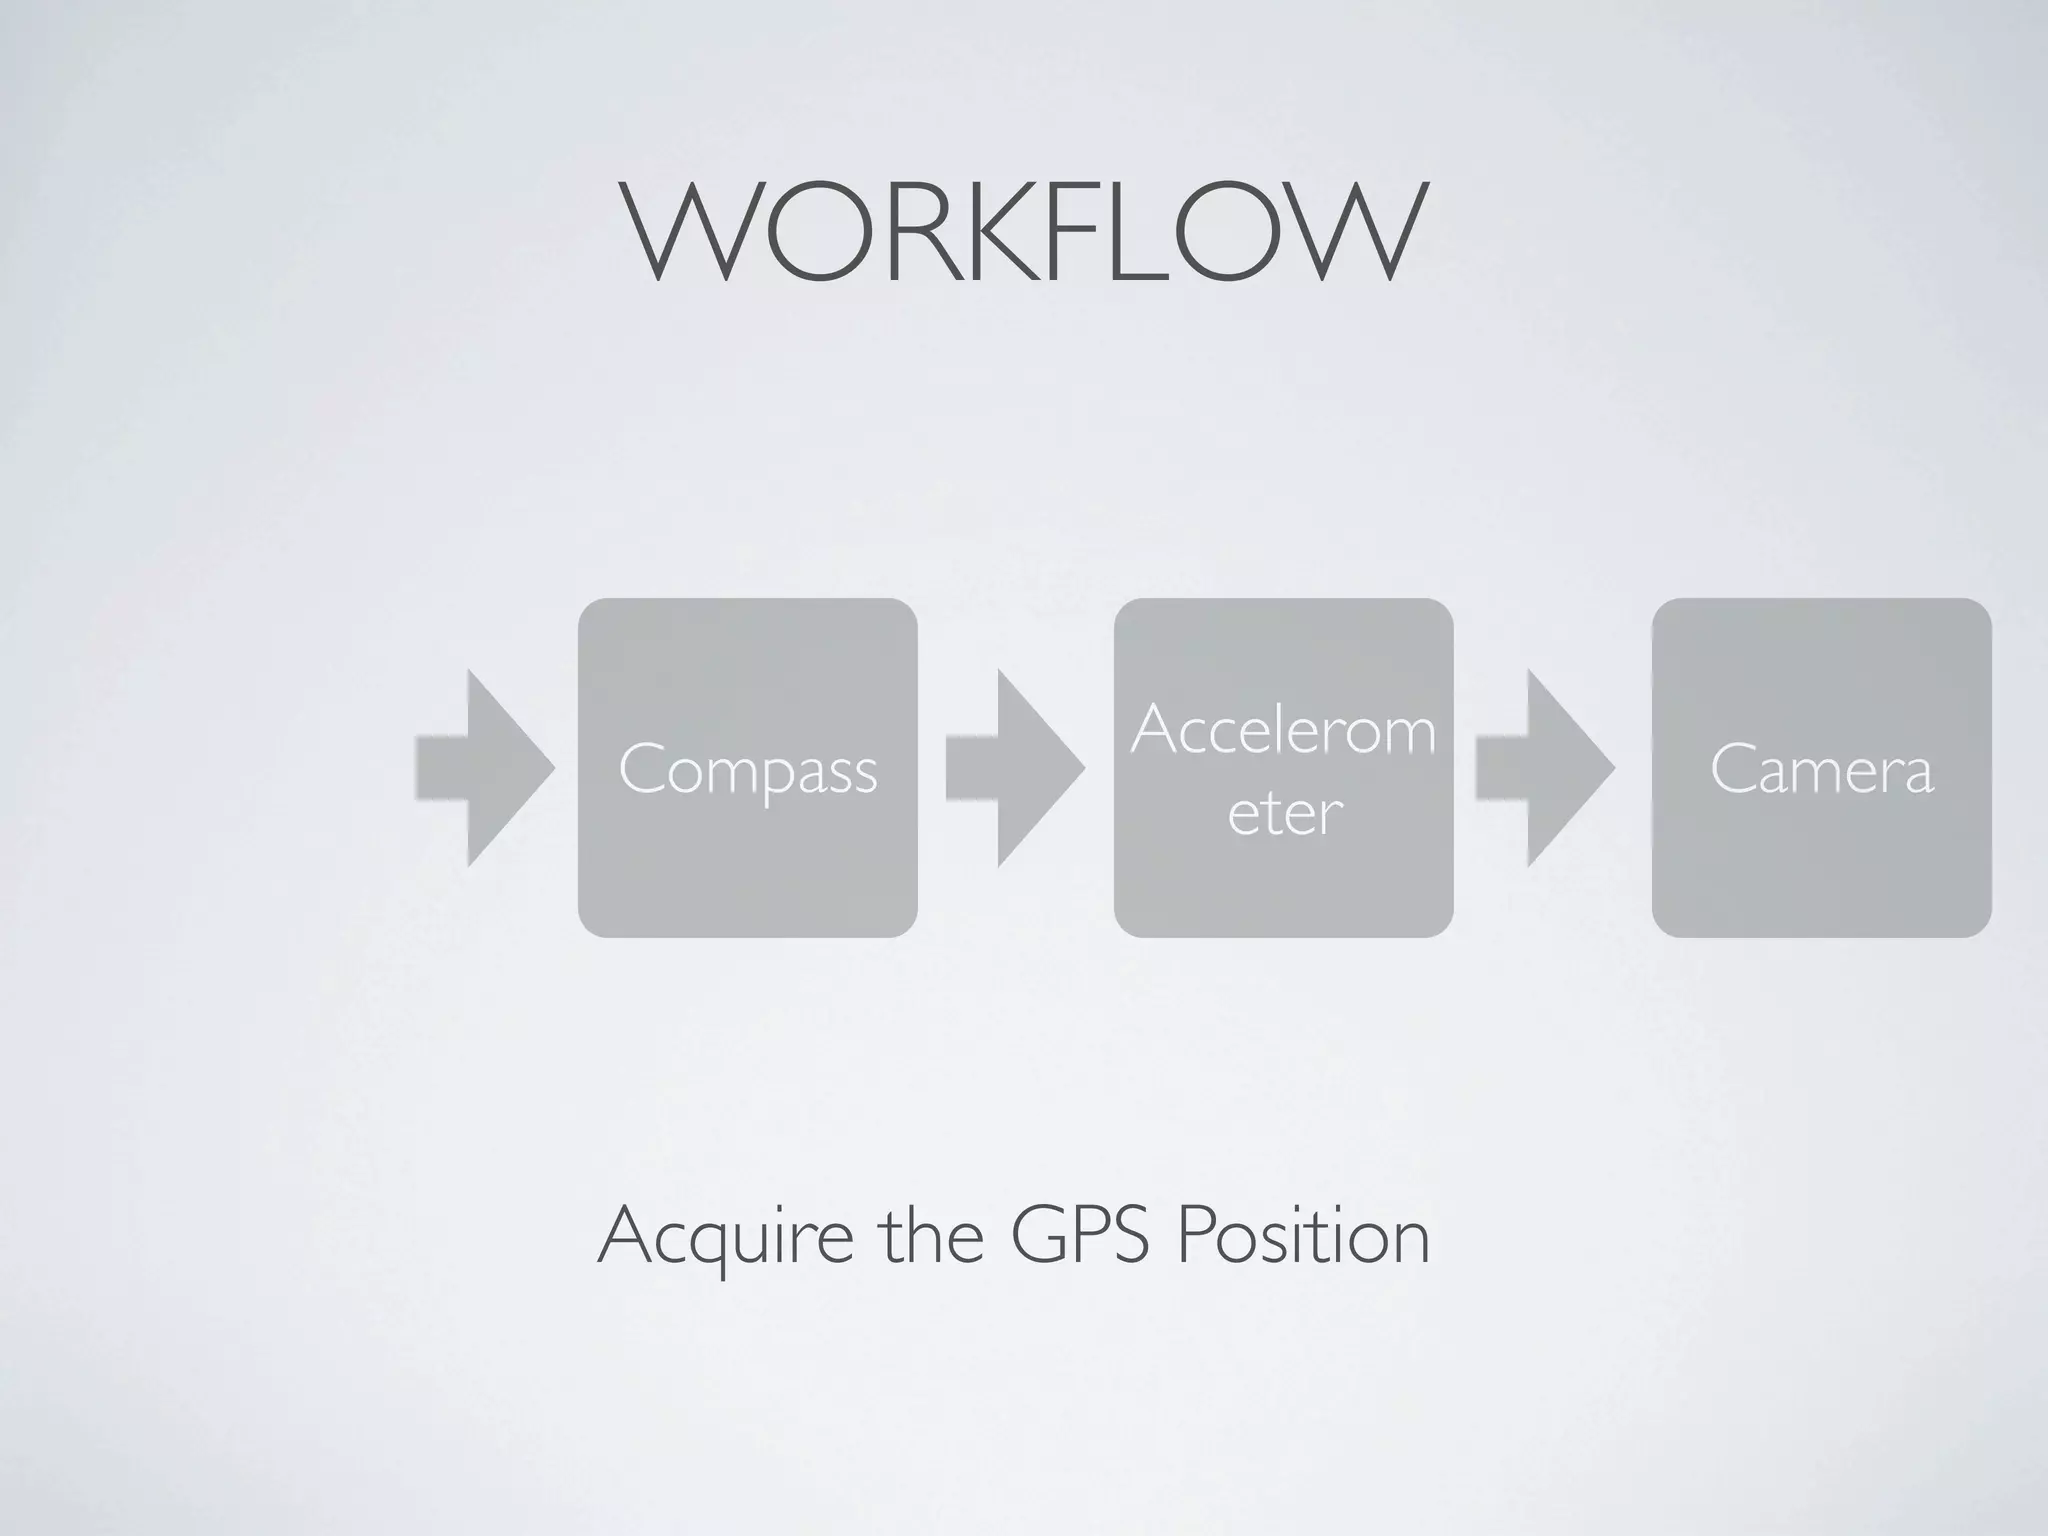

![RETRIEVING GPS POSITION
CLLocationManager* manager =
[[CLLocationManager alloc] init];
[manager setDelegate:self];
[manager
setDesiredAccuracy:kCLLocationAccuracyBest];
[manager setDistanceFilter:10];
[manager startUpdatingLocation];
www.MitAPP.com](https://image.slidesharecdn.com/augmentedreality-100417031645-phpapp02/75/Augmented-reality-13-2048.jpg)
![RETRIEVING GPS POSITION
CLLocationManager* manager = [[CLLocationManager
alloc] init];
[manager setDelegate:self];
[manager
setDesiredAccuracy:kCLLocationAccuracyBest];
[manager setDistanceFilter:10]; // Distance expressed in
meters
[manager startUpdatingLocation];
www.MitAPP.com](https://image.slidesharecdn.com/augmentedreality-100417031645-phpapp02/75/Augmented-reality-14-2048.jpg)
![RETRIEVING GPS POSITION
CLLocationManager* manager = [[CLLocationManager alloc]
init];
[manager setDelegate:self];
[manager setDesiredAccuracy:kCLLocationAccuracyBest];
[manager setDistanceFilter:10];
[manager startUpdatingLocation];
www.MitAPP.com](https://image.slidesharecdn.com/augmentedreality-100417031645-phpapp02/75/Augmented-reality-15-2048.jpg)
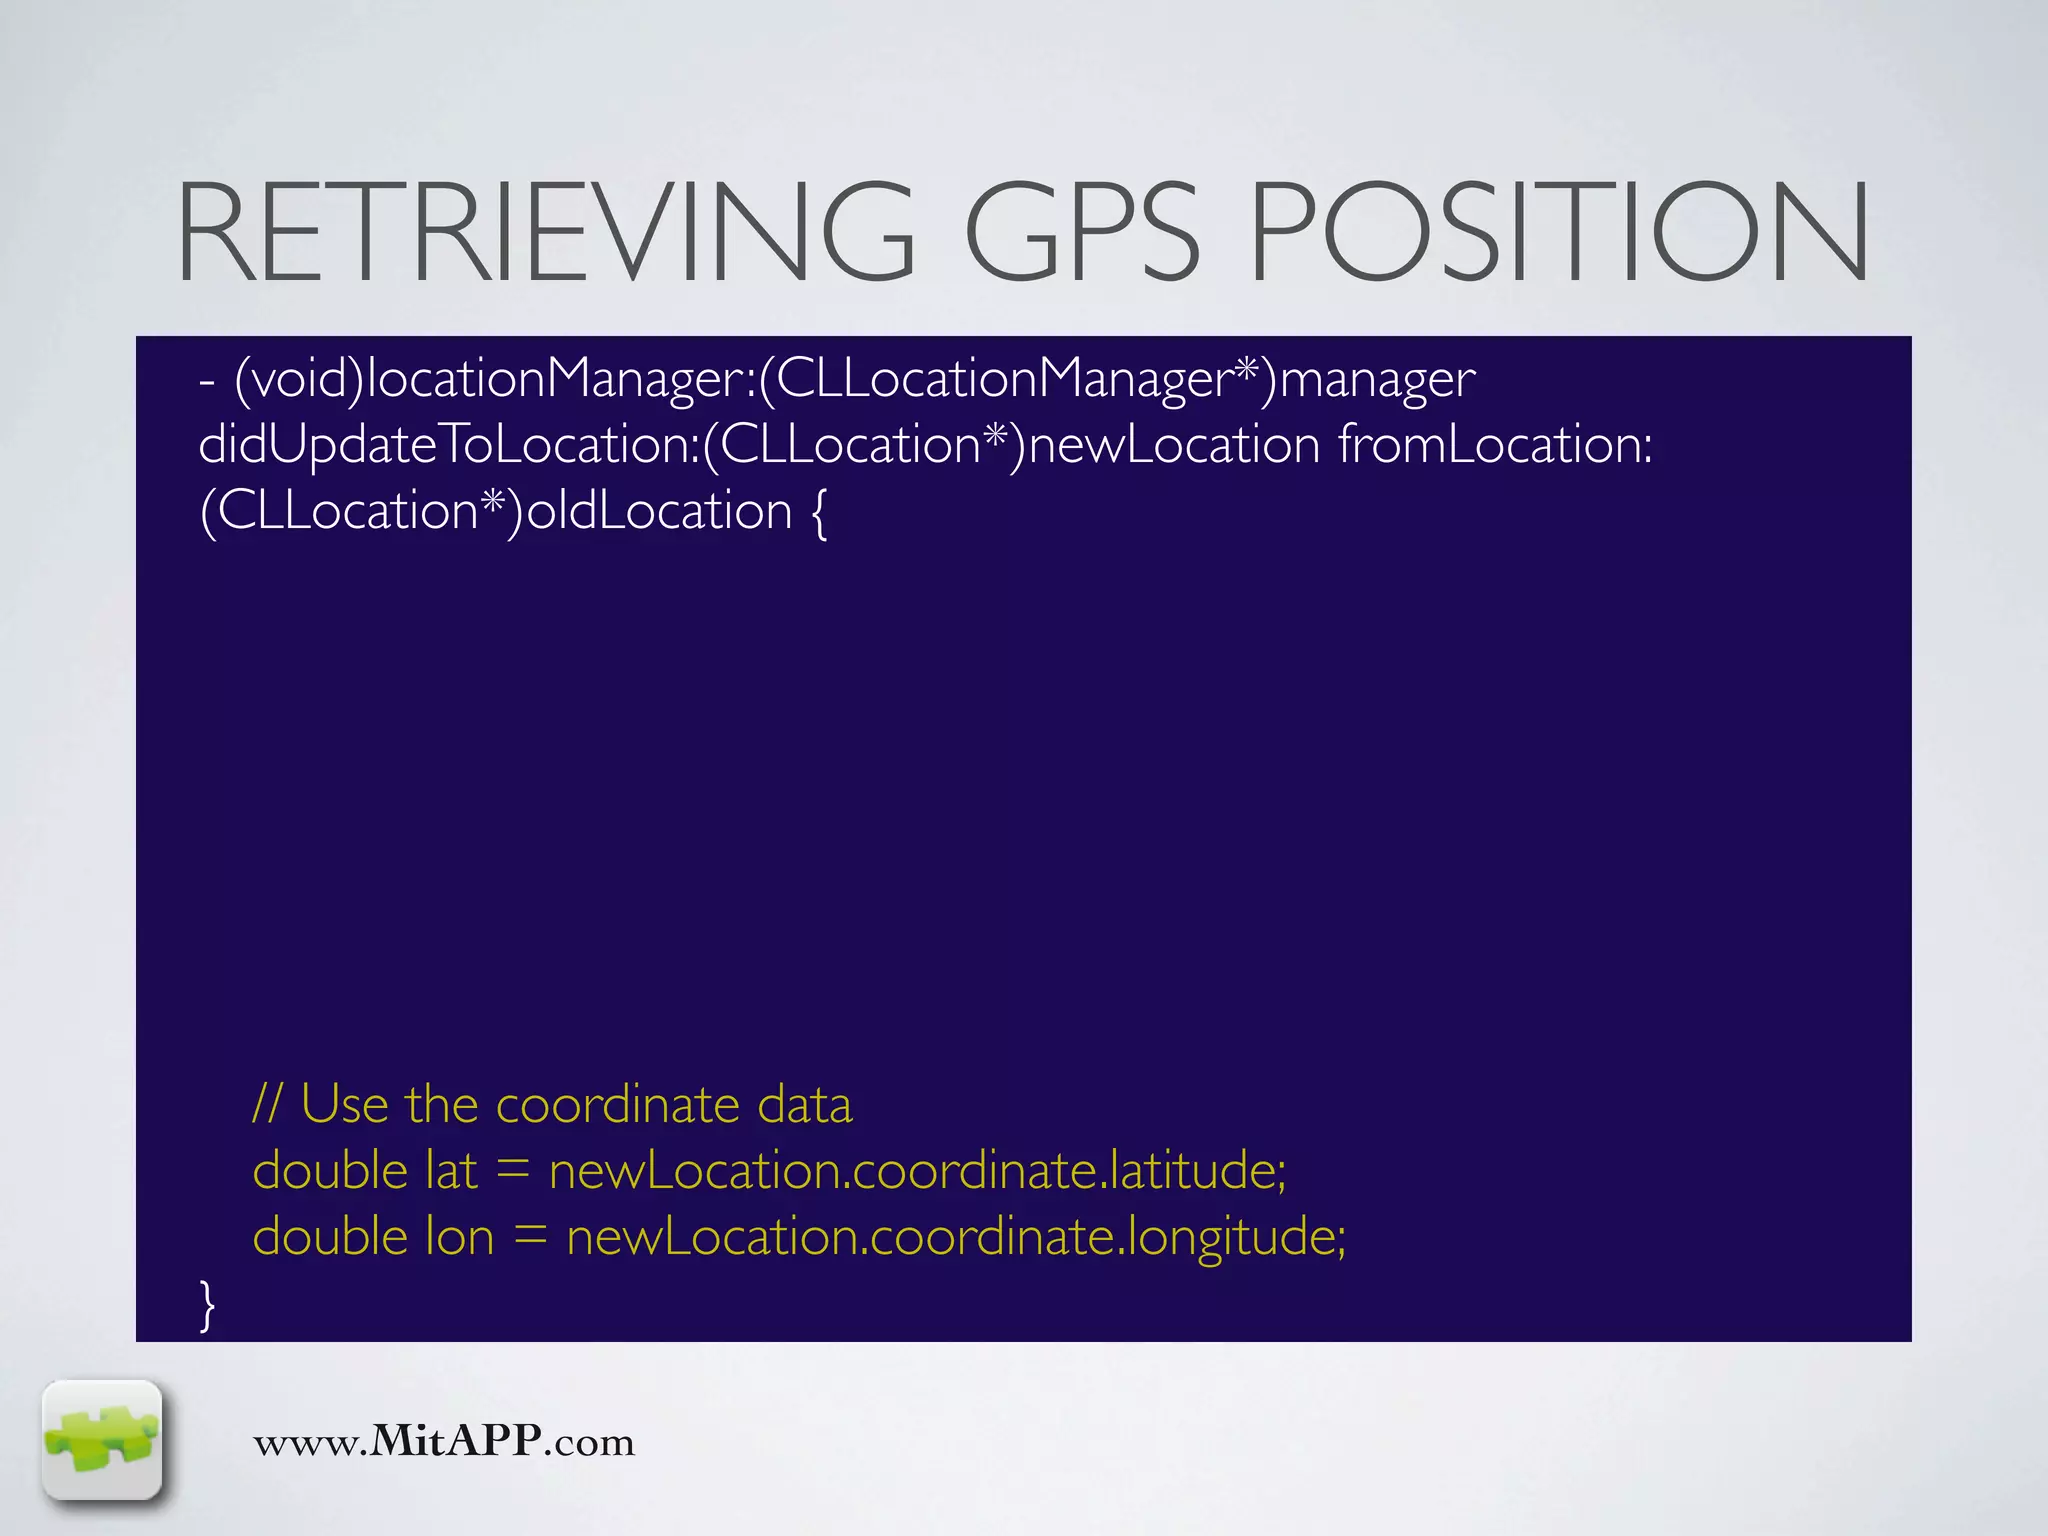
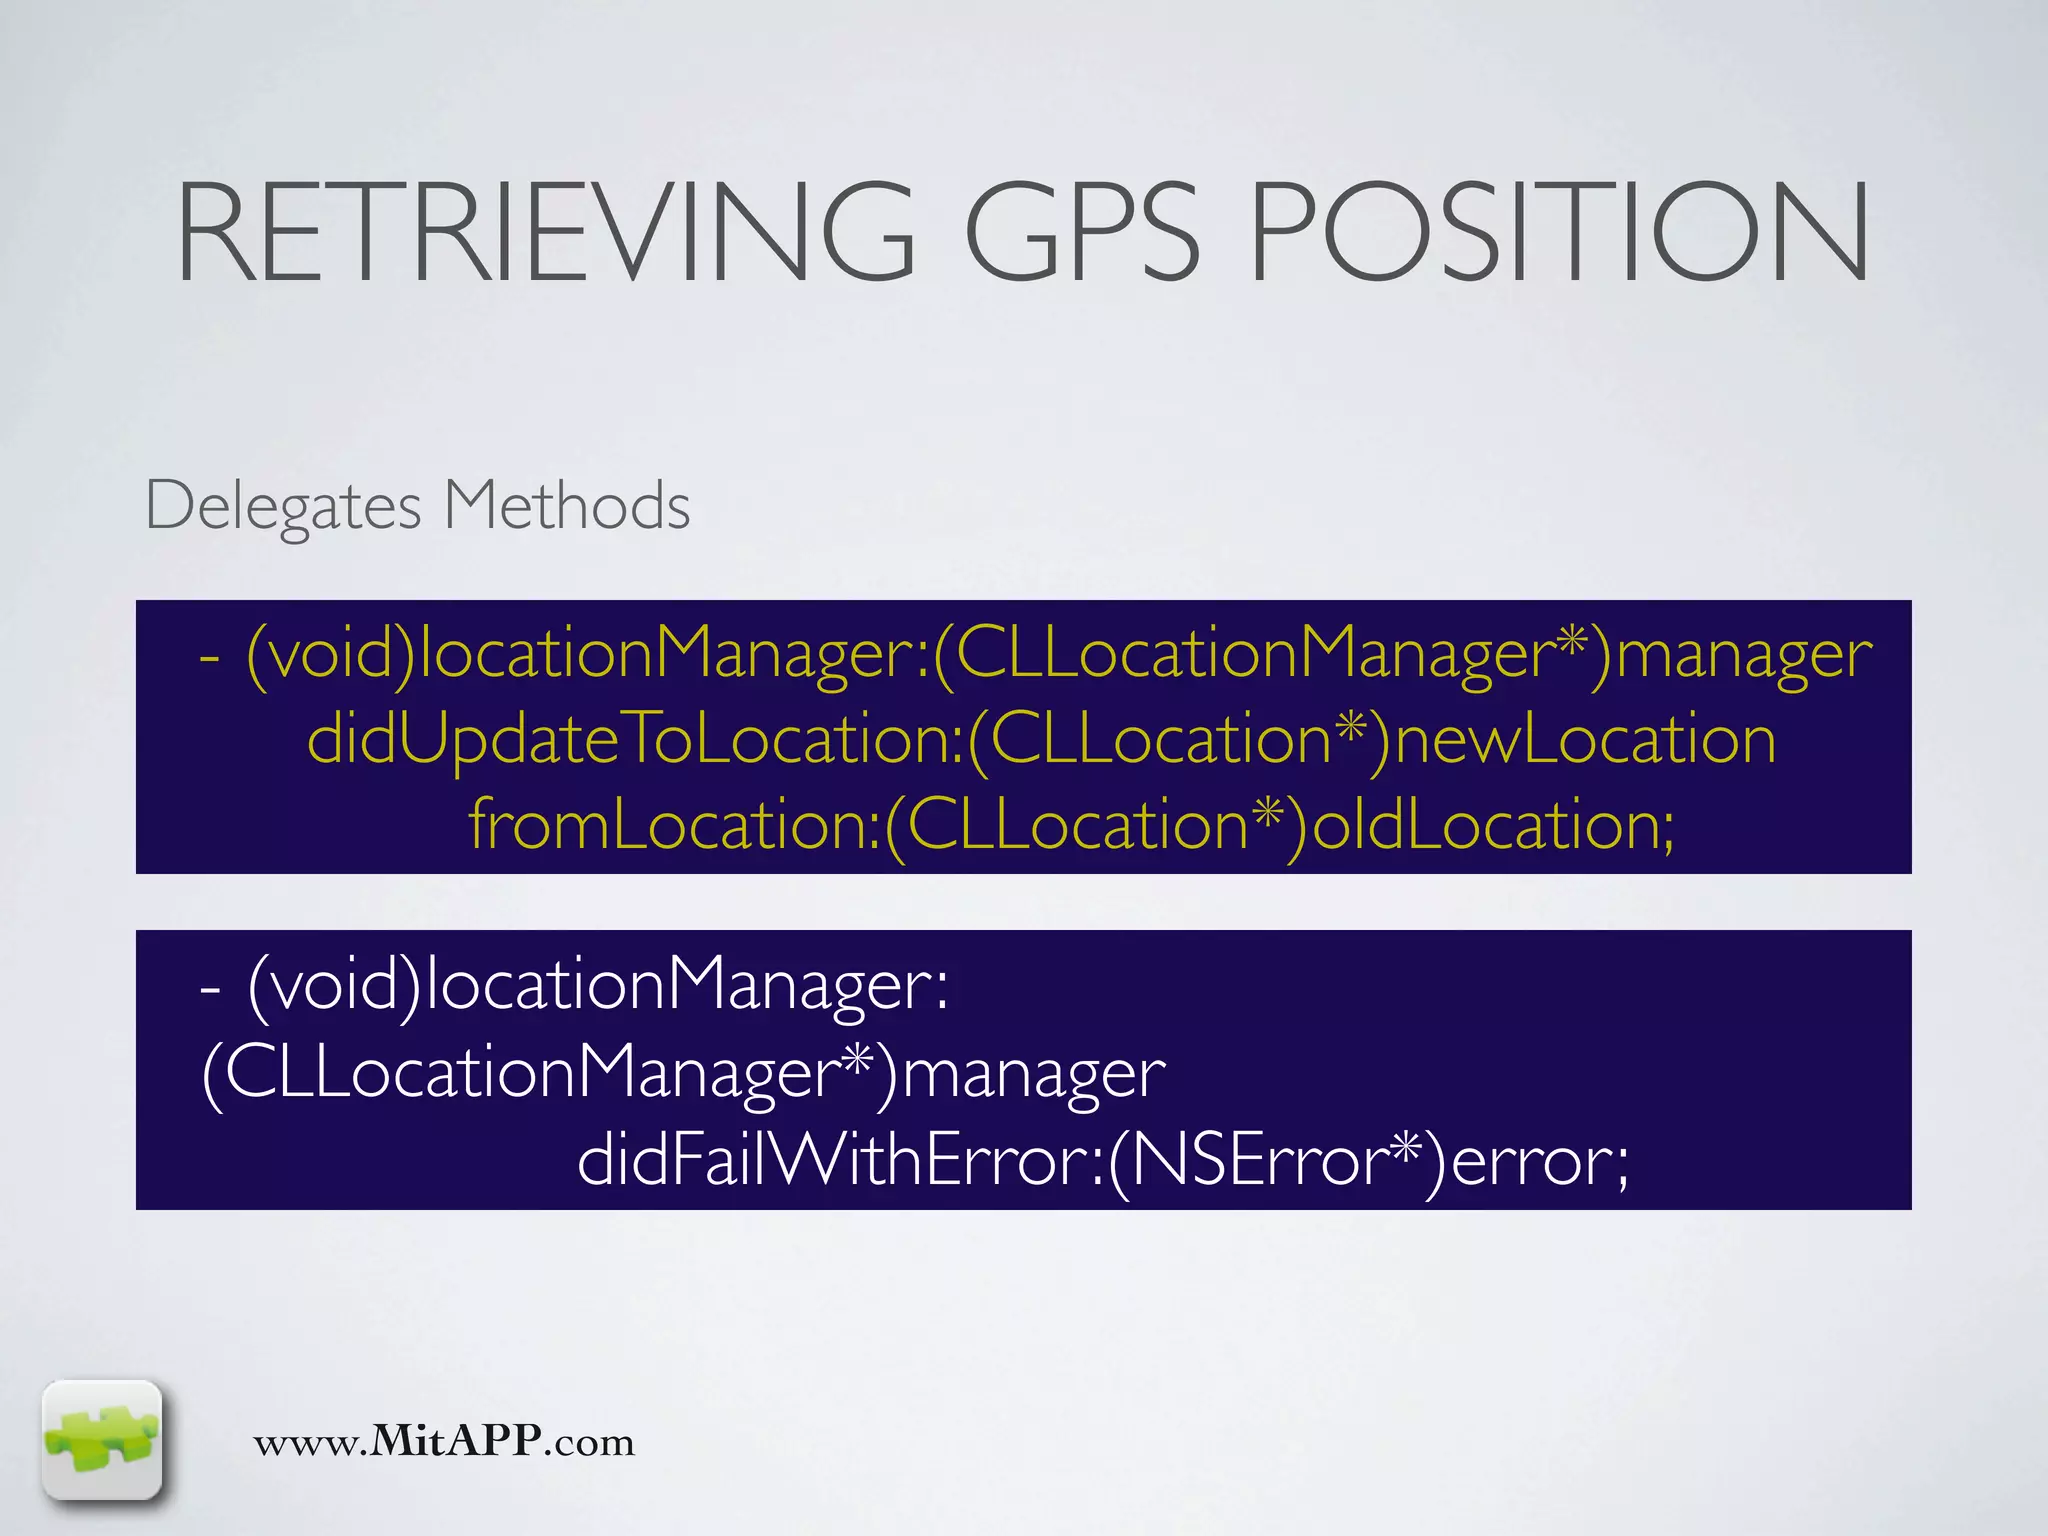
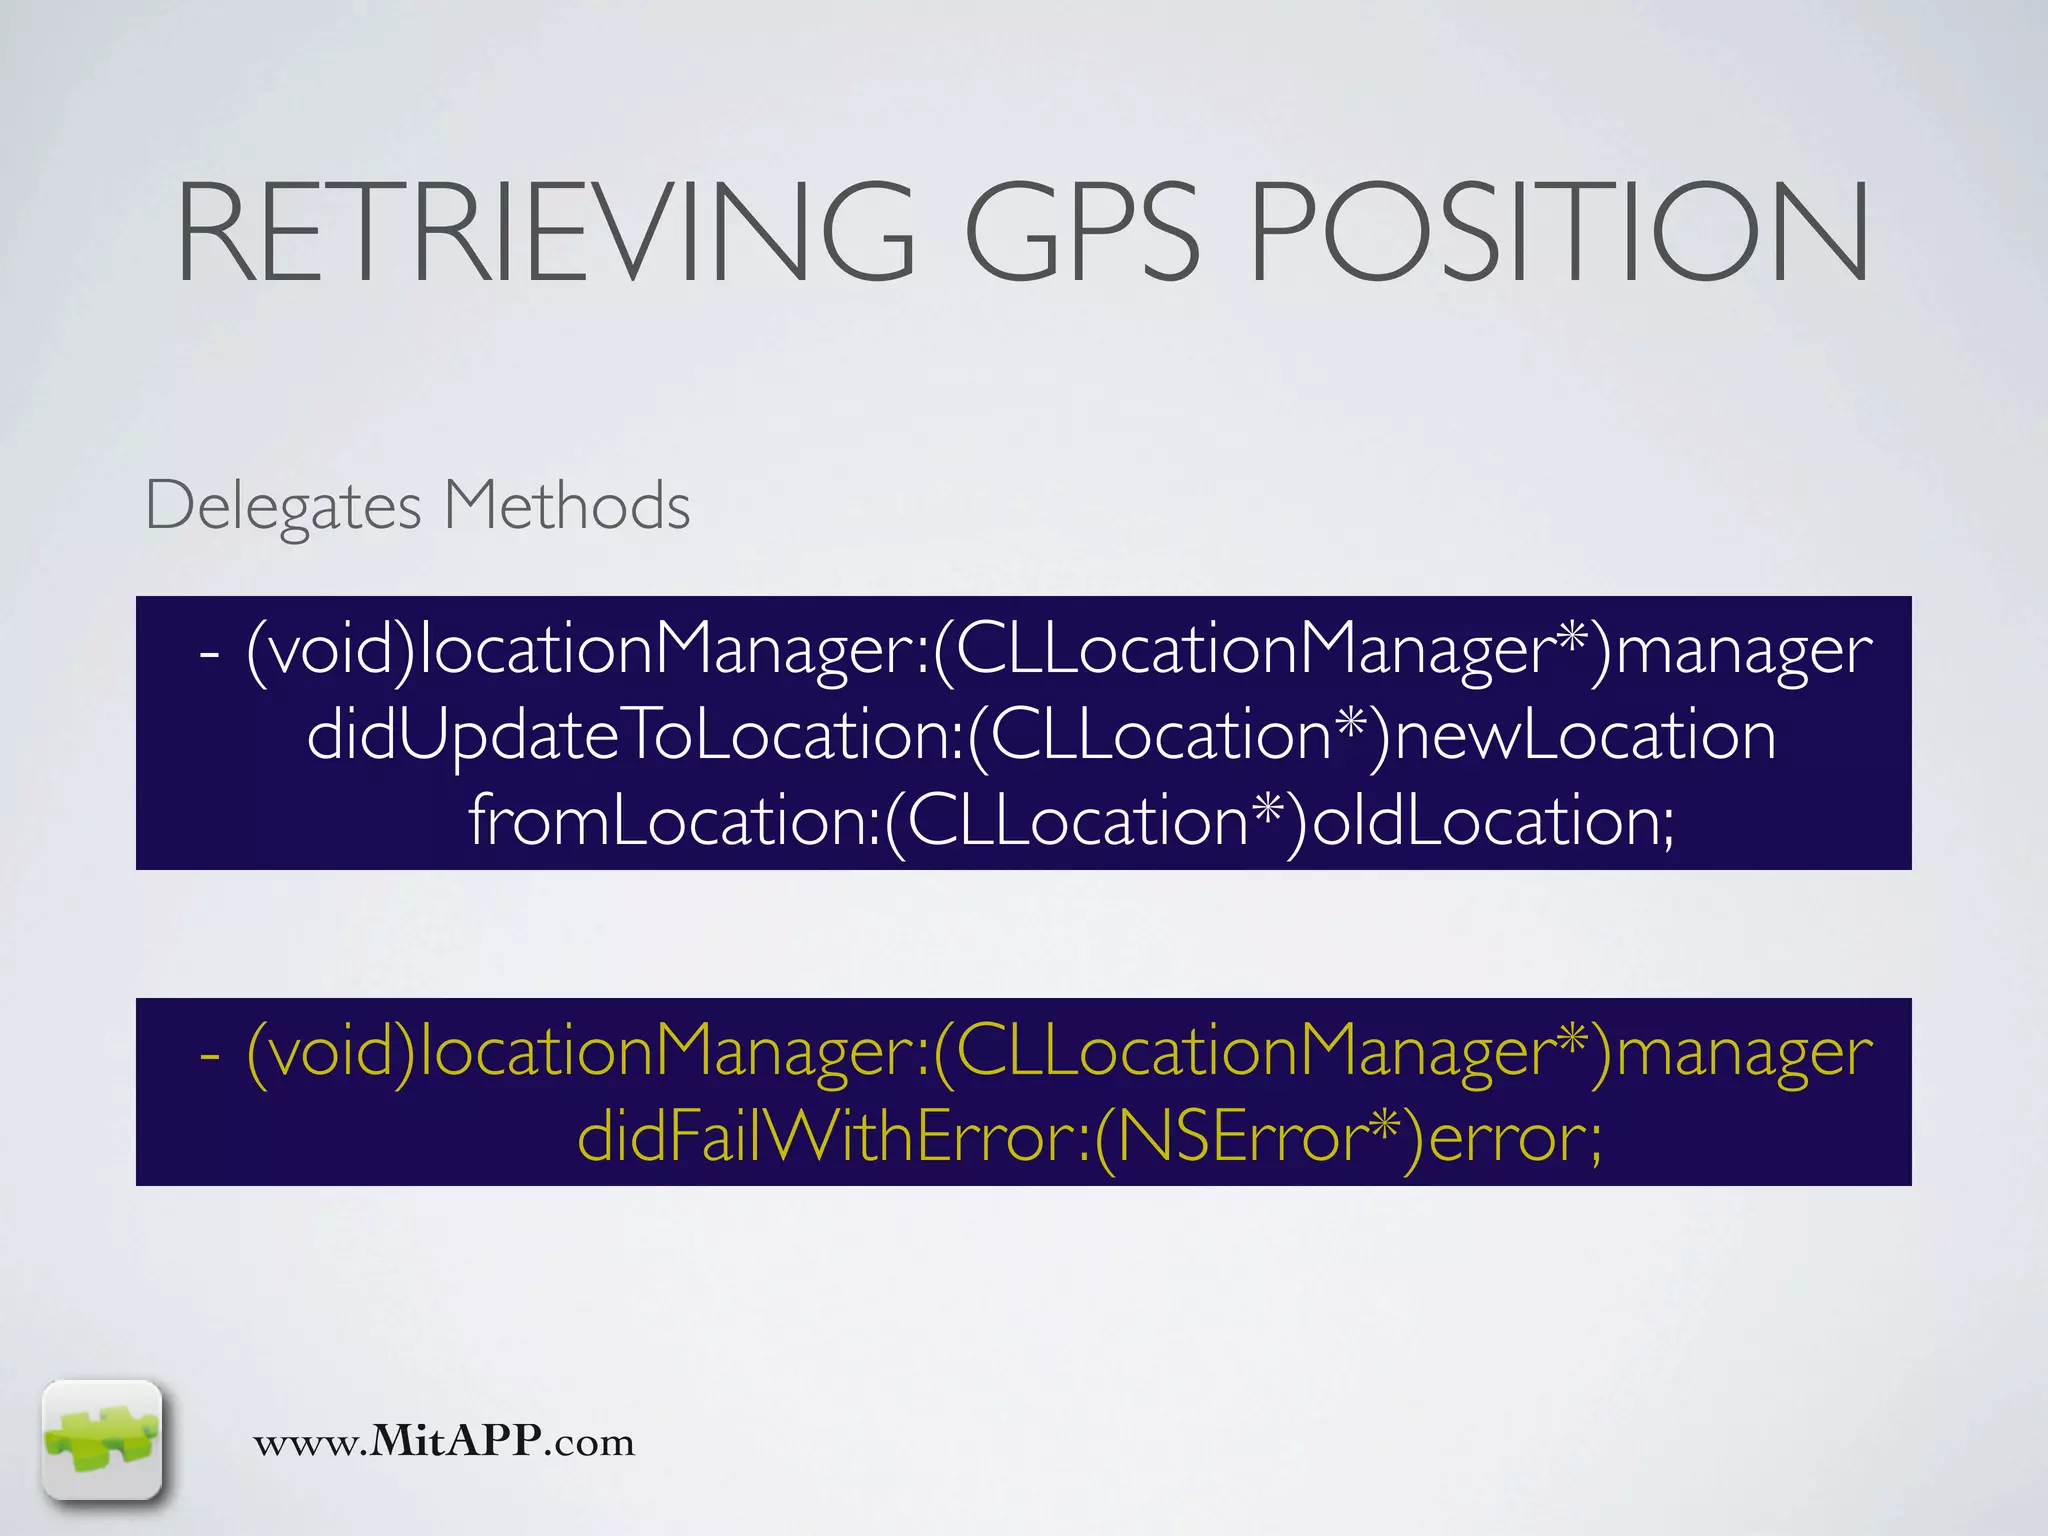
![RETRIEVING GPS POSITION
- (void)locationManager:(CLLocationManager*)manager
didUpdateToLocation:(CLLocation*)newLocation fromLocation:
(CLLocation*)oldLocation {
NSTimeInterval howRecent =
[newLocation.timestamp timeIntervalSinceNow];
if (howRecent < -10) return;
if (newLocation.horizontalAccuracy > 100) return;
// Use the coordinate data
double lat = newLocation.coordinate.latitude;
double lon = newLocation.coordinate.longitude;
}
www.MitAPP.com](https://image.slidesharecdn.com/augmentedreality-100417031645-phpapp02/75/Augmented-reality-17-2048.jpg)
![RETRIEVING GPS POSITION
- (void)locationManager:(CLLocationManager*)manager
didUpdateToLocation:(CLLocation*)newLocation fromLocation:
(CLLocation*)oldLocation {
NSTimeInterval howRecent =
[newLocation.timestamp timeIntervalSinceNow];
if (howRecent < -10) return;
if (newLocation.horizontalAccuracy > 100) return;
// Use the coordinate data
double lat = newLocation.coordinate.latitude;
double lon = newLocation.coordinate.longitude;
}
www.MitAPP.com](https://image.slidesharecdn.com/augmentedreality-100417031645-phpapp02/75/Augmented-reality-18-2048.jpg)


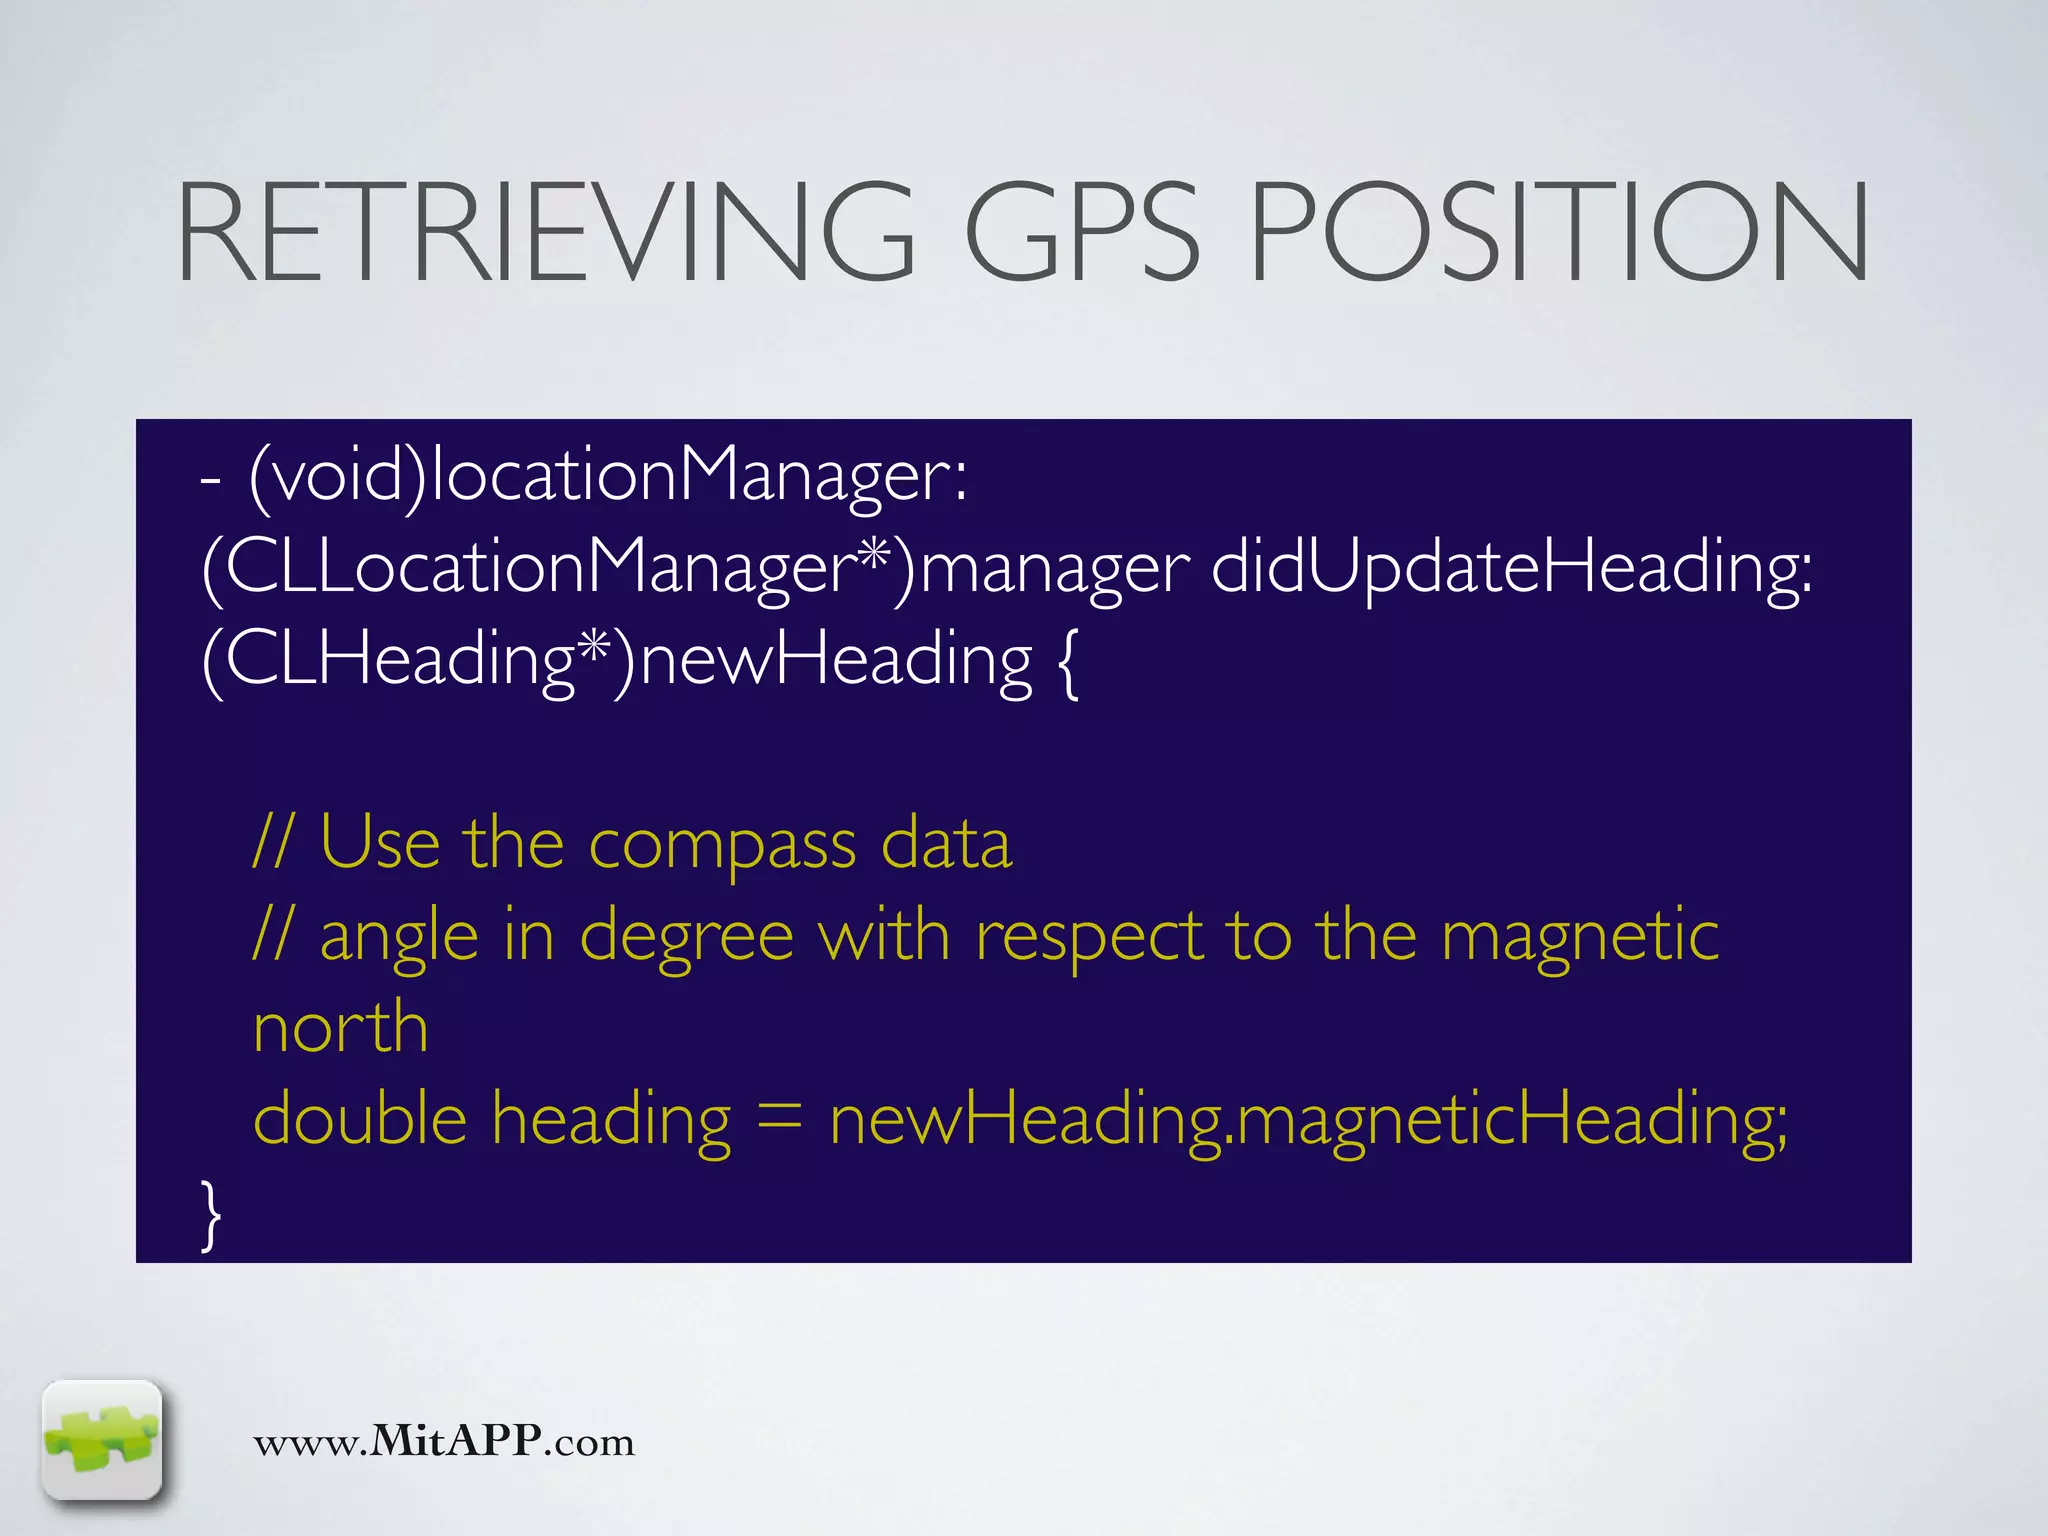
![USING THE COMPASS
CLLocationManager* manager = [[CLLocationManager alloc] init];
[manager setDelegate:self];
[manager setDesiredAccuracy:kCLLocationAccuracyBest];
[manager setDistanceFilter:10];
[manager startUpdatingLocation];
if ([manager headingAvailable]) {
[manager setHeadingFilter:2];
[manager startUpdatingHeading];
} else {
// Show a message to notify the user that compass is required in AR
apps.
}
www.MitAPP.com](https://image.slidesharecdn.com/augmentedreality-100417031645-phpapp02/75/Augmented-reality-24-2048.jpg)
![USING THE COMPASS
CLLocationManager* manager = [[CLLocationManager alloc] init];
[manager setDelegate:self];
[manager setDesiredAccuracy:kCLLocationAccuracyBest];
[manager setDistanceFilter:10];
[manager startUpdatingLocation];
if ([manager headingAvailable]) {
[manager setHeadingFilter:2]; // filter value is in degrees.
[manager startUpdatingHeading];
} else {
// Show a message to notify the user that compass is required in AR
apps.
}
www.MitAPP.com](https://image.slidesharecdn.com/augmentedreality-100417031645-phpapp02/75/Augmented-reality-25-2048.jpg)


![ACCELEROMETERS
UIAccelerometer* accelerometer = [UIAccelerometer
sharedAccelerometer];
[accelerometer setUpdateInterval: 1/25];
[accelerometer setDelegate:self];
www.MitAPP.com](https://image.slidesharecdn.com/augmentedreality-100417031645-phpapp02/75/Augmented-reality-31-2048.jpg)
![ACCELEROMETERS
UIAccelerometer* accelerometer =
[UIAccelerometer sharedAccelerometer];
[accelerometer setUpdateInterval: 1/25];
[accelerometer setDelegate:self];
www.MitAPP.com](https://image.slidesharecdn.com/augmentedreality-100417031645-phpapp02/75/Augmented-reality-32-2048.jpg)

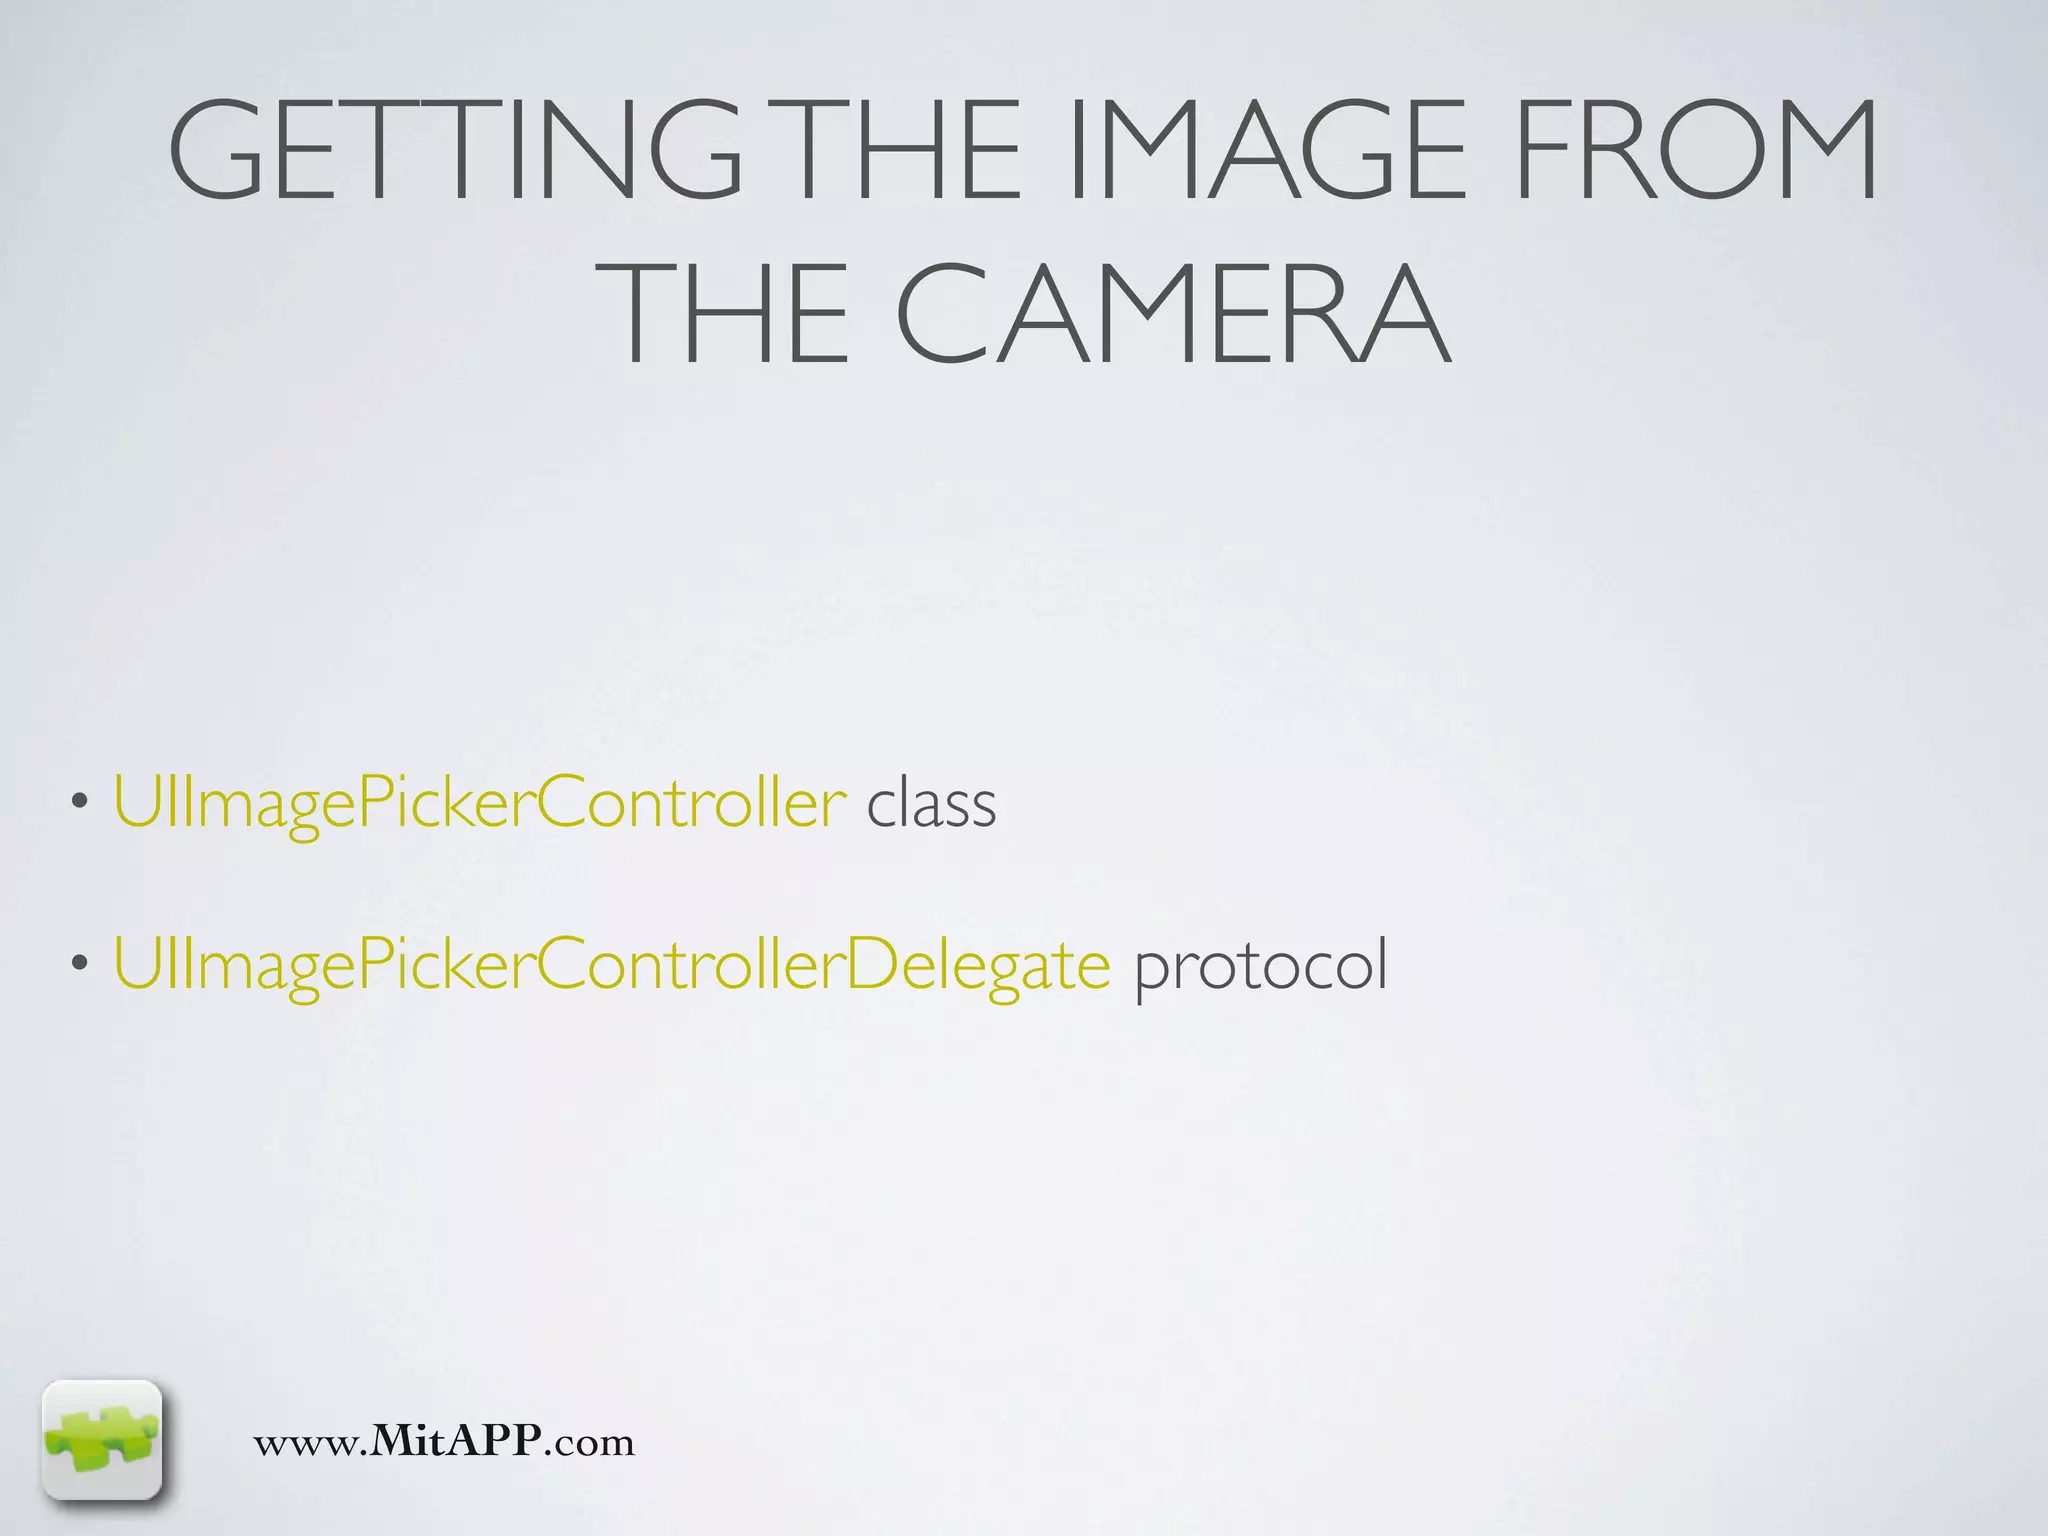
![GETTING THE IMAGE FROM
THE CAMERA
if([UIImagePickerController isSourceTypeAvailable:
UIImagePickerControllerSourceTypeCamera]) {
UIImagePickerController *picker = [[UIImagePickerController alloc] init];
[picker setSourceType:UIImagePickerControllerSourceTypeCamera];
[picker setDelegate:self];
[picker setShowCameraControls:NO];
[picker setNavigationBarHidden:YES];
[picker setCameraOverlayView:[self view]];
[self presentModalViewController:picker animated:NO];
}
www.MitAPP.com](https://image.slidesharecdn.com/augmentedreality-100417031645-phpapp02/75/Augmented-reality-37-2048.jpg)
![GETTING THE IMAGE FROM
THE CAMERA
if([UIImagePickerController isSourceTypeAvailable:
UIImagePickerControllerSourceTypeCamera]) {
UIImagePickerController *picker = [[UIImagePickerController alloc] init];
[picker setSourceType:UIImagePickerControllerSourceTypeCamera];
[picker setDelegate:self];
[picker setShowCameraControls:NO];
[picker setNavigationBarHidden:YES];
[picker setCameraOverlayView:[self view]];
[self presentModalViewController:picker animated:NO];
}
www.MitAPP.com](https://image.slidesharecdn.com/augmentedreality-100417031645-phpapp02/75/Augmented-reality-38-2048.jpg)
![GETTING THE IMAGE FROM
THE CAMERA
if([UIImagePickerController isSourceTypeAvailable:
UIImagePickerControllerSourceTypeCamera]) {
UIImagePickerController *picker = [[UIImagePickerController alloc] init];
[picker setSourceType:UIImagePickerControllerSourceTypeCamera];
[picker setDelegate:self];
[picker setShowCameraControls:NO];
[picker setNavigationBarHidden:YES];
[picker setCameraOverlayView:[self view]];
[self presentModalViewController:picker animated:NO];
}
www.MitAPP.com](https://image.slidesharecdn.com/augmentedreality-100417031645-phpapp02/75/Augmented-reality-39-2048.jpg)
![GETTING THE IMAGE FROM
THE CAMERA
if([UIImagePickerController isSourceTypeAvailable:
UIImagePickerControllerSourceTypeCamera]) {
UIImagePickerController *picker = [[UIImagePickerController alloc] init];
[picker setSourceType:UIImagePickerControllerSourceTypeCamera];
[picker setDelegate:self];
[picker setShowCameraControls:NO];
[picker setNavigationBarHidden:YES];
[picker setCameraOverlayView:[self view]];
[self presentModalViewController:picker animated:NO];
}
www.MitAPP.com](https://image.slidesharecdn.com/augmentedreality-100417031645-phpapp02/75/Augmented-reality-40-2048.jpg)
![GETTING THE IMAGE FROM
THE CAMERA
if([UIImagePickerController isSourceTypeAvailable:
UIImagePickerControllerSourceTypeCamera]) {
UIImagePickerController *picker = [[UIImagePickerController alloc] init];
[picker setSourceType:UIImagePickerControllerSourceTypeCamera];
[picker setDelegate:self];
[picker setShowCameraControls:NO];
[picker setNavigationBarHidden:YES];
[picker setCameraOverlayView:[self view]];
[self presentModalViewController:picker animated:NO];
}
www.MitAPP.com](https://image.slidesharecdn.com/augmentedreality-100417031645-phpapp02/75/Augmented-reality-41-2048.jpg)
![GETTING THE IMAGE FROM
THE CAMERA
if([UIImagePickerController isSourceTypeAvailable:
UIImagePickerControllerSourceTypeCamera]) {
UIImagePickerController *picker = [[UIImagePickerController alloc] init];
[picker setSourceType:UIImagePickerControllerSourceTypeCamera];
[picker setDelegate:self];
[picker setShowCameraControls:NO];
[picker setNavigationBarHidden:YES];
[picker setCameraOverlayView:[self view]];
[self presentModalViewController:picker animated:NO];
}
www.MitAPP.com](https://image.slidesharecdn.com/augmentedreality-100417031645-phpapp02/75/Augmented-reality-42-2048.jpg)

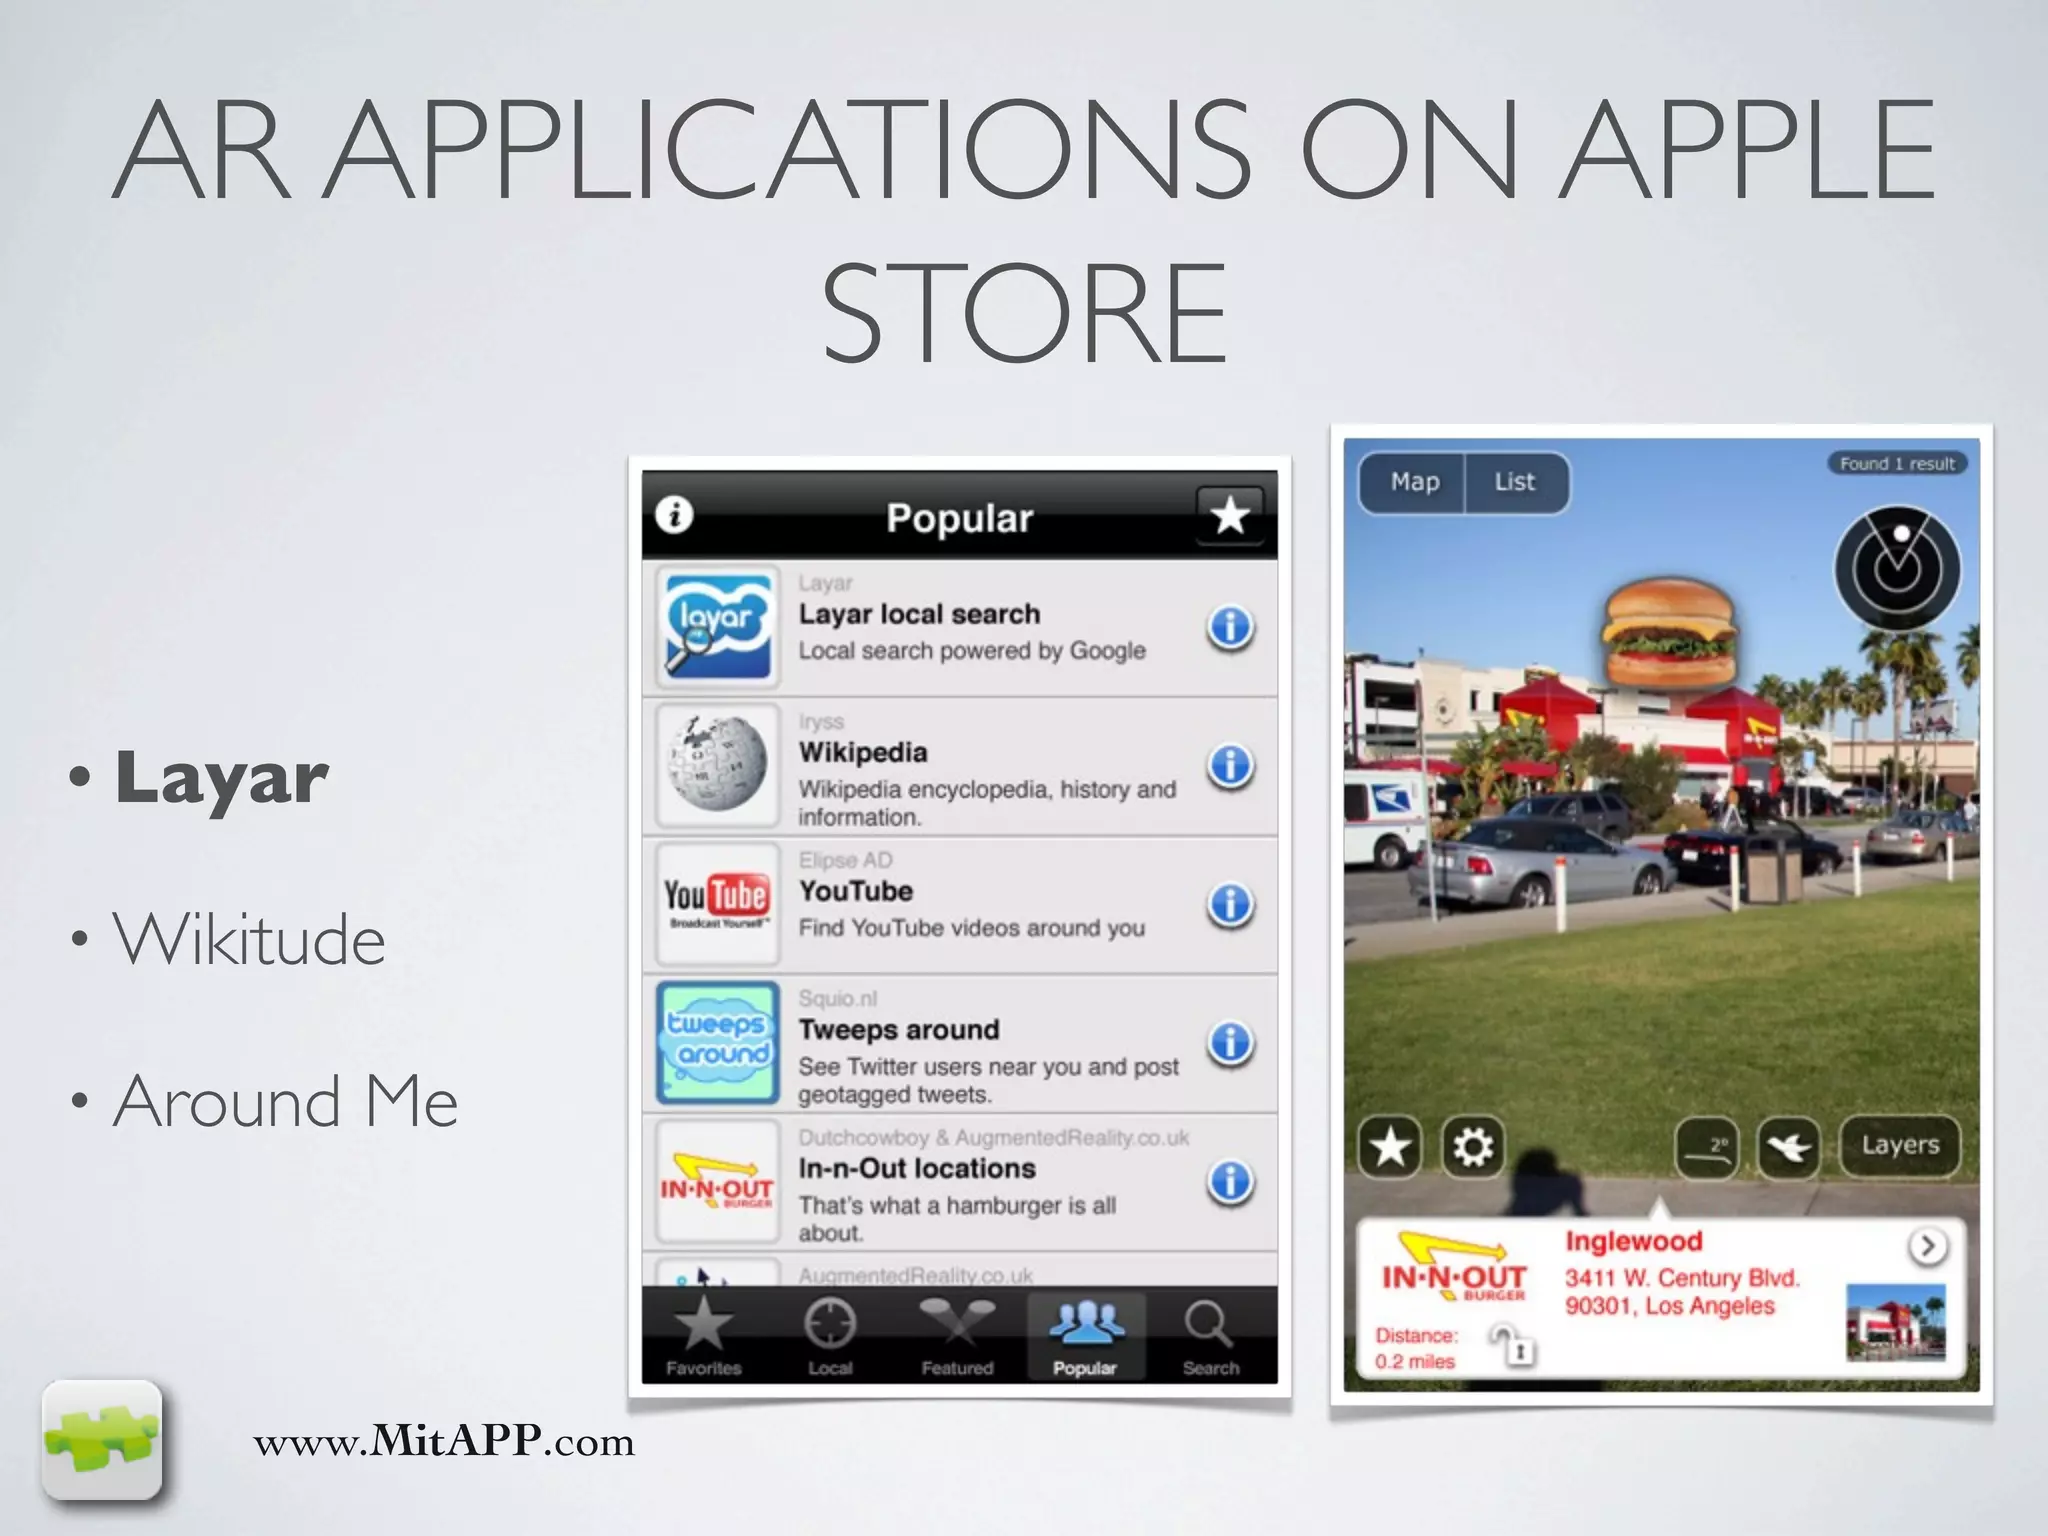
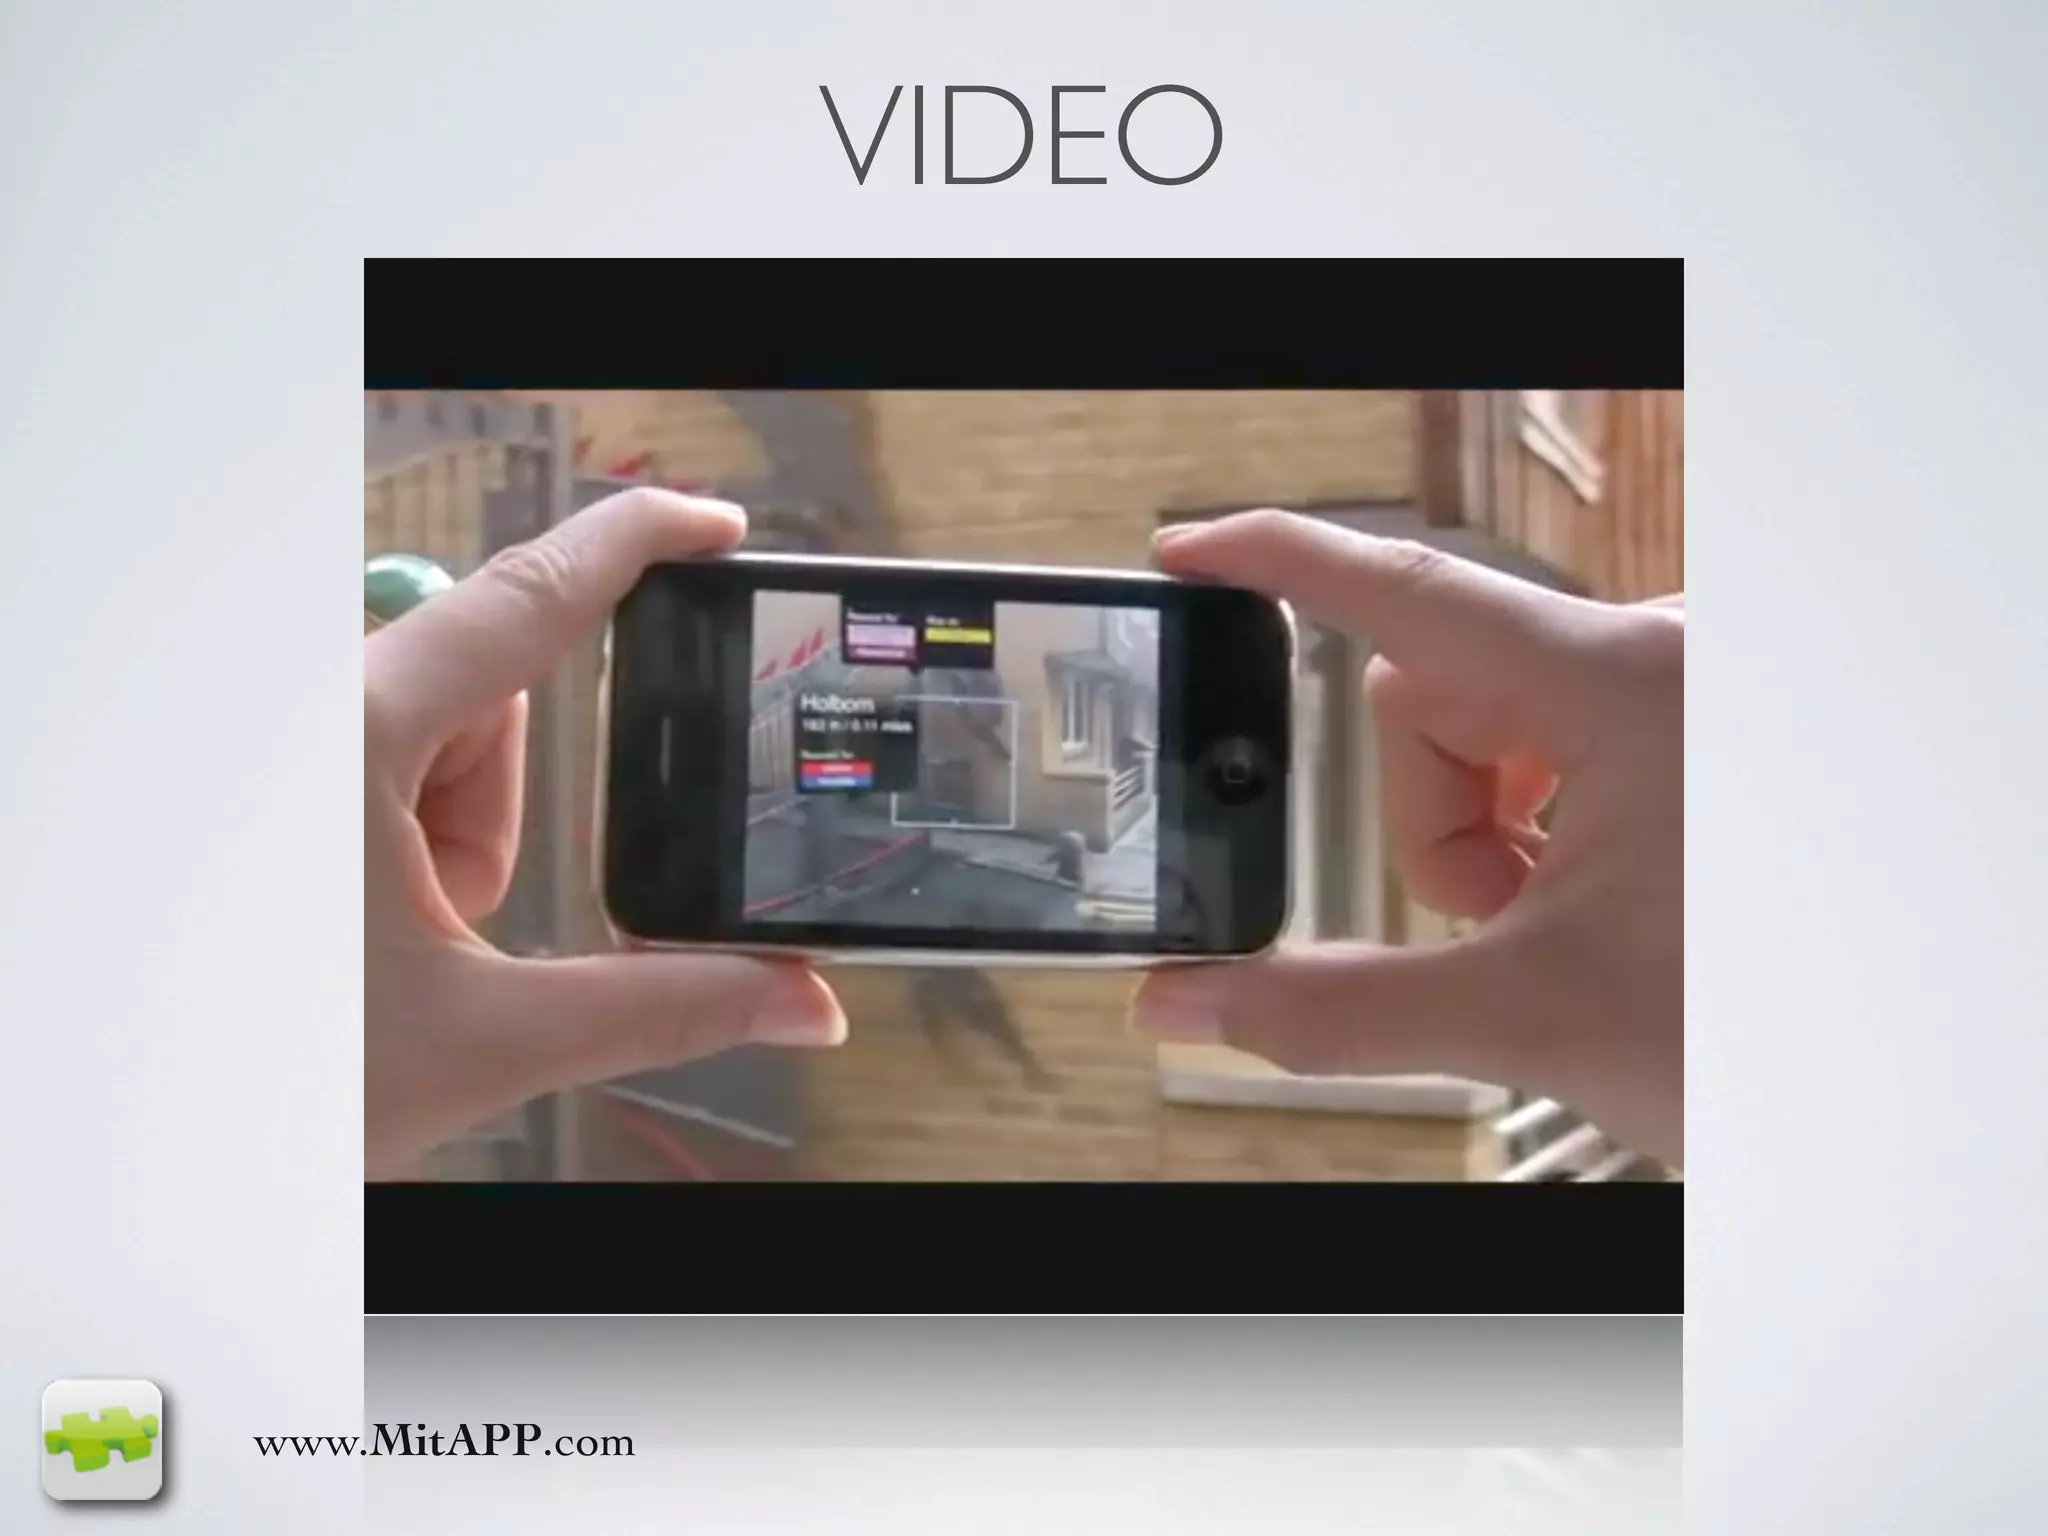


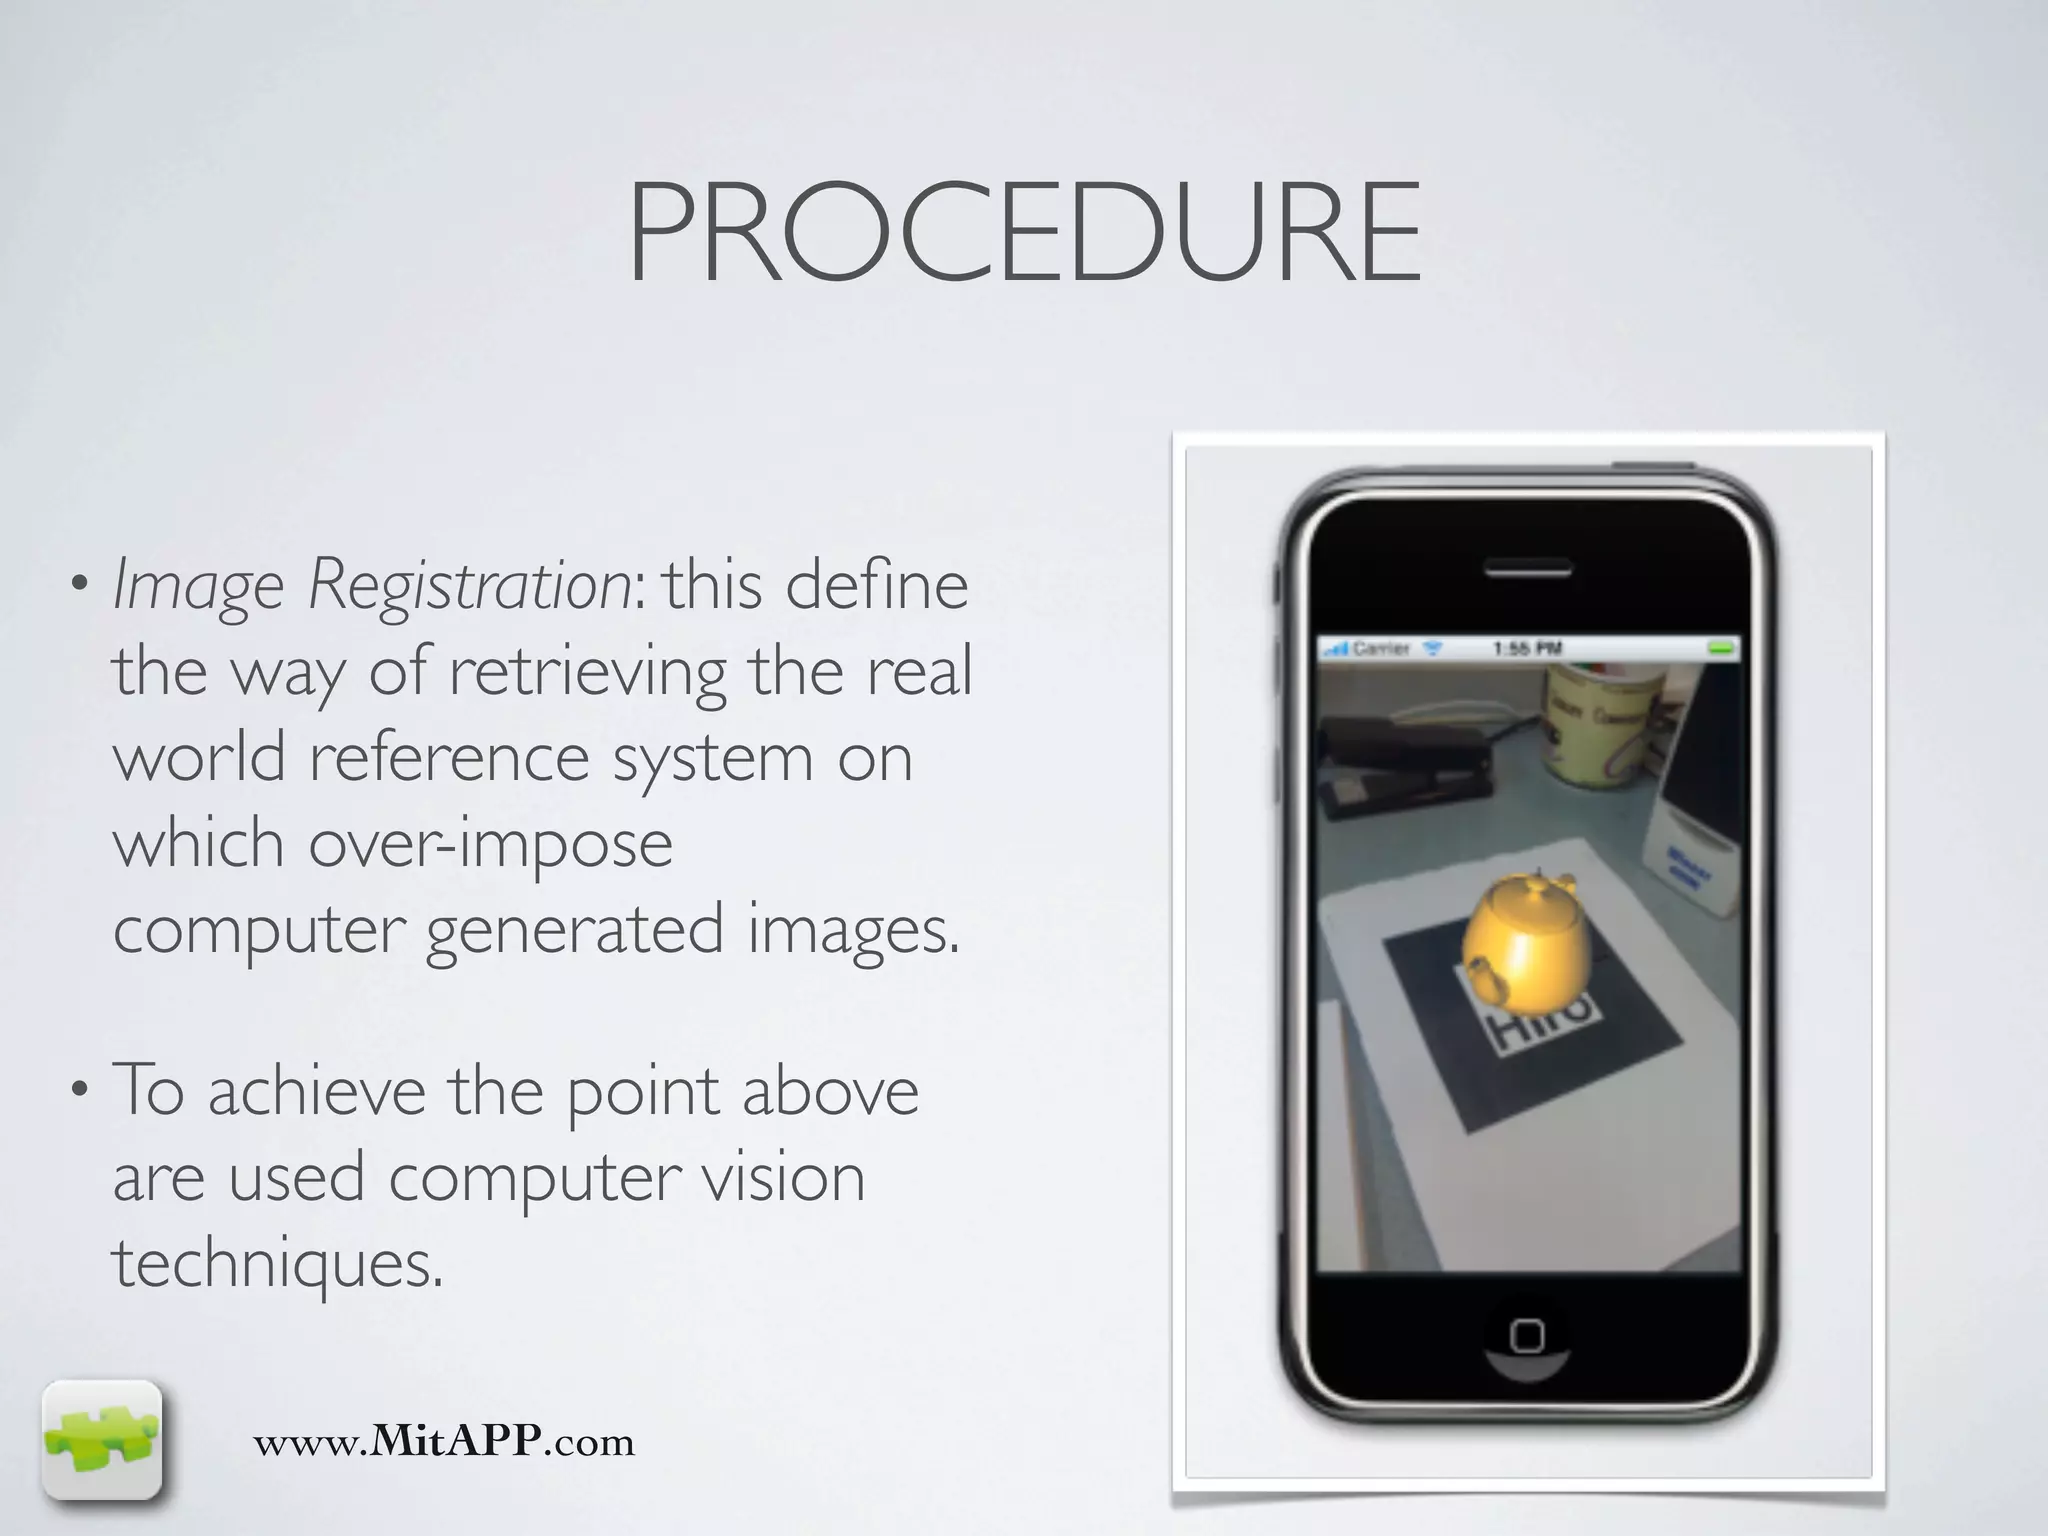
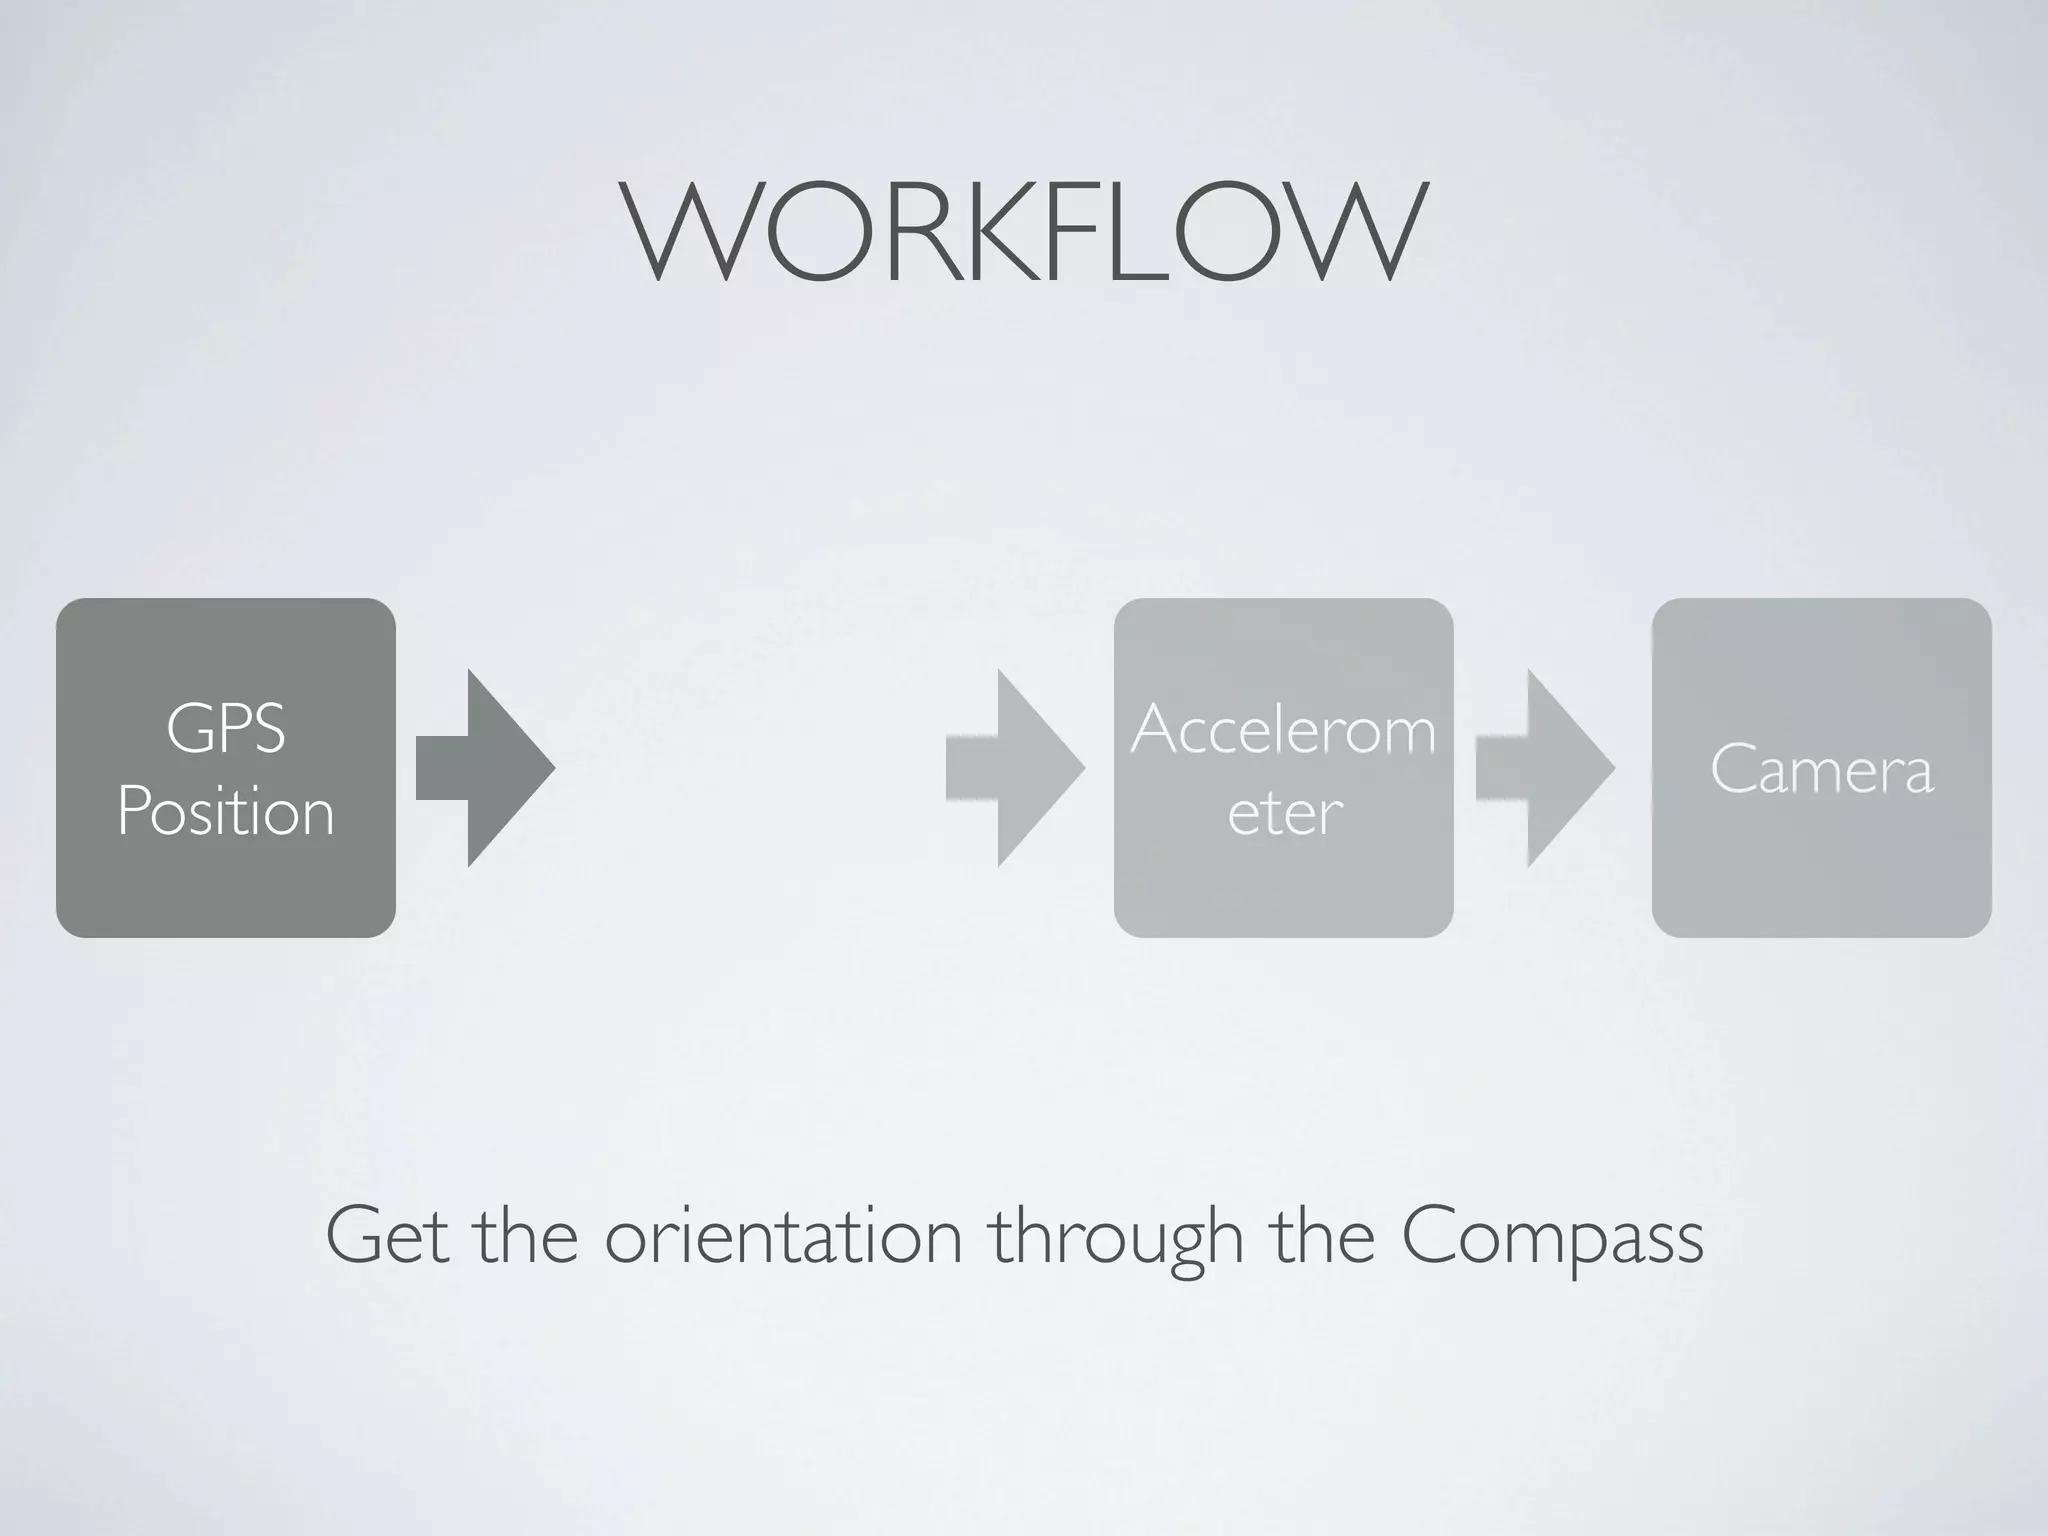
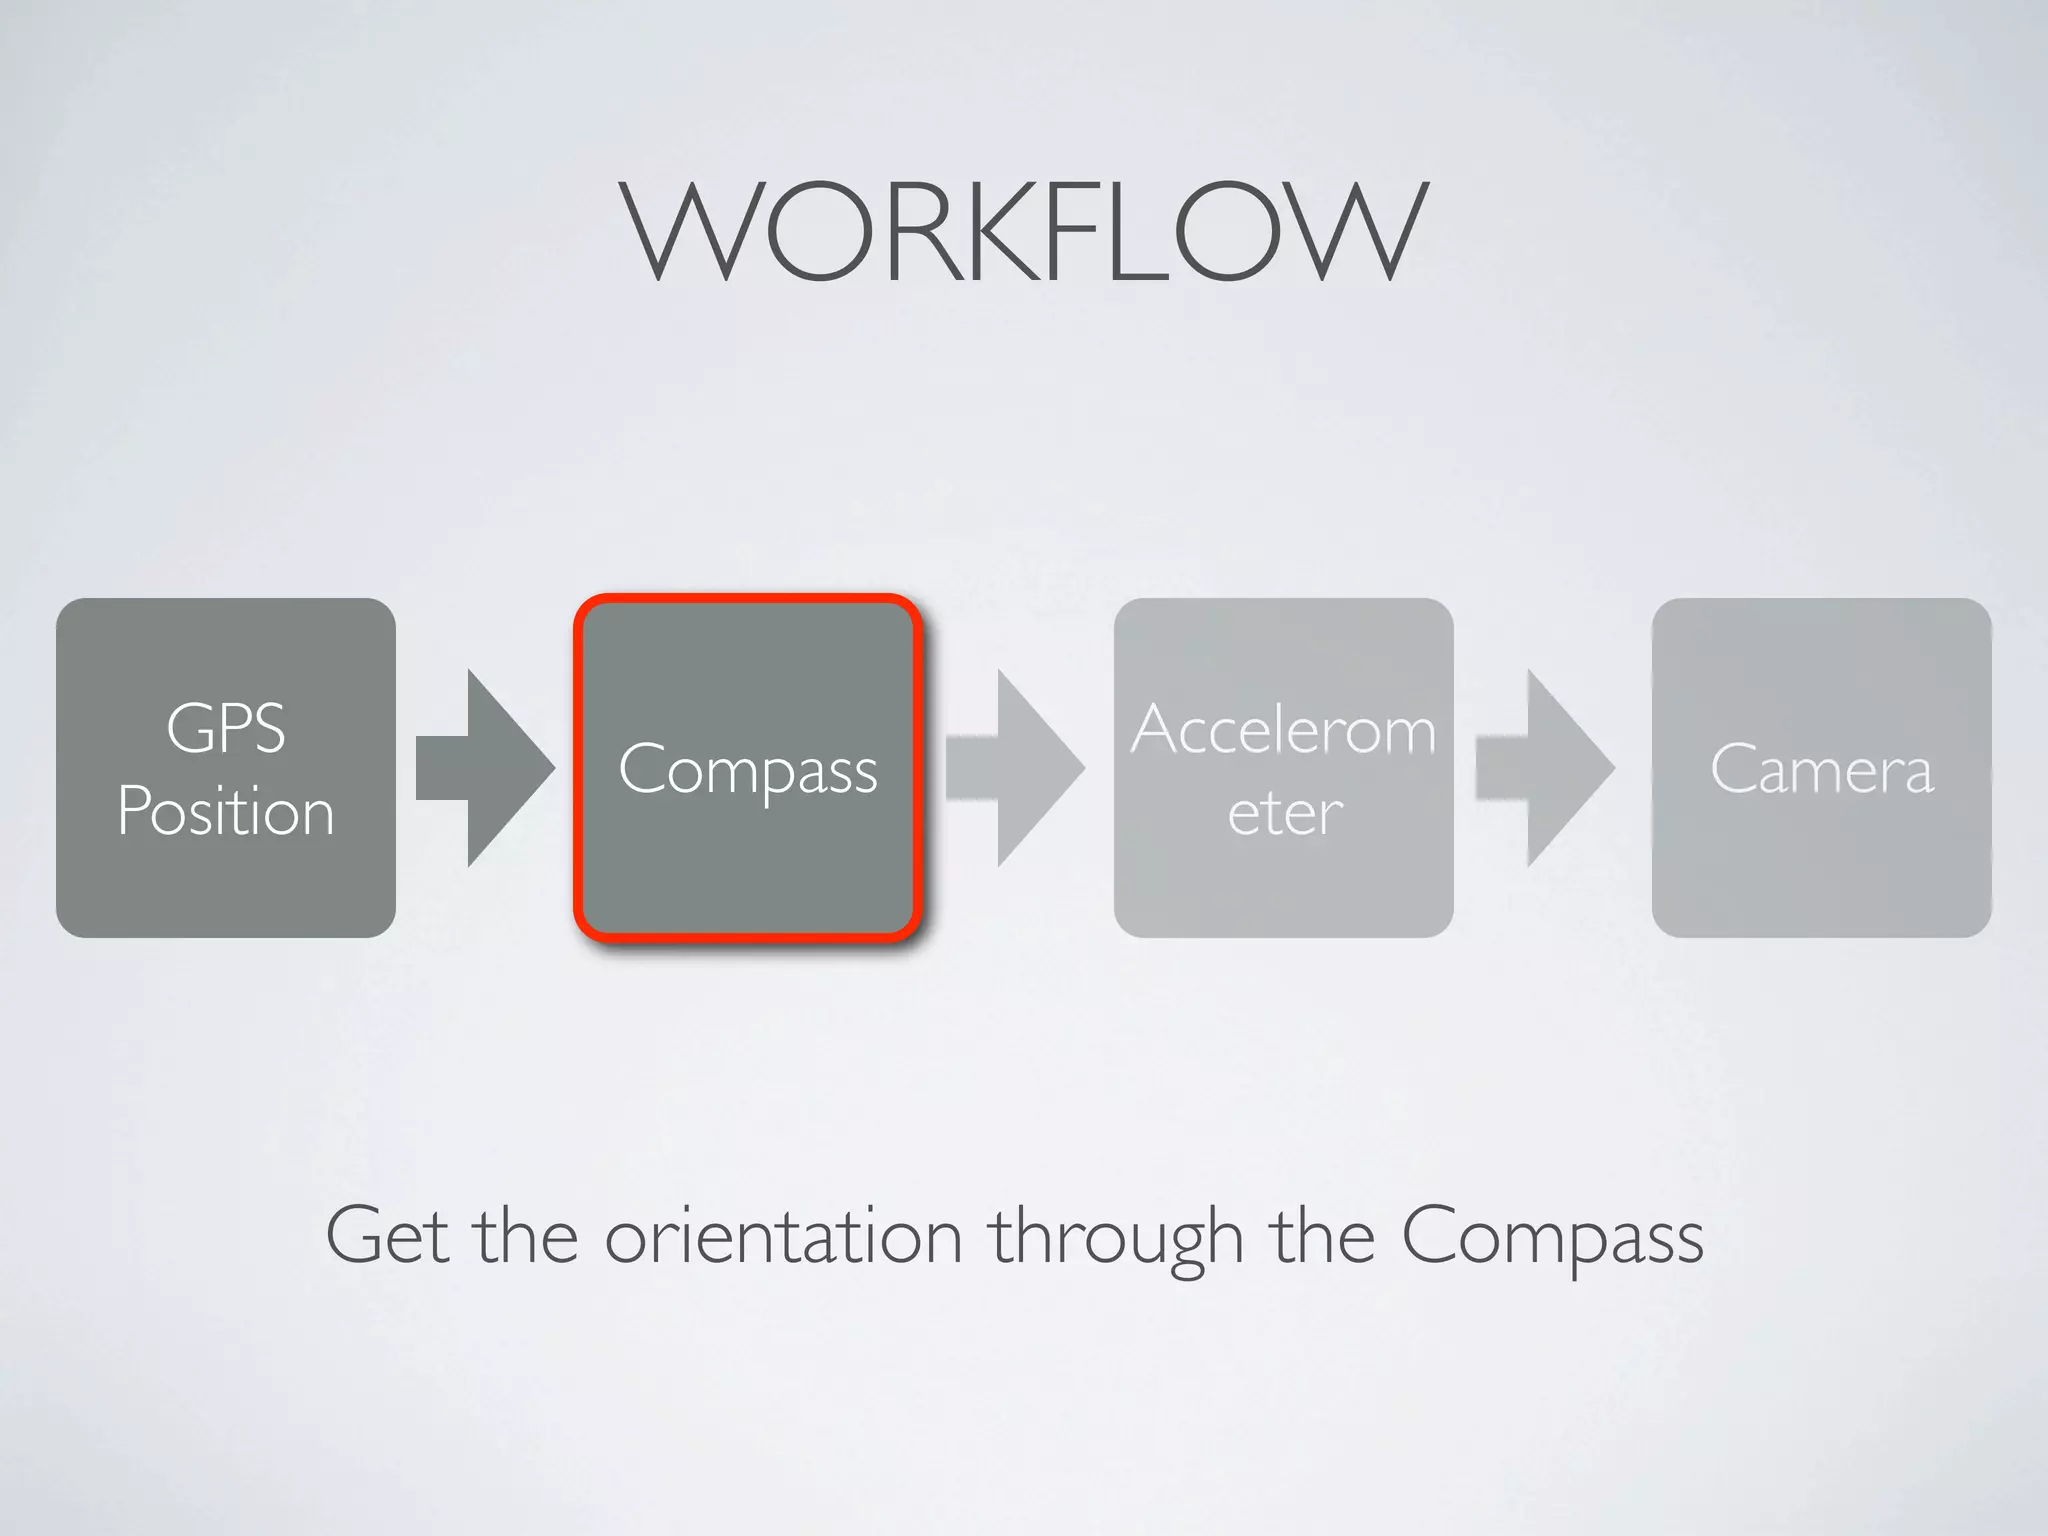
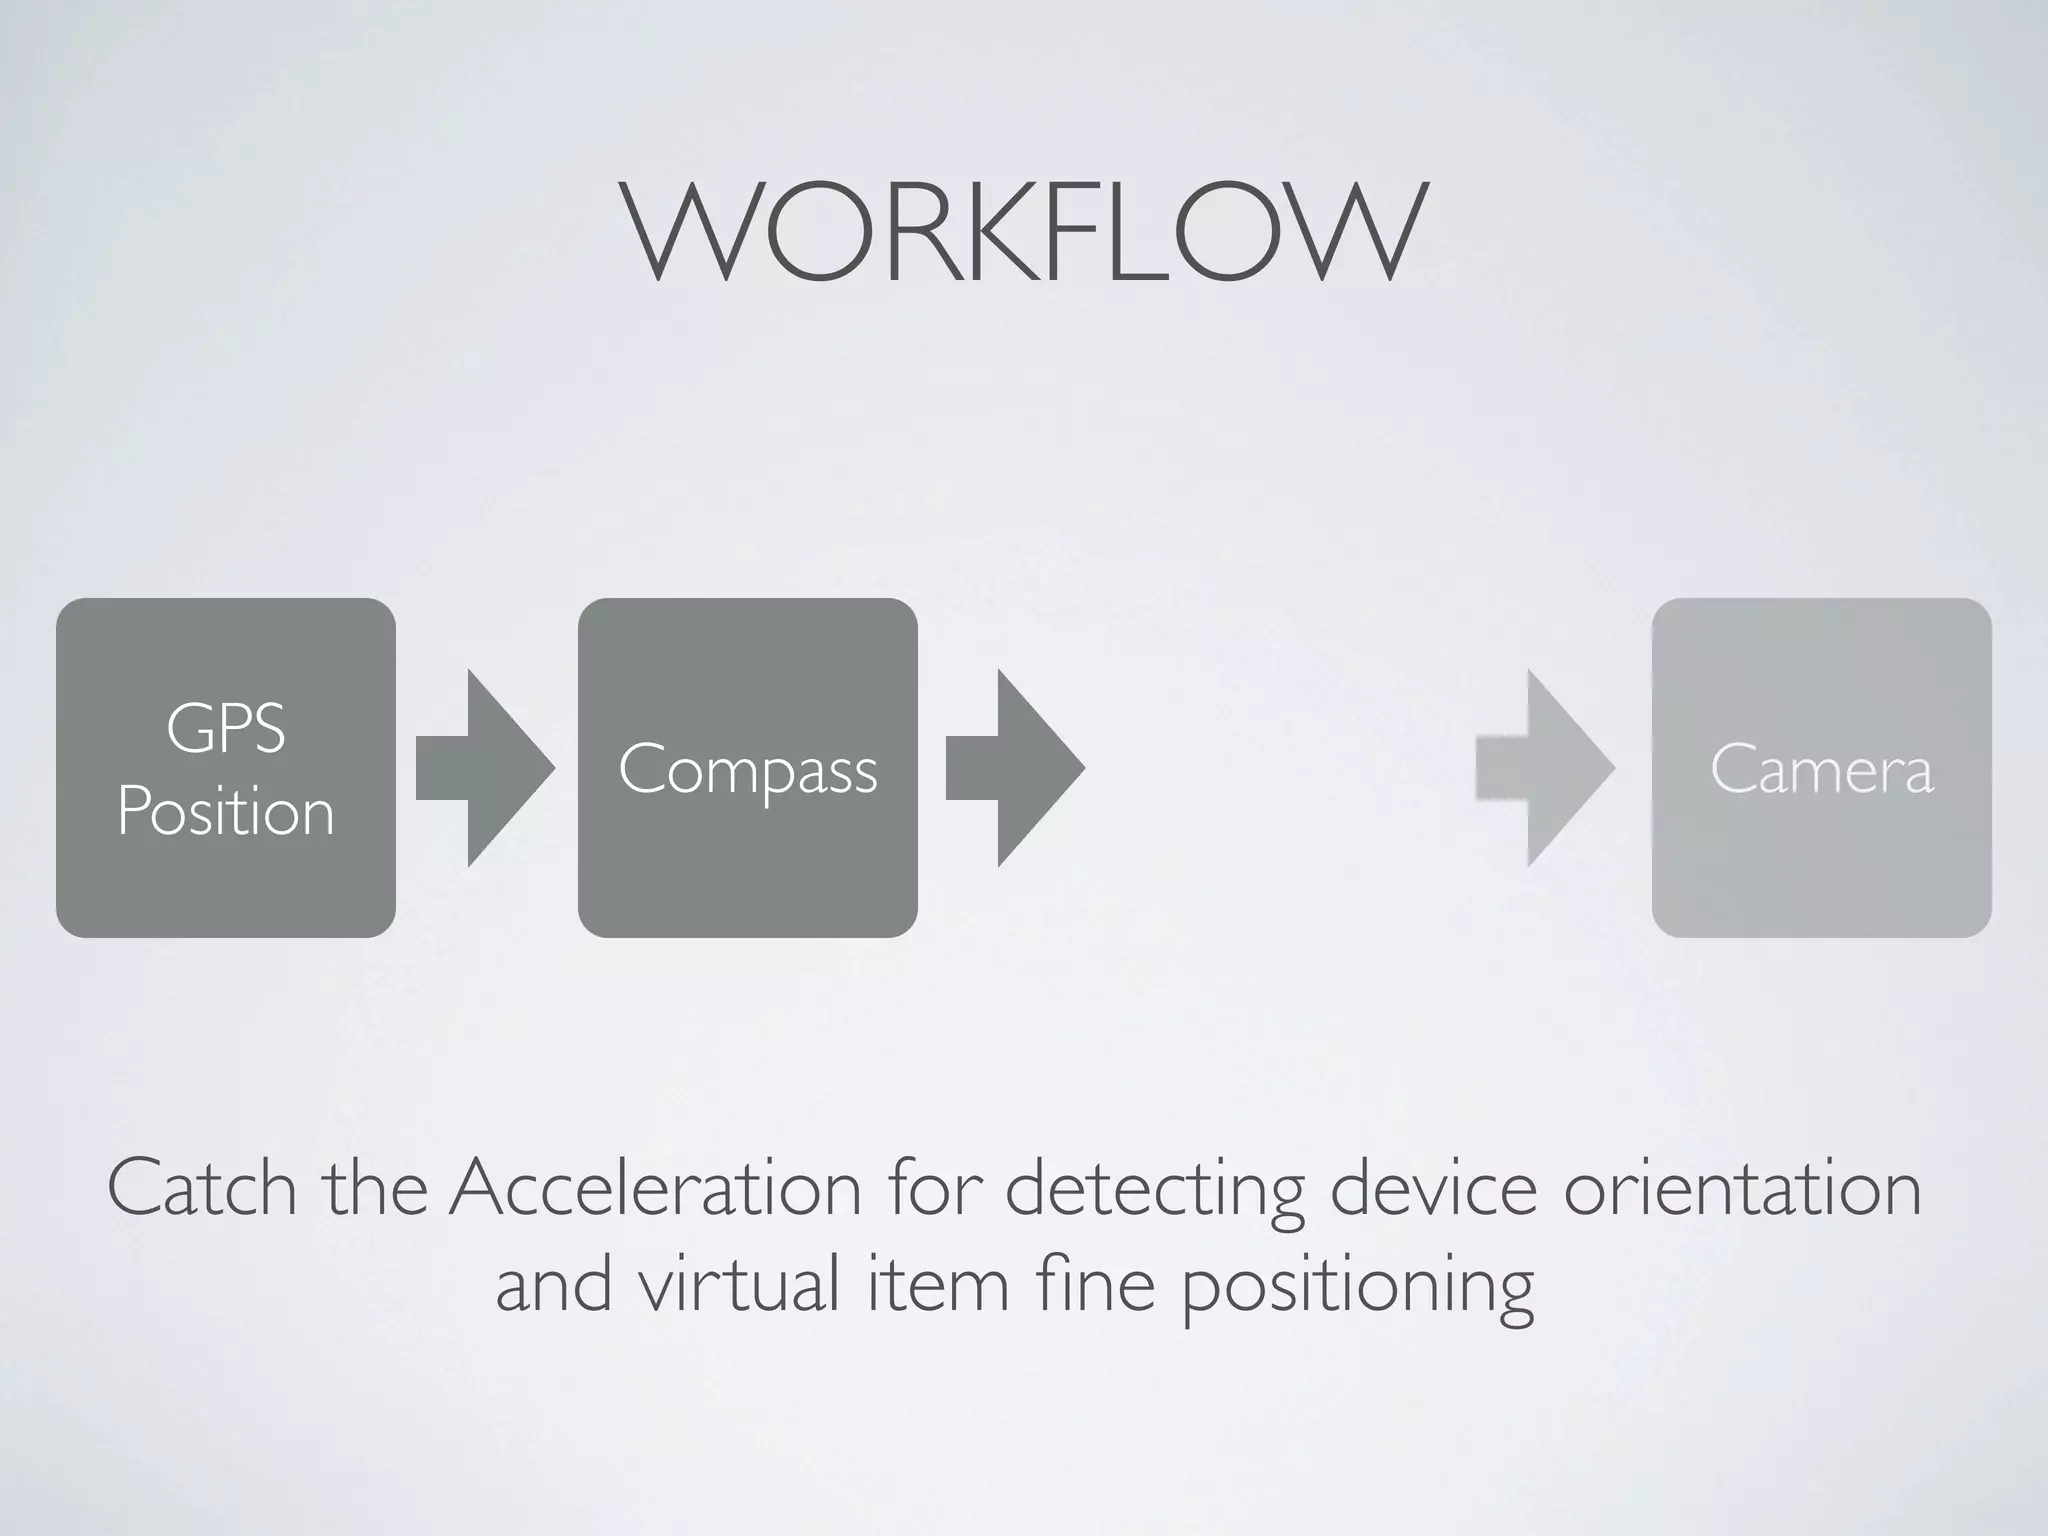
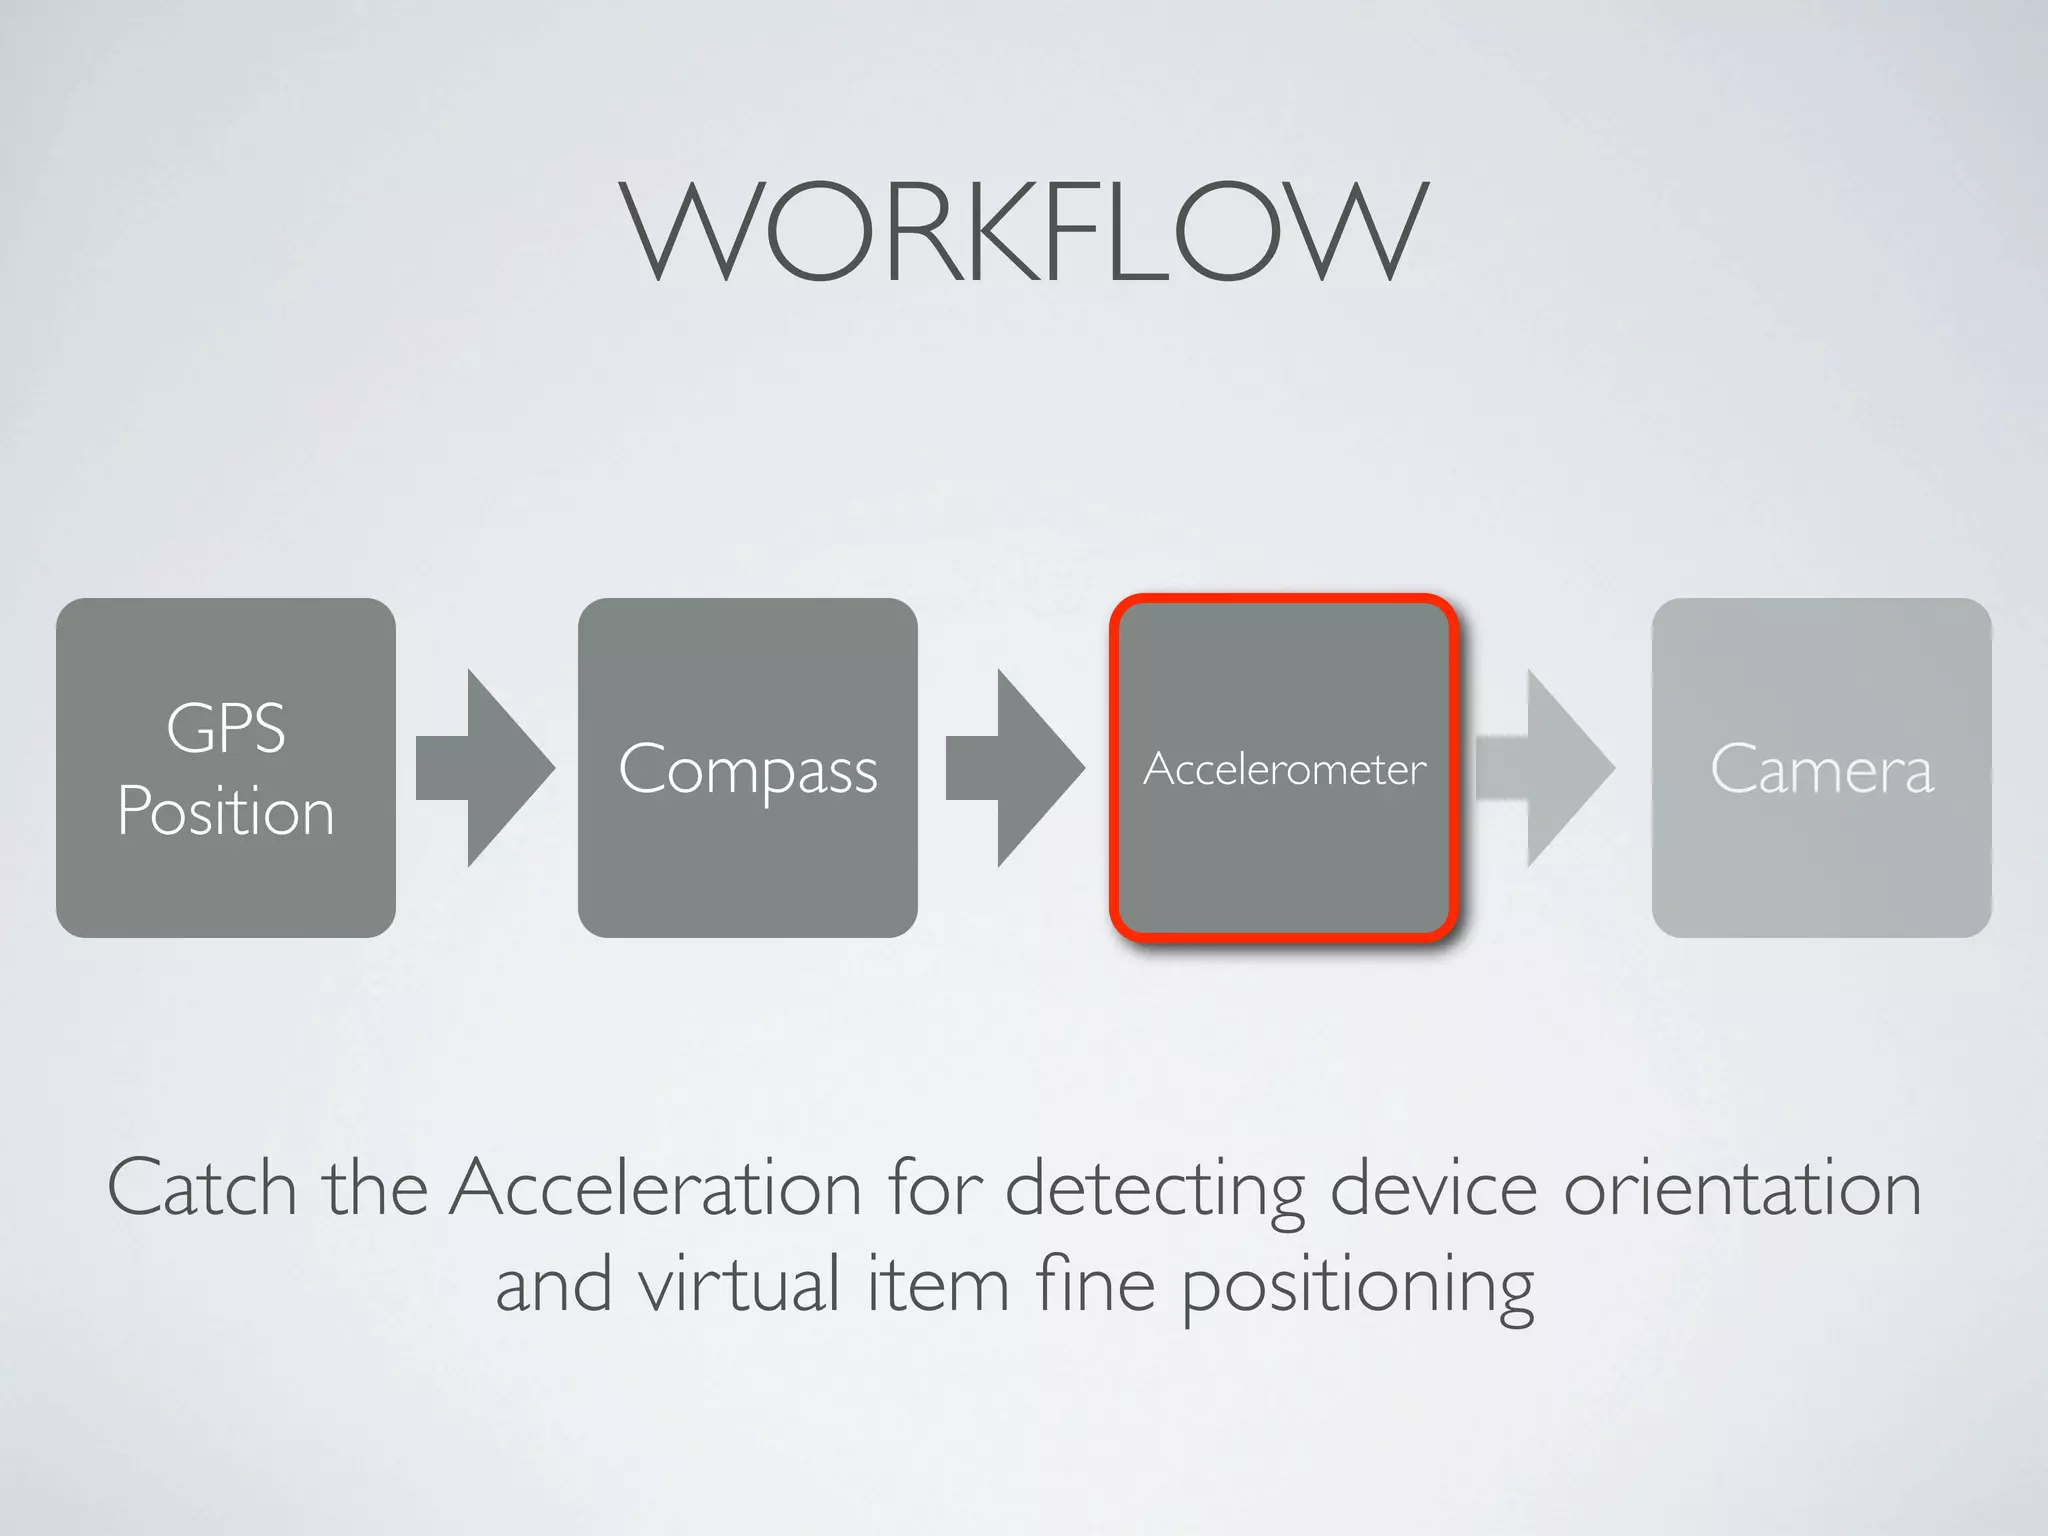
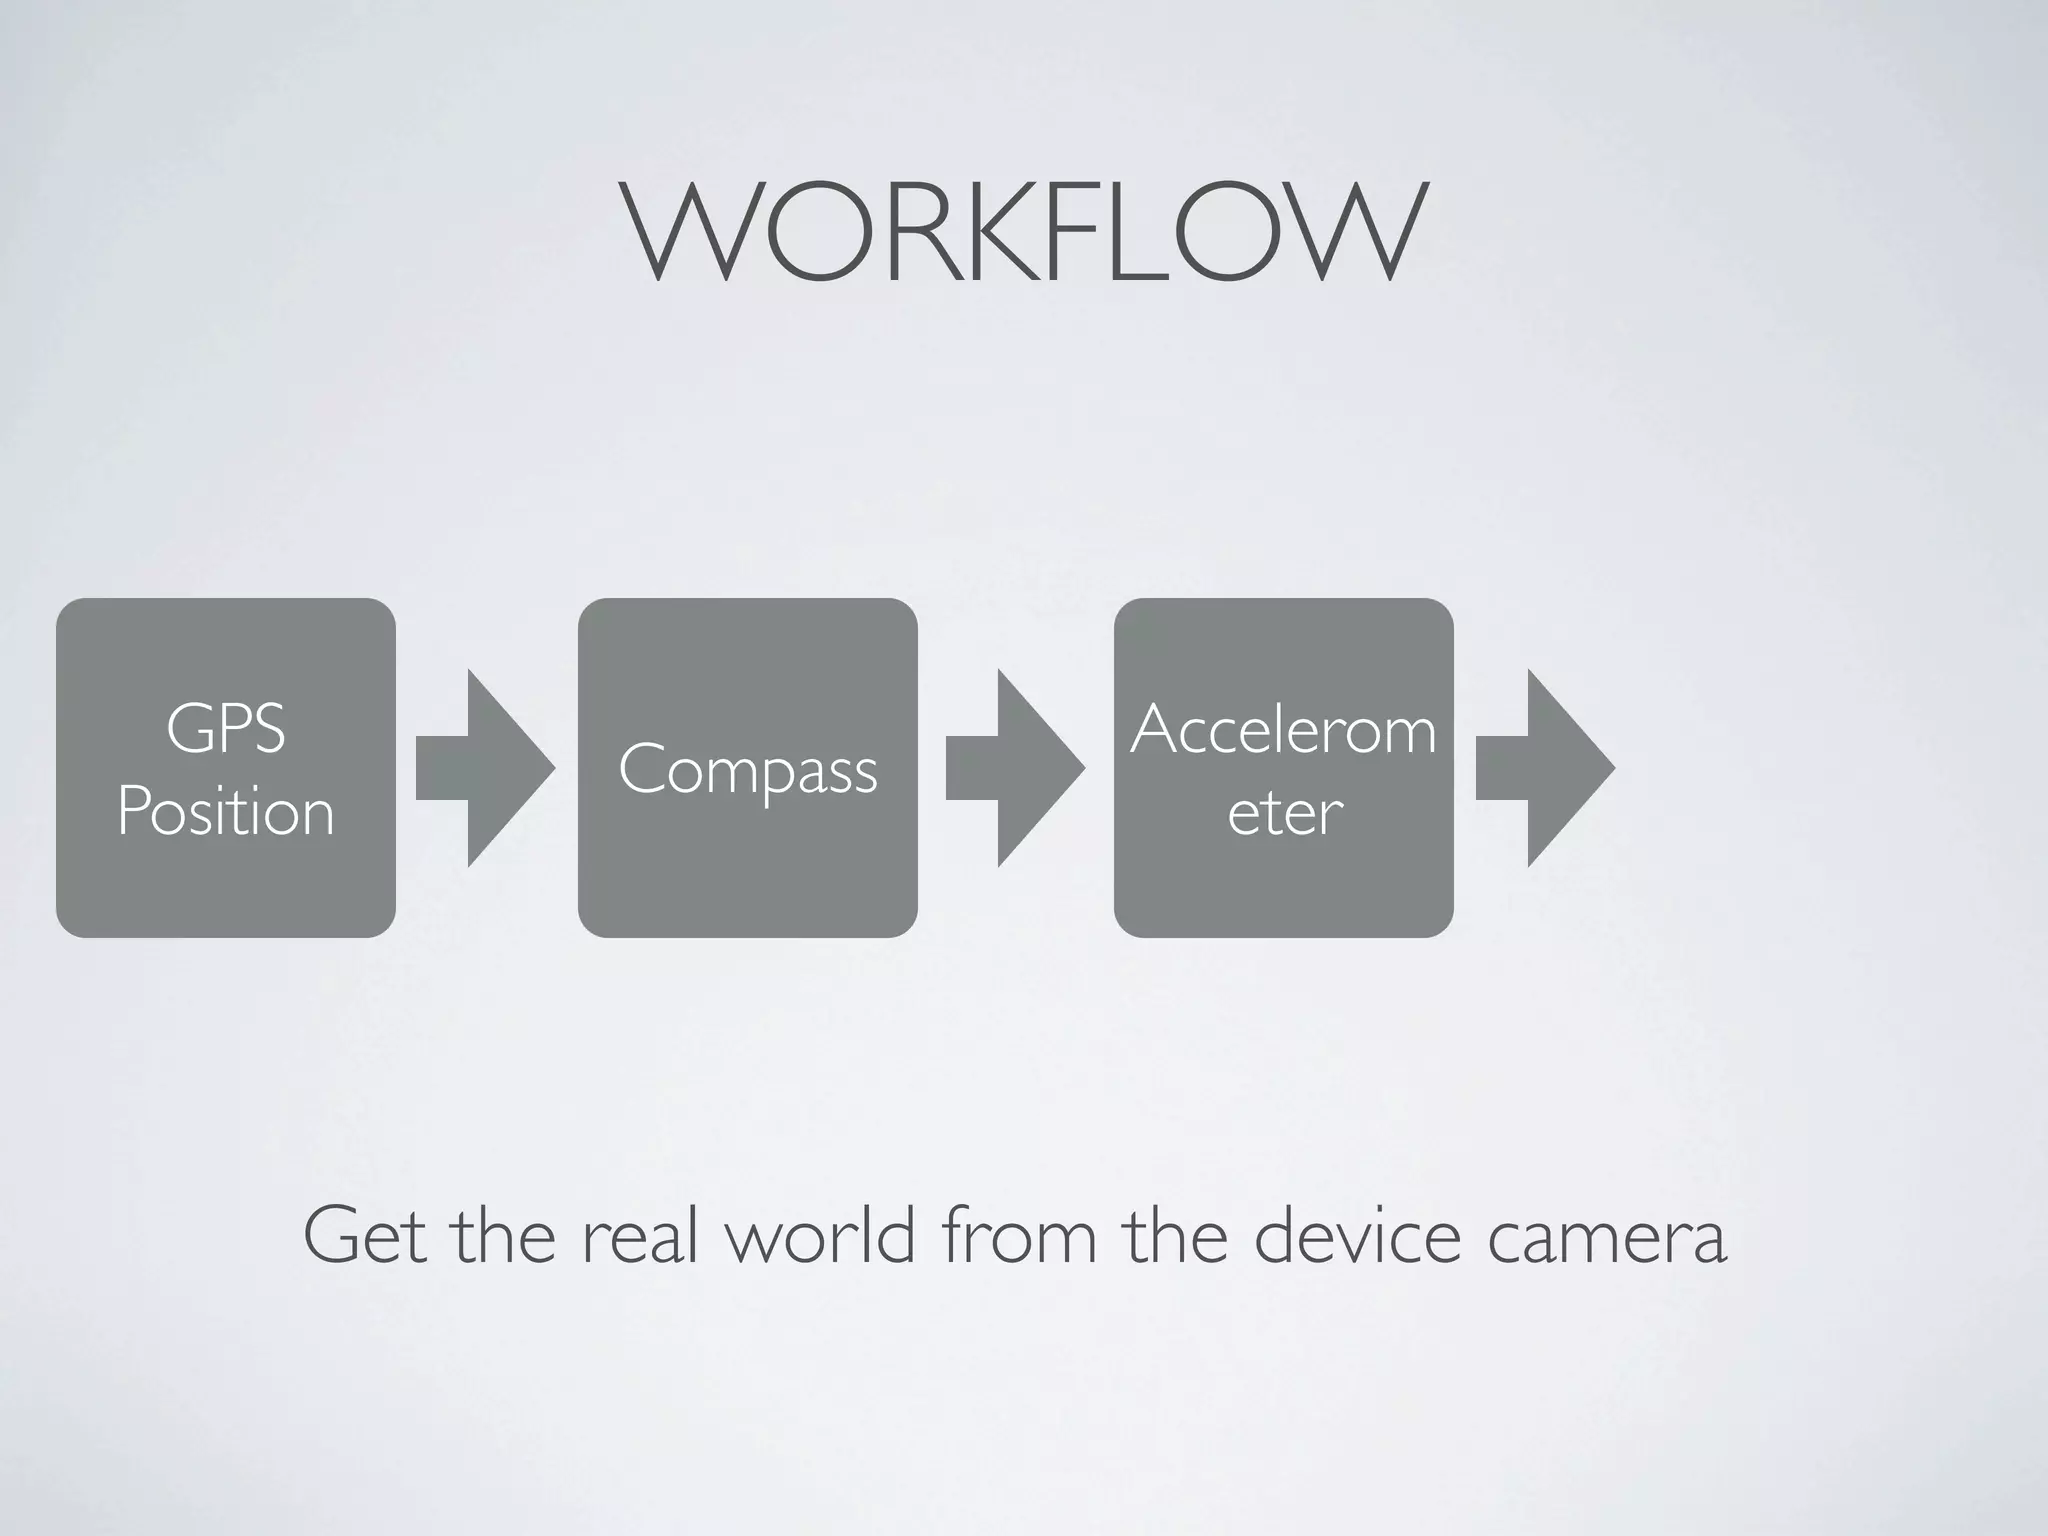
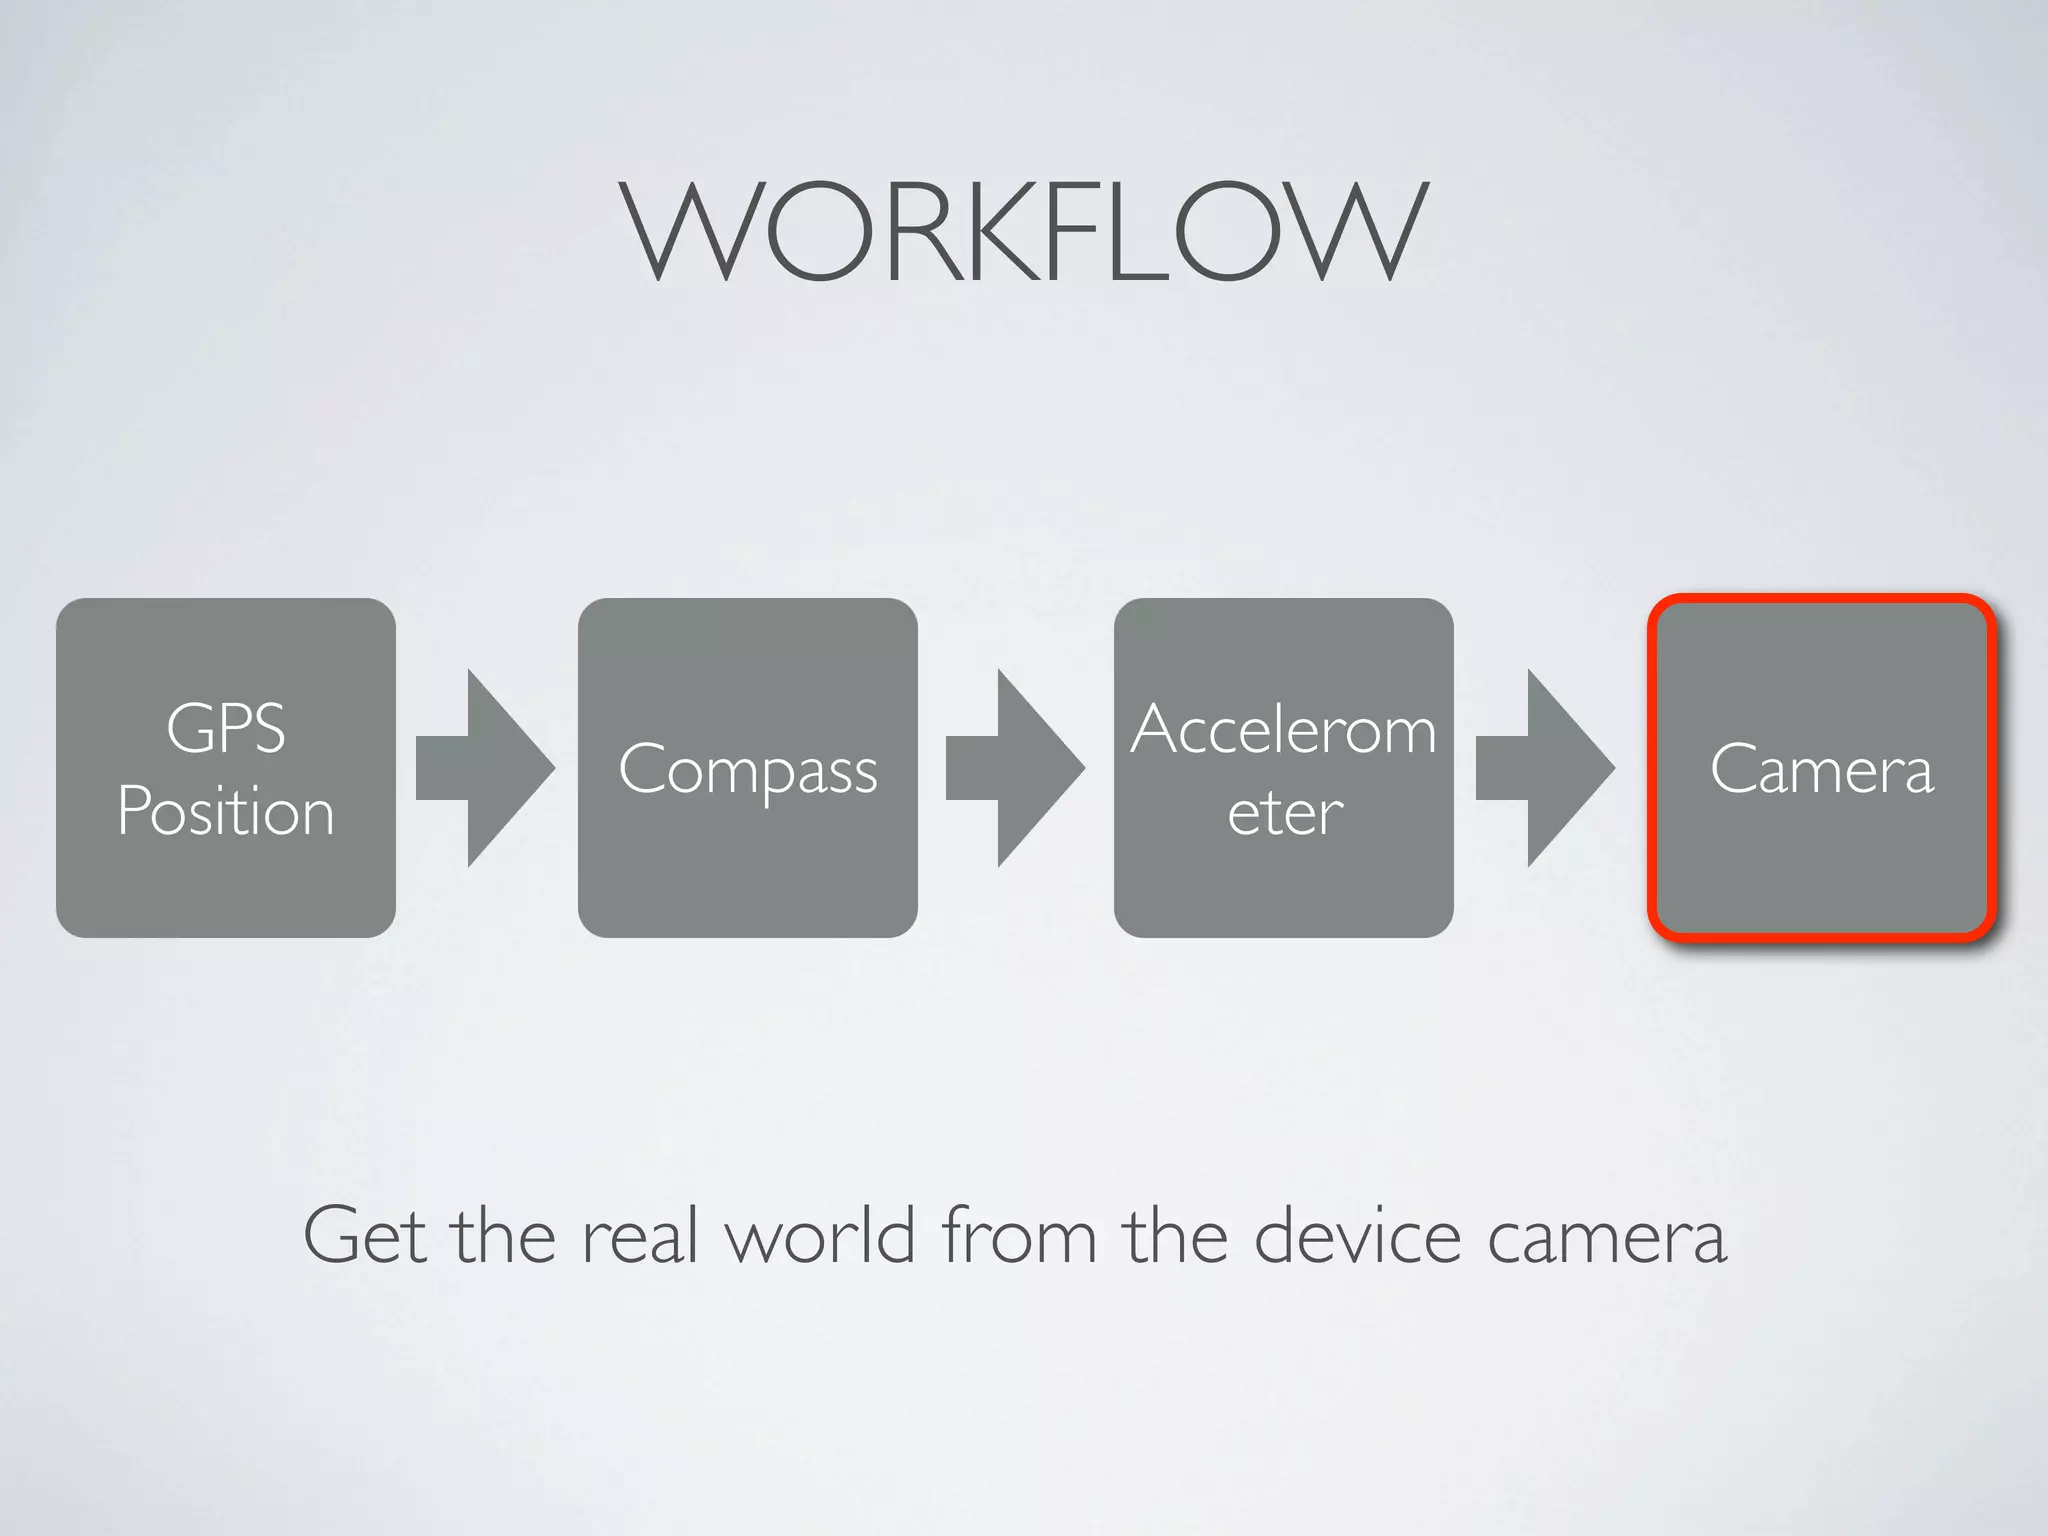
This document provides information on augmented reality (AR), including its definition, history, technologies used, and workflow. It defines AR as a live direct or indirect view of the physical real-world environment whose elements are augmented by computer-generated imagery. The history section outlines some key developments in AR from 1966 to present day. It also discusses the technologies used for tracking such as cameras, sensors and computer vision techniques. Finally, it describes the general workflow for an AR application including retrieving GPS position, orientation, acceleration and camera image.


