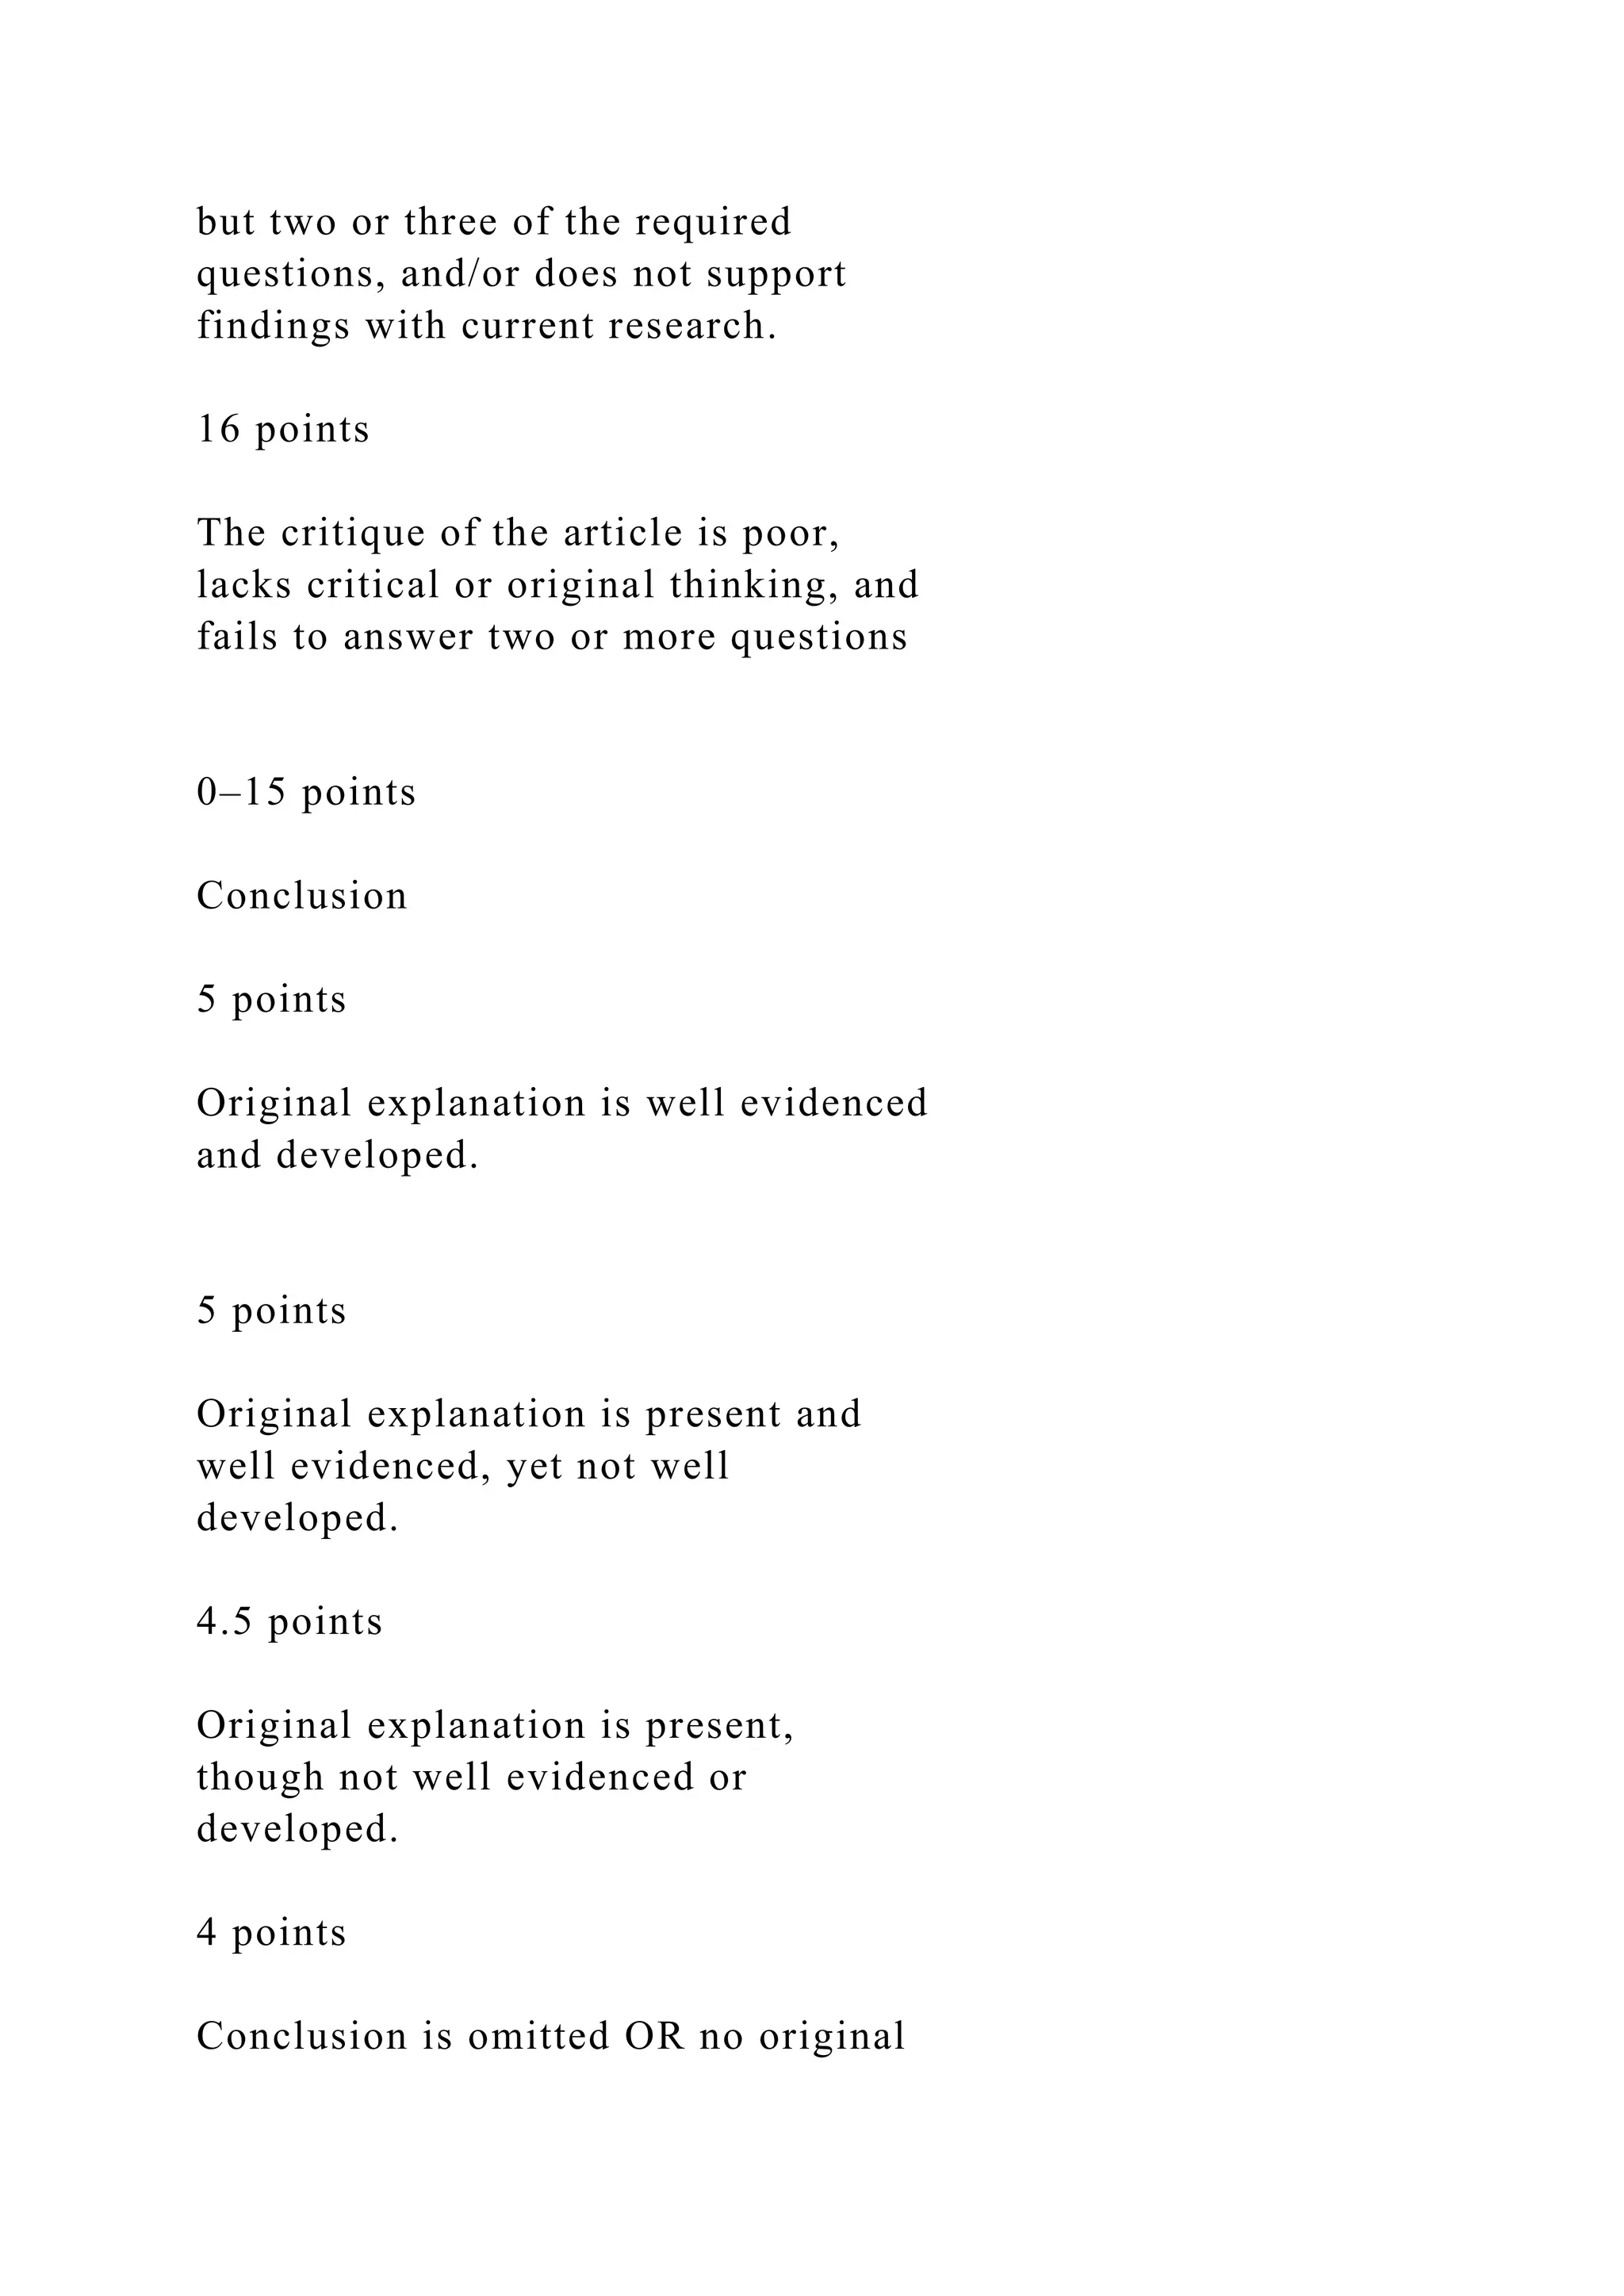
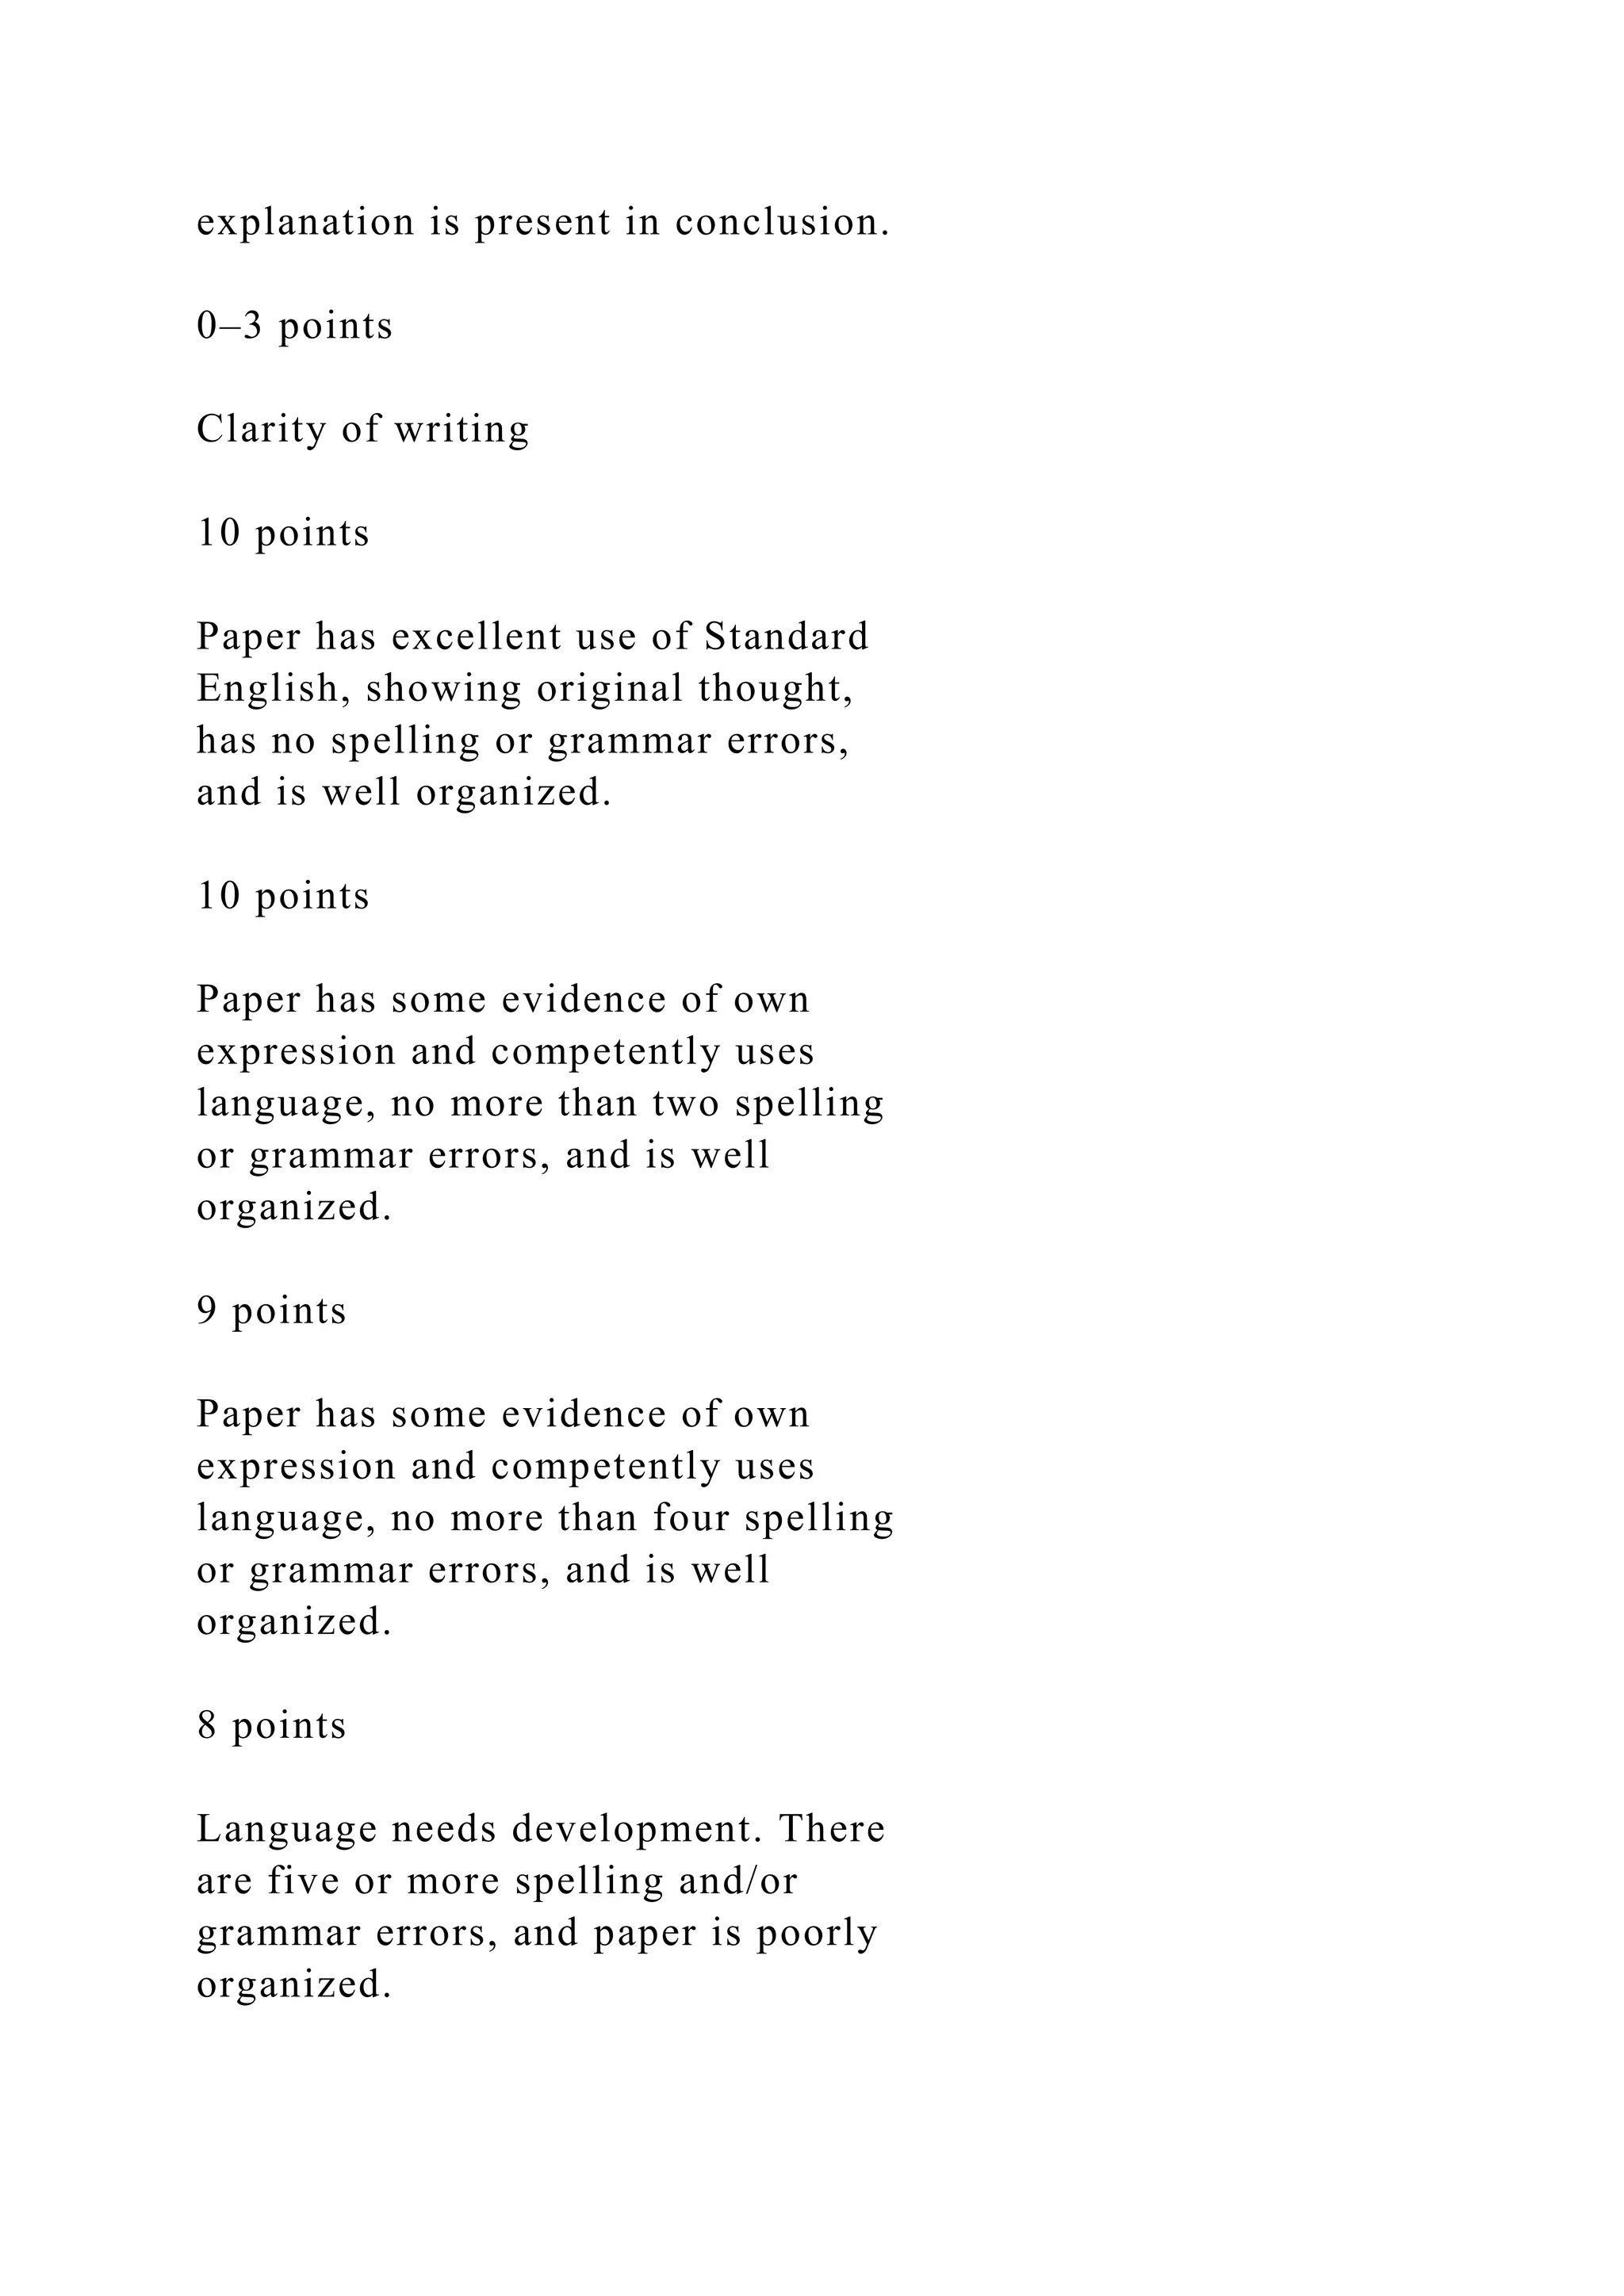
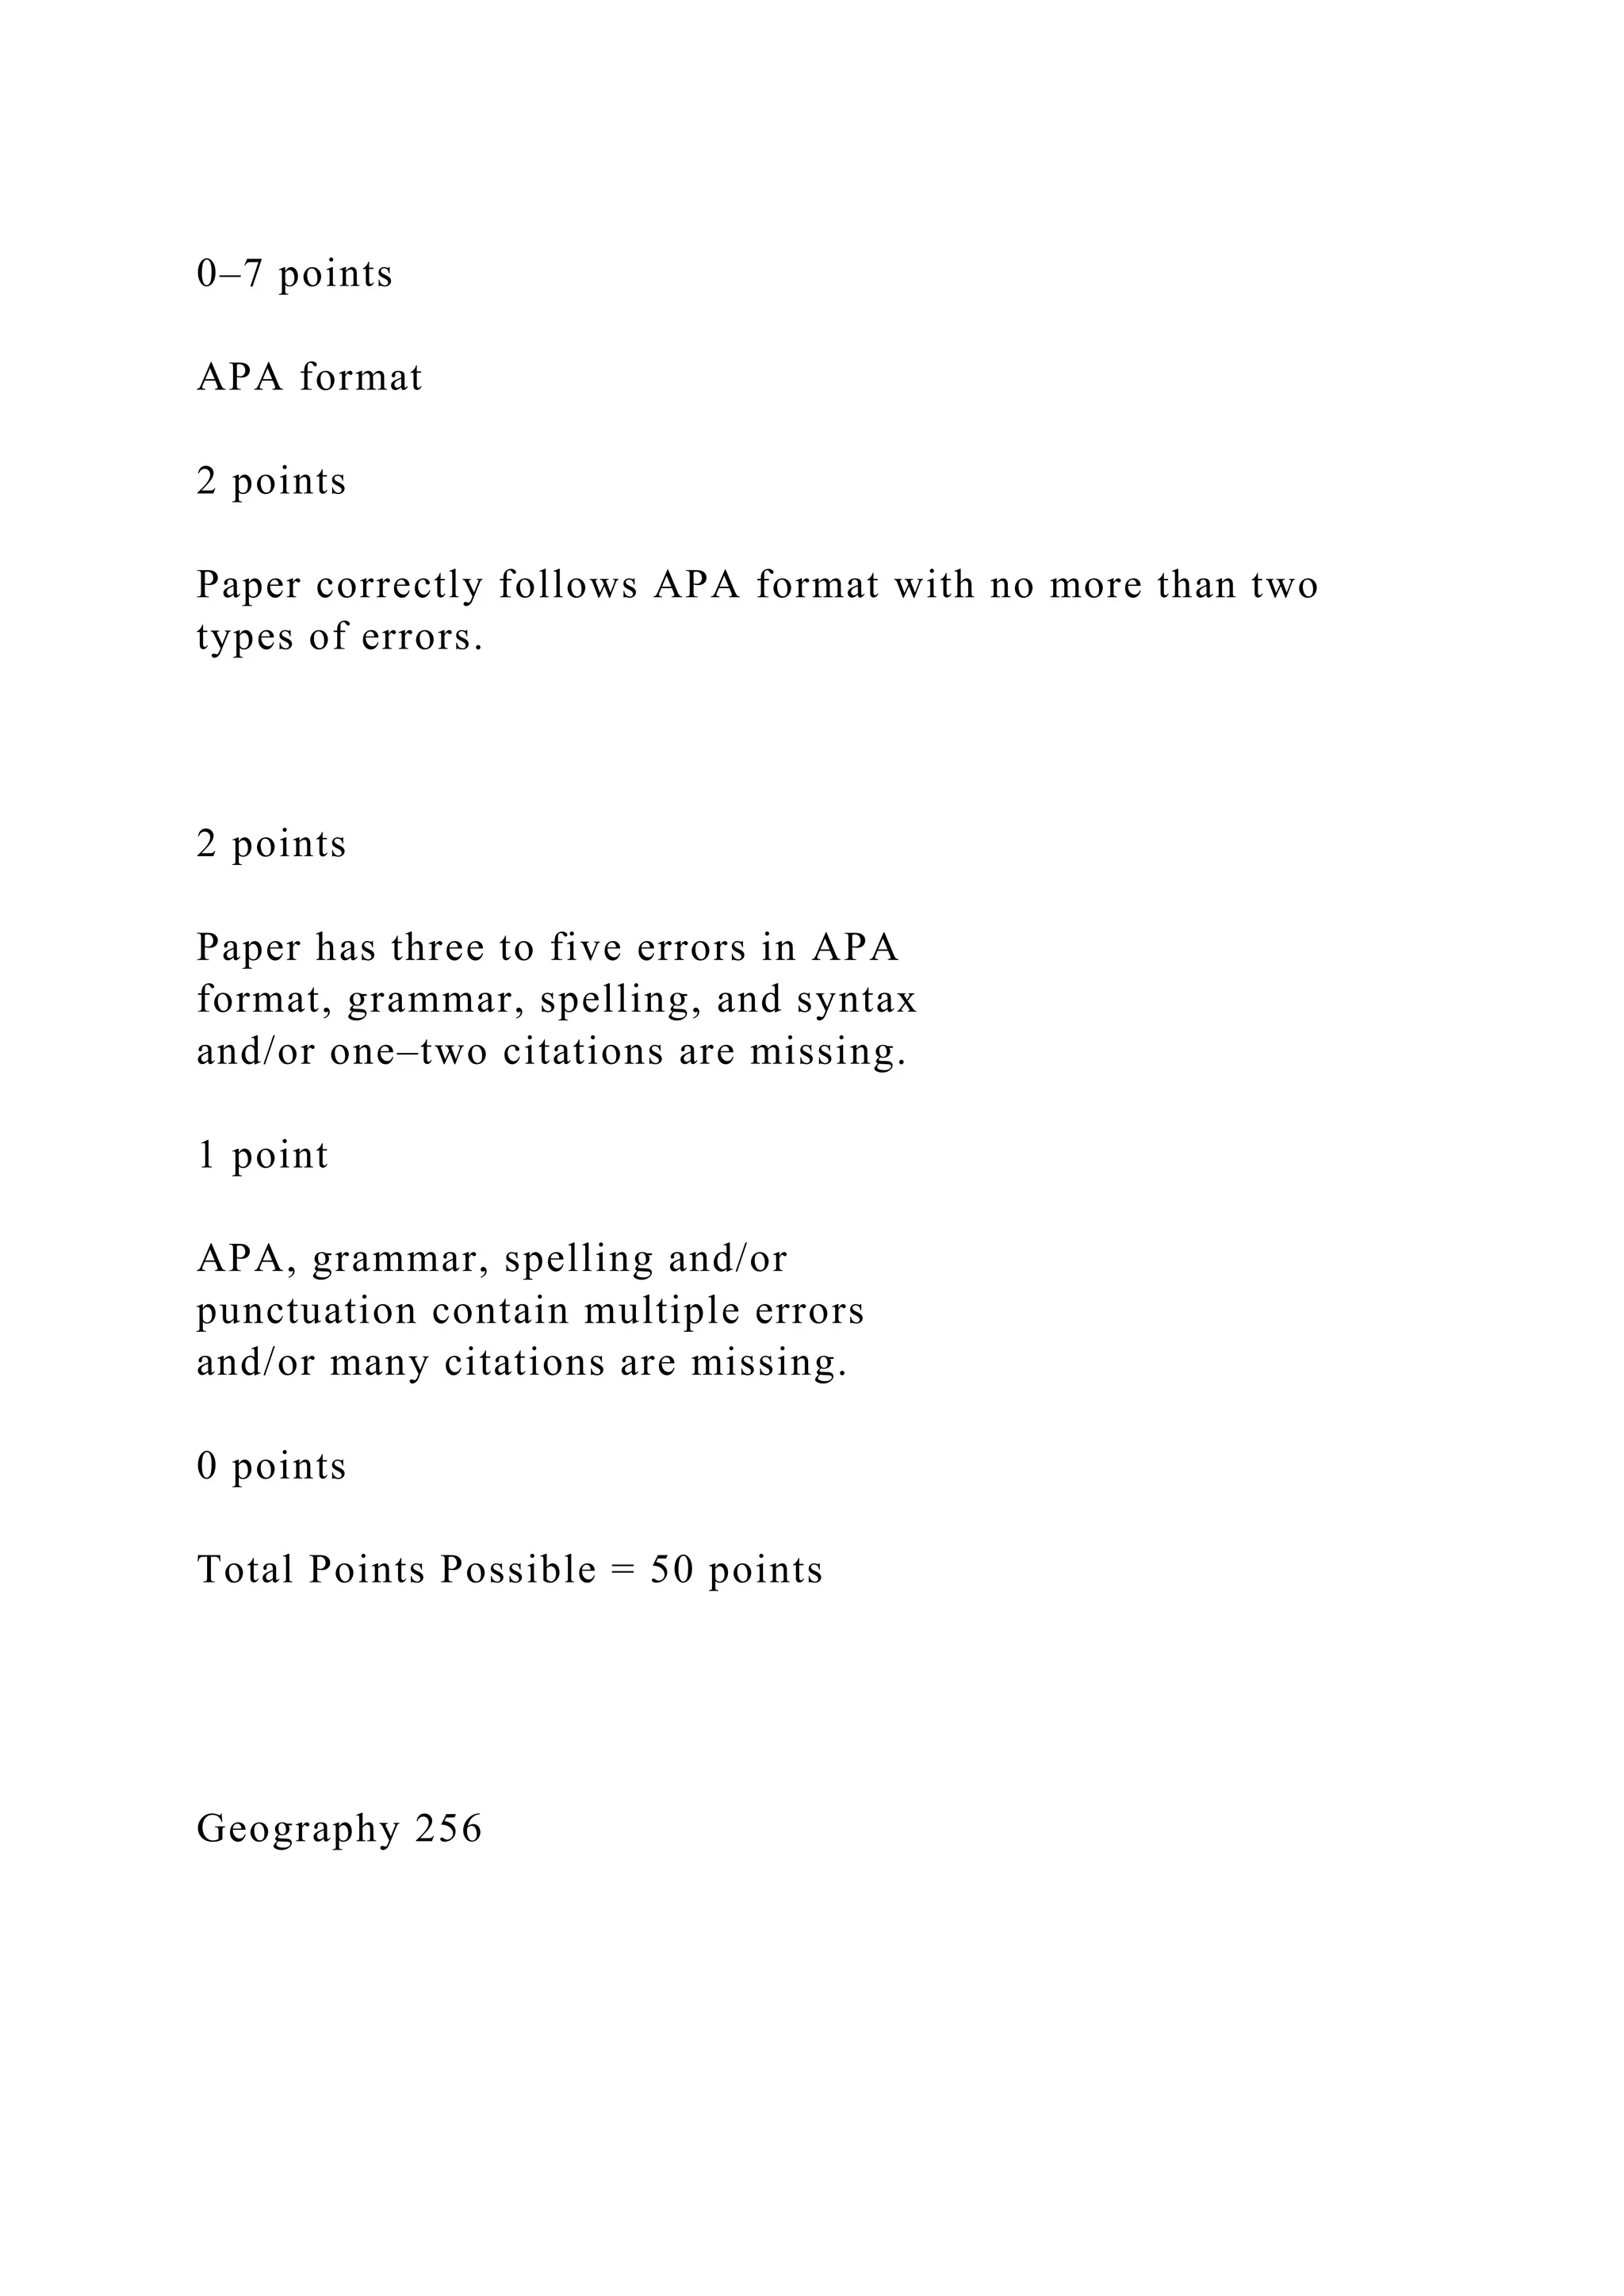
Assignment Guidelines NR224 Fundamentals - Skills
NR224 Safety Goals RUA.docx Revised 06/14/2016
BME 1
Required Uniform Assignment: National Patient Safety Goals
PURPOSE
This exercise is designed to increase the students' awareness of
the National Patient Safety Goals developed
by The Joint Commission. Specifically, this assignment will
introduce the Speak Up Initiatives, an award-
winning patient safety program designed to help patients
promote their own safety by proactively taking
charge of their healthcare.
COURSE OUTCOMES
This assignment enables the student to meet the following
course outcomes.
CO #2: Apply the concepts of health promotion and illness
prevention in the laboratory setting. (PO #2)
CO #8: Explain the rationale for selected nursing interventions
based upon current nursing literature. (PO
#8)
DUE DATE
Week 6
Campus: As directed by your faculty member
Online: As directed by your faculty member
POINTS
50 points
REQUIREMENTS
1. Select a Speak Up brochure developed by The Joint
Commission. Follow this link to the proper
website:
http://www.jointcommission.org/topics/speakup_brochures.aspx
.
2. Write a short paper reviewing the brochure. Use the Grading
Criteria (below) to structure your
critique, and include current nursing or healthcare research to
support your critique.
a. The length of the paper is to be no greater than three pages,
double spaced, excluding title
page and reference page. Extra pages will not be read and will
not count toward your grade.
3. This assignment will be graded on quality of information
presented, use of citations, and use of
Standard English grammar, sentence structure, and organization
based on the required components.
4. Create the review using Microsoft Word 2007 (a part of
Microsoft Office 2007), the required format for
all Chamberlain documents. You can tell that the document is
saved as a MS Word 2007 document
because it will end in “.docx.”
5. Any questions about this paper may be discussed in the
weekly Q & A Forum in your online course or
directly with your faculty member if you are taking NR224 on
campus.
6. APA format is required with both a title page and reference
page. Use the required components of the
review as Level 1 headers (upper- and lowercase, bold,
centered).
a. Introduction
b. Summary of Brochure
c. Evaluation of Brochure
d. Conclusion
PREPARING THE PAPER
The following are the best practices in preparing this paper.
1) Read the brochure carefully and take notes. Highlighting
important points has been helpful to many
students.
http://www.jointcommission.org/topics/speakup_brochures.aspx
Assignment Guidelines NR224 Fundamentals - Skills
NR224 Safety Goals RUA.docx Revised 06/14/2016
BME 2
2) Title page: Include title of your paper, your name,
Chamberlain College of Nursing, NR224
Fundamentals—Skills, faculty name, and the date. Center all
items between the left and right
margins, beginning approximately 3 inches from the top margin.
NOTE: This style of cover page is required by the college and is
a variance of APA formatting.
3) Use the CCN library or online library to find current nursing
research that supports your findings.
4) The brochure you select must be properly cited in the body of
your paper and on the reference list.
DIRECTIONS AND GRADING CRITERIA
Category Points % Description
Introduction 3 6 This first part of your paper should be one
paragraph that includes
the brochure title, date published, and your understanding of
who
the information would benefit.
Summary of the
brochure's
recommendations
10 20 Summary of brochure must include
1. main topics discussed; and
2. how communication between patients and healthcare
providers
is encouraged.
Evaluation of the
brochure
20 40 Critique the brochure. Include a full one- to two-page
critique that
answers all of the following questions.
1. What was done well, and what could have been improved in
the brochure?
2. Why did this topic interest you?
3. Was the information provided in the brochure beneficial?
Could
you incorporate it in your patient education?
4. Was the information presented clearly?
5. Did current nursing or healthcare related research support the
information presented in the brochure?
6. What population or individuals does this article apply to (i.e.,
who will benefit the most from this brochure)? Who else can
use this information?
7. Will this information increase patient safety? Defend your
answer.
Conclusion 5 10 An effective conclusion identifies the main
ideas and major support
points from the body of your report. Minor details are left out.
Summarize the benefits of following the brochure's advice to a
person at risk.
Clarity of writing 10 20 Use Standard English grammar and
sentence structure. No spelling
or typographical errors (typos) are present. The paper is
organized
around required components, using appropriate headers.
APA format 2 4 All information taken from another source,
even if summarized, must
be cited in the paper and listed in the references using (APA
sixth
ed.) format.
1. Document setup
2. Title and reference pages.
3. Citations in the text and reference page.
Total 50 100%
Assignment Guidelines NR224: Fundamentals-Skills
NR224 Safety Goals RUA.docx Revised 06/14/2016
BME 3
GRADING RUBRIC
Assignment Criteria Outstanding or Highest Level
of Performance
A (92–100%)
Very Good or High Level of
Performance
B (84–91%)
Competent or Satisfactory
Level of Performance
C (76–83%)
Poor, Failing or Unsatisfactory
Level of Performance
F (0–75%)
Introduction
3 points
Introduction provides a full and complete identification of the
brochure, including the brochure title, date published, and
understanding of who the information would benefit.
3 points
Partial identification of required
elements OR introduction contains no
required elements OR no introduction
0–2 points
Summary of the
article
10 points
Summary is complete and thoroughly
covers all required elements.
10 points
Summary is complete and is missing
no more than one required element.
9 points
Summary is complete and is missing
no more than two required elements.
8 points
Summary is incomplete or not
included and is missing more than
one required element.
0–7 points
Evaluation of the
Article
20 points
Critique of article demonstrates
critical thinking and answers all
required questions and supported
findings with current nursing
research.
19–20 points
Critique demonstrates basic
understanding of article, answers all
but one of the required questions,
and/or does not support findings with
current research.
17–18 points
Critique demonstrates basic
understanding of article, answers all
but two or three of the required
questions, and/or does not support
findings with current research.
16 points
The critique of the article is poor,
lacks critical or original thinking, and
fails to answer two or more questions
0–15 points
Conclusion
5 points
Original explanation is well evidenced
and developed.
5 points
Original explanation is present and
well evidenced, yet not well
developed.
4.5 points
Original explanation is present,
though not well evidenced or
developed.
4 points
Conclusion is omitted OR no original
explanation is present in conclusion.
0–3 points
Clarity of writing
10 points
Paper has excellent use of Standard
English, showing original thought,
has no spelling or grammar errors,
and is well organized.
10 points
Paper has some evidence of own
expression and competently uses
language, no more than two spelling
or grammar errors, and is well
organized.
9 points
Paper has some evidence of own
expression and competently uses
language, no more than four spelling
or grammar errors, and is well
organized.
8 points
Language needs development. There
are five or more spelling and/or
grammar errors, and paper is poorly
organized.
0–7 points
APA format
2 points
Paper correctly follows APA format with no more than two
types of errors.
2 points
Paper has three to five errors in APA
format, grammar, spelling, and syntax
and/or one–two citations are missing.
1 point
APA, grammar, spelling and/or
punctuation contain multiple errors
and/or many citations are missing.
0 points
Total Points Possible = 50 points
Geography 256
Instructions and answer sheet (Graded, 10 points)
Exercise 6: Distortion in Maps: distance and direction
Purpose: to explore distance and direction distortion in map
projections. To introduce GeoMedia GIS.
Problem: In the previous exercise we explored two of the ways
in which projections distort map objects. The distortional
effects of a map projection are often complex, especially with
respect to distance and direction. A particular projection may
be able to maintain distance relations along one orientation but
not along others, or maintain direction relations along a
standard line but not elsewhere.
In this exercise we continue to examine how projections change
our perception of the mapped world. The goal of this exercise
is visualize and measure changes in map distances and
directions as you change projections.
Materials and Methods: Copy Exer6 folder out of the X:// drive
and paste it into your Z:// drive. Navigate to your Z:// drive and
open the project Exer6 and examine its content. Exercise 6
consists of a U.S. base map and two sets of reference lines
assembled in a GeoMedia GIS project. The US data have 3
layers: states, rivers, and major cities. Notice again how this
GIS software distinguishes each layer as point, line, or polygon
data by symbolization in the legend. There are other two-line
feature layers: LatLon_grid maps meridians and parallels, and
Rhumb_Lines represents airline routes between major U.S.
cities.
In this lab, you will change the projection of the map and
observe what happens to the length and orientation of
meridians, parallels and Rhumb_Lines features. As you change
the projection, the scale of the map will also change. In order
to make valid comparisons of length and orientation between
projections you’ll need to make sure that the re-projected maps
are displayed at the same scale. To re-scale the maps, Open
“Map Display” in the Home menu tab. “Display scale” should
read 1:30,000,000 and “Nominal map scale” should read
1:50,000. If either of these is incorrect, change the entry in the
box to the correct value and hit the Apply button; then Close.
Use the “Pan” (Note: the “Pan” tool is the little hand, found in
the Home menu) tool to center the U.S. within the map window.
NOTE: When you open GeoMedia, an Error Message will
sometimes occur. In this error message, click BROWSE. Go to
your Z:// drive and open Exer6 folder. In this folder, open
WAREHOUSES and select Exer6. Click OK. The map should
display in GeoMedia.
The table on the next page identifies the various map
projections you will explore. To access the map projection tool,
open Coordinate System (next to Map Display)from the Home
menu tab. Notice that this first map is “unprojected” – the
General tab is marked Geographic (radio button) and the
Projection Space tab is inactive (pull-down menu). Verify that
the display scale is correct.
1. Choose at least two meridians, two parallels, and four rhumb
lines. For each projection you will measure the length and
angle of these eight lines. The simplest way to do that is to use
the coordinate display in GeoMedia. The display can be found
outside of the menu tabs—in the lower part of the display. By
default, the coordinate display is set to Lat, Lon. Use the pull
down list and change the coordinate display to the “Projected
distance, Azimuth.” Now click on one end of the line (Projected
distance & azimuth should read “0.0, 0:00:00.0”; move the
mouse to the other end of the line and read the projected
distance and azimuth. Note: this may already be changed to the
correct setting.) Record these measurements in the attached
table.
2. To re-project the map, change the entry on the General (in
Coordinate System) tab to Projection then choose an entry on
the Projection Space tab – scroll down the list to find the
projection you want. Choose one of the map projections from
the table. Verify the display scale (=1:30,000,000) and center
the map. Re-measure the same meridians, parallels and
Rhumb_Lines you measured the first time—using the same
starting points. Record your measurements.
3. For each projection, use Snapshot in the GeoMedia File
menu tab (left of the Home menu tab) and paste into your
answer sheet following the table. Make sure you label the name
of the projection beneath the image. Crop the image
appropriately and enlarge it so that you can read the graticule
lat-long labels.
4. Now do the same for each of the other projections. For the
Mollweide and Local Space Rectangular projections, you’ll
need to adjust the Projection parameters so that the projection is
centered on -90º longitude. In the Projection Space tab, click on
Projection Parameters. Change the Longitude of Origin to -90.
Hit Ok and OK. The map should change. Be sure that you
change the display scale to 1:30,000,000 before measuring the
lines on each map.
Lab Report:
There are three parts to this lab report: the table, the projection
images, and the report. In several paragraphs, discuss what you
see happening to the lengths, orientations, and shapes of the
graticule & rhumb lines as the map projection changes; make
sure that you look up the definition of “rhumb line.” Submit
your summary table and projection images with the report.
Points:
Table: 6 points, Should have 64 entries.
Maps: 2 points, Should have 8 projections
Report: 2 points, 3 paragraphs (3 to 4 sentences each)
*When measuring the angle of everything (meridian, parallels,
& rhumb lines) pay attention to detail.
If you look at the rhumb lines below and see Cleveland ( San
Francisco make sure to get that angle and not San Francisco (
Cleveland…It does make a difference.
Also with the meridians and parallel define your line such as
65N,70W ( 45N,70W.
Exercise 6
Summary table of map projections & distortion measurements*
Line SegmentProjection
unprojected
Mercator
Miller Cylindrical
Albers Equal Area
Lambert Conformal Conic
(1SP)
Mollweide
(Longitude of origin = -90º)
Universal Transverse Mercator
Local Space Rectangular (Longitude of origin = -90º)
Projection surface:
plane
cylinder
cylinder
cone
cone
cylinder
cylinder
plane
length
angle
length
angle
length
angle
length
angle
length
angle
length
angle
length
angle
length
angle
meridian
#1
#2
parallel
#1
#2
Rhumb line: choose 4
Boston-Atlanta
Boston-Dallas
Boston-Seattle
Cleveland-San Francisco
Miami-Seattle
LA-Chicago
LA-Washington, DC
Phoenix-Minneapolis
* Choose at least 2 meridian lines, 2 parallel lines, and 4 rhumb
lines. Measure length and angles using Projected distance,
Azimuth coordinates.
Insert Projections, followed by the lab report, here.
270 degrees
180 degrees
90 degrees
0 degrees

Assignment Guidelines NR224 Fundamentals - Skills NR224 .docx

  • 1.
    Assignment Guidelines NR224Fundamentals - Skills NR224 Safety Goals RUA.docx Revised 06/14/2016 BME 1 Required Uniform Assignment: National Patient Safety Goals PURPOSE This exercise is designed to increase the students' awareness of the National Patient Safety Goals developed by The Joint Commission. Specifically, this assignment will introduce the Speak Up Initiatives, an award- winning patient safety program designed to help patients promote their own safety by proactively taking charge of their healthcare. COURSE OUTCOMES This assignment enables the student to meet the following course outcomes. CO #2: Apply the concepts of health promotion and illness prevention in the laboratory setting. (PO #2) CO #8: Explain the rationale for selected nursing interventions based upon current nursing literature. (PO #8) DUE DATE Week 6 Campus: As directed by your faculty member
  • 2.
    Online: As directedby your faculty member POINTS 50 points REQUIREMENTS 1. Select a Speak Up brochure developed by The Joint Commission. Follow this link to the proper website: http://www.jointcommission.org/topics/speakup_brochures.aspx . 2. Write a short paper reviewing the brochure. Use the Grading Criteria (below) to structure your critique, and include current nursing or healthcare research to support your critique. a. The length of the paper is to be no greater than three pages, double spaced, excluding title page and reference page. Extra pages will not be read and will not count toward your grade. 3. This assignment will be graded on quality of information presented, use of citations, and use of Standard English grammar, sentence structure, and organization based on the required components. 4. Create the review using Microsoft Word 2007 (a part of Microsoft Office 2007), the required format for all Chamberlain documents. You can tell that the document is saved as a MS Word 2007 document because it will end in “.docx.” 5. Any questions about this paper may be discussed in the
  • 3.
    weekly Q &A Forum in your online course or directly with your faculty member if you are taking NR224 on campus. 6. APA format is required with both a title page and reference page. Use the required components of the review as Level 1 headers (upper- and lowercase, bold, centered). a. Introduction b. Summary of Brochure c. Evaluation of Brochure d. Conclusion PREPARING THE PAPER The following are the best practices in preparing this paper. 1) Read the brochure carefully and take notes. Highlighting important points has been helpful to many students. http://www.jointcommission.org/topics/speakup_brochures.aspx Assignment Guidelines NR224 Fundamentals - Skills NR224 Safety Goals RUA.docx Revised 06/14/2016 BME 2 2) Title page: Include title of your paper, your name, Chamberlain College of Nursing, NR224 Fundamentals—Skills, faculty name, and the date. Center all items between the left and right margins, beginning approximately 3 inches from the top margin.
  • 4.
    NOTE: This styleof cover page is required by the college and is a variance of APA formatting. 3) Use the CCN library or online library to find current nursing research that supports your findings. 4) The brochure you select must be properly cited in the body of your paper and on the reference list. DIRECTIONS AND GRADING CRITERIA Category Points % Description Introduction 3 6 This first part of your paper should be one paragraph that includes the brochure title, date published, and your understanding of who the information would benefit. Summary of the brochure's recommendations 10 20 Summary of brochure must include 1. main topics discussed; and 2. how communication between patients and healthcare providers is encouraged. Evaluation of the brochure 20 40 Critique the brochure. Include a full one- to two-page critique that answers all of the following questions.
  • 5.
    1. What wasdone well, and what could have been improved in the brochure? 2. Why did this topic interest you? 3. Was the information provided in the brochure beneficial? Could you incorporate it in your patient education? 4. Was the information presented clearly? 5. Did current nursing or healthcare related research support the information presented in the brochure? 6. What population or individuals does this article apply to (i.e., who will benefit the most from this brochure)? Who else can use this information? 7. Will this information increase patient safety? Defend your answer. Conclusion 5 10 An effective conclusion identifies the main ideas and major support points from the body of your report. Minor details are left out. Summarize the benefits of following the brochure's advice to a person at risk. Clarity of writing 10 20 Use Standard English grammar and sentence structure. No spelling or typographical errors (typos) are present. The paper is organized around required components, using appropriate headers. APA format 2 4 All information taken from another source, even if summarized, must be cited in the paper and listed in the references using (APA
  • 6.
    sixth ed.) format. 1. Documentsetup 2. Title and reference pages. 3. Citations in the text and reference page. Total 50 100% Assignment Guidelines NR224: Fundamentals-Skills NR224 Safety Goals RUA.docx Revised 06/14/2016 BME 3 GRADING RUBRIC Assignment Criteria Outstanding or Highest Level of Performance A (92–100%) Very Good or High Level of Performance B (84–91%) Competent or Satisfactory Level of Performance C (76–83%) Poor, Failing or Unsatisfactory Level of Performance
  • 7.
    F (0–75%) Introduction 3 points Introductionprovides a full and complete identification of the brochure, including the brochure title, date published, and understanding of who the information would benefit. 3 points Partial identification of required elements OR introduction contains no required elements OR no introduction 0–2 points Summary of the article 10 points Summary is complete and thoroughly covers all required elements. 10 points Summary is complete and is missing no more than one required element. 9 points
  • 8.
    Summary is completeand is missing no more than two required elements. 8 points Summary is incomplete or not included and is missing more than one required element. 0–7 points Evaluation of the Article 20 points Critique of article demonstrates critical thinking and answers all required questions and supported findings with current nursing research. 19–20 points Critique demonstrates basic understanding of article, answers all but one of the required questions, and/or does not support findings with current research. 17–18 points Critique demonstrates basic understanding of article, answers all
  • 9.
    but two orthree of the required questions, and/or does not support findings with current research. 16 points The critique of the article is poor, lacks critical or original thinking, and fails to answer two or more questions 0–15 points Conclusion 5 points Original explanation is well evidenced and developed. 5 points Original explanation is present and well evidenced, yet not well developed. 4.5 points Original explanation is present, though not well evidenced or developed. 4 points Conclusion is omitted OR no original
  • 10.
    explanation is presentin conclusion. 0–3 points Clarity of writing 10 points Paper has excellent use of Standard English, showing original thought, has no spelling or grammar errors, and is well organized. 10 points Paper has some evidence of own expression and competently uses language, no more than two spelling or grammar errors, and is well organized. 9 points Paper has some evidence of own expression and competently uses language, no more than four spelling or grammar errors, and is well organized. 8 points Language needs development. There are five or more spelling and/or grammar errors, and paper is poorly organized.
  • 11.
    0–7 points APA format 2points Paper correctly follows APA format with no more than two types of errors. 2 points Paper has three to five errors in APA format, grammar, spelling, and syntax and/or one–two citations are missing. 1 point APA, grammar, spelling and/or punctuation contain multiple errors and/or many citations are missing. 0 points Total Points Possible = 50 points Geography 256
  • 12.
    Instructions and answersheet (Graded, 10 points) Exercise 6: Distortion in Maps: distance and direction Purpose: to explore distance and direction distortion in map projections. To introduce GeoMedia GIS. Problem: In the previous exercise we explored two of the ways in which projections distort map objects. The distortional effects of a map projection are often complex, especially with respect to distance and direction. A particular projection may be able to maintain distance relations along one orientation but not along others, or maintain direction relations along a standard line but not elsewhere. In this exercise we continue to examine how projections change our perception of the mapped world. The goal of this exercise is visualize and measure changes in map distances and directions as you change projections. Materials and Methods: Copy Exer6 folder out of the X:// drive and paste it into your Z:// drive. Navigate to your Z:// drive and open the project Exer6 and examine its content. Exercise 6 consists of a U.S. base map and two sets of reference lines assembled in a GeoMedia GIS project. The US data have 3 layers: states, rivers, and major cities. Notice again how this GIS software distinguishes each layer as point, line, or polygon data by symbolization in the legend. There are other two-line feature layers: LatLon_grid maps meridians and parallels, and Rhumb_Lines represents airline routes between major U.S. cities.
  • 13.
    In this lab,you will change the projection of the map and observe what happens to the length and orientation of meridians, parallels and Rhumb_Lines features. As you change the projection, the scale of the map will also change. In order to make valid comparisons of length and orientation between projections you’ll need to make sure that the re-projected maps are displayed at the same scale. To re-scale the maps, Open “Map Display” in the Home menu tab. “Display scale” should read 1:30,000,000 and “Nominal map scale” should read 1:50,000. If either of these is incorrect, change the entry in the box to the correct value and hit the Apply button; then Close. Use the “Pan” (Note: the “Pan” tool is the little hand, found in the Home menu) tool to center the U.S. within the map window. NOTE: When you open GeoMedia, an Error Message will sometimes occur. In this error message, click BROWSE. Go to your Z:// drive and open Exer6 folder. In this folder, open WAREHOUSES and select Exer6. Click OK. The map should display in GeoMedia. The table on the next page identifies the various map projections you will explore. To access the map projection tool, open Coordinate System (next to Map Display)from the Home menu tab. Notice that this first map is “unprojected” – the General tab is marked Geographic (radio button) and the Projection Space tab is inactive (pull-down menu). Verify that the display scale is correct. 1. Choose at least two meridians, two parallels, and four rhumb lines. For each projection you will measure the length and angle of these eight lines. The simplest way to do that is to use the coordinate display in GeoMedia. The display can be found outside of the menu tabs—in the lower part of the display. By default, the coordinate display is set to Lat, Lon. Use the pull down list and change the coordinate display to the “Projected distance, Azimuth.” Now click on one end of the line (Projected distance & azimuth should read “0.0, 0:00:00.0”; move the
  • 14.
    mouse to theother end of the line and read the projected distance and azimuth. Note: this may already be changed to the correct setting.) Record these measurements in the attached table. 2. To re-project the map, change the entry on the General (in Coordinate System) tab to Projection then choose an entry on the Projection Space tab – scroll down the list to find the projection you want. Choose one of the map projections from the table. Verify the display scale (=1:30,000,000) and center the map. Re-measure the same meridians, parallels and Rhumb_Lines you measured the first time—using the same starting points. Record your measurements. 3. For each projection, use Snapshot in the GeoMedia File menu tab (left of the Home menu tab) and paste into your answer sheet following the table. Make sure you label the name of the projection beneath the image. Crop the image appropriately and enlarge it so that you can read the graticule lat-long labels. 4. Now do the same for each of the other projections. For the Mollweide and Local Space Rectangular projections, you’ll need to adjust the Projection parameters so that the projection is centered on -90º longitude. In the Projection Space tab, click on Projection Parameters. Change the Longitude of Origin to -90. Hit Ok and OK. The map should change. Be sure that you change the display scale to 1:30,000,000 before measuring the lines on each map. Lab Report: There are three parts to this lab report: the table, the projection images, and the report. In several paragraphs, discuss what you see happening to the lengths, orientations, and shapes of the graticule & rhumb lines as the map projection changes; make sure that you look up the definition of “rhumb line.” Submit your summary table and projection images with the report. Points:
  • 15.
    Table: 6 points,Should have 64 entries. Maps: 2 points, Should have 8 projections Report: 2 points, 3 paragraphs (3 to 4 sentences each) *When measuring the angle of everything (meridian, parallels, & rhumb lines) pay attention to detail. If you look at the rhumb lines below and see Cleveland ( San Francisco make sure to get that angle and not San Francisco ( Cleveland…It does make a difference. Also with the meridians and parallel define your line such as 65N,70W ( 45N,70W. Exercise 6 Summary table of map projections & distortion measurements*
  • 16.
    Line SegmentProjection unprojected Mercator Miller Cylindrical AlbersEqual Area Lambert Conformal Conic (1SP) Mollweide (Longitude of origin = -90º) Universal Transverse Mercator Local Space Rectangular (Longitude of origin = -90º) Projection surface: plane cylinder cylinder cone cone cylinder cylinder plane
  • 17.
  • 18.
  • 19.
  • 20.
  • 21.
  • 22.
  • 23.
  • 24.
  • 25.
    * Choose atleast 2 meridian lines, 2 parallel lines, and 4 rhumb lines. Measure length and angles using Projected distance, Azimuth coordinates. Insert Projections, followed by the lab report, here. 270 degrees 180 degrees 90 degrees 0 degrees