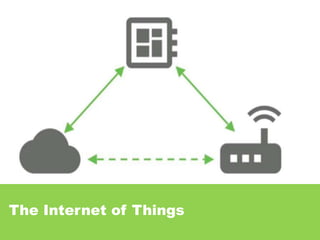
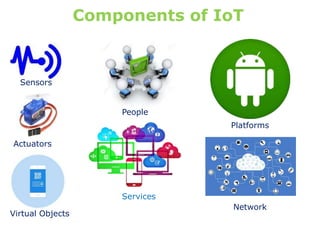
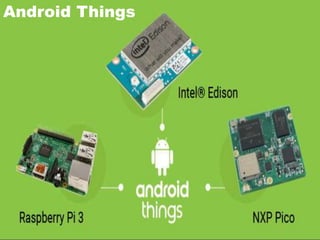
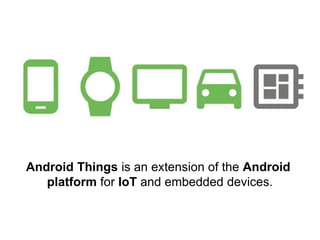
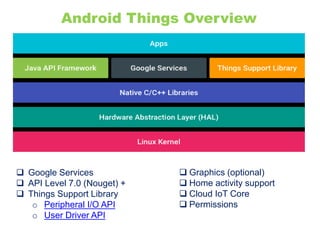
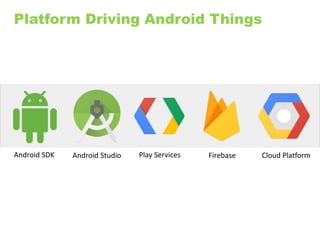
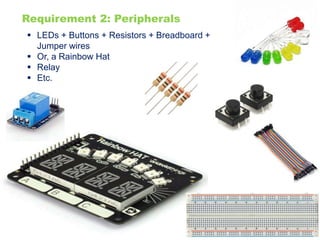
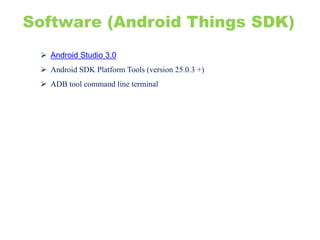
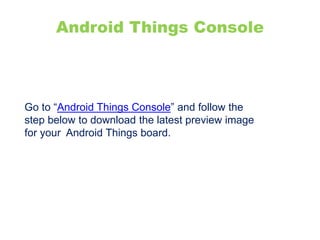
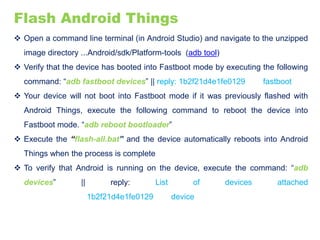
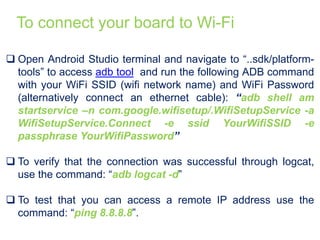
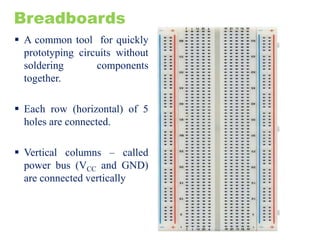
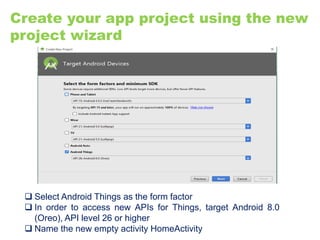
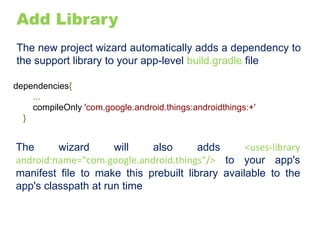
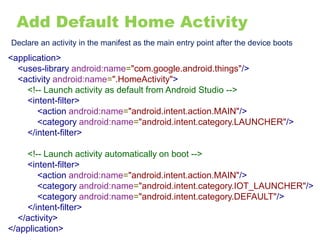
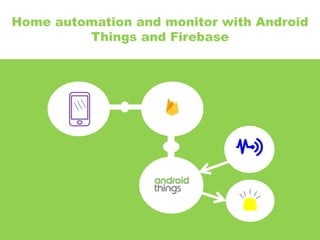
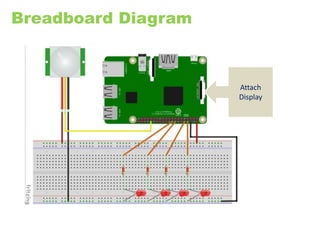
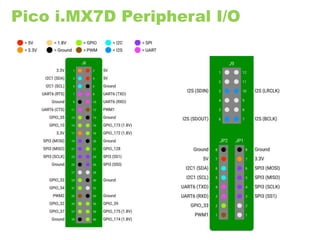
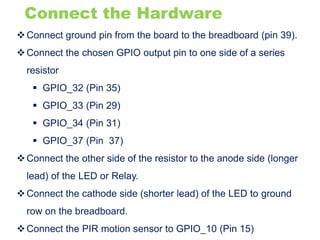
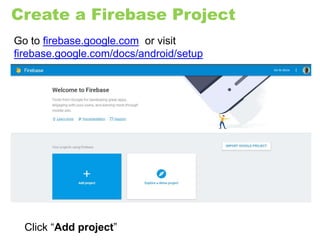
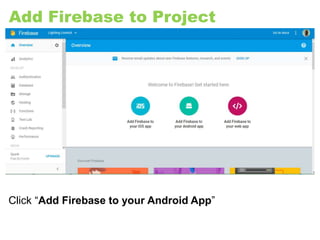
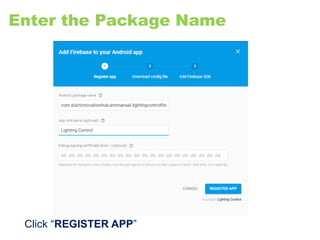
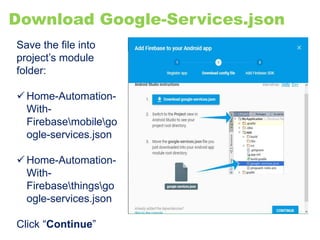
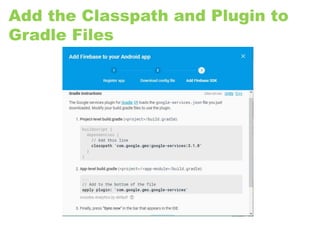
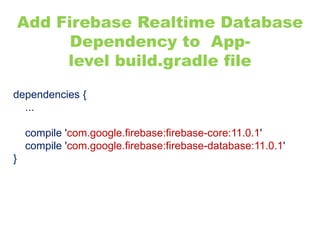
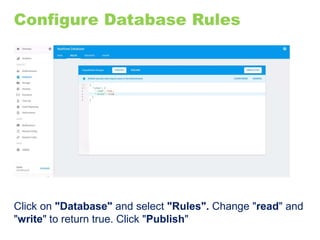
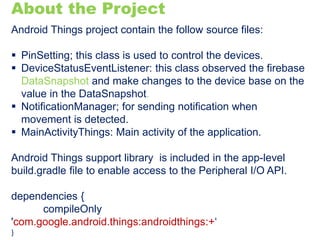
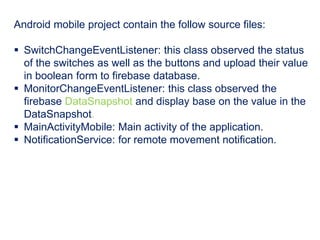
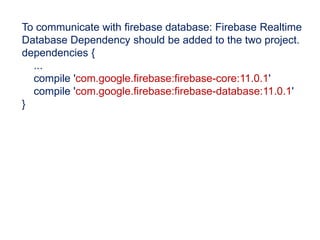
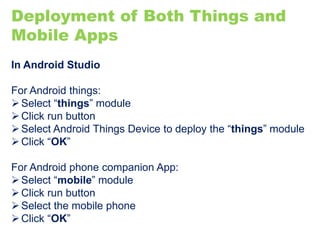
The Internet of Things
Architecture of IoT
Components of IoT
Sensors
Actuators
Virtual Objects
People
Services
Platforms
Network
Idea for powerful and Intelligence IoT devices
 Automatic Street Lighting system
 Smart Building Project
 Smart Water Monitoring System
 Cloud-ready temperature sensor
 Temperature and Humidity Monitor
 Smart Irrigation System
 Intelligent Traffic Information
System
 Smart Meters
 Smart Doorbells
 Multi Room Music Player
 Automatic Smart Parking System
 Home Automation
 Home Security Model
 Biometrics System
 Smart Home with Web Interface
 Wireless Sensor System
 Energy Monitors
 Asset Tracking
 Etc.
Android Things
Android Things is an extension of the Android
platform for IoT and embedded devices.
Android Things Overview
 Google Services
 API Level 7.0 (Nouget) +
 Things Support Library
o Peripheral I/O API
o User Driver API
 Graphics (optional)
 Home activity support
 Cloud IoT Core
 Permissions
Android SDK Android Studio Play Services Firebase Cloud Platform
Platform Driving Android Things
Google Cloud IoT Core
Allows you to easily and securely connect, manage, and
ingest data from millions of globally dispersed devices.
Google Play Services
Proprietary
background
service and API
package for
Android devices.
Firebase
Analytics, databases, messaging and crash reporting
TensorFlow
Add machine
learning into Android
Things apps.
Why should it be Android Things?
Google's IoT Developers Community
https://g.co/iotdev
Hackster.io Community
https://hackster.io/google
Android Things SDK
https://developer.android.com/things
Google’s IoT Solutions
https://iot.google.com/
Code Lab
https://codelabs.developers.google.com/?cat=IoT
Building Android Things Device
Requirement 1: The Board (any one)
Hardware (Developer Kits)
 NXP Pico i.MX7D (Recommended)
 NXP Pico i.MX6D
 Raspberry Pi 3
 Intel® Edison
 Intel® Joule
Requirement 2: Peripherals
 LEDs + Buttons + Resistors + Breadboard +
Jumper wires
 Or, a Rainbow Hat
 Relay
 Etc.
 Android Studio 3.0
 Android SDK Platform Tools (version 25.0.3 +)
 ADB tool command line terminal
Software (Android Things SDK)
Flash Android Things Device
Go to “Android Things Console” and follow the
step below to download the latest preview image
for your Android Things board.
Android Things Console
Create a New Product
 Enter your product name
 Select your board
 Set OEM partition size (must
be between 32 and 512 MB)
 Describe Your product and
 Click Create
Create new product
Create new factory image
Download the factory image to your system.
Unzip the image and copy all the files in the image folder to
directory ...Android/sdk/Platform-tools
Connect the Board
Connect a USB-C cable (Label 1) from host computer for Power and USB OTG
Flash Android Things
 Open a command line terminal (in Android Studio) and navigate to the unzipped
image directory ...Android/sdk/Platform-tools (adb tool)
 Verify that the device has booted into Fastboot mode by executing the following
command: “adb fastboot devices” || reply: 1b2f21d4e1fe0129 fastboot
 Your device will not boot into Fastboot mode if it was previously flashed with
Android Things, execute the following command to reboot the device into
Fastboot mode. “adb reboot bootloader”
 Execute the “flash-all.bat” and the device automatically reboots into Android
Things when the process is complete
 To verify that Android is running on the device, execute the command: “adb
devices” || reply: List of devices attached
1b2f21d4e1fe0129 device
Connecting Android Things device to Wi-Fi
Before connecting the board to a Wi-Fi network, attach an
external IPEX or u.FL Wi-Fi antenna to the board as shown
To connect your board to Wi-Fi
 Open Android Studio terminal and navigate to “..sdk/platform-
tools” to access adb tool and run the following ADB command
with your WiFi SSID (wifi network name) and WiFi Password
(alternatively connect an ethernet cable): “adb shell am
startservice –n com.google.wifisetup/.WifiSetupService -a
WifiSetupService.Connect -e ssid YourWifiSSID -e
passphrase YourWifiPassword”
 To verify that the connection was successful through logcat,
use the command: “adb logcat -d”
 To test that you can access a remote IP address use the
command: “ping 8.8.8.8”.
Basic Electronics
Breadboards
 A common tool for quickly
prototyping circuits without
soldering components
together.
 Each row (horizontal) of 5
holes are connected.
 Vertical columns – called
power bus (VCC and GND)
are connected vertically
Power supply
Power is the input voltage delivered to the components on the
board from an external source such as a wall adapter,
battery, or USB port.
The following signals are provided to the board via power
supply:
VIN - Voltage of external source connected to the board
VCC or VDD - Internal regulated voltage powering the
components on the board (+5V, +3V, and +1.8V).
Ground (GND) - Reference point for 0 volts on the
board.
To shut down a board, disconnect the power supply.
Analog and Digital I/O
Input/output
 Input pins allow your device app to read and interpret the current
electrical state.
 Output pins allow your device app to control the electrical state of the
pins.
Analog
 Analog signals are signal that can be a full range of values , example is
a temperature sensor.
 Analog inputs translate a discrete voltage level into a proportional
integer value using an analog-to-digital converter (ADB).
Digital
Digital logic represents a voltage signal as a binary value:
 High: When the voltage is at or near VCC. Represented as a logical
“1”.
 Low: When the voltage is at or near ground. Represented as a logical
“0”.
Android of Things Supported
Peripherals
 GPIO - General Purpose Inputs/Outputs
 PWM - Digital to Analog Output
 Serial Communication
o I2C (synchronous , 2 wires, up to 127 peripherals, low speed)
o SPI (synchronous , 4+ wires, unlimited peripherals, high speed)
o UART (asynchronous, 2 or 4 , only 1 peripheral, medium speed)
GPIO: Input and Output
Create Android Things Project in
Android Studio
Create your app project using the new
project wizard
 Select Android Things as the form factor
 In order to access new APIs for Things, target Android 8.0
(Oreo), API level 26 or higher
 Name the new empty activity HomeActivity
Add Library
The new project wizard automatically adds a dependency to
the support library to your app-level build.gradle file
dependencies{
...
compileOnly 'com.google.android.things:androidthings:+'
}
The wizard will also adds <uses-library
android:name="com.google.android.things"/> to your app's
manifest file to make this prebuilt library available to the
app's classpath at run time
Add Default Home Activity
Declare an activity in the manifest as the main entry point after the device boots
<application>
<uses-library android:name="com.google.android.things"/>
<activity android:name=".HomeActivity">
<!-- Launch activity as default from Android Studio -->
<intent-filter>
<action android:name="android.intent.action.MAIN"/>
<category android:name="android.intent.category.LAUNCHER"/>
</intent-filter>
<!-- Launch activity automatically on boot -->
<intent-filter>
<action android:name="android.intent.action.MAIN"/>
<category android:name="android.intent.category.IOT_LAUNCHER"/>
<category android:name="android.intent.category.DEFAULT"/>
</intent-filter>
</activity>
</application>
Demo Project
Home automation and monitor with Android
Things and Firebase
Project Description
Android things base project to remotely control appliances and
monitor movement via mobile phone with notification.
Things to be use in this project
 Hardware components:
NXP Pico i.MX7D x 1
LED x 4
Resistor 220R x 4
Breadboard x 1
Jumper wires x 10
TechNexion 5 inch Multitouch Display x 1
4 channel Relay Board x 1
PIR Motion Sensor x 1
 Android device
 Google Android Studio
 Online Service (Firebase)
 Internet
Attach
Display
Breadboard Diagram
Pico i.MX7D Peripheral I/O
Connect the Hardware
Connect ground pin from the board to the breadboard (pin 39).
Connect the chosen GPIO output pin to one side of a series
resistor
 GPIO_32 (Pin 35)
 GPIO_33 (Pin 29)
 GPIO_34 (Pin 31)
 GPIO_37 (Pin 37)
Connect the other side of the resistor to the anode side (longer
lead) of the LED or Relay.
Connect the cathode side (shorter lead) of the LED to ground
row on the breadboard.
Connect the PIR motion sensor to GPIO_10 (Pin 15)
Set up the Project
Download or clone demo project from
https://github.com/emotexplanet/Home-Automation-With-Firebase.
The repository consists of 2 project:
 Mobile: the companion app that runs on android phone. It has four
switches to turn individual light on and off, as well as two buttons,
one to turn all the lights on and one button to turn all the lights off.
And a field to monitor remote movement.
 Things: the project runs on Android Things device to control the
electrical appliances through the Peripheral I/O GPIO API and also
display the status of each device on the screen.
Add Firebase Realtime database to the project: this is used to store
and retrieve the state of devices from mobile phone and Android
Things device will also retrieve the data to control your light.
Create a Firebase Project
Go to firebase.google.com or visit
firebase.google.com/docs/android/setup
Click “Add project”
Create a Project
 Enter project name
 Select a region
 Click “Create Project”
Add Firebase to Project
Click “Add Firebase to your Android App”
Enter the Package Name
Click “REGISTER APP”
Download Google-Services.json
Save the file into
project’s module
folder:
 Home-Automation-
With-
Firebasemobilego
ogle-services.json
 Home-Automation-
With-
Firebasethingsgo
ogle-services.json
Click “Continue”
Add the Classpath and Plugin to
Gradle Files
Add Firebase Realtime Database
Dependency to App-
level build.gradle file
dependencies {
...
compile 'com.google.firebase:firebase-core:11.0.1'
compile 'com.google.firebase:firebase-database:11.0.1'
}
Configure Database Rules
Click on "Database" and select "Rules". Change "read" and
"write" to return true. Click "Publish"
About the Project
Android Things project contain the follow source files:
 PinSetting; this class is used to control the devices.
 DeviceStatusEventListener: this class observed the firebase
DataSnapshot and make changes to the device base on the
value in the DataSnapshot.
 NotificationManager; for sending notification when
movement is detected.
 MainActivityThings: Main activity of the application.
Android Things support library is included in the app-level
build.gradle file to enable access to the Peripheral I/O API.
dependencies {
compileOnly
'com.google.android.things:androidthings:+‘
}
Android mobile project contain the follow source files:
 SwitchChangeEventListener: this class observed the status
of the switches as well as the buttons and upload their value
in boolean form to firebase database.
 MonitorChangeEventListener: this class observed the
firebase DataSnapshot and display base on the value in the
DataSnapshot.
 MainActivityMobile: Main activity of the application.
 NotificationService: for remote movement notification.
To communicate with firebase database: Firebase Realtime
Database Dependency should be added to the two project.
dependencies {
...
compile 'com.google.firebase:firebase-core:11.0.1'
compile 'com.google.firebase:firebase-database:11.0.1'
}
Deployment of Both Things and
Mobile Apps
In Android Studio
For Android things:
Select “things” module
Click run button
Select Android Things Device to deploy the “things” module
Click “OK”
For Android phone companion App:
Select “mobile” module
Click run button
Select the mobile phone
Click “OK”
Links and Resources
 https://github.com/emotexplanet/Home-Automation-With-Firebase
(Demo Project)
 https://firebase.google.com/docs/android/setup
 https://developer.android.com/things/training/doorbell/firebase-db.html
 https://developer.android.com/things/hardware/imx7d-pico-io.html
 https://developer.android.com/things/hardware/imx7d.html

Android Things - The IoT platform from Google

  • 2.
  • 3.
  • 4.
    Components of IoT Sensors Actuators VirtualObjects People Services Platforms Network
  • 5.
    Idea for powerfuland Intelligence IoT devices  Automatic Street Lighting system  Smart Building Project  Smart Water Monitoring System  Cloud-ready temperature sensor  Temperature and Humidity Monitor  Smart Irrigation System  Intelligent Traffic Information System  Smart Meters  Smart Doorbells  Multi Room Music Player  Automatic Smart Parking System  Home Automation  Home Security Model  Biometrics System  Smart Home with Web Interface  Wireless Sensor System  Energy Monitors  Asset Tracking  Etc.
  • 6.
  • 7.
    Android Things isan extension of the Android platform for IoT and embedded devices.
  • 8.
    Android Things Overview Google Services  API Level 7.0 (Nouget) +  Things Support Library o Peripheral I/O API o User Driver API  Graphics (optional)  Home activity support  Cloud IoT Core  Permissions
  • 9.
    Android SDK AndroidStudio Play Services Firebase Cloud Platform Platform Driving Android Things
  • 10.
    Google Cloud IoTCore Allows you to easily and securely connect, manage, and ingest data from millions of globally dispersed devices.
  • 11.
    Google Play Services Proprietary background serviceand API package for Android devices.
  • 12.
  • 13.
  • 14.
    Why should itbe Android Things?
  • 15.
    Google's IoT DevelopersCommunity https://g.co/iotdev Hackster.io Community https://hackster.io/google Android Things SDK https://developer.android.com/things Google’s IoT Solutions https://iot.google.com/ Code Lab https://codelabs.developers.google.com/?cat=IoT
  • 16.
  • 17.
    Requirement 1: TheBoard (any one) Hardware (Developer Kits)  NXP Pico i.MX7D (Recommended)  NXP Pico i.MX6D  Raspberry Pi 3  Intel® Edison  Intel® Joule
  • 18.
    Requirement 2: Peripherals LEDs + Buttons + Resistors + Breadboard + Jumper wires  Or, a Rainbow Hat  Relay  Etc.
  • 19.
     Android Studio3.0  Android SDK Platform Tools (version 25.0.3 +)  ADB tool command line terminal Software (Android Things SDK)
  • 20.
  • 21.
    Go to “AndroidThings Console” and follow the step below to download the latest preview image for your Android Things board. Android Things Console
  • 22.
    Create a NewProduct
  • 23.
     Enter yourproduct name  Select your board  Set OEM partition size (must be between 32 and 512 MB)  Describe Your product and  Click Create Create new product
  • 24.
    Create new factoryimage Download the factory image to your system. Unzip the image and copy all the files in the image folder to directory ...Android/sdk/Platform-tools
  • 25.
    Connect the Board Connecta USB-C cable (Label 1) from host computer for Power and USB OTG
  • 26.
    Flash Android Things Open a command line terminal (in Android Studio) and navigate to the unzipped image directory ...Android/sdk/Platform-tools (adb tool)  Verify that the device has booted into Fastboot mode by executing the following command: “adb fastboot devices” || reply: 1b2f21d4e1fe0129 fastboot  Your device will not boot into Fastboot mode if it was previously flashed with Android Things, execute the following command to reboot the device into Fastboot mode. “adb reboot bootloader”  Execute the “flash-all.bat” and the device automatically reboots into Android Things when the process is complete  To verify that Android is running on the device, execute the command: “adb devices” || reply: List of devices attached 1b2f21d4e1fe0129 device
  • 27.
    Connecting Android Thingsdevice to Wi-Fi Before connecting the board to a Wi-Fi network, attach an external IPEX or u.FL Wi-Fi antenna to the board as shown
  • 28.
    To connect yourboard to Wi-Fi  Open Android Studio terminal and navigate to “..sdk/platform- tools” to access adb tool and run the following ADB command with your WiFi SSID (wifi network name) and WiFi Password (alternatively connect an ethernet cable): “adb shell am startservice –n com.google.wifisetup/.WifiSetupService -a WifiSetupService.Connect -e ssid YourWifiSSID -e passphrase YourWifiPassword”  To verify that the connection was successful through logcat, use the command: “adb logcat -d”  To test that you can access a remote IP address use the command: “ping 8.8.8.8”.
  • 29.
  • 30.
    Breadboards  A commontool for quickly prototyping circuits without soldering components together.  Each row (horizontal) of 5 holes are connected.  Vertical columns – called power bus (VCC and GND) are connected vertically
  • 31.
    Power supply Power isthe input voltage delivered to the components on the board from an external source such as a wall adapter, battery, or USB port. The following signals are provided to the board via power supply: VIN - Voltage of external source connected to the board VCC or VDD - Internal regulated voltage powering the components on the board (+5V, +3V, and +1.8V). Ground (GND) - Reference point for 0 volts on the board. To shut down a board, disconnect the power supply.
  • 32.
    Analog and DigitalI/O Input/output  Input pins allow your device app to read and interpret the current electrical state.  Output pins allow your device app to control the electrical state of the pins. Analog  Analog signals are signal that can be a full range of values , example is a temperature sensor.  Analog inputs translate a discrete voltage level into a proportional integer value using an analog-to-digital converter (ADB). Digital Digital logic represents a voltage signal as a binary value:  High: When the voltage is at or near VCC. Represented as a logical “1”.  Low: When the voltage is at or near ground. Represented as a logical “0”.
  • 33.
    Android of ThingsSupported Peripherals  GPIO - General Purpose Inputs/Outputs  PWM - Digital to Analog Output  Serial Communication o I2C (synchronous , 2 wires, up to 127 peripherals, low speed) o SPI (synchronous , 4+ wires, unlimited peripherals, high speed) o UART (asynchronous, 2 or 4 , only 1 peripheral, medium speed)
  • 34.
  • 35.
    Create Android ThingsProject in Android Studio
  • 36.
    Create your appproject using the new project wizard  Select Android Things as the form factor  In order to access new APIs for Things, target Android 8.0 (Oreo), API level 26 or higher  Name the new empty activity HomeActivity
  • 37.
    Add Library The newproject wizard automatically adds a dependency to the support library to your app-level build.gradle file dependencies{ ... compileOnly 'com.google.android.things:androidthings:+' } The wizard will also adds <uses-library android:name="com.google.android.things"/> to your app's manifest file to make this prebuilt library available to the app's classpath at run time
  • 38.
    Add Default HomeActivity Declare an activity in the manifest as the main entry point after the device boots <application> <uses-library android:name="com.google.android.things"/> <activity android:name=".HomeActivity"> <!-- Launch activity as default from Android Studio --> <intent-filter> <action android:name="android.intent.action.MAIN"/> <category android:name="android.intent.category.LAUNCHER"/> </intent-filter> <!-- Launch activity automatically on boot --> <intent-filter> <action android:name="android.intent.action.MAIN"/> <category android:name="android.intent.category.IOT_LAUNCHER"/> <category android:name="android.intent.category.DEFAULT"/> </intent-filter> </activity> </application>
  • 39.
  • 40.
    Home automation andmonitor with Android Things and Firebase
  • 41.
    Project Description Android thingsbase project to remotely control appliances and monitor movement via mobile phone with notification. Things to be use in this project  Hardware components: NXP Pico i.MX7D x 1 LED x 4 Resistor 220R x 4 Breadboard x 1 Jumper wires x 10 TechNexion 5 inch Multitouch Display x 1 4 channel Relay Board x 1 PIR Motion Sensor x 1  Android device  Google Android Studio  Online Service (Firebase)  Internet
  • 42.
  • 43.
  • 44.
    Connect the Hardware Connectground pin from the board to the breadboard (pin 39). Connect the chosen GPIO output pin to one side of a series resistor  GPIO_32 (Pin 35)  GPIO_33 (Pin 29)  GPIO_34 (Pin 31)  GPIO_37 (Pin 37) Connect the other side of the resistor to the anode side (longer lead) of the LED or Relay. Connect the cathode side (shorter lead) of the LED to ground row on the breadboard. Connect the PIR motion sensor to GPIO_10 (Pin 15)
  • 45.
    Set up theProject Download or clone demo project from https://github.com/emotexplanet/Home-Automation-With-Firebase. The repository consists of 2 project:  Mobile: the companion app that runs on android phone. It has four switches to turn individual light on and off, as well as two buttons, one to turn all the lights on and one button to turn all the lights off. And a field to monitor remote movement.  Things: the project runs on Android Things device to control the electrical appliances through the Peripheral I/O GPIO API and also display the status of each device on the screen. Add Firebase Realtime database to the project: this is used to store and retrieve the state of devices from mobile phone and Android Things device will also retrieve the data to control your light.
  • 46.
    Create a FirebaseProject Go to firebase.google.com or visit firebase.google.com/docs/android/setup Click “Add project”
  • 47.
    Create a Project Enter project name  Select a region  Click “Create Project”
  • 48.
    Add Firebase toProject Click “Add Firebase to your Android App”
  • 49.
    Enter the PackageName Click “REGISTER APP”
  • 50.
    Download Google-Services.json Save thefile into project’s module folder:  Home-Automation- With- Firebasemobilego ogle-services.json  Home-Automation- With- Firebasethingsgo ogle-services.json Click “Continue”
  • 51.
    Add the Classpathand Plugin to Gradle Files
  • 52.
    Add Firebase RealtimeDatabase Dependency to App- level build.gradle file dependencies { ... compile 'com.google.firebase:firebase-core:11.0.1' compile 'com.google.firebase:firebase-database:11.0.1' }
  • 53.
    Configure Database Rules Clickon "Database" and select "Rules". Change "read" and "write" to return true. Click "Publish"
  • 54.
    About the Project AndroidThings project contain the follow source files:  PinSetting; this class is used to control the devices.  DeviceStatusEventListener: this class observed the firebase DataSnapshot and make changes to the device base on the value in the DataSnapshot.  NotificationManager; for sending notification when movement is detected.  MainActivityThings: Main activity of the application. Android Things support library is included in the app-level build.gradle file to enable access to the Peripheral I/O API. dependencies { compileOnly 'com.google.android.things:androidthings:+‘ }
  • 55.
    Android mobile projectcontain the follow source files:  SwitchChangeEventListener: this class observed the status of the switches as well as the buttons and upload their value in boolean form to firebase database.  MonitorChangeEventListener: this class observed the firebase DataSnapshot and display base on the value in the DataSnapshot.  MainActivityMobile: Main activity of the application.  NotificationService: for remote movement notification.
  • 56.
    To communicate withfirebase database: Firebase Realtime Database Dependency should be added to the two project. dependencies { ... compile 'com.google.firebase:firebase-core:11.0.1' compile 'com.google.firebase:firebase-database:11.0.1' }
  • 57.
    Deployment of BothThings and Mobile Apps In Android Studio For Android things: Select “things” module Click run button Select Android Things Device to deploy the “things” module Click “OK” For Android phone companion App: Select “mobile” module Click run button Select the mobile phone Click “OK”
  • 58.
    Links and Resources https://github.com/emotexplanet/Home-Automation-With-Firebase (Demo Project)  https://firebase.google.com/docs/android/setup  https://developer.android.com/things/training/doorbell/firebase-db.html  https://developer.android.com/things/hardware/imx7d-pico-io.html  https://developer.android.com/things/hardware/imx7d.html