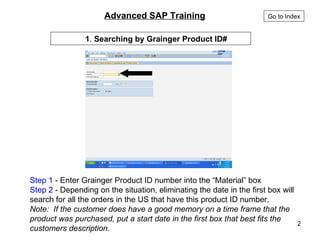
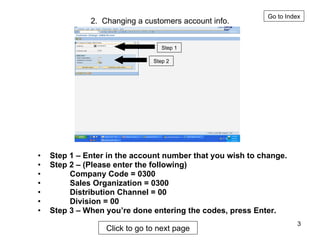
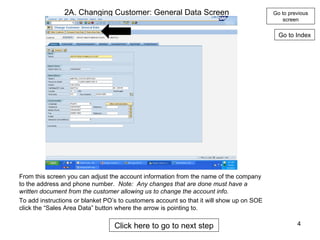
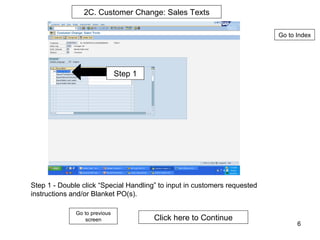
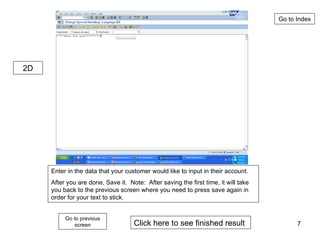
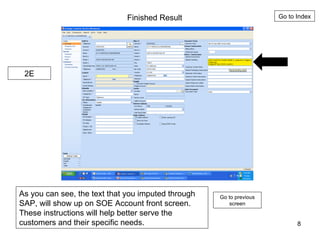
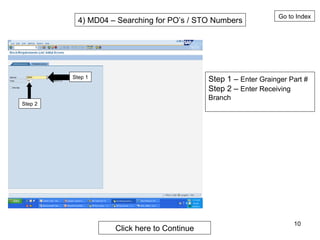
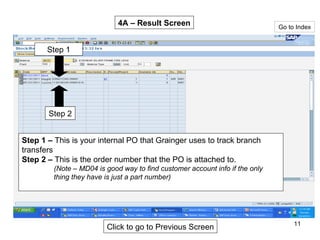
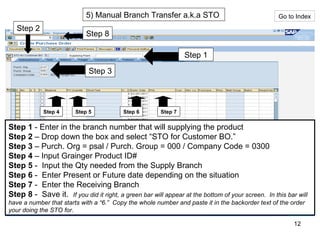
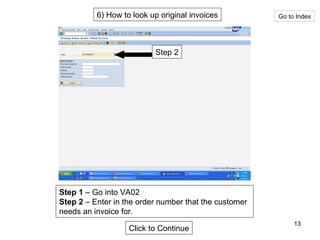
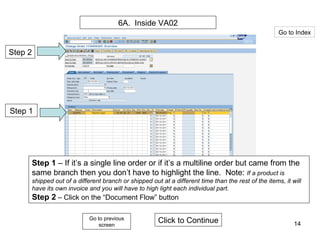
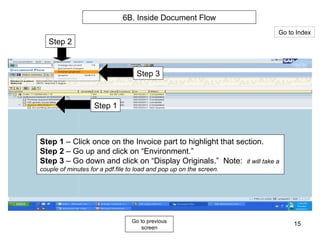
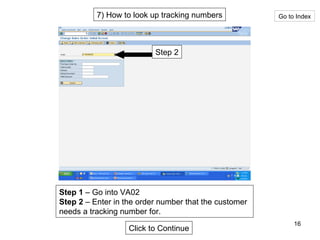
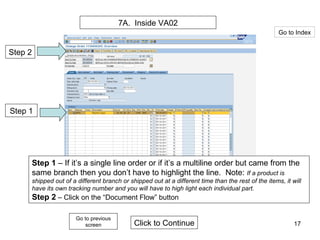
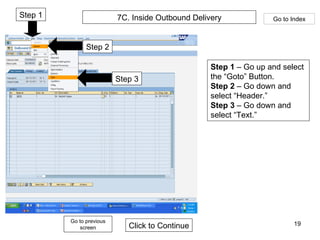
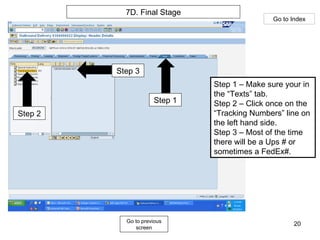
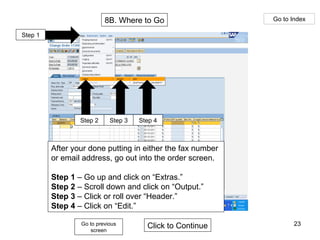
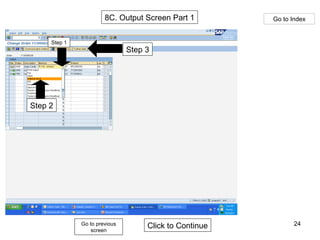
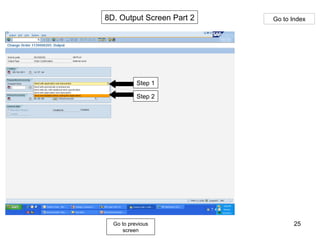
1)  ZZSDVA05  – Searching by Grainger Product ID#  (Pg 2) 2)  XD02  – Changing Account Information  (Pg 3) To:  2A.  Changing Customer: General Data Screen  (Pg 4)   2B.  Sales Data Area  (Pg 5) 2C.  Customer Change: Sales Texts  (Pg 6)   2D .  Entering Text in “Special Handling”  (Pg 7)   2E.  Finished Result  (Pg 8) 3)  ZZSDFIQ  – Searching by Credit Card Number  (Pg 9) 4)  MD04  – Searching for PO / STO Numbers  (Pg 10) 4A.   Result Screen  (Pg 11) 5)  ME21  – Manual Branch Transfer a.k.a STO  (Pg 12) 6)  How to look up original invoices  (Pg 13) 6A.    Inside VA02   (Pg 14) 6B.   Inside Document Flow   (Pg 15) 7)   How to look up tracking numbers   (Pg 16) 7A.   Inside VA02   (Pg 17) 7B.   Inside Document Flow   (Pg 18) 7C.   Inside Outbound Delivery   (Pg 19) 7D.   Final Stage   (Pg 20) Click the green wording to go to that page Index 8)  Sending a email or fax confirmation through SAP     (Pg 21) 8A.  Fast Entry  (Pg 22) 8B.  Where to Go   (Pg 23) 8C.  Output Screen Part 1   (Pg 24) 8D.   Output Screen Part 2  (Pg 25)
Step 1  - Enter Grainger Product ID number into the “Material” box Step 2  - Depending on the situation, eliminating the date in the first box will search for all the orders in the US that have this product ID number. Note:  If the customer does have a good memory on a time frame that the product was purchased, put a start date in the first box that best fits the customers description. 1 .  Searching by Grainger Product ID#   Advanced SAP Training   Go to Index
2.  Changing a customers account info. Step 1 – Enter in the account number that you wish to change. Step 2 – (Please enter the following)  Company Code = 0300 Sales Organization = 0300 Distribution Channel = 00 Division = 00 Step 3 – When you’re done entering the codes, press Enter. Go to Index Step 1 Step 2 Click to go to next page
2A. Changing Customer: General Data Screen From this screen you can adjust the account information from the name of the company to the address and phone number.  Note:  Any changes that are done must have a written document from the customer allowing us to change the account info.   Go to Index Go to previous screen To add instructions or blanket PO’s to customers account so that it will show up on SOE click the “Sales Area Data” button where the arrow is pointing to. Click here to go to next step
Go to Index Go to previous screen Step 1 Step 2 2B. Sales Data Area Step 1 – Click on Extras Step 2 – Scroll down and click on “Texts” Click here to Continue
Go to previous screen Go to Index Click here to Continue 2C. Customer Change: Sales Texts Step 1 - Double click “Special Handling” to input in customers requested instructions and/or Blanket PO(s). Step 1
Go to previous screen Go to Index Enter in the data that your customer would like to input in their account.  After you are done, Save it.  Note:  After saving the first time, it will take you back to the previous screen where you need to press save again in order for your text to stick. Click here to see finished result 2D
Finished Result As you can see, the text that you imputed through SAP, will show up on SOE Account front screen.  These instructions will help better serve the customers and their specific needs. Go to Index Go to previous screen 2E
3) ZZSDFIQ – Searching by Credit Card Number Go to Index Step 1 Step 2 Step 3 Step 1 –  Enter in the fiscal year that the card was used. Note: Most of the time its usually the current year in question. Step 2 –  Enter in the credit card that was used for the order. Step 3 –  ( Fill out just one section) If the customer has a fixed charge, enter that charge amount in the first and second box.  If they give you an average amount, set a dollar range by putting a small amount in the first box and bigger amount in the second For the “Authorized Date,” do the same thing as the above but use dates.
4) MD04 – Searching for PO’s / STO Numbers Step 1 Step 2 Step 1 –  Enter Grainger Part # Step 2 –  Enter Receiving Branch Go to Index Click here to Continue
Go to Index Step 1 –  This is your internal PO that Grainger uses to track branch transfers Step 2 –  This is the order number that the PO is attached to.  (Note – MD04 is good way to find customer account info if the only thing they have is just a part number) Step 1 Step 2 4A – Result Screen Click to go to Previous Screen
5) Manual Branch Transfer a.k.a STO  Step 1 Step 2 Step 3 Step 4 Step 5 Step 6 Step 7 Step 1  - Enter in the branch number that will supplying the product Step 2  – Drop down the box and select “STO for Customer BO.” Step 3  – Purch. Org = psal / Purch. Group = 000 / Company Code = 0300 Step 4  – Input Grainger Product ID# Step 5  -  Input the Qty needed from the Supply Branch Step 6  -  Enter Present or Future date depending on the situation Step 7  -  Enter the Receiving Branch Step 8  -  Save it.  If you did it right, a green bar will appear at the bottom of your screen.  In this bar will have a number that starts with a “6.”  Copy the whole number and paste it in the backorder text of the order your doing the STO for. Go to Index Step 8
6) How to look up original invoices Go to Index Step 2 Step 1  – Go into VA02 Step 2  – Enter in the order number that the customer needs an invoice for. Click to Continue
6A.  Inside VA02 Step 2 Step 1 Step 1  – If it’s a single line order or if it’s a multiline order but came from the same branch then you don’t have to highlight the line.  Note:  If a product is shipped out of a different branch or shipped out at a different time than the rest of the items, it will have its own invoice and you will have to high light each individual part. Step 2  – Click on the “Document Flow” button Click to Continue Go to Index Go to previous screen
6B. Inside Document Flow Step 1 Step 2 Step 3 Step 1  – Click once on the Invoice part to highlight that section. Step 2  – Go up and click on “Environment.” Step 3  – Go down and click on “Display Originals.”  Note:  it will take a couple of minutes for a pdf.file to load and pop up on the screen. Go to Index Go to previous screen
7) How to look up tracking numbers Go to Index Step 2 Step 1  – Go into VA02 Step 2  – Enter in the order number that the customer needs a tracking number for. Click to Continue
7A.  Inside VA02 Step 2 Step 1 Step 1  – If it’s a single line order or if it’s a multiline order but came from the same branch then you don’t have to highlight the line.  Note:  If a product is shipped out of a different branch or shipped out at a different time than the rest of the items, it will have its own tracking number and you will have to high light each individual part. Step 2  – Click on the “Document Flow” button Click to Continue Go to Index Go to previous screen
7B. Inside Document Flow Step 1 Step 2 Step 1 – Click once on the “Outbound Delivery” to highlight that  section. Step 2 – Click on the “Display document” Button. Click to Continue Go to previous screen Go to Index
7C. Inside Outbound Delivery Go to previous screen Click to Continue Step 1 Step 3 Step 2 Step 1  – Go up and select the “Goto” Button. Step 2  – Go down and select “Header.” Step 3  – Go down and select “Text.” Go to Index
Go to previous screen Go to Index 7D. Final Stage Step 2 Step 1 Step 3 Step 1 – Make sure your in the “Texts” tab. Step 2 – Click once on the “Tracking Numbers” line on the left hand side. Step 3 – Most of the time there will be a Ups # or sometimes a FedEx#.
8. Sending a email or fax confirmation through SAP Go to Index Step 2 Step 1  – Go into VA02 Step 2  – Enter in the order number that the customer needs a confirmation for. Click to Continue
8A. Fast Entry Go to Index Step 3 Step 2 Step 1 Click to Continue Go to previous screen Step 1  – Click the “Fast Entry” button. Step 2  –  For fax confirmation , make sure there is a fax number present. Step 3  –  For email confirmation , make sure there is a valid email address present
8B. Where to Go Go to Index Go to previous screen Click to Continue Step 1 Step 2 Step 3 Step 4 After your done putting in either the fax number or email address, go out into the order screen. Step 1  – Go up and click on “Extras.” Step 2  – Scroll down and click on “Output.” Step 3  – Click or roll over “Header.” Step 4  – Click on “Edit.”
8C. Output Screen Part 1 Go to previous screen Click to Continue Go to Index Step 1 Step 3 Step 2
Go to previous screen Go to Index 8D. Output Screen Part 2 Step 1 Step 2

Advanced sap training

  • 1.
    1) ZZSDVA05 – Searching by Grainger Product ID# (Pg 2) 2) XD02 – Changing Account Information (Pg 3) To: 2A. Changing Customer: General Data Screen (Pg 4) 2B. Sales Data Area (Pg 5) 2C. Customer Change: Sales Texts (Pg 6) 2D . Entering Text in “Special Handling” (Pg 7) 2E. Finished Result (Pg 8) 3) ZZSDFIQ – Searching by Credit Card Number (Pg 9) 4) MD04 – Searching for PO / STO Numbers (Pg 10) 4A. Result Screen (Pg 11) 5) ME21 – Manual Branch Transfer a.k.a STO (Pg 12) 6) How to look up original invoices (Pg 13) 6A. Inside VA02 (Pg 14) 6B. Inside Document Flow (Pg 15) 7) How to look up tracking numbers (Pg 16) 7A. Inside VA02 (Pg 17) 7B. Inside Document Flow (Pg 18) 7C. Inside Outbound Delivery (Pg 19) 7D. Final Stage (Pg 20) Click the green wording to go to that page Index 8) Sending a email or fax confirmation through SAP (Pg 21) 8A. Fast Entry (Pg 22) 8B. Where to Go (Pg 23) 8C. Output Screen Part 1 (Pg 24) 8D. Output Screen Part 2 (Pg 25)
  • 2.
    Step 1 - Enter Grainger Product ID number into the “Material” box Step 2 - Depending on the situation, eliminating the date in the first box will search for all the orders in the US that have this product ID number. Note: If the customer does have a good memory on a time frame that the product was purchased, put a start date in the first box that best fits the customers description. 1 . Searching by Grainger Product ID# Advanced SAP Training Go to Index
  • 3.
    2. Changinga customers account info. Step 1 – Enter in the account number that you wish to change. Step 2 – (Please enter the following) Company Code = 0300 Sales Organization = 0300 Distribution Channel = 00 Division = 00 Step 3 – When you’re done entering the codes, press Enter. Go to Index Step 1 Step 2 Click to go to next page
  • 4.
    2A. Changing Customer:General Data Screen From this screen you can adjust the account information from the name of the company to the address and phone number. Note: Any changes that are done must have a written document from the customer allowing us to change the account info. Go to Index Go to previous screen To add instructions or blanket PO’s to customers account so that it will show up on SOE click the “Sales Area Data” button where the arrow is pointing to. Click here to go to next step
  • 5.
    Go to IndexGo to previous screen Step 1 Step 2 2B. Sales Data Area Step 1 – Click on Extras Step 2 – Scroll down and click on “Texts” Click here to Continue
  • 6.
    Go to previousscreen Go to Index Click here to Continue 2C. Customer Change: Sales Texts Step 1 - Double click “Special Handling” to input in customers requested instructions and/or Blanket PO(s). Step 1
  • 7.
    Go to previousscreen Go to Index Enter in the data that your customer would like to input in their account. After you are done, Save it. Note: After saving the first time, it will take you back to the previous screen where you need to press save again in order for your text to stick. Click here to see finished result 2D
  • 8.
    Finished Result Asyou can see, the text that you imputed through SAP, will show up on SOE Account front screen. These instructions will help better serve the customers and their specific needs. Go to Index Go to previous screen 2E
  • 9.
    3) ZZSDFIQ –Searching by Credit Card Number Go to Index Step 1 Step 2 Step 3 Step 1 – Enter in the fiscal year that the card was used. Note: Most of the time its usually the current year in question. Step 2 – Enter in the credit card that was used for the order. Step 3 – ( Fill out just one section) If the customer has a fixed charge, enter that charge amount in the first and second box. If they give you an average amount, set a dollar range by putting a small amount in the first box and bigger amount in the second For the “Authorized Date,” do the same thing as the above but use dates.
  • 10.
    4) MD04 –Searching for PO’s / STO Numbers Step 1 Step 2 Step 1 – Enter Grainger Part # Step 2 – Enter Receiving Branch Go to Index Click here to Continue
  • 11.
    Go to IndexStep 1 – This is your internal PO that Grainger uses to track branch transfers Step 2 – This is the order number that the PO is attached to. (Note – MD04 is good way to find customer account info if the only thing they have is just a part number) Step 1 Step 2 4A – Result Screen Click to go to Previous Screen
  • 12.
    5) Manual BranchTransfer a.k.a STO Step 1 Step 2 Step 3 Step 4 Step 5 Step 6 Step 7 Step 1 - Enter in the branch number that will supplying the product Step 2 – Drop down the box and select “STO for Customer BO.” Step 3 – Purch. Org = psal / Purch. Group = 000 / Company Code = 0300 Step 4 – Input Grainger Product ID# Step 5 - Input the Qty needed from the Supply Branch Step 6 - Enter Present or Future date depending on the situation Step 7 - Enter the Receiving Branch Step 8 - Save it. If you did it right, a green bar will appear at the bottom of your screen. In this bar will have a number that starts with a “6.” Copy the whole number and paste it in the backorder text of the order your doing the STO for. Go to Index Step 8
  • 13.
    6) How tolook up original invoices Go to Index Step 2 Step 1 – Go into VA02 Step 2 – Enter in the order number that the customer needs an invoice for. Click to Continue
  • 14.
    6A. InsideVA02 Step 2 Step 1 Step 1 – If it’s a single line order or if it’s a multiline order but came from the same branch then you don’t have to highlight the line. Note: If a product is shipped out of a different branch or shipped out at a different time than the rest of the items, it will have its own invoice and you will have to high light each individual part. Step 2 – Click on the “Document Flow” button Click to Continue Go to Index Go to previous screen
  • 15.
    6B. Inside DocumentFlow Step 1 Step 2 Step 3 Step 1 – Click once on the Invoice part to highlight that section. Step 2 – Go up and click on “Environment.” Step 3 – Go down and click on “Display Originals.” Note: it will take a couple of minutes for a pdf.file to load and pop up on the screen. Go to Index Go to previous screen
  • 16.
    7) How tolook up tracking numbers Go to Index Step 2 Step 1 – Go into VA02 Step 2 – Enter in the order number that the customer needs a tracking number for. Click to Continue
  • 17.
    7A. InsideVA02 Step 2 Step 1 Step 1 – If it’s a single line order or if it’s a multiline order but came from the same branch then you don’t have to highlight the line. Note: If a product is shipped out of a different branch or shipped out at a different time than the rest of the items, it will have its own tracking number and you will have to high light each individual part. Step 2 – Click on the “Document Flow” button Click to Continue Go to Index Go to previous screen
  • 18.
    7B. Inside DocumentFlow Step 1 Step 2 Step 1 – Click once on the “Outbound Delivery” to highlight that section. Step 2 – Click on the “Display document” Button. Click to Continue Go to previous screen Go to Index
  • 19.
    7C. Inside OutboundDelivery Go to previous screen Click to Continue Step 1 Step 3 Step 2 Step 1 – Go up and select the “Goto” Button. Step 2 – Go down and select “Header.” Step 3 – Go down and select “Text.” Go to Index
  • 20.
    Go to previousscreen Go to Index 7D. Final Stage Step 2 Step 1 Step 3 Step 1 – Make sure your in the “Texts” tab. Step 2 – Click once on the “Tracking Numbers” line on the left hand side. Step 3 – Most of the time there will be a Ups # or sometimes a FedEx#.
  • 21.
    8. Sending aemail or fax confirmation through SAP Go to Index Step 2 Step 1 – Go into VA02 Step 2 – Enter in the order number that the customer needs a confirmation for. Click to Continue
  • 22.
    8A. Fast EntryGo to Index Step 3 Step 2 Step 1 Click to Continue Go to previous screen Step 1 – Click the “Fast Entry” button. Step 2 – For fax confirmation , make sure there is a fax number present. Step 3 – For email confirmation , make sure there is a valid email address present
  • 23.
    8B. Where toGo Go to Index Go to previous screen Click to Continue Step 1 Step 2 Step 3 Step 4 After your done putting in either the fax number or email address, go out into the order screen. Step 1 – Go up and click on “Extras.” Step 2 – Scroll down and click on “Output.” Step 3 – Click or roll over “Header.” Step 4 – Click on “Edit.”
  • 24.
    8C. Output ScreenPart 1 Go to previous screen Click to Continue Go to Index Step 1 Step 3 Step 2
  • 25.
    Go to previousscreen Go to Index 8D. Output Screen Part 2 Step 1 Step 2