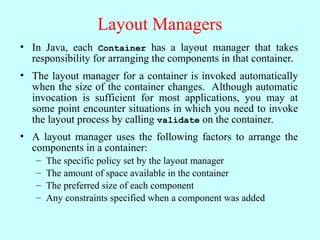
Renaissance Engineers andthe Mac GUI
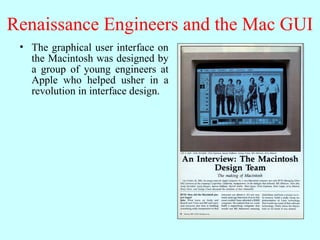
• The graphical user interface on
the Macintosh was designed by
a group of young engineers at
Apple who helped usher in a
revolution in interface design.
4.
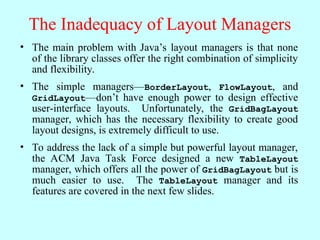
Renaissance Engineers andthe Mac GUI
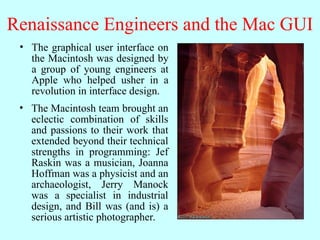
From left, Andy Hertzfeld, Chris Espinoza, Joanna Hoffman, George Crowe, Bill Atkinson, Jerry Manock.
5.
Renaissance Engineers andthe Mac GUI
• The graphical user interface on
the Macintosh was designed by
a group of young engineers at
Apple who helped usher in a
revolution in interface design.
• The Macintosh team brought an
eclectic combination of skills
and passions to their work that
extended beyond their technical
strengths in programming: Jef
Raskin was a musician, Joanna
Hoffman was a physicist and an
archaeologist, Jerry Manock
was a specialist in industrial
design, and Bill was (and is) a
serious artistic photographer.
Managing Component Layout
•In FacePamphlet 2.0, the interactors live in control strips on
each side of the window. Although using control strips
makes sense for simple applications, creating a more
sophisticated user interface requires you to be able to place
interactors anywhere inside a window.
• Arranging interactors to form an elegant, easy-to-use interface is
a difficult design challenge. One of the factors that complicates
the design is the fact that the size of the program window can
change over time. A layout that makes sense for a large window
may not be appropriate for a small one.
• Java seeks to solve the problem of changing window size by
using layout managers, which are responsible for arranging
interactors and other components when the windows that
contain them change size.
8.
Components and Containers
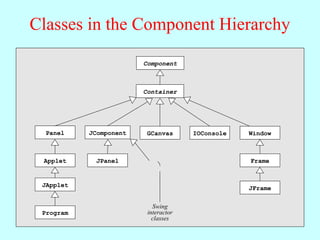
•Understanding how layout managers work is significantly
easier if you first understand the relationship between two
classes—Component and Container—that are fundamental
to Java’s windowing system.
• The Component class forms the root of Java’s window system
hierarchy in the sense that anything that appears in a window
is a subclass of Component.
• The Container class is a subclass of Component that can
contain other Components, thereby making it possible to nest
components inside structures of arbitrary depth.
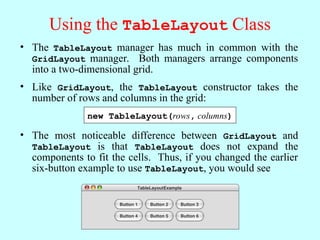
• As you can see from the hierarchy diagram on the next slide,
many of the classes you have seen in the text are subclasses of
both Component and Container. In particular, all Swing
interactors, the GCanvas class, and the Program class are both
components and containers.
9.
Classes in theComponent Hierarchy
Component
Panel JComponent
Container
Window
GCanvas IOConsole
Applet
JApplet
Program
JPanel Frame
JFrame
Swing
interactor
classes
10.
Layout Managers
• InJava, each Container has a layout manager that takes
responsibility for arranging the components in that container.
• The layout manager for a container is invoked automatically
when the size of the container changes. Although automatic
invocation is sufficient for most applications, you may at
some point encounter situations in which you need to invoke
the layout process by calling validate on the container.
• A layout manager uses the following factors to arrange the
components in a container:
– The specific policy set by the layout manager
– The amount of space available in the container
– The preferred size of each component
– Any constraints specified when a component was added
11.
Assigning a NewLayout Manager
• You can assign a new layout manager to a Container by
calling the setLayout method with a new layout manager
object that is usually constructed specifically for that purpose.
• The Program class overrides the definition of setLayout so it
forwards the request to the CENTER region of the program
rather than setting the layout for the program itself. This
strategy makes it possible to use a control strip even if you
call setLayout.
• Although it is possible to write layout managers of your own,
you can usually rely on the standard layout managers
supplied with Java’s libraries. The next few slides describe
the built-in BorderLayout, FlowLayout, and GridLayout
managers; the more flexible TableLayout manager is
covered later in this lecture.
12.
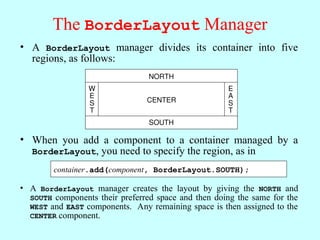
The BorderLayout Manager
•A BorderLayout manager divides its container into five
regions, as follows:
CENTER
NORTH
SOUTH
W
E
S
T
E
A
S
T
• A BorderLayout manager creates the layout by giving the NORTH and
SOUTH components their preferred space and then doing the same for the
WEST and EAST components. Any remaining space is then assigned to the
CENTER component.
• When you add a component to a container managed by a
BorderLayout, you need to specify the region, as in
container.add(component, BorderLayout.SOUTH);
13.
The FlowLayout Manager
•The FlowLayout manager is in many ways the simplest
manager to use and is particularly convenient for getting
programs running quickly.
• The FlowLayout manager arranges its components in rows
from top to bottom and then from left to right within each
row. If there is space within the current row for the next
component, the FlowLayout manager puts it there. If not, the
layout manager centers the components on the current row
and starts the next one. The FlowLayout manager also leaves
a little space between each component so that the components
don’t all run together.
• The problem with the FlowLayout manager is that it has no
way to make sure that the divisions between the lines come at
appropriate places, as illustrated by the example on the next
slide.
14.
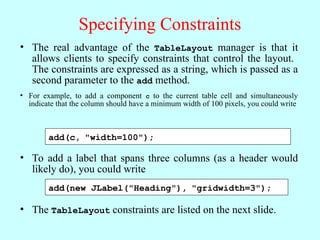
Limitations of FlowLayout
•The following program creates a slider and two labels:
• If the program window is wide enough, everything looks fine.
public class FlowLayoutSlider extends Program {
public void init() {
setLayout(new FlowLayout());
add(new JLabel("Small"));
add(new JSlider(0, 100, 50));
add(new JLabel("Large"));
}
}
FlowLayoutSlider
Small Large
• If, however, you make the program window very narrow, the break between
the interactors comes at an awkward place.
FlowLayoutSlider
Small
Large
15.
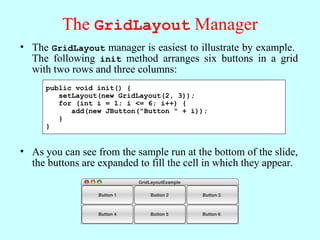
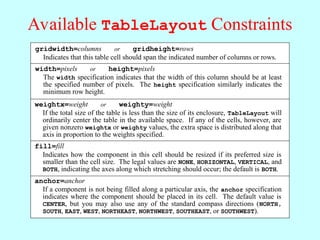
The GridLayout Manager
•The GridLayout manager is easiest to illustrate by example.
The following init method arranges six buttons in a grid
with two rows and three columns:
public void init() {
setLayout(new GridLayout(2, 3));
for (int i = 1; i <= 6; i++) {
add(new JButton("Button " + i));
}
}
• If you change the size of the program window, the buttons
adjust so that they continue to fill the space.
GridLayoutExample
Button 1 Button 2 Button 3
Button 4 Button 5 Button 6
GridLayoutExample
Button 1 Button 2 Button 3
Button 4 Button 5 Button 6
• As you can see from the sample run at the bottom of the slide,
the buttons are expanded to fill the cell in which they appear.
16.
The Inadequacy ofLayout Managers
• The main problem with Java’s layout managers is that none
of the library classes offer the right combination of simplicity
and flexibility.
• The simple managers—BorderLayout, FlowLayout, and
GridLayout—don’t have enough power to design effective
user-interface layouts. Unfortunately, the GridBagLayout
manager, which has the necessary flexibility to create good
layout designs, is extremely difficult to use.
• To address the lack of a simple but powerful layout manager,
the ACM Java Task Force designed a new TableLayout
manager, which offers all the power of GridBagLayout but is
much easier to use. The TableLayout manager and its
features are covered in the next few slides.
17.
Using the TableLayoutClass
• The TableLayout manager has much in common with the
GridLayout manager. Both managers arrange components
into a two-dimensional grid.
• Like GridLayout, the TableLayout constructor takes the
number of rows and columns in the grid:
new TableLayout(rows, columns)
• The most noticeable difference between GridLayout and
TableLayout is that TableLayout does not expand the
components to fit the cells. Thus, if you changed the earlier
six-button example to use TableLayout, you would see
TableLayoutExample
Button 1 Button 2 Button 3
Button 4 Button 5 Button 6
18.
Specifying Constraints
• Thereal advantage of the TableLayout manager is that it
allows clients to specify constraints that control the layout.
The constraints are expressed as a string, which is passed as a
second parameter to the add method.
• For example, to add a component c to the current table cell and simultaneously
indicate that the column should have a minimum width of 100 pixels, you could write
add(c, "width=100");
• To add a label that spans three columns (as a header would
likely do), you could write
add(new JLabel("Heading"), "gridwidth=3");
• The TableLayout constraints are listed on the next slide.
19.
Available TableLayout Constraints
gridwidth=columnsor gridheight=rows
Indicates that this table cell should span the indicated number of columns or rows.
width=pixels or height=pixels
The width specification indicates that the width of this column should be at least
the specified number of pixels. The height specification similarly indicates the
minimum row height.
weightx=weight or weighty=weight
If the total size of the table is less than the size of its enclosure, TableLayout will
ordinarily center the table in the available space. If any of the cells, however, are
given nonzero weightx or weighty values, the extra space is distributed along that
axis in proportion to the weights specified.
fill=fill
Indicates how the component in this cell should be resized if its preferred size is
smaller than the cell size. The legal values are NONE, HORIZONTAL, VERTICAL, and
BOTH, indicating the axes along which stretching should occur; the default is BOTH.
anchor=anchor
If a component is not being filled along a particular axis, the anchor specification
indicates where the component should be placed in its cell. The default value is
CENTER, but you may also use any of the standard compass directions (NORTH,
SOUTH, EAST, WEST, NORTHEAST, NORTHWEST, SOUTHEAST, or SOUTHWEST).
20.
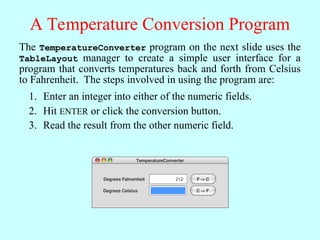
A Temperature ConversionProgram
The TemperatureConverter program on the next slide uses the
TableLayout manager to create a simple user interface for a
program that converts temperatures back and forth from Celsius
to Fahrenheit. The steps involved in using the program are:
TemperatureConverter
F -> C
Degrees Fahrenheit
C -> F
Degrees Celsius
32
0
Enter an integer into either of the numeric fields.
1.
Hit ENTER or click the conversion button.
2.
Read the result from the other numeric field.
3.
1
212
10
100
21.
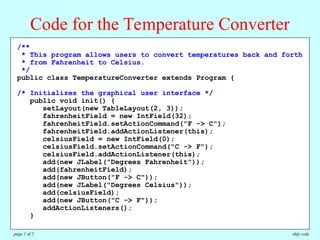
/**
* This programallows users to convert temperatures back and forth
* from Fahrenheit to Celsius.
*/
public class TemperatureConverter extends Program {
/* Initializes the graphical user interface */
public void init() {
setLayout(new TableLayout(2, 3));
fahrenheitField = new IntField(32);
fahrenheitField.setActionCommand("F -> C");
fahrenheitField.addActionListener(this);
celsiusField = new IntField(0);
celsiusField.setActionCommand("C -> F");
celsiusField.addActionListener(this);
add(new JLabel("Degrees Fahrenheit"));
add(fahrenheitField);
add(new JButton("F -> C"));
add(new JLabel("Degrees Celsius"));
add(celsiusField);
add(new JButton("C -> F"));
addActionListeners();
}
Code for the Temperature Converter
skip code
page 1 of 2
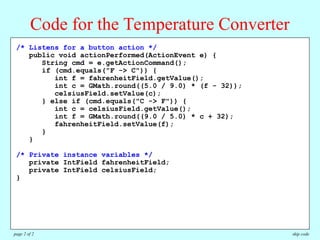
22.
/**
* This programallows users to convert temperatures back and forth
* from Fahrenheit to Celsius.
*/
public class TemperatureConverter extends Program {
/* Initializes the graphical user interface */
public void init() {
setLayout(new TableLayout(2, 3));
fahrenheitField = new IntField(32);
fahrenheitField.setActionCommand("F -> C");
fahrenheitField.addActionListener(this);
celsiusField = new IntField(0);
celsiusField.setActionCommand("C -> F");
celsiusField.addActionListener(this);
add(new JLabel("Degrees Fahrenheit"));
add(fahrenheitField);
add(new JButton("F -> C"));
add(new JLabel("Degrees Celsius"));
add(celsiusField);
add(new JButton("C -> F"));
addActionListeners();
}
/* Listens for a button action */
public void actionPerformed(ActionEvent e) {
String cmd = e.getActionCommand();
if (cmd.equals("F -> C")) {
int f = fahrenheitField.getValue();
int c = GMath.round((5.0 / 9.0) * (f - 32));
celsiusField.setValue(c);
} else if (cmd.equals("C -> F")) {
int c = celsiusField.getValue();
int f = GMath.round((9.0 / 5.0) * c + 32);
fahrenheitField.setValue(f);
}
}
/* Private instance variables */
private IntField fahrenheitField;
private IntField celsiusField;
}
Code for the Temperature Converter
skip code
page 2 of 2
23.
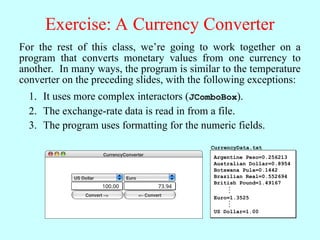
Exercise: A CurrencyConverter
For the rest of this class, we’re going to work together on a
program that converts monetary values from one currency to
another. In many ways, the program is similar to the temperature
converter on the preceding slides, with the following exceptions:
It uses more complex interactors (JComboBox).
1.
The exchange-rate data is read in from a file.
2.
The program uses formatting for the numeric fields.
3.
CurrencyConverter
US Dollar Euro
Convert –> <– Convert
100.00 73.94
Argentine Peso=0.256213
Australian Dollar=0.8954
Botswana Pula=0.1442
Brazilian Real=0.552694
British Pound=1.49167
Euro=1.3525
US Dollar=1.00
.
.
.
.
.
.
CurrencyData.txt