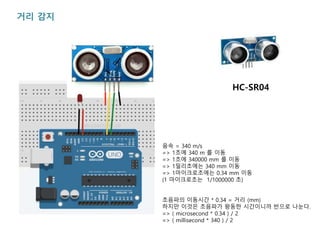
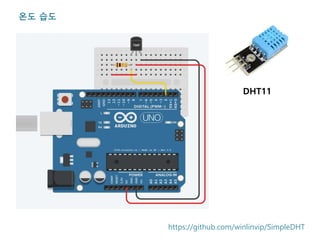
Arduino 활용
(실습)
송치원
프로그램 설치 https://www.arduino.cc
1 2 3 4 5
void setup() {
}
소스코드의 구조
전원 인가 후
한번 실행
void loop() {
}
무한 반복 실행
API Reference
실습
디지털
Tact 스위치
LED
아날로그
Potentionmeter
(가변저항)
PWM (Pulse Width Modulation)
RGB LED
사이렌
피에조 부조
멜로디
/***************
* pitches.h
***************/
#define NOTE_C5 523
#define NOTE_D5 587
#define NOTE_E5 659
#define NOTE_G5 784
#define NOTE_A5 880
https://www.arduino.cc/en/Tutorial/toneMelody
빛 감지
LDR
소리 감지
KY-038
거리 감지
음속 = 340 m/s
=> 1초에 340 m 를 이동
=> 1초에 340000 mm 를 이동
=> 1밀리초에는 340 mm 이동
=> 1마이크로초에는 0.34 mm 이동
(1 마이크로초는 1/1000000 초)
초음파의 이동시간 * 0.34 = 거리 (mm)
하지만 이것은 초음파가 왕동한 시간이니까 반으로 나눈다.
=> ( microsecond * 0.34 ) / 2
=> ( millisecond * 340 ) / 2
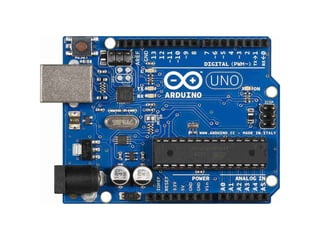
HC-SR04
온도 습도
DHT11
https://github.com/winlinvip/SimpleDHT
LCD
LCD1602
https://github.com/marcoschwartz/LiquidCrystal_I2C
SDA
SCL
응용
Temp 29 *c
Hum 61 %
자동 선풍기
방온도가 28도 이상이면
선풍기가 동작
28도 이하에서
선풍기 멈춤
5V
220V
Relay
(KY-019)
?
https://github.com/iamchiwon/iot_with_arduino/tree/master/Auto_Fan
자동 휴지통
Servo Motor
?
https://github.com/iamchiwon/iot_with_arduino/tree/master/Auto_TrashCan

[2] 아두이노 활용 실습

Editor's Notes

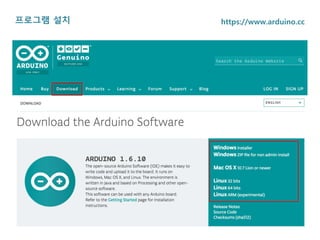
  • #4 아두이노 공식 사이트 : www.arduino.cc Arduino IDE 다운로드 및 설치 (설치 과정에서 USB 드라이버가 함께 설치됨) 기부 결제 화면에서 JUST DOWNLOAD 를 클릭하여 무료로 다운로드 할 수 있음 아두이노와 PC은 USB 케이블로 연결
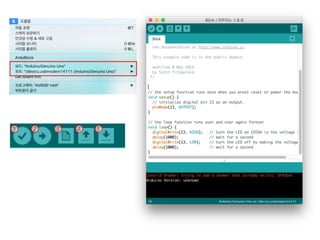
  • #5 IDE 기능버튼 컴파일 : 소스코드의 유효성 확인 업로드 : 소스코드를 컴파일하여 아두이노 보드에 업로드 (baking firmware) New : 새 프로젝트 시작 Open : 기존 프로젝트 열기 Save : 현재 프로젝트 저장 동작확인 아두이노를 연결한 후 설정항목 보드 : Arduino/Genuino Uno 선택 포트 : 아두이노가 연결된 포트 선택 파일 메뉴 > 예제 > 01.Basics > Blnks 선택 업로드 하여 보다가 정상 동작하는지 확인
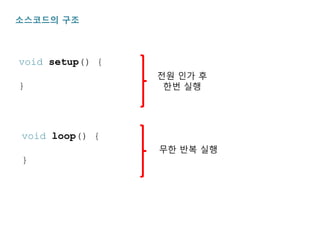
  • #6 아두이노 펌웨어 소스코드는 두 개의 함수로 이루어져 있음 C/C++ 문법을 차용하고 있어 익히기 쉬움 Setup 함수 전원이 켜진 후 한 번 실행 됨 설정관련 코드 및 1회성 코드가 위치함 Loop 함수 전원이 꺼질 때 까지 무한 반복 실행 됨
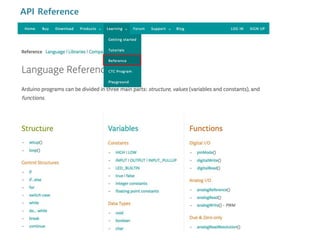
  • #7 프로그램 개발에 사용되는 함수 및 명령어의 설명서 홈페이지의 Learning > Reference 메뉴 선택 예제소스 Learning > Tutorials 메뉴 선택 난이도 별, 센서 별, 라이브러리 별 예제 소스 제공 소스 코드 및 동작 회로 구성도 제공
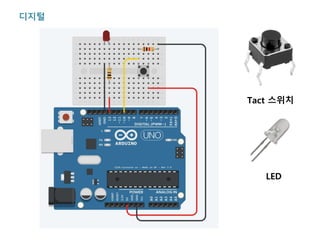
  • #9 컴포넌트 - Arduino UNO R3 - Breadboard Mini - LED - Register 0.1kΩ, 1kΩ - Push Button 코드 int led = 13; int button = 10; int prevButtonState = LOW; int ledState = LOW; void setup() { pinMode(led, OUTPUT); pinMode(button, INPUT); } void loop() { int currentButtonState = digitalRead(button); if(prevButtonState == LOW && currentButtonState == HIGH) { ledState = HIGH - ledState; } prevButtonState = currentButtonState; digitalWrite(led, ledState); delay(50); }
  • #10 void setup() { Serial.begin(9600); } void loop() { int a0 = analogRead(A0); Serial.println(a0); delay(300); }
  • #11 int ledRED = 9; int ledGREEN = 10; int ledBLUE = 11; int nowR = random(0, 255); int nowG = random(0, 255); int nowB = random(0, 255); int toR = random(0, 255); int toG = random(0, 255); int toB = random(0, 255); void setup() { pinMode(ledRED, OUTPUT); pinMode(ledGREEN, OUTPUT); pinMode(ledBLUE, OUTPUT); } void loop() { setColor(nowR, nowG, nowB); if(nowR == toR) toR = random(0, 255); if(nowG == toG) toG = random(0, 255); if(nowB == toB) toB = random(0, 255); if(nowR < toR) nowR++; else nowR--; if(nowG < toG) nowG++; else nowG--; if(nowB < toB) nowB++; else nowB--; delay(10); } void setColor(int red, int green, int blue) { analogWrite(ledRED, red); analogWrite(ledGREEN, green); analogWrite(ledBLUE, blue); }
  • #12 void setup() { } void loop() {   for(int i=500; i<2000; i+=10) {     note(i, 50);   }   for(int i=2000; i>500; i-=10) {     note(i, 50);   } } void note(int pitch, int duration) {   tone(8, pitch, duration);   delay(duration*0.8); }
  • #13 #include "pitches.h" void setup() { } void loop() {   note(NOTE_G5, 500);   note(NOTE_G5, 500);   note(NOTE_A5, 500);   note(NOTE_A5, 500);   note(NOTE_G5, 500);   note(NOTE_G5, 500);   note(NOTE_E5, 1000);   note(NOTE_G5, 500);   note(NOTE_G5, 500);   note(NOTE_E5, 500);   note(NOTE_E5, 500);   note(NOTE_D5, 1000);     note(NOTE_G5, 500);   note(NOTE_G5, 500);   note(NOTE_A5, 500);   note(NOTE_A5, 500);   note(NOTE_G5, 500);   note(NOTE_G5, 500);   note(NOTE_E5, 1000);   note(NOTE_G5, 500);   note(NOTE_E5, 500);   note(NOTE_D5, 500);   note(NOTE_E5, 500);   note(NOTE_C5, 2000);     delay(4000); } void note(int pitch, int duration) {   tone(8, pitch, duration);   delay(duration * 1.3);   noTone(8); }
  • #14 const int LED = 9; const int LDR = A0; void setup() { pinMode(LED, OUTPUT); } void loop() { int a0 = analogRead(LDR); int light = max(map(a0, 0, 600, 1023, 0), 0); analogWrite(LED, light); delay(300); }
  • #15 int sensorPin = A0; int ledPin = 13; int sensorValue = 0; void setup () { pinMode (ledPin, OUTPUT); Serial.begin (9600); } void loop () { sensorValue = analogRead (sensorPin); digitalWrite (ledPin, HIGH); delay (sensorValue); digitalWrite (ledPin, LOW); delay (sensorValue); Serial.println (sensorValue, DEC); }
  • #16 int trig= 7; int echo= 6; int led= 13; void setup() {   // initialize serial communication:   Serial.begin(9600);   pinMode(trig, OUTPUT);   pinMode(echo, INPUT);   pinMode(led, OUTPUT); } void loop() {   digitalWrite(trig, LOW);   delayMicroseconds(2);   digitalWrite(trig, HIGH);   delayMicroseconds(10);   digitalWrite(trig, LOW);   long val= pulseIn(echo, HIGH) * 17 / 100;   Serial.println(val);   if(val < 50) {     //5cm 범위 안에들어오면 LED  점등     digitalWrite(led, HIGH);   } else {     digitalWrite(led, LOW);   }   delay(100); }
  • #17 #include <SimpleDHT.h> int pinDHT11 = 2; SimpleDHT11 dht11; void setup() { Serial.begin(9600); } void loop() { byte temperature = 0; byte humidity = 0; if (dht11.read(pinDHT11, &temperature, &humidity, NULL)) { Serial.print("No Data"); delay(1000); return; } Serial.print("Temp: "); Serial.print((int)temperature); Serial.print(" *C, "); Serial.print((int)humidity); Serial.println(" %"); delay(1000); }
  • #18 #include <LiquidCrystal_I2C.h> LiquidCrystal_I2C lcd(0x27,16,2); //LCD address : 0x27 void setup() { lcd.init(); lcd.backlight(); lcd.setCursor(0, 0); lcd.print("Hello, world!"); } void loop() { }
  • #20 아두이노 응용 프로젝트 자동 전원 장치 실내 온도 체크 실내 온도가 28도 이상이 되는 경우 선풍기를 동작시킴 실내 온도가 28도 미만인 경우 선풍기 동작을 멈춤
  • #21 필요장비 - 아두이노 - 온도센서 - LCD (모니터용) - 선풍기 2. 보통 선풍기는 220V 전원을 사용함 아두이노는 5V 전원을 사용함 (digitalWrite 에서 HIGH 값은 5V 임) 3. 5V 전원을 사용하여 220V 를 컨트롤 하는 방법?
  • #23 아두이노 응용 프로젝트 자동 휴지통 휴지통 휴지를 가까이 가져가면 문이 자동으로 열림
  • #24 필요장비 - 아두이노 - 초음파 센서 - LCD (모니터용) - 선풍기 2. 어떻게 휴지통 뚜껑을 자동으로 열리게 할까?