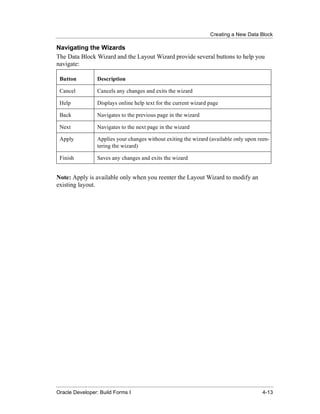
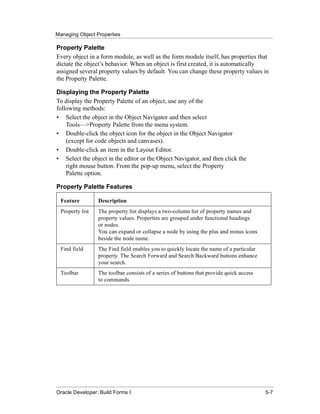
This document provides an instructor guide for the Oracle Developer: Build Forms I course, outlining the course objectives and content which teaches students how to use Oracle Forms Builder to create basic forms and applications. The guide includes 23 lessons on topics such as creating forms, working with items and triggers, and debugging and testing forms. It also contains appendices with additional reference material.


![Preface
.....................................................................................................................................................
Convention Element Example
Arrow Menu paths Select File—>Save.
Brackets Key names Press [Enter].
Commas Key sequences Press and release these keys one at a time:
[Alt], [F], [D]
Plus signs Key combinations Press and hold these keys simultaneously:
[Ctrl]+[Alt]+[Del]
Typographic Conventions in Code
Convention Element Example
Caps and lowercase Oracle Forms When-Validate-Item
triggers
Lowercase Column names, SELECT last_name
table names FROM s_emp;
Passwords DROP USER scott
IDENTIFIED BY tiger;
PL/SQL objects OG_ACTIVATE_LAYER
(OG_GET_LAYER (’prod_pie_layer’))
Lowercase italic Syntax variables CREATE ROLE role
Uppercase SQL commands SELECT userid
and functions FROM emp;
Typographic Conventions in Navigation Paths
This course uses simplified navigation paths, such as the following example, to direct
you through Oracle Applications.
(N) Invoice—>Entry—>Invoice Batches Summary (M) Query—>Find
(B) Approve
This simplified path translates to the following:
1 (N) From the Navigator window, select Invoice—>Entry—>Invoice Batches
Summary.
2 (M) From the menu bar, select Query—>Find.
3 (B) Click the Approve button.
N = Navigator, M = Menu, B = Button
.....................................................................................................................................................
xx Oracle Developer: Build Forms I](https://image.slidesharecdn.com/15884086-oracle-developer-build-forms-i-090616024150-phpapp01/85/15884086-Oracle-Developer-Build-Forms-I-20-320.jpg)


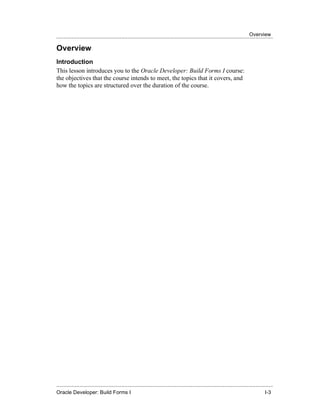


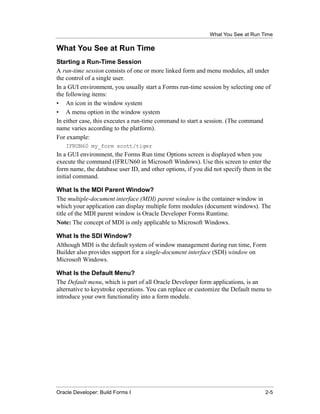
![Lesson 1: Course Introduction
......................................................................................................................................................
Form Builder Layout Editor
Toolbar
Tool Palette
Copyright © Oracle Corporation, 1999. All rights reserved.
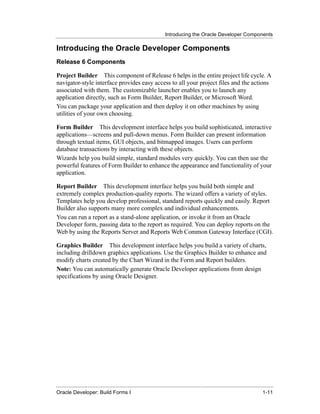
Instructor Note
It is important for the students to gain exposure to the Object Navigator and the Layout
Editor in Form Builder. They will need this knowledge to complete the practice
exercise at the end of this lesson.
Demonstration
• Open an existing form, and briefly explain the features of the Object
Navigator.
• Go to the Layout Editor. Point out the major tools in the Toolbar.
Demonstrate some of the major tools in the Tool Palette.
• Draw a rectangle and an ellipse, and also show how to draw a square and
a circle by holding down the [Shift] key when using the rectangle and
ellipse tools.
• Demonstrate selecting more than one object at the same time, and show
how to group various objects.
• Demonstrate resizing, moving, aligning, coloring, and deleting objects.
• Demonstrate using the Text tool and changing the font style and size.
• Demonstrate how to pin a tool by double-clicking a tool.
......................................................................................................................................................
1-16 Oracle Developer: Build Forms I](https://image.slidesharecdn.com/15884086-oracle-developer-build-forms-i-090616024150-phpapp01/85/15884086-Oracle-Developer-Build-Forms-I-48-320.jpg)


![Navigating Around the Oracle Developer Main Menu
......................................................................................................................................................
Navigating Around the Oracle Developer Main Menu
Introduction
The Main menu in each of the three main application builders is very similar.
The Main menu contains options in one builder that do not always appear in another,
but their basic functionality is the same throughout. The Main menu also varies
depending on your current context in the builder.
Common Menu Features
The following table describes some common features in GUI menus.
Feature Description
Underline Shortcut key: [Alt] + letter
Ellipsis ( . . . ) Additional input, usually by using a dialog box
> Menu option has a submenu
Windows menu List of open windows; select any window to make it active
Help List of help facilities, such as online help text, Cue Cards, Quick Tour
Native GUI Interface
The menu example here is shown in Windows NT. However, menus appear with the
same look and feel of your native GUI interface.
For example, in Motif, the Windows Print Dialog options appear as submenus of the
Font menu.
The Builder Main Menu
Menu Item Description
File Common file utilities, such as open, save, connect, administration
Edit Cut, copy, paste, and so on
View Switch view in current window; options vary greatly depending on context
Navigator Only appears in Object Navigator; includes expand, collapse, bookmark
Program Includes compilation and access to PL/SQL editors
Tools Includes wizards and preferences
......................................................................................................................................................
Oracle Developer: Build Forms I 1-23](https://image.slidesharecdn.com/15884086-oracle-developer-build-forms-i-090616024150-phpapp01/85/15884086-Oracle-Developer-Build-Forms-I-55-320.jpg)

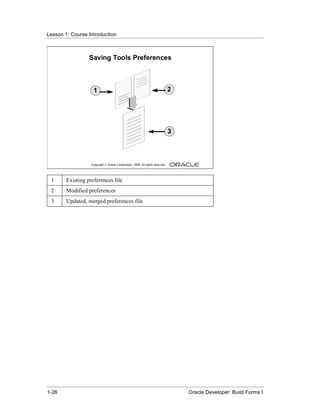
![Customizing Your Oracle Developer Session
......................................................................................................................................................
Customizing Your Oracle Developer Session
What Are Oracle Developer Tools Preferences?
You can use tools preferences to customize some aspects of your
Oracle Developer builder session.
Each Oracle Developer builder has its own set of preferences; however, there are some
that are common to all three.
Form Builder Preferences There are four tab pages in the Form Builder
Preferences dialog box. Press the Help key ([F1] for Windows NT/95) in the
Preferences dialog to see a description of each preference.
As well as session preferences, Form Builder preferences enable you to set run-time
settings when running your form within the builder.
The table describes a few example form preferences.
Tab Preference Name Description
General Build Before Determines whether Form Builder automatically
Running compiles the active module when you run a form. This
option enables you to avoid issuing separate Compile
and Run commands each time you modify and run a
form.
Access Access Determines if form definitions are saved to (or opened
from) the database or from files, or both. If access is set
to both, Form Builder prompts you when you save or
open each form.
Wizards Welcome Dialog Check box to suppress or display the first Welcome
dialog box. There are several similar check boxes.
Runtime Array Processing Determines whether Form Builder processes groups of
records at a time, reducing network traffic and
increasing performance.
How to Modify Tools Preferences
1 Select Tools—>Preferences.
2 Select the option you require.
3 Click OK to save changes, or Cancel to cancel changes.
......................................................................................................................................................
Oracle Developer: Build Forms I 1-25](https://image.slidesharecdn.com/15884086-oracle-developer-build-forms-i-090616024150-phpapp01/85/15884086-Oracle-Developer-Build-Forms-I-57-320.jpg)


![Invoking Online Help Facilities
......................................................................................................................................................
Invoking Online Help Facilities
Oracle Developer Help Options
The table describes the Help menu options in Report Builder.
Help Menu Option Description
Form Builder Help Topics This is the contents page for comprehensive online help.
Includes Index and Find tabs.
The Help key ([F1] (for Windows NT/95) displays
context-sensitive online help at any place in the builder.
Quick Tour This built-in computer-based training package is more
detailed than the Cue Cards, including technical
explanations of the Form Builder components.
Cue Cards These appear as separate windows that give simple
step-by-step instructions and examples to help novice
users learn basic functionality.
Manuals This provides an index to installed online manuals, which
are HTML files that you can view with any browser.
About Form Builder This is a separate window that shows product components
and their version numbers. When you are connected to a
database server, it also displays similar information for
server-side product components.
Most of the Help features are optional extras during product installation, which require
additional resources.
......................................................................................................................................................
Oracle Developer: Build Forms I 1-31](https://image.slidesharecdn.com/15884086-oracle-developer-build-forms-i-090616024150-phpapp01/85/15884086-Oracle-Developer-Build-Forms-I-63-320.jpg)


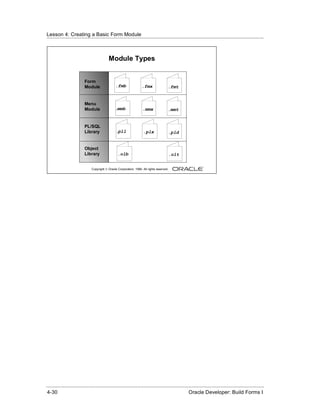
![Creating a New Form Module
......................................................................................................................................................
Methods for Creating a New Form Module
You can create a new form module in many different ways.
• Invoke the Form Builder component. This takes you to the Form Builder
Welcome page. Now do one of the following:
- Select the “Use the Data Block Wizard” option, then follow the
required data block creation steps. Then follow the Layout Wizard
steps.
- Select the “Build a new form manually” option. This takes you into
the Form Builder Object Navigator (automatically creating an empty
form module).
- Select the “Build a form based on a template” option and use a
template form.
• If you are already in the Form Builder component, you can create a new
form module by doing one of the following:
- Double-click the Forms node in the Object Navigator (only when no
other form modules are available).
- Select File—>New—>Form.
- Select the Object Navigator node for Forms, and then click the
Create icon.
Changing the Form Module Name
• When you first build a form module, Form Builder assigns the name
MODULEXX to the new form module, where XX is the next number
available for module names. This name is displayed in the Object
Navigator and in the Property Palette. You should change the default
name to a meaningful name in either of the following places:
• In the Object Navigator:
- Double-click the form module name.
- Change the default name as desired and press [Enter].
• In the Property Palette (shown on the next page)
Note: Follow Oracle naming rules. Do not give two objects of the same type the same
name. The name cannot include Oracle or Form Builder reserved words.
......................................................................................................................................................
Oracle Developer: Build Forms I 4-7](https://image.slidesharecdn.com/15884086-oracle-developer-build-forms-i-090616024150-phpapp01/85/15884086-Oracle-Developer-Build-Forms-I-143-320.jpg)


![Creating a New Data Block
......................................................................................................................................................
Creating a New Data Block with the Data Block Wizard
Use the Data Block Wizard to create a new data block with its associated data sources.
The Data Block Wizard consists of several pages. To create a new data block, you
must interact with each page.
Type Page Choose between one of two data source types:
• Table or View
• Stored Procedure
Select the Table or View (default) option.
Table Page
1 Enter the table or view name for the data source name, or click Browse
and select a name from a dialog box.
2 Click Refresh to display a list of columns in the selected table or view.
If you are not connected to the database, the Connect box is displayed.
3 Select the columns you want to include in the data block. (Use [Control]-
click to select more than one column.)
4 Click >> or << to include or exclude all columns, or click > or < to
include or exclude selected columns only. You can also drag and drop
selected columns from one list to another.
5 Select the Enforce Data Integrity check box if you want the wizard to
enforce the database integrity constraints.
Note: If there is at least one other existing block in the current module, you next get
the Master-Detail page, where you can associate the new data block with other master
data blocks. This page is discussed later in the lesson.
Finish Page Select the “Create the data block, then call the Layout Wizard” option.
Select Finish to create the new data block and immediately invoke the Layout Wizard.
Note: You have the option of exiting the Data Block Wizard at this stage, without
immediately invoking the Layout Wizard. If you do so, you can either lay out the data
block manually or invoke the Layout Wizard at a later time to lay out the items of a
data block.
To invoke the Layout Wizard at a later time, select the data block in the Object
Navigator, and choose Tools—>Layout Wizard.
......................................................................................................................................................
Oracle Developer: Build Forms I 4-17](https://image.slidesharecdn.com/15884086-oracle-developer-build-forms-i-090616024150-phpapp01/85/15884086-Oracle-Developer-Build-Forms-I-153-320.jpg)
![Creating a New Data Block
......................................................................................................................................................
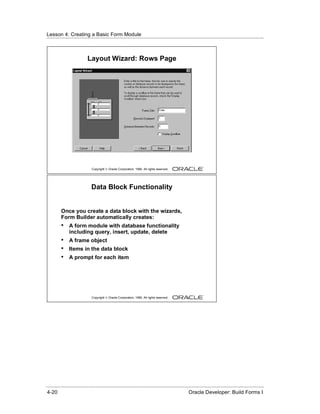
Laying Out a New Data Block with the Layout Wizard
Use the Layout Wizard to lay out the data block items for visual presentation quickly
and easily. The Layout Wizard consists of several pages. You must interact with each
page.
Welcome Page Click Next to continue.
Canvas Page
1 Select New Canvas from the Canvas pop-up list to get a new canvas on
which to display the data block items.
2 Select Content as the canvas type in the Type pop-up list.
Data Block Page
1 Select the items you want to display in the data block frame. (Use
[Control]-click to select more than one column).
2 Click >> or << to include or exclude all items, or click > or < to include
or exclude selected items only. You can also drag and drop selected
items from one list to another.
Note: To lay out the items in a particular sequence, drag and drop items into that
sequence.
3 You can use the Item Type pop-up list to select a type for each item. The
default type is Text for each item.
Note: An item type can also be changed later to something else, such as pop-up list
or radio group.
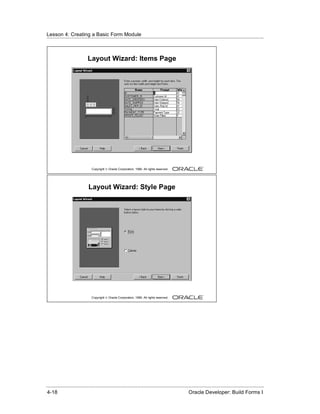
Items Page Specify the prompt text and the display width and height for each
display item for the data block.
Style Page Select a layout style for your frame. Your options are:
• Form (usually used to create single-record data blocks)
• Tabular (usually used to create multirecord data blocks)
......................................................................................................................................................
Oracle Developer: Build Forms I 4-19](https://image.slidesharecdn.com/15884086-oracle-developer-build-forms-i-090616024150-phpapp01/85/15884086-Oracle-Developer-Build-Forms-I-155-320.jpg)


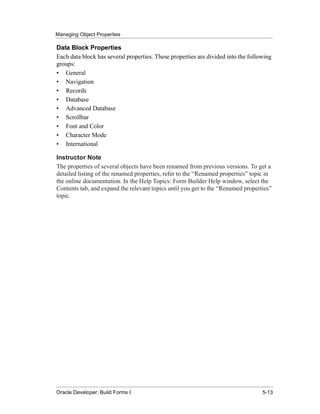


![Lesson 5: Working with Data Blocks and Frames
......................................................................................................................................................
Database Properties
Records Records buffered
fetched
Block display
SELECT ....
WHERE Clause
[ORDER BY Clause]
Work file
Copyright © Oracle Corporation, 1999. All rights reserved.
Instructor Note
When Update Changed Columns Only is set to No, Form Builder can reuse the same
SQL statement for multiple updates without having to reparse each time in the system
global area (SGA). Changing this property value to Yes can degrade performance
because the update statement must be reparsed each time.
......................................................................................................................................................
5-18 Oracle Developer: Build Forms I](https://image.slidesharecdn.com/15884086-oracle-developer-build-forms-i-090616024150-phpapp01/85/15884086-Oracle-Developer-Build-Forms-I-206-320.jpg)


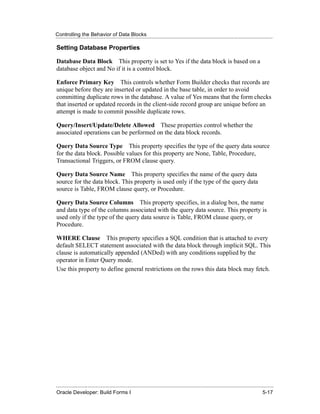
![Lesson 5: Working with Data Blocks and Frames
......................................................................................................................................................
Multiple Property Palettes
• Display multiple Property Palettes for an object:
1 Open a Property Palette for the object.
2 Hold down the [Shift] key and double-click the
object icon for an additional palette.
• Display Property Palettes for the multiple objects:
1 Open the Property Palette for first object.
2 Click the Freeze/Unfreeze button on the
toolbar.
3 Invoke Property Palette for the next object.
Copyright © Oracle Corporation, 1999. All rights reserved.
......................................................................................................................................................
5-26 Oracle Developer: Build Forms I](https://image.slidesharecdn.com/15884086-oracle-developer-build-forms-i-090616024150-phpapp01/85/15884086-Oracle-Developer-Build-Forms-I-214-320.jpg)
![More About Object Properties
......................................................................................................................................................
More About Object Properties
Displaying Multiple Property Palettes
• To display the properties of an object in multiple Property Palettes:
While one Property Palette is already open, hold down the [Shift] key
and double-click the object icon for the object in the Object Navigator.
• To display the Property Palettes for multiple objects at the same time:
1 Open the Property Palette of the first object. Click Freeze/Unfreeze
on the toolbar to “freeze” this palette.
2 Invoke the Property Palette for another object. This Property Palette
appears in a separate window.
If the second window is on top of the first one, drag it alongside the first window.
......................................................................................................................................................
Oracle Developer: Build Forms I 5-27](https://image.slidesharecdn.com/15884086-oracle-developer-build-forms-i-090616024150-phpapp01/85/15884086-Oracle-Developer-Build-Forms-I-215-320.jpg)

![More About Object Properties
......................................................................................................................................................
Setting Properties on Multiple Objects
You can view and set the properties of several objects simultaneously, whether they
are the same or different object types. To do this, select the objects in the Object
Navigator and display a combination of the properties in the Property Palette. The
combination or set may be:
• Intersection (∩): A subset in which you display only the common
properties of the selected objects (This is the default set operator.)
• Union (∪): A superset in which you display both the common properties
and the unique properties of the selected objects
Where there are differing values for a property across the selected objects, you will see
***** in the property value. This changes to a definitive value once you enter a new
value in the Property Palette. This new value then applies to each of the selected
objects to which the property is relevant.
How to Set Properties on Multiple Objects
1 Open the Property Palette for one of the objects.
2 Hold down the [Ctrl] key and click each object in the Object Navigator
or the editors whose properties are to be viewed or changed in
combination. The selected objects are highlighted.
3 Set the Intersection/Union button from the toolbar in the Property Palette
to the desired operation. This button toggles between the two options.
4 Change the displayed properties, as required. Your changes are applied
to all selected objects with these properties.
Note: With a union, some properties you see might not be relevant to all of the
selected objects. Changes to a property are applied only to objects that have the
property.
......................................................................................................................................................
Oracle Developer: Build Forms I 5-29](https://image.slidesharecdn.com/15884086-oracle-developer-build-forms-i-090616024150-phpapp01/85/15884086-Oracle-Developer-Build-Forms-I-217-320.jpg)

![More About Object Properties
......................................................................................................................................................
How to Copy Properties to Other Objects
You can write the properties and values from the Property Palette to a buffer, so that
they can be applied (pasted) to other objects in your design session.
1 In the Property Palette, display and set the properties to be copied. This
may be from one object or a combination of them.
- To copy all the property settings from the Property Palette, select
Edit—>Select All.
- To copy selected property settings only, hold down the [Ctrl] key and
click each property individually.
2 Click Copy Properties on the toolbar of the Property Palette.
3 From the Object Navigator select the object into which the properties are
to be copied.
4 In the Property Palette, click Paste Properties. The selected object
receives values from all copied properties that are relevant to their object
types.
Note: It is possible to copy the property settings of an object to objects of different
types. In this case, properties that do not apply to the target object are ignored.
Property Classes
When you display a list of properties (from either one object or a combination of
objects) in the Property Palette, the list of property names and associated values can be
saved for future application to other objects. This is known as a property class, which
is a Form Builder object in its own right.
Objects can inherit some of their properties from a linked property class, so their
properties will automatically change if the associated properties are changed in the
property class.
Property classes are discussed in more detail in a later lesson.
......................................................................................................................................................
Oracle Developer: Build Forms I 5-31](https://image.slidesharecdn.com/15884086-oracle-developer-build-forms-i-090616024150-phpapp01/85/15884086-Oracle-Developer-Build-Forms-I-219-320.jpg)


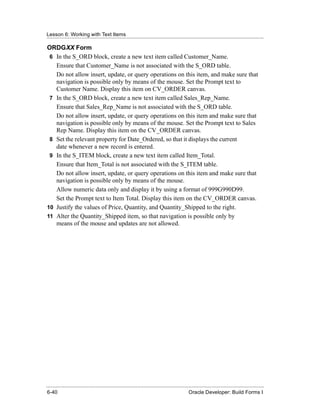
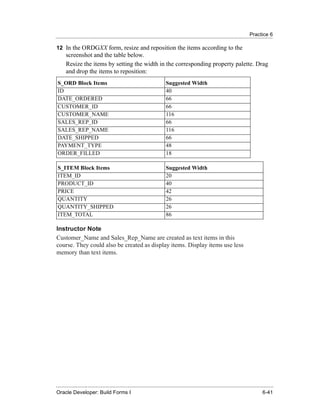
![Practice 5
......................................................................................................................................................
ORDGXX Form (continued)
6 Ensure that the current record is displayed differently from the others in
both the S_ITEM and S_INVENTORY blocks.
Create a visual attribute called Current_Record.
Using the Color Picker, set the Foreground Color to White and the Background
Color to Dark Cyan. (If these colors are not available on your window manager,
use other colors instead.) Using the Pattern Picker, choose any fill pattern. Using
the Font Picker, set the font to MS Serif italic 10 point. (If that font is not available
on your window manager, use any available font.)
Use the multiple selection feature on both data blocks to set the relevant block
property to use this visual attribute.
7 For the S_ITEM block change the number of records displayed to 4 and
resize the scroll bar accordingly.
8 Ensure that the records retrieved in the S_ITEM block are sorted by the
ITEM_ID.
9 Set the property that causes automatic navigation to Next Record, when
the user uses [Next Item] to exit the last item of a record in the S_ITEM
block.
10 Set the frame properties for all blocks as follows:
Remove the frame title and set the Update Layout property to Manually.
11 Save, compile, and run the ORDGXX form.
Test the effects of the properties that you have set.
......................................................................................................................................................
Oracle Developer: Build Forms I 5-41](https://image.slidesharecdn.com/15884086-oracle-developer-build-forms-i-090616024150-phpapp01/85/15884086-Oracle-Developer-Build-Forms-I-229-320.jpg)


![Controlling the Data of a Text Item
......................................................................................................................................................
Creating an Initial Value
Use any one of the following values to issue an initial item value whenever a new
record is created:
• Raw value
Example: 340, RICHMOND
• System variable
- Variables giving current operating system date/time:
Variable Format
$$DATE$$ DD-MON-YY
$$DATETIME$$ DD-MON-YYYY hh:mi[:ss]
$$TIME$$ hh:mi[:ss]
- Variables giving current database date/time:
Variable Format
$$DBDATE$$ DD-MON-YY
$$DBDATETIME$$ DD-MON-YYYY hh:mi[:ss]
$$DBTIME$$ hh:mi[:ss]
• Global variable
Example: :GLOBAL.CUSTOMER_ID
• Form parameter
Example: :PARAMETER.SALES_REP_ID
• Form item
Example: :ORDER.ID
• Sequence
Example: :SEQUENCE.S_ORD_ID.NEXTVAL
Automatic Sequence Number Generation
The initial value can reference a sequence in the database. Form Builder automatically
writes generated sequence numbers into the text item.
......................................................................................................................................................
Oracle Developer: Build Forms I 6-21](https://image.slidesharecdn.com/15884086-oracle-developer-build-forms-i-090616024150-phpapp01/85/15884086-Oracle-Developer-Build-Forms-I-251-320.jpg)


![Lesson 7: Creating LOVs and Editors
......................................................................................................................................................
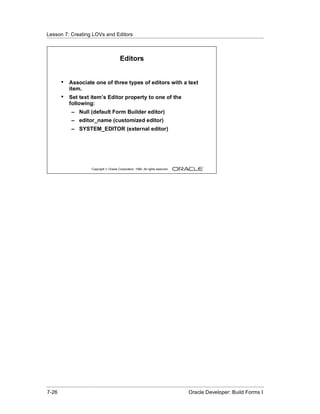
LOVs and Editors
• LOVs
– List of values for text items
– Dynamic or static list
– Independent of single text items
– Flexible and efficient
• Editors
– Override default editor
– Used for special requirements such as larger
editing window, position, color, and title
– System editor available as an option
Copyright © Oracle Corporation, 1999. All rights reserved.
Instructor Note
• Pressing the [Delete Backward] key expands the reduced list of choices
in the LOV. To find a key to match [Delete Backward], select
Help—>Keys to display Keys list.
• The EDIT_TEXTITEM built-in invokes the editor associated with the
current text item. The SHOW_EDITOR built-in invokes a user-named
editor at the specified display coordinates.
......................................................................................................................................................
7-6 Oracle Developer: Build Forms I](https://image.slidesharecdn.com/15884086-oracle-developer-build-forms-i-090616024150-phpapp01/85/15884086-Oracle-Developer-Build-Forms-I-280-320.jpg)
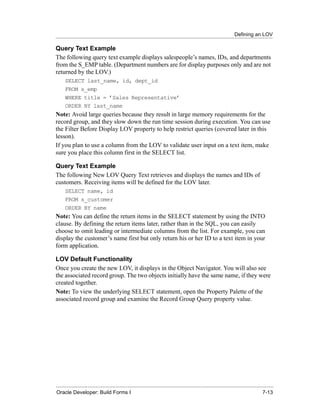
![What Are LOVs and Editors?
......................................................................................................................................................
How to Use an LOV at Run Time
When a text item has an LOV attached, the List of Values lamp displays on the status
line, while the cursor is in the item.
1 Either press the [List of Values] key, or select Edit>Display List to
invoke the LOV.
2 Select an entry in the displayed list. You can type characters to
automatically reduce the list, or enter a search string in the Find field.
3 Click OK to retrieve the line value.
Note: Automatic reduction works by comparing the search string entered with the
values displayed in the first column of the LOV. If you start your search criteria with a
% symbol, Form Builder performs a search on all LOV columns.
Editors
With a text editor enabled the user can view multiple lines of a text item
simultaneously, search and replace text in it, and generally modify the value of an item
from this separate window.
You can use one of three editors at run time:
• Form Builder default editor
• User-named editor
• System editor
Every text item has the default editor available, but you can design your own
replacement editor for those items that have special requirements such as larger editing
window, position, color, and title.
By overriding the default editor for a text item, you can provide a larger editing
window for items with potentially large textual values. Optionally, use an external
system editor.
How to Use an Editor at Run Time
With the cursor in the text item to be edited, follow these steps:
1 Press the [Edit] key, or select Edit>Edit to invoke the attached editor.
2 Edit the text in the Editor window. Form Builder editors provide a
Search button that invokes an additional search-and-replace dialog box
for manipulating text.
3 Click OK to write your changes back to the text item.
......................................................................................................................................................
Oracle Developer: Build Forms I 7-7](https://image.slidesharecdn.com/15884086-oracle-developer-build-forms-i-090616024150-phpapp01/85/15884086-Oracle-Developer-Build-Forms-I-281-320.jpg)


![Defining an LOV
......................................................................................................................................................
The Column Mapping Properties
When you click the More property control button for Column Mapping Properties, the
LOV Column Mapping dialog box opens.
Column Mapping Element Description
Column Names (List) Lets you select an LOV column for mapping or defining a
column
Return Item Specifies the name of the form item or variable to which
Form Builder should assign the column value.
Use one of the following:
block_name.item_name
GLOBAL.variable_name
PARAMETER.parameter_name
If null, the column value is not returned from LOV.
Display Width Width of column display in LOV (A 0 value causes the
column to be hidden, although its value remains available
for return.)
Column Title Heading for column in LOV window
To set a column mapping in this dialog, first select the column from the Column
Names list, then set the other mapping values, as required.
Note: The record group columns and LOV columns must remain compatible.
You can modify the record group query from its own properties list.
Associating an LOV with a Text Item
So that the user can invoke an LOV from a text item, you must specify the LOV name
in the Property Palette of the text item.
1 Select the text item in the Object Navigator from which the LOV is to be
accessible.
2 In the item Property Palette, set the List of Values property to the
required LOV.
Remember that the List of Values lamp is displayed when the user navigates to this
text item, indicating that the LOV is available through the [List of Values] key or menu
command.
......................................................................................................................................................
Oracle Developer: Build Forms I 7-17](https://image.slidesharecdn.com/15884086-oracle-developer-build-forms-i-090616024150-phpapp01/85/15884086-Oracle-Developer-Build-Forms-I-291-320.jpg)


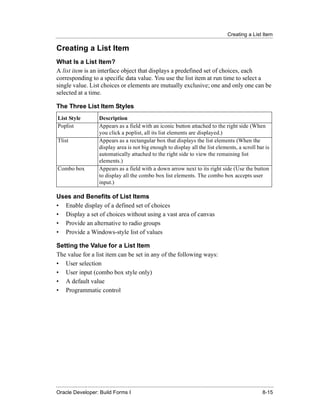
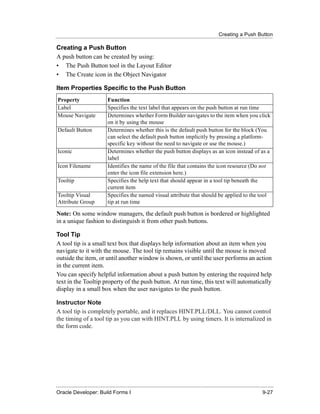
![Creating a Check Box
......................................................................................................................................................
Creating a Check Box
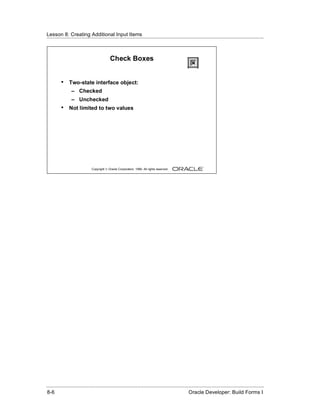
What Is a Check Box?
A check box is a two-state interface object that indicates whether a certain value is ON
or OFF. The display state of a check box is always either checked or unchecked.
Although a check box is limited to two states, it is not limited to just two values. You
specify the value to represent Checked, the value to represent Unchecked, and how
other values are processed.
You can use check boxes to enhance the user interface by converting existing items
that have two possible states.
Using a Check Box at Run Time
You can do the following at run time:
• Set check box values in the following ways:
- By user input
- By means of the Initial Value property
- Programmatically
• Query checked values.
• Query unchecked values.
• Ignore check box values in Enter Query mode by disabling the item with
[Shift] + Click.
......................................................................................................................................................
Oracle Developer: Build Forms I 8-7](https://image.slidesharecdn.com/15884086-oracle-developer-build-forms-i-090616024150-phpapp01/85/15884086-Oracle-Developer-Build-Forms-I-313-320.jpg)


![Creating a Check Box
......................................................................................................................................................
Dealing with Other Values
If your base table column accepts other values, then your check box should account for
them. You can assign other values to either the checked or unchecked states by using
the Check Box Mapping of Other Values property. Alternatively, you can choose not to
accept other values with the Not Allowed setting.
Note: If you choose not to accept other values and they exist in the base table column,
Form Builder ignores the entire record during query processing.
Dealing with Null Values
If your base table column accepts null values, you can account for them by one of the
following methods:
• Set the Check Box Mapping of Other Values property.
• Set the checked or unchecked state to represent null (leave the value
blank).
• Ignore a check box in Enter Query mode (use [Shift] + Click).
......................................................................................................................................................
Oracle Developer: Build Forms I 8-13](https://image.slidesharecdn.com/15884086-oracle-developer-build-forms-i-090616024150-phpapp01/85/15884086-Oracle-Developer-Build-Forms-I-319-320.jpg)