Introductio
n
Every applicationrequired data to be stored for future
reference to manipulate data. Today every application
stores data in database for this purpose
For example, reservation system stores passengers
details for reserving the seats and later on for sending
some messages or for printing tickets etc.
In school student details are saved for many reasons
like attendance, fee collections, exams, report card etc.
Python allows us to connect all types of database like
Oracle, SQLServer, MySQL.
In our syllabus we have to understand how to connect
Python programs with MySQL
3.
Pre-requisite to connectPython with
MySQL
Before we connect python program with any database
like MySQL we need to build a bridge to connect
Python and MySQL.
T
o build this bridge so that data can travel both ways
we need a connector called “mysql.connector”.
We can install “mysql.connector” by using
following methods:
At command prompt (Administrator login)
Type “pip install mysql.connector” and press enter
(internet connection in required)
This connector will work only for MySQL 5.7.3 or later
Or open
“https://dev.mysql.com/downloads/connector/python/”
And download connector as per OS and Python
version
4.
Connecting to MySQLfrom
Python
Once the connector is installed you are ready to
connect your python program to MySQL.
The following steps to follow while connecting your
python program with MySQL
Open python
Import the package required (import
mysql.connector)
Open the connection to database
Create a cursor instance
Execute the query and store it in resultset
Extract data from resultset
Clean up the environment
Open a connectionto MySQL
Database
T
ocreate connection, connect() function is used
Its syntax is:
connect(host=<server_name>,user=<user_name>,
passwd=<password>[,database=<database>])
Here server_name means database servername, generally
it is given as “localhost”
User_name means user by which we connect with mysql
generally it is given as “root”
Password is the password of user “root”
Database is the name of database whose data(table) we
want to use
7.
Example: T
o establishconnection with
MySQL
is_connected() function returns
true if connection is established
otherwise false
“mys” is an alias of package
“mysql.connector”
“mycon” is connection object which stores connection established with
MySQL“connect()”functionisusedtoconnectwithmysql by specifying
parameters like host, user, passwd, database
Creating
Cursor
It isa useful control structure of database connectivity.
When we fire a query to database, it is executed and
resultset (set of records) is sent over he connection in
one go.
We may want to access data one row at a time, but
query processing cannot happens as one row at a time,
so cursor help us in performing this task. Cursor stores
all the data as a temporary container of returned data
and we can fetch data one row at a time from Cursor.
10.
Creating Cursor andExecuting
Query
TO CREATE CURSOR
Cursor_name = connectionObject.cursor()
For e.g.
mycursor = mycon.cursor()
TO EXECUTE QUERY
We use execute() function to send query to
connection
Cursor_name.execute(query)
For e.g.
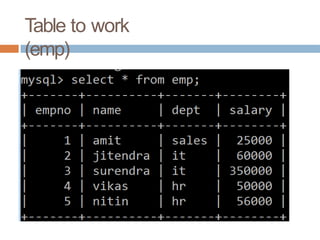
mycursor.execute(„select * from emp )
‟
11.
Example -
Cursor
Output showscursor is created and query is fired and stored, but no data is
coming. T
o fetch data we have to use functions like fetchall(), fetchone(),
fetchmany() are used
12.
Fetching(extracting) data from
ResultSet
T
o extract data from cursor following functions are
used:
fetchall() : it will return all the record in the form of
tuple.
fetchone() : it return one record from the result set. i.e.
first time it will return first record, next time it will return
second record and so on. If no more record it will
return None
fetchmany(n) : it will return n number of records. It no
more record it will return an empty tuple.
rowcount : it will return number of rows retrieved from
the cursor so far.
Parameterized
Query
We canpass values to query to perform dynamic
search like we want to search for any employee
number entered during runtime or to search any
other column values.
T
o Create Parameterized query we can use various
methods like:
Concatenating dynamic variable to
query values are entered.
String template with % formatting
String template with {} and format function
in
which
String template with{} and
format()
In this method in place of %s we will use {} and to
pass values for these placeholder format() is used.
Inside we can optionally give 0,1,2… values for e.g.
{0},{1} but its not mandatory. we can also optionally
pass named parameter inside {} so that while passing
we
need to
pass.
not
to
For
e.g.
values through format
function remember the
order of value
{roll},{name} etc.
Inserting data inMySQL table from
Python
INSERT and UPDATE operation are executed in the
same way we execute SELECT query using execute()
but one thing to remember, after executing insert or
update query we must commit our query using
connection object with commit().
For e.g. (if our connection object nameis mycon)
mycon.commit()


![Open a connection to MySQL
Database
T
ocreate connection, connect() function is used
Its syntax is:
connect(host=<server_name>,user=<user_name>,
passwd=<password>[,database=<database>])
Here server_name means database servername, generally
it is given as “localhost”
User_name means user by which we connect with mysql
generally it is given as “root”
Password is the password of user “root”
Database is the name of database whose data(table) we
want to use](https://image.slidesharecdn.com/015-250328095124-4929e0ab/85/015-Interface-Python-with-sql-interface-ppt-class-12-6-320.jpg)