Salient Features of India constitution especially power and functions
How to schedule a task for system shutdown on windows 10
1. HOW TO SCHEDULE A TASK FOR SYSTEM
SHUTDOWN ON WINDOWS 10?
Windows has never failed to impress us with its cool and advanced
features. One such feature is “system shutdown schedule.”
This feature allows you to set a desired time limit to automatically turn
off your inactive computer. It is available in Windows 7 and the latest
version of the Windows10 operatingsystem.
Basically, you can configure the shutdown schedule feature easily. But,
some Windowsusershaveencountered an issuewith it.
If you’re also encountering the issue while setting up the shutdown
schedule feature on your Windows 10 computer, or if you are
wondering how to set up the shutdown schedule task, then scroll
down this page.
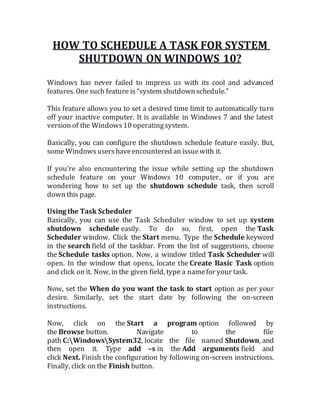
Using the Task Scheduler
Basically, you can use the Task Scheduler window to set up system
shutdown schedule easily. To do so, first, open the Task
Scheduler window. Click the Start menu. Type the Schedule keyword
in the search field of the taskbar. From the list of suggestions, choose
the Schedule tasks option. Now, a window titled Task Scheduler will
open. In the window that opens, locate the Create Basic Task option
and click on it. Now, in the given field, type a namefor your task.
Now, set the When do you want the task to start option as per your
desire. Similarly, set the start date by following the on-screen
instructions.
Now, click on the Start a program option followed by
the Browse button. Navigate to the file
path C:WindowsSystem32, locate the file named Shutdown, and
then open it. Type add –s in the Add arguments field and
click Next. Finish the configuration by following on-screen instructions.
Finally, click on the Finish button.
2. Congratulations! You have successfully configured the “system
shutdown schedule” task on your Windows10 computer.
Alternative ways to schedule taskfor system shutdown:
If you find it difficult to configure the “shutdown schedule” task using
the Task Scheduler window, then you can opt for the alternative method
given below.
Using the Run dialog box, CommandPrompt,or PowerShell
On your Windows 10 computer, open the CMD, PowerShell, or the Run
dialog box of your desire. Make sure to open the corresponding app with
the admin rights. Now, run the shutdown -s -t 600 command in the
corresponding app. (Note: In the “shutdown -s -t 600” command “600”
represents the number of seconds. So, based on your desire, you can set
it. For example, if you want your system to turn off after 5 minutes, then
type shutdown -s -t 300. Similarly, set the time period correctly). If
you’re using the Run dialog box, then type the above command in the
given field of the box and click the OK button.
Using a dedicated software
There are applications like Windows Shutdown Assistant that allows
you to set the time limit to turn off your Windows 10 computer. Before
you use this app, try the above two methods. If they fail to schedule the
task, then you can use this method. Download the software from the
official page and install it on your Windows 10 computer. Configure the
system shutdown schedule task using the software and check whether
it works.
If you need remote assistance in setting up the system shutdown
schedule task on your Windows 10 computer, then click the Call button
provided on this page.