To create anaconda environment user defined path other than default path.docx
•Download as DOCX, PDF•
0 likes•12 views

Python - creating a anaconda new environment with user defined path other than system defined default path

Recommended
More Related Content
Similar to To create anaconda environment user defined path other than default path.docx
Similar to To create anaconda environment user defined path other than default path.docx (20)
More from Raja Adapa
More from Raja Adapa (20)
Recently uploaded
Recently uploaded (20)
To create anaconda environment user defined path other than default path.docx
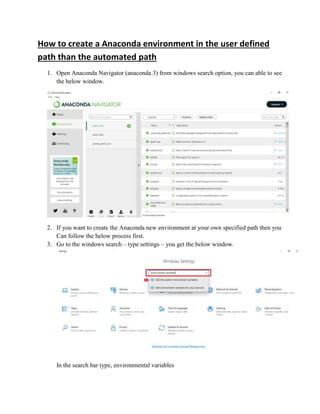
- 1. How to create a Anaconda environment in the user defined path than the automated path 1. Open Anaconda Navigator (anaconda 3) from windows search option, you can able to see the below window. 2. If you want to create the Anaconda new environment at your own specified path then you Can follow the below process first. 3. Go to the windows search – type settings – you get the below window. In the search bar type, environmental variables
- 2. And select the Edit the system environment variables. 4. You can get the below window once clicked on the environmental variables. 5. Once you click on environmental variables, then you can see the below window.
- 3. Note: We can edit the path by clicking edit function here. 6. After set the path at environmental variables, then create a new Environment at Anaconda navigator, it will create the new environment at the above Red color marked path (see the above image).
- 4. Note: If we want install any libraries for ex. Pandas, lets search on the top right and install those libraries that are required for work. For this you cross in the dropdown that is existing beside the channels. Once after installation of required libraries, then select the environment that you want to work and go to home tab and go to Jupyter notebook. Click on launch - Jupyter notebook, we can able to see the below window.
- 5. Once go to the jupyter notebook – first create a folder to work on and name it as demo_env. Go to the new environment created i.e., here it is demo_env. Open it and create a Python3(ipy kernel) notebook file here to work on.
- 6. Note: If any of the Text/CSV file required to work with notebook we have to upload the respected text/csv file in the demo_env folder only.