SlideShare a Scribd company logo
1 of 8
Download to read offline
RC Nitro Gas Car Starting Guide
Step By Step from A to K
Follow These steps to finish, prepare, break in, and run your rc car.
Performing the following steps will ensure your vehicle operates
properly. If you are new to R/C or have limited Nitro Experience, these
instructions should help you get running quickly and with minimal
problems.
A: Remove the vehicle and all other contents from the box. Identify and
familiarize yourself with the following items:
1) Completely assembled rc vehicle with body.
Remove the vehicle from the packaging board.
2) Antenna Tube. This tube houses the receiver
antenna wire. You will install this antenna tube
shortly.
3) Starter Tool Kit. The kit includes a glow plug
ignitor and a set of tools. You will need the ignitor
to start up the engine. These tools for the various
adjustments and maintenance of your vehicle.
(Most of Time, Starter Tool Kit Sold Separately)
4) Radio Control Transmitter with antenna. The
radio control transmitter is used to drive the car
and control the various functions (brake, etc.)
The radio control unit also contains several trims
and switches, which are used to adjust the servo
units in the car.
B) Remove the bottom cover of the radio control transmitter and install the
batteries. Always use fresh, fully charged batteries. Replace cover.
C) Unwrap the receiver antenna wire and feed it through the antenna tube.
Allow about 1" of the wire to stick out of the tube and feed the extra wire
back into the box.
D) Remove the radio box cover by removing the small clip and lifting the cover
out. Remove the battery tray from the box and install four batteries. Again,
always use the fresh, fully charged batteries. Place the battery try back in
the box and replace the cover and clip.
E) Now it's time to check the radio and servo setting. Install the radio antenna
in the radio control unit. Turn on the radio control followed by the receiver
switch in the buggy. Pull the trigger on the radio. The throttle servo (the
servo closer to the rear of the car) should turn counter -clockwise. If the
servo rotates in the opposite direction, slide the "TH" servo reverse switch
to the opposite setting. Repeat this process for the steering. By rotating the
steering wheel left and right and adjusting the "ST" switch accordingly.
F) Now check the neutral "trim" settings. With the steering wheel and trigger in
the neutral position (hands off), the wheels should be pointing straight
ahead, and the throttle servo horn should be pointing straight back and
forth with the carburetor in the neutral (closed) position. If either servo is
not centered, rotate the steering and throttle trim knobs accordingly to
place both servos in the correct neutral position.
G) Fill your fuel bottle with brand name 20% model car glow fuel. Lift the lid of
the fuel tank place the tube of the fuel bottle over the opening, and full with
fuel. Be careful not to spill fuel on the car.
H) The adjustment needles (adjustment screws) on the engine carburetor are
preset at the factory for the engine break -in. These needles control the
fuel/air mixture of the engine, and are used to tune the engine during and
after break -in, and during the use of the engine. These needle settings may
need minor tuning as ambient temperature, brand and nitro content of fuel,
atmospheric pressure, type of surface driven on, and other factors, all have
an effect on the engine idle, tune, and temperature. Tightening the needles
will "lean" the engine, making the speed faster. Loosening the needles will
"richen" the engine, making the speed slower. The factory presets, along
with these information should help you properly and easily start, break -in,
and tune the engine. If you are unsure about your ability to properly break -
in and tune the engine, or encounter difficulty, please seek help from your
local hobby shop. Nearly all engine problems are directly related to poor
break-in procedure and improper adjustments.
The engine may have a sticker placed over the cooling head. Remove any
sticker first. The High-Speed (also known as the Main or Top end) needle
controls the high end rpm's of the engine. This needle is located in the
brass tube directly next to the air filter. The Low Speed (also known as the
bottom end) needle control the low end rpm's of the engine. This needle is
located inside the rubber boot, directly next to the ball linkage. The idle
screw, located just above the flywheel, does not control the fuel mixture, but
instead is used to raise or lower the idle rpm by physically limiting the
carburetor opening while the throttle is in the neutral or  break position. The 
gap in the carburetor (remove the air filter assembly to view ) should be
0.8~1.6mm).
I) Before starting the engine, familiarize yourself with a few ways to safely
shut off the engine. The easiest way is to allow the fuel to run out. To
expedite the process , you can draw the fuel out of the fuel tank with your
fuel bottle. A second method is to pinch the fuel line as shown. Carefully
pinch the fuel line (the tubing from the fuel tank to the engine) until the
engine stops. Be careful not to cut or damage the tubing. At third way is to
cover the exhaust outlet. Do not use your bare fingers, as the exhaust gets
extremely hot during use. Instead, use a thick rag and cover the outlet until
the engine stops.
J) Now it's time to start the engine and begin the break in process. Turn on the
radio followed by the receiver switch. Make sure the throttle servo is in the
neutral position and the carburetor is in the closed position. Cover the
exhaust pipe outlet, and pull the starter cord several times. You can also
remove and blow into the pressure line on the pipe. This will force fuel into
the carburetor. Uncover the exhaust outlet, and attach the glow igniter to
the glow plug in the engine, and pull the starter cord in short fast bursts. If
the engine does not start within 5 seconds, stop, wait, and try again. To help
aid the engine start up, you may apply a small amount of throttle during the
first few seconds after it fires. If the engine does not start at all, refer to the
engine troubleshooting page. If the engine starts, but shuts off due to a low
idle speed, tighten (clockwise) the idle screw 1/2 turn. If the engine runs for
10~30 seconds and shuts off, tighten (lean/clockwise) the low speed needle
1/4 turn, and/or leave the igniter on the glow plug to keep the plug "lit". If the
engine starts but the idle is very high, loosen the idle screw 1/2 turn and/or
make sure the throttle is in neutral/break and the carburetor is in the closed
position.
K) After the engine has broken in and tuned for proper speeds and
performance, you will likely need to fine tune between race weekends or
even on the same day. Adjust only one needle at a time, and in one hour
increments.
The optimum high speed needle setting will allow the engine to accelerate
to top speed with no hesitation, and maintain that speed with a thin stream
of white smoke from the exhaust. If the high speed needle is too lean, the
engine will hesitate during acceleration and will lose power at high speeds.
The engine will also overheat. After setting the high speed needle, you can
set the low speed needle.  Apply full throttle for 2 seconds, followed by full 
brakes. Wait 5 seconds, and apply full throttle again for 2 seconds. The
engine should accelerate smoothly with a large puff of smoke, and only a
slight sluggishness or "blubbering". If the low speed needle is too rich, the
engine will  "blubber" heavily during the above mentioned process. If the 
low speed needle is too lean, the engine will hesitate or "starve" for fuel
during acceleration.
Before you start running your nitro gas car, read your engine break-in and operating instructions
manual thoroughly. If you run your car without following proper break-in procedure, you may damage your
engine, fail to get maximum performance from your engine.
NOTE:
1
Installradiosystembatteries...
......Into the transmitter (8 cells) and car (4 cells)
as shown above. Be sure to use only high-quality
alkaline or rechargeable Ni-Cd batteries.
Check operation of radio system...
.....Turning your transmitter wheel makes the car’s front wheels steer left
and right, and automatically return to center when transmitter wheel is
released. Make sure that pulling transmitter trigger opens the carburetor
throat, and pushing the trigger forward applies the rear wheel brakes.
Carefullycheckpullstartropelength...
...making sure
you never pull
out the rope to
it’s full length.
Doing so can
cause damage,
and the rope
may not retract.
Quick, short
pulls (12”) on
the starter are
the best tech-
nique for starting
your engine.
Get ready to fire it up!
Turn on the transmitter FIRST, then the car's
receiver switch. Attach glow plug igniter to the glow
plug. Hold the front of the car a little higher than
the rear to aid fuel flow to the engine. Pull the
starter with short, quick pulls until engine fires,
then remove glow plug igniter.
Fill the tank with one of the approved fuels...
Lift the lid on your car's fuel tank,
insert the fill tube, and slowly
squeeze until tank is full. Be careful
not to overflow, as spilled fuel may
damage radio gear or brakes.
HavingStarting
Problems?
Check our QUICK
TROUBLESHOOTING
GUIDE!
QUICK-START SHEETQUICK-START SHEET
Stoppingtheengine.
Always stop the engine before you turn the radioAlways stop the engine before you turn the radioAlways stop the engine before you turn the radioAlways stop the engine before you turn the radioAlways stop the engine before you turn the radio
switches ofswitches ofswitches ofswitches ofswitches off.f.f.f.f. You can stop the engine by pushing
a piece of wood against the flywheel underneath
the car or by pinching the fuel line leading to the
carburetor. Do NOT try to stop the engine by
plugging the exhaust outlet or by stopping the
flywheel with your finger or thumb.
EverythingOkay?
Check out the
BREAK-IN TIPS
beforerunning
yourengine
further.
2
3 4
5 6
ThrottleThrottle
BrakeBrake
ThrottleThrottle BrakeBrake
Smaller
Opening
(Lower idle(Lower idle(Lower idle(Lower idle(Lower idle
Speed)Speed)Speed)Speed)Speed)
TROUBLESHOOTING
If you have trouble starting or
keeping your RTR running, here’s a
quick checklist of what to look for
first.
Description Problem Solution
Engine will not start Out of Fuel............................................ Refill fuel tank
Contaminated fuel................................. Replace fuel
Glow plug igniter not charged..................Charge Glow igniter
Glow plug bad...................................... Replace glow plug, see “Glow Plug
Problems” section below
Fuel not getting to carbueretor..................Open and close fuel tank lid twice
Engine flooded..................................... See “Flooding” section below
Engine overheating................................ Allow engine to cool, richen fuel
mixture, see “Fuel Mixture” section
below
Carbueretor incorrectly adjusted...............Readjust carburetor, see “Fuel
Mixture” section below
Exhaust blocked ................................... Check exhaust to remove blockage
Air cleaner blocked.................................Check air cleaner, remove blockage
Engine starts, then stalls Idle speed set too low.............................Adjust idle speed screw, see “Fuel
Mixture” section below
Air bubbles in fuel line............................ Check for leaks in fuel line
Glow plug is fouled................................ Replace glow plug, see “Glow plug
problems” section below
Starter rope will not pull Engine is flooded................................... See “Flooding” section below
Engine is seized ....................................Examine engine for damage
Glow plug problems. The glow plug in your engine must
be replaced periodically to maintain peak performance and
easy starting. Most starting problems or erratic performance
can be traced back to the glow plug. The
easiest way to check for a faulty glow plug
is simply install a new one and see if the
problem goes away. However, to test the
glow plug, remove the glow plug from the
cylinder head with a 5/16” nut driver.
(Make sure there is no dirt on top of the
head which could fall into the engine. Do not lose the copper
gasket which seals the glow plug.) Connect the glow plug to
the glow igniter. All of the coils should glow bright white.
starter won’t operate, and excess fuel draining from the exhaust
outlet. Remove the glow plug with a 5/16” nut driver and also
remove the air cleaner. Turn the car upside down and pull the
starter a couple of times to drain any excess fuel out of the engine
and carbueretor. Reinstall the glow plug and try starting again.
Fuel mixture. The fuel mixture is controlled by three different
adjustments on the carburetor, and come pre-set from the factory
(see photos below). Your engine should start and run slightly rich
with these settings (rich is good for break-in). Tuning Tip: Always
make sure you can see some exhaust smoke coming out of the
exhaust outlet during operation. This is a good sign that enough
fuel is getting to the engine.
Sometimes, the first few coils
will not glow, while the rest are
bright orange. This indicates a
bad glow plug or low igniter
battery. Try recharging the
igniter, or replacing the glow
plug.
Flooding. Symptoms of a
flooded engine include difficulty
in starting, muffled sounds
coming from the exhaust, pull
TROUBLESHOOTING
High Speed Mixture:High Speed Mixture:High Speed Mixture:High Speed Mixture:High Speed Mixture:
2 1/2 turns out2 1/2 turns out2 1/2 turns out2 1/2 turns out2 1/2 turns out
FACTORY CARBURETOR SETTINGS
Leaner
(Less Fuel)
Low Speed Mixture:Low Speed Mixture:Low Speed Mixture:Low Speed Mixture:Low Speed Mixture:
1/16” of screw showing (1.5 mm)1/16” of screw showing (1.5 mm)1/16” of screw showing (1.5 mm)1/16” of screw showing (1.5 mm)1/16” of screw showing (1.5 mm)
1/16”
Idle Speed:1/32” to 1/16” openingIdle Speed:1/32” to 1/16” openingIdle Speed:1/32” to 1/16” openingIdle Speed:1/32” to 1/16” openingIdle Speed:1/32” to 1/16” opening
(.8 to 1.5 mm)(.8 to 1.5 mm)(.8 to 1.5 mm)(.8 to 1.5 mm)(.8 to 1.5 mm)
1/16”
1/32”
1/16”
1/32”
T O
Smaller
Opening
(Lower idle(Lower idle(Lower idle(Lower idle(Lower idle
Speed)Speed)Speed)Speed)Speed)
Larger
Opening
(Higher Idle(Higher Idle(Higher Idle(Higher Idle(Higher Idle
Speed)Speed)Speed)Speed)Speed)
Larger
Opening
(Higher Idle(Higher Idle(Higher Idle(Higher Idle(Higher Idle
Speed)Speed)Speed)Speed)Speed)
Richer
(More Fuel)
Richer
(More Fuel)
OR 2 to 2 1/2 turns from closeOR 2 to 2 1/2 turns from closeOR 2 to 2 1/2 turns from closeOR 2 to 2 1/2 turns from close
High Speed Mixture:High Speed Mixture:High Speed Mixture:High Speed Mixture:High Speed Mixture:
2 1/2 turns out2 1/2 turns out2 1/2 turns out2 1/2 turns out2 1/2 turns out
FACTORY CARBURETOR SETTINGS
Leaner
(Less Fuel)(Less Fuel)(Less Fuel)(Less Fuel)(Less Fuel)
Low Speed Mixture:Low Speed Mixture:Low Speed Mixture:Low Speed Mixture:Low Speed Mixture:
1/16” of screw showing (1.5 mm)1/16” of screw showing (1.5 mm)1/16” of screw showing (1.5 mm)1/16” of screw showing (1.5 mm)1/16” of screw showing (1.5 mm)
1/16”
Idle Speed:1/32” to 1/16” opening
(.8 to 1.5 mm)(.8 to 1.5 mm)(.8 to 1.5 mm)(.8 to 1.5 mm)(.8 to 1.5 mm)
1/16”
1/32”
1/16”
1/32”
T O
Engine Break-In TipsEngine Break-In Tips
The key to breaking in your engine is patience. During the break-in period, your engine may appear to malfunction with problems
such as stalling, inconsistent performance, and fouling out the glow plug. Don’t give up... just keep running, applying the throttle on
and off as smoothly as you can. Here are some points to remember during break-in:
1.1.1.1.1. Expect to replace the glow plug during the break-in period, and definitely when the engine is fully broken in.
2.2.2.2.2. Run the car without the body for extra engine cooling during the break-in period. Then cut out body•s front windshield and side
window after the break-in period (see below for “Cooling Tips”).
3.3.3.3.3. The idle speed should be set as fast as possible without causing the car to move. If necessary, adjust the idle speed screw as
shown in the photo below.
4.4.4.4.4. The standard high speed mixture and low-speed mixture settings of the carburetor vary slightly with each engine. The standard
settings are shown below. Your engine should start and run somewhat rich with these settings (rich is good for break-in). Blue-white
smoke coming from the exhaust is a good sign that the settings are rich. If there is little or no smoke, the settings are probably not
rich enough. In this case, turn the high-speed mixture screw counter-clockwise 1/8 of a turn (see photo).
5.5.5.5.5. As the engine reaches normal operating temperature, it will speed up and performance will increase. This occurs becuuse the fuel
mixture is becoming more lean
with the increased engine tempera-
ture. You might need to richen the
fuel mixture 1/16 to 1/8 of a turn
so the engine continues to run rich
as described above.
6.6.6.6.6. Constantly test the engine for
overheating.Use either an acces-
sory head temperature gauge
(these are expensive, but worth
every penny) or as an alternative,
use the water method: place a
drop of water (or saliva) on top of
the cylinder head. If it sizzles away
immediately, stop your engine and
let it cool down. If it takes about 3 to 5 seconds for the water to boil away, the engine is within normal operating temperature. When
using a temperature gauge, the temperature should always be between 220 and 280 degrees.
7.7.7.7.7. Run your engine this way (rich) until you’re just about out of fuel, bring your car to a stop and shut off the engine, allowing it to
cool for 8 to 10 minutes before starting it up again. Correct break-in will take about four tanks of fuel.Correct break-in will take about four tanks of fuel.Correct break-in will take about four tanks of fuel.Correct break-in will take about four tanks of fuel.Correct break-in will take about four tanks of fuel.
Watch for signs of overheating. These will include:Watch for signs of overheating. These will include:Watch for signs of overheating. These will include:Watch for signs of overheating. These will include:Watch for signs of overheating. These will include:
• Steam or smoke coming from the engine surfaces
• Engine hesitates during hard acceleration, as if it’s running out
of fuel
• Popping or clattering sound when slowing down
• Idle speed will surge or possibly diminish to the point of
stalling.
• Engine stops running and glow plug wire is burned, deformed,
or missing.
If you encounter any of these symptoms, you may need toIf you encounter any of these symptoms, you may need toIf you encounter any of these symptoms, you may need toIf you encounter any of these symptoms, you may need toIf you encounter any of these symptoms, you may need to
richen the high-speed mixture 1/8 to 1/4 counterclockwise orrichen the high-speed mixture 1/8 to 1/4 counterclockwise orrichen the high-speed mixture 1/8 to 1/4 counterclockwise orrichen the high-speed mixture 1/8 to 1/4 counterclockwise orrichen the high-speed mixture 1/8 to 1/4 counterclockwise or
until symptoms stop. (see photo above).until symptoms stop. (see photo above).until symptoms stop. (see photo above).until symptoms stop. (see photo above).until symptoms stop. (see photo above).
Engine may start running more rich as it breaks in.Engine may start running more rich as it breaks in.Engine may start running more rich as it breaks in.Engine may start running more rich as it breaks in.Engine may start running more rich as it breaks in.
Signs of running too rich will include:Signs of running too rich will include:Signs of running too rich will include:Signs of running too rich will include:Signs of running too rich will include:
• More and more smoke may be seen coming from the exhaust
outlet
• Engine may have a difficult time idling.
• The Engine top speed may decrease, and engine pitch will
sound lower
• Engine continually fouls glow-plugs
If you encounter any of these symptoms, you may need to leanIf you encounter any of these symptoms, you may need to leanIf you encounter any of these symptoms, you may need to leanIf you encounter any of these symptoms, you may need to leanIf you encounter any of these symptoms, you may need to lean
the high speed mixture setting by turning it 1/8 clockwise (seethe high speed mixture setting by turning it 1/8 clockwise (seethe high speed mixture setting by turning it 1/8 clockwise (seethe high speed mixture setting by turning it 1/8 clockwise (seethe high speed mixture setting by turning it 1/8 clockwise (see
photo above).photo above).photo above).photo above).photo above).
What to look for during tanks 2-4 as the engine breaks in:
What to look for when running your first tank of fuel:
Caution:Caution:Caution:Caution:Caution: if the engine stalls while you are driving due to an overheating condition, severe engine damage may have already oc-
curred. Overheating is caused by the following errors:
• Fuel mixture is not rich enough
• Air leak around carburetor
• No air filter
• Loss of muffler pressure (line falls off, etc.)
YYYYYour engine will be shorour engine will be shorour engine will be shorour engine will be shorour engine will be short-lived if any of these conditions art-lived if any of these conditions art-lived if any of these conditions art-lived if any of these conditions art-lived if any of these conditions are allowed to occur for any length of time.e allowed to occur for any length of time.e allowed to occur for any length of time.e allowed to occur for any length of time.e allowed to occur for any length of time.
Larger
Opening
(Higher Idle(Higher Idle(Higher Idle(Higher Idle(Higher Idle
Speed)Speed)Speed)Speed)Speed)Smaller
Opening
(Lower idle(Lower idle(Lower idle(Lower idle(Lower idle
Speed)Speed)Speed)Speed)Speed)
• Excessive nitro content in the fuel
• Incorrect oil content in the fuel or poor quality of fuel
• Excessive loads on the engine (bound drive train or brakes
engaged
when throttle is on)
Richer
(More Fuel)(More Fuel)(More Fuel)(More Fuel)(More Fuel)
Richer
(More Fuel)(More Fuel)(More Fuel)(More Fuel)(More Fuel)
A COOL
Gluing Your Wheels & TiresGluing Your Wheels & Tires
Here’s the best way to glue your
tires on the rims...
1. Install the tire to the wheel
2. Glue the tire to the wheel with super-glue
(cyanoacrylic glue) in four spots or more
around the rim on both sides. Make sure the
glue gets between the tire and wheel by pulling
back the tire a small amount from the wheel in
each of the four spots. Do this very quickly
before the super glue has a chance to bond.
3. Install the wheel onto the axle. On the rear
wheels, line up the roll pin with the slot in the
wheel. Thread on the locknuts.
A COOLing Tip for the RC Car
We have some tips for you on how
to keep your gas car running
cool!cool!cool!cool!cool!
1. Cut out the front windshield as shown, making
sure you round off the corners of the hole instead
of having sharp corners. This will prevent the
body from cracking at the corners.
2. If you are running in hot weather, you may
want to even cut out the side windows. Again,
take care to round off the corners of your cut-out window, and start the cutout approximately 1/2”
behind the window body post (see photo) to give the body enough support strength.
3. Be sure you have enough access areas in the body to use your glow-plug driver, and enough
clearance to be able to make your engine adjustments.
Round off the corners of your cut-out windows!Round off the corners of your cut-out windows!Round off the corners of your cut-out windows!Round off the corners of your cut-out windows!Round off the corners of your cut-out windows!
WARNING: Follow the adhesive
manufacturer’s instructions for proper use
and safety. Wear eye and hand protection.

More Related Content

Viewers also liked

Re-think about Web Performance
Re-think about Web PerformanceRe-think about Web Performance
Re-think about Web PerformanceShogo Sensui
 
DG Card: La Nueva Libreta de Direcciones Universal
DG Card: La Nueva Libreta de Direcciones UniversalDG Card: La Nueva Libreta de Direcciones Universal
DG Card: La Nueva Libreta de Direcciones Universal- Luz - Enseñat
 
Juvenile Waiver and transfer provisions
Juvenile Waiver and transfer provisionsJuvenile Waiver and transfer provisions
Juvenile Waiver and transfer provisionsdan760
 
Brush up your Coding!
Brush up your Coding!Brush up your Coding!
Brush up your Coding!Shogo Sensui
 
Brush up your Coding! 2013 winter
Brush up your Coding! 2013 winterBrush up your Coding! 2013 winter
Brush up your Coding! 2013 winterShogo Sensui
 
Web Components changes Web Development
Web Components changes Web DevelopmentWeb Components changes Web Development
Web Components changes Web DevelopmentShogo Sensui
 
Functional JavaScript with Lo-Dash.js
Functional JavaScript with Lo-Dash.jsFunctional JavaScript with Lo-Dash.js
Functional JavaScript with Lo-Dash.jsShogo Sensui
 
We should optimize images
We should optimize imagesWe should optimize images
We should optimize imagesShogo Sensui
 
Foods That Look Like Body Parts They’re Good For
Foods That Look Like Body Parts They’re Good ForFoods That Look Like Body Parts They’re Good For
Foods That Look Like Body Parts They’re Good ForEugen Grigore
 
Web Components 2016 & Polymer v2
Web Components 2016 & Polymer v2Web Components 2016 & Polymer v2
Web Components 2016 & Polymer v2Shogo Sensui
 
Resiliencia el arte de resurgir a la vida
Resiliencia el arte de resurgir a la vidaResiliencia el arte de resurgir a la vida
Resiliencia el arte de resurgir a la vidaMagu García
 

Viewers also liked (11)

Re-think about Web Performance
Re-think about Web PerformanceRe-think about Web Performance
Re-think about Web Performance
 
DG Card: La Nueva Libreta de Direcciones Universal
DG Card: La Nueva Libreta de Direcciones UniversalDG Card: La Nueva Libreta de Direcciones Universal
DG Card: La Nueva Libreta de Direcciones Universal
 
Juvenile Waiver and transfer provisions
Juvenile Waiver and transfer provisionsJuvenile Waiver and transfer provisions
Juvenile Waiver and transfer provisions
 
Brush up your Coding!
Brush up your Coding!Brush up your Coding!
Brush up your Coding!
 
Brush up your Coding! 2013 winter
Brush up your Coding! 2013 winterBrush up your Coding! 2013 winter
Brush up your Coding! 2013 winter
 
Web Components changes Web Development
Web Components changes Web DevelopmentWeb Components changes Web Development
Web Components changes Web Development
 
Functional JavaScript with Lo-Dash.js
Functional JavaScript with Lo-Dash.jsFunctional JavaScript with Lo-Dash.js
Functional JavaScript with Lo-Dash.js
 
We should optimize images
We should optimize imagesWe should optimize images
We should optimize images
 
Foods That Look Like Body Parts They’re Good For
Foods That Look Like Body Parts They’re Good ForFoods That Look Like Body Parts They’re Good For
Foods That Look Like Body Parts They’re Good For
 
Web Components 2016 & Polymer v2
Web Components 2016 & Polymer v2Web Components 2016 & Polymer v2
Web Components 2016 & Polymer v2
 
Resiliencia el arte de resurgir a la vida
Resiliencia el arte de resurgir a la vidaResiliencia el arte de resurgir a la vida
Resiliencia el arte de resurgir a la vida
 

Similar to Quik start of NITRO RC CAR

Checking piston valve clearance
Checking piston valve clearanceChecking piston valve clearance
Checking piston valve clearanceJomer Almozara
 
Setting The Base Ignition Timing On The MGB GT
Setting The Base Ignition Timing On The MGB GTSetting The Base Ignition Timing On The MGB GT
Setting The Base Ignition Timing On The MGB GTJoseph Legan
 
nothing but awesome
nothing but awesome nothing but awesome
nothing but awesome zeth111
 
Automobile training report(GALLOPS MOTORS0
Automobile training report(GALLOPS MOTORS0Automobile training report(GALLOPS MOTORS0
Automobile training report(GALLOPS MOTORS0Vijay Dubey
 
Jcb 3 tst hydrostatic dumper service repair manual
Jcb 3 tst hydrostatic dumper service repair manualJcb 3 tst hydrostatic dumper service repair manual
Jcb 3 tst hydrostatic dumper service repair manualfujsfskekem
 
Jcb 3.5 tst hydrostatic dumper service repair manual
Jcb 3.5 tst hydrostatic dumper service repair manualJcb 3.5 tst hydrostatic dumper service repair manual
Jcb 3.5 tst hydrostatic dumper service repair manualfiksefjkskemm
 
Jcb 3 tft manual dumper service repair manual
Jcb 3 tft manual dumper service repair manualJcb 3 tft manual dumper service repair manual
Jcb 3 tft manual dumper service repair manualfusjejfksemem
 
Jcb 3 tst manual dumper service repair manual
Jcb 3 tst manual dumper service repair manualJcb 3 tst manual dumper service repair manual
Jcb 3 tst manual dumper service repair manualkfs9eidokd
 
Jcb 3 tft hydrostatic dumper service repair manual
Jcb 3 tft hydrostatic dumper service repair manualJcb 3 tft hydrostatic dumper service repair manual
Jcb 3 tft hydrostatic dumper service repair manualfujsjefskekmm
 
Jcb 3 tft manual dumper service repair manual
Jcb 3 tft manual dumper service repair manualJcb 3 tft manual dumper service repair manual
Jcb 3 tft manual dumper service repair manualfisjejfskemmd
 
Jcb 3 tft manual dumper service repair manual
Jcb 3 tft manual dumper service repair manualJcb 3 tft manual dumper service repair manual
Jcb 3 tft manual dumper service repair manualfjsjjdkemmde
 
Jcb 3.5 tst hydrostatic dumper service repair manual
Jcb 3.5 tst hydrostatic dumper service repair manualJcb 3.5 tst hydrostatic dumper service repair manual
Jcb 3.5 tst hydrostatic dumper service repair manualufdjjsjejfkkemm
 
Jcb 2 t hs hydrostatic dumper service repair manual
Jcb 2 t hs hydrostatic dumper service repair manualJcb 2 t hs hydrostatic dumper service repair manual
Jcb 2 t hs hydrostatic dumper service repair manualjfjkksekfsmemwe
 
Jcb 3 tst manual dumper service repair manual
Jcb 3 tst manual dumper service repair manualJcb 3 tst manual dumper service repair manual
Jcb 3 tst manual dumper service repair manualfisjejfskemmd
 
Jcb 3 tst manual dumper service repair manual
Jcb 3 tst manual dumper service repair manualJcb 3 tst manual dumper service repair manual
Jcb 3 tst manual dumper service repair manualfujsfskekem
 
Jcb 3 tst hydrostatic dumper service repair manual
Jcb 3 tst hydrostatic dumper service repair manualJcb 3 tst hydrostatic dumper service repair manual
Jcb 3 tst hydrostatic dumper service repair manualfjsjjdkemmde
 
Jcb 2 t st hydrostatic dumper service repair manual
Jcb 2 t st hydrostatic dumper service repair manualJcb 2 t st hydrostatic dumper service repair manual
Jcb 2 t st hydrostatic dumper service repair manualfujsjefskekmm
 

Similar to Quik start of NITRO RC CAR (20)

Checking piston valve clearance
Checking piston valve clearanceChecking piston valve clearance
Checking piston valve clearance
 
Manuale SSB SSR
Manuale SSB SSRManuale SSB SSR
Manuale SSB SSR
 
Setting The Base Ignition Timing On The MGB GT
Setting The Base Ignition Timing On The MGB GTSetting The Base Ignition Timing On The MGB GT
Setting The Base Ignition Timing On The MGB GT
 
nothing but awesome
nothing but awesome nothing but awesome
nothing but awesome
 
Thunder Tiger 51
Thunder Tiger 51Thunder Tiger 51
Thunder Tiger 51
 
Dafra - Citycom 300i - Manual de Serviço PTBR
Dafra - Citycom 300i - Manual de Serviço PTBRDafra - Citycom 300i - Manual de Serviço PTBR
Dafra - Citycom 300i - Manual de Serviço PTBR
 
Automobile training report(GALLOPS MOTORS0
Automobile training report(GALLOPS MOTORS0Automobile training report(GALLOPS MOTORS0
Automobile training report(GALLOPS MOTORS0
 
Jcb 3 tst hydrostatic dumper service repair manual
Jcb 3 tst hydrostatic dumper service repair manualJcb 3 tst hydrostatic dumper service repair manual
Jcb 3 tst hydrostatic dumper service repair manual
 
Jcb 3.5 tst hydrostatic dumper service repair manual
Jcb 3.5 tst hydrostatic dumper service repair manualJcb 3.5 tst hydrostatic dumper service repair manual
Jcb 3.5 tst hydrostatic dumper service repair manual
 
Jcb 3 tft manual dumper service repair manual
Jcb 3 tft manual dumper service repair manualJcb 3 tft manual dumper service repair manual
Jcb 3 tft manual dumper service repair manual
 
Jcb 3 tst manual dumper service repair manual
Jcb 3 tst manual dumper service repair manualJcb 3 tst manual dumper service repair manual
Jcb 3 tst manual dumper service repair manual
 
Jcb 3 tft hydrostatic dumper service repair manual
Jcb 3 tft hydrostatic dumper service repair manualJcb 3 tft hydrostatic dumper service repair manual
Jcb 3 tft hydrostatic dumper service repair manual
 
Jcb 3 tft manual dumper service repair manual
Jcb 3 tft manual dumper service repair manualJcb 3 tft manual dumper service repair manual
Jcb 3 tft manual dumper service repair manual
 
Jcb 3 tft manual dumper service repair manual
Jcb 3 tft manual dumper service repair manualJcb 3 tft manual dumper service repair manual
Jcb 3 tft manual dumper service repair manual
 
Jcb 3.5 tst hydrostatic dumper service repair manual
Jcb 3.5 tst hydrostatic dumper service repair manualJcb 3.5 tst hydrostatic dumper service repair manual
Jcb 3.5 tst hydrostatic dumper service repair manual
 
Jcb 2 t hs hydrostatic dumper service repair manual
Jcb 2 t hs hydrostatic dumper service repair manualJcb 2 t hs hydrostatic dumper service repair manual
Jcb 2 t hs hydrostatic dumper service repair manual
 
Jcb 3 tst manual dumper service repair manual
Jcb 3 tst manual dumper service repair manualJcb 3 tst manual dumper service repair manual
Jcb 3 tst manual dumper service repair manual
 
Jcb 3 tst manual dumper service repair manual
Jcb 3 tst manual dumper service repair manualJcb 3 tst manual dumper service repair manual
Jcb 3 tst manual dumper service repair manual
 
Jcb 3 tst hydrostatic dumper service repair manual
Jcb 3 tst hydrostatic dumper service repair manualJcb 3 tst hydrostatic dumper service repair manual
Jcb 3 tst hydrostatic dumper service repair manual
 
Jcb 2 t st hydrostatic dumper service repair manual
Jcb 2 t st hydrostatic dumper service repair manualJcb 2 t st hydrostatic dumper service repair manual
Jcb 2 t st hydrostatic dumper service repair manual
 

Recently uploaded

notes on Evolution Of Analytic Scalability.ppt
notes on Evolution Of Analytic Scalability.pptnotes on Evolution Of Analytic Scalability.ppt
notes on Evolution Of Analytic Scalability.pptMsecMca
 
Unleashing the Power of the SORA AI lastest leap
Unleashing the Power of the SORA AI lastest leapUnleashing the Power of the SORA AI lastest leap
Unleashing the Power of the SORA AI lastest leapRishantSharmaFr
 
Work-Permit-Receiver-in-Saudi-Aramco.pptx
Work-Permit-Receiver-in-Saudi-Aramco.pptxWork-Permit-Receiver-in-Saudi-Aramco.pptx
Work-Permit-Receiver-in-Saudi-Aramco.pptxJuliansyahHarahap1
 
Employee leave management system project.
Employee leave management system project.Employee leave management system project.
Employee leave management system project.Kamal Acharya
 
Call Girls In Bangalore ☎ 7737669865 🥵 Book Your One night Stand
Call Girls In Bangalore ☎ 7737669865 🥵 Book Your One night StandCall Girls In Bangalore ☎ 7737669865 🥵 Book Your One night Stand
Call Girls In Bangalore ☎ 7737669865 🥵 Book Your One night Standamitlee9823
 
UNIT - IV - Air Compressors and its Performance
UNIT - IV - Air Compressors and its PerformanceUNIT - IV - Air Compressors and its Performance
UNIT - IV - Air Compressors and its Performancesivaprakash250
 
chapter 5.pptx: drainage and irrigation engineering
chapter 5.pptx: drainage and irrigation engineeringchapter 5.pptx: drainage and irrigation engineering
chapter 5.pptx: drainage and irrigation engineeringmulugeta48
 
Hazard Identification (HAZID) vs. Hazard and Operability (HAZOP): A Comparati...
Hazard Identification (HAZID) vs. Hazard and Operability (HAZOP): A Comparati...Hazard Identification (HAZID) vs. Hazard and Operability (HAZOP): A Comparati...
Hazard Identification (HAZID) vs. Hazard and Operability (HAZOP): A Comparati...soginsider
 
VIP Call Girls Ankleshwar 7001035870 Whatsapp Number, 24/07 Booking
VIP Call Girls Ankleshwar 7001035870 Whatsapp Number, 24/07 BookingVIP Call Girls Ankleshwar 7001035870 Whatsapp Number, 24/07 Booking
VIP Call Girls Ankleshwar 7001035870 Whatsapp Number, 24/07 Bookingdharasingh5698
 
2016EF22_0 solar project report rooftop projects
2016EF22_0 solar project report rooftop projects2016EF22_0 solar project report rooftop projects
2016EF22_0 solar project report rooftop projectssmsksolar
 
Call Girls Pimpri Chinchwad Call Me 7737669865 Budget Friendly No Advance Boo...
Call Girls Pimpri Chinchwad Call Me 7737669865 Budget Friendly No Advance Boo...Call Girls Pimpri Chinchwad Call Me 7737669865 Budget Friendly No Advance Boo...
Call Girls Pimpri Chinchwad Call Me 7737669865 Budget Friendly No Advance Boo...roncy bisnoi
 
Generative AI or GenAI technology based PPT
Generative AI or GenAI technology based PPTGenerative AI or GenAI technology based PPT
Generative AI or GenAI technology based PPTbhaskargani46
 
A Study of Urban Area Plan for Pabna Municipality
A Study of Urban Area Plan for Pabna MunicipalityA Study of Urban Area Plan for Pabna Municipality
A Study of Urban Area Plan for Pabna MunicipalityMorshed Ahmed Rahath
 
Hostel management system project report..pdf
Hostel management system project report..pdfHostel management system project report..pdf
Hostel management system project report..pdfKamal Acharya
 
University management System project report..pdf
University management System project report..pdfUniversity management System project report..pdf
University management System project report..pdfKamal Acharya
 
22-prompt engineering noted slide shown.pdf
22-prompt engineering noted slide shown.pdf22-prompt engineering noted slide shown.pdf
22-prompt engineering noted slide shown.pdf203318pmpc
 
data_management_and _data_science_cheat_sheet.pdf
data_management_and _data_science_cheat_sheet.pdfdata_management_and _data_science_cheat_sheet.pdf
data_management_and _data_science_cheat_sheet.pdfJiananWang21
 
Thermal Engineering-R & A / C - unit - V
Thermal Engineering-R & A / C - unit - VThermal Engineering-R & A / C - unit - V
Thermal Engineering-R & A / C - unit - VDineshKumar4165
 

Recently uploaded (20)

notes on Evolution Of Analytic Scalability.ppt
notes on Evolution Of Analytic Scalability.pptnotes on Evolution Of Analytic Scalability.ppt
notes on Evolution Of Analytic Scalability.ppt
 
(INDIRA) Call Girl Aurangabad Call Now 8617697112 Aurangabad Escorts 24x7
(INDIRA) Call Girl Aurangabad Call Now 8617697112 Aurangabad Escorts 24x7(INDIRA) Call Girl Aurangabad Call Now 8617697112 Aurangabad Escorts 24x7
(INDIRA) Call Girl Aurangabad Call Now 8617697112 Aurangabad Escorts 24x7
 
Unleashing the Power of the SORA AI lastest leap
Unleashing the Power of the SORA AI lastest leapUnleashing the Power of the SORA AI lastest leap
Unleashing the Power of the SORA AI lastest leap
 
(INDIRA) Call Girl Bhosari Call Now 8617697112 Bhosari Escorts 24x7
(INDIRA) Call Girl Bhosari Call Now 8617697112 Bhosari Escorts 24x7(INDIRA) Call Girl Bhosari Call Now 8617697112 Bhosari Escorts 24x7
(INDIRA) Call Girl Bhosari Call Now 8617697112 Bhosari Escorts 24x7
 
Work-Permit-Receiver-in-Saudi-Aramco.pptx
Work-Permit-Receiver-in-Saudi-Aramco.pptxWork-Permit-Receiver-in-Saudi-Aramco.pptx
Work-Permit-Receiver-in-Saudi-Aramco.pptx
 
Employee leave management system project.
Employee leave management system project.Employee leave management system project.
Employee leave management system project.
 
Call Girls In Bangalore ☎ 7737669865 🥵 Book Your One night Stand
Call Girls In Bangalore ☎ 7737669865 🥵 Book Your One night StandCall Girls In Bangalore ☎ 7737669865 🥵 Book Your One night Stand
Call Girls In Bangalore ☎ 7737669865 🥵 Book Your One night Stand
 
UNIT - IV - Air Compressors and its Performance
UNIT - IV - Air Compressors and its PerformanceUNIT - IV - Air Compressors and its Performance
UNIT - IV - Air Compressors and its Performance
 
chapter 5.pptx: drainage and irrigation engineering
chapter 5.pptx: drainage and irrigation engineeringchapter 5.pptx: drainage and irrigation engineering
chapter 5.pptx: drainage and irrigation engineering
 
Hazard Identification (HAZID) vs. Hazard and Operability (HAZOP): A Comparati...
Hazard Identification (HAZID) vs. Hazard and Operability (HAZOP): A Comparati...Hazard Identification (HAZID) vs. Hazard and Operability (HAZOP): A Comparati...
Hazard Identification (HAZID) vs. Hazard and Operability (HAZOP): A Comparati...
 
VIP Call Girls Ankleshwar 7001035870 Whatsapp Number, 24/07 Booking
VIP Call Girls Ankleshwar 7001035870 Whatsapp Number, 24/07 BookingVIP Call Girls Ankleshwar 7001035870 Whatsapp Number, 24/07 Booking
VIP Call Girls Ankleshwar 7001035870 Whatsapp Number, 24/07 Booking
 
2016EF22_0 solar project report rooftop projects
2016EF22_0 solar project report rooftop projects2016EF22_0 solar project report rooftop projects
2016EF22_0 solar project report rooftop projects
 
Call Girls Pimpri Chinchwad Call Me 7737669865 Budget Friendly No Advance Boo...
Call Girls Pimpri Chinchwad Call Me 7737669865 Budget Friendly No Advance Boo...Call Girls Pimpri Chinchwad Call Me 7737669865 Budget Friendly No Advance Boo...
Call Girls Pimpri Chinchwad Call Me 7737669865 Budget Friendly No Advance Boo...
 
Generative AI or GenAI technology based PPT
Generative AI or GenAI technology based PPTGenerative AI or GenAI technology based PPT
Generative AI or GenAI technology based PPT
 
A Study of Urban Area Plan for Pabna Municipality
A Study of Urban Area Plan for Pabna MunicipalityA Study of Urban Area Plan for Pabna Municipality
A Study of Urban Area Plan for Pabna Municipality
 
Hostel management system project report..pdf
Hostel management system project report..pdfHostel management system project report..pdf
Hostel management system project report..pdf
 
University management System project report..pdf
University management System project report..pdfUniversity management System project report..pdf
University management System project report..pdf
 
22-prompt engineering noted slide shown.pdf
22-prompt engineering noted slide shown.pdf22-prompt engineering noted slide shown.pdf
22-prompt engineering noted slide shown.pdf
 
data_management_and _data_science_cheat_sheet.pdf
data_management_and _data_science_cheat_sheet.pdfdata_management_and _data_science_cheat_sheet.pdf
data_management_and _data_science_cheat_sheet.pdf
 
Thermal Engineering-R & A / C - unit - V
Thermal Engineering-R & A / C - unit - VThermal Engineering-R & A / C - unit - V
Thermal Engineering-R & A / C - unit - V
 

Quik start of NITRO RC CAR

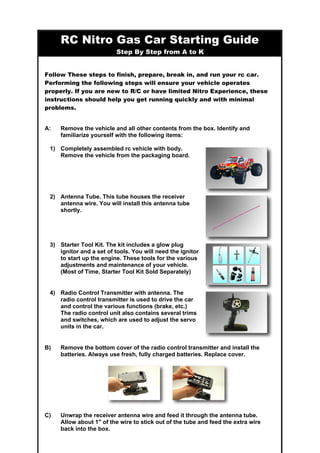
  • 1. RC Nitro Gas Car Starting Guide Step By Step from A to K Follow These steps to finish, prepare, break in, and run your rc car. Performing the following steps will ensure your vehicle operates properly. If you are new to R/C or have limited Nitro Experience, these instructions should help you get running quickly and with minimal problems. A: Remove the vehicle and all other contents from the box. Identify and familiarize yourself with the following items: 1) Completely assembled rc vehicle with body. Remove the vehicle from the packaging board. 2) Antenna Tube. This tube houses the receiver antenna wire. You will install this antenna tube shortly. 3) Starter Tool Kit. The kit includes a glow plug ignitor and a set of tools. You will need the ignitor to start up the engine. These tools for the various adjustments and maintenance of your vehicle. (Most of Time, Starter Tool Kit Sold Separately) 4) Radio Control Transmitter with antenna. The radio control transmitter is used to drive the car and control the various functions (brake, etc.) The radio control unit also contains several trims and switches, which are used to adjust the servo units in the car. B) Remove the bottom cover of the radio control transmitter and install the batteries. Always use fresh, fully charged batteries. Replace cover. C) Unwrap the receiver antenna wire and feed it through the antenna tube. Allow about 1" of the wire to stick out of the tube and feed the extra wire back into the box.
  • 2. D) Remove the radio box cover by removing the small clip and lifting the cover out. Remove the battery tray from the box and install four batteries. Again, always use the fresh, fully charged batteries. Place the battery try back in the box and replace the cover and clip. E) Now it's time to check the radio and servo setting. Install the radio antenna in the radio control unit. Turn on the radio control followed by the receiver switch in the buggy. Pull the trigger on the radio. The throttle servo (the servo closer to the rear of the car) should turn counter -clockwise. If the servo rotates in the opposite direction, slide the "TH" servo reverse switch to the opposite setting. Repeat this process for the steering. By rotating the steering wheel left and right and adjusting the "ST" switch accordingly. F) Now check the neutral "trim" settings. With the steering wheel and trigger in the neutral position (hands off), the wheels should be pointing straight ahead, and the throttle servo horn should be pointing straight back and forth with the carburetor in the neutral (closed) position. If either servo is not centered, rotate the steering and throttle trim knobs accordingly to place both servos in the correct neutral position. G) Fill your fuel bottle with brand name 20% model car glow fuel. Lift the lid of the fuel tank place the tube of the fuel bottle over the opening, and full with fuel. Be careful not to spill fuel on the car.
  • 3. H) The adjustment needles (adjustment screws) on the engine carburetor are preset at the factory for the engine break -in. These needles control the fuel/air mixture of the engine, and are used to tune the engine during and after break -in, and during the use of the engine. These needle settings may need minor tuning as ambient temperature, brand and nitro content of fuel, atmospheric pressure, type of surface driven on, and other factors, all have an effect on the engine idle, tune, and temperature. Tightening the needles will "lean" the engine, making the speed faster. Loosening the needles will "richen" the engine, making the speed slower. The factory presets, along with these information should help you properly and easily start, break -in, and tune the engine. If you are unsure about your ability to properly break - in and tune the engine, or encounter difficulty, please seek help from your local hobby shop. Nearly all engine problems are directly related to poor break-in procedure and improper adjustments. The engine may have a sticker placed over the cooling head. Remove any sticker first. The High-Speed (also known as the Main or Top end) needle controls the high end rpm's of the engine. This needle is located in the brass tube directly next to the air filter. The Low Speed (also known as the bottom end) needle control the low end rpm's of the engine. This needle is located inside the rubber boot, directly next to the ball linkage. The idle screw, located just above the flywheel, does not control the fuel mixture, but instead is used to raise or lower the idle rpm by physically limiting the carburetor opening while the throttle is in the neutral or  break position. The  gap in the carburetor (remove the air filter assembly to view ) should be 0.8~1.6mm). I) Before starting the engine, familiarize yourself with a few ways to safely shut off the engine. The easiest way is to allow the fuel to run out. To expedite the process , you can draw the fuel out of the fuel tank with your fuel bottle. A second method is to pinch the fuel line as shown. Carefully pinch the fuel line (the tubing from the fuel tank to the engine) until the engine stops. Be careful not to cut or damage the tubing. At third way is to cover the exhaust outlet. Do not use your bare fingers, as the exhaust gets extremely hot during use. Instead, use a thick rag and cover the outlet until the engine stops.
  • 4. J) Now it's time to start the engine and begin the break in process. Turn on the radio followed by the receiver switch. Make sure the throttle servo is in the neutral position and the carburetor is in the closed position. Cover the exhaust pipe outlet, and pull the starter cord several times. You can also remove and blow into the pressure line on the pipe. This will force fuel into the carburetor. Uncover the exhaust outlet, and attach the glow igniter to the glow plug in the engine, and pull the starter cord in short fast bursts. If the engine does not start within 5 seconds, stop, wait, and try again. To help aid the engine start up, you may apply a small amount of throttle during the first few seconds after it fires. If the engine does not start at all, refer to the engine troubleshooting page. If the engine starts, but shuts off due to a low idle speed, tighten (clockwise) the idle screw 1/2 turn. If the engine runs for 10~30 seconds and shuts off, tighten (lean/clockwise) the low speed needle 1/4 turn, and/or leave the igniter on the glow plug to keep the plug "lit". If the engine starts but the idle is very high, loosen the idle screw 1/2 turn and/or make sure the throttle is in neutral/break and the carburetor is in the closed position. K) After the engine has broken in and tuned for proper speeds and performance, you will likely need to fine tune between race weekends or even on the same day. Adjust only one needle at a time, and in one hour increments. The optimum high speed needle setting will allow the engine to accelerate to top speed with no hesitation, and maintain that speed with a thin stream of white smoke from the exhaust. If the high speed needle is too lean, the engine will hesitate during acceleration and will lose power at high speeds. The engine will also overheat. After setting the high speed needle, you can set the low speed needle.  Apply full throttle for 2 seconds, followed by full  brakes. Wait 5 seconds, and apply full throttle again for 2 seconds. The engine should accelerate smoothly with a large puff of smoke, and only a slight sluggishness or "blubbering". If the low speed needle is too rich, the engine will  "blubber" heavily during the above mentioned process. If the  low speed needle is too lean, the engine will hesitate or "starve" for fuel during acceleration.
  • 5. Before you start running your nitro gas car, read your engine break-in and operating instructions manual thoroughly. If you run your car without following proper break-in procedure, you may damage your engine, fail to get maximum performance from your engine. NOTE: 1 Installradiosystembatteries... ......Into the transmitter (8 cells) and car (4 cells) as shown above. Be sure to use only high-quality alkaline or rechargeable Ni-Cd batteries. Check operation of radio system... .....Turning your transmitter wheel makes the car’s front wheels steer left and right, and automatically return to center when transmitter wheel is released. Make sure that pulling transmitter trigger opens the carburetor throat, and pushing the trigger forward applies the rear wheel brakes. Carefullycheckpullstartropelength... ...making sure you never pull out the rope to it’s full length. Doing so can cause damage, and the rope may not retract. Quick, short pulls (12”) on the starter are the best tech- nique for starting your engine. Get ready to fire it up! Turn on the transmitter FIRST, then the car's receiver switch. Attach glow plug igniter to the glow plug. Hold the front of the car a little higher than the rear to aid fuel flow to the engine. Pull the starter with short, quick pulls until engine fires, then remove glow plug igniter. Fill the tank with one of the approved fuels... Lift the lid on your car's fuel tank, insert the fill tube, and slowly squeeze until tank is full. Be careful not to overflow, as spilled fuel may damage radio gear or brakes. HavingStarting Problems? Check our QUICK TROUBLESHOOTING GUIDE! QUICK-START SHEETQUICK-START SHEET Stoppingtheengine. Always stop the engine before you turn the radioAlways stop the engine before you turn the radioAlways stop the engine before you turn the radioAlways stop the engine before you turn the radioAlways stop the engine before you turn the radio switches ofswitches ofswitches ofswitches ofswitches off.f.f.f.f. You can stop the engine by pushing a piece of wood against the flywheel underneath the car or by pinching the fuel line leading to the carburetor. Do NOT try to stop the engine by plugging the exhaust outlet or by stopping the flywheel with your finger or thumb. EverythingOkay? Check out the BREAK-IN TIPS beforerunning yourengine further. 2 3 4 5 6 ThrottleThrottle BrakeBrake ThrottleThrottle BrakeBrake
  • 6. Smaller Opening (Lower idle(Lower idle(Lower idle(Lower idle(Lower idle Speed)Speed)Speed)Speed)Speed) TROUBLESHOOTING If you have trouble starting or keeping your RTR running, here’s a quick checklist of what to look for first. Description Problem Solution Engine will not start Out of Fuel............................................ Refill fuel tank Contaminated fuel................................. Replace fuel Glow plug igniter not charged..................Charge Glow igniter Glow plug bad...................................... Replace glow plug, see “Glow Plug Problems” section below Fuel not getting to carbueretor..................Open and close fuel tank lid twice Engine flooded..................................... See “Flooding” section below Engine overheating................................ Allow engine to cool, richen fuel mixture, see “Fuel Mixture” section below Carbueretor incorrectly adjusted...............Readjust carburetor, see “Fuel Mixture” section below Exhaust blocked ................................... Check exhaust to remove blockage Air cleaner blocked.................................Check air cleaner, remove blockage Engine starts, then stalls Idle speed set too low.............................Adjust idle speed screw, see “Fuel Mixture” section below Air bubbles in fuel line............................ Check for leaks in fuel line Glow plug is fouled................................ Replace glow plug, see “Glow plug problems” section below Starter rope will not pull Engine is flooded................................... See “Flooding” section below Engine is seized ....................................Examine engine for damage Glow plug problems. The glow plug in your engine must be replaced periodically to maintain peak performance and easy starting. Most starting problems or erratic performance can be traced back to the glow plug. The easiest way to check for a faulty glow plug is simply install a new one and see if the problem goes away. However, to test the glow plug, remove the glow plug from the cylinder head with a 5/16” nut driver. (Make sure there is no dirt on top of the head which could fall into the engine. Do not lose the copper gasket which seals the glow plug.) Connect the glow plug to the glow igniter. All of the coils should glow bright white. starter won’t operate, and excess fuel draining from the exhaust outlet. Remove the glow plug with a 5/16” nut driver and also remove the air cleaner. Turn the car upside down and pull the starter a couple of times to drain any excess fuel out of the engine and carbueretor. Reinstall the glow plug and try starting again. Fuel mixture. The fuel mixture is controlled by three different adjustments on the carburetor, and come pre-set from the factory (see photos below). Your engine should start and run slightly rich with these settings (rich is good for break-in). Tuning Tip: Always make sure you can see some exhaust smoke coming out of the exhaust outlet during operation. This is a good sign that enough fuel is getting to the engine. Sometimes, the first few coils will not glow, while the rest are bright orange. This indicates a bad glow plug or low igniter battery. Try recharging the igniter, or replacing the glow plug. Flooding. Symptoms of a flooded engine include difficulty in starting, muffled sounds coming from the exhaust, pull TROUBLESHOOTING High Speed Mixture:High Speed Mixture:High Speed Mixture:High Speed Mixture:High Speed Mixture: 2 1/2 turns out2 1/2 turns out2 1/2 turns out2 1/2 turns out2 1/2 turns out FACTORY CARBURETOR SETTINGS Leaner (Less Fuel) Low Speed Mixture:Low Speed Mixture:Low Speed Mixture:Low Speed Mixture:Low Speed Mixture: 1/16” of screw showing (1.5 mm)1/16” of screw showing (1.5 mm)1/16” of screw showing (1.5 mm)1/16” of screw showing (1.5 mm)1/16” of screw showing (1.5 mm) 1/16” Idle Speed:1/32” to 1/16” openingIdle Speed:1/32” to 1/16” openingIdle Speed:1/32” to 1/16” openingIdle Speed:1/32” to 1/16” openingIdle Speed:1/32” to 1/16” opening (.8 to 1.5 mm)(.8 to 1.5 mm)(.8 to 1.5 mm)(.8 to 1.5 mm)(.8 to 1.5 mm) 1/16” 1/32” 1/16” 1/32” T O Smaller Opening (Lower idle(Lower idle(Lower idle(Lower idle(Lower idle Speed)Speed)Speed)Speed)Speed) Larger Opening (Higher Idle(Higher Idle(Higher Idle(Higher Idle(Higher Idle Speed)Speed)Speed)Speed)Speed) Larger Opening (Higher Idle(Higher Idle(Higher Idle(Higher Idle(Higher Idle Speed)Speed)Speed)Speed)Speed) Richer (More Fuel) Richer (More Fuel) OR 2 to 2 1/2 turns from closeOR 2 to 2 1/2 turns from closeOR 2 to 2 1/2 turns from closeOR 2 to 2 1/2 turns from close
  • 7. High Speed Mixture:High Speed Mixture:High Speed Mixture:High Speed Mixture:High Speed Mixture: 2 1/2 turns out2 1/2 turns out2 1/2 turns out2 1/2 turns out2 1/2 turns out FACTORY CARBURETOR SETTINGS Leaner (Less Fuel)(Less Fuel)(Less Fuel)(Less Fuel)(Less Fuel) Low Speed Mixture:Low Speed Mixture:Low Speed Mixture:Low Speed Mixture:Low Speed Mixture: 1/16” of screw showing (1.5 mm)1/16” of screw showing (1.5 mm)1/16” of screw showing (1.5 mm)1/16” of screw showing (1.5 mm)1/16” of screw showing (1.5 mm) 1/16” Idle Speed:1/32” to 1/16” opening (.8 to 1.5 mm)(.8 to 1.5 mm)(.8 to 1.5 mm)(.8 to 1.5 mm)(.8 to 1.5 mm) 1/16” 1/32” 1/16” 1/32” T O Engine Break-In TipsEngine Break-In Tips The key to breaking in your engine is patience. During the break-in period, your engine may appear to malfunction with problems such as stalling, inconsistent performance, and fouling out the glow plug. Don’t give up... just keep running, applying the throttle on and off as smoothly as you can. Here are some points to remember during break-in: 1.1.1.1.1. Expect to replace the glow plug during the break-in period, and definitely when the engine is fully broken in. 2.2.2.2.2. Run the car without the body for extra engine cooling during the break-in period. Then cut out body•s front windshield and side window after the break-in period (see below for “Cooling Tips”). 3.3.3.3.3. The idle speed should be set as fast as possible without causing the car to move. If necessary, adjust the idle speed screw as shown in the photo below. 4.4.4.4.4. The standard high speed mixture and low-speed mixture settings of the carburetor vary slightly with each engine. The standard settings are shown below. Your engine should start and run somewhat rich with these settings (rich is good for break-in). Blue-white smoke coming from the exhaust is a good sign that the settings are rich. If there is little or no smoke, the settings are probably not rich enough. In this case, turn the high-speed mixture screw counter-clockwise 1/8 of a turn (see photo). 5.5.5.5.5. As the engine reaches normal operating temperature, it will speed up and performance will increase. This occurs becuuse the fuel mixture is becoming more lean with the increased engine tempera- ture. You might need to richen the fuel mixture 1/16 to 1/8 of a turn so the engine continues to run rich as described above. 6.6.6.6.6. Constantly test the engine for overheating.Use either an acces- sory head temperature gauge (these are expensive, but worth every penny) or as an alternative, use the water method: place a drop of water (or saliva) on top of the cylinder head. If it sizzles away immediately, stop your engine and let it cool down. If it takes about 3 to 5 seconds for the water to boil away, the engine is within normal operating temperature. When using a temperature gauge, the temperature should always be between 220 and 280 degrees. 7.7.7.7.7. Run your engine this way (rich) until you’re just about out of fuel, bring your car to a stop and shut off the engine, allowing it to cool for 8 to 10 minutes before starting it up again. Correct break-in will take about four tanks of fuel.Correct break-in will take about four tanks of fuel.Correct break-in will take about four tanks of fuel.Correct break-in will take about four tanks of fuel.Correct break-in will take about four tanks of fuel. Watch for signs of overheating. These will include:Watch for signs of overheating. These will include:Watch for signs of overheating. These will include:Watch for signs of overheating. These will include:Watch for signs of overheating. These will include: • Steam or smoke coming from the engine surfaces • Engine hesitates during hard acceleration, as if it’s running out of fuel • Popping or clattering sound when slowing down • Idle speed will surge or possibly diminish to the point of stalling. • Engine stops running and glow plug wire is burned, deformed, or missing. If you encounter any of these symptoms, you may need toIf you encounter any of these symptoms, you may need toIf you encounter any of these symptoms, you may need toIf you encounter any of these symptoms, you may need toIf you encounter any of these symptoms, you may need to richen the high-speed mixture 1/8 to 1/4 counterclockwise orrichen the high-speed mixture 1/8 to 1/4 counterclockwise orrichen the high-speed mixture 1/8 to 1/4 counterclockwise orrichen the high-speed mixture 1/8 to 1/4 counterclockwise orrichen the high-speed mixture 1/8 to 1/4 counterclockwise or until symptoms stop. (see photo above).until symptoms stop. (see photo above).until symptoms stop. (see photo above).until symptoms stop. (see photo above).until symptoms stop. (see photo above). Engine may start running more rich as it breaks in.Engine may start running more rich as it breaks in.Engine may start running more rich as it breaks in.Engine may start running more rich as it breaks in.Engine may start running more rich as it breaks in. Signs of running too rich will include:Signs of running too rich will include:Signs of running too rich will include:Signs of running too rich will include:Signs of running too rich will include: • More and more smoke may be seen coming from the exhaust outlet • Engine may have a difficult time idling. • The Engine top speed may decrease, and engine pitch will sound lower • Engine continually fouls glow-plugs If you encounter any of these symptoms, you may need to leanIf you encounter any of these symptoms, you may need to leanIf you encounter any of these symptoms, you may need to leanIf you encounter any of these symptoms, you may need to leanIf you encounter any of these symptoms, you may need to lean the high speed mixture setting by turning it 1/8 clockwise (seethe high speed mixture setting by turning it 1/8 clockwise (seethe high speed mixture setting by turning it 1/8 clockwise (seethe high speed mixture setting by turning it 1/8 clockwise (seethe high speed mixture setting by turning it 1/8 clockwise (see photo above).photo above).photo above).photo above).photo above). What to look for during tanks 2-4 as the engine breaks in: What to look for when running your first tank of fuel: Caution:Caution:Caution:Caution:Caution: if the engine stalls while you are driving due to an overheating condition, severe engine damage may have already oc- curred. Overheating is caused by the following errors: • Fuel mixture is not rich enough • Air leak around carburetor • No air filter • Loss of muffler pressure (line falls off, etc.) YYYYYour engine will be shorour engine will be shorour engine will be shorour engine will be shorour engine will be short-lived if any of these conditions art-lived if any of these conditions art-lived if any of these conditions art-lived if any of these conditions art-lived if any of these conditions are allowed to occur for any length of time.e allowed to occur for any length of time.e allowed to occur for any length of time.e allowed to occur for any length of time.e allowed to occur for any length of time. Larger Opening (Higher Idle(Higher Idle(Higher Idle(Higher Idle(Higher Idle Speed)Speed)Speed)Speed)Speed)Smaller Opening (Lower idle(Lower idle(Lower idle(Lower idle(Lower idle Speed)Speed)Speed)Speed)Speed) • Excessive nitro content in the fuel • Incorrect oil content in the fuel or poor quality of fuel • Excessive loads on the engine (bound drive train or brakes engaged when throttle is on) Richer (More Fuel)(More Fuel)(More Fuel)(More Fuel)(More Fuel) Richer (More Fuel)(More Fuel)(More Fuel)(More Fuel)(More Fuel)
  • 8. A COOL Gluing Your Wheels & TiresGluing Your Wheels & Tires Here’s the best way to glue your tires on the rims... 1. Install the tire to the wheel 2. Glue the tire to the wheel with super-glue (cyanoacrylic glue) in four spots or more around the rim on both sides. Make sure the glue gets between the tire and wheel by pulling back the tire a small amount from the wheel in each of the four spots. Do this very quickly before the super glue has a chance to bond. 3. Install the wheel onto the axle. On the rear wheels, line up the roll pin with the slot in the wheel. Thread on the locknuts. A COOLing Tip for the RC Car We have some tips for you on how to keep your gas car running cool!cool!cool!cool!cool! 1. Cut out the front windshield as shown, making sure you round off the corners of the hole instead of having sharp corners. This will prevent the body from cracking at the corners. 2. If you are running in hot weather, you may want to even cut out the side windows. Again, take care to round off the corners of your cut-out window, and start the cutout approximately 1/2” behind the window body post (see photo) to give the body enough support strength. 3. Be sure you have enough access areas in the body to use your glow-plug driver, and enough clearance to be able to make your engine adjustments. Round off the corners of your cut-out windows!Round off the corners of your cut-out windows!Round off the corners of your cut-out windows!Round off the corners of your cut-out windows!Round off the corners of your cut-out windows! WARNING: Follow the adhesive manufacturer’s instructions for proper use and safety. Wear eye and hand protection.