3. 1.Planning
3.B Monday Tuesday Wednesday Thursday Friday
25-29
January
Designing the
shelve
Cut the
shelve’s sides
1-5
February
Cut the
backpart and
start marking
the marks for
the interior
shelves
Cut the two
interior
shelves.
Design the
wood
reinforcement
8-12
February
Cut with saw
the
reinforcements
Continue
cutting the
reinforcements
Stick the main
reinforcements
to the backpart
and sides
15-19
February
Continue
sticking the
reinforcement
to the sides
Cut and paint
the decoration
of the shelve
(First design)
4. 1.1 Gantt chart
3.B Desinging Drawing Cutting Sticking Painting
January 25
January 26
February 1
February 2
February 8
February 9
February 12
February 16
February 19
7. 3.Pieces
3.1. Cardboard pieces
3.2. Wood pieces
(Each piece is marked with two numbers, the big one, marks the number in
a list in the following page with its measures. The small one, the number of
times each piece that has been used in this project)
1(x4)2(x1)
3(x2)
4(x4)
5(x2)
6(x4)
7(x4)
8. 4.Instructions
Before starting, search big and hard cardboards for making this shelve.
Each piece has an image in the previous page; marked with the same
number.
Cutting; with cutter and handsaw
Cut the four sides1
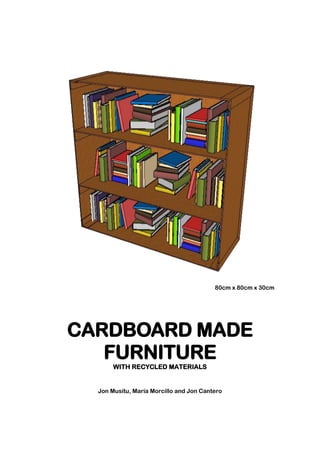
of the shelve, the measures of each side are 80cm x 30cm
Cut the backpart2
of the shelve, its measures are 80cm x 80cm
Cut the two shelves3
, each one; 80cm x 30cm the big part of it, 5cm x 30cm the
short reinforces and 5cm x 80cm the long one. These three pieces must be cut
together
Cut the four cardboard reinforces4
of the corners, each’s measures are 10cm
x 30cm
Cut the four hard cardboard or wood reinforces5
that will sustain the objects
put over the selves, each’s measures are 80cm x 15cm x 2-3cm
Cut the wood reinforces, the ones used to cover corners in house walls, corner
form; the four long ones6
, 80cm x 4cmx 4cm, these ones will be cut in all the
corners again with a 45º angle. The four short ones7
, 30cm x 4cm x 4cm, these
ones will only have two corners cut with a 45º angle (examples in the previous
page)
Cut the optional legs, why?, it makes the shelve instable; measures, 4cm x 4cm
x 7.5cm
Sticking; with white glue (all the steps have an image where explaining how the
piece colored in orange has it to be stacked) (Between all the steps, wait at least
45’ to be sure that the white glue is harded)
Take the backpart2
and the four long wood corner reinforces6
and stick them
to the backpart only from one of the two inner sides
Turn around the whole previous piece and take the four sides1
, stick them to the
corners from the side where it isn’t stacked yet by the inner part of them
9. Stick the four short reinforces7
to each corner to the whole piece made before
Stick the four cardboard reinforces4
to the inner corners of the whole piece, to
stick them, fold the pieces from the length by the middle
To stick the two shelves3
, fold the three pieces 90º down to put it inside the box,
while sticking, put some weigh over the pieces folded to be sure the stick well.
The gap between every objects measures 26.5cm
10. To stick the four hard cardboard or wood reinforces5
, measure the middle of
both; the down part of the shelve and the reinforce by the width of them, stir the
white glue, and make the two marks made before match
Sticking the optional legs
7.5cm
15cm
7.5cm
11. 5.Budget
Materials
Cardboard Free/Recycled
Wood reinforces 5€
White Glue 2€
Paint Free
6.Materials used
Cardboard Wood
Hot Glue White glue
Painting Cello Paint
Sheets
7.Tools used
Cutter Painting Cello
Paintbrush Measuring Tape
Paint Scotch Tape
Ruler Pencil
12. 8.Opinion
In our opinion this furniture is helpful for putting books or other things on the shelves.
This shelve has two cardboard shelves resistant to things of little or middle weight. Some
people of the class think this furniture it´s very well made and resistant, although it’s
make with cardboard that it is not a very hard and resistant material.
We think it is not difficult to do this type of furniture but you have to take calculated
measures to remain designed shelves. It can be better if we had coloured the shelve,
but it is a different type and expression of furniture putting only white colour with shapes
of transport vehicles.
Our idea of the project is, to find different ways to build an original shelve. People in
general (friends, family, teachers…) like our furniture, because, it is fine and we have
worked very hard to have a good result.
Make yourself a furniture is an advantage, not to spend money buying and building is
another type of activity you can do alone or with someone. One disadvantage may be, if
you do with your hands, made with materials that have been used, it is more easily to
break if it is not so resistant.
In the opinion of the group, we like our shelve because it is very well made and we
worked as a team without any problems.