Fun Call Girls In Goa 7028418221 Escort Service In Morjim Beach Call Girl
Bb
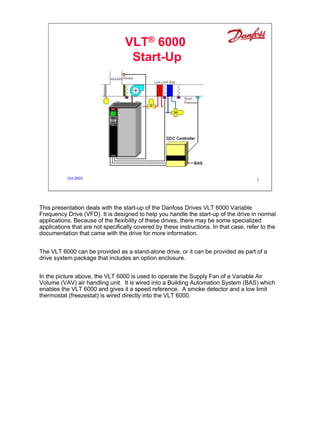
1. VLT® 6000
Start-Up
Oct 2003 1
This presentation deals with the start-up of the Danfoss Drives VLT 6000 Variable
Frequency Drive (VFD). It is designed to help you handle the start-up of the drive in normal
applications. Because of the flexibility of these drives, there may be some specialized
applications that are not specifically covered by these instructions. In that case, refer to the
documentation that came with the drive for more information.
The VLT 6000 can be provided as a stand-alone drive, or it can be provided as part of a
drive system package that includes an option enclosure.
In the picture above, the VLT 6000 is used to operate the Supply Fan of a Variable Air
Volume (VAV) air handling unit. It is wired into a Building Automation System (BAS) which
enables the VLT 6000 and gives it a speed reference. A smoke detector and a low limit
thermostat (freezestat) is wired directly into the VLT 6000.
1
2. Outline
1. Warnings, Reference & Pre-Installation
2. Mounting
3. Wiring – Power, Motor, Control
4. Initial Power & using the LCP
5. Programming
6. Operation
7. Final Adjustments
8. General Troubleshooting
Oct 2003 2
This is an outline for this training module, that covers the startup of the VLT 6000.
1) Covers the warnings, needed reference materials and pre-installation checks.
2) Mounting covers the important points about the mounting of the VFD, including
considerations on clearance, temperature, altitude, etc.
3) This part covers the wiring of the VFD including, incoming power, motor output, control
wiring and serial communications.
4) Initial Power briefly covers the items to check before power is applied.
5) Programming covers the general overview of the Local Control Panel (LCP) and its use in
the Quick Menu, Extended Menu and operational displays.
6) Operation covers the Hand and Auto running of the VFD.
7) Final Adjustments covers the some of the final checkout points.
8) General Troubleshooting covers some information about finding and correcting problems.
Periodically short reviews are given to insure the information given is retained.
2
3. 1) Warnings
! DANGER
Touching the electrical parts may be fatal — even
after the equipment has been disconnected from the
AC line. To be sure that the capacitors have fully
discharged, wait 15 minutes after power has been
removed before touching any internal component.
Oct 2003 3
Because the drive uses large electrolytic capacitors in its power circuitry, it can maintain a
dangerous voltage level for up to 15 minutes after power has been removed. Therefore,
always be sure that power has been removed from the drive for at least 15 minutes before
working with the power circuitry of the drive.
It is always wise to use a voltmeter to measure any potentially dangerous electrical circuit
before working on it.
3
4. 1) Reference Material Needed
• VLT® 6000 Instruction Manual
(general information)
• Customer Connection Diagram
(specific for the order)
• Schematic Diagram
(specific for the order)
Oct 2003 4
These three pieces of reference material should be available to you when you are starting
up a drive.
The VLT 6000 Instruction Manual provides general information on topics like mounting
clearances, drive fuses, terminal tightening torques, and drive parameters.
The Customer Connection Diagram provides a sketch indicating the layout and use of the
customer connection terminals.
The Schematic Diagram provides details of the wiring between the drive, any options, and
the control system.
Both the Customer Connection Diagram and the Schematic Diagram are drawn for the
specific order. If you need to obtain a copy of either of these, contact your local Danfoss
Drives Representative.
4
5. 1) Pre-Installation Checks
All Drives – On the Top or Left Side of the Drive
Type Number Input Ratings of Drive
Oct 2003 Output Ratings of Drive 5
The drive has two identifying numbers.
The longer Model Number clearly codes the drive series number, its voltage rating, and its
output current rating. Page 11 of the instruction manual gives all the information.
In the example above VLT 6011 is the size of the drive which is 7.5kW or 10Hp. The G
always means an HVAC drive. T1 is the incoming power, which is 200-240Vac. CN1
means that this is a NEMA 1 drive. ST is standard, which means there is not braking
circuitry. R0 means there is no RFI Filter. DL, it comes with a display or LCP. F00 = there
is no serial communications. A00 means there is no special application card such as the
Cascade Controller. If there is a C1 at the end the unit has conformal coating.
The shorter Type Number is stored in the drive's parameters and is used in other situations
where the longer number would be too cumbersome. In order to describe the drive using the
Type Number, you must also know its voltage rating.
5
6. 1) Pre-Installation Checks
• Compare the voltage ratings of
– Drive
– Power line
– Motor (check the wiring in the conduit box)
Oct 2003 6
Before installing the drive, check to be sure that the power line, the drive, and the motor are
all rated for the same voltage. It may be necessary to check the wiring inside the motor's
conduit box to confirm its voltage rating.
6
7. 1) Pre-Installation Checks
• Write down motor data:
– Voltage
– Frequency
– Full Load Current
– Full Load Speed
– Power
– Power Factor (if available)
Oct 2003 7
Write down the motor nameplate information. This will be important later during the start-up.
A conversion chart between HP and kW is provided with the description of parameter 102 in
the Instruction Manual. See page 73.
7
8. 1) Pre-Installation Checks
• Compare the full load current ratings; drive and motor(s)
– For multiple motor applications, add the full load current
ratings of all motors
– The drive can be at most one size smaller than the motor
– If the drive rating is less than motor, full motor output can not
be achieved
– Each motor must have individual motor protection, such as
thermal overloads.
Oct 2003 8
It is important to be sure that the drive is sized to provide the full load current requirement of
the motor. If more than one motor is connected simultaneously to the drive, add the full load
current draw of all motors that will be connected at one time and compare this to the drive's
current rating.
Although the drive can control motors whose full load current draw is slightly greater than the
drive's rating, it will not be able to drive them to full output. Therefore, such under-sizing of
the drive should generally be avoided.
In the example above, one drive operates 3 pumps. Each pump has a Full Load Amp (FLA)
of 10A. The drive must have an output current of at least 30A. Notice that each pump still
has its own overload protection.
8
9. 2) Mounting the Drive
• Environment for NEMA 1 (IP 20) drives
– Clean & Dry (max. 95% R.H., non-condensing)
– 14°F (-10°C) to 104°F (40°C) ambient temperature
– 3,300 feet (1000m) maximum elevation without de-rating
Oct 2003 9
The VLT 6000 can be supplied with a NEMA 1 enclosure. This enclosure provides some
degree of protection from falling dust. Therefore, drives with a NEMA 1 enclosure should be
mounted indoors in a relatively clean and dry location.
Because the drive relies on the ambient air for cooling, it is important to observe the
limitations on ambient air temperature and elevation. Contact the Service Department if you
think that the mounting location of the drive compromises its ability to provide long term,
reliable operation.
9
10. 2) Mounting the Drive
• Modifications for other environments
– NEMA 12
– NEMA 3R (requires additional cabinet)
– NEMA 4 or 4X (requires additional cabinet)
Oct 2003 10
To provide for indoor environments where the drive may be subjected to dripping water or
large amounts of dirt, the VLT 6000 can be supplied with a NEMA 12 enclosure.
If the drive is to be mounted outdoors, NEMA 3R, NEMA 4 AND 4X and NEMA 12
enclosures can be supplied.
10
11. 2) Mounting the Drive
• The drive must be mounted vertically
• Drives with exposed heat sink fins on the
back must be mounted against a solid
surface
Oct 2003 11
In order to provide proper cooling, the drive must always be mounted vertically.
It is also important to establish a "chimney" around the drive's heat sink to ensure that all
cooling air passes along the entire length of the heat sink. If a drive with no option panel is
not mounted directly to a vertical flat surface, it is important to see if this leaves any heat
sink fins exposed in the back. If it does, a flat plate must be mounted to the back of the drive
to ensure proper cooling.
Drives that include a bypass or other option enclosure are generally factory-mounted to a
back plate. Therefore, this is not a concern with such drives.
11
12. 2) Mounting the Drive
• Clearance
– No side clearance needed for cooling
– Vertical space for cooling
• Refer to the “mechanical installation”
section of the Instruction Manual
Oct 2003 12
The VLT 6000 cools itself by drawing cooling air through the bottom of its enclosure and
exhausting it out the top. It is therefore important to provide enough space above and below
the drive to ensure proper flow of cooling air. To determine the necessary clearances, see
the “mechanical installation” section of the Instruction Manual, pages 29-31. The smallest
drive requires 4” on the top and bottom, nothing on the sides. This top and bottom space
goes from 4”, to 6” on larger units, then 8”, and 12” on the largest drive which is on the top
only. All drives can be mounted side by side.
12
13. 2) Mounting the Drive
• Keep the drive clean
– Use dust covers to keep construction dust
from getting into it
– Remove the dust covers before applying
Oct 2003
power
13
If construction work will continue after the drive is mounted, it is important to keep the drive
as free as possible from concrete dust and similar dirt. If the drive does not have power
applied to it, it should be kept covered. If the drive must be powered up and run, this cover
must be removed. It is still important to ensure that the drive stays as clean as possible. It
may be necessary to clean the interior of the drive once construction is completed.
13
14. Review
1. How long must you wait to service a drive?
VLT 6100 G T4 CN1 ST R0 DL F10 A00 C0
2. Using the number shown above, what voltage
range should power this VFD?
3. Does this drive have a built in RFI Filter?
4. Does it have serial communications?
5. Does it have conformal coating?
6. What distance around smallest drive?
_____top; ____bottom; _____right; _____left
7. Name two things that must be remembered for
multiply motors
8. What must be done to get a NEMA 4 rating?
Oct 2003 14
Review
1. How long must you wait once power is removed, before the drive is safe to service?
________
Look at the following Part Number for questions 2 and 5.
VLT 6100 G T4 CN1 ST R0 DL F10 A00 C0
2. For what voltage range of incoming power is this drive designed? ________
3. Does this drive have a built in RFI Filter? ____________
4. Does it have serial communications? ___________
5. Does it have conformal coating? ____________
6. For the smallest drive, how much space is required around the drive for proper
ventilation?
_____” top; _____” bottom; _____”right; _____” left
7. Name 2 things that must be remembered when attaching a drive to multiply motors?
___________________________ ____________________________
8. If a customer wants a NEMA 4 drive, how does Danfoss accommodate?
______________________________________
14
15. 3) Wiring the Drive
• General Wiring
• Power Input
• Motor Output
• Control
• Serial Comms
Oct 2003 15
This next section covers the wiring of the drive. The first area to be covered is general wiring
practices. The other sections cover power or line wiring from the drive to incoming power.
The motor wiring covers the connections between the drive and the motor. Control wiring for
Digital Inputs/Outputs and Analog Input/Outputs are also covered. The last section covers
the wiring for serial communications.
15
16. 3) Wiring the Drive
• Conduit entry
– All wiring enter bottom of drive
– Knock-outs are provided on many drives
– Larger drives have a removable conduit entry
or gland plate
Oct 2003 16
General Practices
Most smaller drives have knock-outs for conduit entry. Larger drives provide a removable
conduit entry plate. It is important to remove this plate before drilling or punching it.
When a drive is supplied with an auxiliary enclosure, it is generally necessary to drill or
punch conduit entry holes in the auxiliary enclosure. It is important to ensure that metal chips
or filings don't get into any of the devices which are housed in the auxiliary enclosure.
16
17. 3) Wiring the Drive
• At least three separate METALLIC conduits must be
connected to the drive
– Power into the drive [L1, L2, L3 and a ground back to the
distribution panel]
– Power from the drive to the motor [U, V, W, and PE
(power earth ground)]
– Control wiring
• A dedicated ground wire is needed
Oct 2003 17
At least three separate conduits must be connected to the drive. One is for the incoming
power wiring, one is for the power wiring between the drive and the controlled motor, and the
third is for the control wiring.
Because the wiring from the drive to the motor carries high frequency electrical pulses, it is
important to be sure that no other wires are run in this conduit. If the incoming power wiring
is run in the same conduit as the motor wiring, these pulses can couple electrical noise back
onto the building's power grid.
Control wiring should always be isolated from the high voltage input power wiring to the
drive or the high voltage output power wiring from the drive to the motor.
17
18. 3) Wiring the Drive
• Input fuses
– All drives must have input fuses installed in
the power supply to the drive
– Refer to the Instruction Manual for fuse sizing
– Some drives will have input fuses
• Most drives with bypasses
• Where input fuses were specified on the order (see
the Schematic Diagram)
Oct 2003 18
In order to fulfill the requirements of Underwriters Laboratory (UL), all drives must be
provided with fast-acting input power line fuses. The proper style and rating for these fuses
is specified in the Instruction Manual on page 24.
In most cases, when the drive was ordered with a constant speed bypass, these fuses are
already installed. In other cases, fuses are provided as a part of the drive package only if
they were requested on the order.
18
19. 3) Wiring the Drive
• If a disconnect switch is wired between the drive and motor
– Closing this switch with the drive running causes a
large current surge, it does not damage the drive but
may cause the drive to trip.
Oct 2003 19
Although it may be required to meet electrical code requirements, a disconnect switch
connected between the drive and the driven motor can cause problems. While running the
drive when the disconnect switch is open causes no problems of itself, if the disconnect is
closed while the drive is running, the motor may attempt to draw locked rotor current from
the drive. This may cause the drive to shut down on an over current fault trip. In order to
avoid such a nuisance trip, it is a good idea to wire an auxiliary contact from the disconnect
switch back to the drive's safety interlock circuit. Then, if the disconnect is opened while the
drive is running, the drive will immediately shut off. When the disconnect switch is later
closed, the drive begins from a stop and smoothly accelerates the motor to the desired
speed.
19
20. 3) Wiring the Drive
• Other motor concerns
– No power factor correction capacitors
between the drive and the motor
– Two speed motors must be wired
permanently for full speed
– Y-start, ∆-run motors must be wired
permanently for run
– Partial winding start motors must be
wired permanently for run
Oct 2003 20
It is important to ensure that there is as direct a connection as possible between the drive
and the motor.
In a retrofit application, any power factor correction capacitors that were used with the motor
should be removed. If they are connected between the drive and the motor, the drive will trip
off and refuse to start the motor. In addition, they are not needed on the input power leads to
the drive because the drive already presents the power line with a 0.95 or greater
displacement power factor.
If a motor has special windings or wiring to help it operate when it is connected directly
across the AC power line, it is important to ensure that the motor is always connected in its
full speed run configuration when it is connected to the drive's output.
20
21. 3) Wiring the Drive
• Maximum Cable Length
– Shielded (Screened) = 150m (500’)
– Unshielded (Unscreened) = 300m (1000’)
Oct 2003 21
The maximum cable distance between the drive and motor for unshielded cable is set for
300m (1000feet). If multiple motors are wired to one drive the total distance from the drive to
all the motors does not exceed 300m (1000feet).
If shielded cable is used as pictured above, the distance is dropped to 150m (500feet). The
wires in the shielded cable are more compressed, which means that the capacitance
between the cables is increased. A shorter distance is therefore needed for proper
operation.
21
22. 3) Wiring the Drive
• Connect control wiring shields to ground at only
one end
• The shield should be insulated at the other end of
the control cable
• A clamp is provided for grounding the shield at
the drive end
Oct 2003 22
Whenever possible, shielded control wiring should be used. Although it may be possible to
use twisted pair control wiring in some instances, shielded control wiring provides greater
noise immunity when it is used properly. Proper wiring practices generally dictate connecting
the shield to ground at only one end of the cable. The shield should be insulated at the other
end of the cable. To provide the most effective grounding of the shield, the shield should be
exposed where it runs under the drive's cable clamp. The cable clamp then acts as both a
strain relief and as the shield grounding device. The shield should be kept in tact over the
cable until just before the wires are connected to the drive's terminals. The shielding should
never be twisted and connected as a “pig-tails”.
22
23. 3) Wiring the Drive
• 8 Digital inputs
• Term 12 & 13 are 24Vdc
• 24V = ON, 0V = OFF
• Function Chart page 90
• Galvanic Isolation
Oct 2003 23
There are 8 Digitals Inputs (D in) on the VLT 6000. These terminals are used to start, stop
and reset the drive. They can also be used to reverse, speed up/ slow down and change
between different 4 reference fixed speeds and 4 different setups. These terminal numbers
are displayed on the back of the plastic cover which protects the control wiring terminals.
The terminal numbers for these inputs are 16, 17, 18, 19, 27, 29, 32, and 33. Each input can
be programmed to different functions, some have more functions than others. Page 90 in the
Instruction Manual shows these selections.
If the Digital Input sees 24Vdc it is seen as an “ON” signal. If the Digital Input sees a 0Vdc
signal, it is an “OFF”. Terminals 12 and 13 are a source for 24Vdc. Terminal 20 is an
isolated ground for the Digital Inputs. There are 3 different grounds for the control wiring
which prohibits most interference from other signals. This is referred to as Galvanic
isolation.
23
24. 3) Wiring the Drive
• Terminal 27 is an enable or stop command
• If it does not see 24Vdc the drive does not run
• Display show UN. READY
Oct 2003 24
In its default state, the way it comes from the factory, a jumper is required for operation. This
“missing jumper” is a method used by some manufacturers to encourage the end-user to
read the instruction manual. This method is more of a nuisance in North America than a
help. The missing jumper which is NOT provided, must be connected between terminals 12
(24Vdc) and 27, which defaults to a stop command. If terminal 27 does not see 24Vdc, the
drive does not operate. A display on the front of the drive is very clear when this occurs.
After pressing the “Display/ Status” key, the bottom line reads, “UN. READY”. When ever
this display is seen, the jumper is missing between terminals 12 and 27.
24
25. 3) Wiring the Drive
• 3 Analog Inputs
• Functions: Reference, Feedback or Motor
Thermistor
• 2 - Voltage Inputs, Term 53 & 54 (0-10Vdc)
• Terminal 50 supplies 10Vdc
Oct 2003 25
There are 3 Analog Inputs (A In) in the VLT 6000. These Analog signals are used for
reference, feedback or the motor thermistor. Two of the inputs, terminals 53 and 54 are
setup for a 0 to 10Vdc or voltage signal. Terminal 50 supplied 10 Vdc to the which is usually
used for a potentiometer (pictured above) in giving a reference. Terminal 55 is the common
for the Analog Inputs.
25
26. 3) Wiring the Drive
• One mA input, terminal 60 (0 to 20mA scalable)
• Power for 2 wire transmitter, connect commons
• Used for Feedback in Closed Loop applications
Oct 2003 26
Terminal 60 is setup for a 4-20mA or current signal. Most pressure and level transmitters
are current sensors which send a feedback to the drive for closed loop applications.
Terminal 55 is the common. In the picture above, a 2-wire transmitter is used to detect the
level of a tank. This transmitter requires power to operate. The terminal with 24Vdc,
terminal 13, in the picture above is used. Power goes to the + side of the transmitter and the
– side goes to terminal 60, the current input. A jumper is placed between terminals 55 and
39. This connects the 2 different commons, the common for the AI, terminal 55 and the
power out terminal 39.
26
27. 3) Wiring the Drive
• Analog or Digital Output – Terminals 42 or 45
• Showing Frequency, Feedback, Current, etc.
• 0-20mA, 4-20mA, or 0-32,000 pulses
• Function Chart – Page 98
Oct 2003 27
The VLT 6000 has 2 terminals, 42 and 45, that may be programmed as either a Digital
Output or and Analog Output. If programmed as an Analog Output, a meter is attached to
indicate any of the following:frequency of the drive, external reference, feedback pressure,
output current, or output power.
Each of these selections can be sent as a 0-20mA signal, a 4-20mA signal or a 0-32,000
pulse signal. These outputs are also used to interface drives together in a Master/Slave
arrangement. These signals can also be used as confirmation back to a PLC. A functional
selection chart is shown on page 98 in the Instruction Manual.
27
28. 3) Wiring the Drive
• DO (terminals 42 & 45) powered with 24Vdc
• Relay Outputs (01,02,03 or 04,05) have no power
• Fault Relay (01,02,03) 240Vac-2A
• Run Relay (04,05) 30Vac-1A
• Function chart – page 102
Oct 2003 28
In the diagram to the left, terminal 42 is programmed as a Digital Output. This terminal is
powered by 24Vdc to turn on a light. There are 29 selections for the indication of the light, to
show, running, a fault, alarm, and numerous others. Page 98 in the Instruction Manual gives
a list of these selections.
In addition to the Digital Outputs, there are 2 Relay Outputs. These outputs are not powered,
but are dry contacts. Relay #1 (terminals 01, 02, and 03) can be powered with 240Vac to a
maximum of 2 amps. Relay #4 (terminals 04, and 05) cane be powered with 30Vac to a
maximum of 1 amp. The function selection chart is found on page 102. One selection
involves pump alternation which also requires setup in parameters 433 and 434.
28
29. 3) Wiring the Drive
• Serial Communication Wiring- Terminals 68 & 69
• Standard RS-485 connections
• Address set by Parameter # 501
• Dip switch settings for internal drives
Oct 2003 29
The last wiring section involves serial communications. Serial communications are in an RS-
485 format which means all the positive terminals (#68) are connected together and all the
negative terminals (#69) are connected. The RS-485 format only allows the communication
wire to have 2 ends. The ends are indicated by an EOL or End of Line resistor. These
resistors are built into the VLT 6000. A dip switch, which is just above the serial terminal
connections, is used with these EOL resistors. If 1 or 2 drives are connected on the RS-485,
no changes need to be made. When a 3rd drive and additional drives are attached to the
middle of the serial communications, Pins 2 and 3 of the dip switch must be turned OFF or
down to remove the EOL resistor. There are communication problems if these is not done.
Addresses for each drive are set with parameter 501. The default address is 1, so this
parameter must be changed.
29
30. 3) Wiring the Drive
RS-485
Control Wiring
Terminal blocks
can be unplugged
Digital Inputs
12 & 18: Run Command
12 & 27: Safety Interlock
etc.
Run Relay
30 V AC, 1 A Fault Relay
240 V AC, 2 A
Analog Inputs and Outputs
Oct 2003 30
Some or all or the control wiring will be connected to the terminal blocks at the bottom of the
drive's Main Control Card. For your convenience, all of these terminals may be easily
unplugged from the Main Control Card.
The digital (switch) inputs, analog inputs, transistorized outputs, relay outputs, and RS-485
serial bus connections are arranged in groups for convenience.
The relay contacts that are connected to terminals 04 and 05 are generally used to provide a
remote run indication. It is important to notice that these contacts are rated for a maximum
voltage of 30 V AC or 42.5 V DC.
The relay contacts that are connected to terminals 01, 02 and 03 are generally used to
provide a remote fault indication. These contacts are rated for up to 240 V AC. Note that
relay terminals 01, 02, and 03 are mounted remotely from the other control terminals and the
low voltage relay's terminals.
30
31. 3) Wiring the Drive
Double-Check Wiring
• Input & output power to the correct terminals
• All wiring terminals are tight
Oct 2003 31
The drive should have its own ground wire that goes directly back to a reliable earth ground.
The ground wire from one drive should not be connected to the ground terminal of another
drive. The building's electrical conduit cannot be used as a reliable ground.
Before applying power to the drive, double check to ensure that incoming power to the drive
and the power wiring from the drive to the motor are connected to the correct terminals.
Reversing the incoming and outgoing power connections will damage the drive.
Ensure that all terminals are tightened properly and all control wiring is run properly.
31
32. Review
1. Serial comm. wiring RS485 + ______ & RS485 – _______.
2. A jumper attached between terminal 12 and _______.
3. 4-20mA transmitter – side is attached to terminal _______.
4. Supply power to transmitter, jumper between ____& ____.
5. Terminal numbers to the motor. ______ ______ _______
6. Terminal numbers to power ______ ______ _______
7. Identify what type of connection is 33 _______
Oct 2003 32
Review
1. A serial communication wiring must be attached to the VLT 6000. The RS485 + is wired
to terminal ______ and the RS485 – is wired to terminal _______.
2. In order for the VLT 6000 to operate, a jumper must be attached between terminal 12 and
_______.
3. A 4-20mA pressure transmitter must be attached to the VLT 6000. The + side of the
transmitter is attached to terminal 13, and the – side of the transmitter is attached to
terminal _______.
4. In the wiring above a jumper must be placed to supply power to the transmitter. This
jumper is wired between ________ and ________.
5. Identify the terminal numbers wired to the motor. ______ ______ _______
6. Identify the terminal numbers wired to incoming power ______ ______ _______
7. A wire is attached to terminal 33. Identify what type of connection is 33 _______
32
33. 4) Initial Power Up & LCP
• Before turning unit ON, use an ohm meter to check for input
or output shorts
– Line to DC bus or
– Line to line
• Be sure there is no external run command.
• Apply power.
Oct 2003 33
Prior to applying power to the drive, it is a good idea to use an ohmmeter to check for input
or output short circuits. If the DC bus is available, it is best to check from the DC bus to the
drive's input and output terminals. If the DC bus terminals of the drive are not easily
accessible, it is also possible to make this test from line to line on the input and output. In
this case, it is important to realize that AC fans connected to the drive's input power wiring
may give a false indication of an input short circuit.
To avoid unintended starts, be sure that the automation system is not sending a run
command. Then apply power to the drive.
33
34. 4) Initial Power Up & LCP
LCP = Local Control Panel
• Functions
• A variety of meter
displays
• Status displays
• Drive programming
– Enter parameters
– Store parameters
– Transfer parameters
• Indicator lamps
• Drive controls
Oct 2003 34
After a few seconds, the display on the drive's Local Control Panel (LCP) should light up.
The LCP provides a complete, easy to use interface between the operator and the drive.
34
35. 4) Local Control Panel (LCP)
• Up to four meters
• Direction of rotation
• The active setup
• Warnings/alarms
• Status
– Start/Stop control point
– Speed control point
– Current action
Oct 2003 35
The display on the LCP can provide a wealth of drive status information.
Up to four meters can be programmed to display at one time. The meters displayed can be
chosen from a list of 26 functions.
The arrow over the word SETUP points in a clockwise direction for forward operation and it
points in a counterclockwise direction to indicate that the drive is operating in reverse. The
drive has four independent parameter setups. The number of the one that is controlling the
drive is displayed below the word SETUP.
Warnings and alarms are displayed on the large second display line and the third display
line of the LCP. For simplicity, these are displayed in plain language. There is no need to
decode any of the drive's display messages.
The bottom line of the LCP's display shows the present operating status of the drive.
A complete listing of all of the drive's status, warning and alarm messages is provided in the
back of the Instruction Manual, page 150.
35
36. 5) Programming
Quick Menu
(Note Motor Parameters MUST be entered in order)
001 LANGUAGE 202 MAX. FREQUENCY
60 Hz
102 MOTOR POWER
(in kW; 1Hp=0.75kW) 206 RAMP UP TIME
103 MOTOR VOLTAGE Depends on application
104 MOTOR FREQUENCY 207 RAMP DOWN TIME
105 MOTOR CURRENT Depends on application
106 MOTOR NOM. SPEED 323 RELAY 1 FUNCTION
201 MIN. FREQUENCY NO ALARM
Depends on 326 RELAY 2 FUNCTION
application RUNNING
Oct 2003 36
This is the list of the parameters in the Quick Menu.
Because entering the proper motor nameplate data is essential for reliable drive operation,
this information is part of the Quick Menu.
36
37. 5) Programming
Quick Menu
Quick Menu
• QUICK MENU to
access
• + or – to select the
menu item
Oct 2003 37
The Quick Menu provides access to selected key drive parameters, including the motor data.
To access it, press the QUICK MENU key. The + and – keys move through the list of
parameters.
• The top line of the display show’s the parameter’s location in the Quick Menu.
• The third line of the display shows the parameter’s number in the Extended Menu and
the name of the parameter.
• The bottom line of the display shows the parameter’s present value.
37
38. 5) Programming
Quick Menu
Quick Menu
• CHANGE DATA to
edit a parameter
value
• + or – to select
from a list of
choices
• OK to accept or
CANCEL
Oct 2003 38
• The CHANGE DATA key allows access to the parameter’s value. This is indicated by
the underline moving from the third line to the bottom line of the display.
• The + and – keys allow a new parameter value to be selected from a list.
• The OK key accepts the change and writes the change to non-volatile drive memory.
• The CANCEL key exits the editing process without changing the parameter’s value.
38
39. 5) Programming
Numerical data
• CHANGE DATA
• ! or " to select
the digit
• + or – to change
the digit
• OK or CANCEL
Oct 2003 39
• When numeric data is edited, the ! and " arrows allow selection of the digit to be
edited.
• The + and – keys allow the value of the selected digit to be changed.
• The OK and CANCEL keys function as before.
39
40. 5) Programming
Extended Menu
0xx 4xx
KEYB. & DISPLAY APPL. FUNCTIONS
1xx 5xx
LOAD & MOTOR SERIAL COMM.
2xx 6xx
REF. & LIMITS SERVICE FUNCTS.
3xx 7xx, 8xx, 9xx
INPUTS & OUTPUTS Special Boards
Oct 2003 40
The parameters in the Extended Menu are arranged in logical groups to make it easier to
find a specific parameter.
40
41. 5) Programming
Extended Menu
Extended Menu
• EXTEND. MENU
• ! or " to select
the parameter
group
• + or – to select the
parameter
Oct 2003 41
The Extended Menu contains all of the drive’s parameters, including those that are a part of
the Quick Menu.
• The EXTEND. MENU key accesses it.
• For convenience, parameters are organized in functional groups. The ! and " keys
select the parameter group.
• The + and – keys select the individual parameter in each group.
• Editing parameter data is done in the same way that it was done using the Quick Menu.
41
42. 5) Programming
Extended Menu
Running AMA
• Parameter 107
• CHANGE DATA
Automatic • + or – to select RUN
Motor AMA
Adaptation • OK
• HAND START
• OFF STOP
• RESET
• DISPLAY MODE
Oct 2003 42
Running Automatic Motor Adaptation (AMA) allows the drive to analyze the electrical
characteristics of the motor. AMA also tests to see if the motor is electrically sound.
Because it does not cause the motor shaft to rotate, it doesn’t require the motor shaft to be
disconnected from the load. AMA should always be run when the system is commissioned.
Motor characteristics change with temperature. AMA assumes that the motor is at room
temperature. Therefore, it should only be run on a “cold” motor.
To run AMA:
• Access parameter 107 using the Extended Menu.
• Change the parameter’s value to RUN AMA and press OK.
• Press HAND START.
• The bottom line of the LCP’s display will indicate WORKING.
• After the process is complete (generally within 5 to 10 minutes), the bottom line of the
LCP’s display will either show AMA FINISHED OK or it will provide a message
indicating what caused the process to stop.
• After successful completion, press the HAND START key. This will keep the motor from
starting unexpectedly.
• To complete the process, press the RESET key.
If AMA didn’t complete successfully, attempt using a reduced version of AMA by choosing
RUN AMA WITH LC-FILT in parameter 107 and repeating the steps above.
42
43. 5) Programming
AMA
Some final notes:
When working with AEO remember:
118- Set this parameter to the Power Factor of
the motor.
Check the motor name plate for this number.
If unavailable talk to the motor manufacturer
to obtain this number
Oct 2003 43
The newest software for the drives will provide for the insertion of the motor’s power factor.
This will greatly improve the operation of AEO function. When working with six and eight
pole motors the power factor of the motor drops below the old internal number of 0.75. AEO
was never efficient if the power factor was below the internal. You now have the ability to
adjust the number so the function will work better.
43
44. 5) Programming
MULTIPLE MOTORS
• TORQUE CHARACTERISTICS
MULTIPLE MOTORS (cannot use AEO)
Use VT LOW, VT MED or VT HIGH
107 AUTO MOTOR ADAPT
NO AMA
108 MULTIM. STARTVOLT
The lowest value that provides a reliable start
OR Adjust for the lowest starting current
Oct 2003 44
The first thing to do once power is applied to the drive is to enter the motor information.
Because the drive uses this information to produce an accurate mathematical model of the
motor, this is an essential step.
Parameter 101 indicates whether the drive is controlling a single motor (AEO function) or
multiple motors simultaneously.
Use parameters 102 through 106 to enter the motor nameplate data that was recorded
earlier.
For a single motor application, now run the Automatic Motor Adaptation routine. In
parameter 107 choose RUN AMA, press OK, and give the drive a run command. After the
AMA test is successfully completed, press the RESET key on the drive to leave the test
mode.
44
45. 6) Operation
• Off/Stop
– Stops the drive in all
modes
– OFF LOCAL STOP or
OFF REM. STOP
is displayed on the LCP
– The second line of the
LCP display FLASHES
when this key has been
pressed
Oct 2003 45
The OFF STOP key on the LCP overrides all drive run commands. When it is pressed, the
word STOP displays in the lower right corner of the LCP's display. In addition, the large
second line of the display flashes to indicate that a local stop command was given.
45
46. 6) Operation
• Setpoint 1 & 2 (unit)
• Total reference (%) • Feedback 1, 2 & total (unit)
• Total reference (unit) • Motor voltage
• Output frequency (Hz) • DC bus voltage
• Output frequency (%) • Motor thermal load (%)
• Motor current • Drive thermal load (%)
• Output power (kW) • Digital inputs
• Output power (HP) • Relay Status
• Output energy (kW-h) • Analog inputs, all three
• Running hours • Pulse reference
• Custom readout, related to • External reference (%)
Oct 2003
frequency • Heat sink temp. (oC) 46
It is possible to cycle through all of the meter displays by simply pressing the + or - keys on
the drive's LCP.
Some of these meters, such as output frequency, motor current, and output power are useful
in displaying the drive's present operating status. The custom readout can be programmed
to display some speed-related quantity, such as flow, pressure, or power. The display takes
into account the proper relationship between speed and the displayed quantity, whether it is
linear, quadratic, or cubic.
Output energy and running hours are useful in performing studies of the operation of the
controlled system over time.
The set point and feedback displays can be helpful in setting up the drive's PID controller.
Drive and motor thermal load, digital and analog input status displays and the drive's heat
sink temperature provide handy troubleshooting tools.
46
47. 6) Operation
HAND Operation Test
frequency command (%)
• Press
HAND START
• Press + to
accelerate the drive
to make the motor running frequency (%)
just start
Oct 2003 47
For the initial operational test, press the HAND START key to start the drive and press the +
key until the motor just starts to rotate.
47
48. 6) Operation
HAND Operation Test
• Check the motor’s rotation direction from
the drive
– If incorrect
• Disconnect input power from the drive
• Reverse any two motor leads
• If there is a bypass, check the motor’s
rotation direction in bypass
– If incorrect
• Disconnect input power from the drive
• Reverse any two input power leads
Oct 2003 48
Check the rotation direction of the motor while it is being controlled by the drive. If it is
incorrect, reverse the connections of any two of the motor leads.
If the drive is equipped with a constant speed bypass, briefly start the motor in bypass mode
and again check the direction of its rotation. If it is incorrect, reverse the connections of any
two of the incoming power leads. This will not change the rotation of the motor when it is
controlled by the drive because the power circuitry of the drive is not sensitive to the input
phase rotation.
It is important to follow these procedures to ensure proper motor rotation. Do not change any
of the wiring in the drive's auxiliary enclosure or set up the drive for reverse operation to
correct a rotation problem.
48
49. 6) Operation
HAND Operation Test
• Press OFF STOP
• Press + to command 100% speed
• Press HAND START
– Can the drive reach maximum speed?
– Does the top line show CURRENT
LIMIT?
• Press OFF STOP
Oct 2003 49
This test is to ensure that the driven system operates as desired during maximum
acceleration and deceleration.
If the drive has a bypass, be sure to switch it to DRIVE. With the drive stopped in the local
speed control mode, use the + key on the keypad to set the local speed command to 100%.
Then press the HAND START key. Observe the drive and the system for proper operation.
Now press the OFF STOP key and observe the drive and the system as it decelerates to a
stop.
Adjust the acceleration and deceleration ramp times to obtain the desired operation.
49
50. 6) Operation
HAND Operation Test
• Slowly run the drive over the entire
speed range
• Note any resonant speeds
(speeds where the motor or load
begin to vibrate excessively)
Oct 2003 50
Now use the + and - keys to run the system over the entire operating range. Scan the
operating speed range slowly and note any speeds where the system vibrates excessively
or indicates any other operational problems. These will be addressed later.
50
51. 6) Operation
• Hand/Start
– To control drive
start/stop and
speed remotely
– To start the drive
locally. Control
drive speed using
the “+” and “-”
keys
• Auto/Start
Oct 2003 51
The HAND START key gives the drive a run command that can start the drive regardless of
the status of the building automation system's run/stop command. Generally, pressing the
HAND START key also puts the drive into the local speed control mode, where its speed is
determined by the operator using the LCP's + and - keys.
The AUTO START key puts the starting and stopping of the drive under the control of the
building automation system's run/stop command. Generally, pressing AUTO START also
puts the drive in the remote speed control mode, where the building automation system
determines the speed of the drive.
51
52. 6) Operation
AUTO Operation
Configuration
100 CONFIG. MODE
OPEN LOOP
The drive receives a speed command
from the building automation system
CLOSED LOOP
The drive receives a feedback signal
from the system, compares this with
the desired set point and determines
the correct motor speed
Oct 2003 52
Now it has been determined that the system can be run over the entire operating speed
range. The next step is to ensure that it can be controlled by the building automation system.
The most common type of a control system for the drive is open loop control. This is where
the building automation system determines the proper operating speed for the drive and
gives the drive a speed command.
The first step in setting up an open loop speed control system is to set the range of the
speed reference signal.
Parameters 204 and 205 (maximum and minimum reference) are generally set to equal
parameters 201 and 202 (maximum and minimum frequency). In this way, the drive will be
at minimum speed when the speed reference is minimum and it will be at maximum speed
when the speed reference is maximum. When the speed reference signal is half way
between minimum and maximum, the drive's output speed will be half way between
minimum and maximum speed.
52
53. 6) Operation
Open Loop Analog Inputs
Term 53 Term 54 Term 60
0-10 V 0-10 V 4-20 mA
FUNCTION * 308 311 314
SCALE LOW 309 312 315
SCALE HIGH 310 313 316
* Set the FUNCTION of the terminal used for
speed control to REFERENCE.
Set the FUNCTION of unused terminals to
NO OPERATION.
Oct 2003 53
The most common method of controlling the speed of the drive is using the analog input
terminals. If the building automation system can't successfully control the speed of the drive
throughout the speed range, the first thing to check is the programming of the analog input
terminals. The terminal that is used for the speed reference command should have its
function set to "REFERENCE". Any unused terminals should have their functions set to "NO
OPERATION".
If the building automation system controls the drive's speed, but the drive doesn't run over its
entire speed range, adjust the minimum and maximum scaling parameters for the input.
The drive's ability to display the actual value of all analog input signals can be very helpful in
troubleshooting any problems.
53
54. 6) Operation
AUTO Operation
Open Loop
Two ways to adjust the
reference follower
204 MIN. REFERENCE
Speed
=
201 MIN. FREQUENCY
205 MAX. REFERENCE
= R e fe r e n c e
202 MAX. FREQUENCY
Oct 2003 54
Now it has been determined that the system can be run over the entire operating speed
range. The next step is to ensure that it can be controlled by the building automation system.
The most common type of a control system for the drive is open loop control. This is where
the building automation system determines the proper operating speed for the drive and
gives the drive a speed command.
The first step in setting up an open loop speed control system is to set the range of the
speed reference signal.
Parameters 204 and 205 (maximum and minimum reference) are generally set to equal
parameters 201 and 202 (maximum and minimum frequency). In this way, the drive will be
at minimum speed when the speed reference is minimum and it will be at maximum speed
when the speed reference is maximum. When the speed reference signal is half way
between minimum and maximum, the drive's output speed will be half way between
minimum and maximum speed.
54
55. 6) Operation
AUTO Operation
Open Loop
204 MIN. REFERENCE
= 0
Speed
205 MAX. REFERENCE
=
202 MAX. FREQUENCY
R e fe r e n c e
Oct 2003 55
For some applications it is important for the drive to be at half speed (30 Hz) when the speed
reference is half. This is accomplished by setting parameter 204 (minimum reference) to 0
Hz. Note that this method results in a "dead band" at the bottom of the speed range. Any
time the speed reference signal is below the drive's minimum speed, the drive will produce
minimum output speed.
55
56. 6) Operation
AUTO Operation Test
Open Loop
• Press AUTO START
• Have the system provide
– A run command
– A speed reference signal
• Run the drive over the speed range
– Does it run over the entire speed range?
Oct 2003 56
To start the drive in automatic control mode, press the AUTO START key on the drive's
Local Control Panel.
Have the building automation system give the drive a run command. Once the drive is
running, have the building automation system command the drive to operate throughout the
speed range. Ensure that this is possible.
56
57. 6) Operation
AUTO Operation Note
Open Loop
For all serial communications, parameters 503
through 508 determine if the digital inputs or the
serial bus controls specific drive functions
RS-485 High Speed Bus
• Terminate: SW 2&3 • Terminate on board
• Par. 500: Protocol • Board installed
• Par. 501: Address • Address on board
• Par. 502: BAUD
• Higher parameter groups
• Bus time-out function in set special functions
the high 500s
Oct 2003 57
In addition to controlling the drive's speed using the analog and digital inputs, it is also
possible to control the drive using a serial communications bus.
If the serial communications protocol used is the drive's own FC protocol (for use with VLT
Software Dialog).
If a high speed bus, such as LonWorks, is used, the connections are made on the special
communications card and communications is set up using parameter groups 800 and 900.
57
58. 7) Final Adjustments
As Required
• If resonance was noted during manual
operation
109 RESONANCE DAMP.
100% (OFF - 500%)
or
216 FREQ BYPASS B.W.
217 BYPASS FREQ. 1
218 BYPASS FREQ. 2
219 BYPASS FREQ. 3
220 BYPASS FREQ. 4
Oct 2003 58
The following instructions apply to either open loop or closed loop systems.
Operate the drive manually at any speeds where excessive vibration due to resonance was
previously noted. First try adjusting parameter 109 to see if the drive's build-in resonance
damping algorithm can solve the problem.
If the resonance problem persists, use parameters 216 through 220 to force the drive to skip
over the resonant speeds.
58
59. 7) Final Adjustments
As Required
402 FLYING START
ENABLE
for fans
DISABLE
for pumps
DC BRAKE AND START
for special situations
Also set
114 DC BRAKE CURRENT
115 DC BRAKING TIME
Oct 2003 59
The purpose of flying start is to allow the drive to reliably start the motor when the motor is
already spinning. There are three possible settings for flying start.
ENABLE causes the drive to test to see the speed and direction of the motor before starting.
It does this by producing a range of output frequencies in each direction. The drive
measures the output current at the tested frequencies. If the output current is high, the
output frequency tested is incorrect. When the drive's output current is low, the drive has
determined the motor's speed. It then uses this frequency to start the motor.
In lightly loaded applications, the testing done by flying start may cause the motor to rotate.
If this is objectionable, it may be desirable to DISABLE flying start.
In difficult applications, it may be best to use DC BRAKING to stop the motor before
attempting to start it. When this option is chosen, parameter 114 is used to set the DC
braking current and parameter 115 is used to set the amount of time that this current is
applied before starting the motor. Experimentally determine the proper values for these
parameters by running the motor at full speed and allowing it to coast. Activate DC braking
and determine the values of these parameters that will bring the motor to a stop.
59
60. 7) Final Adjustments
As Required
Lock-outs
012 HAND START BTTN
013 STOP BUTTON
014 AUTO START BTTN
015 RESET BUTTON
Oct 2003 60
If necessary, any or all of the keys on the bottom of the Local Control Panel (LCP) can be
disabled. Before doing this, be sure that the user understands the impact of disabling these
keys.
60
61. 7) Final Adjustments
As Required
Saving parameter settings
003 SETUP COPY
COPY TO ALL
004 LCP COPY
UPLOAD ALL PARAMET.
016 DATA CHANGE LOCK
LOCKED
Oct 2003 61
If only one setup is used, copy the parameters from this setup to all other setups. This
provides a backup in case one of the parameters is changed inadvertently.
As an added backup, copy all parameters to the Local Control Panel (LCP). This can also be
helpful if a number of drives are connected to similar systems. The LCP from one drive can
be used to transfer its parameters to the other drives, even if they are driving different sized
motors.
If the user desires, parameter 16 can be used to lock out any other parameter changes.
61
62. 7) General Troubleshooting
• Messages on the display
– AUTO START
The drive has tripped off and is in the process
of automatically re-starting
– TRIP
The drive has tripped off and it is necessary to
press RESET to restart
– TRIP LOCKED
The drive has tripped off and power must be
removed to restart
Oct 2003 62
If an operating problem causes the drive to stop, the message on its display will indicate its
status in plain language.
62
63. 7) General Troubleshooting
• Refer to the Warnings and Alarms section
of the Instruction Manual
• Check the tightness of all connections
• Check all wires for proper locations
• Measure input signals using the drive’s
display
• Check the drive input and output for
balanced voltage and current
Oct 2003 63
The back of the Installation, Operation and Maintenance Manual gives additional information
about messages that the drive may display, along with providing troubleshooting assistance.
As with troubleshooting any type of electrical equipment, it is always wise to be sure that all
connections are tight and are properly wired.
The displays of input analog and digital signals that are provided by the Local Control Panel
(LCP) can be very helpful for control system troubleshooting.
If the problem seems to relate to the system's power circuitry, it can often be helpful to
measure the input and output voltage and current of the drive. The exact values of these
readings isn't always critical. It is more important to be sure that the current and voltage on
all three input power leads is the same. In the same way, the output voltage and current
from the drive to the motor should be balanced.
63