
Recommended
Recommended
More Related Content
Similar to Interested in learningmore about securitySANS Institute.docx
Similar to Interested in learningmore about securitySANS Institute.docx (12)
More from mariuse18nolet
More from mariuse18nolet (20)
Recently uploaded
Recently uploaded (20)
Interested in learningmore about securitySANS Institute.docx
- 1. Interested in learning more about security? SANS Institute InfoSec Reading Room This paper is from the SANS Institute Reading Room site. Reposting is not permitted without express written permission. Network IDS & IPS Deployment Strategies Information systems are more capable today than ever before. Society increasingly relies on computing environments ranging from simple home networks, commonly attached to high speed Internet connections, to the largest enterprise networks spanning the entire globe. Filling one's tax return, shopping online, banking online, or even reading news headlines posted on the Internet are all so convenient. This increased reliance and convenience, coupled with the fact that attacks are concurrently becoming more p... Copyright SANS Institute Author Retains Full Rights A D http://www.sans.org/info/36923 http://www.sans.org/info/36909 http://www.sans.org/info/36914 http://www.sans.org/reading_room/images/click.php?id=538
- 2. © SANS Institute 2008, Author retains full rights. © S A N S In st itu te 2 00 8 , A ut
- 3. ho r r et ai ns fu ll rig ht s. Key fingerprint = AF19 FA27 2F94 998D FDB5 DE3D F8B5 06E4 A169 4E46 Network IDS & IPS Deployment Strategies Network IDS & IPS Deployment Strategies GSEC Gold Certification Author: Nicholas Pappas, [email protected] Adviser: Joel Esler Accepted: April 2, 2008 Nicholas Pappas 1 © SANS Institute 2008, Author retains full rights. ©
- 5. et ai ns fu ll rig ht s. Key fingerprint = AF19 FA27 2F94 998D FDB5 DE3D F8B5 06E4 A169 4E46 Network IDS & IPS Deployment Strategies Outline 1.Introduction.................................................................... ....3 2.Network Intrusion Detection System (IDS)............................4 3.Network Intrusion Prevention System (IPS)...........................7 4.Key Differences Between IDS & IPS.......................................9 5.Network Segregation & Trust Zones.....................................10 6.Connecting an IDS Device....................................................15
- 6. 7.Connecting an IPS Device.....................................................18 8.IDS & IPS Tuple Deployment.................................................20 9.Practical Applications and Uses............................................27 10.Conclusions....................................................................... 30 11.References......................................................................... 33 12.Appendix A: Step by Step Build of an IDS/IPS....................34 Nicholas Pappas 2 © SANS Institute 2008, Author retains full rights. © S A N S In st itu
- 8. Key fingerprint = AF19 FA27 2F94 998D FDB5 DE3D F8B5 06E4 A169 4E46 Network IDS & IPS Deployment Strategies 1.Introduction Information systems are more capable today than ever before. Society increasingly relies on computing environments ranging from simple home networks, commonly attached to high speed Internet connections, to the largest enterprise networks spanning the entire globe. Filling one's tax return, shopping online, banking online, or even reading news headlines posted on the Internet are all so convenient. This increased reliance and convenience, coupled with the fact that attacks are concurrently becoming more prevalent has consequently elevated the need to have security controls in place to minimize risk as much as possible. This risk is often ignored as many people mistakenly disregard the computing power of their home systems, or small office networks. If the
- 9. risk is not completely ignored, system owners routinely deploy a network firewall to protect web servers, or email servers and mistakenly feel safe. The convenience of conducting business over the world wide web, or communicating over email has made such services a prime target for automated attacks. Most network firewalls control network access by blocking traffic based on an IP address and port number. If you have an email server and wish for it to communicate with systems external to your network you will have to open port 25 (smtp) enabling this external communication. But what happens when an inbound attack comes in over port 25? Without having devices designed to monitor the content of this malicious traffic the email server is at the mercy of such an attack. Nicholas Pappas 3 © SANS Institute 2008, Author retains full rights.
- 11. r r et ai ns fu ll rig ht s. Key fingerprint = AF19 FA27 2F94 998D FDB5 DE3D F8B5 06E4 A169 4E46 Network IDS & IPS Deployment Strategies This document introduces tools used to systematically monitor network activity and discusses the deployment strategies of such systems. Regardless of the size of the network, having the ability to monitor network activity is a key component of defending information systems from attacks launched through various networks as well as finding internal systems that may not be configured correctly resulting in extraneous traffic absorbing valuable network throughput. We begin
- 12. with an introduction of what network intrusion detection systems and intrusion prevention systems are, then discuss connecting and deploying such devices. The paper then concludes after mentioning examples utilizing these systems in practical environments. There is no single security measure sufficient to independently protect information systems. Having a layered security architecture greatly reduces risk to system users. One invaluable layer is comprised of network intrusion detection systems. 2.Network Intrusion Detection System (IDS) Network Intrusion Detection Systems (IDS) monitor system behavior and alert on potentially malicious network traffic (Baker, 2004). IDS can be set inline, attached to a spanning port of a switch, or make use of a hub in place of a switch. The idea here is to allow access to all packets you wish the IDS to monitor. While copious amounts of traffic can be monitored, the key is
- 13. for the system to only alert on events of interest. When IDS raise an over abundance of alerts usefulness and trust in the system are reduced. When the system constantly gives Nicholas Pappas 4 © SANS Institute 2008, Author retains full rights. © S A N S In st itu te 2 00
- 14. 8 , A ut ho r r et ai ns fu ll rig ht s. Key fingerprint = AF19 FA27 2F94 998D FDB5 DE3D F8B5 06E4 A169 4E46 Network IDS & IPS Deployment Strategies false alarms, alerts tend to not be taken seriously. On the other side of the spectrum, if the IDS rarely alerts on malicious traffic, it leads
- 15. one to wonder if it is working at all. Tuning an IDS is somewhat of an art, a balancing act between four points of concern. These four points are true positives, false positives, true negatives and false negatives. Table 1 shows their relationship: Table 1: Relationship of event categories. The ideal tuning of an IDS maximizes instances of events categorized in the cells with a shaded background. True positives occur when the system alerts on intrusion attempts or other malicious activity. False negatives are somewhat of a null situation but are important nonetheless. The false negative is comprised of the system failing to alert on malicious traffic. At times many people have trouble remembering what each of the four event categories are. An analogy helps. Imagine the life cycle of a schoolhouse fire alarm. Using this analogy to describe the four categories is perhaps an easier method of understanding the distinctions. A true positive, would then be analogous to a
- 16. burning schoolhouse and the alarm sounding. This, after all, is the intended purpose of the schoolhouse fire alarm. The false negative occurs when the schoolhouse has an actual fire yet the fire Nicholas Pappas 5 P OS ITIVE NE GATIVE TR UE FALS E True Positive: Alerted on intrusion attempt True Negative: Not alerted on benign activity False Positive: Alerted on benign activity False Negative: Not alerted on intrusion attempt
- 17. © SANS Institute 2008, Author retains full rights. © S A N S In st itu te 2 00 8 , A ut
- 18. ho r r et ai ns fu ll rig ht s. Key fingerprint = AF19 FA27 2F94 998D FDB5 DE3D F8B5 06E4 A169 4E46 Network IDS & IPS Deployment Strategies alarm remains silent; alerting no one of the fire thus creating a danger to those counting on successful operation of the fire alarm. Continuing with this analogy, the remaining conditions are as follows. When a mischievous student pulls the alarm, knowing no fire exists, he/she presents a false positive. The alarm dutifully goes off with the lack of a fire. Numerous occurrences of false positives and the seriousness of the alarm is belittled
- 19. and soon to be ignored. Finally the true negative relates to the alarm remaining silent while the schoolhouse is not aflame. Table 2 maps the conditions of this analogy using a similar format used in Table 1. Table 2: Relationships as they apply to the schoolhouse fire alarm analogy. Tuning an IDS is typically an ongoing task. Threats and computing environments are ever-changing, thus systems deployed to detect such threats must adapt accordingly. Detecting malicious network activity is an important piece of an overall security architecture, but what can we do to defend from detected attacks? Prevention is the key and covered in the section. Nicholas Pappas 6 ALAR M S ILE NC E Intended Function True Positive: Alarm sounded
- 20. during actual fire True Negative: Alarm silent no actual fire B roken Function False Positive: Alarm sounded no actual fire False Negative: Alarm silent during actual fire © SANS Institute 2008, Author retains full rights. © S A N S In st itu
- 22. Key fingerprint = AF19 FA27 2F94 998D FDB5 DE3D F8B5 06E4 A169 4E46 Network IDS & IPS Deployment Strategies 3.Network Intrusion Prevention System (IPS) The ability to monitor network traffic is a key component of protecting information systems. Even still, defending those systems from the many threats can be a daunting task. A firewall is commonly used to provide a layer of security for its respective local network. Firewalls by themselves have limitations though. Most can only block based on IP addresses or ports. In contrast Network Intrusion Prevention Systems (IPS) are able to use signatures designed to detect and defend from specific types of attacks such as denial of service attacks among others. This is an advantage, for instance, with sites hosting Web servers. To permit Web service traffic, a firewall passes Hypertext Transfer Protocol (port 80) to external systems if not the entire world. This opens up risk because
- 23. many attacks and exploits are inherent to Web server applications (e.g., Apache, Microsoft IIS). Even when the Web server is fully patched and well maintained, insecure Web applications all too often exist on a target Web server. Web applications themselves introduce additional risks (e.g., Cross- Site Scripting). Coupling a firewall with an IPS creates the potential to reduce these risks. An IPS is capable of monitoring the content deep inside the Web traffic. When the IPS discovers an event considered to be a true positive, the malicious connection is dropped and all subsequent matching packets are destined for the same outcome. In this ideal situation, the Web server never commits processing power to the malicious attack as it continues providing Web content to legitimate clients it was Nicholas Pappas 7 © SANS Institute 2008, Author retains full rights.
- 25. r r et ai ns fu ll rig ht s. Key fingerprint = AF19 FA27 2F94 998D FDB5 DE3D F8B5 06E4 A169 4E46 Network IDS & IPS Deployment Strategies intended to serve. Web services are commonplace across the Internet, but the above example can be applied to many other networked services. To be compliant with systems across the wide spread internetwork a standard service port must be used. These ports are considered to be “known ports”, for instance port 25 is assigned to Simple Mail Transport Protocol (SMTP), port 53 is assigned to Domain Network Services (DNS).
- 26. Permitting these ports through a firewall is essential to be compatible with systems across the globe. Using an IPS along with a firewall offers the system owners some piece of mind while at the same time maintaining the required functionality. IPS have also been known to block buffer overflow type attacks, and can be configured to report on network scans that typically signal a potential attack is soon to follow. Advanced usage of an IPS may not drop malicious packets but rather redirect specific attacks to a honeypot. A simple example of this utilization might redirect a malicious connection to a device setup to emulate the would be victim. Honeypots are not in the scope of this paper. However, this type of redirection creates research opportunities into methods of attackers or active automated threats, while at the same time defending the actual production systems. At the very least, the honeypot-redirect methodology creates potential to absorb attackers' time
- 27. and other resources as systems under their command attempt to compromise phony assets. Nicholas Pappas 8 © SANS Institute 2008, Author retains full rights. © S A N S In st itu te 2 00
- 28. 8 , A ut ho r r et ai ns fu ll rig ht s. Key fingerprint = AF19 FA27 2F94 998D FDB5 DE3D F8B5 06E4 A169 4E46 Network IDS & IPS Deployment Strategies 4.Key Differences Between IDS & IPS Intrusion detection and intrusion prevention are similar concepts but there are distinct differences, unique concerns, and benefits inherent with deploying either
- 29. one, or both as we will see later. Let's start our dissection with intrusion detection. Network intrusion detection systems allow analysts the ability to peer into network traffic and gain an in-depth understanding of protocols belonging to network stacks, applications and operating systems. While intrusion detection systems can be placed inline, they are commonly connected to the spanning port of a switch, attached to a hub, or make use of network taps. The intent here is to allow a designated network interface to process all traffic analysts want to inspect. If an intrusion detection system is out-of-band, the opposite of inline, then the monitored network will not be at the mercy of the IDS failure potential. If the system is placed inline and it fails, network packets will no longer be processed thus ceasing all connectivity the system is designed to monitor. This is a benefit over intrusion prevention systems which are always configured inline.
- 30. Detection systems connected to a spanning port or hub have the potential to send a reset packet, to both the source and target of malicious sessions. This being an example of utilizing an IDS as a defensive measure. However, this will typically stop an attack already underway. Intrusion prevention systems, while connected inline, can stop or redirect attacks preemptively in most cases (Baker, 2004). Of course this extra control comes with a price. Nicholas Pappas 9 © SANS Institute 2008, Author retains full rights. © S A N S In st itu
- 32. Key fingerprint = AF19 FA27 2F94 998D FDB5 DE3D F8B5 06E4 A169 4E46 Network IDS & IPS Deployment Strategies As mentioned previously, the risk introduced with placing either an IDS or IPS inline is related to the likelihood of the system failing resulting in the link being brought down. Some commercial systems will go into failsafe mode where they default to being open and minimize risk of a device failure causing network outage. Security and network analysts should know outage caused by system failure must be avoided if at all possible. The mission of deploying security controls is defeated when the controls themselves are excessively prone to failure. Especially when their failure unintentionally brings down large scale network connectivity. 5.Network Segregation & Trust Zones Realistically expecting security professionals to completely secure every system on a network is unreasonable. Often times, security controls are
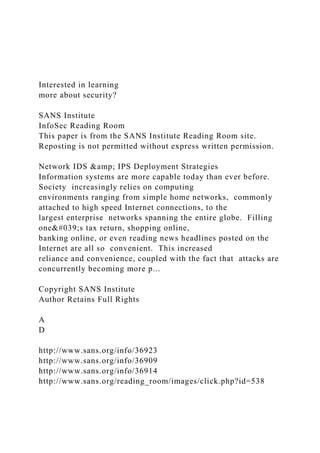
- 33. in direct opposition to functionality inherent with today's feature-rich computing environments. All too often, 100% secure is congruent to 0% usable. An effective strategy to balance security with functionality is with network segregation. The resulting zones are associated with a level of trust based on the sensitivity of the data being processed. Each zone can have a different security policy (Rehman, 2003). This design structure promotes sound security and realistic risk reduction, while at the same time permitting just the right amount of functionality to effectively conduct business. Figure 1 illustrates how a corporate network may be segregated by functional groups of system users. Finance and accounting staff have legitimate need for direct access to their respective systems during group collaboration efforts, or project Nicholas Pappas 10
- 34. © SANS Institute 2008, Author retains full rights. © S A N S In st itu te 2 00 8 , A ut
- 35. ho r r et ai ns fu ll rig ht s. Key fingerprint = AF19 FA27 2F94 998D FDB5 DE3D F8B5 06E4 A169 4E46 Network IDS & IPS Deployment Strategies teams efficiently conducting business. For many reasons it may be inadvisable allowing research and development engineers direct access to systems in the human relations department. Segregating networks as shown provides a layer of security and a means for the company to systematically enforce corporate or enterprise policy. Having a system enforce policy is much more effective than expecting humans to behave appropriately, or avoid mistakes of
- 36. unintentionally compromising sensitive data. Figure 1: Typical corporate network zone diagram. Nicholas Pappas 11 © SANS Institute 2008, Author retains full rights. © S A N S In st itu te 2 00
- 37. 8 , A ut ho r r et ai ns fu ll rig ht s. Key fingerprint = AF19 FA27 2F94 998D FDB5 DE3D F8B5 06E4 A169 4E46 Network IDS & IPS Deployment Strategies Looking towards the center of Figure 1, you will find concentric circles exhibiting “circles of trust”. In this portion of the example, each department has
- 38. direct access to the front end application circle; perhaps in the form of a web application. This front-end application is then utilized to carefully grant or deny access to the organization's most critical data (e.g., file servers, databases). Any four of the sample departments are not capable of gaining direct access to the back end data storage. To view or modify this critically important data, personnel must first go through the middleware responsible for administering the most restrictive permissions. This model follows the principle of least privilege with respect to the innermost data storage zone. That is, giving subjects no more and no less access to objects than is required to exclusively conduct business related tasks (Harris, 2003). IDS and IPS are great tools to leverage when defining, monitoring, auditing, and enforcing the circumference of each circle. Deploying an IDS and/or IPS at each of the department circles provides a means to monitor and block attempts to violate
- 39. the policy of the system. If a system in the marketing department attempts to directly access systems in the human relations department it might be a sign of an employee trying to surreptitiously gather payroll information or personnel folders. If multiple systems, from say the research and development department, attempt to access systems in the other three segments it may signal a worm or virus attempting to propagate throughout the enterprise network. Both cases obviously require immediate attention to avoid potential compromise of personnel data or stability of Nicholas Pappas 12 © SANS Institute 2008, Author retains full rights. © S A N S In
- 41. ht s. Key fingerprint = AF19 FA27 2F94 998D FDB5 DE3D F8B5 06E4 A169 4E46 Network IDS & IPS Deployment Strategies systems enterprise-wide. Such segregation of a network in turn boosts the ability for response teams to isolate or quarantine system compromises, while the zones not compromised continue conducting business. Not only does network segregation lend itself to access control, it also helps in throughput management across a large network. Imagine a university network where multiple academic departments (e.g., Arts & Sciences, School of Engineering) are collectively connected to a single backbone network. Figure 2 depicts an architecture where the backbone network provides conduit from one department to another department as well as connectivity for all departments to access the global Internet (i.e., Internet 1 and Internet 2). Network sessions over
- 42. the backbone will likely outnumber sessions strictly within any single department network. Because of this, the backbone will be best served with network equipment capable of high levels of throughput and low latency. Hardware capable of 10 Gigabit throughput is rather expensive, perhaps too expensive to expect each department to purchase such equipment for their respective segment of the campus network. Without suffering significant performance loss, circuits connecting each department network to the university backbone may be capable of providing 1 Gigabit throughput. Following this model, the local area networks (LAN) within each department may be using 100 Mb equipment. Of course overtime all information technology assets will eventually require an upgrade but the theory behind this model remains valid. Nicholas Pappas 13
- 43. © SANS Institute 2008, Author retains full rights. © S A N S In st itu te 2 00 8 , A ut
- 44. ho r r et ai ns fu ll rig ht s. Key fingerprint = AF19 FA27 2F94 998D FDB5 DE3D F8B5 06E4 A169 4E46 Network IDS & IPS Deployment Strategies Figure 2: Throughput capabilities of a sizable network. Consideration of enterprise architecture is important when deploying IPS and IDS. The reason being that many IPS and IDS will become bottlenecks or points of congestion when expected to efficiently handle 10 Gigabit throughput. It is unwise Nicholas Pappas 14 © SANS Institute 2008, Author retains full rights.
- 46. r r et ai ns fu ll rig ht s. Key fingerprint = AF19 FA27 2F94 998D FDB5 DE3D F8B5 06E4 A169 4E46 Network IDS & IPS Deployment Strategies to place such systems on a backbone network capable of pushing large globs of data at extremely high transfer rates. To work around this issue, we place the IDS or IPS between each department level network and the university backbone. Acquiring systems capable of lower throughput will be more cost effective, and a distributed monitoring infrastructure will also provide awareness of network activity in each segment of the greater network. Figure 2 shows such a setup with circuits labeled
- 47. with their associated data transmission capabilities. The magnified portion of Figure 2 leads us into the next sections covering detailed explanation of IDS/IPS deployment. This section was admittedly a digression from the main topic. However, the concentric circles and segmentation of the network described here are crucial to understand and consider when planning the logical placement of an IDS or IPS. The concepts explained here are referred to in the remaining sections of the document. 6.Connecting an IDS Device There are multiple methods one can use to connect an IDS to capture and monitor traffic. In any case, the IDS needs to gather network traffic to be analyzed. Three methods and the benefits of each are briefly discussed here as depicted in Figure 3. Nicholas Pappas 15
- 48. © SANS Institute 2008, Author retains full rights. © S A N S In st itu te 2 00 8 , A
- 49. ut ho r r et ai ns fu ll rig ht s. Key fingerprint = AF19 FA27 2F94 998D FDB5 DE3D F8B5 06E4 A169 4E46 Network IDS & IPS Deployment Strategies Figure 3: IDS on the edge of a network or zone. Each part in this illustration consists of two servers, a workstation and an IDS all connected to a piece of network equipment attached to an uplink. The servers and workstation are considered internal assets and the uplink leads to an external network. The red lines represent connections being utilized to monitor traffic, while
- 50. the black dashed line represents a connection that may be used to manage the IDS Nicholas Pappas 16 © SANS Institute 2008, Author retains full rights. © S A N S In st itu te 2 00
- 51. 8 , A ut ho r r et ai ns fu ll rig ht s. Key fingerprint = AF19 FA27 2F94 998D FDB5 DE3D F8B5 06E4 A169 4E46 Network IDS & IPS Deployment Strategies remotely from a system in the internal network. Part A of Figure 3 shows the IDS connected to either a hub or a switch capable of configuring a SPAN port. On some managed switches, a SPAN port can be configured to send, “...all packets on the network to that port as
- 52. well as their ultimate destination” (Baker, 2004). With such a configuration, an IDS interface being used to monitor traffic could be connected to a switch yet be able to see all traffic passing through. A network hub intrinsically shares data passing through itself to all of its ports such that any system connected to the hub can see all traffic sourced from or destined to every other system connected to the hub. Using a hub may not be the best option since systems would be capable of intercepting traffic not intentionally sent to them. When using either a hub or switch with SPAN port capabilities, the systems on the internal network are not at the mercy of the IDS having a system failure brining the network down. Making use of a hub or switch SPAN port is a common method of connecting sensors. The use of a network tap is represented in Part B of Figure 3, which essentially replicates data passed through the wire. Network taps are not commonly found in
- 53. typical computer networks but may be purchased. Taps are handy when you need to setup a hasty monitoring solution, perhaps to troubleshoot a problem or temporarily deploy an IDS. Overall, a network tap is needed when the network does not have managed switches, is not using hubs, or when putting an IDS inline is out of the question. Nicholas Pappas 17 © SANS Institute 2008, Author retains full rights. © S A N S In st itu te 2
- 54. 00 8 , A ut ho r r et ai ns fu ll rig ht s. Key fingerprint = AF19 FA27 2F94 998D FDB5 DE3D F8B5 06E4 A169 4E46
- 55. Network IDS & IPS Deployment Strategies The final portion, Part C near the bottom of Figure 3, illustrates an IDS connected inline. This instance includes two connections, shown in red, with one connected to the uplink port of the switch, and the second connected to the external network. In most cases, this is not the best method to use because system failure of the IDS will prevent systems on the internal network from communicating with external systems. Rarely is this an ideal outcome, either way it is certainly an option. The benefit of the inline configuration is a guarantee all packets will be seen by the IDS. Packets are subject to being missed when an IDS is connected to a switch SPAN port, especially when that switch is busy processing a large burst of traffic. Depending on the capability of an inline IDS, a similar burst may lead to congestion of network throughput. Utilizing a management interface is required if the analysis is to
- 56. be done remotely. It is possible to simply connect a keyboard and monitor directly to the IDS and manage the system locally from its console. Whilst this may work for a small office, in a large network this is typically not a viable option. The same applies for an IPS which is covered in the following section. 7.Connecting an IPS Device Intrusion prevention systems are always connected inline. This requirement enables the IPS to drop select packets, and defend against an attack before it takes hold of the internal network (Hansteen, 2008). Here again, in Figure 4, we have red lines showing the network links being used to capture traffic. Nicholas Pappas 18 © SANS Institute 2008, Author retains full rights. © S A
- 58. ns fu ll rig ht s. Key fingerprint = AF19 FA27 2F94 998D FDB5 DE3D F8B5 06E4 A169 4E46 Network IDS & IPS Deployment Strategies Figure 4: IPS on the border of a network or zone. The management interface, shown with a black dashed line, is once again an option but still commonly used to manage the system remotely. Updating signatures and otherwise adapting the system to defend against the latest threats is an ongoing task. Because of this, having an efficient means of administering the device is important. The cons of having a system connected inline have been covered earlier in this document. However, some companies build systems to address this failure
- 59. potential. For instance, TippingPoint Technologies Inc. sells products named Zero Power High Availability devices, designed to pass traffic even in the event their IPS loses electrical power. As you can imagine, during this type of failure the IPS is passing unfiltered traffic; much better than dropping all network connectivity. An optimally configured IPS will block unwanted traffic and, as a consequence, when the Nicholas Pappas 19 © SANS Institute 2008, Author retains full rights. © S A N S In st itu te 2
- 60. 00 8 , A ut ho r r et ai ns fu ll rig ht s. Key fingerprint = AF19 FA27 2F94 998D FDB5 DE3D F8B5 06E4 A169 4E46
- 61. Network IDS & IPS Deployment Strategies IPS fails the network will typically see an increase in activity. Something for network engineers and intrusion analysts alike to consider when a significant unexplained spike in network activity is noticed on internal networks. Connecting an IPS is rather simple. After reading this section, you may wonder what can be done to monitor traffic when an IPS either fails entirely, or allows malicious traffic through; perhaps from not being strict enough. A layered approach is introduced in the next section. 8.IDS & IPS Tuple Deployment Prior to this section, the paper has discussed fundamentals of deploying an IDS or IPS. Now we move on to put these tools together, constructing a layered approach to network monitoring. Connecting these devices appropriately is covered first, we then move into the main point of this document. From a security perspective this is
- 62. by far the ideal deployment, so let's get started. Setting the stage for connecting both an IDS and an IPS, a router is introduced between the two sensors as shown in Figure 5. To follow the example, consider the router as defining a trust zone boundary or a network border separating a local area network (LAN) from a wide area network (WAN). Figure 5 then shows the IPS on the external side of the router, with a management link (dashed line) crossing over into the internal network for administration purposes. The IDS is connected in an inline fashion but, as previously mentioned, the IDS does not have to be inline and can be Nicholas Pappas 20 © SANS Institute 2008, Author retains full rights. © S A N S
- 64. ll rig ht s. Key fingerprint = AF19 FA27 2F94 998D FDB5 DE3D F8B5 06E4 A169 4E46 Network IDS & IPS Deployment Strategies connected out-of-band which is illustrated below in Figure 6. The IDS is strategically placed on the internal side of the router. As before, both figures show red lines depicting connections used to gather data for analysis and/or filtering. Figure 5: IPS & IDS connected inline. With the exception of the management interface connected to make remote administration of the sensors more convenient, the two network interface cards (NIC) internal to the IPS and IDS (i.e., those connecting the IDS and IPS to the red links) do not require IP addresses be assigned to them. In fact not having an IP address assigned to these sensor NIC's makes those interfaces invisible to other systems on
- 65. the network. Conversely the rationale behind the reason why the management interface must have an IP address assigned. The interfaces responsible for collecting data to be analyzed then merely listen on the wire and pickup electrical impulses representing data being transmitted. Nicholas Pappas 21 © SANS Institute 2008, Author retains full rights. © S A N S In st itu te 2 00
- 66. 8 , A ut ho r r et ai ns fu ll rig ht s. Key fingerprint = AF19 FA27 2F94 998D FDB5 DE3D F8B5 06E4 A169 4E46 Network IDS & IPS Deployment Strategies
- 67. Figure 6: IPS connected inline, IDS connected to spanning port. Packets are only concerned with transporting data from source to destination. Therefore, having two invisible NIC's configured as a bridge leaves the data untouched as packets travel from the first NIC to the second and carry on their merry way. When unwanted traffic passes over the invisible IPS bridge, the convivial journey is abruptly interrupted much like an insect innocently flying about before being smashed against the windshield of a car traveling at high speeds. For packets the IPS is programmed to drop, the invisible bridge resembles a thick sheet of glass unable to be seen. The sender of the dropped packet receives no response, and the internal network never processes the dropped packet. Such a scenario excites security professionals charged with defending a network from attack. That is until their joy comes crashing down when the boss is unable to
- 68. communicate with external systems he or she needs to conduct legitimate business with. When an IPS drops a legitimate packet, it resembles a false positive and is the Nicholas Pappas 22 © SANS Institute 2008, Author retains full rights. © S A N S In st itu te 2 00
- 69. 8 , A ut ho r r et ai ns fu ll rig ht s. Key fingerprint = AF19 FA27 2F94 998D FDB5 DE3D F8B5 06E4 A169 4E46 Network IDS & IPS Deployment Strategies effect of an IPS being too stringent. To correct this, the IPS needs to be tuned more conservatively adhering to looser rules while analyzing traffic. When the IPS is
- 70. configured too conservatively, we witness false negatives as unwanted traffic freely passes through. Obviously we have a conundrum between protecting the network, and keeping business flowing – having both live harmoniously ensures the aforementioned security staff remains employed. This is where the IDS comes in. Since the IDS is not responsible for dropping packets, the security administrator can set the IDS to be very aggressive. With this higher level of sensitivity the IDS alerts when even the slightest abnormality is present in the traffic being inspected. After spending time going through extraneous alerts the analyst then tunes the IDS to disregard traffic verified to be benign. Conversely, as the analyst finds traffic on the IDS posing a threat, a rule or signature is written and the IPS blocks the threat. This methodology allows analysts the ability to analyze traffic and become familiar with a normal baseline of traffic without interrupting legitimate data flow on the network.
- 71. Overtime, the diligent analyst will have a sensitive IDS giving very few alerts, as the IPS drops nearly 100% of the unwanted traffic. Any questionable traffic not blocked by the IPS the IDS then alerts on, prompting the analyst for further investigation. Nicholas Pappas 23 © SANS Institute 2008, Author retains full rights. © S A N S In st itu te 2 00
- 72. 8 , A ut ho r r et ai ns fu ll rig ht s. Key fingerprint = AF19 FA27 2F94 998D FDB5 DE3D F8B5 06E4 A169 4E46 Network IDS & IPS Deployment Strategies Figure 7: Data state diagram.
- 73. The different states of traffic passed through this layered model are exhibited in Figure 7. State 1 represents data that may or may not be legitimate. State 1 data is considered neither good nor bad because it has not yet been analyzed. State 2 data has been analyzed and filtered by the IPS. However because of the issue mentioned above, it may be data the conservatively tuned IPS chose to pass but whose legitimacy is still questionable. Data in state 3 has been filtered by the IPS and verified by the more aggressively tuned IDS. Of course any alerts from the IDS during the verification process may require further investigation by the analyst. For now it is permitted to pass through. Perhaps the result of a system not configured properly on the internal network. Of course it may also mean that a new rule needs Nicholas Pappas 24 © SANS Institute 2008, Author retains full rights.
- 75. et ai ns fu ll rig ht s. Key fingerprint = AF19 FA27 2F94 998D FDB5 DE3D F8B5 06E4 A169 4E46 Network IDS & IPS Deployment Strategies to be implemented on the IPS to block similar future attacks. The outcome is a multi-layered approach to monitoring network traffic passing through the boundary of a network or subnetwork. The main intent is to have the IPS block traffic known to be unnecessary or malicious, while the IDS remains sensitive alerting on traffic that may be difficult to categorize without risking termination of legitimate communication. Conceptually, the IPS is tuned somewhat conservatively and the IDS has a
- 76. more aggressive tuning. The IDS also provides a checks and balances of its respective IPS. Since the rules implemented in the IPS also exist in the IDS, if the IPS fails the IDS will continue monitoring. If the IDS suddenly sends numerous alerts the IPS is most likely in fail- over mode or has witnessed a system crash. Without a layered approach, traffic would pass through the network unmonitored until the IPS was brought online again. As shown in figures 5 and 6, the IPS is deployed on the external side of the router or network edge. This allows the IPS to drop packets prior to them hitting the router and prevents the router from having to process extraneous packets thus lightening the load on the routers processor(s). It also provides a means for the analyst to research traffic “in the wild”, as well as seeing any probes and scans coming from external systems. If a brute force attack is posed against the IPS, the router avoids having to deal with such nonsense as the IPS
- 77. actively drops the attack traffic on the floor. Unsuccessful network reconnaissance attempts may be fed into a heuristic of other security controls. Perhaps the organization's competition is in Nicholas Pappas 25 © SANS Institute 2008, Author retains full rights. © S A N S In st itu te 2 00
- 78. 8 , A ut ho r r et ai ns fu ll rig ht s. Key fingerprint = AF19 FA27 2F94 998D FDB5 DE3D F8B5 06E4 A169 4E46 Network IDS & IPS Deployment Strategies the midst of staging an attack. Even a minimally tuned IPS would block this traffic, but the analyst monitoring traffic external to his or her network
- 79. can gain great insight into the latest attacks and threat trends. Both figures show the IDS placement on the internal side of the edge router. This is required to see traffic being passed from or within the internal network. Especially in the case where the internal network is using Network Address Translation (NAT). Pinpointing internal systems using NAT'd IP addresses would be impossible from the perspective of the IPS since it is on the outside. IDS placement is critical when the analyst needs to track down internal systems sending unwanted traffic. Internal systems sending unwanted traffic may be caused by a system not configured correctly or possibly a compromised system attempting to propagate virus infection. Likewise, if an internal employee is transferring data outside the network, the IDS placed internally will be able to see exactly where this data is coming from and can be configured to report such activity.
- 80. Deploying IDS and IPS in pairs is substantially beneficial. Having one without the other will undoubtedly leave gaps in the monitoring of network activity, or possibly lead to ambiguous alerts showing the front end of the NAT'd IP space rather than detailing the specific system responsible for causing questionable traffic. The next section goes over some practical uses of such a setup. Nicholas Pappas 26 © SANS Institute 2008, Author retains full rights. © S A N S In st itu te 2 00
- 81. 8 , A ut ho r r et ai ns fu ll rig ht s. Key fingerprint = AF19 FA27 2F94 998D FDB5 DE3D F8B5 06E4 A169 4E46
- 82. Network IDS & IPS Deployment Strategies 9.Practical Applications and Uses Using an IDS/IPS paired deployment for researching traffic hitting the external side of a network was briefly discussed in the previous section. What was not mentioned was the fact that having such a system on the external side of the network can actually help other administrators world wide. Consider sharing traffic profile information with collaborative groups such as the SANS Internet Storm Center by submitting activity logs. Or participate in the DSheild Cooperative Network Security Community. DSheild allows you to report malicious activity while remaining anonymous. Often times, system administrators do not know when their respective systems are wreaking havoc outside their network. With so many worms and other automated attacks occurring on the Internet, if your system is being threatened, chances are other innocent systems are being attacked in the same manner.
- 83. In organizations required to test applications or carefully examine the effect of new patches prior to being applied to critical servers, it is good practice to setup a test computing environment. In such an environment it is best to ensure traffic is not transmitted outside the test network Having an IDS/IPS paired deployment on the edge of the test environment allows you to prove no traffic has left the environment (implement a drop-all rule on the IPS), as well as the ability to monitor network activity being passed on the inside of the test environment. Ever wonder what anomalous network traffic, if any, the latest prototype of your company's product is causing? How is the latest operating system patch going to effect your Nicholas Pappas 27 © SANS Institute 2008, Author retains full rights. © S
- 85. ai ns fu ll rig ht s. Key fingerprint = AF19 FA27 2F94 998D FDB5 DE3D F8B5 06E4 A169 4E46 Network IDS & IPS Deployment Strategies network? Clearly the test environment is an important piece of modern information technology shops. For information security professionals attempting to evade IDS and IPS detection a test case is very useful. Once such an individual feels they have their IPS and IDS configured just right, they should seek a method to evade their implementation. Likewise with someone who thinks they can sneak in, penetrating the network unnoticed. They should then devise a method to block their covert
- 86. attack. This is an invaluable means to make even the smartest security professional more capable. As far as the Blackhats go, setting up a test case of an IDS/IPS to launch attacks against may be beneficial in honing their craft. As most security folks know, being an effective member of any security team involves routinely wearing a black hat (offensive) and then swapping it with that of a lighter shade of grey or white (defensive); not unlike centuries of weapons development versus armor development. Outside the test environment, larger networks will find the administration of numerous IDS/IPS sensors deployed across their enterprise network a daunting task. Maintaining multiple IDS/IPS pairings is best done by utilizing a central database to store the data gathered. In this case the sensors merely collect data and send it up to a centralized database. Figure 8 shows a high level view of such an
- 87. implementation. Nicholas Pappas 28 © SANS Institute 2008, Author retains full rights. © S A N S In st itu te 2 00
- 88. 8 , A ut ho r r et ai ns fu ll rig ht s. Key fingerprint = AF19 FA27 2F94 998D FDB5 DE3D F8B5 06E4 A169 4E46 Network IDS & IPS Deployment Strategies Figure 8: Distributed infrastructure of IPS/IDS sensors feeding a centralized database. It is important to note, that each IDS/IPS pairing will have their own security policy or rule set. What applies to Segment-1 may not apply to Segment-2 and so
- 89. on. Furthermore, having the data sent to a centralized location, will minimize the number of highly skilled analysts the organization has to train and keep on the payroll. This will obviously bring about the highest return on investment. On that note, having one instance of data storage cuts down on the number of required systems capable of storing mass amounts of data, not to mention the systems required to conduct analysis on those large data stores. Centralizing analysis efforts also leads to a more consistent interpretation. The uses mentioned here are just a few of the many. In reality the uses of Nicholas Pappas 29 © SANS Institute 2008, Author retains full rights. © S A N S
- 91. ll rig ht s. Key fingerprint = AF19 FA27 2F94 998D FDB5 DE3D F8B5 06E4 A169 4E46 Network IDS & IPS Deployment Strategies such a system are only limited to one's imagination or task orders. 10.Conclusions As with any security product designed to protect information systems and the data they process, there are limitations. If the intrusion detection or prevention system lacks rules clever enough to detect traffic of interest the system will neither send alerts nor drop packets appropriately. Keeping your signatures updated and maintaining other rules intended to find exactly what you want is an ongoing endeavor. Another limitation is related to remediation of issues found with a monitoring
- 92. system. This is a task very difficult to automate. If the organization does not have a viable means of responding to incidents and remediation efforts, being alerted on such events is useless. Often times being able to respond in a timely fashion will make the difference between an entire network virus infection and limiting compromises to the fewest amount of systems. Along those lines, ignorance is bliss. Without response personnel to resolve findings the monitoring systems shed light on, the organization becomes increasingly liable for knowing about a problem but not acting on or resolving it. These systems are not magic, they do require maintenance and will benefit the organization only when coupled with trusted analysts and personnel to help with remediation efforts. This remediation may require modification of system configuration or in-depth investigations into system compromises. Nicholas Pappas 30
- 93. © SANS Institute 2008, Author retains full rights. © S A N S In st itu te 2 00 8
- 94. , A ut ho r r et ai ns fu ll rig ht s. Key fingerprint = AF19 FA27 2F94 998D FDB5 DE3D F8B5 06E4 A169 4E46 Network IDS & IPS Deployment Strategies Strategic placement of the monitoring systems is crucial. If you are trying to capture traffic local to your network, you may be missing it if you put it at the network's border. Likewise if you only have one monitoring system, and more than one connection linking your local area network to external networks. One important network device you should be mindful of when selecting the
- 95. optimal placement of your IDS or IPS is a Virtual Private Network (VPN) concentrator. As traffic travels through a VPN tunnel, it is encrypted and the IDS or IPS will not be capable of conducting adequate analysis. There are an increasing number of methods to evade intrusion detection. While network intrusion detection and prevention systems are adapting to an ever changing environment, the methods of evasion are as well. We must keep this in mind when making a judgment call with respect to detecting an intrusion. One should not rely too heavily on IDS or IPS logs. Feeling overly confident an intrusion was avoided simply because such activity was not logged may be a costly mistake. On the other hand, assuming the IDS or IPS is correctly classifying “malicious” traffic when in fact the traffic is legit should be avoided as well. Having an analyst skilled in decoding packets will help minimize these mistakes (packet decoding is
- 96. introduced in the SANS Security Essentials curriculum). In short, having too much trust in any single security product is a recipe for failure. In conclusion, deploying systems designed to monitor network activity will bring about more awareness of the very nature in how the respective network Nicholas Pappas 31 © SANS Institute 2008, Author retains full rights. © S A N S In st itu te 2 00
- 97. 8 , A ut ho r r et ai ns fu ll rig ht s. Key fingerprint = AF19 FA27 2F94 998D FDB5 DE3D F8B5 06E4 A169 4E46 Network IDS & IPS Deployment Strategies
- 98. behaves, and what threatens its intended function. There is certainly not a shortage of malicious traffic being transmitted across the Internet. Having a firewall at the edge of a network is a nice piece of hardware to have protecting internal networks. However, in information security there are no silver bullets. Network firewalls not withstanding. It is crucial to have a layered preventive strategy. Defense in depth is the only reasonable tactic with such adaptable threats being constantly presented to information systems. Nicholas Pappas 32 © SANS Institute 2008, Author retains full rights. © S A N S In st
- 100. ht s. Key fingerprint = AF19 FA27 2F94 998D FDB5 DE3D F8B5 06E4 A169 4E46 Network IDS & IPS Deployment Strategies 11.References Hansteen, P. N. M. (2008). The Book of PF: A No-nonsense Guide to the OpenBSD Firewall. San Fransico, CA: No Starch Press, Inc. Baker, A. R., Beale, J., Caswell, B., & Poor, M. (2004). Snort 2.1 Intrusion Detection Second Edition. Rockland, MA: Syngress Publishing, Inc. Rehman, R. U. (2003). Intrusion Detection with Snort: Advanced IDS Techniques Using Snort, Apache, MySQL, PHP, and ACID. Saddle River, NJ: Prentice Hall PTR. Harris, S. (2003). CISSP Certification All-in-One Exam Guide, Second Edition. Emeryville, CA: McGraw-Hill/Osborne Nicholas Pappas 33 © SANS Institute 2008, Author retains full rights.
- 102. r r et ai ns fu ll rig ht s. Key fingerprint = AF19 FA27 2F94 998D FDB5 DE3D F8B5 06E4 A169 4E46 Network IDS & IPS Deployment Strategies 12.Appendix A: Step by Step Build of an IDS/IPS The following steps have been used to build both IDS and IPS capabilities on a single system. The subject operating system used is OpenBSD. The hardware consists of an Intel based computer with 5 network interface cards installed. The first two cards build an inline bridge and the second pair of cards builds a second inline bridge. The fifth card is used for remote management of the system. OpenBSD was chosen because of their reputation in security and handling of the network stack. The steps listed here pick up after a base install of OpenBSD 4.2 (i386). For more information on how to install OpenBSD please
- 103. see their web site (http://www.openbsd.org/faq/faq4.html). While the author does not claim to be an OpenBSD guru, these steps have been verified to build a baseline IDS/IPS and displays alerts via the Basic Analysis and Security Engine (BASE) interface. No benchmarking has been done on the prototype system, and I would highly advise not deploying the resulting system in a production environment without some thorough testing. The prototype also may (does) not have permissions to their most restrictive setting. This appendix was the result of testing out concepts and ideas which were documented in the respective paper and thus the intent of this appendix is to save the reader time in implementing a test case to explore the concepts shared. Reading content is a good start but, for many, having hands on experience will be significantly more beneficial. So let's get started... Nicholas Pappas 34 © SANS Institute 2008, Author retains full rights. © S A N
- 105. fu ll rig ht s. Key fingerprint = AF19 FA27 2F94 998D FDB5 DE3D F8B5 06E4 A169 4E46 Network IDS & IPS Deployment Strategies General Outline: 1. Acquire OpenBSD ports 2. Network Setup 3. MySQL Installation 4. Snort Installation 5. Oinkmaster Installation 6. Barnyard Installation 7. Integration 8. BASE Installation 9. Baseline pf.conf NOTE: The details listed below have commands input to the command line interface showing in red font. Any output shown from commands, or file
- 106. contents will be shown in italic red font. All commands pickup after a base install of OpenBSD 4.2 and assume the root user account is being used. Where possible, permissions were set appropriately for the environment and daemons to run with non-root accounts upon completion of the install process. Many of the packages were installed from the OpenBSD ports collection. You may setup the partitions as you see fit. However, please note that you must have an ample amount of space in your /var partition as that is where the database will be stored. Just as an example, the prototype had 10GB of memory reserved for the /var partition. Nicholas Pappas 35 © SANS Institute 2008, Author retains full rights. © S A N S In st itu
- 108. s. Key fingerprint = AF19 FA27 2F94 998D FDB5 DE3D F8B5 06E4 A169 4E46 Network IDS & IPS Deployment Strategies Partitions and their sizes for the prototype system: Filesystem Size Mount Point /dev/wd0a 200MB / /dev/wd0h 10GB /archive /dev/wd0g 5GB /home /dev/wd0d 500MB /tmp /dev/wd0f 15GB /usr /dev/wd0e 10GB /var Acquire OpenBSD Ports We begin by downloading the ports collection. First find the packages mirror closest to your location and download the cvsup package. You will find a listing of the mirrors at this url (http://www.openbsd.org/ftp.html#ftp). Here is the command used on the prototype: ftp ftp3.usa.openbsd.org Login as anonymous (no password required) cd /pub/OpenBSD/4.2/packages/i386 get cvsup-16.1hp0.tgz cd /pub/OpenBSD/4.2/ get ports.tar.gz quit
- 109. Now copy the ports.tar.gz file to /usr and unpack it. cp ports.tar.gz /usr cd /usr/ tar -xvzf ports.tar.gz rm ports.tar.gz Add the cvsup package with the following command as the root user: pkg_add cvsup-16.1hp0.tgz This will help keep the ports tree up to date. Now we need to build a cvsup file. The contents of the file called /etc/cvs-supfile are listed here. Nicholas Pappas 36 © SANS Institute 2008, Author retains full rights. © S A N S In st itu te 2 00
- 110. 8 , A ut ho r r et ai ns fu ll rig ht s. Key fingerprint = AF19 FA27 2F94 998D FDB5 DE3D F8B5 06E4 A169 4E46
- 111. Network IDS & IPS Deployment Strategies --begin file content-- #Example command to use CVSup: # cvsup -g -L 2 /etc/cvs-supfile #Defaults applicable to all collections *default host=cvsup.usa.openbsd.org *default base=/usr *default prefix=/usr *default release=cvs *default tag=OPENBSD_4_2 *default delete use-rel-suffix *default compress #Collections OpenBSD-ports --end file content-- Commit the following commands to download your collections files. This will take some time depending on your connection to the associated mirror. cvsup -g -L 2 /etc/cvs-supfile You should now have OpenBSD's ports in /usr/ports. Network Setup First determine how the system indentifies each network interface card (NIC). ifconfig Some of the output has been snipped for brevity. However, the 5 NIC's are shown as: dc0: flags=8802<BROADCAST,SIMPLEX,MULTICAST> mtu 1500 dc1: flags=8802<BROADCAST,SIMPLEX,MULTICAST> mtu
- 112. 1500 dc2: flags=8802<BROADCAST,SIMPLEX,MULTICAST> mtu 1500 dc3: flags=8802<BROADCAST,SIMPLEX,MULTICAST> mtu 1500 sis0: flags=8843<UP,BROADCAST,RUNNING,SIMPLEX,MULTICA ST> mtu 1500 It was decided to use the NIC identified by "sis0" as the administrative interface and the rest are the bridged interfaces. The administrative interface was setup during Nicholas Pappas 37 © SANS Institute 2008, Author retains full rights. © S A N S In st itu te 2 00
- 113. 8 , A ut ho r r et ai ns fu ll rig ht s. Key fingerprint = AF19 FA27 2F94 998D FDB5 DE3D F8B5 06E4 A169 4E46
- 114. Network IDS & IPS Deployment Strategies the installation process to update the entire system. sis0 = administrative interface dc0 = external device non-verified dc1 = internal device non-verified dc2 = external device verified dc3 = internal device verified See the illustration below for an idea of how this system will be connected and deployed. Please note, the cable connecting the NIC labeled dc1 to the router's interface with an IP address of 192.168.0.3 is a crossover type cable. The rest shown in the image are regular straight through cables. As you can see the router separates two networks. The first network is a Class C identified by 192.168.0.0/24, and the second network is yet another Class C of 192.168.1.0/24. The rest of the document will follow the concept of having 192.168.0.0 as the external or non- trusted network, and 192.168.1.0/24 being considered as the trusted network. Make sure to substitute for your needs where appropriate. Nicholas Pappas 38 © SANS Institute 2008, Author retains full rights. ©
- 116. et ai ns fu ll rig ht s. Key fingerprint = AF19 FA27 2F94 998D FDB5 DE3D F8B5 06E4 A169 4E46 Network IDS & IPS Deployment Strategies Figure 9: Protoype diagram. Now that we know how to refer to the NIC's we need to create a file for each. To do this, commit the following commands, while substituting proper identifiers for your NIC's. First make sure these files don't pre-exist (they must only have the word "up" in them for our purposes): rm /etc/hostname.dc0 rm /etc/hostname.dc1 rm /etc/hostname.dc2 rm /etc/hostname.dc3 Next create the files to tell OpenBSD that we want them up with no IP address. echo up > /etc/hostname.dc0
- 117. echo up > /etc/hostname.dc1 echo up > /etc/hostname.dc2 echo up > /etc/hostname.dc3 Nicholas Pappas 39 © SANS Institute 2008, Author retains full rights. © S A N S In st itu te 2 00
- 118. 8 , A ut ho r r et ai ns fu ll rig ht s. Key fingerprint = AF19 FA27 2F94 998D FDB5 DE3D F8B5 06E4 A169 4E46 Network IDS & IPS Deployment Strategies Now create two bridges. The first bridge is intended to actually filter traffic deemed malicious or otherwise unwanted, and the second is to verify the filter. echo "add dc0" >> /etc/bridgename.bridge0 echo "add dc1" >> /etc/bridgename.bridge0 echo "up" >> /etc/bridgename.bridge0
- 119. echo "add dc2" >> /etc/bridgename.bridge1 echo "add dc3" >> /etc/bridgename.bridge1 echo "up" >> /etc/bridgename.bridge1 We should now see the following output from these commands: cat /etc/bridgename.bridge0 add dc0 add dc1 up cat /etc/bridgename.bridge1 add dc2 add dc3 up Reboot the system by typing the following command: reboot Upon boot completion you should have the packets traveling over both bridges. Install these packages for convenience: cd /usr/ports/net/wget make install MySQL Installation First check to see if you already have the required package files ls /usr/ports/packages/i386/ftp/mysql* mysql-client-5.0.45.tgz mysql-server-5.0.45.tgz
- 120. Nicholas Pappas 40 © SANS Institute 2008, Author retains full rights. © S A N S In st itu te 2 00 8
- 121. , A ut ho r r et ai ns fu ll rig ht s. Key fingerprint = AF19 FA27 2F94 998D FDB5 DE3D F8B5 06E4 A169 4E46 Network IDS & IPS Deployment Strategies If you have these files already, you can skip the next step, otherwise do the following: cd /usr/ports/databases/mysql make install Before we install the server we need to install the p5-DBD- mysql package. To do that commit the following steps: cd /usr/ports/databases/p5-DBD-mysql
- 122. make install Ok now you should have the required package files. cd /usr/ports/packages/i386/all pkg_add mysql-server-5.0.45.tgz pkg_add mysql-client-5.0.45.tgz Initial MySQL setup steps for running on OpenBSD. First create the default database: /usr/local/bin/mysql_install_db Increase the kernel limit of open files by making the following modification to /etc/sysctl.conf. echo "kern.maxfiles=4096" >> /etc/sysctl.conf To automatically start MySQL during system boot append to /etc/rc.local. You will have to edit the file at /etc/rc.local in this case. At the bottom of the file, add the contents shown here. #Added to start MySQL during boot. if [ -x /usr/local/bin/mysqld_safe ]; then su -c mysql root -c '/usr/local/bin/mysqld_safe --log-error >/dev/null 2>&1 &' mkdir -p /var/run/mysql ln -s /var/www/var/run/mysql/mysql.sock /var/run/mysql/mysql.sock echo -n ' mysql' sleep 5 echo ' done' fi
- 123. Nicholas Pappas 41 © SANS Institute 2008, Author retains full rights. © S A N S In st itu te 2 00 8
- 124. , A ut ho r r et ai ns fu ll rig ht s. Key fingerprint = AF19 FA27 2F94 998D FDB5 DE3D F8B5 06E4 A169 4E46 Network IDS & IPS Deployment Strategies To make the above entry into /etc/rc.local work properly, we'll need to add to the /etc/login.conf and then rebuild the login.conf.db as described here: First open /etc/login.conf and add: # MySQL class mysql: :openfiles-cur=1024: :openfiles-max=2048: :tc=daemon:
- 125. Then rebuild the login.conf with: cap_mkdb /etc/login.conf Fix some permissions issues so that we can get mysqld started and set a password. mkdir -p /var/run/mysql chown -R _mysql /var/run/mysql Manually start the MySQL daemon for purposes of completing the install. su -c mysql root -c '/usr/local/bin/mysqld_safe' /usr/local/bin/mysqladmin -u root password 'secret-pass' /usr/local/bin/mysqladmin -u root -h centaur.sci-fer.com password 'secret-pass' At this time now MySQL is installed, it's now time to configure it specifically for our purposes. Shutdown the MySQL daemon. mysqladmin shutdown -p <enter MySQL root password> Next copy the configuration file we'll be using. cp /usr/local/share/mysql/my-large.cnf /etc/my.cnf Now do some preparatory steps for our my.cnf file. mkdir -p /var/www/var/run/mysql chown _mysql._mysql /var/www/var/run/mysql Next step is to configure the MySQL Daemon such that it injects the socket in the proper location. To do this we need to make two subtle modifications. First change Nicholas Pappas 42
- 126. © SANS Institute 2008, Author retains full rights. © S A N S In st itu te 2 00 8 , A
- 127. ut ho r r et ai ns fu ll rig ht s. Key fingerprint = AF19 FA27 2F94 998D FDB5 DE3D F8B5 06E4 A169 4E46 Network IDS & IPS Deployment Strategies the client section in /etc/my.cnf from this: [client] #password = your_password port = 3306 socket = /var/run/mysql/mysql.sock To this: [client] #password = your_password port = 3306 socket = /var/www/var/run/mysql/mysql.sock
- 128. Likewise, the mysqld section needs to be changed from this: # The MySQL server [mysqld] port = 3306 socket = /var/run/mysql/mysql.sock To this: # The MySQL server [mysqld] port = 3306 socket = /var/www/var/run/mysql/mysql.sock Now when we force the Snort process into the chroot'd environment it will be able to reach the mysql.sock socket file. Ok time for a reboot to test the startup settings we have thus far. After the system boots, you should have the MySQL server running. Connect to the MySQL server with the following: mysql -u root -p Next we should tidy up a bit. mysql> drop database test; Nicholas Pappas 43 © SANS Institute 2008, Author retains full rights. © S A
- 130. ns fu ll rig ht s. Key fingerprint = AF19 FA27 2F94 998D FDB5 DE3D F8B5 06E4 A169 4E46 Network IDS & IPS Deployment Strategies Now we have a clean slate. Check for something very similar to the following output. mysql> show databases; +--------------------+ | Database | +--------------------+ | information_schema | | mysql | +--------------------+ 2 rows in set (0.00 sec) mysql> quit; Snort Installation Before we create the Snort database we build and install Snort from ports. To do that follow these steps. cd /usr/ports/net/snort export FLAVOR=mysql make install NOTE: At the end of the compile it states how to invoke Snort
- 131. properly --start of snip-- snort-2.6.0.2p1-mysql: complete --- snort-2.6.0.2p1-mysql ------------------- An up-to-date set of rules is needed for Snort to be useful as an IDS. These can be downloaded manually or net/oinkmaster can be used to download the latest rules from several different sources. It is recommended that snort be run as an unprivileged chrooted user. A _snort user/group and a log directory have been created for this purpose. You should start snort with the following options to take advantage of this: -c /etc/snort/snort.conf -u _snort -g _snort -t /var/snort -l /var/snort/log --end of snip-- Now you should have a user and group at the OS level added with the name of "_snort". To check this run: tail -n 1 /etc/passwd _snort:*:557:557:Snort Account:/nonexistent:/sbin/nologin Nicholas Pappas 44 © SANS Institute 2008, Author retains full rights. © S
- 133. ai ns fu ll rig ht s. Key fingerprint = AF19 FA27 2F94 998D FDB5 DE3D F8B5 06E4 A169 4E46 Network IDS & IPS Deployment Strategies Ok time to build the snort database. cd /usr/ports/net/snort/w-snort-2.6.0.2p1-mysql/snort- 2.6.0.2/schemas mysql -u root -p Enter password: Welcome to the MySQL monitor. Commands end with ; or g. Your MySQL connection id is 3 Server version: 5.0.33-log OpenBSD port: mysql-server-5.0.33 Type 'help;' or 'h' for help. Type 'c' to clear the buffer. mysql> CREATE DATABASE snort; Query OK, 1 row affected (0.05 sec) mysql> connect snort Connection id: 4 Current database: snort mysql> show tables; Empty set (0.02 sec)
- 134. mysql> source create_mysql; --output snipped for brevity-- Nicholas Pappas 45 © SANS Institute 2008, Author retains full rights. © S A N S In st itu te 2 00
- 135. 8 , A ut ho r r et ai ns fu ll rig ht s. Key fingerprint = AF19 FA27 2F94 998D FDB5 DE3D F8B5 06E4 A169 4E46 Network IDS & IPS Deployment Strategies mysql> show tables; +------------------+ | Tables_in_snort | +------------------+ | data | | detail | | encoding | | event | | icmphdr |
- 136. | iphdr | | opt | | reference | | reference_system | | schema | | sensor | | sig_class | | sig_reference | | signature | | tcphdr | | udphdr | +------------------+ 16 rows in set (0.00 sec) mysql> GRANT INSERT, SELECT, CREATE, UPDATE, DELETE on snort.* to [email protected] IDENTIFIED BY 'secret-password'; mysql> quit; At this time, we should have a snort database created, and a user named "snort" which will be used to send events to the MySQL database. Now do these steps to ensure Snort will come up automatically: chmod 4755 /usr/local/bin/snort chgrp _snort /usr/local/bin/snort Although were are not quite done with the Snort setup yet, let's move on. Nicholas Pappas 46
- 137. © SANS Institute 2008, Author retains full rights. © S A N S In st itu te 2 00 8 , A ut
- 138. ho r r et ai ns fu ll rig ht s. Key fingerprint = AF19 FA27 2F94 998D FDB5 DE3D F8B5 06E4 A169 4E46 Network IDS & IPS Deployment Strategies Oinkmaster Installation Next we'll install the Oinkmaster package to maintain our Snort rules files. Run the `make install` from ports after setting the FLAVOR environment variable back to null. export FLAVOR= cd /usr/ports/net/oinkmaster make install Now you will probably want to register with Snort to have Oinkmaster keep your rules up to date. Register at https://www.snort.org/pub- bin/register.cgi. Here is a
- 139. snippet from the oinkmaster.conf file which explains this requirement. --start of snip-- # As of March 2005, you must register on the Snort site to get access # to the official Snort rules. This will get you an "oinkcode". # You then specify the URL as # http://www.snort.org/pub- bin/oinkmaster.cgi/<oinkcode>/<filename> # For example, if your code is 5a081649c06a277e1022e1284b and # you use Snort 2.4, the url to use would be (without the wrap): # http://www.snort.org/pub-bin/oinkmaster.cgi/ # 5a081649c06a277e1022e1284bdc8fabda70e2a4/snortrules- snapshot-2.4.tar.gz # See the Oinkmaster FAQ Q1 and http://www.snort.org/rules/ for # more information. --end of snip-- First make sure you know which version of Snort you have. snort -V At the time of this writing, the OpenBSD ports collection contained version 2.6. Once you have your Oinkcode and know the version of Snort you have installed, modify the following line in /etc/oinkmaster.conf url = http://www.snort.org/pub- bin/oinkmaster.cgi/<oinkcode>/snortrules- snapshot-2.4.tar.gz to be url = http://www.snort.org/pub-bin/oinkmaster.cgi/YOUR-
- 140. CODE/snortrules- Nicholas Pappas 47 © SANS Institute 2008, Author retains full rights. © S A N S In st itu te 2 00
- 141. 8 , A ut ho r r et ai ns fu ll rig ht s. Key fingerprint = AF19 FA27 2F94 998D FDB5 DE3D F8B5 06E4 A169 4E46 Network IDS & IPS Deployment Strategies snapshot-2.6.tar.gz Save the file and then give it a test by running Oinkmaster manually. cd /etc/snort/rules oinkmaster -o . You should now have the rules files populated in the /etc/snort/rules directory. To check this list the files in that directory. You will see the files
- 142. containing signatures if Oinkmaster is working properly. ls To learn more about Oinkmaster it is recommended that you read the documentation, specifically the README file located on this page: http://oinkmaster.sourceforge.net/readme.shtml NOTE: At the time of this writing, there appears to be something wrong with the syntax of the telnet rules so you may need to remove that rule or otherwise fix the syntax. To remove the telnet rules you should modify your /etc/snort.conf file by commenting out the line including telnet.rules Change: include $RULE_PATH/telnet.rules So that it looks like: # include $RULE_PATH/telnet.rules Ok, Oinkmaster is installed. You can use this program manually by using the commands shown next. Or you can setup a cronjob to do it for you on a routine basis. cd /etc/snort/rules oinkmaster -o . Barnyard Installation Barnyard is a nice program that takes unified output from programs like Snort
- 143. and inputs log or event information into a useful format. For this prototype, we want Nicholas Pappas 48 © SANS Institute 2008, Author retains full rights. © S A N S In st itu te 2 00
- 144. 8 , A ut ho r r et ai ns fu ll rig ht s. Key fingerprint = AF19 FA27 2F94 998D FDB5 DE3D F8B5 06E4 A169 4E46 Network IDS & IPS Deployment Strategies Barnyard to take the unified output from Snort and insert it into the MySQL database. cd /usr/local/share wget http://www.snort.org/dl/barnyard/barnyard-0.2.0.tar.gz tar -xvzf barnyard-0.2.0.tar.gz rm barnyard-0.2.0.tar.gz cd barnyard-0.2.0 To prevent the loss of MySQL connection(s). We need to patch
- 145. Barnyard source before compiling it. cd barnyard-0.2.0 Now edit the file named “src/output-plugins/op_acid_db.c” by adding the following just before a line containing: "while(mysql_ping(mysql) != 0)" mysql->reconnect=1; The final function should look exactly like this: --start of snip-- int MysqlExecuteQuery(MYSQL *mysql, char *sql) { int mysqlErrno; int result; while((result = mysql_query(mysql, sql) != 0)) { mysqlErrno = mysql_errno(mysql); if(mysqlErrno < CR_MIN_ERROR) { if(pv.verbose) LogMessage("MySQL ERROR(%i): %s. Aborting Queryn", mysql_errno(mysql), mysql_error(mysql)); return result; } if((mysqlErrno == CR_SERVER_LOST) || (mysqlErrno == CR_SERVER_GONE_ERROR)) { LogMessage("Lost connection to MySQL server. Reconnectingn"); /* MySQL reconnect line inserted to fix the MySQL idle disconnect issue. */ mysql->reconnect=1;
- 146. Nicholas Pappas 49 © SANS Institute 2008, Author retains full rights. © S A N S In st itu te 2 00 8
- 147. , A ut ho r r et ai ns fu ll rig ht s. Key fingerprint = AF19 FA27 2F94 998D FDB5 DE3D F8B5 06E4 A169 4E46 Network IDS & IPS Deployment Strategies while(mysql_ping(mysql) != 0) { if(BarnyardSleep(15)) return result; } LogMessage("Reconnected to MySQL server.n"); } else { /* XXX we could spin here, but we do not */ LogMessage("MySQL Error(%i): %sn", mysqlErrno, mysql_error(mysql));
- 148. } } return result; } --end of snip-- Ok now we're clear to compile Barnyard. ./configure –enable-mysql make make install cp /usr/local/share/barnyard-0.2.0/etc/barnyard.conf /etc/snort/ Integration Now we need to integrate many of the applications we have installed thus far. cd /etc/snort You will want to familiarize yourself with the /etc/snort/snort.conf file. The file itself is well commented and discussed in the Official Snort Manual (http://www.snort.org/docs/snort_htmanuals/htmanual_2615/). To get you and your system started, the following variables need to be set. Open snort.conf with vi or some other editor. If you choose an editor other than vi you may have to install it from ports. Change: "var HOME_NET any" to: Nicholas Pappas 50
- 149. © SANS Institute 2008, Author retains full rights. © S A N S In st itu te 2 00 8 , A ut
- 150. ho r r et ai ns fu ll rig ht s. Key fingerprint = AF19 FA27 2F94 998D FDB5 DE3D F8B5 06E4 A169 4E46 Network IDS & IPS Deployment Strategies "var HOME_NET [192.168.1.0/24,192.168.0.3]" Also Change: "var EXTERNAL_NET any" to: "var EXTERNAL_NET !$HOME_NET" To make Snort send alerts through Barnyard we uncomment the following lines: # output alert_unified: filename snort.alert, limit 128 # output log_unified: filename snort.log, limit 128 Such that they look like this: output alert_unified: filename snort.alert, limit 128 output log_unified: filename snort.log, limit 128
- 151. Save your snort.conf changes and exit your favorite editor. Now we'll need to make two configuration files. One for the first bridge and the other for the second bridge. First let's make barnyard-bridge0.conf cd /etc/snort/ cp barnyard.conf barnyard-bridge0.conf Now make the following modifications: Change: # config daemon to this config daemon Change: #config localtime to this config localtime Change: config interface: fxp0 to config interface: bridge0 Change: output alert_fast to # output alert_fast Change: Nicholas Pappas 51 © SANS Institute 2008, Author retains full rights. © S
- 153. ai ns fu ll rig ht s. Key fingerprint = AF19 FA27 2F94 998D FDB5 DE3D F8B5 06E4 A169 4E46 Network IDS & IPS Deployment Strategies output log_dump to # output log_dump Change: config hostname: snorthost to reflect your Snort sensor machine (which may very well be localhost) config hostname: localhost Now enable the following output plugin lines #output alert_acid_db: mysql, sensor_id 1, database snort, server localhost, user root # output log_acid_db: mysql, database snort, server localhost, user root, detail full Such that it looks similar to this (ensure you use the same password you set for the snort account in MySQL): output alert_acid_db: mysql, sensor_id 0, database snort, server localhost, user snort, password secret-pass output log_acid_db: mysql, database snort, server localhost,
- 154. user snort, password secret-password, detail full Ok now save the barnyard-bridge0.conf file and make a copy of barnyard.conf for the next config file we'll need. In the next file, we'll make similar changes. The only difference is swapping bridge0 for bridge1 and making sensor_id 0 set to sensor_id1 cp barnyard.conf barnyard-bridge1.conf Now edit that file. vi barnyard-bridge1.conf Change: # config daemon to this config daemon Change: #config localtime to this config localtime Change: config interface: fxp0 to config interface: bridge0 Nicholas Pappas 52 © SANS Institute 2008, Author retains full rights. © S
- 156. ns fu ll rig ht s. Key fingerprint = AF19 FA27 2F94 998D FDB5 DE3D F8B5 06E4 A169 4E46 Network IDS & IPS Deployment Strategies Change: output alert_fast to # output alert_fast Change: output log_dump to # output log_dump Change: config hostname: snorthost to reflect your Snort sensor machine (which may very well be localhost) config hostname: localhost Now enable the following output plugin lines #output alert_acid_db: mysql, sensor_id 1, database snort, server localhost, user root # output log_acid_db: mysql, database snort, server localhost, user root, detail full Such that it looks similar to this (ensure you use the same
- 157. password you set for the snort account in MySQL): output alert_acid_db: mysql, sensor_id 1, database snort, server localhost, user snort, password secret-pass output log_acid_db: mysql, database snort, server localhost, user snort, password secret-password, detail full Ok you should now save the barnyard-bridge1.conf file Once again the only differences between barnyard-bridge0.conf and barnyard-brdige1.conf are on the "config interface" line and the line starting with "output alert_acid_db" where the id numbers are either '0' or '1'. Set permissions (need to protect the password content): chmod 640 barnyard*.conf Copy the maps over. cd /usr/ports/net/snort/w-snort-2.6.0.2p1/snort-2.6.0.2/etc/ cp gen-msg.map /etc/snort/ cp sid-msg.map /etc/snort/ Nicholas Pappas 53 © SANS Institute 2008, Author retains full rights. © S A N
- 159. fu ll rig ht s. Key fingerprint = AF19 FA27 2F94 998D FDB5 DE3D F8B5 06E4 A169 4E46 Network IDS & IPS Deployment Strategies Insert the following into /etc/rc.local, this will startup both instances of Snort and Barnyard. Please notice that this content goes below the entry we made earlier for MySQL. --start of snip-- # Added to start Barnyard on bridge 0 during boot after the db is up but # before Snort is brought up. if [ -x /usr/local/bin/barnyard ]; then /usr/local/bin/barnyard -D -w barn.waldo-0 -c /etc/snort/barnyard-bridge0.conf -d /var/snort/log/bridge0 -g /etc/snort/gen-msg.map -s /etc/snort/sid-msg.map -f snort.log -X /tmp/barnyard-bridge0.pid echo ' barnyard bridge 0' fi # Added to start Barnyard on bridge 1 during boot after the db is up but # before Snort is brought up. if [ -x /usr/local/bin/barnyard ]; then
- 160. /usr/local/bin/barnyard -D -w barn.waldo-1 -c /etc/snort/barnyard-bridge1.conf -d /var/snort/log/bridge1 -g /etc/snort/gen-msg.map -s /etc/snort/sid-msg.map -f snort.log -X /tmp/barnyard-bridge1.pid echo ' barnyard bridge 1' fi # Added to start the first Snort sensor during boot after the db is brought up. if [ -x /usr/local/bin/snort ]; then /usr/local/bin/snort -c /etc/snort/snort.conf -u _snort -g _snort -t /var/snort -l /var/snort/log/bridge0 -G 0 -i bridge0 -D sleep 5 echo ' snort bridge 0' fi # Added to start the second Snort sensor during boot after the db is brought up. if [ -x /usr/local/bin/snort ]; then /usr/local/bin/snort -c /etc/snort/snort.conf -u _snort -g _snort -t /var/snort -l /var/snort/log/bridge1 -G 1 -i bridge1 -D sleep 5 echo ' snort bridge 1' fi --end of snip-- Nicholas Pappas 54 © SANS Institute 2008, Author retains full rights. ©
- 162. et ai ns fu ll rig ht s. Key fingerprint = AF19 FA27 2F94 998D FDB5 DE3D F8B5 06E4 A169 4E46 Network IDS & IPS Deployment Strategies Finally some minor steps before we reboot for another test. mkdir /var/snort/log/bridge0 mkdir /var/snort/log/bridge1 touch /etc/snort/rules/local.rules chown -R _snort /etc/snort Reboot and hope for the best. This is a critical test. Upon reboot you should have two snort daemons running and their respective barnyard's should be inserting events found into MySQL. Now you should check to make sure you have snort running, two of them actualy. ps aux | grep snort In the resulting output you should see two processes being run by _snort. If not check the /var/log/daemon log for clues and make sure this is working after a
- 163. reboot. It may take a couple tries but it's crucial to ensure your system boots appropriately. BASE Installation To start the web interface we need to make some changes to rc.conf and create an SSL cert. In your /etc/rc.conf file change: #httpd_flags=NO # for normal use: "" (or "-DSSL" after reading ssl(8)) to httpd_flags=-DSSL # for normal use: "" (or "-DSSL" after reading ssl(8)) Create a self-signed SSL certificate. For more information please read the following web page http://www.openbsd.org/faq/faq10.html#HTTPS. While there are validation related issues with self-signed certificates, this should get your system up and running. If you put this system into a production deployment, you should really considering obtaining certificates from a trusted Certifying Authority. Until then, commit the following steps to move forward. Nicholas Pappas 55 © SANS Institute 2008, Author retains full rights. © S
- 165. ai ns fu ll rig ht s. Key fingerprint = AF19 FA27 2F94 998D FDB5 DE3D F8B5 06E4 A169 4E46 Network IDS & IPS Deployment Strategies Create your server key: openssl genrsa -out /etc/ssl/private/server.key 1024 Next create a signing request: openssl req -new -key /etc/ssl/private/server.key -out /etc/ssl/private/server.csr You will be prompted to answer some questions on this step. Now generate a self- signed certificate: openssl x509 -req -days 365 -in /etc/ssl/private/server.csr -signkey /etc/ssl/private/server.key -out /etc/ssl/server.crt If you would like to reboot again, you can then test the SSL functionality with opening the following url up with a browser on the trusted network. https://<system's IP>
- 166. The result should show Apache's garden variety "It Worked" page. Now remove test web content from your filesystem (you don't need it). rm -r /var/www/htdocs/* Installed required packages from OpenBSD's ports. NOTE: Some of these may have been installed by steps noted above. Even if they have been installed, it doesn't hurt to (re)build each of these packages as shown below. cd /usr/ports/databases/p5-DBI make install cd /usr/ports/databases/p5-DBD-mysql make install cd /usr/ports/print/freetype make install cd /usr/ports/devel/gettext make install Nicholas Pappas 56 © SANS Institute 2008, Author retains full rights. © S A N S In
- 168. rig ht s. Key fingerprint = AF19 FA27 2F94 998D FDB5 DE3D F8B5 06E4 A169 4E46 Network IDS & IPS Deployment Strategies cd /usr/ports/converters/libiconv make install cd /usr/ports/converters/recode make install cd /usr/ports/graphics/tiff make install cd /usr/ports/www/php4 make install NOTE: Installing php4 from ports takes a while. cd /usr/ports/graphics/gd make install cd /usr/ports/graphics/png make install cd /usr/ports/graphics/jpeg make install cd /usr/ports/packages/i386/all pkg_add php4-pear-4.4.1p2.tgz Activate PHP /usr/local/sbin/phpxs -s
- 169. cp /usr/local/share/examples/php4/php.ini-dist /var/www/conf/php.ini Open /var/www/conf/httpd.conf with you favorite editor and uncomment the line #AddType application/x-httpd-php .php so that it looks like this: AddType application/x-httpd-php .php Nicholas Pappas 57 © SANS Institute 2008, Author retains full rights. © S A N S In st itu te 2 00
- 170. 8 , A ut ho r r et ai ns fu ll rig ht s. Key fingerprint = AF19 FA27 2F94 998D FDB5 DE3D F8B5 06E4 A169 4E46 Network IDS & IPS Deployment Strategies Add more packages. cd /usr/ports/packages/i386/all pkg_add -v php4-gd-4.4.1p5.tgz
- 171. /usr/local/sbin/phpxs -a gd pkg_add -v php4-mysql-4.4.1p1.tgz /usr/local/sbin/phpxs -a mysql cd /var/www/htdocs wget http://easynews.dl.sourceforge.net/sourceforge/secureideas/base -1.3.9.tar.gz tar -xvzf base-1.3.9.tar.gz rm base-1.3.9.tar.gz ln -s base-1.3.9 base cd base cp base_conf.php.dist base_conf.php chmod 640 /var/www/htdocs/base/*.php chown www /var/www/htdocs/base/*.php Set the following variables in the file at /var/www/htdocs/base/base_conf.php. These variables are in different locations of this file. They are gathered here for brevity. $BASE_urlpath = '/base'; $DBlib_path = '/htdocs/adodb'; $alert_dbname = 'snort'; $alert_host = 'localhost'; $alert_port = ''; $alert_user = 'snort'; $alert_password = 'secret-password'; Save and exit. Next we activate what we need in PEAR. pear upgrade --force http://pear.php.net/get/Archive_Tar- 1.3.2.tgz http://pear.php.net/get/XML_Parser http://pear.php.net/get/Console_Getopt pear upgrade --force http://pear.php.net/get/PEAR-1.4.3.tar
- 172. pear upgrade PEAR pear install Structures_Graph pear install Image_Graph-alpha Image_Canvas-alpha Image_Color Numbers_Roman Nicholas Pappas 58 © SANS Institute 2008, Author retains full rights. © S A N S In st itu te 2 00
- 173. 8 , A ut ho r r et ai ns fu ll rig ht s. Key fingerprint = AF19 FA27 2F94 998D FDB5 DE3D F8B5 06E4 A169 4E46 Network IDS & IPS Deployment Strategies pear install --alldeps channel://pear.php.net/Numbers_Words- 0.15.0 pear install --alldeps channel://pear.php.net/Image_Graph-0.7.2 cp -r /var/www/pear/Image /var/www/pear/lib/Image/ Install ADODB cd /var/www/htdocs/
- 174. wget http://superb- east.dl.sourceforge.net/sourceforge/adodb/adodb495a.tgz tar -xvzf adodb495a.tgz rm adodb495a.tgz Install JPGraph cd /var/www/htdocs/ wget http://hem.bredband.net/jpgraph/jpgraph-1.22.tar.gz tar -xvzf jpgraph-1.22.tar.gz rm jpgraph-1.22.tar.gz mkdir /var/www/tmp chown -R www /var/www/tmp Now is a good time to restart httpd /usr/sbin/apachectl stop /usr/sbin/apachectl startssl Now create the ACID database so that barnyard starts up successfully. From the trusted network, you need to open the link shown below. Open a browser and go to https://<your IP>/base/base_db_setup.php Then click the button labeled "Create BASE AG" in the "Status" column. Now create a user by going to the web interface and clicking on "Administration" and then click "Create a user". After filling in the dialog boxes, choose the appropriate role and click "Submit Query". Now make one last modification to the file at /var/www/htdocs/base/base_conf.php and change the following from: Nicholas Pappas 59
- 175. © SANS Institute 2008, Author retains full rights. © S A N S In st itu te 2 00 8
- 176. , A ut ho r r et ai ns fu ll rig ht s. Key fingerprint = AF19 FA27 2F94 998D FDB5 DE3D F8B5 06E4 A169 4E46 Network IDS & IPS Deployment Strategies $Use_Auth_System = 0; to $Use_Auth_System = 1; This simple step enables some very basic authentication and provides yet another layer for the bad guys to go through if they want to help monitor your traffic. Baseline pf.conf To make PF start during system boot we need to modify /etc/rc.conf and
- 177. change: pf=NO # Packet filter / NAT to pf=YES # Packet filter / NAT You will want to modify your /etc/pf.conf file. The capabilities of this file are way out of the scope of this tutorial. However there are a lot of online resources and recently a book was published titled "The Book of PF" by Peter Hansteen. A great resource to have on hand. Also a great introduction to PF can be found at: http://www.openbsd.org/faq/pf/ For this setup. Here is a snippet of a baseline /etc/pf.conf file. This should help you understand how we are treating the two bridges (with Snort) and running PF on the network interface labeled dc1 (your network card's manufacturer may have a different label for the interface). Nicholas Pappas 60 © SANS Institute 2008, Author retains full rights. © S A N S In
- 179. rig ht s. Key fingerprint = AF19 FA27 2F94 998D FDB5 DE3D F8B5 06E4 A169 4E46 Network IDS & IPS Deployment Strategies --start of snip-- # # Simple pf.conf file # # See pf.conf(5) and /usr/share/pf for syntax and examples. ## MACROS # inboard_int: The internal side of the external bridge # Will be doing most of the filtering on this interface inboard_int = dc1 # mgt_int: The NIC used for managing. # Need to restrict as much as possible on this one. mgt_int = sis0 # Other interfaces: other_int = "{ dc0, dc2, dc3 }" # Trusted IP's trusted = "{ 192.168.1.0/24, 192.168.0.3 }" notrust = "192.168.0.1/24" # The internal trusted zone internal_lan = "192.168.1.0/24" # Outside the trusted zone && notrust zone
- 180. external_wan = "!192.168.0.0/23" client_out = "{ ftp, ssh, 25, domain, pop3, auth, nntp, http, https, cvspserver, 993, 2628, 5999, 8000, 8080 } ##################################################### ############ # TABLES ##################################################### ############ table <bruteforce> persist ##################################################### ############ # Other ##################################################### ############ ## Only filter on specific interfaces set skip on $other_int ##################################################### ############ Nicholas Pappas 61 © SANS Institute 2008, Author retains full rights. © S A N S
- 182. ll rig ht s. Key fingerprint = AF19 FA27 2F94 998D FDB5 DE3D F8B5 06E4 A169 4E46 Network IDS & IPS Deployment Strategies # FILTER RULES ##################################################### ############ # Default deny policy block all block quick from <bruteforce> ##################################################### ############ # Rules for the management interface ##################################################### ############ pass quick on $mgt_int inet proto { tcp, udp } from $trusted to any port { ssh, domain, http, https } keep state (max-src-conn 20, max- src-conn-rate 10/5, overload <bruteforce> flush global) pass quick on $mgt_int inet proto { tcp, udp } from 192.168.1.4 to any port $client_out ##################################################### ############
- 183. # Rules for the bridge ##################################################### ############ pass quick on $inboard_int inet proto { tcp, udp } from $trusted to any port { domain, ntp } pass on $inboard_int inet proto tcp from $trusted to any port $client_out pass on $inboard_int inet proto { tcp, udp } from any to $trusted port 22 keep state (max-src-conn 20, max-src-conn-rate 10/5, overload <bruteforce> flush global) pass on $inboard_int inet proto { tcp, udp } from any to $trusted port 443 keep state (max-src-conn 20, max-src-conn-rate 10/5, overload <bruteforce> flush global) --end of snip-- This pf.conf file only allows ssh (port 22) and https (port 443) inbound from the external network (no trust) to the internal network (trusted). As a reminder, on the prototype system, the network card labled sis0 wasdesignated to be the management interface. Make substitutions as needed. While you are in the beginning stages of configuring your pf.conf file. It is recommended to have a monitor and keyboard (aka console) handy, in case you lock
- 184. yourself out from the network perspective. PS to disable pf, as root you use: pfctl -d The rest is left for the user to explore... Now you are ready to reboot and start the journey! Nicholas Pappas 62 Last Updated: August 4th, 2013 Upcoming SANS Training Click Here for a full list of all Upcoming SANS Events by Location Industrial Control Systems Security Training - DC Washington, DCUS Aug 12, 2013 - Aug 16, 2013 Live Event Critical Security Controls Summit Washington, DCUS Aug 12, 2013 - Aug 18, 2013 Live Event SANS Virginia Beach 2013 Virginia Beach, VAUS Aug 19, 2013 - Aug 30, 2013 Live Event SANS Thailand 2013 Bangkok, TH Aug 26, 2013 - Aug 31, 2013 Live Event SANS Melbourne 2013 Melbourne, AU Sep 02, 2013 - Sep 07, 2013 Live Event SANS Capital City 2013 Washington, DCUS Sep 03, 2013 - Sep 08, 2013 Live Event
- 185. SANS Network Security 2013 Las Vegas, NVUS Sep 14, 2013 - Sep 23, 2013 Live Event SEC 440 @MCMC Sept 2013 CyberJaya, MY Sep 17, 2013 - Sep 19, 2013 Live Event SANS Forensics Prague 2013 Prague, CZ Oct 06, 2013 - Oct 13, 2013 Live Event SANS Seattle 2013 Seattle, WAUS Oct 07, 2013 - Oct 14, 2013 Live Event SANS Baltimore 2013 Baltimore, MDUS Oct 14, 2013 - Oct 19, 2013 Live Event SANS Bangalore 2013 Bangalore, IN Oct 14, 2013 - Oct 26, 2013 Live Event GridSecCon 2013 Jacksonville, FLUS Oct 15, 2013 - Oct 17, 2013 Live Event Securing the Internet of Things Summit San Francisco, CAUS Oct 17, 2013 - Oct 22, 2013 Live Event Healthcare Cyber Security Summit San Francisco, CAUS Oct 17, 2013 - Oct 24, 2013 Live Event October Singapore 2013 Singapore, SG Oct 21, 2013 - Nov 02, 2013 Live Event SANS Tokyo Autumn 2013 Tokyo, JP Oct 21, 2013 - Oct 26, 2013 Live Event SANS Dubai 2013 Dubai, AE Oct 26, 2013 - Nov 07, 2013 Live Event
- 186. SANS Chicago 2013 Chicago, ILUS Oct 28, 2013 - Nov 02, 2013 Live Event FOR572 Advanced Network Forensics and Analysis Washington, DCUS Oct 28, 2013 - Nov 02, 2013 Live Event MGT415 at (ISC)2 SecureSoCal 2013 Manhattan Beach, CAUS Oct 31, 2013 - Oct 31, 2013 Live Event SANS Boston 2013 OnlineMAUS Aug 05, 2013 - Aug 10, 2013 Live Event SANS OnDemand Books & MP3s OnlyUS Anytime Self Paced http://www.sans.org/info/36919 http://www.sans.org/link.php?id=32695 http://www.sans.org/ics-security-training-washington-dc http://www.sans.org/link.php?id=30612 http://www.sans.org/critical-security-controls-summit http://www.sans.org/link.php?id=26469 http://www.sans.org/virginia-beach-2013 http://www.sans.org/link.php?id=30982 http://www.sans.org/thailand-2013 http://www.sans.org/link.php?id=31220 http://www.sans.org/melbourne-2013 http://www.sans.org/link.php?id=32177 http://www.sans.org/sans-capital-city-2013 http://www.sans.org/link.php?id=31230 http://www.sans.org/network-security-2013 http://www.sans.org/link.php?id=33507 http://www.sans.org/sec440-mcmc-2013 http://www.sans.org/link.php?id=31140 http://www.sans.org/forensics-prague-2013 http://www.sans.org/link.php?id=28221 http://www.sans.org/seattle-2013 http://www.sans.org/link.php?id=32635