Chapter6 database connectivity
•
6 likes•3,005 views

for Class XII Subject IP
![API - An application programming interface (API) is an interface
implemented by a software program which enables it to interact with other
software. It facilitates interaction between different software programs
similar to the way the user interface facilitates interaction between users
and computers.
Adding [MySQL JDBC Driver] Library in NetBeans
To add the MySQL JDBC Driver Library follows the given steps.
Step 1: Right click on the Project name and select the Properties option.
Step 2: In the Properties dialog box,
1. Choose the Libraries option from the Categories pane.
2. Click on the Add Library button.
3. From the Add Library dialog box choose the MySQL JDBC Driver.
4. Click on Add Library Button
Step 1: Right click on the Project name and select the Properties option.](data:image/gif;base64,R0lGODlhAQABAIAAAAAAAP///yH5BAEAAAAALAAAAAABAAEAAAIBRAA7)
Recommended
More Related Content
What's hot
What's hot (20)
Similar to Chapter6 database connectivity
Similar to Chapter6 database connectivity (20)
Recently uploaded
Recently uploaded (20)
Chapter6 database connectivity
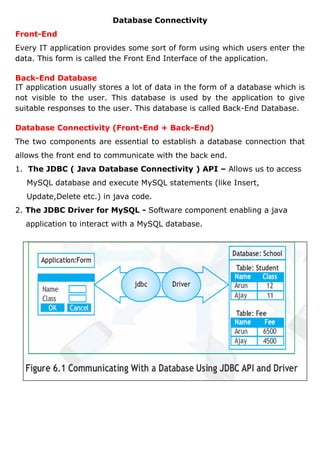
- 1. Database Connectivity Front-End Every IT application provides some sort of form using which users enter the data. This form is called the Front End Interface of the application. Back-End Database IT application usually stores a lot of data in the form of a database which is not visible to the user. This database is used by the application to give suitable responses to the user. This database is called Back-End Database. Database Connectivity (Front-End + Back-End) The two components are essential to establish a database connection that allows the front end to communicate with the back end. 1. The JDBC ( Java Database Connectivity ) API – Allows us to access MySQL database and execute MySQL statements (like Insert, Update,Delete etc.) in java code. 2. The JDBC Driver for MySQL - Software component enabling a java application to interact with a MySQL database.
- 2. API - An application programming interface (API) is an interface implemented by a software program which enables it to interact with other software. It facilitates interaction between different software programs similar to the way the user interface facilitates interaction between users and computers. Adding [MySQL JDBC Driver] Library in NetBeans To add the MySQL JDBC Driver Library follows the given steps. Step 1: Right click on the Project name and select the Properties option. Step 2: In the Properties dialog box, 1. Choose the Libraries option from the Categories pane. 2. Click on the Add Library button. 3. From the Add Library dialog box choose the MySQL JDBC Driver. 4. Click on Add Library Button Step 1: Right click on the Project name and select the Properties option.
- 3. Step 2: In the Properties dialog box, 1. Choose the Libraries option from the Categories pane 2. Click on the Add Library button as shown in Figure
- 4. 3. From the Add Library dialog box choose the MySQL JDBC Driver 4. Click on Add Library Button
- 5. 5. The driver is now added to the compile time libraries 6. Now MySql JDBC Driver is inserted in our project C:Program Files (x86)NetBeans 7.0idemodulesextmysql- connector-java-5.1.13-bin.jar CLASSESS USED FOR DATABASE CONNECTIVITY Following classes are essential for setting up the connection with the database and retrieve data from the database.
- 6. 1. DriverManager Class – This class defines objects which can connect Java applications to a JDBC driver. DriverManager class manages the JDBC drivers that are installed on the system. 2. Connection Class – Manages the communication between a java application and a specific database (e.g. MySQL database). 3. Statement Class - To execute SQL statements, we need to instantiate (create) a Statement object using the connection object. A Statement object is used to send and execute SQL statements to a database. 4. ResultSet Class – Contains predefined methods to access, analyze, and convert data values returned by an executed SQL select statement. Steps for creating Database Connectivity Applications : Step 1 : Import the Packages Required for Database Programming This step consists of two sub-steps : (i) Import the library packages import java.sql.Connection ; import java.sql.DriverManager ; import java.sql.Statement ; import java.sql.ResultSet ; or import java.sql.* ; (ii) Add the MySQL JDBC connector. Step 2 - Register the JDBC Driver – Register the jdbc driver with the DriverManager to open a communication channel with the database from within the Java application. Class named Class offers a method called forName( ) registers the driver with the DriverManager. Syntax : Class.forName ( “driver name”) ; Example:
- 7. Class.forName ( “java.sql.Driver”) ; Or Class.forName ( “com.mysql.jdbc.Driver” ); Step 3 - Open a Connection – getConnection() method of DriverManager class is used to establish a connection to a database. It uses – Username. Password. JDBC URL to establish a connection to the database and returns a connection object. DriverManager.getConnection ( <DB_URL>, <userid>, <password> ) ; DriverManager.getConnection ( “jdbc:mysql://localhost:3306/cbse”, “root”, “kvnmh” ) ; The getConnection ( ) method returns a Connection object , thus we must store its return value in a Connection object. Connection con = (Connection) DriverManager.getConnection("jdbc:mysql://localhost/cbse","root","kvnmh" ); The Connection object allows us to establish a physical connection to the database. Step 4: Execute a Query – First create an object of type Statement for building and submitting an SQL statement to the database using createStatement method of Connection type object. Statement stmt = con.createStatement ( ); Next we need to execute the SQL statement using excuteQuery( ) method. The executeQuery method returns a resultset ( an object of ResultSet type)
- 8. that contains the resultant dataset of the executed query, thus we must store the returned value of executeQuery( ) into a ResultSet object. ResultSet rs =stmt.executeQuery ( “SELECT ID, FIRSTNAME, LASTNAME, AGE FROM EMPLOYEE ; ”) ; OR String sql = “SELECT ID, FIRSTNAME, LASTNAME, AGE FROM EMPLOYEE” ; ResultSet rs = stmt.executeQuery (sql) ; Step 5 : Extract Data from Result Set – This step is required in case we are fetching data from the database. The ResultSet object provides several methods for obtaining column data for a row. int id = re.getInt(1) ; // retrieves the 1st column (int type) String firstname = rs.getString(2) ; /* retrieves the 2nd column (String type) */ OR int id = rs.getInt(“id”) ; // column name (int type) String fname = rs.getString (“firstname”) ; /* column name ( String type) */ Step 6 : Clean up the Environment : Close all database resources using close() method. rs.close( ) ; stmt.close( ) ; con.colse( ) ;