
Recommended
More Related Content
What's hot
What's hot (20)
Similar to Ldo basic
Similar to Ldo basic (20)
More from Đức Hữu
Recently uploaded
Recently uploaded (20)
Ldo basic
- 2. LDO Basics 2 Texas Instruments C O N T E N T S Preface Chapter 1. Dropout Chapter 2. Capacitor vs. capacitance Chapter 3. Thermals Chapter 4. Quiescent current Chapter 5. Current limit Chapter 6. Preventing reverse current Chapter 7. Power-supply rejection ratio Chapter 8. Noise Resources Preface By Wilson Fwu Power management is a fundamental block for all electronic systems. Without it, smartphones, computers and many other electronics we know today would not be possible. With the additional portability, computational power and the myriad of sensors implemented today comes the necessity to scrutinize power management design. The influx of scrutiny for power designs to meet new standards means that you can no longer neglect power design by lever- aging a good enough rail without considering the consequenc- es. What should we worry most about? What specification is critical when powering certain loads? How do you extrapolate the available information in order to determine performance under unspecified conditions? This e-book will help to address all of these questions. Low dropout regulators (LDOs) are a simple way to regulate an output voltage powered from a higher-voltage input. For the most part, they are easy to design with and use. However, modern applications now include a wider array of analog and digital systems. In turn we are now required to pay attention to the systems and operating conditions which will determine what kind of LDO is best suited for the circuit. This e-book provides a comprehensive overview of the basics of what you need to know and what to look for. Each chapter of this e-book was originally published as a post on the blog series, “LDO Basics,” which you can still view on TI’s E2E™ Community. You’ll find these chapters short, to the point and easy to digest. If you’d like more in-depth explanation, there are also accompanying videos on the LDO Training Portal. If you have any questions about the topics covered here, submit them to the power management forum on TI’s E2E™ Community.
- 3. LDO Basics 3 Texas Instruments DC/DC TPS799 12 V 3.375 V 3.2 V IN OUT IN OUT 200mA SW GND GND Although it’s supposed to regulate 3.3V, the TPS799 does not have the headroom required to maintain regulation. As a result, the output voltage begins to track the input voltage. What determines dropout? The architecture of the LDO primarily determines dropout. To see why, let’s look at p-channel metal-oxide semiconductor (PMOS) and n-channel MOS (NMOS) LDOs and compare their operation. PMOS LDOs Figure 2 shows a PMOS LDO architecture. In order to regulate the desired output voltage, the feedback loop controls the drain-to-source resistance, or RDS. As VIN approaches VOUT(nom), the error amplifier will drive the gate-to-source voltage, or VGS, more negative in order to lower RDS and maintain regulation. Figure 2: A PMOS LDO. At a certain point, however, the error-amplifier output will saturate at ground and cannot drive VGS more negative. RDS has reached its minimum value. Multiplying this RDS value against the output current, or IOUT, will yield the dropout voltage. By Aaron Paxton The quintessential characteristic of a low-dropout regulator (LDO) has to be dropout. After all, that is the source of its name and acronym. At the most basic level, dropout describes the minimum delta between VIN and VOUT required for proper regulation. It quickly becomes more nuanced when you incorporate vari- ables, however. Dropout, as you’ll see, is essential to obtain- ing efficient operation and generating voltage rails with limited headroom. What is dropout? Dropout voltage, VDO, refers to the minimum voltage differential that the input voltage, VIN, must maintain above the desired output voltage, VOUT(nom), for proper regulation. See Equation 1: (1) Should VIN fall below this value, the linear regulator will enter dropout operation and will no longer regulate the desired output voltage. In this case, the output voltage, VOUT(dropout), will track VIN minus the dropout voltage (Equation 2): (2) As an example, consider an LDO like the TPS799 regulat- ing 3.3V. When sourcing 200mA, the TPS799’s maximum dropout voltage is specified at 175mV. As long as the input voltage is 3.475V or greater, regulation is not affected. However, dropping the input voltage to 3.375V will cause the LDO to enter dropout operation and cease regulation, as shown in Figure 1. Figure 1: The TPS799 operating in dropout. Chapter 1: Dropout + – VIN To Load VREF VOUT = VREF × (1+R1/R2) GND R1 R2 S D G VIN ≥ VOUT(nom) + VDO VOUT(dropout) = VIN − VDO
- 4. LDO Basics 4 Texas Instruments Chapter 1: Dropout Keep in mind that the more negative the value of VGS, the lower RDS achieved. By increasing the input voltage, you can achieve a more negative VGS. Therefore, PMOS architectures will have lower dropout at higher output voltages. Figure 3 illustrates this behavior. Figure 3: Dropout voltage vs. input voltage for the TPS799. As shown in Figure 3, the TPS799 has a lower dropout voltage as the input voltage (and output voltage, for that matter) increases. That is because a higher input voltage yields a more negative VGS. NMOS LDOs In the case of an NMOS architecture, as shown in Figure 4, the feedback loop still controls RDS. As VIN approaches VOUT(nom), however, the error amplifier will increase VGS in order to lower the RDS and maintain regulation. Figure 4: An NMOS LDO. At a certain point, VGS cannot increase any more, since the error-amplifier output will saturate at the supply voltage, or VIN. When this condition is met, RDS is at its minimum value. Multiplying this value against the output current, or IOUT, derives the dropout voltage. This presents a problem though, because as VIN approaches VOUT(nom), VGS will also decrease, since the error-amplifier output saturates at VIN. This prevents ultra-low dropout. Biasing the LDO Many NMOS LDOs employ an auxiliary rail known as a bias voltage, or VBIAS, as shown in Figure 5. Figure 5: An NMOS LDO with a bias rail. This rail serves as the positive supply rail for the error amplifier and allows its output to swing all the way up to VBIAS, which is higher than VIN. This type of configuration enables the LDO to maintain a high VGS, and therefore achieve ultra-low dropout at low output voltages. Sometimes an auxiliary rail is not available, but you still need low dropout at a low output voltage. In such situations, you can subtitute an internal charge pump in place of VBIAS, as shown in Figure 6. Figure 6: An NMOS LDO with an internal charge pump. The charge pump will boost VIN so that the error amplifier may generate a larger VGS value, despite the lack of an external VBIAS rail. 110 100 90 80 70 60 50 40 30 20 10 0 VDO(mV) 2.5 3.0 3.5 4.0 5.0 6.0 7.04.5 5.5 6.5 VIN (V) IOUT = 200mA + – To Load GND D S G VIN VREF VOUT = VREF × (1+R1/R2) R1 R2 + – To Load GND D S G VIN VREF VBIAS VOUT = VREF × (1+R1/R2) R1 R2 + – VIN VOUT R1 R2 VREF COUTCIN D G S + – Charge Pump VOUT = VREF × (1+R1/R2)
- 5. LDO Basics 5 Texas Instruments Chapter 1: Dropout Other variables In addition to architecture, a few other variables also affect dropout, as outlined in Table 1. Variable Impact on dropout PMOS LDO iVDO when hVOUT NMOS LDO with bias iVDO when hVOUT Pass element size iVDO when hpass element size Output current hVDO when hIOUT Temperature hVDO when hTJ Output accuracy hVDO when htolerance Table 1: Variables affecting dropout. It’s clear that dropout is not a static value. Rather than just complicating your LDO choice, though, these variables should help you choose the optimal LDO for your specific set of conditions.
- 6. LDO Basics 6 Texas Instruments By Wilson Fwu In order for an LDO to operate normally, you need an output capacitor. A common issue when designing LDOs into an appli- cation is selecting the correct output capacitor. So let’s explore different considerations when selecting an output capacitor and how it may affect your LDO. What are capacitors? A capacitor is a device used to store electric charge. It consists of one or more pairs of conductors separated by an insulator. Capacitors are most commonly made of aluminum, tantalum or ceramic. Each of these materials has their own pros and cons when used in a system, as listed in Table 1. Ceramic capaci- tors are usually the best choice because of their minimal varia- tion in capacitance, as well as their low cost. Capacitor material Pros Cons Aluminum • Most commonly used as low-pass filters. • High capacitance available. • Polarized. • Large size. • Large equivalent series resistance (ESR) values. • May overheat. • Limited lifetime. • Large leakage currents. • Polarized. Tantalum • Small footprint. • Long lifetime. • Low leakage current. • Polarized. Ceramic • Nonpolarized. • Very small size. • Minimal ESR values. • Low cost. • Low tolerances. • Thermally stable. • Limited selection of high capacitance. • DC bias derating. Table 1: Capacitor material pros and cons. What’s capacitance? While a capacitor is a device that stores electric charge, capac- itance is the ability to store electric charge. In an ideal world, the value written on a capacitor would be exactly the same as the amount of capacitance it provides. But we don’t live in an ideal world, so you cannot take capacitors at face value. You’ll see later that the capacitance of a capacitor may be as little as 10% of its rated value. This might be caused by derating from being biased with a DC voltage, derating from changes in temperature or manufacturer tolerances. DC voltage derating Given the dynamic nature of capacitors (storing and dissipating electric charge in a nonlinear fashion), some polarization may occur without the application of an external electric field; this is known as “spontaneous polarization.” Spontaneous polariza- tion results from the material’s inert electric field, which gives the capacitor its initial capacitance. Applying an external DC voltage to the capacitor creates an electric field that reverses the initial polarization and then “locks” or polarizes the rest of the active dipoles into place. The polarization is tied to the direction of the electric field within the dielectric. As shown in Figure 1, the locked dipoles do not react to AC voltage transients; as a result, the effective capacitance becomes lower than it was before applying the DC voltage. Figure 1: DC voltage derating. Figure 2 shows the effects of applying voltages to a capacitor and the resulting capacitance. Notice how the larger case size loses less capacitance; this is because larger case sizes have more dielectric between the conductors, which reduces the strength of the electric field and locks on fewer dipoles. Figure 2: Capacitance vs. DC bias vs. capacitor size. Chapter 2: Capacitor vs. capacitance - + - + M etal Plate M etal Plate - +- + - + - + - + - + - + - + - + 0 V DC + – 0V M etal Plate M etal Plate - + - + - + - + - + 5 V DC + – 5V - + - + - + - +- + - + Active Dipole Locked Dipole - + Active Dipole
- 7. LDO Basics 7 Texas Instruments Chapter 2: Capacitor vs. capacitance Temperature derating Like all electronics, capacitors have a temperature rating over which their performance is specified. This temperature derating is usually located underneath the capacitor’s numerical value. Table 2 is a temperature coefficient rating decoder table for capacitors. First character: low temperature Second character: high temperature Third character: maximum change over temperature Character Temperature (°C) Character Temperature (°C) Character Change (%) Z 10 2 45 A ±1.0 Y -30 4 65 B ±1.5 X -55 5 85 C ±2.2 6 105 D ±3.3 7 125 E ±4.7 8 150 F ±7.5 9 200 P ±10 R ±15 S ±22 T +22, -33 U +22, -56 V +22, -82 Table 2: Ceramic capacitor code table. The majority of LDO junction temperatures are usually specified from -40°C to 125°C. Based on this temperature range, X5R or X7R capacitors are best. As shown in Figure 3, temperature alone affects capaci- tance much less than the DC bias derating, which may reduce capacitance values by as much as 90%. Figure 3: Capacitance vs. temperature vs. temperature coefficient. Manufacturer tolerances Due to the nonideal characteristics of real capacitors, the capacitance value itself may change based on the material and size of the capacitor. Companies that manufacture capacitors and other passive electronic components will have a general standard for what values of capacitance their components can tolerate. For demonstration purposes, let’s use ±20% as the manufacturing tolerance when calculating capacitance. A real application A common LDO application would be to take an input voltage from a 3.6V battery and drop it to power a microcontroller (1.8V). In this example, let’s use a 10µF X7R ceramic capacitor in a 0603 package. The 0603 package refers to the dimensions of the capacitor: 0.06 inches by 0.03 inches. Let’s find the true capacitance value of this capacitor for this application: • DC bias derating: By using the chart provided by the manufac- turer of the DC bias characteristics for a capacitor (Figure 2), you can see that with a DC bias of 1.8V the capacitance value will be 7µF. • Thermal derating: Based off of the X7R code, if this capacitor were to be in an ambient temperature of 125°C, you would see another 15% drop in capacitance value, bringing the new total to 5.5µF. • Manufacturer tolerance: Taking into account the manufacturer tolerance of ±20%, the final value for the capacitance will be 3.5µF. As you can see, a 10µF capacitor has a true value of 3.5µF when put into these conditions. The capacitance value has degraded to about 65% of the nominal value. Obviously, not all of these conditions would apply, but it is important to know the range of capacitance values that a capacitor can provide for your application. Although LDOs and capacitors seem simple at first, there are other factors at play that determine the effective capacitance needed for normal operation of an LDO. Capacitance(µF)
- 8. LDO Basics 8 Texas Instruments By Wilson Fwu You can further improve your application’s performance when you consider thermals. A low-dropout regulator’s (LDO) nature is to regulate a voltage by turning excess power into heat, making this integrated circuit a good fit for low-power or small VIN-to-VOUT differential applications. With this in mind, choosing the right LDO with the right package is crucial to maximizing an application’s performance. This is where some designers have nightmares, since the smallest available package isn’t always a match for the desired application. One of the most important features to consider when select- ing an LDO is its thermal resistance (RθJA). RθJA illustrates how efficient the LDO is at dissipating heat in a specific package. Higher RθJA values indicate that a package is not very effec- tive at transferring heat, whereas lower values indicate that the device transfers heat more effectively. RθJA will typically be higher for smaller packages. For example, the TPS732 has different thermal resistance values depending on its package: the small-outline transistor (SOT)-23 (2.9mm by 1.6mm) package thermal resistance is 205.9°C/W, compared to the SOT-223 (6.5mm by 3.5mm) package’s 53.1°C/W. This means that the TPS732 will experience a rise of 205.9°C or 53.1°C per 1W dissipated. You can find these values on the device’s data sheet under Thermal Information, as shown in Table 1. Thermal Information Table 1: Thermal resistance by package. Recommended Operating Conditions Table 2: Recommended operating junction temperatures. Do you have the right package? The recommended operating junction temperature of an LDO is anywhere between -40°C to 125°C; again, you can check these values on the device data sheets, as shown in Table 2. What these recommended temperatures mean is that the device will operate as stated in the Electrical Characteristics table of the data sheet. You can use Equation 1 to determine which package will operate at the right temperature: (1) where TJ is the junction temperature, TA is the ambient temper- ature, RθJA is the thermal resistance (from the data sheet), PD is the power dissipation and Iground is the ground current (from the data sheet). Here is a quick example using the TPS732 to regulate 5.5V down to 3V, supplying 250mA and using both the SOT-23 and SOT-223 packages. Chapter 3: Thermals Thermal Metric (1)(2) TPS732(3) UnitDRB [SON] DCQ [SOT223] DBV [SOT23] 8 Pins 6 Pins 5 Pins RθJA Junction-to-ambient thermal resistance 58.3 53.1 205.9 °C/W RθJC (top) Junction-to-case (top) thermal resistance 93.8 35.2 119 RθJAB Junction-to-board thermal resistance 72.8 7.8 35.4 JT Junction-to-top characterization parameter 2.7 2.9 12.7 JB Junction-to-board characterization parameter 25 7.7 34.5 RθJC(bot) Junction-to-case (bottom) thermal resistance 5 N/A N/A U| U| Min Nom Max Unit VIN Input supply voltage range 1.7 5.5 V IOUT Output current 0 250 mA TJ Operating junction temperature -40 125 °C TJ = TA + (RθJA ×PD ) PD = VIN − VOUT( )×IOUT⎡⎣ ⎤⎦ + VIN ×Iground( ) PD=[(5.5V-3V) x 250mA] + (5.5V x 0.95mA) = 0.63W SOT - 23: TJ = 25°C + (205.9°C/W x 0.63W) = 154.72°C SOT - 223: TJ = 25°C + (53.1°C/W x 0.63W) = 58.45°C
- 9. LDO Basics 9 Texas Instruments Chapter 3: Thermals Figure 1: PCB layout of SOT-23 package. Mounting a heat sink Heat sinks decrease RθJA, but add size and cost to the system. When selecting a heat sink, the base plate should be similar in size to the device to which it attaches. This will help evenly distribute heat over the heat-sink surface. If the heat-sink size is not similar in size to the surface to which it attaches, the thermal resistance will increase. Due to their physical size, packages like the SC-70 (2mm by 1.25mm) and the SOT-23 (2.9mm by 1.6mm) are not often used with a heat sink. One the other hand, you can pair pack- ages like the transistor outline (TO)-220 (10.16mm by 8.7mm) and the TO-263 (10.16mm by 9.85mm) with a heat sink. Figure 2 shows the differences between the four packages. Figure 2: Package differences. You can place a resistor in series with the input voltage in order to share some of the dissipated power; Figure 3 shows an example of this. The goal of this technique is to use the resistor to drop the input voltage to the lowest level possible. Figure 3: Resistor in a series configuration. Thermal shutdown A device with a junction temperature of 154.72°C not only exceeds the recommended temperature specifications, but it also gets really close to the thermal shutdown temperature. The shutdown temperature is typically at 160°C; this means that a device junction temperature greater than 160°C activates the device’s internal thermal protection circuit. This thermal protec- tion circuit disables the output circuitry, allowing the device to cool and protect it from overheating damage. When the device’s junction temperature cools to around 140°C, the thermal protection circuit is disabled and re-enables the output circuitry. If you don’t reduce the ambient temperature and/or the dissipated power, then the device can potentially oscillate on and off as a result of the thermal protection circuit. If you can’t reduce the ambient temperature and/or dissipated power, you’ll have to make design changes to achieve proper performance. One clear design solution is to use the bigger package, since it operates at the recommended temperature. Here are some tips and tricks to minimize heat. Increasing ground, VIN and VOUT contact planes When power dissipates, heat escapes the LDO through the thermal pad; therefore, increasing the size of the input, output and ground planes in the printed circuit board (PCB) will decrease the thermal resistance. As shown in Figure 1, the ground plane is usually as large as possible and covers most of the PCB area not occupied by other circuit traces. This sizing guideline is due to the returning current from many components and to ensure that those components are at the same reference potential. Ultimately, the contact planes help avoid voltage drops that can hurt the system. A large plane will also help increase heat-sinking ability and minimize the trace resistance. Increasing copper-trace size and improving the thermal interface significantly improves the conduction cooling efficiency. When designing a multilayer PCB, it’s usually a good idea to use a separate layer covering the entire board with a ground plane. This helps you ground any component without the need for additional traces. The component leads connect directly through a hole in the board to the layer containing the ground plane.
- 10. LDO Basics 10 Texas Instruments Chapter 3: Thermals Because the LDO needs to stay in the saturation region to regulate properly, you can obtain the minimum input voltage by adding the desired output voltage plus the voltage dropout. Equation 2 expresses the setting of these two LDO properties: (2) Using the conditions in the TPS732 example (regulating 5.5V to 3V using 250mA), you can use Equation 3 to calculate the maximum value of the resistor and the maximum power it can dissipate: (3) Make sure to select a resistor so as not to exceed its “dissipat- ing power rating.” This rating indicates how many watts the resistor can turn into heat without damaging itself. So if VIN = 5.5V, VOUT = 3V, VDROPOUT = 0.15V (from the data sheet), IOUT = 250mA and IGROUND = 0.95mA (from the data sheet), then: Placement Other heat-generating devices on the PCB can potentially affect the LDO’s temperature if they are within close proximity to the LDO. To avoid temperature increases, make sure to place the LDO as far as possible from heat-generating devices. There are many ways to execute an efficient, size-conscious and low-cost thermal solution for an application. The key lies in early design considerations in order to have all options avail- able. Selecting the proper components is not an easy task when managing thermal considerations, but the right devices and techniques will facilitate a successful design process. VIN − [(IOUT +Iground)xRmax ] = VOUT + Vdropout Rmax = VIN − VOUT − Vdropout IOUT +Iground PD(Rmax ) = (IOUT +Iground)2 xRmax Rmax = 5.5V − 3V − 0.15V 250mA + 0.95mA = 9.36Ω PD(Rmax ) = (250mA + 0.95mA)2 x9.36Ω = 0.59W
- 11. LDO Basics 11 Texas Instruments By Wilson Fwu How aggravating is it to pick up an electronic device that you’ve barely used, only to find that the battery is nearly or completely dead? If your device was just on standby or asleep, this may have happened because of a small but crucial specifi- cation: quiescent current. What is quiescent current? Quiescent is defined as “a state or period of inactivity or dormancy.” Thus, quiescent current, or IQ, is the current drawn by a system in standby mode with light or no load. Quiescent current is commonly confused with shutdown current, which is the current drawn when a device is turned off but the battery is still connected to the system. Nevertheless, both specifications are important in any low battery-consumption design. Quiescent current applies to most integrated circuit (IC) designs, where amplifiers, boost and buck converters, and low dropout regulators (LDOs) play a role in the amount of quies- cent current consumed. When an LDO is fully operational, Equation 1 calculates its power dissipation as: (1) For example, if you needed to drop from 4.2V to 1.8V with 200mA of output current using an LDO with 0.05mA of quies- cent current, plugging those numbers into Equation 1 results in a power dissipation (PD) of: When the application switches to standby mode or into a light load situation, quiescent current plays a much greater role in the power dissipated. Continuing from the previous example, if IOUT becomes significantly lower – 100µA, for example – PD becomes: In this example, quiescent current contributes nearly 50% of the power dissipated. You might be thinking, “Well, that’s not that much power being wasted.” But what about applications that spend a majority of their time in standby or shutdown mode? Smartwatches, fitness trackers and even some modules on a cellphone frequently spend their time in either of those states. Fitness trackers that don’t keep their display running all the time mean their system is always in standby mode waiting to be woken up. This means that the quiescent current of the LDO used for regulation will play a significant role in battery life. Space constraints and battery life As the trend toward smaller and lighter consumer products continues, engineers face the challenge of decreasing size while maintaining or increasing battery life. In most instances the battery is the largest and heaviest part of the design; however, you don’t want to physically shrink the battery because that would decrease both battery capacity and battery life. Therefore, it’s essential to keep all other onboard devices as small as possible. Chapter 4: Quiescent current PD= (VIN - VOUT ) x IOUT +(VIN x IQ ) PD = (4.2-1.8) x .2+(4.2 x .00005) PD = 480.21mW PD = (4.2-1.8) x .0001 + (4.2 x .00005) PD= .45mW
- 12. LDO Basics 12 Texas Instruments Chapter 4: Quiescent current Should you be concerned that you’re sacrificing performance for size? The short answer is no. TI has LDOs with peak power performance and small size because thermal resis- tance doesn’t need to be high for low power dissipation. The TPS7A05 is a prime example. It boasts a 0.65mm-by-0.65mm wafer chip-scale size with a 0.35mm pitch that provides 1µA of quiescent current. That is not only one of the smallest-sized LDOs, but also one of the lowest quiescent current devices on the market. The TPS7A05 is also available in a 1mm-by- 1mm quad flat no-lead (QFN) package for designers who don’t need the 0.65mm-by-0.65mm size. This device and similar LDOs give you the best of both worlds in terms of size and performance. Enabling your success An enable or shutdown pin is another simple solution if you’re designing to conserve battery life. Smartwatches, fitness track- ers, phones and even drones can employ this solution for a battery boost. Drones – out of all of the consumer electron- ics mentioned here – spend very little time in standby mode because they’re usually only idle pre- or post-flight. You can still save battery life by shutting down LDOs attached to those modules not needed for flight. Some of these modules include the complementary metal-oxide semiconductor (CMOS) image sensor and gimbal (as shown in Figure 1), since these modules are only used when the user wants to record videos or take pictures. The shutdown current of the LDO, which is typically a few hundred nanoamps, is then a drain on the battery, which is even lower than the LDO’s quiescent current. This ultimately can give users a little bit more flight time. LDOs are also great for the CMOS image sensor and gimbal in particular because both of these modules are sensitive to noise. Any noise reaching the image sensor or gimbal will affect the quality, resolution and stability of video or pictures taken from a drone. You can apply this same idea to a phone’s camera, a module that also isn’t on often but still requires a clean, noiseless rail in order to maintain image quality. Although battery life is highly dependent on the load conditions while running, LDOs with low quiescent current are a simple solution to help boost the run time of any battery-driven device. These small devices aren’t just limited to consumer electron- ics either; they play just as big of a role in industrial applica- tions like building and factory automation. So even though designers sometimes overlook quiescent current and shutdown current, they could ultimately make the difference in an applica- tion running for a few more seconds, minutes, hours or even days. Now that you have learned the importance of quiescent current, make sure to always account for it in your power dissi- pation calculations. Figure 1: Generic block diagram of drone modules.
- 13. LDO Basics 13 Texas Instruments By Jose Gonzalez Torres There are external conditions and scenarios where an LDO might experience an unexpected high current draw. This high current will harm most electronic systems as well as the host power-management circuit if the current is transmitted to the other electronics being powered. Selecting an LDO with inter- nal protection from short circuits and current limiting can help prevent this harmful effect and provide additional protection when designing the overall power management. What is current limiting and how does it work? Current limiting in an LDO is defined by establishing an upper boundary for the current supplied. Unlike a constant current source, LDOs supply current on demand but can also control the total power regulated. Current limiting is achieved through internal circuitry controlling the output stage transistors inside the LDO; see Figure 1. This is a classic current-limiting circuit for an LDO and is commonly referred to as a “brick-wall” current limit due to its abrupt current stop once the limit is reached. In this internal circuit, the LDO measures the output voltage for feedback but also measures a scaled mirror of the output current against the internal reference (IREF). Figure 1: A current-limiting internal LDO structure. Brick-wall current limiting In a brick-wall current limit, the upper boundary is defined and the LDO supplies current incrementally until the limit current limit is reached. Once the current limit is exceeded, the output voltage is not regulated and is determined by the resistance for the load circuitry (RLOAD) and the output current limit (ILIMIT) (Equation 1): (1) The pass transistor will continue this operation and dissipate power as long as the thermal resistance (θJA) allows for healthy power dissipation when the junction temperature is within acceptable limits (TJ < 125°C). Once VOUT goes too low and the thermal limit is reached, thermal shutdown will turn off the device in order to protect it from permanent damage. Once the device cools, it will turn back on and regulation can proceed. This is particularly important in cases where a short circuit may present itself, as the LDO will proceed to regulate VOUT to 0V. For example, TI’s TPS7A16 can limit high current outputs in wide voltage conditions. Figure 2 shows an example behavior of the current-limiting function in 30V input conditions. As you can see, once the current limit is surpassed, the LDO continues to supply at the limit, but it will no longer regulate VOUT to 3.3V. Once the thermal limit is surpassed at 105mA, thermal shut- down kicks in. This current-limiting function is helpful for charging nickel- cadmium and nickel-metal hydride single-cell batteries, as both require a constant current supply. An LDO like the TPS7A16 can help maintain a constant current at the limit (I) as the battery voltage changes while the battery is charging. Figure 2: TPS7A16 brick-wall current limiting (30VIN, 3.3VIN, VSON at 25°C). Chapter 5: Current limit VOUT = ILIMIT ×RLOAD
- 14. LDO Basics 14 Texas Instruments Chapter 5: Current Limit Foldback current limit Foldback current limit is very similar to the standard upper- boundary limit. But the main goal of foldback current is to limit the total power dissipation, keeping the output transistor within its safe power-dissipation limit by reducing the output current limit linearly while VOUT decreases and VIN remains steady. Devices like the TLV717P feature foldback current limiting and benefit from it, due to being predominantly offered in very small packages with higher thermal impedance. If you look at the behavior of the TLV717P’s output current limit, as shown in Figure 3, you can see that the maximum power dissipa- tion allowed at 25°C is 150mW, as VIN is specified as VOUT + 0.5V. After the current limit is exceeded and VOUT begins to reduce (assuming a constant RLOAD), both IOUT and the power dissipation reduce. This adds a bit of complexity for non- ohmic devices that draw a constant current and could trigger a lockout condition in which the powered device continues to reduce VOUT and the LDO continues to reduce IOUT. Figure 3: TLV717P output current limit vs. VOUT. Whenever harmful conditions may be present, such as short circuits or overloading, it is important to prevent the transmis- sion of this effect to other sensitive electronics. Protected LDOs can provide a wide range of functionality that can make any design much more robust. 0 350 3 2.5 2 1.5 1 0.5 0 50 100 150 200 G010 250 300 +85 C +25 C 40 C
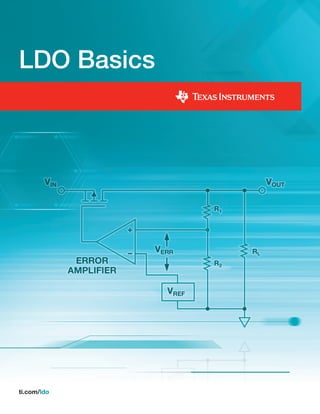
- 15. LDO Basics 15 Texas Instruments By Mark Sellers In most low-dropout regulators (LDOs), current flow is like one-way street – go in the wrong direction and major problems can occur! Reverse current is current that flows from VOUT to VIN instead of from VIN to VOUT. This current usually traverses through the body diode of the LDO instead of the normal conducting channel, and has the potential to cause long-term reliability problems or even destroy the device. There are three main components to an LDO (see Figure 1): the bandgap reference, error amplifier and pass field-effect transistor (FET). The pass FET conducts current, as any normal FET, between the source and the drain in a typical applica- tion. The doped region used to create the body of the FET, called the bulk, is tied to the source; this reduces the amount of threshold voltage change. Figure 1: LDO functional block diagram. One drawback of tying the bulk together with the source is that a parasitic body diode forms in the FET, as shown in Figure 2. This parasitic diode is called the body diode. In this configuration, the body diode can turn on when the output exceeds the input voltage plus the VFB of the parasitic diode. Reverse current flow through this diode can cause device damage through device heating, electromigration or latch-up events. When designing your LDO, it is important to consider reverse current and how to prevent it. There are four ways of preventing reverse current: two at the application level and two during the integrated circuit (IC) design process. Figure 2: Cross-sectional view of a p-channel metal-oxide semiconductor (PMOS) FET. Use a Schottky diode As shown in Figure 3, using a Schottky diode from OUT to IN will keep the body diode in the LDO from conducting when the output voltage exceeds the input voltage. You must use Schottky diodes because of their low forward voltage; tradition- al diodes have a much higher forward voltage than Schottky diodes. During normal operation, the Schottky diode is reverse- biased and will not conduct any current. Another advantage of this approach is that the LDO’s dropout voltage will not increase when placing a Schottky diode between the output and the input. Figure 3: Preventing reverse current using a Schottky diode. Chapter 6: Preventing reverse current +– Bandgap Thermal Shutdown UVLO Logic Current Limit 120 Ω IN EN GND OUT R1 R2 P Substrate N Well (Bulk) P (Source) P (Drain) Gate Body Diode Device IN OUT GND COUTCIN Schottky Diode Internal Body Diode
- 16. LDO Basics 16 Texas Instruments Chapter 6: Preventing reverse current Use a diode before the LDO As shown in Figure 4, this method uses a diode in front of the LDO to prevent current from flowing back into the supply. This is an effective method at preventing reverse current, but it also increases the necessary input voltage needed to keep the LDO out of dropout. The diode placed at the supply of the LDO becomes reverse-biased during a reverse current condition and does not allow any current to flow. This method is similar to the next method. Figure 4: Reverse current prevention using a diode before the LDO. Use a second FET LDOs designed to block reverse current flow often use a second FET to help prevent reverse current flow. The two FETs are placed with the sources back to back, as shown in Figure 5, so that the body diodes face each other. Now, when a reverse current condition is detected, one of the transistors will turn off and current cannot flow through the back-to-back diodes. One of the biggest drawbacks to this approach is that the dropout voltage essentially doubles when using this architecture. To decrease the dropout voltage, you will have to increase the size of the metal-oxide semiconductor field-effect transistors (MOSFETs), thus increasing the overall solution size. Automotive LDOs like TI’s TPS7B7702-Q1 use this approach to prevent reverse current flow. Connect the bulk of the MOSFET to GND This method is the least common way of implementing reverse current but is still extremely effective, as it eliminates the body diode of the MOSFET. This method ties the bulk of the MOSFET to GND (Figure 6), eliminating the connection to the source that was causing the parasitic body diode. TI’s TPS7A37 uses this method to implement reverse current protection. One advantage is that tying the bulk of the MOSFET to GND does not increase the dropout of the LDO. Figure 5: Back-to-back FETs to prevent reverse current. Figure 6: Connecting the bulk of the FET to GND. When you need reverse current protection in your application, look for the LDO topologies that provide the necessary level. If an LDO with reverse current protection does not meet all of your system requirements, consider implementing reverse current protection using a diode. Device IN OUT GND COUTCIN OUT1 OUT2 EA Vref 1.233 V FB1 FB2 FBLIM Current sense Current sense Reverse current monitor Reverse polarity IN SENSE_EN SENSE_SEL SENSE1 SENSE2 LIM1 LIM2 VCC Regulator Reverse current protection UVLO Open and short protection Temperature sense Internal reference GND ERR EN1 EN2Logic control + Bandgap Thermal Shutdown UVLO Logic Current Limit 120 Ω IN EN GND OUT R1 R2 NOTE: R2 = 550 kΩ,R1 = adjustable. -
- 17. LDO Basics 17 Texas Instruments By Aaron Paxton One of the most touted benefits of low dropout regulators (LDOs) is their ability to attenuate voltage ripple generated by switched-mode power supplies. This is especially important for signal-conditioning devices like data converters, phase-locked loops (PLLs) and clocks, where noisy supply voltages can compromise performance. Power-supply rejection ratio (PSRR) is still commonly mistaken as a single, static value, so let’s discuss what PSRR is and the variables that affect it. What is PSRR? PSRR is a common specification found in many LDO data sheets. It specifies the degree to which an AC element of a certain frequency is attenuated from the input to the output of the LDO. Equation 1 expresses PSRR as: (1) Equation 1 tells you that the higher the attenuation, the higher the PSRR value in units of decibels. (Some vendors apply a negative sign to indicate attenuation. Most vendors, including TI, do not.) It’s not uncommon to find PSRR specified in the electrical characteristics table of a data sheet at a frequency of 120Hz or 1kHz. However, this specification alone might not be so helpful in determining if a given LDO meets your filtering requirements. Let’s examine why. Determining PSRR for Your Application Figure 1 shows a DC/DC converter regulating 4.3V from a 12V rail. It’s followed by the TPS717, a high-PSRR LDO, regulating a 3.3V rail. The ripple generated from switching amounts to ±50mV on the 4.3V rail. The PSRR of the LDO will determine the amount of ripple remaining at the output of the TPS717. Figure 1: Using an LDO to filter switching noise. In order to determine the degree of attenuation, you must first know at which frequency the ripple is occurring. Let’s assume 1MHz for this example, as it is right in the middle of the range of common switching frequencies. You can see that the PSRR value specified at 120Hz or 1kHz will not help with this analysis. Instead, you must consult the PSRR plot in Figure 2. Figure 2: PSRR curve for the TPS717 with VIN - VOUT = 1V. The PSRR at 1MHz is specified at 45 dB under these conditions: • IOUT = 150mA • VIN - VOUT = 1V • COUT = 1μF Assume that these conditions match your own. In this case, 45dB equates to an attenuation factor of 178. You can expect your ±50mV ripple at the input to be squashed to ±281μV at the output. Chapter 7: Power-supply rejection ratio PSRR(dB) = 20 log Vripple(in) Vripple(out) DC/DC TPS717 12 V 3.3 V IN OUT IN OUT SW GND GND 4.3 V ± 50mV 80 70 60 50 40 30 20 10 0 )Bd(RRSP M01k00101 Frequency (Hz) 1k 10k100 1M C = 1 F C = 10 nF OUT NR 150 mA 10 mA 75 mA
- 18. LDO Basics 18 Texas Instruments Chapter 7: Power-supply rejection ratio Altering the conditions But let’s say that you changed the conditions and decided to reduce your VIN - VOUT delta to 250mV in order to regulate more efficiently. You would then need to consult the curve in Figure 3. Figure 3: PSRR curve for the TPS717 with VIN - VOUT = 0.25V. You can see that holding all other conditions constant, the PSRR at 1MHz is reduced to 23dB, or an attenuation factor of 14. This is due to the complementary metal-oxide semiconductor (CMOS) pass element entering the triode (or linear) region; that is, as the VIN - VOUT delta approaches the dropout voltage, PSRR begins to degrade. (Keep in mind that dropout voltage is a function of output current, among other factors. Thus, a lower output current decreases the dropout voltage and helps improve PSRR.) Changing the output capacitor will have implications as well, as shown in Figure 4. Figure 4: PSRR curve for the TPS717 with VIN - VOUT = 0.25V, COUT = 10μF. By sizing up the output capacitor from 1μF to 10μF, the PSRR at 1MHz increases to 42dB despite the VIN - VOUT delta remain- ing at 250mV. The high-frequency hump in the curve has shifted to the left. This is due to the impedance characteristics of the output capacitor(s). By sizing the output capacitor appro- priately, you can tune, or increase, the attenuation to coincide with the particular switching noise frequency. Turning all the knobs Just by adjusting VIN - VOUT and the output capacitance, you can improve PSRR for a particular application. These are by no means the only variables affecting PSRR, though. Table 1 outlines the various factors. Parameter PSRR Low frequency (≤ 1kHz) Mid frequency (1kHz -100kHz) High frequency (>100kHz) VIN - VOUT +++ +++ ++ Output capacitor (COUT) No effect + +++ Noise reduction capacitor (CNR) +++ + No effect Feed-forward capacitor (CFF) ++ +++ + Printed circuit board (PCB) layout + + +++ Table 1: Variables affecting PSRR. You should now be more familiar with the various tools at your disposal that can help you design an effective LDO filter. 80 70 60 50 40 30 20 10 0 )Bd(RRSP M01k00101 Frequency (Hz) 1k 10k100 1M C = 1 F C = 10nF OUT NR 150mA 10mA 75mA 80 70 60 50 40 30 20 10 0 )Bd(RRSP M01k00101 Frequency (Hz) 1k 10k100 1M C = 10 F C = 10nF OUT NR 150mA 10mA
- 19. LDO Basics 19 Texas Instruments By Aaron Paxton Using a low-dropout regulator (LDO) to filter ripple voltage arising from switched-mode power supplies isn’t the only consideration for achieving a clean DC power supply. Because LDOs are electronic devices, they generate a certain amount of noise of their own accord. Selecting a low-noise LDO and taking steps to reduce internal noise are integral to generating clean supply rails that won’t compromise system performance. Identifying Noise The ideal LDO would generate a voltage rail with no AC elements. Unfortunately, LDOs generate their own noise like other electronic devices. Figure 1 shows how this noise mani- fests in the time domain. Figure 1: Scope shot of a noisy power supply. Analysis in the time domain is difficult. Therefore, there are two main ways to examine noise: across frequency and as an inte- grated value. You can use a spectrum analyzer to identify the various AC elements at the output of the LDO. Figure 2 plots output noise for a 1A low-noise LDO, the TPS7A91. As you can see from the various curves, output noise (repre- sented in microvolts per square root hertz [μV/Hz]), is concen- trated at the lower end of the frequency spectrum. This noise mostly emanates from the internal reference voltage but also has contributions from the error amplifier, field-effect transistor (FET) and resistor divider. Looking at output noise across frequency is helpful in deter- mining the noise profile for a frequency range of interest. For example, audio application designers care about audible frequencies (20Hz to 20kHz) where power-supply noise might degrade sound quality. Figure 2: Noise spectral density of the TPS7A91 vs. frequency and VOUT. Data sheets commonly provide a single, integrated noise value for apples-to-apples comparisons. Output noise is often inte- grated from 10Hz to 100kHz and is represented in microvolts root mean square (μVRMS). (Vendors will also integrate noise from 100Hz to 100kHz or even over a custom frequency range. Integrating over a select frequency range can help mask unflat- tering noise properties, so it’s important to examine the noise curves in addition to the integrated value.) Figure 2 shows inte- grated noise values that correspond with the various curves. Texas Instruments features a portfolio of LDOs whose integrat- ed noise values measure as low as 3.8μVRMS. Reducing noise In addition to selecting an LDO with low noise qualities, you can also employ a couple of techniques to ensure that your LDO has the lowest noise characteristics. These involve the use of noise-reduction and feed-forward capacitors. Chapter 8: Noise C 2.2IN = OUT OUT NR F Frequency (Hz) 0.001 0.01 0.1 1 10 10 100 1k 10k 100k 1M 10M VOUT 0.8 V, 4.7 1.2 V, 5.4 1.8 V, 5.9 3.3 V, 9.2 5 V, 12.48 µVRMS µVRMS µVRMS µVRMS µVRMS Noise(µV√Hz)
- 20. LDO Basics 20 Texas Instruments Chapter 8: Noise Noise-reduction capacitors Many low-noise LDOs in the TI portfolio have a special pin designated as “NR/SS,” as shown in Figure 3. Figure 3: An n-channel metal-oxide semiconductor (NMOS) LDO with an NR/SS pin. The function of this pin is twofold: it’s used to filter noise emanating from the internal voltage reference and to slow the slew rate during startup or enable of the LDO. Adding a capacitor at this pin (CNR/SS) forms a resistor-capaci- tor (RC) filter with internal resistance, helping shunt undesirable noise generated by the voltage reference. Since the voltage reference is the main contributor to noise, increasing the capacitance helps push the cutoff frequency of the low-pass filter leftward. Figure 4 shows the effect of this capacitor on output noise. Figure 4: Noise spectral density of the TPS7A91 vs. frequency and CNR/SS. As Figure 4 shows, a greater value of CNR/SS yields better noise figures. At a certain point, however, increasing the capacitance will no longer reduce noise. The remaining noise emanates from the error amplifier, FET, etc. Adding a capacitor also introduces an RC delay during startup, which causes the output voltage to ramp at a slower rate. This is advantageous when bulk capacitance is present at the output or load and you need to mitigate the in-rush current. Equation 1 expresses in-rush current as: (1) In order to reduce in-rush current, you must either lower the output capacitance or lower the slew rate. Fortunately, a CNR/SS helps achieve the latter, as Figure 5 shows for the TPS7A85. Figure 5: Startup of the TPS7A85 vs. CNR/SS. As you can see, increasing CNR/SS values results in longer startup times, preventing in-rush current from spiking and potentially triggering a current-limit event. Another method to lower output noise is using a feed-forward capacitor (CFF). Feed-forward capacitors A feed-forward capacitor is an optional capacitor placed in parallel with the top resistor of the resistor divider, as shown in Figure 6. + – VIN To Load VREF VOUT = VREF × (1+R1/R2) GND R1 R2 VBIAS D S G NR/SS Frequency (Hz) 0.001 0.01 0.1 1 10 10 100 1k 10k 100k 1M 10M CNR None, 10.3 10 nF, 5.4 100 nF, 4.7 µVRMS 1 µF, 4.7 µVRMS µVRMS µVRMS Noise(µV√Hz) Iinrush = (COUT + CLOAD ) dV dt Time (ms) Voltage(V) 0 5 10 15 20 25 30 35 40 45 50 -0.2 0 0.2 0.4 0.6 0.8 1 1.2 VEN VOUT, CNR/SS = 0 nF VOUT, CNR/SS = 10 nF VOUT, CNR/SS = 47 nF VOUT, CNR/SS = 100 nF
- 21. LDO Basics 21 Texas Instruments Chapter 8: Noise Figure 6: An NMOS LDO using a feed-forward capacitor. Much like a noise-reduction capacitor (CNR/SS), adding a feed-forward capacitor has multiple effects. Chief among these are improved noise, stability, load response and power-supply rejection ratio (PSRR). It’s also worth noting that a feed-forward capacitor is only viable when using an adjustable LDO because the resistor network is external. Improved noise As part of regulation, the error amplifier of the LDO uses the resistor network (R1 and R2) to increase the gain of the reference voltage, much like a noninverting amplifier, to drive the gate of the FET accordingly. The DC voltage of the reference will be gained up by a factor of 1+R1/R2. However, given the bandwidth of the error amplifier, you can also expect amplification in some portion of the AC elements of the reference voltage as well. By adding a capacitor across the top resistor, you are introducing a shunt for a particular range of frequencies. In other words, you are keeping the AC elements in that frequency range within unity gain, where R1 simulates a short. (Keep in mind that the impedance properties of the capacitor you’re using determine this frequency range.) You can see the reduction in noise of the TPS7A91 by using different CFF values in Figure 7. By adding a 100nF capacitor across the top resistor, you can reduce the noise from 9μVRMS to 4.9μVRMS. Figure 7: TPS7A91 noise vs. frequency and CFF values. Improved stability and transient response Adding a CFF also introduces a zero (ZFF) and pole (PFF) into the LDO feedback loop, calculated with Equations 1 and 2: (1) (2) Placing the zero before the frequency where unity gain occurs improves the phase margin, as shown in Figure 8. Figure 8: Gain/phase plot for a typical LDO using only feed-forward compensation. + – VIN To Load VREF VOUT = VREF × (1+R1/R2) GND R1 R2 VBIAS C FF D S G NR/SS Frequency (Hz) Noise(µV√Hz) 0.001 0.01 0.1 1 10 10 100 1k 10k 100k 1M 10M CFF None, 9 µVRMS 10 nF, 5.4 µVRMS 100 nF, 4.9 µVRMS 100 80 60 40 0 20 -20 Frequency (Hz) 10 100 1k 10k 100k 1M 10M Gain(dB)Phase(°) 0 -90 -180 PCOMP PLOAD PPWR ZFF PFF ZFF = 1 / (2 x π x R1 x CFF ) PFF = 1 / (2 x π x R1 // R2 x CFF )
- 22. You can see that without ZFF, unity gain would occur earlier around 200kHz. By adding the zero, the unity-gain frequency pushes a little to the right (~300kHz) but the phase margin also improves. Since PFF is to the right of the unity-gain frequency, its effect on the phase margin will be minimal. The added phase margin will be evident in the improved load transient response of the LDO. By adding phase margin, the LDO output will ring less and settle quicker. Improved PSRR Depending on the placement of the zero and pole, you can also strategically lessen the gain rolloff. Figure 8 shows the effect of the zero on gain rolloff starting at 100kHz. By increasing the gain in the frequency band, you will also improve the loop response for that band. This will lead to improvements in PSRR for that particular frequency range. See Figure 9. Figure 9: TPS7A8300 PSRR vs. frequency and CFF values. As shown, increasing the CFF capacitance pushes the zero left- ward. This will lead to better loop response and corresponding PSRR at a lower frequency range. Of course, you must choose the value of CFF and the corre- sponding placement of ZFF and PFF so that you don’t intro- duce instability. You can prevent instability by following the CFF limits prescribed in the data sheet. Table 1 lists some rules of thumb regarding how CNR and CFF affect noise. Parameter Noise Low frequency (≤ 1kHz) Mid frequency (1kHz -100kHz) High frequency (>100kHz) Noise-reduction capacitor (CNR) +++ + No effect Feed-forward capacitor (CFF) + +++ + Table 1: Benefits of CNR and CFF versus frequency. As shown, adding a feed-forward capacitor can lead to improvements in noise, stability, load response and PSRR. Of course, you must carefully select the capacitor to maintain stability. When coupled with a noise-reduction capacitor, you can greatly improve AC performance. These are a just few tools to keep in mind for optimizing your power supply. Resources • Ask questions and get help in TI’s E2E™ Community. • Watch the LDO Basics video series to learn more. • Read the series of LDO Basics blog posts. • Check out the Low Dropout Regulators Quick Reference Guide. • Read the blog post, “Reducing high-speed signal chain power supply issues.” • Read these application reports: “Technical Review of Low Dropout Voltage Regulator Operation and Performance.” “How to measure LDO noise.” “Pros and Cons of Using a Feedforward Capacitor with a Low-Dropout Regulator.” 0 10 20 30 40 50 60 70 80 90 10 100 1k 10k 100k PSRR(dB) Frequency (Hz) CFF = Open CFF = 10 nF CFF = 10 F C002 Chapter 8: Noise SLYY151A Important Notice: The products and services of Texas Instruments Incorporated and its subsidiaries described herein are sold subject to TI’s standard terms and conditions of sale. Customers are advised to obtain the most current and complete information about TI products and services before placing orders. TI assumes no liability for applications assistance, customer’s applications or product designs, software performance, or infringement of patents. The publication of information regarding any other company’s products or services does not constitute TI’s approval, warranty or endorsement thereof. The platform bar and E2E are trademarks of Texas Instruments. All other trademarks are the property of their respective owners. © 2018 Texas Instruments Incorporated
- 23. IMPORTANT NOTICE AND DISCLAIMER TI PROVIDES TECHNICAL AND RELIABILITY DATA (INCLUDING DATASHEETS), DESIGN RESOURCES (INCLUDING REFERENCE DESIGNS), APPLICATION OR OTHER DESIGN ADVICE, WEB TOOLS, SAFETY INFORMATION, AND OTHER RESOURCES “AS IS” AND WITH ALL FAULTS, AND DISCLAIMS ALL WARRANTIES, EXPRESS AND IMPLIED, INCLUDING WITHOUT LIMITATION ANY IMPLIED WARRANTIES OF MERCHANTABILITY, FITNESS FOR A PARTICULAR PURPOSE OR NON-INFRINGEMENT OF THIRD PARTY INTELLECTUAL PROPERTY RIGHTS. These resources are intended for skilled developers designing with TI products. You are solely responsible for (1) selecting the appropriate TI products for your application, (2) designing, validating and testing your application, and (3) ensuring your application meets applicable standards, and any other safety, security, or other requirements. These resources are subject to change without notice. TI grants you permission to use these resources only for development of an application that uses the TI products described in the resource. Other reproduction and display of these resources is prohibited. No license is granted to any other TI intellectual property right or to any third party intellectual property right. TI disclaims responsibility for, and you will fully indemnify TI and its representatives against, any claims, damages, costs, losses, and liabilities arising out of your use of these resources. TI’s products are provided subject to TI’s Terms of Sale (www.ti.com/legal/termsofsale.html) or other applicable terms available either on ti.com or provided in conjunction with such TI products. TI’s provision of these resources does not expand or otherwise alter TI’s applicable warranties or warranty disclaimers for TI products. Mailing Address: Texas Instruments, Post Office Box 655303, Dallas, Texas 75265 Copyright © 2019, Texas Instruments Incorporated