
Recommended
More Related Content
Similar to Resin and wood crochet hooks
Similar to Resin and wood crochet hooks (20)
More from jessica30251
Recently uploaded
Recently uploaded (20)
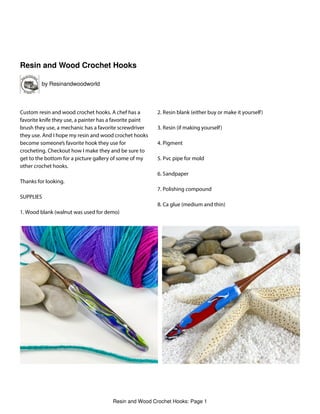
Resin and wood crochet hooks
- 1. instructables Resin and Wood Crochet Hooks by Resinandwoodworld Custom resin and wood crochet hooks. A chef has a favorite knife they use, a painter has a favorite paint brush they use, a mechanic has a favorite screwdriver they use. And I hope my resin and wood crochet hooks become someone’s favorite hook they use for crocheting. Checkout how I make they and be sure to get to the bottom for a picture gallery of some of my other crochet hooks. Thanks for looking. SUPPLIES 1. Wood blank (walnut was used for demo) 2. Resin blank (either buy or make it yourself) 3. Resin (if making yourself) 4. Pigment 5. Pvc pipe for mold 6. Sandpaper 7. Polishing compound 8. Ca glue (medium and thin) Resin and Wood Crochet Hooks: Page 1
- 2. Step 1: Making Resin Blank Resin and Wood Crochet Hooks: Page 2
- 3. 1. Cut several 6 to 7 inch Pieces of 3/4”pvc pipe. 2. Tape o one end of pvc pipe with masking tape. 3. Make a holder by drilling a 1 1/8”hole halfway into a scrap piece of wood. 4. For this demo I mixed ve di erent colors of resin. I used a polyester resin but use any type of resin you are Used to using and mix according to the manufacturer. 5. Once the resin is mixed I pour about 1/2 inch at a time I really the pvc pipe alternating colors As I go. 6. Once resin is fully cured the blank will usually come out with a little tap. Resin and Wood Crochet Hooks: Page 3
- 4. Step 2: Preparing the Resin Blank 1. Sand each end of the resin blank at and square to mate with the wood blank. Resin and Wood Crochet Hooks: Page 4
- 5. Step 3: Preparing Wood Blank for Gluing 2. Drill a hole 1 1/4”deep on one end of the resin blank in the center. I used a 13/64”drill bit. By putting a piece of tape on the bit you can control how deep you go. Resin and Wood Crochet Hooks: Page 5
- 6. 1. Find center of wood blank and mount on lathe. 2. Turn wood blank round. 3. Mark o one end of wood blank just over a 1 1/4”area. This is the area that will slip into the resin blank. 4. Turn this area down to just under the size if the drill bit you used on the resin blank. 5. Remove the wood blank from the lathe and cut o un nished end as shown in the pics for mating with resin blank. 6. Glue wood and resin blanks together. I use medium ca glue for this. 7. Hold wood and resin together until glue has set. I did this by mounting on lathe. Resin and Wood Crochet Hooks: Page 6
- 7. Resin and Wood Crochet Hooks: Page 7
- 8. Step 4: Shaping the Crochet Hook Resin and Wood Crochet Hooks: Page 8
- 9. 1. Put marks on blank to the length you want. 2. Turn blank down to slightly larger then the desired shape. Keep in mind the size hook you want. I wanted this crochet hook to be a 5mm or H-8. 3. Once blank is turned down to slightly over desired size you should start sanding. I started with 180p sandpaper and stoped with 400 wet-dry. 4. After sanding remove any sanding dust. 5. While still on the lathe I put a ca nish on the wood portion of the hook. This is a durable hard nish that many pen turners use. It’s where you put several coats of ca glue on then once set is sanded lightly and then polished. There are many videos out showing this process. Be sure to check some out. 6. After ca nish is complete polish entire hook before removing from lathe. 7. Remove hook from lathe and cut waste pieces o ends. See pics. Resin and Wood Crochet Hooks: Page 9
- 10. Resin and Wood Crochet Hooks: Page 10
- 11. Step 5: Finishing the Final Steps of the Crochet Hook 1. Remove the stub on resin end of crochet hook. Then sand smooth enough to polish end. 2. Cut wood end to desired length then sand end to point as shown in pic. 3. Next place a piece of tape 1/2”from tip. This is where the wedge cutout starts. 4. Next cut a wedge in the tip that goes almost halfway through wood shaft. See pics. I used a dremel cutting wheel for this. 5. ne tune the shaping using les and sandpaper. I used mini les and sandpaper wrapped around a tongue suppressor for this. 6. Next nish the tip o with several coats of thin ca glue. 7. Last step is to give the entire crochet hook a good polish and enjoy. Thanks for looking. Resin and Wood Crochet Hooks: Page 11
- 12. Resin and Wood Crochet Hooks: Page 12
- 13. Step 6: A Few Other Crochet Hooks for Inspiration Resin and Wood Crochet Hooks: Page 13 Make 16,000 projects with step By step plans
- 14. Resin and Wood Crochet Hooks: Page 14 Make 16,000 projects with step By step plans
- 15. Resin and Wood Crochet Hooks: Page 15 Make 16,000 projects with step By step plans
- 16. Resin and Wood Crochet Hooks: Page 16
- 17. Resin and Wood Crochet Hooks: Page 17 Make 16,000 projects with step By step plans
- 18. Resin and Wood Crochet Hooks: Page 18
- 19. Resin and Wood Crochet Hooks: Page 19 Make 16,000 projects with step By step plans