Redfirbark by ron hossack
•
1 like•311 views

Como construir grips o empuñaduras de corteza de árbol.

Recommended
Recommended
More Related Content
Similar to Redfirbark by ron hossack
Similar to Redfirbark by ron hossack (20)
More from Anibal Ruben Reyes
More from Anibal Ruben Reyes (20)
Recently uploaded
Recently uploaded (20)
Redfirbark by ron hossack
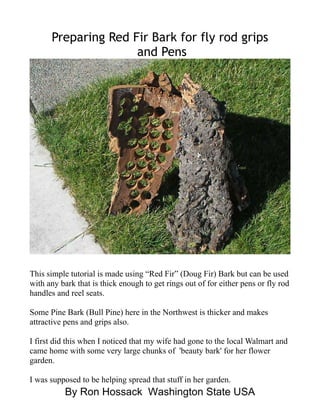
- 1. Preparing Red Fir Bark for fly rod grips and Pens This simple tutorial is made using “Red Fir” (Doug Fir) Bark but can be used with any bark that is thick enough to get rings out of for either pens or fly rod handles and reel seats. Some Pine Bark (Bull Pine) here in the Northwest is thicker and makes attractive pens and grips also. I first did this when I noticed that my wife had gone to the local Walmart and came home with some very large chunks of 'beauty bark' for her flower garden. I was supposed to be helping spread that stuff in her garden. By Ron Hossack Washington State USA
- 2. I grabbed about 6 large chunks and headed to the garage and made some rings and glued up a grip in about 30 minutes and turned it. This got me to thinking about where I worked in the Silver Valley of Idaho where there were lumber yards primarily for Red Fir. I started grabbing large chunks of bark and hauling them home to let then dry. To make the bark rings you will need something to cut the rings (I use a DeWalt 1 5/16” Deep Hole Saw for grips and a 15/16” for pen blanks. There are some precautions you need to take when working with bark. 1 – Wear some type of gloves. There are microscopic splinters that hurt like the dickens if you don't wear gloves. I use the NITRILE GLOVES from Harbor Freight. 2 – Use some kind of dust mask. Same reason, this makes a ton of dust. This is a side view that shows how thick the bark is and how colorful. Some of the bark is 4” thick. By Ron Hossack Washington State USA
- 3. The bark is very wormy and can be a challenge to fill the voids so I use CA and there's plenty of sanding dust and or coffee grounds as a filler. Here's some rings cut and waiting to be trued. You can see the different colors in the rings and the hole saw I use. By Ron Hossack Washington State USA
- 4. Here is the simple jig I made for truing up the rings: By Ron Hossack Washington State USA
- 5. This jig is some scrap 3/8" plywood, 1/4" all thread (which doubles as my mandrel for these grips) and some 1/4” fender washers. (That is Teflon tape as I used some Titebond III and it's very caustic and stained the all thread). I made it 90 degrees by using a plastic drafting triangle. This old tossed away dishwasher is my drying box for my wood I collect. I pulled the pump and use a shop light through the hole with a 75 watt bulb and it'll keep it about 90 degrees even in winter with snow on the ground. This is how I use it with my belt/disc sander to square up the rings. By Ron Hossack Washington State USA
- 6. To square the simple jig to the face of the sanding disk I again use the plastic drafting triangle and square the table to the disk face. By Ron Hossack Washington State USA
- 7. Here are some rings that are glued up with Titebond PU glue that I'm going to turn some pens with. The Fender Washer is to separate the pen tubes so they don't get glued together. When turning these I use drywall sand paper and Nortons sandpaper. It's pretty soft and chisels tend to bite and tear. Here's a picture of one on the lathe being ready to turn into a fly rod handle. Notice the filter mounted to a box fan before it was shaped and after. By Ron Hossack Washington State USA
- 8. This is what it looks like five minutes later. By Ron Hossack Washington State USA
- 9. This is why it's important to wear a mask for safety and health reasons. Once I finish sanding to shape it is ready for either a CA finish or Birchwood-Casey Tru-Oil Gun Stock finish. More than one coat of Tru-Oil and the bark will not dry unless I give it an alcohol bath first to remove the resin from the wood. Here we can see the top grip finished with Tru-oil and the bottom grip I finished with Medium CA. By Ron Hossack Washington State USA
- 10. By Ron Hossack Washington State USA