
Recommended
Recommended
More Related Content
Similar to How to build a shadow box
Similar to How to build a shadow box (20)
Recently uploaded
Recently uploaded (20)
How to build a shadow box
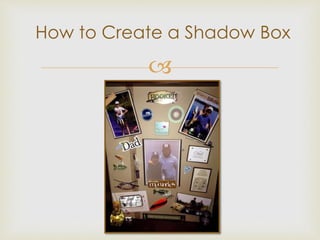
- 1. How to Create a Shadow Box
- 2. Tools & Supplies • Shadow Box • Scrapbook paper • Hot glue gun & glue sticks • Decorations such as: Ribbon, stickers, pictures & embellishments • Push pins • Picture tape • Scissors • Paper Trimmer • Card Stock (to make picture mattes)
- 3. Pick a memory or story you want your shadow box to capture. This can be anything from your child’s first haircut to your wedding day. Pick a Theme
- 4. You need to determine where your Shadow Box will be displayed and what size it will be before you pick the keepsakes you will place inside. Less is more-too many items will look cluttered. Pick Size of Shadowbox
- 5. Use pictures or items from the occasion you want to remember. Pick one main focal point and build around it. In the shadow box on the cover slide I used a 5x7 picture as the main picture and added smaller pictures, souvenirs from the trip and embellishment stickers around it. If you are documenting a baptism consider getting a roll to hold the certificate. If it’s your child’s first hair cut you can get a vile to hold the locket of hair and so on. Pick Your Keepsakes
- 6. Color Scheme & Accents
- 7. Once you have picked out your Shadow Box, paper and keepsakes you are ready to begin. Lay the Shadow Box down and place the scrapbook paper inside. Secure with pushpins. If you have a larger shadowbox and need to overlap paper you can use a ribbon down the overlapping part to hide the crease. See cover slide shadowbox for example of this. Gather pictures and cut out card stock mattings to place behind them for a layered look. You can use multi layers to make your picture look 3-D. Layout
- 8. Practice placing items in shadow box. Try several options so you know what looks best. *Do not hot glue anything until you are sure of your final placement. Once you decide on the layout you can use the picture tape to secure the pictures to the matting and hot glue to secure matting to the scrapbook paper. Secure embellishments and other decorations Layout
- 9. Walk through a Scrapbook Store and see the example pages they have displayed for ideas. Most Scrapbook Stores have tables set up for you to work at and let you use their trimmer and scissors for free if you work on your item in the store. Working on your project at a Scrapbook Store also gives you the advantage of trying different layouts using different options of card stock, embellishments and background papers. Call and ask your local Scrapbook Supply Store if they have free classes to teach scrapbooking techniques. This is a great way to get ideas from others. Helpful Hints
- 10. When my husband, Rob, was 13 years old he got to go with his dad on his annual “men's fishing trip” for the first time. One night towards the end of the evening his dad told him to change his fishing line but he was tired and cranky so he refused. A few minutes later he caught a big fish but as he was reeling it in the line broke and his fish got away. The next day he changed his line like his dad had told him to do the night before and they went fishing on the opposite side of the lake. My Shadowbox
- 11. Rob caught another fish and as he reeled it into the boat his dad was amazed. The fish had the lure from the day before in its mouth, he had caught the exact fish again! Thirty years later my father-in-law died suddenly and we found a box in his closet full of keepsakes from that trip, including the lure from the fishes mouth. I used all the keepsakes he had saved and added a fish urn filled with his ashes to create this shadowbox. My Shadowbox