Read Air Compressor Manual
•
4 likes•2,422 views

This document provides instructions for safely operating a Hitachi DSP rotary screw air compressor. It warns that the air compressor has rotating parts and hot surfaces that can cause injury and must be stopped and cooled down before servicing. It also warns of electric shock hazards when servicing and that breathing compressed air can cause harm. Operators must read and understand the safety instructions fully before use.

Recommended
Recommended
More Related Content
What's hot
What's hot (20)
Similar to Read Air Compressor Manual
Similar to Read Air Compressor Manual (18)
Recently uploaded
Recently uploaded (20)
Read Air Compressor Manual
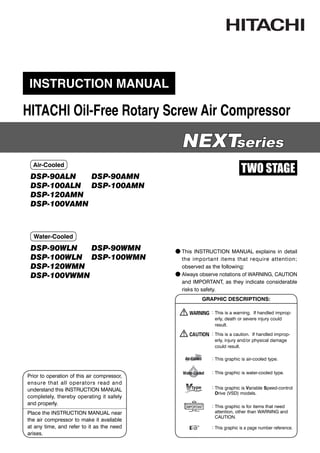
- 1. Prior to operation of this air compressor, ensure that all operators read and understand this INSTRUCTION MANUAL completely, thereby operating it safely and properly. Place the INSTRUCTION MANUAL near the air compressor to make it available at any time, and refer to it as the need arises. INSTRUCTION MANUAL DSP-90ALN DSP-90AMN DSP-100ALN DSP-100AMN DSP-120AMN DSP-100VAMN ● This INSTRUCTION MANUAL explains in detail the important items that require attention; observed as the following: ● Always observe notations of WARNING, CAUTION and IMPORTANT, as they indicate considerable risks to safety. HITACHI Oil-Free Rotary Screw Air Compressor NEXNEXTTseriesseries Air-Cooled DSP-90WLN DSP-90WMN DSP-100WLN DSP-100WMN DSP-120WMN DSP-100VWMN Water-Cooled GRAPHIC DESCRIPTIONS: WARNING :This is a warning. If handled improp- erly, death or severe injury could result. CAUTION :This is a caution. If handled improp- erly, injury and/or physical damage could result. Air-Cooled :This graphic is air-cooled type. :This graphic is water-cooled type. :This graphic is Variable Speed-control Drive (VSD) models. Water-Cooled IMPORTANT :This graphic is for items that need attention, other than WARNING and CAUTION. :This graphic is a page number reference. TWO STAGE
- 2. How to Use This Instruction Manual ■ Model Number Nomenclature ● This Instruction Manual covers the standard models of the Hitachi DSP air compressor. ● This Instruction Manual intended to assist daily operators and maintenance personnel in the installation, operation, control and service of the Hitachi DSP air compressor. ● Prior to operation of this air compressor, ensure that all operators read and understand this INSTRUCTION MANUAL completely, thereby operating it safely and properly. Place the INSTRUTION MANUAL near the air compressor to make it available at any time, and refer to it as the need arises. ● If there are any questions or comments, please contact the local Hitachi distributor or the nearest Hitachi office. ● Fill your DSP’s model name, Serial Number, etc. into the back cover of this Instruction Manual. Such information may be helpful when ordering parts, periodic maintenance, and overhaul. ● Hitachi may make improvements and/or changes in the products described in this publication at any time without notice. DS P - 100 V A 5 M N Dry or Oil-Free Rotary Screw Air Compressor Packaged N-Type (NEXT Series) Main Voltage (L: 200V class, M: 400V class) Frequency (5: 50 Hz, 6: 60 Hz) A: Air-Cooled, W: Water-Cooled w/ V: VSD, w/o V: Fixed Motor Output (kW) Never remove a protective device from the air compressor or modify the air compressor. It is imperative to install an earth leakage (ground) circuit breaker on the power cable. This prevents a ground fault accident. DSP air compressors are not designed, intended or approved for breathing air applications. Hitachi does not approve specialized equipment for breathing air applications and assumes no respon- sibility or liability for compressors used for breathing air services. WARNING ■ International System of Units (SI) For the unit of pressure the International System of Units (SI) is used throughout this manual. To convert it into the conventional system of units, use the following conversion formula: 7.14 kgf/cm2 = 0.70 MPa or 1 kgf/cm2 = 0.098 MPa
- 3. 1 Contents 1. SAFETY ………………………………………………………………………………………… 2 2. GENERAL DESCRIPTION 2.1 Appearance ……………………………………………………………………… 6 2.2 Components …………………………………………………………………… 8 2.3 Daily Operating Components ……………………………………………… 10 3. OPERATING THE DSP 3.1 Instrument Panel ……………………………………………………………… 12 3.2 Start/Stop Operation ………………………………………………………… 14 3.3 How to Use the liquid Crystal Display (LCD) ……………………………… 15 3.4 How to Use the Digital Monitor …………………………………………… 25 3.5 Daily Operation ………………………………………………………………… 32 3.6 Oil Mist Remover Daily Operation ………………………………………… 34 3.7 Adjusting the DSP ……………………………………………………………… 34 4. TROUBLESHOOTING 4.1 Protective Devices …………………………………………………………… 35 4.2 Troubleshooting the Air Compressor ……………………………………… 37 4.3 Troubleshooting the Oil Mist Remover …………………………………… 38 5. INSTALLING 5.1 Unpacking the DSP Air Compressor ……………………………………… 39 AND PIPING THE DSP 5.2 Conveying the DSP Air Compressor ……………………………………… 39 5.3 Installing the DSP Air Compressor ………………………………………… 40 5.4 Piping the DSP Air Compressor …………………………………………… 41 5.5 Ventilation of Air Compressor Room ……………………………………… 44 6. STARTUP OPERATION 6.1 Air Compressor ………………………………………………………………… 46 6.2 Oil Mist Remover ……………………………………………………………… 48 7. WIRING 7.1 Power Supply Transformer and Power Cable …………………………… 49 7.2 Connecting a Power Cable …………………………………………………… 49 7.3 Wiring Connection Diagram ………………………………………………… 51 7.4 Control Panel /LCD monitor Specifications ……………………………… 51 8. STANDARD COMPONENTS 8.1 Standard Components ………………………………………………………… 57 AND SUBSYSTEMS 8.2 Air/Oil Flow ……………………………………………………………………… 58 8.3 Cooling Water ………………………………………………………………… 63 8.4 Capacity Control System ……………………………………………………… 64 8.5 Outline of Oil Mist Remover Subsystem…………………………………… 69 9. MAINTAINING THE DSP 9.1 Air Compressor Maintenance ……………………………………………… 70 9.2 Standard Maintenance Schedule …………………………………………… 71 9.3 Oil Mist Remover Maintenance ……………………………………………… 75 9.4 How to Service the DSP Air Compressor ………………………………… 76 10. PRECAUTIONS WHEN THE COMPRESSOR IS TO BE IDLE FOR AN EXTENDED PERIOD OF TIME ………… 89 11. PARTS LIST ………………………………………………………………………………………… 90 12. WARRANTY, AFTER-SALES AND SERVICE …………………………………………………………… 114 13. OPERATION RECORD LOGBOOK…………………………………………………………………………… 115 14. STANDARD SPECIFICATIONS ……………………………………………………………………………… 116
- 4. 013B0816 012B1240012B1240 Rotating Parts! ●Keep hands and rods, etc. away from the rotating parts (Cooling fans, etc.) ●Use caution at all times, when air com- pressor is powered. The air compres- sor may be capable of restarting with- out hitting the START button. ●When the air compressor is operating, do not remove or open the enclosure panels and doors. ●Before servicing the air compressor, stop it, disconnect the power, especially when accessing any rotating parts. WARNING Hot Surface! ●Do not directly touch any component inside the air compressor enclosure when the air compressor is operating or immediately after it has stopped, as the components are extremely hot and can cause severe injury. ●Before servicing the air compressor, stop it, disconnect the power, then wait for the air compressor to cool down. Heated!! Air End Discharge Air pipe Hot Surface! ●Do not directly touch any component inside the air compressor enclosure when the air compressor is operating or immediately after it has stopped, as the components are extremely hot and can cause severe injury. ●Before servicing the air compressor, stop it, disconnect the power, then wait for the air compressor to cool down. Air End Discharge Air Pipe Hot Surface! Aftercooler Intercooler WARNING Heated!! WARNING WARNING Heated!! ●Do not directly touch any component inside the air compressor enclosure when the air compressor is operating or immediately after it has stopped, as the components are extremely hot and can cause severe injury. ●Before servicing the air compressor, stop it, disconnect the power, then wait for the air compressor to cool down. To ensure safe and proper operation of the air compressor, it is indispensable to carefully read and understand the following warnings and instructions detailed below. These warn- ings and instructions are attached to the air compressor as shown in the figure below. Air-Cooled DSP-90/120AN 100VAN 2 1. SAFETY
- 5. Do Not Breathe Air! Discharge air can contain Carbon Monoxide and other contaminants. Breathing the air can cause severe injury or death. High Pressure Air! ●High pressure air can cause severe injury or death. Be careful when air compressor is operating. Pressurized air can blow out of safety relief valves and etc. at incredibly high velocities. ●When using compressed air to clean equipment, use extreme caution and/or wear eye protection. ●Before servicing the air compressor, stop it, disconnect the power, and relieve pressure before removing filter, plug, fitting or cover. Rotating Parts! ●Keep hands and rods, etc. away from the rotating parts (Cooling fans, etc.) ●Use caution at all times, when air compressor is powered. The air compressor may be capable of restarting without hitting the START button. ●When the air compressor is operating, do not remove or open the enclosure panels and doors. ●Before servicing the air compressor, stop it, dis- connect the power, especially when accessing any rotating parts. Electric Shock Hazard! ●Before servicing or wiring the air compressor, disconnect the power. This will prevent anyone from turning on the power and causing an electric shock that could lead to severe injury or death. ●Do not allow any unlicensed person to wire the air compressor. Always use a licensed electrician. ●Ground the air compressor. Electric Shock Hazard! ●Before servicing or wiring the air compressor, disconnect the power. This will prevent anyone from turning on the power and causing an elec- tric shock that could lead to severe injury or death. ●Do not allow any unlicensed person to wire the air compres- sor. Always use a licensed electrician. ●Ground the air compressor. WARNING WARNING WARNING WARNING WARNING Hot Surface! ●Do not directly touch the air end, discharge air pipe,and coolers when the air compressor is operating and immediately after it has stopped, because these parts are heated then. ●Before servicing the air compressor (especially when accessing to the heated parts), stop it, discon- nect the power, and wait until it is cooled down. WARNING CAUTION Precaution against Fire! ●Keep any other hazardous materials such as flammable solvents away from the air compressor. Also do not use fire nearby it; otherwise a spark may enter the air compressor and burn it internally. ●Do not remove any protective relay s. Also do not make a modification of the control circuit that may result in impairing the protective relay s function. Remember that the loss of the protective relay s function may cause serious damage. ●Install an earth leakage circuit breaker between the air compressor and the power supply. Do not use a disconnector such as a knife switch because it cannot protect the air compressor and may cause burnout of the air end if a ground fault has occurred. 3 1. SAFETY
- 6. 013B0816 012B1240012B1240 Hot Surface! WARNING Heated!! Air End Discharge Air pipe Hot Surface! WARNING Air End Discharge Air Pipe Heated!! Aftercooler Intercooler Heated!! Hot Surface! WARNING WARNING Rotating Parts! ●Keep hands and rods, etc. away from the rotating parts (Cooling fans, etc.) ●Use caution at all times, when air com- pressor is powered. The air compres- sor may be capable of restarting with- out hitting the START button. ●When the air compressor is operating, do not remove or open the enclosure panels and doors. ●Before servicing the air compressor, stop it, disconnect the power, especially when accessing any rotating parts. ●Do not directly touch any component inside the air compressor enclosure when the air compressor is operating or immediately after it has stopped, as the components are extremely hot and can cause severe injury. ●Before servicing the air compressor, stop it, disconnect the power, then wait for the air compressor to cool down. ●Do not directly touch any component inside the air compressor enclosure when the air compressor is operating or immediately after it has stopped, as the components are extremely hot and can cause severe injury. ●Before servicing the air compressor, stop it, disconnect the power, then wait for the air compressor to cool down. ●Do not directly touch any component inside the air compressor enclosure when the air compressor is operating or immediately after it has stopped, as the components are extremely hot and can cause severe injury. ●Before servicing the air compressor, stop it, disconnect the power, then wait for the air compressor to cool down. Water-Cooled DSP-90/120WN 100VWN 4 1. SAFETY
- 7. Electric Shock Hazard! WARNING ●Before servicing or wiring the air compressor, disconnect the power. This will prevent anyone from turning on the power and causing an elec- tric shock that could lead to severe injury or death. ●Do not allow any unlicensed person to wire the air compres- sor. Always use a licensed electrician. ●Ground the air compressor. Do Not Breathe Air! Discharge air can contain Carbon Monoxide and other contaminants. Breathing the air can cause severe injury or death. High Pressure Air! ●High pressure air can cause severe injury or death. Be careful when air compressor is operating. Pressurized air can blow out of safety relief valves and etc. at incredibly high velocities. ●When using compressed air to clean equipment, use extreme caution and/or wear eye protection. ●Before servicing the air compressor, stop it, disconnect the power, and relieve pressure before removing filter, plug, fitting or cover. Rotating Parts! ●Keep hands and rods, etc. away from the rotating parts (Cooling fans, etc.) ●Use caution at all times, when air compressor is powered. The air compressor may be capable of restarting without hitting the START button. ●When the air compressor is operating, do not remove or open the enclosure panels and doors. ●Before servicing the air compressor, stop it, dis- connect the power, especially when accessing any rotating parts. Electric Shock Hazard! ●Before servicing or wiring the air compressor, disconnect the power. This will prevent anyone from turning on the power and causing an electric shock that could lead to severe injury or death. ●Do not allow any unlicensed person to wire the air compressor. Always use a licensed electrician. ●Ground the air compressor. WARNING WARNING WARNING WARNING Hot Surface! ●Do not directly touch the air end, discharge air pipe,and coolers when the air compressor is operating and immediately after it has stopped, because these parts are heated then. ●Before servicing the air compressor (especially when accessing to the heated parts), stop it, discon- nect the power, and wait until it is cooled down. WARNING CAUTION Precaution against Fire! ●Keep any other hazardous materials such as flammable solvents away from the air compressor. Also do not use fire nearby it; otherwise a spark may enter the air compressor and burn it internally. ●Do not remove any protective relay s. Also do not make a modification of the control circuit that may result in impairing the protective relay s function. Remember that the loss of the protective relay s function may cause serious damage. ●Install an earth leakage circuit breaker between the air compressor and the power supply. Do not use a disconnector such as a knife switch because it cannot protect the air compressor and may cause burnout of the air end if a ground fault has occurred. 5 1. SAFETY
- 8. Enclosure Oil Filling Port Air Intake (Inlet to the Air End) Oil Level Gauge OMR Sling Fitting Instrument Panel Left Door Plate of Operating / Servicing Instructions Air Exhaust (Air Compressor Package) Compressed Air Discharge Power Supply Port Air Intake (Air Compressor Package) Air Exhaust Air Intake Enclosure panels lower the sound level of the air compressor package. Use the port to fill the gear case with oil. This indicates the quantity of the oil in the gear case. Check the oil level before starting the DSP and when operating it. Use the sling fitting when moving and installing the DSP air compressor. See page pp. 12-13, chapter 3, for details. Read carefully the plate before operating and servicing the DSP. Open the left door only when servicing the DSP air compres- sor. Keep it closed when operating the DSP air compressor. See page 69 for the details This panel discharges the hot air generated in the air compressor. Check the specifica- tions, power supply and voltage before connecting the power supply. Air Exhaust Air Intake Air Intake Air Intake Air Intake Air Intake (Air for inverter) Air Intake (Air for coolers) 2.1 Appearance Air-Cooled DSP-90/120AN 100VAN This section illustrates and describes the major components of the DSP air compressor. Be familiar with the name, location and function of each component before using the DSP air compressor. [Front View] [Rear View] 6 2. GENERAL DESCRIPTION
- 9. Water-Cooled DSP-90/120WN 100VWN Enclosure Oil Filling Port Air Intake (Inlet to the Air End) Oil Level Gauge OMR Sling Fitting Instrument Panel Left Door Plate of Operating / Servicing Instructions Air Exhaust (Air Compressor Package) Compressed Air Discharge Power Supply Port Air Intake (Air Compressor Package) Air Exhaust Air Intake Enclosure panels lower the sound level of the air compressor package. Use the port to fill the gear case with oil. This indicates the quantity of the oil in the gear case. Check the oil level before starting the DSP and when operating it. Use the sling fitting when moving and installing the DSP air compressor. See page pp. 12-13, chapter 3, for details. Read carefully the plate before operating and servicing the DSP. Open the left door only when servicing the DSP air compres- sor. Keep it closed when operating the DSP air compressor. See page 69 for the details This panel discharges the hot air generated in the air compressor. Check the specifica- tions, power supply and voltage before connecting the power supply. Air Exhaust Air Intake Air Intake Air Intake Air Intake Air Intake (Air for inverter) Air Intake (Air for Package) [Front View] [Rear View] 7 2. GENERAL DESCRIPTION [Appearance]
- 10. 2.2 Components Cooling Fan Check Valve Intercooler Aftercooler Oil Filter Oil Cooler Air Intake Filter 1st-Stage Air End 2nd-Stage Air End Main Motor Oil Mist Remover Discharge Pipe (Compressed Air Discharge) Oil Level Gauge Common Base Starter / Control Box Safety Relief Valve Enclosure Instrument Panel High-Precooler Air-Cooled DSP-90/120AN 100VAN 8 2. GENERAL DESCRIPTION [Components]
- 11. Cooling Fan Check Valve Intercooler Aftercooler Oil Filter Oil Cooler Air Intake Filter 1st-Stage Air End 2nd-Stage Air End Main Motor Oil Mist Remover Discharge Pipe (Compressed Air Discharge) Oil Level Gauge Common Base Enclosure Instrument Panel Safety Relief Valve Starter / Control Box Water-Cooled DSP-90/120WN 100VWN 9 2. GENERAL DESCRIPTION [Components]
- 12. Oil Filling Port Oil Level Gauge ● Indicates the operation control section. ( For more information, see Chapter 3 on page 12.) ● Operation ON → POWER light on. ● Start: Press START button → Operation Light on during operation ● Stop: Press UNLOAD STOP button → unloading operation stops for 5 minutes → Operation Light off during operation ● Power OFF: → POWER light off 2.3 Daily Operating Components Controls on the Instrument Panel Aftercooler and Intercooler - Condensate Drain ValveLubricating Oil Oil Level Gauge1 2 3 4 ● Please use the following lubricating oil exclusively for rotary compressor. Manufacturer Description IDEMITSU DAPHNE NEW ROTARY COMPRESSOR OIL A COSMO OIL LUBRICANTS COSMO SCREW 32X JAPAN ENERGY JOMO SCREW 32 SHELL CORENA OIL RS32 NIPPON OIL FAIRCOL RA32 EXXON MOBIL MOBIL RARUS 424J *Oil company may change oil name without notice. モニタ メニュー リセット 遠 方 機 能 電 源 運 転 停 止 運転状況 故 障 運転管理 負 荷 遠 方 起動待ち 設 定 自 動 UP/ DOWN 警 報 記 憶 表示切替/ ワイドモード +/− AUTO MONITOR MENU SET SELECT/WIDE 2 RUNNING CONTROL STARTREMOTE 1 FUNC [× 10h] ALARM STR REMOTE RUNNING MODE AUTO START POWER LOAD RESET SHUTDOWN STOP MONITOR UNLOAD STOP ● Verify that air containing drainage is discharged intermittently from the intercooler and after cooler drain ports. The higher the temperature and humidity, the more drain- age is produced. Drainage may not be produced on the intercooler side during winter. [Fixed speed type] Intercooler drain port After cooler drain port Intercooler drain port After cooler drain port Control pipe filter drain port ● Verify that the oil level of the lubricating oil is between the red lines during operation. Lubricating oil circulates in the cooler and piping during operation, so the position of the oil level differs when the compressor is running and when it is off. The level rises when the compressor stops running. 10 2. GENERAL DESCRIPTION [Daily Operating Components]
- 13. Control Line Filter Manual Valve Level Gauge ① Shut off the cooling water when the compressor is off. ② Open the peacock for draining water. Also open the valve of the water drain port and drain the cooling water. ③ Be especially careful of freezing during the winter. ( For details, see page 63.) Water drain peacock Water drain port Cooling Water5 ● Normally use the UNLOAD STOP button to stop the compressor. The compressor then unloads for 5 minutes and stops running. (In the case of an emergency, press the STOP button to stop operation.) Stopping operation7 モニタ メニュー リセット 遠 方 機 能 電 源 運 転 停 止 運転状況 故 障 運転管理 負 荷 遠 方 起動待ち 設 定 自 動 UP/ DOWN 警 報 記 憶 表示切替/ ワイドモード +/− AUTO MONITOR MENU SET SELECT/WIDE 2 RUNNING CONTROL STARTREMOTE 1 FUNC [× 10h] ALARM STR REMOTE RUNNING MODE AUTO START POWER LOAD RESET SHUTDOWN STOP MONITOR UNLOAD STOP Keeping the second-stage air end as dry as possible is essential for preventing it from rusting due to a long- term operation suspension. When stopping the DSP, therefore, execute an unloading operation and thereby remove the moisture from the second-stage air end. Controls on the Instrument Panel [Fixed speed type]6 ① Check the sight glass of the control line filter for the accumulation of the condensate. ② To drain the accumulated condensate, slowly turn to the left the condensate drain valve to open. After draining the condensate, turn it to the right to close. 11 2. GENERAL DESCRIPTION [Daily Operating Components] IMPORTANT
- 14. 12 3. OPERATING THE DSP 3.1 Instrument Panel +/− AUTO MONITOR MENU SET MONITOR モニタ メニュー 設 定 自 動 UP/ DOWN Liquid Crystal Display (LCD) Displays the operation data, various setting, shutdowns/ alarms information, etc. ( page 15) MENU Button Functions to display the menu screen and move the cursor. ( page 20) +/- UP DOWN Buttons Each of these buttons act as an up-arrow, down-arrow and right-arrow key. ( page 20) SET Button It saves any adjusted set points. Contrast adjustment SET+[ ] button operation: Brightens the display. SET+[ ] button operation: Darkens the display. ( page 24) MONITOR Button Enables movement within each of the monitoring displays (M1, M2) and the message display (M3). This button also enables you to return to the M1 display from the FUNCTION MENU display ( page 15). RESET Button Reset the system or cancels the shutdown/alarm circuit ( page 17). ON (glowing) when an automatic operation (an AUTO operation, a schedul- ing operation, or lead/lag operation) is activated. ON (flashing) when external calendar or scheduling operation is abnormal. ( page 18, 22) AUTO light (yellow)
- 15. 13 3. OPERATING THE DSP [Instrument Panel] SELECT/WIDE 2 RUNNING CONTROL STARTREMOTE 1 FUNC [× 10h] ALARM STR REMOTE RUNNING MODE AUTO START POWER LOAD RESET SHUTDOWN STOP POWER light (yellow): ON (glowing) when the power to the air compressor is turned on. REMOTE light (green): ON (glowing) when the REMOTE button is pressed in order to activate a remote operation. ON (flashing) when an external remote-operation-activation switch has been turned on in order to activate a remote operation. ( page 30) LOAD light (yellow): ON (glowing) when the air compressor is loading. AUTO START light (green): ON (glowing) while the air compressor is in a stop due to an AUTO operation, lead/lag operation, or scheduling operation. ON (blinking) while the air compressor is in a stop due to a restartable instantaneous power interruption. ( page 18) SHUTDOWN light (red): ON (either glowing or blinking) when a shutdown/alarm problem has occurred. ( page 17) リセット 遠 方 機 能 電 源 運 転 停 止 運転状況 故 障 運転管理 負 荷 遠 方 起動待ち 警 報 記 憶 表示切替/ ワイドモード Digital Monitor In addition to basic settings, used to set various types of setting values in combination with the LCD monitor. ( page 24) SELECT/WIDE Button/Light (Yellow) Press to confirm various types of setting values, shutdown history, and setting status. ( page 26, 27) To set to ECOMODE (energy conservation mode) (standard type only), press and hold the SELECT/ WIDE button for at least 7 seconds. The light flashes and ECOMODE is set. START Button Starts the air compressor. The OPERATION light (red) turns on while the compressor is running. STOP Button Stops the compressor immedi- ately. ( page 14) UNLOAD STOP Button The air compressor will stop after removing the condensate from the air end. ( page 14) REMOTE Button Activates or deactivates a remote start/stop operation locally or on the instrument panel. it also acts as a right-arrow key stop ( page 30). UNLOAD STOP Press this button to stop the air compressor. The air compressor will stop after removing the condensate from the air end. ※This stop button is effective while a stand alone operation. RUNNING MODE Light
- 16. 3.2.1 Connecting the Power When you connect the power, the POWER light turns on and the LCD monitor displays the following screen for 5 seconds, and then switches to the monitor screen (M1) that displays control settings, discharge air pres- sure, and total operating hours. If phase is reversed, “Connection Error: Reverse Phase” is displayed on the LCD monitor for setting and connection inspection. In this case, switch 2 of the 3 main power cables. If there is no phase, “Connection Error: No Phase” is displayed on the LCD monitor. In this case, check the power cables. 3.2 Start/Stop Operation COMPRESSOR MONITOR CONTROLLER * The asterisk flashes when the clock and total run- ning hours are engaged. 5 sec 3.2.2 Start/Stop When the START button is pressed the START light turns on and the compressor starts operating. When running, the asterisk on the right side of running hours flashes and running time is counted. To stop, press the UNLOAD STOP button. Operation stops when the air end and the air piping have dried for 5 minutes. To stop the compressor immediately without unload- ing, press the STOP button. Note: If the STOP button is pressed while unloading, the compressor stops immediately. 14 3. OPERATING THE DSP [Start/Stop Operation]
- 17. 15 3.3.1 How to Move between the Various Displays ■ Menu Displays Follow the bottom line message on the display. 3.3 How to Use the liquid Crystal Display (LCD) ■ Monitoring Displays There are three monitoring displays: M1, M2, and M3. To move between these displays, press the MONITOR button. 機能 FUNCTION モニタ MONITOR モニタ MONITOR モニタ MONITOR モニタ MONITOR ■ Monitoring Display( p.16) M1 Monitoring Display M2 Monitoring Display M3 Monitoring Display ■ Message Display( p.18) ■ Function Menu Display( p.20) Function Menu Display IMPORTANT About the LCD Backlight (1) In the event that no button has been used for 10 minutes, the LCD backlight automatically turns OFF for protection to the display panel. It comes ON again if any button is pressed, other than the START and STOP buttons. (2) If an event happens while the LCD backlight is off, the backlight automatically turns ON and stays ON as long as the event exists. The message display is not displayed if the LCD monitor is in remote or instant stop setting mode. Set after referring to “3.4 How to Use the Digital Monitor.” ( page 25) 15 3. OPERATING THE DSP [How to Use the Liquid Crystal Display (LCD)] ■ Message Display There is only one message display: M3 (the con- tents, however, vary from time to time). It is avail- able only when some event (air compressor alarm or shutdown, maintenance notice, etc.) has occurred. Once an event happens, however, the M3 message display appears immediately and automatically. From the M3 display, pressing the MONITOR but- ton will switch the LCD to the M1 or M2 monitoring displays; but after approximately ten (10) seconds, the M1 or M2 monitoring displays will revert back to the M3 display.
- 18. 3.3.2 Typical Monitoring Displays VSDA * SAVE ECOMODE (Energy Conservation Mode) “SAVE” is displayed on the monitor screen. Displayed when stop is limited for AUTO opera- tion (standard: no symbol). INTE :Fixed speed type control (load/unload operation) AUTO :Fixed speed type control (AUTO operation * optional) VSDB :V type control (AUTO function off) VSDA :V type control (with AUTO function, V type standard) EXIT :Setting display when capacity control is executed externally MR :Multiple unit control connection by communication control (1) (2) (3) (4) (5) (6) (7) (8) (9) (10) (11) (10) (11) (1) Displays current time. Asterisk flashes. (2) Indicates a capacity control type. (3) Displays compressor discharge port pressure. (4) Indicates interstage pressure (INTSTG. P), and oil pressure (OIL PRESS). Blink asterisk indicates running time is being meas- ured. (5) Displays load rate. Indicates total running hours (RUN HR), total loaded hours (LOAD HR), and total number of loads (LOAD NOS.). (6) Indicates a 1st-stage discharge temperature (DIS. TEMP. 1), 2nd-stage discharge temperature (DIS. When the DSP is operating normally, typical monitor- ing displays appear as follows. M1 Monitoring Display M2 Monitoring Display TEMP. 2), oil temperature (OIL TEMP.), 2nd-stage suction temperature (2ND SUCT. TEMP.). (In the case of V type, displays current value of inverter primary side.) (7) Displays an operating frequency of main motor. (V type only. Fixed speed type displays **.* ) (8) Displays main motor output (reference value). (9) Displays master or slave control status when in lead/lag operation mode. (10) Displays various pressures and temperatures. (Asterisk indicates not in use.) (11) Displays time remaining till next inspection as maintenance period and next maintenance period. Current is an approximate S-phase ampere. Output is reference value of calculated power. IMPORTANT 16 3. OPERATING THE DSP [How to Use the Liquid Crystal Display (LCD)]
- 19. ■ Alarm Messages ① In the case an alarm occurs for the compressor, the ALARM light and contents / details displayed on alarm screen on the LCD monitor flash and operation continues. There are 2 types of alarm screens: ALARM and PROBLEM. ② Take the proper corrective action, and press the RESET button. ③ For further information, see pages 35, 36. NOTE) Malfunction detection of water failure is available for only water cooled single stage compressor. Malfunction detection of dryer is available for only built-in dryer models. Malfunction detection of oil water separator and element is not available. 3.3.3 Message Displays ■ Shutdown Messages ① When a shutdown occurs for the compressor, the SHUTDOWN light and shutdown contents on the LCD monitor (contents are displays on the left side and details are displayed on the right side) flash and the compressor stops running. There are 2 types of screens for shutdown: SHUTDOWN and FAILURE. ② Take the proper corrective action, and press the RESET button. ③ For further information, see pages 35, 36. NOTE) Malfunction detection of water failure is available for only water cooled single stage compressor. Malfunction detection of dryer is available for only built-in dryer models. Malfunction detection of oil water separator and element is not available. (Example) Example of temperature sensor malfunction, sensor 1 discon- nection FAILURE and TEMPERATURE SENSOR flash and the location of the abnormality is indicated. IMPORTANT (Example) In the case ALARM and AIR FILTER flash while the com- pressor is running, it indicates the filter is clogged. (Example) Example of battery replacement period. (Example) In the case the thermal relay trips and the compressor stops running, SHUTDOWN and OVERLOAD flash and the mal- function part of the main circuit is indicated. 17 3. OPERATING THE DSP [How to Use the Liquid Crystal Display (LCD)] ALARM and PROBLEM messages are treated as alarms, but aside from connection abnormalities that make operation impos- sible such as reverse phase and no phase when power is turned on, they also may indicate shutdown due to malfunction of the communication status.
- 20. ■ Messages of Automatic Stop Display and Automatic Restart Display When the DSP air compressor has automatically stopped, the following screen is displayed, the AUTO START light flashes/lights, and the RESTART message screen and details of contents flash on the LCD monitor. ● SCHEDULED STOP: Schedule operation setting < AUTO light ON > When schedule is set on the scheduled operation screen, displays state of operation being stopped by preset time. Operation starts automatically when the preset restart time comes. ● LEAD/LAG OPERATION STOP (Note: applies only to machines equipped with two- unit alternate operation.) < AUTO light ON > When the operation control mode is set to dual or backup on the operation mode setting screen, standby status of the slave machine in dual or backup operation is indicated. ● DRYER PRESTARTED (Note: Applies only to machines equipped with a built-in dryer.) < AUTO START light flashes > When dryer prestart is set, the dryer starts operat- ing in advance, and compressor stopped status is indicated. RESTART WAIT time is counted down. ● AUTO OPERATION (Note: Applies only to machines equipped with AUTO function) < AUTO START light ON > Indicates status stopped by low load when set to AUTO operation. AUTO START light flashes during restart limit while stopped, and RESTART WAIT time is counted down. ● INSTANT STOP / RETRY (Note: Retry applies to V type only.) < AUTO START light flashes > Displays status of restart for instantaneous power interruption (IPI) restart and V type retry. RESTART WAIT time is counted down. 18 3. OPERATING THE DSP [How to Use the Liquid Crystal Display (LCD)] It takes maximum 50 seconds from AUTO STOP (when AUTO setting is valid) to restart for V type. IMPORTANT
- 21. ■ Maintenance Notice Messages A maintenance date is determined by the amount of total operating hours or an elapsed calendar period, whichever comes first. When the maintenance date or time arrives, the maintenance notice message appears on the display under the heading of MAINTenance. This function is an alarm display only, and does not output alarm externally. Replace suction throttle valve consumable parts when inspection maintenance is displayed or the 1 million unloader count alarm is given, whichever comes first. NOTES: 1. MAINTenance can be reset, if the servicing is done earlier than expected and if the remaining operating time to next maintenance is less than 1,500h 2. On the contrary, if the servicing is done after the maintenance notice has appeared, the remaining operating hours to the next main- tenance has been zero until the maintenance is done. After maintenance and resetting the counter, new counting time starts just after the maintenance notice message has appeared on the display. If the inspection/maintenance is displayed, check the display contents, refer to maintenance standards given in the compressor instruction manual and perform inspection/maintenance as soon as possible. When inspection is complete, press and hold the SET button for at least 7 seconds. The LCD monitor display contents then move to “Maintenance initial value completed” of the message screen, and then return to the monitor screen 1 minute later. (1) SWITCHED TO LOCAL. If set to local by remote operation following shut- down restoration, operation automatically returns to local when shutdown occurs, and the message is displayed for 1 minute. For setting details, see “3.4 How to Use the Digital Monitor.” ( page 25) (2) IN OVERRIDE MODE. This message blinks when the DSP is in an over- ride mode. ■ Other Messages (3) UNLOAD STOP If the UNLOAD STOP button is used, the display flashes. The compressor unloads for 5 minutes and then stops. CAUTION Every these calendar periods: Service the DSP according to the schedules: 0.5 years, 1.5 years, 2.5 years 3.5 years, 4.5 years, 5.5 years Half-Yearly 1.0 years, 5.0 years Yearly + Half-Yearly 2.0 years, 4.0 years 2-Yearly + Yearly + Half-Yearly 3.0 years 3-Yearly + Yearly + Half-Yearly 6.0 years (for overhauling) 6-Yearly + 3-Yearly + 2-Yearly + Yearly + Half-Yearly A Standard Maintenance Schedule (A) (for yearly 8,000-or-less operating hours) B Standard Maintenance Schedule (B) (for yearly 4,000-or-less operating hours) (1) (2) (3) 19 3. OPERATING THE DSP [How to Use the Liquid Crystal Display (LCD)]
- 22. 3.3.4 How to Move within a Menu Display and to Change a Setting ー [FUNCTION MENU] and [MAINTenance DATA MENU] ー The method and procedure for altering settings is displayed using the following as an example. ① Press the MENU button displayed on monitor screen 1 – 2. ② Select the number of the item to be set with the △ ▽ buttons. ③ Enter with the SET button. The display then switch- es to the detail setting screen for that item. The following explanation uses [2. Operation Mode Setting Screen] as an example. How to Move within a [FUNCTION MENU] Display1 How to Select or Change a Setting within a Setting Display2 ① When the display switches to the details screen, move to the line to be altered with the △ ▽ buttons. ② Move to the item to be altered with the ▽ button. ③ Alter the setting value with the △ ▽ buttons. ④ After altering the setting value, press the SET but- ton. The cursor moves to the number. ⑤ Press the SET button again. The cursor moves to the first number at the top of the screen and the setting contents are entered. When setting is complete, pressing the MONITOR but- ton once returns the display to the MENU screen, and pressing it again returns to MONITOR screen 1. The same procedure is used to alter settings for other menus. When altering settings of the LCD screen, number update by button operation is slow. Press the buttons slowly when altering settings. IMPORTANT Items with a dash next to their number cannot be altered on the LCD monitor. In this case, alter from the digital monitor while referring to the instructions manual for the compressor. IMPORTANT ① ③ ④ ⑤ ② 20 3. OPERATING THE DSP [How to Use the Liquid Crystal Display (LCD)]
- 23. 3.3.5 [FUNCTION MENU] − Setting Displays Confirm settings by compressor alternate operation specifications and multiple unit control (communica- tion support). Wiring must be supplied separately for use. Items for which a dash is displayed next to their number cannot be set on the LCD monitor. 1. Operation control: Set operation control is dis- played on the digital monitor. 2. LEAD/LAG operation time: Time setting for alternate operation of a pair of compressors (set- ting range: 0.1 – 99.9 hours; initial value: 8.0) 3. Switching conditions: Setting of conditions for switching operation between a pair of compressors 4. Switching time: Switching time setting if switch- ing conditions are “parallel” or “interval” (setting range: 5 – 300 seconds, initial value: 15) ① ② ③ ④ ⑤ ⑥ ⑦ ⑧ ⑨ ⑩ If using the backup function, switch to the digital moni- tor and set. Model Setting Confirmation1 Operation Mode Settings2 The starter of settings can be confirm the software, model and setting status of model-specific settings such as capacity control. (Double asterisks are displayed for settings that do not require confirmation.) ① Indicates board software version. ② Indicates compressor type. ③ Displays cooling type. ④ Displays the number of compressor stages. ⑤ Displays pressure specification. ⑥ Displays interstage pressure. ⑦ Indicates CT setting value. ⑧ Displays water failure detection conditions for water cooled compressor. ⑨ Displays status of instantaneous power interruption (IPI) restart setting. ⑩ Displays compressor number. (Must be distinguished by number is using communication function.) The screen provides the model and serves as a target for setting status. Check the screen when making an inquiry. IMPORTANT IMPORTANT Altered setting values can only be entered when the com- pressor is not running. IMPORTANT 5. BACKUP: Setting of pressure to start the backup compressor when set to backup operation (range: 0.00 – 0.50 MPa, initial value: 0.05, difference from control pressure in the minus direction). 6. UNLOAD: Pressure setting that manually unloads 1 unit when the preset pressure is reached in backup operation (range: 0.00 – 0.50 MPa, initial value: 0.02, dif- ference from control pressure in the minus direction). 7. DUAL TIME: Displays time remaining until switch for dual / backup operation. Time is not counted down when operating 2 units for backup operation. When operation is stopped, remaining time is maintained. 8. SPEED CONTROL MODE: Displays control mode of V type. An asterisk is displayed for the Fixed speed type. Single Operates compressor independently. STPR Multiple unit Case where multiple unit control is executed by communication function of multi roller EX (dedicated panel of NEXT Series). Unit control is executed by RS485 communication according to the settings. Requires separate setting of compressor number. Dual Operation alternates between a pair of compressors for a preset amount of time. AUTO light lights. Backup Operation mode that adds pressure backup function to dual operation. When pressure drops, the slave machine starts. AUTO light lights. OVER LAP Method whereby first compressor is stopped after switching time for the other unit in parallel operation when it is time for dual operation. Interval Method of operating the other compressor after stopping the first one after switching time when it is time for dual operation. 21 3. OPERATING THE DSP [How to Use the Liquid Crystal Display (LCD)] ( )
- 24. If “SCHEDULE” is set, the AUTO light lights. If there is no valid setting for time, the AUTO light flashes. Altered set- ting can only be entered when the compressor is not run- ning. Scheduled operation can be set for 1 day (standard equipment). 1. TYPE: Displays setting data for capacity control. ① Control settings set by the digital monitor can be confirmed. Fixed speed type: I (load/unload operation)/IP (AUTO operation specifications * optional) V type: VB (AUTO function off)/ VA (AUTO opera- tion specifications) ② Setting type of pressure set by the digital monitor can be confirmed. SETTING 1: Standard pressure setting; SETTING 2: 2nd pressure setting EXT: External load/unload setting AUTO: Switches setting 1 and setting 2 by time. ③ Sets optional conditions. With standard specifica- tions, displays “ordinary” characters. 2 - 3. OPTION: Used for options. 4 - 6. PRESSURE SETTING: Pressure settings set by the digital monitor, target pressure and time limit can be confirmed all at once on the LCD monitor. ④ 7. TIME LIMIT: (Fixed speed type only) Preset time limit can be confirmed. The time limit is effective when ECOMODE (energy conservation mode) is selected by pressing and hold- ing the DISPLAY SWITCH button for at least 7 sec- onds. The function sets energy conservation mode until control pressure (unload start pressure) drops to the target value if the load and unload repeat time clears the time limit. If control pressure and recovery pres- 1. to 5. : Five Start/Stop Time Patterns ・ START: Starting Time ・ STOP: Stopping Time ・ Y or N :Yes starts or stops as scheduled. 2. DATA MEASUREMENT TIME: Time for recording operation data twice a day can be set. Recorded operation data can be confirmed by the “5” operation data record screen. Capacity CONTROL SETTING Display3 Schedule Setting4 If the time limit is altered, consult with your dealer or the Hitachi Service Station given on the rear cover. IMPORTANT IMPORTANT 1. MODE: Scheduling Mode The display shows an example setting of scheduled opera- tion from 7:00 to 20:00. “19:07” indicates the current time ① ② ③ ④ ⑤ ⑥ sure change time is measured and it exceeds the time limit, control pressure is lowered so the time limit is no longer exceeded. ⑤ (Time limit range: 30 - 120 seconds; initial value: 30 sec- onds) 8. USE TIME: Sets time to use pressure of setting 2. At that time, it displays automatic at the position of (2) of the type. When start and stop time become the same value, the automatic display is returned to setting 1 and the function is stopped. OFF Operates the DSP without a schedule. SCHEDULED Operates the DSP according to a daily 24- hour calendar. Settings are selectable when the DSP is in a stop. IMPORTANT Screen for confirming pressure settings for capacity control. Pressure settings are set from the digital moni- tor. Pressure settings consist of setting 1 and setting 2, which can be used by setting time used. 22 3. OPERATING THE DSP [How to Use the Liquid Crystal Display (LCD)]
- 25. ① Operation state is indicated by a symbol next to the shutdown code. L: Load, U: Unload, S: Stop Displays alarm contents and code, date, time, state and how many times alarm occurred. If the same alarm continues to occur, it is overwritten as update data, and the number of times the alarm occurs is updated. The latest warning is recorded as item 1. If there is no alarm, asterisks are displayed. The screen displays data for 3 types, and the necessary data can be confirmed by △ ▽ button operation. ① Up to 6 items of alarm history are recorded aside from shutdown history. Contents and occurrence state can be confirmed. Select the number of the shutdown on the SHUTDOWN HISTORY screen, press the SET button and the operation state when the shutdown occurred can furthermore be confirmed on the details screen. ● How to clear shutdown and alarm history. If you want to clear the entire shutdown history and alarm history, set F041 from the F mode of the dig- ital monitor to “1: CLEAR HISTORY” while referring to the instructions manual of the compressor. Operation Data Display5 Alarm History7 Load Data Display6 Shutdown History Display8 Records date/time, pressure, current, temperature and load status at that time as operating state recorded by data measurement time. Up to 12 times can be record- ed, after which the oldest data is deleted one at a time; the latest data is displayed for item 1. The screen shows record for 2 times, and the necessary data can be con- firmed by △ ▽ button operation. If altered before time is up, the data prior to change is main- tained, and the time recorded as soon as the data is altered changes. 1. and 2. - :Indicates the MONTH / DAY HOUR: MINUTE. P - Represents a pressure (MPa) and indicates, from left to right, the: Discharge air pressure, pressure data. C - Current (A). T - Represents a temperature(℃)and indicates from left to right: 1st stage discharge air temperature, 2nd stage discharge air temperature. L - Represents a load ratio percentage (%). and out put (kW). If there is no data, an asterisk is displayed. This display shows the averaged load data per day. Data can be recorded for a maximum of six days; the 7th day of averaged loaded data is automatically deleted and the 1st or most recent day of averaged data is added. The most recent data is arranged at the top of the display. The screen shows record for 2 times, and the neces- sary data can be confirmed by △ ▽ button operation. Data is averaged from operation start to stop. The average is however fixed at 0.00 minutes in the case of 24 hours operation. If an alarm occurs on the digital monitor, shutdown history is recorded. Up to 6 items of alarm history however can be recorded aside from shutdown history. Contents and occurrence state can be confirmed. 23 3. OPERATING THE DSP [How to Use the Liquid Crystal Display (LCD)]
- 26. 3.3.6 Other Hardware Setting Adjust the LCD brightness as follows: To brighten: Hold down the SET button and press the MONITOR button. To darken: Hold down the SET button and press the FUNCTION button. The calendar and clock are set by Hitachi prior to delivery. To reset the calendar and clock, please contact the local Hitachi distributor. The following is a table of contents that can be set by the LCD monitor and digital monitor (next section). Initial Setting The language of the display can be switched to Japanese, English or Chinese by the dip switch on the back of the LCD monitor board. If the language needs to be changed, consult with the local Hitachi distributor. 3-Language Display Switch Brightness Adjusting Digital Monitor Operation Classification Bit 1 2 3 4 ∼ 8 Japanese setting OFF OFF Not used English setting ON OFF Chinese setting OFF ON Test mode ON ON Power must be turned off before changing setting. Function Item LCD monitor oper- ation Digital monitor (F mode) Remarks Operation Mode Screen Mode − ○ F000 Dual, backup, etc. Dual operation time ○ − Switch conditions ○ Switch time ○ Backup pressure ○ Differential pressure Unload ○ Differential pressure Dual operation remaining time △ (AUTO change) Speed control mode − ○ (Factory set) V type only Capacity Control Screen Type (Left: Capacity control) ○ F019 Example: I type (load/unload type) Type (Center: Setting type) ○ F018 Example: Setting 1 Type (Right: Function) ○ − Option (not supported) Pressure loss ○ Option (not supported) Total piping capacity ○ Option (not supported) Control pressure − ○ F022 ∼ Setting 1, Setting 2 Recovery pressure ○ F022 ∼ Setting 1, Setting 2 Target pressure ○ F022 ∼ Pressure differential Time limit ○ (Factory set) Energy saving mode decision time Setting 2: Use time ○ − Scheduled Operation Screen Contents ○ Function switch Start/stop time ○ Data measurement time ○ Operation data measurement Other Settings Compressor No. setting − ○ F001 Instantaneous power interruption (IPI) setting ○ F002 ∼ Remote operation setting ○ F005 ∼ Dryer operation setting ○ F008 ∼ AUTO operation setting ○ F011 ∼ Energy saving mode setting ○ Display switch button operation Reset Shutdown/alarm reset ○ Reset button operation Load count reset ○ Remote + display switch button Maintenance reset ○ − Set button 7 sec. ON Shutdown/alarm history clear − ○ F041 24 3. OPERATING THE DSP [How to Use the Liquid Crystal Display (LCD)]
- 27. 3.4 How to Use the Digital Monitor 3.4.1 How to display operation status, shutdown history, and status of various settings All display contents of the digital monitor are linked with the LCD monitor. All of the following display contents can be can be confirmed by the LCD monitor. Use the following operations to display the contents of other operation/setting status on the LCD monitor and simply confirm operation status and setting status by the digital monitor. (1) How to Display the Operation Status When the power is turned on, discharge pressure is displayed on the screen of the digital monitor. Use the following proce- dure to switch the digital monitor to other display. ① Press the SWITCH DISPLAY button. Operation time is then displayed on the screen. ② Press the SWITCH DISPLAY button. Interstage pressure is then displayed on the screen together with “b.” ③ Press the SWITCH DISPLAY button. Compressor dis- charge temperature is then displayed on the screen togeth- er with “C.” ④ Press the SWITCH DISPLAY button. Load rate is then dis- played on the screen together with “L.” ⑤ Press the SWITCH DISPLAY button. Load count is then displayed on the screen in units of 10,000 times together with “U.” Each time the SWITCH DISPLAY button is subsequently pressed, it continues on to (2) Display of shutdown history and (3) Monitor display of various settings. To return one item at a time, press 2 . To return to discharge pres- sure, press RESET. ● If the alarm or shutdown light is flashing, the shutdown code is displayed along with “E0” ( page 35, 36). “E0” indicates the contents of the latest shutdown. ● If the alarm or shutdown light is flashing, it indicates that the alarm or shutdown has not been reset. Check E0.XX and reset. リセット To shutdown history display b : Interstage pressure (MPa) P:Discharge pressure (MPa) Operation time (×10) Flashes when operation time is added. L : Load rate(%) U: Load count(×10,000 times) H: Not used (display only) 表示切替 1 2 Press SWITCH DISPLAY. d: Not used (display only) C: Compressor discharge temperature (°C) (50℃) Proceeds by 1 each time pressed. Returns by 1 each time pressed. Returns to discharge pressure. IMPORTANT 1. When other than P0.00 is displayed, automatically returns to P0.00 discharge pressure display in 3 min- utes. 2. Load rate is a reference value determined by com- putation. 25 3. OPERATING THE DSP [How to Use the Digital Monitor]
- 28. SWITCH DISPLAY Press 8 times. [1 prior shutdown] [Local shutdown] [Oldest shutdown] 1 Discharge pressure display History consists of 6 items. Not used (display only) To display of various settings XX: Shutdown code リセット 表示切替 1 2 Not used (display only) Proceeds by 1 each time pressed. Returns by 1 each time pressed. Returns to discharge pressure. (2) How to Display Shutdown History Use the following procedure to display shutdown history on the screen. ① Press the SWITCH DISPLAY button 8 times. “E0.” is the displayed together with the shutdown code ( page 35, 36). “0” indicates the latest shutdown. (Automatically changes to “E.0” when shutdown or alarm occurs.) ② Press the SWITCH DISPLAY button. “E1.” is then dis- played along with the shutdown code. “1” indicates shut- down that occurred previously. Six items of data from 0 – 5 are recorded. “E5” indicates the oldest shutdown. ③ Press the RESET Button. The screen then returns to the usual digital monitor display. IMPORTANT If the shutdown code “XX ”is “ ” it means there is no shutdown history. Also, when anything other than shut- down history is displayed without resetting shutdown, it returns to the latest shutdown history in 3 minutes. SWITCH DISPLAY Press 16 times. Discharge pressure display A : Capacity control type No.0 : Control status No.1 : Start pressure 1 070 : 0.7MPa No.2 : Recover pressure 1 060 : 0.6MPa No.5 : Start pressure 2 070 : 0.7MPa No.8 : Instantaneous power interruption (IPI) setting 000 : No.9 : Compressor address 001 : No.1 No.6 : Recover pressure 2 060 : 0.6MPa No.7 : Pressure differential 2 005 : 0.05MPa No.3 : Pressure differential 1 005 : 0.05MPa リセット 1 表示切替 1 2 No.4 : ECOMODE [Energy conservation mode] Decision time Proceeds by 1 each time pressed. Returns by 1 each time pressed. Returns to discharge pressure. Invalid (3) How to Display Various Settings (Perform operation only when confirmation is necessary.) Use the following procedure to display capacity control type and pressure setting values for confirmation. ① Press the SWITCH DISPLAY button 16 times. “0.A ** ” is then displayed on the screen. ** changes with specifi- cations. “A” may be “L” or “U” depending on capacity con- trol specifications. ② Consists of items 0 - 9. Pressure setting status and optional pressure setting 2 can be confirmed each time the SWITCH DISPLAY button is pressed. ③ Press the RESET Button. The screen then returns to the usual discharge pressure display. IMPORTANT Symbol displayed at No. 0 and corresponding capacity control type A: AUTO function setting L: Fixed speed type setting (INTE … Load/unload operation) U: V type AUTO function off setting For details on the various types, see pages 22 and 64 - 68. 26 3. OPERATING THE DSP [How to Use the Digital Monitor]
- 29. 3.4.2 How to Set Control Functions ■ Various settings (instantaneous power interruption (IPI), remote operation, capacity control setting, pressure setting, etc.) Switches display from monitor mode to setting mode (F mode). 1 1 2 1 2 リセット 表示切替 For details, see the F mode table. To alter settings, change the values with the buttons. ( page 28) Displays 000th item of F mode. Changes each time FUNCTION is pressed. Forward Back Press ENTER to enter the settings. Back Press and hold simultaneously for at least 3 seconds. Perform same operation to return. Displays setting contents. F000:(0:Sets single unit operation.) F000:(1: Sets multiple unit control.) 27 3. OPERATING THE DSP [How to Use the Digital Monitor]
- 30. Settings can be altered or entered into the memory from the digital monitor without opening the start panel. Function 7 segment display Item Range Precision/ unit Initial value Multiple unit control setting F000 Control setting 0∼1 1 0 0:Single operation, 1: Multiple unit control (communication supported) Instantaneous power inter- ruption (IPI) restart setting F002 Instantaneous power inter- ruption (IPI) setting 0∼1 1 0 0:ON、1:OFF Remote operation set- ting F005 Remote control switch method 0∼3 1 0 0:Panel setting, 1:Local fixed, 2:Remote fixed, 3:Remote switch signal F006 Remote operation method 0∼1 1 0 0:Pulse input, 1:Level input F007 Remote operation shut- down recovery 0∼1 1 0 0:Disable, 1:Enable AUTO setting (*2) F011 AUTO operation enable 0∼1 1 0 0:Enable, 1:Disable Capacity control F018 Control pressure selection 0∼2 1 0 0:Setting 1, 1:Setting 2, 2:External input Function setting (optional) F021 Pressure control mode 0∼2 1 0 0:Built-in sensor, 1:External contact, 2:External input 0.7/0.93MPaspecifications V type Pressure setting 1 ※ F022 Control pressure setting 1 (control pressure) 0.5∼0.70 0.01MPa 0.70(0.93) ※ Setting can be altered at any time. F023 Start pressure 1 (cut out pressure) 0.5∼0.72(0.95) 0.01MPa 0.72(0.95) F024 Recovery pressure 1 (cut in pressure) 0.5∼0.68(0.91) 0.01MPa 0.67(0.90) F025(*2) P type recovery pressure 1 (restart pressure) 0.5∼0.68(0.91) 0.01MPa 0.67(0.90) Pressure setting 2 ※ F031 Control pressure setting 2 (control pressure) 0.5∼0.70 0.01MPa 0.70(0.93) F032 Start pressure 2 (cut out pressure) 0.5∼0.72(0.95) 0.01MPa 0.72(0.95) F033 Recovery pressure 2 (cut in pressure) 0.5∼0.68(0.91) 0.01MPa 0.67(0.90) F034(*2) P type recovery pressure 2 (restart pressure) 0.5∼0.68(0.91) 0.01MPa 0.67(0.90) Standard type Pressure setting 1 ※ F023 Start pressure 1 (cut out pressure) 0.5∼0.70(0.93) 0.01MPa 0.70(0.93) ※ Setting can be altered at any time. F024 Recovery pressure 1 (cut in pressure) 0.5∼0.60(0.92) 0.01MPa 0.60(0.83) Pressure setting 2 ※ F032 Start pressure 2 (cut out pressure) 0.5∼0.70(0.93) 0.01MPa 0.70(0.93) F033 Recovery pressure 2 (cut in pressure) 0.5∼0.60(0.92) 0.01MPa 0.60(0.83) Shutdown history clear F041(*1)History clear 0 ∼1 1 0 0:Enter, 1:History clear Note: ※ Setting can be altered at any time other than this. *1:When set to 1,” history is cleared. After clearing, the value is automatically reset to “0.” *2:Only the V type is equipped with AUTO function. The AUTO function is available as an option for the Fixed speed type. Do not alter settings for any F items not given in the table. IMPORTANT 1. Pressure setting V type: Set pressure differential of start pressure and recovery pressure to a minimum of 0.05 MPa when using a standard receiver. Set Pressure differential of start pressure and control pressure to a minimum of 0.02 MPa. Fixed speed type: Set pressure differential of start pressure and recovery pressure to a minimum of 0.1 MPa. 2. Function for switching to pressure setting 2 by external pressure alteration input is optional. 28 3. OPERATING THE DSP [How to Use the Digital Monitor]
- 31. 3.4.3 Alteration of Pressure Setting Values Use the following procedure to alter the pressure set- ting values for the capacity control system. ① Switch from monitor mode to setting mode (F mode). ② Set PRESSURE SETTING 1 of F mode. (For detailed contents of setting specifications, see page 28.) If using pressure setting 2, you must also set pres- sure setting 2. For operation method, be sure to refer to the vari- ous settings, and after entering the setting values with the STORE button, return to the monitor mode. 1 2 機能 記憶 Pressure setting 1 Alter values. Press button. Press button. 3.4.4 Capacity Control Mode Setting and Confirmation 機能 記憶 1 2 AUTO setting Alter values. (Initial value 0) Press button. Press button. Set to AUTO OFF. IMPORTANT The AUTO function is available for the Fixed speed type as an option. You can switch the capacity control mode by the follow- ing method according to the application. The V type is a automatic stop type, but can also be changed to control mode that does not stop automatically (AUTO OFF). Capacity control mode setting can be changed by switching the digital monitor from monitor mode to setting mode (F mode) while the compressor is not running and setting to “0: Enable” or “1: Disable” by altering the AUTO setting (F011) of F mode. Capacity control mode AUTO ON AUTO OFF F011 0 : Enable 1 : Disable Digital monitor display 0.A X X 0.U X X After altering, confirm the capacity control mode by display of various settings on the digital monitor ( page 25). ( For capacity control operation and details, see pages 31 and 64 - 68. Pressure for control can also be switched by F018 (pressure setting 1 / pres- sure setting 2). 29 3. OPERATING THE DSP [How to Use the Digital Monitor]
- 32. 3.4.5 Remote Operation Setting REMOTE 遠 方 On On Flashing Off (1) Remote setting by instrument panel (2) Remote setting fixed (3) Remote setting by external operation button Local setting 機能 記憶 1 2 Alter values. (Initial value 1) Remote operation switch method Press button. Press button. Set to remote fixed. Operation mode is basically switched by panel opera- tion. The remote operation mode can also be set by methods (2) and (3). ① Turn off the main power supply. ② Remove the front cover and remove the start panel cover. ③ Connect the wiring of the remote control panel and the compressor control panel. ( See the wiring diagrams on pages 52 - 56.) ④ Mount the start panel cover and the front cover. ⑤ Turn on the main power supply. [1] To “set the operation buttons of the instrument panel to remote operation mode” ① Press the REMOTE button. ② The REMOTE light lights to indicate that operation of the instrument panel buttons is set to the remote operation mode. ③ To return to local operation mode, press the REMOTE button again. The REMOTE light then goes off to indicate that operation has been switched to the local operation mode. [2] To “fix remote operation to remote operation mode” ① Switch from the monitor mode to the setting mode (F mode). ② Change the remote operation switch method for remote operation setting (F005) from “0: Panel set- ting” to “2: Remote fixed.” ③ The REMOTE light lights to indicate that the remote operation mode has been set. [3] To “set to remote operation by operation button provided externally” (Consult with your dealer or the Hitachi Service Station.) ① Wire the external remote setting buttons. ② Switch from the monitor mode to the setting mode (F mode). ③ Change the remote operation switch method for remote operation setting (F005) from “0: Panel set- ting” to “3: Remote switch signal.” ④ Set the external remote setting button to “ON.” ⑤ The REMOTE light flashes to indicate that the oper- ation mode has been switched to remote operation by external buttons. IMPORTANT ● In the case of multiple unit control specifications, when multiple unit control is set, it automatically changes to the remote setting. The REMOTE light flashes at this time. ● Remote operation method alteration in the setting mode can only be entered when the compressor is not operating. ● The compressor STOP button can also be used to stop operation when operating in the remote mode. 30 3. OPERATING THE DSP [How to Use the Digital Monitor]
- 33. 3.4.7 Capacity Control Flow when ECOMODE (Energy Saving Mode) is Set (ECOMODE is set to off when shipped from the factory, but may be set according to your needs.) RUNNING CONTROL 運転管理 ALARM 警 報 1 記 憶 遠 方 REMOTE 表示切替/ ワイドモード STR 機 能 FUNC リセット RESET SELECT/WIDE 1 表示切替/ ワイドモード ON :Light flashes. OFF:Light goes off. SELECT/WIDE 表示切替/ワイドモード Set by button Execute capacity control in accordance with the follow- ing time charts. (1) ECOMODE (Energy Saving Mode) setting When you set to ECOMODE by load/unload type control, if the cycle time for load → unload exceeds 30 seconds, the start pressure setting is automati- cally lowered until it reaches recovery pressure + 0.05 MPa to conserve energy. If 30 seconds is exceeded, the DISPLAY SWITCH / WIDE MODE light flashes; if 30 seconds is not exceeded, the DISPLAY SWITCH / WIDE MODE light lights steadily, and control is executed by pres- sure setting value of ordinary load/unload type con- trol. When using ECOMODE (Energy Conservation Mode), “ECO” is displayed on the monitor screen. ( page 16) (2) Precautions when using ECOMODE (Energy Saving Mode) Enabling ECOMODE (Energy Conservation Mode) requires an air tank that is one turn larger that the air tank recommended for load/unload type control. ( For information concerning the air tank, see page 42.) This function is used for load/unload type control, and operates only for the ordinary pressure setting. Linepressure Energy Saving Effect Load Unload Time Start pressure (Unload start pressure) Recovery pressure (Loadrecoverypressure) Recovery is automatically reduced. : 0.1MPa : 0.05MPa Factory set upper/lower limit pressure differential ECOMODE differential pressure Start pressure is automatically reduced to 1 cycle per 30 seconds. ※ Start pressure = Cutout pressure ※ Recovery pressure = Cutin pressure According to alteration of the pressure setting value of section 3.4.1, by setting start pressure 2 (value of F032) and recovery pressure 2 (value of F033), the control setting can be easily switched by external button opera- tion in accordance with usage time on the load side. During ordinary control, the LOAD light is lit when loading and goes off when unloading. With pressure setting 2, however, the light flashes when loading and goes off when unloading. If using this function, consult with your dealer or the Hitachi Service Station. (The ECOMODE however can- not be used with pressure setting 2.) Pressure setting 2 selection (flash range)Ordinary (on range) ONOFFExternal pressure setting switch Time Energy Saving Effect Load Unload Start pressure 2 Recovery pressure 2 Start pressure 1 Recovery pressure 1 Linepressure Load light ※ Start pressure = Cutout pressure ※ Recovery pressure = Cutin pressure 31 3. OPERATING THE DSP [How to Use the Digital Monitor] 3.4.6 Pressure Setting Switch Function (Can be supported as an option)
- 34. CAUTION 3.5 Daily Operation ① Turn on the main power supply. ② Check the POWER light and LCD monitor display. – Is the light lit ? – Is the monitor screen displayed on the LCD monitor? ③ Check the level of lubricating oil. – Is the oil level near the red line ? ④ Set the water drainage cock valve of the cooling water piping and the water drainage cock on the rear of the compressor to “fully closed.” ⑤ Allow cooling water to pass through. ① Open the discharge side valve. ② Start operation by pressing the START button. ③ Check the pressure after the compressor starts up. – The compressor stops running if the oil pressure does not rise to at least 0.08 MPa. – The compressor switches to full load operation within 15 seconds for the Fixed speed type and within 10 seconds for the V type. ④ Make sure the discharge pressure rises gradually. – Make sure the maximum pressure does not exceed the specified discharge pressure. ● When using the DSP air compressor, do not raise the discharge pressure excessively. Operating the DSP air compressor over the rated pressure can result in main motor overload, shutdown of the air- end and/or damage of parts. ● If the safety relief valve has blown or a protective device has shutdown the DSP air compressor, investigate the cause of and take corrective action. If there any questions or comments in taking these actions, please contact the local Hitachi distributor. ③ RUNNING CONTROL 運転管理 RUNNING MODE ALARM 警 報 運転状況 故 障 LOAD SHUTDOWN REMOTE 負 荷 遠 方 電 源 POWER 起動待ち AUTO START 停 止 STOP 運 転 START 1 2 記 憶 遠 方 REMOTE 表示切替/ ワイドモード STR 機 能 FUNC リセット RESET SELECT/WIDE ② UNLOAD STOP 3.5.1 Preparing the DSP Air Compressor Water-Cooled DIS. PRESS: 0.70MPa INTSTG. P: 0.15MPa OIL PRESS: 0.15MPa CLT PRESS: *.**MPa [Rear View] ② ③④ ① RUNNING CONTROL 運転管理 RUNNING MODE ALARM 警 報 運転状況 故 障 LOAD SHUTDOWN REMOTE 負 荷 遠 方 電 源 POWER 起動待ち AUTO START 停 止 STOP 運 転 START 1 2 記 憶 遠 方 REMOTE 表示切替/ ワイドモード STR 機 能 FUNC リセット RESET SELECT/WIDE UNLOAD STOP 3.5.2 Starting the DSP Air Compressor Make sure the oil level of the lubricating oil is between the red lines while the compressor is running. Because lubricating oil is circulated through the cooler and the pip- ing while the compressor is running, the position when the compressor is running and when it is off differs, and is higher when the compressor is not running. IMPORTANT 32 3. OPERATING THE DSP [Daily Operation]
- 35. ① Check the LCD for operating pressures and tem- peratures, and verify that: – Discharge air pressure, interstage air pressure, oil pres- sure, discharge air temperature, 2nd-stage suction air tem- perature, and oil temperature stay within a normal range; see page 47 ② Make sure air containing drain from the inter cooler drain discharge port and after cooler drain dis- charge port is intermittently discharged. ① Press the UNLOAD STOP button. The compressor then unloads for 5 minutes and then stops running. (In the case of an emergency, press the STOP but- ton.) ② Check the LCD for pressures, and verify that: - Oil pressure, interstage air pressure, 0 MPa (or 0.01 MPa depending on your operating conditions). ③ Drain the condensate through the control line filter’s condensate drain valve.(Fixed speed type) ④ Close the discharge stop valve. ⑤ Stop the cooling water. Open the valve for drain- ing water in the cooling water piping and drain the cooling water. To avoid damaging the casing and cooler, be careful not to allow freezing during the winter. モニタ メニュー リセット 遠 方 機 能 電 源 運 転 停 止 運転状況 故 障 運転管理 負 荷 遠 方 起動待ち 設 定 自 動 UP/ DOWN 警 報 記 憶 表示切替/ ワイドモード +/− AUTO MONITOR MENU SET SELECT/WIDE 2 RUNNING CONTROL STARTREMOTE 1 FUNC [× 10h] ALARM STR REMOTE RUNNING MODE AUTO START POWER LOAD RESET SHUTDOWN STOP MONITOR UNLOAD STOP [Rear View] ② ④ ③ RUNNING CONTROL 運転管理 RUNNING MODE ALARM 警 報 運転状況 故 障 LOAD SHUTDOWN REMOTE 負 荷 遠 方 電 源 POWER 起動待ち AUTO START 停 止 STOP 運 転 START 1 2 記 憶 遠 方 REMOTE 表示切替/ ワイドモード STR 機 能 FUNC リセット RESET SELECT/WIDE UNLOAD STOP ① DIS. PRESS: 0.70MPa INTSTG. P: 0.15MPa OIL PRESS: 0.15MPa CLT PRESS: *.**MPa 3.5.3 During Operating the DSP Air Compressor 3.5.4 Stopping the DSP Air Compressor Water-Cooled 33 3. OPERATING THE DSP [Daily Operation]
- 36. 3.6 Oil Mist Remover Daily Operation 3.6.1 When Starting 3.6.2 When Stopping ① Make sure that the vacuum indicator shows a red mark. ② Verify that the pressure gauge reads 0 (zero). φ8 Make sure that the pressure gauge reads as follows: Pressure Gauge 0.35 to 0.38 MPa Make sure that the condensate is not collected in the filter bowl. If the condensate is collected, push up the cock to drain the condensate. Make sure that the vacuum indicator does not show a red mark. Condensate Drain Cock If the oil pressure is reduced to 0.08 MPa or lower, the oil pres- sure sensor will detect it and shut down the DSP air compressor. ① Use the relief valve to regulate the oil pressure. To regulate the oil pressure, open the relief valve cap, loosen the lock nut, and turn the regulating bolt to keep the oil pressure at the specified 0.12 to 0.16MPa. ・0.12 to 0.16 when the ambient temperature is 20 degree C or higher. ・0.14 to 0.18 when the ambient temperature is 20 degree C or lower. (for V type, adjust at the maximum operating frequency.) ② Turn the regulating bolt clockwise to increase the oil pressure and vice versa. ③ Tighten the locknut and replace the cap. IMPORTANT Relief Valve 3.7 Adjusting the DSP 3.7.2 Regulating the Oil Pressure Locknut Seal Washer Air Intake Filter Usually keep the bolt tightened, but not excessively. Adjusting Bolt (Suction Bypass Valve) Suction Throttle Valve ①④ ②④ ③ ② The first steps to resolve the lower suction vacuum pressure are as following. A) Clean or replace the air intake filter. B) Clean the suction throttle valve’s valve plate. Note; If the unloaded interstage pressure drops as low as -0.08MPa, discharge air temperature will gradually increased. ③ If the DSP air compressor cannot be shutdown to clean these parts, turn the adjusting bolt (the suction bypass valve) counterclockwise to open. This will allow the air intake and increase the discharge air pressure to be geater than -0.08MPa when running unloaded. ④ Replace the consumable parts in the air intake fil- ter and suction throttle valve with new consumable parts in accordance with the appropriate mainte- nance schedule. For the detail refer to the sec- tion 9, Maintenance the DSP. ① When dust particles accumulate on the valve plate of the suction throttle valve, the suction vacuum pres- sure may drop and eventually causing the discharge air temperature to rise. 3.7.1 While Operating the DSP Air Compressor (Fixed speed type) The interstage pressure of as low as -0.08 MPa during unloading period may increase the discharge air temperature. IMPORTANT 34 3. OPERATING THE DSP [Oil Mist Remover Daily Operation, Adjusting the DSP]
- 37. 4.1 Protective Devices CAUTION If an alarming trouble or a shutdown trouble has happened, investigate the cause and take a corrective remedy before restarting. If you have anything unclear or any question, please contact the local Hitachi distributor. The DSP is provided with the protective devices as listed below. Shutdown troubles and alarming troubles detected by these protective devices are indicated on the liquid crystal display (LCD). Referring to the LCD indications, investigate the cause of a shutdown or alarming trouble. ■ When Connecting the power LCD Indication What and How to Detect SHUTDOWN MODELight Detector Shutdown What Actions to Take How to Reset History CodeHeading Trouble Description PROBREM Reversal phase connection Detected for 3 seconds after connecting the power Blinks in red CPU Yes Change 2 of 3 wires of the power cord. Press RESET button. 01 Phase-lacking connection CPU Yes Reconnect the power cord tightly, check the power supply, and take a corrective remedy. Press RESET button. 02 Short period Power Interruption Black out for 1 to 5 seconds − CPU No See page for Power Interruption detection − 03 Instantaneous Power Interruption Black out for less than 1 seconds CPU No See page for Power Interruption detection 04 ■ During Operation LCD Indication What and How to Detect SHUTDOWN MODELight Detector Shutdown What Actions to Take How to Reset History CodeHeading Trouble Description SHUTDOWN Discharge air tem- perature (1) [Fixed speed type] The temperature detected at 1st stage rises above the below settings. Blinks in red Thermistor Yes See page 37. Press RESET button. 55 0.70MPa model about 225℃ (about 215℃)0.93MPa model Discharge air temperature (1) The temperature detected at 1st stage rises above the below settings. Blinks in red Thermistor Yes See page 37. Press RESET button. 55 0.70MPa model about 230℃ (about 220℃)0.93MPa model Discharge air tem- perature (2) The temperature detected at 1st stage rises above the below settings. Blinks in red Thermistor Yes See page 37. Press RESET button. 560.70MPa model about 230℃ (about 220℃) 0.93MPa model about 260℃ (about 250℃) Interstage pressure [Fixed speed type] 0.27MPa or higher Blinks in red Pressure sensor Yes See page 37. Press RESET button. 52 Interstage pressure 0.30MPa or higher Blinks in red Pressure sensor Yes See page 37. Press RESET button. 52 2nd-stage suction air temperature 73(70)℃ or higher (after the intercooler) Blinks in red Thermistor Yes See page 37. Press RESET button. 5B Oil temperature 73(70)℃ or higher Blinks in red Thermistor Yes See page 37. Press RESET button. 58 Oil pressure [Fixed speed type] 0.08MPa or lower Blinks in red Pressure sensor Yes See page 37. Press RESET button. 5C Oil pressure (OIL-LOW PRESS) Oil pressure descends under below settings. Blinks in red Pressure sensor Yes See page 37. Press RESET button. 5CFreg. 45Hz or higher 0.08MPa Freg. less than 45Hz 0.04MPa Overloading (main motor) Detected during oper- ation Blinks in red Thermal relay Yes See page 37. Press RESET button. 17 Overloading (ancillary motor) Detected during oper- ation Blinks in red Thermal relay Yes See page 37. Press RESET button. 53 Answer error of 52 Detected during running. Blinks in red CPU Yes See page 37. Press RESET button. 51 Answer error of 42 [Fixed speed type] Detected after shifting to △ running. Blinks in red CPU Yes See page 37. Press RESET button. 16 FAILURE INV STOP Inverter tripping or main motor overloading with automatic retrials. Failure signal from inverter Blinks in red CPU Failure stop after repetition of retrials. See page 37. Press RESET button. 44 35 4. TROUBLESHOOTING
- 38. ■ Others LCD Indication What and How to Detect SHUTDOWN MODELight Detector Shutdown What Actions to Take How to Reset History CodeHeading Trouble Description PROBLEM Battery out Battery voltage low Blinks in green CPU No Disconnect the power, and replace the battery with a new one. Press RESET button. 64 Error of a scheduling operation Start/stop time not set yet Blinks in green CPU No Check the operation setting. Press RESET button. 62 Error of a multiple- unit operation Setting error Blinks in green CPU No Check the wire and the operation setting. Press RESET button. 5B Error of RS−485C port Setting error Blinks in red Thermistor Yes Check the wire and the operation setting. Press RESET button. 63 65 ∼68 Error of RS−485 port Setting error Blinks in green Pressure sensor Yes Check the wire and the operation setting. Press RESET button. 63 65 ∼68 FAILURE PCB error (ROM1) (RAM1) MAIN Memory failed Blinks in red CPU Yes Disconnect and reconnect the power. If the problem is reproduced, change the PCB. Press RESET button. 41 42, 46 (ROM2) (RAM2) LCD Memory failed Blinks in red CPU Yes Disconnect and reconnect the power. If the problem is reproduced, change the PCB. Press RESET button. 41 47, 48 CT error Disconnected Blinks in red CPU Yes Disconnect the power and check the CT sensor wire for tightness. Press RESET button. E10 Pressure sensor (disconnection 1) PS5 disconnected (sensor for interstage pressure) Blinks in red CPU Yes Disconnect the power and check the pressure sensor wire for tightness. Press RESET button. 33 Pressure sensor (disconnection 2) PS2 disconnected (sensor for discharge air pressure) Blinks in red CPU Yes Press RESET button. 34 Pressure sensor (disconnection 4) PS4 disconnected (sensor for Oil pressure) Blinks in red CPU Yes Press RESET button. 39 Temperature sensor (disconnection 2) TH2 disconnected (thermistor for interstage temperature) Blinks in red CPU Yes Press RESET button. 32 Temperature sensor (disconnection 3) TH3 disconnected (thermistor for 1st-stage discharge temperature) Blinks in red CPU Yes Disconnect the power and check the thermistor sensor wire for tightness. Press RESET button. 35 Temperature sensor (disconnection 4) TH4 disconnected (thermistor for 2nd-stage discharge temperature) Blinks in red CPU Yes Press RESET button. 36 Temperature sensor (disconnection 5) TH5 disconnected (thermistor for oil temperature) Blinks in red CPU Yes Press RESET button. 37 NOTES: 1. Figures in ( ) are for water cooled models. 2. Both the DSP for a 400 V class power supply and the DSP with a control circuit of 100 volt employ a reversal phase relay. 3. Both the DSP for a 400 V class power supply and the DSP with a control circuit of 100 volt indicate a phase-lacking connection as a reversal phase. 4. Battery Replacement: Use the Hitachi Maxell Button type Lithium Battery (model:CR2032WK17, with lead wire connector, 3V) Replace the battery with a new one every 6 years. When replacing, disconnect the power and complete the replacement work within 15 minutes. 5. If a Thermistor is disconnected, an override operation is not allowed. Contact your distributor immediately. ■ During Operation LCD Indication What and How to Detect SHUTDOWN MODELight Detector Shutdown What Actions to Take How to Reset History CodeHeading Trouble Description ALARM Clogging of air intake filter Pressure differential of −4.98kPa or more Blinks in green Pressure differential sensor No See page 76 Press RESET button. 21 Discharge air temperature (1) [Fixed speed type] The temperature detected at 1st stage rises above the below settings. Blinks in green Thermistor No See page 37 Automatically reset. 250.70MPa model about 220℃ (about 210℃)0.93MPa model Discharge air temperature (1) The temperature detected at 1st stage rises above the below settings. Blinks in green Thermistor No See page 37 Automatically reset. 250.70MPa model about 225℃ (about 215℃)0.93MPa model Discharge air temperature (2) The temperature detected at 2nd stage rises above the below settings. Blinks in green Thermistor No See page 37 Automatically reset. 260.70MPa model about 225℃ (about 215℃) 0.93MPa model about 255℃ (about 245℃) 2nd-stage suction air temperature 68(65)℃ or higher (after the intercooler) Blinks in green Thermistor No See page 37 Automatically reset. 2B Oil temperature 68(65)℃ or higher Blinks in green Thermistor No See page 37 Automatically reset. 26 L. COUNT OVER (Load/unload cycle count) 1 million times Blinks in green CPU No Replace suction throttle valve consum- able parts and Blow off solenoid valves Hold the REMOTE Button and SELECT/ WIDE Button for at lease 7 seconds 59 36 4. TROUBLESHOOTING [Protective Devices]
- 39. 4.2 Troubleshooting the Air Compressor4.2 Troubleshooting the Air Compressor Most likely problems, causes, and remedies are described below. Causes LCD Indication Causes Corrective Remedies The DSP motor does not start. < P R O B L E M > C O N N E C T I O N E R R : R E V P r e s s R E S a f t e r C H K . 1. Power supply switch - Off 2. Power - Failed 3. Power cord - In a reversal phase connection 4. Power cord - In a phase-lacking connection 1. Check the main breaker. 2. Check the power supply. 3. Change 2 of 3 wires of the power cord. 4. Reconnect the power cord tightly and check the power supply. NOTE: Phase-lacking is detectable only when connecting the power. < P R O B L E M > C O N N E C T I O N E R R : O P E N P r e s s R E S a f t e r C H K . Shutdown – 1st-stage discharge air temperature and/ or pressure too high < A L A R M > D I S . T E M P . 1 : P r e s s R E S a f t e r C H K . 1. 2nd-stage AIR END air intake effi- ciency - Lowered 2. Air intake filter - Dirty 3. Temperature of Suction Air-High 1. Contact your Hitachi distributor. 2. Clean the air intake filter. 3. Lower the suction air temperature. < S H U T D O W N > H I G H D I S . T E M P : P r e s s R E S a f t e r C H K . Shutdown – 2nd-stage discharge air temperature too high < A L A R M > D I S . T E M P . 2 : P r e s s R E S a f t e r C H K . 1. Check valve – Compressed air leaked (from the aftercooler to the air end when the DSP unloads) 2. Suction throttle valve - Dirty [Fixed speed type] 1. Replace the check valve. 2. Clean the Suction throttle valve. [Fixed speed type] Note: For information about the Suction bypass valve, see page 29. Shutdown – 2nd-stage suction air temperature too high < S H U T D O W N > 2 N D S U C T . T E M P : P r e s s R E S a f t e r C H K . 1. Cooling water pump – Failed, or Cooling water pressure – Fluctuating 2. Intercooler – Dirty 1. Check the cooling water system. 2. Clean the intercooler Shutdown – Oil temperature too high < S H U T D O W N > O I L : H I G H T E M P P r e s s R E S a f t e r C H K . 1. Oil cooler – Dirty 2. Room temperature – High 3. Oil temperature control valve – Failed 1. Check the oil cooler. 2. Reduce the room temperature. 3. Check the oil temperature control valve. Shutdown – Oil pressure too low < S H U T D O W N > O I L : L O W T E M P P r e s s R E S a f t e r C H K . 1. Oil strainer and/or oil filter – Dirty 2. Oil level – Low 1. Clean the oil strainer 2. Replace the oil filter. 3. Add the oil. Shutdown – Main motor and/ or ancillary motor overloading < S H U T D O W N > O V E R L O A D : M A I N P r e s s R E S a f t e r C H K . 1. Power supply voltage – Low 2. Discharge air pressure – Too high 1. Rectify the power supply voltage. 2. Check the suction throttle valve [Fixed speed type] 3. Check the capacity control system. < S H U T D O W N > O V E R L O A D : S U B P r e s s R E S a f t e r C H K . 1. Power supply voltage – Low 2. Cooling fan motor – Failed 1. Rectify the power supply voltage. 2. Check the cooling fan motor. (Measure insulation resistance etc.) Shutdown – Inverter tripping/ restarting < F A I L U R E > S Y S T E M R E T R Y : 1. Power supply voltage – Low or in unbalance 2. Discharge air pressure – Too high 3. Main motor – Overloading NOTE: ‘INVERTER RESTART’ means that the DSP shutdowns when the inverter repeats a restarting action within 1 minute. 1. Rectify the power supply voltage. 2. Check the capacity control system. 3. Measure insulation resistance etc. or check the main motor. 37 4. TROUBLESHOOTING [Troubleshooting the Air Compressor]
- 40. 4.3 Troubleshooting the Oil Mist Remover ① The vacuum indicator shows a red mark (Gear case has a positive internal pressure) The pressure gauges reads zero (0) MPa. Check the solenoid valve for operation. Pressure setting of the regulator is lower ? Reset the regulator to a proper pressure. Clean the filter. Pressure of a control air is lower than 0.39 MPa ? Maintain the pressure of a control air at 0.39 MPa or more. The gear case or gear case vent pipe has a leak (for example, the oil filling port plug on the gear case is not tight). ・ Tighten every screw and plug to remove all leaks. ・ Make sure that the safety relief valve is closed. Element may be dirty. Inspect the element and replace if necessary. ② The safety relief valve has opened and oil mists are vented (the gear case internal pressure has risen). See the NOTE below. Yes Yes Yes Yes No No No No The safety relief valve is dirty or stuck open by a foreign object. Disassemble and clean the safety relief valve. Replace if necessary. Go to the procedure ① . The vacuum indicator shows a red mark. (Gear case has a positive internal pressure.) Yes No ④ Oil pressure is low (oil pump may be inhaling air). Accumulated oil is visible in the tube between the ele- ment housing and the float trap. Clean the nozzle of the float trap. Upper or lower packing is not seated properly on the element ? Reinstall the element, seating the packing properly for a maximum sealing performance. Control air contains oil ? Check the control air for oil contents. Element may be dirty. Inspect the element and replace if necessary. Yes Yes Yes No Has the air compressor developed an alarm or shutdown trouble (i.e. oil filter dirty, oil pressure reduced due to oil leaking, oil pump failed, safety relief valve failed, etc.)? Readjust or repair as required. The nozzle of the float trap is clogged (for example, a large quantity of air is inhaled through the oil recovery pipe to the oil pump inlet)? Clean the nozzle of the float trap. Disassemble the float trap and clean. Yes Yes No No No 38 4. TROUBLESHOOTING [Troubleshooting the Oil Mist Remover] ③ Oil is vented through the ejector’s compressed air outlet (the separated oil is not being recovered). NOTE: The oil mist remover makes the gear case internal pressure negative during operation, reducing the pressure by 0.005 to 0.01 MPa . This is not unusual; reset the oil pressure on the safety relief valve. NOTE: The safety relief valve opens immediately when starting the DSP (the control air pressure is still low) or when the DSP has stopped. This is a normal occurrence.
- 41. Common Base Fork Slot Cover Bolt (M6×15) Pad Use a pad to protect the DSP enclosure panels. Use the adhesive tapes to prevent the front door from detached during conveyance. Use a pad to protect the DSP enclosure panels. Use the adhesive tapes to prevent the front door from detached during conveyance. Keep the distance of 1500 mm or more. Use the strong wires. Adjust the wire length to keep the DSP’s balance when hoisting it. Lift the unit balanced. Use the attached tie frame. 5.1 Unpacking the DSP Air Compressor ■ After unpacking the crate, verify that the inside DSP is what you have ordered, by referring to page 81 through 82 STANDARD SPECIFICATIONS”and also by checking the model nameplate. ■ Verify that the DSP is not damaged or deformed in transportation. Model Nameplate Standard Accessories Motor Output(kW) Model Frequency(Hz) Foundation Bracket, Foundation Bolt/Nut(M20) 4 pieces Bolt (M20) for Foundation Bracket 4 pieces Fork Slot Cover 4 pieces Bolt (M6) for Fork Slot Cover(M6) 8 pieces Motorized Isolation Valve(※) 1 piece Motorized Water Isolation Valve(※※) 1 piece 5.2 Conveying the DSP Air Compressor ■ With a Forklift ■ With a Shop Crane ■ After installing the DSP, plug the fork slots with the fork slot covers. Item ※ -marked shall be supplied only for Item ※※ -marked shall be supplied only for water cooled Model Total Mass(kg) DSP-100VAN 2,350 DSP-100VWN 2,200 Model Total Mass(kg) DSP-90AL(M)N DSP-100AL(M)N 2,250 DSP-120AMN 2,400 DSP-90WL(M)N DSP-100WL(M)N 2,100 DSP-120WMN 2,250 39 5. INSTALLING AND PIPING THE DSP
- 42. 5.3 Installing the DSP Air Compressor ■ Install the DSP in a bright, wide, and airy room as follows: Ventilating Fan Maintenance Space Ⓓ Maintenance Space Ⓒ Foundation Maintenance Space Ⓑ Maintenance Space Ⓐ If you install the DSP in a small room, provide a ventilating fan to keep the room temperature at 45℃ or lower. Plug the fork slots with the fork slot covers (standard accessory) Provide a vibration-absorbing mat if the foundation is vibrative. If it is too vibrative, look for another dequate location. ■ Install the DSP in a dry and dust-free room, and avoid the following. ■ Install the DSP on a level floor. ■ Do not install the DSP near a wall. Doing this may cause the operating sound to resonate and increase the sound levels. Raindrops, Basements, Steam Metals, Sand, Other Hard Materials Harmful Gases These conditions may cause leakage, condensation, rusting and CPU mal- function. Installing on a level floor is required to keep an adequate amount of lubrication oil in the DSP and prevent excessive noise and vibration. Do not set the DSP on the blocks. These conditions may cause deterio- ration of motor insulation level, dam- age to the air end bearings and CPU malfunction. These conditions may cause oil deterio- ration, corrosion of coolers and peeling of the rotor coatings. Prohibited WARNING 1. Keep flammable solvents or any other hazardous chemicals away from the DSP. Such chemicals may be sucked by the air end, compressed, and exploded. 2. Do not use fire near the DSP; otherwise the sparks may enter the air end and burn it internally. CAUTION ● Install the DSP indoors. Installing it outdoors may lead to a damage of the air end due to water vapor, dust, etc. ● The DSP installation room must have an air intake opening and an air exhaust opening and must be well ventilated. If the room is poorly ventilated, hot air exhausted by the DSP may cause the room temperature to rise abnormally and in the worst case lead to damage of the air end. ( ) Chlorine, hydrogen sulfide, sulfurous acid, highly concentrated ozone, and ammonium gases ※ Keep the spaces in the below table required for cooler-air intake, daily maintenance and overhauling. Maintenance Space Item Air-cooled type Water-cooled type A Front 1000 1200 B Right 1200 800 C Rear 1000 1000 D Left 1000 1000 40 5. INSTALLING AND PIPING THE DSP [Installing the DSP Air Compressor]
- 43. 5.4 Piping the DSP Air Compressor 5.4.1 General Instructions 5.4.2 Two-Unit Parallel Piping / Operation Stop Valve Condensate Drain Valve IMPORTANT Prevent the condensate from flowing back from the main plant airline pipe. From the DSP Main Plant Airline Pipe 500mm or more Stop Valve Motorized isolation valve (VSD only) Air Receiver Tank Stop Valve Opened Operating DSP Non-Operating DSP Closed Discharge Air Motorized isolation valve (VSD only) If you operate only one of the two or more DSPs, keep fully closed the discharge stop valve of the non-operat- ing DSP. If you operate the two DSPs alternately and automati- cally, use an electric-driven or any other automatic stop valve, one that can be automatically closed when the corresponding DSP has stopped. If you use a solenoid valve as an automatic stop valve, consult your Hitachi distributor. A motorized isolation valve is included as a standard accessory. Arrange for the motorized isolation valve to be “closed” while the compressor is stopped. If not using the motorized isolation valve, when operating one side, provide a stop valve for the dis- charge piping of the compressor that is not running and close it completely. IMPORTANT Assume that one DSP is operating and another is not. In case that the discharge stop valve of the non-operating DSP is opened, a back pressure is applied on that DSP ’s aftercooler, check valve, etc. As a result the condensate is produced much more than otherwise; even the Aftercooler is rusted internally and the check valve is earlier rusted. ① Use the degreased pipe as a plant airline pipe. ② If you connect the DSP directly to a gas pipe, use a union or flange joint to ease disassembling the DSP enclosure panels. ③ If a plant airline pipe is longer, use a larger diameter pipe taking into consideration the pressure loss through the pipe. ④ If there is a concaved or upright part in a plant airline pipe, provide a condensate drain valve at its bottom. 41 5. INSTALLING AND PIPING THE DSP [Piping the DSP Air Compressor] ⑤ Install a discharge stop valve on a plant airline pipe near the DSP. ⑥ If you want to elevate a plant airline pipe near the DSP, keep a space of 500 mm between the elevated pipe and the DSP enclosure panel to ease the main- tenance servicing. ⑦ If you connect the DSP’s discharge pipe to a main plant airline pipe, run the discharge pipe upwards and then downwards before joining to the main plant airline pipe, to prevent the condensate from flowing back. Discharge Air Stop Valve Union or Flange Joint