
Recommended
More Related Content
What's hot
What's hot (19)
Similar to Media Photoshop
Similar to Media Photoshop (20)
Recently uploaded
Recently uploaded (20)
Media Photoshop
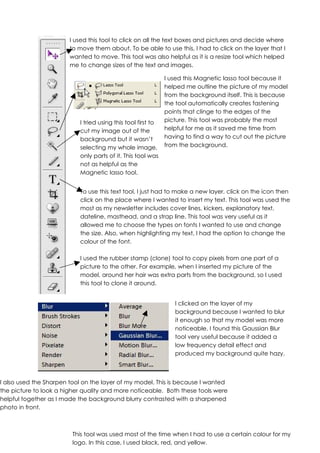
- 1. I used this tool to click on all the text boxes and pictures and decide where to move them about. To be able to use this, I had to click on the layer that I wanted to move. This tool was also helpful as it is a resize tool which helped me to change sizes of the text and images. I used this Magnetic lasso tool because it helped me outline the picture of my model from the background itself. This is because the tool automatically creates fastening points that clinge to the edges of the I tried using this tool first to picture. This tool was probably the most cut my image out of the helpful for me as it saved me time from background but it wasn’t having to find a way to cut out the picture selecting my whole image, from the background. only parts of it. This tool was not as helpful as the Magnetic lasso tool. To use this text tool, I just had to make a new layer, click on the icon then click on the place where I wanted to insert my text. This tool was used the most as my newsletter includes cover lines, kickers, explanatory text, dateline, masthead, and a strap line. This tool was very useful as it allowed me to choose the types on fonts I wanted to use and change the size. Also, when highlighting my text, I had the option to change the colour of the font. I used the rubber stamp (clone) tool to copy pixels from one part of a picture to the other. For example, when I inserted my picture of the model, around her hair was extra parts from the background, so I used this tool to clone it around. I clicked on the layer of my background because I wanted to blur it enough so that my model was more noticeable. I found this Gaussian Blur tool very useful because it added a low frequency detail effect and produced my background quite hazy. I also used the Sharpen tool on the layer of my model. This is because I wanted the picture to look a higher quality and more noticeable. Both these tools were helpful together as I made the background blurry contrasted with a sharpened photo in front. This tool was used most of the time when I had to use a certain colour for my logo. In this case, I used black, red, and yellow.