

Recommended
Recommended
More Related Content
Similar to Kriti Tolani
Similar to Kriti Tolani (20)
More from Dezyneecole
More from Dezyneecole (20)
Recently uploaded
Recently uploaded (20)
Kriti Tolani
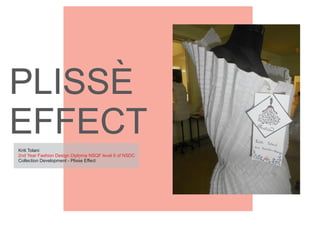
- 1. PLISSE EFFECT ` Kriti Tolani 2nd Year Fashion Design Diploma NSQF level 6 of NSDC Collection Development - Plisse Effect`
- 2. Introduction In the Design Basics subject, we got the knowledge of Elements Of Design. In which we learnt point, different types of lines, constructed geometric sh- -apes, motifs and patterns using scale and compass. All the above mentioned work is in my previous pages. After this, what we have learnt is in my subsequent pages. Earlier we work- -ed in two dimensions and now on three dimensions. We have created forms using different types of shapes like sqaure in cube and rectangle incuboid. We have created different types of folds and pleats using lines. Our organises an exhibition every year where we showcase our work and portfolios and make one collection. This years exhibition on the concept hooked, brings out the pleat work collection which in turn is going to hook the client to the customer. This time we made our collection on Plisse Effect in which design basics helped us. The knowledge of different form lead us to the silhoutte for the dress. The aesthics of geometry is used in foldings. We have devised different types of pleats and folds using lines onto the paper in our prototype development phase leading to a final selection of same into the fabric. `
- 3. identity EXHIBITION This exhibition “identity” is a student works exhibition. The students present their identity for industry and develop confidence in them by This is a platform where students get a chance to showcase their work and portfolio and get an opportunity to create their own identity. We had our this years works exhibition on 9th and 10th November. We had a lot of jury members to see our creations and a lot of students to hear us speaking, which really helped us to create our own identity Receiving feedback from judges and students as viewers is a part of the development and confidence building process learning the industry skills. and build confidence.
- 4. Plisse Effect` Plisse is a french word which means to pleat, to fold or to crease. The term encompass a variety of effects from the tiny puckers to thestraight pin tucks. For creating Plisse Effect, we had devised various types of pleats by hand using methods like furl, corrugation ruff drape, crimp, plait, gather, ruck, tuck, dart ruche or wrinkle, even plisse, smocking, shirring or ganging or one of many other specialist terms relating specifically to manipulation of fabric. In industry this is usually done by pleaters. But we had tried on small scale and one home method for creating pleats in by simply folding material and ironing or sewing to achive the desired effect ` `
- 5. Foldings Plisse Effect ` These are some papers which I had folded to give Plisse Effect. `
- 6. These are some papers which I had folded to give Plisse Effect. Plisse Effect `Forms `
- 7. My Creation On PLISSE EFFECT I had taken Pleats tesselation and mountain valley folds in my dress. 1. Mountain And Valley Fold: They are the simplest of origami folds. Every origami starts out with a valley or mountain fold. Valley fold is the crease at the bottom and the paper is folded forward into itself. The paper should form a V when you unfold. Mountain fold is the crease sits at the top like peak of a mountain when you unfold, the paper looks like a mountain. I had taken mountain and valley fold as the base of my dress. `
- 8. My Creation On PLISSE EFFECT I had taken Pleats tesselation and mountain valley folds in my dress. 2. Pleat Tesselation: Pleats is formed by a pair of adjacent parallel fold, one a mountain and the other a valley fold. Tesselations are formed by repeating a single pattern or a small set of pattern across the whole fabric. So, Pleat tesselation formed by folding a sequence of pleats parallel to edges. Paper has positive finite thickness and this folding is notflat. They can be forced into lying flat by careful application of force, but as soon as they are released, they spring back into three-dimensional shape. This behaviour is the result of locking fold. the lock consist of 2 parallel mountain folds close to edge, and keeps the pleats folded tightly at the edge. Basic Pleat Tesselation; unlocked Basic Pleat tesselation; reverse While constructing: `
- 9. 1. I had divided the square into 180×180 small squares of 1cm×1cm by mountain folds. 2. Then used the first mountain line to make a pleat downwards; the valley fold of the pleat should be about 1/3 of the grid distance away from the mountain. 3. Then folded a rightward pleat similar as before using the first vertical mountain line. 4. Then I continue pleating alternating between horizontal and vertical pleats till the end. And the last pleats in the air and not on the table(when the paper begins to curve). Technique Basic Pleat Technique
- 10. Final Dress
- 11. Thank You I would like to thank Dezyne E’cole College for providing me such an opportunity, where I was filled with thrill and energy. I am proud Dezyne E’colian.