1. My laptop does not have Photoshop or any version of it, but in high school we used a similar
editor called Paint.NET. It is a free downloadable photo editor that has many tools similar to Photoshop.
I completed two pictures on Paint.NET. One was with the help of a tutorial about Paint.NET which taught
me how to touch up a photo in ways including sharpness, brightness, contrast, saturation, etc. I used a
poor photo of a drawing I created.
Step by Step:
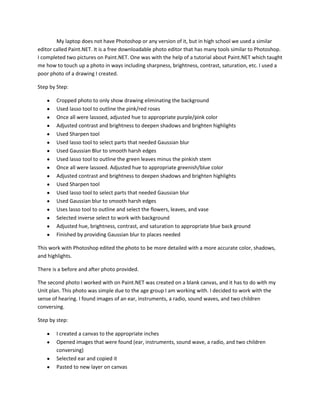
Cropped photo to only show drawing eliminating the background
Used lasso tool to outline the pink/red roses
Once all were lassoed, adjusted hue to appropriate purple/pink color
Adjusted contrast and brightness to deepen shadows and brighten highlights
Used Sharpen tool
Used lasso tool to select parts that needed Gaussian blur
Used Gaussian Blur to smooth harsh edges
Used lasso tool to outline the green leaves minus the pinkish stem
Once all were lassoed. Adjusted hue to appropriate greenish/blue color
Adjusted contrast and brightness to deepen shadows and brighten highlights
Used Sharpen tool
Used lasso tool to select parts that needed Gaussian blur
Used Gaussian blur to smooth harsh edges
Uses lasso tool to outline and select the flowers, leaves, and vase
Selected inverse select to work with background
Adjusted hue, brightness, contrast, and saturation to appropriate blue back ground
Finished by providing Gaussian blur to places needed
This work with Photoshop edited the photo to be more detailed with a more accurate color, shadows,
and highlights.
There is a before and after photo provided.
The second photo I worked with on Paint.NET was created on a blank canvas, and it has to do with my
Unit plan. This photo was simple due to the age group I am working with. I decided to work with the
sense of hearing. I found images of an ear, instruments, a radio, sound waves, and two children
conversing.
Step by step:
I created a canvas to the appropriate inches
Opened images that were found (ear, instruments, sound wave, a radio, and two children
conversing)
Selected ear and copied it
Pasted to new layer on canvas
2. Repeated this step with each image so that each was on own layer
Went to each layer and used rectangle select to select and move image to appropriate position
Selected Sound wave layer and moved under layer holding the ear to hide parts of the sound
wave
Used text to insert labels for each image as well as inserting the question on the top of photo
Flattened layers
Saved as JPEG
This photo was simple, but accomplished its purpose for children of a younger age.
Image was uploaded.