1. Setting up Argocd with SSO in Dex mode using Azure AD OIDC is a multi-step process. Here are the
high-level steps to follow:
1. Create an Azure AD Application:
Sign in to the Azure portal and navigate to the App registrations blade.
Click the New registration button and give your application a name.
Under Redirect URI, select Web and enter the URL https://<argocd-domain>/api/dex/callback.
Once the registration is complete, take note of the Client ID and Tenant ID values as you will need
them later.
2. Configure Argocd to use Dex with Azure AD OIDC:
Install Argocd: You can follow the installation instructions on the Argocd documentation site.
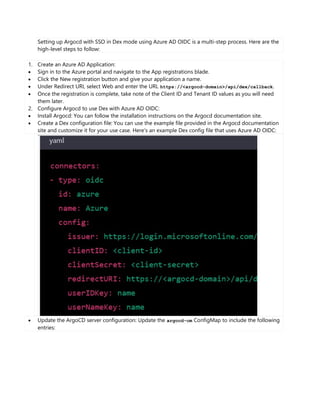
Create a Dex configuration file: You can use the example file provided in the Argocd documentation
site and customize it for your use case. Here's an example Dex config file that uses Azure AD OIDC:
Update the ArgoCD server configuration: Update the argocd-cm ConfigMap to include the following
entries:
2. Restart the ArgoCD server: Restart the ArgoCD server for the changes to take effect.
3. Verify that SSO is working:
Navigate to the ArgoCD UI: https://<argocd-domain>/login.
You will be redirected to the Azure AD login page where you can enter your credentials.
After successful authentication, you will be redirected back to the ArgoCD UI.
That's it! You have now set up Argocd SSO in Dex mode using Azure AD OIDC.
============================================================
how to setup argocd sso in azure ad with oidc method
Setting up ArgoCD with SSO in Azure AD using OIDC method requires several steps. Here's an
overview of what you'll need to do:
1. Create an Azure AD Application:
Sign in to the Azure portal and navigate to the App registrations blade.
Click the New registration button and give your application a name.
Under Redirect URI, select Web and enter the URL https://<argocd-domain>/auth/callback.
Under Implicit grant, check the box next to Access tokens and ID tokens.
Once the registration is complete, take note of the Application (client) ID and Directory (tenant) ID
values as you will need them later.
2. Configure ArgoCD to use Azure AD OIDC:
Install ArgoCD: You can follow the installation instructions on the ArgoCD documentation site.
3. Create an ArgoCD ConfigMap: Create a ConfigMap named argocd-cm that includes the following
entries:
config:
# Add the following under the `users.anonymous` section:
users.anonymous.enabled: false
# Add the following under the `url` section:
url: https://<argocd-domain>
# Add the following under the `oidc.config` section:
oidc.config:
name: Azure AD
issuer: https://login.microsoftonline.com/<tenant-id>/v2.0
clientID: <client-id>
clientSecret: <client-secret>
requestedScopes: ["openid", "email", "profile"]
requestedIDTokenClaims: {"groups": {"essential": true}}
claimsMap:
"groups": https://schemas.microsoft.com/ws/2008/06/identity/claims/groups
Note: You will need to replace <argocd-domain>, <client-id>, and <client-secret> with your own
values.
3. Configure Azure AD for ArgoCD:
In the Azure portal, navigate to the Azure Active Directory blade and select Enterprise applications.
4. Click the New application button and select Non-gallery application.
Give the application a name and click Add.
In the Overview page of the new application, click the Set up single sign-on button.
Select the Web application or API option.
In the Basic SAML Configuration section, enter the following values:
Identifier (Entity ID): https://<argocd-domain>
Reply URL (Assertion Consumer Service URL): https://<argocd-domain>/auth/callback
Download the Federation Metadata XML and save it as azure-ad-metadata.xml.
Upload the azure-ad-metadata.xml file to your ArgoCD server. You can use a ConfigMap or a secret
to store the file. Here's an example ConfigMap:
yamlCopy code
apiVersion: v1 kind: ConfigMap metadata: name: argocd-oidc-cm data: azure-ad-metadata.xml: | <contents
of your Azure AD Federation Metadata file>
4. Verify that SSO is working:
Navigate to the ArgoCD UI: https://<argocd-domain>.
Click the Login with Azure AD button.
You will be redirected to the Azure AD login page where you can enter your credentials.
After successful authentication, you will be redirected back to the ArgoCD UI.
That's it! You have now set up ArgoCD SSO in Azure AD using OIDC method.