The document provides tips and techniques for improving photo composition, including breaking the rules of traditional composition. The author includes examples of photos they have taken that demonstrate various composition techniques. Some of the techniques discussed and shown include: avoiding centering the subject; using a shallow depth of field to blur backgrounds; capturing action or movement; employing the rule of thirds; balancing elements in the frame; and leveraging colors. The author's photos show them experimenting with different angles, viewpoints, aspects ratios, and ways to create depth, balance, and emphasis using composition.
1. Breaking the Rules
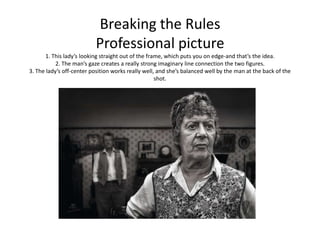
Professional picture
1. This lady’s looking straight out of the frame, which puts you on edge-and that’s the idea.
2. The man’s gaze creates a really strong imaginary line connection the two figures.
3. The lady’s off-center position works really well, and she’s balanced well by the man at the back of the
shot.
2. My Breaking the Rules
I was taking this picture of my daughter, Abigale, but when I viewed the picture on my computer I
noticed the other two kids who look like they are dancing, but they are really jumping to pose for
another picture being taken.
3. Professional Backgrounds
• Use a long focal length and
wide lens aperture to throw
busy, distracting backdrops
out of focus.
• Fill the frame-the less space
that’s taken up by an
unwanted background the
better.
• Choose your camera
position carefully, as this
will affect what’s in the
background.
4. My Background Photo
I took this picture from a restaurant on the coast using a long lens .
5. Avoid the Middle
Professional shot
• Don’t be a slave to the
“Rule of Thirds” –just get
your subject off center
• Look out for any balancing
elements in the scene, such
as this bright cave entrance
• In this image you can see
how the space on the right
(for the climber to look into)
has simplified the picture.
6. Avoiding the middle-
I chose not to center this picture so I could get a view of the boat the
water and the kids.
7. Aspect Ratio
Professional shot
• You can crop the shot
later if a subject is too tall
to shoot.
• Turn the camera and try
an upright shot to get
different and sometimes
improved results.
• Remember that your
camera’s aspect ratio
might not be the same as
the paper you print on.
8. My Aspect Ratio photo-
For this picture I turned the camera vertically and used the sport setting.
9. Action
• Even though photographs
themselves are static, they
can still convey a strong
sense of movement. When
we look at pictures, we see
what’s happening and tend
to look ahead – this creates
a feeling of imbalance or
unease if your subject has
nowhere to move except
out of the frame.
10. My Action Photo
In this shot my son is riding on a skim board very quickly. In order to
take this shot I had to focus on what is about to happen by focusing on
the skim board.
11. Depth
• Because photography is a two-
dimensional medium, we have to
choose our composition carefully to
conveys the sense of depth that
was present in the actual scene.
You can create depth in a photo by
including objects in the
foreground, middle ground and
background. Another useful
composition technique is
overlapping, where you
deliberately partially obscure one
object with another. The human
eye naturally recognises these
layers and mentally separates them
out, creating an image with more
depth.
12. My example of depth
In this picture you can see the human subjects, but the clouds show the depth of the
picture
13. Viewpoint
• Before photographing your
subject, take time to think about
where you will shoot it from. Our
viewpoint has a massive impact
on the composition of our
photo, and as a result it can
greatly affect the message that
the shot conveys. Rather than just
shooting from eye level, consider
photographing from high
above, down at ground
level, from the side, from the
back, from a long way away, from
very close up, and so on.
14. View Point-
My photo using view point was taken from the second floor of a beach house looking down at the
girls.
15. The Rule of Thirds
• The Rule of Thirds means that the
frame can be divided into three
horizontal sections and three
vertical sections and
therefore, where the horizontal
and vertical lines intersect makes
an ideal location for the more
important parts of your picture.
By locating your main subject at
one of the four intersections you
give the subject more emphasis
than if it was right smack in the
middle of the picture.
16. My example of Rule of Thirds
If you cut this picture into thirds you would find my daughter and he friend in the in
the vertical and horizontal intersects.
17. Balance
• The problem with following the
rule of thirds rule is that it can
leave you with a strong focus point
on one side of your shot and a big
empty space on the other so, to
improve this, see how you can add
a secondary point of interest that's
less important to balance your
shot. This could mean moving an
object (if you can), cropping in by
zooming in with your lens or with
the crop tool in your editing
software or by moving your feet to
find a different angle.
18. My Balance photo
In this picture the subjects (my son and daughter) are in balance
with the scenery
19. Colors
• Colors are what add heart and
emotion to your pictures. Certain
color configurations can inspire
awe and amazement in onlookers.
Colors can be used to add all sorts
of accents and effects, but you
must be careful to not draw
attention away from the main
subject.
•
• It might not be a bad idea to keep
these key terms with you when you
practice taking pictures. The best
way to learn and improve your
composition is just lots of practice
and experimenting.
20. My example of Colors
This pictures shows the deep rich colors of rocks and stones at a playground
by my house. The playground in covered in these types of rocks.