
Recommended
Recommended
More Related Content
Similar to Getting Ready for Your Visualization Project
Similar to Getting Ready for Your Visualization Project (20)
Recently uploaded
Recently uploaded (20)
Getting Ready for Your Visualization Project
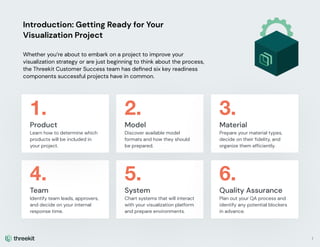
- 1. Introduction: Getting Ready for Your Visualization Project Whether you’re about to embark on a project to improve your visualization strategy or are just beginning to think about the process, the Threekit Customer Success team has defined six key readiness components successful projects have in common. 1. Product Learn how to determine which products will be included in your project. 2. Model Discover available model formats and how they should be prepared. 3. Material Prepare your material types, decide on their fidelity, and organize them efficiently. 4. Team Identify team leads, approvers, and decide on your internal response time. 5. System Chart systems that will interact with your visualization platform and prepare environments. 6. Quality Assurance Plan out your QA process and identify any potential blockers in advance. 1
- 2. Part 1: Product Readiness In our first section on product readiness, we're going to help you think about your product catalog. We'll walk you through priming your product data for your project and help you strategize about how you'll want to organize your products. Things to Consider Which products will be included in your initial project? Phases 2 and 3, if applicable? There is likely a business reason you are including specific (or all) products in your project – this reason should be top of mind when you are working to build your configurator. Since most companies have a limited budget for 3D assets, come prepared with a list of products you would like to include in the first phase of your implementation and a clear list of metrics to measure success. Example: A sporting goods company that sells hundreds of products may decide they initially only want to create customizable 3D models for their helmets, which are often worn by professional athletes, in order to grow awareness of their brand. Later, they may reevaluate their catalog and find other products that would benefit from customization. 1. Product Selection Some products are inherently better suited for a digital visual experience. Here are some top reasons to select a specific product. Production costs are high If you have a product that incurs substantial costs for photography or product production, visualization can help reduce the shipping, studio, and build costs. A product is configurable Customers want to customize their products and see their configurations before purchase. Customers care about fit If size is a concern for your customers during the shopping process (e.g. suitcases that have to meet size requirements), AR can help customers literally place a product in space. 2
- 3. What is your current product structure? Are there components that remain static? Take a look at your product plans and highlight every part of your product that will be configurable. Are there parts that can be configured but that will not feature in your 3D model? Make a list of all parts and/or components, separating out configurable and static parts. Example: A company that makes customizable footwear may include the same sole in all of its shoes regardless of other interchangeable features, which streamlines the design process for the sole component. Does every part of your product need to be designed in 3D? Oftentimes, products may have hidden configurable features that have no impact on the final 3D model during configuration – think linings, stuffings, internal components, etc. Example: A furniture manufacturer may want to offer different stuffing options for their couches and would like to include the options in their eCommerce configurator but not change the 3D model visually during customization. 2. 3. 3
- 4. Do you have a comprehensive list of SKUs or do you need to export and organize them in advance? Think about where you currently manage your SKUs. Whether it's an Excel spreadsheet, a CPQ/ERP system, or a random Google document that hasn't been updated in six months, this is a great time to revisit your list if it needs to be reorganized and renamed. How many levels of configuration does your product require? Now that you've made a list of your parts, determine how many separate steps you want your end user to take in order to configure your product. Listing out the steps can help you organize your product list and materials, which will save you time on importing and tagging products and parts. Download our configuration workbook to help you build out your configurator 4. 5. Configuration Workbook Did you know? The Threekit platform will organize your imported assets by the name predetermined in your import structure, so make sure you include any information you need to find assets easily. 4
- 5. Part 2: Model Readiness In this section, we are going to discuss your existing models and reference images and review model creation, formats, and storage. Definitions Before we jump into discussing models, let's review what we mean by specific terms. You can review our 3D Dictionary for the full list. Material The physical nature of a configurable part. This can refer to things such as color, texture, metallic nature, or glow. This does not refer to anything that changes the underlying shape of a part (see: 3D Asset). 3D Model Any individual model that will be referenced as part of a product being configured. Depending on the complexity of the product, this asset may represent the entire product or a single configurable piece. Resource Links THREEKIT 3D and AR Dictionary 5
- 6. Things to Consider Do you currently have 3D models or will they need to be created from scratch? Most 3D teams can help you create assets from reference photographs, CAD files, and/or 3D/polygon files, but it is helpful to know whether you have existing models before you begin your project. Even if you have existing 3D models available, many 3D artists will still want to evaluate at least one sample before project kickoff to determine the complexity of the geometry, lighting, and materials. 3D models can vary depending on your visual preferences and project investment, so it's important to determine what is best for your budget and desired final output. If your goal is to render photorealistic images of a suit or sofa, for example, your expectation of visual quality may be different than a company who wants a custom workstation configurator for the purpose of showcasing the thousands of custom-built options they offer without needing to display every add-on with photorealistic 3D. 1. Mesh Matters All 3D models have a mesh, the structural build of a model. Adding polygons to a mesh adds details to a model; however, this often creates a performance tradeoff, especially online. 6
- 7. What is the existing format for your models, e.x. CAD (STEP, IGES), 3D/polygon (FBX, gITF, USDZ), etc.? Depending on your existing model format, a 3D team may need to complete more or less work to convert the models into web-enabled visual assets. The Threekit platform, for example, supports FBX, gITF, and USDZ imports for both configuration and ray tracing and rendering. CAD files, including STEP and IGES file formats, are often used in sectors that require precise representation of curves and shapes. Unlike 3D/polygon file formats, CAD files do not convey material, lighting, or texture information when converted to a 3D/polygon file. They can still be useful references for 3D models, however, and are often a good starting point if you have them available. Photographs are helpful in referencing product appearance and available colorways, but will require an artist to build the 3D model from scratch to make it usable in a 3D format if no other visual files are available. Depending on your final output plans, having 3D/polygon files on hand will usually get you a head start in terms of product modeling, as they will already include basic geometry, dimensions, and materials. For more technical information on 2. 3D CAD Photograph 7
- 8. the benefits and challenges of each type, our founder Ben has a series titled "Ben Houston's Ultimate Guide to 3D File Formats," which provides comprehensive overviews of FBX, gITF, OBJ, and USDZ file types. Where are your models currently stored and how are you planning to share them with your visualization platform? Depending on how you've set up your models, you may have specific naming, organization, and security systems in place. It's important to decide on a mutually accessible location for your assets and any additional components (materials, for example) in advance of your project. In particular, think about the following: • How large are your asset files and are there size restrictions for the storage option you've chosen? • Are there security protocols and processes you need to clear before sharing the files with a project partner? • If a 3D artist is altering existing files, what is your plan for updating your current files once the project is complete? 3. 8 Resource Links THREEKIT Ben Houston's Ultimate Guide to 3D File Formats
- 9. Part 3: Material Readiness In part 3 of our "Getting Ready” series, we will talk about material prep. We will help you organize your proprietary materials, give you guidelines on delivering your materials in their current format, and help you decide on material fidelity. Things to Consider Do you have any custom proprietary materials (woodgrain, fur, leather, custom patterns, etc.)? While there are some materials that are readily available online references for 3D artists, proprietary materials are often more time-consuming to create. If you don't already have a visual catalog of materials, start by creating a spreadsheet that organizes materials by type. Generally, glass, plastic, and some metals can be created from images available online, whereas specific woods, fabrics, and custom patterns will need to be scanned and generated by a 3D artist from scratch. Breaking out your material swatches by category will help your scoping team better determine the amount of work involved in your project. 1. Scalable Texture A 3D artist can easily find a scalable fabric texture, like this one, online to use as a material. Custom Texture A 3D artist had to manually create the above custom texture for a plastic chair, taking substantially more time and resources. 9
- 10. Are your materials available as digital swatches? You may already have digital swatches of your fabrics on hand, which can save you hundreds of hours on your implementation in both scanning and digitally rendering materials. To ensure optimal quality, your files should be 2700x2300 pixels at 300 dpi. If you have files at a lower-quality resolution, reach out to your scoping team to determine whether these files will still work for your use case. Are you able to provide physical samples? If you do not have digital files, or if your digital files do not meet the quality guidelines below, your implementation team will need to scan your materials in order to create 3D assets from the scans. Getting swatches or materials to your implementation team can sometimes be more time- consuming that anticipated. Consider the following: • Do you currently have all of your materials in-house and are they easy to transport? • Did you include budget for shipping materials and/or swatches for scanning? 2. 3. 10 DPI DPI or “dots per inch” is a measurement of how many dots fit into a linear inch. 3D artists zoom into a reference image in order to see minor details for modeling. Below are two images at different DPIs – the right one become blurry and makes modeling difficult. Resource Links TECHTERMS DPI
- 11. • Are some or all of your swatches located in an offsite facility? Who do you need to contact to ensure those materials arrive at the scanning site in a timely fashion? • Do you need approval to ship materials offsite? • What is your material refreshment lifecycle? Will you be able to complete this project before the next batch of materials is released? • Do you know where you need to send your materials? Have you compiled and saved your materials in a readily- identifiable naming convention? Whether you are generating materials in-house or are working with a third-party designer, think about the current organization structure – are you receiving a folder with arbitrary numbers or SKU numbers that provide little reference to the final material itself? Providing a clear organization structure can majorly streamline your implementation. If you are generating a bill of materials (BOM) based on part SKUs, you may need need to maintain a SKU structure for your material files. In that case, provide a spreadsheet that lists out your SKUs, their corresponding materials, and ideally, a link to the folder where the corresponding material file exists. 4. 11
- 12. If you have more flexibility with your organization structure, you might consider simply creating folders with each material by type. If you are completing your implementation in phases, you can prioritize your materials by their respective implementation deadlines and organize by type within these date folders. Will all of your materials need to have the same fidelity and 3D representation? When creating a model, some materials may be in a hard-to- see part of the model or, conversely, require more attention to convey specific details. A Threekit apparel client recently added a configureable suit option with professional team logos emblazoned on the linings. Because customers had to be able to zoom in on these logos to see pattern details, the images for this line needed to be more detailed than the standard single-color linings we created for the company's initial offering. Below are some additional considerations around quality: • Do materials show up in parts of the model that are hard to see? If so, are you comfortable having the 3D team spend less time on these components? When Details Matter A Threekit apparel client provides an in- store customer configuration experience by showing lining upgrades for their suits to potential clients. They opted for high- detail modeling for their custom linings and measured a 30% increase in upsells. 5. 12
- 13. • Are there some materials on the model that matter less in quality, e.g. inside apparel shots, mechanical components, etc.? • Do you have premium materials that need higher fidelity to show specific details or finishes? • Can you stagger materials so they are released at a later date to allow for budget timing? 13
- 14. Part 4: Team Readiness Now that we've reviewed the product, model, and material prep requirements, we're turning our attention to the team managing your project. Today, we'll make sure you have the right individuals assigned to manage the project and provide insight into project success and adoption. Things to Consider Have you identified a project lead and relevant Subject Matter Experts (SMEs)? How much experience does your lead have with 3D/AR projects? Most projects begin with the assignment of a Project Manager (PM). PMs evaluate the budget, assign resources, and act as your main point-of-contact during your implementation. Subject Matter Experts (SMEs) can either work at your company or be a part of a contracted team. They have specialized knowledge that will be relevant to some portion of the project, whether it's the 3D assets themselves or the website integration you will need to undertake as part of the final product rollout. 1. 14 Resource Links THE BALANCE CAREERS What is a Subject Matter Expert?
- 15. Relevant SMEs for a visualization project might include: • 3D or digital artists • Members of the eCommerce team • Internal or external product experts and designers Do you have a clear internal approval structure for the project? Approvals can often be one of the bottlenecks in a project, particularly if you have not cleared the appropriate internal hurdles before the project kicks off. Let's say you expected your project manager to have the ability to approve a 3D design. However, six weeks into your project, you realize that you also need the internal pattern team's approval of 3D model quality on all models – this will likely impact your timeline. To streamline the approval process: • Ensure you have clear internal guidelines on who will be approving your 3D models/images. • Determine whether any of the individuals required for approvals will be out-of-office or on other high-priority projects during the weeks planned for approval. 2. 15 Approval Plan An approval plan can seem simple, until you realize you need additional input half- way through a project. Designate your structure before your project starts. VP of Product Digital Director Head of Design 3D Artist
- 16. • If you realize you do need to bring in another team, let your Threekit project manager know as soon as you find out so they can adjust your project timeline. Be realistic about the time the project is dependent on your feedback. When an external project manager scopes a project, they are making some assumptions about the time it will take your team to provide materials, reference images, configuration requirements, and other key project details. In order for a project to kick off on time and subsequently progress on schedule, both teams need to stick to project milestones or risk impacting the eventual go-live. A simple spreadsheet can help you track whether your team is providing feedback and required materials on time. It's worth investing a little upfront time to check for inefficiencies in your process so you can resolve them before they become an issue for the project timeline. • Who will be managing the platform & products once the implementation is complete? • Do you have somebody on staff who understands how to add new products, upload models, and render them (if necessary)? If not, do you have the budget to hire an external partner or undertake additional project scope 3. 16
- 17. every time you need to make changes? • You should have a sense of this process and budget before you even sign the Statement of Work (SOW) for your current project; otherwise, you might be taking on substantial tech debt before you complete your new initiative. Who will be supporting the change management process post-implementation? If your project impacts specific teams or individuals on those teams, have you discussed training and support for those team members as part of your project SOW? Is this something you want to undertake internally, and if so, do you have a rollout and adoption plan as part of your internal project checklist? There is nothing more disappointing than completing a project (especially if it's a substantial investment) and not having team buy-in. A good strategy is to bring in early adopters during the implementation process for feedback and eventual testing. Getting key performers excited about a novel technology that will help them increase revenue, whether online or in-store, can really help adoption and visibility to your project. 4. 17 Resource Links PROSCI What is Change Management and How Does it Work?
- 18. Part 5: System Readiness In part five of our six-part series on project readiness, we're going to help you think about the systems that are a part of your visualization strategy. We will discuss your existing data streams and provide recommendations for identifying the steps you need to take to ensure your data is primed for deployment. Things to Consider Are any 3rd-party systems involved/required? If you are considering a more comprehensive visualization solution, it helps to make a flow chart of the systems involved. Here are some common data sources to consider when drawing out your necessary integrations: • Creative Inputs: • Model & Material Import: do your 3D assets begin their lives outside of your visualization platform? • 3D Design Tools: do you use a separate set of 3D design tools for your models? Are you importing CAD files instead of web-ready 3D asset files like WebGL? 1. 18
- 19. • Commercial Inputs: • Product Catalog: do you have an existing product catalog? What system does it use for identifying products and parts? Is your product catalog up-to- date? • ERP & CPQ: do you have pricing that is updated elsewhere and needs to be incorporated into the configurator? Is your pricing up-to-date? • Spreadsheets: are you using spreadsheets to manage your order data? How will you be tracking whether the necessary products have been imported into your visualization platform? • Outputs: • External Outputs (In-Store Demos/Kiosks, Mobile App, Print): does your configuration need to send data to an external or proprietary system? • Bill of Materials (BOM): will you need to send BOM data to an external system to manufacture the product? • Marketing: does your marketing team need to be able to access customer configuration data in order to follow up with them about their order? 19
- 20. Do you have a dedicated testing process before pushing to production? The recommended best practice for any digital project is to have a designated test process in place before finalizing changes or updates to live configurations, which often requires managing both a test instance and a live production site. Some companies choose to push their changes from testing to production on a regular cadence (Threekit, for example, pushes changes live from our test site every Wednesday), and some companies opt to only publish changes once they’ve completed a testing checklist. 2. 20
- 21. Whichever method you choose to manage your company’s updates, make sure you designate a timeline, process, and owner for this process in advance. Will your visualization project team need access to these systems, and if so, can it be easily provided? If you are working with a visualization project team to develop an integration with some or all of the aforementioned systems, specific team members may need access to each system. If this access will need to come from another team or department, make sure you have the appropriate permissions to provide access and will not need to wait for a formal request to be completed. Many SaaS platforms and products enable companies to provide temporary access to their respective instances or organizations for a set period of time – this can be particularly useful for project access. Will any data need to be cleaned up prior to project kickoff? Having incomplete or redundant data can create some major delays for your project; it should, therefore, be a top priority to clean up any data systems impacting your configurator prior to project start. 3. 21 Temporary Login Access Click on a logo below to learn about granting temporary access on each respective platform. Saleforce CRM, Commerce Cloud, CPQ Magento eCommerce Shopify eCommerce
- 22. Some of the top data streams you will want to verify include: • CPQ and/or Product Catalog Data: if you plan to use these systems as inputs into your visualization platform, avoiding redundancies or product misalignment prior to the initial setup will be particularly important. As time- consuming as this data cleanup can be, now is the time to ensure your data is squeaky clean. • CMS/Model Data: make sure you build out a clear workflow for model import. Even if you are simply storing models in shared folders outside of a formal CMS, ensure they are labeled and you have a clear method for knowing if they have already been imported/processed by your visualization platform. • Material Libraries: ensure your material libraries are well- labeled/tagged and up-to-date with the latest version. 22
- 23. Part 6: Quality Assurance In the final part of our six-part series on project readiness, you will learn about best practices for approvals and User Acceptance Testing. We will review creating an approval chain of command, agreeing upon an approval timeline, and making sure that everyone on your project team is onboard with your model quality standards. Things to Consider Will you have a clear chain of command and internal process designated for QA approvals? Before your project kicks off, you need to sit down with your internal project team and determine your approval matrix. This matrix should include the chain of command for approving models, materials, UI, and configurations and list out the various teams who will need to provide timely input in each of these project scope areas. If you have products with different levels of complexity, make sure you determine how the approval matrix needs to change in order to accommodate your needs. For example, a furniture company might simultaneously be working on a sofa model and seasonal fabrics for their project. Perhaps the sofa requires four levels of approvals, but the fabrics only need to 1. 23
- 24. be approved by two individuals. Ensure your matrix reflects this. Threekit simplifies the approval process by including a built-in approval module in the platform; this allows your team to build, review, and approve/reject models and materials directly from the platform itself. Do you have an agreed-upon response time for your QA process? In order for any project to proceed in a timely manner, there should be a predetermined timeline for systematic approvals. Many project managers will actively build these approvals into their schedule, but it is the client’s responsibility to ensure that your team is approving materials on time. Go through your approval matrix and identify potential time blockers in advance of your project – will Joe, the VP of Product, be going on a month-long vacation when you are expecting to approve the model designs? Make sure you either have a delegate in place of Joe or you are comfortable with a month-long delay in your project proceeding. There are existing project best practices around feedback: Threekit builds a three-day response time into our QA process, which we can modify in the case of a more complex build or approval structure. 2. 24 Threekit Approval Module
- 25. Does everybody on your team agree with the expectations around visual quality for all parts of your model? We discussed model readiness in the first part of this series and it is critical that all of your project team members understand and agree on the quality of your model parts before project start. The matrix on the next page highlights how quickly model complexity, quality, and existing asset files can quickly impact your project scope and budget. If your VP of Marketing expects photorealistic images at the end of your project and you planned on created web-ready 3D assets instead, you could be in for a substantial surprise during the approval process. Do you have well-defined use cases and related scripts for User Acceptance Testing? There are generally two methods for User Acceptance Testing (UAT): use cases and user stories. Whichever one you decide to use for testing, your team should define end-state, click- by-click test scripts and communicate these to your project manager, ideally when you send over your configuration and UX/UI requirements. 3. 25 4. Resource Links VISUAL PARADIGM User Story vs Use Case
- 26. 26 Stock 1.25 hours .5 hours .5 hours CAD 8.75 hours 3.5 hours 3.5 hours Scratch 10 hours 4 hours 4 hours Stock 1.75 hours 1 hours 1 hours CAD 12.25 hours 7 hours 7 hours Scratch 14 hours 8 hours 8 hours Stock 3.5 hours 3 hours 2 hours CAD 24.5 hours 21 hours 14 hours Scratch 28 hours 24 hours 16 hours Sizing & Complexity Chart Resources THREEKIT Services Scoping Algorithm