
Recommended
More Related Content
Similar to Práctica 1 a 7 m bot ingles
Similar to Práctica 1 a 7 m bot ingles (20)
Recently uploaded
Recently uploaded (20)
Práctica 1 a 7 m bot ingles
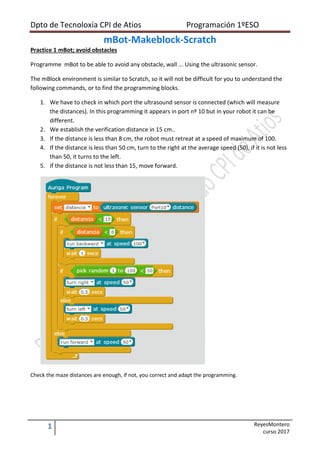
- 1. Dpto de Tecnoloxía CPI de Atios Programación 1ºESO mBot-Makeblock-Scratch 1 ReyesMontero curso 2017 Practice 1 mBot; avoid obstacles Programme mBot to be able to avoid any obstacle, wall ... Using the ultrasonic sensor. The mBlock environment is similar to Scratch, so it will not be difficult for you to understand the following commands, or to find the programming blocks. 1. We have to check in which port the ultrasound sensor is connected (which will measure the distances). In this programming it appears in port nº 10 but in your robot it can be different. 2. We establish the verification distance in 15 cm.. 3. If the distance is less than 8 cm, the robot must retreat at a speed of maximum of 100. 4. If the distance is less than 50 cm, turn to the right at the average speed (50), if it is not less than 50, it turns to the left. 5. If the distance is not less than 15, move forward. Check the maze distances are enough, if not, you correct and adapt the programming.
- 2. Dpto de Tecnoloxía CPI de Atios Programación 1ºESO mBot-Makeblock-Scratch 2 ReyesMontero curso 2017 Practice 2 mBot; playing with the colours of light (LED) The 12 RedGreenBlue LEDs of mBotRangerson are very cool, they are placed in a circle. Each RGB LED can be programmed to control the brightness of the three colours (red, green and blue) and combine these three colours to produce different colours of light. Now, we will learn how to control the RGB LEDs with blocks: The Auriga board of mBot contains 12 LEDs. If we choose the option "all" we can control the colour of the 12 LEDs. If we selected a number "2" we could control the colour of the LED number 2. The minimum value of light is "0" and the maximum light is 255. 1. You can try different values for the Red, Green and Blue and observe what colour comes out. 2.Do you find out what color comes up by putting the next block? If we want to change colour, we will have to add some waiting time (0.5 seconds) to be able to observe it. You can also put a different colour for each LED. 1. Now we programme the following algorithm: 2. Next, design your own colour sequence. When you finished, save it with the name programme-Practice2. playing with colors and upload the Virtual Classroom.
- 3. Dpto de Tecnoloxía CPI de Atios Programación 1ºESO mBot-Makeblock-Scratch 3 ReyesMontero curso 2017 Practice 3.- Produce music with mBot With this simple program, the robot plays different notes and repeats them twice. Could you programme the robot to play a simple song? For example Beethoven's "Ode to Joy". • Note the letters to identify musical notes (Do = C = D Re, Mi = E, F = Fa, Sol = G, A = A, B = Si) • The number corresponds to the scale (1,2,3,4,5) • The pulse corresponds to the duration (Minim = 2, Quarter note = 1, Quaver= 1/2, Semiquaver = 1/4, Demisemiquaver = 1/8)
- 4. Dpto de Tecnoloxía CPI de Atios Programación 1ºESO mBot-Makeblock-Scratch 4 ReyesMontero curso 2017 Practice 3.1.- We program the song of "happy birthday" With this program, repeated continuously (cyclically) a sequence (forever) 1. Turn on all LEDs in red 2. Play different notes 3. Wait 0.4 sec 4. Turn on the LEDs in green 5. Repeat notes 6. Wait In the table below, there is an equivalence of notes and sound frequencies, the higher the frequency, the acute the sound. DO RE MI FA SOL LA SI NOTA C2 D2 E2 F2 G2 A2 B2 Frecuencia Hz 65.4 73.4 82.4 87.3 98.0 110.0 123.5 NOTA C3 D3 E3 F3 G2 A3 B3 Frecuencia Hz 130.8 146.8 164.8 174.6 196.0 220.0 246.9 NOTA C4 D4 E4 F4 G4 A4 B4 Frecuencia Hz 261.6 293.6 329.6 349.2 392.0 440.0 493.9 NOTA C5 D5 E5 F5 G5 A5 B5 Frecuencia Hz 523.2 587.3 659.3 698.5 784.0 880.0 987.8 NOTA C6 D6 E6 F6 G6 A6 B6 Frecuencia Hz 1046.5 1174.7 1318.5 1397.0 1568.0 1760.0 1975.5 NOTA C7 D7 E7 F7 G7 A7 B7 Frecuencia Hz 2093.0 2349.3 2637.0 2793.8 3136.0 3520.0 3951.1 NOTA C8 D8 E8 F8 G8 A8 B8 Frecuencia Hz 4186. 0 4698.6 5274.0 5587.7 6271.9 7040.0 7902.1
- 5. Dpto de Tecnoloxía CPI de Atios Programación 1ºESO mBot-Makeblock-Scratch 5 ReyesMontero curso 2017 Practice 4.- The mBot follows the light of a flashlight To the left and right of the LED ring, the robot has two light sensors (LDR) "ligth_sensor 1" and "light_sensor2" First of all we must calibrate or test the ambient light of the room where we are, and also when we approach the light of a flashlight. We will use the following command ; For this program to work, you must restore the default software on mBotRanger Connect menu - Restore the default program - mBotRanger Once the ambient light has been checked, we must programme it to follow the lantern light, which should be higher than the one set for ambient light. • If light is detected >200 by the right sensor, then it turns to the right, and it plays a sound. • If light is detected >200 by the left sensor, then it turns left and plays another sound different. • If it does not detect light >200 then it moves forward. Now you: Try changing the values of the light sensor because this programme works in the dark. If you do not get darkness in the room, you are able to get dark you must change the values of the light sensor to values higher than what you originally measured.
- 6. Dpto de Tecnoloxía CPI de Atios Programación 1ºESO mBot-Makeblock-Scratch 6 ReyesMontero curso 2017 Practice 5.- mBot follows a line With the module "follow-lines" we can get the robot to move along a black line on a white surface or vice versa. This sensor is placed at low side front of the robot. This sensor consists of 2 electronic components: an LED that emits light and a PHOTOTRANSISTOR IR (photodiode) that receives the reflected light signal. The black surfaces reflect little light. The white surfaces reflect a lot of light. Let's create a variable (black_line); the value sent by the sensor may be (0,1,2,3) • If the value is = 0 then it is on the black line, and it will continue straight. • If the value is = 1, then it does not detect the line with the right sensor, and it must rotate to the left. • If the value is = 2 then it does not detect the line with the left sensor and must rotate to the right. • If the value is = 3, does not detect the black line with any sensor and must backtrack. • The speed must not be too high, so that it does not get out the path (80) and we will adjust. Now you: How would the programme be if we want to follow a white line on a black background?
- 7. Dpto de Tecnoloxía CPI de Atios Programación 1ºESO mBot-Makeblock-Scratch 7 ReyesMontero curso 2017 Practice 6.- We measure the temperature with mBot The board of our mbot contains a temperature sensor that offers analog measurement of temperature in the range of approximately - 40 °C to +125 °C. (-40ºF to 275ºF) This is a NTC thermistor. The thermistor bases its operation on the variation that suffers the resistance of the semiconductor material whena change in temperature occurs. It NTC (NegativeTemperatureCoefficient), the strength of the semiconductor decreases with increasing temperature. We will use the following command; In the following example we will schedule to show us on the makeBlok screen of the computer, at room temperature at three different temperature ranges: Fahrenheit, Celsius and Kelvin. To do this, we create three variables (temperature in ° C, ºK and ºF) that are associated with each of the scales • Direct measurement in ºCelsius (Centigrade) • Measurement in degrees Kelvin = ºC + 273 The "penguin" object will tell us every 6 seconds, the numerical value of the temperature (approximate value using the rounding function) on the three scales. The programme would look like this: In order for this program to work, you must restore the default software to mBotRanger Connect menu - Restore the default program - mBotRanger