SlideShare a Scribd company logo
1 of 6
MICROMETER
The micrometer is divided from two greek words. Micro means small or little and meter
means a measurement. It is easily understood that the word micrometer means, it is an
instrument made to measure the length or diameter of a piece of job within an accuracy of 0.01
mm.
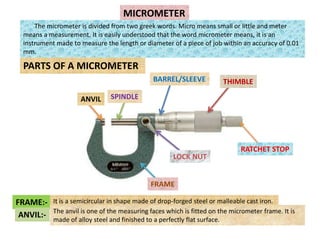
PARTS OF A MICROMETER
THIMBLE
BARREL/SLEEVE
LOCK NUT
FRAME
ANVIL SPINDLE
RATCHET STOP
FRAME:- It is a semicircular in shape made of drop-forged steel or malleable cast iron.
ANVIL:- The anvil is one of the measuring faces which is fitted on the micrometer frame. It is
made of alloy steel and finished to a perfectly flat surface.
SPINDLE:-
BARREL/SLEEVE:-
THIMBLE:-
RATCHET STOP:-
LOCK NUT:-
One end of the spindle is the measuring face. The other end is threaded and
passes through a nut. The threaded mechanism allows for forward and backward
movement of the spindle.
The barrel or sleeve is fixed to the frame. It is a hollow piece of steel heaving
internal threads on some length. The datum line and graduations are marked on
this.
This is a hollow cover rigidly fixed to the spindle when the thimble is rotated the
spindle rotates. The bevelled edge of the thimble is divided into 50 equal circular
divisions.
The ratchet stop ensures a uniform pressure between the measuring surfaces
The lock nut is used to lock the spindle at a desired position.
WORKING PRINCIPLE:-
The micrometer works on the principle of screw and nut. The longitudinal movement of the
spindle during one rotation is equal to the pitch of the screw. The movement of the spindle to the
distance of the pitch or its fractions can be accurately measured on the barrel and thimble.
GRADUATIONS:-
In metric micrometers the pitch of the spindle thread is 0.5 mm.
There by, in one rotation of the thimble, the spindle advances by 0.5 mm.
On the barrel a 25 mm long datum line is marked. This line is further graduated in to
millimeters and half millimeters ( i.e, 1 mm & 0.5 mm. The graduations are numbered as 0, 5, 10,
15, 20 & 25 mm.
The circumference of the bevel edge of the thimble is graduated into 50 divisions and marked
0, 5, 10, 15, 20, 25, 30, 35, 40, 45, & 0 in clockwise direction.
LEAST COUNT OF METRIC MICROMETER:
In one complete rotation of the thimble, the spindle is forward or backward 0.5 mm.
The circumference of the bevel edge of the thimble is graduated into 50 divisions.
So value of one division of thimble is 0.5/50 = 0.01 mm.
RANGES OF OUTSIDE MICROMETER
Outside micrometers are available in ranges of 0 to25 mm,25 to 50 mm, 50 to 75 mm, 75 to 100
mm, 100 to 125 mm & 125 to 150 mm. It is specified by the minimum and maximum dimension
which can be measured by it.
For all ranges of micrometers, the graduation marked on the barrel is only 0 - 25 mm
A test piece is given for testing of minimum capacity of micrometer
READING OF MICROMETER MEASUREMENTS
Show the reading 33.12 mm
At first note the minimum range = 25.00 mm
No of division above datum line = 8 =8x1 mm = 8.00 mm.
No of thimble division in line with the barrel datum line= 12x 0.01 = 0.12 mm.
TOTAL READING = 33.12 mm
SHOW THE READING 5.78 mm
At first note the minimum range (0-25 mm) = 00.00 mm
No of division above datum line = 5 =5x1 mm = 5. 00mm.
No of thimble division in line with the barrel datum line= 27x 0.01 = 0.28 mm.
No of division below the datum say 1 , 1x0.5 mm = 0.50 mm
TOTAL READING = 5.78 mm
A) POSSITIVE ERROR:-
B) NEGATIVE ERROR:-
ERRORS IN MICROMETER -
When the faces of the anvil and the spindle contact closely, the
datum line and the zero of the thimble must coincided. If the thimble
does not, it is sure that the micrometer has got some error.
There are two kinds of errors such as -
While the faces of the anvil and spindle are in contact, the zero on
the thimble does not reach the datum line. The number of divisions
requires to line up, that number of divisions is called positive (+) error
The zero line on the thimble passes over the datum line at the
time of measuring faces are in contact. The number of divisions
passes over the datum line is called negative (-) error.
VERNIER MICROMETER:-
In ordinary micrometers we can measure to an accuracy of 0.01 mm. But in vernier micrometers
we can measure to an accuracy of 0.001 mm.
Vernier micrometers are similar to ordinary micrometers in construction but additional vernier
graduations given above the datum line.
There are 10(ten) such vernier graduation lines marked parallel above the datum line.
The sapce between these 10lines is equal to 9 divisions in the thimble.
The value of 10 vernier division is = (0.01x9) = 0.09 mm
The value of one vernier division =0.09/10 mm =0.009mm
The least count = 1 thimble division -1 vernier division = (0.01 -0.009) mm = 0.001 mm.
Show the reading in vernier micrometer 5.783mm
Range of micrometer is 0 t0 25 mm
Full mm division visible on the barrel =5x1mm=5.00mm
Half mm division visible after the full mm division
=1x0.5mm=0.50mm
Thimble division below the datum line =28x0.01mm=0.28mm
Vernier division coinciding with thimble =3x0.001mm =0.003mm
Total reading=5.783mm

More Related Content

Similar to MICROMETER (PPT).pptx

Ch 25 measurement of lines & surfaces
Ch 25 measurement of lines & surfacesCh 25 measurement of lines & surfaces
Ch 25 measurement of lines & surfacesNandan Choudhary
 
Micrometer screw gauge
Micrometer screw gaugeMicrometer screw gauge
Micrometer screw gaugeAmol Kumbhar
 
Mechanical Engineering Technical Interview Q & A Metrology and precision inst...
Mechanical Engineering Technical Interview Q & A Metrology and precision inst...Mechanical Engineering Technical Interview Q & A Metrology and precision inst...
Mechanical Engineering Technical Interview Q & A Metrology and precision inst...Er. Bade Bhausaheb
 
Manufacturing process lab lecture 2
Manufacturing process lab lecture 2Manufacturing process lab lecture 2
Manufacturing process lab lecture 2JGarner4
 
Linear measurements
Linear measurementsLinear measurements
Linear measurementsMamta Patel
 
Metrology and Quality Control.pptx
Metrology and Quality Control.pptxMetrology and Quality Control.pptx
Metrology and Quality Control.pptx138HemangiAhire
 
17036 vernier caliper and micrometer
17036 vernier caliper and micrometer17036 vernier caliper and micrometer
17036 vernier caliper and micrometerEshank Gupta
 
work shop1.pptx
work shop1.pptxwork shop1.pptx
work shop1.pptxAsheMathew
 
Geometrical Tolerancing in Practice by Jenoptik
Geometrical Tolerancing in Practice by JenoptikGeometrical Tolerancing in Practice by Jenoptik
Geometrical Tolerancing in Practice by JenoptikHommel Etamic (Jenoptik)
 
Micrometer or screw gauge
Micrometer or screw gaugeMicrometer or screw gauge
Micrometer or screw gaugeTalha Javed
 
UNIT II MEASUREMENT OF LINEAR, ANGULAR DIMENSIONS, ASSEMBLY AND TRANSMISSION ...
UNIT II MEASUREMENT OF LINEAR, ANGULAR DIMENSIONS, ASSEMBLY AND TRANSMISSION ...UNIT II MEASUREMENT OF LINEAR, ANGULAR DIMENSIONS, ASSEMBLY AND TRANSMISSION ...
UNIT II MEASUREMENT OF LINEAR, ANGULAR DIMENSIONS, ASSEMBLY AND TRANSMISSION ...prakashPrAkAsH143
 
metrology and measurement CORE TRAINING-M&M.pptx
metrology and measurement CORE TRAINING-M&M.pptxmetrology and measurement CORE TRAINING-M&M.pptx
metrology and measurement CORE TRAINING-M&M.pptxjohn tamil selvan
 
Linear measurements vernier and micro meter
Linear measurements vernier and micro meterLinear measurements vernier and micro meter
Linear measurements vernier and micro meterGLA UNIVERSITY MATHURA
 
3773 -workshop practice
3773 -workshop practice3773 -workshop practice
3773 -workshop practiceSyed Bakhtyar
 
metrology and measurement CORE TRAINING-M&M.pptx
metrology and measurement CORE TRAINING-M&M.pptxmetrology and measurement CORE TRAINING-M&M.pptx
metrology and measurement CORE TRAINING-M&M.pptxjohn tamil selvan
 

Similar to MICROMETER (PPT).pptx (20)

Ch 25 measurement of lines & surfaces
Ch 25 measurement of lines & surfacesCh 25 measurement of lines & surfaces
Ch 25 measurement of lines & surfaces
 
Micrometer screw gauge
Micrometer screw gaugeMicrometer screw gauge
Micrometer screw gauge
 
Mechanical Engineering Technical Interview Q & A Metrology and precision inst...
Mechanical Engineering Technical Interview Q & A Metrology and precision inst...Mechanical Engineering Technical Interview Q & A Metrology and precision inst...
Mechanical Engineering Technical Interview Q & A Metrology and precision inst...
 
Manufacturing process lab lecture 2
Manufacturing process lab lecture 2Manufacturing process lab lecture 2
Manufacturing process lab lecture 2
 
UNIT-I PPT EMM.ppt
UNIT-I PPT EMM.pptUNIT-I PPT EMM.ppt
UNIT-I PPT EMM.ppt
 
Linear measurements
Linear measurementsLinear measurements
Linear measurements
 
Metrology and Quality Control.pptx
Metrology and Quality Control.pptxMetrology and Quality Control.pptx
Metrology and Quality Control.pptx
 
17036 vernier caliper and micrometer
17036 vernier caliper and micrometer17036 vernier caliper and micrometer
17036 vernier caliper and micrometer
 
work shop1.pptx
work shop1.pptxwork shop1.pptx
work shop1.pptx
 
Geometrical Tolerancing in Practice by Jenoptik
Geometrical Tolerancing in Practice by JenoptikGeometrical Tolerancing in Practice by Jenoptik
Geometrical Tolerancing in Practice by Jenoptik
 
Presentation1
Presentation1Presentation1
Presentation1
 
Micrometer or screw gauge
Micrometer or screw gaugeMicrometer or screw gauge
Micrometer or screw gauge
 
UNIT II MEASUREMENT OF LINEAR, ANGULAR DIMENSIONS, ASSEMBLY AND TRANSMISSION ...
UNIT II MEASUREMENT OF LINEAR, ANGULAR DIMENSIONS, ASSEMBLY AND TRANSMISSION ...UNIT II MEASUREMENT OF LINEAR, ANGULAR DIMENSIONS, ASSEMBLY AND TRANSMISSION ...
UNIT II MEASUREMENT OF LINEAR, ANGULAR DIMENSIONS, ASSEMBLY AND TRANSMISSION ...
 
metrology and measurement CORE TRAINING-M&M.pptx
metrology and measurement CORE TRAINING-M&M.pptxmetrology and measurement CORE TRAINING-M&M.pptx
metrology and measurement CORE TRAINING-M&M.pptx
 
unit-2.ppt
unit-2.pptunit-2.ppt
unit-2.ppt
 
Linear measurements vernier and micro meter
Linear measurements vernier and micro meterLinear measurements vernier and micro meter
Linear measurements vernier and micro meter
 
3773 -workshop practice
3773 -workshop practice3773 -workshop practice
3773 -workshop practice
 
unit ii.pptx
unit ii.pptxunit ii.pptx
unit ii.pptx
 
UNIT II LINEAR AND ANGULAR MEASUREMENTS
UNIT II LINEAR AND ANGULAR MEASUREMENTSUNIT II LINEAR AND ANGULAR MEASUREMENTS
UNIT II LINEAR AND ANGULAR MEASUREMENTS
 
metrology and measurement CORE TRAINING-M&M.pptx
metrology and measurement CORE TRAINING-M&M.pptxmetrology and measurement CORE TRAINING-M&M.pptx
metrology and measurement CORE TRAINING-M&M.pptx
 

Recently uploaded

Painted Grey Ware.pptx, PGW Culture of India
Painted Grey Ware.pptx, PGW Culture of IndiaPainted Grey Ware.pptx, PGW Culture of India
Painted Grey Ware.pptx, PGW Culture of IndiaVirag Sontakke
 
Roles & Responsibilities in Pharmacovigilance
Roles & Responsibilities in PharmacovigilanceRoles & Responsibilities in Pharmacovigilance
Roles & Responsibilities in PharmacovigilanceSamikshaHamane
 
Crayon Activity Handout For the Crayon A
Crayon Activity Handout For the Crayon ACrayon Activity Handout For the Crayon A
Crayon Activity Handout For the Crayon AUnboundStockton
 
MARGINALIZATION (Different learners in Marginalized Group
MARGINALIZATION (Different learners in Marginalized GroupMARGINALIZATION (Different learners in Marginalized Group
MARGINALIZATION (Different learners in Marginalized GroupJonathanParaisoCruz
 
Capitol Tech U Doctoral Presentation - April 2024.pptx
Capitol Tech U Doctoral Presentation - April 2024.pptxCapitol Tech U Doctoral Presentation - April 2024.pptx
Capitol Tech U Doctoral Presentation - April 2024.pptxCapitolTechU
 
AmericanHighSchoolsprezentacijaoskolama.
AmericanHighSchoolsprezentacijaoskolama.AmericanHighSchoolsprezentacijaoskolama.
AmericanHighSchoolsprezentacijaoskolama.arsicmarija21
 
Framing an Appropriate Research Question 6b9b26d93da94caf993c038d9efcdedb.pdf
Framing an Appropriate Research Question 6b9b26d93da94caf993c038d9efcdedb.pdfFraming an Appropriate Research Question 6b9b26d93da94caf993c038d9efcdedb.pdf
Framing an Appropriate Research Question 6b9b26d93da94caf993c038d9efcdedb.pdfUjwalaBharambe
 
Enzyme, Pharmaceutical Aids, Miscellaneous Last Part of Chapter no 5th.pdf
Enzyme, Pharmaceutical Aids, Miscellaneous Last Part of Chapter no 5th.pdfEnzyme, Pharmaceutical Aids, Miscellaneous Last Part of Chapter no 5th.pdf
Enzyme, Pharmaceutical Aids, Miscellaneous Last Part of Chapter no 5th.pdfSumit Tiwari
 
MICROBIOLOGY biochemical test detailed.pptx
MICROBIOLOGY biochemical test detailed.pptxMICROBIOLOGY biochemical test detailed.pptx
MICROBIOLOGY biochemical test detailed.pptxabhijeetpadhi001
 
Historical philosophical, theoretical, and legal foundations of special and i...
Historical philosophical, theoretical, and legal foundations of special and i...Historical philosophical, theoretical, and legal foundations of special and i...
Historical philosophical, theoretical, and legal foundations of special and i...jaredbarbolino94
 
“Oh GOSH! Reflecting on Hackteria's Collaborative Practices in a Global Do-It...
“Oh GOSH! Reflecting on Hackteria's Collaborative Practices in a Global Do-It...“Oh GOSH! Reflecting on Hackteria's Collaborative Practices in a Global Do-It...
“Oh GOSH! Reflecting on Hackteria's Collaborative Practices in a Global Do-It...Marc Dusseiller Dusjagr
 
Organic Name Reactions for the students and aspirants of Chemistry12th.pptx
Organic Name Reactions  for the students and aspirants of Chemistry12th.pptxOrganic Name Reactions  for the students and aspirants of Chemistry12th.pptx
Organic Name Reactions for the students and aspirants of Chemistry12th.pptxVS Mahajan Coaching Centre
 
Like-prefer-love -hate+verb+ing & silent letters & citizenship text.pdf
Like-prefer-love -hate+verb+ing & silent letters & citizenship text.pdfLike-prefer-love -hate+verb+ing & silent letters & citizenship text.pdf
Like-prefer-love -hate+verb+ing & silent letters & citizenship text.pdfMr Bounab Samir
 
Difference Between Search & Browse Methods in Odoo 17
Difference Between Search & Browse Methods in Odoo 17Difference Between Search & Browse Methods in Odoo 17
Difference Between Search & Browse Methods in Odoo 17Celine George
 
call girls in Kamla Market (DELHI) 🔝 >༒9953330565🔝 genuine Escort Service 🔝✔️✔️
call girls in Kamla Market (DELHI) 🔝 >༒9953330565🔝 genuine Escort Service 🔝✔️✔️call girls in Kamla Market (DELHI) 🔝 >༒9953330565🔝 genuine Escort Service 🔝✔️✔️
call girls in Kamla Market (DELHI) 🔝 >༒9953330565🔝 genuine Escort Service 🔝✔️✔️9953056974 Low Rate Call Girls In Saket, Delhi NCR
 
Computed Fields and api Depends in the Odoo 17
Computed Fields and api Depends in the Odoo 17Computed Fields and api Depends in the Odoo 17
Computed Fields and api Depends in the Odoo 17Celine George
 
ENGLISH 7_Q4_LESSON 2_ Employing a Variety of Strategies for Effective Interp...
ENGLISH 7_Q4_LESSON 2_ Employing a Variety of Strategies for Effective Interp...ENGLISH 7_Q4_LESSON 2_ Employing a Variety of Strategies for Effective Interp...
ENGLISH 7_Q4_LESSON 2_ Employing a Variety of Strategies for Effective Interp...JhezDiaz1
 
18-04-UA_REPORT_MEDIALITERAСY_INDEX-DM_23-1-final-eng.pdf
18-04-UA_REPORT_MEDIALITERAСY_INDEX-DM_23-1-final-eng.pdf18-04-UA_REPORT_MEDIALITERAСY_INDEX-DM_23-1-final-eng.pdf
18-04-UA_REPORT_MEDIALITERAСY_INDEX-DM_23-1-final-eng.pdfssuser54595a
 

Recently uploaded (20)

Painted Grey Ware.pptx, PGW Culture of India
Painted Grey Ware.pptx, PGW Culture of IndiaPainted Grey Ware.pptx, PGW Culture of India
Painted Grey Ware.pptx, PGW Culture of India
 
Roles & Responsibilities in Pharmacovigilance
Roles & Responsibilities in PharmacovigilanceRoles & Responsibilities in Pharmacovigilance
Roles & Responsibilities in Pharmacovigilance
 
Crayon Activity Handout For the Crayon A
Crayon Activity Handout For the Crayon ACrayon Activity Handout For the Crayon A
Crayon Activity Handout For the Crayon A
 
MARGINALIZATION (Different learners in Marginalized Group
MARGINALIZATION (Different learners in Marginalized GroupMARGINALIZATION (Different learners in Marginalized Group
MARGINALIZATION (Different learners in Marginalized Group
 
Capitol Tech U Doctoral Presentation - April 2024.pptx
Capitol Tech U Doctoral Presentation - April 2024.pptxCapitol Tech U Doctoral Presentation - April 2024.pptx
Capitol Tech U Doctoral Presentation - April 2024.pptx
 
AmericanHighSchoolsprezentacijaoskolama.
AmericanHighSchoolsprezentacijaoskolama.AmericanHighSchoolsprezentacijaoskolama.
AmericanHighSchoolsprezentacijaoskolama.
 
Framing an Appropriate Research Question 6b9b26d93da94caf993c038d9efcdedb.pdf
Framing an Appropriate Research Question 6b9b26d93da94caf993c038d9efcdedb.pdfFraming an Appropriate Research Question 6b9b26d93da94caf993c038d9efcdedb.pdf
Framing an Appropriate Research Question 6b9b26d93da94caf993c038d9efcdedb.pdf
 
Enzyme, Pharmaceutical Aids, Miscellaneous Last Part of Chapter no 5th.pdf
Enzyme, Pharmaceutical Aids, Miscellaneous Last Part of Chapter no 5th.pdfEnzyme, Pharmaceutical Aids, Miscellaneous Last Part of Chapter no 5th.pdf
Enzyme, Pharmaceutical Aids, Miscellaneous Last Part of Chapter no 5th.pdf
 
MICROBIOLOGY biochemical test detailed.pptx
MICROBIOLOGY biochemical test detailed.pptxMICROBIOLOGY biochemical test detailed.pptx
MICROBIOLOGY biochemical test detailed.pptx
 
Historical philosophical, theoretical, and legal foundations of special and i...
Historical philosophical, theoretical, and legal foundations of special and i...Historical philosophical, theoretical, and legal foundations of special and i...
Historical philosophical, theoretical, and legal foundations of special and i...
 
“Oh GOSH! Reflecting on Hackteria's Collaborative Practices in a Global Do-It...
“Oh GOSH! Reflecting on Hackteria's Collaborative Practices in a Global Do-It...“Oh GOSH! Reflecting on Hackteria's Collaborative Practices in a Global Do-It...
“Oh GOSH! Reflecting on Hackteria's Collaborative Practices in a Global Do-It...
 
Organic Name Reactions for the students and aspirants of Chemistry12th.pptx
Organic Name Reactions  for the students and aspirants of Chemistry12th.pptxOrganic Name Reactions  for the students and aspirants of Chemistry12th.pptx
Organic Name Reactions for the students and aspirants of Chemistry12th.pptx
 
Like-prefer-love -hate+verb+ing & silent letters & citizenship text.pdf
Like-prefer-love -hate+verb+ing & silent letters & citizenship text.pdfLike-prefer-love -hate+verb+ing & silent letters & citizenship text.pdf
Like-prefer-love -hate+verb+ing & silent letters & citizenship text.pdf
 
ESSENTIAL of (CS/IT/IS) class 06 (database)
ESSENTIAL of (CS/IT/IS) class 06 (database)ESSENTIAL of (CS/IT/IS) class 06 (database)
ESSENTIAL of (CS/IT/IS) class 06 (database)
 
9953330565 Low Rate Call Girls In Rohini Delhi NCR
9953330565 Low Rate Call Girls In Rohini  Delhi NCR9953330565 Low Rate Call Girls In Rohini  Delhi NCR
9953330565 Low Rate Call Girls In Rohini Delhi NCR
 
Difference Between Search & Browse Methods in Odoo 17
Difference Between Search & Browse Methods in Odoo 17Difference Between Search & Browse Methods in Odoo 17
Difference Between Search & Browse Methods in Odoo 17
 
call girls in Kamla Market (DELHI) 🔝 >༒9953330565🔝 genuine Escort Service 🔝✔️✔️
call girls in Kamla Market (DELHI) 🔝 >༒9953330565🔝 genuine Escort Service 🔝✔️✔️call girls in Kamla Market (DELHI) 🔝 >༒9953330565🔝 genuine Escort Service 🔝✔️✔️
call girls in Kamla Market (DELHI) 🔝 >༒9953330565🔝 genuine Escort Service 🔝✔️✔️
 
Computed Fields and api Depends in the Odoo 17
Computed Fields and api Depends in the Odoo 17Computed Fields and api Depends in the Odoo 17
Computed Fields and api Depends in the Odoo 17
 
ENGLISH 7_Q4_LESSON 2_ Employing a Variety of Strategies for Effective Interp...
ENGLISH 7_Q4_LESSON 2_ Employing a Variety of Strategies for Effective Interp...ENGLISH 7_Q4_LESSON 2_ Employing a Variety of Strategies for Effective Interp...
ENGLISH 7_Q4_LESSON 2_ Employing a Variety of Strategies for Effective Interp...
 
18-04-UA_REPORT_MEDIALITERAСY_INDEX-DM_23-1-final-eng.pdf
18-04-UA_REPORT_MEDIALITERAСY_INDEX-DM_23-1-final-eng.pdf18-04-UA_REPORT_MEDIALITERAСY_INDEX-DM_23-1-final-eng.pdf
18-04-UA_REPORT_MEDIALITERAСY_INDEX-DM_23-1-final-eng.pdf
 

MICROMETER (PPT).pptx

  • 1. MICROMETER The micrometer is divided from two greek words. Micro means small or little and meter means a measurement. It is easily understood that the word micrometer means, it is an instrument made to measure the length or diameter of a piece of job within an accuracy of 0.01 mm. PARTS OF A MICROMETER THIMBLE BARREL/SLEEVE LOCK NUT FRAME ANVIL SPINDLE RATCHET STOP FRAME:- It is a semicircular in shape made of drop-forged steel or malleable cast iron. ANVIL:- The anvil is one of the measuring faces which is fitted on the micrometer frame. It is made of alloy steel and finished to a perfectly flat surface.
  • 2. SPINDLE:- BARREL/SLEEVE:- THIMBLE:- RATCHET STOP:- LOCK NUT:- One end of the spindle is the measuring face. The other end is threaded and passes through a nut. The threaded mechanism allows for forward and backward movement of the spindle. The barrel or sleeve is fixed to the frame. It is a hollow piece of steel heaving internal threads on some length. The datum line and graduations are marked on this. This is a hollow cover rigidly fixed to the spindle when the thimble is rotated the spindle rotates. The bevelled edge of the thimble is divided into 50 equal circular divisions. The ratchet stop ensures a uniform pressure between the measuring surfaces The lock nut is used to lock the spindle at a desired position.
  • 3. WORKING PRINCIPLE:- The micrometer works on the principle of screw and nut. The longitudinal movement of the spindle during one rotation is equal to the pitch of the screw. The movement of the spindle to the distance of the pitch or its fractions can be accurately measured on the barrel and thimble. GRADUATIONS:- In metric micrometers the pitch of the spindle thread is 0.5 mm. There by, in one rotation of the thimble, the spindle advances by 0.5 mm. On the barrel a 25 mm long datum line is marked. This line is further graduated in to millimeters and half millimeters ( i.e, 1 mm & 0.5 mm. The graduations are numbered as 0, 5, 10, 15, 20 & 25 mm. The circumference of the bevel edge of the thimble is graduated into 50 divisions and marked 0, 5, 10, 15, 20, 25, 30, 35, 40, 45, & 0 in clockwise direction. LEAST COUNT OF METRIC MICROMETER: In one complete rotation of the thimble, the spindle is forward or backward 0.5 mm. The circumference of the bevel edge of the thimble is graduated into 50 divisions. So value of one division of thimble is 0.5/50 = 0.01 mm. RANGES OF OUTSIDE MICROMETER Outside micrometers are available in ranges of 0 to25 mm,25 to 50 mm, 50 to 75 mm, 75 to 100 mm, 100 to 125 mm & 125 to 150 mm. It is specified by the minimum and maximum dimension which can be measured by it. For all ranges of micrometers, the graduation marked on the barrel is only 0 - 25 mm A test piece is given for testing of minimum capacity of micrometer
  • 4. READING OF MICROMETER MEASUREMENTS Show the reading 33.12 mm At first note the minimum range = 25.00 mm No of division above datum line = 8 =8x1 mm = 8.00 mm. No of thimble division in line with the barrel datum line= 12x 0.01 = 0.12 mm. TOTAL READING = 33.12 mm SHOW THE READING 5.78 mm At first note the minimum range (0-25 mm) = 00.00 mm No of division above datum line = 5 =5x1 mm = 5. 00mm. No of thimble division in line with the barrel datum line= 27x 0.01 = 0.28 mm. No of division below the datum say 1 , 1x0.5 mm = 0.50 mm TOTAL READING = 5.78 mm
  • 5. A) POSSITIVE ERROR:- B) NEGATIVE ERROR:- ERRORS IN MICROMETER - When the faces of the anvil and the spindle contact closely, the datum line and the zero of the thimble must coincided. If the thimble does not, it is sure that the micrometer has got some error. There are two kinds of errors such as - While the faces of the anvil and spindle are in contact, the zero on the thimble does not reach the datum line. The number of divisions requires to line up, that number of divisions is called positive (+) error The zero line on the thimble passes over the datum line at the time of measuring faces are in contact. The number of divisions passes over the datum line is called negative (-) error. VERNIER MICROMETER:- In ordinary micrometers we can measure to an accuracy of 0.01 mm. But in vernier micrometers we can measure to an accuracy of 0.001 mm. Vernier micrometers are similar to ordinary micrometers in construction but additional vernier graduations given above the datum line. There are 10(ten) such vernier graduation lines marked parallel above the datum line. The sapce between these 10lines is equal to 9 divisions in the thimble. The value of 10 vernier division is = (0.01x9) = 0.09 mm The value of one vernier division =0.09/10 mm =0.009mm The least count = 1 thimble division -1 vernier division = (0.01 -0.009) mm = 0.001 mm.
  • 6. Show the reading in vernier micrometer 5.783mm Range of micrometer is 0 t0 25 mm Full mm division visible on the barrel =5x1mm=5.00mm Half mm division visible after the full mm division =1x0.5mm=0.50mm Thimble division below the datum line =28x0.01mm=0.28mm Vernier division coinciding with thimble =3x0.001mm =0.003mm Total reading=5.783mm