SlideShare a Scribd company logo
1 of 219
Login id: jsnyder47
Password: XeGACUkEN8
CONNECTING TO THE CYBERLAB VPN
Part 1: Connect to the Cyberlab VPN
1.Open your web browser
2.Type https://vpn.csvcl.net in the address bar
3.Click on “Continue to this website(not recommended)”
4.Select the appropriate heading under the Group section. Select
OOB-anyconnect if you are a student
Type your username, your password and click Login
5.Click on Start Anyconnect to install the Cisco Anyconnect
VPN Client
6.Click Allow
Note: Go to Part 1A if Web based installation is unsuccessful
and you do not see the screen above
7.Click Yes to proceed and connect to the VPN
8.This indicates the VPN connection is established. Close the
browser window
You can connect to the VPN subsequently by Clicking on
StartAll ProgramsCisco AnyConnect VPN Client
PART 1A: Alternative Manual Installation
1.Click on the Start Anyconnect link
2.Click Download
3.Click on the underlined Windows 7/Vista 64/XP link
4.Click the drop down and arrow and select Save as
5.Select Desktop and click Save to save the anyconnect install
file to your desktop.
6.Double –Click on the Cisco Anyconnect Installation file on
your Desktop
7.Click Run
8.Click Next
9.Accept the terms in the License Agreement and Click Next
10.Wait as installation process runs
11.Click Finish.
12.You can access the Cisco VPN any other time by Clicking
Start -> All Programs -> Cisco Anyconnect
13.Type in your assigned username and password to logon.
14.The logon screen will disappear if when you successfully
connect to the VPN
15. To verify successful connection to the VPN, open a web
browser and type https://csvcl.vcl.local/cloud/org/csec650 and
you should see the screen below or a logon screen
16. Go to the CyberlabVMaccess650 document and continue
with those instructions to access the virtual environment
CONNECTING TO THE CYBERLAB VIRTUAL
ENVIRONMENT
Note: A connection to the VPN must be established before
following the instructions contained in this document.
Macintosh users are to complete instructions in Part 1B before
completing instructions in Part 2
Windows Users should follow instructions in Part 2
PART 1B
These steps assume that a successful connection has been made
to the VPN
Type https://citrix.vcl.local
A.Click I Understand the Risksand then ClickAdd Exception
B.Verify that Permanently store this exception box is checked
Click on Confirm Security Exception
C.Type in your username and password
D.Click Download to download the Citrix web client
E.Enter the local administrator credentials and click Install
Software
After successful installation, the screen below should appear
F.Click on the appropriate CSEC 600 level course icon
G.You should be redirected to the Virtual Computing Lab.
Continue from Part 2
Note: You must connect to the VPN before you can connect to
the virtual computing lab cloud.
PART II: Connecting to the Virtual Computing Lab (VCL)
1.Type https://csvcl.vcl.local/cloud/org/csec650 in your web
browser.
Click “Continue to this website (not recommended)”
2.Type your username and password and click on Login
3.Click Add vApp from Catalog
4. Select the first VM template (CSEC650_Lab01) for Lab1 and
the second template for Lab 2
Click Next
5. Type your username in the name field and click Finish
6. Wait until the VM is created and the status changes to
Stopped.
7. Click on the Green start button to Start the VM
8. Click OK on the VMRC plugin message if prompted
9. Click OK to the message prompting you to install the
VMRC installation file
10. Download the VMRC installation file to your desktop, close
all browsers and double click
the file to start the installation.
11. Complete the installation of the VMRC client, reopen your
browser and continue accessing your
running virtual machine.
12. Allow any pop-ups if prompted
13. Click Allow if this message pops up. Make sure Always
trust this host with this certificate is checked
14. Type a username of “cseclabuser” and hit enter.
15. Type a password of “cseclabuser” and hit enter.
First Responders Guide
to Computer Forensics:
Advanced Topics
Richard Nolan
Marie Baker
Jake Branson
Josh Hammerstein
Kris Rush
Cal Waits
Elizabeth Schweinsberg
September 2005
HANDBOOK
CMU/SEI-2005-HB-003
Pittsburgh, PA 15213-3890
First Responders Guide
to Computer Forensics:
Advanced Topics
CMU/SEI-2005-HB-003
Richard Nolan
Marie Baker
Jake Branson
Josh Hammerstein
Kris Rush
Cal Waits
Elizabeth Schweinsberg
September 2005
CERT Training and Education
Unlimited distribution subject to the copyright.
This report was prepared for the
SEI Administrative Agent
ESC/XPK
5 Eglin Street
Hanscom AFB, MA 01731-2100
The ideas and findings in this report should not be construed as
an official DoD position. It is published in the interest of
scientific and technical information exchange.
FOR THE COMMANDER
Christos Scondras
Chief of Programs, XPK
This work is sponsored by the SEI FFRDC primary sponsor and
the Department of Homeland Security. The Software Engi-
neering Institute is a federally funded research and development
center sponsored by the U.S. Department of Defense.
Copyright 2005 Carnegie Mellon University.
NO WARRANTY
THIS CARNEGIE MELLON UNIVERSITY AND SOFTWARE
ENGINEERING INSTITUTE MATERIAL IS
FURNISHED ON AN "AS-IS" BASIS. CARNEGIE MELLON
UNIVERSITY MAKES NO WARRANTIES OF ANY
KIND, EITHER EXPRESSED OR IMPLIED, AS TO ANY
MATTER INCLUDING, BUT NOT LIMITED TO,
WARRANTY OF FITNESS FOR PURPOSE OR
MERCHANTABILITY, EXCLUSIVITY, OR RESULTS
OBTAINED
FROM USE OF THE MATERIAL. CARNEGIE MELLON
UNIVERSITY DOES NOT MAKE ANY WARRANTY OF
ANY KIND WITH RESPECT TO FREEDOM FROM PATENT,
TRADEMARK, OR COPYRIGHT INFRINGEMENT.
Use of any trademarks in this report is not intended in any way
to infringe on the rights of the trademark holder.
Internal use. Permission to reproduce this document and to
prepare derivative works from this document for internal use is
granted, provided the copyright and "No Warranty" statements
are included with all reproductions and derivative works.
External use. Requests for permission to reproduce this
document or prepare derivative works of this document for
external
and commercial use should be addressed to the SEI Licensing
Agent.
This work was created in the performance of Federal
Government Contract Number FA8721-05-C-0003 with
Carnegie
Mellon University for the operation of the Software Engineering
Institute, a federally funded research and development
center. The Government of the United States has a royalty-free
government-purpose license to use, duplicate, or disclose the
work, in whole or in part and in any manner, and to have or
permit others to do so, for government purposes pursuant to the
copyright license under the clause at 252.227-7013.
For information about purchasing paper copies of SEI reports,
please visit the publications portion of our Web site
(http://www.sei.cmu.edu/publications/pubweb.html).
Table of Contents
Executive Summary
...............................................................................................
.. xi
Abstract..................................................................................
................................. xiii
1 Module 1: Log File
Analysis............................................................................. 1
1.1 Swatch
...............................................................................................
........ 3
1.1.1 Swatch Log
Monitor...................................................................... 4
1.1.2 Swatch Installation
....................................................................... 5
1.1.2.1 Installing Perl
Modules...................................................... 5
1.1.2.2 Installing Swatch
............................................................... 6
1.1.3 Swatch
Configuration................................................................... 8
1.1.3.1 The Configuration File Location
........................................ 9
1.1.3.2 Adding Rules to the Configuration File
............................. 9
1.1.4 Swatch Execution
....................................................................... 15
1.1.5
Summary.................................................................................
..... 17
1.2 Microsoft Log Parser 2.2
........................................................................ 18
1.2.1 Microsoft Log Parser Features
.................................................. 20
1.2.2 Log Parser Installation
............................................................... 21
1.2.3 Log Parser Input and Output
..................................................... 22
1.2.3.1 Input
Formats.................................................................. 22
1.2.3.2 Output Formats
............................................................... 24
1.2.4 Log Parser
Queries..................................................................... 26
1.2.4.1 Query Examples
............................................................. 27
1.2.5 Log Parser COM
Objects............................................................ 29
1.2.5.1 Creating Custom Input
Formats...................................... 29
1.2.5.2 Using the Log Parser COM API
...................................... 30
1.2.6 Log Parser Execution
................................................................. 31
1.2.7
Summary.................................................................................
..... 33
2 Module 2: Process Characterization
............................................................. 35
2.1 Understanding a Running Process
....................................................... 36
2.1.1
Objectives...............................................................................
..... 37
2.1.2 Programs, Processes, and
Threads.......................................... 38
2.1.3 Threads
.................................................................................... .... 39
2.1.3.1 Displaying Threads for a Running Process.....................
39
CMU/SEI-2005-HB-003 i
2.1.3.2 Sysinternals Process Explorer........................................
40
2.1.4 Process Tree Structure
.............................................................. 43
2.1.4.1 pstree
(Linux).................................................................. 44
2.1.4.2 Linux ps –A
..................................................................... 44
2.1.5 Process Descriptions
................................................................. 46
2.1.6 Process Hashes (National Software Reference
Library)......... 47
2.1.7 Process Analysis Checklist
....................................................... 49
2.1.8 Common Process Characteristics
............................................ 51
2.1.8.1 Process Filenames
......................................................... 51
2.1.8.2 Open Ports
..................................................................... 53
2.1.8.3 Open Files
...................................................................... 55
2.1.8.4 Base Priority
................................................................... 56
2.1.8.5 Process Times and Terminated Processes.....................
58
2.1.8.6 Location of Process Image
............................................. 60
2.1.8.7 Survivable Processes
..................................................... 61
2.1.8.8 Process Forensic
Tasks.................................................. 66
2.2 Automated Process Collection
............................................................. 76
2.2.1
Objectives...............................................................................
..... 77
2.2.2 First Responder Utility (FRU)
.................................................... 78
2.2.2.1 First Responder Utility (FRUC) Setup
............................ 79
2.2.3 Forensic Server Project (FSP)
................................................... 82
2.2.3.1 FSP Setup
...................................................................... 82
2.2.3.2 Testing FRUC
................................................................. 83
2.2.3.3 Output of FRUC
.............................................................. 84
3 Module 3: Image
Management....................................................................... 87
3.1 Slice and Dice with
dd............................................................................ 88
4 Module 4: Capturing a Running Process
................................................... 101
4.1.1 Hedons and
Dolors................................................................... 103
4.1.2 Capturing a Process on a Windows System
.......................... 104
5 Module 5: Understanding Spoofed
Email....................................................113
5.1 Objectives
..............................................................................................
114
5.2 Identifying Spoofed Email
....................................................................115
5.2.1 Definition of the Problem
..........................................................116
5.2.2 Understanding the Process of Sending and Receiving
Email
...........................................................................................11
7
5.2.2.1 The Life Cycle of an
Email.............................................117
5.2.2.2 Overview of the Simple Mail Transfer
Protocol..............119
5.2.3 Understanding Email
Headers................................................. 123
5.2.3.1 Interpreting Email Headers ...........................................
123
5.2.4 How Spoofed Email Is Sent
..................................................... 127
ii CMU/SEI-2005-HB-003
5.2.4.1 Open Mail Relay
........................................................... 127
5.2.4.2 Compromised Machines ...............................................
129
5.2.4.3 Self-Owned Mail Servers
.............................................. 129
5.2.4.4 Temporary Accounts
..................................................... 129
5.2.4.5 Hijacked Accounts
........................................................ 129
5.2.5 How to Identify Spoofed Email
................................................ 130
5.2.5.1 Carefully Examine the “Received” Headers..................
130
5.2.5.2 Look Out for Spoofed Headers .....................................
132
5.2.5.3 Comparing Timestamps ................................................
133
5.3 Tracing the Origins of a Spoofed
Email.............................................. 135
5.3.1 nslookup
.................................................................................... 136
5.3.2
whois......................................................................................
.... 139
5.3.2.1 IP Block
Identification.................................................... 139
5.3.2.2 WHOIS Information for a Domain Name ......................
142
5.3.3 Traceroute
................................................................................. 144
5.3.4 Sam
Spade.................................................................................
145
5.4 Summary
...............................................................................................
146
References..............................................................................
............................... 147
CMU/SEI-2005-HB-003 iii
iv CMU/SEI-2005-HB-003
List of Figures
Figure 1: Example Run of the Swatch Configuration
File...................................... 14
Figure 2: Example Run of PsList
........................................................................... 39
Figure 3: Sysinternals Process Explorer
Utility...................................................... 40
Figure 4: Verifying a Process Image in Process Explorer
..................................... 41
Figure 5: The Strings Tab in Process Explorer
...................................................... 41
Figure 6: Displaying a Process Tree Using
PsList................................................. 43
Figure 7: Displaying a Process Tree Using pstree
................................................ 44
Figure 8: Displaying PID Assignments Using ps
................................................... 45
Figure 9: WinTasks Process Description
............................................................... 47
Figure 10: Listing Process Filenames Using
pulist.................................................. 52
Figure 11: Displaying Open Ports Using fport
......................................................... 53
Figure 12: Displaying Open Ports Using
netstat...................................................... 54
Figure 13: Viewing Handles Using
handle............................................................... 55
Figure 14: Displaying Which Process Has Port 6002 Open
.................................... 56
Figure 15: Displaying Who Has the Bash Shell Open
............................................. 56
Figure 16: Displaying All the Currently Open Files by the User
Root ...................... 56
Figure 17: Listing Priority Levels Using pslist
.......................................................... 57
Figure 18: Listing Priority Levels Using top
............................................................. 57
Figure 19: Displaying the Priority Level for a Specific Process
............................... 57
CMU/SEI-2005-HB-003 v
Figure 20: Checking Uptime Using psuptime
.......................................................... 58
Figure 21: Checking Elapsed Time for a Process Using pslist
................................ 58
Figure 22: Windows Event Log
............................................................................... 59
Figure 23: psloglist
Command................................................................................
. 59
Figure 24: Locating a Process Image Using ListDLLs
............................................ 60
Figure 25: Locating a Process Image Using
ps....................................................... 60
Figure 26: Locating a Process Image by
PID.......................................................... 61
Figure 27: autorunsc.exe Command
....................................................................... 62
Figure 28: The chkconfig -list
Command................................................................. 63
Figure 29: A Cron Log
.............................................................................................
64
Figure 30: The Crontab
Command.......................................................................... 65
Figure 31: The svchost.exe 780 Process
................................................................ 67
Figure 32: listdlls.exe Output for
svchost.exe.......................................................... 68
Figure 33: MD5deep
Utility.....................................................................................
. 69
Figure 34: Performing a String Search Using
grep.................................................. 69
Figure 35: The mshearts.exe 2840 Process
........................................................... 70
Figure 36: listdlls.exe Output for the mshearts Process
.......................................... 71
Figure 37: MD5deep.exe Command Line Arguments
............................................. 71
Figure 38: strings Command
................................................................................... 73
Figure 39: strings Command Output
....................................................................... 73
Figure 40: Hash of John the Ripper
........................................................................ 74
Figure 41: First Part of the fruc.ini File
.................................................................... 80
Figure 42: Second Part of the fruc.ini File
............................................................... 80
vi CMU/SEI-2005-HB-003
Figure 43: Final Part of fruc.ini
File.......................................................................... 81
Figure 44: FSP Setup
..............................................................................................
83
Figure 45: FRUC Utility Command
.......................................................................... 83
Figure 46: FSP Command Output
........................................................................... 84
Figure 47: FRUC Output
File................................................................................... 85
Figure 48: FRUC Audit
File........................................................................ ..............
85
Figure 49: Result of Using md5 to Calculate a Hash
Value..................................... 92
Figure 50: Confirming the Result of Splitting Images
.............................................. 92
Figure 51: Result of Using cat and md5sum to Check the
Integrity of Split
Images....................................................................................
................ 93
Figure 52: Result of Using md5sum to Check the Integrity of a
New Image ........... 94
Figure 53: Finding a .jpg Tag in a Captured Image
................................................. 96
Figure 54: Decimal Form of the Beginning of the .jpg File
...................................... 96
Figure 55: Searching for the End of the .jpg File
..................................................... 97
Figure 56: Tag Delineating the End of a .jpg
File..................................................... 97
Figure 57: Decimal Address for the End of the .jpg File
.......................................... 97
Figure 58: Calculating the Size of the .jpg File
........................................................ 97
Figure 59: File Carved Out Using dd
....................................................................... 98
Figure 60: Viewing Carved .jpg
File......................................................................... 98
Figure 61: Running a Trusted Command
.............................................................. 106
Figure 62: Command Shell Spawned from a Trusted
CD...................................... 106
Figure 63: netcat Command to Listen on Port
3333.............................................. 106
Figure 64: Using Trusted pslist and netcat to Specify IP Address
and Listening
Port........................................................................................
............... 107
CMU/SEI-2005-HB-003 vii
Figure 65: Looking for Suspicious Processes Using cat
....................................... 107
Figure 66: Suspicious Process
Found................................................................... 107
Figure 67: netcat Command to Listen on Port
4444.............................................. 108
Figure 68: Specifying netcat Listener Machine and Port
....................................... 108
Figure 69: Viewing Path to a Suspicious Process
................................................. 108
Figure 70: Setting Up a Listening Session on a Suspicious
Process.................... 109
Figure 71: Collecting the Executable of a Suspicious Process
............................. 109
Figure 72: Calculating a Hash of a Captured Process
.......................................... 109
Figure 73: The Life Cycle of an Email
....................................................................118
Figure 74: Mail Delivery for Valid Users
................................................................ 128
Figure 75: Spoofed Email via an Open Relay
....................................................... 128
Figure 76: nslookup of Valid Fully Qualified Domain Name
.................................. 137
Figure 77: nslookup of Falsified Host Information
................................................ 138
Figure 78: WHOIS Query of
ARIN......................................................................... 140
Figure 79: WHOIS Query of APNIC
...................................................................... 141
Figure 80: WHOIS Query of
IANA......................................................................... 142
Figure 81: Query of .com WHOIS Database
......................................................... 143
Figure 82: Query of the Registrar's WHOIS
Database.......................................... 143
Figure 83: Traceroute Example
............................................................................. 145
viii CMU/SEI-2005-HB-003
List of Tables
Table 1: Actions in Swatch
................................................................................... 11
Table 2: time_regex for Popular Services
........................................................ 13
Table 3: Common Input
Formats.......................................................................... 22
Table 4: Output Formats
...................................................................................... 24
Table 5: Misc Log Parser Commands
.................................................................. 31
Table 6: A Subset of ps Options
........................................................................... 52
Table 7: Output Headings for ps and top
............................................................. 52
Table 8: dd Syntax
...............................................................................................
88
Table 9: Tools for Capturing Running Processes
............................................... 104
Table 10: The Life Cycle of an Email
................................................................... 118
Table 11: Email
Headers...................................................................................
... 124
CMU/SEI-2005-HB-003 ix
x CMU/SEI-2005-HB-003
Executive Summary
First Responders Guide to Computer Forensics: Advanced
Topics expands on the technical
material presented in SEI handbook CMU/SEI-2005-HB-001,
First Responders Guide to
Computer Forensics [Nolan 05]. While the latter presented
techniques for forensically sound
collection of data and reviewed the fundamentals of
admissibility pertaining to electronic
files, this handbook focuses exclusively on more advanced
technical operations like process
characterization and spoofed email. It is designed for
experienced security and network pro-
fessionals who already have a fundamental understanding of
forensic methodology. There-
fore, emphasis is placed on technical procedures and not
forensic methodology.
The first module focuses on log file analysis as well as
exploring techniques for using com-
mon analysis tools such as Swatch and Log Parser. The second
module focuses on advanced
techniques for process characterization, analysis, and volatile
data recovery. The third module
demonstrates advanced usage of the dd command-line utility.
Topics include how to slice an
image and reassemble it with dd, carving out a section of data
with dd, and imaging a running
process with dd. The fourth and final module examines spoofed
email messages. This module
looks at the RFCs for email, describes how email messages are
spoofed, and presents some
techniques for identifying and tracing spoofed email.
Our focus is to provide system and network administrators with
advanced methodologies,
tools, and procedures for applying sound computer forensics
best practices when performing
routine log file reviews, network alert verifications, and other
routine interactions with sys-
tems and networks. The final goal is to create trained system
and network professionals who
are able to understand the fundamentals of computer forensics
so that in the normal course of
their duties they can safely preserve technical information
related to network alerts and other
security issues. This handbook is not intended to be a training
guide for computer forensics
practitioners, but rather an advanced resource for system and
network security professionals
who are charged with performing first responder functions. The
target audience includes sys-
tem and network administrators, law enforcement, and any
information security practitioners
who find themselves in the role of first responders. The
handbook should help the target au-
dience to
• install, configure, and use Swatch to analyze log files
• install, configure, and use Log Parser to analyze log files
• understand advanced elements of a running process
• perform an automated collection of volatile data
• carve out data using the dd command-line utility
• use the dd command-line utility to slice and reassemble
images and files
CMU/SEI-2005-HB-003 xi
• understand spoofed email
• identify reliable information in an email header
xii CMU/SEI-2005-HB-003
Abstract
This handbook expands on the technical material presented in
SEI handbook CMU/SEI-
2005-HB-001, First Responders Guide to Computer Forensics.
While the latter presented
techniques for forensically sound collection of data and
explained the fundamentals of admis-
sibility pertaining to electronic files, this handbook covers more
advanced technical opera-
tions such as process characterization and spoofed email. It
describes advanced methodolo-
gies, tools, and procedures for applying computer forensics
when performing routine log file
reviews, network alert verifications, and other routine
interactions with systems and net-
works. The material will help system and network professionals
to safely preserve technical
information related to network alerts and other security issues.
CMU/SEI-2005-HB-003 xiii
xiv CMU/SEI-2005-HB-003
1 Module 1: Log File Analysis
© 2005 Carnegie Mellon University
First Responders Guide to
Computer Forensics:
Advanced Topics
Module 1:
Log File Analysis
This module focuses on log file analysis, specifically post-event
analysis using Swatch and
Log Parser. We explain how to install, configure, and execute
Swatch and Log Parser and
provide several sample configurations for each.
CMU/SEI-2005-HB-003 1
© 2005 Carnegie Mellon University
First Responders Guide to
Computer Forensics
Swatch
2 CMU/SEI-2005-HB-003
© 2005 Carnegie Mellon University 3
Overview
Why Swatch?
Installation
Configuration
Execution
Forensics, in this case, is the act of looking for events
after they have happened, not performing an
investigation for law enforcement.
1.1 Swatch
The focus is on using Swatch and Log Parser as forensic
analysis tools, meaning that they
will be used on logs after an incident has occurred. If you are
planning to use these tech-
niques on files involved in a law enforcement investigation,
please make sure you prepare the
files according to established best practices before use.
CMU/SEI-2005-HB-003 3
© 2005 Carnegie Mellon University 4
Swatch Log Monitor
Swatch, the Simple Watcher, is an open
source log monitoring tool written in Perl for
use primarily on UNIX/Linux systems.
Swatch can be used to monitor current logs on
running servers, or to examine older logs.
The configuration file contains a list of regular
expressions to look for and actions to take, if
any are found, called rules.
While originally designed for use with syslog
files, Swatch can be used on any file.
1.1.1 Swatch Log Monitor
Log files are useful only if they are read. After an incident, log
files often have clues as to
what happened. However, many servers produce large volumes
of log information, often
spread out over more than one file, so sifting through this data
can be tedious and time con-
suming. As an added problem, different servers have different
log formats. If it is necessary
to compare files, it can be challenging to match up fields.
Swatch, the Simple Watcher log monitoring tool, is capable of
searching a file for a list of
strings and then performing specific actions when one is found.
It was designed to do real-
time monitoring of server log files but can also be set to process
a stand-alone file. Swatch
was designed to work with syslog files, but it can be used on
any file.
Swatch was written in Perl, and because of the way it is
installed it is best used on a Linux
system. It is an open source tool, and the project is maintained
on SourceForge.
Throughout this module we will consider more heavily the case
where Swatch is used to ex-
amine older log files as opposed to active log files.
4 CMU/SEI-2005-HB-003
© 2005 Carnegie Mellon University 5
Swatch Installation
Requirements: Perl 5, make utility, tar utility
Download Swatch from the SourceForge project:
http://sourceforge.net/projects/swatch/
Download the throttle patch from http://www.cert.org
Obtain and install the additional Perl modules:
Time::HiRes
Date::Calc
Date::Format
File::Tail
Make Swatch – On the command line, type in progression:
tar zxvf swatch-3.1.1.tar.gz
patch –p0 < throttle.patch
cd swatch-3.1.1
perl Makefile.PL
make
make test
make install
1.1.2 Swatch Installation
Swatch has the same installation process as a Perl module. You
download a tarball, uncom-
press it, expand it, and build it. The tool installs itself in
/usr/bin, and you can use it from any
directory. It also installs a manual page.
To begin, make sure that Perl 5 is installed on the machine.
Later versions of Perl may come
with some of the necessary modules installed already. You also
need the ability to use the
GNU utility make to fully install Swatch.
1.1.2.1 Installing Perl Modules
If your Linux distribution offers versions of the Perl modules
needed to support Swatch, it is
best to get the operating-system-specific ones. Otherwise, you
will need to obtain them from
either the module’s developer’s web site or from a centralized
repository such as the Com-
prehensive Perl Archive Network (CPAN).1 CPAN indexes most
of the Perl packages avail-
able, makes the list searchable, and has them available for
download. They also have links to
the developer’s web site if you would prefer to get the modules
straight from the source.
To install Swatch you need these modules:2
• File::Tail – in File-Tail-0.99.1.tar.gz
• Date::Calc – in Date-Calc-5.4.tar.gz
1 http://www.cpan.org
2 All module version numbers are current at time of printing.
CMU/SEI-2005-HB-003 5
• Date::Parse – in TimeDate-1.16.tar.gz
• Time::HiRes – in Time-HiRes-1.66.tar.gz
To support these you might also need
• Bit::Vector – in Bit-Vector-6.4.tar.gz
• Carp::Clan – in Carp-Clan-5.3.tar.gz
Once the tar file is on the machine, you must decompress and
expand it before it can be in-
stalled. Once expanded, read the INSTALL file to make sure
that the module has the standard
installation commands. For these modules, there is a Perl script
called Makefile.PL that cre-
ates a makefile specific to the machine. Next, run the make file
three times: once to initialize,
once to test, and then once to install. After that, the package is
ready to use. In order for other
users to be able to use these modules, they must be installed by
root. The commands follow
in shaded boxes (the normal text is what is sent to the console):
tar zxvf perlmod.tar.gz
Lists all the files in perlmod.tar
cd perlmod
perl Makefile.PL
Writing Makefile for Perl::Mod
make
Check for errors
make test
Look for “All tests successful”
make install
Check for errors
Repeat for the other packages and you are ready to install
Swatch itself.
1.1.2.2 Installing Swatch
Installing Swatch involves the same procedure as the Perl
modules. First, download the tar-
ball to the local machine from
http://sourceforge.net/projects/swatch. There is a patch needed
to enable the throttle action to fully work. Download that from
http://www.cert.org. These
instructions are for Swatch 3.1.1 (the normal text is what is sent
to the console):
tar zxvf swatch-X.X.X.tar.gz
Lists all the files in swatch-X.X.X.tar
patch –p0 < throttle.patch
6 CMU/SEI-2005-HB-003
The character after the –p is a zero
cd swatch-X.X.X
perl Makefile.PL
Writing Makefile for swatch
If Time::HiRes, Date::Calc, or Date::Parse are missing it will
say
make
Check for errors
make test
Look for “All tests successful”
make install
Check for errors
Swatch is now ready to be executed.
CMU/SEI-2005-HB-003 7
© 2005 Carnegie Mellon University 6
Swatch Configuration–Rules 1
The configuration file contains a list of rules
Default file location is $HOME/.swatchrc, but it
can be any name and any location
The three parts of a rule:
Event – “watchfor” or “ignore”
Pattern – regular expression pattern to look for
Action – what the script does when the pattern
is found
1.1.3 Swatch Configuration
The configuration file is the source of Swatch’s power. It is a
text file of rules that are used to
create the script that will be run against the log file. This topic
is about how to develop your
own configuration file.
Before you begin adding rules, determine what you are trying to
find. Perhaps you want to
look for Nessus attacks in your Apache log files, or find when
people try to use an SMTP
server as an open relay. Make a list of strings or regular
expression patterns that you might
need. Keep in mind that creating a good configuration file is an
iterative process, and it may
take a few rounds to extract the desired information from the
file.
8 CMU/SEI-2005-HB-003
© 2005 Carnegie Mellon University 7
Swatch Configuration–Rules 2
Rules are looked for in the order they appear in the
configuration
file.
Example rules:
ignore /127.0.0.5/
watchfor /Nessus/
throttle 0:10:00,key=nessus
echo
The first rule looks for the string “127.0.0.5” and ignores any
log
entries that contain it. The second rule looks for log entries
that
contain “Nessus” and echoes them to the console, but only at
the
rate of one entry every 10 minutes.
Pattern
Event
Event
Pattern
Action
Action
1.1.3.1 The Configuration File Location
By default, Swatch looks for the configuration file .swatchrc in
the home directory. If this file
is not found, it uses a default configuration of
watchfor /.*/
echo
This merely echoes every message in the log file to the console.
This is not any more useful
than inspecting the log file by hand. To harness the power, a
customized configuration file
should be created (this is addressed in the next section, 1.1.3.2).
The default name is .swatchrc, but it can be whatever you want.
Configuration files for dif-
ferent types of log files may be identified by a distinct name.
One might call their Apache
configuration file apache.swatchrc and their sendmail
sendmail.swatchrc. The file can be
stored anywhere that is accessible from the command line, not
just in the home directory. If a
different name or location is used for the configuration file, it is
added as an argument to the
command line when Swatch is executed (this is discussed in
Section 1.1.4).
1.1.3.2 Adding Rules to the Configuration File
Rules are a list of keywords and values that are used to make
conditional statements to check
against, and actions to take if one is true. They have three parts:
the event, the pattern, and the
action(s).
CMU/SEI-2005-HB-003 9
1.1.3.2.1 Types of Events
There are two types of events in Swatch: “watchfor” and
“ignore.” The keyword “watchfor”
looks for the specified pattern in messages in the log file. The
“ignore” keyword will skip the
rest of the rules when a message matches the pattern.
By default, the first rule that matches a message will be the
only rule that acts on that mes-
sage. This property can be harnessed by using the “ignore”
event to filter out messages. For
example, since you know that the system administrator always
uses the same machine to do
penetration testing, you create an “ignore” rule for messages
that come from a specific inter-
nal IP address, 127.0.0.5, and list the rule for Nessus scans after
it so that internal scans will
not cause alerts. In this case, you will want to put these two
events in this order:
ignore /127.0.0.5/
watchfor /Nessus/
throttle 0:10:00,key=nessus
echo
1.1.3.2.2 Types of Patterns
The value for the event keyword is the regular expression
pattern that follows on the same
line. The simplest regular expression is a string to match
character by character enclosed in
“/”; for example, “/Nessus/” matches only the substring
“Nessus” if it appears anywhere in
the line. If there are characters in the search string, the
capitalization must be the same for the
string to match. If you want “nEsSuS” to also match, then you
need to put an “i” after the
second “/” to indicate a case insensitive search.
Regular Expressions
A regular expression is a pattern that describes or matches a set
of strings [Wikipedia 05d]. It
is a syntax for describing more general criteria for matching
strings than simply matching a
word in a string. For example, with a regular search you could
find the substring “cat” in
“catapult.” But a regular expression would let you look for a
string that starts with “ca” and
ends with “t,” and you would find both “cat” and “catapult.”
For more examples of regular expressions in general, see the
Wikipedia entry:
http://en.wikipedia.org/wiki/Regular_expression
For more examples of regular expressions in Perl, see the Perl
manual page:
http://www.perl.com/doc/manual/html/pod/perlre.html
1.1.3.2.3 Types of Actions
Actions are what the script does when it matches a pattern.
They range from printing the log
message to the console to executing a separate script to call a
pager. There can be multiple
10 CMU/SEI-2005-HB-003
actions associated with each rule. The “ignore” event has its
action built in, namely, to stop
looking at the log entry. The complete list of actions is found in
Table 1 [SourceForge 04]:
Table 1: Actions in Swatch
Action Description
echo [modes] Prints the log message to the console.
Takes an optional value of a text color, a background color, or a
font weight.
Possible values are bold, underscore, inverse, blink, black,
red, green, yellow, blue, magenta, cyan, white, black_h,
red_h, green_h, yellow_h, blue_h, magenta_h, cyan_h, and
white_h.
bell [n] Prints the log message to the console and then rings the
bell (007)
n times.
throttle H:M:S
[,key=log|<identifier>]
[,time_from=timestamp]
[,time_regex=<regex>]
[,threshold=N]
throttle reduces the number of times an action is performed on
messages matching the same pattern in the specified duration.
Hours, minutes, and seconds must all be specified. However, the
time does not need to be specified if threshold is being used.
The key is the identifier that is stored to compare to new mes-
sages. log means use the exact log file, excluding a syslog time-
stamp, if present, and is the default. Any other string will be
used
exactly as requested/indicated.
Setting the time_from option to timestamp indicates that the
time in the log message should be used instead of the system
time
for comparisons. This is best for examining a log file.
The time_regex lets you specify a regular expression to match
the
timestamp of the message. The default is a regular expression
for
the syslog timestamp.
The threshold=N acts on the first instance and on every Nth in-
stance after that. It repeats counting once N messages have been
found. Each instance is appended with “(threshold N ex-
ceeded).”
exec command
Executes the command listed.
If arguments are needed, they may be substituted with fields in
the
log message. $N is replaced with the Nth field in the line. A $0
or a
$* uses the entire message. The --awk-field-separator switch
must be used during execution (see Section 1.1.4).
CMU/SEI-2005-HB-003 11
Action Description
mail [ad-
dresses:bob:joe:…]
[,subject=Subject]
Sends an email to the address(es) listed with the subject listed
con-
taining the matched log messages. Must have a sendmail
compati-
ble server installed. Default recipient is the user who is running
the
program.
pipe com-
mand[,keep_open]
Pipes the log messages into the command. keep_open keeps the
pipe open until a different pipe is activated or Swatch exits.
write [user:user:…] Uses write(1) to send the message to the
users listed. The user
running Swatch is the default.
continue Tells Swatch to evaluate this message against the rule
set.
quit Causes Swatch to exit.
when=day:hour This action is a modifier to all the other actions
indicating that the
action should occur only during the times specified. For
example,
when=1-5-8-17 indicates that the action should occur only Mon-
day-Friday between 8 a.m. and 5 p.m.
The exec command can be used to write log entries to a file.
Redirection from the console
does not work because there are unprintable characters on the
command line that are printed
in the resulting file and are meaningless and in the way. Use
this action:
exec “echo $* >> output.txt”
When examining a file, the most useful actions will be echo,
exec, and throttle. The others are
more oriented for when you need to be alerted to a new
development in real time.
It is also possible to include Perl in the configuration file if you
want to do something such as
define a regular expression for repeated use. Start each line with
“perlcode” and end it with a
semicolon.
The throttle command can be very powerful. It will take some
practice to get the right bal-
ance of regular expressions to search for timing and to
determine whether throttle or thresh-
old is better.
For the regular expressions in the time_regex, all backslashes
must be escaped, (e.g., put in
two instead of one). Regular expressions on the action line with
commas get cut off, so you
need to put the expression in a perlcode. This includes both IIS
formats. For example:
perlcode my $iis_time = “(d{4}-d{2}-
d{2}s+d{1,2}:d{2}:d{2}s)”;
watchfor /WEBROOT DIRECTORY TRANSVERSAL/
throttle
0:04:00,key=web,time_from=timestamp,time_regex=$iis_time
echo blue
12 CMU/SEI-2005-HB-003
Some log formats may not have time_regex. Table 2 lists
time_regexes for the log files on
popular services:
Table 2: time_regex for Popular Services
Log File Timestamp Regular Expression
Apache
access_log
04/Mar/2005:11:38:45
(d{2}/w{3}/d{4}:d{2}:d{2}:d{2})
Apache
error_log;
ssh logs
Fri Mar 04 11:38:51 2005
(w{3}s+w{3}s+d{2}s+d{2}:d{2}:d{2}s+d{4})
IIS 6.0 and
later
03/04/05, 11:38:51
(d{2}/d{2}/d{2},s+d{1,2}:d{2}:d{2}s)
IIS 5.*,
W3C Ex-
tended
2005-03-14 11:38:51 (d{4}-d{2}-
d{2}s+d{1,2}:d{2}:d{2}s)
The when command can be useful for identifying events that
occur at abnormal times. Use it
to look for login attempts in the middle of the night.
The following is an example configuration file for a syslog
setup that has two machines,
named “server” and “client,” logging to one file. The central
syslog server resides on the
server. All facilities on the client log to this file. The client is
running the default applications.
The server logs most facilities to the file and is running Apache
(httpd) and Snort, in addition
to the basics.
# Copies all of the entries from the client to a separate file
watchfor / client /
exec “echo $* >> client.log” #echoes the log entry to a file
# Prints one entry every 4 minutes (based on the time in the
logfile #for
any entries containing a Nessus attack keyword.
watchfor /WEBROOT DIRECTORY TRANSVERSAL/
throttle 0:04:00,key=webroot,time_from=timestamp
echo blue
# Searches for snort followed by portscan somewhere in the log
entry
# Prints the first entry and then every 6th one both to the
console and
# a separate file
watchfor /snort.*portscan/
throttle threshold=6,key=ps
echo red
exec “echo $* >> portscan.log”
CMU/SEI-2005-HB-003 13
Figure 1 is an example run of the configuration file on a syslog
file (“(portscan)” and
“(http_inspect)” distinguish the different types of messages).
Figure 1: Example Run of the Swatch Configuration File
14 CMU/SEI-2005-HB-003
© 2005 Carnegie Mellon University 8
Swatch Execution
Swatch is run from the command line.
swatch -c .swatchrc -f file.log
This runs Swatch using the file .swatchrc as the configuration
file
on file.log.
Swatch can be run on only one file at a time, but multiple
instances of Swatch can be running at once.
Accepts its input from this command-p command
Tail the specific file (/var/log/messages is the default)-t file.log
Examine the specific file-f file.log
Name a specific configuration file-c config.file
UseSwitch
Examine this fileConfiguration file
1.1.4 Swatch Execution
Swatch is run on the command line and has many options to
specialize the execution. You can
identify the configuration file, the log file, how to monitor the
log file, and even what charac-
ter(s) indicate a new log message. While most options will be
listed, the focus is on the op-
tions that relate to running Swatch on a log file in a single pass.
More information about all
the options can be found in the manual page.
-c filename or --config-file=filename
Indicates where the configuration file is. The default location is
$HOME/.swatchrc.
-f filename or --examine=filename
Indicates that Swatch should perform a single pass on the log
file.
-t filename or --tail-file=filename
This option enables Swatch to monitor a file as a service
continues to log to it. This action is
the default, so if none of -f, -p, or -t is given, Swatch will tail
either “/var/log/messages” or
“/var/log/syslog.”
-p command or --read-pipe=command
Monitors the data that is being piped in from the given
command.
--awk-field-syntax
Tells Swatch to use the syntax for awk expressions. It is needed
when the exec action is used.
CMU/SEI-2005-HB-003 15
--input-record-separator=regular_expression
This option indicates that the default record separator of
carriage return should be replaced
with the regular expression listed.
Other options include --help and --version, which respectively
give usage information and
the current version; --script-dir=path, which indicates where the
temporary script should
be stored if not in the user’s home directory; and --restart-
time=hh:mm[am|pm], which
tells Swatch to restart at a particular time.
The most common usage will be
swatch -c .swatchrc -f log_file
Remember to specify the complete path of the configuration file
or the log file if either one is
not located in the local directory.
16 CMU/SEI-2005-HB-003
© 2005 Carnegie Mellon University 9
Summary
Swatch is a simple log monitor designed to run
regular expressions against a text log file.
an effective tool for finding interesting or
anomalous events
configured easily to watch for any type of entry
in any type of file
Many actions can be taken on matching
message logs, but for analysis “echo” will be
used most often.
1.1.5 Summary
Swatch can be an effective tool for sifting through log files to
find interesting or anomalous
events. The results serve as a jumping off point for further
inspection of the files by leading
you directly to areas of interest. Or it can be used to filter out
entries that you know can be
excluded so as to reduce the amount of material to examine by
hand. Swatch can also be used
on other files, such as VMWare virtual disk files and disk
images, to efficiently find strings in
data.
CMU/SEI-2005-HB-003 17
© 2005 Carnegie Mellon University
First Responders Guide to
Computer Forensics
Microsoft Log Parser
1.2 Microsoft Log Parser 2.2
This topic is an overview of the installation, configuration, and
usage of Microsoft’s Log
Parser 2.2. The focus is on using Log Parser as a forensic
analysis tool, meaning that it will
be used on logs after an incident has occurred. If you are
planning to use these techniques on
files involved in a law enforcement investigation, please make
sure you prepare the files ac-
cording to established best practices.
18 CMU/SEI-2005-HB-003
© 2005 Carnegie Mellon University 2
Overview
Why Log Parser?
Installation
Writing Queries
Execution
Forensics in this case is the act of looking for
events after they have happened, not
performing an investigation for law
enforcement
CMU/SEI-2005-HB-003 19
© 2005 Carnegie Mellon University 3
Microsoft Log Parser 2.2
Command line tool from Microsoft to process log files
using SQL-like queries
Can read in many formats and many types of log files
Output available in many formats—from text to XML
files to database storage
Easy generation of HTML reports and MS Office
objects
Log Parser functions usable in other scripts
1.2.1 Microsoft Log Parser Features
Microsoft Log Parser 2.2 is the most recent incarnation of
Microsoft’s log analysis tool. Re-
leased in January 2005, it contains many improvements and
additions to make it useful to
anyone with a log file to process. Log Parser is free to
download and use. It is a command
line tool; there is no GUI to make creating commands easier.
Log Parser uses SQL-like queries to sort through log files. It is
very flexible and can be used
to read any text based file, file system objects, registries, and
database formats.
Log Parser can format the text output into a variety of formats.
It can also send output di-
rectly to a syslog server, a database, and MS Office charts, and
can be used to create HTML
reports from a template.
Log Parser can also be used in other programs and scripts to
bring its processing power to
other applications.
20 CMU/SEI-2005-HB-003
© 2005 Carnegie Mellon University 4
Log Parser Installation
Requirements: Windows 2000, 2003, or XP
Professional
Download Log Parser from Microsoft’s website
Double-click on the setup file and follow the
instructions
The Unofficial Log Parser Support Site is an
excellent resource: http://www.logparser.com/
1.2.2 Log Parser Installation
Log Parser is a Microsoft Windows application that runs on
Windows 2000, 2003, and Win-
dows XP Professional. Installation is quick and easy.
Download the file from the Microsoft website. In addition to the
Microsoft website, The Un-
official Log Parser Support Site maintains a current link to the
setup file on its home page:
http://www.logparser.com. That site is also an excellent
resource for Log Parser information.
Once you’ve downloaded the file, double-click on the setup file,
LogParser.msi. Follow the
instructions in the Setup Wizard and Log Parser is installed.
CMU/SEI-2005-HB-003 21
© 2005 Carnegie Mellon University 5
Log Parser Input and Output
Log Parser can read many text-based log formats
Use the switch -i:TYPE to indicate file type
Default is determined from the input file type
Type LogParser -h -i:TYPE for more information
on a specific type
Output can be formatted into text files or MS Office
objects or sent to other programs
Use the switch -o:TYPE to indicate type of report
Default is determined from the name of the output file
Type LogParser -h -o:TYPE for more information
on a specific type
1.2.3 Log Parser Input and Output
Log Parser has a variety of built-in text-based formats that it
can use to easily parse files and
several output formats it can create. Many of them correspond
to the log formats of popular
applications, though it is Windows-centric.
1.2.3.1 Input Formats
To specify an import format, use the switch -i:TYPE, where
TYPE is one of the built-in types.
The default input type is determined by Log Parser based on the
file extension in the FROM
clause. Table 3 lists many of the types and application logs for
which each can be used. More
information and usage examples for each one can be found by
using the command line help:
LogParser -h -i:TYPE. Other types can be found under
LogParser -h.
Table 3: Common Input Formats
Type Uses Selected Parameters
IISW3C IIS W3C Extended Log Format, primar-
ily IIS 5.X logs and older
n/a
IIS Microsoft IIS log format, mostly used
with version 6.0 and newer
n/a
NCSA NCSA Common, Combined, and Ex-
tended Log formats, for Apache logs
n/a
22 CMU/SEI-2005-HB-003
Type Uses Selected Parameters
CSV Text files with comma-separated values -headerRow
[ON|OFF] – for speci-
fying if there is a header row
-iTsFormat <timestamp format>
– for specifying timestamps other than
“yyyy-MM-dd hh:mm:ss”
TSV Tab or space separated values -headerRow [ON|OFF] – for
speci-
fying if there is a header row
-iSeparator <character> –
Character that indicates a new field;
can be any character, “spaces,”
“space,” or “tab”
W3C Generic W3C log format -iSeparator <character> –
Character that indicates a new field;
can be any character, “spaces,”
“space,” or “tab”
XML XML formatted logs -rootXPath <XPath> – XPath query
of nodes to be considered roots
EVT Windows Event Log -fullText [ON|OFF] – Use the full
text message
NETMON NetMon captures files -fMode [TCPIP|TCPConn] –
Field
mode, each record is a single packet or
a single connection
REG Registry keys and values n/a
ADS Active Directory objects -objClass <class name> – Spe-
cific class for object mode
-username <uname> – user name for
AD access
-password <pword> – password for
the specified user
TEXTLINE Parses entire lines of text files n/a
TEXTWORD Parses single words out of generic text
files
n/a
FS File system properties n/a
COM Custom COM input format -iProgID <progid> – version
inde-
pendent Prog ID of the COM plug-in
CMU/SEI-2005-HB-003 23
1.2.3.2 Output Formats
To specify an output format to create, use the switch -o:TYPE.
Output can be in several text
formats as well as some non-text ones. The default, for when no
INTO clause is stated, is to
print the list using NAT to STDOUT. When the INTO clause is
stated, if there is no -o:TYPE,
then Log Parser will attempt to guess from the file extension.
Table 4 lists many of the types.
More information and usage examples can be found by using the
command line help: Log-
Parser -h -o:TYPE. Other types can be found under LogParser -
h.
Table 4: Output Formats
Type Format Special Parameters
CSV Comma-separated values -headers [ON|OFF|AUTO] –
Write
field names as the first line; AUTO
won’t write headers when appending to
an existing file
TSV Tab-separated values -headers [ON|OFF|AUTO] – Write
field names as the first line; AUTO
won’t write headers when appending to
an existing file
-oSeparator <any string> –
Separator between fields: <string>,
“space,” or “tab”
XML XML output format -rootName <element name> –
Name of the Root element
DATAGRID ASP.NET data type for displaying
tabular data
-rpt <number of rows> – Rows to
print before pausing
CHART Microsoft Office Chart web compo-
nent; MS Office must be installed for
use
-chartType <chart type> – One
of the designated chart types
SYSLOG Sends output to a syslog server -hostName
<hostname> – syslog
server name
NAT Native format – tabular view of the
records
-rtp <number of rows> – Rows to
print before pausing
W3C W3C Extended Log format -rtp <number of rows> – Rows
to
print before pausing
IIS IIS Log format -rtp <number of rows> – Rows to
print before pausing
24 CMU/SEI-2005-HB-003
Type Format Special Parameters
SQL Sends the output to a SQL table -server <server name> –
Server
the database is on
-database <database name> –
Name of the database
TPL Output a report in a user-specified tem-
plate
-tpl <template file path> –
Path of the template file
-tplHeader <header path> – Lo-
cation of a header file to use
CMU/SEI-2005-HB-003 25
© 2005 Carnegie Mellon University 6
Log Parser Queries
Log Parser can be run with standard SQL queries on the log
files
Format:
SELECT <log fields>
[ INTO <output file name> ]
FROM <input file name>
[ WHERE <clauses> ]
The main differences are
inclusion of the INTO clause with the output filename
FROM clause specifies a filename, not a table
Help with SQL can be gotten from Log Parser: LogParser -h
GRAMMAR
SELECT Clause
INTO Clause
FROM Clause
WHERE Clause
1.2.4 Log Parser Queries
Log Parser queries are based on standard SQL queries. This
enables users to be able to select
the fields that they need displayed, the log entries to ignore, and
which to act on. This also
allows for aggregation of log information, such as counting the
number of “Error 500” re-
sponses from a web server.
The basic parts of a SQL query are the SELECT clause, the
FROM clause, and the optional
WHERE clause. SELECT indicates the fields to return. FROM
indicates the data source to use.
And WHERE indicates any conditions for rows to be included in
the results.
There are a few differences between standard SQL and the Log
Parser SQL. First, the output
location needs to be specified with the INTO clause in Log
Parser SQL. This is generally a
filename, though it might also be STDOUT if displaying the
information on the console is
desired. Next, the input is from a file, rather than from a table,
so a filename follows the
FROM clause. Lastly, the input is limited to one file. Joins are
not allowed, though subqueries
are allowed.
There is query documentation in the help command using
LogParser -h Grammar.
There are also a number of examples, both under the help
sections for specific input and out-
put formats as well as under a special examples topic:
LogParser -h Examples. For
more references on how to write SQL queries, see
http://en.wikipedia.org/wiki/SQL.
26 CMU/SEI-2005-HB-003
© 2005 Carnegie Mellon University 7
Log Parser Query Examples
Filtering out irrelevant entries
SELECT *
INTO output.log
FROM input.log
WHERE sc-status >= 400
Adjusting timestamps
SELECT LogFilename, LogRow, RemoteHostName,
RemoteLogName, UserName,
To_Localtime(Add(DateTime, Timestamp(’00:00:10’,
‘hh:mm:ss’))) AS DateTime,
Request, StatusCode, BytesSent, Referer, UserAgent, Cookie
FROM access_log
1.2.4.1 Query Examples
1.2.4.1.1 Filtering out Irrelevant Entries
When focusing on a web server’s logs, you will probably want
to separate out entries where
page requests failed to reduce the logs to the important
information. The query
SELECT * INTO output.log FROM input.log
WHERE sc-status >= 400
would return all of the log entries where the status code was
400 or above, indicating any
server errors, “Page Not Found” errors, and access denials. By
filtering out what is known to
not be a problem, (e.g., successful page requests), it reduces the
log files to a more manage-
able size. Please note that this example is for IISW3C input;
different input formats will have
different field names.
1.2.4.1.2 Adjusting Timestamps
Another common problem is that sometimes the time on one
machine may drift and not be
the same as on another machine. When you try to compare logs
generated on these two ma-
chines, events may be out of order. Log Parser can be used to
adjust a timestamp in a file.
Since we care about the entire log entry and not just the
adjusted timestamp, we will need to
specify the timestamp and all the other fields. This example
uses the NCSA input, is format-
ted for W3C output, and adds 10 seconds to all the entries.
SELECT LogFilename, LogRow, RemoteHostName,
RemoteLogName, UserName,
To_Localtime(Add(DateTime, Timestamp(’00:00:10’,
‘hh:mm:ss’)))
CMU/SEI-2005-HB-003 27
AS DateTime, Request, StatusCode, BytesSent, Referer,
UserAgent, Cookie
FROM access_log
This can also be done on IISW3C formatted logs, though the
timestamp is different so a dif-
ferent command is needed:
To_LocalTime(Add(To_Timestamp(date, time),
Timestamp(’00:00:10’,
‘hh:mm:ss’)))
This query will not change the timestamps in the original files
but will create a new file with
the adjusted timestamps, making log comparison easier.
28 CMU/SEI-2005-HB-003
© 2005 Carnegie Mellon University 8
Log Parser COM Objects
COM allows for cross-platform development. It
can be used in C++, C#, Visual Basic,
Jscript, and VBScript.
COM Objects can be used in two ways:
1. Create custom input formats (the syslog
format is not currently supported).
2. Use Log Parser functions in other
programs—add queries and input formats to
your own scripts.
1.2.5 Log Parser COM Objects
Component Object Model (COM) objects allow for cross-
platform development of programs
and scripts. Log Parser comes with a COM Application
Programming Interface (API), allow-
ing programmers to use the underlying constructions of Log
Parser either to extend its capa-
bilities or for use in their own programs.
Log Parser COM API is available for use in C++, C#, Visual
Basic, JScript, and VBScript.
The only adjustment needed to use the API is that the
LogParser.dll binary needs to be regis-
tered with the computer’s COM infrastructure so the API will be
found. Use this command:
C:LogParser>regsvr32 LogParser.dll
1.2.5.1 Creating Custom Input Formats
If the built-in input formats are too restricting, you can create
your own. There is one inter-
face to extend in C++ or Visual Basic and another for JScript
and VBScript. The resulting
script must also be registered with the computer, as in the
example above. After that, it can be
used when running Log Parser, as in this example:
C:LogParser>LogParser “SELECT * INTO out.file FROM
in.file” -i:COM -
iProgID:MySample.MyInputFormat
For more examples of this, please refer to the documentation
that comes with Log Parser 2.2.
CMU/SEI-2005-HB-003 29
1.2.5.2 Using the Log Parser COM API
The Log Parser COM API allows for all the same actions as the
command line binary, plus
more. In addition to query execution and the various input and
output formats, it is also pos-
sible to have direct access to the log entries in record format.
The MSUtil.LogQuery object is the base object for Log Parser.
All others are subclasses.
There are subclasses for each of the input and output types, as
well as the LogRecordSet and
LogRecord types.
There are two modes of query execution: batch and interactive.
Batch execution is used when
the output will be formatted with one of the output formats, as
is done in the command line
program. Interactive execution is when no output format is
specified and a LogRecordSet is
returned. The programmer can then move through the set and
process individual records as
desired.
The Log Parser documentation provides further illustration of
these concepts and specific
commands that are available.
30 CMU/SEI-2005-HB-003
© 2005 Carnegie Mellon University 9
Log Parser Execution
The Log Parser program opens a command
window in the Log Parser directory.
Log Parser is run in two ways:
1. entering the query at the command line
LogParser “SELECT * INTO out.file FROM in.file” -
i:TYPE -o:TYPE <other switches>
2. using a saved query
LogParser file:query.sql -i:TYPE -o:TYPE
1.2.6 Log Parser Execution
Log Parser will normally be run on the command line in the
special Log Parser window. To
start Log Parser go to Start Programs Log Parser 2.2 Log
Parser 2.2. This opens a
command window, displays the help information, and then gives
a command prompt with
which to work.
On the command line, you list the query, input format, and
output format. Certain formats
also have other parameters that need to be entered using some
extra commands. These com-
mands are listed in Table 5. Switches are separated from their
parameters by a colon. The
format of the line is
>LogParser “SELECT * INTO out.file FROM in.file” -i:TYPE -
o:TYPE
<switches>
Table 5: Misc Log Parser Commands
Command Function Parameters
-q Quiet mode ON or OFF (default)
-e Maximum number of errors allowed be-
fore aborting
integer, -1 is default (ignore all)
-iw Ignore warnings ON or OFF (default)
-stats Display statistics after executing query ON (default) or
OFF
CMU/SEI-2005-HB-003 31
Command Function Parameters
-c Use built-in conversion query -i:TYPE <filename>
-o:TYPE <filename>
-multiSite Send any BIN conversion output to multi-
ple files depending on the SiteID value
ON or OFF (default)
-saveDefaults Save options as default values none
-
restoreDefaults
Restore factory defaults none
-queryInfo Display query processing information, but
do not execute query
none
Queries can get long and it can be cumbersome to type the same
one over and over. You can
specify a file that contains a query on the command line instead
of the query itself. Type
file:query.sql instead of the full query. This will be particularly
useful for queries that
convert from one file type to another (aside from the predefined
conversions) and for queries
that you run repeatedly.
32 CMU/SEI-2005-HB-003
© 2005 Carnegie Mellon University 10
Summary
Log Parser 2.2 is an extremely flexible tool for parsing
and searching through logs, Event Viewer files, XML,
and other text-based files.
Use it to
convert logs from one format to another
filter out specific types of log entries into a new file
create a new log with an adjusted timestamp
write custom programs and scripts to process log files
It assumes prior knowledge of SQL.
1.2.7 Summary
Log Parser 2.2 is such an improvement on previous versions
that it is like a new program.
Log Parser is as extensible and flexible as you can make it. It
can be used for
• converting log files from one format to another for ease of
analysis
• filtering out specific types of log entries into a new log
• creating a new log with an adjusted timestamp after skew has
been determined
• writing custom programs and scripts to process log files
There is a steep learning curve with Log Parser. It is necessary
to know the fundamentals of
SQL queries to be able to process logs effectively. Once this
limitation is overcome, many
standard logs can be processed and reduced to create
meaningful output.
CMU/SEI-2005-HB-003 33
34 CMU/SEI-2005-HB-003
2 Module 2: Process Characterization
© 2005 Carnegie Mellon University
First Responders Guide to
Computer Forensics
Module 2:
Process Characterization
The identification, characterization, and forensic collection of
currently running processes on
a PC should be a frequently practiced information security
procedure. Baselining a running
system’s processes frequently and enumerating the list of
currently running processes will
allow you to monitor system activity and see whether serious
changes have been made to the
system. Running processes on a PC are at the crux of either
normal or abnormal system be-
havior. However, even after process collection, it can be a
difficult task to make the determi-
nation whether a particular process or set of processes may be
the result of an intrusion or
malicious user activity.
For most system users and security practitioners, the first alert
to abnormal system behavior
may be the trivial questions one has about the system during
routine day to day interactions
with the PC. Why is my PC responding so sluggishly? Why does
my PC show extremely
high processor activity? What is that process and why is it
running? These are commonly
asked questions. In most cases, the default reaction to abnormal
system behavior is the
widely practiced reboot. This second-nature reaction may
temporarily solve a problem, but if
the machine was truly infected or compromised you may never
find the source of the problem
because of the volatility of running processes.
CMU/SEI-2005-HB-003 35
© 2005 Carnegie Mellon University
First Responders Guide to
Computer Forensics
Understanding a Running Process
2.1 Understanding a Running Process
This module is intended to enable system users and first
responders (system and network ad-
ministrators, law enforcement, etc.) to
• better understand running processes
• forensically collect and enumerate the set of current running
processes on a system
• potentially differentiate between normal running processes and
abnormal running proc-
esses (i.e., malware) by looking at key process characteristics
36 CMU/SEI-2005-HB-003
© 2005 Carnegie Mellon University 3
Objectives
Background info on processes
– Programs, processes, threads
– Process tree structure
– Process identifiers (PIDs)
– Process descriptions
– Process analysis checklist
8 key process characteristics
– Tools and native commands for collecting process
characteristics
3 process forensic tasks
2.1.1 Objectives
The focus of this module is to demonstrate how to determine the
existence of running mal-
ware by performing basic process characterization and the
forensic examination of running
processes on a system. The module is limited to running
processes because the majority of
malware (viruses, worms, Trojans, backdoors, etc.) have an
associated process that may be
aliased, newly created, or masked that allows the malware to
perform its malicious actions on
a machine and sometimes even remain or replicate after a
reboot.
Therefore, in an attempt to identify potential rogue processes,
we will first cover some back-
ground information on processes, identify eight key process
characteristics, demonstrate fo-
rensic collection procedures, and, finally, introduce native
commands and tools that will al-
low a first responder to forensically collect the key process
characteristics for running
processes.
CMU/SEI-2005-HB-003 37
© 2005 Carnegie Mellon University 4
Programs, Processes, Threads
A computer process can be
best defined as a program in
execution. Generally, a process
consists of the following:1
executable code
data
the execution context ( e.g., the contents of
certain relevant CPU registers)
Threads are execution contexts for a process.
1 Gollman, Dieter. Computer Security. England: John Wiley &
Sons Ltd, 1999.
2.1.2 Programs, Processes, and Threads
A computer process can best be defined as a program in
execution. Generally, a process con-
sists of the following:3
• executable code
• data
• the execution context (e.g., the contents of certain relevant
CPU registers)
While the word “program” refers to the executable code (the exe
file, for exam-
ple), a process is a program that is being executed. When you
start a program in
Windows, the executable will be loaded into RAM. Windows
will then add the
new process to its internal process list and make sure the
process receives some
CPU time as well as memory and other resources. A process can
then request
any amount of resources from Windows as long as there are
resources left. Win-
dows keeps track of which processes are using which resources.
As soon as a
process is closed or terminated, all resources used by that
process will be re-
turned to Windows and will then be handed out to other
processes. Unlike mem-
ory and similar resources, CPU time cannot simply be requested
but is instead
shared equally between processes. A process can also return the
CPU to Win-
3 Gollman, Dieter. Computer Security. England: John Wiley &
Sons Ltd, 1999.
38 CMU/SEI-2005-HB-003
dows before the assigned time slice ends. This is actually what
happens most of
the time and is the reason why your CPU usage is not always at
100 %.4
The Linux Tutorial5 is a great tutorial for understanding in
depth how processes work and
also provides interactive demonstrations describing the parent-
child process relationship.
2.1.3 Threads
Threads are execution contexts. Initially each process has a
single execution context. This
execution context is called a thread. If a process requires
another execution context, it can
simply create another process. Threads were invented to provide
a lightweight mechanism for
creating multiple execution contexts. Windows and Linux
schedule threads from the operat-
ing system with the goal of providing a fair execution
environment.
The most obvious distinction between processes and threads is
that all threads of a process
share the same memory space and system-defined “facilities.”
Facilities include open file
handles (file descriptors), shared memory, process
synchronization primitives, and current
directory. Because global memory is shared and almost no new
memory must be allocated,
creating a thread is simpler and faster than creating a process.6
2.1.3.1 Displaying Threads for a Running Process
Using the Sysinternals7
PsList command line util-
ity with the –d command
line argument will display
currently running proc-
esses, threads for each
process, each process’s
thread state, and memory
statistics for each process.
This utility comes in very
handy when you need a
quick way of enumerating
all currently running proc-
esses, each process’s asso-
ciated threads, and their
thread state.
Figure 2: Example Run of PsList
4
http://www.liutilities.com/products/wintaskspro/whitepapers/pa
per8/
5 http://www.linux-
tutorial.info/modules.php?name=Tutorial&pageid=3
6 Bradford, Edward “High-Performance Programming
Techniques on Linux and Windows 2000,”
http://www.developertutorials.com/tutorials/linux/run-time-
linux-windows-050428/page1.html.
7 http://www.sysinternals.com/index.html
CMU/SEI-2005-HB-003 39
2.1.3.2 Sysinternals Process Explorer
Another Sysinternals utility called Process Explorer is an
excellent administrative tool for
showing a dynamic display of real-time system process activity.
Process Explorer’s graphical
user interface (GUI) is a more robust Windows Task Manager.
It displays in an easy to read
format what handles each process has open and what DLLs and
memory-mapped files each
process has loaded, and has a quick search capability to locate a
particular DLL or handle for
the currently running processes.8
Figure 3 is an action screenshot of the Process Explorer GUI.
The GUI displays a process list
(e.g., tree format) of currently running processes in the top half
of the pane, while the bottom
half of the pane displays all currently loaded DLLs for the
highlighted mozilla.exe process.
Figure 3: Sysinternals Process Explorer Utility
8 http://www.sysinternals.com/ntw2k/freeware/procexp.shtml
40 CMU/SEI-2005-HB-003
More importantly, the
Process Explorer utility
has a unique security fea-
ture that verifies a proc-
ess’s image (i.e., the pro-
gram/binary responsible
for the executing process).
Figure 4: Verifying a Process Image in Process Explorer
If you are curious about
whether a particular run-
ning process is a legitimate
Microsoft process, you
could verify the process
image by using the added
functionality in Process
Explorer.
To do this, you would
1. Right-click on any of the displayed processes in the Process
Explorer GUI.
2. Click Properties.
3. Click Verify. An example result is shown in Figure 4.
In addition to the Verify
option, another great feature
is the Strings tab.
Clicking on the Strings tab
will display all alpha and
numeric strings found in the
process image, as shown in
the example in Figure 5.
This may come in handy for
looking further into an un-
known process image.
It is important to point out
that this utility uses a GUI
and, therefore, is not an ideal tool that a first responder would
use in responding to a com-
puter security incident to forensically analyze running processes
on a machine. This utility
should have already been incorporated into the daily operations
for everyday system and
network troubleshooting. If you were to use the Process
Explorer utility in an incident re-
sponse situation you might actually contaminate potential
uncollected evidence from a possi-
bly compromised machine (e.g., changing Mac Times on critical
files or folders on the sys-
tem). Sysinternals’ command line utility pslist.exe is a better
choice for responding to
Figure 5: The Strings Tab in Process Explorer
CMU/SEI-2005-HB-003 41
computer security incidents and forensically collecting running
processes, simply because it
is much lighter and leaves a significantly smaller footprint.
42 CMU/SEI-2005-HB-003
© 2005 Carnegie Mellon University 5
Process Tree Structure and PIDs
2.1.4 Process Tree Structure
Windows and Linux OS envi-
ronments currently running
processes exhibit a hierarchical
tree structure. By looking at
this hierarchical tree structure
of currently running processes
we can gain insight about what
processes have started other
processes and so forth.
Figure 6: Displaying a Process Tree Using PsList
This kind of relationship is
known as the parent and child
process relationship. The crea-
tor is called the parent process,
the created is called the child
process, and the parent-child
relationship is expressed by a
process tree.
Using Sysinternals’ PsList util-
ity with the –t command line argument, we can visually display
the parent-child relationship
(i.e., the process tree) for currently running processes.
CMU/SEI-2005-HB-003 43
In the example shown in Figure 6, we can easily see that the
System.exe process is the parent
process for smss.exe and so forth as you work your way down
the process tree.
2.1.4.1 pstree (Linux)
Using the native Linux pstree command, we can easily display
the parent-child process rela-
tionship for currently running processes. Using pstree with the –
hp command line argument
will display the process tree, highlight the current process, and
display the PIDs for each
process (Figure 7).
Figure 7: Displaying a Process Tree Using pstree
2.1.4.1.1 PIDS
Process identifiers, commonly known as PIDs, are unique
integer values assigned to each
currently running process. Generally, PID assignments will be
multiples of 4 for Windows
operating systems, thus guaranteeing an even integer PID
assignment ranging from 0–
XXXX.
From a forensic or first responder perspective, PIDs offer a
quick and easy way of uniquely
identifying running processes. However, there is nothing of
forensic value in distinguishing
legitimate processes from non-legitimate processes by just
looking at the PID assignments.
What is useful is the mapping or correlation from the PID
assignments to generated system
event log tickets. We can search the system event logs for a PID
that was responsible for gen-
erating a certain ticket’s event log and map them back to the
PID or current running process.
2.1.4.2 Linux ps –A
Using Linux’s native ps command, we can quickly display each
currently running process’s
PID assignment and the command that was to used start the
process. When displaying proc-
esses in Linux, PIDs will always be displayed in sequential
order ranging from the infamous
init process, or PID 1, to XXXX (Figure 8).
44 CMU/SEI-2005-HB-003
Figure 8: Displaying PID Assignments Using ps
CMU/SEI-2005-HB-003 45
© 2005 Carnegie Mellon University 6
Process Descriptions
WinTasks Process Library
Great resource for knowing the exact purpose
and description of every single Windows
process
Categories of Windows processes
Top system processes
Top application processes
Top security threat processes
Other unfamiliar processes
Example: svchost.exe
2.1.5 Process Descriptions
There is no easy way of quickly knowing whether the current
set of running processes are
normal, especially if you do not have in-depth knowledge of the
system you are analyzing or
if proper process baselining was not implemented.
Understanding what each process is and
why it is currently running can be a difficult task. There are a
few online resources outlined
below that will attempt to alleviate some of the ambiguity of
unfamiliar Windows processes,
particularly in determining whether a process is legitimate.
Uniblue has an online hyperlinked table for each type of
Windows process. The online re-
source is a great tool for quickly checking and gathering
information about a known rogue
process or gaining information such as a description about any
legitimate Windows process.
A Uniblue hyperlinked table for each of the following process
categories is available online.9
Categories of Windows Processes
• top system processes
• top application processes
• top security threat processes
• other, unfamiliar processes
Figure 9 is a snapshot of the type of information you can obtain
from the Uniblue website for
each of the categories of Windows processes. We chose a
process description pertaining to
the svchost.exe process that is often found running on Windows
systems.
9
http://www.liutilities.com/products/wintaskspro/processlibrary/
allprocesses/
46 CMU/SEI-2005-HB-003
Figure 9: WinTasks Process Description
2.1.6 Process Hashes (National Software Reference Library)
Another valuable online resource is NIST’s National Software
Reference Library’s repository
of SHA1 and MD5 hashes for critical system and application
files. The NSRL repository in-
cludes hashes of non-English software files, operating system
files, application software files,
images, and graphics found on a typical Windows installation.
NSRL’s stored repositories of
hashes are cryptographic hashes of safe or uncorrupted files.
This is very important when
wanting to compare your own system’s critical file hashes
against a known safe set. This
online resource provides the cryptographic hashes free of
charge; they are downloadable as
ISO images.
Once you’ve burned the images to a CD-ROM, you can unzip
the zipped files and get started.
You’ll find a list and description of the five text files that come
with the NIST Operating Sys-
tem ISO. The Operating System ISO is important because it
contains safe hashes of executa-
bles and DLL files. These are common types of critical files on
Windows machines that be-
come corrupted or replaced with compromised ones. NSRL
maintains and updates the ISO
images periodically (non-English software, operating systems,
application software, and im-
ages and graphics) as new updates and patches are released.
Operating System ISO:
• Hashes.txt – contains hashes for the files so you can check the
integrity of the
downloaded files
• Version.txt – displays the version and date of the downloaded
ISO. Keep in mind these
ISOs will be updated periodically, so it is import to check the
version file for each ISO
file because hashes may change with different versions.
CMU/SEI-2005-HB-003 47
• NSRLMfg.txt – displays the Manufacture Code (MfgCode) and
Name (MfgName) of the
supported manufacturers
• NSRLProd.txt – displays the supported “ProductCode,”
“ProductName,” “Product Ver-
sion,” “OpSystemCode,” “MfgCode,” “Language,” and
“ApplicationType”
• NSRLFile.txt – This is the file that actually has the list of the
SHA1 and MD5 hashes that
can be used for checking critical associated OS files. The
format of each entry in the text
file goes as follows:
SHA-1, MD5, CRC32, FileName, FileSize, ProductCode,
OpSystemCode, SpecialCode
Here is an example of one entry in the NSRLFile.txt text file
that contains a list of SHA-1 and
MD5 hashes. As you can see, the entry corresponds to the
mshearts.exe program for a Win-
dows XP machine and has a SHA-1 and MD5 hash for the
mshearts executable.
"001A6C9B8D9471B0A3B4F46302DB951F4D877227","BE1B8
5306352E0AC901EC0850
6792B6B","CB76D275","mshearts.exe",126976,1567,"WINXP",
""
48 CMU/SEI-2005-HB-003
© 2005 Carnegie Mellon University 7
Process Analysis Checklist
2.1.7 Process Analysis Checklist
The procedure of inspecting processes for unexpected behavior
or characteristics involves
many detailed actions. The abbreviated checklist below contains
questions about processes
that you may wish to ask yourself and characteristics you may
wish to enumerate. In the fol-
lowing paragraphs we are going to demonstrate how to
forensically collect some identified
items and some extra process characteristics using native
commands and third-party tools.
• How was this process initiated?
− By what user?
− From what program or other process?
• What is the current execution status of each process?
− Is it running, stopped, suspended, swapped out, exiting, or in
some other unexpected
state?
− Does the process continue to appear among active processes
after it should have ex-
ited?
− Is it missing from among the processes you expected to be
active?
• In what environment is this process executing?
− What system settings are in effect for this process?
− Did the process inherit any environment settings from other
processes?
− How might the current environment settings affect how the
process operates and
what it can access?
• With what options or input arguments is the process
executing? Are these appropriate
settings?
CMU/SEI-2005-HB-003 49
• Are the system resources (CPU time, memory usage, etc.)
being utilized by each process
within expected consumption amounts?
− Are there any processes that seem to be tying up an unusually
large amount of system
resources?
− Are any processes not performing as expected because they
don’t seem to be getting
enough resources?
• What is the relationship between this process and other
processes executing on the sys-
tem? What are the characteristics of the related processes?
• What files have been opened by the processes executing on the
system?
− Are they authorized to have these files open?
− Have the files been opened with excessive privileges (e.g.,
opened with read-write
capability when there is no reason for the process to write to the
file)?
• Have there been any unexpected accesses to sensitive system
files or other private data,
such as password files?
− From what process were the accesses made?
− With which user is that process associated?
• Have there been any unauthorized attempts to access a file?
Has the system reported any
file access errors?
50 CMU/SEI-2005-HB-003
© 2005 Carnegie Mellon University 8
8 Process Characteristics
1. Process filename
2. Open ports
3. Open files
4. Base priority
5. Start, stop, elapsed
times
6. Location (i.e., full path)
of process image
7. Survivable processes
8. Loaded DLLs or libraries
top –n 14. pslist.exe
lsof3. handle.exe
netstat -tap2. fport.exe
ps -aux1. ps.exe
lsof –p PID6. listdlls.exe
ps -auxw5. pslist.exe
psloglist.exe
checkconfig
crontab
7. autorunsc.exe
ldd8. listdlls.exe
2.1.8 Common Process Characteristics
We have outlined the eight key process characteristics that
follow along with the Process
Analysis Checklist, as well as a set of tools and native
commands a first responder can use to
collect those characteristics. Note that this is not an exhaustive
list of running process charac-
teristics. But collecting these eight process characteristics for a
potential rogue can signifi-
cantly aid in determining whether that running process is
legitimate or not.
2.1.8.1 Process Filenames
The process filename is the filename of the process image that
was executed to initiate the
currently running process. In most cases you can look at the
process filename to determine
whether the current running process is a legitimate Windows or
Linux process.
CMU/SEI-2005-HB-003 51
2.1.8.1.1 pulist (Windows)
Using the pulist.exe command
line utility, a Windows Resource
kit utility, we can generate a list
of currently running processes
and the associated filenames to
be examined for unexpected
process filenames and unusual
user identifications.
In the screenshot in Figure 10,
the four processes that we identi-
fied to be rogue processes judg-
ing by the process filenames are
tini.exe, klogger.exe, svchost1.exe, and qfskrtwj.exe.
Figure 10: Listing Process Filenames Using pulist
2.1.8.1.2 ps (Linux)
The Linux ps command can be used to display the filename of
the process image as well as
other things outlined in Table 6 and Table 7.
Table 6: A Subset of ps Options
Option Description
$ ps –ux View current processes
$ ps –U user View other system users running processes
$ ps –C program_name View all occurrences of a program
$ ps –p4, 8, 2203 View selected processes 4, 8, 2203
$ ps –efww View all processes with full command lines
Table 7 describes some output headings for ps and top output.
Table 7: Output Headings for ps and top
Field Description
USER Username of the process owner
PID Process ID
%CPU Percentage of the CPU this process is using
%MEM Percentage of real memory this process is using
VSZ Virtual size of the process, in kilobytes
52 CMU/SEI-2005-HB-003
Field Description
RSS
TT
STAT Current Process Status
R= Runnable D = In disk wait
I = Sleeping (< 20 sec) S = Sleeping (> 20 sec)
T = Stopped Z = Zombie
Additional Flags
L = Some pages are locked in core (for rawio)
S = Process is a session leader (head of control terminal)
W = Process is swapped out
+ = Process is in the foreground of its control terminal
START Time the process was started
TIME CPU time the process has consumed
COMMAND Command name and arguments
2.1.8.2 Open Ports
Another critical process characteristic is the number of ports a
particular process has open.
Processes that have unfamiliar or unnecessary TCP or UDP
ports open could indicate that the
process is a backdoor or Trojan allowing remote access to the
machine.
Figure 11: Displaying Open Ports Using fport
2.1.8.2.1 fport (Windows)
The fport.exe command line
utility, like the native win-
dows netstat –anb com-
mand, displays all open
TCP/IP and UDP ports and
maps them to the owning
application as shown in
Figure 11.
Fport also maps those ports
to running processes with
the PID, process name, and
path to the process image.
CMU/SEI-2005-HB-003 53
2.1.8.2.2 netstat (Linux)
Figure 12: Displaying Open Ports Using netstat
The Linux netstat command
can be used to display all
TCP/IP and UDP ports that
are open in relation to a
running process.
Using netstat with the –tap
command line arguments
will display all running
processes that have a
TCP/IP port open, the PID
of the process, the port
number assignment, the
foreign address if con-
nected, and the state of the
port (Figure 12).
54 CMU/SEI-2005-HB-003
© 2005 Carnegie Mellon University 9
Potential Rogue Processes
C:..System321024284NAspoolsv.exe
C:..System329887777notepad.exe:alds.exe
C:..System3231280svchost1.exe
C:WINDOWS228827374cuoikqkxvs.exe
LocationPIDPortFilename
2.1.8.3 Open Files
Open files associated with an executing process should not be
overlooked. Often, rogue proc-
esses such as a key logger or network sniffer will have an
associated open file to capture their
collected information. One quick way to determine whether a
potential rogue process has any
current files open is to use the handle.exe utility for Windows
and the native lsof command
for Linux.
Figure 13: Viewing Handles Using handle
2.1.8.3.1 handle (Windows)
The handle.exe utility displays in-
formation about open handles for
processes running on the system.
You can use it to view the pro-
grams that have a file open or to
view the object types and names of
all the handles of a program.
The screenshot in Figure 13 dem-
onstrates how we can use the han-
dle.exe utility to look at all open
handles for the potential rogue
process svchost1.
CMU/SEI-2005-HB-003 55
2.1.8.3.2 lsof (Linux)
The native lsof command without any command line arguments
will display all open files
belonging to all currently running processes. The three
screenshots (Figure 14, Figure 15, and
Figure 16) demonstrate lsof’s command versatility.
Figure 14: Displaying Which Process Has Port 6002 Open
Figure 15: Displaying Who Has the Bash Shell Open
Figure 16: Displaying All the Currently Open Files by the User
Root
2.1.8.4 Base Priority
When a process is initially executed for both Windows and
Linux it is assigned a base prior-
ity value. That value determines what priority it has over other
processes in regard to the
computer resources it is assigned and consumes, such as
memory and CPU time. When look-
ing at a potential rogue or runaway process you may want to
check the assigned priority
value.
56 CMU/SEI-2005-HB-003
2.1.8.4.1 pslist (Windows)
Figure 17: Listing Priority Levels Using pslist
Using Sysinternal’s pslist.exe
utility we can enumerate the
priority levels for each current
running process by looking at
the “Pri” column. The screen-
shot in Figure 17 demonstrates
how to display priority values
for running processes.
2.1.8.4.2 top (Linux)
Using the native Linux top
command we can enumerate
the priority levels for each cur-
rent running process. Linux
processes will generally have a
priority value between -20 and
19, where the value of -20 is
the highest and 19 is the lowest
priority value (Figure 18).
Since the top command only
displays the top current proc-
esses, if we need to enumerate
the process priority value for a
particular process we can use
the top command with the
command line arguments –p
PID –n 1, as shown in Figure 19.
Figure 18: Listing Priority Levels Using top
Figure 19: Displaying the Priority Level for a Specific Process
CMU/SEI-2005-HB-003 57
2.1.8.5 Process Times and Terminated Processes
2.1.8.5.1 Process Start Time
The process start time is the point in time when the process
started executing. An interesting
characteristic of rogue processes is that they generally will have
a start time that is a few sec-
onds or few minutes later than all other legitimate running
processes. To discover processes
that may have started later in time after the boot cycle you can
use the psuptime.exe and
pslist.exe command line tools. These tools will tell you when a
process first started.
psuptime (Windows)
Figure 20: Checking Uptime Using psuptime
To calculate the initial start time of a
process, we first have to collect the up-
time or how long the system has been
running. We can do this using the psup-
time.exe utility.
Once we have the uptime of the system,
the next step is to enumerate all of the
elapsed times for the current set of run-
ning processes using pslist.exe.
2.1.8.5.2 Process Elapsed Time
pslist (Windows)
Once we have the uptime of the system and the elapsed time for
a particular process we can
simply subtract the (Uptime – Elapsed time) to calculate Start
Time for any given process.
For example, the Uptime of the system was = 27h:41m:24s and
the Elapsed Time of the
Svchost.exe process was = 3h:34s:41s; therefore, the Start Time
for the Svchost.exe process
was 24h:6m:43s (12:06:43 a.m.).
Figure 21: Checking Elapsed Time for a Process Using pslist
58 CMU/SEI-2005-HB-003
Note that, by just looking at the pslist.exe output, more
specifically the elapsed times, you
can determine which processes started after the boot process.
2.1.8.5.3 Terminated Processes
Suspended or prematurely terminated processes can be
indicators of abnormal system behav-
ior. Often in computer security situations, a critical system
process will be suspended or ter-
minated. For example, an antivirus or other critical process may
be terminated in an attempt
to prevent the host system’s security mechanisms from checking
for running malware on the
system. Therefore, terminated processes should be collected and
identified.
One method to check for terminated processes in Windows,
assuming proper auditing is en-
abled, is reviewing the event logs.
The screenshot in Figure 22 dis-
plays a system event log using the
Windows Event Viewer. A termi-
nated process in Windows exhibits
an Event ID of 7034.
Figure 22: Windows Event Log
Knowing what Event ID to search
for, we can use a command line
utility called psloglist.exe devel-
Login id  jsnyder47Password  XeGACUkEN8CONNECTING TO THE.docx

More Related Content

Similar to Login id jsnyder47Password XeGACUkEN8CONNECTING TO THE.docx

Mixpanel Integration in Android
Mixpanel Integration in AndroidMixpanel Integration in Android
Mixpanel Integration in Androidmobi fly
 
CloudStudio User manual (basic edition):
CloudStudio User manual (basic edition):CloudStudio User manual (basic edition):
CloudStudio User manual (basic edition):comworks
 
Blockchain Hyperledger Lab
Blockchain Hyperledger LabBlockchain Hyperledger Lab
Blockchain Hyperledger LabDev_Events
 
Start Guide for data based optimization techniques
Start Guide for data based  optimization techniquesStart Guide for data based  optimization techniques
Start Guide for data based optimization techniquesShatvikMishra1
 
N-Tier Application with Windows Forms - Deployment and Security
N-Tier Application with Windows Forms - Deployment and SecurityN-Tier Application with Windows Forms - Deployment and Security
N-Tier Application with Windows Forms - Deployment and SecurityPeter Gfader
 
Jenkins Setup Document
Jenkins Setup DocumentJenkins Setup Document
Jenkins Setup Documentmobi fly
 
Bca sem 5 c# practical
Bca sem 5 c# practicalBca sem 5 c# practical
Bca sem 5 c# practicalHitesh Patel
 
Exam viewassessmentsuiteuserguide version 9
Exam viewassessmentsuiteuserguide version 9Exam viewassessmentsuiteuserguide version 9
Exam viewassessmentsuiteuserguide version 9William McIntosh
 
Laporan Praktikum Keamanan Siber - Tugas 1 - Kelas C - Kelompok 3.pdf
Laporan Praktikum Keamanan Siber - Tugas 1 - Kelas C - Kelompok 3.pdfLaporan Praktikum Keamanan Siber - Tugas 1 - Kelas C - Kelompok 3.pdf
Laporan Praktikum Keamanan Siber - Tugas 1 - Kelas C - Kelompok 3.pdfIGedeArieYogantaraSu
 
Codemotion Rome 2015 Bluemix Lab Tutorial
Codemotion Rome 2015 Bluemix Lab TutorialCodemotion Rome 2015 Bluemix Lab Tutorial
Codemotion Rome 2015 Bluemix Lab Tutorialgjuljo
 
8- Siemens Open Library - SIMATIC Visualization Architect (SiVArc).pdf
8- Siemens Open Library - SIMATIC Visualization Architect (SiVArc).pdf8- Siemens Open Library - SIMATIC Visualization Architect (SiVArc).pdf
8- Siemens Open Library - SIMATIC Visualization Architect (SiVArc).pdfEMERSON EDUARDO RODRIGUES
 
MN502Overview of Network SecurityPage 6 of 6Assessment D.docx
MN502Overview of Network SecurityPage 6 of 6Assessment D.docxMN502Overview of Network SecurityPage 6 of 6Assessment D.docx
MN502Overview of Network SecurityPage 6 of 6Assessment D.docxraju957290
 
6- Siemens Open Library - PID Configuration.pdf
6- Siemens Open Library - PID Configuration.pdf6- Siemens Open Library - PID Configuration.pdf
6- Siemens Open Library - PID Configuration.pdfEMERSON EDUARDO RODRIGUES
 
975-0743-01-01_Rev-B(Quick Setup Conext Insight)
975-0743-01-01_Rev-B(Quick Setup Conext Insight)975-0743-01-01_Rev-B(Quick Setup Conext Insight)
975-0743-01-01_Rev-B(Quick Setup Conext Insight)Jayvee Vergara
 
Instant chime plugin_installation_guide_for_ibm_sametime_9
Instant chime plugin_installation_guide_for_ibm_sametime_9Instant chime plugin_installation_guide_for_ibm_sametime_9
Instant chime plugin_installation_guide_for_ibm_sametime_9a8us
 
August Patch Tuesday Analysis
August Patch Tuesday AnalysisAugust Patch Tuesday Analysis
August Patch Tuesday AnalysisIvanti
 

Similar to Login id jsnyder47Password XeGACUkEN8CONNECTING TO THE.docx (20)

Cloud flow designer: Salesforce.com
Cloud flow designer: Salesforce.comCloud flow designer: Salesforce.com
Cloud flow designer: Salesforce.com
 
Mixpanel Integration in Android
Mixpanel Integration in AndroidMixpanel Integration in Android
Mixpanel Integration in Android
 
SCCM HOw to
SCCM HOw toSCCM HOw to
SCCM HOw to
 
CloudStudio User manual (basic edition):
CloudStudio User manual (basic edition):CloudStudio User manual (basic edition):
CloudStudio User manual (basic edition):
 
Blockchain Hyperledger Lab
Blockchain Hyperledger LabBlockchain Hyperledger Lab
Blockchain Hyperledger Lab
 
Start Guide for data based optimization techniques
Start Guide for data based  optimization techniquesStart Guide for data based  optimization techniques
Start Guide for data based optimization techniques
 
Microsoft Lync Server 2010 Installation
Microsoft Lync Server 2010 InstallationMicrosoft Lync Server 2010 Installation
Microsoft Lync Server 2010 Installation
 
N-Tier Application with Windows Forms - Deployment and Security
N-Tier Application with Windows Forms - Deployment and SecurityN-Tier Application with Windows Forms - Deployment and Security
N-Tier Application with Windows Forms - Deployment and Security
 
Jenkins Setup Document
Jenkins Setup DocumentJenkins Setup Document
Jenkins Setup Document
 
Bca sem 5 c# practical
Bca sem 5 c# practicalBca sem 5 c# practical
Bca sem 5 c# practical
 
Exam viewassessmentsuiteuserguide version 9
Exam viewassessmentsuiteuserguide version 9Exam viewassessmentsuiteuserguide version 9
Exam viewassessmentsuiteuserguide version 9
 
Exam view user guide v9
Exam view user guide v9Exam view user guide v9
Exam view user guide v9
 
Laporan Praktikum Keamanan Siber - Tugas 1 - Kelas C - Kelompok 3.pdf
Laporan Praktikum Keamanan Siber - Tugas 1 - Kelas C - Kelompok 3.pdfLaporan Praktikum Keamanan Siber - Tugas 1 - Kelas C - Kelompok 3.pdf
Laporan Praktikum Keamanan Siber - Tugas 1 - Kelas C - Kelompok 3.pdf
 
Codemotion Rome 2015 Bluemix Lab Tutorial
Codemotion Rome 2015 Bluemix Lab TutorialCodemotion Rome 2015 Bluemix Lab Tutorial
Codemotion Rome 2015 Bluemix Lab Tutorial
 
8- Siemens Open Library - SIMATIC Visualization Architect (SiVArc).pdf
8- Siemens Open Library - SIMATIC Visualization Architect (SiVArc).pdf8- Siemens Open Library - SIMATIC Visualization Architect (SiVArc).pdf
8- Siemens Open Library - SIMATIC Visualization Architect (SiVArc).pdf
 
MN502Overview of Network SecurityPage 6 of 6Assessment D.docx
MN502Overview of Network SecurityPage 6 of 6Assessment D.docxMN502Overview of Network SecurityPage 6 of 6Assessment D.docx
MN502Overview of Network SecurityPage 6 of 6Assessment D.docx
 
6- Siemens Open Library - PID Configuration.pdf
6- Siemens Open Library - PID Configuration.pdf6- Siemens Open Library - PID Configuration.pdf
6- Siemens Open Library - PID Configuration.pdf
 
975-0743-01-01_Rev-B(Quick Setup Conext Insight)
975-0743-01-01_Rev-B(Quick Setup Conext Insight)975-0743-01-01_Rev-B(Quick Setup Conext Insight)
975-0743-01-01_Rev-B(Quick Setup Conext Insight)
 
Instant chime plugin_installation_guide_for_ibm_sametime_9
Instant chime plugin_installation_guide_for_ibm_sametime_9Instant chime plugin_installation_guide_for_ibm_sametime_9
Instant chime plugin_installation_guide_for_ibm_sametime_9
 
August Patch Tuesday Analysis
August Patch Tuesday AnalysisAugust Patch Tuesday Analysis
August Patch Tuesday Analysis
 

More from SHIVA101531

Answer the following questions in a minimum of 1-2 paragraphs ea.docx
Answer the following questions in a minimum of 1-2 paragraphs ea.docxAnswer the following questions in a minimum of 1-2 paragraphs ea.docx
Answer the following questions in a minimum of 1-2 paragraphs ea.docxSHIVA101531
 
Answer the following questions using scholarly sources as references.docx
Answer the following questions using scholarly sources as references.docxAnswer the following questions using scholarly sources as references.docx
Answer the following questions using scholarly sources as references.docxSHIVA101531
 
Answer the following questions about this case studyClient .docx
Answer the following questions about this case studyClient .docxAnswer the following questions about this case studyClient .docx
Answer the following questions about this case studyClient .docxSHIVA101531
 
Answer the following questions using art vocabulary and ideas from L.docx
Answer the following questions using art vocabulary and ideas from L.docxAnswer the following questions using art vocabulary and ideas from L.docx
Answer the following questions using art vocabulary and ideas from L.docxSHIVA101531
 
Answer the following questions in a total of 3 pages (900 words). My.docx
Answer the following questions in a total of 3 pages (900 words). My.docxAnswer the following questions in a total of 3 pages (900 words). My.docx
Answer the following questions in a total of 3 pages (900 words). My.docxSHIVA101531
 
Answer the following questions No single word responses (at lea.docx
Answer the following questions No single word responses (at lea.docxAnswer the following questions No single word responses (at lea.docx
Answer the following questions No single word responses (at lea.docxSHIVA101531
 
Answer the following questions based on the ethnography Dancing Skel.docx
Answer the following questions based on the ethnography Dancing Skel.docxAnswer the following questions based on the ethnography Dancing Skel.docx
Answer the following questions based on the ethnography Dancing Skel.docxSHIVA101531
 
Answer the following questions to the best of your ability1) De.docx
Answer the following questions to the best of your ability1) De.docxAnswer the following questions to the best of your ability1) De.docx
Answer the following questions to the best of your ability1) De.docxSHIVA101531
 
Answer the following questionDo you think it is necessary to .docx
Answer the following questionDo you think it is necessary to .docxAnswer the following questionDo you think it is necessary to .docx
Answer the following questionDo you think it is necessary to .docxSHIVA101531
 
Answer the following question. Use facts and examples to support.docx
Answer the following question. Use facts and examples to support.docxAnswer the following question. Use facts and examples to support.docx
Answer the following question. Use facts and examples to support.docxSHIVA101531
 
Answer the bottom questions  in apa format and decent answer no shor.docx
Answer the bottom questions  in apa format and decent answer no shor.docxAnswer the bottom questions  in apa format and decent answer no shor.docx
Answer the bottom questions  in apa format and decent answer no shor.docxSHIVA101531
 
Answer the following below using the EXCEL attachment. chapter 5.docx
Answer the following below using the EXCEL attachment. chapter 5.docxAnswer the following below using the EXCEL attachment. chapter 5.docx
Answer the following below using the EXCEL attachment. chapter 5.docxSHIVA101531
 
Answer the following prompts about A Germanic People Create a Code .docx
Answer the following prompts about A Germanic People Create a Code .docxAnswer the following prompts about A Germanic People Create a Code .docx
Answer the following prompts about A Germanic People Create a Code .docxSHIVA101531
 
Answer the following discussion board question below minumun 25.docx
Answer the following discussion board question below minumun 25.docxAnswer the following discussion board question below minumun 25.docx
Answer the following discussion board question below minumun 25.docxSHIVA101531
 
Answer the following questions about IT Project Management. What.docx
Answer the following questions about IT Project Management. What.docxAnswer the following questions about IT Project Management. What.docx
Answer the following questions about IT Project Management. What.docxSHIVA101531
 
Answer the following in at least 100 words minimum each1.Of.docx
Answer the following in at least 100 words minimum each1.Of.docxAnswer the following in at least 100 words minimum each1.Of.docx
Answer the following in at least 100 words minimum each1.Of.docxSHIVA101531
 
Answer the following questions(at least 200 words) and responses 2 p.docx
Answer the following questions(at least 200 words) and responses 2 p.docxAnswer the following questions(at least 200 words) and responses 2 p.docx
Answer the following questions(at least 200 words) and responses 2 p.docxSHIVA101531
 
Answer the following questions in a Word document and upload it by M.docx
Answer the following questions in a Word document and upload it by M.docxAnswer the following questions in a Word document and upload it by M.docx
Answer the following questions in a Word document and upload it by M.docxSHIVA101531
 
Answer the following questions in complete sentences. Each answer sh.docx
Answer the following questions in complete sentences. Each answer sh.docxAnswer the following questions in complete sentences. Each answer sh.docx
Answer the following questions in complete sentences. Each answer sh.docxSHIVA101531
 
ANSWER THE DISCUSSION QUESTION 250 WORDS MINDiscussion Q.docx
ANSWER THE DISCUSSION QUESTION 250 WORDS MINDiscussion Q.docxANSWER THE DISCUSSION QUESTION 250 WORDS MINDiscussion Q.docx
ANSWER THE DISCUSSION QUESTION 250 WORDS MINDiscussion Q.docxSHIVA101531
 

More from SHIVA101531 (20)

Answer the following questions in a minimum of 1-2 paragraphs ea.docx
Answer the following questions in a minimum of 1-2 paragraphs ea.docxAnswer the following questions in a minimum of 1-2 paragraphs ea.docx
Answer the following questions in a minimum of 1-2 paragraphs ea.docx
 
Answer the following questions using scholarly sources as references.docx
Answer the following questions using scholarly sources as references.docxAnswer the following questions using scholarly sources as references.docx
Answer the following questions using scholarly sources as references.docx
 
Answer the following questions about this case studyClient .docx
Answer the following questions about this case studyClient .docxAnswer the following questions about this case studyClient .docx
Answer the following questions about this case studyClient .docx
 
Answer the following questions using art vocabulary and ideas from L.docx
Answer the following questions using art vocabulary and ideas from L.docxAnswer the following questions using art vocabulary and ideas from L.docx
Answer the following questions using art vocabulary and ideas from L.docx
 
Answer the following questions in a total of 3 pages (900 words). My.docx
Answer the following questions in a total of 3 pages (900 words). My.docxAnswer the following questions in a total of 3 pages (900 words). My.docx
Answer the following questions in a total of 3 pages (900 words). My.docx
 
Answer the following questions No single word responses (at lea.docx
Answer the following questions No single word responses (at lea.docxAnswer the following questions No single word responses (at lea.docx
Answer the following questions No single word responses (at lea.docx
 
Answer the following questions based on the ethnography Dancing Skel.docx
Answer the following questions based on the ethnography Dancing Skel.docxAnswer the following questions based on the ethnography Dancing Skel.docx
Answer the following questions based on the ethnography Dancing Skel.docx
 
Answer the following questions to the best of your ability1) De.docx
Answer the following questions to the best of your ability1) De.docxAnswer the following questions to the best of your ability1) De.docx
Answer the following questions to the best of your ability1) De.docx
 
Answer the following questionDo you think it is necessary to .docx
Answer the following questionDo you think it is necessary to .docxAnswer the following questionDo you think it is necessary to .docx
Answer the following questionDo you think it is necessary to .docx
 
Answer the following question. Use facts and examples to support.docx
Answer the following question. Use facts and examples to support.docxAnswer the following question. Use facts and examples to support.docx
Answer the following question. Use facts and examples to support.docx
 
Answer the bottom questions  in apa format and decent answer no shor.docx
Answer the bottom questions  in apa format and decent answer no shor.docxAnswer the bottom questions  in apa format and decent answer no shor.docx
Answer the bottom questions  in apa format and decent answer no shor.docx
 
Answer the following below using the EXCEL attachment. chapter 5.docx
Answer the following below using the EXCEL attachment. chapter 5.docxAnswer the following below using the EXCEL attachment. chapter 5.docx
Answer the following below using the EXCEL attachment. chapter 5.docx
 
Answer the following prompts about A Germanic People Create a Code .docx
Answer the following prompts about A Germanic People Create a Code .docxAnswer the following prompts about A Germanic People Create a Code .docx
Answer the following prompts about A Germanic People Create a Code .docx
 
Answer the following discussion board question below minumun 25.docx
Answer the following discussion board question below minumun 25.docxAnswer the following discussion board question below minumun 25.docx
Answer the following discussion board question below minumun 25.docx
 
Answer the following questions about IT Project Management. What.docx
Answer the following questions about IT Project Management. What.docxAnswer the following questions about IT Project Management. What.docx
Answer the following questions about IT Project Management. What.docx
 
Answer the following in at least 100 words minimum each1.Of.docx
Answer the following in at least 100 words minimum each1.Of.docxAnswer the following in at least 100 words minimum each1.Of.docx
Answer the following in at least 100 words minimum each1.Of.docx
 
Answer the following questions(at least 200 words) and responses 2 p.docx
Answer the following questions(at least 200 words) and responses 2 p.docxAnswer the following questions(at least 200 words) and responses 2 p.docx
Answer the following questions(at least 200 words) and responses 2 p.docx
 
Answer the following questions in a Word document and upload it by M.docx
Answer the following questions in a Word document and upload it by M.docxAnswer the following questions in a Word document and upload it by M.docx
Answer the following questions in a Word document and upload it by M.docx
 
Answer the following questions in complete sentences. Each answer sh.docx
Answer the following questions in complete sentences. Each answer sh.docxAnswer the following questions in complete sentences. Each answer sh.docx
Answer the following questions in complete sentences. Each answer sh.docx
 
ANSWER THE DISCUSSION QUESTION 250 WORDS MINDiscussion Q.docx
ANSWER THE DISCUSSION QUESTION 250 WORDS MINDiscussion Q.docxANSWER THE DISCUSSION QUESTION 250 WORDS MINDiscussion Q.docx
ANSWER THE DISCUSSION QUESTION 250 WORDS MINDiscussion Q.docx
 

Recently uploaded

Accessible design: Minimum effort, maximum impact
Accessible design: Minimum effort, maximum impactAccessible design: Minimum effort, maximum impact
Accessible design: Minimum effort, maximum impactdawncurless
 
Basic Civil Engineering first year Notes- Chapter 4 Building.pptx
Basic Civil Engineering first year Notes- Chapter 4 Building.pptxBasic Civil Engineering first year Notes- Chapter 4 Building.pptx
Basic Civil Engineering first year Notes- Chapter 4 Building.pptxDenish Jangid
 
Application orientated numerical on hev.ppt
Application orientated numerical on hev.pptApplication orientated numerical on hev.ppt
Application orientated numerical on hev.pptRamjanShidvankar
 
Beyond the EU: DORA and NIS 2 Directive's Global Impact
Beyond the EU: DORA and NIS 2 Directive's Global ImpactBeyond the EU: DORA and NIS 2 Directive's Global Impact
Beyond the EU: DORA and NIS 2 Directive's Global ImpactPECB
 
Gardella_PRCampaignConclusion Pitch Letter
Gardella_PRCampaignConclusion Pitch LetterGardella_PRCampaignConclusion Pitch Letter
Gardella_PRCampaignConclusion Pitch LetterMateoGardella
 
Mixin Classes in Odoo 17 How to Extend Models Using Mixin Classes
Mixin Classes in Odoo 17  How to Extend Models Using Mixin ClassesMixin Classes in Odoo 17  How to Extend Models Using Mixin Classes
Mixin Classes in Odoo 17 How to Extend Models Using Mixin ClassesCeline George
 
Sports & Fitness Value Added Course FY..
Sports & Fitness Value Added Course FY..Sports & Fitness Value Added Course FY..
Sports & Fitness Value Added Course FY..Disha Kariya
 
Grant Readiness 101 TechSoup and Remy Consulting
Grant Readiness 101 TechSoup and Remy ConsultingGrant Readiness 101 TechSoup and Remy Consulting
Grant Readiness 101 TechSoup and Remy ConsultingTechSoup
 
psychiatric nursing HISTORY COLLECTION .docx
psychiatric  nursing HISTORY  COLLECTION  .docxpsychiatric  nursing HISTORY  COLLECTION  .docx
psychiatric nursing HISTORY COLLECTION .docxPoojaSen20
 
Making and Justifying Mathematical Decisions.pdf
Making and Justifying Mathematical Decisions.pdfMaking and Justifying Mathematical Decisions.pdf
Making and Justifying Mathematical Decisions.pdfChris Hunter
 
SECOND SEMESTER TOPIC COVERAGE SY 2023-2024 Trends, Networks, and Critical Th...
SECOND SEMESTER TOPIC COVERAGE SY 2023-2024 Trends, Networks, and Critical Th...SECOND SEMESTER TOPIC COVERAGE SY 2023-2024 Trends, Networks, and Critical Th...
SECOND SEMESTER TOPIC COVERAGE SY 2023-2024 Trends, Networks, and Critical Th...KokoStevan
 
Z Score,T Score, Percential Rank and Box Plot Graph
Z Score,T Score, Percential Rank and Box Plot GraphZ Score,T Score, Percential Rank and Box Plot Graph
Z Score,T Score, Percential Rank and Box Plot GraphThiyagu K
 
Russian Escort Service in Delhi 11k Hotel Foreigner Russian Call Girls in Delhi
Russian Escort Service in Delhi 11k Hotel Foreigner Russian Call Girls in DelhiRussian Escort Service in Delhi 11k Hotel Foreigner Russian Call Girls in Delhi
Russian Escort Service in Delhi 11k Hotel Foreigner Russian Call Girls in Delhikauryashika82
 
Ecological Succession. ( ECOSYSTEM, B. Pharmacy, 1st Year, Sem-II, Environmen...
Ecological Succession. ( ECOSYSTEM, B. Pharmacy, 1st Year, Sem-II, Environmen...Ecological Succession. ( ECOSYSTEM, B. Pharmacy, 1st Year, Sem-II, Environmen...
Ecological Succession. ( ECOSYSTEM, B. Pharmacy, 1st Year, Sem-II, Environmen...Shubhangi Sonawane
 
Explore beautiful and ugly buildings. Mathematics helps us create beautiful d...
Explore beautiful and ugly buildings. Mathematics helps us create beautiful d...Explore beautiful and ugly buildings. Mathematics helps us create beautiful d...
Explore beautiful and ugly buildings. Mathematics helps us create beautiful d...christianmathematics
 
How to Give a Domain for a Field in Odoo 17
How to Give a Domain for a Field in Odoo 17How to Give a Domain for a Field in Odoo 17
How to Give a Domain for a Field in Odoo 17Celine George
 
Holdier Curriculum Vitae (April 2024).pdf
Holdier Curriculum Vitae (April 2024).pdfHoldier Curriculum Vitae (April 2024).pdf
Holdier Curriculum Vitae (April 2024).pdfagholdier
 

Recently uploaded (20)

Accessible design: Minimum effort, maximum impact
Accessible design: Minimum effort, maximum impactAccessible design: Minimum effort, maximum impact
Accessible design: Minimum effort, maximum impact
 
Basic Civil Engineering first year Notes- Chapter 4 Building.pptx
Basic Civil Engineering first year Notes- Chapter 4 Building.pptxBasic Civil Engineering first year Notes- Chapter 4 Building.pptx
Basic Civil Engineering first year Notes- Chapter 4 Building.pptx
 
Application orientated numerical on hev.ppt
Application orientated numerical on hev.pptApplication orientated numerical on hev.ppt
Application orientated numerical on hev.ppt
 
Beyond the EU: DORA and NIS 2 Directive's Global Impact
Beyond the EU: DORA and NIS 2 Directive's Global ImpactBeyond the EU: DORA and NIS 2 Directive's Global Impact
Beyond the EU: DORA and NIS 2 Directive's Global Impact
 
Gardella_PRCampaignConclusion Pitch Letter
Gardella_PRCampaignConclusion Pitch LetterGardella_PRCampaignConclusion Pitch Letter
Gardella_PRCampaignConclusion Pitch Letter
 
Mixin Classes in Odoo 17 How to Extend Models Using Mixin Classes
Mixin Classes in Odoo 17  How to Extend Models Using Mixin ClassesMixin Classes in Odoo 17  How to Extend Models Using Mixin Classes
Mixin Classes in Odoo 17 How to Extend Models Using Mixin Classes
 
Sports & Fitness Value Added Course FY..
Sports & Fitness Value Added Course FY..Sports & Fitness Value Added Course FY..
Sports & Fitness Value Added Course FY..
 
Grant Readiness 101 TechSoup and Remy Consulting
Grant Readiness 101 TechSoup and Remy ConsultingGrant Readiness 101 TechSoup and Remy Consulting
Grant Readiness 101 TechSoup and Remy Consulting
 
psychiatric nursing HISTORY COLLECTION .docx
psychiatric  nursing HISTORY  COLLECTION  .docxpsychiatric  nursing HISTORY  COLLECTION  .docx
psychiatric nursing HISTORY COLLECTION .docx
 
Making and Justifying Mathematical Decisions.pdf
Making and Justifying Mathematical Decisions.pdfMaking and Justifying Mathematical Decisions.pdf
Making and Justifying Mathematical Decisions.pdf
 
Código Creativo y Arte de Software | Unidad 1
Código Creativo y Arte de Software | Unidad 1Código Creativo y Arte de Software | Unidad 1
Código Creativo y Arte de Software | Unidad 1
 
SECOND SEMESTER TOPIC COVERAGE SY 2023-2024 Trends, Networks, and Critical Th...
SECOND SEMESTER TOPIC COVERAGE SY 2023-2024 Trends, Networks, and Critical Th...SECOND SEMESTER TOPIC COVERAGE SY 2023-2024 Trends, Networks, and Critical Th...
SECOND SEMESTER TOPIC COVERAGE SY 2023-2024 Trends, Networks, and Critical Th...
 
Z Score,T Score, Percential Rank and Box Plot Graph
Z Score,T Score, Percential Rank and Box Plot GraphZ Score,T Score, Percential Rank and Box Plot Graph
Z Score,T Score, Percential Rank and Box Plot Graph
 
Russian Escort Service in Delhi 11k Hotel Foreigner Russian Call Girls in Delhi
Russian Escort Service in Delhi 11k Hotel Foreigner Russian Call Girls in DelhiRussian Escort Service in Delhi 11k Hotel Foreigner Russian Call Girls in Delhi
Russian Escort Service in Delhi 11k Hotel Foreigner Russian Call Girls in Delhi
 
Ecological Succession. ( ECOSYSTEM, B. Pharmacy, 1st Year, Sem-II, Environmen...
Ecological Succession. ( ECOSYSTEM, B. Pharmacy, 1st Year, Sem-II, Environmen...Ecological Succession. ( ECOSYSTEM, B. Pharmacy, 1st Year, Sem-II, Environmen...
Ecological Succession. ( ECOSYSTEM, B. Pharmacy, 1st Year, Sem-II, Environmen...
 
INDIA QUIZ 2024 RLAC DELHI UNIVERSITY.pptx
INDIA QUIZ 2024 RLAC DELHI UNIVERSITY.pptxINDIA QUIZ 2024 RLAC DELHI UNIVERSITY.pptx
INDIA QUIZ 2024 RLAC DELHI UNIVERSITY.pptx
 
Mattingly "AI & Prompt Design: The Basics of Prompt Design"
Mattingly "AI & Prompt Design: The Basics of Prompt Design"Mattingly "AI & Prompt Design: The Basics of Prompt Design"
Mattingly "AI & Prompt Design: The Basics of Prompt Design"
 
Explore beautiful and ugly buildings. Mathematics helps us create beautiful d...
Explore beautiful and ugly buildings. Mathematics helps us create beautiful d...Explore beautiful and ugly buildings. Mathematics helps us create beautiful d...
Explore beautiful and ugly buildings. Mathematics helps us create beautiful d...
 
How to Give a Domain for a Field in Odoo 17
How to Give a Domain for a Field in Odoo 17How to Give a Domain for a Field in Odoo 17
How to Give a Domain for a Field in Odoo 17
 
Holdier Curriculum Vitae (April 2024).pdf
Holdier Curriculum Vitae (April 2024).pdfHoldier Curriculum Vitae (April 2024).pdf
Holdier Curriculum Vitae (April 2024).pdf
 

Login id jsnyder47Password XeGACUkEN8CONNECTING TO THE.docx

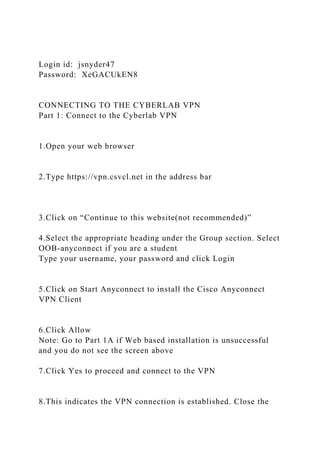
  • 1. Login id: jsnyder47 Password: XeGACUkEN8 CONNECTING TO THE CYBERLAB VPN Part 1: Connect to the Cyberlab VPN 1.Open your web browser 2.Type https://vpn.csvcl.net in the address bar 3.Click on “Continue to this website(not recommended)” 4.Select the appropriate heading under the Group section. Select OOB-anyconnect if you are a student Type your username, your password and click Login 5.Click on Start Anyconnect to install the Cisco Anyconnect VPN Client 6.Click Allow Note: Go to Part 1A if Web based installation is unsuccessful and you do not see the screen above 7.Click Yes to proceed and connect to the VPN 8.This indicates the VPN connection is established. Close the
  • 2. browser window You can connect to the VPN subsequently by Clicking on StartAll ProgramsCisco AnyConnect VPN Client PART 1A: Alternative Manual Installation 1.Click on the Start Anyconnect link 2.Click Download 3.Click on the underlined Windows 7/Vista 64/XP link 4.Click the drop down and arrow and select Save as 5.Select Desktop and click Save to save the anyconnect install file to your desktop. 6.Double –Click on the Cisco Anyconnect Installation file on your Desktop 7.Click Run 8.Click Next 9.Accept the terms in the License Agreement and Click Next 10.Wait as installation process runs 11.Click Finish. 12.You can access the Cisco VPN any other time by Clicking Start -> All Programs -> Cisco Anyconnect
  • 3. 13.Type in your assigned username and password to logon. 14.The logon screen will disappear if when you successfully connect to the VPN 15. To verify successful connection to the VPN, open a web browser and type https://csvcl.vcl.local/cloud/org/csec650 and you should see the screen below or a logon screen 16. Go to the CyberlabVMaccess650 document and continue with those instructions to access the virtual environment CONNECTING TO THE CYBERLAB VIRTUAL ENVIRONMENT Note: A connection to the VPN must be established before following the instructions contained in this document. Macintosh users are to complete instructions in Part 1B before completing instructions in Part 2 Windows Users should follow instructions in Part 2
  • 4. PART 1B These steps assume that a successful connection has been made to the VPN Type https://citrix.vcl.local A.Click I Understand the Risksand then ClickAdd Exception B.Verify that Permanently store this exception box is checked Click on Confirm Security Exception C.Type in your username and password
  • 5. D.Click Download to download the Citrix web client E.Enter the local administrator credentials and click Install Software After successful installation, the screen below should appear F.Click on the appropriate CSEC 600 level course icon
  • 6. G.You should be redirected to the Virtual Computing Lab. Continue from Part 2 Note: You must connect to the VPN before you can connect to the virtual computing lab cloud. PART II: Connecting to the Virtual Computing Lab (VCL) 1.Type https://csvcl.vcl.local/cloud/org/csec650 in your web browser. Click “Continue to this website (not recommended)” 2.Type your username and password and click on Login 3.Click Add vApp from Catalog 4. Select the first VM template (CSEC650_Lab01) for Lab1 and the second template for Lab 2 Click Next 5. Type your username in the name field and click Finish 6. Wait until the VM is created and the status changes to Stopped.
  • 7. 7. Click on the Green start button to Start the VM 8. Click OK on the VMRC plugin message if prompted 9. Click OK to the message prompting you to install the VMRC installation file 10. Download the VMRC installation file to your desktop, close all browsers and double click the file to start the installation. 11. Complete the installation of the VMRC client, reopen your browser and continue accessing your running virtual machine. 12. Allow any pop-ups if prompted 13. Click Allow if this message pops up. Make sure Always trust this host with this certificate is checked 14. Type a username of “cseclabuser” and hit enter. 15. Type a password of “cseclabuser” and hit enter. First Responders Guide to Computer Forensics: Advanced Topics
  • 8. Richard Nolan Marie Baker Jake Branson Josh Hammerstein Kris Rush Cal Waits Elizabeth Schweinsberg September 2005 HANDBOOK CMU/SEI-2005-HB-003 Pittsburgh, PA 15213-3890 First Responders Guide to Computer Forensics: Advanced Topics
  • 9. CMU/SEI-2005-HB-003 Richard Nolan Marie Baker Jake Branson Josh Hammerstein Kris Rush Cal Waits Elizabeth Schweinsberg September 2005 CERT Training and Education Unlimited distribution subject to the copyright. This report was prepared for the SEI Administrative Agent ESC/XPK 5 Eglin Street Hanscom AFB, MA 01731-2100 The ideas and findings in this report should not be construed as an official DoD position. It is published in the interest of scientific and technical information exchange. FOR THE COMMANDER
  • 10. Christos Scondras Chief of Programs, XPK This work is sponsored by the SEI FFRDC primary sponsor and the Department of Homeland Security. The Software Engi- neering Institute is a federally funded research and development center sponsored by the U.S. Department of Defense. Copyright 2005 Carnegie Mellon University. NO WARRANTY THIS CARNEGIE MELLON UNIVERSITY AND SOFTWARE ENGINEERING INSTITUTE MATERIAL IS FURNISHED ON AN "AS-IS" BASIS. CARNEGIE MELLON UNIVERSITY MAKES NO WARRANTIES OF ANY KIND, EITHER EXPRESSED OR IMPLIED, AS TO ANY MATTER INCLUDING, BUT NOT LIMITED TO, WARRANTY OF FITNESS FOR PURPOSE OR MERCHANTABILITY, EXCLUSIVITY, OR RESULTS OBTAINED FROM USE OF THE MATERIAL. CARNEGIE MELLON UNIVERSITY DOES NOT MAKE ANY WARRANTY OF ANY KIND WITH RESPECT TO FREEDOM FROM PATENT, TRADEMARK, OR COPYRIGHT INFRINGEMENT. Use of any trademarks in this report is not intended in any way to infringe on the rights of the trademark holder. Internal use. Permission to reproduce this document and to prepare derivative works from this document for internal use is granted, provided the copyright and "No Warranty" statements are included with all reproductions and derivative works. External use. Requests for permission to reproduce this
  • 11. document or prepare derivative works of this document for external and commercial use should be addressed to the SEI Licensing Agent. This work was created in the performance of Federal Government Contract Number FA8721-05-C-0003 with Carnegie Mellon University for the operation of the Software Engineering Institute, a federally funded research and development center. The Government of the United States has a royalty-free government-purpose license to use, duplicate, or disclose the work, in whole or in part and in any manner, and to have or permit others to do so, for government purposes pursuant to the copyright license under the clause at 252.227-7013. For information about purchasing paper copies of SEI reports, please visit the publications portion of our Web site (http://www.sei.cmu.edu/publications/pubweb.html). Table of Contents Executive Summary ............................................................................................... .. xi Abstract.................................................................................. ................................. xiii 1 Module 1: Log File Analysis............................................................................. 1 1.1 Swatch ............................................................................................... ........ 3
  • 12. 1.1.1 Swatch Log Monitor...................................................................... 4 1.1.2 Swatch Installation ....................................................................... 5 1.1.2.1 Installing Perl Modules...................................................... 5 1.1.2.2 Installing Swatch ............................................................... 6 1.1.3 Swatch Configuration................................................................... 8 1.1.3.1 The Configuration File Location ........................................ 9 1.1.3.2 Adding Rules to the Configuration File ............................. 9 1.1.4 Swatch Execution ....................................................................... 15 1.1.5 Summary................................................................................. ..... 17 1.2 Microsoft Log Parser 2.2 ........................................................................ 18 1.2.1 Microsoft Log Parser Features .................................................. 20 1.2.2 Log Parser Installation ............................................................... 21 1.2.3 Log Parser Input and Output ..................................................... 22 1.2.3.1 Input Formats.................................................................. 22 1.2.3.2 Output Formats
  • 13. ............................................................... 24 1.2.4 Log Parser Queries..................................................................... 26 1.2.4.1 Query Examples ............................................................. 27 1.2.5 Log Parser COM Objects............................................................ 29 1.2.5.1 Creating Custom Input Formats...................................... 29 1.2.5.2 Using the Log Parser COM API ...................................... 30 1.2.6 Log Parser Execution ................................................................. 31 1.2.7 Summary................................................................................. ..... 33 2 Module 2: Process Characterization ............................................................. 35 2.1 Understanding a Running Process ....................................................... 36 2.1.1 Objectives............................................................................... ..... 37 2.1.2 Programs, Processes, and Threads.......................................... 38 2.1.3 Threads .................................................................................... .... 39 2.1.3.1 Displaying Threads for a Running Process..................... 39
  • 14. CMU/SEI-2005-HB-003 i 2.1.3.2 Sysinternals Process Explorer........................................ 40 2.1.4 Process Tree Structure .............................................................. 43 2.1.4.1 pstree (Linux).................................................................. 44 2.1.4.2 Linux ps –A ..................................................................... 44 2.1.5 Process Descriptions ................................................................. 46 2.1.6 Process Hashes (National Software Reference Library)......... 47 2.1.7 Process Analysis Checklist ....................................................... 49 2.1.8 Common Process Characteristics ............................................ 51 2.1.8.1 Process Filenames ......................................................... 51 2.1.8.2 Open Ports ..................................................................... 53 2.1.8.3 Open Files ...................................................................... 55 2.1.8.4 Base Priority ................................................................... 56 2.1.8.5 Process Times and Terminated Processes..................... 58 2.1.8.6 Location of Process Image ............................................. 60 2.1.8.7 Survivable Processes
  • 15. ..................................................... 61 2.1.8.8 Process Forensic Tasks.................................................. 66 2.2 Automated Process Collection ............................................................. 76 2.2.1 Objectives............................................................................... ..... 77 2.2.2 First Responder Utility (FRU) .................................................... 78 2.2.2.1 First Responder Utility (FRUC) Setup ............................ 79 2.2.3 Forensic Server Project (FSP) ................................................... 82 2.2.3.1 FSP Setup ...................................................................... 82 2.2.3.2 Testing FRUC ................................................................. 83 2.2.3.3 Output of FRUC .............................................................. 84 3 Module 3: Image Management....................................................................... 87 3.1 Slice and Dice with dd............................................................................ 88 4 Module 4: Capturing a Running Process ................................................... 101 4.1.1 Hedons and Dolors................................................................... 103 4.1.2 Capturing a Process on a Windows System .......................... 104
  • 16. 5 Module 5: Understanding Spoofed Email....................................................113 5.1 Objectives .............................................................................................. 114 5.2 Identifying Spoofed Email ....................................................................115 5.2.1 Definition of the Problem ..........................................................116 5.2.2 Understanding the Process of Sending and Receiving Email ...........................................................................................11 7 5.2.2.1 The Life Cycle of an Email.............................................117 5.2.2.2 Overview of the Simple Mail Transfer Protocol..............119 5.2.3 Understanding Email Headers................................................. 123 5.2.3.1 Interpreting Email Headers ........................................... 123 5.2.4 How Spoofed Email Is Sent ..................................................... 127 ii CMU/SEI-2005-HB-003 5.2.4.1 Open Mail Relay ........................................................... 127 5.2.4.2 Compromised Machines ............................................... 129
  • 17. 5.2.4.3 Self-Owned Mail Servers .............................................. 129 5.2.4.4 Temporary Accounts ..................................................... 129 5.2.4.5 Hijacked Accounts ........................................................ 129 5.2.5 How to Identify Spoofed Email ................................................ 130 5.2.5.1 Carefully Examine the “Received” Headers.................. 130 5.2.5.2 Look Out for Spoofed Headers ..................................... 132 5.2.5.3 Comparing Timestamps ................................................ 133 5.3 Tracing the Origins of a Spoofed Email.............................................. 135 5.3.1 nslookup .................................................................................... 136 5.3.2 whois...................................................................................... .... 139 5.3.2.1 IP Block Identification.................................................... 139 5.3.2.2 WHOIS Information for a Domain Name ...................... 142 5.3.3 Traceroute ................................................................................. 144 5.3.4 Sam Spade................................................................................. 145 5.4 Summary
  • 18. ............................................................................................... 146 References.............................................................................. ............................... 147 CMU/SEI-2005-HB-003 iii iv CMU/SEI-2005-HB-003 List of Figures Figure 1: Example Run of the Swatch Configuration File...................................... 14 Figure 2: Example Run of PsList ........................................................................... 39 Figure 3: Sysinternals Process Explorer Utility...................................................... 40 Figure 4: Verifying a Process Image in Process Explorer ..................................... 41 Figure 5: The Strings Tab in Process Explorer ...................................................... 41 Figure 6: Displaying a Process Tree Using PsList................................................. 43
  • 19. Figure 7: Displaying a Process Tree Using pstree ................................................ 44 Figure 8: Displaying PID Assignments Using ps ................................................... 45 Figure 9: WinTasks Process Description ............................................................... 47 Figure 10: Listing Process Filenames Using pulist.................................................. 52 Figure 11: Displaying Open Ports Using fport ......................................................... 53 Figure 12: Displaying Open Ports Using netstat...................................................... 54 Figure 13: Viewing Handles Using handle............................................................... 55 Figure 14: Displaying Which Process Has Port 6002 Open .................................... 56 Figure 15: Displaying Who Has the Bash Shell Open ............................................. 56 Figure 16: Displaying All the Currently Open Files by the User Root ...................... 56 Figure 17: Listing Priority Levels Using pslist .......................................................... 57 Figure 18: Listing Priority Levels Using top ............................................................. 57
  • 20. Figure 19: Displaying the Priority Level for a Specific Process ............................... 57 CMU/SEI-2005-HB-003 v Figure 20: Checking Uptime Using psuptime .......................................................... 58 Figure 21: Checking Elapsed Time for a Process Using pslist ................................ 58 Figure 22: Windows Event Log ............................................................................... 59 Figure 23: psloglist Command................................................................................ . 59 Figure 24: Locating a Process Image Using ListDLLs ............................................ 60 Figure 25: Locating a Process Image Using ps....................................................... 60 Figure 26: Locating a Process Image by PID.......................................................... 61 Figure 27: autorunsc.exe Command ....................................................................... 62 Figure 28: The chkconfig -list Command................................................................. 63 Figure 29: A Cron Log
  • 21. ............................................................................................. 64 Figure 30: The Crontab Command.......................................................................... 65 Figure 31: The svchost.exe 780 Process ................................................................ 67 Figure 32: listdlls.exe Output for svchost.exe.......................................................... 68 Figure 33: MD5deep Utility..................................................................................... . 69 Figure 34: Performing a String Search Using grep.................................................. 69 Figure 35: The mshearts.exe 2840 Process ........................................................... 70 Figure 36: listdlls.exe Output for the mshearts Process .......................................... 71 Figure 37: MD5deep.exe Command Line Arguments ............................................. 71 Figure 38: strings Command ................................................................................... 73 Figure 39: strings Command Output ....................................................................... 73 Figure 40: Hash of John the Ripper ........................................................................ 74
  • 22. Figure 41: First Part of the fruc.ini File .................................................................... 80 Figure 42: Second Part of the fruc.ini File ............................................................... 80 vi CMU/SEI-2005-HB-003 Figure 43: Final Part of fruc.ini File.......................................................................... 81 Figure 44: FSP Setup .............................................................................................. 83 Figure 45: FRUC Utility Command .......................................................................... 83 Figure 46: FSP Command Output ........................................................................... 84 Figure 47: FRUC Output File................................................................................... 85 Figure 48: FRUC Audit File........................................................................ .............. 85 Figure 49: Result of Using md5 to Calculate a Hash Value..................................... 92 Figure 50: Confirming the Result of Splitting Images .............................................. 92
  • 23. Figure 51: Result of Using cat and md5sum to Check the Integrity of Split Images.................................................................................... ................ 93 Figure 52: Result of Using md5sum to Check the Integrity of a New Image ........... 94 Figure 53: Finding a .jpg Tag in a Captured Image ................................................. 96 Figure 54: Decimal Form of the Beginning of the .jpg File ...................................... 96 Figure 55: Searching for the End of the .jpg File ..................................................... 97 Figure 56: Tag Delineating the End of a .jpg File..................................................... 97 Figure 57: Decimal Address for the End of the .jpg File .......................................... 97 Figure 58: Calculating the Size of the .jpg File ........................................................ 97 Figure 59: File Carved Out Using dd ....................................................................... 98 Figure 60: Viewing Carved .jpg File......................................................................... 98 Figure 61: Running a Trusted Command .............................................................. 106
  • 24. Figure 62: Command Shell Spawned from a Trusted CD...................................... 106 Figure 63: netcat Command to Listen on Port 3333.............................................. 106 Figure 64: Using Trusted pslist and netcat to Specify IP Address and Listening Port........................................................................................ ............... 107 CMU/SEI-2005-HB-003 vii Figure 65: Looking for Suspicious Processes Using cat ....................................... 107 Figure 66: Suspicious Process Found................................................................... 107 Figure 67: netcat Command to Listen on Port 4444.............................................. 108 Figure 68: Specifying netcat Listener Machine and Port ....................................... 108 Figure 69: Viewing Path to a Suspicious Process ................................................. 108 Figure 70: Setting Up a Listening Session on a Suspicious Process.................... 109 Figure 71: Collecting the Executable of a Suspicious Process ............................. 109
  • 25. Figure 72: Calculating a Hash of a Captured Process .......................................... 109 Figure 73: The Life Cycle of an Email ....................................................................118 Figure 74: Mail Delivery for Valid Users ................................................................ 128 Figure 75: Spoofed Email via an Open Relay ....................................................... 128 Figure 76: nslookup of Valid Fully Qualified Domain Name .................................. 137 Figure 77: nslookup of Falsified Host Information ................................................ 138 Figure 78: WHOIS Query of ARIN......................................................................... 140 Figure 79: WHOIS Query of APNIC ...................................................................... 141 Figure 80: WHOIS Query of IANA......................................................................... 142 Figure 81: Query of .com WHOIS Database ......................................................... 143 Figure 82: Query of the Registrar's WHOIS Database.......................................... 143 Figure 83: Traceroute Example ............................................................................. 145
  • 26. viii CMU/SEI-2005-HB-003 List of Tables Table 1: Actions in Swatch ................................................................................... 11 Table 2: time_regex for Popular Services ........................................................ 13 Table 3: Common Input Formats.......................................................................... 22 Table 4: Output Formats ...................................................................................... 24 Table 5: Misc Log Parser Commands .................................................................. 31 Table 6: A Subset of ps Options ........................................................................... 52 Table 7: Output Headings for ps and top ............................................................. 52 Table 8: dd Syntax ............................................................................................... 88 Table 9: Tools for Capturing Running Processes ............................................... 104 Table 10: The Life Cycle of an Email
  • 27. ................................................................... 118 Table 11: Email Headers................................................................................... ... 124 CMU/SEI-2005-HB-003 ix x CMU/SEI-2005-HB-003 Executive Summary First Responders Guide to Computer Forensics: Advanced Topics expands on the technical material presented in SEI handbook CMU/SEI-2005-HB-001, First Responders Guide to Computer Forensics [Nolan 05]. While the latter presented techniques for forensically sound collection of data and reviewed the fundamentals of admissibility pertaining to electronic files, this handbook focuses exclusively on more advanced technical operations like process characterization and spoofed email. It is designed for experienced security and network pro- fessionals who already have a fundamental understanding of forensic methodology. There- fore, emphasis is placed on technical procedures and not forensic methodology. The first module focuses on log file analysis as well as exploring techniques for using com-
  • 28. mon analysis tools such as Swatch and Log Parser. The second module focuses on advanced techniques for process characterization, analysis, and volatile data recovery. The third module demonstrates advanced usage of the dd command-line utility. Topics include how to slice an image and reassemble it with dd, carving out a section of data with dd, and imaging a running process with dd. The fourth and final module examines spoofed email messages. This module looks at the RFCs for email, describes how email messages are spoofed, and presents some techniques for identifying and tracing spoofed email. Our focus is to provide system and network administrators with advanced methodologies, tools, and procedures for applying sound computer forensics best practices when performing routine log file reviews, network alert verifications, and other routine interactions with sys- tems and networks. The final goal is to create trained system and network professionals who are able to understand the fundamentals of computer forensics so that in the normal course of their duties they can safely preserve technical information related to network alerts and other security issues. This handbook is not intended to be a training guide for computer forensics practitioners, but rather an advanced resource for system and network security professionals who are charged with performing first responder functions. The target audience includes sys- tem and network administrators, law enforcement, and any information security practitioners who find themselves in the role of first responders. The handbook should help the target au-
  • 29. dience to • install, configure, and use Swatch to analyze log files • install, configure, and use Log Parser to analyze log files • understand advanced elements of a running process • perform an automated collection of volatile data • carve out data using the dd command-line utility • use the dd command-line utility to slice and reassemble images and files CMU/SEI-2005-HB-003 xi • understand spoofed email • identify reliable information in an email header xii CMU/SEI-2005-HB-003 Abstract This handbook expands on the technical material presented in SEI handbook CMU/SEI- 2005-HB-001, First Responders Guide to Computer Forensics. While the latter presented techniques for forensically sound collection of data and explained the fundamentals of admis-
  • 30. sibility pertaining to electronic files, this handbook covers more advanced technical opera- tions such as process characterization and spoofed email. It describes advanced methodolo- gies, tools, and procedures for applying computer forensics when performing routine log file reviews, network alert verifications, and other routine interactions with systems and net- works. The material will help system and network professionals to safely preserve technical information related to network alerts and other security issues. CMU/SEI-2005-HB-003 xiii xiv CMU/SEI-2005-HB-003 1 Module 1: Log File Analysis © 2005 Carnegie Mellon University First Responders Guide to Computer Forensics: Advanced Topics Module 1: Log File Analysis This module focuses on log file analysis, specifically post-event analysis using Swatch and
  • 31. Log Parser. We explain how to install, configure, and execute Swatch and Log Parser and provide several sample configurations for each. CMU/SEI-2005-HB-003 1 © 2005 Carnegie Mellon University First Responders Guide to Computer Forensics Swatch 2 CMU/SEI-2005-HB-003 © 2005 Carnegie Mellon University 3 Overview Why Swatch? Installation Configuration Execution Forensics, in this case, is the act of looking for events after they have happened, not performing an investigation for law enforcement.
  • 32. 1.1 Swatch The focus is on using Swatch and Log Parser as forensic analysis tools, meaning that they will be used on logs after an incident has occurred. If you are planning to use these tech- niques on files involved in a law enforcement investigation, please make sure you prepare the files according to established best practices before use. CMU/SEI-2005-HB-003 3 © 2005 Carnegie Mellon University 4 Swatch Log Monitor Swatch, the Simple Watcher, is an open source log monitoring tool written in Perl for use primarily on UNIX/Linux systems. Swatch can be used to monitor current logs on running servers, or to examine older logs. The configuration file contains a list of regular expressions to look for and actions to take, if any are found, called rules. While originally designed for use with syslog files, Swatch can be used on any file. 1.1.1 Swatch Log Monitor Log files are useful only if they are read. After an incident, log files often have clues as to what happened. However, many servers produce large volumes of log information, often
  • 33. spread out over more than one file, so sifting through this data can be tedious and time con- suming. As an added problem, different servers have different log formats. If it is necessary to compare files, it can be challenging to match up fields. Swatch, the Simple Watcher log monitoring tool, is capable of searching a file for a list of strings and then performing specific actions when one is found. It was designed to do real- time monitoring of server log files but can also be set to process a stand-alone file. Swatch was designed to work with syslog files, but it can be used on any file. Swatch was written in Perl, and because of the way it is installed it is best used on a Linux system. It is an open source tool, and the project is maintained on SourceForge. Throughout this module we will consider more heavily the case where Swatch is used to ex- amine older log files as opposed to active log files. 4 CMU/SEI-2005-HB-003 © 2005 Carnegie Mellon University 5 Swatch Installation Requirements: Perl 5, make utility, tar utility Download Swatch from the SourceForge project: http://sourceforge.net/projects/swatch/
  • 34. Download the throttle patch from http://www.cert.org Obtain and install the additional Perl modules: Time::HiRes Date::Calc Date::Format File::Tail Make Swatch – On the command line, type in progression: tar zxvf swatch-3.1.1.tar.gz patch –p0 < throttle.patch cd swatch-3.1.1 perl Makefile.PL make make test make install 1.1.2 Swatch Installation Swatch has the same installation process as a Perl module. You download a tarball, uncom- press it, expand it, and build it. The tool installs itself in /usr/bin, and you can use it from any directory. It also installs a manual page. To begin, make sure that Perl 5 is installed on the machine. Later versions of Perl may come with some of the necessary modules installed already. You also need the ability to use the GNU utility make to fully install Swatch. 1.1.2.1 Installing Perl Modules If your Linux distribution offers versions of the Perl modules needed to support Swatch, it is best to get the operating-system-specific ones. Otherwise, you
  • 35. will need to obtain them from either the module’s developer’s web site or from a centralized repository such as the Com- prehensive Perl Archive Network (CPAN).1 CPAN indexes most of the Perl packages avail- able, makes the list searchable, and has them available for download. They also have links to the developer’s web site if you would prefer to get the modules straight from the source. To install Swatch you need these modules:2 • File::Tail – in File-Tail-0.99.1.tar.gz • Date::Calc – in Date-Calc-5.4.tar.gz 1 http://www.cpan.org 2 All module version numbers are current at time of printing. CMU/SEI-2005-HB-003 5 • Date::Parse – in TimeDate-1.16.tar.gz • Time::HiRes – in Time-HiRes-1.66.tar.gz To support these you might also need • Bit::Vector – in Bit-Vector-6.4.tar.gz • Carp::Clan – in Carp-Clan-5.3.tar.gz Once the tar file is on the machine, you must decompress and expand it before it can be in-
  • 36. stalled. Once expanded, read the INSTALL file to make sure that the module has the standard installation commands. For these modules, there is a Perl script called Makefile.PL that cre- ates a makefile specific to the machine. Next, run the make file three times: once to initialize, once to test, and then once to install. After that, the package is ready to use. In order for other users to be able to use these modules, they must be installed by root. The commands follow in shaded boxes (the normal text is what is sent to the console): tar zxvf perlmod.tar.gz Lists all the files in perlmod.tar cd perlmod perl Makefile.PL Writing Makefile for Perl::Mod make Check for errors make test Look for “All tests successful” make install Check for errors Repeat for the other packages and you are ready to install Swatch itself.
  • 37. 1.1.2.2 Installing Swatch Installing Swatch involves the same procedure as the Perl modules. First, download the tar- ball to the local machine from http://sourceforge.net/projects/swatch. There is a patch needed to enable the throttle action to fully work. Download that from http://www.cert.org. These instructions are for Swatch 3.1.1 (the normal text is what is sent to the console): tar zxvf swatch-X.X.X.tar.gz Lists all the files in swatch-X.X.X.tar patch –p0 < throttle.patch 6 CMU/SEI-2005-HB-003 The character after the –p is a zero cd swatch-X.X.X perl Makefile.PL Writing Makefile for swatch If Time::HiRes, Date::Calc, or Date::Parse are missing it will say make Check for errors make test
  • 38. Look for “All tests successful” make install Check for errors Swatch is now ready to be executed. CMU/SEI-2005-HB-003 7 © 2005 Carnegie Mellon University 6 Swatch Configuration–Rules 1 The configuration file contains a list of rules Default file location is $HOME/.swatchrc, but it can be any name and any location The three parts of a rule: Event – “watchfor” or “ignore” Pattern – regular expression pattern to look for Action – what the script does when the pattern is found 1.1.3 Swatch Configuration The configuration file is the source of Swatch’s power. It is a text file of rules that are used to create the script that will be run against the log file. This topic is about how to develop your own configuration file. Before you begin adding rules, determine what you are trying to
  • 39. find. Perhaps you want to look for Nessus attacks in your Apache log files, or find when people try to use an SMTP server as an open relay. Make a list of strings or regular expression patterns that you might need. Keep in mind that creating a good configuration file is an iterative process, and it may take a few rounds to extract the desired information from the file. 8 CMU/SEI-2005-HB-003 © 2005 Carnegie Mellon University 7 Swatch Configuration–Rules 2 Rules are looked for in the order they appear in the configuration file. Example rules: ignore /127.0.0.5/ watchfor /Nessus/ throttle 0:10:00,key=nessus echo The first rule looks for the string “127.0.0.5” and ignores any log entries that contain it. The second rule looks for log entries that contain “Nessus” and echoes them to the console, but only at the rate of one entry every 10 minutes.
  • 40. Pattern Event Event Pattern Action Action 1.1.3.1 The Configuration File Location By default, Swatch looks for the configuration file .swatchrc in the home directory. If this file is not found, it uses a default configuration of watchfor /.*/ echo This merely echoes every message in the log file to the console. This is not any more useful than inspecting the log file by hand. To harness the power, a customized configuration file should be created (this is addressed in the next section, 1.1.3.2). The default name is .swatchrc, but it can be whatever you want. Configuration files for dif- ferent types of log files may be identified by a distinct name. One might call their Apache configuration file apache.swatchrc and their sendmail sendmail.swatchrc. The file can be stored anywhere that is accessible from the command line, not just in the home directory. If a different name or location is used for the configuration file, it is
  • 41. added as an argument to the command line when Swatch is executed (this is discussed in Section 1.1.4). 1.1.3.2 Adding Rules to the Configuration File Rules are a list of keywords and values that are used to make conditional statements to check against, and actions to take if one is true. They have three parts: the event, the pattern, and the action(s). CMU/SEI-2005-HB-003 9 1.1.3.2.1 Types of Events There are two types of events in Swatch: “watchfor” and “ignore.” The keyword “watchfor” looks for the specified pattern in messages in the log file. The “ignore” keyword will skip the rest of the rules when a message matches the pattern. By default, the first rule that matches a message will be the only rule that acts on that mes- sage. This property can be harnessed by using the “ignore” event to filter out messages. For example, since you know that the system administrator always uses the same machine to do penetration testing, you create an “ignore” rule for messages that come from a specific inter- nal IP address, 127.0.0.5, and list the rule for Nessus scans after it so that internal scans will not cause alerts. In this case, you will want to put these two events in this order:
  • 42. ignore /127.0.0.5/ watchfor /Nessus/ throttle 0:10:00,key=nessus echo 1.1.3.2.2 Types of Patterns The value for the event keyword is the regular expression pattern that follows on the same line. The simplest regular expression is a string to match character by character enclosed in “/”; for example, “/Nessus/” matches only the substring “Nessus” if it appears anywhere in the line. If there are characters in the search string, the capitalization must be the same for the string to match. If you want “nEsSuS” to also match, then you need to put an “i” after the second “/” to indicate a case insensitive search. Regular Expressions A regular expression is a pattern that describes or matches a set of strings [Wikipedia 05d]. It is a syntax for describing more general criteria for matching strings than simply matching a word in a string. For example, with a regular search you could find the substring “cat” in “catapult.” But a regular expression would let you look for a string that starts with “ca” and ends with “t,” and you would find both “cat” and “catapult.” For more examples of regular expressions in general, see the Wikipedia entry:
  • 43. http://en.wikipedia.org/wiki/Regular_expression For more examples of regular expressions in Perl, see the Perl manual page: http://www.perl.com/doc/manual/html/pod/perlre.html 1.1.3.2.3 Types of Actions Actions are what the script does when it matches a pattern. They range from printing the log message to the console to executing a separate script to call a pager. There can be multiple 10 CMU/SEI-2005-HB-003 actions associated with each rule. The “ignore” event has its action built in, namely, to stop looking at the log entry. The complete list of actions is found in Table 1 [SourceForge 04]: Table 1: Actions in Swatch Action Description echo [modes] Prints the log message to the console. Takes an optional value of a text color, a background color, or a font weight. Possible values are bold, underscore, inverse, blink, black, red, green, yellow, blue, magenta, cyan, white, black_h, red_h, green_h, yellow_h, blue_h, magenta_h, cyan_h, and white_h.
  • 44. bell [n] Prints the log message to the console and then rings the bell (007) n times. throttle H:M:S [,key=log|<identifier>] [,time_from=timestamp] [,time_regex=<regex>] [,threshold=N] throttle reduces the number of times an action is performed on messages matching the same pattern in the specified duration. Hours, minutes, and seconds must all be specified. However, the time does not need to be specified if threshold is being used. The key is the identifier that is stored to compare to new mes- sages. log means use the exact log file, excluding a syslog time- stamp, if present, and is the default. Any other string will be used exactly as requested/indicated. Setting the time_from option to timestamp indicates that the time in the log message should be used instead of the system time for comparisons. This is best for examining a log file. The time_regex lets you specify a regular expression to match the timestamp of the message. The default is a regular expression for the syslog timestamp.
  • 45. The threshold=N acts on the first instance and on every Nth in- stance after that. It repeats counting once N messages have been found. Each instance is appended with “(threshold N ex- ceeded).” exec command Executes the command listed. If arguments are needed, they may be substituted with fields in the log message. $N is replaced with the Nth field in the line. A $0 or a $* uses the entire message. The --awk-field-separator switch must be used during execution (see Section 1.1.4). CMU/SEI-2005-HB-003 11 Action Description mail [ad- dresses:bob:joe:…] [,subject=Subject] Sends an email to the address(es) listed with the subject listed con- taining the matched log messages. Must have a sendmail compati- ble server installed. Default recipient is the user who is running the program.
  • 46. pipe com- mand[,keep_open] Pipes the log messages into the command. keep_open keeps the pipe open until a different pipe is activated or Swatch exits. write [user:user:…] Uses write(1) to send the message to the users listed. The user running Swatch is the default. continue Tells Swatch to evaluate this message against the rule set. quit Causes Swatch to exit. when=day:hour This action is a modifier to all the other actions indicating that the action should occur only during the times specified. For example, when=1-5-8-17 indicates that the action should occur only Mon- day-Friday between 8 a.m. and 5 p.m. The exec command can be used to write log entries to a file. Redirection from the console does not work because there are unprintable characters on the command line that are printed in the resulting file and are meaningless and in the way. Use this action: exec “echo $* >> output.txt” When examining a file, the most useful actions will be echo, exec, and throttle. The others are more oriented for when you need to be alerted to a new
  • 47. development in real time. It is also possible to include Perl in the configuration file if you want to do something such as define a regular expression for repeated use. Start each line with “perlcode” and end it with a semicolon. The throttle command can be very powerful. It will take some practice to get the right bal- ance of regular expressions to search for timing and to determine whether throttle or thresh- old is better. For the regular expressions in the time_regex, all backslashes must be escaped, (e.g., put in two instead of one). Regular expressions on the action line with commas get cut off, so you need to put the expression in a perlcode. This includes both IIS formats. For example: perlcode my $iis_time = “(d{4}-d{2}- d{2}s+d{1,2}:d{2}:d{2}s)”; watchfor /WEBROOT DIRECTORY TRANSVERSAL/ throttle 0:04:00,key=web,time_from=timestamp,time_regex=$iis_time echo blue 12 CMU/SEI-2005-HB-003 Some log formats may not have time_regex. Table 2 lists time_regexes for the log files on
  • 48. popular services: Table 2: time_regex for Popular Services Log File Timestamp Regular Expression Apache access_log 04/Mar/2005:11:38:45 (d{2}/w{3}/d{4}:d{2}:d{2}:d{2}) Apache error_log; ssh logs Fri Mar 04 11:38:51 2005 (w{3}s+w{3}s+d{2}s+d{2}:d{2}:d{2}s+d{4}) IIS 6.0 and later 03/04/05, 11:38:51 (d{2}/d{2}/d{2},s+d{1,2}:d{2}:d{2}s) IIS 5.*, W3C Ex- tended 2005-03-14 11:38:51 (d{4}-d{2}- d{2}s+d{1,2}:d{2}:d{2}s) The when command can be useful for identifying events that occur at abnormal times. Use it to look for login attempts in the middle of the night.
  • 49. The following is an example configuration file for a syslog setup that has two machines, named “server” and “client,” logging to one file. The central syslog server resides on the server. All facilities on the client log to this file. The client is running the default applications. The server logs most facilities to the file and is running Apache (httpd) and Snort, in addition to the basics. # Copies all of the entries from the client to a separate file watchfor / client / exec “echo $* >> client.log” #echoes the log entry to a file # Prints one entry every 4 minutes (based on the time in the logfile #for any entries containing a Nessus attack keyword. watchfor /WEBROOT DIRECTORY TRANSVERSAL/ throttle 0:04:00,key=webroot,time_from=timestamp echo blue # Searches for snort followed by portscan somewhere in the log entry # Prints the first entry and then every 6th one both to the console and
  • 50. # a separate file watchfor /snort.*portscan/ throttle threshold=6,key=ps echo red exec “echo $* >> portscan.log” CMU/SEI-2005-HB-003 13 Figure 1 is an example run of the configuration file on a syslog file (“(portscan)” and “(http_inspect)” distinguish the different types of messages). Figure 1: Example Run of the Swatch Configuration File 14 CMU/SEI-2005-HB-003 © 2005 Carnegie Mellon University 8 Swatch Execution Swatch is run from the command line. swatch -c .swatchrc -f file.log This runs Swatch using the file .swatchrc as the configuration file on file.log. Swatch can be run on only one file at a time, but multiple
  • 51. instances of Swatch can be running at once. Accepts its input from this command-p command Tail the specific file (/var/log/messages is the default)-t file.log Examine the specific file-f file.log Name a specific configuration file-c config.file UseSwitch Examine this fileConfiguration file 1.1.4 Swatch Execution Swatch is run on the command line and has many options to specialize the execution. You can identify the configuration file, the log file, how to monitor the log file, and even what charac- ter(s) indicate a new log message. While most options will be listed, the focus is on the op- tions that relate to running Swatch on a log file in a single pass. More information about all the options can be found in the manual page. -c filename or --config-file=filename Indicates where the configuration file is. The default location is $HOME/.swatchrc. -f filename or --examine=filename Indicates that Swatch should perform a single pass on the log file. -t filename or --tail-file=filename This option enables Swatch to monitor a file as a service continues to log to it. This action is the default, so if none of -f, -p, or -t is given, Swatch will tail
  • 52. either “/var/log/messages” or “/var/log/syslog.” -p command or --read-pipe=command Monitors the data that is being piped in from the given command. --awk-field-syntax Tells Swatch to use the syntax for awk expressions. It is needed when the exec action is used. CMU/SEI-2005-HB-003 15 --input-record-separator=regular_expression This option indicates that the default record separator of carriage return should be replaced with the regular expression listed. Other options include --help and --version, which respectively give usage information and the current version; --script-dir=path, which indicates where the temporary script should be stored if not in the user’s home directory; and --restart- time=hh:mm[am|pm], which tells Swatch to restart at a particular time. The most common usage will be swatch -c .swatchrc -f log_file Remember to specify the complete path of the configuration file or the log file if either one is not located in the local directory.
  • 53. 16 CMU/SEI-2005-HB-003 © 2005 Carnegie Mellon University 9 Summary Swatch is a simple log monitor designed to run regular expressions against a text log file. an effective tool for finding interesting or anomalous events configured easily to watch for any type of entry in any type of file Many actions can be taken on matching message logs, but for analysis “echo” will be used most often. 1.1.5 Summary Swatch can be an effective tool for sifting through log files to find interesting or anomalous events. The results serve as a jumping off point for further inspection of the files by leading you directly to areas of interest. Or it can be used to filter out entries that you know can be excluded so as to reduce the amount of material to examine by hand. Swatch can also be used on other files, such as VMWare virtual disk files and disk images, to efficiently find strings in data. CMU/SEI-2005-HB-003 17
  • 54. © 2005 Carnegie Mellon University First Responders Guide to Computer Forensics Microsoft Log Parser 1.2 Microsoft Log Parser 2.2 This topic is an overview of the installation, configuration, and usage of Microsoft’s Log Parser 2.2. The focus is on using Log Parser as a forensic analysis tool, meaning that it will be used on logs after an incident has occurred. If you are planning to use these techniques on files involved in a law enforcement investigation, please make sure you prepare the files ac- cording to established best practices. 18 CMU/SEI-2005-HB-003 © 2005 Carnegie Mellon University 2 Overview Why Log Parser? Installation Writing Queries Execution
  • 55. Forensics in this case is the act of looking for events after they have happened, not performing an investigation for law enforcement CMU/SEI-2005-HB-003 19 © 2005 Carnegie Mellon University 3 Microsoft Log Parser 2.2 Command line tool from Microsoft to process log files using SQL-like queries Can read in many formats and many types of log files Output available in many formats—from text to XML files to database storage Easy generation of HTML reports and MS Office objects Log Parser functions usable in other scripts 1.2.1 Microsoft Log Parser Features Microsoft Log Parser 2.2 is the most recent incarnation of Microsoft’s log analysis tool. Re- leased in January 2005, it contains many improvements and additions to make it useful to anyone with a log file to process. Log Parser is free to download and use. It is a command line tool; there is no GUI to make creating commands easier.
  • 56. Log Parser uses SQL-like queries to sort through log files. It is very flexible and can be used to read any text based file, file system objects, registries, and database formats. Log Parser can format the text output into a variety of formats. It can also send output di- rectly to a syslog server, a database, and MS Office charts, and can be used to create HTML reports from a template. Log Parser can also be used in other programs and scripts to bring its processing power to other applications. 20 CMU/SEI-2005-HB-003 © 2005 Carnegie Mellon University 4 Log Parser Installation Requirements: Windows 2000, 2003, or XP Professional Download Log Parser from Microsoft’s website Double-click on the setup file and follow the instructions The Unofficial Log Parser Support Site is an excellent resource: http://www.logparser.com/ 1.2.2 Log Parser Installation
  • 57. Log Parser is a Microsoft Windows application that runs on Windows 2000, 2003, and Win- dows XP Professional. Installation is quick and easy. Download the file from the Microsoft website. In addition to the Microsoft website, The Un- official Log Parser Support Site maintains a current link to the setup file on its home page: http://www.logparser.com. That site is also an excellent resource for Log Parser information. Once you’ve downloaded the file, double-click on the setup file, LogParser.msi. Follow the instructions in the Setup Wizard and Log Parser is installed. CMU/SEI-2005-HB-003 21 © 2005 Carnegie Mellon University 5 Log Parser Input and Output Log Parser can read many text-based log formats Use the switch -i:TYPE to indicate file type Default is determined from the input file type Type LogParser -h -i:TYPE for more information on a specific type Output can be formatted into text files or MS Office objects or sent to other programs Use the switch -o:TYPE to indicate type of report Default is determined from the name of the output file Type LogParser -h -o:TYPE for more information on a specific type
  • 58. 1.2.3 Log Parser Input and Output Log Parser has a variety of built-in text-based formats that it can use to easily parse files and several output formats it can create. Many of them correspond to the log formats of popular applications, though it is Windows-centric. 1.2.3.1 Input Formats To specify an import format, use the switch -i:TYPE, where TYPE is one of the built-in types. The default input type is determined by Log Parser based on the file extension in the FROM clause. Table 3 lists many of the types and application logs for which each can be used. More information and usage examples for each one can be found by using the command line help: LogParser -h -i:TYPE. Other types can be found under LogParser -h. Table 3: Common Input Formats Type Uses Selected Parameters IISW3C IIS W3C Extended Log Format, primar- ily IIS 5.X logs and older n/a IIS Microsoft IIS log format, mostly used with version 6.0 and newer n/a
  • 59. NCSA NCSA Common, Combined, and Ex- tended Log formats, for Apache logs n/a 22 CMU/SEI-2005-HB-003 Type Uses Selected Parameters CSV Text files with comma-separated values -headerRow [ON|OFF] – for speci- fying if there is a header row -iTsFormat <timestamp format> – for specifying timestamps other than “yyyy-MM-dd hh:mm:ss” TSV Tab or space separated values -headerRow [ON|OFF] – for speci- fying if there is a header row -iSeparator <character> – Character that indicates a new field; can be any character, “spaces,” “space,” or “tab” W3C Generic W3C log format -iSeparator <character> – Character that indicates a new field; can be any character, “spaces,” “space,” or “tab” XML XML formatted logs -rootXPath <XPath> – XPath query of nodes to be considered roots
  • 60. EVT Windows Event Log -fullText [ON|OFF] – Use the full text message NETMON NetMon captures files -fMode [TCPIP|TCPConn] – Field mode, each record is a single packet or a single connection REG Registry keys and values n/a ADS Active Directory objects -objClass <class name> – Spe- cific class for object mode -username <uname> – user name for AD access -password <pword> – password for the specified user TEXTLINE Parses entire lines of text files n/a TEXTWORD Parses single words out of generic text files n/a FS File system properties n/a COM Custom COM input format -iProgID <progid> – version inde- pendent Prog ID of the COM plug-in CMU/SEI-2005-HB-003 23
  • 61. 1.2.3.2 Output Formats To specify an output format to create, use the switch -o:TYPE. Output can be in several text formats as well as some non-text ones. The default, for when no INTO clause is stated, is to print the list using NAT to STDOUT. When the INTO clause is stated, if there is no -o:TYPE, then Log Parser will attempt to guess from the file extension. Table 4 lists many of the types. More information and usage examples can be found by using the command line help: Log- Parser -h -o:TYPE. Other types can be found under LogParser - h. Table 4: Output Formats Type Format Special Parameters CSV Comma-separated values -headers [ON|OFF|AUTO] – Write field names as the first line; AUTO won’t write headers when appending to an existing file TSV Tab-separated values -headers [ON|OFF|AUTO] – Write field names as the first line; AUTO won’t write headers when appending to an existing file -oSeparator <any string> – Separator between fields: <string>, “space,” or “tab” XML XML output format -rootName <element name> – Name of the Root element
  • 62. DATAGRID ASP.NET data type for displaying tabular data -rpt <number of rows> – Rows to print before pausing CHART Microsoft Office Chart web compo- nent; MS Office must be installed for use -chartType <chart type> – One of the designated chart types SYSLOG Sends output to a syslog server -hostName <hostname> – syslog server name NAT Native format – tabular view of the records -rtp <number of rows> – Rows to print before pausing W3C W3C Extended Log format -rtp <number of rows> – Rows to print before pausing IIS IIS Log format -rtp <number of rows> – Rows to print before pausing 24 CMU/SEI-2005-HB-003 Type Format Special Parameters
  • 63. SQL Sends the output to a SQL table -server <server name> – Server the database is on -database <database name> – Name of the database TPL Output a report in a user-specified tem- plate -tpl <template file path> – Path of the template file -tplHeader <header path> – Lo- cation of a header file to use CMU/SEI-2005-HB-003 25 © 2005 Carnegie Mellon University 6 Log Parser Queries Log Parser can be run with standard SQL queries on the log files Format: SELECT <log fields> [ INTO <output file name> ] FROM <input file name>
  • 64. [ WHERE <clauses> ] The main differences are inclusion of the INTO clause with the output filename FROM clause specifies a filename, not a table Help with SQL can be gotten from Log Parser: LogParser -h GRAMMAR SELECT Clause INTO Clause FROM Clause WHERE Clause 1.2.4 Log Parser Queries Log Parser queries are based on standard SQL queries. This enables users to be able to select the fields that they need displayed, the log entries to ignore, and which to act on. This also allows for aggregation of log information, such as counting the number of “Error 500” re- sponses from a web server. The basic parts of a SQL query are the SELECT clause, the FROM clause, and the optional WHERE clause. SELECT indicates the fields to return. FROM indicates the data source to use. And WHERE indicates any conditions for rows to be included in the results. There are a few differences between standard SQL and the Log Parser SQL. First, the output
  • 65. location needs to be specified with the INTO clause in Log Parser SQL. This is generally a filename, though it might also be STDOUT if displaying the information on the console is desired. Next, the input is from a file, rather than from a table, so a filename follows the FROM clause. Lastly, the input is limited to one file. Joins are not allowed, though subqueries are allowed. There is query documentation in the help command using LogParser -h Grammar. There are also a number of examples, both under the help sections for specific input and out- put formats as well as under a special examples topic: LogParser -h Examples. For more references on how to write SQL queries, see http://en.wikipedia.org/wiki/SQL. 26 CMU/SEI-2005-HB-003 © 2005 Carnegie Mellon University 7 Log Parser Query Examples Filtering out irrelevant entries SELECT * INTO output.log FROM input.log WHERE sc-status >= 400 Adjusting timestamps SELECT LogFilename, LogRow, RemoteHostName, RemoteLogName, UserName,
  • 66. To_Localtime(Add(DateTime, Timestamp(’00:00:10’, ‘hh:mm:ss’))) AS DateTime, Request, StatusCode, BytesSent, Referer, UserAgent, Cookie FROM access_log 1.2.4.1 Query Examples 1.2.4.1.1 Filtering out Irrelevant Entries When focusing on a web server’s logs, you will probably want to separate out entries where page requests failed to reduce the logs to the important information. The query SELECT * INTO output.log FROM input.log WHERE sc-status >= 400 would return all of the log entries where the status code was 400 or above, indicating any server errors, “Page Not Found” errors, and access denials. By filtering out what is known to not be a problem, (e.g., successful page requests), it reduces the log files to a more manage- able size. Please note that this example is for IISW3C input; different input formats will have different field names. 1.2.4.1.2 Adjusting Timestamps Another common problem is that sometimes the time on one machine may drift and not be the same as on another machine. When you try to compare logs generated on these two ma-
  • 67. chines, events may be out of order. Log Parser can be used to adjust a timestamp in a file. Since we care about the entire log entry and not just the adjusted timestamp, we will need to specify the timestamp and all the other fields. This example uses the NCSA input, is format- ted for W3C output, and adds 10 seconds to all the entries. SELECT LogFilename, LogRow, RemoteHostName, RemoteLogName, UserName, To_Localtime(Add(DateTime, Timestamp(’00:00:10’, ‘hh:mm:ss’))) CMU/SEI-2005-HB-003 27 AS DateTime, Request, StatusCode, BytesSent, Referer, UserAgent, Cookie FROM access_log This can also be done on IISW3C formatted logs, though the timestamp is different so a dif- ferent command is needed: To_LocalTime(Add(To_Timestamp(date, time), Timestamp(’00:00:10’, ‘hh:mm:ss’))) This query will not change the timestamps in the original files but will create a new file with the adjusted timestamps, making log comparison easier.
  • 68. 28 CMU/SEI-2005-HB-003 © 2005 Carnegie Mellon University 8 Log Parser COM Objects COM allows for cross-platform development. It can be used in C++, C#, Visual Basic, Jscript, and VBScript. COM Objects can be used in two ways: 1. Create custom input formats (the syslog format is not currently supported). 2. Use Log Parser functions in other programs—add queries and input formats to your own scripts. 1.2.5 Log Parser COM Objects Component Object Model (COM) objects allow for cross- platform development of programs and scripts. Log Parser comes with a COM Application Programming Interface (API), allow- ing programmers to use the underlying constructions of Log Parser either to extend its capa- bilities or for use in their own programs. Log Parser COM API is available for use in C++, C#, Visual Basic, JScript, and VBScript. The only adjustment needed to use the API is that the LogParser.dll binary needs to be regis-
  • 69. tered with the computer’s COM infrastructure so the API will be found. Use this command: C:LogParser>regsvr32 LogParser.dll 1.2.5.1 Creating Custom Input Formats If the built-in input formats are too restricting, you can create your own. There is one inter- face to extend in C++ or Visual Basic and another for JScript and VBScript. The resulting script must also be registered with the computer, as in the example above. After that, it can be used when running Log Parser, as in this example: C:LogParser>LogParser “SELECT * INTO out.file FROM in.file” -i:COM - iProgID:MySample.MyInputFormat For more examples of this, please refer to the documentation that comes with Log Parser 2.2. CMU/SEI-2005-HB-003 29 1.2.5.2 Using the Log Parser COM API The Log Parser COM API allows for all the same actions as the command line binary, plus more. In addition to query execution and the various input and output formats, it is also pos- sible to have direct access to the log entries in record format. The MSUtil.LogQuery object is the base object for Log Parser. All others are subclasses.
  • 70. There are subclasses for each of the input and output types, as well as the LogRecordSet and LogRecord types. There are two modes of query execution: batch and interactive. Batch execution is used when the output will be formatted with one of the output formats, as is done in the command line program. Interactive execution is when no output format is specified and a LogRecordSet is returned. The programmer can then move through the set and process individual records as desired. The Log Parser documentation provides further illustration of these concepts and specific commands that are available. 30 CMU/SEI-2005-HB-003 © 2005 Carnegie Mellon University 9 Log Parser Execution The Log Parser program opens a command window in the Log Parser directory. Log Parser is run in two ways: 1. entering the query at the command line LogParser “SELECT * INTO out.file FROM in.file” - i:TYPE -o:TYPE <other switches> 2. using a saved query
  • 71. LogParser file:query.sql -i:TYPE -o:TYPE 1.2.6 Log Parser Execution Log Parser will normally be run on the command line in the special Log Parser window. To start Log Parser go to Start Programs Log Parser 2.2 Log Parser 2.2. This opens a command window, displays the help information, and then gives a command prompt with which to work. On the command line, you list the query, input format, and output format. Certain formats also have other parameters that need to be entered using some extra commands. These com- mands are listed in Table 5. Switches are separated from their parameters by a colon. The format of the line is >LogParser “SELECT * INTO out.file FROM in.file” -i:TYPE - o:TYPE <switches> Table 5: Misc Log Parser Commands Command Function Parameters -q Quiet mode ON or OFF (default) -e Maximum number of errors allowed be- fore aborting integer, -1 is default (ignore all) -iw Ignore warnings ON or OFF (default)
  • 72. -stats Display statistics after executing query ON (default) or OFF CMU/SEI-2005-HB-003 31 Command Function Parameters -c Use built-in conversion query -i:TYPE <filename> -o:TYPE <filename> -multiSite Send any BIN conversion output to multi- ple files depending on the SiteID value ON or OFF (default) -saveDefaults Save options as default values none - restoreDefaults Restore factory defaults none -queryInfo Display query processing information, but do not execute query none Queries can get long and it can be cumbersome to type the same one over and over. You can specify a file that contains a query on the command line instead
  • 73. of the query itself. Type file:query.sql instead of the full query. This will be particularly useful for queries that convert from one file type to another (aside from the predefined conversions) and for queries that you run repeatedly. 32 CMU/SEI-2005-HB-003 © 2005 Carnegie Mellon University 10 Summary Log Parser 2.2 is an extremely flexible tool for parsing and searching through logs, Event Viewer files, XML, and other text-based files. Use it to convert logs from one format to another filter out specific types of log entries into a new file create a new log with an adjusted timestamp write custom programs and scripts to process log files It assumes prior knowledge of SQL. 1.2.7 Summary Log Parser 2.2 is such an improvement on previous versions that it is like a new program. Log Parser is as extensible and flexible as you can make it. It can be used for • converting log files from one format to another for ease of analysis
  • 74. • filtering out specific types of log entries into a new log • creating a new log with an adjusted timestamp after skew has been determined • writing custom programs and scripts to process log files There is a steep learning curve with Log Parser. It is necessary to know the fundamentals of SQL queries to be able to process logs effectively. Once this limitation is overcome, many standard logs can be processed and reduced to create meaningful output. CMU/SEI-2005-HB-003 33 34 CMU/SEI-2005-HB-003 2 Module 2: Process Characterization © 2005 Carnegie Mellon University First Responders Guide to Computer Forensics Module 2: Process Characterization The identification, characterization, and forensic collection of currently running processes on
  • 75. a PC should be a frequently practiced information security procedure. Baselining a running system’s processes frequently and enumerating the list of currently running processes will allow you to monitor system activity and see whether serious changes have been made to the system. Running processes on a PC are at the crux of either normal or abnormal system be- havior. However, even after process collection, it can be a difficult task to make the determi- nation whether a particular process or set of processes may be the result of an intrusion or malicious user activity. For most system users and security practitioners, the first alert to abnormal system behavior may be the trivial questions one has about the system during routine day to day interactions with the PC. Why is my PC responding so sluggishly? Why does my PC show extremely high processor activity? What is that process and why is it running? These are commonly asked questions. In most cases, the default reaction to abnormal system behavior is the widely practiced reboot. This second-nature reaction may temporarily solve a problem, but if the machine was truly infected or compromised you may never find the source of the problem because of the volatility of running processes. CMU/SEI-2005-HB-003 35 © 2005 Carnegie Mellon University
  • 76. First Responders Guide to Computer Forensics Understanding a Running Process 2.1 Understanding a Running Process This module is intended to enable system users and first responders (system and network ad- ministrators, law enforcement, etc.) to • better understand running processes • forensically collect and enumerate the set of current running processes on a system • potentially differentiate between normal running processes and abnormal running proc- esses (i.e., malware) by looking at key process characteristics 36 CMU/SEI-2005-HB-003 © 2005 Carnegie Mellon University 3 Objectives Background info on processes – Programs, processes, threads – Process tree structure – Process identifiers (PIDs) – Process descriptions – Process analysis checklist 8 key process characteristics
  • 77. – Tools and native commands for collecting process characteristics 3 process forensic tasks 2.1.1 Objectives The focus of this module is to demonstrate how to determine the existence of running mal- ware by performing basic process characterization and the forensic examination of running processes on a system. The module is limited to running processes because the majority of malware (viruses, worms, Trojans, backdoors, etc.) have an associated process that may be aliased, newly created, or masked that allows the malware to perform its malicious actions on a machine and sometimes even remain or replicate after a reboot. Therefore, in an attempt to identify potential rogue processes, we will first cover some back- ground information on processes, identify eight key process characteristics, demonstrate fo- rensic collection procedures, and, finally, introduce native commands and tools that will al- low a first responder to forensically collect the key process characteristics for running processes. CMU/SEI-2005-HB-003 37 © 2005 Carnegie Mellon University 4
  • 78. Programs, Processes, Threads A computer process can be best defined as a program in execution. Generally, a process consists of the following:1 executable code data the execution context ( e.g., the contents of certain relevant CPU registers) Threads are execution contexts for a process. 1 Gollman, Dieter. Computer Security. England: John Wiley & Sons Ltd, 1999. 2.1.2 Programs, Processes, and Threads A computer process can best be defined as a program in execution. Generally, a process con- sists of the following:3 • executable code • data • the execution context (e.g., the contents of certain relevant CPU registers) While the word “program” refers to the executable code (the exe file, for exam- ple), a process is a program that is being executed. When you start a program in Windows, the executable will be loaded into RAM. Windows will then add the new process to its internal process list and make sure the
  • 79. process receives some CPU time as well as memory and other resources. A process can then request any amount of resources from Windows as long as there are resources left. Win- dows keeps track of which processes are using which resources. As soon as a process is closed or terminated, all resources used by that process will be re- turned to Windows and will then be handed out to other processes. Unlike mem- ory and similar resources, CPU time cannot simply be requested but is instead shared equally between processes. A process can also return the CPU to Win- 3 Gollman, Dieter. Computer Security. England: John Wiley & Sons Ltd, 1999. 38 CMU/SEI-2005-HB-003 dows before the assigned time slice ends. This is actually what happens most of the time and is the reason why your CPU usage is not always at 100 %.4 The Linux Tutorial5 is a great tutorial for understanding in depth how processes work and also provides interactive demonstrations describing the parent- child process relationship. 2.1.3 Threads Threads are execution contexts. Initially each process has a
  • 80. single execution context. This execution context is called a thread. If a process requires another execution context, it can simply create another process. Threads were invented to provide a lightweight mechanism for creating multiple execution contexts. Windows and Linux schedule threads from the operat- ing system with the goal of providing a fair execution environment. The most obvious distinction between processes and threads is that all threads of a process share the same memory space and system-defined “facilities.” Facilities include open file handles (file descriptors), shared memory, process synchronization primitives, and current directory. Because global memory is shared and almost no new memory must be allocated, creating a thread is simpler and faster than creating a process.6 2.1.3.1 Displaying Threads for a Running Process Using the Sysinternals7 PsList command line util- ity with the –d command line argument will display currently running proc- esses, threads for each process, each process’s thread state, and memory statistics for each process. This utility comes in very handy when you need a quick way of enumerating all currently running proc- esses, each process’s asso-
  • 81. ciated threads, and their thread state. Figure 2: Example Run of PsList 4 http://www.liutilities.com/products/wintaskspro/whitepapers/pa per8/ 5 http://www.linux- tutorial.info/modules.php?name=Tutorial&pageid=3 6 Bradford, Edward “High-Performance Programming Techniques on Linux and Windows 2000,” http://www.developertutorials.com/tutorials/linux/run-time- linux-windows-050428/page1.html. 7 http://www.sysinternals.com/index.html CMU/SEI-2005-HB-003 39 2.1.3.2 Sysinternals Process Explorer Another Sysinternals utility called Process Explorer is an excellent administrative tool for showing a dynamic display of real-time system process activity. Process Explorer’s graphical user interface (GUI) is a more robust Windows Task Manager. It displays in an easy to read format what handles each process has open and what DLLs and memory-mapped files each process has loaded, and has a quick search capability to locate a particular DLL or handle for the currently running processes.8
  • 82. Figure 3 is an action screenshot of the Process Explorer GUI. The GUI displays a process list (e.g., tree format) of currently running processes in the top half of the pane, while the bottom half of the pane displays all currently loaded DLLs for the highlighted mozilla.exe process. Figure 3: Sysinternals Process Explorer Utility 8 http://www.sysinternals.com/ntw2k/freeware/procexp.shtml 40 CMU/SEI-2005-HB-003 More importantly, the Process Explorer utility has a unique security fea- ture that verifies a proc- ess’s image (i.e., the pro- gram/binary responsible for the executing process). Figure 4: Verifying a Process Image in Process Explorer If you are curious about whether a particular run- ning process is a legitimate Microsoft process, you could verify the process image by using the added functionality in Process
  • 83. Explorer. To do this, you would 1. Right-click on any of the displayed processes in the Process Explorer GUI. 2. Click Properties. 3. Click Verify. An example result is shown in Figure 4. In addition to the Verify option, another great feature is the Strings tab. Clicking on the Strings tab will display all alpha and numeric strings found in the process image, as shown in the example in Figure 5. This may come in handy for looking further into an un- known process image. It is important to point out that this utility uses a GUI and, therefore, is not an ideal tool that a first responder would use in responding to a com- puter security incident to forensically analyze running processes on a machine. This utility should have already been incorporated into the daily operations for everyday system and network troubleshooting. If you were to use the Process Explorer utility in an incident re- sponse situation you might actually contaminate potential uncollected evidence from a possi-
  • 84. bly compromised machine (e.g., changing Mac Times on critical files or folders on the sys- tem). Sysinternals’ command line utility pslist.exe is a better choice for responding to Figure 5: The Strings Tab in Process Explorer CMU/SEI-2005-HB-003 41 computer security incidents and forensically collecting running processes, simply because it is much lighter and leaves a significantly smaller footprint. 42 CMU/SEI-2005-HB-003 © 2005 Carnegie Mellon University 5 Process Tree Structure and PIDs 2.1.4 Process Tree Structure Windows and Linux OS envi- ronments currently running processes exhibit a hierarchical tree structure. By looking at this hierarchical tree structure of currently running processes we can gain insight about what processes have started other processes and so forth.
  • 85. Figure 6: Displaying a Process Tree Using PsList This kind of relationship is known as the parent and child process relationship. The crea- tor is called the parent process, the created is called the child process, and the parent-child relationship is expressed by a process tree. Using Sysinternals’ PsList util- ity with the –t command line argument, we can visually display the parent-child relationship (i.e., the process tree) for currently running processes. CMU/SEI-2005-HB-003 43 In the example shown in Figure 6, we can easily see that the System.exe process is the parent process for smss.exe and so forth as you work your way down the process tree. 2.1.4.1 pstree (Linux) Using the native Linux pstree command, we can easily display the parent-child process rela- tionship for currently running processes. Using pstree with the – hp command line argument will display the process tree, highlight the current process, and display the PIDs for each process (Figure 7).
  • 86. Figure 7: Displaying a Process Tree Using pstree 2.1.4.1.1 PIDS Process identifiers, commonly known as PIDs, are unique integer values assigned to each currently running process. Generally, PID assignments will be multiples of 4 for Windows operating systems, thus guaranteeing an even integer PID assignment ranging from 0– XXXX. From a forensic or first responder perspective, PIDs offer a quick and easy way of uniquely identifying running processes. However, there is nothing of forensic value in distinguishing legitimate processes from non-legitimate processes by just looking at the PID assignments. What is useful is the mapping or correlation from the PID assignments to generated system event log tickets. We can search the system event logs for a PID that was responsible for gen- erating a certain ticket’s event log and map them back to the PID or current running process. 2.1.4.2 Linux ps –A Using Linux’s native ps command, we can quickly display each currently running process’s PID assignment and the command that was to used start the process. When displaying proc- esses in Linux, PIDs will always be displayed in sequential order ranging from the infamous init process, or PID 1, to XXXX (Figure 8).
  • 87. 44 CMU/SEI-2005-HB-003 Figure 8: Displaying PID Assignments Using ps CMU/SEI-2005-HB-003 45 © 2005 Carnegie Mellon University 6 Process Descriptions WinTasks Process Library Great resource for knowing the exact purpose and description of every single Windows process Categories of Windows processes Top system processes Top application processes Top security threat processes Other unfamiliar processes Example: svchost.exe 2.1.5 Process Descriptions There is no easy way of quickly knowing whether the current set of running processes are normal, especially if you do not have in-depth knowledge of the system you are analyzing or if proper process baselining was not implemented. Understanding what each process is and
  • 88. why it is currently running can be a difficult task. There are a few online resources outlined below that will attempt to alleviate some of the ambiguity of unfamiliar Windows processes, particularly in determining whether a process is legitimate. Uniblue has an online hyperlinked table for each type of Windows process. The online re- source is a great tool for quickly checking and gathering information about a known rogue process or gaining information such as a description about any legitimate Windows process. A Uniblue hyperlinked table for each of the following process categories is available online.9 Categories of Windows Processes • top system processes • top application processes • top security threat processes • other, unfamiliar processes Figure 9 is a snapshot of the type of information you can obtain from the Uniblue website for each of the categories of Windows processes. We chose a process description pertaining to the svchost.exe process that is often found running on Windows systems. 9 http://www.liutilities.com/products/wintaskspro/processlibrary/ allprocesses/
  • 89. 46 CMU/SEI-2005-HB-003 Figure 9: WinTasks Process Description 2.1.6 Process Hashes (National Software Reference Library) Another valuable online resource is NIST’s National Software Reference Library’s repository of SHA1 and MD5 hashes for critical system and application files. The NSRL repository in- cludes hashes of non-English software files, operating system files, application software files, images, and graphics found on a typical Windows installation. NSRL’s stored repositories of hashes are cryptographic hashes of safe or uncorrupted files. This is very important when wanting to compare your own system’s critical file hashes against a known safe set. This online resource provides the cryptographic hashes free of charge; they are downloadable as ISO images. Once you’ve burned the images to a CD-ROM, you can unzip the zipped files and get started. You’ll find a list and description of the five text files that come with the NIST Operating Sys- tem ISO. The Operating System ISO is important because it contains safe hashes of executa- bles and DLL files. These are common types of critical files on Windows machines that be- come corrupted or replaced with compromised ones. NSRL maintains and updates the ISO images periodically (non-English software, operating systems, application software, and im-
  • 90. ages and graphics) as new updates and patches are released. Operating System ISO: • Hashes.txt – contains hashes for the files so you can check the integrity of the downloaded files • Version.txt – displays the version and date of the downloaded ISO. Keep in mind these ISOs will be updated periodically, so it is import to check the version file for each ISO file because hashes may change with different versions. CMU/SEI-2005-HB-003 47 • NSRLMfg.txt – displays the Manufacture Code (MfgCode) and Name (MfgName) of the supported manufacturers • NSRLProd.txt – displays the supported “ProductCode,” “ProductName,” “Product Ver- sion,” “OpSystemCode,” “MfgCode,” “Language,” and “ApplicationType” • NSRLFile.txt – This is the file that actually has the list of the SHA1 and MD5 hashes that can be used for checking critical associated OS files. The format of each entry in the text file goes as follows: SHA-1, MD5, CRC32, FileName, FileSize, ProductCode, OpSystemCode, SpecialCode
  • 91. Here is an example of one entry in the NSRLFile.txt text file that contains a list of SHA-1 and MD5 hashes. As you can see, the entry corresponds to the mshearts.exe program for a Win- dows XP machine and has a SHA-1 and MD5 hash for the mshearts executable. "001A6C9B8D9471B0A3B4F46302DB951F4D877227","BE1B8 5306352E0AC901EC0850 6792B6B","CB76D275","mshearts.exe",126976,1567,"WINXP", "" 48 CMU/SEI-2005-HB-003 © 2005 Carnegie Mellon University 7 Process Analysis Checklist 2.1.7 Process Analysis Checklist The procedure of inspecting processes for unexpected behavior or characteristics involves many detailed actions. The abbreviated checklist below contains questions about processes that you may wish to ask yourself and characteristics you may wish to enumerate. In the fol- lowing paragraphs we are going to demonstrate how to forensically collect some identified items and some extra process characteristics using native commands and third-party tools. • How was this process initiated? − By what user? − From what program or other process?
  • 92. • What is the current execution status of each process? − Is it running, stopped, suspended, swapped out, exiting, or in some other unexpected state? − Does the process continue to appear among active processes after it should have ex- ited? − Is it missing from among the processes you expected to be active? • In what environment is this process executing? − What system settings are in effect for this process? − Did the process inherit any environment settings from other processes? − How might the current environment settings affect how the process operates and what it can access? • With what options or input arguments is the process executing? Are these appropriate settings? CMU/SEI-2005-HB-003 49 • Are the system resources (CPU time, memory usage, etc.) being utilized by each process within expected consumption amounts? − Are there any processes that seem to be tying up an unusually large amount of system
  • 93. resources? − Are any processes not performing as expected because they don’t seem to be getting enough resources? • What is the relationship between this process and other processes executing on the sys- tem? What are the characteristics of the related processes? • What files have been opened by the processes executing on the system? − Are they authorized to have these files open? − Have the files been opened with excessive privileges (e.g., opened with read-write capability when there is no reason for the process to write to the file)? • Have there been any unexpected accesses to sensitive system files or other private data, such as password files? − From what process were the accesses made? − With which user is that process associated? • Have there been any unauthorized attempts to access a file? Has the system reported any file access errors? 50 CMU/SEI-2005-HB-003 © 2005 Carnegie Mellon University 8 8 Process Characteristics
  • 94. 1. Process filename 2. Open ports 3. Open files 4. Base priority 5. Start, stop, elapsed times 6. Location (i.e., full path) of process image 7. Survivable processes 8. Loaded DLLs or libraries top –n 14. pslist.exe lsof3. handle.exe netstat -tap2. fport.exe ps -aux1. ps.exe lsof –p PID6. listdlls.exe ps -auxw5. pslist.exe psloglist.exe checkconfig crontab 7. autorunsc.exe
  • 95. ldd8. listdlls.exe 2.1.8 Common Process Characteristics We have outlined the eight key process characteristics that follow along with the Process Analysis Checklist, as well as a set of tools and native commands a first responder can use to collect those characteristics. Note that this is not an exhaustive list of running process charac- teristics. But collecting these eight process characteristics for a potential rogue can signifi- cantly aid in determining whether that running process is legitimate or not. 2.1.8.1 Process Filenames The process filename is the filename of the process image that was executed to initiate the currently running process. In most cases you can look at the process filename to determine whether the current running process is a legitimate Windows or Linux process. CMU/SEI-2005-HB-003 51 2.1.8.1.1 pulist (Windows) Using the pulist.exe command line utility, a Windows Resource kit utility, we can generate a list of currently running processes and the associated filenames to be examined for unexpected
  • 96. process filenames and unusual user identifications. In the screenshot in Figure 10, the four processes that we identi- fied to be rogue processes judg- ing by the process filenames are tini.exe, klogger.exe, svchost1.exe, and qfskrtwj.exe. Figure 10: Listing Process Filenames Using pulist 2.1.8.1.2 ps (Linux) The Linux ps command can be used to display the filename of the process image as well as other things outlined in Table 6 and Table 7. Table 6: A Subset of ps Options Option Description $ ps –ux View current processes $ ps –U user View other system users running processes $ ps –C program_name View all occurrences of a program $ ps –p4, 8, 2203 View selected processes 4, 8, 2203 $ ps –efww View all processes with full command lines Table 7 describes some output headings for ps and top output. Table 7: Output Headings for ps and top
  • 97. Field Description USER Username of the process owner PID Process ID %CPU Percentage of the CPU this process is using %MEM Percentage of real memory this process is using VSZ Virtual size of the process, in kilobytes 52 CMU/SEI-2005-HB-003 Field Description RSS TT STAT Current Process Status R= Runnable D = In disk wait I = Sleeping (< 20 sec) S = Sleeping (> 20 sec) T = Stopped Z = Zombie Additional Flags L = Some pages are locked in core (for rawio) S = Process is a session leader (head of control terminal)
  • 98. W = Process is swapped out + = Process is in the foreground of its control terminal START Time the process was started TIME CPU time the process has consumed COMMAND Command name and arguments 2.1.8.2 Open Ports Another critical process characteristic is the number of ports a particular process has open. Processes that have unfamiliar or unnecessary TCP or UDP ports open could indicate that the process is a backdoor or Trojan allowing remote access to the machine. Figure 11: Displaying Open Ports Using fport 2.1.8.2.1 fport (Windows) The fport.exe command line utility, like the native win- dows netstat –anb com- mand, displays all open TCP/IP and UDP ports and maps them to the owning application as shown in Figure 11. Fport also maps those ports
  • 99. to running processes with the PID, process name, and path to the process image. CMU/SEI-2005-HB-003 53 2.1.8.2.2 netstat (Linux) Figure 12: Displaying Open Ports Using netstat The Linux netstat command can be used to display all TCP/IP and UDP ports that are open in relation to a running process. Using netstat with the –tap command line arguments will display all running processes that have a TCP/IP port open, the PID of the process, the port number assignment, the foreign address if con- nected, and the state of the port (Figure 12). 54 CMU/SEI-2005-HB-003 © 2005 Carnegie Mellon University 9
  • 100. Potential Rogue Processes C:..System321024284NAspoolsv.exe C:..System329887777notepad.exe:alds.exe C:..System3231280svchost1.exe C:WINDOWS228827374cuoikqkxvs.exe LocationPIDPortFilename 2.1.8.3 Open Files Open files associated with an executing process should not be overlooked. Often, rogue proc- esses such as a key logger or network sniffer will have an associated open file to capture their collected information. One quick way to determine whether a potential rogue process has any current files open is to use the handle.exe utility for Windows and the native lsof command for Linux. Figure 13: Viewing Handles Using handle 2.1.8.3.1 handle (Windows) The handle.exe utility displays in- formation about open handles for processes running on the system. You can use it to view the pro- grams that have a file open or to view the object types and names of
  • 101. all the handles of a program. The screenshot in Figure 13 dem- onstrates how we can use the han- dle.exe utility to look at all open handles for the potential rogue process svchost1. CMU/SEI-2005-HB-003 55 2.1.8.3.2 lsof (Linux) The native lsof command without any command line arguments will display all open files belonging to all currently running processes. The three screenshots (Figure 14, Figure 15, and Figure 16) demonstrate lsof’s command versatility. Figure 14: Displaying Which Process Has Port 6002 Open Figure 15: Displaying Who Has the Bash Shell Open Figure 16: Displaying All the Currently Open Files by the User Root 2.1.8.4 Base Priority When a process is initially executed for both Windows and
  • 102. Linux it is assigned a base prior- ity value. That value determines what priority it has over other processes in regard to the computer resources it is assigned and consumes, such as memory and CPU time. When look- ing at a potential rogue or runaway process you may want to check the assigned priority value. 56 CMU/SEI-2005-HB-003 2.1.8.4.1 pslist (Windows) Figure 17: Listing Priority Levels Using pslist Using Sysinternal’s pslist.exe utility we can enumerate the priority levels for each current running process by looking at the “Pri” column. The screen- shot in Figure 17 demonstrates how to display priority values for running processes. 2.1.8.4.2 top (Linux) Using the native Linux top command we can enumerate the priority levels for each cur- rent running process. Linux processes will generally have a priority value between -20 and 19, where the value of -20 is
  • 103. the highest and 19 is the lowest priority value (Figure 18). Since the top command only displays the top current proc- esses, if we need to enumerate the process priority value for a particular process we can use the top command with the command line arguments –p PID –n 1, as shown in Figure 19. Figure 18: Listing Priority Levels Using top Figure 19: Displaying the Priority Level for a Specific Process CMU/SEI-2005-HB-003 57 2.1.8.5 Process Times and Terminated Processes 2.1.8.5.1 Process Start Time The process start time is the point in time when the process started executing. An interesting characteristic of rogue processes is that they generally will have a start time that is a few sec- onds or few minutes later than all other legitimate running processes. To discover processes that may have started later in time after the boot cycle you can use the psuptime.exe and pslist.exe command line tools. These tools will tell you when a process first started.
  • 104. psuptime (Windows) Figure 20: Checking Uptime Using psuptime To calculate the initial start time of a process, we first have to collect the up- time or how long the system has been running. We can do this using the psup- time.exe utility. Once we have the uptime of the system, the next step is to enumerate all of the elapsed times for the current set of run- ning processes using pslist.exe. 2.1.8.5.2 Process Elapsed Time pslist (Windows) Once we have the uptime of the system and the elapsed time for a particular process we can simply subtract the (Uptime – Elapsed time) to calculate Start Time for any given process. For example, the Uptime of the system was = 27h:41m:24s and the Elapsed Time of the Svchost.exe process was = 3h:34s:41s; therefore, the Start Time for the Svchost.exe process was 24h:6m:43s (12:06:43 a.m.). Figure 21: Checking Elapsed Time for a Process Using pslist 58 CMU/SEI-2005-HB-003
  • 105. Note that, by just looking at the pslist.exe output, more specifically the elapsed times, you can determine which processes started after the boot process. 2.1.8.5.3 Terminated Processes Suspended or prematurely terminated processes can be indicators of abnormal system behav- ior. Often in computer security situations, a critical system process will be suspended or ter- minated. For example, an antivirus or other critical process may be terminated in an attempt to prevent the host system’s security mechanisms from checking for running malware on the system. Therefore, terminated processes should be collected and identified. One method to check for terminated processes in Windows, assuming proper auditing is en- abled, is reviewing the event logs. The screenshot in Figure 22 dis- plays a system event log using the Windows Event Viewer. A termi- nated process in Windows exhibits an Event ID of 7034. Figure 22: Windows Event Log Knowing what Event ID to search for, we can use a command line utility called psloglist.exe devel-