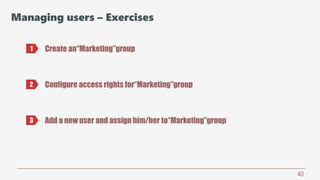
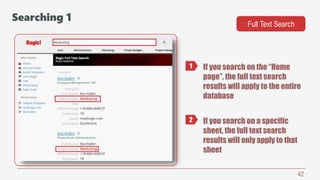
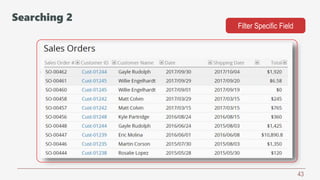
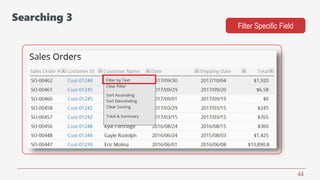
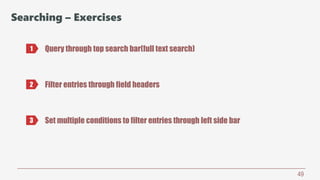
Ragic Database Design 101
START!
CONTENT
Introduction
Basic
Advanced
Designing your Ragic application
Managing users
Searching and filtering
Integrating with Excel
Building data relationships
Improving efficiency with one click
Reports
Database settings
29
9
3
39
47
55
74
92
106
Click on title to jump to a chapter
Extra
Online support 115
Introduction
3
4
Introduction 1 A complete database can contain all kinds of
business applications.
5
Tab
Sheets
1
2
Introduction 2
6
Click on a sheet to
access records
1
Introduction 3
7
The“Listing Page” is a table that contains the summary
of many entries.
Click to see the
details of this entry
1
Introduction 4
8
The“Form Page” is the full detail of a single entry as a
page.
Field1
Introduction 5
Designing your Ragic application
9
Get the hang of Ragic
10
Design application 1 – Create sheet Design your own sheet
Create new tab and
sheet
1
11
Name your tab1
Design application 2 – Create sheet
12
Name your sheet1
Design application 3 – Create sheet
13
Type the field name
that you would like
to create
1
Design application 4 – Create fields
14
Field Type
Field Name
Field Value
Field Settings
1
2
3
Design application 5 – Create fields
15
Field Description
Fields
1
2
Design application 6 – Create fields
16
Set up Default Value
Format Fill out this field
Default Value
1
2 3
Design application 7 – Create fields
17
Subtable
Handling one-to-many relationships
1
Design application 8 – Subtable
18
Set up Formula
Applying a formula
Assign to Field Header1 2
Design application 9 – Formula
19
Setting up approval flow
Configure
approval flow
1
Design application 10 – Approval
20
Click to configure
Add approval step
Set the approver
1
2
3
Design application 11 – Approval
21
Approver Title
Select Approver
1
2
Design application 12 – Approval
22
Done!
Design application 13 – Approval
23
Remember to save before leaving “Design Mode”1
Design application 14
24
Input Data
Default Value
1
2
Design application 15 – Adding an entry
25
Back to listing page
Approval
Form page
1
2
Design application 16 – Adding an entry
26
Listing page
Design application 17 – Adding an entry
27
Fields Displayed on the Listing Page
Click on “Change Design” on
listing page
1
Design application 18 – Listing page
28
Choose the fields that will
be displayed in
the listing page
1
Design application 19 – Listing page
29
Design application – Exercises
Create an “Sales Order”which including fields and subtable1
2 Apply formula to sum the subtotal in subtable
3 Configure a two steps approval flow in “Sale Order”
4 Add a entry and save
Managing users
30
Get the hang of Ragic
31
Managing users 1
Define user groups
Adding new users
Configure access rights
Add new users and
assign them to
appropriate groups
1
2
3
32
Just add the new user
groups that you need
Need more groups?
1
Managing users 2
33
Option 1: Global Access Rights Panel
Configure access rights on all of sheets for each user group
1
Managing users 3
34
Option 2: Setting up
Access Rights for
Individual Sheets
Additional Access Rights
Settings
1
2
Managing users 4
35
Add new users
List all users in this database
1
2
Managing users 5
36
Ragic will send an e-mail to the new users and guide
them through the setup process
1
Managing users 6
37
You can assign users to more than one group1
Managing users 7
38
Decide who can access these features
Managing users 8
39
Configure feature access rights for user groups1
Managing users 9
Decide who can access these features
40
Managing users – Exercises
Create an“Marketing”group1
2 Configure access rights for“Marketing”group
3 Add a new user and assign him/her to“Marketing”group
Searching and filtering
41
Get the hang of Ragic
42
Searching 1
Full Text Search
If you search on the “Home
page”, the full text search
results will apply to the entire
database
If you search on a specific
sheet, the full text search
results will only apply to that
sheet
1
2
43
Filter Specific Field
Searching 2
44
Searching 3
Filter Specific Field
45
Input your query1
Searching 4
Filter Specific Field
46
Clear Filter
Result
1
2
Searching 5 Filter Specific Field
47
Filter more than one field
Searching 6
48
Saving frequent searches as views
Click
Name this
view
1
2
Searching 7
49
Searching – Exercises
Query through top search bar(full text search)1
2 Filter entries through field headers
3 Set multiple conditions to filter entries through left side bar
Integrating with Excel
50
Get the hang of Ragic
51
Integrating with Excel - 1
Prepare Import Files
The headers of the fields
Key field
1
2
52
Click
Import File
1
Integrating with Excel - 2
53
Choose File
Next
Upload1 2
3
Integrating with Excel - 3
Import File
54
Next1
Integrating with Excel - 4
Import File
55
Map Fields
Next
1
2
Integrating with Excel - 5
Import File
56
Advanced Settings Back to database
Import
1
2
3
Integrating with Excel - 6
Import File
57
Click to download
Download
Configuration
1
2
Integrating with Excel - 7
Export File
58
Integrating with Excel – Exercises
Import an Excel file to Ragic1
2 Export“Sales Order”as Excel file
Building data relationships
59
The Road to Mastery
60
Four different
linking tools
Linking sheets together
1
Data relationship
61
Case 1: When entering sales orders, we want to populate
the related customer information which is saved in another
form.
Data relationship 1-1
62
Click here Select from“Customers”sheet1 2
Data relationship 1-2
63
Select customer ID
Populate
corresponding
information
1
2
Data relationship 1-3
64
Click
Link & Load
1
Data relationship 1-4
65
Set up the Linked Field1
Data relationship 1-5
Link & Load
66
Link the Loaded Fields to the corresponding cells1
Data relationship 1-6
Link & Load
67
Case 2: Sometimes you will want to create different versions of the
same form so that different groups of users can see different
versions.
Data relationship 2-1
68
Click here Duplicate Sheet1 2
Data relationship 2-2
Multiple Versions
69
All edits and deletion of entry values
will be reflected on both sheets
1
Data relationship 2-3
Multiple Versions
70
Fields, access right and layout can be different from another sheet1
Data relationship 2-4 Multiple Versions
71
Case 3: To make the data in the subtables more
accessible, you can create a new sheet from a
subtable.
Contains all of the
subtable entries
1
Data relationship 3-1
72
Click Create new sheet1 2
Data relationship 3-2
New Sheet from Subtable
73
The newly created form will contain an additional field that will link back to your
original form
1
Data relationship 3-3
New Sheet from Subtable
74
Case 4: To see all sales orders a customer has
placed, we can add a reference subtable on the
Accounts sheet.
Data relationship 4-1
75
Show References from Existing Sheets
Click Choose the sheet you want to reference to1 2
Data relationship 4-2
76
Insert reference table1
Data relationship 4-3 Show References from Existing Sheets
77
All of the order
records of that
account
Data relationship 4-4 Show References from Existing Sheets
1
78
Data relationship – Exercises
Create an “Client Sheet”and link data to “Sales Order”1
2 Create multiple versions for “Client Sheet”and configure different layout and
access right for the new sheet
3 Create new sheet from“Sales Order”subtable
4 Create a reference subtable from “Sales Order ”on“Client Sheet”
Improving efficiency with one click
79
The Road to Mastery
80
Four different
custom buttons
Have work done with one click!
1
Improving efficiency
81
Case 1: Creating a button to post some
values in this entry to be saved in another
sheet.
Improving efficiency 1-1
82
Create a copy of your data to be saved
in another sheet.
Improving efficiency 1-2
83
Convert Records
Click1
Improving efficiency 1-3
84
Convert to this sheet
Convert these fields
Create button
1
2
3
Improving efficiency 1-4
Convert Records
85
Case 2: You might want to update field values on a record
without manually inputting.
Click to update
value
1
Improving efficiency 2-1
86
Update to “Qualified”
Improving efficiency 2-2
87
Update value on this sheet
Click1
Improving efficiency 2-3
88
Update field(s)
Create button
1
2
Improving efficiency 2-4
Update value on this sheet
89
Case 3: You might want to update field values in
sheet A's records according to the values in a
record from sheet B.
Issuing goods from a
Outgoing Stock to
change the inventory
of the products
1
Improving efficiency 3-1
90
Update value on another
“Inventory Sheet”
Improving efficiency 3-2
91
Update value on another sheet
Click1
Improving efficiency 3-3
92
Select sheet to be updated
Update to field(s)
Conditions
1
2
3
Improving efficiency 3-4 Update value on another sheet
93
Case 4: Creating a button to send a custom
e-mail that contain your entry values.
Improving efficiency 4-1
94
Send custom e-mail
Click1
Improving efficiency 4-2
95
Design template
Automatically filled
with the values in this
entry
1
Improving efficiency 4-3
96
Improving efficiency 4-4 Preview template
97
Improving efficiency – Exercises
Create an “Delivery Note”and convert record in “Sales Order”to it1
2 Update field values in “Sales Order”through action button
3 Update“Sales Order”order amount due field to “Client Sheet”accumulate
spending field
4 Send order confirmation E-mail in “Sales Order”through custom E-mail action
button
Reports
98
The Road to Mastery
99
You can generate reports from the data you
have in your Ragic sheets.
Reports 1
100
Option 1: Create new report from
“Reports Tab”
1
Reports 2 You can generate reports from the data you
have in your Ragic sheets.
101
Option 2: Create new report in your sheet1
Reports 3 You can generate reports from the data you
have in your Ragic sheets.
102
Dashboard ReportReports 4
103
Ranking Report
Reports 5
104
Pivot Table
Reports 6
105
Calendar
Reports 7
106
To-do List
Reports 8
107
Label Maker
Reports 9
108
Address MappingReports 10
109
Line Graph
Reports 11
110
Gantt Chart
Reports 12
111
Grouping ReportReports 13
112
Reports – Exercises
Create Dashborad Report to analyze “Sales Order”1
Database settings
113
The Road to Mastery
114
Database settings 1 Customizing Ragic for your Company
115
Custom LogoDatabase settings 2
116
Database settings 3 Custom Banner
117
Custom Login ScreenDatabase settings 4
118
Account BillingDatabase settings 5
119
Backup and RestoreDatabase settings 6
120
BackupDatabase settings 7
121
Choose backup file
Upload
1
2
Database settings 8 Restore
122
Database settings – Exercises
Upload custom logo and banner1
2 Manually download database backup
Online support
123
124
Documents
Blog and Social
Media
1
2
Online resources
125
Customer support 1
Lower right corner Ask a question with keywords
Ragic Bot
1 2
126
Upper right corner Provide URL and describe the problem
you are facing
Contact Support
1 2
Customer support 2
Ragic Database design 101

Ragic Database design 101