SlideShare a Scribd company logo
1 of 7
Download to read offline
Cautions
1.Do not look at the IR infrared light directly in case of damage to your
eyes!
2.Massive power will be gathered when the infrared light is turned on.
Do not aim at flammable items at a close range, otherwise it may cause
fire. Please turn the infrared light off or switch to sleep mode after use.
3.Please use rechargeable battery with rated voltage of 3.7V.
4.If item is defective, notify point of purchase contact for maintenance.
Attempts to disassemble or repair the device unauthorized will make
the warranty invalid.
-1-
Shenzhen Shi Yutong Technology Co., LTD
PRODUCT INSTRUCTION
-2-
Digital Night Vision
Note : only suitable for charging voltage below 5v. Do not charge the
device with voltage over 5v.
Laser adjustment hole
Stretchable fill light
Power/Sleep button
Battery compartment cap
Eyepiece dioptre adjustment ring
Objective lens focusing adjustment ring
1/4 British Standard Screw Interface
HDMI high-definition
interface
TF card slot
USB charging port
-3-
Components
1*HT-66 ; 1* Micro USB cable; 1*Adapter;
2*Hex-nut wrenches; 1* Cotton bag; 1*Power Adapter;
Storage card is not included. Please prepare a TF card (128g maximum) for data
storage.
Installation
Battery
Please use lithium chargeable 3.7V flat battery 18650. Remove battery com-
partment cap and make sure setting the positive polar towards to the direction
inward. Put the cap back and screw it until tight. ( Fail to do so may result in
restarting!).
Adjustments
To check the function after the installation of battery. First, rotate and adjust the
eyepiece dioptre adjustment ring until you see the four-character icon on the
screen ( there's no need to see a clear image ), then rotate the Objective lens
adjustment ring until you can see your target clearly. Second, switch to different
modes, test IR, Red dot or Rangefinder.
Adapter installation
Outfit the adapter to front side of the device, screw it to the bottom to fix the
adapter tight. Using screws to fix the device onto scope. (Or use tape to assist
the installation).
-4-
-5- -6-
Long press: Take photos/ Short press: Zoom in or out
( , UP in "Menu" mode)
Long press: MENU
(Short press to exit MENU page)
Short press: Turn on/off laser red dot
Long press: Recording ON/OFF
Short press: OK, CONFIRM in "Menu" mode
Long press: IR mode/ Short press: Infrared level adjustment
( , DOWN in "Menu" mode)
2.
3.
1.
Instructions
Turn On/Off
Turn on the device with a short press of Power button. Turn off the device with
a long press of Power button. Power indicator will keep ON when the device is
turned on.
Sleep Mode
Enter sleep mode with a short press of Power/Sleep button when the device is
turned on. Power indicator will keep ON when the device entering sleep mode.
The Eyepiece Dioptre Adjustment
The purpose of dioptre adjustment is to get a clear image for users with different
vision. Rotate and adjust the dioptre adjustment ring until
you get a clear view of the four-character icon on the screen. One adjustment
only for each eye-view.
(Please note it's possible that the image is not clear without the adjustment
of objective lens.)
The Objective Lens Adjustment
Make sure the eyepiece dioptre adjustment is finished. Aiming at your target,
rotate and adjust the objective lens ring until you get a clear and well-focused
image.
IR Fill Light Control
Turn on the device, enter Black and W hite mode with a long press of IR button.
Switch to IR1-3 or off with a short press of IR button. The part of fill light is
stretchable which can be pull out or push back to make a quick adjustment.
Red dot Adjustment
Turn on the device, then turn the laser on/off with a short press of Laser/Menu
button. The position of laser can be adjusted on the laser adjustment holes by a
hex-nut wrench.
Menu operation
Enter the menu with a long press of Menu button. Press / button to select
options. Enter a submenu with a short press of OK button. Exit the menu with a
short press of Menu button.
-7- -8-
-9-
1.
2.
3.
4.
5.
6.
7.
>Reticle Adjustment
Enter the submenu reticle adjustment with a short press of OK button . Select
options with a short press of OK button. Adjust scope reticle or values with
some short press of / button .
To confirm your setting by enter “Save” with a short press of + button , choose
“Yes” with a short press of OK button; To deny your setting by enter “Save”
with a short press of – button, choose “No” with a short press of OK button.
>Gyroscope
Enter the submenu Gyroscope with a short press of OK button. Select "Display"
or "Calibration" with a short press of / button. Select "On" or "Off" to turn
on/off the gyroscope after entering "Display". Turn on the gyroscope before you
-10-
1
2
press of OK button. Please note this setting is for the default brightness of IR.
Pressing IR button under Black & White mode for instant setting of IR brightness.
>Brightness
Enter the submenu Brightness with a short press of OK button. Select “LEVEL 0”,
“LEVEL 1”, “LEVEL 2”, “LEVEL 3” with a short press of / button. Confirm your
selection with a short press of OK button.
Select “Off” or “On” with a short press of / button. Confirm your selection with
a short press of OK button. This setting is to realize an audio or a silent video.
>Auto Recording
Enter the submenu Auto Recording with a short press of OK button. Select “Off”
or “ On” with a short press of / button. Confirm your selection with a short press
of OK button.
>Loop Recording
Enter the submenu Loop Recording with a short press of OK button. Select
“Off” , “3 minutes”, “5 minutes” or “10 minutes” with a short press of / button.
Confirm your selection with a short press of OK button.
>Date Stamp
Enter the submenu Date Stamp with a short press of OK button. Select “Off” or
“ On” with a short press of / button. Confirm your selection with a short press
of OK button.
>Record Audio
Enter the submenu record audio with a short press of OK button.
-12-
-13- -14-
6
7
8
9
10
select "Calibration". Enter "Calibration" by pressing OK button. Keep the machine
level and remain still for about 8 seconds to complete the calibration.
>Default Magnification
Enter the submenu Default Magnification with a short press of OK button. Select
“1.0x/ 1.5x/ 2.0x/ 2.5x/ 3.0x/ 3.5x” as default magnification. Confirm your selec-
tion with a short press of OK button.
>Default Color
Enter the submenu Default Color with a short press of OK button. Select “Color”
or “Black & White” mode with a short press of / button. Confirm your selection
with a short press of OK button.
>Brightness Of IR
Enter the submenu Brightness of IR with a short press of OK button.Select “Off” ,
“1”, “2”, or “3” with a short press of / button.Confirm your selection with a short
-11-
3
4
5
>Beep sound
Enter the submenu beep sound with a short press of OK button. Select “Off” or
“ On” with a short press of / button. Confirm your selection with a short press
of OK button. This setting is to choose whether the keyboard press sound will
be recorded into the video or not.
11
-15-
>WiFi
Enter the submenu WiFi with a short press of OK button②.
Select"Off” or "On” with a short press of / button. Confirm your selection
with a short press of OK button②. Exit WiFi with a long press of Menu button .
(The Menu page can not be opened while WiFi is turned on) The corresponding
APP is available in its official website.
>Exposure
Enter the submenu exposure with a short press of OK button②. Select one of
the options with a short press of / button. Confirm your selection with a short
press of OK button②.
>Language
Enter the submenu Language with a short press of OK button②. Select one of
the options with a short press of / button. Confirm your selection with a short
press of OK button②.
12
13
14
>Date/ Time
Enter the submenu “Date/Time” with a short press of OK button②. Select one
of the options with OK button②. Select a correct value for year, month and date
with a short press of / button. Select “YY /MM/DD”, “MM/DD/YY”or “DD/M-
M/YY”as your date format with a short press of / button. Save selected date
and exit the submenu with a short press of Menu button.
>Format
Enter the submenu “Format” with a short press of OK button ②. Select
“Memory” or “ TF card” with a short press of / button. Confirm your selection
with a short press of OK button②.
Please be careful, the data can not be recovered after the device is formatted.
>Default Setting
Enter the submenu “Default Setting” with a short press of OK button ②. Select
“Cancel” or “ OK” with a short press of / button. Confirm your selection with
a short press of OK button②.
15
16
17
-16-
Shortcuts
Power/Sleep button
Turn on the device with a short press of power button, turn off the device with
a long press of power button. Enter or exit sleep mode with a short press of
sleep button.
①.Zoom(+) / Photo Taking
Zoom in or out with a short press of zoom button. Taking photos with a long press.
8.
-17-
②.OK / Recording
Turn on/ off recording with a long press. Confirm your selection by pressing OK
button.
③.IR/ mode switch (-) button
Switch between Black and White/Colorful mode with a long press of IR button.
Pressing IR button under Black & White mode for instant setting of IR brightness.
④.Red dot button/ Menu
Turn on or off the red dot with a short press of red dot button. Enter the menu
page with a long press of red dot button , exit the menu page with a short press.
-18-
①
③
② ④
Specifications
Warranty
Warranty card
-20-
-21- -22-
This product is warranted against defects in materials and workmanship for a
period of one year from the date of purchase.
This warranty is for the original purchaser only!
Notice:
Do not disassemble the night vision device by yourself. If there is any trouble,please
contact the factory in time. If the repair, modification or product seal sticker is not
approved by the company, it will not be covered by the warranty.
All damage caused by human factors or accidental product damage, including use
in abnormal working conditions, damage caused by failure to follow the instructions
and installation, is not covered by the warranty.
Product model:
Product code:
Date of purchase:
Warranty period:
User Name:
User's phone:
User address:
Warranty records:
-19-
Key Specifications
General Specifications
(1) 1x1 2.4GHz frequency band (channels 1–13)
(2) PHY supporting IEEE 802.11b/g/n
(3) MAC supporting IEEE 802.11 d/e/h/i/k/v/w
(4) Built-in PA and LNA, integrated with TX/RX Switch and Balun
(5) Station (STA) and access point (AP) modes, up to six STA devices allowed for
access as an AP
(6) WFA WPA, WFA WPA2 personal, and WPS2.0
(7) 2/3/4-line PTA solution with BT and BLE chips coexisting
(8) Input voltage range: 2.3–3.6 V;I/O power voltage: 1.8 V or 3.3 V
(9) RF auto-calibration solution
FCC Warnning
-24-
-25-
-23-
Any Changes or modifications not expressly approved by the party responsible for
compliance could void the user's authority to operate the equipment.
This device complies with part 15 of the FCC Rules. Operation is subject to the
following two conditions:
(1) This device may not cause harmful interference, and
(2) this device must accept any interference received, including interference that
may cause undesired operation.
Note: This equipment has been tested and found to comply with the limits for a
Class B digital device, pursuant to part 15 of the FCC Rules. These limits are
designed to provide reasonable protection against harmful interference in a resi-
dential installation. This equipment generates uses and can radiate radio frequency
energy and, if not installed and used
in accordance with the instructions, may cause harmful interference to radio communica-
tions. However, there is no guarantee that interference will not occur in a particular installa-
tion. If this equipment does cause harmful interference to radio or television reception,
which can be determined by turning the equipment off and on, the user is encour-
aged to try to correct the interference by one or more of the following measures:
-Reorient or relocate the receiving antenna.
-Increase the separation between the equipment and receiver.
-Connect the equipment into an outlet on a circuit different from that to which the
receiver is connected.
-Consult the dealer or an experienced radio/TV technician for help.
This equipment complies with FCC radiation exposure limits set forth for an uncon
4th floor, Building 4, Lianjian Tech. Park, Dalang Ave., Longhua District, Shenzhen City,
Guangdong Province,China 518109
PHY Features
(1) All single-antenna data rates of IEEE802.11b/g/n
(2) Maximum rate of 72.2Mbit/s@HT20 MCS7
(3) Standard 20MHz bandwidth
(5) STBC RX
(6) Short GI
MAC Features
(1) A-MPDU and A-MSDU
(2) Blk-ACK
(3) QoS
Other Information
(1) Operating temperature: –40°C to +85°C (–40°F to 185°F)

More Related Content

What's hot

SELF HEALING CONCRETE
SELF HEALING CONCRETESELF HEALING CONCRETE
SELF HEALING CONCRETEAkifPerwez
 
Detailed ppt on Curing of concrete
Detailed ppt on Curing of concreteDetailed ppt on Curing of concrete
Detailed ppt on Curing of concreteRushabh shah
 
Nya krav och möjligheter med SS-EN 206 och SS 137003 - Elisabeth Helsing
Nya krav och möjligheter med SS-EN 206 och SS 137003 - Elisabeth HelsingNya krav och möjligheter med SS-EN 206 och SS 137003 - Elisabeth Helsing
Nya krav och möjligheter med SS-EN 206 och SS 137003 - Elisabeth HelsingSvenska Betongföreningen
 
Self healing concrete
Self healing concreteSelf healing concrete
Self healing concretebuiltify
 
Rehabilitation of structures,Method of Demolition of Structures
Rehabilitation of  structures,Method of Demolition of  StructuresRehabilitation of  structures,Method of Demolition of  Structures
Rehabilitation of structures,Method of Demolition of StructuresPRAJWAL SHRIRAO
 
Special concrete
Special concreteSpecial concrete
Special concreteshruthiv19
 
Cable Layout, Continuous Beam & Load Balancing Method
 Cable Layout, Continuous Beam & Load Balancing Method Cable Layout, Continuous Beam & Load Balancing Method
Cable Layout, Continuous Beam & Load Balancing MethodMd Tanvir Alam
 
Use of chemical and mineral admixture in concrete
Use of chemical and mineral admixture in concreteUse of chemical and mineral admixture in concrete
Use of chemical and mineral admixture in concreteHardik Visapara
 
Standard test on fresh concrete
Standard test on fresh concreteStandard test on fresh concrete
Standard test on fresh concreteAbhishek Shah
 
perpetual pavement .pptx
perpetual pavement .pptxperpetual pavement .pptx
perpetual pavement .pptxhemalatha821568
 
Concrete technology
Concrete technologyConcrete technology
Concrete technologyJNTU
 
Chapter 2 seviceability and durability
Chapter 2 seviceability and durabilityChapter 2 seviceability and durability
Chapter 2 seviceability and durabilityAnkit Patel
 
types of admixtures for concrete
types of admixtures for concretetypes of admixtures for concrete
types of admixtures for concreteang_604
 
Lecture - 01: Introduction to Reinforced Concrete Design
Lecture - 01: Introduction to Reinforced Concrete DesignLecture - 01: Introduction to Reinforced Concrete Design
Lecture - 01: Introduction to Reinforced Concrete DesignHezb
 
Pervious or Porous Concrete
Pervious or Porous ConcretePervious or Porous Concrete
Pervious or Porous ConcreteMANUJ sinh
 
Earthwork & track formation Railway Engineering
Earthwork & track formation Railway EngineeringEarthwork & track formation Railway Engineering
Earthwork & track formation Railway EngineeringLatif Hyder Wadho
 

What's hot (20)

SELF HEALING CONCRETE
SELF HEALING CONCRETESELF HEALING CONCRETE
SELF HEALING CONCRETE
 
Detailed ppt on Curing of concrete
Detailed ppt on Curing of concreteDetailed ppt on Curing of concrete
Detailed ppt on Curing of concrete
 
Nya krav och möjligheter med SS-EN 206 och SS 137003 - Elisabeth Helsing
Nya krav och möjligheter med SS-EN 206 och SS 137003 - Elisabeth HelsingNya krav och möjligheter med SS-EN 206 och SS 137003 - Elisabeth Helsing
Nya krav och möjligheter med SS-EN 206 och SS 137003 - Elisabeth Helsing
 
Self healing concrete
Self healing concreteSelf healing concrete
Self healing concrete
 
Rehabilitation of structures,Method of Demolition of Structures
Rehabilitation of  structures,Method of Demolition of  StructuresRehabilitation of  structures,Method of Demolition of  Structures
Rehabilitation of structures,Method of Demolition of Structures
 
Special concrete
Special concreteSpecial concrete
Special concrete
 
Vacuum concrete
Vacuum concreteVacuum concrete
Vacuum concrete
 
Cable Layout, Continuous Beam & Load Balancing Method
 Cable Layout, Continuous Beam & Load Balancing Method Cable Layout, Continuous Beam & Load Balancing Method
Cable Layout, Continuous Beam & Load Balancing Method
 
Use of chemical and mineral admixture in concrete
Use of chemical and mineral admixture in concreteUse of chemical and mineral admixture in concrete
Use of chemical and mineral admixture in concrete
 
Standard test on fresh concrete
Standard test on fresh concreteStandard test on fresh concrete
Standard test on fresh concrete
 
U Boot Beton
U Boot BetonU Boot Beton
U Boot Beton
 
Final Report (Group 5)
Final Report (Group 5)Final Report (Group 5)
Final Report (Group 5)
 
perpetual pavement .pptx
perpetual pavement .pptxperpetual pavement .pptx
perpetual pavement .pptx
 
Concrete technology
Concrete technologyConcrete technology
Concrete technology
 
Chapter 2 seviceability and durability
Chapter 2 seviceability and durabilityChapter 2 seviceability and durability
Chapter 2 seviceability and durability
 
types of admixtures for concrete
types of admixtures for concretetypes of admixtures for concrete
types of admixtures for concrete
 
Lecture - 01: Introduction to Reinforced Concrete Design
Lecture - 01: Introduction to Reinforced Concrete DesignLecture - 01: Introduction to Reinforced Concrete Design
Lecture - 01: Introduction to Reinforced Concrete Design
 
Pervious or Porous Concrete
Pervious or Porous ConcretePervious or Porous Concrete
Pervious or Porous Concrete
 
Topic 2
Topic 2Topic 2
Topic 2
 
Earthwork & track formation Railway Engineering
Earthwork & track formation Railway EngineeringEarthwork & track formation Railway Engineering
Earthwork & track formation Railway Engineering
 

Similar to Instruction Manual | Sytong HT-66 | Optics Trade

Sytong HT-60 Instruction Manual | Optics Trade
Sytong HT-60 Instruction Manual | Optics TradeSytong HT-60 Instruction Manual | Optics Trade
Sytong HT-60 Instruction Manual | Optics TradeOptics-Trade
 
InfiRay Thermal E3 Max V2 Instruction Manual - Optics Trade
InfiRay Thermal E3 Max V2 Instruction Manual - Optics TradeInfiRay Thermal E3 Max V2 Instruction Manual - Optics Trade
InfiRay Thermal E3 Max V2 Instruction Manual - Optics TradeOptics-Trade
 
InfiRay Thermal Monocular E6+ V2.pdf
InfiRay Thermal Monocular E6+ V2.pdfInfiRay Thermal Monocular E6+ V2.pdf
InfiRay Thermal Monocular E6+ V2.pdfOptics-Trade
 
InfiRay Thermal Monocular E6 Pro V2 Instruction Manual - Optics Trade
InfiRay Thermal Monocular E6 Pro V2 Instruction Manual - Optics TradeInfiRay Thermal Monocular E6 Pro V2 Instruction Manual - Optics Trade
InfiRay Thermal Monocular E6 Pro V2 Instruction Manual - Optics TradeOptics-Trade
 
The TANDBERG Video Conferencing System
The TANDBERG Video Conferencing SystemThe TANDBERG Video Conferencing System
The TANDBERG Video Conferencing SystemVideoguy
 
xgimi h1 dlp projector user manual in english
xgimi h1 dlp projector user manual in englishxgimi h1 dlp projector user manual in english
xgimi h1 dlp projector user manual in englishXueLeah
 
Instruction Manual | Burris BTC 35 / BTC 50 | Optics Trade
Instruction Manual | Burris BTC 35 / BTC 50 | Optics TradeInstruction Manual | Burris BTC 35 / BTC 50 | Optics Trade
Instruction Manual | Burris BTC 35 / BTC 50 | Optics TradeOptics-Trade
 
Instruction Manual | Guide TA Series | Optics Trade
Instruction Manual | Guide TA Series | Optics TradeInstruction Manual | Guide TA Series | Optics Trade
Instruction Manual | Guide TA Series | Optics TradeOptics-Trade
 
Uv820 usb3.0 user manual 2014.7.14
Uv820 usb3.0 user manual 2014.7.14Uv820 usb3.0 user manual 2014.7.14
Uv820 usb3.0 user manual 2014.7.14Jill Liang
 
Instruction Manual | Burris BTH 25/35/50
Instruction Manual | Burris BTH 25/35/50Instruction Manual | Burris BTH 25/35/50
Instruction Manual | Burris BTH 25/35/50Optics-Trade
 
Quickstart Guide | Flir LSX-R | Optics Trade
Quickstart Guide | Flir LSX-R | Optics TradeQuickstart Guide | Flir LSX-R | Optics Trade
Quickstart Guide | Flir LSX-R | Optics TradeOptics-Trade
 
Video conferencing
Video conferencingVideo conferencing
Video conferencingVideoguy
 
COGITO Classic Tutorial (Android)
COGITO Classic Tutorial (Android)COGITO Classic Tutorial (Android)
COGITO Classic Tutorial (Android)Cookoo Tips
 
Instruction Manual | Guide TD210 Thermal Imaging Monocular | Optics Trade
Instruction  Manual | Guide TD210 Thermal Imaging Monocular | Optics TradeInstruction  Manual | Guide TD210 Thermal Imaging Monocular | Optics Trade
Instruction Manual | Guide TD210 Thermal Imaging Monocular | Optics TradeOptics-Trade
 
COGITO CLASSIC tutorial (Android)
COGITO CLASSIC tutorial (Android)COGITO CLASSIC tutorial (Android)
COGITO CLASSIC tutorial (Android)CONNECTEDEVICE Ltd
 
clock radio hidden camera spy clock camera clock radio camera V21
clock radio hidden camera spy clock camera clock radio camera V21 clock radio hidden camera spy clock camera clock radio camera V21
clock radio hidden camera spy clock camera clock radio camera V21 george david
 
Bushnell Night visison Monoculars Instruction Manual | Optics Trade
Bushnell Night visison Monoculars Instruction Manual | Optics TradeBushnell Night visison Monoculars Instruction Manual | Optics Trade
Bushnell Night visison Monoculars Instruction Manual | Optics TradeOptics-Trade
 
Liemke Merlin Clip On 35 Instruction Manual | Optics Trade
Liemke Merlin Clip On 35 Instruction Manual | Optics TradeLiemke Merlin Clip On 35 Instruction Manual | Optics Trade
Liemke Merlin Clip On 35 Instruction Manual | Optics TradeOptics-Trade
 

Similar to Instruction Manual | Sytong HT-66 | Optics Trade (20)

Sytong HT-60 Instruction Manual | Optics Trade
Sytong HT-60 Instruction Manual | Optics TradeSytong HT-60 Instruction Manual | Optics Trade
Sytong HT-60 Instruction Manual | Optics Trade
 
InfiRay Thermal E3 Max V2 Instruction Manual - Optics Trade
InfiRay Thermal E3 Max V2 Instruction Manual - Optics TradeInfiRay Thermal E3 Max V2 Instruction Manual - Optics Trade
InfiRay Thermal E3 Max V2 Instruction Manual - Optics Trade
 
InfiRay Thermal Monocular E6+ V2.pdf
InfiRay Thermal Monocular E6+ V2.pdfInfiRay Thermal Monocular E6+ V2.pdf
InfiRay Thermal Monocular E6+ V2.pdf
 
InfiRay Thermal Monocular E6 Pro V2 Instruction Manual - Optics Trade
InfiRay Thermal Monocular E6 Pro V2 Instruction Manual - Optics TradeInfiRay Thermal Monocular E6 Pro V2 Instruction Manual - Optics Trade
InfiRay Thermal Monocular E6 Pro V2 Instruction Manual - Optics Trade
 
The TANDBERG Video Conferencing System
The TANDBERG Video Conferencing SystemThe TANDBERG Video Conferencing System
The TANDBERG Video Conferencing System
 
xgimi h1 dlp projector user manual in english
xgimi h1 dlp projector user manual in englishxgimi h1 dlp projector user manual in english
xgimi h1 dlp projector user manual in english
 
Instruction Manual | Burris BTC 35 / BTC 50 | Optics Trade
Instruction Manual | Burris BTC 35 / BTC 50 | Optics TradeInstruction Manual | Burris BTC 35 / BTC 50 | Optics Trade
Instruction Manual | Burris BTC 35 / BTC 50 | Optics Trade
 
Instruction Manual | Guide TA Series | Optics Trade
Instruction Manual | Guide TA Series | Optics TradeInstruction Manual | Guide TA Series | Optics Trade
Instruction Manual | Guide TA Series | Optics Trade
 
Uv820 usb3.0 user manual 2014.7.14
Uv820 usb3.0 user manual 2014.7.14Uv820 usb3.0 user manual 2014.7.14
Uv820 usb3.0 user manual 2014.7.14
 
Instruction Manual | Burris BTH 25/35/50
Instruction Manual | Burris BTH 25/35/50Instruction Manual | Burris BTH 25/35/50
Instruction Manual | Burris BTH 25/35/50
 
Quickstart Guide | Flir LSX-R | Optics Trade
Quickstart Guide | Flir LSX-R | Optics TradeQuickstart Guide | Flir LSX-R | Optics Trade
Quickstart Guide | Flir LSX-R | Optics Trade
 
Video conferencing
Video conferencingVideo conferencing
Video conferencing
 
COGITO Classic Tutorial (Android)
COGITO Classic Tutorial (Android)COGITO Classic Tutorial (Android)
COGITO Classic Tutorial (Android)
 
Instruction Manual | Guide TD210 Thermal Imaging Monocular | Optics Trade
Instruction  Manual | Guide TD210 Thermal Imaging Monocular | Optics TradeInstruction  Manual | Guide TD210 Thermal Imaging Monocular | Optics Trade
Instruction Manual | Guide TD210 Thermal Imaging Monocular | Optics Trade
 
COGITO CLASSIC tutorial (Android)
COGITO CLASSIC tutorial (Android)COGITO CLASSIC tutorial (Android)
COGITO CLASSIC tutorial (Android)
 
clock radio hidden camera spy clock camera clock radio camera V21
clock radio hidden camera spy clock camera clock radio camera V21 clock radio hidden camera spy clock camera clock radio camera V21
clock radio hidden camera spy clock camera clock radio camera V21
 
Multimedia camara
Multimedia camaraMultimedia camara
Multimedia camara
 
Kpnp pss user guide20170330
Kpnp pss user guide20170330Kpnp pss user guide20170330
Kpnp pss user guide20170330
 
Bushnell Night visison Monoculars Instruction Manual | Optics Trade
Bushnell Night visison Monoculars Instruction Manual | Optics TradeBushnell Night visison Monoculars Instruction Manual | Optics Trade
Bushnell Night visison Monoculars Instruction Manual | Optics Trade
 
Liemke Merlin Clip On 35 Instruction Manual | Optics Trade
Liemke Merlin Clip On 35 Instruction Manual | Optics TradeLiemke Merlin Clip On 35 Instruction Manual | Optics Trade
Liemke Merlin Clip On 35 Instruction Manual | Optics Trade
 

More from Optics-Trade

Technical Data | Sig Sauer Easy6 BDX 1-6x24 | Optics Trade
Technical Data | Sig Sauer Easy6 BDX 1-6x24 | Optics TradeTechnical Data | Sig Sauer Easy6 BDX 1-6x24 | Optics Trade
Technical Data | Sig Sauer Easy6 BDX 1-6x24 | Optics TradeOptics-Trade
 
Technical Data | ThermTec Wild 650L | Optics Trade
Technical Data | ThermTec Wild 650L | Optics TradeTechnical Data | ThermTec Wild 650L | Optics Trade
Technical Data | ThermTec Wild 650L | Optics TradeOptics-Trade
 
Technical Data | ThermTec Wild 635L | Optics Trade
Technical Data | ThermTec Wild 635L | Optics TradeTechnical Data | ThermTec Wild 635L | Optics Trade
Technical Data | ThermTec Wild 635L | Optics TradeOptics-Trade
 
Technical Data | ThermTec Wild 650 | Optics Trade
Technical Data | ThermTec Wild 650 | Optics TradeTechnical Data | ThermTec Wild 650 | Optics Trade
Technical Data | ThermTec Wild 650 | Optics TradeOptics-Trade
 
Technical Data | ThermTec Wild 635 | Optics Trade
Technical Data | ThermTec Wild 635 | Optics TradeTechnical Data | ThermTec Wild 635 | Optics Trade
Technical Data | ThermTec Wild 635 | Optics TradeOptics-Trade
 
Technical Data | ThermTec Wild 335 | Optics Trade
Technical Data | ThermTec Wild 335 | Optics TradeTechnical Data | ThermTec Wild 335 | Optics Trade
Technical Data | ThermTec Wild 335 | Optics TradeOptics-Trade
 
Technical Data | ThermTec Wild 325 | Optics Trade
Technical Data | ThermTec Wild 325 | Optics TradeTechnical Data | ThermTec Wild 325 | Optics Trade
Technical Data | ThermTec Wild 325 | Optics TradeOptics-Trade
 
Instruction Manual | ThermTec Wild Thermal Monoculars | Optics Trade
Instruction Manual | ThermTec Wild Thermal Monoculars | Optics TradeInstruction Manual | ThermTec Wild Thermal Monoculars | Optics Trade
Instruction Manual | ThermTec Wild Thermal Monoculars | Optics TradeOptics-Trade
 
Technical Data | ThermTec Hunt 335 | Optics Trade
Technical Data | ThermTec Hunt 335 | Optics TradeTechnical Data | ThermTec Hunt 335 | Optics Trade
Technical Data | ThermTec Hunt 335 | Optics TradeOptics-Trade
 
Instruction Manual | ThermTec Hunt Thermal Clip-On Series | Optics Trade
Instruction Manual | ThermTec Hunt Thermal Clip-On Series | Optics TradeInstruction Manual | ThermTec Hunt Thermal Clip-On Series | Optics Trade
Instruction Manual | ThermTec Hunt Thermal Clip-On Series | Optics TradeOptics-Trade
 
Instruction Manual | Steiner eRanger LRF 10x42 | Optics Trade
Instruction Manual | Steiner eRanger LRF 10x42 | Optics TradeInstruction Manual | Steiner eRanger LRF 10x42 | Optics Trade
Instruction Manual | Steiner eRanger LRF 10x42 | Optics TradeOptics-Trade
 
Flyer | Guide DN Series Handheld Digital Binoculars | Optics Trade
Flyer | Guide DN Series Handheld Digital Binoculars | Optics TradeFlyer | Guide DN Series Handheld Digital Binoculars | Optics Trade
Flyer | Guide DN Series Handheld Digital Binoculars | Optics TradeOptics-Trade
 
Quick Start Guide | Guide TB Series | Optics Trade
Quick Start Guide | Guide TB Series | Optics TradeQuick Start Guide | Guide TB Series | Optics Trade
Quick Start Guide | Guide TB Series | Optics TradeOptics-Trade
 
Instruction Manual | Pard FD1 Digital NV Front Attachment | Optics Trade
Instruction Manual | Pard FD1 Digital NV Front Attachment | Optics TradeInstruction Manual | Pard FD1 Digital NV Front Attachment | Optics Trade
Instruction Manual | Pard FD1 Digital NV Front Attachment | Optics TradeOptics-Trade
 
Instruction Manual | EOTech Vudu X 2-12x40 | Optics Trade
Instruction Manual | EOTech Vudu X 2-12x40 | Optics TradeInstruction Manual | EOTech Vudu X 2-12x40 | Optics Trade
Instruction Manual | EOTech Vudu X 2-12x40 | Optics TradeOptics-Trade
 
Instruction Manual | EOTech Vudu X 1-6x24 | Optics Trade
Instruction Manual | EOTech Vudu X 1-6x24 | Optics TradeInstruction Manual | EOTech Vudu X 1-6x24 | Optics Trade
Instruction Manual | EOTech Vudu X 1-6x24 | Optics TradeOptics-Trade
 
Instruction Manual | Nightforce CFS 6-36x50 F1 | Optics Trade
Instruction Manual | Nightforce CFS 6-36x50 F1 | Optics TradeInstruction Manual | Nightforce CFS 6-36x50 F1 | Optics Trade
Instruction Manual | Nightforce CFS 6-36x50 F1 | Optics TradeOptics-Trade
 
Instruction Manual | Athlon Cronus Tactical G2 ED 7-42x60 | Optics Trade
Instruction Manual | Athlon Cronus Tactical G2 ED 7-42x60 | Optics TradeInstruction Manual | Athlon Cronus Tactical G2 ED 7-42x60 | Optics Trade
Instruction Manual | Athlon Cronus Tactical G2 ED 7-42x60 | Optics TradeOptics-Trade
 
Insrtuction Manual | Swarovski CL Companion Habicht | Optics Trade
Insrtuction Manual | Swarovski CL Companion Habicht | Optics TradeInsrtuction Manual | Swarovski CL Companion Habicht | Optics Trade
Insrtuction Manual | Swarovski CL Companion Habicht | Optics TradeOptics-Trade
 
Technical Data | Swarovski CL Companion Habicht | Optics Trade
Technical Data | Swarovski CL Companion Habicht | Optics TradeTechnical Data | Swarovski CL Companion Habicht | Optics Trade
Technical Data | Swarovski CL Companion Habicht | Optics TradeOptics-Trade
 

More from Optics-Trade (20)

Technical Data | Sig Sauer Easy6 BDX 1-6x24 | Optics Trade
Technical Data | Sig Sauer Easy6 BDX 1-6x24 | Optics TradeTechnical Data | Sig Sauer Easy6 BDX 1-6x24 | Optics Trade
Technical Data | Sig Sauer Easy6 BDX 1-6x24 | Optics Trade
 
Technical Data | ThermTec Wild 650L | Optics Trade
Technical Data | ThermTec Wild 650L | Optics TradeTechnical Data | ThermTec Wild 650L | Optics Trade
Technical Data | ThermTec Wild 650L | Optics Trade
 
Technical Data | ThermTec Wild 635L | Optics Trade
Technical Data | ThermTec Wild 635L | Optics TradeTechnical Data | ThermTec Wild 635L | Optics Trade
Technical Data | ThermTec Wild 635L | Optics Trade
 
Technical Data | ThermTec Wild 650 | Optics Trade
Technical Data | ThermTec Wild 650 | Optics TradeTechnical Data | ThermTec Wild 650 | Optics Trade
Technical Data | ThermTec Wild 650 | Optics Trade
 
Technical Data | ThermTec Wild 635 | Optics Trade
Technical Data | ThermTec Wild 635 | Optics TradeTechnical Data | ThermTec Wild 635 | Optics Trade
Technical Data | ThermTec Wild 635 | Optics Trade
 
Technical Data | ThermTec Wild 335 | Optics Trade
Technical Data | ThermTec Wild 335 | Optics TradeTechnical Data | ThermTec Wild 335 | Optics Trade
Technical Data | ThermTec Wild 335 | Optics Trade
 
Technical Data | ThermTec Wild 325 | Optics Trade
Technical Data | ThermTec Wild 325 | Optics TradeTechnical Data | ThermTec Wild 325 | Optics Trade
Technical Data | ThermTec Wild 325 | Optics Trade
 
Instruction Manual | ThermTec Wild Thermal Monoculars | Optics Trade
Instruction Manual | ThermTec Wild Thermal Monoculars | Optics TradeInstruction Manual | ThermTec Wild Thermal Monoculars | Optics Trade
Instruction Manual | ThermTec Wild Thermal Monoculars | Optics Trade
 
Technical Data | ThermTec Hunt 335 | Optics Trade
Technical Data | ThermTec Hunt 335 | Optics TradeTechnical Data | ThermTec Hunt 335 | Optics Trade
Technical Data | ThermTec Hunt 335 | Optics Trade
 
Instruction Manual | ThermTec Hunt Thermal Clip-On Series | Optics Trade
Instruction Manual | ThermTec Hunt Thermal Clip-On Series | Optics TradeInstruction Manual | ThermTec Hunt Thermal Clip-On Series | Optics Trade
Instruction Manual | ThermTec Hunt Thermal Clip-On Series | Optics Trade
 
Instruction Manual | Steiner eRanger LRF 10x42 | Optics Trade
Instruction Manual | Steiner eRanger LRF 10x42 | Optics TradeInstruction Manual | Steiner eRanger LRF 10x42 | Optics Trade
Instruction Manual | Steiner eRanger LRF 10x42 | Optics Trade
 
Flyer | Guide DN Series Handheld Digital Binoculars | Optics Trade
Flyer | Guide DN Series Handheld Digital Binoculars | Optics TradeFlyer | Guide DN Series Handheld Digital Binoculars | Optics Trade
Flyer | Guide DN Series Handheld Digital Binoculars | Optics Trade
 
Quick Start Guide | Guide TB Series | Optics Trade
Quick Start Guide | Guide TB Series | Optics TradeQuick Start Guide | Guide TB Series | Optics Trade
Quick Start Guide | Guide TB Series | Optics Trade
 
Instruction Manual | Pard FD1 Digital NV Front Attachment | Optics Trade
Instruction Manual | Pard FD1 Digital NV Front Attachment | Optics TradeInstruction Manual | Pard FD1 Digital NV Front Attachment | Optics Trade
Instruction Manual | Pard FD1 Digital NV Front Attachment | Optics Trade
 
Instruction Manual | EOTech Vudu X 2-12x40 | Optics Trade
Instruction Manual | EOTech Vudu X 2-12x40 | Optics TradeInstruction Manual | EOTech Vudu X 2-12x40 | Optics Trade
Instruction Manual | EOTech Vudu X 2-12x40 | Optics Trade
 
Instruction Manual | EOTech Vudu X 1-6x24 | Optics Trade
Instruction Manual | EOTech Vudu X 1-6x24 | Optics TradeInstruction Manual | EOTech Vudu X 1-6x24 | Optics Trade
Instruction Manual | EOTech Vudu X 1-6x24 | Optics Trade
 
Instruction Manual | Nightforce CFS 6-36x50 F1 | Optics Trade
Instruction Manual | Nightforce CFS 6-36x50 F1 | Optics TradeInstruction Manual | Nightforce CFS 6-36x50 F1 | Optics Trade
Instruction Manual | Nightforce CFS 6-36x50 F1 | Optics Trade
 
Instruction Manual | Athlon Cronus Tactical G2 ED 7-42x60 | Optics Trade
Instruction Manual | Athlon Cronus Tactical G2 ED 7-42x60 | Optics TradeInstruction Manual | Athlon Cronus Tactical G2 ED 7-42x60 | Optics Trade
Instruction Manual | Athlon Cronus Tactical G2 ED 7-42x60 | Optics Trade
 
Insrtuction Manual | Swarovski CL Companion Habicht | Optics Trade
Insrtuction Manual | Swarovski CL Companion Habicht | Optics TradeInsrtuction Manual | Swarovski CL Companion Habicht | Optics Trade
Insrtuction Manual | Swarovski CL Companion Habicht | Optics Trade
 
Technical Data | Swarovski CL Companion Habicht | Optics Trade
Technical Data | Swarovski CL Companion Habicht | Optics TradeTechnical Data | Swarovski CL Companion Habicht | Optics Trade
Technical Data | Swarovski CL Companion Habicht | Optics Trade
 

Recently uploaded

Neo4j - How KGs are shaping the future of Generative AI at AWS Summit London ...
Neo4j - How KGs are shaping the future of Generative AI at AWS Summit London ...Neo4j - How KGs are shaping the future of Generative AI at AWS Summit London ...
Neo4j - How KGs are shaping the future of Generative AI at AWS Summit London ...Neo4j
 
04-2024-HHUG-Sales-and-Marketing-Alignment.pptx
04-2024-HHUG-Sales-and-Marketing-Alignment.pptx04-2024-HHUG-Sales-and-Marketing-Alignment.pptx
04-2024-HHUG-Sales-and-Marketing-Alignment.pptxHampshireHUG
 
Factors to Consider When Choosing Accounts Payable Services Providers.pptx
Factors to Consider When Choosing Accounts Payable Services Providers.pptxFactors to Consider When Choosing Accounts Payable Services Providers.pptx
Factors to Consider When Choosing Accounts Payable Services Providers.pptxKatpro Technologies
 
The Role of Taxonomy and Ontology in Semantic Layers - Heather Hedden.pdf
The Role of Taxonomy and Ontology in Semantic Layers - Heather Hedden.pdfThe Role of Taxonomy and Ontology in Semantic Layers - Heather Hedden.pdf
The Role of Taxonomy and Ontology in Semantic Layers - Heather Hedden.pdfEnterprise Knowledge
 
EIS-Webinar-Prompt-Knowledge-Eng-2024-04-08.pptx
EIS-Webinar-Prompt-Knowledge-Eng-2024-04-08.pptxEIS-Webinar-Prompt-Knowledge-Eng-2024-04-08.pptx
EIS-Webinar-Prompt-Knowledge-Eng-2024-04-08.pptxEarley Information Science
 
Automating Google Workspace (GWS) & more with Apps Script
Automating Google Workspace (GWS) & more with Apps ScriptAutomating Google Workspace (GWS) & more with Apps Script
Automating Google Workspace (GWS) & more with Apps Scriptwesley chun
 
Breaking the Kubernetes Kill Chain: Host Path Mount
Breaking the Kubernetes Kill Chain: Host Path MountBreaking the Kubernetes Kill Chain: Host Path Mount
Breaking the Kubernetes Kill Chain: Host Path MountPuma Security, LLC
 
A Call to Action for Generative AI in 2024
A Call to Action for Generative AI in 2024A Call to Action for Generative AI in 2024
A Call to Action for Generative AI in 2024Results
 
Mastering MySQL Database Architecture: Deep Dive into MySQL Shell and MySQL R...
Mastering MySQL Database Architecture: Deep Dive into MySQL Shell and MySQL R...Mastering MySQL Database Architecture: Deep Dive into MySQL Shell and MySQL R...
Mastering MySQL Database Architecture: Deep Dive into MySQL Shell and MySQL R...Miguel Araújo
 
WhatsApp 9892124323 ✓Call Girls In Kalyan ( Mumbai ) secure service
WhatsApp 9892124323 ✓Call Girls In Kalyan ( Mumbai ) secure serviceWhatsApp 9892124323 ✓Call Girls In Kalyan ( Mumbai ) secure service
WhatsApp 9892124323 ✓Call Girls In Kalyan ( Mumbai ) secure servicePooja Nehwal
 
08448380779 Call Girls In Diplomatic Enclave Women Seeking Men
08448380779 Call Girls In Diplomatic Enclave Women Seeking Men08448380779 Call Girls In Diplomatic Enclave Women Seeking Men
08448380779 Call Girls In Diplomatic Enclave Women Seeking MenDelhi Call girls
 
Workshop - Best of Both Worlds_ Combine KG and Vector search for enhanced R...
Workshop - Best of Both Worlds_ Combine  KG and Vector search for  enhanced R...Workshop - Best of Both Worlds_ Combine  KG and Vector search for  enhanced R...
Workshop - Best of Both Worlds_ Combine KG and Vector search for enhanced R...Neo4j
 
Handwritten Text Recognition for manuscripts and early printed texts
Handwritten Text Recognition for manuscripts and early printed textsHandwritten Text Recognition for manuscripts and early printed texts
Handwritten Text Recognition for manuscripts and early printed textsMaria Levchenko
 
Boost PC performance: How more available memory can improve productivity
Boost PC performance: How more available memory can improve productivityBoost PC performance: How more available memory can improve productivity
Boost PC performance: How more available memory can improve productivityPrincipled Technologies
 
How to Troubleshoot Apps for the Modern Connected Worker
How to Troubleshoot Apps for the Modern Connected WorkerHow to Troubleshoot Apps for the Modern Connected Worker
How to Troubleshoot Apps for the Modern Connected WorkerThousandEyes
 
Kalyanpur ) Call Girls in Lucknow Finest Escorts Service 🍸 8923113531 🎰 Avail...
Kalyanpur ) Call Girls in Lucknow Finest Escorts Service 🍸 8923113531 🎰 Avail...Kalyanpur ) Call Girls in Lucknow Finest Escorts Service 🍸 8923113531 🎰 Avail...
Kalyanpur ) Call Girls in Lucknow Finest Escorts Service 🍸 8923113531 🎰 Avail...gurkirankumar98700
 
Data Cloud, More than a CDP by Matt Robison
Data Cloud, More than a CDP by Matt RobisonData Cloud, More than a CDP by Matt Robison
Data Cloud, More than a CDP by Matt RobisonAnna Loughnan Colquhoun
 
Histor y of HAM Radio presentation slide
Histor y of HAM Radio presentation slideHistor y of HAM Radio presentation slide
Histor y of HAM Radio presentation slidevu2urc
 
Salesforce Community Group Quito, Salesforce 101
Salesforce Community Group Quito, Salesforce 101Salesforce Community Group Quito, Salesforce 101
Salesforce Community Group Quito, Salesforce 101Paola De la Torre
 
Apidays Singapore 2024 - Building Digital Trust in a Digital Economy by Veron...
Apidays Singapore 2024 - Building Digital Trust in a Digital Economy by Veron...Apidays Singapore 2024 - Building Digital Trust in a Digital Economy by Veron...
Apidays Singapore 2024 - Building Digital Trust in a Digital Economy by Veron...apidays
 

Recently uploaded (20)

Neo4j - How KGs are shaping the future of Generative AI at AWS Summit London ...
Neo4j - How KGs are shaping the future of Generative AI at AWS Summit London ...Neo4j - How KGs are shaping the future of Generative AI at AWS Summit London ...
Neo4j - How KGs are shaping the future of Generative AI at AWS Summit London ...
 
04-2024-HHUG-Sales-and-Marketing-Alignment.pptx
04-2024-HHUG-Sales-and-Marketing-Alignment.pptx04-2024-HHUG-Sales-and-Marketing-Alignment.pptx
04-2024-HHUG-Sales-and-Marketing-Alignment.pptx
 
Factors to Consider When Choosing Accounts Payable Services Providers.pptx
Factors to Consider When Choosing Accounts Payable Services Providers.pptxFactors to Consider When Choosing Accounts Payable Services Providers.pptx
Factors to Consider When Choosing Accounts Payable Services Providers.pptx
 
The Role of Taxonomy and Ontology in Semantic Layers - Heather Hedden.pdf
The Role of Taxonomy and Ontology in Semantic Layers - Heather Hedden.pdfThe Role of Taxonomy and Ontology in Semantic Layers - Heather Hedden.pdf
The Role of Taxonomy and Ontology in Semantic Layers - Heather Hedden.pdf
 
EIS-Webinar-Prompt-Knowledge-Eng-2024-04-08.pptx
EIS-Webinar-Prompt-Knowledge-Eng-2024-04-08.pptxEIS-Webinar-Prompt-Knowledge-Eng-2024-04-08.pptx
EIS-Webinar-Prompt-Knowledge-Eng-2024-04-08.pptx
 
Automating Google Workspace (GWS) & more with Apps Script
Automating Google Workspace (GWS) & more with Apps ScriptAutomating Google Workspace (GWS) & more with Apps Script
Automating Google Workspace (GWS) & more with Apps Script
 
Breaking the Kubernetes Kill Chain: Host Path Mount
Breaking the Kubernetes Kill Chain: Host Path MountBreaking the Kubernetes Kill Chain: Host Path Mount
Breaking the Kubernetes Kill Chain: Host Path Mount
 
A Call to Action for Generative AI in 2024
A Call to Action for Generative AI in 2024A Call to Action for Generative AI in 2024
A Call to Action for Generative AI in 2024
 
Mastering MySQL Database Architecture: Deep Dive into MySQL Shell and MySQL R...
Mastering MySQL Database Architecture: Deep Dive into MySQL Shell and MySQL R...Mastering MySQL Database Architecture: Deep Dive into MySQL Shell and MySQL R...
Mastering MySQL Database Architecture: Deep Dive into MySQL Shell and MySQL R...
 
WhatsApp 9892124323 ✓Call Girls In Kalyan ( Mumbai ) secure service
WhatsApp 9892124323 ✓Call Girls In Kalyan ( Mumbai ) secure serviceWhatsApp 9892124323 ✓Call Girls In Kalyan ( Mumbai ) secure service
WhatsApp 9892124323 ✓Call Girls In Kalyan ( Mumbai ) secure service
 
08448380779 Call Girls In Diplomatic Enclave Women Seeking Men
08448380779 Call Girls In Diplomatic Enclave Women Seeking Men08448380779 Call Girls In Diplomatic Enclave Women Seeking Men
08448380779 Call Girls In Diplomatic Enclave Women Seeking Men
 
Workshop - Best of Both Worlds_ Combine KG and Vector search for enhanced R...
Workshop - Best of Both Worlds_ Combine  KG and Vector search for  enhanced R...Workshop - Best of Both Worlds_ Combine  KG and Vector search for  enhanced R...
Workshop - Best of Both Worlds_ Combine KG and Vector search for enhanced R...
 
Handwritten Text Recognition for manuscripts and early printed texts
Handwritten Text Recognition for manuscripts and early printed textsHandwritten Text Recognition for manuscripts and early printed texts
Handwritten Text Recognition for manuscripts and early printed texts
 
Boost PC performance: How more available memory can improve productivity
Boost PC performance: How more available memory can improve productivityBoost PC performance: How more available memory can improve productivity
Boost PC performance: How more available memory can improve productivity
 
How to Troubleshoot Apps for the Modern Connected Worker
How to Troubleshoot Apps for the Modern Connected WorkerHow to Troubleshoot Apps for the Modern Connected Worker
How to Troubleshoot Apps for the Modern Connected Worker
 
Kalyanpur ) Call Girls in Lucknow Finest Escorts Service 🍸 8923113531 🎰 Avail...
Kalyanpur ) Call Girls in Lucknow Finest Escorts Service 🍸 8923113531 🎰 Avail...Kalyanpur ) Call Girls in Lucknow Finest Escorts Service 🍸 8923113531 🎰 Avail...
Kalyanpur ) Call Girls in Lucknow Finest Escorts Service 🍸 8923113531 🎰 Avail...
 
Data Cloud, More than a CDP by Matt Robison
Data Cloud, More than a CDP by Matt RobisonData Cloud, More than a CDP by Matt Robison
Data Cloud, More than a CDP by Matt Robison
 
Histor y of HAM Radio presentation slide
Histor y of HAM Radio presentation slideHistor y of HAM Radio presentation slide
Histor y of HAM Radio presentation slide
 
Salesforce Community Group Quito, Salesforce 101
Salesforce Community Group Quito, Salesforce 101Salesforce Community Group Quito, Salesforce 101
Salesforce Community Group Quito, Salesforce 101
 
Apidays Singapore 2024 - Building Digital Trust in a Digital Economy by Veron...
Apidays Singapore 2024 - Building Digital Trust in a Digital Economy by Veron...Apidays Singapore 2024 - Building Digital Trust in a Digital Economy by Veron...
Apidays Singapore 2024 - Building Digital Trust in a Digital Economy by Veron...
 

Instruction Manual | Sytong HT-66 | Optics Trade

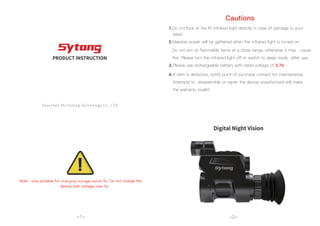
  • 1. Cautions 1.Do not look at the IR infrared light directly in case of damage to your eyes! 2.Massive power will be gathered when the infrared light is turned on. Do not aim at flammable items at a close range, otherwise it may cause fire. Please turn the infrared light off or switch to sleep mode after use. 3.Please use rechargeable battery with rated voltage of 3.7V. 4.If item is defective, notify point of purchase contact for maintenance. Attempts to disassemble or repair the device unauthorized will make the warranty invalid. -1- Shenzhen Shi Yutong Technology Co., LTD PRODUCT INSTRUCTION -2- Digital Night Vision Note : only suitable for charging voltage below 5v. Do not charge the device with voltage over 5v.
  • 2. Laser adjustment hole Stretchable fill light Power/Sleep button Battery compartment cap Eyepiece dioptre adjustment ring Objective lens focusing adjustment ring 1/4 British Standard Screw Interface HDMI high-definition interface TF card slot USB charging port -3- Components 1*HT-66 ; 1* Micro USB cable; 1*Adapter; 2*Hex-nut wrenches; 1* Cotton bag; 1*Power Adapter; Storage card is not included. Please prepare a TF card (128g maximum) for data storage. Installation Battery Please use lithium chargeable 3.7V flat battery 18650. Remove battery com- partment cap and make sure setting the positive polar towards to the direction inward. Put the cap back and screw it until tight. ( Fail to do so may result in restarting!). Adjustments To check the function after the installation of battery. First, rotate and adjust the eyepiece dioptre adjustment ring until you see the four-character icon on the screen ( there's no need to see a clear image ), then rotate the Objective lens adjustment ring until you can see your target clearly. Second, switch to different modes, test IR, Red dot or Rangefinder. Adapter installation Outfit the adapter to front side of the device, screw it to the bottom to fix the adapter tight. Using screws to fix the device onto scope. (Or use tape to assist the installation). -4- -5- -6- Long press: Take photos/ Short press: Zoom in or out ( , UP in "Menu" mode) Long press: MENU (Short press to exit MENU page) Short press: Turn on/off laser red dot Long press: Recording ON/OFF Short press: OK, CONFIRM in "Menu" mode Long press: IR mode/ Short press: Infrared level adjustment ( , DOWN in "Menu" mode) 2. 3. 1.
  • 3. Instructions Turn On/Off Turn on the device with a short press of Power button. Turn off the device with a long press of Power button. Power indicator will keep ON when the device is turned on. Sleep Mode Enter sleep mode with a short press of Power/Sleep button when the device is turned on. Power indicator will keep ON when the device entering sleep mode. The Eyepiece Dioptre Adjustment The purpose of dioptre adjustment is to get a clear image for users with different vision. Rotate and adjust the dioptre adjustment ring until you get a clear view of the four-character icon on the screen. One adjustment only for each eye-view. (Please note it's possible that the image is not clear without the adjustment of objective lens.) The Objective Lens Adjustment Make sure the eyepiece dioptre adjustment is finished. Aiming at your target, rotate and adjust the objective lens ring until you get a clear and well-focused image. IR Fill Light Control Turn on the device, enter Black and W hite mode with a long press of IR button. Switch to IR1-3 or off with a short press of IR button. The part of fill light is stretchable which can be pull out or push back to make a quick adjustment. Red dot Adjustment Turn on the device, then turn the laser on/off with a short press of Laser/Menu button. The position of laser can be adjusted on the laser adjustment holes by a hex-nut wrench. Menu operation Enter the menu with a long press of Menu button. Press / button to select options. Enter a submenu with a short press of OK button. Exit the menu with a short press of Menu button. -7- -8- -9- 1. 2. 3. 4. 5. 6. 7. >Reticle Adjustment Enter the submenu reticle adjustment with a short press of OK button . Select options with a short press of OK button. Adjust scope reticle or values with some short press of / button . To confirm your setting by enter “Save” with a short press of + button , choose “Yes” with a short press of OK button; To deny your setting by enter “Save” with a short press of – button, choose “No” with a short press of OK button. >Gyroscope Enter the submenu Gyroscope with a short press of OK button. Select "Display" or "Calibration" with a short press of / button. Select "On" or "Off" to turn on/off the gyroscope after entering "Display". Turn on the gyroscope before you -10- 1 2
  • 4. press of OK button. Please note this setting is for the default brightness of IR. Pressing IR button under Black & White mode for instant setting of IR brightness. >Brightness Enter the submenu Brightness with a short press of OK button. Select “LEVEL 0”, “LEVEL 1”, “LEVEL 2”, “LEVEL 3” with a short press of / button. Confirm your selection with a short press of OK button. Select “Off” or “On” with a short press of / button. Confirm your selection with a short press of OK button. This setting is to realize an audio or a silent video. >Auto Recording Enter the submenu Auto Recording with a short press of OK button. Select “Off” or “ On” with a short press of / button. Confirm your selection with a short press of OK button. >Loop Recording Enter the submenu Loop Recording with a short press of OK button. Select “Off” , “3 minutes”, “5 minutes” or “10 minutes” with a short press of / button. Confirm your selection with a short press of OK button. >Date Stamp Enter the submenu Date Stamp with a short press of OK button. Select “Off” or “ On” with a short press of / button. Confirm your selection with a short press of OK button. >Record Audio Enter the submenu record audio with a short press of OK button. -12- -13- -14- 6 7 8 9 10 select "Calibration". Enter "Calibration" by pressing OK button. Keep the machine level and remain still for about 8 seconds to complete the calibration. >Default Magnification Enter the submenu Default Magnification with a short press of OK button. Select “1.0x/ 1.5x/ 2.0x/ 2.5x/ 3.0x/ 3.5x” as default magnification. Confirm your selec- tion with a short press of OK button. >Default Color Enter the submenu Default Color with a short press of OK button. Select “Color” or “Black & White” mode with a short press of / button. Confirm your selection with a short press of OK button. >Brightness Of IR Enter the submenu Brightness of IR with a short press of OK button.Select “Off” , “1”, “2”, or “3” with a short press of / button.Confirm your selection with a short -11- 3 4 5 >Beep sound Enter the submenu beep sound with a short press of OK button. Select “Off” or “ On” with a short press of / button. Confirm your selection with a short press of OK button. This setting is to choose whether the keyboard press sound will be recorded into the video or not. 11
  • 5. -15- >WiFi Enter the submenu WiFi with a short press of OK button②. Select"Off” or "On” with a short press of / button. Confirm your selection with a short press of OK button②. Exit WiFi with a long press of Menu button . (The Menu page can not be opened while WiFi is turned on) The corresponding APP is available in its official website. >Exposure Enter the submenu exposure with a short press of OK button②. Select one of the options with a short press of / button. Confirm your selection with a short press of OK button②. >Language Enter the submenu Language with a short press of OK button②. Select one of the options with a short press of / button. Confirm your selection with a short press of OK button②. 12 13 14 >Date/ Time Enter the submenu “Date/Time” with a short press of OK button②. Select one of the options with OK button②. Select a correct value for year, month and date with a short press of / button. Select “YY /MM/DD”, “MM/DD/YY”or “DD/M- M/YY”as your date format with a short press of / button. Save selected date and exit the submenu with a short press of Menu button. >Format Enter the submenu “Format” with a short press of OK button ②. Select “Memory” or “ TF card” with a short press of / button. Confirm your selection with a short press of OK button②. Please be careful, the data can not be recovered after the device is formatted. >Default Setting Enter the submenu “Default Setting” with a short press of OK button ②. Select “Cancel” or “ OK” with a short press of / button. Confirm your selection with a short press of OK button②. 15 16 17 -16- Shortcuts Power/Sleep button Turn on the device with a short press of power button, turn off the device with a long press of power button. Enter or exit sleep mode with a short press of sleep button. ①.Zoom(+) / Photo Taking Zoom in or out with a short press of zoom button. Taking photos with a long press. 8. -17- ②.OK / Recording Turn on/ off recording with a long press. Confirm your selection by pressing OK button. ③.IR/ mode switch (-) button Switch between Black and White/Colorful mode with a long press of IR button. Pressing IR button under Black & White mode for instant setting of IR brightness. ④.Red dot button/ Menu Turn on or off the red dot with a short press of red dot button. Enter the menu page with a long press of red dot button , exit the menu page with a short press. -18- ① ③ ② ④
  • 6. Specifications Warranty Warranty card -20- -21- -22- This product is warranted against defects in materials and workmanship for a period of one year from the date of purchase. This warranty is for the original purchaser only! Notice: Do not disassemble the night vision device by yourself. If there is any trouble,please contact the factory in time. If the repair, modification or product seal sticker is not approved by the company, it will not be covered by the warranty. All damage caused by human factors or accidental product damage, including use in abnormal working conditions, damage caused by failure to follow the instructions and installation, is not covered by the warranty. Product model: Product code: Date of purchase: Warranty period: User Name: User's phone: User address: Warranty records: -19- Key Specifications General Specifications (1) 1x1 2.4GHz frequency band (channels 1–13) (2) PHY supporting IEEE 802.11b/g/n (3) MAC supporting IEEE 802.11 d/e/h/i/k/v/w (4) Built-in PA and LNA, integrated with TX/RX Switch and Balun (5) Station (STA) and access point (AP) modes, up to six STA devices allowed for access as an AP (6) WFA WPA, WFA WPA2 personal, and WPS2.0 (7) 2/3/4-line PTA solution with BT and BLE chips coexisting (8) Input voltage range: 2.3–3.6 V;I/O power voltage: 1.8 V or 3.3 V (9) RF auto-calibration solution
  • 7. FCC Warnning -24- -25- -23- Any Changes or modifications not expressly approved by the party responsible for compliance could void the user's authority to operate the equipment. This device complies with part 15 of the FCC Rules. Operation is subject to the following two conditions: (1) This device may not cause harmful interference, and (2) this device must accept any interference received, including interference that may cause undesired operation. Note: This equipment has been tested and found to comply with the limits for a Class B digital device, pursuant to part 15 of the FCC Rules. These limits are designed to provide reasonable protection against harmful interference in a resi- dential installation. This equipment generates uses and can radiate radio frequency energy and, if not installed and used in accordance with the instructions, may cause harmful interference to radio communica- tions. However, there is no guarantee that interference will not occur in a particular installa- tion. If this equipment does cause harmful interference to radio or television reception, which can be determined by turning the equipment off and on, the user is encour- aged to try to correct the interference by one or more of the following measures: -Reorient or relocate the receiving antenna. -Increase the separation between the equipment and receiver. -Connect the equipment into an outlet on a circuit different from that to which the receiver is connected. -Consult the dealer or an experienced radio/TV technician for help. This equipment complies with FCC radiation exposure limits set forth for an uncon 4th floor, Building 4, Lianjian Tech. Park, Dalang Ave., Longhua District, Shenzhen City, Guangdong Province,China 518109 PHY Features (1) All single-antenna data rates of IEEE802.11b/g/n (2) Maximum rate of 72.2Mbit/s@HT20 MCS7 (3) Standard 20MHz bandwidth (5) STBC RX (6) Short GI MAC Features (1) A-MPDU and A-MSDU (2) Blk-ACK (3) QoS Other Information (1) Operating temperature: –40°C to +85°C (–40°F to 185°F)