
Recommended
More Related Content
Similar to 1121.pdf
Similar to 1121.pdf (20)
Recently uploaded
Recently uploaded (20)
1121.pdf
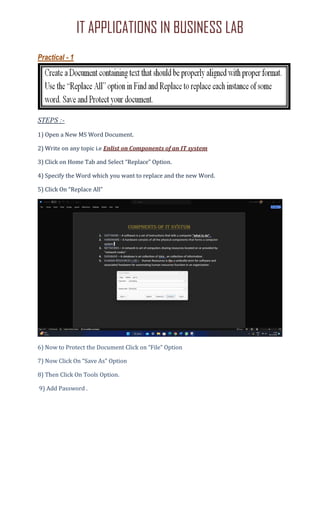
- 1. IT APPLICATIONS IN BUSINESS LAB Practical - 1 STEPS :- 1) Open a New MS Word Document. 2) Write on any topic i.e Enlist on Components of an IT system 3) Click on Home Tab and Select “Replace” Option. 4) Specify the Word which you want to replace and the new Word. 5) Click On “Replace All” 6) Now to Protect the Document Click on “File” Option 7) Now Click On “Save As” Option 8) Then Click On Tools Option. 9) Add Password .
- 2. IT APPLICATIONS IN BUSINESS LAB Practical - 2 STEPS :- 1) First Of all write The Information You want to add 2) Now Add Different Styles to Text and It will look like this . 3) Now for Sorting Click On Icon. 4) Now after Sorting It will Arrange According to alphabets.
- 3. IT APPLICATIONS IN BUSINESS LAB Practical - 3 STEPS :- 1) Write a document on Computer Basics and Advantages/ Disadvantages. Now to Insert Header and Footer. Click on the Insert tab, in the Header & Footer group, click Header or Footer. 2) Click the header or footer design that you want. And it will look Like This. 3) Now to Indent the Document Select the text you want to indent. 4) Click the Increase Indent command to increase the indent. The default is 1/2 inch. You can press the command multiple times.
- 4. IT APPLICATIONS IN BUSINESS LAB 4) Click on the Decrease Indent command so that the indent could be decreased. Practical - 4 STEPS :- 1) To create an invitation card it is required to first Click on Insert Tab , and then select Clip Art. Here , in Windows 11 the name of clip art is changed to “online pictures” but in Windows version 7 , 8 and 10 it is named as “Clip Art” . 2) Now to insert Watermark Click on the Page Layout tab, in the Page Background group, click Watermark.
- 5. IT APPLICATIONS IN BUSINESS LAB 3) Click Custom Watermark. 4) Click Picture watermark, and then click Select Picture. 5) Select the picture that you want, and then click Insert. 6) Select a percentage under Scale to insert the picture at a particular size. 7) Select the Washout check box to lighten the picture so that it doesn't interfere with text. Practical - 5 STEPS :- 1) Now To Create a Block Diagram We need to use Clipart And Shapes Facility MS Word. 2) Insert a drawing canvas. On the Insert tab, in the Illustrations group, click Shapes, and then click New Drawing Canvas.
- 6. IT APPLICATIONS IN BUSINESS LAB 3) Under Drawing Tools, on the Format tab, in the Insert Shapes group, click the more buttons . 4) Click the shape that you want, click anywhere in the document, and then drag to place the shape. 5) You Can Also Format The AutoShape You Have Inserted. 6) By following all the steps our block diagram will be made .
- 7. IT APPLICATIONS IN BUSINESS LAB Practical - 6 November 2023 Sunday Monday Tuesday Wednesday Thursday Friday Saturday 1 2 3 4 5 6 7 8 9 10 11 12 13 14 15 16 17 18 19 20 21 22 23 24 25 26 27 28 29 30 STEPS :- 1. Click on Insert option and Select Table 2. Make a 7*6 Table 3. Write the Names of the days of the week in the First Row of Table 4. Select the Names and Right Click then Select Cell Alignment option and choose the Center Alignment 5. Change the Font Size and Style of the days of the week 6. Select the First Row and Right Click then choose Insert Row above option 7. Select the First Row and right Click to Choose Merge Cell option 8. Write the Name of the month in the First Row 9. Click on Table tools and Shade the Table as desired 10. Click on Table tools to give attractive border 11. Choose any of the Table styles to make it attractive 12. Highlight any two dates on the calendar
- 8. IT APPLICATIONS IN BUSINESS LAB Practical - 7 STEPS :- 1. Insert a bookmark in the Web page. 2. Open the file that you want to open from , and select the text you want to display as a hyperlink. 3. Right-click on mouse and then on shortcut menu click on HYPERLINK . 4. Under Link , click Existing File or Web Page. 5. In the box, click the down arrow, and navigate to and select the file that you want to link to. 6. Click Bookmark , and select the bookmark that you want , and then click OK. ✓ Add the link 1. Select the text that you want to display as the hyperlink. 2. Right-click and then click Hyperlink on the shortcut menu. 3. Under Link to, click Place in This Document. 4. In the list, select the heading or bookmark that you want to link to.
- 9. IT APPLICATIONS IN BUSINESS LAB For Bookmark 1. Select the text which you want to assign a bookmark, or click where you want to insert a bookmark. 2. On the Insert tab, in the Links group, click Bookmark. 3. Under Bookmark name, type or select a name. 4. Click “OK” Practical - 8 STEPS :- 1) To start a mail merge, open MS Word 2016 Version, and click on the Mailings tab.
- 10. IT APPLICATIONS IN BUSINESS LAB 2) Find the Start Mail Merge button under the Mailings tab and click the arrow beside it. Choose the last option, Step by Step Mail Merge Wizrd g 3) Select Letters (or whatever type you suits the job you’re working on as the type of document and then click on the Next , Starting document link at the bottom of the task pane to go to the next step to select your starting document.
- 11. IT APPLICATIONS IN BUSINESS LAB 4) At this point you have options to use the current document you have open, to select a template, or to browse to an existing document not open. For this example we will start from a template. Select Start from a template. This brings up a link you click on to Select template.
- 12. IT APPLICATIONS IN BUSINESS LAB 5) This will open the Select Template dialog box. Select the Letters tab and choose Oriel Merge Letter. Click Ok. This will take you to the next step in the Mail Merge process which you will select recipients. 6) Select Use an existing list and click on the Browse link. Locate and open the file containing your data source. Your data source can be anything from a database holding thousands of records to a simple spreadsheet that contains 10 names. For this exercise I will use an existing test spreadsheet.
- 13. IT APPLICATIONS IN BUSINESS LAB 7) This opens the Mail Merge Recipients dialog box shown below. Here you can select which recipients to include or deselect by unchecking the check box by the name. 8) Pick the date and replace the letter content with your own and then go on to the next step to preview your letters by clicking on the link at the bottom of the task pane. 9) You can then click on the link, next: Complete the merger, which the following message will appear.
- 14. IT APPLICATIONS IN BUSINESS LAB 10) You can choose whether to merge all or selected records. Click OK and then a new merged document entitled Letters1 is created. It contains the individual letters for each recipient. If you look at the status bar, you will see that it indicates multiple letters. At this point you have completed a mail merge in Word 2007. When finished you can always save this document you created for future reference.
- 15. IT APPLICATIONS IN BUSINESS LAB Practical No. 9 STEPS :- 1) Open a new excel document. 2) Make columns for 1) S. No. 2) Product ID 3) Product Name 4) Product type (food, clothes, toys etc.) 5) Quantity 6) Price per unit 3) Make all the text bold and underline by clicking the home tab button. 4) Add border form the home tab.
- 16. IT APPLICATIONS IN BUSINESS LAB Steps: Open a new excel document . To auto sum do as under: 1) Select the cell in which you want to result to appear. 2) On the Home tab, in the Editing group, click on the SUM icon. 3) Observe the formula bar. The range that Excel guessed is displayed. 4) If the guess is correct, press “Enter” 5) If the guess is incorrect, select the range of cells you want to use.
- 17. IT APPLICATIONS IN BUSINESS LAB 6) Click “Enter” button . Practical - 10
- 18. IT APPLICATIONS IN BUSINESS LAB Steps to Sort the records in ascending orderr of Marks 1: 1. Select all the values of Marks I 2. Click on Home tab 3. Select Sort & Filter option 4. Click on Sort Smallest to Largest and Select- Continue with current selection and Click OK
- 19. IT APPLICATIONS IN BUSINESS LAB Steps to Sort the records according to decreasing order of Names: 1. Select all the Names 2. Click on Home tab 3. Select Sort & Filter option 4. Click on Sort A to Z and Select- Continue with current selection and Click OK Steps to Round off Percentage to one unit: 1. Select all the values of Percentage 2. Click on Home tab 3. Select Sort & Filter option 4. First Click on Increase Decimal Then Click on Decrease Decimal and Click OK
- 20. IT APPLICATIONS IN BUSINESS LAB Steps to Convert the Percentage in Text: 1. Select all the values of Percentage 2. Click on Home tab 3. Select Sort & Filter option 4. Click on Number Format 5. Select More Number Format 6. Now Select Text and Click OK
- 21. IT APPLICATIONS IN BUSINESS LAB Steps to Apply Filter on Course Field: 1. Select whole D-Column 2. Click on Home tab 3. Select Sort & Filter option 4. Click on Filter 5. Now Click on Arrow in Course Field and Unselect BBA or BCA and Click OK
- 22. IT APPLICATIONS IN BUSINESS LAB Practical - 11 Steps to Insert Line Chart: 1. Select the names of products and values of all 3 years 2. Click on Insert tab 3. Select Insert Line Chart and Select 4th type of Chart 4. Now Select Legend in Layout tab and Select above Chart 5. Now Select Data Label and Select either Centre, Above, Below, Right or Left. 6. Now in same tab Select Axis Title and Select 2^nd option in both Horizontal and Vertical Axis Title and write Series in Vertical Axis and Product Name in Horizontal Axis 7. Now Select Gridlines in Layout tab and Select Minor in Vertical Gridlines
- 23. IT APPLICATIONS IN BUSINESS LAB Steps to Insert Pie Chart: 1. Select the names of products and values of 2012, 2013 and 2014 one-by-one 2. Click on Insert tab 3. Select Insert Pie Chart and Select different types of Chart for all the years 4. Now in same tab Select Chart Title and Select Above Chart and write year of Sales 5. Now Select Data Label and Select either Centre, Above, Below, Right or Left.
- 24. IT APPLICATIONS IN BUSINESS LAB Practical - 12 Steps to Create Pivot Chart : 1. Select the Table 2. Click on Insert tab and Select Pivot Chart option 3. Drag State and Year in Legend
- 25. IT APPLICATIONS IN BUSINESS LAB 4. Drag Manufacturer and Product in Axis 5. Drag Quantity in Values Practical - 13 Steps to Create a Bar Graph: 1. Click on Insert tab 2. Select Insert Bar Graph 3. Now Select First Graph Type
- 26. IT APPLICATIONS IN BUSINESS LAB Steps to Switch Column: 1. Select the Graph 2. Click on Design tab 3. Select Switch Row/Column Steps to Change Graph to Column Chart 1. Select the Graph 2. Click on Design tab 3. Select Change Chart Type
- 27. IT APPLICATIONS IN BUSINESS LAB 4. Now Select Column and in this First Chart 5. Then Click OK Practical - 14 Steps to Fill Grade A as Pink, B as Blue, C as Yellow & D as Red: 1. Select all the values of Grade 2. Click on Home tab 3. Select Conditional Formatting 4. Then Select Highlight Cell Rules and in this Select Equals To .
- 28. IT APPLICATIONS IN BUSINESS LAB 5. Then Write A, B, C & D one-by-one & Select Color respectively Steps to Split Roll No in 4 Parts: 1. Insert 3 Columns after First Column 2. Select all Roll No's 3. Click on Data tab 4. Select Text to Columns 5. Select Fixed Width & Click Next
- 29. IT APPLICATIONS IN BUSINESS LAB Steps to Split Name in 2 Parts: 1. Insert 3 Columns after Name 2. Select all Names’ 3. Click on Data tab 4. Select Text to Columns 5. Select Fixed Width & Click Next 6. Place the arrow to Split in 2 Parts & Click Next 7. Now Finish . Steps to Remove Duplicate Course: 1. Select the entire Course 2. Click on Data tab 3. Select Remove Duplicates 4. Then Select Continue with the current selection 5. Now Click on Remove Duplicates & Then Click OK
- 30. IT APPLICATIONS IN BUSINESS LAB Practical - 15 Steps to Change the Time Period for earning minimum Rs5000: 1. Select the Cell 2. Click on Data tab 3. Select What if Analysis
- 31. IT APPLICATIONS IN BUSINESS LAB 4. In this Select Goal Seek 5. Write 5000 in to Value 6. Now Select the Time Cell and Click OK Steps to Change the Principle Value for earning minimum Rs10000: 1. Select the Cell 2. Click on Data tab 3. Select What if Analysis 4. In this Select Goal Seek 5. Write 10000 in To Value 6. Now Select the Principle Cell and Click OK
- 32. IT APPLICATIONS IN BUSINESS LAB Steps to apply Freeze Panes: 1. Click on View tab 2. Select Freeze Panes 3. Now Select Freeze Top Row Practical - 16
- 33. IT APPLICATIONS IN BUSINESS LAB Practical - 17 Steps :- 1. Create a new MS Excel sheet. 2. Write down student performance after merging cell in center. Then, write S.no, name, M1, M2, M3, M4, M5, M6 (Total). 3. Enlist all the marks for each student in all M sections. 4. Go to “Home” tab, select the option “Conditional Formatting”. 5. Use the following specification under ‘Conditional Formatting’; Greater than, less than, equal to, between, data bar, color scales.
- 34. IT APPLICATIONS IN BUSINESS LAB Practical - 18 STEPS :- 1) Open a new excel sheet. 2) Enter the details s.no, name, date of birth, age, marks, remarks. 3) Select one or more cells to validate. 4) On the Data tab, in the Data Tools group, click Data Validation.
- 35. IT APPLICATIONS IN BUSINESS LAB 5) On the Settings tab, in the Allow box, select List
- 36. IT APPLICATIONS IN BUSINESS LAB
- 37. IT APPLICATIONS IN BUSINESS LAB Practical - 19 Steps :- 1. Open a new Microsoft Office PowerPoint presentation. 2. On the menu bar, click on Insert>Photo Album. A dialog box will open, titled Photo Album. 3. Click on File/Disk to select images/album you want to include in your photo album. ... 4. Click the Create button to view your album.
- 38. IT APPLICATIONS IN BUSINESS LAB Practical - 20 Steps- 1. Click the object you want to animate. 2. On the Animations tab, click Add Animation. Scroll down to Motion Paths, and pick one. Tip: If you choose the Custom path option, you will draw the path that you want the object to take. To stop drawing a custom path, press Esc.