1. Inserting Pictures
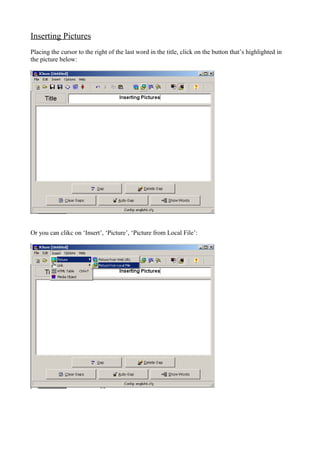
Placing the cursor to the right of the last word in the title, click on the button that’s highlighted in
the picture below:
Or you can clikc on ‘Insert’, ‘Picture’, ‘Picture from Local File’:
2. The following window will appear (‘Abrir):
Select the Picture that you want to use on clic on the ‘Abrir’ button.
In the following window, you can modify the width and height of the picture. Always remember to
select an option under ‘Picture alignment’ (I’ve always used ‘Centre’). When everything’s set, click
on the ‘OK’button:
3. You will notice that there are many strange letters next to your title. Don’t worry, they will be
displayed in your exercises as the picture you have chosen, and the title will remain intact:
4. Saving
To save your exercises as Hot Potatoes files (so that you can make changes whenever you want),
click on the button highlighted in the next picture:
To save them as the actual exercises (what your students will get), click on the button highlighted in
the next picture:
6. Saving Indexes
If you create an index with the ‘Masher’ application, remember to do the following to avoid a
frequent problem:
The index file is named (unimaginatively enough) ‘index’ (you’ve got these files in your hand-
outs). Right-click on this file and click on ‘Copiar’, as shown in the picture below:
Right-click with the cursor on the folder and click on ‘Pegar’:
7. The new file ‘Copia de index’ will be created:
Rename it ‘contents’:
That’s it! If you’ve got any questions, please send me an e-mail to lisandropaz@live.com.ar
P.S.: you can enlarge all the pictures in this Word file by double-clicking on them, clicking on the
‘Tamaño’ flap, and setting the size, thus: