Mitsubishi power management meters electronic multi measuring instrument-dienhathe.vn
•
1 like•258 views

Thiết Bị Điện Mitsubishi, Thiết Bị Điện, Điện Công Nghiệp Mitsubishi, Điện Công Nghiệp, Điện Hạ Thế Mitsubishi, Điện Hạ Thế, Điện Dân Dụng Mitsubishi, Điện Dân Dụng, Mitsubishi, Thiết Bị Đóng Cắt Mitsubishi, Thiết Bị Đóng Cắt, Thiết Bị Điện Mitsubishi, Thiết Bị Điện,
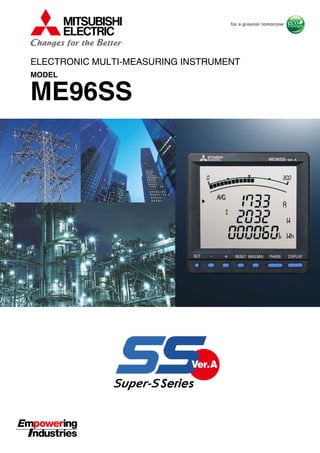
![Highly appreciated ME96SS Series Electronic Multi-Measuring Instruments
measuring functions and network capability has been released.
This new series has improved measuring accuracy; even the economy model
MODBUS®
TCP communication unit for Ethernet communication and logging
will be helpful in realizing more effective measurement monitoring systems
ME96 Super-S Series
Electronic Indicating Instruments
functions and optional units
ME96 Super-S Series
Electronic Indicating Instruments
functions and optional units
ME96SSRA-MB (standard model)
ME96SSHA-MB (high-performance model)
[1] Active energy measuring accuracy of class 0.5S
[2] Applicable to harmonics (THD)
[3] Applicable to current demand
Major features
[1] Active energy measuring accuracy of class 0.5S
[2] Applicable to harmonics of ±1.0% (19th)
[3] Applicable to demands A and W,var,VA
[4] Optional units can be added.
Major features
[1] Active energy measuring accuracy of class 0.5S
[2] Applicable to harmonics of ±1.0% (31st)
[3] Applicable to demands A and W,var,VA
[4] Optional units can be added.
Major features
w ME96SSRA-MB (standard model)
e ME96SSHA-MB (high-performance model)
ME96SSEA-MB (economy model)q ME96SSEA-MB (economy model)
1](data:image/gif;base64,R0lGODlhAQABAIAAAAAAAP///yH5BAEAAAAALAAAAAABAAEAAAIBRAA7)
Recommended
More Related Content
What's hot
What's hot (17)
Similar to Mitsubishi power management meters electronic multi measuring instrument-dienhathe.vn
Similar to Mitsubishi power management meters electronic multi measuring instrument-dienhathe.vn (20)
More from Dien Ha The
More from Dien Ha The (20)
Recently uploaded
Recently uploaded (20)
Mitsubishi power management meters electronic multi measuring instrument-dienhathe.vn
- 2. Highly appreciated ME96SS Series Electronic Multi-Measuring Instruments measuring functions and network capability has been released. This new series has improved measuring accuracy; even the economy model MODBUS® TCP communication unit for Ethernet communication and logging will be helpful in realizing more effective measurement monitoring systems ME96 Super-S Series Electronic Indicating Instruments functions and optional units ME96 Super-S Series Electronic Indicating Instruments functions and optional units ME96SSRA-MB (standard model) ME96SSHA-MB (high-performance model) [1] Active energy measuring accuracy of class 0.5S [2] Applicable to harmonics (THD) [3] Applicable to current demand Major features [1] Active energy measuring accuracy of class 0.5S [2] Applicable to harmonics of ±1.0% (19th) [3] Applicable to demands A and W,var,VA [4] Optional units can be added. Major features [1] Active energy measuring accuracy of class 0.5S [2] Applicable to harmonics of ±1.0% (31st) [3] Applicable to demands A and W,var,VA [4] Optional units can be added. Major features w ME96SSRA-MB (standard model) e ME96SSHA-MB (high-performance model) ME96SSEA-MB (economy model)q ME96SSEA-MB (economy model) 1
- 3. have been remodeled, and ME96 Super-S Series with enhanced has an active energy measuring accuracy corresponding to Class 0.5S. The unit for enhanced data backup can be added to the models. The new series and energy-saving measurement monitoring. with enhanced measuringwith enhanced measuring Contents Optional plug-in modules ‡ Outline and Features .......................................................... 3 ‡ ME96 Super-S Series Ver.A Features ................................ 4 ‡ Specifications ...................................................................... 9 ‡ Operating Instructions ..................................................... 14 ‡ External Dimensions, Installation and Connections ..... 27 ‡ Related Products .............................................................. 31 ‡ Safety Precautions ............................................................ 33 [1] MODBUS® TCP communication unit [2] Data logging unit [3] CC-Link communication unit [4] Digital input and output unit [5] Analog, pulse and alarm output unit Major features NEW NEW Remarks MODBUS® RTU communication function provided as standard r Optional plug-in modules 2
- 4. Outline and Features Improved Measurement Functions ME96SSHA-MB (High-performance class) ME96SSRA-MB (Standard class) ME96SSEA-MB (Economy class) MODBUS® RTU communication Plug-in module (options) • Analog/Pulse/Contact output/input • CC-Link communication • Digital input/output (for MODBUS® RTU communication) • Backup (on SD card) • MODBUS® TCP communication MODBUS® RTU communication Plug-in module (options) • Analog/Pulse/Contact output/input • CC-Link communication • Digital input/output (for MODBUS® RTU communication) • Backup (on SD card) • MODBUS® TCP communication MODBUS® RTU communication A, DA, V, Hz = ±0.1% W, var, VA, PF = ±0.2% Wh = class 0.5S (IEC62053-22) varh = class 1S (IEC62053-24) Harmonics = 31st -deg (max) Rolling demand = W, var, VA A, DA, V = ±0.2% Hz = ±0.1% W, var, VA, PF = ±0.5% Wh = class 0.5S (IEC62053-22) varh = class 1S (IEC62053-24) Harmonics = 19th -deg (max) Rolling demand = W, var, VA A, DA, V = ±0.5% Hz = ±0.2% W, PF = ±0.5% Wh = class 0.5S (IEC62053-22) Harmonics = Only total Optional Plug-in Modules Note: Optional Plug-in Module can not be used with ME96SSEA-MB. Model name ME-4210-SS96 ME-0040C-SS96 ME-0052-SS96 ME-0000BU-SS96 ME-0000MT-SS96 Analog output 4 — — — — Pulse/Alarm output 2 — — — — Contact input 1 4 5 — — Contact output — — 2 — — Transmission function — CC-Link — SD CARD MODBUS® TCP Used with ME96SSHA-MB ME96SSRA-MB MODBUS® RTU System (ME96SSHA-MB/ME96SSRA-MB with ME-0052-SS96 (optional plug-in module)) Central monitor RS485/USB converter RS485 (MODBUS® RTU) USB »MODBUS® RTU communication system optimizes computer monitoring operations »Attachment of ME-0052-SS96 (optional) enables remote monitoring of the contact input signal and on/off control of the contact output signal »Digital input signals can be latched for over 30ms, and there is no need for external latch circuits ME-0052-SS96 optional unit Tripping Closing AL PAL TAL Turning on/off breaker, etc. <MODBUS® RTU Interface Specifications> • Max. Baud rate: 38.4kbps • Max. Connection Distance: 1,200m • Max. Connection Units: 31 <Optional Plug-in Module ME-0052-SS96> • Digital Input: 5 points (24VDC) • Digital Output: 2 points (35VDC) Model name Transmission/Option specifications Main measurement items »Improved accuracy of active energy, reactive energy and power factor and expanded measurement ranges of harmonics and demand values have been realized. 3
- 5. CC-Link System (ME96SSHA-MB/ME96SSRA-MB with ME-0040C-SS96 (optional plug-in module)) MODBUS® TCP Communication (ME96SSHA-MB/ME96SSRA-MB with ME-0000MT-SS96 (optional plug-in module)) Data Logging (ME96SSHA-MB/ME96SSRA-MB with ME-0000BU-SS96 (optional plug-in module)) Analog/Pulse/Alarm Output System (ME96SSHA-MB/ME96SSRA-MB with ME-4210-SS96 (optional plug-in module)) »Applicable to analog output, pulse output and alarm output with the aid of the optional module ME-4210-SS96 »Remote monitoring of A, DA, V, W, var, VA, PF, Hz, Harmonics Current RMS value and Harmonics voltage RMS value at 4 to 20mA output (max. 4 outputs) »Active energy, reactive energy, apparent power and periodic energy (ME96SSHA- MB) can be monitored by pulse output (max. 2 pulses) »Can remotely monitor upper/lower limit alarm by contact output (max. 2 points) »There is available an optional module usable not only for the conventional MODBUS® RTU (RS-485) communication and CC-Link communication, but also for MODBUS® TCP communication in an Ethernet environment. »There is available an optional module which can retain data even when communication cannot be established. <Analog output specifications> • 4-20mA • 4 outputs • Resistance load 600Ω or less <Pulse output specifications> • No-voltage a contact point • 35VDC, 0.1A • Select output from pulse widths of 0.125, 0.5 or 1s <Alarm output specifications> • No-voltage a contact point • 35VDC, 0.1A <Digital input specifications> • 1 point (24VDC) CC-Link IE Analog output Pulse output Alarm output SWITCH / HUB Ethernet PLC Data in more than one logging unit can be managed with one SD memory card. Note: Use the SD memory card (EMU4-SD2GB) made by Mitsubishi Electric. Use of any memory card other than our product (EMU4-SD2GB) is not covered by the warranty. CSV file data ME96 Super-S Series Ver.A Features »Optimum transmission system for remote monitoring using Mitsubishi PLC »Contact signals can be remotely monitored by installing the optional module ME-0040C-SS96. This is helpful in wiring and space saving. »Digital unit signal can be latched for over 30ms, and there is no need for external latch circuits Abnormal Signal (Facility) Abnormal Signal (Earth Leakage) Abnormal Signal (Temperature) Circuit Breaker Status Signal, etc. <CC-Link Interface> • Max. Baud rate: 10Mbps • Max. Connection Distance: 100m (10Mbps)~ 1,200m (156kbps) • Max. Connection Units: 42 • Digital Input: 4 points (24VDC) CC-Link CC-Link IE MELSEC Series 4
- 6. ME96 Super-S Series Ver.A Features Succeeded Display Functions Large Bar Graph Display Special Special Display Function Max/Min Display Function High-brightness Backlight Note: Alarm indicator blinks when it is set on alarm mode. (2) Digital Values Display by Bar Graph »Bar Graph Display Each measuring items can be displayed by a bar graph. With bar graph display, one can grasps the rated value and percentage against the alarm value instantly. »Maximum/Minimum Value Display The maximum and minimum value of each measuring items can be displayed. Since the max/min display shows the current value as well as max/min values, the display can be used for monitoring. Also, range of minimum value to maximum value is shown by bar graph. Alarm indicator Values on the tri-level digital display can be shown by bar graphs (Except when the tri-level display is measuring the same items). Bar graph shows the digital value of Value shown by bar graph Alarm indicator DISPLAY DISPLAY DISPLAY »Special Display by Display Pattern P00 Display can be selected as desired Display Pattern P00. »High-reliability and high-brightness backlight is built in »Backlight brightness can be adjusted from level 1 to 5 (default setting is 3) »“Always-on mode” or “Automatic off mode” can be selected (default setting is automatic off mode) ME96NS Series ME96SS Series Upper/Middle/Lower levels: Select from A, DA, V, W, var, VA, PF, Hz, Wh, -Wh, varh, VAh Maximum of four displays can be set (1) Bar Graph Fixed Display 5
- 7. Impressive Monitoring Functions Advanced Alarm Display Motor Starting Current Mask Function (1) A function to blink the backlight upon occurrence of an alarm is provided. On the conventional models, the display was lit up upon occurrence of an alarm. The new product has a setting function to blink the backlight upon occurrence of an alarm. (2) As with the conventional models, the automatic or manual alarm cancel mode can be selected. (3) As with the conventional models, up to four points of upper and lower limits can be monitored. (4) The alarm output delay time (alarm mask time) can be set. Time of alarm output after the maximum value and minimum value is reached can be set. With this function, alarm output caused by frequency change at start-up current of a motor and start-up of private power generating facility can be avoided. Current Time Upper limit value Lower limit value Motor starting current Motor starting current mask time Alarm mask time No alarm output and maximum/minimum value update during alarm delay time Alarm generation No lower limit alarm on 0A, 0V The use of the motor starting current mask function for monitoring the motor current can prevent updating of the maximum value and alarm output caused by the motor starting current. Although the maximum value is not updated, the current value is displayed. The starting current mask time can be set in the range from 1s to 5min. <Starting current mask> The maximum values for current and power are not updated during the starting current mask time. Furthermore, the alarm is not activated even if the upper limit alarm value is exceeded. <Starting current detection> The starting current mask time starts when the current exceeds the starting current threshold value. Starting current mask time Starting current Current upper limit alarm value Starting current threshold value Time Note: Set the starting current threshold to a value lower than the lower limit value in consideration of fluctuations in load current during operation. 6
- 8. ME96 Super-S Series Ver.A Features Variety of Complementary Features Password Function Special Primary Voltage/Current and Special Secondary Voltage are settable With the password function, the following items can be protected from an accidental execution. No. 1 2 3 4 Shift to the setting mode Reset the max./min. values Reset the value of active energy, reactive energy and apparent energy Reset the value of periodic active energy Adjust the time limit of rolling demand Reset the peak value of rolling demand Reset the value of operating time Password-protected item No. 5 6 7 Password-protected item Time (min) Time (min) 0 5 10 15 15min 5min 20 25 0 15 30 15min 15min (1) Special primary current 1A~30kA Under 10A: Top two digits setting Over 10A: Top three digits setting (2) Special primary voltage 60V~750kV Under 100V: Top two digits setting Over 100V: Top three digits setting Three phase 4-wire system 63.5V, 100V, 110V, 115V, 120V Three phase 3-wire, Single phase 2-wire system 100V, 110V, 220V (3) Special secondary voltage Periodic Monitoring Function Power consumption can be measured in two individual intervals (e.g., peak/off- peak, day/night, etc.). The time segments can be switched according to the setting via communication or the digital input (DI). (The time segments cannot be switched manually (button operation).) Power consumption (period 1) Power consumption (period 2) Rolling Demand Function Rolling demand is the estimated power consumption in a specified period (interval). For the block interval demand, select the duration (interval) of the block to be used for demand calculation. qRolling block Use rolling block to set the interval and sub-intervals from 1~60min (1min intervals). Rolling demand is calculated and updated at the end of each sub-interval. wFixed block Use fixed block to set the interval from 1~60min (1min intervals). Rolling demand is calculated and updated at the end of each interval. (For fixed block, use the same time limits both of interval and sub-interval). <Example: Interval, 15min; Sub-interval, 5min> <Rolling demand calculation> Rolling demand is calculated when the sub-interval has been completed. <Rolling demand display> When an interval has been completed, the rolling demand displayed is the newest time limit value. <Rolling demand calculation> Rolling demand is calculated when the sub-interval has been completed. <Rolling demand display> When an interval has been completed, the rolling demand displayed is the newest time limit value. <Example: Interval, 15min; Sub-interval, 15min> 7
- 9. ON OFF (1) Communications Test qDisplays current alarm and contact status. wPress the Reset button for 2sec, and regardless if there is an alarm or not, the display and contact output will operate as follows. (2) Alarm/Contact Output Operation Test (3) Analog Output Operation Test Press the Reset button one time to output one pulse. Note: After reaching 50, count will return to 1. (4) Pulse Output Operation Test Standards All products are compliant with CE Marking, UL Standards, KC mark and FCC/IC. 0% 25% 4mA 8mA Output 4-20mA Output specs 50% 12mA 75% 16mA 100% 20mA 0% 25% 50% 75% 100% Test Function »A test function is provided to check the wiring for communication, alarm output/contact output, analog output and pulse output without input of voltage or current. »At the time of wiring test before shipment of the board and counter test for system validation on site, test signals can be output only by applying the auxiliary power. Note: Depending on the optional unit and settings, the test function may not be available (may not be displayed). qDisplay »The same as for the operating mode, display patterns and other data are shown as set. »Both maximum and minimum values can be displayed. wCommunication data »Communication items and value are the same one on the display. The items value that are not displayed is 0 (zero). »Measuring items set for alarm will be displayed at the time of an alarm. »Input/Output contact status can be monitored. Output terminalStatus Alarm No alarm Display ON OFF Open Closed qDisplay the output items. wPress the + or – button to change the analog output. Note: Default value is 0%. 0 1 2 … 49 50 [pulse] Note: Default value is 0 pulses. 8
- 10. Specifications ‡ME96SSHA-MB Model name ME96SSHA-MB Phase wire Three phase 4-wire, Three phase 3-wire (3CT, 2CT), Single phase 3-wire, Single phase 2-wire (common use) Rating Current 5AAC, 1AAC (common use) Voltage Three phase 4-wire: 277/480VAC (max) Three phase 3-wire: Delta connections: 220VAC (max), Star connections: 440VAC (max) Single phase 3-wire: 220/440VAC (max) Single phase 2-wire: Delta connections: 220VAC (max), Star connections: 440VAC (max) Frequency 50-60Hz (common use) Measurement items Class Measurement items and accuracy Current (A) A1, A2, A3, AN, AAVG ±0.1% Current demand (DA) DA1, DA2, DA3, DAN, DAAVG ±0.1% Voltage (V) V12, V23, V31, VAVG (L-L) V1N, V2N, V3N, VAVG (L-N) ±0.1% Active power (W) W1, W2, W3, ∑ W ±0.2% Reactive power (var) var1, var2, var3, ∑ var ±0.2% Apparent power (VA) VA1, VA2, VA3, ∑ VA ±0.2% Power factor (PF) PF1, PF2, PF3, ∑ PF ±0.2% Frequency (Hz) Hz ±0.1% Active energy (Wh) Imported, Exported class 0.5S (IEC62053-22) Reactive energy (varh) Imported lead, lag Exported lead, lag class 1S (IEC62053-24) Apparent energy (Vah) — ±2.0% Harmonic current (HI) Total, 1st to 31st degree (odd number degree only) ±1.0% Harmonic voltage (HV) Total, 1st to 31st degree (odd number degree only) ±1.0% Rolling demand (DW) Rolling block, fixed block ±0.2% Rolling demand, reactive power (Dvar) Rolling block, fixed block ±1.0% Rolling demand, apparent power (DVA) Rolling block, fixed block ±1.0% Periodic Active energy (Wh) Periodic active energy 1, 2 class 0.5S (IEC62053-22) Operating time Operating time 1, 2 (Reference) Analog output response time 2s or less (HI, HV: 10s or less) Measuring method Instantaneous value A/V: RMS calculation, W/ var/ VA/ Wh/ varh/ VAh: Digital multiplication, PF: Power ratio calculation, Hz: Zero-cross, HI/HV: FFT Demand value DA: Thermal type calculation DW, Dvar, DVA: Rolling demand calculation Display Indicator LCD with LED backlight No. of display digits and segments Digital display 6 digits each at upper, middle, and lower line A, DA, V, W, var, VA, PF, DW, Dvar, DVA: 4 digits Hz: 3 digits Wh, varh, VAh: 9 digits (6 or 12 possible) Harmonic distortion ratio, content ratio: 3 digits Harmonic RMS: 4 digits Operating time: 6 digits Contact input/output: I/O Bar graph 21 segment bar graph, 22 segment indicator Display updating time interval 0.5s or 1s (selectable) Communication MODBUS® RTU communication Available optional plug-in module ME-4210-SS96 ME-0000BU-SS96 ME-0040C-SS96 ME-0000MT-SS96 ME-0052-SS96 Power failure compensation Non-volatile memory used (items: setting value, max/min value, active/reactive energy, apparent energy, periodic active energy, rolling demand, operating time) Consumption (VA) VT Each phase 0.1VA (110VAC), 0.2VA (220VAC), 0.4VA (440VAC) CT Each phase 0.1VA (5AAC) Auxiliary power circuit 7VA (at 110VAC), 8VA (at 220VAC), 5W (at 100VDC) Auxiliary power 100-240VAC (±15%), 100-240VDC (-30% +15%) Weight 0.5kg Dimensions 96 (H) × 96 (W) × 90 (D) Installation method Embedded Operating temperature -5~+55°C (average operating temperature: 35°C or less per day) Operating humidity 0~85% RH (non condensing) Storage temperature -25~+75°C (average temperature: 35°C or less per day) Storage humidity 0~85% RH (non condensing) Notes 1. Class values based on 100% of rated value. Notes 2. Harmonic measurements where distortion ratio (content rate) is 100% or more may exceed ±1.0%. Notes 3. Harmonic current cannot be measured without voltage input. 9
- 11. Model name ME96SSRA-MB Phase wire Three phase 4-wire, Three phase 3-wire (3CT, 2CT), Single phase 3-wire, Single phase 2-wire (common use) Rating Current 5AAC, 1AAC (common use) Voltage Three phase 4-wire: 277/480VAC (max) Three phase 3-wire: Delta connections: 220VAC (max), Star connections: 440VAC (max) Single phase 3-wire: 220/440VAC (max) Single phase 2-wire: Delta connections: 220VAC (max), Star connections: 440VAC (max) Frequency 50-60Hz (common use) Measurement items Class Measurement items and accuracy Current (A) A1, A2, A3, AN, AAVG ±0.2% Current demand (DA) DA1, DA2, DA3, DAN, DAAVG ±0.2% Voltage (V) V12, V23, V31, VAVG (L-L) V1N, V2N, V3N, VAVG (L-N) ±0.2% Active power (W) W1, W2, W3, ∑ W ±0.5% Reactive power (var) var1, var2, var3, ∑ var ±0.5% Apparent power (VA) VA1, VA2, VA3, ∑ VA ±0.5% Power factor (PF) PF1, PF2, PF3, ∑ PF ±0.5% Frequency (Hz) Hz ±0.1% Active energy (Wh) Imported, Exported class 0.5S (IEC62053-22) Reactive energy (varh) Imported lead, lag Exported lead, lag class 1S (IEC62053-24) Apparent energy (Vah) — ±2.0% Harmonic current (HI) Total, 1st to 19th degree (odd number degree only) ±1.0% Harmonic voltage (HV) Total, 1st to 19th degree (odd number degree only) ±1.0% Rolling demand (DW) Rolling block, fixed block ±0.5% Rolling demand, reactive power (Dvar) Rolling block, fixed block ±1.0% Rolling demand, apparent power (DVA) Rolling block, fixed block ±1.0% Periodic Active energy (Wh) Periodic active energy 1, 2 class 0.5S (IEC62053-22) Operating time Operating time 1, 2 (Reference) Analog output response time 2s or less (HI, HV: 10s or less) Measuring method Instantaneous value A/V: RMS calculation, W/var/VA/Wh/varh: Digital multiplication, PF: Power ratio calculation, Hz: Zero-cross, HI/HV: FFT Demand value DA: Thermal type calculation DW, Dvar, DVA: Rolling demand calculation Display Indicator LCD with LED backlight No. of display digits and segments Digital display 6 digits each at upper, middle, and lower line A, DA, V, W, var, VA, PF, DW, Dvar, DVA: 4 digits Hz: 3 digits Wh, varh: 9 digits (6 or 12 possible) Harmonic distortion ratio, content ratio: 3 digits Harmonic RMS: 4 digits Operating time: 6 digits Contact input/output: I/O Bar graph 21 segment bar graph, 22 segment indicator Display updating time interval 0.5s or 1s (selectable) Communication MODBUS® RTU communication Available optional plug-in module ME-4210-SS96 ME-0000BU-SS96 ME-0040C-SS96 ME-0000MT-SS96 ME-0052-SS96 Power failure compensation Non-volatile memory used (items: setting value, max/min value, active/reactive energy, apparent energy, periodic active energy, rolling demand, operating time) Consumption (VA) VT Each phase 0.1VA (110VAC), 0.2VA (220VAC), 0.4VA (440VAC) CT Each phase 0.1VA (5AAC) Auxiliary power circuit 7VA (at 110VAC), 8VA (at 220VAC), 5W (at 100VDC) Auxiliary power 100-240VAC (±15%), 100-240VDC (-30% +15%) Weight 0.5kg Dimensions 96 (H) × 96 (W) × 90 (D) Installation method Embedded Operating temperature -5~+55°C (average operating temperature: 35°C or less per day) Operating humidity 0~85% RH (non condensing) Storage temperature -25~+75°C (average temperature: 35°C or less per day) Storage humidity 0~85% RH (non condensing) Notes 1. Class values based on 100% of rated value. Notes 2. Harmonic measurements where distortion ratio (content rate) is 100% or more may exceed ±1.0%. Notes 3. Harmonic current cannot be measured without voltage input. ‡ME96SSRA-MB 10
- 12. Specifications Model name ME96SSEA-MB Phase wire Three phase 4-wire, Three phase 3-wire (3CT, 2CT), Single phase 3-wire, Single phase 2-wire (common use) Rating Current 5AAC, 1AAC (common use) Voltage Three phase 4-wire: 277/480VAC (max) Three phase 3-wire: Delta connections: 220VAC (max), Star connections: 440VAC (max) Single phase 3-wire: 220/440VAC (max) Single phase 2-wire: Delta connections: 220VAC (max), Star connections: 440VAC (max) Frequency 50-60Hz (common use) Measurement items Class Measurement items and accuracy Current (A) A1, A2, A3, AN, AAVG ±0.5% Current demand (DA) DA1, DA2, DA3, DAN, DAAVG ±0.5% Voltage (V) V12, V23, V31, VAVG (L-L) V1N, V2N, V3N, VAVG (L-N) ±0.5% Active power (W) W1, W2, W3, ∑ W ±0.5% Reactive power (var) — — Apparent power (VA) — — Power factor (PF) PF1, PF2, PF3, ∑ PF ±0.5% Frequency (Hz) Hz ±0.2% Active energy (Wh) Receiving class 0.5S (IEC62053-22) Reactive energy (varh) — — Apparent energy (Vah) — — Harmonic current (HI) Total ±2.0% Harmonic voltage (HV) Total ±2.0% Rolling demand (DW) — — Rolling demand, reactive power (Dvar) — — Rolling demand, apparent power (DVA) — — Periodic Active energy (Wh) — — Operating time Operating time 1, 2 (Reference) Analog output response time — Measuring method Instantaneous value A/V: RMS calculation, W: Digital multiplication, PF: Power ratio calculation, Hz: Zero-cross, HI/HV: FFT Demand value DA: Thermal type calculation Display Indicator LCD with LED backlight No. of display digits and segments Digital display 6 digits each at upper, middle, and lower line A, DA, V, W, PF: 4 digits Hz: 3 digits Wh: 9 digits (6 or 12 possible) Relative harmonic content: 3 digits Harmonic RMS value: 4 digits Operating time: 6 digits Bar graph 21 segment bar graph, 22 segment indicator Display updating time interval 0.5s or 1s (selectable) Communication MODBUS® RTU communication Available optional plug-in module — Power failure compensation Non-volatile memory used (items: setting value, max/min value, active energy, operating time) Consumption (VA) VT Each phase 0.1VA (110VAC), 0.2VA (220VAC), 0.4VA (440VAC) CT Each phase 0.1VA (5AAC) Auxiliary power circuit 7VA (at 110VAC), 8VA (at 220VAC), 5W (at 100VDC) Auxiliary power 100-240VAC (±15%), 100-240VDC (-30% +15%) Weight 0.5kg Dimensions 96 (H) × 96 (W) × 90 (D) Installation method Embedded Operating temperature -5~+55°C (average operating temperature: 35°C or less per day) Operating humidity 0~85%RH (non condensing) Storage temperature -25~+75°C (average temperature: 35°C or less per day) Storage humidity 0~85%RH (non condensing) Notes 1. Class values based on 100% of rated value. Notes 2. Harmonic measurements where distortion ratio (content rate) is 100% or more may exceed ±2.0%. ‡ME96SSEA-MB 11
- 13. ‡Standards Compliance Electromagnetic Compatibility Emissions Radiated Emission EN61326-1/CISPR 11, FCC Part15 Subpart B Class A Conducted Emission EN61326-1/CISPR 11, FCC Part15 Subpart B Class A Harmonics Measurement EN61000-3-2 Flicker Meter Measurement EN61000-3-3 Immunity Electrostatic discharge Immunity EN61326-1/EN61000-4-2 Radio Frequency Electromagnetic field Immunity EN61326-1/EN61000-4-3 Electrical Fast Transient/Burst Immunity EN61326-1/EN61000-4-4 Surge Immunity EN61326-1/EN61000-4-5 Conducted Disturbances, Induced By Radio Frequency Fields Immunity EN61326-1/EN61000-4-6 Power Frequency Magnetic Field Immunity EN61326-1/EN61000-4-8 Voltage Dips and Short Interruptions EN61326-1/EN61000-4-11 Safety Europe CE, as per EN61010-1 U.S. and Canada cRUus as per UL61010-1, IEC61010-1 Installation Category III Measuring Category III Pollution Degree 2 ‡MODBUS ® RTU Communication Specifications Item Specification Interface RS-485 2-wire half-duplex transmission Protocol RTU (binary data transfer) Transmission method Asynchronous Connection type Multi-point bus Baud rate 2400, 4800, 9600, 19200, 38400bps Data bit 8 Stop bit 1, 2 Parity ODD, EVEN, NONE Address 1 to 255 (0: for broadcast mode) Distance 1,200m (max) Max. connectable units 31 units Terminal Resistance 120Ω 1/2W Recommended Cable Shielded twisted-pair AWG24 to 14 For more information on data, please refer to the following document. · Electronic Multi-Measuring Instrument ME series MODBUS® Interface specifications…LMS-0492 ‡CC-Link Communication Specifications Item Specification No. of occupied stations 1 Station Remote device station CC-Link version CC-Link Ver 1.10 / Ver 2.00 Baud rate 10Mbps / 5Mbps / 2.5Mbps / 625kbps / 156kbps Transmission method Broadcast polling system Synchronous method Frame synchronous system Encoding method NRZI Transmission path format Bus format (EIA RS485) Transmission format HDLC Error control system CRC (X16 + X12 + X5 + 1) Number of connectable units 42 units (max, remote device station) Remote station numbers (station numbers) 1 to 64 For CC-Link connection cables, please use the dedicated cables. For information regarding dedicated cables, please refer to the CC-Link Partner Product Catalog published by the CC-Link Partner Association or CC-Link Partner Product Information on the CC-Link Partner Association website (http://www.cc-link.org). Notes 1. Dedicated CC-Link cables compatible with Ver. 1.00 cannot be used in tandem with dedicated CC-Link high-performance cables compatible with Ver. 1.00. Notes 2. In the case of systems consisting of units compatible with Ver. 1.00, 1.10 or 2.00 used in tandem with Ver. 1.00 or 1.10 cables, Ver. 1.00 specifications will apply for the maximum total cable length and length of cables between stations. Notes 3. For terminal resistance, be sure to use 110 Ω ±5% (1/2W product) when using dedicated CC-Link cables or 130 Ω ±5% (1/2W product) when using dedicated CC-Link high-performance cables. For more information on data, please refer to the following document. · Electronic Multi-Measuring Instrument programming manual (CC-Link)……………………………………………LEN080334 · Electronic Multi-Measuring Instrument programming manual (CC-Link)(For ver. 2 remote device station)…LEN130391 ‡Input/Output Specifications Item Specification Optional Plug-in Module type Analog output 4-20mA (0~600 Ω) ME-4210-SS96 Pulse/Alarm output No-voltage “a” contact Capacity: 35VDC, 0.1A ME-4210-SS96 Digital input 19-30VDC 7mA or less ME-4210-SS96, ME-0040C-SS96, ME-0052-SS96 Digital output No-voltage a contact Capacity: 35VDC, 0.2A ME-0052-SS96 12
- 14. Specifications ‡MODBUS ® TCP Communication Specifications Item Specification Interface 1 port (10BASE-T/100BASE-TX) Transmission method Base band Number of stages connected in cascade Max. 4 stages (10BASE-T), max. 2 stages (100BASE-TX) (when repeater hub is used) Max. distance between nodes 200m Max. segment length 100m Connector applicable to external wiring RJ45 Cable 10BASE-T Cable meeting IEEE802.3 10BASE-T standard (Unshielded twisted pair cable (UTP cable), category 3 or higher) 100BASE-TX Cable meeting IEEE802.3 100BASE-TX standard (Shielded twisted pair cable (STP cable), category 5 or higher) Protocol MODBUS® TCP (port No.502) Max. number of connections 4 Support functions Auto-negotiation function (automatic recognition of 10BASE-T/100BASE-TX) Auto-MDIX function (automatic recognition of straight cable/cross cable) For more information on data, please refer to the following document. Electronic Multi-Measuring Instrument ME series MODBUS® Interface specifications…LMS-0492 ‡Logging Specifications Item Specification Logging mode Automatic updating by overwriting (not provided with a function to automatically start according to the start time setting) Kinds of logging data Detailed data Measurement data is stored at the specified “detailed data logging interval” (1 min, 5 min, 10 min, 15 min or 30 min). Note: The data will be output as a detailed data file. Note: As the integrated values, not the difference values, but the values displayed on the multi indicating instrument will be output. 1-hour data Measurement data is stored at a one-hour interval. Note: The data will be output as a one-hour data file or a one-day data file. Note: As the integrated values, not the difference values, but the values displayed on the multi indicating instrument will be output. Number of logging elements Detailed data Max. 6 elements 1-hour data Max. 6 elements Internal memory logging period Detailed data Detailed data logging interval: 1 min for 2 days Detailed data logging interval: 5 min for 10 days Detailed data logging interval: 10 min for 20 days Detailed data logging interval: 15 min for 30 days Detailed data logging interval: 30 min for 60 days 1-hour data 400 days (about 13 months) SD memory card (2GB) logging period 10 years or more System log data 1200 records Logging data / system log data output format CSV format (ASCII code) Power failure compensation Backup by built-in lithium battery Total power interruption backup time: 5 years (at daily average temperature of 35°C or less) (The life of the lithium battery is 10 years (at a daily average temperature of 35°C or less).) The battery cannot be replaced by the customer. Please consider updating the module. Set values ( logging ID, logging elements and detailed data logging interval ) Stored in FRAM (non-volatile memory) Note: The data will not be deleted even if power interruption is caused by battery voltage drop (BAT. LED is on). Logging data and system log data Stored in SRAM (volatile memory) Note: The data will be deleted if power interruption is caused by battery voltage drop (BAT. LED is on). Clock operation Note: The clock operation will stop if power interruption is caused by battery voltage drop (BAT. LED is on). After power restoration, the clock operation will start from 00:00 on Jan. 1, 2016. Clock accuracy 1 min / month Output data storage medium SD memory card (SD or SDHC) Optional accessory SD memory card (EMU4-SD2GB) *1 *1: Use the SD memory card (EMU4-SD2GB) made by Mitsubishi Electric. Use of any memory card other than our product (EMU4-SD2GB) is not covered by the warranty. For more information on data, please refer to the following document. Logging specifications…LMS-0551 13
- 15. Operating Instructions ‡Functions »LCD Functions ‡Set-up »Set-up workflow (in the case of ME96SSHA-MB) »Button Functions For correct measurement, it is necessary to set the primary voltage/current in set-up mode. Access set-up mode from the measurement mode and set the necessary items. Factory default settings will apply to items not set. Set-up menu End Measurement screen Change/ Confirm values set Enter set-up mode Enter setting value confirmation mode Phase/ Wire Display pattern Using VT/ direct input CT current Frequency Rolling demand time limit Demand current time limit Set-up menu 1 MODBUS® RTU address Communication MODBUS® RTU baud rate MODBUS® RTU parity MODBUS® RTU stop bit Set-up menu 2 Current scale Voltage scale Power scale Reactive power scale Power factor Power used scale Harmonic display Set-up menu 3 Function display Version display Backlight brightness Backlight connection/ automatic Display refresh time CC-Link station No CC-Link baud rate CC-Link version setting CC-Link reset Set-up menu 4 Upper/Lower limit alarm items Upper/Lower limit alarm values Alarm mask time Alarm reset method Backlight of alarm Motor starting current mask function Pulse/Alarm output function Pulse output Set-up menu 5 Set-up menu 6 Time-based power used display Time-based power used toggle setting Rolling demand display Rolling demand time limit adjustment setting Contact display Contact input reset method Set-up menu 7 Operating time display Test mode Operating time count target Operating time threshold value Phase display setting IEC mode setting Set-up menu 8 Setting value confirmation menu 9 End display Cancel display When ME-0040C-SS95 is installed When ME-0000MT-SS96 is installed MODBUS® TCP IP address MODBUS® TCP sub-net mask Use/non-use of MODBUS® TCP default gateway MODBUS® TCP default gateway Communication reset Selection of options Analog output 1 Analog output 2 Analog output 3 Analog output 4 Output limit Logging ID Logging data clearing Logging element pattern Detailed data logging interval When ME-4210-SS96 is installed When ME-0000BU-SS96 is installed Lead Status Lag status Scale of the bar graph Excessively low input Excessively high input Upper/lower limit alarm indicator Bar graph status Phase status Digital Unit Metering status Harmonics Setup status Test status Clock status Upper/lower limit alarm status Communication status Power factor status is lead Power factor status is lag The scale of the bar graph On when the measurement value is lower than the minimum scale value On when the measurement value is higher than the maximum scale value Flashing when the upper and lower limit alarm values have been set The item expressed with the bar graph The phase for each of the digital displays The measured value is displayed in a digital number The unit for each of the digital display When it is blinking, the instrument is counting active energy On when harmonics values are displayed is on in the test mode. is flashing in the set value check mode. On in the test mode When it is blinking, the instrument is counting operating time Flashing when upper/lower limit alarm has occurred On in normal state, and flashing or off in abnormal state No. 1 2 3 4 5 6 7 8 9 10 11 12 13 14 15 16 17 Segment name Description Notes 1. Basic measurements are possible by adjusting settings in menu 1 ( area enclosed by dotted line). Notes 2. Item settings vary depending on the model. Notes 3. Setting confirmation menu 9 (test mode) is not displayed in the setting mode. Operation (function) details Access set-up mode from operating mode Access setting value confirmation mode from operating mode Save settings and return to operating mode Select set-up menu Move to next screen Return to previous setting item Skip remaining settings Select cancel Button operation Simultaneously press for 2s Press for 2s Press for 1s Symbol + or or DISPLAY SET SET RESET SET SET SET 1 2 3 5 6 10 11 4 7 8 9 13 14 15 16 17 12 3 Functions Button Functions Basic functions Button Set up setting items such as primary voltage and current, and choose and indicate setting itmes Change setting and bar graph display Change display from Max/Min to instantaneous value Change phase Change display Push for 2s Push for 2s Push for 2s Push for 2s Push for 1s Manual display change = Cyclic display change Manual phase change = Cyclic phase change Zoom display of Wh, varh etc Reset all the Max/Min values Fast forward or fast return values when setting Reset Wh, varh, Vah values to zero by holding down the buttons for 2 sec or MAX/MIN PHASE DISPLAY DISPLAY PHASE RESET SET RESET PHASE + or + + + SET Special functions 14
- 16. Operating Instructions »Basic Set-up Operations (1) ME96SSHA-MB / ME96SSRA-MB Set-up menu 1: Basic settings (set phase wire system, display pattern, Using VT/direct input, CT primary current, etc.) (2) ME96SSEA-MB Set-up menu qPhase/Wire system wDisplay pattern eVT/Direct voltage DISPLAY SET DISPLAY SET DISPLAY SET DISPLAY SET Adjust the set-up menu No. to “1”. qSet the phase/wire system according to the number of measurement circuits targeted. wSet the display pattern : Can be displayed with this setting only : Other settings are required to display data : Select P00 and set display order and position To access setting mode, press and hold the and buttons down at the same time for 2s. Press the button to display the items to be set, and the and buttons to set the details. Settings can be saved for each set-up menu No. To do so, press the button when the End screen is displayed. SET SET RESET SET The underlined setting parameters are the initial value. 3P4: 3-phase, 4-wire system 3P3. 2Ct: 3-phase, 3-wire system (2CT) 3P3. 3Ct: 3-phase, 3-wire system (3CT) 1P3. 1n2: 1-phase, 3-wire system (1N2 display) 1P3. 1n3: 1-phase, 3-wire system (1N3 display) 1P2: 1-phase, 2-wire system eSet VT In the case of direct measurements (without VT) = To select no, press and see (1) below. In the case of using VT = To select yES, press and see (2) below. ·To set Three phase 4-wire ·To set Three phase 3-wire or Single phase 2-wire (1) In the case of direct measurements (without VT) (a) Three phase 4-wire setting (phase voltage/line voltage) (b) Three phase 3-wire (2CT, 3CT) or Single phase 2-wire setting (line voltage) (c) Single phase 3-wire setting (1N2, 1N3) (phase voltage/line voltage) SET SET 63.5/110V 100/173V 110/190V 220/380V 230/400V 240/415V 254/440V 277/480V no yES yES no 110V 220V 440V 110/220V 220/440V For Single phase 3-wire setting for qPhase/Wire system Only used for direct measurements. Skipped for this setting. e e (1) Additional screens w q P01 P02 P03 P04 P05 P06 P07 P08 P09 P10 P11 P12 P13 P00 P01 P02 P03 P04 P05 P06 P07 P08 P09 P00 Operatingtime Displaypattern A DA V W PF Var Vah varhVA Hz Displaypattern A DA V W PF Wh (Imported) Wh (Exported) Varh (Importedlag) Additional screens Wh (Imported) Wh (Exported) Wh (periodic) DI/DOHI/HVDW Hz Wh (Imported) Wh (Imported) HI/HV Operatingtime 15
- 17. Set-up menu 2: MODBUS® RTU Communication settings (when ME4210-SS96, ME0052-SS96 or ME0000BU-SS96 is installed and any options are not installed) *Only in the case of ME96SSHA-MB or ME96SSRA-MB, it is applicable. u y t r e(2) eVT/Direct voltage rCT current DISPLAY SET DISPLAY SET tFrequency DISPLAY SET yRolling demand time limit DISPLAY SET uDemand current time limit SET Set-up menu (2) In the case of using with VT Secondary voltage settings (a) Three phase 4-wire setting (phase voltage) (b) Three phase 3-wire (2CT, 3CT) or Single phase 2-wire setting (line voltage) Set primary voltage Can be set in 60~750,000V range (setting unit: V) Under 100V: Top two digits settings Over 100V: Top three digits settings rSet CT. Set the primary and secondary currents of the CT to be combined. Set secondary current 1A 5A Set primary current Can be set in1.0~30,000.0A range (setting unit: A) Under 10A: Top two digits settings Over 10A: Top three digits settings tSet frequency. 50Hz 60Hz Notes1. Frequency scale on bar graph display will also change. Notes2. Analog output scale will also change. ySet the rolling demand interval time limit (Only ME96SSHA-MB and ME96SSRA-MB). (1) Interval time limit (2) Sub-interval time limit uSet the demand current time limit. Select another set-up menu or finish set-up. 63.5V 100V 110V 115V 120V 100V 110V 220V Factory default settings Three phase 4-wire: 200V (phase voltage) Three phase 3-wire; Single phase 2-wire: 10,000V (line voltage) Factory default setting: 5.0A Setting range 1 ~ 15 ~ 60 (min) Setting interval 1min Setting range 1 ~ 60 (min) Setting interval 1min 0 s 10 s 20 s 30 s 40 s 50 s 1 min 2 min 3 min 4 min 5 min 6 min 7 min 8 min 9 min 10 min 15 min 20 min 25 min 30 min ‡To continue to set-up Select the menu No. using the or button. ‡To finish set-up Press the or button to display the End screen, then press the button to save the settings. SET Set-up menu DISPLAY SET DISPLAY SET DISPLAY SET wMODBUS® RTU communication address qMODBUS® RTU communication address Adjust the set-up menu No. to “2”. qSet MODBUS® RTU communication address Possible address settings: 1~255 wSet the MODBUS® RTU communication baud rate. 2400bps 4800bps 9600bps 19.2kbps 38.4kbps w q 16
- 18. Operating Instructions Set-up menu 2: CC-Link Communication settings (when ME-0040C-SS96 is installed) *Only in the case of ME96SSHA-MB or ME96SSRA-MB, it is applicable. Set-up menu DISPLAY SET DISPLAY SET qSelect communication system Adjust the set-up menu No. to “2”. DISPLAY SET SET Set-up menu tReset communication rSet CC-Link communication version DISPLAY SET DISPLAY SET wCC-Link communication station number eCC-Link communication speed eSet the CC-Link communication speed. w DISPLAY SET Set-up menu eMODBUS® RTU communication parity DISPLAY SET rMODBUS® RTU communication stop bit eSet the MODBUS® RTU communication parity. rSet the MODBUS® RTU communication stop bit. Stop bit 1 Stop bit 2 Select another set-up menu or end set-up. non odd even (EVEn) Continued from previous page ‡To continue to set-up Select the menu No. using the or button. ‡To finish set-up Press the or button to display the End screen, then press the button to save settings. SET Select another set-up menu or end set-up. ‡To continue to set-up Select the menu No. using the or button. ‡To finish set-up Press the or button to display the End screen, then press the button to save settings. SET When “MODBUS® RTU communication” is selected, set the communication conditions as stated in and after wMODBUS® RTU communication address on page 16. wSet the CC-Link communication station number. 156kbps 625kbps 2.5Mbps 5Mbps 10Mbps rSet the CC-Link communication version. Version 1.10 Version 2.00 tSet to “on” if changes have been made to the CC-Link settings. (If not set to “on,” changes will not be effective.) e r e q r t qSelect CC-Link or MODBUS® RTU communication. CC : CC-Link communication Mb. rtu : MODBUS® RTU communication oFF on Possible station number settings: 1~64 17
- 19. Set-up menu 2: MODBUS® TCP Communication settings (when ME-0000MT-SS96 is installed) *Only in the case of ME96SSHA-MB or ME96SSRA-MB, it is applicable. yReset communication DISPLAY SET DISPLAY SET DISPLAY SET wMODBUS® TCP communication IP address rUse/non-use of MODBUS® TCP communication default gateway DISPLAY SET eMODBUS® TCP communication sub-net mask DISPLAY SET DISPLAY SET SET tMODBUS® TCP communication default gateway Set-up menu Adjust the set-up menu No. to “2”. qSelect communication system When “MODBUS® RTU communication” is selected, set the communication conditions as stated in and after wMODBUS® RTU communication address on page 16. qSelect MODBUS® TCP communication or MODBUS® RTU communication. Mb.tcp : MODBUS® TCP communication Mb.rtu : MODBUS ® RTU communication wSet the IP address of MODBUS® TCP communication. eSet the sub-net mask of MODBUS® TCP communication. Select one of the sub-net masks shown in the following table. (Non-use) (Use) Allowable IP addresses: 000.000.000.000 ~ 192.168.3.10 ~ 255.255.255.255 rDetermine whether or not to use the default gateway of MODBUS® TCP communication. tSet the default gateway of MODBUS® TCP communication. When the default gateway is not used, this window is not displayed. Allowable default gateways: 000.000.000.000 ~ 127.0.0.1 ~ 255.255.255.255 tSet the default gateway of MODBUS® TCP communication. When the default gateway is not used, this window is not displayed. yIf settings relating to MODBUS® TCP communication have been changed, turn on this item. (If it is not turned on, the changes will not be enabled.) oFF on oFF on Set-up menu Select another set-up menu or end set-up. ‡To continue to set-up Select the menu No. using the or button. ‡To finish set-up Press the or button to display the End screen, then press the button to save settings. SET w e q r t y (1) 128.0.0.0 (9) 255.128.0.0 (17) 255.255.128.0 (25) 255.255.255.128 (2) 192.0.0.0 (10) 255.192.0.0 (18) 255.255.192.0 (26) 255.255.255.192 (3) 224.0.0.0 (11) 255.224.0.0 (19) 255.255.224.0 (27) 255.255.255.224 (4) 240.0.0.0 (12) 255.240.0.0 (20) 255.255.240.0 (28) 255.255.255.240 (5) 248.0.0.0 (13) 255.248.0.0 (21) 255.255.248.0 (29) 255.255.255.248 (6) 252.0.0.0 (14) 255.252.0.0 (22) 255.255.252.0 (30) 255.255.255.252 (7) 254.0.0.0 (15) 255.254.0.0 (23) 255.255.254.0 (8) 255.0.0.0 (16) 255.255.0.0 (24) 255.255.255.0 18
- 20. Operating Instructions Set-up menu 3: Display settings (max. scale, active energy, harmonics, etc.) DISPLAY SET DISPLAY SET DISPLAY SET Set-up menu qCurrent scale wVoltage scale This screen will not appear if the current is not selected in the display pattern. This screen will not appear if the voltage is not selected in the display pattern. This screen will not appear if “CT primary current value” is selected. ePower scale DISPLAY SET DISPLAY SET DISPLAY SET DISPLAY SET Positive/Negative Example display screens Combination I : Imported : Exported : varh lead : varh lag Combination II Combination III Combination IV DISPLAY SET This screen will not appear if the power is not selected in the display pattern. This screen will not appear if the reactive power is not selected in the display pattern. yMeasure power consumption tPower factor scale rReactive power scale r t Adjust the set-up menu No. to “3”. qSet the maximum current scale value on the bar graph. (1)Maximum current scale value (1)Maximum scale value (2)Positive-only or Positive/Negative The setting procedure is the same as that described in ePower unit (1) Max. scale value . The reactive power scale can only be positive/negative. rSet the maximum reactive power scale value on the bar graph (ME96SSHA-MB, ME96SSRA-MB only). tSet the power factor scale on the bar graph. ySet display combinations of receiving/transmitting, lag/lead, power used/reactive power used and the measurement method for reactive power used (ME96SSHA-MB, ME96SSRA-MB only). Combinations I, II = Suitable for measuring reactive power in facilities not equipped with in-house generators, and generally for capacitor loads where the power factor is close to zero. Combinations III, IV = Suitable for measurements in facilities equipped with in-house generators. Positive-only wSet the maximum voltage scale value on the bar graph Maximum scale value. (2)Maximum current scale value special setting + 3 steps (approx. 120%) ± 0 steps (100%: instrument rating) - 10 steps (approx. 40%) + 10 steps (approx. 250%) ± 0 steps (100%: instrument rating) −18 steps (approx. 20%) + 3 steps (approx. 120%) ± 0 steps (100%: instrument rating) −18 steps (approx. 20%) CT primary current value SP. (special primary current value)Set-up menu 1.4.1 primary current setting Set value −0.5 1 0.5 0 1 0 eSet the maximum power/rolling demand scale value on the bar graph, and select positive-only scale or positive/negative scale (The rolling demand must be set only for ME96SSHA-MB and ME96SSRA-MB). Imported Exported Lag Lead Lag Lead Reactive energy used measurement method 2 Quadrants Measurement 4 Quadrants Measurement Combinations (set value) I II III IV Display combinations Wh varh Imported Exported q(1) w q(2) e(1) 19
- 21. SET Set-up menu uHarmonic display u Set-up menu DISPLAY SET DISPLAY SET DISPLAY SET Set-up menu 6: Analog output setting (only when ME-4210-SS96 is installed) *Only in the case of ME96SSHA-MB or ME96SSRA-MB, it is applicable. This menu will not appear if ME-4210-SS96 (optional) is not installed. non A1 A2 A3 AN AAVG (CH1) Demand A1 Demand A2 Demand A3 Demand AN Demand AAVG V1N V2N V3N VAVG (L-N) (CH2) V12 V23 V31 VAVG (L-L) W1 W2 W3 WΣ (CH3) var1 var2 var3 varΣ VA1 VA2 VA3 VAΣ PF1 PF2 PF3 PFΣ (CH4) Hz Harmonic A1 Harmonic A2 Harmonic A3 Harmonic AN Harmonic V1N Harmonic V2N Harmonic V3N Three phase 4-wire AVG: Average value, Σ: Total effective value DISPLAY SET DISPLAY SET To next channel settings qAnalog output CH1 output items wAnalog output CH1 detailed settings 20 4 12 mA 1−0.5 20 4 12 mA 1−0 0 0 20 4 mA 40kW 20 4 12 mA 0−40kW 40kW uSelect with or without harmonic display. oFF on (without) (with) When the display is set to “on,” the harmonic value measured will be displayed on an additional screen. Select another set-up menu or end set-up Adjust the set-up menu No. to “6”. When 3-phase 4-wire system has been selected qSet the output items for “analog output CH1”. Select the measured items to be output from the table below. wSet the details for “analog output CH1.” (The following settings can be made separately from the measurement items included in the display pattern.) (1) If analog output is selected for current, demand current, voltage, power, reactive power, power factor (set-up menu: 6.1.1) (2) If analog output is selected for current, demand current, power (set-up menu: 6.1.2) Notes 1. The same measurement items can be set for all channels. Notes 2. Measurement items not included in the selected display pattern can also be chosen. Notes 3. Channels set to “non” will have minimum output (4mA). Additionally, set-up will proceed to the next channel. Notes 4. Underlined specifications are factory default settings of measurement items allocated to each channel. Notes 5. Harmonic current is output at the scale of 0~60% (with respect to rated value) of the total effective value. Harmonic voltage is output at the scale of 0~20% of the total distortion ratio. q w(1) w(2) CT primary current value (value set for set-up menu 1.4.1 primary current setting )A Demand A V W var PF SP. (special primary current value) Output item Setting range −0.5~1~0.5 −0~1~0 +10 steps (approx. 250%) ±0 steps (100%: standard max. scale value) −18 steps (approx. 20%) +3 steps (approx. 120%) ±0 steps (100%: instrument rating) −18 steps (approx. 20%) A Demand A W Output item Setting range Positive-only Positive/Negative +3 steps (approx. 120%) ±0 steps (100%: instrument rating) −10 steps (approx. 40%) Positive-only Positive/Negative 0.5 ‡To continue to set-up Select the menu No. using the or button. ‡To finish set-up Press the or button to display the End screen, then press the button to save settings. SET 20
- 22. Operating Instructions DISPLAY SET Set-up menu tAnalog output limit The setting procedure is the same as that of qAnalog output CH1 output items . eSet the output items for “analog output CH2~4.” The setting procedure is the same as that of wAnalog output CH1 detailed settings . rSet the details for “analog output CH2~4.” tSet the upper limit for analog output (same for all channels). Select another set-up menu or end set-up. DISPLAY SET eAnalog output CH2~4 output items rAnalog output CH2~4 detailed settings t Set-up menu Adjust the set-up menu No. to “6”. qSet the ID number of the optional logging unit. Allowable IDs : 001 255 When an ID number has been set for the installed optional logging unit, the value is displayed as the default. wClear the data stored in the optional logging unit. no yES (Not clear) (Clear) eSet the logging element pattern to select the data to be logged. If the logging data is not cleared, the logging element pattern cannot be set. Allowable patterns : LP01 LP02 LP00 When the pattern is set to LP00, any logging elements can be selected. For the details of LP00 setting, see the instruction manual. The logging element patterns of LP01 and LP02 are defined as shown below. Detailed data is recorded at a shorter interval than that of 1-hour data. The detailed data logging interval can be set in r“Detailed data logging interval.” Phase wire system setting: For three-phase four-wire rSet the interval of logging the detailed data in the logging element pattern LP01 or LP02. If the logging data is not cleared, the detailed data logging interval cannot be changed. 1min 5min 10min 15min 30min Select another set-up menu or end set-up. Set-up menu 6: Logging setting (only when ME-0000BU-SS96 is installed) *Only in the case of ME96SSHA-MB or ME96SSRA-MB, it is applicable. SET Set-up menu SET DISPLAY SET qLogging ID DISPLAY SET eLogging element pattern DISPLAY SET wLogging data clearing rDetailed data logging interval DISPLAY SET q r w e Notes: If the SD memory card contains data with the same logging ID, the data may be overwritten. When the data of more than one optional logging unit are collected in one SD memory card, set the logging ID without fail. Continued from previous page oFF (no limit) on (limit) Setting Explanation Output to +5% of upper limit and -5% of lower limit (with respect to span value) Output to +1% of upper limit and -1% of lower limit (with respect to span value) Note: Skip this setting when the analog output of all channel output items is set to “non.” ‡To continue to set-up Select the menu No. using the or button. ‡To finish set-up Press the or button to display the End screen, then press the button to save settings. SET ‡To continue to set-up Select the menu No. using the or button. ‡To finish set-up Press the or button to display the End screen, then press the button to save settings. SET Logging element pattern LP01 LP02 Detailed data 1-hour data Detailed data 1-hour data Data 1 Wh receiving Wh receiving Wh receiving Wh receiving Data 2 varh receiving (lag) Wh sending AAVG Wh sending Data 3 VAh varh receiving (lag) VAVG (L-L) varh receiving (lag) Data 4 DW (current value) varh receiving (lead) WΣ varh receiving (lead) Data 5 Dvar (current value) VAh PFΣ VAh Data 6 DVA (current value) None Hz None 21
- 23. ‡Operation (for ME96SSHA-MB) Example of changing display (Three phase 4-wire system; display pattern: P01; no additional screens) DISPLAY DISPLAY DISPLAY PHASE PHASE PHASE PHASE PHASE PHASE PHASEPHASE Hold down and simultaneously for 2s MAX/MIN DISPLAY DISPLAY »Display Change »Changing Phases DISPLAYPress , the measurement display switches over. DISPLAYWhen the and buttons are held down for 2 seconds or more, the display will change in reverse order. Screen 1 of 4 Upper: Current Middle: Power Lower: Voltage Screen 2 of 4 Upper: Current Middle: Power Lower: Power factor Screen 3 of 4 Upper: Current Middle: Power Lower: Voltage Screen 4 of 4 Upper: Current Middle: No display Lower: N-phase current Example of changing phases (Three phase 4-wire system) Press , the current phase and the voltage phase switches over.PHASE Average current Power (total) Average voltage (interphase) Current phase 1 Power phase 1 Voltage phase 1N Current phase 2 Power phase 2 Voltage phase 2N Current phase 3 Power phase 3 Voltage phase 3N Current phase 3 Power phase 3 Voltage phase 31 Current phase 2 Power phase 2 Voltage phase 23 Current phase 1 Power phase 1 Voltage phase 12 Average current Power (total) Average voltage (between lines)»Bar Graph Display Three phase 4-wire system Items measured can be displayed on the bar graph. By displaying one item by a bar graph and other three items by digital numbers four elements can be displayed at once. • Bar graph explanation The or mark indicates that the measurement item is displayed on the bar graph. • Select bar graph Press the or button to select the measurement items to be displayed on the bar graph. (clockwise) (anticlockwise) (Upper) VAVG(LN) VAVG(LL) AAVG ∑W (Middle) (Lower) Hz ∑PF ∑var Example of bottom item displayed in the bar graph Example of power factor displayed in the bar graph »Maximum/Minimum Display Values »Reset Maximum/Minimum Values Press the button to change to the maximum and minimum values of the display screen. Press it again to return to the current value display screen. Press the button for 2s to reset the maximum/minimum values of the measurement items displayed. The maximum/minimum values will become the current values. Press the and buttons simultaneously for 2s to reset all maximum/minimum values. The maximum/minimum values will become the current values. MAX/MIN RESET RESET Example of switching between changing current value display and maximum/minimum value display screens Current value display screen Maximum/Minimum value display screen »Displaying Active energy/Reactive energy/Apparent energy * To display these screens, it is necessary to change the power used measurement settings using set-up menu 3. Active energy (Imported) Active energy (Exported)* Apparent energy Reactive energy (Imported,lag) Reactive energy (Imported,lead)* Reactive energy (Exported,lag)* Reactive energy (Exported,lead)* Change the unit (M, k, none) or increase the digits in the bottom display for power used/reactive power used/apparent power used/time-based power used to check the lower/higher-order digits. Push the and buttons simultaneously for 2s to switch between screens. Power used (receiving): Example of changing 012,345,678,901,234.567Wh »Reset Active energy/Reactive energy/Apparent energy Press the , and buttons simultaneously for 2s to reset all of the following together: active energy/reactive energy/apparent energy (this operation only works on the current value display screen). SET RESET PHASE Unit: M Bottom digits increased Unit: None Unit: k 22
- 24. Operating Instructions »Changing Upper/Lower Limits for Alarm Activation and Cancellation »During Alarm Generation Alarm condition: When a measured value exceeds the alarm value setting, the screen begins to flash and the alarm contact closes. Alarm cancelled: When the alarm is cancelled, the screen stops flashing and the alarm contact opens. »Alarm Cancel The alarm can be reset automatically or manually. The alarm recovery method varies according to the reset method setting. »Alarm delay Time Alarm reset method Measurement value ≥ Upper limit alarm value (or ≤ Lower limit alarm value) Measurement value Upper limit alarm value (or Lower limit alarm value) Alarm contact ScreenAutomatic (Auto) Manual (Hold) Screen Alarm contact Open RESET When measurement values exceed the upper/lower limit values that have been set, an alarm activates and the screen begins to blink. The blinking mark on the bar graph indicates the current upper/lower limit value settings. or will flash or will flash (Alarm activated) Closed Closed Constantly on Upper/Lower limit indicator Constantly on (Alarm on hold) Closed Open (Alarm cancelled) or will flash If the item that caused the alarm is displayed on the screen, the digital value, unit (A, V, W, var, PF, HZ, %, DM, THD) and phase (1, 2, 3, N) will be displayed as shown in the table below. If the item is not displayed on the screen, the screen will not flash. Digital value Flashing* On On Unit Flashing Flashing On Phase Flashing* Flashing* On Alarm activated Alarm on hold Alarm cancelled Alarm status * Only flashes if the phase that caused the alarm is being displayed. Automatic (Auto) Manual (Hold) RESET RESET RESET The alarm resets automatically when the measurement value returns to within the upper/lower limit set value. The alarm setting changes to “on hold” even after the measurement value becomes returns to within the upper/lower limit value setting. Once the value returns to within the upper/lower limit value set, perform the following alarm recovery operations. (Note: Alarm recovery operations cannot be carried out from the maximum/minimum value display screen or contact input screen.) To select item and cancel alarm When the item that caused the alarm is displayed, press the button to deactivate the alarm. For items with phases such as current and voltage, it is necessary to press the button for each phase to cancel the alarm. To cancel alarms for all items To cancel alarms for all items at once (batch), press the button for 2s when in operating mode. If an alarm delay time has been set, alarm notification begins only when the measurement value exceeds the upper/lower limit alarm value for a period longer than the alarm delay time. »Harmonic Display The harmonic effective value, distortion ratio and content ratio can be displayed. To do so, first set the harmonic display (set-up menu: 3.7). Example of total harmonic current display Example of 5th-deg harmonic voltage display Upper: Degree No. Middle: Distortion (content) ratio Lower: Effective value RMS Distortion (content) ratio RMS Distortion (content) ratio RMS Distortion (content) ratio Harmonic total 1st (fundamental) 3rd, 5th, 7th, 9th, 11th, 13th, 15th, 17th, 19th, 21st, 23rd, 25th, 27th, 29th and 31st N-phase harmonic current Harmonic voltageHarmonic current Degree »Changing the Harmonic Degree Display Press the or button to change the harmonic degree. Previous measurement screen Next measurement screen Harmonic current Current total phase 1 Current total phases 2, 3 Current 1st -degree phase 1 Current 1st -degree phases 2, 3 Current 31st -degree phase 1 Current 31st -degree phases 2, 3 Displayed in order: 3rd, 5th, 7th, 9th, 11th, 13th, 15th, 17th, 19th, 21st, 23rd, 25th, 27th, 29th PHASE N-phase harmonic current Current total phase N Current 1st -degree phase N Current 31st -degree phase N Displayed in order: 3rd, 5th, 7th, 9th, 11th, 13th, 15th, 17th, 19th, 21st, 23rd, 25th, 27th, 29th Harmonic voltage Voltage total phase 1N Voltage total phases 2N, 3N Voltage 1st -degree, phase 1N Voltage1st -degree,phases2N,3N Voltage 31st -degree, phase N Voltage31st -degree,phases2N,3N Displayed in order: 3rd, 5th, 7th, 9th, 11th, 13th, 15th, 17th, 19th, 21st, 23rd, 25th, 27th, 29th PHASE DISPLAY DISPLAY DISPLAY DISPLAY Alarm reset method Cancellation method 23
- 25. ■Display Pattern Contents The items set in display patterns and additional settings will be displayed as explained in the following table. »ME96SSHA-MB Screen Display (Three phase 4-wire) Display pattern (digital display) Screen set based on display pattern Additional screens (set in set-up menu Nos. 3, 7 and 8) No.1 No.2 No.3 No.4 No.5 No.6 No.7 No.8 No.9 No.10 No.11 No.12 No.13 No.14 No.15 No.16 No.17 No.18 No.19 No.20 No.21 No.22 No.23 No.24 No.25 No.26 No.27 No.28 Wh Wh exported varh varh Imported (lead) varh exported (lag) varh exported (lead) VAh Periodic active energy Wh1 Periodic active energy Wh2 Rolling demand (DW) Rolling demand (Dvar) Rolling demand (DVA) Harmonic current Harmonic current N-phase Harmonic voltage DI status DO status Operating time 1 Operating time 2 P01 Upper A A A A – – – – – Degree No. Degree No. Degree No. DI DO – – Middle W W PF – Periodic active energy Wh1 Periodic active energy Wh2 Peak value Peak value Peak value Distortion (content) ratio – Distortion (content) ratio DI No. DO No. hour1 hour2 Lower V PF V AN Rolling demand, active energy Rolling demand, reactive energy Rolling demand, apparent energy RMS RMS RMS Contact status Contact status Operating time Operating time P02 Upper A A A A – – Same as above Same as above Same as above Same as above Same as above Same as above Same as above Same as above Same as above Same as above Same as above Same as above Middle V W PF – Wh Wh exportedLower Wh Wh Wh AN P03 Upper A A A A A A Same as above Same as above Same as above Same as above Same as above Same as above Same as above Same as above Same as above Same as above Same as above Same as above Middle PF PF PF PF PF – Lower V W var VA Hz AN P04 Upper A A A A A A A – – – – – – – Same as above Same as above Same as above Same as above Same as above Same as above Same as above Same as above Same as above Same as above Same as above Same as above Middle V W var VA PF Hz – Wh Wh exported varh varh Imported (lead) varh exported (lag) varh exported (lead) VAh Lower Wh Wh varh VAh Wh Wh AN P05 Upper PF Hz VA Same as above Same as above Same as above Same as above Same as above Same as above Same as above Same as above Same as above Same as above Same as above Same as above Middle W W W Lower var var var P06 Upper A1 V1N A A Same as above Same as above Same as above Same as above Same as above Same as above Same as above Same as above Same as above Same as above Same as above Same as above Middle A2 V2N – – Lower A3 V3N V AN P07 Upper A A1 V1N A Same as above Same as above Same as above Same as above Same as above Same as above Same as above Same as above Same as above Same as above Same as above Same as above Middle V A2 V2N – Lower W A3 V3N AN P08 Upper A A A1 V1N A – Same as above Same as above Same as above Same as above Same as above Same as above Same as above Same as above Same as above Same as above Same as above Same as above Middle V W A2 V2N – Wh Wh exportedLower Wh Wh A3 V3N AN P09 Upper A A1 DA1 V1N A DA Same as above Same as above Same as above Same as above Same as above Same as above Same as above Same as above Same as above Same as above Same as above Same as above Middle DA A2 DA2 V2N – – Lower V A3 DA3 V3N AN DAN P10 Upper A A A1 DA1 V1N A DA Same as above Same as above Same as above Same as above Same as above Same as above Same as above Same as above Same as above Same as above Same as above Same as above Middle DA DA A2 DA2 V2N – – Lower V W A3 DA3 V3N AN DAN P11 Upper A A DA1 V1N A DA – – Same as above Same as above Same as above Same as above Same as above Same as above Same as above Same as above Same as above Same as above Same as above Same as above Middle DA V DA2 V2N – – Wh Wh exportedLower Wh Wh DA3 V3N AN DAN P12 Upper A A A DA W A DA – – Same as above Same as above Same as above Same as above Same as above Same as above Same as above Same as above Same as above Same as above Same as above Same as above Middle DA W V V V – – Wh Wh exportedLower Wh Wh Wh Wh Wh AN DAN P13 Upper A1 V1N W1 var1 VA1 PF1 V V A – – – – – – – Same as above Same as above Same as above Same as above Same as above Same as above Same as above Same as above Same as above Same as above Same as above Same as above Middle A2 V2N W2 var2 VA2 PF2 Hz Hz AN Wh Wh exported varh varh Imported (lead) varh exported (lag) varh exported (lead) VAh Lower A3 V3N W3 var3 VA3 PF3 Wh varh VAh P00 Upper Free Free Free Free – – – – – – – Same as above Same as above Same as above Same as above Same as above Same as above Same as above Same as above Same as above Same as above Same as above Same as above Middle Free Free Free Free Wh Wh exported varh varh Imported (lead) varh exported (lag) varh exported (lead) VAh Lower Free Free Free Free »ME96SSHA-MB Screen Display (Three phase 3-wire, Single phase 3-wire, Single phase 2-wire) Display pattern Screen set based on display pattern Additional screens (set in set-up menu Nos. 3, 7 and 8) No.1 No.2 No.3 No.4 No.5 No.6 No.7 No.8 No.9 No.10 No.11 No.12 No.13 No.14 No.15 No.16 No.17 No.18 No.19 No.20 No.21 No.22 No.23 No.24 Wh Wh exported varh varh Imported (lead) varh exported (lag) varh exported (lead) VAh Periodic active energy Wh1 Periodic active energy Wh2 Rolling demand (DW) Rolling demand (Dvar) Rolling demand (DVA) Harmonic current Harmonic voltage DI Status DO Status Operating time 1 Operating time 2 P01 Upper A A A – – – – – Degree No. Degree No. DI DO – – Middle W W PF Periodic active energy Wh1 Periodic active energy Wh2 Peak value Peak value Peak value Distortion (content)ratio Distortion (content)ratio DI No. DO No. hour1 hour2 Lower V PF V Rolling demand, active energy Rolling demand, reactive energy Rolling demand, apparent energy RMS RMS Contact status Contact status Operating time Operating time P02 Upper A A A – – Same as above Same as above Same as above Same as above Same as above Same as above Same as above Same as above Same as above Same as above Same as above Middle V W PF Wh Wh exportedLower Wh Wh Wh P03 Upper A A A A A Same as above Same as above Same as above Same as above Same as above Same as above Same as above Same as above Same as above Same as above Same as above Middle PF PF PF PF PF Lower V W var VA Hz P04 Upper A A A A A A – – – – – – – Same as above Same as above Same as above Same as above Same as above Same as above Same as above Same as above Same as above Same as above Same as above Middle V W var VA PF Hz Wh Wh exported varh varh Imported (lead) varh exported (lag) varh exported (lead) VAh Lower Wh Wh varh VAh Wh Wh P05 Upper PF Hz VA Same as above Same as above Same as above Same as above Same as above Same as above Same as above Same as above Same as above Same as above Same as above Middle W W W Lower var var var P06 Upper A1 V12 A Same as above Same as above Same as above Same as above Same as above Same as above Same as above Same as above Same as above Same as above Same as above Middle A2 V23 – Lower A3 V31 V P07 Upper A A1 V12 Same as above Same as above Same as above Same as above Same as above Same as above Same as above Same as above Same as above Same as above Same as above Middle V A2 V23 Lower W A3 V31 P08 Upper A A A1 V12 – – Same as above Same as above Same as above Same as above Same as above Same as above Same as above Same as above Same as above Same as above Same as above Middle V W A2 V23 Wh Wh exportedLower Wh Wh A3 V31 P09 Upper A A1 DA1 V12 Same as above Same as above Same as above Same as above Same as above Same as above Same as above Same as above Same as above Same as above Same as above Middle DA A2 DA2 V23 Lower V A3 DA3 V31 P10 Upper A A A1 DA1 V12 Same as above Same as above Same as above Same as above Same as above Same as above Same as above Same as above Same as above Same as above Same as above Middle DA DA A2 DA2 V23 Lower V W A3 DA3 V31 P11 Upper A A DA1 V12 – – Same as above Same as above Same as above Same as above Same as above Same as above Same as above Same as above Same as above Same as above Same as above Middle DA V DA2 V23 Wh Wh exportedLower Wh Wh DA3 V31 P12 Upper A A A DA W – – Same as above Same as above Same as above Same as above Same as above Same as above Same as above Same as above Same as above Same as above Same as above Middle DA W V V V Wh Wh exportedLower Wh Wh Wh Wh Wh P13 Upper A1 V12 W V V A – – – – – – – Same as above Same as above Same as above Same as above Same as above Same as above Same as above Same as above Same as above Same as above Same as above Middle A2 V23 var Hz Hz VA Wh Wh exported varh varh Imported (lead) varh exported (lag) varh exported (lead) VAh Lower A3 V31 PF Wh varh VAh P00 Upper Free Free Free Free – – – – – – – Same as above Same as above Same as above Same as above Same as above Same as above Same as above Same as above Same as above Same as above Same as above Middle Free Free Free Free Wh Wh exported varh varh Imported (lead) varh exported (lag) varh exported (lead) VAh Lower Free Free Free Free 24
- 26. Operating Instructions ■Display Pattern Contents The items set in display patterns and additional settings will be displayed as explained in the following table. »ME96SSRA-MB Screen Display (Three phase 4-wire) Display pattern (digital display) Screen set based on display pattern Additional screens (set in set-up menu Nos. 3, 7 and 8) No.1 No.2 No.3 No.4 No.5 No.6 No.7 No.8 No.9 No.10 No.11 No.12 No.13 No.14 No.15 No.16 No.17 No.18 No.19 No.20 No.21 No.22 No.23 No.24 No.25 No.26 No.27 No.28 Wh Wh exported varh varh Imported (lead) varh exported (lag) varh exported (lead) VAh Periodic active energy Wh1 Periodic active energy Wh2 Rolling demand (DW) Rolling demand (Dvar) Rolling demand (DVA) Harmonic current Harmonic current N-Phase Harmonic voltage DI Status DO Status Operating time 1 Operating time 2 P01 Upper A A A A – – – – – Degree No. Degree No. Degree No. DI DO – – Middle W W PF – Periodic active energy Wh1 Periodic active energy Wh2 Peak value Peak value Peak value Distortion (content) ratio – Distortion (content) ratio DI No. DO No. hour1 hour2 Lower V PF V AN Rolling demand, active energy Rolling demand, reactive energy Rolling demand, apparent energy RMS RMS RMS Contact status Contact status Operating time Operating time P02 Upper A A A A – – Same as above Same as above Same as above Same as above Same as above Same as above Same as above Same as above Same as above Same as above Same as above Same as above Middle V W PF – Wh Wh exportedLower Wh Wh Wh AN P03 Upper A A A A A A Same as above Same as above Same as above Same as above Same as above Same as above Same as above Same as above Same as above Same as above Same as above Same as above Middle PF PF PF PF PF – Lower V W var VA Hz AN P04 Upper A A A A A A A – – – – – – – Same as above Same as above Same as above Same as above Same as above Same as above Same as above Same as above Same as above Same as above Same as above Same as above Middle V W var VA PF Hz – Wh Wh exported varh varh Imported (lead) varh exported (lag) varh exported (lead) VAh Lower Wh Wh varh VAh Wh Wh AN P05 Upper PF Hz VA Same as above Same as above Same as above Same as above Same as above Same as above Same as above Same as above Same as above Same as above Same as above Same as above Middle W W W Lower var var var P06 Upper A1 V1N A A Same as above Same as above Same as above Same as above Same as above Same as above Same as above Same as above Same as above Same as above Same as above Same as above Middle A2 V2N – – Lower A3 V3N V AN P07 Upper A A1 V1N A Same as above Same as above Same as above Same as above Same as above Same as above Same as above Same as above Same as above Same as above Same as above Same as above Middle V A2 V2N – Lower W A3 V3N AN P08 Upper A A A1 V1N A – – Same as above Same as above Same as above Same as above Same as above Same as above Same as above Same as above Same as above Same as above Same as above Same as above Middle V W A2 V2N – Wh Wh exportedLower Wh Wh A3 V3N AN P09 Upper A A1 DA1 V1N A DA Same as above Same as above Same as above Same as above Same as above Same as above Same as above Same as above Same as above Same as above Same as above Same as above Middle DA A2 DA2 V2N – – Lower V A3 DA3 V3N AN DAN P10 Upper A A A1 DA1 V1N A DA Same as above Same as above Same as above Same as above Same as above Same as above Same as above Same as above Same as above Same as above Same as above Same as above Middle DA DA A2 DA2 V2N – – Lower V W A3 DA3 V3N AN DAN P11 Upper A A DA1 V1N A DA – – Same as above Same as above Same as above Same as above Same as above Same as above Same as above Same as above Same as above Same as above Same as above Same as above Middle DA V DA2 V2N – – Wh Wh exportedLower Wh Wh DA3 V3N AN DAN P12 Upper A A A DA W A DA – – Same as above Same as above Same as above Same as above Same as above Same as above Same as above Same as above Same as above Same as above Same as above Same as above Middle DA W V V V – – Wh Wh exportedLower Wh Wh Wh Wh Wh AN DAN P13 Upper A1 V1N W1 var1 VA1 PF1 V V A – – – – – – – Same as above Same as above Same as above Same as above Same as above Same as above Same as above Same as above Same as above Same as above Same as above Same as above Middle A2 V2N W2 var2 VA2 PF2 Hz Hz AN Wh Wh exported varh varh Imported (lead) varh exported (lag) varh exported (lead) VAh Lower A3 V3N W3 var3 VA3 PF3 Wh varh VAh P00 Upper Free Free Free Free – – – – – – – Same as above Same as above Same as above Same as above Same as above Same as above Same as above Same as above Same as above Same as above Same as above Same as above Middle Free Free Free Free Wh Wh exported varh varh Imported (lead) varh exported (lag) varh exported (lead) VAh Lower Free Free Free Free »ME96SSRA-MB Screen Display (Three phase 3-wire, Single phase 3-wire, Single phase 2-wire) Display pattern Screen set based on display pattern Additional screens (set in set-up menu Nos. 3, 7 and 8) No.1 No.2 No.3 No.4 No.5 No.6 No.7 No.8 No.9 No.10 No.11 No.12 No.13 No.14 No.15 No.16 No.17 No.18 No.19 No.20 No.21 No.22 No.23 No.24 Wh Wh exported varh varh Imported (lead) varh exported (lag) varh exported (lead) VAh Periodic active energy Wh1 Periodic active energy Wh2 Rolling demand (DW) Rolling demand (Dvar) Rolling demand (DVA) Harmonic current Harmonic voltage DI Status DO Status Operating time 1 Operating time 2 P01 Upper A A A – – – – – Degree No. Degree No. DI DO – – Middle W W PF Periodic active energy Wh1 Periodic active energy Wh2 Peak value Peak value Peak value Distortion (content) ratio Distortion (content) ratio DI No. DO No. hour1 hour2 Lower V PF V Rolling demand, active energy Rolling demand, reactive energy Rolling demand, apparent energy RMS RMS Contact status Contact status Operating time Operating time P02 Upper A A A – – Same as above Same as above Same as above Same as above Same as above Same as above Same as above Same as above Same as above Same as above Same as above Middle V W PF Wh Wh exportedLower Wh Wh Wh P03 Upper A A A A A Same as above Same as above Same as above Same as above Same as above Same as above Same as above Same as above Same as above Same as above Same as above Middle PF PF PF PF PF Lower V W var VA Hz P04 Upper A A A A A A – – – – – – – Same as above Same as above Same as above Same as above Same as above Same as above Same as above Same as above Same as above Same as above Same as above Middle V W var VA PF Hz Wh Wh exported varh varh Imported (lead) varh exported (lag) varh exported (lead) VAh Lower Wh Wh varh VAh Wh Wh P05 Upper PF Hz VA Same as above Same as above Same as above Same as above Same as above Same as above Same as above Same as above Same as above Same as above Same as above Middle W W W Lower var var var P06 Upper A1 V12 A Same as above Same as above Same as above Same as above Same as above Same as above Same as above Same as above Same as above Same as above Same as above Middle A2 V23 – Lower A3 V31 V P07 Upper A A1 V12 Same as above Same as above Same as above Same as above Same as above Same as above Same as above Same as above Same as above Same as above Same as above Middle V A2 V23 Lower W A3 V31 P08 Upper A A A1 V12 – – Same as above Same as above Same as above Same as above Same as above Same as above Same as above Same as above Same as above Same as above Same as above Middle V W A2 V23 Wh Wh exportedLower Wh Wh A3 V31 P09 Upper A A1 DA1 V12 Same as above Same as above Same as above Same as above Same as above Same as above Same as above Same as above Same as above Same as above Same as above Middle DA A2 DA2 V23 Lower V A3 DA3 V31 P10 Upper A A A1 DA1 V12 Same as above Same as above Same as above Same as above Same as above Same as above Same as above Same as above Same as above Same as above Same as above Middle DA DA A2 DA2 V23 Lower V W A3 DA3 V31 P11 Upper A A DA1 V12 – – Same as above Same as above Same as above Same as above Same as above Same as above Same as above Same as above Same as above Same as above Same as above Middle DA V DA2 V23 Wh Wh exportedLower Wh Wh DA3 V31 P12 Upper A A A DA W – – Same as above Same as above Same as above Same as above Same as above Same as above Same as above Same as above Same as above Same as above Same as above Middle DA W V V V Wh Wh exportedLower Wh Wh Wh Wh Wh P13 Upper A1 V12 W V V A – – – – – – – Same as above Same as above Same as above Same as above Same as above Same as above Same as above Same as above Same as above Same as above Same as above Middle A2 V23 var Hz Hz VA Wh Wh exported varh varh Imported (lead) varh exported (lag) varh exported (lead) VAh Lower A3 V31 PF Wh varh VAh P00 Upper Free Free Free Free – – – – – – – Same as above Same as above Same as above Same as above Same as above Same as above Same as above Same as above Same as above Same as above Same as above Middle Free Free Free Free Wh Wh exported varh varh Imported (lead) varh exported (lag) varh exported (lead) VAh Lower Free Free Free Free 25
- 27. »ME96SSEA-MB Screen Display (Three phase 4-wire) Display pattern (digital display) Screen set based on display pattern Additional screens (set in set-up menu Nos.3 and 8) No.1 No.2 No.3 No.4 No.5 No.6 No.7 No.8 No.9 No.10 No.11 No.12 No.13 Wh Harmonic current Harmonic current N-phase Harmonic voltage Operating time 1 Operating time 2 P01 Upper A A A A Total Total Total – – Middle W W PF – Total distortion ratio – Distortion (content) ratio hour1 hour2 Lower V PF V AN Total RMS Total RMS Total RMS Operating time Operating time P02 Upper A A A A A – Same as above Same as above Same as above Same as above Same as above Middle V W PF – Hz Wh Lower Wh Wh Wh AN Wh P03 Upper A1 V1N A A Same as above Same as above Same as above Same as above Same as above Middle A2 V2N – – Lower A3 V3N V AN P04 Upper A A1 V1N A Same as above Same as above Same as above Same as above Same as above Middle V A2 V2N – Lower W A3 V3N AN P05 Upper A A A1 V1N A – Same as above Same as above Same as above Same as above Same as above Middle V W A2 V2N – Wh Lower Wh Wh A3 V3N AN P06 Upper A A1 DA1 V1N A DA Same as above Same as above Same as above Same as above Same as above Middle DA A2 DA2 V2N – – Lower V A3 DA3 V3N AN DAN P07 Upper A A A1 DA1 V1N A DA Same as above Same as above Same as above Same as above Same as above Middle DA DA A2 DA2 V2N – – Lower V W A3 DA3 V3N AN DAN P08 Upper A A DA1 V1N A DA – Same as above Same as above Same as above Same as above Same as above Middle DA V DA2 V2N – – Wh Lower Wh Wh DA3 V3N AN DAN P09 Upper A A A DA W A DA – Same as above Same as above Same as above Same as above Same as above Middle DA W V V V – – Wh Lower Wh Wh Wh Wh Wh AN DAN P00 Upper Free Free Free Free – Same as above Same as above Same as above Same as above Same as above Middle Free Free Free Free Wh Lower Free Free Free Free »ME96SSEA-MB Screen Display (Three phase 3-wire, Single phase 3-wire, Single phase 2-wire) Display pattern Screen set based on display pattern Additional screens (set in set-up menu Nos.3 and 8) No.1 No.2 No.3 No.4 No.5 No.6 No.7 No.8 No.9 No.10 Wh Imported Harmonic current Harmonic voltage Operating time 1 Operating time 2 P01 Upper A A A Total Total – – Middle W W PF Total distortion ratio Total distortion ratio hour1 hour2 Lower V PF V Total RMS Total RMS Operating time Operating time P02 Upper A A A A – Same as above Same as above Same as above Same as above Middle V W PF Hz Wh Lower Wh Wh Wh Wh P03 Upper A1 V12 A Same as above Same as above Same as above Same as above Middle A2 V23 – Lower A3 V31 V P04 Upper A A1 V12 Same as above Same as above Same as above Same as above Middle V A2 V23 Lower W A3 V31 P05 Upper A A A1 V12 – Same as above Same as above Same as above Same as above Middle V W A2 V23 Wh Lower Wh Wh A3 V31 P06 Upper A A1 DA1 V12 – Same as above Same as above Same as above Same as above Middle DA A2 DA2 V23 Wh Lower V A3 DA3 V31 P07 Upper A A A1 DA1 V12 – Same as above Same as above Same as above Same as above Middle DA DA A2 DA2 V23 Wh Lower V W A3 DA3 V31 P08 Upper A A DA1 V12 – Same as above Same as above Same as above Same as above Middle DA V DA2 V23 Wh Lower Wh Wh DA3 V31 P09 Upper A A A DA W – Same as above Same as above Same as above Same as above Middle DA W V V V Wh Lower Wh Wh Wh Wh Wh P00 Upper Free Free Free Free – Same as above Same as above Same as above Same as above Middle Free Free Free Free Wh Lower Free Free Free Free »Phase/Wire Displays The phase/wire system will be displayed as shown in the following table and is common for all models. Phase/Wire settings Top phase display 1P2W 1P3W(1N2) 1P3W(1N3) 3P3W current 1 None 1 1 1 2 None N N 2 3 None 2 3 3 Voltage 12 None 1N 1N 12 23 None 2N 3N 23 31 None 12 13 31 26
- 28. For attachment of the basic device into the panel hole, attach according to the following procedure. qThe attachment lug is installed in two holes of the top and bottom of the basic device. wTighten the screws of the lug, and fix onto the panel. External Dimensions/Installation/Connections Dimensions Optional Plug-in Module : ME-4210-SS96, ME-0040C-SS96, ME-0052-SS96 Optional Plug-in Module : ME-0000BU-SS96 Optional Plug-in Module : ME-0000MT-SS96 Mounting 1 Dimension of panel 2 View Angle 3 Attachment 4 Installing Optional Plug-in Module The contrast of the display changes at view angle. Mount it at the position that is easy to see. Panel hole dimensions are as shown in the following figure. It can be attached to a panel with thickness of 1.6 to 4.0mm. When installing the optional plug-in module onto the basic device, install according to the following procedure. qRemove the optional cover. Fit the protruding part of the optional unit into the slot in the main unit. Viewing angle 60° 10° 60° 60° (overhead view)(side view) Main unit mounting screws: M3 92+0.5 0 92 +0.5 0 wAttach the optional unit to the main unit. 25.2 17.1 75.8 61.3 46.8 81.2 88.8 25.2 17.1 88.8 81.2 61.3 75.8 88.8 25.2 17.1 81.2 61.3 75.8 Note To prevent damage to the panel and screws, do not fasten screws too tightly. Recommended torque for these products: 0.3~0.5N·m (approx. half of standard torque) Also, please tighten the upper and lower screws at the same time. Terminal screw M3 95.8 95.8 91.6 91.6 20.790.2 (110.9) Terminal screw M3 95.8 95.8 91.6 91.6 20.790.2 (110.9) ME96SSHA-MB, ME96SSRA-MB ME96SSEA-MB 27
- 29. Wiring 1 Applicable Cable Size The table on the right describes the applicable wire size. Product main body (auxiliary power supply, voltage input, current input and MODBUS® RTU communication terminals) Optional unit terminal (ME-0052-SS96, ME-0040C-SS96, ME-4210-SS96) Part Screw type Screwless Wire specifications Tightening torque 2 Wiring ‡Optional Plug-in Module Terminal 3 Confirmations After wiring, make sure the following: There is no misitake in wiring All wiring is connected ‡Optional Plug-in Module Terminal LeverWire insertion hole Wiring Diagrams Three phase 4-wire system: Direct input qAuxiliary power supply: 100-240VAC or VDC wFuse: 0.5A eWhen the MODBUS® RTU unit at the destination does not have an SG terminal, it is unnecessary to connect this line. *1 For low-voltage circuits, secondary-side grounding of instrument-use voltage/current transformers is not required. qAuxiliary power supply: 100-240VAC or VDC wFuse: 0.5A eWhen the MODBUS® RTU unit at the destination does not have an SG terminal, it is unnecessary to connect this line. *1 For low-voltage circuits, secondary-side grounding of instrument-use voltage/current transformers is not required. qRemove the wire casing at the end of the wire and solder to the rod terminal. wWith the lever pushed in, insert the wire and then release the lever to connect. • Use of crimp-style terminals: AWG26 to 14 (2 wires can be connected.) Applicable crimp-style terminal: OD of 6 mm or less, for screw M3 Three phase 4-wire system: With VT Three phase 3-wire system: Direct input, 2CT qAuxiliary power supply: 100-240VAC or VDC wFuse: 0.5A eWhen the MODBUS® RTU unit at the destination does not have an SG terminal, it is unnecessary to connect this line. *1 For low-voltage circuits, secondary-side grounding of instrument-use voltage/current transformers is not required. *2 Connection to NC terminal is prohibited. qAuxiliary power supply: 100-240VAC or VDC wFuse: 0.5A eWhen the MODBUS® RTU unit at the destination does not have an SG terminal, it is unnecessary to connect this line. *1 For low-voltage circuits, secondary-side grounding of instrument-use voltage/current transformers is not required. *2 Connection to NC terminal is prohibited. Three phase 3-wire system: With VT, 3CT 0.6 to 0.8 N·mM3 • Single wire and stranded wire: AWG24 to 14 (Rod terminal can be used together with stranded wire.) Wire stripping length: 10 to 11 mm *1: To conform to UL Standard, use in accordance with the following requirements. • Single wire and stranded wire: AWG24 to 18 •Use of a bar terminal is not allowed. *2: When using a bar terminal for inserting two wires, select a terminal whose insertion part into the terminal block is 12 to 13 mm long. SG MODBUS® RTU Communication T/R+ T/R− MA MB SLD Ter k K L C2 321 321 Load 0 321 321 0 (+) (−) (+) (−) +C1 C1 +C2 +C3 C3 P1 P2 P3 PN SG T/R+ T/R− MA MB SLD Ter C2 +C1 C1 +C2 +C3 C3 P1 P2 P3 PN SG T/R+ T/R− MA MB SLD Ter C2 +C1 C1 +C2 +C3 C3 P1 P2 P3 K L l k l K L k l MODBUS® RTU Communication Protective Earthing MODBUS® RTU Communication u v u v u v U V U V U V k K L Load K L l k l K L k l (−) Protective Earthing MODBUS® RTU Communication k K L Load l K L k l Protective Earthing MODBUS® RTU Communication SG T/R+ T/R− MA MB SLD Ter C2 +C1 C1 +C2 +C3 C3 P1 NC P3 P2 U V u v u v U V K L l k k K L Load l K L k l (−) Protective Earthing MODBUS® RTU Communication NC OD Installation position Protective sheet If installing the unit at the panel edge, choose an installation position where there is sufficient space for wiring work. Optional unit There is a protective sheet covering the LCD screen to prevent scratching during panel installation. Please remove the sheet before using the meter. When removing the sheet, the LCD may turn on due to the static electricity generated. This is not abnormal; the LCD will turn off after a short time. Turn the auxiliary power supply off before attaching the optional unit. If attached with the power on, the main unit will not recognize the optional unit. To remedy this, turn off/restart the auxiliary power supply or execute the “instrument restart” operation. Note w q e w q e (+) w q e (+) w q e 28
- 30. External Dimensions/Installation/Connections Wiring Diagrams (Continued) Optional Plug-in Module: ME-4210-SS96 CH1+ CH1– CH2+ CH2– CH3+ CH3– CH4+ CH4– C1A/A1 C1B/COM1 C2A/A2 C2B/COM2 DI+ DI– Analog output CH1 Analog output CH2 Analog output CH3 Analog output CH4 Pulse output1/Alarm output1 Pulse output2/Alarm output2 { { { { { { { Digital input Optional Plug-in Module: ME-0052-SS96 Optional Plug-in Module: ME-0000MT-SS96 Optional Plug-in Module: ME-0000BU-SS96 DI1+ DI1– DI2+ DI2– DI3+ DI3– DI4+ DI4– DI5+ DI5– DO1+ DO1– DO2+ DO2– DC24V DO1 DO2 { { Optional Plug-in Module: ME-0040C-SS96 DC24V Protective Bonding DI1-, DI2-, DI3-, DI4-, DI5-, are connected inside. CC-Link Communication CC-Link Communication DA DB DG SLD FG SLD DG DB DA DI1 DI2 DI3 DI4 DI COM Single phase 3-wire system Single phase 2-wire system: With VT qAuxiliary power supply: 100-240VAC or VDC wFuse: 0.5A eWhen the MODBUS® RTU unit at the destination does not have an SG terminal, it is unnecessary to connect this line. *1 For low-voltage circuits, secondary-side grounding of instrument-use voltage/current transformers is not required. *2 Connection to NC terminal is prohibited. SD CARD Protective Earthing k K L Load l K L k l U V u v k K L Load l (−) MODBUS® RTU Communication Protective Earthing Protective Earthing ETHERNET qAuxiliary power supply: 100-240VAC or VDC wFuse: 0.5A eWhen the MODBUS® RTU unit at the destination does not have an SG terminal, it is unnecessary to connect this line. *1 For low-voltage circuits, secondary-side grounding of instrument-use voltage/current transformers is not required. *2 Connection to NC terminal is prohibited. 201 21 (+) (−) MODBUS® RTU Communication Protective Earthing MODBUS® RTU Communication SG T/R+ T/R− MA MB SLD Ter C2 +C1 C1 +C2 +C3 C3 P1 P2 P3 PN SG T/R+ T/R− MA MB SLD Ter C2 +C1 C1 +C2 +C3 C3 P1 P2 P3 PN w q e (+) w q e Note 1. The voltage input terminal will vary depending on if it is a 3-phase, 3-wire system or otherwise. 2. VT/CT polarity errors will cause incorrect measurement. 3. Always use the grounding terminal ( ) in a grounded state. Perform grounding with a grounding resistance of 100Ω or less. Insufficient grounding may cause erroneous operation. 4. Use shielded twisted-pair cables for transmission signal lines. 5. Use terminal resistance (120Ω) for devices at both ends of the MODBUS® RTU communication transmission line. These meters can be terminated at 120Ω by short-circuiting the “T-” and “Ter” terminals. 6. Use the thickest possible grounding wire to ensure low impedance. 7. MODBUS® RTU transmission signal cables must not be in close proximity or bundled with high-voltage cables. SG T/R+ T/R− MA MB SLD Ter C2 +C1 C1 +C2 +C3 C3 P1 P2 P3 PN SG T/R+ T/R− MA MB SLD Ter C2 +C1 C1 +C2 +C3 C3 P1 P2 P3 PN 29
- 31. Wiring Diagrams (Continued) Fig. 3. Three phase 3-wire (star)Fig. 2. Three phase 3-wire (delta)Fig. 1. Three phase 4-wire (star) Fig. 6. Single phase 2-wire (star)Fig. 4. Single phase 3-wire Fig. 5. Single phase 2-wire (delta) Condition Distance Power lines under 600V/600A Other power lines More than 30cm More than 60cm 1. Pulse output, alarm output, and contact input/output cables must not be in close proximity or bundled with power cables or high-voltage cables. When laid parallel, separate by the distance shown in the following table. 2. Analog output cables must not be in close proximity or bundled with other power cables or input cables (e.g., VT, CT, auxiliary power supply). In addition, to prevent noise, surge and induction, use shielded cables or twisted-pair cables. Make sure that cables are as short as possible. 3. There is no insulation between the MODBUS® RTU communication portion and the optional module ME-4210-SS96, ME-0040C-SS96 or ME-0000MT-SS96. 4. Use only designated cables when connecting the CC-Link (see communication specifications). CC-Link dedicated cables cannot be used at the same time as CC-Link dedicated high-performance cables. Normal data transmission cannot be guaranteed if used at the same time. The terminal resistance value varies depending on the type of dedicated cable. 5. For cables connecting the CC-Link, connect shielded cables to “SLD” and ground “FG” cables. “SLD” and “FG” cables are connected inside the unit. 6. CC-Link transmission lines are small signal circuits: separate from strong electrical circuits by a distance of 10cm or more, or 30cm or more if laid in parallel over a long distance. Ground the terminal before use. 7. For CC-Link transmission, always use dedicated lines and comply with conditions for total wiring distance, distance between stations and terminal resistance values according to the communication speed. Not doing so may prevent normal communica- tion (see the CC-Link Master Unit Operations Manual for information on dedicated lines and wiring conditions). 8. The terminal resistance supplied with the CC-Link Master Unit must always be used for the units at both ends of the CC-Link transmission line. If the meter is at the end of the CC-Link transmission line, connect it between the DA and DB terminals. 9. Communication errors may occur under the influence of high-frequency noise from other devices in the installation environ- ment during high-speed communication (100 Mbps) via 100BASE-TX connection of MODBUS® TCP. Measures to be taken when the network system is configured to avoid the influence of high-frequency noise are shown below. (1) Wiring connection • When laying a twisted pair cable, do not bundle the cable together with any main circuit line or power line or lay it close to such a line. • Keep the twisted pair cables in the duct. (2) Communication method • Increase the number of communication retries as needed. • Replace the hub to be used for connection with that for 10 Mbps, and communicate at a data transmission speed of 10 Mbps. 10. Do not connect any terminal or RJ45 connector in the live state. 11. Do not insert or remove the SD memory card in the live state. Note Phase/Wire Three phase 4-wire Three phase 3-wire Single phase 3-wire Single phase 2-wire* Connection Star Delta Star − Delta Star Figure Figure 1 Figure 2 Figure 3 Figure 4 Figure 5 Figure 6 Max. 277VAC (L-N)/480VAC(L-L) Max. 220VAC (L-L) Max. 440VAC (L-L) Max. 220VAC (L-N)/440VAC(L-L) Max. 220VAC (L-L) Max. 440VAC (L-L) Rated voltage * The circuit derived from the three-phase 3-wire delta connection and the single-phase 2-wire transformer circuit have the maximum rating of 220 VAC. The circuits derived from the three-phase 4-wire and three-phase 3-wire star connections and single-phase 3-wire connection have the maximum rating of 440 VAC. Rated voltage for each phase/wire system 30
- 32. Related Products ‡EcoWebServerIII ‡ME110SS Mitsubishi Electric Energy-saving Data Collection Server From visualization to publication of energy data Simple Set-up When using the set-up software supplied, power management meters connected to CC-Link and measurement data can be set by mouse and keyboard operations. Display Measurement Data as Graphs on a Web Browser The main unit has a built-in web server that allows anyone, anywhere to understand the amount of energy being used in real time via computer without requiring additional software, thereby supporting early detection of energy waste. Automatic Transmission of Data Collected, Mail Notifications and Contact Output Users are notified of changes in energy, facilities, etc. via e-mail and alarms. Energy management targets and status monitoring of entire factories and buildings help ensure that problems onsite are detected without fail. PLC data can also be sent to EcoWebServerIII by Ethernet. Data of various sites can be browsed in the head office by utilizing the internal network. Common-use Models Two phase wiring system (Three phase 3-wire and Three phase 4-wire systems) were required previously, but user needs can now be met with a single unit. Enhanced Visibility Wide-angle-view LCD with top and bottom tiers integrated for total freedom in installation. Crystal-clear display makes text even easier to read when viewed from the front. A high-brightness backlight is provided, and its brightness can be adjusted in five stages. Operating Time, CO2 Conversion, Alarm Display Functions Functions that enable load operating time measurement, conversion to CO2 emissions and backlight blinking at the time of an alarm are incorporated. Mitsubishi Electronic Indicating Instrument Super-S Series Highly functional and easy-to-use series supporting the realization of various instrument monitoring systems and energy-saving measurement monitoring systems Collection, storage, visualization, publication on the web, analysis and monitoring All can be realized by one server. 31