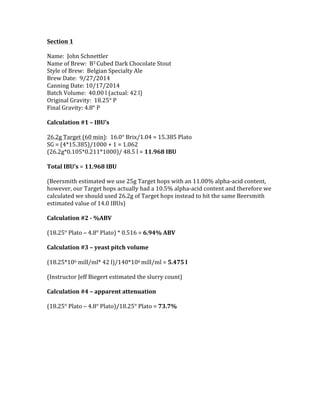
SlideShare a Scribd company logo
1 of 14
Download to read offline
Section	
  1	


Name:	
  	
  John	
  Schnettler	
  
Name	
  of	
  Brew:	
  	
  B3	
  Cubed	
  Dark	
  Chocolate	
  Stout	
  
Style	
  of	
  Brew:	
  	
  Belgian	
  Specialty	
  Ale	
  
Brew	
  Date:	
  	
  9/27/2014	
  
Canning	
  Date:	
  10/17/2014	
  
Batch	
  Volume:	
  	
  40.00	
  l	
  (actual:	
  42	
  l)	
  
Original	
  Gravity:	
  	
  18.25°	
  P	
  
Final	
  Gravity:	
  4.8°	
  P	


Calculation	
  #1	
  –	
  IBU’s	


26.2g	
  Target	
  (60	
  min):	
  	
  16.0°	
  Brix/1.04	
  =	
  15.385	
  Plato	
  
SG	
  =	
  (4*15.385)/1000	
  +	
  1	
  =	
  1.062	
  
(26.2g*0.105*0.211*1000)/	
  48.5	
  l	
  =	
  11.968	
  IBU	


Total	
  IBU’s	
  =	
  11.968	
  IBU	


(Beersmith	
  estimated	
  we	
  use	
  25g	
  Target	
  hops	
  with	
  an	
  11.00%	
  alpha-­‐acid	
  content,	
  
however,	
  our	
  Target	
  hops	
  actually	
  had	
  a	
  10.5%	
  alpha-­‐acid	
  content	
  and	
  therefore	
  we	
  
calculated	
  we	
  should	
  used	
  26.2g	
  of	
  Target	
  hops	
  instead	
  to	
  hit	
  the	
  same	
  Beersmith	
  
estimated	
  value	
  of	
  14.0	
  IBUs)	


Calculation	
  #2	
  -­‐	
  %ABV	


(18.25°	
  Plato	
  –	
  4.8°	
  Plato)	
  *	
  0.516	
  =	
  6.94%	
  ABV	


Calculation	
  #3	
  –	
  yeast	
  pitch	
  volume	


(18.25*106	
  mill/ml*	
  42	
  l)/140*106	
  mill/ml	
  =	
  5.475	
  l	


(Instructor	
  Jeff	
  Biegert	
  estimated	
  the	
  slurry	
  count)	


Calculation	
  #4	
  –	
  apparent	
  attenuation	


(18.25°	
  Plato	
  –	
  4.8°	
  Plato)/18.25°	
  Plato	
  =	
  73.7%	


Section	
  2	


Material	
  Bill	


Water	
  Additives:	


Ingredient	
   Amount	
   Step	
   Time	
  
Calcium	
  Chloride	
   8.00	
  g	
   Mash	
  	
   60	
  minutes	


Grist	
  Bill:	


Malt	
   Amount	
   Color	
  (European	
  Brewing	
  
Convention)	
  	
  
Pale	
  Malt	
  (2	
  Row)	
  US	
   11.40	
  kg	
   3.9	
  EBC	
  
Roasted	
  Barley	
   0.76	
  kg	
   591.0	
  EBC	
  
Chocolate	
  Malt	
   0.51	
  kg	
   689.5	
  EBC	
  
Caramel/Crystal	
  Malt	
  –	
  
60L	
  
0.34	
  kg	
   157.6	
  EBC	


Boil	
  Ingredients:	


Ingredient	
   Amount	
   Time	
  
Target	
  (11.00%	
  alpha-­‐acid):	
  
Hop	
  addition	
  
26.2	
  g	
   60	
  minutes	
  
Oat	
  Sweet:	
  
Flavor/Fermentable	
  Sugars	
  
0.75	
  kg	
   30	
  minutes	
  
Cocoa	
  Nibs:	
  Flavor	
   175.00	
  g	
   10	
  minutes	
  
Whirlfloc:	
  Clarification	
   1	
  Tablet	
   10	
  minutes	
  
Yeast	
  Nutrient	
  (StartUp)	
   4.0	
  g	
   10	
  minutes	


Yeast:	
  	
  Abbey	
  IV	
  Ale	
  Yeast	
  (White	
  Labs	
  #WLP540)	
  
Other:	
  	
  Blackberries	
  (Added	
  to	
  Secondary	
  in	
  steep	
  bag	
  10/1/14):	
  510	
  g	
  (18	
  ounces)	


  Blueberries	
  (Added	
  to	
  Secondary	
  in	
  steep	
  bag	
  10/1/14):	
  510	
  g	
  (18	
  ounces)	


Equipment:	


A.	
  Gifford	
  Sabco	
  BrewMagic	
  Brewing	
  System:	
  
-­‐Hot	
  Liquor	
  Tank	
  (1/2	
  barrel	
  keg)	
  
-­‐Mash	
  Tun	
  (1/2	
  barrel	
  keg)	
  
-­‐Brew	
  Kettle	
  (`1/2	
  barrel	
  keg)	
  
-­‐Sabco	
  Pump	
  
-­‐Sabco	
  Frame	
  (V350MS	
  PLC,	
  USB	
  Port,	
  RTD	
  Sensor,	
  E-­‐Stop,	
  LP	
  Bottle	
  Rack,	
  3x	
  
Gas	
  Valves,	
  Locking	
  Front	
  Casters)	
  
B.	
  	
  Chill	
  Wizard	
  plate	
  chiller	
  
C.	
  	
  Chill	
  Wizard	
  pump	
  
D.	
  	
  Grain	
  mill	
  
E.	
  	
  Garden	
  hoses	
  
F.	
  	
  Food	
  grade	
  tri-­‐clamp	
  hoses	
  
G.	
  	
  Extension	
  cords	
  
H.	
  	
  Propane	
  tank	
  
I.	
  	
  	
  Oxygen	
  tank	
  with	
  tubing	
  and	
  filter	
  
J.	
  	
  	
  Metal	
  spoon	
  
K.	
  	
  Mash	
  thermometer	
  
L.	
  	
  Hot	
  gloves	
  
M.	
  Tool	
  bucket	
  
N.	
  	
  Iodophor	
  spray	
  bottle,	
  freshly	
  mixed	
  
O.	
  	
  Clean	
  rags	
  
P.	
  	
  Long	
  lighter	
  
Q.	
  	
  Box	
  of	
  extra	
  tri-­‐clamps	
  and	
  gaskets	
  
R.	
  	
  pH	
  meter	
  
S.	
  	
  Tub	
  for	
  spent	
  grain	
  
T.	
  	
  Kim-­‐wipes	
  
U.	
  	
  Refractometer	
  
V.	
  	
  Deionized	
  water	
  bottler	
  
W.	
  Hose	
  sprayer	
  nozzle	
  
X.	
  	
  	
  Slop	
  buckets	
  
Y.	
  	
  	
  PRONTO	
  cleaning	
  solution	


Procedure	


Pre-­‐Boil:	


9/26/2014	
  
1. We	
  measured	
  out	
  all	
  water	
  additives,	
  grains,	
  hops,	
  and	
  other	
  ingredients	
  
and	
  used	
  the	
  grain	
  mill	
  to	
  crush	
  all	
  grains	
  into	
  grist,	
  leaving	
  the	
  husk	
  still	
  
intact.	


-­‐US	
  pale	
  malt	
  (2-­‐row)	
  served	
  as	
  our	
  base	
  malt	
  and	
  primary	
  source	
  of	
  
fermentable	
  sugar.	
  	
  Roasted	
  barley	
  was	
  used	
  to	
  provide	
  a	
  small	
  amount	
  of	
  
fermentable	
  sugar,	
  contribute	
  roast	
  and	
  coffee	
  flavors,	
  and	
  lend	
  a	
  darker	
  
color.	
  	
  Chocolate	
  malt	
  was	
  also	
  used	
  in	
  order	
  to	
  provide	
  a	
  small	
  amount	
  of	
  
fermentable	
  sugar,	
  contribute	
  chocolate	
  and	
  nutty	
  flavors,	
  and	
  lend	
  a	
  
darker	
  color.	
  	
  Finally,	
  we	
  used	
  Caramel/Crystal	
  malt	
  (80L)	
  to	
  contribute	
  
body	
  and	
  color	
  to	
  the	
  beer	
  as	
  well	
  as	
  aid	
  in	
  head	
  retention.	
  	
  The	
  
culmination	
  of	
  these	
  darker	
  grains	
  helped	
  to	
  buffer	
  down	
  the	
  pH	
  towards	
  
an	
  optimal	
  mash	
  temperature.	
  	
  The	
  grains	
  we	
  utilized	
  had	
  already	
  been	
  
steeped,	
  germinated,	
  and	
  kilned	
  in	
  order	
  to	
  develop	
  and	
  preserve	
  
enzymes	
  for	
  the	
  mash	
  as	
  well	
  as	
  break	
  down	
  grain	
  cell	
  walls	
  in	
  order	
  to	
  
be	
  modified	
  for	
  an	
  effective	
  mash	
  and	
  fermentation.	
  	
  	
  In	
  addition,	
  the	
  
kilning	
  process	
  affects	
  the	
  color	
  and	
  flavor	
  of	
  the	
  grains.	
  	
  These	
  processes	
  
constitute	
  the	
  malting	
  of	
  the	
  grain.	
  
-­‐We	
  used	
  Target	
  hops	
  for	
  bittering	
  due	
  to	
  the	
  fact	
  they	
  have	
  a	
  high	
  
alpha-­‐acid	
  content	
  of	
  10.5%.	
  	
  Alpha	
  acids	
  are	
  a	
  soft	
  resin	
  found	
  in	
  hops	
  
that	
  add	
  bitterness	
  to	
  the	
  beer	
  when	
  isomerized	
  during	
  the	
  boil.	
  	
  
Isomerization	
  is	
  the	
  process	
  in	
  which	
  the	
  original	
  alpha-­‐acid	
  6-­‐carbon	
  
ring	
  becomes	
  a	
  5-­‐carbon	
  ring	
  under	
  high	
  temperatures	
  making	
  the	
  alpha	
  
acid	
  soluble	
  in	
  water	
  and	
  perceivably	
  bitter.	
  
-­‐Our	
  only	
  water	
  additive	
  for	
  this	
  beer	
  was	
  calcium	
  chloride,	
  which	
  was	
  
used	
  to	
  lower	
  the	
  pH	
  of	
  our	
  mash	
  and	
  enhance	
  the	
  body	
  and	
  fullness	
  of	
  
the	
  beer.	


  -­‐This	
  beer	
  used	
  a	
  variety	
  of	
  specialty	
  ingredients.	
  	
  For	
  example,	
  we	
  used	
  
oat	
  sweet	
  that	
  contributed	
  fermentable	
  sugars	
  and	
  was	
  done	
  
experimentally	
  to	
  observe	
  flavor.	
  	
  In	
  addition,	
  we	
  added	
  blueberries	
  and	
  
blackberries	
  for	
  flavoring	
  and	
  fermentable	
  sugars.	
  	
  Finally,	
  we	
  added	
  
Cocoa	
  nibs,	
  which	
  would	
  enhance	
  the	
  chocolate	
  character	
  of	
  our	
  stout.	
  
-­‐Grain	
  is	
  milled	
  in	
  order	
  to	
  reduce	
  and	
  control	
  the	
  size	
  of	
  the	
  grain	
  and	
  
break	
  up	
  the	
  endosperm	
  in	
  order	
  to	
  make	
  convertible	
  starches	
  more	
  
available	
  at	
  the	
  desired	
  extract	
  yield.	


9/27/2014	
  
1. The	
  teaching	
  assistants	
  cleaned	
  all	
  Sabco	
  brewing	
  system	
  equipment	
  and	
  
materials	
  thoroughly	
  using	
  Pronto	
  (0.5	
  cap	
  per	
  gallon	
  of	
  hot	
  water)	
  and	
  
rinse	
  with	
  hot	
  water.	


  -­‐Cleaning	
  is	
  vital	
  in	
  removing	
  soil	
  and	
  a	
  majority	
  of	
  existing	
  
microorganisms	
  from	
  the	
  equipment	
  that	
  can	
  cause	
  inactivation	
  of	
  
sanitizer	
  and	
  potential	
  contamination	
  of	
  the	
  final	
  product.	
  
2. The	
  teaching	
  assistants	
  sanitized	
  all	
  equipment	
  and	
  materials	
  thoroughly	
  
using	
  Iodophor	
  and	
  cold	
  water.	


  -­‐Iodophor	
  is	
  a	
  halogen	
  sanitizer	
  containing	
  surface-­‐active	
  agents	
  that	
  
inhibit	
  the	
  function	
  of	
  microbial	
  proteins	
  thus	
  removing	
  any	
  
microorganisms.	
  	
  Iodophor	
  does	
  not	
  require	
  rinsing	
  degrades	
  to	
  
flavorless,	
  odorless,	
  and	
  non-­‐toxic	
  compounds	
  which	
  volatize.	
  
3. We	
  started	
  by	
  heating	
  the	
  filled	
  hot	
  liquor	
  tank	
  for	
  our	
  sparge	
  volume	
  of	
  
32.3	
  l	
  and	
  also	
  heated	
  36.96	
  l	
  of	
  strike	
  water	
  in	
  the	
  mash	
  tun.	
  	
  In	
  addition,	
  
we	
  began	
  heating	
  water	
  in	
  the	
  kettle	
  to	
  be	
  used	
  in	
  sterilizing	
  the	
  plate	
  
chiller.	
  
4. Once	
  the	
  mash	
  tun	
  water	
  reached	
  72.5°C,	
  we	
  added	
  the	
  culmination	
  of	
  
our	
  pale,	
  chocolate,	
  and	
  crystal	
  malts	
  as	
  well	
  as	
  roasted	
  barley	
  to	
  the	
  
mash	
  tun	
  at	
  a	
  steady	
  rate	
  while	
  simultaneously	
  stirring	
  to	
  avoid	
  clumping	
  
of	
  grain,	
  which	
  can	
  decrease	
  the	
  efficiency	
  of	
  the	
  mash	
  in	
  converting	
  
starches	
  to	
  fermentable	
  sugars.	
  	
  	
  We	
  also	
  added	
  our	
  calcium	
  chloride	
  at	
  
the	
  beginning	
  of	
  the	
  mash.	


  -­‐The	
  roasted	
  barley	
  and	
  chocolate	
  malt	
  was	
  a	
  bit	
  too	
  fine	
  ground	
  and	
  
therefore	
  we	
  made	
  sure	
  to	
  look	
  out	
  for	
  a	
  stuck	
  mash.	


  -­‐We	
  utilized	
  a	
  downward	
  infusion	
  mash	
  consisting	
  of	
  an	
  insulated	
  mash	
  
tun	
  and	
  stainless	
  steel	
  false	
  bottom	
  allowing	
  for	
  effective	
  separation	
  of	
  
wort	
  from	
  grain	
  that	
  is	
  unstirred	
  and	
  facilitates	
  starch	
  conversion	
  at	
  a	
  
single	
  temperature.	


  -­‐The	
  mash-­‐in	
  occurred	
  at	
  9:05am	
  and	
  the	
  strike	
  water	
  brought	
  the	
  mash	
  
to	
  65.2°C	
  for	
  one	
  hour	
  which	
  we	
  closely	
  monitored.	
  	
  At	
  this	
  temperature,	
  
although	
  both	
  alpha	
  and	
  beta	
  amylase	
  enzymes	
  were	
  functioning,	
  beta-­‐
amylase	
  was	
  predominant	
  thus	
  creating	
  chemical	
  conditions	
  lending	
  to	
  a	
  
lower	
  extract	
  yield	
  but	
  higher	
  fermentability.	
  	
  This	
  higher	
  fermentability	
  
will	
  occur	
  based	
  on	
  beta-­‐amylase’s	
  creation	
  of	
  maltose	
  which	
  is	
  a	
  less	
  
complex	
  carbohydrate	
  and	
  thus	
  easier	
  to	
  break	
  down	
  during	
  
fermentation.	
  	
  This	
  lower	
  mash	
  temp	
  will	
  ultimately	
  contribute	
  to	
  a	
  drier	
  
beer.	


  -­‐We	
  took	
  a	
  pH	
  reading	
  during	
  the	
  mash	
  and	
  observed	
  a	
  pH	
  of	
  5.4,	
  a	
  great	
  
pH	
  for	
  amylase	
  to	
  effectively	
  function.	


  -­‐At	
  the	
  end	
  of	
  the	
  mash	
  the	
  temperature	
  had	
  dropped	
  to	
  61.4°	
  C,	
  which	
  
is	
  below	
  the	
  optimal	
  temperature	
  ranges	
  for	
  starch	
  conversion.	
  	
  Although	
  
conversion	
  typically	
  occurs	
  in	
  the	
  first	
  thirty	
  minutes	
  or	
  less	
  of	
  the	
  mash,	
  
it	
  wouldn’t	
  have	
  been	
  a	
  bad	
  idea	
  to	
  do	
  an	
  iodine	
  test	
  to	
  double	
  check	
  and	
  
make	
  sure	
  conversion	
  had	
  occurred.	
  
5.	
   While	
  we	
  allowed	
  conversion	
  to	
  occur	
  in	
  our	
  mash	
  tun,	
  we	
  began	
  
sterilizing	
  our	
  plate	
  chiller	
  in	
  preparation	
  for	
  post-­‐boil.	


  -­‐The	
  plate	
  chiller	
  was	
  sterilized	
  by	
  running	
  hot	
  water	
  that	
  had	
  been	
  
heated	
  in	
  the	
  boil	
  kettle	
  to	
  temperatures	
  above	
  82°C.	
  	
  This	
  removed	
  all	
  
residue	
  and	
  microorganisms	
  in	
  order	
  to	
  avoid	
  contaminating	
  our	
  wort	
  
during	
  cooling	
  after	
  the	
  boil.	
  
	
  6.	
  	
  We	
  started	
  our	
  vorlauf	
  at	
  9:57am	
  and	
  allowed	
  for	
  ten	
  minutes	
  of	
  
recirculation.	


  -­‐Vorlauf	
  is	
  the	
  German	
  word	
  for	
  “pre-­‐run”	
  and	
  is	
  utilized	
  in	
  brewing	
  to	
  
draw	
  off	
  and	
  recirculate	
  the	
  wort	
  throughout	
  the	
  mash	
  tun	
  without	
  
running	
  off	
  into	
  the	
  boil	
  kettle.	


  -­‐Vorlauf	
  is	
  important	
  in	
  clarifying	
  the	
  wort	
  being	
  drawn	
  out	
  of	
  the	
  mash	
  
tun	
  and	
  establishing	
  a	
  good	
  filtration	
  system	
  through	
  the	
  grain	
  bed.	
  	
  The	
  
first	
  runnings	
  will	
  appear	
  hazy	
  and	
  contain	
  some	
  milled	
  grain	
  particles	
  
but	
  will	
  eventually	
  clear	
  up.	
  	
  Due	
  to	
  our	
  potentially	
  too	
  fine	
  ground	
  
roasted	
  barley	
  and	
  chocolate	
  malts,	
  we	
  wanted	
  a	
  slow	
  vorlauf	
  in	
  order	
  to	
  
avoid	
  pulling	
  the	
  grain	
  bed	
  down	
  to	
  the	
  filter	
  and	
  clogging	
  the	
  false	
  
bottom.	
  	
  
7.	
  	
  After	
  clarifying	
  our	
  wort,	
  we	
  began	
  our	
  runoff	
  into	
  the	
  boil	
  kettle	
  at	
  
10:07am.	
  	
  At	
  10:15am	
  we	
  began	
  sparging	
  using	
  32.31	
  l	
  of	
  water	
  at	
  75.1°C.	
  	
  
During	
  the	
  sparge,	
  we	
  made	
  sure	
  to	
  adjust	
  the	
  sparge	
  pump	
  so	
  that	
  the	
  
liquid	
  level	
  was	
  about	
  2-­‐3	
  cm	
  above	
  the	
  grain	
  level	
  in	
  order	
  to	
  ensure	
  a	
  
steady	
  rinsing	
  of	
  the	
  grains.	
  	
  While	
  we	
  ran	
  off	
  into	
  the	
  kettle,	
  we	
  
simultaneously	
  heated	
  the	
  boil	
  kettle	
  and	
  held	
  at	
  a	
  temperature	
  just	
  
before	
  boiling	
  in	
  order	
  to	
  be	
  able	
  to	
  begin	
  boiling	
  quickly	
  after	
  finishing	
  
runoff.	


  -­‐The	
  technical	
  term	
  for	
  the	
  runoff	
  is	
  lautering,	
  where	
  wort	
  is	
  separated	
  
from	
  grains.	
  	
  Our	
  mash	
  tun	
  also	
  acted	
  as	
  a	
  lauter	
  tun	
  due	
  to	
  the	
  fact	
  that	
  it	
  
has	
  a	
  false	
  bottom	
  that	
  effectively	
  filters	
  the	
  wort	
  without	
  letting	
  the	
  
grain	
  drain	
  off	
  in	
  to	
  the	
  kettle.	


  -­‐We	
  sparged	
  in	
  order	
  to	
  give	
  the	
  grain	
  an	
  extra	
  rinse	
  to	
  drain	
  off	
  any	
  
residual	
  fermentable	
  sugars	
  on	
  the	
  grain	
  bed	
  into	
  our	
  boil	
  kettle.	
  	
  To	
  
avoid	
  extracting	
  tannins	
  from	
  the	
  grains,	
  we	
  sparged	
  using	
  water	
  at	
  a	
  
temperature	
  that	
  wasn’t	
  too	
  hot,	
  avoided	
  over	
  sparging,	
  and	
  avoided	
  
sparging	
  above	
  a	
  pH	
  of	
  5.8.	
  
	
   -­‐The	
  sparge	
  water	
  temperature	
  went	
  unchecked	
  for	
  some	
  time	
  and	
  we	
  
noticed	
  it	
  had	
  risen	
  to	
  85°C	
  so	
  we	
  stopped	
  sparging	
  at	
  10:19am	
  and	
  
started	
  again	
  at	
  10:21am	
  after	
  it	
  had	
  cooled.	
  
8.	
  	
  	
  We	
  finished	
  sparging	
  at	
  10:38am	
  and	
  ended	
  our	
  runoff	
  into	
  the	
  boil	
  kettle	
  
at	
  10:45am.	
  	
  Our	
  pre-­‐boil	
  volume	
  was	
  48.5	
  l	
  and	
  had	
  a	
  pre-­‐boil	
  gravity	
  
reading	
  of	
  16.0°	
  Brix	
  measured	
  using	
  a	
  refractometer.	


  -­‐Our	
  pH	
  just	
  prior	
  to	
  boiling	
  was	
  5.4,	
  indicating	
  we	
  had	
  a	
  good	
  acidity	
  
and	
  hadn’t	
  extracted	
  tannins	
  based	
  on	
  pH	
  during	
  the	
  sparge.	


  -­‐Our	
  actual	
  pre-­‐boil	
  volume	
  of	
  48.5	
  l	
  was	
  right	
  on	
  our	
  estimated	
  pre-­‐boil	
  
volume	
  of	
  49.12	
  l.	
  	
  Our	
  actual	
  pre-­‐boil	
  gravity	
  of	
  14.5°	
  Brix	
  was	
  quite	
  a	
  
way	
  off	
  from	
  our	
  estimated	
  pre-­‐boil	
  volume	
  of	
  16.172°	
  Plato	
  which	
  
converts	
  to	
  16.819°	
  Brix.	
  	
  Therefore,	
  we	
  decided	
  to	
  add	
  extra	
  time	
  to	
  our	
  
boil	
  before	
  	
  our	
  actual	
  60	
  minute	
  boil	
  in	
  order	
  to	
  concentrate	
  the	
  wort	
  
thus	
  lowering	
  the	
  gravity.	


  -­‐It	
  is	
  important	
  to	
  note	
  that	
  refractometers	
  are	
  fairly	
  inaccurate	
  when	
  
measuring	
  alcohol	
  and	
  typically	
  shouldn’t	
  be	
  used	
  for	
  beer.	
  	
  However,	
  we	
  
use	
  a	
  refractometer	
  anyway	
  to	
  obtain	
  a	
  rough	
  estimate	
  of	
  numerous	
  
gravity	
  measurements.	


  -­‐We	
  monitor	
  the	
  gravity	
  of	
  our	
  wort	
  throughout	
  the	
  brewing	
  process	
  
because	
  gravity	
  is	
  a	
  measurement	
  of	
  sugar	
  concentration	
  in	
  wort/beer,	
  
which	
  allows	
  us	
  to	
  know	
  the	
  fermentation	
  capacity	
  of	
  our	
  brew	
  and	
  how	
  
much	
  alcohol	
  will	
  ultimately	
  be	
  produced	
  during	
  fermentation.	
  
	
   -­‐We	
  also	
  made	
  the	
  decision	
  to	
  end	
  runoff	
  based	
  on	
  our	
  monitoring	
  of	
  the	
  
gravity	
  throughout	
  and	
  once	
  we	
  had	
  reached	
  our	
  estimated	
  pre-­‐boil	
  
gravity	
  we	
  ended	
  runoff.	


The	
  Boil:	


9/27/2014	
  (Same	
  day)	
  
1. We	
  began	
  our	
  boil	
  time	
  at	
  10:45am	
  after	
  achieving	
  a	
  rolling	
  boil.	
  	
  We	
  
boiled	
  until	
  11:32	
  am	
  in	
  order	
  to	
  concentrate	
  out	
  wort	
  to	
  what	
  we	
  
measured	
  as	
  16.0°	
  Brix	
  At	
  this	
  time	
  we	
  momentarily	
  shut	
  off	
  the	
  burner	
  
and	
  added	
  our	
  only	
  hop	
  addition,	
  26.2	
  g	
  of	
  Target	
  hops,	
  which	
  would	
  last	
  
the	
  duration	
  of	
  our	
  sixty-­‐minute	
  boil.	


  -­‐We	
  boil	
  our	
  wort	
  (unfermented	
  beer)	
  in	
  order	
  to	
  evaporate	
  water	
  thus	
  
concentrating	
  the	
  wort’s	
  fermentable	
  sugars,	
  boil	
  off	
  any	
  volatiles	
  such	
  as	
  
dimethyl	
  sulfide,	
  and	
  extract	
  bitterness	
  from	
  hops	
  via	
  isomerization.	
  	
  In	
  
addition,	
  boiling	
  wort	
  is	
  essential	
  in	
  stabilizing	
  the	
  wort	
  by	
  denaturing	
  
amylase	
  enzymes	
  from	
  mash	
  as	
  well	
  as	
  killing	
  any	
  microorganisms	
  
present	
  in	
  the	
  beer.	
  	
  Furthermore,	
  boiling	
  helps	
  to	
  react	
  simple	
  sugars	
  
with	
  amino	
  acids	
  to	
  form	
  melanoidins	
  and	
  flavor	
  compounds.	
  	
  Finally,	
  
boiling	
  denatures	
  proteins,	
  causing	
  the	
  formation	
  and	
  precipitation	
  of	
  
undesirable	
  protein-­‐polyphenol	
  complexes.	


  -­‐Hops	
  added	
  toward	
  the	
  beginning	
  of	
  the	
  boil	
  are	
  known	
  as	
  bittering	
  
hops	
  because	
  the	
  heat	
  of	
  the	
  boil	
  isomerizes	
  (changes	
  the	
  6-­‐carbon	
  ring	
  
to	
  a	
  5-­‐carbon	
  ring)	
  alpha-­‐acids	
  making	
  them	
  soluble	
  in	
  water	
  and	
  bitter	
  
when	
  they	
  were	
  previously	
  insoluble	
  in	
  water	
  prior	
  to	
  boiling.	
  	
  These	
  
alpha-­‐acids	
  are	
  soft	
  resins	
  known	
  as	
  humulones	
  found	
  within	
  the	
  lupulin	
  
glands	
  of	
  hops	
  along	
  with	
  essential	
  oils.	


  -­‐When	
  adding	
  hops	
  to	
  the	
  boil	
  it	
  is	
  important	
  to	
  monitor	
  the	
  level	
  of	
  
liquid	
  in	
  the	
  kettle	
  in	
  order	
  to	
  avoid	
  a	
  boil	
  over.	
  	
  When	
  adding	
  ingredients	
  
to	
  the	
  Sabco	
  system	
  we	
  turned	
  off	
  the	
  burner	
  to	
  avoid	
  boil	
  over	
  and	
  also	
  
kept	
  a	
  hose	
  nearby	
  to	
  spray	
  any	
  erupting	
  wort.	
  
2. Thirty-­‐six	
  minutes	
  later,	
  at	
  12:02pm,	
  we	
  added	
  our	
  0.75	
  kg	
  of	
  oat	
  sweet	
  
extract,	
  which	
  would	
  contribute	
  fermentable	
  sugars	
  and	
  hopefully	
  
desirable	
  flavor	
  characteristics	
  to	
  our	
  beer.	
  
3. At	
  12:22pm,	
  we	
  added	
  175.00g	
  of	
  cocoa	
  nibs,	
  yeast	
  nutrient,	
  and	
  one	
  
Whirlfloc	
  tablet	
  with	
  ten	
  minutes	
  left	
  to	
  boil.	


  -­‐We	
  added	
  cocoa	
  nibs	
  to	
  enhance	
  the	
  chocolate	
  flavor	
  of	
  our	
  stout.	
  	
  We	
  
also	
  added	
  nutrient	
  in	
  order	
  to	
  nourish	
  the	
  yeast	
  throughout	
  the	
  stages	
  of	
  
fermentation.	
  	
  Finally,	
  we	
  added	
  Whirlfloc	
  in	
  order	
  to	
  help	
  clarify	
  the	
  
wort	
  by	
  precipitating	
  proteins	
  and	
  beta	
  glucans	
  that	
  contribute	
  haze	
  in	
  
the	
  final	
  product.	
  
4. At	
  12:32pm	
  we	
  turned	
  off	
  the	
  heat	
  ending	
  the	
  boil,	
  a	
  process	
  known	
  as	
  
flameout.	
  	
  Although	
  cleaning	
  and	
  sanitation	
  are	
  emphasized	
  throughout	
  
the	
  entire	
  brewing	
  process,	
  it	
  is	
  absolutely	
  vital	
  that	
  anything	
  that	
  comes	
  
in	
  contact	
  with	
  the	
  wort	
  from	
  this	
  point	
  forward	
  is	
  clean	
  and	
  sanitized	
  to	
  
avoid	
  contamination	
  due	
  to	
  the	
  fact	
  that	
  the	
  major	
  antibacterial	
  step,	
  the	
  
boil,	
  is	
  finished.	


Post	
  Boil:	


9/27/2014	
  (Same	
  day)	
  
1. After	
  turning	
  the	
  kettle	
  burner	
  off,	
  we	
  simultaneously	
  initiated	
  the	
  
whirlpool	
  and	
  prepared	
  the	
  Chill	
  Wizard	
  plate	
  chiller	
  for	
  knockout	
  at	
  
12:32pm.	
  	
  To	
  initiate	
  the	
  whirlpool,	
  we	
  used	
  a	
  clean	
  and	
  sanitized	
  spoon	
  
to	
  vigorously	
  stir	
  the	
  wort	
  into	
  centrifugal	
  motion.	
  
-­‐The	
  purpose	
  of	
  the	
  whirlpool	
  is	
  to	
  collect	
  hop	
  residues	
  and	
  hot	
  break	
  
(denatured	
  protein-­‐polyphenol	
  complexes)	
  at	
  the	
  center	
  and	
  bottom	
  of	
  
the	
  kettle	
  via	
  centrifugal	
  motion.	
  	
  This	
  helps	
  to	
  clarify	
  the	
  wort	
  and	
  make	
  
it	
  easier	
  to	
  separate	
  from	
  the	
  trub	
  settled	
  at	
  the	
  bottom	
  of	
  the	
  kettle.	
  
2. During	
  the	
  whirlpool,	
  we	
  prepared	
  for	
  knockout	
  (running	
  off	
  wort	
  into	
  
the	
  fermenter)	
  by	
  connecting	
  the	
  hose	
  to	
  the	
  cold	
  water	
  inlet	
  of	
  the	
  
sterilized	
  plate	
  chiller,	
  connecting	
  a	
  second	
  hose	
  to	
  the	
  warm	
  water	
  
outlet,	
  and	
  connecting	
  the	
  oxygen	
  tank	
  (set	
  to	
  5	
  psi	
  but	
  not	
  yet	
  turned	
  on)	
  
to	
  the	
  oxygen	
  inlet.	
  	
  In	
  addition,	
  we	
  measured	
  the	
  post-­‐boil	
  gravity	
  to	
  be	
  
16.8°	
  Brix,	
  the	
  post-­‐boil	
  pH	
  to	
  be	
  5.3,	
  and	
  the	
  post-­‐boil	
  volume	
  to	
  be	
  45	
  l.	


  -­‐Our	
  estimated	
  post-­‐boil	
  gravity	
  was	
  16.433°	
  Plato.	
  	
  When	
  we	
  convert	
  or	
  
actual	
  gravity	
  to	
  Plato,	
  we	
  get	
  a	
  value	
  of	
  16.154°	
  Plato,	
  which	
  is	
  pretty	
  
close	
  to	
  our	
  estimated	
  gravity.	
  	
  In	
  addition,	
  our	
  estimated	
  post	
  boil	
  
volume	
  was	
  44.51	
  l,	
  which	
  was	
  also	
  very	
  close	
  to	
  our	
  actual	
  post-­‐boil	
  
volume.	
  
3. First,	
  we	
  connected	
  a	
  clean	
  and	
  sanitized	
  tri-­‐clamp	
  hose	
  from	
  the	
  kettle	
  to	
  
the	
  plate	
  chiller	
  and	
  a	
  clean	
  and	
  sanitized	
  tri-­‐clamp	
  hose	
  form	
  the	
  plate	
  
chiller	
  to	
  the	
  fermenter.	
  	
  Next,	
  we	
  turned	
  on	
  the	
  water	
  supply	
  facilitating	
  
cooling	
  of	
  the	
  wort	
  as	
  it	
  passed	
  through	
  the	
  chiller	
  into	
  the	
  fermenter.	
  	
  In	
  
addition,	
  we	
  opened	
  the	
  oxygen	
  tank	
  connected	
  to	
  the	
  chiller	
  to	
  facilitate	
  
a	
  steady	
  bubbling	
  and	
  aeration	
  of	
  the	
  wort.	
  	
  We	
  began	
  knockout	
  at	
  
12:47pm	
  by	
  opening	
  the	
  kettle	
  and	
  allowing	
  the	
  wort	
  to	
  pass	
  through	
  the	
  
chiller	
  system	
  and	
  into	
  the	
  fermenter.	
  	
  This	
  process	
  occurred	
  at	
  an	
  
temperature	
  of	
  33°C,	
  then	
  cooled	
  to	
  27°	
  C.	
  
-­‐Cooling	
  the	
  wort	
  to	
  approximately	
  16°	
  C	
  is	
  absolutely	
  vital	
  in	
  order	
  to	
  
provide	
  the	
  ale	
  yeast	
  we	
  were	
  using	
  the	
  proper	
  fermentation	
  
environment	
  in	
  terms	
  of	
  temperature.	
  	
  Both	
  ale	
  and	
  lager	
  yeast	
  will	
  not	
  
survive	
  if	
  pitched	
  into	
  non-­‐cooled	
  wort.	
  	
  The	
  wort	
  should	
  be	
  rapidly	
  
cooled	
  in	
  order	
  to	
  avoid	
  oxidation,	
  formation	
  of	
  sulfur	
  compounds,	
  
contamination,	
  and	
  also	
  in	
  order	
  to	
  form	
  the	
  cold	
  break	
  (trub	
  settled	
  out	
  
after	
  cooling).	


  -­‐We	
  use	
  oxygen	
  to	
  aerate	
  the	
  wort	
  due	
  to	
  the	
  fact	
  that	
  yeast	
  need	
  oxygen	
  
in	
  the	
  lag	
  and	
  growth	
  phase	
  in	
  order	
  to	
  produce	
  lipids	
  and	
  ultimately	
  
grow	
  and	
  multiply.	
  	
  This	
  ensures	
  a	
  healthy,	
  steady	
  fermentation.	


  -­‐Ideally,	
  we	
  want	
  to	
  cool	
  the	
  wort	
  to	
  16°	
  C,	
  however,	
  we	
  were	
  only	
  able	
  
to	
  get	
  our	
  heat	
  exchanger	
  down	
  to	
  a	
  temperature	
  of	
  27°C	
  and	
  our	
  
fermenter	
  to	
  25°C.	
  	
  Therefore,	
  we	
  planned	
  on	
  placing	
  the	
  fermenter	
  in	
  the	
  
cooler	
  following	
  the	
  end	
  of	
  knockout.	


4. At	
  1:00	
  pm,	
  we	
  finished	
  knockout	
  into	
  the	
  keg-­‐style	
  fermenter.	
  	
  The	
  rapid	
  
chilling	
  of	
  the	
  wort	
  formed	
  a	
  cold	
  break	
  (trub	
  settled	
  out	
  after	
  cooling),	
  
which	
  we	
  drained	
  into	
  a	
  slop	
  bucket	
  and	
  discarded.	


  -­‐Our	
  post	
  boil	
  volume,	
  as	
  previously	
  noted,	
  was	
  measured	
  at	
  
approximately	
  43.5	
  l;	
  however,	
  after	
  transfer	
  and	
  cooling	
  we	
  measure	
  
approximately	
  42	
  l	
  of	
  cool	
  wort.	
  	
  This	
  discrepancy	
  likely	
  occurred	
  due	
  to	
  
formation	
  of	
  cold	
  break	
  as	
  well	
  as	
  losses	
  from	
  the	
  leaking	
  cylindroconical	
  
and/or	
  transferring	
  between	
  fermenters.	


  -­‐Our	
  fermenter	
  after	
  cooling	
  was	
  about	
  19-­‐22°C	
  and	
  therefore	
  we	
  put	
  
the	
  keg-­‐style	
  fermenter	
  into	
  the	
  cooler	
  after	
  slightly	
  pressurizing	
  with	
  
oxygen	
  and	
  brought	
  it	
  down	
  to	
  16°C,	
  our	
  desired	
  fermentation	
  
temperature.	
  	
  
5. As	
  part	
  of	
  the	
  class	
  handled	
  transferring	
  between	
  fermenters,	
  we	
  also	
  
began	
  cleaning	
  the	
  Sabco	
  Brew	
  Magic	
  System	
  and	
  its	
  components.	


  -­‐To	
  clean	
  the	
  brew	
  system,	
  we	
  first	
  emptied	
  the	
  mash	
  tun	
  into	
  buckets	
  
that	
  we	
  dumped	
  into	
  Gifford’s	
  outdoor	
  compost.	
  	
  In	
  addition,	
  we	
  drained	
  
the	
  trub	
  from	
  the	
  boil	
  kettle	
  and	
  cleaned	
  manually	
  aka	
  cleaned	
  out	
  of	
  
place	
  (COP).	


  -­‐Next,	
  we	
  cleaned	
  all	
  of	
  the	
  components	
  of	
  the	
  Brew	
  Magic	
  System	
  by	
  
utilizing	
  the	
  system’s	
  CIP	
  (clean-­‐in-­‐place)	
  loop.	
  	
  This	
  was	
  accomplished	
  
by	
  first	
  connecting	
  a	
  tri-­‐clamp	
  hose	
  between	
  the	
  mash	
  tun	
  inlet	
  and	
  chill	
  
wizard	
  outlet,	
  attaching	
  a	
  second	
  tri-­‐clamp	
  hose	
  to	
  the	
  chill-­‐wizard	
  outlet,	
  
and	
  placing	
  the	
  open	
  end	
  of	
  the	
  second	
  tri-­‐clamp	
  hose	
  into	
  a	
  slop	
  bucket.	
  	
  
Next,	
  we	
  filled	
  the	
  hot	
  liquor	
  tank	
  with	
  Pronto	
  cleaner	
  and	
  used	
  the	
  Sabco	
  
pump	
  to	
  propel	
  cleaning	
  solution	
  through	
  the	
  system	
  while	
  periodically	
  
venting	
  oxygen	
  in	
  the	
  chill	
  wizard	
  to	
  be	
  cleaned	
  as	
  well.	
  	
  After	
  the	
  water	
  
runs	
  clear	
  into	
  slop	
  buckets	
  from	
  both	
  the	
  hot	
  liquor	
  tank	
  and	
  mash	
  tun,	
  
we	
  emptied	
  any	
  remaining	
  water	
  in	
  both	
  vessels	
  into	
  the	
  slop	
  buckets.	


  -­‐Following	
  cleaning,	
  we	
  rinsed	
  the	
  system	
  by	
  filling	
  the	
  mash	
  tun	
  with	
  
cold	
  water	
  and	
  circulating	
  throughout	
  the	
  system.	
  	
  Finally,	
  we	
  drained	
  all	
  
vessels	
  after	
  rinsing	
  and	
  brought	
  the	
  system	
  piece	
  by	
  piece	
  back	
  up	
  to	
  the	
  
2nd	
  floor	
  Gifford	
  lab.	
  
6. Once	
  our	
  fermenter	
  had	
  cooled	
  to	
  16°	
  C,	
  we	
  took	
  a	
  gravity	
  reading	
  using	
  a	
  
hydrometer	
  and	
  measured	
  a	
  gravity	
  of	
  18.25°	
  Plato.	
  	
  We	
  sanitized	
  the	
  
opening	
  of	
  our	
  fermenter	
  containing	
  42	
  l	
  cooled	
  wort	
  and	
  poured	
  1,105	
  
ml	
  of	
  Abbey	
  IV	
  Ale	
  yeast	
  slurry	
  into	
  the	
  fermenter	
  at	
  1:35pm	
  and	
  closed.	
  	
  
We	
  ran	
  a	
  blow	
  off	
  hose	
  from	
  the	
  fermenter	
  into	
  a	
  bucket	
  of	
  Iodophor.	


  -­‐Our	
  instructor	
  Jeff	
  Biegert	
  prepared	
  the	
  yeast	
  slurry	
  based	
  on	
  his	
  
calculations	
  using	
  two	
  flasks	
  containing	
  500	
  ml	
  propagated	
  yeast	
  each,	
  
and	
  three	
  vials	
  of	
  35	
  ml	
  yeast	
  containing	
  40	
  billion	
  cells/ml	
  each.	
  	
  The	
  
yeast	
  slurry	
  count	
  for	
  the	
  propagated	
  flasks	
  was	
  approximately	
  
140,000,000	
  cells/ml.	


  -­‐As	
  previously	
  mentioned,	
  cleaning	
  and	
  sanitation	
  is	
  vital	
  post	
  boil	
  
therefore	
  we	
  exercised	
  extreme	
  caution	
  when	
  handling	
  our	
  cooled	
  wort.	


  -­‐We	
  use	
  a	
  blow	
  off	
  hose	
  to	
  allow	
  carbon	
  dioxide,	
  a	
  product	
  of	
  
fermentation,	
  to	
  escape	
  our	
  fermentation	
  vessel.	
  	
  We	
  placed	
  the	
  blow	
  off	
  
in	
  sanitizer	
  to	
  avoid	
  contamination	
  and	
  oxygen	
  from	
  entering	
  the	
  
fermenter.	


  -­‐Our	
  estimated	
  batch	
  volume	
  was	
  40	
  l	
  according	
  to	
  Beersmith	
  whereas	
  
our	
  actual	
  batch	
  volume	
  in	
  the	
  fermenter	
  was	
  42	
  l.	
  	
  This	
  might	
  explain	
  
why	
  our	
  actual	
  original	
  gravity	
  of	
  18.25°	
  Plato	
  was	
  less	
  than	
  our	
  
estimated	
  original	
  gravity	
  of	
  18.422	
  Plato	
  because	
  our	
  actual	
  batch	
  
volume	
  was	
  less	
  concentrated	
  than	
  our	
  estimated	
  batch	
  volume.	
  	
  
7. After	
  pitching	
  the	
  yeast,	
  we	
  stored	
  the	
  fermenter	
  at	
  room	
  temperature	
  
until	
  it	
  was	
  time	
  to	
  cold	
  crash.	
  
-­‐During	
  storage	
  at	
  room	
  temperature,	
  the	
  yeast	
  we	
  pitched	
  were	
  in	
  an	
  
anaerobic	
  environment	
  which	
  facilitated	
  the	
  metabolism	
  of	
  sugars	
  
(primarily	
  maltose	
  and	
  maltotriose)	
  by	
  yeast	
  creating	
  ethanol,	
  carbon	
  
dioxide,	
  and	
  various	
  other	
  flavor	
  components/byproducts	
  in	
  a	
  process	
  
known	
  as	
  fermentation.	


10/2/2014	
  
1. We	
  added	
  three	
  six-­‐ounce	
  bags	
  of	
  each	
  berry	
  (blueberry	
  and	
  blackberry)	
  
in	
  a	
  steep	
  bag.	


10/6/2014	
  
1. Jeff	
  decided	
  to	
  add	
  some	
  left	
  over	
  cocoa	
  nibs	
  to	
  the	
  fermenter	
  at	
  an	
  
unknown	
  amount.	


10/7/2014	
  
1. We	
  cold	
  crashed	
  our	
  beer	
  at	
  this	
  time	
  in	
  order	
  to	
  ultimately	
  clarify	
  our	
  
beer.	
  	
  This	
  occurs	
  due	
  to	
  the	
  fact	
  that	
  when	
  cold	
  crashed	
  at	
  near	
  freezing	
  
temperatures,	
  yeast	
  and	
  other	
  sediments	
  undesirable	
  in	
  the	
  final	
  product	
  
will	
  group	
  together	
  (flocculate)	
  and	
  fall	
  to	
  the	
  bottom	
  of	
  the	
  vessel.	


10/10/2014	
  
1. We	
  ended	
  cold	
  crash	
  on	
  this	
  day.	
  	
  New	
  Belgium	
  lab	
  analysis	
  from	
  
10/6/14	
  indicated	
  a	
  back	
  calculated	
  original	
  gravity	
  (BCOG)	
  of	
  16.97°	
  
Plato,	
  a	
  final	
  gravity	
  (FG)	
  of	
  approximately	
  4.25°	
  Plato,	
  High	
  EBC	
  
(European	
  Brewing	
  Convention:	
  measure	
  of	
  color),	
  and	
  6.94%	
  ABV.	
  	
  We	
  
used	
  a	
  hydrometer	
  to	
  observe	
  a	
  final	
  gravity	
  4.8°	
  Plato.	


-­‐The	
  lab	
  report	
  indicated	
  both	
  our	
  original	
  and	
  final	
  gravity	
  
measurements	
  using	
  a	
  hydrometer	
  were	
  off	
  due	
  to	
  the	
  fact	
  our	
  actual	
  
original	
  and	
  final	
  gravities	
  were	
  higher	
  than	
  those	
  calculated	
  at	
  New	
  
Belgium’s	
  lab.	
  	
  These	
  differences	
  in	
  measurements	
  can	
  likely	
  be	
  
attributed	
  to	
  human	
  error,	
  perhaps	
  we	
  didn’t	
  account	
  for	
  temperature	
  
when	
  measuring	
  original	
  and	
  final	
  gravity.	
  	
  However,	
  the	
  alcohol-­‐by-­‐
volume	
  values	
  were	
  the	
  same.	


2. We	
  cleaned	
  (using	
  Pronto)	
  and	
  sanitized	
  (using	
  Iodophor)	
  or	
  maturation	
  
keg	
  where	
  we	
  would	
  be	
  transferring	
  our	
  green	
  beer,	
  or	
  non-­‐matured	
  
fermented	
  beer.	
  	
  In	
  addition,	
  we	
  purged	
  our	
  maturation	
  vessel	
  in	
  order	
  to	
  
avoid	
  oxidation	
  of	
  our	
  beer,	
  which	
  can	
  cause	
  off	
  flavors	
  in	
  the	
  finished	
  
product.	
  
3. We	
  racked	
  from	
  our	
  keg-­‐style	
  fermenter	
  into	
  our	
  clean	
  and	
  sanitized	
  
maturation	
  keg	
  using	
  carbon	
  dioxide	
  head	
  pressure	
  to	
  transfer.	
  	
  Once	
  we	
  
had	
  racked	
  into	
  our	
  maturation	
  keg	
  we	
  returned	
  the	
  green	
  beer	
  to	
  the	
  
cooler	
  to	
  be	
  further	
  matured	
  and	
  stabilized.	
  
 
Packaging:	


10/17/2014	
  
1. Our	
  teaching	
  assistants	
  and	
  Oskar	
  Blues	
  guest	
  speakers	
  had	
  presumably	
  
cleaned	
  and	
  sanitized	
  all	
  cans	
  and	
  equipment	
  when	
  we	
  showed	
  up	
  to	
  
class.	
  	
  In	
  addition,	
  they	
  had	
  set	
  up	
  their	
  Cask	
  Manual	
  Canning	
  System,	
  
which	
  they	
  had	
  used	
  to	
  can	
  their	
  beers	
  when	
  they	
  were	
  a	
  smaller	
  
brewery.	
  	
  This	
  system	
  consists	
  of	
  a	
  can	
  filling	
  platform	
  and	
  a	
  seaming	
  
platform.	
  	
  With	
  all	
  of	
  our	
  equipment	
  cleaned	
  and	
  sanitized	
  we	
  were	
  ready	
  
to	
  package	
  our	
  beer.	
  
2. Next,	
  we	
  added	
  180g	
  of	
  corn	
  sugar	
  mixed	
  with	
  300	
  ml	
  of	
  boiled	
  distilled	
  
water	
  for	
  the	
  40	
  l	
  of	
  beer	
  we	
  had	
  collected	
  in	
  the	
  maturation	
  tank.	
  	
  Jeff	
  
Biegert	
  calculated	
  this	
  amount	
  of	
  corn	
  sugar	
  using	
  Beersmith,	
  which	
  he	
  
mentioned	
  considered	
  a	
  wide	
  variety	
  of	
  aspects	
  of	
  the	
  beer.	


  -­‐We	
  used	
  corn	
  sugar	
  for	
  canning	
  due	
  to	
  the	
  fact	
  that	
  it	
  is	
  a	
  simple	
  sugar	
  
(dextrose),	
  which	
  will	
  be	
  metabolized	
  for	
  a	
  “mini”	
  fermentation	
  within	
  
the	
  can.	
  	
  This	
  mini	
  fermentation	
  will	
  contribute	
  an	
  insignificant	
  amount	
  of	
  
ethanol	
  but	
  more	
  importantly	
  it	
  will	
  produce	
  carbon	
  dioxide,	
  thus	
  
carbonating	
  our	
  beer.	


  -­‐We	
  carbonate	
  beer	
  because	
  carbonation	
  is	
  very	
  important	
  in	
  
contributing	
  to	
  mouthfeel,	
  consistency	
  and	
  stability	
  of	
  the	
  foamy	
  head,	
  
and	
  overall	
  flavor.	
  
3. We	
  connected	
  our	
  maturation	
  tank	
  to	
  the	
  filling	
  platform	
  in	
  order	
  to	
  
properly	
  dispense	
  our	
  beer	
  into	
  each	
  can.	
  
4. To	
  can,	
  we	
  first	
  placed	
  empty	
  cans	
  on	
  the	
  filling	
  platform.	
  	
  With	
  the	
  push	
  
of	
  a	
  button,	
  the	
  automated	
  system	
  purged	
  all	
  oxygen	
  from	
  the	
  can	
  using	
  
carbon	
  dioxide	
  at	
  approximately	
  15	
  psi.	
  	
  By	
  purging	
  the	
  cans	
  of	
  oxygen,	
  
the	
  cans	
  are	
  less	
  likely	
  to	
  oxidize	
  and	
  spoil	
  and	
  therefore	
  will	
  have	
  a	
  
longer,	
  more-­‐stable	
  shelf	
  life.	
  	
  After	
  purging	
  each	
  can,	
  the	
  filling	
  platform	
  
also	
  automatically	
  fills	
  each	
  can	
  to	
  the	
  correct	
  amount	
  with	
  the	
  help	
  of	
  an	
  
automatic	
  shut	
  off	
  sensor.	
  
5. Once	
  a	
  can	
  had	
  been	
  filled,	
  we	
  placed	
  a	
  clean	
  and	
  sanitized	
  lid	
  on	
  the	
  top	
  
of	
  the	
  can	
  and	
  placed	
  it	
  in	
  the	
  sealing	
  platform.	
  	
  Again,	
  with	
  the	
  push	
  of	
  a	
  
button,	
  the	
  sealing	
  platform	
  will	
  seal	
  the	
  lid	
  to	
  each	
  can,	
  eliminating	
  the	
  
possibility	
  of	
  oxygen	
  or	
  any	
  sources	
  of	
  contamination	
  to	
  enter	
  the	
  can.	
  
6. Finally,	
  while	
  students	
  simultaneously	
  filled	
  and	
  sealed	
  cans,	
  we	
  made	
  
sure	
  to	
  label	
  each	
  can.	
  	
  We	
  stored	
  a	
  yield	
  of	
  approximately	
  three	
  cases	
  of	
  
beer	
  in	
  the	
  brew	
  lab’s	
  incubator	
  just	
  above	
  room	
  temperature	
  (a	
  
favorable	
  temperature	
  for	
  residual	
  yeast)	
  and	
  allowed	
  carbonation	
  to	
  
occur	
  via	
  fermentation.	
  	
  This	
  was	
  done	
  in	
  order	
  to	
  be	
  ready	
  for	
  when	
  we	
  
tasted	
  our	
  first	
  sample	
  of	
  finished	
  beer	
  a	
  week	
  later	
  on	
  October	
  24,	
  2014.	


Sensory	
  Evaluation	


After	
  completing	
  tasting	
  and	
  a	
  BJCP	
  score	
  sheet	
  of	
  our	
  B3	
  Cubed	
  Dark	
  
Chocolate	
  Stout	
  on	
  11/4/2014,	
  my	
  total	
  score	
  for	
  our	
  brew	
  was	
  35/50.	
  	
  Here	
  was	
  
the	
  breakdown:	


Aroma	
  (9/12):	
  
	
   -­‐The	
  primary	
  aromas	
  are	
  chocolate,	
  alcohol,	
  slight	
  roast,	
  and	
  dark	
  fruits.	
  	
  The	
  
chocolate	
  aromas	
  are	
  a	
  result	
  of	
  both	
  the	
  chocolate	
  malts	
  we	
  used	
  as	
  well	
  as	
  cocoa	
  
nibs.	
  	
  The	
  smell	
  of	
  alcohol	
  is	
  particularly	
  surprising	
  due	
  to	
  the	
  fact	
  the	
  New	
  Belgium	
  
lab	
  only	
  tested	
  the	
  ABV	
  to	
  be	
  6.85%.	
  	
  Nonetheless,	
  the	
  aroma	
  was	
  fairly	
  alcoholic	
  
leading	
  one	
  to	
  think	
  the	
  fermentation	
  temperature	
  was	
  high	
  thus	
  creating	
  fusel	
  
alcohols.	
  	
  The	
  aroma	
  also	
  had	
  some	
  slight	
  roast,	
  which	
  can	
  be	
  attributed	
  to	
  the	
  
roasted	
  barley	
  we	
  included.	
  	
  Finally,	
  the	
  stout	
  had	
  a	
  pleasant	
  dark	
  fruit	
  and	
  berry	
  
aroma	
  from	
  the	
  blackberries	
  and	
  blueberries	
  we	
  added	
  during	
  fermentation.	
  	
  These	
  
fruity,	
  estery	
  aromas	
  could’ve	
  also	
  been	
  a	
  product	
  of	
  the	
  Belgian	
  Abbey	
  yeast	
  strain	
  
we	
  used.	
  Overall,	
  there	
  were	
  a	
  variety	
  of	
  pleasant	
  aromas	
  present	
  however	
  the	
  smell	
  
of	
  alcohol	
  was	
  slightly	
  offputting.	


Appearance	
  (1.5/3):	
  
	
   -­‐The	
  beer	
  had	
  a	
  nice	
  dark	
  black	
  color	
  rendering	
  it	
  opaque	
  as	
  a	
  result	
  of	
  the	
  
combination	
  of	
  chocolate	
  and	
  crystal	
  malts	
  as	
  well	
  as	
  use	
  of	
  roasted	
  barley.	
  	
  In	
  
addition,	
  despite	
  the	
  use	
  of	
  Whirlfloc,	
  whirlpooling,	
  formation	
  and	
  separation	
  of	
  cold	
  
break,	
  and	
  cold	
  crashing,	
  the	
  stout	
  was	
  so	
  dark	
  it	
  was	
  opaque.	
  	
  The	
  beer	
  poured	
  a	
  
large	
  tan	
  head	
  with	
  big	
  bubbles	
  that	
  subsided	
  almost	
  instantly.	
  	
  Overall,	
  the	
  finished	
  
beer	
  had	
  a	
  fair	
  appearance	
  but	
  could’ve	
  benefited	
  from	
  good	
  head	
  retention	
  and	
  
lacing.	


Flavor	
  (15/20):	
  
	
   -­‐Again,	
  the	
  culmination	
  of	
  malt,	
  cocoa	
  nib,	
  and	
  berry	
  additions	
  added	
  some	
  
great	
  flavors.	
  	
  There	
  were	
  nice	
  roast	
  and	
  chocolate	
  tastes	
  as	
  a	
  result	
  of	
  the	
  malts	
  and	
  
cocoa	
  nibs	
  we	
  used.	
  	
  Furthermore,	
  the	
  stout	
  had	
  a	
  pleasant	
  dark	
  fruit	
  and	
  berry	
  
flavor	
  which	
  could	
  be	
  attributed	
  to	
  the	
  berry	
  additions	
  and	
  perhaps	
  our	
  Belgian	
  
yeast	
  strain.	
  	
  The	
  beer	
  also	
  finished	
  fairly	
  sweet,	
  likely	
  due	
  to	
  our	
  higher	
  than	
  
expected	
  final	
  gravity.	
  	
  Overall,	
  the	
  stout	
  was	
  fairly	
  balanced	
  between	
  roast,	
  
chocolate,	
  and	
  fruit,	
  however,	
  the	
  alcohol	
  content	
  isn’t	
  well	
  masked	
  and	
  the	
  beer	
  
tastes	
  slightly	
  alcoholic.	


Mouthfeel	
  (3.5/5):	
  
	
   The	
  beer	
  is	
  fairly	
  smooth	
  and	
  medium-­‐bodied.	
  	
  The	
  beer	
  is	
  warm	
  likely	
  due	
  
to	
  fusel	
  alcohols	
  produced	
  during	
  fermentation.	
  	
  The	
  beer	
  also	
  tastes	
  slightly	
  flat	
  
perhaps	
  due	
  to	
  inadequate	
  priming	
  sugar.	
  	
  Overall,	
  the	
  beer	
  had	
  decent	
  mouthfeel	
  
but	
  was	
  slightly	
  off-­‐put	
  by	
  warmth	
  and	
  lack	
  of	
  carbonation.	


Overall	
  Impression	
  (7/10)	
  
	
   -­‐As	
  evident	
  by	
  my	
  overall	
  impressions	
  of	
  aroma,	
  appearance,	
  flavor,	
  and	
  
mouthfeel,	
  there	
  were	
  a	
  lot	
  of	
  enjoyable	
  characteristics	
  of	
  this	
  beer	
  including	
  malt	
  
and	
  berry	
  aroma	
  and	
  flavor,	
  the	
  color,	
  and	
  the	
  smooth,	
  medium-­‐bodied	
  mouthfeel.	
  	
  
However,	
  the	
  aroma,	
  taste,	
  and	
  flavor	
  of	
  alcohol	
  in	
  the	
  beer	
  was	
  fairly	
  off	
  putting.	
  	
  
The	
  lack	
  of	
  full	
  carbonation	
  was	
  also	
  fairly	
  undesirable.	
  	
  The	
  beer	
  could	
  be	
  improved	
  
by	
  eliminating	
  the	
  alcohol	
  presence	
  in	
  the	
  aroma	
  and	
  flavor	
  likely	
  by	
  fermenting	
  at	
  
lower	
  temperatures	
  or	
  balancing	
  ingredients	
  as	
  well	
  as	
  further	
  conditioning	
  time	
  or	
  
recalculation	
  and	
  new	
  use	
  of	
  priming	
  sugar	
  in	
  order	
  to	
  fully	
  carbonate	
  the	
  beer.	
  	
  
Overall,	
  our	
  second	
  brew	
  attempt	
  of	
  a	
  fairly	
  experimental	
  Belgian	
  chocolate	
  stout	
  
was	
  fairly	
  successful,	
  but	
  not	
  outstanding	
  and	
  could	
  use	
  improvement.	


Reflection	
  of	
  Results	


   For	
  being	
  a	
  fairly	
  experimental	
  beer	
  and	
  encountering	
  a	
  few	
  problems	
  along	
  
the	
  way,	
  our	
  overall	
  experience	
  brewing	
  the	
  B3	
  Chocolate	
  Stout	
  as	
  well	
  as	
  our	
  
finished	
  beer	
  seemed	
  to	
  be	
  a	
  success.	
  	
  The	
  first	
  problem	
  we	
  encountered	
  was	
  milling	
  
some	
  of	
  the	
  grain	
  a	
  bit	
  too	
  finely.	
  	
  However,	
  we	
  luckily	
  did	
  not	
  encounter	
  a	
  stuck	
  
mash	
  and	
  therefore	
  this	
  didn’t	
  become	
  much	
  of	
  an	
  issue.	
  	
  Although	
  we	
  may	
  have	
  
avoided	
  some	
  of	
  the	
  technical	
  difficulties	
  we	
  had	
  encountered	
  in	
  our	
  first	
  brew,	
  we	
  
weren’t	
  as	
  close	
  to	
  our	
  estimated	
  values	
  as	
  we	
  had	
  gotten	
  on	
  our	
  first	
  brew.	
  	
  For	
  
example,	
  we	
  ended	
  up	
  having	
  to	
  boil	
  for	
  forty-­‐five	
  minutes	
  prior	
  to	
  our	
  actual	
  sixty-­‐
minute	
  boil	
  due	
  to	
  the	
  fact	
  that	
  we	
  had	
  a	
  much	
  lower	
  gravity	
  than	
  expected	
  going	
  
into	
  our	
  boil,	
  meaning	
  we	
  needed	
  to	
  concentrate	
  our	
  wort	
  to	
  achieve	
  the	
  correct	
  
gravity.	
  	
  Another	
  problem	
  we	
  encountered	
  was	
  chilling	
  our	
  wort	
  to	
  the	
  correct	
  
temperature	
  during	
  knockout,	
  which	
  was	
  attributed	
  to	
  the	
  chiller	
  not	
  working	
  
optimally.	
  	
  Although	
  our	
  calculated	
  and	
  actual	
  alcohol-­‐by-­‐volumes	
  were	
  the	
  same,	
  
our	
  actual	
  original	
  and	
  final	
  gravities	
  were	
  higher	
  than	
  calculated	
  by	
  New	
  Belgium’s	
  
lab.	
  	
  As	
  previously	
  mentioned	
  in	
  the	
  procedure,	
  this	
  discrepancy	
  was	
  likely	
  the	
  
result	
  of	
  human	
  error	
  of	
  measurement.	
  	
  Regardless,	
  we	
  had	
  a	
  fairly	
  high	
  final	
  
gravity,	
  which	
  likely	
  occurred	
  due	
  to	
  an	
  incomplete	
  fermentation.	
  	
  Although	
  we	
  
seemingly	
  pitched	
  far	
  more	
  yeast	
  for	
  this	
  brew	
  than	
  our	
  first,	
  the	
  Odell	
  house	
  yeast	
  
pulled	
  from	
  the	
  bottom	
  of	
  one	
  of	
  their	
  fermenters	
  had	
  already	
  been	
  propagated	
  for	
  a	
  
massive	
  scale	
  fermentation	
  and	
  therefore	
  had	
  a	
  much	
  higher	
  slurry	
  count	
  than	
  the	
  
Belgian	
  Abbey	
  yeast	
  we	
  had	
  propagated.	
  	
  Despite	
  pitching	
  over	
  a	
  liter	
  of	
  yeast	
  into	
  
our	
  wort,	
  it	
  seems	
  the	
  beer	
  simply	
  did	
  not	
  have	
  enough	
  yeast	
  to	
  consume	
  all	
  of	
  the	
  
fermentable	
  sugar	
  in	
  our	
  wort	
  and	
  bring	
  the	
  final	
  gravity	
  down.	
  	
  Overall,	
  although	
  
we	
  encountered	
  several	
  problems	
  throughout	
  the	
  brew,	
  it	
  is	
  safe	
  to	
  say	
  it	
  was	
  
ultimately	
  a	
  smooth	
  experience	
  that	
  went	
  well	
  and	
  accomplished	
  its	
  goals.	
  
	
   Other	
  than	
  some	
  minor	
  issues	
  than	
  we	
  were	
  able	
  to	
  easily	
  resolve	
  or	
  at	
  least	
  
work	
  with,	
  the	
  brewing	
  experience	
  went	
  well.	
  	
  We	
  had	
  no	
  trouble	
  mashing,	
  sparging	
  
or	
  boiling,	
  little	
  to	
  no	
  trouble	
  with	
  fermentation,	
  maturation,	
  or	
  packaging,	
  and	
  our	
  
finished	
  beer	
  came	
  out	
  pretty	
  good.	
  	
  Unlike	
  our	
  last	
  beer,	
  we	
  didn’t	
  have	
  trouble	
  
with	
  a	
  leaking	
  plate	
  chiller	
  or	
  fermentation	
  vessel.	
  	
  Another	
  positive	
  aspect	
  of	
  our	
  
brewing	
  experience	
  was	
  the	
  fact	
  that	
  our	
  Beersmith	
  estimated,	
  actual,	
  calculated,	
  
and	
  New	
  Belgium	
  lab	
  tested	
  measurements	
  and	
  values	
  were	
  all	
  fairly	
  consistent	
  
with	
  the	
  exception	
  of	
  our	
  high	
  final	
  gravity.	
  	
  Our	
  estimated	
  and	
  actual	
  pre-­‐boil	
  
gravity	
  and	
  volumes,	
  post-­‐boil	
  gravity	
  and	
  volumes,	
  and	
  overall	
  batch	
  volume	
  and	
  
gravity	
  were	
  all	
  fairly	
  consistent	
  and	
  when	
  inconsistencies	
  arose	
  we	
  corrected	
  for	
  
them	
  (such	
  as	
  the	
  low	
  pre-­‐boil	
  gravity).	
  	
  There	
  were	
  some	
  minor	
  discrepancies	
  
between	
  estimated,	
  calculated,	
  and	
  actual	
  ABV	
  and	
  IBUs	
  but	
  these	
  were	
  likely	
  the	
  
result	
  of	
  minor	
  differences	
  in	
  gravities	
  and	
  volumes	
  of	
  each	
  step.	
  	
  Overall,	
  we	
  
yielded	
  fairly	
  consistent	
  results	
  with	
  some	
  minor	
  exceptions	
  based	
  on	
  our	
  
Beersmith	
  estimations	
  and	
  actual	
  results	
  indicating	
  that	
  we	
  were	
  fairly	
  efficient	
  in	
  
our	
  brewing	
  processes.	
  
	
   Based	
  on	
  the	
  wide	
  parameters	
  of	
  the	
  BJCP	
  Specialty	
  Beer	
  category,	
  it	
  was	
  
difficult	
  to	
  compare	
  our	
  beer	
  directly	
  to	
  the	
  category.	
  	
  However,	
  we	
  ultimately	
  
produced	
  a	
  black,	
  opaque,	
  smooth,	
  medium-­‐bodied	
  ale	
  which	
  had	
  great	
  chocolate,	
  
berry,	
  and	
  dark	
  fruit	
  flavors	
  and	
  aromas	
  which	
  seem	
  to	
  point	
  to	
  our	
  beer	
  being	
  a	
  
successful	
  interpretation	
  of	
  a	
  chocolate	
  and	
  fruit	
  Belgian	
  stout.	
  	
  The	
  only	
  changes	
  I	
  
would	
  make	
  to	
  the	
  beer	
  next	
  time	
  would	
  be	
  to	
  adjust	
  the	
  sweet	
  malt	
  backbone	
  and	
  
the	
  strong-­‐alcoholic	
  nature	
  of	
  the	
  beer	
  in	
  terms	
  of	
  aroma	
  and	
  flavor	
  which	
  I	
  believe	
  
negatively	
  affects	
  the	
  balance	
  of	
  the	
  beer.	
  	
  Also,	
  I	
  would	
  make	
  sure	
  the	
  beer	
  is	
  fully	
  
carbonated	
  (although	
  the	
  beer	
  poured	
  with	
  a	
  head	
  it	
  instantly	
  disappeared).	
  	
  In	
  
conclusion,	
  we	
  had	
  a	
  great,	
  relatively	
  problem-­‐free	
  brewing	
  experience	
  brewing	
  the	
  
B3	
  Cubed	
  Dark	
  Chocolate	
  Stout	
  in	
  which	
  we	
  furthered	
  our	
  already	
  developing	
  
knowledge	
  of	
  fermentation	
  and	
  brewing	
  processes	
  and	
  ultimately	
  created	
  a	
  quality	
  
final	
  product.	


More Related Content

What's hot

Senior Design
Senior Design Senior Design
Senior Design kanecm17
 
Asb 2019 Diosna presentation
Asb 2019   Diosna presentationAsb 2019   Diosna presentation
Asb 2019 Diosna presentationPeter Meredith
 
3 nights Sample culinary tour in Le Terre del Verde B2B service
3 nights Sample culinary tour in Le Terre del Verde B2B service3 nights Sample culinary tour in Le Terre del Verde B2B service
3 nights Sample culinary tour in Le Terre del Verde B2B serviceAlessandro Pricolo
 
Speidel brew master brewing system
Speidel brew master brewing systemSpeidel brew master brewing system
Speidel brew master brewing systemgadid
 
Proposal ppt Viduranga edited
Proposal ppt Viduranga editedProposal ppt Viduranga edited
Proposal ppt Viduranga editedLahiru Viduranga
 
3nights Sample culinary tour (self drive) in Le Terre del Verde B2B service
3nights Sample culinary tour (self drive) in Le Terre del Verde B2B service3nights Sample culinary tour (self drive) in Le Terre del Verde B2B service
3nights Sample culinary tour (self drive) in Le Terre del Verde B2B serviceAlessandro Pricolo
 
1 rich fermented coconut palm sap products
1 rich fermented coconut palm sap products1 rich fermented coconut palm sap products
1 rich fermented coconut palm sap productsfoodfermentation
 
FOOD N BEVERAGES PPT
FOOD N BEVERAGES PPTFOOD N BEVERAGES PPT
FOOD N BEVERAGES PPTrahul gupta
 
Homebrew 101
Homebrew 101Homebrew 101
Homebrew 101Gil Lopez
 
1061 2015 pacific coast ipa recipe
1061 2015 pacific coast ipa recipe1061 2015 pacific coast ipa recipe
1061 2015 pacific coast ipa recipeVohinh Ngo
 

What's hot (15)

Beer ingredients
Beer ingredientsBeer ingredients
Beer ingredients
 
Irish Red log
Irish Red logIrish Red log
Irish Red log
 
Senior Design
Senior Design Senior Design
Senior Design
 
Asb 2019 Diosna presentation
Asb 2019   Diosna presentationAsb 2019   Diosna presentation
Asb 2019 Diosna presentation
 
3 nights Sample culinary tour in Le Terre del Verde B2B service
3 nights Sample culinary tour in Le Terre del Verde B2B service3 nights Sample culinary tour in Le Terre del Verde B2B service
3 nights Sample culinary tour in Le Terre del Verde B2B service
 
Speidel brew master brewing system
Speidel brew master brewing systemSpeidel brew master brewing system
Speidel brew master brewing system
 
Proposal ppt Viduranga edited
Proposal ppt Viduranga editedProposal ppt Viduranga edited
Proposal ppt Viduranga edited
 
3nights Sample culinary tour (self drive) in Le Terre del Verde B2B service
3nights Sample culinary tour (self drive) in Le Terre del Verde B2B service3nights Sample culinary tour (self drive) in Le Terre del Verde B2B service
3nights Sample culinary tour (self drive) in Le Terre del Verde B2B service
 
1 rich fermented coconut palm sap products
1 rich fermented coconut palm sap products1 rich fermented coconut palm sap products
1 rich fermented coconut palm sap products
 
Belgian pale ale
Belgian pale aleBelgian pale ale
Belgian pale ale
 
John laird
John lairdJohn laird
John laird
 
FOOD N BEVERAGES PPT
FOOD N BEVERAGES PPTFOOD N BEVERAGES PPT
FOOD N BEVERAGES PPT
 
Book_Recipe
Book_RecipeBook_Recipe
Book_Recipe
 
Homebrew 101
Homebrew 101Homebrew 101
Homebrew 101
 
1061 2015 pacific coast ipa recipe
1061 2015 pacific coast ipa recipe1061 2015 pacific coast ipa recipe
1061 2015 pacific coast ipa recipe
 

Viewers also liked

20150412 Sunday Business Post - Ireland plays for high stakes in fintech game
20150412 Sunday Business Post - Ireland plays for high stakes in fintech game20150412 Sunday Business Post - Ireland plays for high stakes in fintech game
20150412 Sunday Business Post - Ireland plays for high stakes in fintech gamePeter Oakes
 
Does Viva need a Mobile App? 2013
Does Viva need a Mobile App? 2013Does Viva need a Mobile App? 2013
Does Viva need a Mobile App? 2013Colin Blackwell
 
Practicum 151013121814-lva1-app6892
Practicum 151013121814-lva1-app6892Practicum 151013121814-lva1-app6892
Practicum 151013121814-lva1-app6892smitharajr
 
THE HARAPPAN CIVILISATION
THE HARAPPAN CIVILISATIONTHE HARAPPAN CIVILISATION
THE HARAPPAN CIVILISATIONHitarth9
 
Harappan Civilisation
Harappan CivilisationHarappan Civilisation
Harappan CivilisationPankaj Saikia
 
Unidad 4: Servicio web (HTTP)
Unidad 4: Servicio web (HTTP)Unidad 4: Servicio web (HTTP)
Unidad 4: Servicio web (HTTP)carmenrico14
 
Unidad 2: Seguridad física
Unidad 2: Seguridad físicaUnidad 2: Seguridad física
Unidad 2: Seguridad físicacarmenrico14
 
Transmisi Otomatis Sepeda Motor ( CVT )
Transmisi Otomatis Sepeda Motor ( CVT )Transmisi Otomatis Sepeda Motor ( CVT )
Transmisi Otomatis Sepeda Motor ( CVT )Muh Aryadi
 

Viewers also liked (11)

Ficha1
Ficha1Ficha1
Ficha1
 
20150412 Sunday Business Post - Ireland plays for high stakes in fintech game
20150412 Sunday Business Post - Ireland plays for high stakes in fintech game20150412 Sunday Business Post - Ireland plays for high stakes in fintech game
20150412 Sunday Business Post - Ireland plays for high stakes in fintech game
 
Presentación guajira
Presentación guajiraPresentación guajira
Presentación guajira
 
Does Viva need a Mobile App? 2013
Does Viva need a Mobile App? 2013Does Viva need a Mobile App? 2013
Does Viva need a Mobile App? 2013
 
Practicum 151013121814-lva1-app6892
Practicum 151013121814-lva1-app6892Practicum 151013121814-lva1-app6892
Practicum 151013121814-lva1-app6892
 
THE HARAPPAN CIVILISATION
THE HARAPPAN CIVILISATIONTHE HARAPPAN CIVILISATION
THE HARAPPAN CIVILISATION
 
Advertising law-ethics
Advertising law-ethicsAdvertising law-ethics
Advertising law-ethics
 
Harappan Civilisation
Harappan CivilisationHarappan Civilisation
Harappan Civilisation
 
Unidad 4: Servicio web (HTTP)
Unidad 4: Servicio web (HTTP)Unidad 4: Servicio web (HTTP)
Unidad 4: Servicio web (HTTP)
 
Unidad 2: Seguridad física
Unidad 2: Seguridad físicaUnidad 2: Seguridad física
Unidad 2: Seguridad física
 
Transmisi Otomatis Sepeda Motor ( CVT )
Transmisi Otomatis Sepeda Motor ( CVT )Transmisi Otomatis Sepeda Motor ( CVT )
Transmisi Otomatis Sepeda Motor ( CVT )
 

Similar to Brew Lab #2

Similar to Brew Lab #2 (20)

FTEC 422 Lab Report 1
FTEC 422 Lab Report 1FTEC 422 Lab Report 1
FTEC 422 Lab Report 1
 
Beer ok
Beer okBeer ok
Beer ok
 
Basicbeverageknowledgeheru
Basicbeverageknowledgeheru Basicbeverageknowledgeheru
Basicbeverageknowledgeheru
 
FTEC 422 Lab Report 2
FTEC 422 Lab Report 2FTEC 422 Lab Report 2
FTEC 422 Lab Report 2
 
Beer production by Likhith K
Beer production by Likhith KBeer production by Likhith K
Beer production by Likhith K
 
Beer and softdrinks
Beer and softdrinksBeer and softdrinks
Beer and softdrinks
 
Beverage-ind.pptx
Beverage-ind.pptxBeverage-ind.pptx
Beverage-ind.pptx
 
Lab Report 2
Lab Report 2Lab Report 2
Lab Report 2
 
Beer Processing in a Brewery
Beer Processing in a BreweryBeer Processing in a Brewery
Beer Processing in a Brewery
 
Basic beverage knowledge heru
Basic beverage knowledge heruBasic beverage knowledge heru
Basic beverage knowledge heru
 
Your step by-step guide to learn the difference between home-made beer and fa...
Your step by-step guide to learn the difference between home-made beer and fa...Your step by-step guide to learn the difference between home-made beer and fa...
Your step by-step guide to learn the difference between home-made beer and fa...
 
Beer1
Beer1Beer1
Beer1
 
How do make bear
How do make bearHow do make bear
How do make bear
 
beer
beerbeer
beer
 
Beer making
Beer makingBeer making
Beer making
 
Food microbiology
Food microbiologyFood microbiology
Food microbiology
 
Beer production
Beer productionBeer production
Beer production
 
How to brew 1
How to brew 1How to brew 1
How to brew 1
 
Beer
BeerBeer
Beer
 
Classifications of Beverages
Classifications of BeveragesClassifications of Beverages
Classifications of Beverages
 

Brew Lab #2

  • 1. Section  1     Name:    John  Schnettler   Name  of  Brew:    B3  Cubed  Dark  Chocolate  Stout   Style  of  Brew:    Belgian  Specialty  Ale   Brew  Date:    9/27/2014   Canning  Date:  10/17/2014   Batch  Volume:    40.00  l  (actual:  42  l)   Original  Gravity:    18.25°  P   Final  Gravity:  4.8°  P         Calculation  #1  –  IBU’s     26.2g  Target  (60  min):    16.0°  Brix/1.04  =  15.385  Plato   SG  =  (4*15.385)/1000  +  1  =  1.062   (26.2g*0.105*0.211*1000)/  48.5  l  =  11.968  IBU     Total  IBU’s  =  11.968  IBU     (Beersmith  estimated  we  use  25g  Target  hops  with  an  11.00%  alpha-­‐acid  content,   however,  our  Target  hops  actually  had  a  10.5%  alpha-­‐acid  content  and  therefore  we   calculated  we  should  used  26.2g  of  Target  hops  instead  to  hit  the  same  Beersmith   estimated  value  of  14.0  IBUs)     Calculation  #2  -­‐  %ABV     (18.25°  Plato  –  4.8°  Plato)  *  0.516  =  6.94%  ABV       Calculation  #3  –  yeast  pitch  volume     (18.25*106  mill/ml*  42  l)/140*106  mill/ml  =  5.475  l     (Instructor  Jeff  Biegert  estimated  the  slurry  count)     Calculation  #4  –  apparent  attenuation     (18.25°  Plato  –  4.8°  Plato)/18.25°  Plato  =  73.7%                    
  • 2. Section  2     Material  Bill     Water  Additives:     Ingredient   Amount   Step   Time   Calcium  Chloride   8.00  g   Mash     60  minutes     Grist  Bill:     Malt   Amount   Color  (European  Brewing   Convention)     Pale  Malt  (2  Row)  US   11.40  kg   3.9  EBC   Roasted  Barley   0.76  kg   591.0  EBC   Chocolate  Malt   0.51  kg   689.5  EBC   Caramel/Crystal  Malt  –   60L   0.34  kg   157.6  EBC     Boil  Ingredients:     Ingredient   Amount   Time   Target  (11.00%  alpha-­‐acid):   Hop  addition   26.2  g   60  minutes   Oat  Sweet:   Flavor/Fermentable  Sugars   0.75  kg   30  minutes   Cocoa  Nibs:  Flavor   175.00  g   10  minutes   Whirlfloc:  Clarification   1  Tablet   10  minutes   Yeast  Nutrient  (StartUp)   4.0  g   10  minutes     Yeast:    Abbey  IV  Ale  Yeast  (White  Labs  #WLP540)   Other:    Blackberries  (Added  to  Secondary  in  steep  bag  10/1/14):  510  g  (18  ounces)        Blueberries  (Added  to  Secondary  in  steep  bag  10/1/14):  510  g  (18  ounces)                        
  • 3. Equipment:       A.  Gifford  Sabco  BrewMagic  Brewing  System:   -­‐Hot  Liquor  Tank  (1/2  barrel  keg)   -­‐Mash  Tun  (1/2  barrel  keg)   -­‐Brew  Kettle  (`1/2  barrel  keg)   -­‐Sabco  Pump   -­‐Sabco  Frame  (V350MS  PLC,  USB  Port,  RTD  Sensor,  E-­‐Stop,  LP  Bottle  Rack,  3x   Gas  Valves,  Locking  Front  Casters)   B.    Chill  Wizard  plate  chiller   C.    Chill  Wizard  pump   D.    Grain  mill   E.    Garden  hoses   F.    Food  grade  tri-­‐clamp  hoses   G.    Extension  cords   H.    Propane  tank   I.      Oxygen  tank  with  tubing  and  filter   J.      Metal  spoon   K.    Mash  thermometer   L.    Hot  gloves   M.  Tool  bucket   N.    Iodophor  spray  bottle,  freshly  mixed   O.    Clean  rags   P.    Long  lighter   Q.    Box  of  extra  tri-­‐clamps  and  gaskets   R.    pH  meter   S.    Tub  for  spent  grain   T.    Kim-­‐wipes   U.    Refractometer   V.    Deionized  water  bottler   W.  Hose  sprayer  nozzle   X.      Slop  buckets   Y.      PRONTO  cleaning  solution       Procedure     Pre-­‐Boil:     9/26/2014   1. We  measured  out  all  water  additives,  grains,  hops,  and  other  ingredients   and  used  the  grain  mill  to  crush  all  grains  into  grist,  leaving  the  husk  still   intact.       -­‐US  pale  malt  (2-­‐row)  served  as  our  base  malt  and  primary  source  of   fermentable  sugar.    Roasted  barley  was  used  to  provide  a  small  amount  of   fermentable  sugar,  contribute  roast  and  coffee  flavors,  and  lend  a  darker   color.    Chocolate  malt  was  also  used  in  order  to  provide  a  small  amount  of  
  • 4. fermentable  sugar,  contribute  chocolate  and  nutty  flavors,  and  lend  a   darker  color.    Finally,  we  used  Caramel/Crystal  malt  (80L)  to  contribute   body  and  color  to  the  beer  as  well  as  aid  in  head  retention.    The   culmination  of  these  darker  grains  helped  to  buffer  down  the  pH  towards   an  optimal  mash  temperature.    The  grains  we  utilized  had  already  been   steeped,  germinated,  and  kilned  in  order  to  develop  and  preserve   enzymes  for  the  mash  as  well  as  break  down  grain  cell  walls  in  order  to   be  modified  for  an  effective  mash  and  fermentation.      In  addition,  the   kilning  process  affects  the  color  and  flavor  of  the  grains.    These  processes   constitute  the  malting  of  the  grain.   -­‐We  used  Target  hops  for  bittering  due  to  the  fact  they  have  a  high   alpha-­‐acid  content  of  10.5%.    Alpha  acids  are  a  soft  resin  found  in  hops   that  add  bitterness  to  the  beer  when  isomerized  during  the  boil.     Isomerization  is  the  process  in  which  the  original  alpha-­‐acid  6-­‐carbon   ring  becomes  a  5-­‐carbon  ring  under  high  temperatures  making  the  alpha   acid  soluble  in  water  and  perceivably  bitter.   -­‐Our  only  water  additive  for  this  beer  was  calcium  chloride,  which  was   used  to  lower  the  pH  of  our  mash  and  enhance  the  body  and  fullness  of   the  beer.      -­‐This  beer  used  a  variety  of  specialty  ingredients.    For  example,  we  used   oat  sweet  that  contributed  fermentable  sugars  and  was  done   experimentally  to  observe  flavor.    In  addition,  we  added  blueberries  and   blackberries  for  flavoring  and  fermentable  sugars.    Finally,  we  added   Cocoa  nibs,  which  would  enhance  the  chocolate  character  of  our  stout.   -­‐Grain  is  milled  in  order  to  reduce  and  control  the  size  of  the  grain  and   break  up  the  endosperm  in  order  to  make  convertible  starches  more   available  at  the  desired  extract  yield.         9/27/2014   1. The  teaching  assistants  cleaned  all  Sabco  brewing  system  equipment  and   materials  thoroughly  using  Pronto  (0.5  cap  per  gallon  of  hot  water)  and   rinse  with  hot  water.      -­‐Cleaning  is  vital  in  removing  soil  and  a  majority  of  existing   microorganisms  from  the  equipment  that  can  cause  inactivation  of   sanitizer  and  potential  contamination  of  the  final  product.   2. The  teaching  assistants  sanitized  all  equipment  and  materials  thoroughly   using  Iodophor  and  cold  water.      -­‐Iodophor  is  a  halogen  sanitizer  containing  surface-­‐active  agents  that   inhibit  the  function  of  microbial  proteins  thus  removing  any   microorganisms.    Iodophor  does  not  require  rinsing  degrades  to   flavorless,  odorless,  and  non-­‐toxic  compounds  which  volatize.   3. We  started  by  heating  the  filled  hot  liquor  tank  for  our  sparge  volume  of   32.3  l  and  also  heated  36.96  l  of  strike  water  in  the  mash  tun.    In  addition,   we  began  heating  water  in  the  kettle  to  be  used  in  sterilizing  the  plate   chiller.  
  • 5. 4. Once  the  mash  tun  water  reached  72.5°C,  we  added  the  culmination  of   our  pale,  chocolate,  and  crystal  malts  as  well  as  roasted  barley  to  the   mash  tun  at  a  steady  rate  while  simultaneously  stirring  to  avoid  clumping   of  grain,  which  can  decrease  the  efficiency  of  the  mash  in  converting   starches  to  fermentable  sugars.      We  also  added  our  calcium  chloride  at   the  beginning  of  the  mash.      -­‐The  roasted  barley  and  chocolate  malt  was  a  bit  too  fine  ground  and   therefore  we  made  sure  to  look  out  for  a  stuck  mash.      -­‐We  utilized  a  downward  infusion  mash  consisting  of  an  insulated  mash   tun  and  stainless  steel  false  bottom  allowing  for  effective  separation  of   wort  from  grain  that  is  unstirred  and  facilitates  starch  conversion  at  a   single  temperature.                -­‐The  mash-­‐in  occurred  at  9:05am  and  the  strike  water  brought  the  mash   to  65.2°C  for  one  hour  which  we  closely  monitored.    At  this  temperature,   although  both  alpha  and  beta  amylase  enzymes  were  functioning,  beta-­‐ amylase  was  predominant  thus  creating  chemical  conditions  lending  to  a   lower  extract  yield  but  higher  fermentability.    This  higher  fermentability   will  occur  based  on  beta-­‐amylase’s  creation  of  maltose  which  is  a  less   complex  carbohydrate  and  thus  easier  to  break  down  during   fermentation.    This  lower  mash  temp  will  ultimately  contribute  to  a  drier   beer.            -­‐We  took  a  pH  reading  during  the  mash  and  observed  a  pH  of  5.4,  a  great   pH  for  amylase  to  effectively  function.          -­‐At  the  end  of  the  mash  the  temperature  had  dropped  to  61.4°  C,  which   is  below  the  optimal  temperature  ranges  for  starch  conversion.    Although   conversion  typically  occurs  in  the  first  thirty  minutes  or  less  of  the  mash,   it  wouldn’t  have  been  a  bad  idea  to  do  an  iodine  test  to  double  check  and   make  sure  conversion  had  occurred.   5.   While  we  allowed  conversion  to  occur  in  our  mash  tun,  we  began   sterilizing  our  plate  chiller  in  preparation  for  post-­‐boil.        -­‐The  plate  chiller  was  sterilized  by  running  hot  water  that  had  been   heated  in  the  boil  kettle  to  temperatures  above  82°C.    This  removed  all   residue  and  microorganisms  in  order  to  avoid  contaminating  our  wort   during  cooling  after  the  boil.    6.    We  started  our  vorlauf  at  9:57am  and  allowed  for  ten  minutes  of   recirculation.        -­‐Vorlauf  is  the  German  word  for  “pre-­‐run”  and  is  utilized  in  brewing  to   draw  off  and  recirculate  the  wort  throughout  the  mash  tun  without   running  off  into  the  boil  kettle.        -­‐Vorlauf  is  important  in  clarifying  the  wort  being  drawn  out  of  the  mash   tun  and  establishing  a  good  filtration  system  through  the  grain  bed.    The   first  runnings  will  appear  hazy  and  contain  some  milled  grain  particles   but  will  eventually  clear  up.    Due  to  our  potentially  too  fine  ground   roasted  barley  and  chocolate  malts,  we  wanted  a  slow  vorlauf  in  order  to   avoid  pulling  the  grain  bed  down  to  the  filter  and  clogging  the  false   bottom.    
  • 6. 7.    After  clarifying  our  wort,  we  began  our  runoff  into  the  boil  kettle  at   10:07am.    At  10:15am  we  began  sparging  using  32.31  l  of  water  at  75.1°C.     During  the  sparge,  we  made  sure  to  adjust  the  sparge  pump  so  that  the   liquid  level  was  about  2-­‐3  cm  above  the  grain  level  in  order  to  ensure  a   steady  rinsing  of  the  grains.    While  we  ran  off  into  the  kettle,  we   simultaneously  heated  the  boil  kettle  and  held  at  a  temperature  just   before  boiling  in  order  to  be  able  to  begin  boiling  quickly  after  finishing   runoff.        -­‐The  technical  term  for  the  runoff  is  lautering,  where  wort  is  separated   from  grains.    Our  mash  tun  also  acted  as  a  lauter  tun  due  to  the  fact  that  it   has  a  false  bottom  that  effectively  filters  the  wort  without  letting  the   grain  drain  off  in  to  the  kettle.        -­‐We  sparged  in  order  to  give  the  grain  an  extra  rinse  to  drain  off  any   residual  fermentable  sugars  on  the  grain  bed  into  our  boil  kettle.    To   avoid  extracting  tannins  from  the  grains,  we  sparged  using  water  at  a   temperature  that  wasn’t  too  hot,  avoided  over  sparging,  and  avoided   sparging  above  a  pH  of  5.8.     -­‐The  sparge  water  temperature  went  unchecked  for  some  time  and  we   noticed  it  had  risen  to  85°C  so  we  stopped  sparging  at  10:19am  and   started  again  at  10:21am  after  it  had  cooled.   8.      We  finished  sparging  at  10:38am  and  ended  our  runoff  into  the  boil  kettle   at  10:45am.    Our  pre-­‐boil  volume  was  48.5  l  and  had  a  pre-­‐boil  gravity   reading  of  16.0°  Brix  measured  using  a  refractometer.        -­‐Our  pH  just  prior  to  boiling  was  5.4,  indicating  we  had  a  good  acidity   and  hadn’t  extracted  tannins  based  on  pH  during  the  sparge.        -­‐Our  actual  pre-­‐boil  volume  of  48.5  l  was  right  on  our  estimated  pre-­‐boil   volume  of  49.12  l.    Our  actual  pre-­‐boil  gravity  of  14.5°  Brix  was  quite  a   way  off  from  our  estimated  pre-­‐boil  volume  of  16.172°  Plato  which   converts  to  16.819°  Brix.    Therefore,  we  decided  to  add  extra  time  to  our   boil  before    our  actual  60  minute  boil  in  order  to  concentrate  the  wort   thus  lowering  the  gravity.        -­‐It  is  important  to  note  that  refractometers  are  fairly  inaccurate  when   measuring  alcohol  and  typically  shouldn’t  be  used  for  beer.    However,  we   use  a  refractometer  anyway  to  obtain  a  rough  estimate  of  numerous   gravity  measurements.        -­‐We  monitor  the  gravity  of  our  wort  throughout  the  brewing  process   because  gravity  is  a  measurement  of  sugar  concentration  in  wort/beer,   which  allows  us  to  know  the  fermentation  capacity  of  our  brew  and  how   much  alcohol  will  ultimately  be  produced  during  fermentation.     -­‐We  also  made  the  decision  to  end  runoff  based  on  our  monitoring  of  the   gravity  throughout  and  once  we  had  reached  our  estimated  pre-­‐boil   gravity  we  ended  runoff.     The  Boil:     9/27/2014  (Same  day)  
  • 7. 1. We  began  our  boil  time  at  10:45am  after  achieving  a  rolling  boil.    We   boiled  until  11:32  am  in  order  to  concentrate  out  wort  to  what  we   measured  as  16.0°  Brix  At  this  time  we  momentarily  shut  off  the  burner   and  added  our  only  hop  addition,  26.2  g  of  Target  hops,  which  would  last   the  duration  of  our  sixty-­‐minute  boil.      -­‐We  boil  our  wort  (unfermented  beer)  in  order  to  evaporate  water  thus   concentrating  the  wort’s  fermentable  sugars,  boil  off  any  volatiles  such  as   dimethyl  sulfide,  and  extract  bitterness  from  hops  via  isomerization.    In   addition,  boiling  wort  is  essential  in  stabilizing  the  wort  by  denaturing   amylase  enzymes  from  mash  as  well  as  killing  any  microorganisms   present  in  the  beer.    Furthermore,  boiling  helps  to  react  simple  sugars   with  amino  acids  to  form  melanoidins  and  flavor  compounds.    Finally,   boiling  denatures  proteins,  causing  the  formation  and  precipitation  of   undesirable  protein-­‐polyphenol  complexes.        -­‐Hops  added  toward  the  beginning  of  the  boil  are  known  as  bittering   hops  because  the  heat  of  the  boil  isomerizes  (changes  the  6-­‐carbon  ring   to  a  5-­‐carbon  ring)  alpha-­‐acids  making  them  soluble  in  water  and  bitter   when  they  were  previously  insoluble  in  water  prior  to  boiling.    These   alpha-­‐acids  are  soft  resins  known  as  humulones  found  within  the  lupulin   glands  of  hops  along  with  essential  oils.      -­‐When  adding  hops  to  the  boil  it  is  important  to  monitor  the  level  of   liquid  in  the  kettle  in  order  to  avoid  a  boil  over.    When  adding  ingredients   to  the  Sabco  system  we  turned  off  the  burner  to  avoid  boil  over  and  also   kept  a  hose  nearby  to  spray  any  erupting  wort.   2. Thirty-­‐six  minutes  later,  at  12:02pm,  we  added  our  0.75  kg  of  oat  sweet   extract,  which  would  contribute  fermentable  sugars  and  hopefully   desirable  flavor  characteristics  to  our  beer.   3. At  12:22pm,  we  added  175.00g  of  cocoa  nibs,  yeast  nutrient,  and  one   Whirlfloc  tablet  with  ten  minutes  left  to  boil.          -­‐We  added  cocoa  nibs  to  enhance  the  chocolate  flavor  of  our  stout.    We   also  added  nutrient  in  order  to  nourish  the  yeast  throughout  the  stages  of   fermentation.    Finally,  we  added  Whirlfloc  in  order  to  help  clarify  the   wort  by  precipitating  proteins  and  beta  glucans  that  contribute  haze  in   the  final  product.   4. At  12:32pm  we  turned  off  the  heat  ending  the  boil,  a  process  known  as   flameout.    Although  cleaning  and  sanitation  are  emphasized  throughout   the  entire  brewing  process,  it  is  absolutely  vital  that  anything  that  comes   in  contact  with  the  wort  from  this  point  forward  is  clean  and  sanitized  to   avoid  contamination  due  to  the  fact  that  the  major  antibacterial  step,  the   boil,  is  finished.     Post  Boil:     9/27/2014  (Same  day)   1. After  turning  the  kettle  burner  off,  we  simultaneously  initiated  the   whirlpool  and  prepared  the  Chill  Wizard  plate  chiller  for  knockout  at  
  • 8. 12:32pm.    To  initiate  the  whirlpool,  we  used  a  clean  and  sanitized  spoon   to  vigorously  stir  the  wort  into  centrifugal  motion.   -­‐The  purpose  of  the  whirlpool  is  to  collect  hop  residues  and  hot  break   (denatured  protein-­‐polyphenol  complexes)  at  the  center  and  bottom  of   the  kettle  via  centrifugal  motion.    This  helps  to  clarify  the  wort  and  make   it  easier  to  separate  from  the  trub  settled  at  the  bottom  of  the  kettle.   2. During  the  whirlpool,  we  prepared  for  knockout  (running  off  wort  into   the  fermenter)  by  connecting  the  hose  to  the  cold  water  inlet  of  the   sterilized  plate  chiller,  connecting  a  second  hose  to  the  warm  water   outlet,  and  connecting  the  oxygen  tank  (set  to  5  psi  but  not  yet  turned  on)   to  the  oxygen  inlet.    In  addition,  we  measured  the  post-­‐boil  gravity  to  be   16.8°  Brix,  the  post-­‐boil  pH  to  be  5.3,  and  the  post-­‐boil  volume  to  be  45  l.      -­‐Our  estimated  post-­‐boil  gravity  was  16.433°  Plato.    When  we  convert  or   actual  gravity  to  Plato,  we  get  a  value  of  16.154°  Plato,  which  is  pretty   close  to  our  estimated  gravity.    In  addition,  our  estimated  post  boil   volume  was  44.51  l,  which  was  also  very  close  to  our  actual  post-­‐boil   volume.   3. First,  we  connected  a  clean  and  sanitized  tri-­‐clamp  hose  from  the  kettle  to   the  plate  chiller  and  a  clean  and  sanitized  tri-­‐clamp  hose  form  the  plate   chiller  to  the  fermenter.    Next,  we  turned  on  the  water  supply  facilitating   cooling  of  the  wort  as  it  passed  through  the  chiller  into  the  fermenter.    In   addition,  we  opened  the  oxygen  tank  connected  to  the  chiller  to  facilitate   a  steady  bubbling  and  aeration  of  the  wort.    We  began  knockout  at   12:47pm  by  opening  the  kettle  and  allowing  the  wort  to  pass  through  the   chiller  system  and  into  the  fermenter.    This  process  occurred  at  an   temperature  of  33°C,  then  cooled  to  27°  C.   -­‐Cooling  the  wort  to  approximately  16°  C  is  absolutely  vital  in  order  to   provide  the  ale  yeast  we  were  using  the  proper  fermentation   environment  in  terms  of  temperature.    Both  ale  and  lager  yeast  will  not   survive  if  pitched  into  non-­‐cooled  wort.    The  wort  should  be  rapidly   cooled  in  order  to  avoid  oxidation,  formation  of  sulfur  compounds,   contamination,  and  also  in  order  to  form  the  cold  break  (trub  settled  out   after  cooling).      -­‐We  use  oxygen  to  aerate  the  wort  due  to  the  fact  that  yeast  need  oxygen   in  the  lag  and  growth  phase  in  order  to  produce  lipids  and  ultimately   grow  and  multiply.    This  ensures  a  healthy,  steady  fermentation.      -­‐Ideally,  we  want  to  cool  the  wort  to  16°  C,  however,  we  were  only  able   to  get  our  heat  exchanger  down  to  a  temperature  of  27°C  and  our   fermenter  to  25°C.    Therefore,  we  planned  on  placing  the  fermenter  in  the   cooler  following  the  end  of  knockout.       4. At  1:00  pm,  we  finished  knockout  into  the  keg-­‐style  fermenter.    The  rapid   chilling  of  the  wort  formed  a  cold  break  (trub  settled  out  after  cooling),   which  we  drained  into  a  slop  bucket  and  discarded.          -­‐Our  post  boil  volume,  as  previously  noted,  was  measured  at   approximately  43.5  l;  however,  after  transfer  and  cooling  we  measure   approximately  42  l  of  cool  wort.    This  discrepancy  likely  occurred  due  to  
  • 9. formation  of  cold  break  as  well  as  losses  from  the  leaking  cylindroconical   and/or  transferring  between  fermenters.      -­‐Our  fermenter  after  cooling  was  about  19-­‐22°C  and  therefore  we  put   the  keg-­‐style  fermenter  into  the  cooler  after  slightly  pressurizing  with   oxygen  and  brought  it  down  to  16°C,  our  desired  fermentation   temperature.     5. As  part  of  the  class  handled  transferring  between  fermenters,  we  also   began  cleaning  the  Sabco  Brew  Magic  System  and  its  components.        -­‐To  clean  the  brew  system,  we  first  emptied  the  mash  tun  into  buckets   that  we  dumped  into  Gifford’s  outdoor  compost.    In  addition,  we  drained   the  trub  from  the  boil  kettle  and  cleaned  manually  aka  cleaned  out  of   place  (COP).      -­‐Next,  we  cleaned  all  of  the  components  of  the  Brew  Magic  System  by   utilizing  the  system’s  CIP  (clean-­‐in-­‐place)  loop.    This  was  accomplished   by  first  connecting  a  tri-­‐clamp  hose  between  the  mash  tun  inlet  and  chill   wizard  outlet,  attaching  a  second  tri-­‐clamp  hose  to  the  chill-­‐wizard  outlet,   and  placing  the  open  end  of  the  second  tri-­‐clamp  hose  into  a  slop  bucket.     Next,  we  filled  the  hot  liquor  tank  with  Pronto  cleaner  and  used  the  Sabco   pump  to  propel  cleaning  solution  through  the  system  while  periodically   venting  oxygen  in  the  chill  wizard  to  be  cleaned  as  well.    After  the  water   runs  clear  into  slop  buckets  from  both  the  hot  liquor  tank  and  mash  tun,   we  emptied  any  remaining  water  in  both  vessels  into  the  slop  buckets.      -­‐Following  cleaning,  we  rinsed  the  system  by  filling  the  mash  tun  with   cold  water  and  circulating  throughout  the  system.    Finally,  we  drained  all   vessels  after  rinsing  and  brought  the  system  piece  by  piece  back  up  to  the   2nd  floor  Gifford  lab.   6. Once  our  fermenter  had  cooled  to  16°  C,  we  took  a  gravity  reading  using  a   hydrometer  and  measured  a  gravity  of  18.25°  Plato.    We  sanitized  the   opening  of  our  fermenter  containing  42  l  cooled  wort  and  poured  1,105   ml  of  Abbey  IV  Ale  yeast  slurry  into  the  fermenter  at  1:35pm  and  closed.     We  ran  a  blow  off  hose  from  the  fermenter  into  a  bucket  of  Iodophor.      -­‐Our  instructor  Jeff  Biegert  prepared  the  yeast  slurry  based  on  his   calculations  using  two  flasks  containing  500  ml  propagated  yeast  each,   and  three  vials  of  35  ml  yeast  containing  40  billion  cells/ml  each.    The   yeast  slurry  count  for  the  propagated  flasks  was  approximately   140,000,000  cells/ml.            -­‐As  previously  mentioned,  cleaning  and  sanitation  is  vital  post  boil   therefore  we  exercised  extreme  caution  when  handling  our  cooled  wort.      -­‐We  use  a  blow  off  hose  to  allow  carbon  dioxide,  a  product  of   fermentation,  to  escape  our  fermentation  vessel.    We  placed  the  blow  off   in  sanitizer  to  avoid  contamination  and  oxygen  from  entering  the   fermenter.      -­‐Our  estimated  batch  volume  was  40  l  according  to  Beersmith  whereas   our  actual  batch  volume  in  the  fermenter  was  42  l.    This  might  explain   why  our  actual  original  gravity  of  18.25°  Plato  was  less  than  our  
  • 10. estimated  original  gravity  of  18.422  Plato  because  our  actual  batch   volume  was  less  concentrated  than  our  estimated  batch  volume.     7. After  pitching  the  yeast,  we  stored  the  fermenter  at  room  temperature   until  it  was  time  to  cold  crash.   -­‐During  storage  at  room  temperature,  the  yeast  we  pitched  were  in  an   anaerobic  environment  which  facilitated  the  metabolism  of  sugars   (primarily  maltose  and  maltotriose)  by  yeast  creating  ethanol,  carbon   dioxide,  and  various  other  flavor  components/byproducts  in  a  process   known  as  fermentation.     10/2/2014   1. We  added  three  six-­‐ounce  bags  of  each  berry  (blueberry  and  blackberry)   in  a  steep  bag.     10/6/2014   1. Jeff  decided  to  add  some  left  over  cocoa  nibs  to  the  fermenter  at  an   unknown  amount.     10/7/2014   1. We  cold  crashed  our  beer  at  this  time  in  order  to  ultimately  clarify  our   beer.    This  occurs  due  to  the  fact  that  when  cold  crashed  at  near  freezing   temperatures,  yeast  and  other  sediments  undesirable  in  the  final  product   will  group  together  (flocculate)  and  fall  to  the  bottom  of  the  vessel.           10/10/2014   1. We  ended  cold  crash  on  this  day.    New  Belgium  lab  analysis  from   10/6/14  indicated  a  back  calculated  original  gravity  (BCOG)  of  16.97°   Plato,  a  final  gravity  (FG)  of  approximately  4.25°  Plato,  High  EBC   (European  Brewing  Convention:  measure  of  color),  and  6.94%  ABV.    We   used  a  hydrometer  to  observe  a  final  gravity  4.8°  Plato.       -­‐The  lab  report  indicated  both  our  original  and  final  gravity   measurements  using  a  hydrometer  were  off  due  to  the  fact  our  actual   original  and  final  gravities  were  higher  than  those  calculated  at  New   Belgium’s  lab.    These  differences  in  measurements  can  likely  be   attributed  to  human  error,  perhaps  we  didn’t  account  for  temperature   when  measuring  original  and  final  gravity.    However,  the  alcohol-­‐by-­‐ volume  values  were  the  same.       2. We  cleaned  (using  Pronto)  and  sanitized  (using  Iodophor)  or  maturation   keg  where  we  would  be  transferring  our  green  beer,  or  non-­‐matured   fermented  beer.    In  addition,  we  purged  our  maturation  vessel  in  order  to   avoid  oxidation  of  our  beer,  which  can  cause  off  flavors  in  the  finished   product.   3. We  racked  from  our  keg-­‐style  fermenter  into  our  clean  and  sanitized   maturation  keg  using  carbon  dioxide  head  pressure  to  transfer.    Once  we   had  racked  into  our  maturation  keg  we  returned  the  green  beer  to  the   cooler  to  be  further  matured  and  stabilized.  
  • 11.   Packaging:       10/17/2014   1. Our  teaching  assistants  and  Oskar  Blues  guest  speakers  had  presumably   cleaned  and  sanitized  all  cans  and  equipment  when  we  showed  up  to   class.    In  addition,  they  had  set  up  their  Cask  Manual  Canning  System,   which  they  had  used  to  can  their  beers  when  they  were  a  smaller   brewery.    This  system  consists  of  a  can  filling  platform  and  a  seaming   platform.    With  all  of  our  equipment  cleaned  and  sanitized  we  were  ready   to  package  our  beer.   2. Next,  we  added  180g  of  corn  sugar  mixed  with  300  ml  of  boiled  distilled   water  for  the  40  l  of  beer  we  had  collected  in  the  maturation  tank.    Jeff   Biegert  calculated  this  amount  of  corn  sugar  using  Beersmith,  which  he   mentioned  considered  a  wide  variety  of  aspects  of  the  beer.      -­‐We  used  corn  sugar  for  canning  due  to  the  fact  that  it  is  a  simple  sugar   (dextrose),  which  will  be  metabolized  for  a  “mini”  fermentation  within   the  can.    This  mini  fermentation  will  contribute  an  insignificant  amount  of   ethanol  but  more  importantly  it  will  produce  carbon  dioxide,  thus   carbonating  our  beer.        -­‐We  carbonate  beer  because  carbonation  is  very  important  in   contributing  to  mouthfeel,  consistency  and  stability  of  the  foamy  head,   and  overall  flavor.   3. We  connected  our  maturation  tank  to  the  filling  platform  in  order  to   properly  dispense  our  beer  into  each  can.   4. To  can,  we  first  placed  empty  cans  on  the  filling  platform.    With  the  push   of  a  button,  the  automated  system  purged  all  oxygen  from  the  can  using   carbon  dioxide  at  approximately  15  psi.    By  purging  the  cans  of  oxygen,   the  cans  are  less  likely  to  oxidize  and  spoil  and  therefore  will  have  a   longer,  more-­‐stable  shelf  life.    After  purging  each  can,  the  filling  platform   also  automatically  fills  each  can  to  the  correct  amount  with  the  help  of  an   automatic  shut  off  sensor.   5. Once  a  can  had  been  filled,  we  placed  a  clean  and  sanitized  lid  on  the  top   of  the  can  and  placed  it  in  the  sealing  platform.    Again,  with  the  push  of  a   button,  the  sealing  platform  will  seal  the  lid  to  each  can,  eliminating  the   possibility  of  oxygen  or  any  sources  of  contamination  to  enter  the  can.   6. Finally,  while  students  simultaneously  filled  and  sealed  cans,  we  made   sure  to  label  each  can.    We  stored  a  yield  of  approximately  three  cases  of   beer  in  the  brew  lab’s  incubator  just  above  room  temperature  (a   favorable  temperature  for  residual  yeast)  and  allowed  carbonation  to   occur  via  fermentation.    This  was  done  in  order  to  be  ready  for  when  we   tasted  our  first  sample  of  finished  beer  a  week  later  on  October  24,  2014.     Sensory  Evaluation    
  • 12. After  completing  tasting  and  a  BJCP  score  sheet  of  our  B3  Cubed  Dark   Chocolate  Stout  on  11/4/2014,  my  total  score  for  our  brew  was  35/50.    Here  was   the  breakdown:     Aroma  (9/12):     -­‐The  primary  aromas  are  chocolate,  alcohol,  slight  roast,  and  dark  fruits.    The   chocolate  aromas  are  a  result  of  both  the  chocolate  malts  we  used  as  well  as  cocoa   nibs.    The  smell  of  alcohol  is  particularly  surprising  due  to  the  fact  the  New  Belgium   lab  only  tested  the  ABV  to  be  6.85%.    Nonetheless,  the  aroma  was  fairly  alcoholic   leading  one  to  think  the  fermentation  temperature  was  high  thus  creating  fusel   alcohols.    The  aroma  also  had  some  slight  roast,  which  can  be  attributed  to  the   roasted  barley  we  included.    Finally,  the  stout  had  a  pleasant  dark  fruit  and  berry   aroma  from  the  blackberries  and  blueberries  we  added  during  fermentation.    These   fruity,  estery  aromas  could’ve  also  been  a  product  of  the  Belgian  Abbey  yeast  strain   we  used.  Overall,  there  were  a  variety  of  pleasant  aromas  present  however  the  smell   of  alcohol  was  slightly  offputting.     Appearance  (1.5/3):     -­‐The  beer  had  a  nice  dark  black  color  rendering  it  opaque  as  a  result  of  the   combination  of  chocolate  and  crystal  malts  as  well  as  use  of  roasted  barley.    In   addition,  despite  the  use  of  Whirlfloc,  whirlpooling,  formation  and  separation  of  cold   break,  and  cold  crashing,  the  stout  was  so  dark  it  was  opaque.    The  beer  poured  a   large  tan  head  with  big  bubbles  that  subsided  almost  instantly.    Overall,  the  finished   beer  had  a  fair  appearance  but  could’ve  benefited  from  good  head  retention  and   lacing.     Flavor  (15/20):     -­‐Again,  the  culmination  of  malt,  cocoa  nib,  and  berry  additions  added  some   great  flavors.    There  were  nice  roast  and  chocolate  tastes  as  a  result  of  the  malts  and   cocoa  nibs  we  used.    Furthermore,  the  stout  had  a  pleasant  dark  fruit  and  berry   flavor  which  could  be  attributed  to  the  berry  additions  and  perhaps  our  Belgian   yeast  strain.    The  beer  also  finished  fairly  sweet,  likely  due  to  our  higher  than   expected  final  gravity.    Overall,  the  stout  was  fairly  balanced  between  roast,   chocolate,  and  fruit,  however,  the  alcohol  content  isn’t  well  masked  and  the  beer   tastes  slightly  alcoholic.     Mouthfeel  (3.5/5):     The  beer  is  fairly  smooth  and  medium-­‐bodied.    The  beer  is  warm  likely  due   to  fusel  alcohols  produced  during  fermentation.    The  beer  also  tastes  slightly  flat   perhaps  due  to  inadequate  priming  sugar.    Overall,  the  beer  had  decent  mouthfeel   but  was  slightly  off-­‐put  by  warmth  and  lack  of  carbonation.     Overall  Impression  (7/10)     -­‐As  evident  by  my  overall  impressions  of  aroma,  appearance,  flavor,  and   mouthfeel,  there  were  a  lot  of  enjoyable  characteristics  of  this  beer  including  malt   and  berry  aroma  and  flavor,  the  color,  and  the  smooth,  medium-­‐bodied  mouthfeel.    
  • 13. However,  the  aroma,  taste,  and  flavor  of  alcohol  in  the  beer  was  fairly  off  putting.     The  lack  of  full  carbonation  was  also  fairly  undesirable.    The  beer  could  be  improved   by  eliminating  the  alcohol  presence  in  the  aroma  and  flavor  likely  by  fermenting  at   lower  temperatures  or  balancing  ingredients  as  well  as  further  conditioning  time  or   recalculation  and  new  use  of  priming  sugar  in  order  to  fully  carbonate  the  beer.     Overall,  our  second  brew  attempt  of  a  fairly  experimental  Belgian  chocolate  stout   was  fairly  successful,  but  not  outstanding  and  could  use  improvement.     Reflection  of  Results       For  being  a  fairly  experimental  beer  and  encountering  a  few  problems  along   the  way,  our  overall  experience  brewing  the  B3  Chocolate  Stout  as  well  as  our   finished  beer  seemed  to  be  a  success.    The  first  problem  we  encountered  was  milling   some  of  the  grain  a  bit  too  finely.    However,  we  luckily  did  not  encounter  a  stuck   mash  and  therefore  this  didn’t  become  much  of  an  issue.    Although  we  may  have   avoided  some  of  the  technical  difficulties  we  had  encountered  in  our  first  brew,  we   weren’t  as  close  to  our  estimated  values  as  we  had  gotten  on  our  first  brew.    For   example,  we  ended  up  having  to  boil  for  forty-­‐five  minutes  prior  to  our  actual  sixty-­‐ minute  boil  due  to  the  fact  that  we  had  a  much  lower  gravity  than  expected  going   into  our  boil,  meaning  we  needed  to  concentrate  our  wort  to  achieve  the  correct   gravity.    Another  problem  we  encountered  was  chilling  our  wort  to  the  correct   temperature  during  knockout,  which  was  attributed  to  the  chiller  not  working   optimally.    Although  our  calculated  and  actual  alcohol-­‐by-­‐volumes  were  the  same,   our  actual  original  and  final  gravities  were  higher  than  calculated  by  New  Belgium’s   lab.    As  previously  mentioned  in  the  procedure,  this  discrepancy  was  likely  the   result  of  human  error  of  measurement.    Regardless,  we  had  a  fairly  high  final   gravity,  which  likely  occurred  due  to  an  incomplete  fermentation.    Although  we   seemingly  pitched  far  more  yeast  for  this  brew  than  our  first,  the  Odell  house  yeast   pulled  from  the  bottom  of  one  of  their  fermenters  had  already  been  propagated  for  a   massive  scale  fermentation  and  therefore  had  a  much  higher  slurry  count  than  the   Belgian  Abbey  yeast  we  had  propagated.    Despite  pitching  over  a  liter  of  yeast  into   our  wort,  it  seems  the  beer  simply  did  not  have  enough  yeast  to  consume  all  of  the   fermentable  sugar  in  our  wort  and  bring  the  final  gravity  down.    Overall,  although   we  encountered  several  problems  throughout  the  brew,  it  is  safe  to  say  it  was   ultimately  a  smooth  experience  that  went  well  and  accomplished  its  goals.     Other  than  some  minor  issues  than  we  were  able  to  easily  resolve  or  at  least   work  with,  the  brewing  experience  went  well.    We  had  no  trouble  mashing,  sparging   or  boiling,  little  to  no  trouble  with  fermentation,  maturation,  or  packaging,  and  our   finished  beer  came  out  pretty  good.    Unlike  our  last  beer,  we  didn’t  have  trouble   with  a  leaking  plate  chiller  or  fermentation  vessel.    Another  positive  aspect  of  our   brewing  experience  was  the  fact  that  our  Beersmith  estimated,  actual,  calculated,   and  New  Belgium  lab  tested  measurements  and  values  were  all  fairly  consistent   with  the  exception  of  our  high  final  gravity.    Our  estimated  and  actual  pre-­‐boil   gravity  and  volumes,  post-­‐boil  gravity  and  volumes,  and  overall  batch  volume  and   gravity  were  all  fairly  consistent  and  when  inconsistencies  arose  we  corrected  for   them  (such  as  the  low  pre-­‐boil  gravity).    There  were  some  minor  discrepancies  
  • 14. between  estimated,  calculated,  and  actual  ABV  and  IBUs  but  these  were  likely  the   result  of  minor  differences  in  gravities  and  volumes  of  each  step.    Overall,  we   yielded  fairly  consistent  results  with  some  minor  exceptions  based  on  our   Beersmith  estimations  and  actual  results  indicating  that  we  were  fairly  efficient  in   our  brewing  processes.     Based  on  the  wide  parameters  of  the  BJCP  Specialty  Beer  category,  it  was   difficult  to  compare  our  beer  directly  to  the  category.    However,  we  ultimately   produced  a  black,  opaque,  smooth,  medium-­‐bodied  ale  which  had  great  chocolate,   berry,  and  dark  fruit  flavors  and  aromas  which  seem  to  point  to  our  beer  being  a   successful  interpretation  of  a  chocolate  and  fruit  Belgian  stout.    The  only  changes  I   would  make  to  the  beer  next  time  would  be  to  adjust  the  sweet  malt  backbone  and   the  strong-­‐alcoholic  nature  of  the  beer  in  terms  of  aroma  and  flavor  which  I  believe   negatively  affects  the  balance  of  the  beer.    Also,  I  would  make  sure  the  beer  is  fully   carbonated  (although  the  beer  poured  with  a  head  it  instantly  disappeared).    In   conclusion,  we  had  a  great,  relatively  problem-­‐free  brewing  experience  brewing  the   B3  Cubed  Dark  Chocolate  Stout  in  which  we  furthered  our  already  developing   knowledge  of  fermentation  and  brewing  processes  and  ultimately  created  a  quality   final  product.