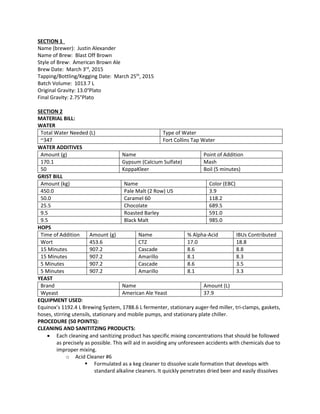
SlideShare a Scribd company logo
1 of 9
Download to read offline
SECTION 1
Name (brewer): Justin Alexander
Name of Brew: Blast Off Brown
Style of Brew: American Brown Ale
Brew Date: March 3rd
, 2015
Tapping/Bottling/Kegging Date: March 25th
, 2015
Batch Volume: 1013.7 L
Original Gravity: 13.0°Plato
Final Gravity: 2.75°Plato
SECTION 2
MATERIAL BILL:
WATER
Total Water Needed (L) Type of Water
~347 Fort Collins Tap Water
WATER ADDITIVES
Amount (g) Name Point of Addition
170.1 Gypsum (Calcium Sulfate) Mash
50 KoppaKleer Boil (5 minutes)
GRIST BILL
Amount (kg) Name Color (EBC)
450.0 Pale Malt (2 Row) US 3.9
50.0 Caramel 60 118.2
25.5 Chocolate 689.5
9.5 Roasted Barley 591.0
9.5 Black Malt 985.0
HOPS
Time of Addition Amount (g) Name % Alpha-Acid IBUs Contributed
Wort 453.6 CTZ 17.0 18.8
15 Minutes 907.2 Cascade 8.6 8.8
15 Minutes 907.2 Amarillo 8.1 8.3
5 Minutes 907.2 Cascade 8.6 3.5
5 Minutes 907.2 Amarillo 8.1 3.3
YEAST
Brand Name Amount (L)
Wyeast American Ale Yeast 37.9
EQUIPMENT USED:
Equinox’s 1192.4 L Brewing System, 1788.6 L fermenter, stationary auger-fed miller, tri-clamps, gaskets,
hoses, stirring utensils, stationary and mobile pumps, and stationary plate chiller.
PROCEDURE (50 POINTS):
CLEANING AND SANITITZING PRODUCTS:
 Each cleaning and sanitizing product has specific mixing concentrations that should be followed
as precisely as possible. This will aid in avoiding any unforeseen accidents with chemicals due to
improper mixing.
o Acid Cleaner #6
 Formulated as a keg cleaner to dissolve scale formation that develops with
standard alkaline cleaners. It quickly penetrates dried beer and easily dissolves
oxalate scale. Being an acid detergent, it can clean in a CO2 environment
without damaging the keg. (www.fivestarchemicals.com)
 A large amount of breweries will use a caustic solution for their cleaner.
o Peracetic Acid
 A sanitizing chemical with the chemical structure of CH3COOH that breaks down
into acetic acid and hydrogen peroxide, later decomposing into H2O, O2, and
CO2. This sanitizer is used by many breweries as a standard sanitizer.
 Sanitizers are used to stabilize any cleaner that was leftover from the CIP, as
well as reduce or eliminate any microorganisms that may have been left behind.
 A large amount of breweries use Peracetic Acid as their sanitizer.
CLEANING AND SANITIZING PROCESSES:
NOTE: Each brewing system will be different, but the basic concepts of CIP and SIP remain.
1. First, all utensils, tri-clamps, and gaskets should be cleaned and ready to use. Set those aside in a
bucket of sanitizer once cleaned.
2. The hot liquor tank (HLT) needs to be filled and mixed with the proper amount of Acid Cleaner
#6. This solution will be used to clean the entire system.
3. Once the HLT is filled with the proper amount of cleaning solution, the control panel can be
used to move the solution through the pipes, hoses, plate chiller, and into the desired vessels.
The vessels are the HLT, mash tun, boil kettle, lauter tun (if it is a separate vessel), and the
fermentation vessel.
4. Allow the cleaner to circulate through each destination for 15 minutes.
5. Once the 15 minutes has passed, the system, pipes, hoses, plate chiller, and vessels need to be
emptied and then rinsed. Once everything has been rinsed, the system is ready to be sanitized.
6. In order to sanitize-in-place (SIP), run all CIP steps with the proper amount of Peracetic Acid, but
do not attempt to rinse anything that needs to remain sanitized; rinsing with water negates
sanitizing. The sanitizer should have contact with anything that will be used for 2 minutes.
PRE-BREW: MARCH 3rd
1. Ensure that the brewing system, as well as all transfer lines and hoses have been CIP’d and SIP’d.
Ensure that the system is operating properly and is without defects. Also, be sure to clean and
sanitize any tools and utensils that will be used during the brewing process. This includes tri-
clamps, stirring utensils, hoses, etc.
2. Ensure that the plate chiller has been cleaned and sanitized before use. Failure to do so will
result in the transferring of the finished wort through dirty, contaminated lines, which will
jeopardize the finished product.
3. Ensure that the fermentation vessel has been cleaned and sanitized. Failure to properly clean
and sanitize this vessel will result in unwanted contaminants, such as soils and microorganisms,
in the finished product.
4. We measured out 170.1 g of Gypsum (calcium sulfate) into a container. These will be added to
the mash.
5. We measured out 450 kg of 2-row malt, 50 kg of Caramel 60 malt, 25.5 kg of Chocolate malt, 9.5
kg of Roasted Barley malt, and 9.5 kg of Black malt and sent them separately into the auger-fed
miller. Once we obtained the correct amounts of each malt, we ran them separately through the
properly calibrated miller. This ensures that the contents of the barley are exposed, making
them available to enzymatic activity later in the brewing process.
 Pale Malt (2 Row) US – The pale malt serves as a base malt for a large variety of styles. It
has an adequate amount of enzymes available for starch conversion, allowing for the
use of higher modified varieties of malts.
 Caramel Malt 60 – This malt is a medium colored malt that is capable of adding a slight
sweetness to the beer, increasing head retention, as well as adding body to the
mouthfeel.
 Chocolate – This malt is a darker variety malt that is used to add deep red and brown
colors to beer. It doesn’t add a lot of malty flavor to the beer, but it is capable of adding
nutty flavors.
 Roasted Barley – With enough of this malt used, it can impart roasted, coffee-like
flavors. The malt also imparts a nice red-brown color to beers.
 Black Malt – Black malt is typically used to add a dryer, bittering malt flavor to beers.
The extreme dark color makes it capable of being added in moderation to achieve
substantial color change in the beer.
6. We measured out 453.6 g of CTZ hops, 907.2 g of Cascade hops, 907.2 of Amarillo hops, and
then another 907.2 g of Cascade hops, 907.2 of Amarillo hops. The doubled measurements are
to accommodate for different addition times. These will be added to the boil. These hop
additions will be done without a hop bag.
 Pellet hops were used for this brew. Pellet hops are easier to store, and the trub is much
less of a hassle compared to whole-cone hops, reducing the odds of having to filter.
They also have a higher utilization factor than whole-cone hops, and they also break
apart easier in the boil (resulting in higher utilization).
 CTZ (Columbus/Tomahawk/Zeus) – The CTZ hops were used for their bittering qualities.
The addition in the wort will make it possible for some of the alpha and beta acids to
create flavor compounds before they are possibly volatized away during the boil.
 Cascade (15 minutes) – These hops were used mainly for aroma, as indicated by their
addition time of 15 minutes. The 907.2 g addition will contribute some bittering and
flavor qualities to the brew, but a majority of the hop will be utilized for aroma. These
hops are of a US variety.
 Amarillo (15 minutes) – These hops were used mainly for aroma, as indicated by their
addition time of 15 minutes. The 907.2 g addition will contribute some bittering and
flavor qualities to the brew, but a majority of the hop will be utilized for aroma. These
hops are of a US variety.
 Cascade (5 minutes) – These hops were used mainly for aroma, as indicated by their
addition time of 20 minutes. The 907.2 g addition will be utilized for aroma. These hops
are of a US variety.
 Amarillo (5 minutes) – These hops were used mainly for aroma, as indicated by their
addition time of 20 minutes. The 907.2 g addition will be utilized for aroma. These hops
are of a US variety.
NOTE: The protein contents of malts and hops contribute to the head of a finished beer. The
higher the protein content, the better head production and retention.
BREW-DAY: MARCH 3rd
SAFETY NOTE: WHEN CONNECTING ANY HOSES, TRI-CLAMPS, OR USING ANY EQUIPMENT
THAT WILL CONTACT THE WORT, BE SURE THAT THEY HAVE BEEN PROPERLY SANITIZED, AS
WELL AS SPRAYING ANY CONNECTIONS WITH IODOPHOR BEFORE SEALING.
1. In the HLT, we brought 715.4 of water to 80.0°C. This temperature will be high enough to
introduce the water to the grain to achieve our desired mashing temperature of 67.8°C.
 The reason that strike water was brought up to 80.0°C and not the desired mashing
temperature of 67.8°C was to account for the temperature difference of the cool grains.
2. Once the water was brought up to temperature, we began moving the grain through the miller
and into the mash tun. While the transfer was occurring, the grains were wetted upon entry into
the mash tun. This ensures that there is a consistent moisture coating for all of the grains,
resulting in higher quality wort and higher consistency of enzymatic activity.
3. At 9:27 am, the water reached 80.0°C. At this point, we moved the 715.4 L of water to the mash
tun where it was simultaneously introduced to our milled grain. This is also the point that the
water additive was introduced to the mash. The measured temperature of the mash was 67.8°C
which is proper for a mashing temperature.
 The water additive introduced will help the water components increase in calcium
content, leading to a harder water quality. The calcium will help lower the pH of the
water, and this will favor: enzymatic activity, extraction efficiency, aid in precipitating
proteins, increase free amino nitrogen (FAN) content (important for yeast growth),
promote perceived sweetness of the beer, and extract less harshly perceived bitterness
from the hops.
 The purpose of mashing at this temperature is to achieve the desired enzymatic activity.
This enzymatic activity is responsible for converting the starches (amylose and
amylopectin) located in the grain into sugars that can be converted to alcohol by the
yeast that will be introduced at the beginning of the fermentation process. There are
two enzymes that are vital to starch conversion: α-amylase and β-amylase.
o α-amylase breaks down the starches in the grain at random 1-4 linkages. This
enzyme is the only one capable of penetrating amylopectin, and prefers
temperatures at or above 70°C.
o β-amylase hydrolyzes amylose and amylopectin at reducing ends only, making
α-amylase vital to the process. This enzyme prefers temperatures from 54-60°C.
4. At 10:15 am, the mashing step was completed, and the vorlauf process was initiated. This
process lasted until 10:30 am (15 minutes).
 Vorlaufing is the process of pulling off wort from the mash tun and reintroducing it at
the top of the vessel. This allows you to determine when the grain bed has effectively
packed itself, creating a filter bed for the sparging step, helping to achieve a clearer
wort.
5. At 10:15 am, we began the runoff phase. This is when we moved the wort from the mash tun to
the boil kettle. The runoff needs to achieve a volume in the mash tun that leaves about 5 cm of
wort above the grain bed, which would then initiate the sparging phase.
6. At 10:30 am, the wort level was approximately 5 cm above the grain bed, and we began the
sparging phase. We sparged with 715.4 L of water at 78.3°C, and the process lasted until 12:00
pm (90 minutes).
 Sparging, essentially, is the process of chasing the wort from the mash tun to the boil
kettle with the proper temperature of water (75-80°C). Sparging aids in the removal of
desirable extracts, such as sugars, proteins, color, and flavor compounds. Sparging too
quickly can result in the extract of unwanted compounds such as tannins, as well as less
efficient color extraction.
7. Once the wort was completely transferred into the boil kettle, prior to boiling, we added our
CTZ hops.
8. Before the boil began, we obtained the volume of the wort and it was at 1311.6 L.
 At this stage, our class would typically take a pre-boil gravity reading for consistency
from brew to brew, but Equinox prefers to skip this step.
9. At 12:10 pm, the wort came to a rolling boil, and the Target hops were added. Careful attention
must be paid during addition steps, as boil overs are a common occurrence. If a boil over occurs,
spray it down with cold water from a hose until the vigor subsides, and/or shut off the gas to the
kettle burner.
 Boiling has 5 primary goals: evaporation of water and concentration of wort,
evaporation of volatiles, extraction of bitterness from hops, color and flavor formation,
and stabilizing the wort.
o Evaporation of water and concentration of wort – This step ensures that water
has evaporated, leaving a concentrated wort for the yeast to efficiently work
with during fermentation.
o Evaporation of volatiles – There are specific compounds of wort and hops that,
if unattended, would impart off flavors and aromas to the beer, such as cooked
corn odor, which results from dimethyl sulfide (DMS). Proper boiling techniques
ensures that these compounds are removed.
o Extraction of bitterness from hops – During boiling, the α-acids in hops are
isomerized, changing them from a 6-carbon ring to a 5-carbon rings. The 6-
carbon rings are insoluble in beer and would result in a haze.
o Color and flavor formation – Boiling ensures that reducing sugars react with
amino acids from the malt, forming colored Maillard compounds (melanoidins),
and flavor compounds. This reaction also reduces the likelihood of scorching
due to over boiling.
o Stabilization of the wort – During the boil, α- and β-amylases are denatured, the
wort is sterilized (killing any microorganisms present), and protein-polyphenol
complexes are formed and precipitated. The heat causes the proteins to
denature, causing the exposure of many negative sites. These negative sites
react with the positive poly-phenols, resulting in a complex (flocs). These
complexes are the floating compounds seen in the wort.
10. At 1:25 pm, we added our Cascade and Amarillo hops. Be aware of a boil over.
11. At 1:35 pm, we added our second addition of Cascade and Amarillo hops. Again, be aware of a
boil over.
12. At 1:35 pm we also introduced 10 tablets of KoppaKleer (5 g each, 50 g total).
 KoppaKleer aids in the coagulation of the flocs during the boil and whirlpool step,
settling the complexes out, thus stabilizing the wort and resulting in a clearer, brighter
beer.
13. At 1:40 pm, the boil step was completed, and the flameout step was reached. This is the point
where the whirlpool was initiated. The wort was stirred into a whirlpool and allowed to rest for
20 minutes.
 During this step, wort haze was pulled together to form larger precipitates, and the
remaining circulation of the wort brings all of the precipitates to the center of the boil
kettle, making them easier to avoid removing during transfer.
14. As the whirlpool was occurring, we prepared the plate chiller for the knockout step. The plate
chiller was already cleaned and sanitized during at the end of the brew. We also connected the
oxygen tank to the oxygen inlet.
15. Before we began the knockout phase, we took the gravity measurement of the wort, which was
13.0°Plato.
 By taking the OG reading, we are enabling ourselves to calculate the % alcohol-by-
volume (%ABV) of the finished product. We will be able to calculate the %ABV once we
obtain the final gravity (FG).
16. At 2:05 pm, we began the knockout phase. During this phase, we turned on the pump to move
the wort from the kettle, through the plate chiller, and from the plate chiller through the tri-
clamp hose to the cleaned and sanitized fermentation vessel. This allows a cross-flow of cold
water with the hot wort, which will chill the wort down to our desired final temperature of 20°C.
 Using a plate heat exchanger allows the wort to be cooled down to temperature at a
rapid rate. If the wort doesn’t achieve its final temperature in adequate time, off-flavors
and compounds will result, producing a less-than-adequate final product.
17. While the wort was being moved to the cylindroconical vessel (CCV)/fermentation vessel (FV),
we turned on the oxygen tank. We maintained a steady, constant bubbling with the oxygen
control valve. The transferred wort was measured at a final temperature of 20°C. This step
lasted until 2:37 pm (32 minutes).
 The 20°C goal is a temperature that allows us to pitch the yeast into the wort without
harming the yeast. If yeast is pitched at too high of a temperature, the yeast will be
killed off, and fermentation will not proceed, but if the temperature is too cold, the
fermentation will be delayed, and off flavors may be produced.
 The purpose of oxygenation during the transferring of the wort is to provide oxygen to
the yeast. Without oxygen, the yeast will not have the necessary nutrients available to
reproduce, resulting in an under-fermented product.
18. At this point, we were ready pitch the yeast. In total, we pitched 37.9 L of yeas. Equinox prefers
to have a more hands-on approach to their brewing practices, so they measured the amount of
yeast to use by feel. The yeast pitched amount was determined by Jared, the head brewer of
Equinox. The yeast strain we used was from a previous batch of Equinox’s Eutropycal IPA, and
the strain was their 5th
generation of the American Ale yeast.
 CCVs are ideal fermentation vessels because of their shape. The CCVs have a cone shape
at the bottom of the vessel, and this is where the yeast and sediment flocculate out and
settle. The cone also has an access valve, making it easy to remove sediment, helping to
achieve a clearer finished product.
 Flocculation is the ability of the yeast to drop out of solution, resulting in a clearer, less
hazy beer.
 Attenuation is the percentage that measures the conversion of sugars in the substance
to alcohol and CO2.
19. During fermentation, the temperature was maintained at 20°C. The CCV was kept in check by
their glycol jackets lining the fermenter. The fermentation process is quite complex, with
different factors altering the final product. According to the Fermentation Theory, there are 4
basic steps:
 Step 1 – Lag Phase: During this phase, the yeast are consuming the oxygen that was
introduced during the transfer of the wort from the boil kettle, through the place chiller,
and then to the CCV. This is also the stage where the yeast are synthesizing enzymes
that are needed to support growth.
 Step 2 – Growth Phase: During the growth phase, yeast cells are budding, and the
population is increasing logarithmically. The rate of the fermentation is determined by
this phase, dependent on the rate and extent of growth.
 Step 3 – Fermentation: During fermentation, the yeast cells are metabolizing the simple
sugars into double the amount of pyruvate. From there, enzymes convert the pyruvate,
with the help of pyruvate decarboxylase, into acetaldehyde, releasing CO2. Once
acetaldehyde is obtained, the yeast then convert them into ethanol with the help of
alcohol dehydrogenase. There are a large number of other compounds created during
this phase, from aromas to flavors, and each compound produced can be controlled
with the environment the fermentation is placed in.
 Step 4 – Flocculation: This is the point where the yeast have done all that they can do
for the fermentation and begin to clump together. The larger clumps are then heavy
enough to settle to the bottle of the CCV, where they can be removed through the valve
at the bottom of the vessel.
20. On March 19th
, the fermentation reached the final gravity (FG) of 2.75°Plato and stayed
constant, indicating that fermentation was complete and the process could be halted. At this
point, the CCV was dropped down to a temperature of 3.3°C, and this would stop metabolic
processes and begin to settle out the yeast and sediment. The CCV was left at this temperature
until March 23rd
.
RACKING: MARCH 19TH
1. On March 19th
, the product was dropped down to 3.3°C and left there until March 23rd
. It was
left at this temperature until March 25th
, allowing the beer to rest and smooth out as many of
the flavor profiles as possible.
 Racking is the process of moving beer from one vessel to another in order to chill it. The
purpose of racking is to remove the beer from any settled yeast and sediment that may
be left behind in the CCV. These yeast, once they have consumed all of the nutrients
that the wort has to offer, can begin to autolyze, creating off, undesirable flavors. By
moving the beer to another vessel, it allows flavors and aromas time to smooth out,
creating a better quality final product. The racking stage also allows particles in the
product a little more time to precipitate out, resulting in a clearer finished product.
2. For this brew, we set the temperature of the CCV to 3.3°C and allowed it to rest for 2 days.
Typically, Equinox leaves their beer at this temperature for only 24 hours, but in order to allow
each of the students in the class to participate, they waited 48 hours.
3. After the 48 hours, we fined the beer with 350 mL of Biofine and allowed it to go through a
diacetyl rest. Fining the beer will allow the fining agent to grab onto the remaining yeast and
sediment, making them able to be removed easily after a set period of time (48 hours for this
brew). This process will enhance the clarity of the beer.
 A diacetyl rest allows the yeast to consume and digest any diacetyl that may have been
produced during fermentation. Diacetyl is a common byproduct of yeast metabolism
that, if left unchecked, can produce off flavors described as “buttery” or can give the
beer a “slick” mouthfeel.
NOTE: It is important that, during transfer, the amount of oxygen introduced to the product is
minimal to none. Oxygen introduced at this stage will oxidize the beer, lessening the quality of
the final product in terms of flavor and overall satisfaction.
PACKAGING AND CARBONATION: MARCH 13TH
1. This is the stage where the beer is moved from the conditioning vessel to the carbonating
vessel, whether that be bottles, cans, kegs, or a beer bright tank (BBT). For this brew, we utilized
Equinox’s BBTs that also serve as their serving tanks in their taproom.
2. To begin, we ensured that the BBT was cleaned and sanitized using their Acid Cleaner #6 for
cleaning, and their Peracetic Acid for sanitizing. The cleaning step will again last 15 minutes,
then needs to be rinsed. After rinsing, the sanitizing step should last for 2 minutes.
3. After cleaning and sanitizing, the BBT needed to be purged with CO2 in order to remove any
remaining oxygen or other beer spoilers.
4. In order to move the beer from the CCV into the BBT, sterilized hoses were hooked up from the
CCV to the BBT and head pressure was applied to the CCV. This allows the beer to be forced
through the lines without the use of any pumps.
5. Carbonating occurred after the beer was transferred into the BBT by the use of carbonating
stones. These stone are rod-shaped and porous. The rod is connected to a sterile CO2 line that
forces CO2 through the pores, thus carbonating the beer. Equinox decided that the volumes of
CO2 should be at 2.35 volumes for this beer.
 Volumes of CO2 are determined by the temperature at which the beer will be stored and
the amount of pressure inside of the bottles. There are pressure/temperature
dependent charts available for reference on-line.
6. At this point, the beer, once up to carbonation levels (~2 hours), is ready to be served. It should
be kept chilled from this point on.
SENSORY EVALUATION: MARCH 12TH
(see separate, completed BJCP score sheet)
REFLECTION OF RESULTS AND DISCUSSION
Overall, I think the beer turned out to be above average. My sensory analysis shows that
the beer has room for improvement when stylistic accuracy is concerned, but regardless of
points, it is a beer. Nearly every aspect of it left me wanting another drink, but it still had its
flaws.
 Aroma – The aroma was prominently of roasted malts and hop spiciness. There was a
very faint chocolate smell as well. The hop aroma gave me mixed feelings when mixed
with the roasted aroma of the malts. I don’t think they worked well together. Separately
they may be very appealing, but combined I think they were a little too contrasting. I
didn’t detect any diacetyl or ester aromas, but this was OK when considering style
guidelines.
 Appearance – I felt that the appearance of the beer was satisfying. You could make
assumptions about the flavor of the beer without even tasting it, and I thought those
assumptions held true. It was a clear beer with deep brown and amber notes. The head
was tan in color (stylistically it should have been off-white to light-tan) and was able to
stick around.
 Flavor – The flavor is where I took the most points off for stylistic accuracy. The flavor
was roasted malt up front, but was quickly drowned out by the bitterness of the hop.
The bitterness lingered at the back of the tongue for a few seconds after swallowing.
While the malts were given a back seat to hop bitterness prevalence, I was still able to
catch a hint of citrus from the hops. I wasn’t able to detect any esters or diacetyl, which
is OK according to style guidelines.
 Mouthfeel – The beer turned out to be very crisp and clean. It wasn’t overly sweet, the
carbonation level wasn’t overpowering or underwhelming, and it had a nice astringency
due to the darker malts that were used.
o Astringency can be attributed to a few different steps. You can achieve
astringency by hitting a pH that isn’t between 5.2-5.6, or by over hopping the
beer at bittering addition times or at aroma addition times.
 Overall Impression – Despite the beer not being perfectly true-to-style, I thought it was
an impressive one. I truly enjoyed nearly every aspect of it and I would most happily
have another.
In the end, I think we did a very good job with this brew. We didn’t run into any off-
flavors like DMS or diacetyl, and I ended up rating the beer as “Very Good” in my BJCP judging.
If you ask me, changing the amount of hop additions, specifically the 15 minute
additions (to reduce added bitterness) would go a long way towards eliminating the bitterness
that overwhelms at the back of the tongue. The aroma hops (5 minute additions) could use a
change as well. I didn’t find the aroma of the beer off-putting, but I didn’t find it completely
desirable either. I would have liked to use hops that went well with the roasted notes of the
malts, but due to my inexperience with hops, I can’t admit that I have a recommendation at this
point. By changing the amount of hops added and the aroma hops used, I think this beer could
benefit immensely. I expect that by making those simple changes, we could achieve a deeper,
more complex flavor to the beer with a more appealing aroma.

More Related Content

Viewers also liked

Unknown Species Lab Report
Unknown Species Lab ReportUnknown Species Lab Report
Unknown Species Lab ReportJustin Alexander
 
LinkedIn CO 300 Exploratory Essay
LinkedIn CO 300 Exploratory EssayLinkedIn CO 300 Exploratory Essay
LinkedIn CO 300 Exploratory EssayJustin Alexander
 
Beer and Its Effects on Health
Beer and Its Effects on HealthBeer and Its Effects on Health
Beer and Its Effects on HealthJustin Alexander
 
Unknown Species Lab Report 2
Unknown Species Lab Report 2Unknown Species Lab Report 2
Unknown Species Lab Report 2Justin Alexander
 
University of Washington Global Health E-Learning
University of Washington Global Health E-LearningUniversity of Washington Global Health E-Learning
University of Washington Global Health E-Learningcamcgee
 
Aportes técnico constructivos de los estilos
Aportes técnico constructivos de los estilosAportes técnico constructivos de los estilos
Aportes técnico constructivos de los estilosteresa nigro
 
Código de ética en las Organizaciones
Código de ética en las Organizaciones Código de ética en las Organizaciones
Código de ética en las Organizaciones Alex Flores
 
Académie sur les migrations de main d'oeuvre - module de pré-formation
Académie sur les migrations de main d'oeuvre - module de pré-formationAcadémie sur les migrations de main d'oeuvre - module de pré-formation
Académie sur les migrations de main d'oeuvre - module de pré-formationACPMigration
 
Chemistry of Food Packaging of Food Products
Chemistry of Food Packaging of Food ProductsChemistry of Food Packaging of Food Products
Chemistry of Food Packaging of Food ProductsJustin Alexander
 
técnicas y materiales constructivos de Egipto y Mesopotamia
técnicas y materiales constructivos de Egipto y Mesopotamiatécnicas y materiales constructivos de Egipto y Mesopotamia
técnicas y materiales constructivos de Egipto y Mesopotamiateresa nigro
 
Encourager la réintégration 2 FR
Encourager la réintégration 2 FREncourager la réintégration 2 FR
Encourager la réintégration 2 FRACPMigration
 

Viewers also liked (17)

Food Chem Paper
Food Chem PaperFood Chem Paper
Food Chem Paper
 
Apresentação casa forte
Apresentação casa forteApresentação casa forte
Apresentação casa forte
 
Unknown Species Lab Report
Unknown Species Lab ReportUnknown Species Lab Report
Unknown Species Lab Report
 
LinkedIn CO 300 Exploratory Essay
LinkedIn CO 300 Exploratory EssayLinkedIn CO 300 Exploratory Essay
LinkedIn CO 300 Exploratory Essay
 
Soberaniaalimentaria
Soberaniaalimentaria Soberaniaalimentaria
Soberaniaalimentaria
 
Beer and Its Effects on Health
Beer and Its Effects on HealthBeer and Its Effects on Health
Beer and Its Effects on Health
 
Unknown Species Lab Report 2
Unknown Species Lab Report 2Unknown Species Lab Report 2
Unknown Species Lab Report 2
 
Diapositivas completas 2016
Diapositivas completas 2016Diapositivas completas 2016
Diapositivas completas 2016
 
University of Washington Global Health E-Learning
University of Washington Global Health E-LearningUniversity of Washington Global Health E-Learning
University of Washington Global Health E-Learning
 
Aportes técnico constructivos de los estilos
Aportes técnico constructivos de los estilosAportes técnico constructivos de los estilos
Aportes técnico constructivos de los estilos
 
Código de ética en las Organizaciones
Código de ética en las Organizaciones Código de ética en las Organizaciones
Código de ética en las Organizaciones
 
SOP UV Spectrophotometer
SOP UV SpectrophotometerSOP UV Spectrophotometer
SOP UV Spectrophotometer
 
Académie sur les migrations de main d'oeuvre - module de pré-formation
Académie sur les migrations de main d'oeuvre - module de pré-formationAcadémie sur les migrations de main d'oeuvre - module de pré-formation
Académie sur les migrations de main d'oeuvre - module de pré-formation
 
Chemistry of Food Packaging of Food Products
Chemistry of Food Packaging of Food ProductsChemistry of Food Packaging of Food Products
Chemistry of Food Packaging of Food Products
 
técnicas y materiales constructivos de Egipto y Mesopotamia
técnicas y materiales constructivos de Egipto y Mesopotamiatécnicas y materiales constructivos de Egipto y Mesopotamia
técnicas y materiales constructivos de Egipto y Mesopotamia
 
Lana gutnik resume new
Lana gutnik resume newLana gutnik resume new
Lana gutnik resume new
 
Encourager la réintégration 2 FR
Encourager la réintégration 2 FREncourager la réintégration 2 FR
Encourager la réintégration 2 FR
 

Similar to Blast Off Brown Report

Similar to Blast Off Brown Report (20)

Lab Report 2
Lab Report 2Lab Report 2
Lab Report 2
 
FTEC_460LR3
FTEC_460LR3FTEC_460LR3
FTEC_460LR3
 
FTEC 422 Lab Report 2
FTEC 422 Lab Report 2FTEC 422 Lab Report 2
FTEC 422 Lab Report 2
 
How to brew 1
How to brew 1How to brew 1
How to brew 1
 
Homebrew 101
Homebrew 101Homebrew 101
Homebrew 101
 
Beer
BeerBeer
Beer
 
Irish Red log
Irish Red logIrish Red log
Irish Red log
 
Final senior design prez
Final senior design prezFinal senior design prez
Final senior design prez
 
Beer Brewing .pdf
Beer Brewing .pdfBeer Brewing .pdf
Beer Brewing .pdf
 
Beer production by Likhith K
Beer production by Likhith KBeer production by Likhith K
Beer production by Likhith K
 
Beer
BeerBeer
Beer
 
Beer
BeerBeer
Beer
 
BEER
BEERBEER
BEER
 
Adapting beer recipes between breweries hryclik
Adapting beer recipes between breweries   hryclikAdapting beer recipes between breweries   hryclik
Adapting beer recipes between breweries hryclik
 
Chemistry in Brewing- Beer
Chemistry in Brewing- BeerChemistry in Brewing- Beer
Chemistry in Brewing- Beer
 
History and types_of_beer
History and types_of_beerHistory and types_of_beer
History and types_of_beer
 
Bulleit world class seminar
Bulleit world class seminar Bulleit world class seminar
Bulleit world class seminar
 
Beer1
Beer1Beer1
Beer1
 
Crisp Malt Scotch Distilling Mash Protocol
Crisp Malt Scotch Distilling Mash ProtocolCrisp Malt Scotch Distilling Mash Protocol
Crisp Malt Scotch Distilling Mash Protocol
 
1061 2015 pacific coast ipa recipe
1061 2015 pacific coast ipa recipe1061 2015 pacific coast ipa recipe
1061 2015 pacific coast ipa recipe
 

Blast Off Brown Report

  • 1. SECTION 1 Name (brewer): Justin Alexander Name of Brew: Blast Off Brown Style of Brew: American Brown Ale Brew Date: March 3rd , 2015 Tapping/Bottling/Kegging Date: March 25th , 2015 Batch Volume: 1013.7 L Original Gravity: 13.0°Plato Final Gravity: 2.75°Plato SECTION 2 MATERIAL BILL: WATER Total Water Needed (L) Type of Water ~347 Fort Collins Tap Water WATER ADDITIVES Amount (g) Name Point of Addition 170.1 Gypsum (Calcium Sulfate) Mash 50 KoppaKleer Boil (5 minutes) GRIST BILL Amount (kg) Name Color (EBC) 450.0 Pale Malt (2 Row) US 3.9 50.0 Caramel 60 118.2 25.5 Chocolate 689.5 9.5 Roasted Barley 591.0 9.5 Black Malt 985.0 HOPS Time of Addition Amount (g) Name % Alpha-Acid IBUs Contributed Wort 453.6 CTZ 17.0 18.8 15 Minutes 907.2 Cascade 8.6 8.8 15 Minutes 907.2 Amarillo 8.1 8.3 5 Minutes 907.2 Cascade 8.6 3.5 5 Minutes 907.2 Amarillo 8.1 3.3 YEAST Brand Name Amount (L) Wyeast American Ale Yeast 37.9 EQUIPMENT USED: Equinox’s 1192.4 L Brewing System, 1788.6 L fermenter, stationary auger-fed miller, tri-clamps, gaskets, hoses, stirring utensils, stationary and mobile pumps, and stationary plate chiller. PROCEDURE (50 POINTS): CLEANING AND SANITITZING PRODUCTS:  Each cleaning and sanitizing product has specific mixing concentrations that should be followed as precisely as possible. This will aid in avoiding any unforeseen accidents with chemicals due to improper mixing. o Acid Cleaner #6  Formulated as a keg cleaner to dissolve scale formation that develops with standard alkaline cleaners. It quickly penetrates dried beer and easily dissolves
  • 2. oxalate scale. Being an acid detergent, it can clean in a CO2 environment without damaging the keg. (www.fivestarchemicals.com)  A large amount of breweries will use a caustic solution for their cleaner. o Peracetic Acid  A sanitizing chemical with the chemical structure of CH3COOH that breaks down into acetic acid and hydrogen peroxide, later decomposing into H2O, O2, and CO2. This sanitizer is used by many breweries as a standard sanitizer.  Sanitizers are used to stabilize any cleaner that was leftover from the CIP, as well as reduce or eliminate any microorganisms that may have been left behind.  A large amount of breweries use Peracetic Acid as their sanitizer. CLEANING AND SANITIZING PROCESSES: NOTE: Each brewing system will be different, but the basic concepts of CIP and SIP remain. 1. First, all utensils, tri-clamps, and gaskets should be cleaned and ready to use. Set those aside in a bucket of sanitizer once cleaned. 2. The hot liquor tank (HLT) needs to be filled and mixed with the proper amount of Acid Cleaner #6. This solution will be used to clean the entire system. 3. Once the HLT is filled with the proper amount of cleaning solution, the control panel can be used to move the solution through the pipes, hoses, plate chiller, and into the desired vessels. The vessels are the HLT, mash tun, boil kettle, lauter tun (if it is a separate vessel), and the fermentation vessel. 4. Allow the cleaner to circulate through each destination for 15 minutes. 5. Once the 15 minutes has passed, the system, pipes, hoses, plate chiller, and vessels need to be emptied and then rinsed. Once everything has been rinsed, the system is ready to be sanitized. 6. In order to sanitize-in-place (SIP), run all CIP steps with the proper amount of Peracetic Acid, but do not attempt to rinse anything that needs to remain sanitized; rinsing with water negates sanitizing. The sanitizer should have contact with anything that will be used for 2 minutes. PRE-BREW: MARCH 3rd 1. Ensure that the brewing system, as well as all transfer lines and hoses have been CIP’d and SIP’d. Ensure that the system is operating properly and is without defects. Also, be sure to clean and sanitize any tools and utensils that will be used during the brewing process. This includes tri- clamps, stirring utensils, hoses, etc. 2. Ensure that the plate chiller has been cleaned and sanitized before use. Failure to do so will result in the transferring of the finished wort through dirty, contaminated lines, which will jeopardize the finished product. 3. Ensure that the fermentation vessel has been cleaned and sanitized. Failure to properly clean and sanitize this vessel will result in unwanted contaminants, such as soils and microorganisms, in the finished product. 4. We measured out 170.1 g of Gypsum (calcium sulfate) into a container. These will be added to the mash. 5. We measured out 450 kg of 2-row malt, 50 kg of Caramel 60 malt, 25.5 kg of Chocolate malt, 9.5 kg of Roasted Barley malt, and 9.5 kg of Black malt and sent them separately into the auger-fed miller. Once we obtained the correct amounts of each malt, we ran them separately through the properly calibrated miller. This ensures that the contents of the barley are exposed, making them available to enzymatic activity later in the brewing process.  Pale Malt (2 Row) US – The pale malt serves as a base malt for a large variety of styles. It has an adequate amount of enzymes available for starch conversion, allowing for the use of higher modified varieties of malts.
  • 3.  Caramel Malt 60 – This malt is a medium colored malt that is capable of adding a slight sweetness to the beer, increasing head retention, as well as adding body to the mouthfeel.  Chocolate – This malt is a darker variety malt that is used to add deep red and brown colors to beer. It doesn’t add a lot of malty flavor to the beer, but it is capable of adding nutty flavors.  Roasted Barley – With enough of this malt used, it can impart roasted, coffee-like flavors. The malt also imparts a nice red-brown color to beers.  Black Malt – Black malt is typically used to add a dryer, bittering malt flavor to beers. The extreme dark color makes it capable of being added in moderation to achieve substantial color change in the beer. 6. We measured out 453.6 g of CTZ hops, 907.2 g of Cascade hops, 907.2 of Amarillo hops, and then another 907.2 g of Cascade hops, 907.2 of Amarillo hops. The doubled measurements are to accommodate for different addition times. These will be added to the boil. These hop additions will be done without a hop bag.  Pellet hops were used for this brew. Pellet hops are easier to store, and the trub is much less of a hassle compared to whole-cone hops, reducing the odds of having to filter. They also have a higher utilization factor than whole-cone hops, and they also break apart easier in the boil (resulting in higher utilization).  CTZ (Columbus/Tomahawk/Zeus) – The CTZ hops were used for their bittering qualities. The addition in the wort will make it possible for some of the alpha and beta acids to create flavor compounds before they are possibly volatized away during the boil.  Cascade (15 minutes) – These hops were used mainly for aroma, as indicated by their addition time of 15 minutes. The 907.2 g addition will contribute some bittering and flavor qualities to the brew, but a majority of the hop will be utilized for aroma. These hops are of a US variety.  Amarillo (15 minutes) – These hops were used mainly for aroma, as indicated by their addition time of 15 minutes. The 907.2 g addition will contribute some bittering and flavor qualities to the brew, but a majority of the hop will be utilized for aroma. These hops are of a US variety.  Cascade (5 minutes) – These hops were used mainly for aroma, as indicated by their addition time of 20 minutes. The 907.2 g addition will be utilized for aroma. These hops are of a US variety.  Amarillo (5 minutes) – These hops were used mainly for aroma, as indicated by their addition time of 20 minutes. The 907.2 g addition will be utilized for aroma. These hops are of a US variety. NOTE: The protein contents of malts and hops contribute to the head of a finished beer. The higher the protein content, the better head production and retention. BREW-DAY: MARCH 3rd SAFETY NOTE: WHEN CONNECTING ANY HOSES, TRI-CLAMPS, OR USING ANY EQUIPMENT THAT WILL CONTACT THE WORT, BE SURE THAT THEY HAVE BEEN PROPERLY SANITIZED, AS WELL AS SPRAYING ANY CONNECTIONS WITH IODOPHOR BEFORE SEALING. 1. In the HLT, we brought 715.4 of water to 80.0°C. This temperature will be high enough to introduce the water to the grain to achieve our desired mashing temperature of 67.8°C.  The reason that strike water was brought up to 80.0°C and not the desired mashing temperature of 67.8°C was to account for the temperature difference of the cool grains.
  • 4. 2. Once the water was brought up to temperature, we began moving the grain through the miller and into the mash tun. While the transfer was occurring, the grains were wetted upon entry into the mash tun. This ensures that there is a consistent moisture coating for all of the grains, resulting in higher quality wort and higher consistency of enzymatic activity. 3. At 9:27 am, the water reached 80.0°C. At this point, we moved the 715.4 L of water to the mash tun where it was simultaneously introduced to our milled grain. This is also the point that the water additive was introduced to the mash. The measured temperature of the mash was 67.8°C which is proper for a mashing temperature.  The water additive introduced will help the water components increase in calcium content, leading to a harder water quality. The calcium will help lower the pH of the water, and this will favor: enzymatic activity, extraction efficiency, aid in precipitating proteins, increase free amino nitrogen (FAN) content (important for yeast growth), promote perceived sweetness of the beer, and extract less harshly perceived bitterness from the hops.  The purpose of mashing at this temperature is to achieve the desired enzymatic activity. This enzymatic activity is responsible for converting the starches (amylose and amylopectin) located in the grain into sugars that can be converted to alcohol by the yeast that will be introduced at the beginning of the fermentation process. There are two enzymes that are vital to starch conversion: α-amylase and β-amylase. o α-amylase breaks down the starches in the grain at random 1-4 linkages. This enzyme is the only one capable of penetrating amylopectin, and prefers temperatures at or above 70°C. o β-amylase hydrolyzes amylose and amylopectin at reducing ends only, making α-amylase vital to the process. This enzyme prefers temperatures from 54-60°C. 4. At 10:15 am, the mashing step was completed, and the vorlauf process was initiated. This process lasted until 10:30 am (15 minutes).  Vorlaufing is the process of pulling off wort from the mash tun and reintroducing it at the top of the vessel. This allows you to determine when the grain bed has effectively packed itself, creating a filter bed for the sparging step, helping to achieve a clearer wort. 5. At 10:15 am, we began the runoff phase. This is when we moved the wort from the mash tun to the boil kettle. The runoff needs to achieve a volume in the mash tun that leaves about 5 cm of wort above the grain bed, which would then initiate the sparging phase. 6. At 10:30 am, the wort level was approximately 5 cm above the grain bed, and we began the sparging phase. We sparged with 715.4 L of water at 78.3°C, and the process lasted until 12:00 pm (90 minutes).  Sparging, essentially, is the process of chasing the wort from the mash tun to the boil kettle with the proper temperature of water (75-80°C). Sparging aids in the removal of desirable extracts, such as sugars, proteins, color, and flavor compounds. Sparging too quickly can result in the extract of unwanted compounds such as tannins, as well as less efficient color extraction. 7. Once the wort was completely transferred into the boil kettle, prior to boiling, we added our CTZ hops. 8. Before the boil began, we obtained the volume of the wort and it was at 1311.6 L.  At this stage, our class would typically take a pre-boil gravity reading for consistency from brew to brew, but Equinox prefers to skip this step. 9. At 12:10 pm, the wort came to a rolling boil, and the Target hops were added. Careful attention must be paid during addition steps, as boil overs are a common occurrence. If a boil over occurs,
  • 5. spray it down with cold water from a hose until the vigor subsides, and/or shut off the gas to the kettle burner.  Boiling has 5 primary goals: evaporation of water and concentration of wort, evaporation of volatiles, extraction of bitterness from hops, color and flavor formation, and stabilizing the wort. o Evaporation of water and concentration of wort – This step ensures that water has evaporated, leaving a concentrated wort for the yeast to efficiently work with during fermentation. o Evaporation of volatiles – There are specific compounds of wort and hops that, if unattended, would impart off flavors and aromas to the beer, such as cooked corn odor, which results from dimethyl sulfide (DMS). Proper boiling techniques ensures that these compounds are removed. o Extraction of bitterness from hops – During boiling, the α-acids in hops are isomerized, changing them from a 6-carbon ring to a 5-carbon rings. The 6- carbon rings are insoluble in beer and would result in a haze. o Color and flavor formation – Boiling ensures that reducing sugars react with amino acids from the malt, forming colored Maillard compounds (melanoidins), and flavor compounds. This reaction also reduces the likelihood of scorching due to over boiling. o Stabilization of the wort – During the boil, α- and β-amylases are denatured, the wort is sterilized (killing any microorganisms present), and protein-polyphenol complexes are formed and precipitated. The heat causes the proteins to denature, causing the exposure of many negative sites. These negative sites react with the positive poly-phenols, resulting in a complex (flocs). These complexes are the floating compounds seen in the wort. 10. At 1:25 pm, we added our Cascade and Amarillo hops. Be aware of a boil over. 11. At 1:35 pm, we added our second addition of Cascade and Amarillo hops. Again, be aware of a boil over. 12. At 1:35 pm we also introduced 10 tablets of KoppaKleer (5 g each, 50 g total).  KoppaKleer aids in the coagulation of the flocs during the boil and whirlpool step, settling the complexes out, thus stabilizing the wort and resulting in a clearer, brighter beer. 13. At 1:40 pm, the boil step was completed, and the flameout step was reached. This is the point where the whirlpool was initiated. The wort was stirred into a whirlpool and allowed to rest for 20 minutes.  During this step, wort haze was pulled together to form larger precipitates, and the remaining circulation of the wort brings all of the precipitates to the center of the boil kettle, making them easier to avoid removing during transfer. 14. As the whirlpool was occurring, we prepared the plate chiller for the knockout step. The plate chiller was already cleaned and sanitized during at the end of the brew. We also connected the oxygen tank to the oxygen inlet. 15. Before we began the knockout phase, we took the gravity measurement of the wort, which was 13.0°Plato.  By taking the OG reading, we are enabling ourselves to calculate the % alcohol-by- volume (%ABV) of the finished product. We will be able to calculate the %ABV once we obtain the final gravity (FG). 16. At 2:05 pm, we began the knockout phase. During this phase, we turned on the pump to move the wort from the kettle, through the plate chiller, and from the plate chiller through the tri-
  • 6. clamp hose to the cleaned and sanitized fermentation vessel. This allows a cross-flow of cold water with the hot wort, which will chill the wort down to our desired final temperature of 20°C.  Using a plate heat exchanger allows the wort to be cooled down to temperature at a rapid rate. If the wort doesn’t achieve its final temperature in adequate time, off-flavors and compounds will result, producing a less-than-adequate final product. 17. While the wort was being moved to the cylindroconical vessel (CCV)/fermentation vessel (FV), we turned on the oxygen tank. We maintained a steady, constant bubbling with the oxygen control valve. The transferred wort was measured at a final temperature of 20°C. This step lasted until 2:37 pm (32 minutes).  The 20°C goal is a temperature that allows us to pitch the yeast into the wort without harming the yeast. If yeast is pitched at too high of a temperature, the yeast will be killed off, and fermentation will not proceed, but if the temperature is too cold, the fermentation will be delayed, and off flavors may be produced.  The purpose of oxygenation during the transferring of the wort is to provide oxygen to the yeast. Without oxygen, the yeast will not have the necessary nutrients available to reproduce, resulting in an under-fermented product. 18. At this point, we were ready pitch the yeast. In total, we pitched 37.9 L of yeas. Equinox prefers to have a more hands-on approach to their brewing practices, so they measured the amount of yeast to use by feel. The yeast pitched amount was determined by Jared, the head brewer of Equinox. The yeast strain we used was from a previous batch of Equinox’s Eutropycal IPA, and the strain was their 5th generation of the American Ale yeast.  CCVs are ideal fermentation vessels because of their shape. The CCVs have a cone shape at the bottom of the vessel, and this is where the yeast and sediment flocculate out and settle. The cone also has an access valve, making it easy to remove sediment, helping to achieve a clearer finished product.  Flocculation is the ability of the yeast to drop out of solution, resulting in a clearer, less hazy beer.  Attenuation is the percentage that measures the conversion of sugars in the substance to alcohol and CO2. 19. During fermentation, the temperature was maintained at 20°C. The CCV was kept in check by their glycol jackets lining the fermenter. The fermentation process is quite complex, with different factors altering the final product. According to the Fermentation Theory, there are 4 basic steps:  Step 1 – Lag Phase: During this phase, the yeast are consuming the oxygen that was introduced during the transfer of the wort from the boil kettle, through the place chiller, and then to the CCV. This is also the stage where the yeast are synthesizing enzymes that are needed to support growth.  Step 2 – Growth Phase: During the growth phase, yeast cells are budding, and the population is increasing logarithmically. The rate of the fermentation is determined by this phase, dependent on the rate and extent of growth.  Step 3 – Fermentation: During fermentation, the yeast cells are metabolizing the simple sugars into double the amount of pyruvate. From there, enzymes convert the pyruvate, with the help of pyruvate decarboxylase, into acetaldehyde, releasing CO2. Once acetaldehyde is obtained, the yeast then convert them into ethanol with the help of alcohol dehydrogenase. There are a large number of other compounds created during this phase, from aromas to flavors, and each compound produced can be controlled with the environment the fermentation is placed in.
  • 7.  Step 4 – Flocculation: This is the point where the yeast have done all that they can do for the fermentation and begin to clump together. The larger clumps are then heavy enough to settle to the bottle of the CCV, where they can be removed through the valve at the bottom of the vessel. 20. On March 19th , the fermentation reached the final gravity (FG) of 2.75°Plato and stayed constant, indicating that fermentation was complete and the process could be halted. At this point, the CCV was dropped down to a temperature of 3.3°C, and this would stop metabolic processes and begin to settle out the yeast and sediment. The CCV was left at this temperature until March 23rd . RACKING: MARCH 19TH 1. On March 19th , the product was dropped down to 3.3°C and left there until March 23rd . It was left at this temperature until March 25th , allowing the beer to rest and smooth out as many of the flavor profiles as possible.  Racking is the process of moving beer from one vessel to another in order to chill it. The purpose of racking is to remove the beer from any settled yeast and sediment that may be left behind in the CCV. These yeast, once they have consumed all of the nutrients that the wort has to offer, can begin to autolyze, creating off, undesirable flavors. By moving the beer to another vessel, it allows flavors and aromas time to smooth out, creating a better quality final product. The racking stage also allows particles in the product a little more time to precipitate out, resulting in a clearer finished product. 2. For this brew, we set the temperature of the CCV to 3.3°C and allowed it to rest for 2 days. Typically, Equinox leaves their beer at this temperature for only 24 hours, but in order to allow each of the students in the class to participate, they waited 48 hours. 3. After the 48 hours, we fined the beer with 350 mL of Biofine and allowed it to go through a diacetyl rest. Fining the beer will allow the fining agent to grab onto the remaining yeast and sediment, making them able to be removed easily after a set period of time (48 hours for this brew). This process will enhance the clarity of the beer.  A diacetyl rest allows the yeast to consume and digest any diacetyl that may have been produced during fermentation. Diacetyl is a common byproduct of yeast metabolism that, if left unchecked, can produce off flavors described as “buttery” or can give the beer a “slick” mouthfeel. NOTE: It is important that, during transfer, the amount of oxygen introduced to the product is minimal to none. Oxygen introduced at this stage will oxidize the beer, lessening the quality of the final product in terms of flavor and overall satisfaction. PACKAGING AND CARBONATION: MARCH 13TH 1. This is the stage where the beer is moved from the conditioning vessel to the carbonating vessel, whether that be bottles, cans, kegs, or a beer bright tank (BBT). For this brew, we utilized Equinox’s BBTs that also serve as their serving tanks in their taproom. 2. To begin, we ensured that the BBT was cleaned and sanitized using their Acid Cleaner #6 for cleaning, and their Peracetic Acid for sanitizing. The cleaning step will again last 15 minutes, then needs to be rinsed. After rinsing, the sanitizing step should last for 2 minutes. 3. After cleaning and sanitizing, the BBT needed to be purged with CO2 in order to remove any remaining oxygen or other beer spoilers.
  • 8. 4. In order to move the beer from the CCV into the BBT, sterilized hoses were hooked up from the CCV to the BBT and head pressure was applied to the CCV. This allows the beer to be forced through the lines without the use of any pumps. 5. Carbonating occurred after the beer was transferred into the BBT by the use of carbonating stones. These stone are rod-shaped and porous. The rod is connected to a sterile CO2 line that forces CO2 through the pores, thus carbonating the beer. Equinox decided that the volumes of CO2 should be at 2.35 volumes for this beer.  Volumes of CO2 are determined by the temperature at which the beer will be stored and the amount of pressure inside of the bottles. There are pressure/temperature dependent charts available for reference on-line. 6. At this point, the beer, once up to carbonation levels (~2 hours), is ready to be served. It should be kept chilled from this point on. SENSORY EVALUATION: MARCH 12TH (see separate, completed BJCP score sheet) REFLECTION OF RESULTS AND DISCUSSION Overall, I think the beer turned out to be above average. My sensory analysis shows that the beer has room for improvement when stylistic accuracy is concerned, but regardless of points, it is a beer. Nearly every aspect of it left me wanting another drink, but it still had its flaws.  Aroma – The aroma was prominently of roasted malts and hop spiciness. There was a very faint chocolate smell as well. The hop aroma gave me mixed feelings when mixed with the roasted aroma of the malts. I don’t think they worked well together. Separately they may be very appealing, but combined I think they were a little too contrasting. I didn’t detect any diacetyl or ester aromas, but this was OK when considering style guidelines.  Appearance – I felt that the appearance of the beer was satisfying. You could make assumptions about the flavor of the beer without even tasting it, and I thought those assumptions held true. It was a clear beer with deep brown and amber notes. The head was tan in color (stylistically it should have been off-white to light-tan) and was able to stick around.  Flavor – The flavor is where I took the most points off for stylistic accuracy. The flavor was roasted malt up front, but was quickly drowned out by the bitterness of the hop. The bitterness lingered at the back of the tongue for a few seconds after swallowing. While the malts were given a back seat to hop bitterness prevalence, I was still able to catch a hint of citrus from the hops. I wasn’t able to detect any esters or diacetyl, which is OK according to style guidelines.  Mouthfeel – The beer turned out to be very crisp and clean. It wasn’t overly sweet, the carbonation level wasn’t overpowering or underwhelming, and it had a nice astringency due to the darker malts that were used. o Astringency can be attributed to a few different steps. You can achieve astringency by hitting a pH that isn’t between 5.2-5.6, or by over hopping the beer at bittering addition times or at aroma addition times.  Overall Impression – Despite the beer not being perfectly true-to-style, I thought it was an impressive one. I truly enjoyed nearly every aspect of it and I would most happily have another. In the end, I think we did a very good job with this brew. We didn’t run into any off- flavors like DMS or diacetyl, and I ended up rating the beer as “Very Good” in my BJCP judging.
  • 9. If you ask me, changing the amount of hop additions, specifically the 15 minute additions (to reduce added bitterness) would go a long way towards eliminating the bitterness that overwhelms at the back of the tongue. The aroma hops (5 minute additions) could use a change as well. I didn’t find the aroma of the beer off-putting, but I didn’t find it completely desirable either. I would have liked to use hops that went well with the roasted notes of the malts, but due to my inexperience with hops, I can’t admit that I have a recommendation at this point. By changing the amount of hops added and the aroma hops used, I think this beer could benefit immensely. I expect that by making those simple changes, we could achieve a deeper, more complex flavor to the beer with a more appealing aroma.