

Recommended
Recommended
More Related Content
What's hot
What's hot (20)
Similar to Successfactor mastery
Similar to Successfactor mastery (20)
Recently uploaded
Recently uploaded (20)
Successfactor mastery
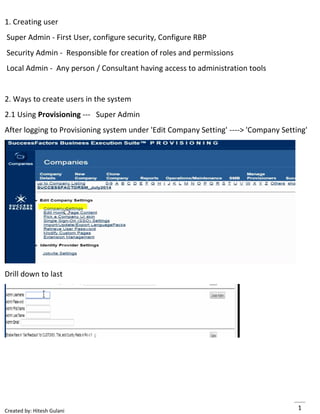
- 1. Created by: Hitesh Gulani 1 1. Creating user Super Admin - First User, configure security, Configure RBP Security Admin - Responsible for creation of roles and permissions Local Admin - Any person / Consultant having access to administration tools 2. Ways to create users in the system 2.1 Using Provisioning --- Super Admin After logging to Provisioning system under 'Edit Company Setting' ----> 'Company Setting' Drill down to last
- 2. Created by: Hitesh Gulani 2 2.2 Using Instance --- Admin tools ---> Manage Users --> Assign required admin priviledges to the users Go to Admin Center and under ‘Update User Information’ ---> Manage Users Note: Employee/ User has been created
- 3. Created by: Hitesh Gulani 3 Assigning administrative privileges to user 2.3 Using Instance --- Import UDF (User data file) ---> Assign admin privileges to the users Go to Admin Center and under ‘Update User Information’ ---> Employee Export
- 4. Created by: Hitesh Gulani 4 Open the csv file in excel format, this template is customizable as per the requirement. Always import file in csv format only Options available in Employee export
- 5. Created by: Hitesh Gulani 5 ‘Valid Users’ will fetch Active users only ‘Short format only System fields’ will fetch mandt fields ‘Export as batch process’ is useful when multiple employee’s information to be fetched since till the employee’s will be fetched this screen will be frozen and it may create problem if there are more number of employees. Employee Import
- 6. Created by: Hitesh Gulani 6 We can import blank csv file using ‘data import the template’ option. Note System follows delta approach while importing the employees. As soon as you import the file system starts background job and you can monitor the job and also the person who imports the file will get notification email after completion of this job.
- 7. Created by: Hitesh Gulani 7 Under Provisioning system also there is option for monitoring jobs Email notification
- 8. Created by: Hitesh Gulani 8 Assign required permission to the imported employee under ‘Manage employee’ Set user permisssion Administrative privileges 3. Customizing Tiles on Home page 3.1 Todo Portlet can be activated and deactivated from provisioning system 3.2 From admin point of view
- 9. Created by: Hitesh Gulani 9 To configure all the other tiles Go to Admin Center Company settings Manage home page Here you can add custom tile and edit existing tiles.
- 10. Created by: Hitesh Gulani 10 You can create groups for showing tiles
- 11. Created by: Hitesh Gulani 11 3.3 From End user (employee) point of view Now to edit tiles on your own home page Goto User’s menu Personalize Homepage Note You can remove (not delete) tiles from your home page which have been given access as ‘Removable by user’ as ‘Yes’. These changes will be affected to only that specific user’s only. 3.4 Now if admin wants to make a tile as available but not display on home page by default. It’s up to the user whether he wants that tile or not and he/she can add using ‘Personalize homepage’.
- 12. Created by: Hitesh Gulani 12 Move that tile to ‘Tile Catalog’. 3.5 If admin want any specific tile not to be available to display to user but at any later point of time he can make it available then admin can use ‘Not used’ option. 4. Options available in user’s menu
- 13. Created by: Hitesh Gulani 13 Note Under ‘Change Language’ option you will be able to see only those languages which are activated in Provisioning system.
- 14. Created by: Hitesh Gulani 14 5. Branding 5.1 Organization Logo Goto Admin Center Company Setting Upload company Logo Session 5 6. Permission Model / Security Approaches / Privileges or Security Framework Under the Provisioning system you get 2 options for maintaining security in the system. Goto Company setting then search for permission, there you can activate the permission model.
- 15. Created by: Hitesh Gulani 15 6.1 Default permission model / Administrative privileges (Domain) It has 2 layers Default permissions and Admin permissions Default User permission
- 16. Created by: Hitesh Gulani 16 Here selects the permission that by default applied to all the users(Employees) i.e. by default all the employees have these selected permissions. Note We should not assign admin privileges by default to users under ‘Default User Permission’. Keep it minimum
- 17. Created by: Hitesh Gulani 17 Administrative Privileges Based on the requirement we can assign admin privileges to the users/consultant. Under ‘Permission’ you can further break up the permission like under ‘Manage Users’ by clicking on it. Under ‘Manage Security’
- 18. Created by: Hitesh Gulani 18 6.2 Role Based Permission (RBP) Under Provisioning Under SF Instance create group, create roles, and then assign. Step1 Permission Group (group of users) Admin Center Manage Employees Set User Permission Manage Permission Groups
- 19. Created by: Hitesh Gulani 19
- 20. Created by: Hitesh Gulani 20 Step 2 Define Permission Roles: Create/Edit/Delete permission to the object Admin Center Manage Employees Set User Permission Manage Permission Roles By clicking on role you can define permissions to the object
- 21. Created by: Hitesh Gulani 21 Permission group consist of Users and roles are assigned to this group Permission Group (has Users) <---- Permission Roles Step 3: Assigning groups to roles Admin Center Manage Employees Set User Permission Manage Permission Roles Add Note If EC module is being used then Default permission model cannot be used. Note RBP is much superior than administrative privileges (default permission model). 7. Release Strategy SAP SF release 4 version every year in the month of
- 22. Created by: Hitesh Gulani 22 February, May, August, November (probably 3rd week of the month) Release information B stands for build and then year and month b1705 UI Version v12 (revolution) earlier version was v11 Admin version OneAdmin and latest admin version is 2.0 Previous version of admin tools
- 23. Created by: Hitesh Gulani 23 8. Proxy Management Using proxy management, we can debug the user’s issue without going to their desk. This can be considered as security threat in some organization so we can activate or deactivate this functionality from provisioning system. In Provisioning system go to Company setting Enable proxy Feature Using Instance Way 1
- 24. Created by: Hitesh Gulani 24 Using this functionality ‘admin’ can allow proxy user to access employee account Proxy user will login to other employee’s account as proxy user and can access or fill the information and in audit log also it will mention the name as <Proxy user> on behalf of <Employee>. This functionality can be used for debugging or fulfilling the requirement in employee’s absence. Using below option we can delete/view the proxy user assignment under ‘Proxy Management’.
- 25. Created by: Hitesh Gulani 25 Way 2 We can also mass import proxy users using csv file
- 26. Created by: Hitesh Gulani 26 Way 3 Using Employee Import and export we can set proxy user using proxy column In employee export csv file, we can put users for which proxy users has access to. Here in proxy column you can put multiple users fow which this user can access as ‘PROXY’ i.e. this employee can access all the employee accounts that will be mentioned in this proxy column.
- 27. Created by: Hitesh Gulani 27 9. Rating Scale
- 28. Created by: Hitesh Gulani 28 Use of rating scale (Used in PMGM) Assigning rating scale to template in Performance management
- 29. Created by: Hitesh Gulani 29 In employee Performance template this rating scale will be applicable.
- 30. Created by: Hitesh Gulani 30 10. Route Maps To achieve Workflow functionality route maps are being used in SF.
- 31. Created by: Hitesh Gulani 31 Click on ‘View your route map list’
- 32. Created by: Hitesh Gulani 32 Modify stage, Evaluation stage, Signature stage, Completion stage Assigning Route maps to Template
- 33. Created by: Hitesh Gulani 33 In Employee’s performance template applied route maps will be followed.
- 34. Created by: Hitesh Gulani 34 11 Data Models They can be considered as similar to info types which provide to structure the data and capture the employee data into the system. Corporate Data Models: Enterprise level/ Org level Like company, location business unit, workflow etc. Succession data models: Employee data, their personal details, etc. Succession data model xml file (xml file can be edited using XmlPad) Open the xml file in XmlPad and use the table view and click on standard element
- 35. Created by: Hitesh Gulani 35 Note Field level security can be achieved in Succession data models using roles. We can set edit, read permission using roles for employee (E), for all (*), Employee Manager (EM), Employee Manager’s manager (EM+), Employee Manager Manager’s manager (EM++), Employee HR(EH). PII element can be used to mark field as secured like encrypting bank information.
- 36. Created by: Hitesh Gulani 36 For example: Use custom field and change the label as ‘Social Security number’ and mark the PII as ‘true’. Make this field available to ‘Write’ section i.e. write access to this field to employee (or any role). Note Do not change the id of the field. In instance system make this field available in the portlet in ‘Admin Center’ ‘Employee Profile’ ‘Configure People Profile’
- 37. Created by: Hitesh Gulani 37 After configuring the field this field will be available in ‘Employee Profile’ 12 Picklist Step 1: In Provisioning system set the field attribute as picklist Step 2: Set the values in the instance system. Step 1 In downloaded xml for the custom field add field as hobbies
- 38. Created by: Hitesh Gulani 38 Giving write permissions to this field
- 39. Created by: Hitesh Gulani 39 Import xml file in the provisioning system Step 2 Setting up values and making field available in instance system In instance system make this field available in the portlet in ‘Admin Center’ ‘Employee Profile’ ‘Configure People Profile’
- 40. Created by: Hitesh Gulani 40 After making field available in portlet we can see the field in employee profile but with no dropdown values. Note Here in above example picklist id is ‘employhobbylist’. Now for populating values in Picklist goto ‘Picklist Management’ in admin center.
- 41. Created by: Hitesh Gulani 41 Note a. ‘Optionid’ is unique for all picklistid to identify their value and is generated by the system. When you create any picklist value it will be kept as blank. b. Using ‘parentOption’ we can create cascading picklist. For example upon choosing Country corresponding states should appear and from states corresponding cities. But parent picklist should be imported first in the system so that their optioned can be generated. Cascading picklist example. Now exporting picklist related to ‘employhobbylist’
- 42. Created by: Hitesh Gulani 42 After importing the picklist, we will able to see all the picklist value in field hobbies.
- 43. Created by: Hitesh Gulani 43 13 Email Notification
- 44. Created by: Hitesh Gulani 44 There are System tokens available in the system which can be used using ‘[ ]’
- 45. Created by: Hitesh Gulani 45 To customize email signature body So whatever changes (body) we kept here that will applicable as signature under [[signature]] system token. 14 Password and Login Policy setting
- 46. Created by: Hitesh Gulani 46 15. Restrict users using IP address In ‘Provisioning system’ under ‘Company setting’ there is option to restrict access on the basis of ip address. 16 Text Replacement To replace existing SF terminologies with organization specific terminologies
- 47. Created by: Hitesh Gulani 47 17. Successfactor Implementation a. Completely implemented on cloud b. Hybrid implementation like SAP SF SAP HCM or Any HR system Ways for Hybrid implementation 1. File integration (Manual Integration and Automated integration) 2. Dell Boomi Cloud Atmosphere Integration Tool 3. Informatica Cloud 4. PI/XI PO 5. HANA Cloud Integration Tool (HCI) and may more.
- 48. Created by: Hitesh Gulani 48 Coming to File Integration SAP provide add on to automate file updating from SAP HCM to successfactor using SF integration add on 3.0 (SFI) at SAP HCM side. There are reports to export and import data into csv file from SAP HCM system in the format that are acceptable to SF.
- 49. Created by: Hitesh Gulani 49 Provide agreed FTP server details and file path, name, job occurrence details. 18 Job Role, Competencies Job Families Job Roles Competencies Job Code Company Setting Manage Job Roles
- 50. Created by: Hitesh Gulani 50 Managing Competencies Company Setting Manage Competencies
- 51. Created by: Hitesh Gulani 51 Assigning competencies to job role and creating competencies under competencies Library
- 52. Created by: Hitesh Gulani 52 Under Manage Job Roles we can mass import job families/job roles/competencies mapping 19. BIZx implementation methodology