IDENCOM Access Control = BioKey Fingerprint Identification
•
1 like•1,563 views

IDENCOM, a ten year old design & manufacturing company in Germany offers their patented technology fingerprint reader device as easy plug-in with TP RS 485 or Wiegand Protocol based security systems.

Recommended
Recommended
More Related Content
What's hot
What's hot (11)
Viewers also liked
Viewers also liked (20)
Similar to IDENCOM Access Control = BioKey Fingerprint Identification
Similar to IDENCOM Access Control = BioKey Fingerprint Identification (20)
More from HTCS LLC
More from HTCS LLC (20)
Recently uploaded
Recently uploaded (20)
IDENCOM Access Control = BioKey Fingerprint Identification
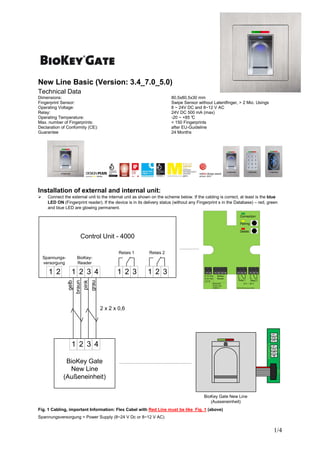
- 1. 1/4 New Line Basic (Version: 3.4_7.0_5.0) Technical Data Dimensions: 80,5x80,5x30 mm Fingerprint Sensor: Swipe Sensor without Latentfinger, > 2 Mio. Usings Operating Voltage: 8 ~ 24V DC and 8~12 V AC Relay: 24V DC 500 mA (max) Operating Temperature: -20 ~ +85 °C Max. number of Fingerprints: < 150 Fingerprints Declaration of Conformity (CE): after EU-Guideline Guarantee 24 Months Installation of external and internal unit: Connect the external unit to the internal unit as shown on the scheme below. If the cabling is correct, at least is the blue LED ON (Fingerprint reader). If the device is in its delivery status (without any Fingerprint s in the Database) – red, green and blue LED are glowing permanent. Fig. 1 Cabling, important Information: Flex Cabel with Red Line must be like Fig. 1 (above) Spannungsversorgung = Power Supply (8~24 V Dc or 8~12 V AC) 1 2 3 4 BioKey Gate New Line (Außeneinheit) 1 2 1 2 3 4 1 2 31 2 3 Control Unit - 4000 Spannungs- versorgung BioKey- Reader Relais 1 Relais 2 gelb braun pink grau 2 x 2 x 0,6 BioKey Gate New Line (Ausseneinheit) 1 2 1 2 3 1 2 3 8-12 Vac 8-24 Vdc 2,5 W BioKey Reader Relay 1 Relay 2 5 A / 30 V Connection Pairing Delete IDENCOM Control Unit -4000V1.1 IDENCOM Germany GmbH 1 2 3 4 4321 CU4000 P2 321P3P1
- 2. 2/4 Fig. 2 Cabling: BioKey + E Opener „Connection“ – LED: blink every 5 sec = the Connection between BioKey Reader and the Contro Unit is Okay. „Pairing“ – LED: glow= Pairing muss be done -> Push the Pairing button for 5 sec. „Delete“ – for delete all the Finger (incl. Masterfinger) -> Push the Delete button for 5 sec. „Relay 1“, „Relay 2“: LED Info for Relay Abb. 3 Control Unit 4000 ( Interior ) Selftest (Autotest, new Feature, Version: V3.4_7.0_5.0) Autotest without using Fingerprints, just to do: Press the Delete Key (See above) for about 3s. Precondition: device is in delivery status (Fingerprint Database is empty – red, green and blue LED are glowing permanent). All the I/Os (like Relays, E-Opener, Motor Lock and Alarm Device), the cabling, the Pairing (Unicat) etc. will be tested automatically. This takes about 10s. Spannungsversorgung 121234123123 8-12Vac 8-24Vdc 2,5W BioKey Reader Relay1Relay2 5A/30V Connection Pairing Delete IDENCOM ControlUnit -4000V1.1IDENCOMGermanyGmbH Außeneinheit Relais 1 Relais 2 Relay1 Relay2
- 3. 3/4 Operation as Overview (M = Masterfinger) Operation Explanation Approach Enroll Masterfinger Provide 3 Masterfingers that are used for management of the terminal Initial state (Red, Green and Blue LEDs ON) Enroll 3 x Masterfinger Acquire Userfinger Userfingers are used to open the door Masterfinger Scan Userfinger (1~6 times every Finger ) …… waiting for about 10 s. Open Door Scan Userfinger Delete all fingers (reset) Reset device to initial state Press the Delete Key Waiting for 30s Initial State (Red, Green and Blue LEDs ON) Unlock terminal Leave lock mode and return to normal operation mode Provide a valid finger (Userfinger or Masterfinger) just one time Please note: 1. Masterfingers (e.g. left index finger) are used for administration (to enroll new Userfingers or reset the device). The first three successfully enrolled fingers are automatically the masterfingers. You can use the same finger three times as Masterfinger.Userfingers (e.g. right index finger) just open the door. NEVER use a Masterfinger as a Userfinger! 2. After scanning one finger over the sensor it is necessary to wait (~3s) for the process to finish before the next finger is used 3. Some useful hints for getting better fingerprint when scanning the finger over the sensor: • Slide your finger with a constant speed and slightly pressure over the sensor • The area of the finger that contacts with the line sensor should be as large as possible. (Refer to the figure below). IDENCOM Germany GmbH, Schillerstr. 56-58, 10627 Berlin Tel. +49-30-398839 310, Fax: Tel. +49-30-398839 318 E-mail: support@idencom.com www.idencom.com IDENCOM Germany GmbH-April 13– Printed in Germany- All rights reserved BioKey® is a registered trademark of IDENCOM AG (Switzerland). All other names are the property of there respective owners.
- 4. 4/4 II. All Functions (Details) 1. Master Finger Enrolment (3 x Master Finger: can be the same finger, three times) Condition: Device is initialized; Red, Green and Blue LEDs are alight Swipe the master finger over the sensor for the first time. Red & green LEDs: flash for appr. 1 sec-> go out -> are alight again for the next Master finger Swipe the master finger over the sensor again. Red & green LEDs: flash for appr. 1 sec-> go out -> are alight again for the next Master finger Swipe the master finger over the sensor a third time. Green LED flashes for appr. 3 sec. The Master finger enrollment is completed. It is now possible to enrol User fingers. If a master finger has been drawn over the sensor and the quality was not optimal, the green & red LEDs are alight -> Repeat. 2. User Finger Enrolment (Userfinger should be different from the Master finger!) Condition: just the blue LED is alight Swipe the Masterfinger once over the sensor. Red & green LEDs: flashes for appr. 3s. ->go out Swipe new User Finger (recommended enrol the same finger: 3~6 times), if the quality is OKAY, green LED, otherwise red LED To complete the User finger Enrolment: wait for about 10s. The red and green LEDs flash three times to confirm the end of the enrolment. Optionally: To complete the User finger Enrolment: Swipe the master fingerprint once again to end enrolment immediately. 3. Identification Condition: just the blue LED is alight Swipe a User Finger, if OKAY, green LED, otherwise red LED 4. Delete All (Reset ) To delete all fingerprints (including masterfingers) from the database, press the Delete Key (Control Unit 4000) for appr. 3s -> Waiting for 30s -> Device is initialized; Red, Green and Blue LEDs are alight Alternative Option for Delete(reset): Swipe the Master finger three times over the sensor and waiting for about 30 sec -> Device is initialized. 5. Locking and Unblocking the Terminal Locking: If a finger which is not enrolled is pulled over the sensor 10 times (red LED glows), the module switches to lock mode. This is to avoid that unauthorised people have the possibility to try undisturbed for any length of time to get access. Locking intervals: 1 minute, 5 minutes, 30 minutes and 1 hour Unblocking: Lock mode can be aborted early by swiping any enrolled finger one time over the sensor (master or Userfinger). IDENCOM Germany GmbH, Schillerstr. 56-58, 10627 Berlin Tel. +49-30-398839 310, Fax: Tel. +49-30-398839 318 E-mail: support@idencom.com www.idencom.com IDENCOM Germany GmbH-April 13– Printed in Germany- All rights reserved BioKey® is a registered trademark of IDENCOM AG (Switzerland). All other names are the property of there respective owners.