1. Able2Extract Professional 8 - Quick Start Guide
WATCH OUR TUTORIAL ON YOUTUBE: http://www.youtube.com/watch?v=tnTu2u5NHvA
Converting Your PDFs to Excel - Easy 3-Step Guide DOWNLOAD FREE TRIAL: http://www.investintech.com/prod_downloadsa2e_pro.htm
Step 1 : Open Your PDF Step 3: Converting to Excel
Select the Open... command from the File menu. After selecting, you are ready for conversion. For conversions to
Excel:
Click the on on the toolbar;
Or select “Convert to Excel” from the File menu.
Or, click on on the toolbar
Step 2: Select PDF data to convert
You must select data in your PDF prior to converting. Three selection
options are available.
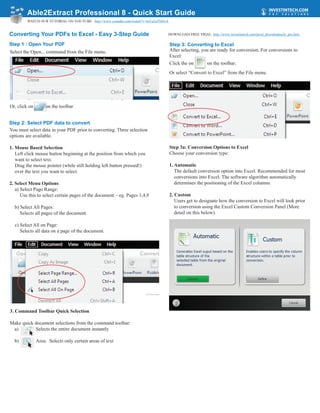
1. Mouse Based Selection Step 3a: Conversion Options to Excel
Left click mouse button beginning at the position from which you Choose your conversion type:
want to select text.
Drag the mouse pointer (while still holding left button pressed!) 1. Automatic
over the text you want to select. The default conversion option into Excel. Recommended for most
conversions into Excel. The software algorithm automatically
2. Select Menu Options determines the positioning of the Excel columns.
a) Select Page Range:
Use this to select certain pages of the document – eg. Pages 1,4,9 2. Custom
Users get to designate how the conversion to Excel will look prior
b) Select All Pages: to conversion using the Excel Custom Conversion Panel (More
Selects all pages of the document. detail on this below).
c) Select All on Page:
Selects all data on a page of the document.
3. Command Toolbar Quick Selection
Make quick document selections from the command toolbar:
a) Selects the entire document instantly
b) Area: Selects only certain areas of text
2. Able2Extract Professional 8 - Quick Start Guide
Step 3b: Using the Excel Custom Conversion Panel Columns
Selecting the Excel ''Custom'' conversion solution activates the
Custom Conversion Panel on the left hand side. This panel will let a) Add Columns:
you manually add and reposition as many lines as required to Add a column. Once activated, left click to add a vertical column
designate the column breaks and rows for the conversion into Excel. line
1. Page Range b) Erase Column Lines:
Erase a column line. Left click on a column to erase it.
Users can first designate a page range for applying and customizing
the file’s table structure. c) Manage Cell Content: drop down menu options
Decide how cell content is treated (such as text or numbers) when
a) Page Range: it comes into contact or into close contact with a column line.
Apply a table structure on each page of the indicated page range
c) Column Types:
b) Expand: Decide how the content within each column is treated for the
Add additional pages where they would like to the table structure. purposes of Excel – as numbers, by default, or text.
c) Exclude:
Exclude a page within a previously selected Page Range.
2. Tables
a) Add:
Add a table to a page.
b) Delete:
Delete a table. Once activated, left click on the table you wish to
delete.
c) Replot:
Automatically recalculates the column structure for all tables
within the active page range.
Once a table is created, you can edit the table structure using the tools
in the conversion Panel:
3. Able2Extract Professional 8 - Quick Start Guide
Rows Header and Footer
a) Show Rows: a) Edit Header:
Show the rows on the page. When activated, lets you adjust the header. To adjust the header
use your mouse and left click the header, hold, and move the mouse
b) Manual Row Editing: up and down
When this option is checked, the “Add Rows” and “Erase Row
Line” functionality is activated. b) Edit Footer:
Allows you to adjust the footer left click the footer line, and adjust
Add Rows: Left click to add a row accordingly.
Erase Row Line: Left click to erase a row
c) Header/Footer Options:
c) Row Settings: Enables the user to select to enable/disable the headers and footers
Demarcate the rows based on a specific column table within a table
or by using the existing row lines on the page.
Click on and save your file to complete
your conversion
4. Able2Extract Professional 8 - Quick Start Guide
Converting your PDFs to Word Brief Background
Able2Extract Professional 8 works on all 3 Windows, Mac and Linux
Step 1 : Open Your PDF
Select the Open... command from the File menu. platforms. It converts native and scanned PDFs to MS Word (.doc)
Or, documents or rich text format (.rtf) (Native PDFs are PDFs created by
Click on the button on the tool bar computer applications). Comes with its own built-in PDF viewer.
Requirements
Step 2: Select PDF Data Windows 98, ME, Windows NT 4.0, 2000, XP, Vista, 7, 8, Mac OSX,
You must select data in your PDF prior to converting. Three selection Linux: Ubuntu, Fedora
options are available. Additional Software: Microsoft Office 2000, 2002/XP, 2010
1. Mouse Based Selection Processor: Intel Pentium II 233 MHZ processor or equivalent
Left click mouse button beginning at the position from which you Hard Drive Space: 40MB of available hard-disk space
want to select text. Memory: 256MB RAM
Drag the mouse pointer (while still holding left button pressed!) over Monitor: VGA 16 color 640x480 screen resolution
the text you want to select.
2. Select Menu Options Key Menu Commands
View Menu > Rotate View
a) Select Page Range: Conversion quality will suffer when the PDF page is displayed on
Use this to select certain pages of the document - eg. Pages 1,4,9 its side. Rotate View menu solves this:
b) Select All Pages: Clockwise - Rotates the document 90 degrees clockwise
Selects all pages of the document. Counterclockwise - Rotates the document 90 degrees
counterclockwise.
c) Select All on Page:
Selects all data on a page of the document.
Edit Menu > OCR Options
Default - Default setting. Software determines whether to convert
using OCR or not.
Perform Image Based Conversion - Can be useful for PDF files
that have been created electronically, but that have damaged fonts or
that otherwise convert very poorly.
No Image Based Conversion - Turns off OCR engine to only
capture electroically created PDF elements.
View Menu Options
Options in this menu lets users alter the size of their PDF in the PDF
viewer.
3. Command Toolbar Quick Selection Document Menu Options
Make quick document selections from the command toolbar: These menu options allow user to scroll through pages in the PDF
document.
a) : Selects the entire document instantly
b) Selects only certain areas of text Help Menu Options
Contains a comprehensive help file to instruct users in greater detail.
Tips & Tricks
Step 3: Converting to Word
Converting Image PDFs
With PDF data selected you are now ready for conversion. For PDF to
The Software should automatically detect Image PDFs. If not, the
Word conversions:
user can select “Perform Image Based Conversion” option in the
Click the on the toolbar. Edit Menu > OCR Options
Save your file to complete your conversion.
Selecting an Area of Data
On native PDFs, users can select the icon on the toolbar.
Selection for Image PDFs is slightly different. To select a single
column on an image PDF, drag the mouse pointer over the text you
want to select.
Batch Conversion
Click in order to convert a batch of multiple files at once into a
specified folder or location.
Telephone and E-mail Support
Having trouble converting a PDF File? We offer top-tier customer
support. Call us at 416-920-2539 (M-F 9am-5pm EST) or e-mail
techsupport@investintech.com with your question.
600 – 425 University Avenue, Toronto, Ontario, M5G 1T6 | Tel: 416-920-5884 | Fax: 416-920-5848 | http://www.investintech.com