Angular 12 CRUD Example with Web API

In this article, we will learn angular 12 CRUD example with web API as well as way to implement datatable in angular 12, cascading dropdown, searching, sorting, and pagination using angular 12. In this tutorial, we will use the SQL Server database and for the attractive and responsive user interface for our Web app, we will use the Angular Material theme. In my previous article's I have shared few articles on Angular 11, Angular 12, angular datatable as well as on AngularJS that you might like to read. Angular 11 CRUD Application using Web API With Material Design and Angular 12 Bar Chart Using ng2-Charts and AngularJS Pie Chart Using Highcharts Library With Example and datatable angular 12 and Export AngularJs Table in Excel using JQuery in ASP.NET Web Forms and AngularJS Hide or Show HTML Control Based on Condition and AngularJS Cascading Dropdown List Using Bootstrap 4 and AngularJS Editable Table With Checkbox using Bootstrap 4 in Asp.Net. In this tutorial, we are using visual studio 2019 and here I explained how to create components, services, routes, pipes, searching, sorting, pagination in a simple way so it would be easy to understand for beginners. Requirement Create simple CRUD opration using Anguler 12 with WEB API. Explain how to update latest version of angular. Use Angular Material theme. Implement cascading dropdown using angular 12. Implementation In this article we will create a CRUD operation to store basic details of employees, So, let's start with a database and create a new database and table using SQL server. Step1: Here, we will create 4 different tables for store information of employees as well as store information of the country, state, and city for cascading dropdown. Now, Please add a few sample records into the country, state, and city table for demonstration. Step 2: Now, we have to create a WEB API to perform CRUD (Create, Replace, Update, and Delete) operations for employees. To create web API, open the visual studio 2019 >> file >> new >> project >> Select Web Application. When you click the OK button, another window will appear on your screen for template selection where you have to select WebAPI and click on the OK button. Step 3: Now, you have to go to solution explorer and right-click on Model folder >> Add >> New Item >> select Data from left panel >> Select ADO.NET Entity Data Model. Now, click on the Add button and select the EF Designer from the database >> Next >> Gives your credential of SQL server and select the database. Now, you have to click on the Add button and select your table and click on the finish button. If you a beginner or need any help to add entity data model then you can read this article where I explained how to create an ADO.NET entity data model (EDM) in asp.net step by step. Step 4: Now, we will add a new empty controller into our web API project to create a WEB API for perform CRUD operation, and for that, you have to go to solution explorer and right-click on...

Recommended
Recommended
More Related Content
Similar to Angular 12 CRUD Example with Web API
Similar to Angular 12 CRUD Example with Web API (20)
Recently uploaded
Recently uploaded (20)
Angular 12 CRUD Example with Web API
- 1. Angular 12 CRUD Example with Web API 1 | www.codingvila.com
- 2. In this article, we will learn angular 12 CRUD example with web API as well as way to implement datatable in angular 12, cascading dropdown, searching, sorting, and pagination using angular 12. In this tutorial, we will use the SQL Server database and for the attractive and responsive user interface for our Web app, we will use the Angular Material theme. In my previous article's I have shared few articles on Angular 11, Angular 12, angular datatable as well as on AngularJS that you might like to read. Angular 11 CRUD Application using Web API With Material Design and Angular 12 Bar Chart Using ng2-Charts and AngularJS Pie Chart Using Highcharts Library With Example and datatable angular 12 and Export AngularJs Table in Excel using JQuery in ASP.NET Web Forms and AngularJS Hide or Show HTML Control Based on Condition and AngularJS Cascading Dropdown List Using Bootstrap 4 and AngularJS Editable Table With Checkbox using Bootstrap 4 in Asp.Net. In this tutorial, we are using visual studio 2019 and here I explained how to create components, services, routes, pipes, searching, sorting, pagination in a simple way so it would be easy to understand for beginners. Requirement 1. Create simple CRUD opration using Anguler 12 with WEB API. 2. Explain how to update latest version of angular. 3. Use Angular Material theme. 4. Implement cascading dropdown using angular 12. Implementation In this article we will create a CRUD operation to store basic details of employees, So, let's start with a database and create a new database and table using SQL server. 2 | www.codingvila.com
- 3. Step1: Here, we will create 4 different tables for store information of employees as well as store information of the country, state, and city for cascading dropdown. Table Employee CREATE TABLE [dbo].[tblEmployeeMaster] ( [EmpId] INT IDENTITY (1, 1) NOT NULL, [FirstName] VARCHAR (50) NULL, [LastName] VARCHAR (50) NULL, [DateofBirth] DATETIME NULL, [EmailId] NVARCHAR (50) NULL, [Gender] NCHAR (10) NULL, [CountryId] INT NULL, [StateId] INT NULL, [Cityid] INT NULL, [Address] VARCHAR (100) NULL, [Pincode] VARCHAR (50) NULL, CONSTRAINT [PK_tblEmployeeMaster] PRIMARY KEY CLUSTERED ([EmpId] ASC) ); Country CREATE TABLE [dbo].[CountryMaster] ( [CountryId] INT IDENTITY (1, 1) NOT NULL, [CountryName] VARCHAR (50) NULL, CONSTRAINT [PK_CountryMaster] PRIMARY KEY CLUSTERED ([CountryId] ASC) ); State CREATE TABLE [dbo].[StateMaster] ( [StateId] INT IDENTITY (1, 1) NOT NULL, [StateName] VARCHAR (50) NULL, [CountryId] INT NOT NULL, CONSTRAINT [PK_StateMaster] PRIMARY KEY CLUSTERED ([StateId] ASC) ); City 3 | www.codingvila.com
- 4. CREATE TABLE [dbo].[CityMaster] ( [Cityid] INT IDENTITY (1, 1) NOT NULL, [CityName] VARCHAR (50) NULL, [StateId] INT NOT NULL, [CountryId] INT NOT NULL, CONSTRAINT [PK_CityMaster] PRIMARY KEY CLUSTERED ([Cityid] ASC) ); Now, Please add a few sample records into the country, state, and city table for demonstration. INSERT [dbo].[CountryMaster] ([CountryName]) VALUES (N'India') INSERT [dbo].[CountryMaster] ([CountryName]) VALUES (N'United States') INSERT [dbo].[StateMaster] ([StateName], [CountryId]) VALUES (N'Andhra Pradesh', 1) INSERT [dbo].[StateMaster] ([StateName], [CountryId]) VALUES (N'Gujarat', 1) INSERT [dbo].[StateMaster] ([StateName], [CountryId]) VALUES (N'Kerala', 1) INSERT [dbo].[CityMaster] ([CityName], [StateId], [CountryId]) VALUES (N'Ahmedabad', 2, 1) INSERT [dbo].[CityMaster] ([CityName], [StateId], [CountryId]) VALUES (N'Surat', 2, 1) INSERT [dbo].[CityMaster] ([CityName], [StateId], [CountryId]) VALUES (N'Vadodara', 2, 1) INSERT [dbo].[CityMaster] ([CityName], [StateId], [CountryId]) VALUES (N'Rajkot', 2, 1) Step 2: Now, we have to create a WEB API to perform CRUD (Create, Replace, Update, and Delete) operations for employees. To create web API, open the visual studio 2019 >> file >> new >> project >> Select Web Application. When you click the OK button, another window will appear on your screen for template selection where you have to select WebAPI and click on the OK button. Step 3: Now, you have to go to solution explorer and right-click on Model folder >> Add >> New Item >> select Data from left panel >> Select ADO.NET Entity Data Model. 4 | www.codingvila.com
- 5. Now, click on the Add button and select the EF Designer from the database >> Next >> Gives your credential of SQL server and select the database. Now, you have to click on the Add button and select your table and click on the finish button. If you a beginner or need any help to add entity data model then you can read this article where I explained how to create an ADO.NET entity data model (EDM) in asp.net step by step. Step 4: Now, we will add a new empty controller into our web API project to create a WEB API for perform CRUD operation, and for that, you have to go to solution explorer and right-click on the Controllers folder >> Add >> Controller >> Select Web API 2 Controller-Empty >> Click on Add. Now, you have to open our controller class and write the following APIs. AngulerWebAppController.cs using System; 5 | www.codingvila.com
- 6. using System.Collections.Generic; using System.Data.Entity; using System.Linq; using System.Net; using System.Net.Http; using System.Web.Http; using AngulerWebApp.Models; namespace AngulerWebApp.Controllers { [RoutePrefix("Api/Employee")] public class AngulerWebAppController : ApiController { AngulerDBEntities objEntity = new AngulerDBEntities(); [HttpGet] [Route("AllEmployeeDetails")] public IHttpActionResult GetEmaployee() { try { var result = (from tblEmp in objEntity.tblEmployeeMasters join tblCountry in objEntity.CountryMasters on tblEmp.CountryId equals tblCountry.CountryId join tblState in objEntity.StateMasters on tblEmp.StateId equals tblState.StateId join tblCity in objEntity.CityMasters on tblEmp.Cityid equals tblCity.Cityid select new { EmpId = tblEmp.EmpId, FirstName = tblEmp.FirstName, LastName = tblEmp.LastName, DateofBirth = tblEmp.DateofBirth, EmailId = tblEmp.EmailId, Gender = tblEmp.Gender, CountryId = tblEmp.CountryId, StateId = tblEmp.StateId, Cityid = tblEmp.Cityid, Address = tblEmp.Address, Pincode = tblEmp.Pincode, Country = tblCountry.CountryName, State = tblState.StateName, City = tblCity.CityName }).ToList(); return Ok(result); 6 | www.codingvila.com
- 7. } catch (Exception) { throw; } } [HttpGet] [Route("GetEmployeeDetailsById/{employeeId}")] public IHttpActionResult GetEmaployeeById(string employeeId) { try { tblEmployeeMaster objEmp = new tblEmployeeMaster(); int ID = Convert.ToInt32(employeeId); try { objEmp = objEntity.tblEmployeeMasters.Find(ID); if (objEmp == null) { return NotFound(); } } catch (Exception) { throw; } return Ok(objEmp); } catch (Exception ex) { throw ex; } } [HttpPost] [Route("InsertEmployeeDetails")] public IHttpActionResult PostEmaployee(tblEmployeeMaster data) { try { if (!ModelState.IsValid) { return BadRequest(ModelState); } try { 7 | www.codingvila.com
- 8. data.DateofBirth = data.DateofBirth.HasValue ? data.DateofBirth.Value.AddDays(1) : (DateTime?)null; objEntity.tblEmployeeMasters.Add(data); objEntity.SaveChanges(); } catch (Exception) { throw; } return Ok(data); } catch (Exception ex) { throw ex; } } [HttpPut] [Route("UpdateEmployeeDetails")] public IHttpActionResult PutEmaployeeMaster(tblEmployeeMaster employee) { try { if (!ModelState.IsValid) return BadRequest(ModelState); try { tblEmployeeMaster objEmp = new tblEmployeeMaster(); objEmp = objEntity.tblEmployeeMasters.Find(employee.EmpId); if (objEmp != null) { objEmp.FirstName = employee.FirstName; objEmp.LastName = employee.LastName; objEmp.Address = employee.Address; objEmp.EmailId = employee.EmailId; objEmp.DateofBirth = employee.DateofBirth.HasValue ? employee.DateofBirth.Value.AddDays(1) : (DateTime?)null; objEmp.Gender = employee.Gender; objEmp.CountryId = employee.CountryId; objEmp.StateId = employee.StateId; objEmp.Cityid = employee.Cityid; objEmp.Pincode = employee.Pincode; } this.objEntity.SaveChanges(); } catch (Exception) { 8 | www.codingvila.com
- 9. throw; } return Ok(employee); } catch (Exception ex) { throw ex; } } [HttpDelete] [Route("DeleteEmployeeDetails")] public IHttpActionResult DeleteEmaployeeDelete(int id) { try { tblEmployeeMaster emaployee = objEntity.tblEmployeeMasters.Find(id); if (emaployee == null) { return NotFound(); } objEntity.tblEmployeeMasters.Remove(emaployee); objEntity.SaveChanges(); return Ok(emaployee); } catch (Exception ex) { throw ex; } } [HttpGet] [Route("Country")] public IQueryable<CountryMaster> GetCountry() { try { return objEntity.CountryMasters; } catch (Exception) { throw; } } public List<CountryMaster> CountryData() { 9 | www.codingvila.com
- 10. try { return objEntity.CountryMasters.ToList(); } catch (Exception ex) { throw ex; } } [Route("Country/{CountryId}/State")] [HttpGet] public List<StateMaster> StateData(int CountryId) { try { return objEntity.StateMasters.Where(s => s.CountryId == CountryId).ToList(); } catch (Exception ex) { throw ex; } } [Route("State/{StateId}/City")] [HttpGet] public List<CityMaster> CityData(int StateId) { try { return objEntity.CityMasters.Where(s => s.StateId == StateId).ToList(); } catch (Exception ex) { throw ex; } } [HttpPost] [Route("DeleteRecord")] public IHttpActionResult DeleteRecord(List<tblEmployeeMaster> user) { string result = ""; if (!ModelState.IsValid) 10 | www.codingvila.com
- 11. { return BadRequest(ModelState); } try { result = DeleteData(user); } catch (Exception ex) { throw ex; } return Ok(result); } private string DeleteData(List<tblEmployeeMaster> users) { string str = ""; try { foreach (var item in users) { tblEmployeeMaster objEmp = new tblEmployeeMaster(); objEmp.EmpId = item.EmpId; objEmp.FirstName = item.FirstName; objEmp.LastName = item.LastName; objEmp.Address = item.Address; objEmp.EmailId = item.EmailId; objEmp.DateofBirth = item.DateofBirth.HasValue ? item.DateofBirth.Value.AddDays(1) : (DateTime?)null; objEmp.Gender = item.Gender; objEmp.CountryId = item.CountryId; objEmp.StateId = item.StateId; objEmp.Cityid = item.Cityid; objEmp.Pincode = item.Pincode; var entry = objEntity.Entry(objEmp); if (entry.State == EntityState.Detached) objEntity.tblEmployeeMasters.Attach(objEmp); objEntity.tblEmployeeMasters.Remove(objEmp); } int i = objEntity.SaveChanges(); if (i > 0) { str = "Records has been deleted"; } else { str = "Records deletion has been faild"; } } 11 | www.codingvila.com
- 12. catch (Exception ex) { throw ex; } return str; } } } Step 5: As you can see, we have created all the required API's and our API creation part is done, now we have to focus on the angular part like installation of angular CLI, create a project of angular 12, consume API using angular 12, commands for build and run angular application and etc. Now, first, we have to install angular CLI into our system, if you already installed angular CLI into your system then you can skip this step. To, install angular CLI open package manager console or command prompt and type the below command and press enter. npm install - g @angular/CLI NOTE: If you facing any issue related to npm then you have to download and install the active LTS, or maintenance the LTS version of Node.js. If you are running an older version of angular and wants to update your angular application with the latest version of angular you can use the following command: ng update @angular/core @angular/cli --force Now, we have to create a new angular project. To, Create a new angular project open package manager console from API Project, write the following command, and hit enter. 12 | www.codingvila.com
- 13. ng new AngularCRUD Here, AngularCRUD is the name of our Angular project. Now, we have to create a component into the created Angular project, for that first we have to change the directory and move to Angular project, So open the package manager console from your WEB API project and write the following command. cd NameofYourAngulerProject Here, the Name of our angular project is AngularCRUD so you have to write the command as shown below and hit enter. cd AngularCRUD Now, we will create a component, for that you have to write the following command and hit enter. Create Component ng g c employee Where an employee is the name of the component. Step 6: Now, we will create a service for that you have to write the following command and hit enter. Create Service ng g s employee 13 | www.codingvila.com
- 14. Where the employee is the name of the service. When you open the directory of your Angular project, you can see these two files are created in the directory as shown below. Now, we will create a class in angular project same as model class, for that you have to write the following command. 14 | www.codingvila.com
- 15. Create a Class ng g class employee Where the employee is the name of the class. Now, we will write all the required properties of employees as shown below in the created class. Employee.ts export class Employee { EmpId: string; FirstName: string; LastName: string; DateofBirth: Date; EmailId: string; Gender: string; CountryId: string; StateId: string; Cityid: string; Address: string; Pincode: string; Country: string; State: string; City: string; } export class Country { CountryId: string; CountryName: string; } export class State { StateId: string; StateName: string; CountryId: string; } export class City { Cityid: string; CityName: string; StateId: string; 15 | www.codingvila.com
- 16. CountryId: string; } Now, Open created an angular project in a new window of the visual studio by selecting the angular project folder, and open employee.service.ts, and import the necessary class and library as shown below. import { Injectable } from '@angular/core'; import { HttpClient } from '@angular/common/http'; import { HttpHeaders } from '@angular/common/http'; import { Observable } from 'rxjs'; import { Employee, State,City } from './employee'; import { Country } from './employee'; Now, We will write all the required methods into employee.service.ts to consume the created web API. As you can see in the code above, here we have taken variable URL and assign the URL or web API, where http://localhost:59465/ is the root URL taken from the property as shown below, and /Api/Employee is URL Prefix that we added while creating WEB API in Controller. 16 | www.codingvila.com
- 17. When you consume web API from any other port or domain, angular will block the particular URL and we called this issue CORS(Cross-Origin Resource Sharing), To resolve this issue you have to go into WEB API Project >> Goto NuGet Package Manager >> Download "CORS" in Web API project. 17 | www.codingvila.com
- 18. Now, you have to go to solution explorer >> App_Start folder of Web API project >> WebApiConfig.cs class. In this file, you have to modify the register method and for that, you have to write the following code as shown below. Add namespace using System.Web.Http.Cors; Now, Write following code in Register Method. var cors = new EnableCorsAttribute("*", "*", "*");//origins,headers,methods config.EnableCors(cors); Step 7: Now, we have to install an Angular Material theme So, open the package manager console and write the following code. npm install--save @angular/material @angular/cdk @angular/animations If, you are using an angular material theme, and wants to update the latest version of angular material you can use the following command: ng update @angular/material --force 18 | www.codingvila.com
- 19. You can check the package.json file in the Angular project to verify the Material theme is installed or not. package.json { "name": "angular-crud", "version": "0.0.0", "scripts": { "ng": "ng", "start": "ng serve", "build": "ng build", "test": "ng test", "lint": "ng lint", "e2e": "ng e2e" }, "private": true, "dependencies": { "@angular/animations": "^12.0.2", "@angular/cdk": "^12.0.2", "@angular/common": "~12.0.2", "@angular/compiler": "~12.0.2", "@angular/core": "~12.0.2", "@angular/forms": "~12.0.2", "@angular/material": "^12.0.2", "@angular/platform-browser": "~12.0.2", "@angular/platform-browser-dynamic": "~12.0.2", "@angular/router": "~12.0.2", "mat-table-exporter": "^9.0.2", "ng-marquee": "^9.5.0", "rxjs": "~6.6.0", "tslib": "^2.0.0", "zone.js": "~0.11.4" }, "devDependencies": { "@angular-devkit/build-angular": "~12.0.2", "@angular/cli": "^12.0.2", "@angular/compiler-cli": "~12.0.2", "@types/jasmine": "~3.6.0", "@types/node": "^12.11.1", "codelyzer": "^6.0.0", "jasmine-core": "~3.6.0", "jasmine-spec-reporter": "~5.0.0", 19 | www.codingvila.com
- 20. "karma": "~6.3.2", "karma-chrome-launcher": "~3.1.0", "karma-coverage": "~2.0.3", "karma-jasmine": "~4.0.0", "karma-jasmine-html-reporter": "^1.5.0", "protractor": "~7.0.0", "ts-node": "~8.3.0", "tslint": "~6.1.0", "typescript": "~4.2.4" } } Now, you have to import all the required libraries in app.module.ts as shown below. import { BrowserModule } from '@angular/platform-browser'; import { NgModule } from '@angular/core'; import { EmployeeService } from './employee.service'; import { FormsModule, ReactiveFormsModule } from '@angular/forms'; import { HttpClientModule, HttpClient } from '@angular/common/http'; import { MatInputModule } from "@angular/material/input"; import { MatCardModule } from '@angular/material/card'; import { MatButtonModule } from '@angular/material/button'; import { MatDatepickerModule } from '@angular/material/datepicker'; import { MatMenuModule } from '@angular/material/menu'; import { MatNativeDateModule } from '@angular/material/core'; import { MatIconModule } from '@angular/material/icon'; import { MatSidenavModule } from '@angular/material/sidenav'; import { MatFormFieldModule } from '@angular/material/form-field'; import { MatTooltipModule } from '@angular/material/tooltip'; import { MatToolbarModule } from '@angular/material/toolbar'; import { MatRadioModule } from '@angular/material/radio'; import { BrowserAnimationsModule } from '@angular/platform-browser/animations'; import { AppRoutingModule } from './app-routing.module'; import { AppComponent } from './app.component'; import { EmployeeComponent } from './employee/employee.component'; import { MatCheckboxModule } from '@angular/material/checkbox'; import { MatSelectModule } from '@angular/material/select'; import { MatSnackBarModule } from '@angular/material/snack-bar'; import { MatTableModule } from '@angular/material/table'; import { CdkTableModule } from '@angular/cdk/table'; import { MatPaginatorModule } from '@angular/material/paginator'; import { NgMarqueeModule } from 'ng-marquee'; 20 | www.codingvila.com
- 21. @NgModule({ declarations: [ AppComponent, EmployeeComponent ], imports: [ BrowserModule, FormsModule, ReactiveFormsModule, HttpClientModule, BrowserAnimationsModule, MatButtonModule, MatMenuModule, MatDatepickerModule, MatNativeDateModule, MatIconModule, MatRadioModule, MatCardModule, MatSidenavModule, MatFormFieldModule, MatInputModule, MatTooltipModule, MatToolbarModule, AppRoutingModule, MatCheckboxModule, MatSelectModule, MatSnackBarModule, MatTableModule, CdkTableModule, MatPaginatorModule, NgMarqueeModule ], providers: [], bootstrap: [AppComponent] }) export class AppModule { } Now, you have to import CSS of the angular material theme in the styles.css file as shown below. There are many different material themes are available, you can follow this official document of Material Angular. styles.css @import '@angular/material/prebuilt-themes/deeppurple-amber.css'; 21 | www.codingvila.com
- 22. Step 8: Now, you have to write the following HTML code in the employee.component.html file. employee.component.html <div class="container"> <mat-card class="mat-elevation-z8"> <mat-toolbar color="accent" style="box-shadow: 0 3px 5px -1px rgba(0,0,0,.2), 0 6px 10px 0 rgba(0,0,0,.14), 0 1px 18px 0 rgba(0,0,0,.12);"> <div align="center" style="text-align: right;"> Angular 12 CRUD Example With WEB API </div> </mat-toolbar> <br><br> <mat-card-content> <form [formGroup]="employeeForm" (ngSubmit)="onFormSubmit()"> <table> <tr> <td class="tbl1"> <mat-form-field class="demo-full-width"> <input formControlName="FirstName" matTooltip="Enter Employee FirstName" matInput placeholder="FirstName" autocomplete="off"> </mat-form-field> <mat-error> <span *ngIf="!employeeForm.get('FirstName').value && employeeForm.get('FirstName').touched"></span> </mat-error> </td> <td class="tbl1"> <mat-form-field class="demo-full-width"> <input formControlName="LastName" matTooltip="Enter Employee LastName" matInput placeholder="LastName" autocomplete="off"> </mat-form-field> <mat-error> <span *ngIf="!employeeForm.get('LastName').value && employeeForm.get('LastName').touched"></span> </mat-error> </td> <td class="tbl1"> <mat-form-field class="demo-full-width"> <input matInput [matDatepicker]="picker" matTooltip="Enter Date Of Birth" formControlName="DateofBirth" placeholder="Date Of Birth" autocomplete="off"> <mat-datepicker-toggle matSuffix [for]="picker"></mat-datepicker-toggle> 22 | www.codingvila.com
- 23. <mat-datepicker #picker></mat-datepicker> </mat-form-field> <mat-error> <span *ngIf="!employeeForm.get('DateofBirth').value && employeeForm.get('DateofBirth').touched"></span> </mat-error> </td> <td class="tbl1"> <mat-form-field class="demo-full-width"> <input formControlName="EmailId" matTooltip="Enter EmailId" matInput placeholder="Email ID" autocomplete="off"> </mat-form-field> <mat-error> <span *ngIf="!employeeForm.get('EmailId').value && employeeForm.get('EmailId').touched"></span> </mat-error> </td> <td class="tbl1"> <span>Gender</span> <mat-radio-group matTooltip="Enter Gender" formControlName="Gender"> <mat-radio-button value="0" [checked]="isMale">Male</mat-radio-button> <mat-radio-button value="1" [checked]="isFeMale">Female</mat-radio-button> </mat-radio-group> <mat-error> <span *ngIf="!employeeForm.get('Gender').value && employeeForm.get('Gender').touched"></span> </mat-error> </td> </tr> <tr> <td class="tbl1"> <mat-form-field> <mat-label>Country</mat-label> <mat-select (selectionChange)="FillStateDDL($event)" formControlName="Country" matTooltip="Select Country" autocomplete="off"> <mat-option *ngFor="let Country of (allCountry | async)" [value]="Country.CountryId"> {{Country.CountryName}} </mat-option> </mat-select> </mat-form-field> </td> <td class="tbl1"> <mat-form-field> <mat-label>State</mat-label> <mat-select (selectionChange)="FillCityDDL($event)" formControlName="State" matTooltip="Select State" autocomplete="off"> <mat-option *ngFor="let State of (allState | async)" [value]="State.StateId"> 23 | www.codingvila.com
- 24. {{State.StateName}} </mat-option> </mat-select> </mat-form-field> </td> <td class="tbl1"> <mat-form-field> <mat-label>City</mat-label> <mat-select formControlName="City" (selectionChange)="GetSelectedCity($event)" matTooltip="Select City" autocomplete="off"> <mat-option *ngFor="let City of (allCity | async)" [value]="City.Cityid"> {{City.CityName}} </mat-option> </mat-select> </mat-form-field> </td> <td class="tbl1"> <mat-form-field class="demo-full-width"> <input matTooltip="Enter Address" formControlName="Address" matInput placeholder="Address" autocomplete="off"> </mat-form-field> <mat-error> <span *ngIf="!employeeForm.get('Address').value && employeeForm.get('Address').touched"></span> </mat-error> </td> <td class="tbl1"> <mat-form-field class="demo-full-width"> <input formControlName="Pincode" matTooltip="Enter Pine Code" matInput placeholder="Pincode" minLength="5" maxLength="6" autocomplete="off"> </mat-form-field> <mat-error> <span *ngIf="!employeeForm.get('Pincode').value && employeeForm.get('Pincode').touched"></span> </mat-error> </td> </tr> <tr> <td class="content-center"> <button type="submit" mat-raised-button color="accent" matTooltip="Submit" [disabled]="!employeeForm.valid">Submit</button> <button type="reset" mat-raised-button color="accent" matTooltip="Reset" (click)="resetForm()">Reset</button> </td> <td> <p *ngIf="dataSaved" style="color:rgb(0, 128, 0);font-size:20px;font-weight:bold" Class="success" align="left"> 24 | www.codingvila.com
- 25. {{massage}} </p> </td> <td></td> <td></td> </tr> </table> <br><br> <mat-form-field> <input matInput (keyup)="applyFilter($event.target.value)" placeholder="Filter"> </mat-form-field> <button mat-icon-button aria-label="Example icon button with a delete icon" type="button" mat-raised-button color="accent" matTooltip="Delete" (click)="DeleteData()"><mat-icon>delete</mat-icon></button> <div> <mat-table [dataSource]="dataSource" matSort class="mat-elevation-z8" style="box-shadow: 0 3px 5px -1px rgba(0,0,0,.2), 0 6px 10px 0 rgba(0,0,0,.14), 0 1px 18px 0 rgba(0,0,0,.12);"> <!-- Checkbox Column --> <ng-container matColumnDef="select"> <mat-header-cell *matHeaderCellDef> <mat-checkbox (change)="$event ? masterToggle() : null" [checked]="selection.hasValue() && isAllSelected()" [indeterminate]="selection.hasValue() && !isAllSelected()"></mat-checkbox> </mat-header-cell> <mat-cell *matCellDef="let row"> <mat-checkbox (click)="$event.stopPropagation()" (change)="$event ? selection.toggle(row) : null" [checked]="selection.isSelected(row)" [aria-label]="checkboxLabel(row)"></mat-checkbox> </mat-cell> </ng-container> <ng-container matColumnDef="FirstName"> <mat-header-cell *matHeaderCellDef mat-sort-header> First Name </mat-header-cell> <mat-cell *matCellDef="let employee"> {{employee.FirstName}} </mat-cell> </ng-container> <ng-container matColumnDef="LastName"> <mat-header-cell *matHeaderCellDef mat-sort-header> Last Name </mat-header-cell> <mat-cell *matCellDef="let employee"> {{employee.LastName}} </mat-cell> </ng-container> <ng-container matColumnDef="DateofBirth"> <mat-header-cell *matHeaderCellDef mat-sort-header> Date Of Birth </mat-header-cell> <mat-cell *matCellDef="let employee"> {{employee.DateofBirth | date:'dd-MM-yyyy'}}</mat-cell> 25 | www.codingvila.com
- 26. </ng-container> <ng-container matColumnDef="EmailId"> <mat-header-cell *matHeaderCellDef mat-sort-header> Email Id </mat-header-cell> <mat-cell *matCellDef="let employee"> {{employee.EmailId}} </mat-cell> </ng-container> <ng-container matColumnDef="Gender"> <mat-header-cell *matHeaderCellDef mat-sort-header> Gender </mat-header-cell> <mat-cell *matCellDef="let employee"> {{employee.Gender ==0? 'Male' : 'Female'}} </mat-cell> </ng-container> <ng-container matColumnDef="Country"> <mat-header-cell *matHeaderCellDef mat-sort-header> Country </mat-header-cell> <mat-cell *matCellDef="let employee"> {{employee.Country}} </mat-cell> </ng-container> <ng-container matColumnDef="State"> <mat-header-cell *matHeaderCellDef mat-sort-header> State </mat-header-cell> <mat-cell *matCellDef="let employee"> {{employee.State}} </mat-cell> </ng-container> <ng-container matColumnDef="City"> <mat-header-cell *matHeaderCellDef mat-sort-header> City </mat-header-cell> <mat-cell *matCellDef="let employee"> {{employee.City}} </mat-cell> </ng-container> <ng-container matColumnDef="Address"> <mat-header-cell *matHeaderCellDef mat-sort-header> Address </mat-header-cell> <mat-cell *matCellDef="let employee"> {{employee.Address}} </mat-cell> </ng-container> <ng-container matColumnDef="Pincode"> <mat-header-cell *matHeaderCellDef mat-sort-header> Pincode </mat-header-cell> <mat-cell *matCellDef="let employee"> {{employee.Pincode}} </mat-cell> </ng-container> <ng-container matColumnDef="Edit"> <mat-header-cell *matHeaderCellDef mat-sort-header> Edit </mat-header-cell> <mat-cell *matCellDef="let employee"> <button mat-icon-button aria-label="Example icon button with a vertical three dot icon" type="button" mat-raised-button color="accent" matTooltip="Edit" (click)="loadEmployeeToEdit(employee.EmpId)"><mat-icon>edit</mat-icon></button> </mat-cell> </ng-container> 26 | www.codingvila.com
- 27. <ng-container matColumnDef="Delete"> <mat-header-cell *matHeaderCellDef mat-sort-header> Delete </mat-header-cell> <mat-cell *matCellDef="let employee"> <button mat-icon-button aria-label="Example icon button with a delete icon" type="button" mat-raised-button color="accent" matTooltip="Delete" (click)="deleteEmployee(employee.EmpId)"><mat-icon>delete_forever</mat-icon></button></mat-cell> </ng-container> <mat-header-row *matHeaderRowDef="displayedColumns"></mat-header-row> <mat-row *matRowDef="let row; columns: displayedColumns;"></mat-row> </mat-table> <mat-paginator [pageSizeOptions]="[5, 10, 25, 100]"></mat-paginator> </div> </form> </mat-card-content> </mat-card> </div> Step 9: Now, you have to write the following code into the app.component.html file. app.component.html <p> <app-employee></app-employee> </p> Step 10: Now, you have to write the following code into the employee.component.ts file. employee.component.ts import { Component, OnInit, ViewChild } from '@angular/core'; import { FormBuilder, Validators } from '@angular/forms'; import { Observable } from 'rxjs'; 27 | www.codingvila.com
- 28. import { EmployeeService } from '../employee.service'; import { Employee } from '../employee'; import { MatSnackBar, MatSnackBarHorizontalPosition, MatSnackBarVerticalPosition } from '@angular/material/snack-bar'; import { MatDialog } from '@angular/material/dialog'; import { MatTableDataSource, } from '@angular/material/table'; import { MatPaginator } from '@angular/material/paginator'; import { MatSort } from '@angular/material/sort'; import { SelectionModel } from '@angular/cdk/collections'; interface Country { CountryId: string; CountryName: string; } interface State { StateId: string; StateName: string; CountryId: string; } interface City { Cityid: string; CityName: string; StateId: string; CountryId: string; } @Component({ selector: 'app-employee', templateUrl: './employee.component.html', styleUrls: ['./employee.component.css'] }) export class EmployeeComponent implements OnInit { dataSaved = false; employeeForm: any; allEmployees: Observable<Employee[]>; dataSource: MatTableDataSource<Employee>; selection = new SelectionModel<Employee>(true, []); employeeIdUpdate = null; massage = null; allCountry: Observable<Country[]>; allState: Observable<State[]>; allCity: Observable<City[]>; CountryId = null; 28 | www.codingvila.com
- 29. StateId = null; CityId = null; SelectedDate = null; isMale = true; isFeMale = false; horizontalPosition: MatSnackBarHorizontalPosition = 'center'; verticalPosition: MatSnackBarVerticalPosition = 'bottom'; displayedColumns: string[] = ['select', 'FirstName', 'LastName', 'DateofBirth', 'EmailId', 'Gender', 'Country', 'State', 'City', 'Address', 'Pincode', 'Edit', 'Delete']; @ViewChild(MatPaginator) paginator: MatPaginator; @ViewChild(MatSort) sort: MatSort; constructor(private formbulider: FormBuilder, private employeeService: EmployeeService, private _snackBar: MatSnackBar, public dialog: MatDialog) { this.employeeService.getAllEmployee().subscribe(data => { this.dataSource = new MatTableDataSource(data); this.dataSource.paginator = this.paginator; this.dataSource.sort = this.sort; }); } ngOnInit() { this.employeeForm = this.formbulider.group({ FirstName: ['', [Validators.required]], LastName: ['', [Validators.required]], DateofBirth: ['', [Validators.required]], EmailId: ['', [Validators.required]], Gender: ['', [Validators.required]], Address: ['', [Validators.required]], Country: ['', [Validators.required]], State: ['', [Validators.required]], City: ['', [Validators.required]], Pincode: ['', Validators.compose([Validators.required, Validators.pattern('[0-9]{6}')])] }); this.FillCountryDDL(); this.dataSource.paginator = this.paginator; this.dataSource.sort = this.sort; } isAllSelected() { const numSelected = this.selection.selected.length; const numRows = !!this.dataSource && this.dataSource.data.length; return numSelected === numRows; } 29 | www.codingvila.com
- 30. /** Selects all rows if they are not all selected; otherwise clear selection. */ masterToggle() { this.isAllSelected() ? this.selection.clear() : this.dataSource.data.forEach(r => this.selection.select(r)); } /** The label for the checkbox on the passed row */ checkboxLabel(row: Employee): string { if (!row) { return `${this.isAllSelected() ? 'select' : 'deselect'} all`; } return `${this.selection.isSelected(row) ? 'deselect' : 'select'} row ${row.EmpId + 1}`; } DeleteData() { debugger; const numSelected = this.selection.selected; if (numSelected.length > 0) { if (confirm("Are you sure to delete items ")) { this.employeeService.deleteData(numSelected).subscribe(result => { this.SavedSuccessful(2); this.loadAllEmployees(); }) } } else { alert("Select at least one row"); } } applyFilter(filterValue: string) { this.dataSource.filter = filterValue.trim().toLowerCase(); if (this.dataSource.paginator) { this.dataSource.paginator.firstPage(); } } loadAllEmployees() { this.employeeService.getAllEmployee().subscribe(data => { this.dataSource = new MatTableDataSource(data); this.dataSource.paginator = this.paginator; this.dataSource.sort = this.sort; }); } onFormSubmit() { this.dataSaved = false; const employee = this.employeeForm.value; 30 | www.codingvila.com
- 31. this.CreateEmployee(employee); this.employeeForm.reset(); } loadEmployeeToEdit(employeeId: string) { this.employeeService.getEmployeeById(employeeId).subscribe(employee => { this.massage = null; this.dataSaved = false; this.employeeIdUpdate = employee.EmpId; this.employeeForm.controls['FirstName'].setValue(employee.FirstName); this.employeeForm.controls['LastName'].setValue(employee.LastName); this.employeeForm.controls['DateofBirth'].setValue(employee.DateofBirth); this.employeeForm.controls['EmailId'].setValue(employee.EmailId); this.employeeForm.controls['Gender'].setValue(employee.Gender); this.employeeForm.controls['Address'].setValue(employee.Address); this.employeeForm.controls['Pincode'].setValue(employee.Pincode); this.employeeForm.controls['Country'].setValue(employee.CountryId); this.allState = this.employeeService.getState(employee.CountryId); this.CountryId = employee.CountryId; this.employeeForm.controls['State'].setValue(employee.StateId); this.allCity = this.employeeService.getCity(employee.StateId); this.StateId = employee.StateId; this.employeeForm.controls['City'].setValue(employee.Cityid); this.CityId = employee.Cityid; this.isMale = employee.Gender.trim() == "0" ? true : false; this.isFeMale = employee.Gender.trim() == "1" ? true : false; }); } CreateEmployee(employee: Employee) { console.log(employee.DateofBirth); if (this.employeeIdUpdate == null) { employee.CountryId = this.CountryId; employee.StateId = this.StateId; employee.Cityid = this.CityId; this.employeeService.createEmployee(employee).subscribe( () => { this.dataSaved = true; this.SavedSuccessful(1); this.loadAllEmployees(); this.employeeIdUpdate = null; this.employeeForm.reset(); } ); } else { 31 | www.codingvila.com
- 32. employee.EmpId = this.employeeIdUpdate; employee.CountryId = this.CountryId; employee.StateId = this.StateId; employee.Cityid = this.CityId; this.employeeService.updateEmployee(employee).subscribe(() => { this.dataSaved = true; this.SavedSuccessful(0); this.loadAllEmployees(); this.employeeIdUpdate = null; this.employeeForm.reset(); }); } } deleteEmployee(employeeId: string) { if (confirm("Are you sure you want to delete this ?")) { this.employeeService.deleteEmployeeById(employeeId).subscribe(() => { this.dataSaved = true; this.SavedSuccessful(2); this.loadAllEmployees(); this.employeeIdUpdate = null; this.employeeForm.reset(); }); } } FillCountryDDL() { this.allCountry = this.employeeService.getCountry(); this.allState = this.StateId = this.allCity = this.CityId = null; } FillStateDDL(SelCountryId) { this.allState = this.employeeService.getState(SelCountryId.value); this.CountryId = SelCountryId.value; this.allCity = this.CityId = null; } FillCityDDL(SelStateId) { this.allCity = this.employeeService.getCity(SelStateId.value); this.StateId = SelStateId.value } GetSelectedCity(City) { this.CityId = City.value; } 32 | www.codingvila.com
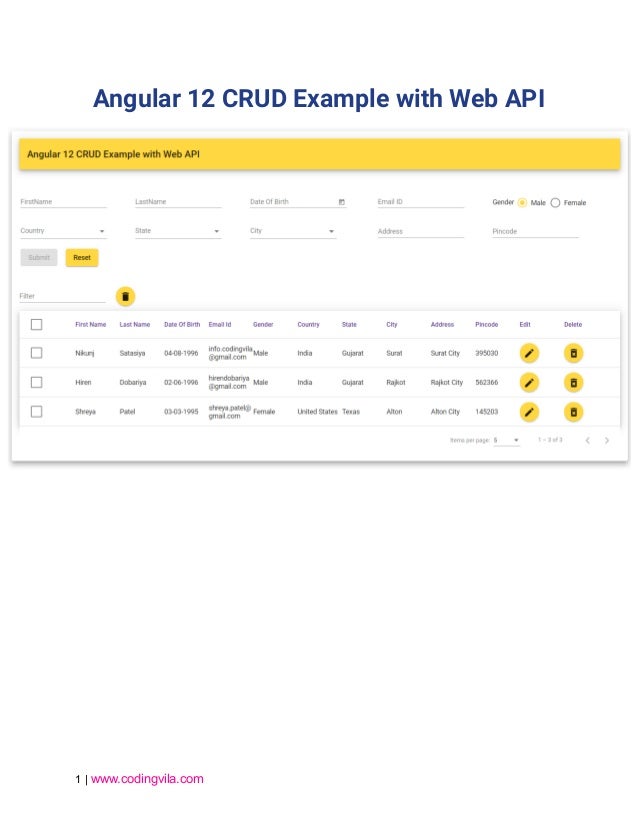
- 33. resetForm() { this.employeeForm.reset(); this.massage = null; this.dataSaved = false; this.isMale = true; this.isFeMale = false; this.loadAllEmployees(); } SavedSuccessful(isUpdate) { if (isUpdate == 0) { this._snackBar.open('Record Updated Successfully!', 'Close', { duration: 2000, horizontalPosition: this.horizontalPosition, verticalPosition: this.verticalPosition, }); } else if (isUpdate == 1) { this._snackBar.open('Record Saved Successfully!', 'Close', { duration: 2000, horizontalPosition: this.horizontalPosition, verticalPosition: this.verticalPosition, }); } else if (isUpdate == 2) { this._snackBar.open('Record Deleted Successfully!', 'Close', { duration: 2000, horizontalPosition: this.horizontalPosition, verticalPosition: this.verticalPosition, }); } } } Step 11: As you can see, we have completed all the code and created two different projects for WEB API and Angular. Now, it's time to build and run our project. So, first, build your project of WEB API and run it. 33 | www.codingvila.com
- 34. Now, it is time to build and run a project of Angular after successfully run the project of WEB API. To build the project of angular you have to write the following command in the package manager console. Build an Angular Project ng build Run Angular Project ng serve - o When you press enter your angular project will run on URL: http://localhost:4200/ Summary In this article, we learned how to implement the CRUD operation using angular 12 with Web API and SQL Server database, as well as we also learned how to use date piker in angular, radio buttons in angular as well as cascading dropdown using angular 12. Please leave your comments and share a link of this article if you like. Download Source Code 34 | www.codingvila.com