Salesforce Development Lifecycle: Detailed Phases
•
0 likes•3 views

The salesforce development lifecycle is layered, and this guide explains exactly how to undertake it. Read to understand the process so it gives you an insight into how you might want to prepare for development.

Recommended
Recommended
More Related Content
Similar to Salesforce Development Lifecycle: Detailed Phases
Similar to Salesforce Development Lifecycle: Detailed Phases (20)
More from CRMJetty
More from CRMJetty (18)
Recently uploaded
Recently uploaded (20)
Salesforce Development Lifecycle: Detailed Phases
- 1. Salesforce Development Lifecycle: Detailed Phases “With great power comes great responsibility.” We all know this. Or at least anyone who has ever heard of Spiderman knows these words. Salesforce as a tool is kind of the all-powerful one in this context. But anyone who knows Salesforce development also fits the bill. The Salesforce development lifecycle is multi-layered; not only does it require investment, but rather, a commitment from the entire organization to see the development through. The development team will, of course, commit to their role in it, but it is crucial that the organization, who is the client, does so too. sales@crmjetty.com
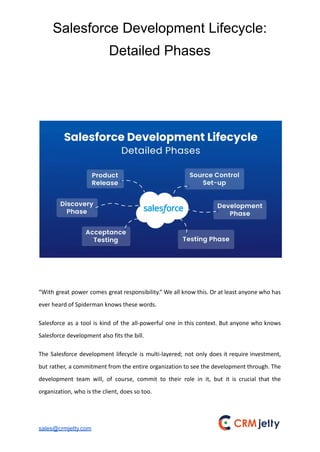
- 2. SFDC development life cycle begins with discovery, understanding why a client requires Salesforce, and their exact needs. There are several complex phases that follow, all culminating in project delivery and staff training. Let’s take a look at all the phases of the Salesforce development lifecycle: Phases of Salesforce application development lifecycle Generally, development projects are completed in phases, with every phase having a particular goal to achieve. Salesforce Development Lifecycle goes through 6 such phases. Let us better understand each phase of the Salesforce Development Lifecycle: 1. Discovery Phase This is the primary phase of Salesforce development. In this phase, the requirements of the department are assembled, analyzed, and decided upon. Later on, these are shared with development teams. Now, several factors are involved in the discovery phase, like the objectives/goals of projects, critical needs, development intricacies, automation needs, reporting, gaps in the previous implementation, APIs, tools, and development approaches. 2. Source Control Set-up Source control provides you with a tool to help track changes occurring in files. A release manager would kick off a development project and create repositories and branches. Let’s see what these two components are: Repository It is sort of like a vessel for version control. Usually used to store away files, and it can track changes in files in real time. A repository is the master storage of files, from which many branches, which contain new elements in development, come out. You can oversee changes, review the work of other developers, and clear up discord by creating different repositories. sales@crmjetty.com
- 3. Branches Branches give the developers an autonomous working environment to work on new features away from other development work. Branches allow for parallel development and provide the developers with control changes when products are released for testing. It is favorable to have a separate Git repository for different projects. You can merge all the data later on with the main application. The responsibility falls to the release manager to assign tasks according to the intellect of the developer. When you create a version control, you can set up a single source of code, manage conflicts, reduce risks, facilitate deployment risks, clarify reduction, and release at a higher rate. 3. Development Phase Development operations are executed in sandbox environments. Every developer who works in such an environment has a copy of the main production application and the essential configuration info. Developers use these separate environments to write code, modifications, and testing. They may connect with their sandbox using Force.com and transmit metadata to IDE. After all the required changes are made and tested, they are transferred to the Git repository. If a project requires multiple people working on the same code, check the conflicts before you put the code in the repository. 4. Testing Phase After the development phase comes the testing phase, teams are gathered to conduct top-to-bottom testing sessions where code is moved from the primary repository to the sandbox. Quality Analysts conduct different testing processes in Salesforce application development projects, like unit testing, performance testing, regression testing, visual testing, integration/API testing, load testing, etc. Most of all, Salesforce application development partners use agile methodology so that any structural changes can be taken care of at this stage. Although, should serious modifications arise, you have to go back to the drawing board (initial development stage). sales@crmjetty.com
- 4. 5. Acceptance Testing After the stages mentioned above are completed, we come to the acceptance testing phase. User acceptance tests are conducted and carried out by end-users in combination with the development team. In this phase, a release manager creates sandboxes, which the end user then uses for testing. Once the testing is completed and approved, the product is ready to be released. However, if there are changes suggested at this stage, you can take the entire thing back to the initial development phase. 6. Product Release After undergoing different testing procedures, the product is tested a final time for performance in a sandbox. Here, all the configurations, functionalities, and app data are tested a last time. Here we have to ensure that the solution passes through the service level agreements before being set up in production. How will CRMJetty help you with the same? We have been honing our Salesforce development skills for over 16 years now and have built a strong portfolio of clients who have made it in the industry with us. You can count on our expertise with the software, as well as our understanding of your unique needs. Contact us today to learn more about everything we offer in terms of Salesforce development and get started on your path to success! Original Blog: https://www.crmjetty.com/blog/sfdc-development-lifecycle-phases/ Contact Us sales@crmjetty.com