SlideShare a Scribd company logo
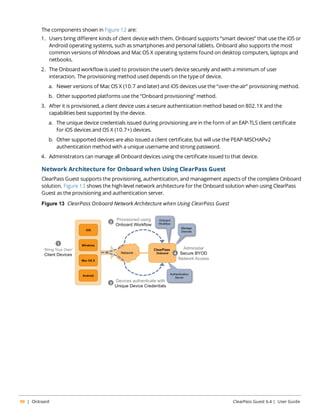
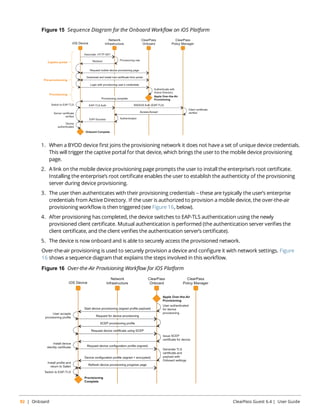
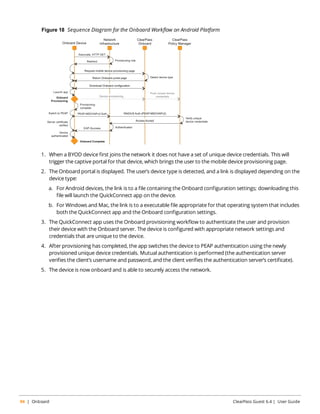
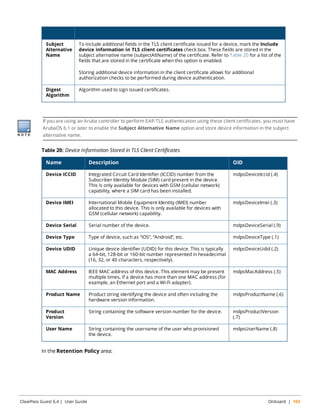
1 of 558
Download to read offline
ClearPass Guest 6.4 
User Guide
Copyright 
© 2014 Aruba Networks, Inc. Aruba Networks trademarks include , Aruba Networks®, Aruba 
Wireless Networks®, the registered Aruba the Mobile Edge Company logo, Aruba Mobility Management 
System®, Mobile Edge Architecture®, People Move. Networks Must Follow®, RFProtect®, Green Island®. All 
rights reserved. All other trademarks are the property of their respective owners. 
Open Source Code 
Certain Aruba products include Open Source software code developed by third parties, including software code 
subject to the GNU General Public License (GPL), GNU Lesser General Public License (LGPL), or other Open 
Source Licenses. Includes software from Litech Systems Design. The IF-MAP client library copyright 2011 
Infoblox, Inc. All rights reserved.This product includes software developed by Lars Fenneberg et al. The Open 
Source code used can be found at this site: 
http://www.arubanetworks.com/open_source 
Legal Notice 
The use of Aruba Networks, Inc. switching platforms and software, by all individuals or corporations, to 
terminate other vendors’ VPN client devices constitutes complete acceptance of liability by that individual or 
corporation for this action and indemnifies, in full, Aruba Networks, Inc. from any and all legal actions that 
might be taken against it with respect to infringement of copyright on behalf of those vendors. 
Warranty 
This hardware product is protected by the standard Aruba warranty of one year parts/labor. For more 
information, refer to the ARUBACARE SERVICE AND SUPPORT TERMS AND CONDITIONS. 
Altering this device (such as painting it) voids the warranty. 
2 | ClearPass Guest 6.4 | User Guide
Contents 
About this Guide 17 
Audience 17 
Conventions 17 
Contacting Support 18 
ClearPass Guest Overview 19 
About ClearPass Guest 19 
Visitor Access Scenarios 20 
Reference Network Diagram 21 
Key Interactions 22 
AAA Framework 23 
Key Features 24 
Visitor Management Terminology 25 
ClearPass Guest Deployment Process 26 
Operational Concerns 26 
Network Provisioning 26 
Site Preparation Checklist 27 
Security Policy Considerations 27 
AirGroup Deployment Process 28 
Documentation and User Assistance 29 
User Guide and Online Help 29 
Context-Sensitive Help 29 
Field Help 29 
Quick Help 30 
If You Need More Assistance 30 
Use of Cookies 30 
Guest Manager 31 
Accessing Guest Manager 31 
About Guest Management Processes 32 
Sponsored Guest Access 32 
Self Provisioned Guest Access 32 
Active Sessions Management 33 
Session States 35 
RFC 3576 Dynamic Authorization 35 
ClearPass Guest 6.4 | User Guide Contents | 3
Filtering the List of Active Sessions 36 
Disconnecting Multiple Active Sessions 37 
Sending Multiple SMS Alerts 37 
About SMS Guest Account Receipts 38 
Using Standard Guest Management Features 38 
Creating a Guest Account 39 
Creating a Guest Account Receipt 41 
Creating a Device 41 
Creating Devices Manually in ClearPass Guest 42 
Creating Devices During Self-Registration - MAC Only 44 
Creating Devices During Self-Registration - Paired Accounts 44 
Creating Multiple Guest Accounts 45 
Creating Multiple Guest Account Receipts 47 
Creating a Single Password for Multiple Accounts 48 
Exporting Guest Account Information 50 
About CSV and TSV Exports 51 
About XML Exports 51 
Importing Guest Accounts 52 
Managing Single Guest Accounts 55 
Managing Devices 59 
Changing a Device’s Expiration Date 60 
Disabling and Deleting Devices 61 
Activating a Device 61 
Editing a Device 62 
Viewing Current Sessions for a Device 63 
Printing Device Details 64 
Viewing Device Details 64 
Managing Multiple Guest Accounts 64 
AirGroup Device Registration 66 
Registering Groups of Devices or Services 67 
Registering Personal Devices 69 
AirGroup Time-Based Sharing Syntax Examples 71 
Time-Based Syntax Reference 73 
About AirGroup Time-Based Sharing 75 
Basics of Time-Based Sharing Setup 75 
MAC Authentication in ClearPass Guest 76 
MAC Address Formats 76 
Automatically Registering MAC Devices in ClearPass Policy Manager 76 
4 | Contents ClearPass Guest 6.4 | User Guide
Importing MAC Devices 77 
Advanced MAC Features 77 
User Detection on Landing Pages 77 
Click-Through Login Pages 78 
Onboard 79 
Accessing Onboard 79 
About ClearPass Onboard 80 
Onboard Deployment Checklist 81 
Onboard Feature List 83 
Supported Platforms 84 
Public Key Infrastructure for Onboard 85 
Certificate Hierarchy 85 
Certificate Configuration in a Cluster 86 
Revoking Unique Device Credentials 86 
Revoking Credentials to Prevent Network Access 86 
Re-Provisioning a Device 87 
Network Requirements for Onboard 87 
Using Same SSID for Provisioning and Provisioned Networks 87 
Using Different SSID for Provisioning and Provisioned Networks 88 
Configuring Online Certificate Status Protocol 88 
Configuring Certificate Revocation List (CRL) 88 
Network Architecture for Onboard 89 
Network Architecture for Onboard when Using ClearPass Guest 90 
The ClearPass Onboard Process 91 
Devices Supporting Over-the-Air Provisioning 91 
Devices Supporting Onboard Provisioning 93 
Configuring the User Interface for Device Provisioning 95 
Using the {nwa_mdps_config} Template Function 95 
Onboard Troubleshooting 96 
iOS Device Provisioning Failures 96 
Hostname-to-Certificate Match Failures 97 
Onboard Interface Not Displayed 97 
Certificate Renewal through OS X Mavericks 97 
Certificate Authorities 97 
Creating a New Certificate Authority 98 
Editing Certificate Authority Settings 101 
Requesting a Certificate for the Certificate Authority 105 
ClearPass Guest 6.4 | User Guide Contents | 5
Installing a Certificate Authority’s Certificate 105 
Using Microsoft Active Directory Certificate Services 107 
Management and Control 109 
Device Management (View by Device) 110 
Device Management (View by Username) 113 
Certificate Management (View by Certificate) 115 
Searching for Certificates in the List 116 
Working with Certificates in the List 116 
Working with Certificate Signing Requests 119 
Importing a Code-Signing Certificate 122 
Importing a Trusted Certificate 123 
Creating a Certificate 123 
Requesting a Certificate 126 
The Trust Chain and Uploading Certificates for the CA 128 
Considerations for iOS Devices 130 
Onboard Configuration 130 
Network Settings 130 
Configuring Basic Network Access Settings 131 
Configuring Enterprise Protocol Settings 134 
Configuring Device Authentication Settings 135 
Configuring Certificate Trust Settings 136 
Configuring Windows-Specific Network Settings 138 
Configuring Proxy Settings 139 
iOS Settings 140 
Configuring ActiveSync Settings 141 
Configuring AirPlay Settings 143 
Configuring AirPrint Settings 144 
Configuring APN Settings 145 
Configuring Calendar Settings 145 
Configuring Contacts Settings 147 
Configuring Email Settings 148 
Configuring Global HTTP Proxy Settings 151 
Configuring an iOS Device Passcode Policy 152 
Configuring Single Sign-On Settings 154 
Configuring Calendar Subscription Settings 155 
Configuring an iOS Device VPN Connection 156 
Configuring Web Clips 160 
Configuring Web Content Filter Settings 161 
6 | Contents ClearPass Guest 6.4 | User Guide
Windows Applications 163 
Configuring App Sets 163 
Deployment and Provisioning 164 
Configuration Profiles 165 
Creating and Editing Configuration Profiles 165 
Provisioning Settings 168 
About Configuring Provisioning Settings 169 
Configuring Basic Provisioning Settings 170 
Configuring Provisioning Settings for the Web Login Page 174 
Configuring Provisioning Settings for iOS and OS X 176 
Configuring Provisioning Settings for Legacy OS X Devices 178 
Configuring Provisioning Settings for Windows Devices 179 
Configuring Provisioning Settings for Android Devices 180 
Configuring Provisioning Settings for Ubuntu 181 
Configuring Provisioning Settings for Chromebook 182 
Configuring Options for Onboard Client Devices 184 
About the Self-Service Portal 185 
Configuration 187 
Accessing Configuration 187 
Configuring ClearPass Guest Authentication 188 
Content Manager 189 
Managing Content: Private Files and Public Files 189 
Uploading Content 190 
Downloading Content 191 
Creating a New Content Directory 191 
Configuring Guest Manager 192 
Default Settings for Account Creation 192 
About Fields, Forms, and Views 198 
Business Logic for Account Creation 198 
Verification Properties 198 
Basic User Properties 198 
Visitor Account Activation Properties 199 
Visitor Account Expiration Properties 200 
Other Properties 200 
Standard Forms and Views 201 
Configuring Access Code Logins 202 
Customize Random Username and Passwords 202 
ClearPass Guest 6.4 | User Guide Contents | 7
Create the Print Template 202 
Customize the Guest Accounts Form 204 
Create the Access Code Guest Accounts 204 
Pages 206 
Customizing Fields 206 
Creating a Custom Field 206 
Duplicating a Field 208 
Editing a Field 208 
Deleting a Field 208 
Displaying Forms that Use a Field 209 
Displaying Views that Use a Field 209 
Customizing AirGroup Registration Forms 209 
Customizing Forms and Views 212 
Editing Forms and Views 213 
Duplicating Forms and Views 213 
Editing Forms 214 
Form Field Editor 215 
Form Display Properties 215 
Form Validation Properties 227 
Examples of Form field Validation 228 
Advanced Form Field Properties 230 
Form Field Validation Processing Sequence 231 
Editing Views 233 
View Field Editor 234 
Customizing Guest Self-Registration 235 
Accessing the Guest Self-Registration Customization Forms 236 
Self-Registration Sequence Diagram 239 
Editing Self-Registration Pages 240 
Creating a Self-Registration Page 241 
Configuring Basic Properties for Self-Registration 243 
Editing Registration Page Properties 245 
Editing the Default Self-Registration Form Settings 245 
Creating a Single Password for Multiple Accounts 247 
Editing Guest Receipt Page Properties 248 
Editing Receipt Actions 248 
Enabling and Editing NAS Login Properties 253 
Editing Login Page Properties 254 
Self-Service Portal Properties 257 
8 | Contents ClearPass Guest 6.4 | User Guide
Resetting Passwords with the Self-Service Portal 258 
Managing Web Logins 260 
Creating and Editing Web Login Pages 261 
Receipts 270 
Digital Passes 271 
About Digital Passes 271 
Viewing Digital Pass Certificates 274 
Installing Digital Pass Certificates 275 
Managing Digital Passes 276 
Creating and Editing a Digital Pass Template 277 
Example Template Code Variables 283 
Images in Digital Passes 283 
Email Receipts and SMTP Services 284 
About Email Receipts 284 
Configuring Email Receipts 285 
Email Receipt Options 286 
About Customizing SMTP Email Receipt Fields 288 
Customizing SMS Receipt 290 
SMS Receipt Fields 290 
Customizing Print Templates 291 
Creating New Print Templates 292 
Print Template Wizard 293 
Modifying Wizard-Generated Templates 294 
Setting Print Template Permissions 294 
SMS Services 296 
Viewing SMS Gateways 296 
Creating a New SMS Gateway 297 
Editing an SMS Gateway 301 
Sending an SMS 303 
About SMS Credits 303 
About SMS Guest Account Receipts 304 
SMS Receipt Options 305 
Working with the Mobile Carriers List 305 
About Translations 307 
Translation Packs 308 
Creating and Editing Translation Packs 308 
Translation Assistant 310 
Customizing Translated User Interface Text 311 
ClearPass Guest 6.4 | User Guide Contents | 9
Advertising Services 313 
About Advertising Services 313 
Materials 313 
Promotions 313 
Campaigns 314 
Spaces 314 
Pages 314 
Advertising Services Process Overview 314 
About the Tutorial 314 
Navigating the Tutorial 315 
Advertising Pages 315 
Editing Advertising Pages 316 
The nwa_adspace Smarty Template Tag 320 
Advertising Spaces 323 
Creating and Editing Advertising Spaces 324 
"Other Location" Example 326 
"Maximum Height" Example 327 
"Maximum Width" Example 328 
Advertising Campaigns 329 
Creating and Editing Advertising Campaigns 329 
Campaign Rank and Weight 332 
Advertising Promotions 332 
Creating and Editing Advertising Promotions 333 
Using Labels in Advertising Services 336 
Advertising Materials 337 
Creating and Editing Advertising Materials 338 
Hotspot Manager 341 
Accessing Hotspot Manager 341 
About Hotspot Management 342 
Managing the Hotspot Sign-up Interface 342 
Captive Portal Integration 343 
Web Site Look-and-Feel 344 
SMS Services 344 
Managing Hotspot Plans 344 
Editing or Creating a Hotspot Plan 345 
Managing Transaction Processors 346 
Creating a New Transaction Processor 347 
10 | Contents ClearPass Guest 6.4 | User Guide
Managing Existing Transaction Processors 348 
Managing Customer Information 348 
Managing Hotspot Invoices 348 
Customizing the User Interface 349 
Customizing Visitor Sign-Up Page One 349 
Customizing Visitor Sign-Up Page Two 351 
Customizing Visitor Sign-Up Page Three 354 
Viewing the Hotspot User Interface 355 
Administration 357 
Accessing Administration 357 
AirGroup Services 358 
AirGroup Controllers 358 
Creating and Editing AirGroup Controllers 359 
Configuring AirGroup Services 361 
AirGroup Diagnostics 362 
Creating AirGroup Administrators 363 
Creating AirGroup Operators 364 
Authenticating AirGroup Users via LDAP 364 
Configuring LDAP User Search for AirGroup 364 
LDAP User Search Architecture 364 
User Search Workflow 364 
Configuration Summary 365 
Basic LDAP Server Settings 365 
User Search Settings 366 
Configuring the AirGroup Shared User Field 367 
Select2 Options Details 368 
Select2 Hook Details 369 
MACTrac Services 370 
Creating MACTrac Operators 371 
Managing MACTrac Devices 371 
Registering MACTrac Devices 373 
About MAC Addresses 374 
Automatically Supplying the MACTrac Device Address 374 
API Services 375 
API Clients 375 
Creating and Editing API Clients 376 
Configuring the API Framework Plugin 378 
ClearPass Guest 6.4 | User Guide Contents | 11
Setting API Privileges in Operator Profiles 379 
About OAuth 380 
OAuth Basics 380 
OAuth2 Client or App 381 
Client ID and Secret 381 
Redirect URI 381 
Authorization Grant Types for OAuth 381 
Application Service Accounts for OAuth 383 
SOAP Web Services and API 383 
Viewing Available Web Services 384 
Configuring Web Services 385 
SOAP API Introduction 385 
Audience 386 
API Documentation Overview 386 
Disclaimer 386 
About the SOAP API 386 
Using the SOAP API 388 
Integration Example 391 
API Documentation 395 
The XML-RPC Interface and API 408 
About the XML-RPC API 408 
Accessing the API 411 
Invoking the API 413 
Method Summary 414 
API Documentation 414 
Data Retention 431 
3.9 Configuration Import 432 
Creating a Customized Configuration Backup 432 
Uploading the 3.9 Backup File 433 
Restoring Configuration Items 434 
Viewing Imported Item Details 435 
Import Information for Specific Import Items 437 
Import Information: Advertising Services 438 
Import Information: AirGroup Services 438 
Import Information: Cisco IP Phones 438 
Import Information: Guest Manager 438 
Import Information: High Availability (HA) 439 
Import Information: Hotspot Manager 439 
12 | Contents ClearPass Guest 6.4 | User Guide
Import Information: Onboard 440 
Import Information: Operator Logins 440 
Import Information: Palo Alto Network Services 440 
Import Information: RADIUS Services 440 
Import Information: Reporting Manager Definitions 441 
Import Information: Server Configuration 442 
Import Information: SMS Services 443 
Import Information: SMTP Services 443 
Plugin Manager 444 
Viewing Available Plugins 444 
Configuring Plugins 445 
Configuring the Kernel Plugin 446 
Configuring the Aruba ClearPass Skin Plugin 447 
Configuring the SMS Services Plugin 448 
Configuring the IP Phone Services Plugin 449 
Configuring the Translations Plugin 450 
Support Services 450 
Viewing the Application Log 451 
Exporting the Application Log 452 
Contacting Support 452 
Viewing Documentation 453 
Operator Logins 455 
Accessing Operator Logins 455 
About Operator Logins 455 
Role-Based Access Control for Multiple Operator Profiles 456 
Operator Logins Configuration 456 
Custom Login Message 457 
Advanced Operator Login Options 458 
Automatic Logout 458 
Operator Profiles 458 
Creating an Operator Profile 458 
Configuring the User Interface 461 
Customizing Forms and Views 462 
Operator Profile Privileges 462 
Managing Operator Profiles 463 
Configuring AirGroup Operator Device Limit 464 
Local Operator Authentication 464 
ClearPass Guest 6.4 | User Guide Contents | 13
Creating a New Operator 464 
External Operator Authentication 465 
Manage LDAP Operator Authentication Servers 465 
Viewing the LDAP Server List 466 
Creating an LDAP Server 467 
Advanced LDAP URL Syntax 469 
LDAP Operator Server Troubleshooting 469 
Testing Connectivity 470 
Testing Operator Login Authentication 470 
Looking Up Sponsor Names 470 
Troubleshooting Error Messages 471 
LDAP Translation Rules 472 
Custom LDAP Translation Processing 474 
Reference 477 
Basic HTML Syntax 477 
Standard HTML Styles 478 
Smarty Template Syntax 480 
Basic Template Syntax 480 
Text Substitution 480 
Template File Inclusion 480 
Comments 480 
Variable Assignment 480 
Conditional Text Blocks 481 
Script Blocks 481 
Repeated Text Blocks 481 
Foreach Text Blocks 481 
Modifiers 482 
Predefined Template Functions 482 
dump 483 
nwa_commandlink 483 
nwa_iconlink 484 
nwa_icontext 484 
nwa_quotejs 485 
nwa_radius_query 485 
Advanced Developer Reference 491 
nwa_assign 492 
nwa_bling 492 
14 | Contents ClearPass Guest 6.4 | User Guide
nwa_makeid 492 
nwa_nav 493 
nwa_plugin 494 
nwa_privilege 494 
nwa_replace 495 
nwa_text 495 
nwa_userpref 495 
nwa_youtube 495 
Date/Time Format Syntax 496 
nwadateformat Modifier 496 
nwatimeformat Modifier 497 
Date/Time Format String Reference 497 
Programmer’s Reference 498 
NwaAlnumPassword 499 
NwaBoolFormat 499 
NwaByteFormat 499 
NwaByteFormatBase10 499 
NwaComplexPassword 500 
NwaCsvCache 500 
NwaDigitsPassword($len) 500 
NwaDynamicLoad 500 
NwaGeneratePictureString 500 
NwaGenerateRandomPasswordMix 500 
NwaLettersDigitsPassword 501 
NwaLettersPassword 501 
NwaMoneyFormat 501 
NwaParseCsv 501 
NwaParseXml 502 
NwaPasswordByComplexity 502 
NwaSmsIsValidPhoneNumber 503 
NwaStrongPassword 503 
NwaVLookup 503 
NwaWordsPassword 504 
Field, Form, and View Reference 504 
GuestManager Standard Fields 504 
Hotspot Standard Fields 512 
SMS Services Standard Fields 513 
SMTP Services Standard Fields 513 
ClearPass Guest 6.4 | User Guide Contents | 15
Format Picture String Symbols 515 
Form Field Validation Functions 516 
Form Field Conversion Functions 521 
Form Field Display Formatting Functions 522 
View Display Expression Technical Reference 523 
LDAP Standard Attributes for User Class 525 
Regular Expressions 526 
Chromebook in Onboard 527 
About Chromebook in Onboard 527 
Caveats and Recommendations 528 
Google Admin Chromebook License is Required 528 
Managed Chromebook Deployment is Required 528 
Chrome Extension is Required 528 
Chromebook Release 37 or Later is Required 528 
Chromebook Supports Only “Created by Device” Certificates 528 
A Separate Provisioning SSID is Required 529 
Directory-Based Authentication Source is Recommended 530 
Onboard Configuration for Chromebook 530 
Google Admin Configuration for Chromebook 531 
Configuring the Chrome extension 531 
Configuring Network Settings 532 
Glossary 535 
Index 545 
16 | Contents ClearPass Guest 6.4 | User Guide
Chapter 1 
About this Guide 
ClearPass Guest provides a simple and personalized user interface through which operational staff can quickly 
and securely manager visitor network access. 
Audience 
This User Guide is intended for system administrators and people who are installing and configuring ClearPass 
Guest as their visitor management solution. It describes the installation and configuration process. 
Conventions 
The following conventions are used throughout this guide to emphasize important concepts: 
Table 1: Typographical Conventions 
Type Style Description 
Italics This style is used to emphasize important terms and to mark the titles of books. 
System items This fixed-width font depicts the following: 
l Sample screen output 
l System prompts 
l Filenames, software devices, and specific commands when mentioned in the text 
Commands In the command examples, this bold font depicts text that you must type exactly as 
shown. 
<Arguments> In the command examples, italicized text within angle brackets represents items that 
you should replace with information appropriate to your specific situation. For example: 
# send <text message> 
In this example, you would type “send” at the system prompt exactly as shown, followed 
by the text of the message you wish to send. Do not type the angle brackets. 
[Optional] Command examples enclosed in brackets are optional. Do not type the brackets. 
{Item A | 
Item B} 
In the command examples, items within curled braces and separated by a vertical bar 
represent the available choices. Enter only one choice. Do not type the braces or bars. 
The following informational icons are used throughout this guide: 
Indicates helpful suggestions, pertinent information, and important things to remember. 
Indicates a risk of damage to your hardware or loss of data. 
Indicates a risk of personal injury or death. 
ClearPass Guest 6.4 | User Guide About this Guide | 17
Contacting Support 
Main Site arubanetworks.com 
Support Site support.arubanetworks.com 
Airheads Social Forums and 
Knowledge Base 
community.arubanetworks.com 
North American Telephone 1-800-943-4526 (Toll Free) 
1-408-754-1200 
International Telephones arubanetworks.com/support-services/support-program/contact-support/ 
Software Licensing Site licensing.arubanetworks.com 
End of Support information arubanetworks.com/support-services/end-of-life-products/end-of-life-policy/ 
Wireless Security Incident 
Response Team (WSIRT) 
arubanetworks.com/support-services/security-bulletins/ 
Support Email Addresses 
Americas and APAC 
EMEA 
support@arubanetworks.com 
WSIRT Email 
Please email details of any 
security problem found in an 
Aruba product. 
sirt@arubanetworks.com 
18 | About this Guide ClearPass Guest 6.4 | User Guide
Chapter 2 
ClearPass Guest Overview 
This chapter explains the terms, concepts, processes, and equipment involved in managing visitor access to a 
network, and helps you understand how ClearPass Guest can be successfully integrated into your network 
infrastructure. It is intended for network architects, IT administrators, and security consultants who are 
planning to deploy visitor access, or who are in the early stages of deploying a visitor access solution. 
This chapter includes the following sections: 
l "About ClearPass Guest" on page 19 
l "Visitor Access Scenarios" on page 20 
l "Reference Network Diagram" on page 21 
l "Key Interactions" on page 22 
l "AAA Framework" on page 23 
l "Key Features" on page 24 
l "Visitor Management Terminology" on page 25 
l "ClearPass Guest Deployment Process" on page 26 
l "AirGroup Deployment Process" on page 28 
l "Documentation and User Assistance" on page 29 
l "Use of Cookies" on page 30 
About ClearPass Guest 
ClearPass Guest provides a simple and personalized user interface through which operational staff can quickly 
and securely manage visitor network access. It gives your non-technical staff controlled access to a dedicated 
visitor management user database. Through a customizable Web portal, your staff can easily create an 
account, reset a password, or set an expiry time for visitors. Access permissions to ClearPass Guest functions 
are controlled through an operator profile that can be integrated with an LDAP server or Active Directory login. 
Visitors can be registered at reception and provisioned with an individual guest account that defines their 
visitor profile and the duration of their visit. The visitor can be given a printed customized receipt with account 
details, or the receipt can be delivered wirelessly using the integrated SMS services. Companies are also able to 
pre-generate custom scratch cards, each with a defined network access time, which can then be handed out in 
a corporate environment or sold in public access scenarios. 
You can use the customization features to define settings that allow your visitors to self-provision their own 
guest accounts. Visitors register through a branded and customized Web portal, ensuring a streamlined and 
professional experience. Surveys can also be presented during the self-registration process and the data stored 
for later analysis and reporting, providing additional insight to your visitors and their network usage. 
ClearPass Guest integrates with all leading wireless and NAC solutions through a flexible definition point, 
ClearPass Policy Manager. This ensures that IT administrators have a standard integration with the network 
security framework, but gives operational staff the user interface they require. 
ClearPass Guest 6.4 | User Guide ClearPass Guest Overview | 19
Visitor Access Scenarios 
The following figure shows a high-level representation of a typical visitor access scenario. 
Figure 1 Visitor access using ClearPass Guest 
In this scenario, visitors are using their own mobile devices to access a corporate wireless network. Because 
access to the network is restricted, visitors must first obtain a username and password. A guest account may 
be provisioned by a corporate operator such as a receptionist, who can then give the visitor a print receipt that 
shows their username and password for the network. 
When visitors use self-registration, as might be the case for a network offering public access, the process is 
broadly similar but does not require a corporate operator to create the guest account. The username and 
password for a self-provisioned guest account may be delivered directly to the visitor’s Web browser, or sent 
via SMS or email. 
20 | ClearPass Guest Overview ClearPass Guest 6.4 | User Guide
Reference Network Diagram 
The following figure shows the network connections and protocols used by ClearPass Guest. 
Figure 2 Reference network diagram for visitor access 
The network administrator, operators, and visitors may use different network interfaces to access the visitor 
management features. The exact topology of the network and the connections made to it will depend on the 
type of network access offered to visitors and the geographical layout of the access points. 
ClearPass Guest 6.4 | User Guide ClearPass Guest Overview | 21
Key Interactions 
The following figure shows the key interactions between ClearPass Guest and the people and other 
components involved in providing guest access. 
Figure 3 Interactions involved in guest access 
ClearPass Guest is part of your network’s core infrastructure and manages guest access to the network. 
NAS devices, such as wireless access points and wired switches on the edge of the network, use the RADIUS 
protocol to ask ClearPass Policy Manager to authenticate the username and password provided by a guest 
logging in to the network. If authentication is successful, the guest is then authorized to access the network. 
Roles are assigned to a guest as part of the context ClearPass Policy Manager uses to apply its policies. RADIUS 
attributes that define a role’s access permissions are contained within Policy Manager’s Enforcement Profile. 
Additional features such as role mapping for ClearPass Guest can be performed in ClearPass Policy Manager. 
The network usage of authorized guests is monitored by the NAS and reported in summary form to ClearPass 
Policy Manager using RADIUS accounting, which allows administrators to generate network reports in 
ClearPass Insight. 
22 | ClearPass Guest Overview ClearPass Guest 6.4 | User Guide
AAA Framework 
ClearPass Guest is built on the industry standard AAA framework, which consists of authentication, 
authorization, and accounting components. 
The following figure shows how the different components of this framework are employed in a guest access 
scenario. 
Figure 4 Sequence diagram for network access using AAA 
In the standard AAA framework, network access is provided to a user according to the following process: 
l The user connects to the network by associating with a local access point [1]. 
l A landing page is displayed to the user [2] which allows them to log in to the NAS [3], [4] using the login 
name and password of their guest account. 
l The NAS authenticates the user with the RADIUS protocol [5]. 
l ClearPass Policy Manager determines whether the user is authorized, and, if so, returns vendor-specific 
attributes [6] that are used to configure the NAS based on the user’s role and other policies [7]. 
l If the user’s access is granted, the NAS permits the guest access to the network based on the settings 
provided by the ClearPass Policy Manager server. 
l The NAS reports details about the user’s session to the ClearPass Policy Manager server using RADIUS 
accounting messages [8]. 
l After the user’s session times out [9], the NAS will return the user to an unauthorized state and finalize the 
details of the user’s session with an accounting update [10]. 
ClearPass Guest 6.4 | User Guide ClearPass Guest Overview | 23
Key Features 
Refer to the table below for a list of key features and a cross-reference to the relevant section of this User 
Guide. 
Table 2: List of Key features 
Feature Reference 
Visitor Access 
Web server providing content delivery for guests "Managing Content: Private 
Files and Public Files" on page 
189 
Guest self-registration "Customizing Guest Self- 
Registration" on page 235 
Visitor Management 
Create and manage visitor accounts, individually or in groups "Using Standard Guest 
Management Features" on 
page 38 
Manage active RADIUS sessions using RFC 3576 dynamic authorization support "Active Sessions 
Management" on page 33 
Import and export visitor accounts "Importing Guest Accounts" 
on page 52 
Create guest self-registration forms "Creating a Self-Registration 
Page" on page 241 
Configure a self-service portal for guests "Self-Service Portal 
Properties" on page 257 
Local printer, SMS or email delivery of account receipts "Editing Guest Receipt Page 
Properties" on page 248 
Visitor Account Features 
Independent activation time, expiration time, and maximum usage time "Business Logic for Account 
Creation" on page 198 
Define unlimited custom fields "Customizing Fields" on page 
206 
Username up to 64 characters "GuestManager Standard 
Fields" on page 504 
Customization Features 
Create new fields and forms for visitor management "Customizing Forms and 
Views" on page 212 
Use built-in data validation to implement visitor survey forms "Form Validation Properties" 
on page 227 
Create print templates for visitor account receipts "Editing Guest Receipt Page 
Properties" on page 248 
24 | ClearPass Guest Overview ClearPass Guest 6.4 | User Guide
Feature Reference 
Administrative Management Features 
Operators defined and authenticated locally "Local Operator 
Authentication" on page 464 
Operators authenticated via LDAP "External Operator 
Authentication" on page 465 
Role based access control for operators "Operator Profiles" on page 
458 
Plugin-based application features, automatically updated by ClearPass Policy 
Manager 
"Plugin Manager" on page 
444 
User Interface Features 
Context-sensitive help with searchable online documentation "Documentation and User 
Assistance" on page 29 
Visitor Management Terminology 
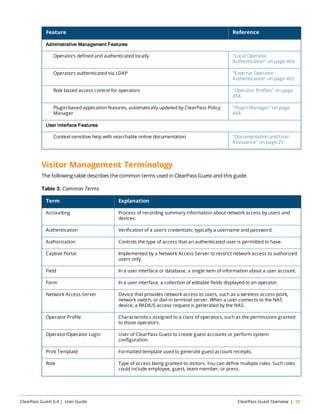
The following table describes the common terms used in ClearPass Guest and this guide. 
Term Explanation 
Accounting Process of recording summary information about network access by users and 
devices. 
Authentication Verification of a user’s credentials; typically a username and password. 
Authorization Controls the type of access that an authenticated user is permitted to have. 
Captive Portal Implemented by a Network Access Server to restrict network access to authorized 
users only. 
Field In a user interface or database, a single item of information about a user account. 
Form In a user interface, a collection of editable fields displayed to an operator. 
Network Access Server Device that provides network access to users, such as a wireless access point, 
network switch, or dial-in terminal server. When a user connects to the NAS 
device, a RADIUS access request is generated by the NAS. 
Operator Profile Characteristics assigned to a class of operators, such as the permissions granted 
to those operators. 
Operator/Operator Login User of ClearPass Guest to create guest accounts or perform system 
configuration. 
Print Template Formatted template used to generate guest account receipts. 
Role Type of access being granted to visitors. You can define multiple roles. Such roles 
could include employee, guest, team member, or press. 
Table 3: Common Terms 
ClearPass Guest 6.4 | User Guide ClearPass Guest Overview | 25
Term Explanation 
Sponsor Operator 
User Database Database listing the guest accounts in ClearPass Guest. 
View In a user interface, a table displaying data, such as visitor account information, to 
operators. 
Visitor/Guest Someone who is permitted to access the Internet through your Network Access 
Server. 
Visitor Account Settings for a visitor stored in the user database, including username, password 
and other fields. 
Web Login/NAS Login Login page displayed to a guest user. 
ClearPass Guest Deployment Process 
As part of your preparations for deploying a visitor management solution, you should consider the following 
areas: 
l Management decisions about security policy 
l Decisions about the day-to-day operation of visitor management 
l Technical decisions related to network provisioning 
Operational Concerns 
When deploying a visitor management solution, you should consider these operational concerns: 
l Who is going to be responsible for managing guest accounts? What privileges will the guest account 
manager have? Will this person only create guest accounts or will this person also be permitted access to 
reports? 
l Do you want guests to be able to self-provision their own network access? What settings should be applied 
to self-provisioned visitor accounts? 
l How will operator logins be provisioned? Should operators be authenticated against an LDAP server? 
l Who will manage reporting of guest access? What are the reports of interest? Are any custom reports 
needed? 
Network Provisioning 
ClearPass Guest requires provisioning the following: 
l Physical location – rack space, power and cooling requirements; or deployment using virtualization 
l Network connectivity – VLAN selection, IP address, and hostname 
l Security infrastructure – SSL certificate 
26 | ClearPass Guest Overview ClearPass Guest 6.4 | User Guide
Site Preparation Checklist 
The following is a checklist of the items that should be considered when setting up ClearPass Guest. 
Table 4: Site Preparation Checklist 
ü Policy Decision 
Security Policy 
Segregated guest accounts? 
Type of network access? 
Time of day access? 
Bandwidth allocation to guests? 
Prioritization of traffic? 
Different guest roles? 
IP address ranges for operators? 
Enforce access via HTTPS? 
Operational Concerns 
Who will manage guest accounts? 
Guest account self provisioning? 
What privileges will the guest managers have? 
Who will be responsible for printing reports? 
Network Management Policy 
Password format for guest accounts? 
Shared secret format? 
Operator provisioning? 
Network Provisioning 
Physical location? 
Network connectivity? 
Security infrastructure? 
Security Policy Considerations 
To ensure that your network remains secure, decisions have to be made regarding guest access: 
l Do you wish to segregate guest access? Do you want a different VLAN, or different physical network 
infrastructure to be used by your guests? 
ClearPass Guest 6.4 | User Guide ClearPass Guest Overview | 27
l What resources are you going to make available to guests (for example, type of network access; permitted 
times of day; bandwidth allocation)? 
l Will guest access be separated into different roles? If so, what roles are needed? 
l How will you prioritize traffic on the network to differentiate quality of service for guest accounts and non-guest 
accounts? 
l What will be the password format for guest accounts? Will you be changing this format on a regular basis? 
l What requirements will you place on the shared secret, between NAS and the RADIUS server to ensure 
network security is not compromised? 
l What IP address ranges will operators be using to access the server? 
l Should HTTPS be required in order to access the visitor management server? 
AirGroup Deployment Process 
AirGroup allows users to register their personal mobile devices on the local network and define a group of 
friends or associates who are allowed to share them. You use ClearPass Guest to define AirGroup 
administrators and operators. AirGroup administrators can then use ClearPass Guest to register and manage 
an organization’s shared devices and configure access according to username, role, location, or time. AirGroup 
operators (end users) can use ClearPass Guest to register their personal devices and define the group who can 
share them. 
Table 5 summarizes the steps for configuring Aruba AirGroup functionality in ClearPass Guest. Details for these 
steps are provided in the relevant sections of this Guide. This table does not include the configuration steps 
performed in ClearPass Policy Manager or the ArubaOS controller. For complete AirGroup deployment 
information, refer to the AirGroup sections in the ArubaOS User Guide and the ClearPass Policy Manager 
documentation. 
Table 5: Summary of AirGroup Configuration Steps in ClearPass Guest 
Step Section in this Guide 
Create AirGroup administrators "Creating a New Operator" on page 464 
Create AirGroup operators 
Configure an operator’s device limit "Configuring AirGroup Operator Device Limit" on page 464 
Configure an AirGroup controller "AirGroup Controllers" on page 358 
Enable support for dynamic notifications "Configuring AirGroup Services" on page 361 
To authenticate AirGroup users via LDAP: 
"External Operator Authentication" on page 465 
Define the LDAP server 
"LDAP Translation Rules" on page 472 
Define appropriate translation rules 
AirGroup administrator: Register devices or groups 
of devices 
"AirGroup Device Registration" on page 66 
AirGroup operator: Register personal devices 
(Optional) Configure device registration form with 
drop-down lists for existing locations and roles 
"Customizing AirGroup Registration Forms" on page 209 
Set up time-based sharing "About AirGroup Time-Based Sharing" on page 75 
28 | ClearPass Guest Overview ClearPass Guest 6.4 | User Guide
Documentation and User Assistance 
This section describes the variety of user assistance available for ClearPass Guest. 
User Guide and Online Help 
This User Guide provides complete information for all ClearPass Guest features. The following quick links may 
be useful in getting started. 
Table 6: Quick Links 
For information about... Refer to... 
What visitor management is and how it works "About ClearPass Guest" on page 19 
Using the guest management features "Using Standard Guest Management Features" on 
page 38 
Role-based access control for operators "Operator Profiles" on page 458 
Setting up LDAP authentication for operators "External Operator Authentication" on page 465 
Guest self-provisioning features "Self Provisioned Guest Access" on page 32 
Dynamic authorization extensions "RFC 3576 Dynamic Authorization" on page 35 
SMS receipts for guest accounts "SMS Services" on page 296 
Email receipts for guest accounts "Email Receipts and SMTP Services" on page 284 
Network administration of the appliance "Administration" on page 357 
Context-Sensitive Help 
For more detailed information about the area of the application you are using, click the context-sensitive Help 
link displayed at the top right of the page. This opens a new browser tab showing the relevant section of this 
User Guide. 
The User Guide may be searched using the Search box in the top right corner. 
Type in keywords related to your search and click the Search button to display a list of matches. The most 
relevant matches will be displayed first. Words may be excluded from the search by typing a minus sign directly 
before the word to exclude (for example-exclude). Exact phrase matches may also be searched for by enclosing 
the phrase in double quotes (for example, “word phrase”). 
Field Help 
The ClearPass Guest user interface has field help built into every form. The field help provides a short summary 
of the purpose of the field at the point you need it most. In many cases this is sufficient to use the application 
without further assistance or training. 
ClearPass Guest 6.4 | User Guide ClearPass Guest Overview | 29
Quick Help 
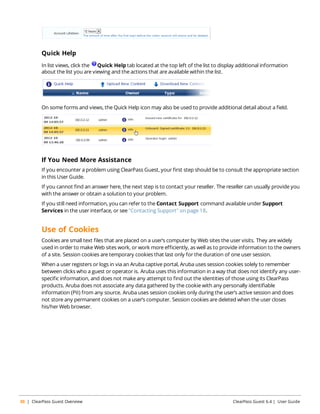
In list views, click the Quick Help tab located at the top left of the list to display additional information 
about the list you are viewing and the actions that are available within the list. 
On some forms and views, the Quick Help icon may also be used to provide additional detail about a field. 
If You Need More Assistance 
If you encounter a problem using ClearPass Guest, your first step should be to consult the appropriate section 
in this User Guide. 
If you cannot find an answer here, the next step is to contact your reseller. The reseller can usually provide you 
with the answer or obtain a solution to your problem. 
If you still need information, you can refer to the Contact Support command available under Support 
Services in the user interface, or see "Contacting Support" on page 18. 
Use of Cookies 
Cookies are small text files that are placed on a user’s computer by Web sites the user visits. They are widely 
used in order to make Web sites work, or work more efficiently, as well as to provide information to the owners 
of a site. Session cookies are temporary cookies that last only for the duration of one user session. 
When a user registers or logs in via an Aruba captive portal, Aruba uses session cookies solely to remember 
between clicks who a guest or operator is. Aruba uses this information in a way that does not identify any user-specific 
information, and does not make any attempt to find out the identities of those using its ClearPass 
products. Aruba does not associate any data gathered by the cookie with any personally identifiable 
information (PII) from any source. Aruba uses session cookies only during the user’s active session and does 
not store any permanent cookies on a user’s computer. Session cookies are deleted when the user closes 
his/her Web browser. 
30 | ClearPass Guest Overview ClearPass Guest 6.4 | User Guide
Chapter 3 
Guest Manager 
The ability to easily create and manage guest accounts is the primary function of ClearPass Guest. The Guest 
Manager module provides complete control over the user account creation process. 
Guest Manager features for managing guest accounts let you: 
l View and manage active sessions 
l Create single or multiple guest accounts and receipts 
l Create new MAC devices 
l Bulk edit accounts 
l Export a list of accounts 
l Import new accounts from a text file 
l View guest accounts and edit individual or multiple guest accounts 
l View MAC devices and edit individual or multiple devices 
Many features can also be customized. For information on customizing Guest Manager settings, forms and 
views, guest self-registration, and print templates, see "Configuration" on page 187. 
Accessing Guest Manager 
To access ClearPass Guest’s guest management features, click the Guest link in the left navigation. 
ClearPass Guest 6.4 | User Guide Guest Manager | 31
About Guest Management Processes 
There are two major ways to manage guest access – either by your operators provisioning guest accounts, or 
by the guests self-provisioning their own accounts. Both of these processes are described in this chapter. 
Sponsored Guest Access 
The following figure shows the process of sponsored guest access. 
Figure 5 Sponsored guest access with guest created by operator 
The operator creates the guest accounts and generates a receipt for the account. 
The guest logs on to the Network Access Server (NAS) using the credentials provided on her receipt. The NAS 
authenticates and authorizes the guest’s login in ClearPass Guest. After authorization, the guest is able to 
access the network. 
Self Provisioned Guest Access 
Self-provisioned access is similar to sponsored guest access, but there is no need for an operator to create the 
account or to print the receipt. The following figure shows the process of self-provisioned guest access. 
Figure 6 Guest access when guest is self-provisioned 
The guest logs on to the Network Access Server (NAS), which captures the guest and redirects them to a captive 
portal login page. From the login page, guests without an account can browse to the guest self-registration 
page, where the guest creates a new account. At the conclusion of the registration process, the guest is 
automatically redirected to the NAS to log in. 
The guest can print or download a receipt, or have the receipt information delivered by SMS or email. 
32 | Guest Manager ClearPass Guest 6.4 | User Guide
The NAS performs authentication and authorization for the guest in ClearPass Guest. After authorization, the 
guest is able to access the network. 
See "Customizing Guest Self-Registration" on page 235 for details on creating and managing self-registration 
pages. 
Active Sessions Management 
The RADIUS server maintains a list of active visitor sessions. If your NAS equipment has RFC 3576 support, the 
RADIUS dynamic authorization extensions allow you to disconnect or modify an active session. 
To view and manage active sessions for the RADIUS server, go to Guest > Active Sessions. The Active 
Sessions list opens. You can use this list to modify, disconnect or reauthorize, or send SMS notifications for 
active visitor sessions; manage multiple sessions; or customize the list to include additional fields. 
l To view details for an active session, click the session’s row in the list, then click its Show Details link. The 
form expands to include the Session Details view. 
ClearPass Guest 6.4 | User Guide Guest Manager | 33
l If the NAS equipment has RFC 3576 support, you can disconnect or dynamically reauthorize active sessions. 
See "RFC 3576 Dynamic Authorization" on page 35 for more information. 
n To disconnect an active session, click the session’s row in the list, then click its Disconnect link. A 
message is displayed to show that the disconnect is in progress and acknowledge when it is complete. 
n To reauthorize a session that was disconnected, click the session’s row in the list, then click its 
Reauthorize link. The Reauthorize Session form opens. Click Reauthorize Session. A message is 
displayed to show that the disconnect is in progress and acknowledge when it is complete. 
n To disconnect multiple sessions, click the Manage Multiple tab. The form expands to include the 
Manage Multiple Sessions form. For more information, see "Disconnecting Multiple Active Sessions " on 
page 37. 
l To view and work with the guest accounts associated with a session, click the session’s row in the list, then 
click its List Accounts link. The Guest Manager Accounts view opens. See "Managing Single Guest Accounts 
" on page 55 for more information. 
l To display only sessions that meet certain criteria, click the Filter tab. For more information, see "Filtering 
the List of Active Sessions" on page 36. 
l To send SMS notifications to visitors, click the SMS tab. For more information, see "Sending Multiple SMS 
Alerts " on page 37. 
34 | Guest Manager ClearPass Guest 6.4 | User Guide
l To include additional fields in the Active Sessions list, or delete fields from it, click the More Options tab. 
The Customize View Fields page opens. For more information, see "Editing Forms " on page 214. 
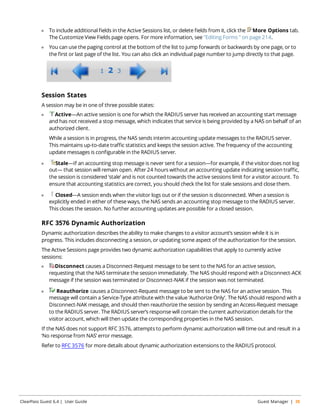
l You can use the paging control at the bottom of the list to jump forwards or backwards by one page, or to 
the first or last page of the list. You can also click an individual page number to jump directly to that page. 
Session States 
A session may be in one of three possible states: 
l Active—An active session is one for which the RADIUS server has received an accounting start message 
and has not received a stop message, which indicates that service is being provided by a NAS on behalf of an 
authorized client. 
While a session is in progress, the NAS sends interim accounting update messages to the RADIUS server. 
This maintains up-to-date traffic statistics and keeps the session active. The frequency of the accounting 
update messages is configurable in the RADIUS server. 
l Stale—If an accounting stop message is never sent for a session—for example, if the visitor does not log 
out— that session will remain open. After 24 hours without an accounting update indicating session traffic, 
the session is considered ‘stale’ and is not counted towards the active sessions limit for a visitor account. To 
ensure that accounting statistics are correct, you should check the list for stale sessions and close them. 
l Closed—A session ends when the visitor logs out or if the session is disconnected. When a session is 
explicitly ended in either of these ways, the NAS sends an accounting stop message to the RADIUS server. 
This closes the session. No further accounting updates are possible for a closed session. 
RFC 3576 Dynamic Authorization 
Dynamic authorization describes the ability to make changes to a visitor account’s session while it is in 
progress. This includes disconnecting a session, or updating some aspect of the authorization for the session. 
The Active Sessions page provides two dynamic authorization capabilities that apply to currently active 
sessions: 
l Disconnect causes a Disconnect-Request message to be sent to the NAS for an active session, 
requesting that the NAS terminate the session immediately. The NAS should respond with a Disconnect-ACK 
message if the session was terminated or Disconnect-NAK if the session was not terminated. 
l Reauthorize causes a Disconnect-Request message to be sent to the NAS for an active session. This 
message will contain a Service-Type attribute with the value ‘Authorize Only’. The NAS should respond with a 
Disconnect-NAK message, and should then reauthorize the session by sending an Access-Request message 
to the RADIUS server. The RADIUS server’s response will contain the current authorization details for the 
visitor account, which will then update the corresponding properties in the NAS session. 
If the NAS does not support RFC 3576, attempts to perform dynamic authorization will time out and result in a 
‘No response from NAS’ error message. 
Refer to RFC 3576 for more details about dynamic authorization extensions to the RADIUS protocol. 
ClearPass Guest 6.4 | User Guide Guest Manager | 35
Filtering the List of Active Sessions 
On the Guest > Active Sessions list, you can use the Filter tab to narrow the search parameters and 
quickly find all matching sessions: 
Enter a username or IP address in the Filter field. Additional fields can be included in the search if the “Include 
values when performing a quick search” option was selected for the field within the view. To control this 
option, use the Choose Columns command link on the More Options tab. 
You may enter a simple substring to match a portion of the username or any other fields that are configured 
for search, and you can include the following operators: 
Table 7: Operators supported in filters 
Operator Meaning Additional Information 
= is equal to You may search for multiple values when using the 
equality (=) or inequality !=) operators. To specify multiple 
values, list them separated by the pipe character ( | ). 
For example, specifying the filter "role_id=2|3, custom_ 
field=Value" restricts the accounts displayed to those with 
role IDs 2 and 3 (Guest and Employee), and with the field 
named "custom_field" set to "Value". 
!= is not equal to 
> is greater than 
>= is greater than or equal to 
< is less than 
<= is less than or equal to 
~ matches the regular expression 
!~ does not match the regular 
expression 
To restore the default view, click the Clear Filter link. 
Click the Apply Filter button to save your changes and update the view, or click the Reset button to 
remove the filter and return to the default view. 
36 | Guest Manager ClearPass Guest 6.4 | User Guide
Disconnecting Multiple Active Sessions 
To disconnect multiple sessions, click the Manage Multiple tab. The Manage Multiple Sessions form opens. 
l To close all active sessions, leave the Start Time and End Time fields empty and click Make Changes. All 
active sessions are closed and are removed from the Active Sessions list. 
You can specify sessions in a time range. 
1. To close all sessions that started after a particular time, click the button in the Start Time row. The calendar 
picker opens. Use the calendar to specify the year, month, and day, and click the numbers in the Time fields 
to increment the hours and minutes. All sessions that started after the specified date and time will be 
disconnected. 
2. To close all sessions that started before a particular time, click the button in the End Time row. The calendar 
picker opens. Use the calendar to specify the year, month, and day, and click the numbers in the Time fields 
to increment the hours and minutes. All sessions that started before the specified date and time will be 
disconnected. 
3. Click Make Changes. The specified sessions are closed and are removed from the Active Sessions list. 
Sending Multiple SMS Alerts 
The SMS tab on the Active Sessions page lets you send an SMS alert message to all active sessions that have a 
valid phone number. An SMS alert during an active session can be used to send a group of visitors information 
you might want them to have immediately—for example, a special offer that will only be available for an hour, 
a change in a meeting’s schedule or location, or a public safety announcement. 
To create an SMS message: 
1. Click the SMS tab on the Active Sessions page. The Send SMS Notification form opens. 
2. Use the filter to specify the group of addresses that should receive the message. See "Filtering the List of 
Active Sessions" on page 36. Only accounts with valid phone numbers can be sent SMS alerts. 
3. Enter the message in the Message text box. Messages may contain up to 160 characters. 
ClearPass Guest 6.4 | User Guide Guest Manager | 37
4. Click Send. 
About SMS Guest Account Receipts 
You can send SMS receipts for guest accounts that are created using either sponsored guest access or self-provisioned 
guest access. This is convenient in situations where the visitor may not be physically present to 
receive a printed receipt. 
ClearPass Guest may be configured to automatically send SMS receipts to visitors, or to send receipts only on 
demand. 
To manually send an SMS receipt: 
1. Go to the Guest > Manage Accounts and click to expand the row of the guest to whom you want to send 
a receipt. 
2. Click Print to display the Updated Account Details view, and then click the Send SMS receipt link. The 
SMS Receipt form opens. Use the fields on this form to enter the service to use, the recipient’s mobile 
phone number, and the message text. 
When using guest self-registration, SMS Delivery options are available for the receipt page actions; See "Editing 
Receipt Actions" on page 248 for full details. For more information on SMS services, see "SMS Services" on page 
296. 
Using Standard Guest Management Features 
This section describes: 
l "Creating a Guest Account " on page 39 
l "Creating a Guest Account Receipt " on page 41 
l "Creating a Device" on page 41 
l "Creating Multiple Guest Accounts" on page 45 
l "Creating Multiple Guest Account Receipts" on page 47 
l "Creating a Single Password for Multiple Accounts " on page 48 
38 | Guest Manager ClearPass Guest 6.4 | User Guide
l "Managing Single Guest Accounts " on page 55 
l "Managing Multiple Guest Accounts " on page 64 
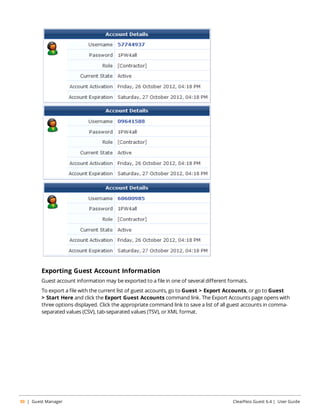
l "Exporting Guest Account Information " on page 50 
l "Importing Guest Accounts" on page 52 
l "Managing Single Guest Accounts " on page 55 
l "Managing Devices " on page 59 
l "Managing Multiple Guest Accounts " on page 64 
To customize guest self-registration, please see Configuration on page 187. 
Creating a Guest Account 
To create a new account, go to Guest > Create Account, or click the Create New Guest Account command 
link on the Guest Manager page. The Create New Guest Account form opens. 
The Create New Guest Account form (create_user) can be customized by adding new fields, or modifying or 
removing the existing fields. See "Customizing Guest Self-Registration" on page 235 for details about the 
customization process. The default settings for this form are described below. 
ClearPass Guest 6.4 | User Guide Guest Manager | 39
Table 8: The Create New Guest Account Form 
Field Description 
Guest's 
Name 
(Required) Name of the guest user for this account. 
Company 
Name 
(Required) Name of the organization the guest user belongs to. 
Email 
Address 
(Required) The guest user's email address. This email address will be the guest's username. 
Account 
Activation 
You can select an activation time from this drop-down list. The guest's account cannot be used 
before the activation time. Options include: 
l Now 
l Disable account 
l Tomorrow 
l Next Monday 
l 1 hour from now 
l 1 day from now 
l 1 week from now 
l Activate at specified time... 
Activation 
Time 
If you selected "Activate at specified time", use the calendar picker in this field to specify the date 
and time. If no selection is made, the account will be enabled immediately. 
Account 
Expiration 
You can select an expiration time from this drop-down list. The guest's account cannot be used after 
the expiration time. Options include: 
l Account will not expire 
l Now 
l Tonight 
l Friday night 
l 1 hour from now 
l 1 day from now 
l 1 week from now 
l 30 days from now 
l 90 days from now 
l 180 days from now 
l 1 year from now 
l Account expires after... 
l Account expires at specified time... 
Expires 
After 
If you selected "Account expires after", use this drop-down list to specify a length of time. Options 
include several intervals of hours, days, or weeks. 
Expiration 
Time 
If you selected "Account expires at specified time", use the calendar picker in this field to specify the 
date and time. If no selection is made, the account will not expire. 
Account 
Role 
(Required) Specify the type of account the guest should have. Options include: 
l Contractor 
l Employee 
l Guest 
Password A random password is created for each visitor account. This is displayed on this form, but will also 
be available on the guest account receipt. 
40 | Guest Manager ClearPass Guest 6.4 | User Guide
Field Description 
Notes You may enter notes about this guest account. 
Terms of 
Use 
(Required) You must select the check box in in this field in order to create the account. 
Create When your entries on the form are complete, click this button to create the guest's account. 
Creating a Guest Account Receipt 
After you click the Create button on the Create New Guest Account form, the details for that account are 
displayed. 
To print a receipt for the guest, select an appropriate template from the Open print window using 
template… list. A new Web browser window opens and the browser’s Print dialog box is displayed. 
Click the Send SMS receipt link to send a guest account receipt via text message. Use the SMS Receipt 
form to enter the mobile telephone number to which the receipt should be sent. 
Sending SMS receipts requires the SMS Services plugin. If the administrator has enabled automatic SMS, and 
the visitor’s phone number was typed into the Create New Guest Account form, an SMS message will be 
sent automatically. A message is displayed on the account receipt page after an SMS message has been sent. 
Click the Send email receipt link to send an email copy of the guest account receipt. Use the Email Receipt 
form to enter the email address to which the receipt should be sent. You can also specify the subject line for 
the email message. If the administrator has enabled automatic email for guest account receipts, and the 
visitor’s email address was typed into the Create New Guest Account form, an email receipt will be sent 
automatically. A message is displayed on the account receipt page after an email has been sent. 
Creating a Device 
Device accounts may be created in three ways: 
l Manually in ClearPass Guest using the Create New Device form 
l During guest self-registration by a MAC parameter passed in the redirect URL, if the process is configured to 
create a MAC device account 
l During guest self-registration by a MAC parameter passed in the redirect URL, creating a parallel account 
paired with the visitor account 
ClearPass Guest 6.4 | User Guide Guest Manager | 41
Creating Devices Manually in ClearPass Guest 
If you have the MAC address, you can create a new device manually. To create a new device, go to Guest 
> Create Device, or go to Guest > Manage Devices and click the Create link. 
The Create New Device form opens. 
Table 9: New Device 
Field Description 
MAC Address (Required) Enter the device's MAC address. 
Device Name (Required) Enter the name for the device. 
If you need to modify the configuration for expected separator format or case, go to 
Administration > Plugin Manager > Manage Plugins and click the Configuration link 
for the MAC Authentication Plugin. 
AirGroup Enables AirGroup for the device. Configuration options are added to the form. 
Ownership Specifies whether device ownership should be personal or shared. Personal devices are 
automatically shared with the owner's other devices. 
Shared With Usernames of people who can share this device. Enter usernames as a comma-separated 
list. To make the device available to all users, leave this field blank. 
Each username may not exceed 64 characters. A maximum of 100 usernames may be 
entered. The maximum character limit for the list is 1000 characters (including comma 
separators). 
42 | Guest Manager ClearPass Guest 6.4 | User Guide
Field Description 
Shared Locations Locations where the device can be shared. When you type a location name in the Shared 
Locations field and press the Enter key, the location appears as a "tag" and is created in the 
system when the form is saved. 
Each location name may not exceed 64 characters. A maximum of 100 location names may 
be entered. The maximum character limit for the list is 1000 characters (including comma 
separators). 
Shared Roles User roles that can share this device. When you type a role name in the Shared Roles field 
and press the Enter key, the role appears as a "tag" and is created in the system when the 
form is saved. 
Each role name may not exceed 64 characters. A maximum of 100 role names may be 
entered. The maximum character limit for the list is 1000 characters (including comma 
separators). 
Shared Groups User groups that can share this device. These will be available in the Shared Groups field 
for users to choose from when they share a device. 
When you type a name for the group in the Group Names field and press the Enter key, the 
group appears as a "tag" and is created in the system when the form is saved. 
Each group name may not exceed 64 characters. A maximum of 32 group names may be 
entered. The maximum character limit for the list is 320 characters (including comma 
separators). 
This feature requires AOS 6.4 or later. 
Time Sharing Time-based sharing rules for this device. For more information, see "About AirGroup Time- 
Based Sharing" on page 75. 
Syntax Opens the help topic "AirGroup Time-Based Sharing Syntax Examples" on page 71 
Account Activation Options include: Activate the account immediately, at a preset interval of hours or days, at a 
specified time, or leave the account disabled. 
If you choose Activate at a specified time, the ActivationTime row is added to the form. 
Click the button to open the calendar picker. In the calendar, use the arrows to select the 
year and month, click the numbers in the Time fields to increment the hours and minutes, 
then click a day to select the date. 
Account Expiration Options include: Never expire, expire at a preset interval of hours or days, or expire at a 
specified time. 
l If you choose any time in the future, the Expire Action row is added to the form. 
Indicate the expiration action for the account—either delete, delete and log out, disable, 
or disable and log out. The action will be applied at the time set in the Account Expiration 
row. 
l If you choose Account expires after, the ExpiresAfter row is added to the form. 
Choose an interval of hours, days, or weeks. The maximum is two weeks. 
l If you choose Account Expires at a specified time, the ExpirationTime row is added 
to the form. In the calendar picker, use the arrows to select the year and month, click the 
numbers in the Time fields to increment the hours and minutes, then click a day to 
select the date. 
Account Role Assigns the visitor’s role. 
Terms of Use Click the terms of use link and read the agreement, then mark the check box to agree to 
the terms. 
Create Device Commits your changes and creates the device. The Account Details and print options are 
displayed. For more information, see "Printing Device Details" on page 64. 
ClearPass Guest 6.4 | User Guide Guest Manager | 43
Creating Devices During Self-Registration - MAC Only 
This section describes how to configure a guest self-registration so that it creates a MAC device account. After 
the guest is registered, future authentication can take place without the need for the guest to enter their 
credentials. A registration can be converted to create a MAC device instead of standard guest credentials. 
This requires a vendor to pass a MAC parameter in the redirect URL. ClearPass Guest does not support 
querying the controller or DHCP servers for the client's MAC based on IP. 
To edit the registration form fields, go to Configuration > Forms and Views. In the guest_register row, 
click the Edit Fields link. The Customize Form Fields page opens. If you do not see mac or mac_auth in the list, 
click the Customize fields link above the list. Click the Edit link in the field’s row. In the Define Custom Field 
form, edit the registration form fields: 
l Add or enable mac 
n UI: Hidden field 
n Field Required: checked 
n Validator: IsValidMacAddress 
l Add or enable mac_auth 
n UI: Hidden field 
l Any other expiration options, role choice, surveys, and so on can be entered as usual. 
Figure 7 Modify fields 
l Edit the receipt form fields: 
n Edit username to be a Hidden field 
n Edit password to be a Hidden field 
l Adjust any headers or footers as needed. 
When the visitor registers, they should be able to still log in via the Log In button. The MAC will be passed as 
their username and password via standard captive portal means. 
The account will only be visible on the List Devices page. 
If the guest logs out and reconnects, they should be immediately logged in without being redirected to the 
captive portal page. 
Creating Devices During Self-Registration - Paired Accounts 
Paired accounts is a means to create a standard visitor account with credentials, but to have a MAC account 
created in parallel that is directly tied to the visitor account. These accounts share the same role, expiration and 
44 | Guest Manager ClearPass Guest 6.4 | User Guide
other properties. 
This requires a vendor passing a mac parameter in the redirect URL. ClearPass Guest does not support 
querying the controller or DHCP servers for the client's MAC based on IP. 
To edit the registration form fields, go to Configuration > Forms and Views. In the guest_register row, 
click the Edit Fields link. The Customize Form Fields page opens. If you do not see mac or mac_auth_pair in the 
list, click the Customize fields link above the list. Click the Edit link in the field’s row. In the Define Custom 
Field form, edit the registration form fields: 
l Add or enable mac 
n UI: Hidden field 
n Field Required: optional 
n Validator: IsValidMacAddress 
l Add or enable mac_auth_pair 
n UI: Hidden field 
n Initial Value: -1 
l Any other expiration options, role choice, surveys and so on can be entered as usual. 
You will see an entry under both List Accounts and List Devices. Each should have a View Pair action that 
cross-links the two. 
If you delete the base account, all of its pairings will also be deleted. If RFC-3576 has been configured, all pairs will be 
logged out. 
Creating Multiple Guest Accounts 
The Create Multiple Guest Accounts form is used to create a group of visitor accounts. 
To create multiple accounts, go to Guest > Create Multiple, or click the Create Multiple Guest Accounts 
command link on the Guest Manager > Start Here page. The Create Multiple Guest Accounts form opens. 
The Create Multiple Guest Accounts form (create_multi) can be customized by adding new fields, or modifying or 
removing the existing fields. See "Customizing Guest Self-Registration" on page 235 for details about the 
customization process. The default settings for this form are described below. 
ClearPass Guest 6.4 | User Guide Guest Manager | 45
Table 10: The Create New Guest Account Form 
Field Description 
Number of 
Accounts 
(Required) Enter the number of accounts to create. 
Account 
Activation 
You can select an activation time from this drop-down list. The guests' accounts cannot be used 
before the activation time. Options include: 
l Now 
l Disable account 
l Tomorrow 
l Next Monday 
l 1 hour from now 
l 1 day from now 
l 1 week from now 
l Activate at specified time... 
Activation 
Time 
If you selected "Activate at specified time", use the calendar picker in this field to specify the date 
and time. If no selection is made, the account will be enabled immediately. 
Account 
Expiration 
You can select an expiration time from this drop-down list. The guests' accounts cannot be used 
after the expiration time. Options include: 
l Account will not expire 
l Now 
l Tonight 
l Friday night 
l 1 hour from now 
l 1 day from now 
l 1 week from now 
l 30 days from now 
l 90 days from now 
l 180 days from now 
l 1 year from now 
l Account expires after... 
l Account expires at specified time... 
Expires 
After 
If you selected "Account expires after", use this drop-down list to specify a length of time. Options 
include several intervals of hours, days, or weeks. 
Expiration 
Time 
If you selected "Account expires at specified time", use the calendar picker in this field to specify the 
date and time. If no selection is made, the account will not expire. 
Expire 
Action 
(Required) Specify how the behavior of the expiration. Options include: 
l Delete and log out at specified time 
l Delete at specified time 
l Disable and log out at specified time 
l Disable at specified time 
Be aware that a logout can only occur if the NAS is RFC-3576 compliant. 
Account 
Role 
(Required) Specify the type of account the guest should have. Options include: 
l Contractor 
l Employee 
l Guest 
46 | Guest Manager ClearPass Guest 6.4 | User Guide
Field Description 
Notes You may enter notes about this guest account. 
Terms of 
Use 
(Required) You must select the check box in in this field in order to create the account. 
Create 
Accounts 
When your entries on the form are complete, click this button to create the guests' accounts. 
A random username and password will be created for each visitor account. This is not displayed on this form, 
but will be available on the guest account receipt. The default password length is six characters. 
Creating Multiple Guest Account Receipts 
After a group of guest accounts has been created, the details for the accounts are displayed. 
To print the receipts, select an appropriate template from the Open print window using template… 
drop-down list. A new browser window opens with the Print dialog displayed. 
ClearPass Guest 6.4 | User Guide Guest Manager | 47
To download a copy of the receipt information in CSV format, click the Save list for scratch cards (CSV 
file) link. You will be prompted to either open or save the spreadsheet (CSV) file. The fields available in the CSV 
file are: 
l Number – The sequential number of the visitor account, starting at one. 
l Username – The username for the visitor account. 
l Password – The password for the visitor account. The default password length is six characters. 
l Role – The visitor account’s role. 
l Activation Time – The date and time at which the account will be activated, or N/A if there is no activation 
time. 
l Expiration Time – The date and time at which the account will expire, or N/A if there is no activation time. 
l Lifetime – The account lifetime in minutes, or N/A if the account does not have a lifetime specified. 
l Successful – “Yes” if the account was created successfully, or “No” if there was an error creating the 
account. 
Creating a Single Password for Multiple Accounts 
You can create multiple accounts that have the same password. In order to do this, you first customize the 
Create Multiple Guest Accounts form to include the Password field. 
To include the Password field on the Create Multiple Guest Accounts form: 
1. Go to Configuration > Forms & Views. Click the create_multi row, then click its Edit Fields link. The 
Customize Form Fields view opens, showing a list of the fields included in the Create Multiple Guest 
Accounts form and their descriptions. 
At this point, the Password field is not listed because the Create Multiple Guest Accounts form (create_ 
multi) has not yet been customized to include it. You will create it for the form in the next step. 
2. Click on any field in the list to expand a row, then click the Insert After link (you can modify this placement 
later). The Customize Form Field form opens. 
3. In the Field Name row, choose password from the drop-down list. The form displays configuration 
options for this field. 
4. In the Field row, mark the Enable this field check box. 
5. To adjust the placement of the password field on the Create Multiple Guest Accounts form, you may change 
the number in the Rank field. 
6. In the User Interface row, choose Password text field from the drop-down list. The Field Required 
check box should now be automatically marked, and the Validator field should be set to IsNonEmpty. 
7. Click Save Changes. The Customize Form Fields view opens again, and the password field is now included 
and can be edited. 
48 | Guest Manager ClearPass Guest 6.4 | User Guide
To create multiple accounts that all use the same password: 
1. Go to Guest > Create Multiple. The Create Guest Accounts form opens, and includes the Visitor 
Password field. 
2. In the Number of Accounts field, enter the number of accounts you wish to create. 
3. In the Visitor Password field, enter the password that is to be used by all the accounts. The minimum 
password length is six characters. 
4. Complete the other fields with the appropriate information, then click Create Accounts. The Finished 
Creating Guest Accounts view opens. The password and other account details are displayed for each 
account. 
ClearPass Guest 6.4 | User Guide Guest Manager | 49
Exporting Guest Account Information 
Guest account information may be exported to a file in one of several different formats. 
To export a file with the current list of guest accounts, go to Guest > Export Accounts, or go to Guest 
> Start Here and click the Export Guest Accounts command link. The Export Accounts page opens with 
three options displayed. Click the appropriate command link to save a list of all guest accounts in comma-separated 
values (CSV), tab-separated values (TSV), or XML format. 
50 | Guest Manager ClearPass Guest 6.4 | User Guide
The Export Accounts view (guest_export) may be customized by adding new fields, or by modifying or 
removing the existing fields. See "Customizing Guest Self-Registration" on page 235 for details about this 
customization process. 
About CSV and TSV Exports 
In CSV and TSV format, the following default fields are included in the export: 
l Number – Sequential number of the guest account in the exported data 
l User ID – Numeric user ID of the guest account 
l Username – Username for the guest account 
l Role – Role for the guest account 
l Activation – Date and time at which the guest account will be activated, or “N/A” if there is no activation 
time 
l Expiration – Date and time at which the guest account will expire, or “N/A” if there is no expiration time 
l Lifetime – The guest account’s lifetime in minutes after login, or 0 if the account lifetime is not set 
l Expire Action – Number specifying the action to take when the guest account expires (0 through 4) 
About XML Exports 
The default XML format consists of a <GuestUsers> element containing a <GuestUser> element for each 
exported guest account. The numeric ID of the guest account is provided as the “id” attribute of the 
<GuestUser> element. This format is compatible with the ClearPass Policy Manager XML format for guest 
users. 
The values for both standard and custom fields for guest accounts are exported as the contents of an XML tag, 
where the tag has the same name as the guest account field. 
An example XML export is given below: 
<?xml version="1.0" encoding="UTF-8" standalone="true"?> 
<MyContents xmlns="http://www.example.com/myapiDefs/1.0"> 
<MyHeader version="6.0" exportTime="Sun, 16 Dec 2012 16:36:03 PST"/> 
<GuestUsers> 
<GuestUser guestType="USER" enabled="true" sponsorName="55480025" 
expiryTime="2012-12-04 13:39:25" startTime="1969-12-31 16:00:00" 
password="08654361" name="55480025"> 
<GuestUserTags tagValue="Hotspot Services self-provisioned guest account 
Source IP: 10.11.10.254 MAC: unknown Plan: Free Access x 1 Transaction 
Amount: $0.00 Invoice Number: P-15 Transaction ID: " tagName="notes"/> 
<GuestUserTags tagValue="2" tagName="[Role ID]"/> 
<GuestUserTags tagValue="1" tagName="do_expire"/> 
<GuestUserTags tagValue="1" tagName="simultaneous_use"/> 
ClearPass Guest 6.4 | User Guide Guest Manager | 51
<GuestUserTags tagValue="ff" tagName="Company Name"/> 
<GuestUserTags tagValue="2012-12-04 12:39:14" tagName="Create Time"/> 
<GuestUserTags tagValue="fff@df" tagName="Email"/> 
<GuestUserTags tagValue="ff" tagName="first_name"/> 
<GuestUserTags tagValue="plan0" tagName="hotspot_plan_id"/> 
<GuestUserTags tagValue="Free Access" tagName="hotspot_plan_name"/> 
<GuestUserTags tagValue="ff" tagName="last_name"/> 
<GuestUserTags tagValue="ff ff" tagName="Visitor Name"/> 
<GuestUserTags tagValue="ff" tagName="zip"/> 
</GuestUser> 
Importing Guest Accounts 
Guest accounts may be created from an existing list by uploading the list to ClearPass Guest. 
To import a file with the current list of guest accounts, go to Guest > Import Accounts, or go to Guest 
> Start Here and click the Import Guest Accounts command link. The Import Accounts page opens with the 
first part of the form displayed, Upload User List. 
The Upload User List form provides you with different options for importing guest account data. 
To complete the form, you must either specify a file containing account information, or type or paste in the 
account information to the Accounts Text area. 
Select the Show additional import options check box to display the following advanced import options: 
l Character Set: ClearPass Guest uses the UTF-8 character set encoding internally to store visitor account 
information. If your accounts file is not encoded in UTF-8, the import may fail or produce unexpected 
results if non-ASCII characters are used. To avoid this, you should specify what character set encoding you 
are using. 
l Import format: The format of the accounts file is automatically detected. You may specify a different 
encoding type if automatic detection is not suitable for your data. The Import Format drop-down list 
includes the following options: 
n Automatically detect format (This default option recognizes guest accounts exported from ClearPass 
Policy Manager in XML format) 
n XML 
n Comma separated values 
52 | Guest Manager ClearPass Guest 6.4 | User Guide
n Tab separated values 
n Pipe ( | ) separated values 
n Colon ( : ) separated values 
n Semicolon ( ; ) separated values 
l Select the Force first row as header row check box if your data contains a header row that specifies the 
field names. This option is only required if the header row is not automatically detected. 
Click Next Step to upload the account data. 
In step 2 of 3, ClearPass Guest determines the format of the uploaded account data and matches the 
appropriate fields to the data. The first few records in the data are displayed, together with any automatically 
detected field names. 
In this example, the following data was used: 
username,visitor_name,password,expire_time 
demo005,Demo five,secret005,2011-06-10 09:00 
demo006,Demo six,secret006,2011-06-11 10:00 
demo007,Demo seven,secret007,2011-06-12 11:00 
demo008,Demo eight,secret008,2011-06-13 12:00 
demo009,Demo nine,secret009,2011-06-13 12:00 
demo010,Demo ten,secret010,2011-06-13 12:00 
demo011,Demo eleven,secret011,2011-06-13 12:00 
Because this data includes a header row that contains field names, the corresponding fields were automatically 
detected in the data: 
Use the Match Fields form to identify which guest account fields are present in the imported data. You can 
also specify the values to be used for fields that are not present in the data. 
ClearPass Guest 6.4 | User Guide Guest Manager | 53
To complete the Match Fields form, make a selection from each of the drop-down lists. Choose a column 
name to use the values from that column when importing guest accounts, or select one of the other available 
options to use a fixed value for each imported guest account. 
Click the Next Step button to preview the final result. Import Step 3 of 3, the Import Accounts form, opens 
and shows a preview of the import operation. The values of each guest account field are determined, and any 
conflicts with existing user accounts are shown. 
The icon displayed for each user account indicates if it is a new entry ( ) or if an existing user account will be 
updated ( ). 
By default, this form shows ten entries per page. To view additional entries, click the arrow button at the 
bottom of the form to display the next page, or click the 10 rows per page drop-down list at the bottom of 
the form and select the number of entries that should appear on each page. 
Click the check box by the account entries you want to create, or click one of the following options to select the 
desired accounts: 
l Click the This Page link to select all entries on the current page. 
l Click the All link to select all entries on all pages 
l Click the None link to deselect all entries 
l Click the New link to select all new entries 
54 | Guest Manager ClearPass Guest 6.4 | User Guide
l Click the Existing link to select all existing user accounts in the list. 
Click the Create Accounts button to finish the import process. The selected items will be created or 
updated. You can then print new guest account receipts or download a list of the guest accounts. See "Creating 
Multiple Guest Account Receipts" on page 47 in this chapter for more information. 
Managing Single Guest Accounts 
Use the Manage Guest Accounts list view to work with individual guest accounts. To open the Manage Guest 
Accounts list, go to Guest > Manage Accounts. 
The Manage Guest Accounts list view opens.This view (guest_users) may be customized by adding new fields or 
modifying or removing the existing fields. See "Customizing Fields" on page 206 for details about this 
customization process. The default settings for this view are described below. 
The Username, Role, State, Activation, and Expiration columns display information about the visitor 
accounts that have been created: 
l The value in the Expiration column is colored red if the account will expire within the next 24 hours. The 
expiration time is additionally highlighted in boldface if the account will expire within the next hour. 
l In addition, icons in the Username column indicate the account’s activation status: 
n —Visitor account is active 
n —Visitor account was created but is not activated yet 
n —Visitor account was disabled by Administrator 
n —Visitor account has expired 
n —Visitor account was deleted 
ClearPass Guest 6.4 | User Guide Guest Manager | 55
You can use the Filter field to narrow the search parameters. You may enter a simple substring to match a 
portion of the username or any other fields that are configured for search, and you can include the following 
operators: 
Table 11: Operators supported in filters 
Operator Meaning Additional Information 
= is equal to You may search for multiple values when using the 
equality (=) or inequality !=) operators. To specify multiple 
values, list them separated by the pipe character ( | ). 
For example, specifying the filter "role_id=2|3, custom_ 
field=Value" restricts the accounts displayed to those with 
role IDs 2 and 3 (Guest and Employee), and with the field 
named "custom_field" set to "Value". 
!= is not equal to 
> is greater than 
>= is greater than or equal to 
< is less than 
<= is less than or equal to 
~ matches the regular expression 
!~ does not match the regular 
expression 
To restore the default view, click the Clear Filter link. 
Use the paging control at the bottom of the list to jump forwards or backwards by one page, or to the first or 
last page of the list. You can also click an individual page number to jump directly to that page. 
When the list contains numerous user accounts, consider using the Filter field to speed up finding a specific user 
account. 
Use the Create tab to create new visitor accounts using the Create New Guest Account form. See 
"Creating a Guest Account " on page 39 for details about this form. 
Use the More Options tab for additional functions, including import and export of guest accounts and the 
ability to customize the view. 
Click a user account’s row to select it. You can then select from one of these actions: 
l Reset password – Changes the password for a guest account. A new randomly generated password is 
displayed on the Reset Password form. The default password length is six characters. 
56 | Guest Manager ClearPass Guest 6.4 | User Guide
Click Update Account to reset the guest account’s password. A new account receipt is displayed, 
allowing you to print a receipt showing the updated account details. 
l Change expiration – Changes the expiration time for a guest account. 
This form (change_expiration) can be customized by adding new fields, or modifying or removing the existing fields. 
See "Customizing Forms and Views" on page 212 for details about this customization process. 
Select an option from the drop-down list to change the expiration time of the guest account. 
Click Update Account to set the new expiration time for the guest account. A new account receipt is 
displayed, allowing you to print a receipt showing the updated account details. 
l Remove – Disables or deletes a guest account. 
Select the appropriate Action radio button, and click Make Changes to disable or delete the account. 
If you wish to have automatic disconnect messages sent when the enabled value changes, you can specify 
this in the Configuration module. See "Configuring ClearPass Guest Authentication " on page 188. 
l Activate – Re-enables a disabled guest account, or specifies an activation time for the guest account. 
Select an option from the drop-down list to change the activation time of the guest account. To re-enable 
an account that has been disabled, choose Now. Click Enable Account to set the new activation time for 
the guest account. A new account receipt is displayed, allowing you to print a receipt showing the updated 
account details. 
ClearPass Guest 6.4 | User Guide Guest Manager | 57
l Edit – Changes the properties of a guest account. 
This form can be customized by adding new fields, or modifying or removing the existing fields. See "Customizing 
Forms and Views" on page 212 for details about this customization process. 
Click Update Account to update the properties of the guest account. A new account receipt is displayed, 
allowing you to print a receipt showing the updated account details. 
l Sessions – Displays the active sessions for a guest account. See "Active Sessions Management" on page 
33 in this chapter for details about managing active sessions. 
l Print – Displays the guest account’s receipt and the delivery options for the receipt. For security reasons, 
the guest’s password is not displayed on this receipt. To recover a forgotten or lost guest account password, 
use the Reset password link. 
l Show Details—The row expands to display all the properties of the guest's account in a table, including 
endpoint details. This option is only available to users whose operator profile includes the Show Details 
privilege. 
58 | Guest Manager ClearPass Guest 6.4 | User Guide
Managing Devices 
To view the list of current MAC devices, go to Guest > Manage Devices. 
The Guest Manager Devices page opens. 
All devices created by one of methods described in the following section are listed. Options on the form let you 
change a device’s account expiration time; activate, remove, or edit the device; view active sessions or details 
for the device; or print details, receipts, confirmations, or other information. 
The MAC Address, Device Name, Expiration, Sponsor, and Sharing columns display information about the 
device accounts that have been created: 
l The value in the Expiration column is colored red if the device account will expire within the next 24 hours. 
The expiration time is additionally highlighted in boldface if the device account will expire within the next 
hour. 
l In addition, icons in the MAC Address column indicate the device account’s activation status: 
n —Device account is active 
n —Device account was created but is not activated yet 
n —Device account was disabled by Administrator 
n —Device account has expired 
n —Device account was deleted 
ClearPass Guest 6.4 | User Guide Guest Manager | 59
You can use the Filter field to narrow the search parameters. You may enter a simple substring to match a 
portion of any fields that are configured for search, and you can include the following operators: 
Table 12: Operators supported in filters 
Operator Meaning Additional Information 
= is equal to You may search for multiple values when using the 
equality (=) or inequality !=) operators. To specify 
multiple values, list them separated by the pipe 
character ( | ). 
For example, specifying the filter "role_id=2|3, 
custom_field=Value" restricts the accounts displayed 
to those with role IDs 2 and 3 (Guest and Employee), 
and with the field named "custom_field" set to 
"Value". 
!= is not equal to 
> is greater than 
>= is greater than or equal to 
< is less than 
<= is less than or equal to 
~ matches the regular expression 
!~ does not match the regular 
expression 
To restore the default view, click the Clear Filter link. 
Use the paging control at the bottom of the list to jump forwards or backwards by one page, or to the first or 
last page of the list. You can also click an individual page number to jump directly to that page. 
To select a device, click the device you want to work with. 
Changing a Device’s Expiration Date 
To change a device’s expiration date, click the device’s row in the Guest Manager Devices list, then click its 
Change expiration link. The row expands to include the Change Expiration form. 
1. In the Account Expiration row, choose one of the options in the drop-down list to set an expiration date: 
l If you choose Account expires after, the Expires After row is added to the form. Choose an interval 
of hours, days, or weeks from the drop-down list. 
60 | Guest Manager ClearPass Guest 6.4 | User Guide
l If you choose Account Expires at a specified time, the Expiration Time row is added to the form. 
Click the button to open the calendar picker. In the calendar, use the arrows to select the year and 
month, click the numbers in the Time fields to increment the hours and minutes, then click a day to 
select the date. 
2. If you choose any option other than “will not expire” or “now” in the Account Expiration field, the Expire 
Action row is added to the table. Use the drop-down list in this row to specify one of the following actions: 
delete, delete and log out, disable, or disable and log out. 
3. Click Update Account to commit your changes. 
Disabling and Deleting Devices 
To remove a device’s account by disabling or deleting it, click the device’s row in the Guest Manager Devices list, 
then click its Remove link. The row expands to include the Remove Account form. 
You may choose to either disable or delete the account. If you disable it, it remains in the device list and you 
may activate it again later. If you delete the account, it is removed from the list permanently. 
Activating a Device 
To activate a disabled device’s account, click the device’s row in the Guest Manager Devices list, then click its 
Activate link. The row expands to include the Enable Guest Account form. 
1. In the Activate Account row, choose one of the options in the drop-down list to specify when to activate 
the account. You may choose an interval, or you may choose to specify a time. 
2. If you choose Activate at specified time, the Activation Time row is added to the form. Click the 
button to open the calendar picker. In the calendar, use the arrows to select the year and month, click the 
numbers in the Time fields to increment the hours and minutes, then click a day to select the date. 
3. Click Enable Account to commit your changes. 
ClearPass Guest 6.4 | User Guide Guest Manager | 61
Editing a Device 
To edit a device’s account, click the device’s row in the Guest Manager Devices list, then click its Edit link. The 
row expands to include the Edit Device form. You can edit any of the device's properties. 
Table 13: New Device 
Field Description 
MAC Address The device's MAC address. 
Device Name The name for the device. 
If you need to modify the configuration for expected separator format or case, go to 
Administration > Plugin Manager > Manage Plugins and click the Configuration link 
for the MAC Authentication Plugin. 
AirGroup Enables AirGroup for the device. Configuration options are added to the form. 
Ownership Specifies whether device ownership should be personal or shared. Personal devices are 
automatically shared with the owner's other devices. 
Shared With Usernames of people who can share this device. Enter usernames as a comma-separated 
list. To make the device available to all users, leave this field blank. 
Each username may not exceed 64 characters. A maximum of 100 usernames may be 
entered. The maximum character limit for the list is 1000 characters (including comma 
separators). 
Shared Locations Locations where the device can be shared. When you type a location name in the Shared 
Locations field and press the Enter key, the location appears as a "tag" and is created in the 
system when the form is saved. 
Each location name may not exceed 64 characters. A maximum of 100 location names may 
be entered. The maximum character limit for the list is 1000 characters (including comma 
separators). 
Shared Roles User roles that can share this device. When you type a role name in the Shared Roles field 
62 | Guest Manager ClearPass Guest 6.4 | User Guide
ClearPass Guest 6.4 User Guide

More Related Content

What's hot

Byod and guest access workshop enabling byod carlos gomez gallego_network ser...
Byod and guest access workshop enabling byod carlos gomez gallego_network ser...Byod and guest access workshop enabling byod carlos gomez gallego_network ser...
Byod and guest access workshop enabling byod carlos gomez gallego_network ser...Aruba, a Hewlett Packard Enterprise company
 

What's hot (20)

Aruba wireless and clear pass 6 integration guide v1.3
Aruba wireless and clear pass 6 integration guide v1.3Aruba wireless and clear pass 6 integration guide v1.3
Aruba wireless and clear pass 6 integration guide v1.3
 
ClearPass Guest Overview
ClearPass Guest Overview ClearPass Guest Overview
ClearPass Guest Overview
 
Access Management with Aruba ClearPass
Access Management with Aruba ClearPassAccess Management with Aruba ClearPass
Access Management with Aruba ClearPass
 
ClearPass design scenarios that solve the toughest security policy requirements
ClearPass design scenarios that solve the toughest security policy requirementsClearPass design scenarios that solve the toughest security policy requirements
ClearPass design scenarios that solve the toughest security policy requirements
 
Base Designs Lab Setup for Validated Reference Design
Base Designs Lab Setup for Validated Reference DesignBase Designs Lab Setup for Validated Reference Design
Base Designs Lab Setup for Validated Reference Design
 
Airwaveand arubabestpracticesguide
Airwaveand arubabestpracticesguideAirwaveand arubabestpracticesguide
Airwaveand arubabestpracticesguide
 
Getting the most out of the aruba policy enforcement firewall
Getting the most out of the aruba policy enforcement firewallGetting the most out of the aruba policy enforcement firewall
Getting the most out of the aruba policy enforcement firewall
 
Advanced ClearPass Workshop
Advanced ClearPass WorkshopAdvanced ClearPass Workshop
Advanced ClearPass Workshop
 
Bringing up Aruba Mobility Master, Managed Device & Access Point
Bringing up Aruba Mobility Master, Managed Device & Access PointBringing up Aruba Mobility Master, Managed Device & Access Point
Bringing up Aruba Mobility Master, Managed Device & Access Point
 
Useful cli commands v1
Useful cli commands v1Useful cli commands v1
Useful cli commands v1
 
Aruba WLANs 101 and design fundamentals
Aruba WLANs 101 and design fundamentalsAruba WLANs 101 and design fundamentals
Aruba WLANs 101 and design fundamentals
 
Guest Access with ArubaOS
Guest Access with ArubaOSGuest Access with ArubaOS
Guest Access with ArubaOS
 
Real-world 802.1X Deployment Challenges
Real-world 802.1X Deployment ChallengesReal-world 802.1X Deployment Challenges
Real-world 802.1X Deployment Challenges
 
Aruba Remote Access Point (RAP) Networks Validated Reference Design
Aruba Remote Access Point (RAP) Networks Validated Reference DesignAruba Remote Access Point (RAP) Networks Validated Reference Design
Aruba Remote Access Point (RAP) Networks Validated Reference Design
 
Airheads Tech Talks: Advanced Clustering in AOS 8.x
Airheads Tech Talks: Advanced Clustering in AOS 8.xAirheads Tech Talks: Advanced Clustering in AOS 8.x
Airheads Tech Talks: Advanced Clustering in AOS 8.x
 
Campus Redundancy Models
Campus Redundancy ModelsCampus Redundancy Models
Campus Redundancy Models
 
Byod and guest access workshop enabling byod carlos gomez gallego_network ser...
Byod and guest access workshop enabling byod carlos gomez gallego_network ser...Byod and guest access workshop enabling byod carlos gomez gallego_network ser...
Byod and guest access workshop enabling byod carlos gomez gallego_network ser...
 
Large scale, distributed access management deployment with aruba clear pass
Large scale, distributed access management deployment with aruba clear passLarge scale, distributed access management deployment with aruba clear pass
Large scale, distributed access management deployment with aruba clear pass
 
Aruba instant 6.4.0.2 4.1 user guide
Aruba instant 6.4.0.2 4.1 user guideAruba instant 6.4.0.2 4.1 user guide
Aruba instant 6.4.0.2 4.1 user guide
 
Clear pass policy manager advanced_ashwath murthy
Clear pass policy manager advanced_ashwath murthyClear pass policy manager advanced_ashwath murthy
Clear pass policy manager advanced_ashwath murthy
 

Viewers also liked

Aos & cppm integration & testing document for eap tls & eap peap
Aos & cppm integration & testing document for eap tls & eap peapAos & cppm integration & testing document for eap tls & eap peap
Aos & cppm integration & testing document for eap tls & eap peapJulia Ostrowski
 

Viewers also liked (20)

ClearPass 6.4.0 Release Notes
ClearPass 6.4.0 Release NotesClearPass 6.4.0 Release Notes
ClearPass 6.4.0 Release Notes
 
ClearPass 6.3.5 Release Notes
ClearPass 6.3.5 Release NotesClearPass 6.3.5 Release Notes
ClearPass 6.3.5 Release Notes
 
ClearPass 6.3.6 Release Notes
ClearPass 6.3.6 Release NotesClearPass 6.3.6 Release Notes
ClearPass 6.3.6 Release Notes
 
ClearPass Insight 6.3 User Guide
ClearPass Insight 6.3 User GuideClearPass Insight 6.3 User Guide
ClearPass Insight 6.3 User Guide
 
ClearPass Policy Model - An Introduction
ClearPass Policy Model - An IntroductionClearPass Policy Model - An Introduction
ClearPass Policy Model - An Introduction
 
ClearPass 6.4.2 Release Notes
ClearPass 6.4.2 Release NotesClearPass 6.4.2 Release Notes
ClearPass 6.4.2 Release Notes
 
ClearPass Policy Manager 6.3 User Guide
ClearPass Policy Manager 6.3 User GuideClearPass Policy Manager 6.3 User Guide
ClearPass Policy Manager 6.3 User Guide
 
Aos & cppm integration & testing document for eap tls & eap peap
Aos & cppm integration & testing document for eap tls & eap peapAos & cppm integration & testing document for eap tls & eap peap
Aos & cppm integration & testing document for eap tls & eap peap
 
ClearPass Policy Manager 6.3 User Guide
ClearPass Policy Manager 6.3 User GuideClearPass Policy Manager 6.3 User Guide
ClearPass Policy Manager 6.3 User Guide
 
Aruba VIA 2.0 (Mac) User Guide
Aruba VIA 2.0 (Mac) User GuideAruba VIA 2.0 (Mac) User Guide
Aruba VIA 2.0 (Mac) User Guide
 
ClearPass 6.3.2 Release Notes
ClearPass 6.3.2 Release NotesClearPass 6.3.2 Release Notes
ClearPass 6.3.2 Release Notes
 
Aruba VIA 2.0.1 User Guide Linux Edition
Aruba VIA 2.0.1 User Guide Linux EditionAruba VIA 2.0.1 User Guide Linux Edition
Aruba VIA 2.0.1 User Guide Linux Edition
 
Aruba OS 6.3 Command Line Interface Reference Guide
Aruba OS 6.3 Command Line Interface Reference GuideAruba OS 6.3 Command Line Interface Reference Guide
Aruba OS 6.3 Command Line Interface Reference Guide
 
ArubaOS 6.3.x Quick Start Guide
ArubaOS 6.3.x Quick Start GuideArubaOS 6.3.x Quick Start Guide
ArubaOS 6.3.x Quick Start Guide
 
Aruba OS 6.3 User Guide
Aruba OS 6.3 User GuideAruba OS 6.3 User Guide
Aruba OS 6.3 User Guide
 
Airwave 7.7.9 Release Notes
Airwave 7.7.9 Release NotesAirwave 7.7.9 Release Notes
Airwave 7.7.9 Release Notes
 
Aruba OS 7.3 User Guide
Aruba OS 7.3 User GuideAruba OS 7.3 User Guide
Aruba OS 7.3 User Guide
 
Aruba Instant 6.4.0.2-4.1 Command Line Interface Reference Guide
Aruba Instant 6.4.0.2-4.1 Command Line Interface Reference GuideAruba Instant 6.4.0.2-4.1 Command Line Interface Reference Guide
Aruba Instant 6.4.0.2-4.1 Command Line Interface Reference Guide
 
Aruba MeshOS 4.7 User Guide
Aruba MeshOS 4.7 User GuideAruba MeshOS 4.7 User Guide
Aruba MeshOS 4.7 User Guide
 
Aruba VIA 2.0 User Guide
Aruba VIA 2.0 User GuideAruba VIA 2.0 User Guide
Aruba VIA 2.0 User Guide
 

Similar to ClearPass Guest 6.4 User Guide

AirWave 8.2.10 User Guide
AirWave 8.2.10 User GuideAirWave 8.2.10 User Guide
AirWave 8.2.10 User GuideLisa Muthukumar
 
ESM_CommandCenterGuide_6.9.0.pdf
ESM_CommandCenterGuide_6.9.0.pdfESM_CommandCenterGuide_6.9.0.pdf
ESM_CommandCenterGuide_6.9.0.pdfProtect724v2
 
ESM Administrator's Guide (ESM v6.9.1c)
ESM Administrator's Guide (ESM v6.9.1c)ESM Administrator's Guide (ESM v6.9.1c)
ESM Administrator's Guide (ESM v6.9.1c)Protect724tk
 
ArcSight Command Center User's Guide (ESM v6.9.1c)
ArcSight Command Center User's Guide (ESM v6.9.1c)ArcSight Command Center User's Guide (ESM v6.9.1c)
ArcSight Command Center User's Guide (ESM v6.9.1c)Protect724tk
 
ArcSight Management Center 2.2 Administrator's Guide.pdf
ArcSight Management Center 2.2 Administrator's Guide.pdfArcSight Management Center 2.2 Administrator's Guide.pdf
ArcSight Management Center 2.2 Administrator's Guide.pdfProtect724mouni
 
ArcSight Management Center 2.5 Administrator's Guide
ArcSight Management Center 2.5 Administrator's Guide	ArcSight Management Center 2.5 Administrator's Guide
ArcSight Management Center 2.5 Administrator's Guide Protect724mouni
 
rsa_authentication_manager_8.4_setup_config_guide.pdf
rsa_authentication_manager_8.4_setup_config_guide.pdfrsa_authentication_manager_8.4_setup_config_guide.pdf
rsa_authentication_manager_8.4_setup_config_guide.pdfBarCode7
 
Exploring Advanced Authentication Methods in Novell Access Manager
Exploring Advanced Authentication Methods in Novell Access ManagerExploring Advanced Authentication Methods in Novell Access Manager
Exploring Advanced Authentication Methods in Novell Access ManagerNovell
 
ESM_AdminGuide_6.9.0.pdf
ESM_AdminGuide_6.9.0.pdfESM_AdminGuide_6.9.0.pdf
ESM_AdminGuide_6.9.0.pdfProtect724v2
 
ArcSight Management Center 2.2 P1 Administrator's Guide.pdf
ArcSight Management Center 2.2 P1 Administrator's Guide.pdfArcSight Management Center 2.2 P1 Administrator's Guide.pdf
ArcSight Management Center 2.2 P1 Administrator's Guide.pdfProtect724mouni
 
Leveraging New Features in CA Single-Sign on to Enable Web Services, Social S...
Leveraging New Features in CA Single-Sign on to Enable Web Services, Social S...Leveraging New Features in CA Single-Sign on to Enable Web Services, Social S...
Leveraging New Features in CA Single-Sign on to Enable Web Services, Social S...CA Technologies
 
Prévention et détection des mouvements latéraux
Prévention et détection des mouvements latérauxPrévention et détection des mouvements latéraux
Prévention et détection des mouvements latérauxColloqueRISQ
 
Claims based identity second edition device
Claims based identity second edition deviceClaims based identity second edition device
Claims based identity second edition deviceSteve Xu
 
Cloudstack Certification
Cloudstack CertificationCloudstack Certification
Cloudstack CertificationVskills
 
fortimanager-v5.0.10-administration-guide
fortimanager-v5.0.10-administration-guidefortimanager-v5.0.10-administration-guide
fortimanager-v5.0.10-administration-guideDrew Shearman
 
Linux and Windows Integration Certification
Linux and Windows Integration CertificationLinux and Windows Integration Certification
Linux and Windows Integration CertificationVskills
 
Service management Dec 11
Service management Dec 11Service management Dec 11
Service management Dec 11Richard Conway
 
Service Management Dec 11
Service Management Dec 11Service Management Dec 11
Service Management Dec 11clarendonint
 

Similar to ClearPass Guest 6.4 User Guide (20)

AirWave 8.2.10 User Guide
AirWave 8.2.10 User GuideAirWave 8.2.10 User Guide
AirWave 8.2.10 User Guide
 
ESM_CommandCenterGuide_6.9.0.pdf
ESM_CommandCenterGuide_6.9.0.pdfESM_CommandCenterGuide_6.9.0.pdf
ESM_CommandCenterGuide_6.9.0.pdf
 
Aruba OS 6.4 User Guide
Aruba OS 6.4 User GuideAruba OS 6.4 User Guide
Aruba OS 6.4 User Guide
 
ESM Administrator's Guide (ESM v6.9.1c)
ESM Administrator's Guide (ESM v6.9.1c)ESM Administrator's Guide (ESM v6.9.1c)
ESM Administrator's Guide (ESM v6.9.1c)
 
ArcSight Command Center User's Guide (ESM v6.9.1c)
ArcSight Command Center User's Guide (ESM v6.9.1c)ArcSight Command Center User's Guide (ESM v6.9.1c)
ArcSight Command Center User's Guide (ESM v6.9.1c)
 
ArcSight Management Center 2.2 Administrator's Guide.pdf
ArcSight Management Center 2.2 Administrator's Guide.pdfArcSight Management Center 2.2 Administrator's Guide.pdf
ArcSight Management Center 2.2 Administrator's Guide.pdf
 
ArcSight Management Center 2.5 Administrator's Guide
ArcSight Management Center 2.5 Administrator's Guide	ArcSight Management Center 2.5 Administrator's Guide
ArcSight Management Center 2.5 Administrator's Guide
 
rsa_authentication_manager_8.4_setup_config_guide.pdf
rsa_authentication_manager_8.4_setup_config_guide.pdfrsa_authentication_manager_8.4_setup_config_guide.pdf
rsa_authentication_manager_8.4_setup_config_guide.pdf
 
Exploring Advanced Authentication Methods in Novell Access Manager
Exploring Advanced Authentication Methods in Novell Access ManagerExploring Advanced Authentication Methods in Novell Access Manager
Exploring Advanced Authentication Methods in Novell Access Manager
 
ESM_AdminGuide_6.9.0.pdf
ESM_AdminGuide_6.9.0.pdfESM_AdminGuide_6.9.0.pdf
ESM_AdminGuide_6.9.0.pdf
 
ArcSight Management Center 2.2 P1 Administrator's Guide.pdf
ArcSight Management Center 2.2 P1 Administrator's Guide.pdfArcSight Management Center 2.2 P1 Administrator's Guide.pdf
ArcSight Management Center 2.2 P1 Administrator's Guide.pdf
 
Leveraging New Features in CA Single-Sign on to Enable Web Services, Social S...
Leveraging New Features in CA Single-Sign on to Enable Web Services, Social S...Leveraging New Features in CA Single-Sign on to Enable Web Services, Social S...
Leveraging New Features in CA Single-Sign on to Enable Web Services, Social S...
 
Prévention et détection des mouvements latéraux
Prévention et détection des mouvements latérauxPrévention et détection des mouvements latéraux
Prévention et détection des mouvements latéraux
 
Webservices
WebservicesWebservices
Webservices
 
Claims based identity second edition device
Claims based identity second edition deviceClaims based identity second edition device
Claims based identity second edition device
 
Cloudstack Certification
Cloudstack CertificationCloudstack Certification
Cloudstack Certification
 
fortimanager-v5.0.10-administration-guide
fortimanager-v5.0.10-administration-guidefortimanager-v5.0.10-administration-guide
fortimanager-v5.0.10-administration-guide
 
Linux and Windows Integration Certification
Linux and Windows Integration CertificationLinux and Windows Integration Certification
Linux and Windows Integration Certification
 
Service management Dec 11
Service management Dec 11Service management Dec 11
Service management Dec 11
 
Service Management Dec 11
Service Management Dec 11Service Management Dec 11
Service Management Dec 11
 

More from Aruba, a Hewlett Packard Enterprise company

More from Aruba, a Hewlett Packard Enterprise company (20)

Airheads Tech Talks: Cloud Guest SSID on Aruba Central
Airheads Tech Talks: Cloud Guest SSID on Aruba CentralAirheads Tech Talks: Cloud Guest SSID on Aruba Central
Airheads Tech Talks: Cloud Guest SSID on Aruba Central
 
Airheads Tech Talks: Understanding ClearPass OnGuard Agents
Airheads Tech Talks: Understanding ClearPass OnGuard AgentsAirheads Tech Talks: Understanding ClearPass OnGuard Agents
Airheads Tech Talks: Understanding ClearPass OnGuard Agents
 
EMEA Airheads_ Advance Aruba Central
EMEA Airheads_ Advance Aruba CentralEMEA Airheads_ Advance Aruba Central
EMEA Airheads_ Advance Aruba Central
 
EMEA Airheads_ Aruba AppRF – AOS 6.x & 8.x
EMEA Airheads_ Aruba AppRF – AOS 6.x & 8.xEMEA Airheads_ Aruba AppRF – AOS 6.x & 8.x
EMEA Airheads_ Aruba AppRF – AOS 6.x & 8.x
 
EMEA Airheads- Switch stacking_ ArubaOS Switch
EMEA Airheads- Switch stacking_ ArubaOS SwitchEMEA Airheads- Switch stacking_ ArubaOS Switch
EMEA Airheads- Switch stacking_ ArubaOS Switch
 
EMEA Airheads- LACP and distributed LACP – ArubaOS Switch
EMEA Airheads- LACP and distributed LACP – ArubaOS SwitchEMEA Airheads- LACP and distributed LACP – ArubaOS Switch
EMEA Airheads- LACP and distributed LACP – ArubaOS Switch
 
Introduction to AirWave 10
Introduction to AirWave 10Introduction to AirWave 10
Introduction to AirWave 10
 
EMEA Airheads- Virtual Switching Framework- Aruba OS Switch
EMEA Airheads- Virtual Switching Framework- Aruba OS SwitchEMEA Airheads- Virtual Switching Framework- Aruba OS Switch
EMEA Airheads- Virtual Switching Framework- Aruba OS Switch
 
EMEA Airheads- Aruba Central with Instant AP
EMEA Airheads- Aruba Central with Instant APEMEA Airheads- Aruba Central with Instant AP
EMEA Airheads- Aruba Central with Instant AP
 
EMEA Airheads- AirGroup profiling changes across 8.1 & 8.2 – ArubaOS 8.x
EMEA Airheads- AirGroup profiling changes across 8.1 & 8.2 – ArubaOS 8.xEMEA Airheads- AirGroup profiling changes across 8.1 & 8.2 – ArubaOS 8.x
EMEA Airheads- AirGroup profiling changes across 8.1 & 8.2 – ArubaOS 8.x
 
EMEA Airheads- Getting Started with the ClearPass REST API – CPPM
EMEA Airheads-  Getting Started with the ClearPass REST API – CPPMEMEA Airheads-  Getting Started with the ClearPass REST API – CPPM
EMEA Airheads- Getting Started with the ClearPass REST API – CPPM
 
EMEA Airheads - AP Discovery Logic and AP Deployment
EMEA Airheads - AP Discovery Logic and AP DeploymentEMEA Airheads - AP Discovery Logic and AP Deployment
EMEA Airheads - AP Discovery Logic and AP Deployment
 
EMEA Airheads- Layer-3 Redundancy for Mobility Master - ArubaOS 8.x
EMEA Airheads- Layer-3 Redundancy for Mobility Master - ArubaOS 8.xEMEA Airheads- Layer-3 Redundancy for Mobility Master - ArubaOS 8.x
EMEA Airheads- Layer-3 Redundancy for Mobility Master - ArubaOS 8.x
 
EMEA Airheads- Manage Devices at Branch Office (BOC)
EMEA Airheads- Manage Devices at Branch Office (BOC)EMEA Airheads- Manage Devices at Branch Office (BOC)
EMEA Airheads- Manage Devices at Branch Office (BOC)
 
EMEA Airheads - What does AirMatch do differently?v2
 EMEA Airheads - What does AirMatch do differently?v2 EMEA Airheads - What does AirMatch do differently?v2
EMEA Airheads - What does AirMatch do differently?v2
 
Airheads Meetups: 8400 Presentation
Airheads Meetups: 8400 PresentationAirheads Meetups: 8400 Presentation
Airheads Meetups: 8400 Presentation
 
Airheads Meetups: Ekahau Presentation
Airheads Meetups: Ekahau PresentationAirheads Meetups: Ekahau Presentation
Airheads Meetups: Ekahau Presentation
 
Airheads Meetups- High density WLAN
Airheads Meetups- High density WLANAirheads Meetups- High density WLAN
Airheads Meetups- High density WLAN
 
Airheads Meetups- Avans Hogeschool goes Aruba
Airheads Meetups- Avans Hogeschool goes ArubaAirheads Meetups- Avans Hogeschool goes Aruba
Airheads Meetups- Avans Hogeschool goes Aruba
 
EMEA Airheads - Configuring different APIs in Aruba 8.x
EMEA Airheads - Configuring different APIs  in Aruba 8.x EMEA Airheads - Configuring different APIs  in Aruba 8.x
EMEA Airheads - Configuring different APIs in Aruba 8.x
 

Recently uploaded

TrustArc Webinar - Stay Ahead of US State Data Privacy Law Developments
TrustArc Webinar - Stay Ahead of US State Data Privacy Law DevelopmentsTrustArc Webinar - Stay Ahead of US State Data Privacy Law Developments
TrustArc Webinar - Stay Ahead of US State Data Privacy Law DevelopmentsTrustArc
 
Automating Google Workspace (GWS) & more with Apps Script
Automating Google Workspace (GWS) & more with Apps ScriptAutomating Google Workspace (GWS) & more with Apps Script
Automating Google Workspace (GWS) & more with Apps Scriptwesley chun
 
Raspberry Pi 5: Challenges and Solutions in Bringing up an OpenGL/Vulkan Driv...
Raspberry Pi 5: Challenges and Solutions in Bringing up an OpenGL/Vulkan Driv...Raspberry Pi 5: Challenges and Solutions in Bringing up an OpenGL/Vulkan Driv...
Raspberry Pi 5: Challenges and Solutions in Bringing up an OpenGL/Vulkan Driv...Igalia
 
Exploring the Future Potential of AI-Enabled Smartphone Processors
Exploring the Future Potential of AI-Enabled Smartphone ProcessorsExploring the Future Potential of AI-Enabled Smartphone Processors
Exploring the Future Potential of AI-Enabled Smartphone Processorsdebabhi2
 
Slack Application Development 101 Slides
Slack Application Development 101 SlidesSlack Application Development 101 Slides
Slack Application Development 101 Slidespraypatel2
 
Finology Group – Insurtech Innovation Award 2024
Finology Group – Insurtech Innovation Award 2024Finology Group – Insurtech Innovation Award 2024
Finology Group – Insurtech Innovation Award 2024The Digital Insurer
 
Boost Fertility New Invention Ups Success Rates.pdf
Boost Fertility New Invention Ups Success Rates.pdfBoost Fertility New Invention Ups Success Rates.pdf
Boost Fertility New Invention Ups Success Rates.pdfsudhanshuwaghmare1
 
Artificial Intelligence: Facts and Myths
Artificial Intelligence: Facts and MythsArtificial Intelligence: Facts and Myths
Artificial Intelligence: Facts and MythsJoaquim Jorge
 
Workshop - Best of Both Worlds_ Combine KG and Vector search for enhanced R...
Workshop - Best of Both Worlds_ Combine  KG and Vector search for  enhanced R...Workshop - Best of Both Worlds_ Combine  KG and Vector search for  enhanced R...
Workshop - Best of Both Worlds_ Combine KG and Vector search for enhanced R...Neo4j
 
Mastering MySQL Database Architecture: Deep Dive into MySQL Shell and MySQL R...
Mastering MySQL Database Architecture: Deep Dive into MySQL Shell and MySQL R...Mastering MySQL Database Architecture: Deep Dive into MySQL Shell and MySQL R...
Mastering MySQL Database Architecture: Deep Dive into MySQL Shell and MySQL R...Miguel Araújo
 
Boost PC performance: How more available memory can improve productivity
Boost PC performance: How more available memory can improve productivityBoost PC performance: How more available memory can improve productivity
Boost PC performance: How more available memory can improve productivityPrincipled Technologies
 
2024: Domino Containers - The Next Step. News from the Domino Container commu...
2024: Domino Containers - The Next Step. News from the Domino Container commu...2024: Domino Containers - The Next Step. News from the Domino Container commu...
2024: Domino Containers - The Next Step. News from the Domino Container commu...Martijn de Jong
 
CNv6 Instructor Chapter 6 Quality of Service
CNv6 Instructor Chapter 6 Quality of ServiceCNv6 Instructor Chapter 6 Quality of Service
CNv6 Instructor Chapter 6 Quality of Servicegiselly40
 
[2024]Digital Global Overview Report 2024 Meltwater.pdf
[2024]Digital Global Overview Report 2024 Meltwater.pdf[2024]Digital Global Overview Report 2024 Meltwater.pdf
[2024]Digital Global Overview Report 2024 Meltwater.pdfhans926745
 
Axa Assurance Maroc - Insurer Innovation Award 2024
Axa Assurance Maroc - Insurer Innovation Award 2024Axa Assurance Maroc - Insurer Innovation Award 2024
Axa Assurance Maroc - Insurer Innovation Award 2024The Digital Insurer
 
The Role of Taxonomy and Ontology in Semantic Layers - Heather Hedden.pdf
The Role of Taxonomy and Ontology in Semantic Layers - Heather Hedden.pdfThe Role of Taxonomy and Ontology in Semantic Layers - Heather Hedden.pdf
The Role of Taxonomy and Ontology in Semantic Layers - Heather Hedden.pdfEnterprise Knowledge
 
Tata AIG General Insurance Company - Insurer Innovation Award 2024
Tata AIG General Insurance Company - Insurer Innovation Award 2024Tata AIG General Insurance Company - Insurer Innovation Award 2024
Tata AIG General Insurance Company - Insurer Innovation Award 2024The Digital Insurer
 
Presentation on how to chat with PDF using ChatGPT code interpreter
Presentation on how to chat with PDF using ChatGPT code interpreterPresentation on how to chat with PDF using ChatGPT code interpreter
Presentation on how to chat with PDF using ChatGPT code interpreternaman860154
 
How to convert PDF to text with Nanonets
How to convert PDF to text with NanonetsHow to convert PDF to text with Nanonets
How to convert PDF to text with Nanonetsnaman860154
 
A Domino Admins Adventures (Engage 2024)
A Domino Admins Adventures (Engage 2024)A Domino Admins Adventures (Engage 2024)
A Domino Admins Adventures (Engage 2024)Gabriella Davis
 

Recently uploaded (20)

TrustArc Webinar - Stay Ahead of US State Data Privacy Law Developments
TrustArc Webinar - Stay Ahead of US State Data Privacy Law DevelopmentsTrustArc Webinar - Stay Ahead of US State Data Privacy Law Developments
TrustArc Webinar - Stay Ahead of US State Data Privacy Law Developments
 
Automating Google Workspace (GWS) & more with Apps Script
Automating Google Workspace (GWS) & more with Apps ScriptAutomating Google Workspace (GWS) & more with Apps Script
Automating Google Workspace (GWS) & more with Apps Script
 
Raspberry Pi 5: Challenges and Solutions in Bringing up an OpenGL/Vulkan Driv...
Raspberry Pi 5: Challenges and Solutions in Bringing up an OpenGL/Vulkan Driv...Raspberry Pi 5: Challenges and Solutions in Bringing up an OpenGL/Vulkan Driv...
Raspberry Pi 5: Challenges and Solutions in Bringing up an OpenGL/Vulkan Driv...
 
Exploring the Future Potential of AI-Enabled Smartphone Processors
Exploring the Future Potential of AI-Enabled Smartphone ProcessorsExploring the Future Potential of AI-Enabled Smartphone Processors
Exploring the Future Potential of AI-Enabled Smartphone Processors
 
Slack Application Development 101 Slides
Slack Application Development 101 SlidesSlack Application Development 101 Slides
Slack Application Development 101 Slides
 
Finology Group – Insurtech Innovation Award 2024
Finology Group – Insurtech Innovation Award 2024Finology Group – Insurtech Innovation Award 2024
Finology Group – Insurtech Innovation Award 2024
 
Boost Fertility New Invention Ups Success Rates.pdf
Boost Fertility New Invention Ups Success Rates.pdfBoost Fertility New Invention Ups Success Rates.pdf
Boost Fertility New Invention Ups Success Rates.pdf
 
Artificial Intelligence: Facts and Myths
Artificial Intelligence: Facts and MythsArtificial Intelligence: Facts and Myths
Artificial Intelligence: Facts and Myths
 
Workshop - Best of Both Worlds_ Combine KG and Vector search for enhanced R...
Workshop - Best of Both Worlds_ Combine  KG and Vector search for  enhanced R...Workshop - Best of Both Worlds_ Combine  KG and Vector search for  enhanced R...
Workshop - Best of Both Worlds_ Combine KG and Vector search for enhanced R...
 
Mastering MySQL Database Architecture: Deep Dive into MySQL Shell and MySQL R...
Mastering MySQL Database Architecture: Deep Dive into MySQL Shell and MySQL R...Mastering MySQL Database Architecture: Deep Dive into MySQL Shell and MySQL R...
Mastering MySQL Database Architecture: Deep Dive into MySQL Shell and MySQL R...
 
Boost PC performance: How more available memory can improve productivity
Boost PC performance: How more available memory can improve productivityBoost PC performance: How more available memory can improve productivity
Boost PC performance: How more available memory can improve productivity
 
2024: Domino Containers - The Next Step. News from the Domino Container commu...
2024: Domino Containers - The Next Step. News from the Domino Container commu...2024: Domino Containers - The Next Step. News from the Domino Container commu...
2024: Domino Containers - The Next Step. News from the Domino Container commu...
 
CNv6 Instructor Chapter 6 Quality of Service
CNv6 Instructor Chapter 6 Quality of ServiceCNv6 Instructor Chapter 6 Quality of Service
CNv6 Instructor Chapter 6 Quality of Service
 
[2024]Digital Global Overview Report 2024 Meltwater.pdf
[2024]Digital Global Overview Report 2024 Meltwater.pdf[2024]Digital Global Overview Report 2024 Meltwater.pdf
[2024]Digital Global Overview Report 2024 Meltwater.pdf
 
Axa Assurance Maroc - Insurer Innovation Award 2024
Axa Assurance Maroc - Insurer Innovation Award 2024Axa Assurance Maroc - Insurer Innovation Award 2024
Axa Assurance Maroc - Insurer Innovation Award 2024
 
The Role of Taxonomy and Ontology in Semantic Layers - Heather Hedden.pdf
The Role of Taxonomy and Ontology in Semantic Layers - Heather Hedden.pdfThe Role of Taxonomy and Ontology in Semantic Layers - Heather Hedden.pdf
The Role of Taxonomy and Ontology in Semantic Layers - Heather Hedden.pdf
 
Tata AIG General Insurance Company - Insurer Innovation Award 2024
Tata AIG General Insurance Company - Insurer Innovation Award 2024Tata AIG General Insurance Company - Insurer Innovation Award 2024
Tata AIG General Insurance Company - Insurer Innovation Award 2024
 
Presentation on how to chat with PDF using ChatGPT code interpreter
Presentation on how to chat with PDF using ChatGPT code interpreterPresentation on how to chat with PDF using ChatGPT code interpreter
Presentation on how to chat with PDF using ChatGPT code interpreter
 
How to convert PDF to text with Nanonets
How to convert PDF to text with NanonetsHow to convert PDF to text with Nanonets
How to convert PDF to text with Nanonets
 
A Domino Admins Adventures (Engage 2024)
A Domino Admins Adventures (Engage 2024)A Domino Admins Adventures (Engage 2024)
A Domino Admins Adventures (Engage 2024)
 

ClearPass Guest 6.4 User Guide

  • 1. ClearPass Guest 6.4 User Guide
  • 2. Copyright © 2014 Aruba Networks, Inc. Aruba Networks trademarks include , Aruba Networks®, Aruba Wireless Networks®, the registered Aruba the Mobile Edge Company logo, Aruba Mobility Management System®, Mobile Edge Architecture®, People Move. Networks Must Follow®, RFProtect®, Green Island®. All rights reserved. All other trademarks are the property of their respective owners. Open Source Code Certain Aruba products include Open Source software code developed by third parties, including software code subject to the GNU General Public License (GPL), GNU Lesser General Public License (LGPL), or other Open Source Licenses. Includes software from Litech Systems Design. The IF-MAP client library copyright 2011 Infoblox, Inc. All rights reserved.This product includes software developed by Lars Fenneberg et al. The Open Source code used can be found at this site: http://www.arubanetworks.com/open_source Legal Notice The use of Aruba Networks, Inc. switching platforms and software, by all individuals or corporations, to terminate other vendors’ VPN client devices constitutes complete acceptance of liability by that individual or corporation for this action and indemnifies, in full, Aruba Networks, Inc. from any and all legal actions that might be taken against it with respect to infringement of copyright on behalf of those vendors. Warranty This hardware product is protected by the standard Aruba warranty of one year parts/labor. For more information, refer to the ARUBACARE SERVICE AND SUPPORT TERMS AND CONDITIONS. Altering this device (such as painting it) voids the warranty. 2 | ClearPass Guest 6.4 | User Guide
  • 3. Contents About this Guide 17 Audience 17 Conventions 17 Contacting Support 18 ClearPass Guest Overview 19 About ClearPass Guest 19 Visitor Access Scenarios 20 Reference Network Diagram 21 Key Interactions 22 AAA Framework 23 Key Features 24 Visitor Management Terminology 25 ClearPass Guest Deployment Process 26 Operational Concerns 26 Network Provisioning 26 Site Preparation Checklist 27 Security Policy Considerations 27 AirGroup Deployment Process 28 Documentation and User Assistance 29 User Guide and Online Help 29 Context-Sensitive Help 29 Field Help 29 Quick Help 30 If You Need More Assistance 30 Use of Cookies 30 Guest Manager 31 Accessing Guest Manager 31 About Guest Management Processes 32 Sponsored Guest Access 32 Self Provisioned Guest Access 32 Active Sessions Management 33 Session States 35 RFC 3576 Dynamic Authorization 35 ClearPass Guest 6.4 | User Guide Contents | 3
  • 4. Filtering the List of Active Sessions 36 Disconnecting Multiple Active Sessions 37 Sending Multiple SMS Alerts 37 About SMS Guest Account Receipts 38 Using Standard Guest Management Features 38 Creating a Guest Account 39 Creating a Guest Account Receipt 41 Creating a Device 41 Creating Devices Manually in ClearPass Guest 42 Creating Devices During Self-Registration - MAC Only 44 Creating Devices During Self-Registration - Paired Accounts 44 Creating Multiple Guest Accounts 45 Creating Multiple Guest Account Receipts 47 Creating a Single Password for Multiple Accounts 48 Exporting Guest Account Information 50 About CSV and TSV Exports 51 About XML Exports 51 Importing Guest Accounts 52 Managing Single Guest Accounts 55 Managing Devices 59 Changing a Device’s Expiration Date 60 Disabling and Deleting Devices 61 Activating a Device 61 Editing a Device 62 Viewing Current Sessions for a Device 63 Printing Device Details 64 Viewing Device Details 64 Managing Multiple Guest Accounts 64 AirGroup Device Registration 66 Registering Groups of Devices or Services 67 Registering Personal Devices 69 AirGroup Time-Based Sharing Syntax Examples 71 Time-Based Syntax Reference 73 About AirGroup Time-Based Sharing 75 Basics of Time-Based Sharing Setup 75 MAC Authentication in ClearPass Guest 76 MAC Address Formats 76 Automatically Registering MAC Devices in ClearPass Policy Manager 76 4 | Contents ClearPass Guest 6.4 | User Guide
  • 5. Importing MAC Devices 77 Advanced MAC Features 77 User Detection on Landing Pages 77 Click-Through Login Pages 78 Onboard 79 Accessing Onboard 79 About ClearPass Onboard 80 Onboard Deployment Checklist 81 Onboard Feature List 83 Supported Platforms 84 Public Key Infrastructure for Onboard 85 Certificate Hierarchy 85 Certificate Configuration in a Cluster 86 Revoking Unique Device Credentials 86 Revoking Credentials to Prevent Network Access 86 Re-Provisioning a Device 87 Network Requirements for Onboard 87 Using Same SSID for Provisioning and Provisioned Networks 87 Using Different SSID for Provisioning and Provisioned Networks 88 Configuring Online Certificate Status Protocol 88 Configuring Certificate Revocation List (CRL) 88 Network Architecture for Onboard 89 Network Architecture for Onboard when Using ClearPass Guest 90 The ClearPass Onboard Process 91 Devices Supporting Over-the-Air Provisioning 91 Devices Supporting Onboard Provisioning 93 Configuring the User Interface for Device Provisioning 95 Using the {nwa_mdps_config} Template Function 95 Onboard Troubleshooting 96 iOS Device Provisioning Failures 96 Hostname-to-Certificate Match Failures 97 Onboard Interface Not Displayed 97 Certificate Renewal through OS X Mavericks 97 Certificate Authorities 97 Creating a New Certificate Authority 98 Editing Certificate Authority Settings 101 Requesting a Certificate for the Certificate Authority 105 ClearPass Guest 6.4 | User Guide Contents | 5
  • 6. Installing a Certificate Authority’s Certificate 105 Using Microsoft Active Directory Certificate Services 107 Management and Control 109 Device Management (View by Device) 110 Device Management (View by Username) 113 Certificate Management (View by Certificate) 115 Searching for Certificates in the List 116 Working with Certificates in the List 116 Working with Certificate Signing Requests 119 Importing a Code-Signing Certificate 122 Importing a Trusted Certificate 123 Creating a Certificate 123 Requesting a Certificate 126 The Trust Chain and Uploading Certificates for the CA 128 Considerations for iOS Devices 130 Onboard Configuration 130 Network Settings 130 Configuring Basic Network Access Settings 131 Configuring Enterprise Protocol Settings 134 Configuring Device Authentication Settings 135 Configuring Certificate Trust Settings 136 Configuring Windows-Specific Network Settings 138 Configuring Proxy Settings 139 iOS Settings 140 Configuring ActiveSync Settings 141 Configuring AirPlay Settings 143 Configuring AirPrint Settings 144 Configuring APN Settings 145 Configuring Calendar Settings 145 Configuring Contacts Settings 147 Configuring Email Settings 148 Configuring Global HTTP Proxy Settings 151 Configuring an iOS Device Passcode Policy 152 Configuring Single Sign-On Settings 154 Configuring Calendar Subscription Settings 155 Configuring an iOS Device VPN Connection 156 Configuring Web Clips 160 Configuring Web Content Filter Settings 161 6 | Contents ClearPass Guest 6.4 | User Guide
  • 7. Windows Applications 163 Configuring App Sets 163 Deployment and Provisioning 164 Configuration Profiles 165 Creating and Editing Configuration Profiles 165 Provisioning Settings 168 About Configuring Provisioning Settings 169 Configuring Basic Provisioning Settings 170 Configuring Provisioning Settings for the Web Login Page 174 Configuring Provisioning Settings for iOS and OS X 176 Configuring Provisioning Settings for Legacy OS X Devices 178 Configuring Provisioning Settings for Windows Devices 179 Configuring Provisioning Settings for Android Devices 180 Configuring Provisioning Settings for Ubuntu 181 Configuring Provisioning Settings for Chromebook 182 Configuring Options for Onboard Client Devices 184 About the Self-Service Portal 185 Configuration 187 Accessing Configuration 187 Configuring ClearPass Guest Authentication 188 Content Manager 189 Managing Content: Private Files and Public Files 189 Uploading Content 190 Downloading Content 191 Creating a New Content Directory 191 Configuring Guest Manager 192 Default Settings for Account Creation 192 About Fields, Forms, and Views 198 Business Logic for Account Creation 198 Verification Properties 198 Basic User Properties 198 Visitor Account Activation Properties 199 Visitor Account Expiration Properties 200 Other Properties 200 Standard Forms and Views 201 Configuring Access Code Logins 202 Customize Random Username and Passwords 202 ClearPass Guest 6.4 | User Guide Contents | 7
  • 8. Create the Print Template 202 Customize the Guest Accounts Form 204 Create the Access Code Guest Accounts 204 Pages 206 Customizing Fields 206 Creating a Custom Field 206 Duplicating a Field 208 Editing a Field 208 Deleting a Field 208 Displaying Forms that Use a Field 209 Displaying Views that Use a Field 209 Customizing AirGroup Registration Forms 209 Customizing Forms and Views 212 Editing Forms and Views 213 Duplicating Forms and Views 213 Editing Forms 214 Form Field Editor 215 Form Display Properties 215 Form Validation Properties 227 Examples of Form field Validation 228 Advanced Form Field Properties 230 Form Field Validation Processing Sequence 231 Editing Views 233 View Field Editor 234 Customizing Guest Self-Registration 235 Accessing the Guest Self-Registration Customization Forms 236 Self-Registration Sequence Diagram 239 Editing Self-Registration Pages 240 Creating a Self-Registration Page 241 Configuring Basic Properties for Self-Registration 243 Editing Registration Page Properties 245 Editing the Default Self-Registration Form Settings 245 Creating a Single Password for Multiple Accounts 247 Editing Guest Receipt Page Properties 248 Editing Receipt Actions 248 Enabling and Editing NAS Login Properties 253 Editing Login Page Properties 254 Self-Service Portal Properties 257 8 | Contents ClearPass Guest 6.4 | User Guide
  • 9. Resetting Passwords with the Self-Service Portal 258 Managing Web Logins 260 Creating and Editing Web Login Pages 261 Receipts 270 Digital Passes 271 About Digital Passes 271 Viewing Digital Pass Certificates 274 Installing Digital Pass Certificates 275 Managing Digital Passes 276 Creating and Editing a Digital Pass Template 277 Example Template Code Variables 283 Images in Digital Passes 283 Email Receipts and SMTP Services 284 About Email Receipts 284 Configuring Email Receipts 285 Email Receipt Options 286 About Customizing SMTP Email Receipt Fields 288 Customizing SMS Receipt 290 SMS Receipt Fields 290 Customizing Print Templates 291 Creating New Print Templates 292 Print Template Wizard 293 Modifying Wizard-Generated Templates 294 Setting Print Template Permissions 294 SMS Services 296 Viewing SMS Gateways 296 Creating a New SMS Gateway 297 Editing an SMS Gateway 301 Sending an SMS 303 About SMS Credits 303 About SMS Guest Account Receipts 304 SMS Receipt Options 305 Working with the Mobile Carriers List 305 About Translations 307 Translation Packs 308 Creating and Editing Translation Packs 308 Translation Assistant 310 Customizing Translated User Interface Text 311 ClearPass Guest 6.4 | User Guide Contents | 9
  • 10. Advertising Services 313 About Advertising Services 313 Materials 313 Promotions 313 Campaigns 314 Spaces 314 Pages 314 Advertising Services Process Overview 314 About the Tutorial 314 Navigating the Tutorial 315 Advertising Pages 315 Editing Advertising Pages 316 The nwa_adspace Smarty Template Tag 320 Advertising Spaces 323 Creating and Editing Advertising Spaces 324 "Other Location" Example 326 "Maximum Height" Example 327 "Maximum Width" Example 328 Advertising Campaigns 329 Creating and Editing Advertising Campaigns 329 Campaign Rank and Weight 332 Advertising Promotions 332 Creating and Editing Advertising Promotions 333 Using Labels in Advertising Services 336 Advertising Materials 337 Creating and Editing Advertising Materials 338 Hotspot Manager 341 Accessing Hotspot Manager 341 About Hotspot Management 342 Managing the Hotspot Sign-up Interface 342 Captive Portal Integration 343 Web Site Look-and-Feel 344 SMS Services 344 Managing Hotspot Plans 344 Editing or Creating a Hotspot Plan 345 Managing Transaction Processors 346 Creating a New Transaction Processor 347 10 | Contents ClearPass Guest 6.4 | User Guide
  • 11. Managing Existing Transaction Processors 348 Managing Customer Information 348 Managing Hotspot Invoices 348 Customizing the User Interface 349 Customizing Visitor Sign-Up Page One 349 Customizing Visitor Sign-Up Page Two 351 Customizing Visitor Sign-Up Page Three 354 Viewing the Hotspot User Interface 355 Administration 357 Accessing Administration 357 AirGroup Services 358 AirGroup Controllers 358 Creating and Editing AirGroup Controllers 359 Configuring AirGroup Services 361 AirGroup Diagnostics 362 Creating AirGroup Administrators 363 Creating AirGroup Operators 364 Authenticating AirGroup Users via LDAP 364 Configuring LDAP User Search for AirGroup 364 LDAP User Search Architecture 364 User Search Workflow 364 Configuration Summary 365 Basic LDAP Server Settings 365 User Search Settings 366 Configuring the AirGroup Shared User Field 367 Select2 Options Details 368 Select2 Hook Details 369 MACTrac Services 370 Creating MACTrac Operators 371 Managing MACTrac Devices 371 Registering MACTrac Devices 373 About MAC Addresses 374 Automatically Supplying the MACTrac Device Address 374 API Services 375 API Clients 375 Creating and Editing API Clients 376 Configuring the API Framework Plugin 378 ClearPass Guest 6.4 | User Guide Contents | 11
  • 12. Setting API Privileges in Operator Profiles 379 About OAuth 380 OAuth Basics 380 OAuth2 Client or App 381 Client ID and Secret 381 Redirect URI 381 Authorization Grant Types for OAuth 381 Application Service Accounts for OAuth 383 SOAP Web Services and API 383 Viewing Available Web Services 384 Configuring Web Services 385 SOAP API Introduction 385 Audience 386 API Documentation Overview 386 Disclaimer 386 About the SOAP API 386 Using the SOAP API 388 Integration Example 391 API Documentation 395 The XML-RPC Interface and API 408 About the XML-RPC API 408 Accessing the API 411 Invoking the API 413 Method Summary 414 API Documentation 414 Data Retention 431 3.9 Configuration Import 432 Creating a Customized Configuration Backup 432 Uploading the 3.9 Backup File 433 Restoring Configuration Items 434 Viewing Imported Item Details 435 Import Information for Specific Import Items 437 Import Information: Advertising Services 438 Import Information: AirGroup Services 438 Import Information: Cisco IP Phones 438 Import Information: Guest Manager 438 Import Information: High Availability (HA) 439 Import Information: Hotspot Manager 439 12 | Contents ClearPass Guest 6.4 | User Guide
  • 13. Import Information: Onboard 440 Import Information: Operator Logins 440 Import Information: Palo Alto Network Services 440 Import Information: RADIUS Services 440 Import Information: Reporting Manager Definitions 441 Import Information: Server Configuration 442 Import Information: SMS Services 443 Import Information: SMTP Services 443 Plugin Manager 444 Viewing Available Plugins 444 Configuring Plugins 445 Configuring the Kernel Plugin 446 Configuring the Aruba ClearPass Skin Plugin 447 Configuring the SMS Services Plugin 448 Configuring the IP Phone Services Plugin 449 Configuring the Translations Plugin 450 Support Services 450 Viewing the Application Log 451 Exporting the Application Log 452 Contacting Support 452 Viewing Documentation 453 Operator Logins 455 Accessing Operator Logins 455 About Operator Logins 455 Role-Based Access Control for Multiple Operator Profiles 456 Operator Logins Configuration 456 Custom Login Message 457 Advanced Operator Login Options 458 Automatic Logout 458 Operator Profiles 458 Creating an Operator Profile 458 Configuring the User Interface 461 Customizing Forms and Views 462 Operator Profile Privileges 462 Managing Operator Profiles 463 Configuring AirGroup Operator Device Limit 464 Local Operator Authentication 464 ClearPass Guest 6.4 | User Guide Contents | 13
  • 14. Creating a New Operator 464 External Operator Authentication 465 Manage LDAP Operator Authentication Servers 465 Viewing the LDAP Server List 466 Creating an LDAP Server 467 Advanced LDAP URL Syntax 469 LDAP Operator Server Troubleshooting 469 Testing Connectivity 470 Testing Operator Login Authentication 470 Looking Up Sponsor Names 470 Troubleshooting Error Messages 471 LDAP Translation Rules 472 Custom LDAP Translation Processing 474 Reference 477 Basic HTML Syntax 477 Standard HTML Styles 478 Smarty Template Syntax 480 Basic Template Syntax 480 Text Substitution 480 Template File Inclusion 480 Comments 480 Variable Assignment 480 Conditional Text Blocks 481 Script Blocks 481 Repeated Text Blocks 481 Foreach Text Blocks 481 Modifiers 482 Predefined Template Functions 482 dump 483 nwa_commandlink 483 nwa_iconlink 484 nwa_icontext 484 nwa_quotejs 485 nwa_radius_query 485 Advanced Developer Reference 491 nwa_assign 492 nwa_bling 492 14 | Contents ClearPass Guest 6.4 | User Guide
  • 15. nwa_makeid 492 nwa_nav 493 nwa_plugin 494 nwa_privilege 494 nwa_replace 495 nwa_text 495 nwa_userpref 495 nwa_youtube 495 Date/Time Format Syntax 496 nwadateformat Modifier 496 nwatimeformat Modifier 497 Date/Time Format String Reference 497 Programmer’s Reference 498 NwaAlnumPassword 499 NwaBoolFormat 499 NwaByteFormat 499 NwaByteFormatBase10 499 NwaComplexPassword 500 NwaCsvCache 500 NwaDigitsPassword($len) 500 NwaDynamicLoad 500 NwaGeneratePictureString 500 NwaGenerateRandomPasswordMix 500 NwaLettersDigitsPassword 501 NwaLettersPassword 501 NwaMoneyFormat 501 NwaParseCsv 501 NwaParseXml 502 NwaPasswordByComplexity 502 NwaSmsIsValidPhoneNumber 503 NwaStrongPassword 503 NwaVLookup 503 NwaWordsPassword 504 Field, Form, and View Reference 504 GuestManager Standard Fields 504 Hotspot Standard Fields 512 SMS Services Standard Fields 513 SMTP Services Standard Fields 513 ClearPass Guest 6.4 | User Guide Contents | 15
  • 16. Format Picture String Symbols 515 Form Field Validation Functions 516 Form Field Conversion Functions 521 Form Field Display Formatting Functions 522 View Display Expression Technical Reference 523 LDAP Standard Attributes for User Class 525 Regular Expressions 526 Chromebook in Onboard 527 About Chromebook in Onboard 527 Caveats and Recommendations 528 Google Admin Chromebook License is Required 528 Managed Chromebook Deployment is Required 528 Chrome Extension is Required 528 Chromebook Release 37 or Later is Required 528 Chromebook Supports Only “Created by Device” Certificates 528 A Separate Provisioning SSID is Required 529 Directory-Based Authentication Source is Recommended 530 Onboard Configuration for Chromebook 530 Google Admin Configuration for Chromebook 531 Configuring the Chrome extension 531 Configuring Network Settings 532 Glossary 535 Index 545 16 | Contents ClearPass Guest 6.4 | User Guide
  • 17. Chapter 1 About this Guide ClearPass Guest provides a simple and personalized user interface through which operational staff can quickly and securely manager visitor network access. Audience This User Guide is intended for system administrators and people who are installing and configuring ClearPass Guest as their visitor management solution. It describes the installation and configuration process. Conventions The following conventions are used throughout this guide to emphasize important concepts: Table 1: Typographical Conventions Type Style Description Italics This style is used to emphasize important terms and to mark the titles of books. System items This fixed-width font depicts the following: l Sample screen output l System prompts l Filenames, software devices, and specific commands when mentioned in the text Commands In the command examples, this bold font depicts text that you must type exactly as shown. <Arguments> In the command examples, italicized text within angle brackets represents items that you should replace with information appropriate to your specific situation. For example: # send <text message> In this example, you would type “send” at the system prompt exactly as shown, followed by the text of the message you wish to send. Do not type the angle brackets. [Optional] Command examples enclosed in brackets are optional. Do not type the brackets. {Item A | Item B} In the command examples, items within curled braces and separated by a vertical bar represent the available choices. Enter only one choice. Do not type the braces or bars. The following informational icons are used throughout this guide: Indicates helpful suggestions, pertinent information, and important things to remember. Indicates a risk of damage to your hardware or loss of data. Indicates a risk of personal injury or death. ClearPass Guest 6.4 | User Guide About this Guide | 17
  • 18. Contacting Support Main Site arubanetworks.com Support Site support.arubanetworks.com Airheads Social Forums and Knowledge Base community.arubanetworks.com North American Telephone 1-800-943-4526 (Toll Free) 1-408-754-1200 International Telephones arubanetworks.com/support-services/support-program/contact-support/ Software Licensing Site licensing.arubanetworks.com End of Support information arubanetworks.com/support-services/end-of-life-products/end-of-life-policy/ Wireless Security Incident Response Team (WSIRT) arubanetworks.com/support-services/security-bulletins/ Support Email Addresses Americas and APAC EMEA support@arubanetworks.com WSIRT Email Please email details of any security problem found in an Aruba product. sirt@arubanetworks.com 18 | About this Guide ClearPass Guest 6.4 | User Guide
  • 19. Chapter 2 ClearPass Guest Overview This chapter explains the terms, concepts, processes, and equipment involved in managing visitor access to a network, and helps you understand how ClearPass Guest can be successfully integrated into your network infrastructure. It is intended for network architects, IT administrators, and security consultants who are planning to deploy visitor access, or who are in the early stages of deploying a visitor access solution. This chapter includes the following sections: l "About ClearPass Guest" on page 19 l "Visitor Access Scenarios" on page 20 l "Reference Network Diagram" on page 21 l "Key Interactions" on page 22 l "AAA Framework" on page 23 l "Key Features" on page 24 l "Visitor Management Terminology" on page 25 l "ClearPass Guest Deployment Process" on page 26 l "AirGroup Deployment Process" on page 28 l "Documentation and User Assistance" on page 29 l "Use of Cookies" on page 30 About ClearPass Guest ClearPass Guest provides a simple and personalized user interface through which operational staff can quickly and securely manage visitor network access. It gives your non-technical staff controlled access to a dedicated visitor management user database. Through a customizable Web portal, your staff can easily create an account, reset a password, or set an expiry time for visitors. Access permissions to ClearPass Guest functions are controlled through an operator profile that can be integrated with an LDAP server or Active Directory login. Visitors can be registered at reception and provisioned with an individual guest account that defines their visitor profile and the duration of their visit. The visitor can be given a printed customized receipt with account details, or the receipt can be delivered wirelessly using the integrated SMS services. Companies are also able to pre-generate custom scratch cards, each with a defined network access time, which can then be handed out in a corporate environment or sold in public access scenarios. You can use the customization features to define settings that allow your visitors to self-provision their own guest accounts. Visitors register through a branded and customized Web portal, ensuring a streamlined and professional experience. Surveys can also be presented during the self-registration process and the data stored for later analysis and reporting, providing additional insight to your visitors and their network usage. ClearPass Guest integrates with all leading wireless and NAC solutions through a flexible definition point, ClearPass Policy Manager. This ensures that IT administrators have a standard integration with the network security framework, but gives operational staff the user interface they require. ClearPass Guest 6.4 | User Guide ClearPass Guest Overview | 19
  • 20. Visitor Access Scenarios The following figure shows a high-level representation of a typical visitor access scenario. Figure 1 Visitor access using ClearPass Guest In this scenario, visitors are using their own mobile devices to access a corporate wireless network. Because access to the network is restricted, visitors must first obtain a username and password. A guest account may be provisioned by a corporate operator such as a receptionist, who can then give the visitor a print receipt that shows their username and password for the network. When visitors use self-registration, as might be the case for a network offering public access, the process is broadly similar but does not require a corporate operator to create the guest account. The username and password for a self-provisioned guest account may be delivered directly to the visitor’s Web browser, or sent via SMS or email. 20 | ClearPass Guest Overview ClearPass Guest 6.4 | User Guide
  • 21. Reference Network Diagram The following figure shows the network connections and protocols used by ClearPass Guest. Figure 2 Reference network diagram for visitor access The network administrator, operators, and visitors may use different network interfaces to access the visitor management features. The exact topology of the network and the connections made to it will depend on the type of network access offered to visitors and the geographical layout of the access points. ClearPass Guest 6.4 | User Guide ClearPass Guest Overview | 21
  • 22. Key Interactions The following figure shows the key interactions between ClearPass Guest and the people and other components involved in providing guest access. Figure 3 Interactions involved in guest access ClearPass Guest is part of your network’s core infrastructure and manages guest access to the network. NAS devices, such as wireless access points and wired switches on the edge of the network, use the RADIUS protocol to ask ClearPass Policy Manager to authenticate the username and password provided by a guest logging in to the network. If authentication is successful, the guest is then authorized to access the network. Roles are assigned to a guest as part of the context ClearPass Policy Manager uses to apply its policies. RADIUS attributes that define a role’s access permissions are contained within Policy Manager’s Enforcement Profile. Additional features such as role mapping for ClearPass Guest can be performed in ClearPass Policy Manager. The network usage of authorized guests is monitored by the NAS and reported in summary form to ClearPass Policy Manager using RADIUS accounting, which allows administrators to generate network reports in ClearPass Insight. 22 | ClearPass Guest Overview ClearPass Guest 6.4 | User Guide
  • 23. AAA Framework ClearPass Guest is built on the industry standard AAA framework, which consists of authentication, authorization, and accounting components. The following figure shows how the different components of this framework are employed in a guest access scenario. Figure 4 Sequence diagram for network access using AAA In the standard AAA framework, network access is provided to a user according to the following process: l The user connects to the network by associating with a local access point [1]. l A landing page is displayed to the user [2] which allows them to log in to the NAS [3], [4] using the login name and password of their guest account. l The NAS authenticates the user with the RADIUS protocol [5]. l ClearPass Policy Manager determines whether the user is authorized, and, if so, returns vendor-specific attributes [6] that are used to configure the NAS based on the user’s role and other policies [7]. l If the user’s access is granted, the NAS permits the guest access to the network based on the settings provided by the ClearPass Policy Manager server. l The NAS reports details about the user’s session to the ClearPass Policy Manager server using RADIUS accounting messages [8]. l After the user’s session times out [9], the NAS will return the user to an unauthorized state and finalize the details of the user’s session with an accounting update [10]. ClearPass Guest 6.4 | User Guide ClearPass Guest Overview | 23
  • 24. Key Features Refer to the table below for a list of key features and a cross-reference to the relevant section of this User Guide. Table 2: List of Key features Feature Reference Visitor Access Web server providing content delivery for guests "Managing Content: Private Files and Public Files" on page 189 Guest self-registration "Customizing Guest Self- Registration" on page 235 Visitor Management Create and manage visitor accounts, individually or in groups "Using Standard Guest Management Features" on page 38 Manage active RADIUS sessions using RFC 3576 dynamic authorization support "Active Sessions Management" on page 33 Import and export visitor accounts "Importing Guest Accounts" on page 52 Create guest self-registration forms "Creating a Self-Registration Page" on page 241 Configure a self-service portal for guests "Self-Service Portal Properties" on page 257 Local printer, SMS or email delivery of account receipts "Editing Guest Receipt Page Properties" on page 248 Visitor Account Features Independent activation time, expiration time, and maximum usage time "Business Logic for Account Creation" on page 198 Define unlimited custom fields "Customizing Fields" on page 206 Username up to 64 characters "GuestManager Standard Fields" on page 504 Customization Features Create new fields and forms for visitor management "Customizing Forms and Views" on page 212 Use built-in data validation to implement visitor survey forms "Form Validation Properties" on page 227 Create print templates for visitor account receipts "Editing Guest Receipt Page Properties" on page 248 24 | ClearPass Guest Overview ClearPass Guest 6.4 | User Guide
  • 25. Feature Reference Administrative Management Features Operators defined and authenticated locally "Local Operator Authentication" on page 464 Operators authenticated via LDAP "External Operator Authentication" on page 465 Role based access control for operators "Operator Profiles" on page 458 Plugin-based application features, automatically updated by ClearPass Policy Manager "Plugin Manager" on page 444 User Interface Features Context-sensitive help with searchable online documentation "Documentation and User Assistance" on page 29 Visitor Management Terminology The following table describes the common terms used in ClearPass Guest and this guide. Term Explanation Accounting Process of recording summary information about network access by users and devices. Authentication Verification of a user’s credentials; typically a username and password. Authorization Controls the type of access that an authenticated user is permitted to have. Captive Portal Implemented by a Network Access Server to restrict network access to authorized users only. Field In a user interface or database, a single item of information about a user account. Form In a user interface, a collection of editable fields displayed to an operator. Network Access Server Device that provides network access to users, such as a wireless access point, network switch, or dial-in terminal server. When a user connects to the NAS device, a RADIUS access request is generated by the NAS. Operator Profile Characteristics assigned to a class of operators, such as the permissions granted to those operators. Operator/Operator Login User of ClearPass Guest to create guest accounts or perform system configuration. Print Template Formatted template used to generate guest account receipts. Role Type of access being granted to visitors. You can define multiple roles. Such roles could include employee, guest, team member, or press. Table 3: Common Terms ClearPass Guest 6.4 | User Guide ClearPass Guest Overview | 25
  • 26. Term Explanation Sponsor Operator User Database Database listing the guest accounts in ClearPass Guest. View In a user interface, a table displaying data, such as visitor account information, to operators. Visitor/Guest Someone who is permitted to access the Internet through your Network Access Server. Visitor Account Settings for a visitor stored in the user database, including username, password and other fields. Web Login/NAS Login Login page displayed to a guest user. ClearPass Guest Deployment Process As part of your preparations for deploying a visitor management solution, you should consider the following areas: l Management decisions about security policy l Decisions about the day-to-day operation of visitor management l Technical decisions related to network provisioning Operational Concerns When deploying a visitor management solution, you should consider these operational concerns: l Who is going to be responsible for managing guest accounts? What privileges will the guest account manager have? Will this person only create guest accounts or will this person also be permitted access to reports? l Do you want guests to be able to self-provision their own network access? What settings should be applied to self-provisioned visitor accounts? l How will operator logins be provisioned? Should operators be authenticated against an LDAP server? l Who will manage reporting of guest access? What are the reports of interest? Are any custom reports needed? Network Provisioning ClearPass Guest requires provisioning the following: l Physical location – rack space, power and cooling requirements; or deployment using virtualization l Network connectivity – VLAN selection, IP address, and hostname l Security infrastructure – SSL certificate 26 | ClearPass Guest Overview ClearPass Guest 6.4 | User Guide
  • 27. Site Preparation Checklist The following is a checklist of the items that should be considered when setting up ClearPass Guest. Table 4: Site Preparation Checklist ü Policy Decision Security Policy Segregated guest accounts? Type of network access? Time of day access? Bandwidth allocation to guests? Prioritization of traffic? Different guest roles? IP address ranges for operators? Enforce access via HTTPS? Operational Concerns Who will manage guest accounts? Guest account self provisioning? What privileges will the guest managers have? Who will be responsible for printing reports? Network Management Policy Password format for guest accounts? Shared secret format? Operator provisioning? Network Provisioning Physical location? Network connectivity? Security infrastructure? Security Policy Considerations To ensure that your network remains secure, decisions have to be made regarding guest access: l Do you wish to segregate guest access? Do you want a different VLAN, or different physical network infrastructure to be used by your guests? ClearPass Guest 6.4 | User Guide ClearPass Guest Overview | 27
  • 28. l What resources are you going to make available to guests (for example, type of network access; permitted times of day; bandwidth allocation)? l Will guest access be separated into different roles? If so, what roles are needed? l How will you prioritize traffic on the network to differentiate quality of service for guest accounts and non-guest accounts? l What will be the password format for guest accounts? Will you be changing this format on a regular basis? l What requirements will you place on the shared secret, between NAS and the RADIUS server to ensure network security is not compromised? l What IP address ranges will operators be using to access the server? l Should HTTPS be required in order to access the visitor management server? AirGroup Deployment Process AirGroup allows users to register their personal mobile devices on the local network and define a group of friends or associates who are allowed to share them. You use ClearPass Guest to define AirGroup administrators and operators. AirGroup administrators can then use ClearPass Guest to register and manage an organization’s shared devices and configure access according to username, role, location, or time. AirGroup operators (end users) can use ClearPass Guest to register their personal devices and define the group who can share them. Table 5 summarizes the steps for configuring Aruba AirGroup functionality in ClearPass Guest. Details for these steps are provided in the relevant sections of this Guide. This table does not include the configuration steps performed in ClearPass Policy Manager or the ArubaOS controller. For complete AirGroup deployment information, refer to the AirGroup sections in the ArubaOS User Guide and the ClearPass Policy Manager documentation. Table 5: Summary of AirGroup Configuration Steps in ClearPass Guest Step Section in this Guide Create AirGroup administrators "Creating a New Operator" on page 464 Create AirGroup operators Configure an operator’s device limit "Configuring AirGroup Operator Device Limit" on page 464 Configure an AirGroup controller "AirGroup Controllers" on page 358 Enable support for dynamic notifications "Configuring AirGroup Services" on page 361 To authenticate AirGroup users via LDAP: "External Operator Authentication" on page 465 Define the LDAP server "LDAP Translation Rules" on page 472 Define appropriate translation rules AirGroup administrator: Register devices or groups of devices "AirGroup Device Registration" on page 66 AirGroup operator: Register personal devices (Optional) Configure device registration form with drop-down lists for existing locations and roles "Customizing AirGroup Registration Forms" on page 209 Set up time-based sharing "About AirGroup Time-Based Sharing" on page 75 28 | ClearPass Guest Overview ClearPass Guest 6.4 | User Guide
  • 29. Documentation and User Assistance This section describes the variety of user assistance available for ClearPass Guest. User Guide and Online Help This User Guide provides complete information for all ClearPass Guest features. The following quick links may be useful in getting started. Table 6: Quick Links For information about... Refer to... What visitor management is and how it works "About ClearPass Guest" on page 19 Using the guest management features "Using Standard Guest Management Features" on page 38 Role-based access control for operators "Operator Profiles" on page 458 Setting up LDAP authentication for operators "External Operator Authentication" on page 465 Guest self-provisioning features "Self Provisioned Guest Access" on page 32 Dynamic authorization extensions "RFC 3576 Dynamic Authorization" on page 35 SMS receipts for guest accounts "SMS Services" on page 296 Email receipts for guest accounts "Email Receipts and SMTP Services" on page 284 Network administration of the appliance "Administration" on page 357 Context-Sensitive Help For more detailed information about the area of the application you are using, click the context-sensitive Help link displayed at the top right of the page. This opens a new browser tab showing the relevant section of this User Guide. The User Guide may be searched using the Search box in the top right corner. Type in keywords related to your search and click the Search button to display a list of matches. The most relevant matches will be displayed first. Words may be excluded from the search by typing a minus sign directly before the word to exclude (for example-exclude). Exact phrase matches may also be searched for by enclosing the phrase in double quotes (for example, “word phrase”). Field Help The ClearPass Guest user interface has field help built into every form. The field help provides a short summary of the purpose of the field at the point you need it most. In many cases this is sufficient to use the application without further assistance or training. ClearPass Guest 6.4 | User Guide ClearPass Guest Overview | 29
  • 30. Quick Help In list views, click the Quick Help tab located at the top left of the list to display additional information about the list you are viewing and the actions that are available within the list. On some forms and views, the Quick Help icon may also be used to provide additional detail about a field. If You Need More Assistance If you encounter a problem using ClearPass Guest, your first step should be to consult the appropriate section in this User Guide. If you cannot find an answer here, the next step is to contact your reseller. The reseller can usually provide you with the answer or obtain a solution to your problem. If you still need information, you can refer to the Contact Support command available under Support Services in the user interface, or see "Contacting Support" on page 18. Use of Cookies Cookies are small text files that are placed on a user’s computer by Web sites the user visits. They are widely used in order to make Web sites work, or work more efficiently, as well as to provide information to the owners of a site. Session cookies are temporary cookies that last only for the duration of one user session. When a user registers or logs in via an Aruba captive portal, Aruba uses session cookies solely to remember between clicks who a guest or operator is. Aruba uses this information in a way that does not identify any user-specific information, and does not make any attempt to find out the identities of those using its ClearPass products. Aruba does not associate any data gathered by the cookie with any personally identifiable information (PII) from any source. Aruba uses session cookies only during the user’s active session and does not store any permanent cookies on a user’s computer. Session cookies are deleted when the user closes his/her Web browser. 30 | ClearPass Guest Overview ClearPass Guest 6.4 | User Guide
  • 31. Chapter 3 Guest Manager The ability to easily create and manage guest accounts is the primary function of ClearPass Guest. The Guest Manager module provides complete control over the user account creation process. Guest Manager features for managing guest accounts let you: l View and manage active sessions l Create single or multiple guest accounts and receipts l Create new MAC devices l Bulk edit accounts l Export a list of accounts l Import new accounts from a text file l View guest accounts and edit individual or multiple guest accounts l View MAC devices and edit individual or multiple devices Many features can also be customized. For information on customizing Guest Manager settings, forms and views, guest self-registration, and print templates, see "Configuration" on page 187. Accessing Guest Manager To access ClearPass Guest’s guest management features, click the Guest link in the left navigation. ClearPass Guest 6.4 | User Guide Guest Manager | 31
  • 32. About Guest Management Processes There are two major ways to manage guest access – either by your operators provisioning guest accounts, or by the guests self-provisioning their own accounts. Both of these processes are described in this chapter. Sponsored Guest Access The following figure shows the process of sponsored guest access. Figure 5 Sponsored guest access with guest created by operator The operator creates the guest accounts and generates a receipt for the account. The guest logs on to the Network Access Server (NAS) using the credentials provided on her receipt. The NAS authenticates and authorizes the guest’s login in ClearPass Guest. After authorization, the guest is able to access the network. Self Provisioned Guest Access Self-provisioned access is similar to sponsored guest access, but there is no need for an operator to create the account or to print the receipt. The following figure shows the process of self-provisioned guest access. Figure 6 Guest access when guest is self-provisioned The guest logs on to the Network Access Server (NAS), which captures the guest and redirects them to a captive portal login page. From the login page, guests without an account can browse to the guest self-registration page, where the guest creates a new account. At the conclusion of the registration process, the guest is automatically redirected to the NAS to log in. The guest can print or download a receipt, or have the receipt information delivered by SMS or email. 32 | Guest Manager ClearPass Guest 6.4 | User Guide
  • 33. The NAS performs authentication and authorization for the guest in ClearPass Guest. After authorization, the guest is able to access the network. See "Customizing Guest Self-Registration" on page 235 for details on creating and managing self-registration pages. Active Sessions Management The RADIUS server maintains a list of active visitor sessions. If your NAS equipment has RFC 3576 support, the RADIUS dynamic authorization extensions allow you to disconnect or modify an active session. To view and manage active sessions for the RADIUS server, go to Guest > Active Sessions. The Active Sessions list opens. You can use this list to modify, disconnect or reauthorize, or send SMS notifications for active visitor sessions; manage multiple sessions; or customize the list to include additional fields. l To view details for an active session, click the session’s row in the list, then click its Show Details link. The form expands to include the Session Details view. ClearPass Guest 6.4 | User Guide Guest Manager | 33
  • 34. l If the NAS equipment has RFC 3576 support, you can disconnect or dynamically reauthorize active sessions. See "RFC 3576 Dynamic Authorization" on page 35 for more information. n To disconnect an active session, click the session’s row in the list, then click its Disconnect link. A message is displayed to show that the disconnect is in progress and acknowledge when it is complete. n To reauthorize a session that was disconnected, click the session’s row in the list, then click its Reauthorize link. The Reauthorize Session form opens. Click Reauthorize Session. A message is displayed to show that the disconnect is in progress and acknowledge when it is complete. n To disconnect multiple sessions, click the Manage Multiple tab. The form expands to include the Manage Multiple Sessions form. For more information, see "Disconnecting Multiple Active Sessions " on page 37. l To view and work with the guest accounts associated with a session, click the session’s row in the list, then click its List Accounts link. The Guest Manager Accounts view opens. See "Managing Single Guest Accounts " on page 55 for more information. l To display only sessions that meet certain criteria, click the Filter tab. For more information, see "Filtering the List of Active Sessions" on page 36. l To send SMS notifications to visitors, click the SMS tab. For more information, see "Sending Multiple SMS Alerts " on page 37. 34 | Guest Manager ClearPass Guest 6.4 | User Guide
  • 35. l To include additional fields in the Active Sessions list, or delete fields from it, click the More Options tab. The Customize View Fields page opens. For more information, see "Editing Forms " on page 214. l You can use the paging control at the bottom of the list to jump forwards or backwards by one page, or to the first or last page of the list. You can also click an individual page number to jump directly to that page. Session States A session may be in one of three possible states: l Active—An active session is one for which the RADIUS server has received an accounting start message and has not received a stop message, which indicates that service is being provided by a NAS on behalf of an authorized client. While a session is in progress, the NAS sends interim accounting update messages to the RADIUS server. This maintains up-to-date traffic statistics and keeps the session active. The frequency of the accounting update messages is configurable in the RADIUS server. l Stale—If an accounting stop message is never sent for a session—for example, if the visitor does not log out— that session will remain open. After 24 hours without an accounting update indicating session traffic, the session is considered ‘stale’ and is not counted towards the active sessions limit for a visitor account. To ensure that accounting statistics are correct, you should check the list for stale sessions and close them. l Closed—A session ends when the visitor logs out or if the session is disconnected. When a session is explicitly ended in either of these ways, the NAS sends an accounting stop message to the RADIUS server. This closes the session. No further accounting updates are possible for a closed session. RFC 3576 Dynamic Authorization Dynamic authorization describes the ability to make changes to a visitor account’s session while it is in progress. This includes disconnecting a session, or updating some aspect of the authorization for the session. The Active Sessions page provides two dynamic authorization capabilities that apply to currently active sessions: l Disconnect causes a Disconnect-Request message to be sent to the NAS for an active session, requesting that the NAS terminate the session immediately. The NAS should respond with a Disconnect-ACK message if the session was terminated or Disconnect-NAK if the session was not terminated. l Reauthorize causes a Disconnect-Request message to be sent to the NAS for an active session. This message will contain a Service-Type attribute with the value ‘Authorize Only’. The NAS should respond with a Disconnect-NAK message, and should then reauthorize the session by sending an Access-Request message to the RADIUS server. The RADIUS server’s response will contain the current authorization details for the visitor account, which will then update the corresponding properties in the NAS session. If the NAS does not support RFC 3576, attempts to perform dynamic authorization will time out and result in a ‘No response from NAS’ error message. Refer to RFC 3576 for more details about dynamic authorization extensions to the RADIUS protocol. ClearPass Guest 6.4 | User Guide Guest Manager | 35
  • 36. Filtering the List of Active Sessions On the Guest > Active Sessions list, you can use the Filter tab to narrow the search parameters and quickly find all matching sessions: Enter a username or IP address in the Filter field. Additional fields can be included in the search if the “Include values when performing a quick search” option was selected for the field within the view. To control this option, use the Choose Columns command link on the More Options tab. You may enter a simple substring to match a portion of the username or any other fields that are configured for search, and you can include the following operators: Table 7: Operators supported in filters Operator Meaning Additional Information = is equal to You may search for multiple values when using the equality (=) or inequality !=) operators. To specify multiple values, list them separated by the pipe character ( | ). For example, specifying the filter "role_id=2|3, custom_ field=Value" restricts the accounts displayed to those with role IDs 2 and 3 (Guest and Employee), and with the field named "custom_field" set to "Value". != is not equal to > is greater than >= is greater than or equal to < is less than <= is less than or equal to ~ matches the regular expression !~ does not match the regular expression To restore the default view, click the Clear Filter link. Click the Apply Filter button to save your changes and update the view, or click the Reset button to remove the filter and return to the default view. 36 | Guest Manager ClearPass Guest 6.4 | User Guide
  • 37. Disconnecting Multiple Active Sessions To disconnect multiple sessions, click the Manage Multiple tab. The Manage Multiple Sessions form opens. l To close all active sessions, leave the Start Time and End Time fields empty and click Make Changes. All active sessions are closed and are removed from the Active Sessions list. You can specify sessions in a time range. 1. To close all sessions that started after a particular time, click the button in the Start Time row. The calendar picker opens. Use the calendar to specify the year, month, and day, and click the numbers in the Time fields to increment the hours and minutes. All sessions that started after the specified date and time will be disconnected. 2. To close all sessions that started before a particular time, click the button in the End Time row. The calendar picker opens. Use the calendar to specify the year, month, and day, and click the numbers in the Time fields to increment the hours and minutes. All sessions that started before the specified date and time will be disconnected. 3. Click Make Changes. The specified sessions are closed and are removed from the Active Sessions list. Sending Multiple SMS Alerts The SMS tab on the Active Sessions page lets you send an SMS alert message to all active sessions that have a valid phone number. An SMS alert during an active session can be used to send a group of visitors information you might want them to have immediately—for example, a special offer that will only be available for an hour, a change in a meeting’s schedule or location, or a public safety announcement. To create an SMS message: 1. Click the SMS tab on the Active Sessions page. The Send SMS Notification form opens. 2. Use the filter to specify the group of addresses that should receive the message. See "Filtering the List of Active Sessions" on page 36. Only accounts with valid phone numbers can be sent SMS alerts. 3. Enter the message in the Message text box. Messages may contain up to 160 characters. ClearPass Guest 6.4 | User Guide Guest Manager | 37
  • 38. 4. Click Send. About SMS Guest Account Receipts You can send SMS receipts for guest accounts that are created using either sponsored guest access or self-provisioned guest access. This is convenient in situations where the visitor may not be physically present to receive a printed receipt. ClearPass Guest may be configured to automatically send SMS receipts to visitors, or to send receipts only on demand. To manually send an SMS receipt: 1. Go to the Guest > Manage Accounts and click to expand the row of the guest to whom you want to send a receipt. 2. Click Print to display the Updated Account Details view, and then click the Send SMS receipt link. The SMS Receipt form opens. Use the fields on this form to enter the service to use, the recipient’s mobile phone number, and the message text. When using guest self-registration, SMS Delivery options are available for the receipt page actions; See "Editing Receipt Actions" on page 248 for full details. For more information on SMS services, see "SMS Services" on page 296. Using Standard Guest Management Features This section describes: l "Creating a Guest Account " on page 39 l "Creating a Guest Account Receipt " on page 41 l "Creating a Device" on page 41 l "Creating Multiple Guest Accounts" on page 45 l "Creating Multiple Guest Account Receipts" on page 47 l "Creating a Single Password for Multiple Accounts " on page 48 38 | Guest Manager ClearPass Guest 6.4 | User Guide
  • 39. l "Managing Single Guest Accounts " on page 55 l "Managing Multiple Guest Accounts " on page 64 l "Exporting Guest Account Information " on page 50 l "Importing Guest Accounts" on page 52 l "Managing Single Guest Accounts " on page 55 l "Managing Devices " on page 59 l "Managing Multiple Guest Accounts " on page 64 To customize guest self-registration, please see Configuration on page 187. Creating a Guest Account To create a new account, go to Guest > Create Account, or click the Create New Guest Account command link on the Guest Manager page. The Create New Guest Account form opens. The Create New Guest Account form (create_user) can be customized by adding new fields, or modifying or removing the existing fields. See "Customizing Guest Self-Registration" on page 235 for details about the customization process. The default settings for this form are described below. ClearPass Guest 6.4 | User Guide Guest Manager | 39
  • 40. Table 8: The Create New Guest Account Form Field Description Guest's Name (Required) Name of the guest user for this account. Company Name (Required) Name of the organization the guest user belongs to. Email Address (Required) The guest user's email address. This email address will be the guest's username. Account Activation You can select an activation time from this drop-down list. The guest's account cannot be used before the activation time. Options include: l Now l Disable account l Tomorrow l Next Monday l 1 hour from now l 1 day from now l 1 week from now l Activate at specified time... Activation Time If you selected "Activate at specified time", use the calendar picker in this field to specify the date and time. If no selection is made, the account will be enabled immediately. Account Expiration You can select an expiration time from this drop-down list. The guest's account cannot be used after the expiration time. Options include: l Account will not expire l Now l Tonight l Friday night l 1 hour from now l 1 day from now l 1 week from now l 30 days from now l 90 days from now l 180 days from now l 1 year from now l Account expires after... l Account expires at specified time... Expires After If you selected "Account expires after", use this drop-down list to specify a length of time. Options include several intervals of hours, days, or weeks. Expiration Time If you selected "Account expires at specified time", use the calendar picker in this field to specify the date and time. If no selection is made, the account will not expire. Account Role (Required) Specify the type of account the guest should have. Options include: l Contractor l Employee l Guest Password A random password is created for each visitor account. This is displayed on this form, but will also be available on the guest account receipt. 40 | Guest Manager ClearPass Guest 6.4 | User Guide
  • 41. Field Description Notes You may enter notes about this guest account. Terms of Use (Required) You must select the check box in in this field in order to create the account. Create When your entries on the form are complete, click this button to create the guest's account. Creating a Guest Account Receipt After you click the Create button on the Create New Guest Account form, the details for that account are displayed. To print a receipt for the guest, select an appropriate template from the Open print window using template… list. A new Web browser window opens and the browser’s Print dialog box is displayed. Click the Send SMS receipt link to send a guest account receipt via text message. Use the SMS Receipt form to enter the mobile telephone number to which the receipt should be sent. Sending SMS receipts requires the SMS Services plugin. If the administrator has enabled automatic SMS, and the visitor’s phone number was typed into the Create New Guest Account form, an SMS message will be sent automatically. A message is displayed on the account receipt page after an SMS message has been sent. Click the Send email receipt link to send an email copy of the guest account receipt. Use the Email Receipt form to enter the email address to which the receipt should be sent. You can also specify the subject line for the email message. If the administrator has enabled automatic email for guest account receipts, and the visitor’s email address was typed into the Create New Guest Account form, an email receipt will be sent automatically. A message is displayed on the account receipt page after an email has been sent. Creating a Device Device accounts may be created in three ways: l Manually in ClearPass Guest using the Create New Device form l During guest self-registration by a MAC parameter passed in the redirect URL, if the process is configured to create a MAC device account l During guest self-registration by a MAC parameter passed in the redirect URL, creating a parallel account paired with the visitor account ClearPass Guest 6.4 | User Guide Guest Manager | 41
  • 42. Creating Devices Manually in ClearPass Guest If you have the MAC address, you can create a new device manually. To create a new device, go to Guest > Create Device, or go to Guest > Manage Devices and click the Create link. The Create New Device form opens. Table 9: New Device Field Description MAC Address (Required) Enter the device's MAC address. Device Name (Required) Enter the name for the device. If you need to modify the configuration for expected separator format or case, go to Administration > Plugin Manager > Manage Plugins and click the Configuration link for the MAC Authentication Plugin. AirGroup Enables AirGroup for the device. Configuration options are added to the form. Ownership Specifies whether device ownership should be personal or shared. Personal devices are automatically shared with the owner's other devices. Shared With Usernames of people who can share this device. Enter usernames as a comma-separated list. To make the device available to all users, leave this field blank. Each username may not exceed 64 characters. A maximum of 100 usernames may be entered. The maximum character limit for the list is 1000 characters (including comma separators). 42 | Guest Manager ClearPass Guest 6.4 | User Guide
  • 43. Field Description Shared Locations Locations where the device can be shared. When you type a location name in the Shared Locations field and press the Enter key, the location appears as a "tag" and is created in the system when the form is saved. Each location name may not exceed 64 characters. A maximum of 100 location names may be entered. The maximum character limit for the list is 1000 characters (including comma separators). Shared Roles User roles that can share this device. When you type a role name in the Shared Roles field and press the Enter key, the role appears as a "tag" and is created in the system when the form is saved. Each role name may not exceed 64 characters. A maximum of 100 role names may be entered. The maximum character limit for the list is 1000 characters (including comma separators). Shared Groups User groups that can share this device. These will be available in the Shared Groups field for users to choose from when they share a device. When you type a name for the group in the Group Names field and press the Enter key, the group appears as a "tag" and is created in the system when the form is saved. Each group name may not exceed 64 characters. A maximum of 32 group names may be entered. The maximum character limit for the list is 320 characters (including comma separators). This feature requires AOS 6.4 or later. Time Sharing Time-based sharing rules for this device. For more information, see "About AirGroup Time- Based Sharing" on page 75. Syntax Opens the help topic "AirGroup Time-Based Sharing Syntax Examples" on page 71 Account Activation Options include: Activate the account immediately, at a preset interval of hours or days, at a specified time, or leave the account disabled. If you choose Activate at a specified time, the ActivationTime row is added to the form. Click the button to open the calendar picker. In the calendar, use the arrows to select the year and month, click the numbers in the Time fields to increment the hours and minutes, then click a day to select the date. Account Expiration Options include: Never expire, expire at a preset interval of hours or days, or expire at a specified time. l If you choose any time in the future, the Expire Action row is added to the form. Indicate the expiration action for the account—either delete, delete and log out, disable, or disable and log out. The action will be applied at the time set in the Account Expiration row. l If you choose Account expires after, the ExpiresAfter row is added to the form. Choose an interval of hours, days, or weeks. The maximum is two weeks. l If you choose Account Expires at a specified time, the ExpirationTime row is added to the form. In the calendar picker, use the arrows to select the year and month, click the numbers in the Time fields to increment the hours and minutes, then click a day to select the date. Account Role Assigns the visitor’s role. Terms of Use Click the terms of use link and read the agreement, then mark the check box to agree to the terms. Create Device Commits your changes and creates the device. The Account Details and print options are displayed. For more information, see "Printing Device Details" on page 64. ClearPass Guest 6.4 | User Guide Guest Manager | 43
  • 44. Creating Devices During Self-Registration - MAC Only This section describes how to configure a guest self-registration so that it creates a MAC device account. After the guest is registered, future authentication can take place without the need for the guest to enter their credentials. A registration can be converted to create a MAC device instead of standard guest credentials. This requires a vendor to pass a MAC parameter in the redirect URL. ClearPass Guest does not support querying the controller or DHCP servers for the client's MAC based on IP. To edit the registration form fields, go to Configuration > Forms and Views. In the guest_register row, click the Edit Fields link. The Customize Form Fields page opens. If you do not see mac or mac_auth in the list, click the Customize fields link above the list. Click the Edit link in the field’s row. In the Define Custom Field form, edit the registration form fields: l Add or enable mac n UI: Hidden field n Field Required: checked n Validator: IsValidMacAddress l Add or enable mac_auth n UI: Hidden field l Any other expiration options, role choice, surveys, and so on can be entered as usual. Figure 7 Modify fields l Edit the receipt form fields: n Edit username to be a Hidden field n Edit password to be a Hidden field l Adjust any headers or footers as needed. When the visitor registers, they should be able to still log in via the Log In button. The MAC will be passed as their username and password via standard captive portal means. The account will only be visible on the List Devices page. If the guest logs out and reconnects, they should be immediately logged in without being redirected to the captive portal page. Creating Devices During Self-Registration - Paired Accounts Paired accounts is a means to create a standard visitor account with credentials, but to have a MAC account created in parallel that is directly tied to the visitor account. These accounts share the same role, expiration and 44 | Guest Manager ClearPass Guest 6.4 | User Guide
  • 45. other properties. This requires a vendor passing a mac parameter in the redirect URL. ClearPass Guest does not support querying the controller or DHCP servers for the client's MAC based on IP. To edit the registration form fields, go to Configuration > Forms and Views. In the guest_register row, click the Edit Fields link. The Customize Form Fields page opens. If you do not see mac or mac_auth_pair in the list, click the Customize fields link above the list. Click the Edit link in the field’s row. In the Define Custom Field form, edit the registration form fields: l Add or enable mac n UI: Hidden field n Field Required: optional n Validator: IsValidMacAddress l Add or enable mac_auth_pair n UI: Hidden field n Initial Value: -1 l Any other expiration options, role choice, surveys and so on can be entered as usual. You will see an entry under both List Accounts and List Devices. Each should have a View Pair action that cross-links the two. If you delete the base account, all of its pairings will also be deleted. If RFC-3576 has been configured, all pairs will be logged out. Creating Multiple Guest Accounts The Create Multiple Guest Accounts form is used to create a group of visitor accounts. To create multiple accounts, go to Guest > Create Multiple, or click the Create Multiple Guest Accounts command link on the Guest Manager > Start Here page. The Create Multiple Guest Accounts form opens. The Create Multiple Guest Accounts form (create_multi) can be customized by adding new fields, or modifying or removing the existing fields. See "Customizing Guest Self-Registration" on page 235 for details about the customization process. The default settings for this form are described below. ClearPass Guest 6.4 | User Guide Guest Manager | 45
  • 46. Table 10: The Create New Guest Account Form Field Description Number of Accounts (Required) Enter the number of accounts to create. Account Activation You can select an activation time from this drop-down list. The guests' accounts cannot be used before the activation time. Options include: l Now l Disable account l Tomorrow l Next Monday l 1 hour from now l 1 day from now l 1 week from now l Activate at specified time... Activation Time If you selected "Activate at specified time", use the calendar picker in this field to specify the date and time. If no selection is made, the account will be enabled immediately. Account Expiration You can select an expiration time from this drop-down list. The guests' accounts cannot be used after the expiration time. Options include: l Account will not expire l Now l Tonight l Friday night l 1 hour from now l 1 day from now l 1 week from now l 30 days from now l 90 days from now l 180 days from now l 1 year from now l Account expires after... l Account expires at specified time... Expires After If you selected "Account expires after", use this drop-down list to specify a length of time. Options include several intervals of hours, days, or weeks. Expiration Time If you selected "Account expires at specified time", use the calendar picker in this field to specify the date and time. If no selection is made, the account will not expire. Expire Action (Required) Specify how the behavior of the expiration. Options include: l Delete and log out at specified time l Delete at specified time l Disable and log out at specified time l Disable at specified time Be aware that a logout can only occur if the NAS is RFC-3576 compliant. Account Role (Required) Specify the type of account the guest should have. Options include: l Contractor l Employee l Guest 46 | Guest Manager ClearPass Guest 6.4 | User Guide
  • 47. Field Description Notes You may enter notes about this guest account. Terms of Use (Required) You must select the check box in in this field in order to create the account. Create Accounts When your entries on the form are complete, click this button to create the guests' accounts. A random username and password will be created for each visitor account. This is not displayed on this form, but will be available on the guest account receipt. The default password length is six characters. Creating Multiple Guest Account Receipts After a group of guest accounts has been created, the details for the accounts are displayed. To print the receipts, select an appropriate template from the Open print window using template… drop-down list. A new browser window opens with the Print dialog displayed. ClearPass Guest 6.4 | User Guide Guest Manager | 47
  • 48. To download a copy of the receipt information in CSV format, click the Save list for scratch cards (CSV file) link. You will be prompted to either open or save the spreadsheet (CSV) file. The fields available in the CSV file are: l Number – The sequential number of the visitor account, starting at one. l Username – The username for the visitor account. l Password – The password for the visitor account. The default password length is six characters. l Role – The visitor account’s role. l Activation Time – The date and time at which the account will be activated, or N/A if there is no activation time. l Expiration Time – The date and time at which the account will expire, or N/A if there is no activation time. l Lifetime – The account lifetime in minutes, or N/A if the account does not have a lifetime specified. l Successful – “Yes” if the account was created successfully, or “No” if there was an error creating the account. Creating a Single Password for Multiple Accounts You can create multiple accounts that have the same password. In order to do this, you first customize the Create Multiple Guest Accounts form to include the Password field. To include the Password field on the Create Multiple Guest Accounts form: 1. Go to Configuration > Forms & Views. Click the create_multi row, then click its Edit Fields link. The Customize Form Fields view opens, showing a list of the fields included in the Create Multiple Guest Accounts form and their descriptions. At this point, the Password field is not listed because the Create Multiple Guest Accounts form (create_ multi) has not yet been customized to include it. You will create it for the form in the next step. 2. Click on any field in the list to expand a row, then click the Insert After link (you can modify this placement later). The Customize Form Field form opens. 3. In the Field Name row, choose password from the drop-down list. The form displays configuration options for this field. 4. In the Field row, mark the Enable this field check box. 5. To adjust the placement of the password field on the Create Multiple Guest Accounts form, you may change the number in the Rank field. 6. In the User Interface row, choose Password text field from the drop-down list. The Field Required check box should now be automatically marked, and the Validator field should be set to IsNonEmpty. 7. Click Save Changes. The Customize Form Fields view opens again, and the password field is now included and can be edited. 48 | Guest Manager ClearPass Guest 6.4 | User Guide
  • 49. To create multiple accounts that all use the same password: 1. Go to Guest > Create Multiple. The Create Guest Accounts form opens, and includes the Visitor Password field. 2. In the Number of Accounts field, enter the number of accounts you wish to create. 3. In the Visitor Password field, enter the password that is to be used by all the accounts. The minimum password length is six characters. 4. Complete the other fields with the appropriate information, then click Create Accounts. The Finished Creating Guest Accounts view opens. The password and other account details are displayed for each account. ClearPass Guest 6.4 | User Guide Guest Manager | 49
  • 50. Exporting Guest Account Information Guest account information may be exported to a file in one of several different formats. To export a file with the current list of guest accounts, go to Guest > Export Accounts, or go to Guest > Start Here and click the Export Guest Accounts command link. The Export Accounts page opens with three options displayed. Click the appropriate command link to save a list of all guest accounts in comma-separated values (CSV), tab-separated values (TSV), or XML format. 50 | Guest Manager ClearPass Guest 6.4 | User Guide
  • 51. The Export Accounts view (guest_export) may be customized by adding new fields, or by modifying or removing the existing fields. See "Customizing Guest Self-Registration" on page 235 for details about this customization process. About CSV and TSV Exports In CSV and TSV format, the following default fields are included in the export: l Number – Sequential number of the guest account in the exported data l User ID – Numeric user ID of the guest account l Username – Username for the guest account l Role – Role for the guest account l Activation – Date and time at which the guest account will be activated, or “N/A” if there is no activation time l Expiration – Date and time at which the guest account will expire, or “N/A” if there is no expiration time l Lifetime – The guest account’s lifetime in minutes after login, or 0 if the account lifetime is not set l Expire Action – Number specifying the action to take when the guest account expires (0 through 4) About XML Exports The default XML format consists of a <GuestUsers> element containing a <GuestUser> element for each exported guest account. The numeric ID of the guest account is provided as the “id” attribute of the <GuestUser> element. This format is compatible with the ClearPass Policy Manager XML format for guest users. The values for both standard and custom fields for guest accounts are exported as the contents of an XML tag, where the tag has the same name as the guest account field. An example XML export is given below: <?xml version="1.0" encoding="UTF-8" standalone="true"?> <MyContents xmlns="http://www.example.com/myapiDefs/1.0"> <MyHeader version="6.0" exportTime="Sun, 16 Dec 2012 16:36:03 PST"/> <GuestUsers> <GuestUser guestType="USER" enabled="true" sponsorName="55480025" expiryTime="2012-12-04 13:39:25" startTime="1969-12-31 16:00:00" password="08654361" name="55480025"> <GuestUserTags tagValue="Hotspot Services self-provisioned guest account Source IP: 10.11.10.254 MAC: unknown Plan: Free Access x 1 Transaction Amount: $0.00 Invoice Number: P-15 Transaction ID: " tagName="notes"/> <GuestUserTags tagValue="2" tagName="[Role ID]"/> <GuestUserTags tagValue="1" tagName="do_expire"/> <GuestUserTags tagValue="1" tagName="simultaneous_use"/> ClearPass Guest 6.4 | User Guide Guest Manager | 51
  • 52. <GuestUserTags tagValue="ff" tagName="Company Name"/> <GuestUserTags tagValue="2012-12-04 12:39:14" tagName="Create Time"/> <GuestUserTags tagValue="fff@df" tagName="Email"/> <GuestUserTags tagValue="ff" tagName="first_name"/> <GuestUserTags tagValue="plan0" tagName="hotspot_plan_id"/> <GuestUserTags tagValue="Free Access" tagName="hotspot_plan_name"/> <GuestUserTags tagValue="ff" tagName="last_name"/> <GuestUserTags tagValue="ff ff" tagName="Visitor Name"/> <GuestUserTags tagValue="ff" tagName="zip"/> </GuestUser> Importing Guest Accounts Guest accounts may be created from an existing list by uploading the list to ClearPass Guest. To import a file with the current list of guest accounts, go to Guest > Import Accounts, or go to Guest > Start Here and click the Import Guest Accounts command link. The Import Accounts page opens with the first part of the form displayed, Upload User List. The Upload User List form provides you with different options for importing guest account data. To complete the form, you must either specify a file containing account information, or type or paste in the account information to the Accounts Text area. Select the Show additional import options check box to display the following advanced import options: l Character Set: ClearPass Guest uses the UTF-8 character set encoding internally to store visitor account information. If your accounts file is not encoded in UTF-8, the import may fail or produce unexpected results if non-ASCII characters are used. To avoid this, you should specify what character set encoding you are using. l Import format: The format of the accounts file is automatically detected. You may specify a different encoding type if automatic detection is not suitable for your data. The Import Format drop-down list includes the following options: n Automatically detect format (This default option recognizes guest accounts exported from ClearPass Policy Manager in XML format) n XML n Comma separated values 52 | Guest Manager ClearPass Guest 6.4 | User Guide
  • 53. n Tab separated values n Pipe ( | ) separated values n Colon ( : ) separated values n Semicolon ( ; ) separated values l Select the Force first row as header row check box if your data contains a header row that specifies the field names. This option is only required if the header row is not automatically detected. Click Next Step to upload the account data. In step 2 of 3, ClearPass Guest determines the format of the uploaded account data and matches the appropriate fields to the data. The first few records in the data are displayed, together with any automatically detected field names. In this example, the following data was used: username,visitor_name,password,expire_time demo005,Demo five,secret005,2011-06-10 09:00 demo006,Demo six,secret006,2011-06-11 10:00 demo007,Demo seven,secret007,2011-06-12 11:00 demo008,Demo eight,secret008,2011-06-13 12:00 demo009,Demo nine,secret009,2011-06-13 12:00 demo010,Demo ten,secret010,2011-06-13 12:00 demo011,Demo eleven,secret011,2011-06-13 12:00 Because this data includes a header row that contains field names, the corresponding fields were automatically detected in the data: Use the Match Fields form to identify which guest account fields are present in the imported data. You can also specify the values to be used for fields that are not present in the data. ClearPass Guest 6.4 | User Guide Guest Manager | 53
  • 54. To complete the Match Fields form, make a selection from each of the drop-down lists. Choose a column name to use the values from that column when importing guest accounts, or select one of the other available options to use a fixed value for each imported guest account. Click the Next Step button to preview the final result. Import Step 3 of 3, the Import Accounts form, opens and shows a preview of the import operation. The values of each guest account field are determined, and any conflicts with existing user accounts are shown. The icon displayed for each user account indicates if it is a new entry ( ) or if an existing user account will be updated ( ). By default, this form shows ten entries per page. To view additional entries, click the arrow button at the bottom of the form to display the next page, or click the 10 rows per page drop-down list at the bottom of the form and select the number of entries that should appear on each page. Click the check box by the account entries you want to create, or click one of the following options to select the desired accounts: l Click the This Page link to select all entries on the current page. l Click the All link to select all entries on all pages l Click the None link to deselect all entries l Click the New link to select all new entries 54 | Guest Manager ClearPass Guest 6.4 | User Guide
  • 55. l Click the Existing link to select all existing user accounts in the list. Click the Create Accounts button to finish the import process. The selected items will be created or updated. You can then print new guest account receipts or download a list of the guest accounts. See "Creating Multiple Guest Account Receipts" on page 47 in this chapter for more information. Managing Single Guest Accounts Use the Manage Guest Accounts list view to work with individual guest accounts. To open the Manage Guest Accounts list, go to Guest > Manage Accounts. The Manage Guest Accounts list view opens.This view (guest_users) may be customized by adding new fields or modifying or removing the existing fields. See "Customizing Fields" on page 206 for details about this customization process. The default settings for this view are described below. The Username, Role, State, Activation, and Expiration columns display information about the visitor accounts that have been created: l The value in the Expiration column is colored red if the account will expire within the next 24 hours. The expiration time is additionally highlighted in boldface if the account will expire within the next hour. l In addition, icons in the Username column indicate the account’s activation status: n —Visitor account is active n —Visitor account was created but is not activated yet n —Visitor account was disabled by Administrator n —Visitor account has expired n —Visitor account was deleted ClearPass Guest 6.4 | User Guide Guest Manager | 55
  • 56. You can use the Filter field to narrow the search parameters. You may enter a simple substring to match a portion of the username or any other fields that are configured for search, and you can include the following operators: Table 11: Operators supported in filters Operator Meaning Additional Information = is equal to You may search for multiple values when using the equality (=) or inequality !=) operators. To specify multiple values, list them separated by the pipe character ( | ). For example, specifying the filter "role_id=2|3, custom_ field=Value" restricts the accounts displayed to those with role IDs 2 and 3 (Guest and Employee), and with the field named "custom_field" set to "Value". != is not equal to > is greater than >= is greater than or equal to < is less than <= is less than or equal to ~ matches the regular expression !~ does not match the regular expression To restore the default view, click the Clear Filter link. Use the paging control at the bottom of the list to jump forwards or backwards by one page, or to the first or last page of the list. You can also click an individual page number to jump directly to that page. When the list contains numerous user accounts, consider using the Filter field to speed up finding a specific user account. Use the Create tab to create new visitor accounts using the Create New Guest Account form. See "Creating a Guest Account " on page 39 for details about this form. Use the More Options tab for additional functions, including import and export of guest accounts and the ability to customize the view. Click a user account’s row to select it. You can then select from one of these actions: l Reset password – Changes the password for a guest account. A new randomly generated password is displayed on the Reset Password form. The default password length is six characters. 56 | Guest Manager ClearPass Guest 6.4 | User Guide
  • 57. Click Update Account to reset the guest account’s password. A new account receipt is displayed, allowing you to print a receipt showing the updated account details. l Change expiration – Changes the expiration time for a guest account. This form (change_expiration) can be customized by adding new fields, or modifying or removing the existing fields. See "Customizing Forms and Views" on page 212 for details about this customization process. Select an option from the drop-down list to change the expiration time of the guest account. Click Update Account to set the new expiration time for the guest account. A new account receipt is displayed, allowing you to print a receipt showing the updated account details. l Remove – Disables or deletes a guest account. Select the appropriate Action radio button, and click Make Changes to disable or delete the account. If you wish to have automatic disconnect messages sent when the enabled value changes, you can specify this in the Configuration module. See "Configuring ClearPass Guest Authentication " on page 188. l Activate – Re-enables a disabled guest account, or specifies an activation time for the guest account. Select an option from the drop-down list to change the activation time of the guest account. To re-enable an account that has been disabled, choose Now. Click Enable Account to set the new activation time for the guest account. A new account receipt is displayed, allowing you to print a receipt showing the updated account details. ClearPass Guest 6.4 | User Guide Guest Manager | 57
  • 58. l Edit – Changes the properties of a guest account. This form can be customized by adding new fields, or modifying or removing the existing fields. See "Customizing Forms and Views" on page 212 for details about this customization process. Click Update Account to update the properties of the guest account. A new account receipt is displayed, allowing you to print a receipt showing the updated account details. l Sessions – Displays the active sessions for a guest account. See "Active Sessions Management" on page 33 in this chapter for details about managing active sessions. l Print – Displays the guest account’s receipt and the delivery options for the receipt. For security reasons, the guest’s password is not displayed on this receipt. To recover a forgotten or lost guest account password, use the Reset password link. l Show Details—The row expands to display all the properties of the guest's account in a table, including endpoint details. This option is only available to users whose operator profile includes the Show Details privilege. 58 | Guest Manager ClearPass Guest 6.4 | User Guide
  • 59. Managing Devices To view the list of current MAC devices, go to Guest > Manage Devices. The Guest Manager Devices page opens. All devices created by one of methods described in the following section are listed. Options on the form let you change a device’s account expiration time; activate, remove, or edit the device; view active sessions or details for the device; or print details, receipts, confirmations, or other information. The MAC Address, Device Name, Expiration, Sponsor, and Sharing columns display information about the device accounts that have been created: l The value in the Expiration column is colored red if the device account will expire within the next 24 hours. The expiration time is additionally highlighted in boldface if the device account will expire within the next hour. l In addition, icons in the MAC Address column indicate the device account’s activation status: n —Device account is active n —Device account was created but is not activated yet n —Device account was disabled by Administrator n —Device account has expired n —Device account was deleted ClearPass Guest 6.4 | User Guide Guest Manager | 59
  • 60. You can use the Filter field to narrow the search parameters. You may enter a simple substring to match a portion of any fields that are configured for search, and you can include the following operators: Table 12: Operators supported in filters Operator Meaning Additional Information = is equal to You may search for multiple values when using the equality (=) or inequality !=) operators. To specify multiple values, list them separated by the pipe character ( | ). For example, specifying the filter "role_id=2|3, custom_field=Value" restricts the accounts displayed to those with role IDs 2 and 3 (Guest and Employee), and with the field named "custom_field" set to "Value". != is not equal to > is greater than >= is greater than or equal to < is less than <= is less than or equal to ~ matches the regular expression !~ does not match the regular expression To restore the default view, click the Clear Filter link. Use the paging control at the bottom of the list to jump forwards or backwards by one page, or to the first or last page of the list. You can also click an individual page number to jump directly to that page. To select a device, click the device you want to work with. Changing a Device’s Expiration Date To change a device’s expiration date, click the device’s row in the Guest Manager Devices list, then click its Change expiration link. The row expands to include the Change Expiration form. 1. In the Account Expiration row, choose one of the options in the drop-down list to set an expiration date: l If you choose Account expires after, the Expires After row is added to the form. Choose an interval of hours, days, or weeks from the drop-down list. 60 | Guest Manager ClearPass Guest 6.4 | User Guide
  • 61. l If you choose Account Expires at a specified time, the Expiration Time row is added to the form. Click the button to open the calendar picker. In the calendar, use the arrows to select the year and month, click the numbers in the Time fields to increment the hours and minutes, then click a day to select the date. 2. If you choose any option other than “will not expire” or “now” in the Account Expiration field, the Expire Action row is added to the table. Use the drop-down list in this row to specify one of the following actions: delete, delete and log out, disable, or disable and log out. 3. Click Update Account to commit your changes. Disabling and Deleting Devices To remove a device’s account by disabling or deleting it, click the device’s row in the Guest Manager Devices list, then click its Remove link. The row expands to include the Remove Account form. You may choose to either disable or delete the account. If you disable it, it remains in the device list and you may activate it again later. If you delete the account, it is removed from the list permanently. Activating a Device To activate a disabled device’s account, click the device’s row in the Guest Manager Devices list, then click its Activate link. The row expands to include the Enable Guest Account form. 1. In the Activate Account row, choose one of the options in the drop-down list to specify when to activate the account. You may choose an interval, or you may choose to specify a time. 2. If you choose Activate at specified time, the Activation Time row is added to the form. Click the button to open the calendar picker. In the calendar, use the arrows to select the year and month, click the numbers in the Time fields to increment the hours and minutes, then click a day to select the date. 3. Click Enable Account to commit your changes. ClearPass Guest 6.4 | User Guide Guest Manager | 61
  • 62. Editing a Device To edit a device’s account, click the device’s row in the Guest Manager Devices list, then click its Edit link. The row expands to include the Edit Device form. You can edit any of the device's properties. Table 13: New Device Field Description MAC Address The device's MAC address. Device Name The name for the device. If you need to modify the configuration for expected separator format or case, go to Administration > Plugin Manager > Manage Plugins and click the Configuration link for the MAC Authentication Plugin. AirGroup Enables AirGroup for the device. Configuration options are added to the form. Ownership Specifies whether device ownership should be personal or shared. Personal devices are automatically shared with the owner's other devices. Shared With Usernames of people who can share this device. Enter usernames as a comma-separated list. To make the device available to all users, leave this field blank. Each username may not exceed 64 characters. A maximum of 100 usernames may be entered. The maximum character limit for the list is 1000 characters (including comma separators). Shared Locations Locations where the device can be shared. When you type a location name in the Shared Locations field and press the Enter key, the location appears as a "tag" and is created in the system when the form is saved. Each location name may not exceed 64 characters. A maximum of 100 location names may be entered. The maximum character limit for the list is 1000 characters (including comma separators). Shared Roles User roles that can share this device. When you type a role name in the Shared Roles field 62 | Guest Manager ClearPass Guest 6.4 | User Guide